

Page 1

AOPEN FHD LED Projector
QF18s/L85/CD85/U1P2401 Series
User’s Guide
Copyri ght © 2023. Aop en Incorpora ted. All Righ ts Reserved .
Aopen Pr ojector Use r’s Guide
Original Issue: 06/2024
Page 2
WARNING
To prevent el ectric shock, please do not op en the device case.
Internal components of the device are not user-serviceable.
Please contact professional maintenance staff for repairs.
Notice
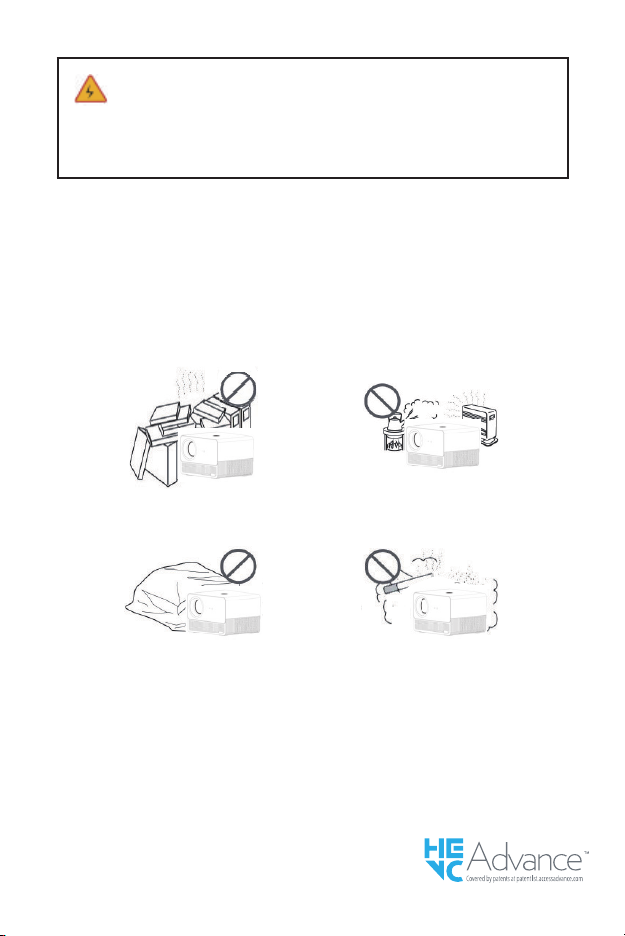
Alth ough there is an ENCLO SED PRO JEC TION B ARE EN GINE i n the projec tor, avoid
obst ructing th e air in let wi th any objec ts dur ing us e.
Ther e is no du st fil ter on t he ven ts. St ill, i t is nec essary to a void ob str ucti ng the a ir inle t,
as thi s will t rigge r the pr ojec tor ’s LCD pan el and COB prot ect ion mechani sm due to poor
ventilation.
Important safety announcements
Don’t i nst all eq uipme nt in a po orly
ventilated area.
Don’t b lock t he vent (intake or
exhaust).
Don’t i nst all eq uipme nt in ho t and
humid areas.
Don’t i nst all eq uipme nt in du sty o r
smoky areas.
1
Page 3

Parts and Functions
10
11
13
Importan t noti ce: Aud io out let wi th Mic roph one
function headset/speaker may not work properly.
# Icon Function Description
1 On/Of f Turn the pr ojec tor on /off.
2 Back Return to the previ ous pa ge.
3 Pasue/Play Pause o r play.
4 Input Source Chang e the in put so urce.
5 Volume up Increase the volume.
6 Volu me do wn Decr ease t he volu me.
7 Mute Mute t he volu me.
8 Select/Enter OK
9
10 Menu
11 Lower Keystone Adjust lower keystone
12 Upper Keystone Adjus t upper keys tone
13 Focus + Increase focus
14 Focus - Decrease focus
9 The re mote contro l is pow ered by two A AA b atterie s. (no t inclu ded)
Audio outlet
HDMI
Four directional
selection keys
1
12
14
3
9
6
Power inlet
USB
Pres s to con firm t he select ion it em.
Mouse mode:
- Long Pr ess “O K” to ena ble mo use fu nct ion
- Shor t pres s “OK” to disable mou se fun cti on
Use th e up/dow n/l ef t/right bu tto ns to se lec t
items or make adjustments.
Disp lay the O SD men u for var ious s ett ings a nd
adjustments.
4
8
2
5
7
2
Page 4

Connect Equipment and Apparatus
Direction of signal flow
USB Disk
Speaker Headphones DVD/ VCD Media Playe r, etc
Projector installation
Horizontal placement
30° side projection image setting
PC
3
Page 5
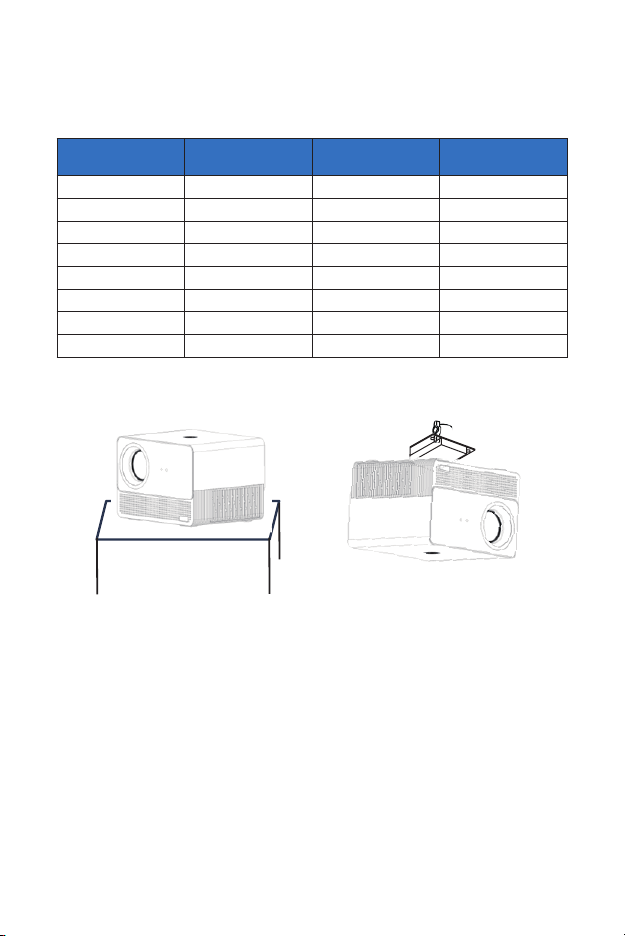
Projection distance reference
Projection distance corresponds to screen size
Proje cti on size
(inch)
55 122 68 14 9
60 133 75 162.5
70 155 87 18 7. 5
80 177 100 211 .5
90 199 112 236.5
100 221 125 261
110 244 137 288
120 266 149 313
Scre en Len gth
(cm)
Screen Width
(cm)
Installation and Adjustment
Desktop Ceiling
Lens d ista nce fr om
scre en (cm)
4
Page 6
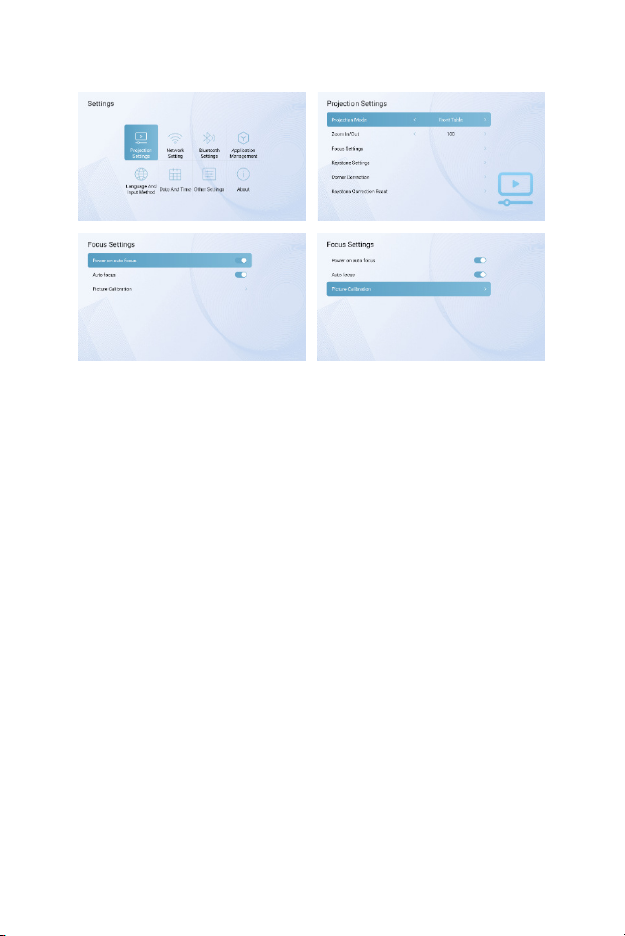
Automatic Focus
The sm art projec tor is equip ped wi th an au to- focu s syst em (la ser-assis ted fo cus
optional) that supports remote control focusing, ensuring optimal picture clarity.
Autom atic f ocus i niti ates u pon po werin g on, pro viding a clea r proj ecti on scr een.
Due to different personal visual experiences, individual perceptions of picture clarity
may var y. User s can use the fo cus bu tton on the r emot e cont rol to ad just t he pic ture for
the be st vie wing e ff ect.
5
Page 7

Keystone Correction
The smart projector supports automatic keystone correction upon starting up. Users
can al so per for m manua l corr ect ion as re quir ed.
Connect to the wireless network
1. Turn on W i-Fi by clic king “ Wif i Set tin gs” an d pres s “OK”.
2. Sel ect th e desired ne two rk and p ress “ OK” to confi rm.
6
Page 8

Bluetooth settings
1. Cli ck “Blueto oth Se ttings” and pre ss “OK ”. Then, cl ick “Add acces sor y”.
2. Turn on th e Blue tooth swit ch, search fo r the de sire d devi ce (e.g. B luetooth speake rs),
and connect.
Language selection:
Sele ct the l angu age that bes t suit s your p erso nal pr efer ence .
Date and Time setting:
Sele ct the p referre d date and time f orma t base d on your p ers onal prefe renc e.
7
Page 9
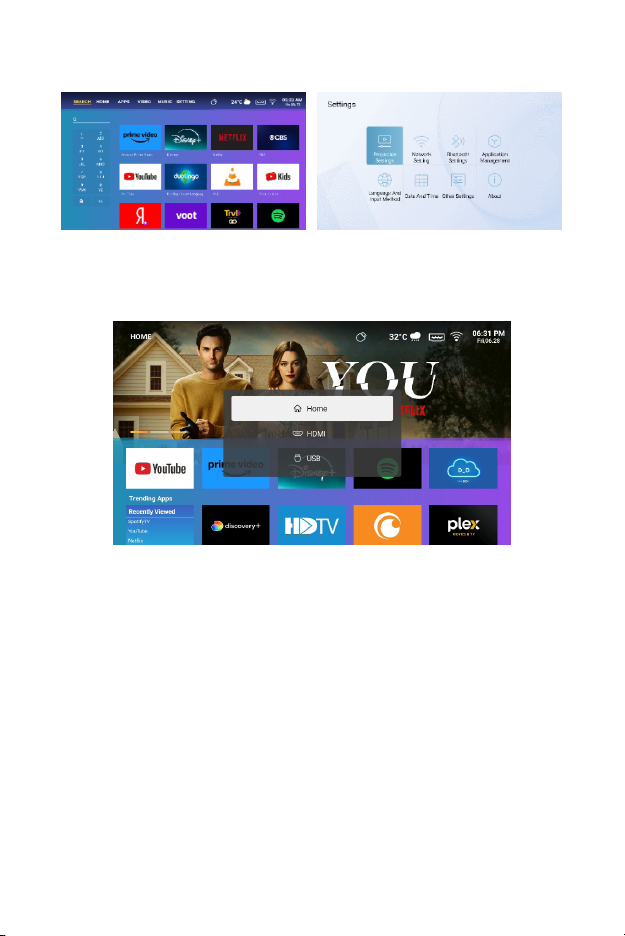
Application settings:
Download the app from Men u Sear ch, ty pe th e app nam e, and search . Clic k on
“Applic ati on Set tings” to v iew all d ownl oade d apps a nd sel ect th e app you w ant to u se.
Input Source Selection
On the r emote c ontr olle r, press t he “In put So urce ” but ton to acces s the so urce menu.
Sele ct the a ppro pria te inpu t sour ce based on yo ur nee ds.
8
Page 10
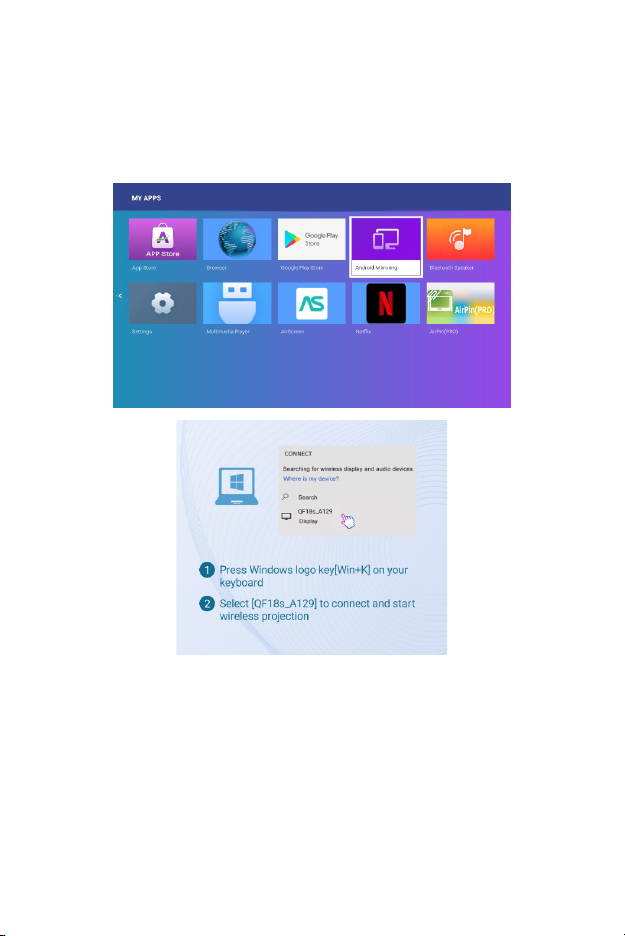
Screen Mirroring Instructions
• Windows system:
1. Go to the “M y apps ” menu and select th e “Androi d Mirr orin g” app.
2. Pre ss the W indo ws log o Key (W in+P) and ( Win+K), then select t he wir eles s disp lay
“QF18s ” to st art p rojec tion .
9
Page 11

• Android system:
Android Mirroring:
1. Turn on the wireles s disp lay functi on on your m obil e device.
2. Go to t he “My a pps” m enu an d sele ct the “An droid Mirro ring ” app.
3. Sel ect th e “QF18s” from the lis t of ava ilab le devices to star t projecti on.
10
Page 12
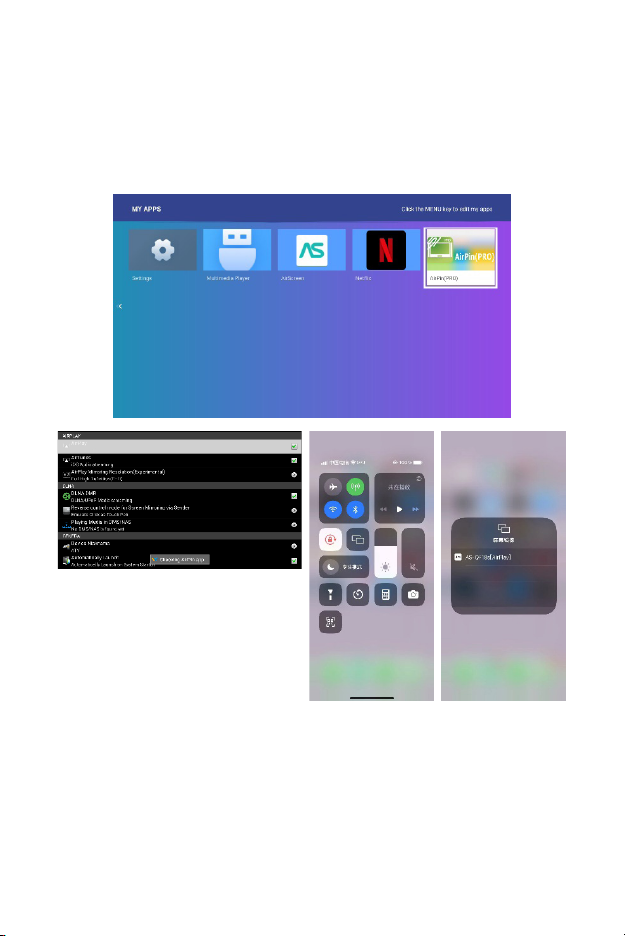
• iOS system:
Air Pin(PRO):
1. Turn on the wireles s disp lay functi on on your m obil e device.
2. Go to t he “My a pps” m enu an d sele ct the “Ai rPin(PRO)” app.
3. Ensu re bot h your pr ojec tor an d mobil e devi ce are connec ted to the same Wi- Fi
router.
4. Acc ess th e Scre en Mir rori ng fea ture on y our mob ile device an d sele ct th e
“QF18s -xx xx xx ” from t he lis t to st art p rojec tion .
11
Page 13
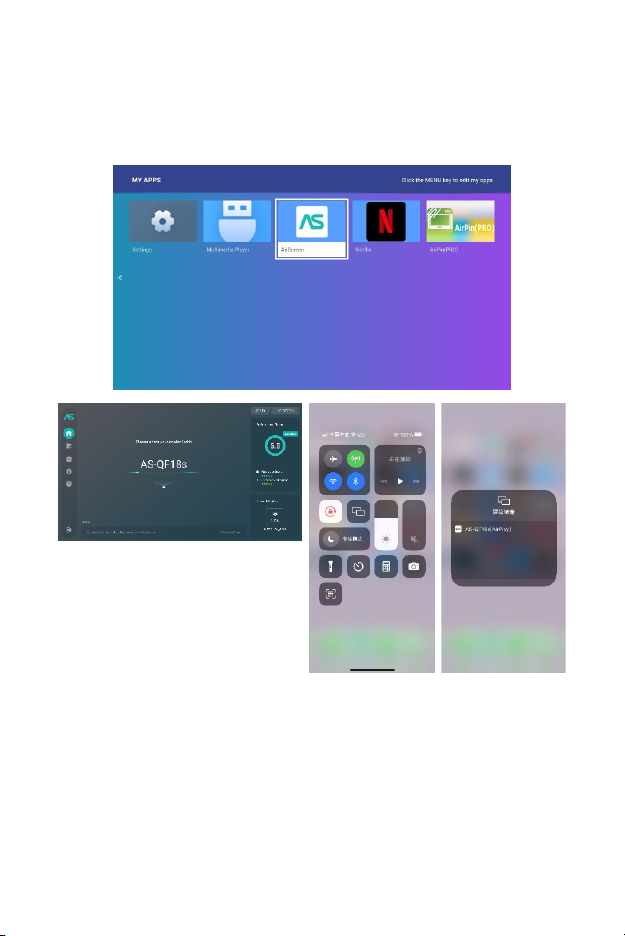
AirScreen:
1. Turn on the wireles s disp lay functi on on your m obil e device.
2. Go to t he “My a pps” m enu an d sele ct the “Ai rScr een” a pp.
3. Ensu re bot h your pr ojec tor an d mobil e devi ce are connec ted to the same Wi- Fi
router.
4. Acc ess th e Scre en Mir rori ng fea ture on y our mob ile device an d sele ct th e
“QF18s -xx xx xx ” from t he lis t to st art p rojec tion .
12
Page 14
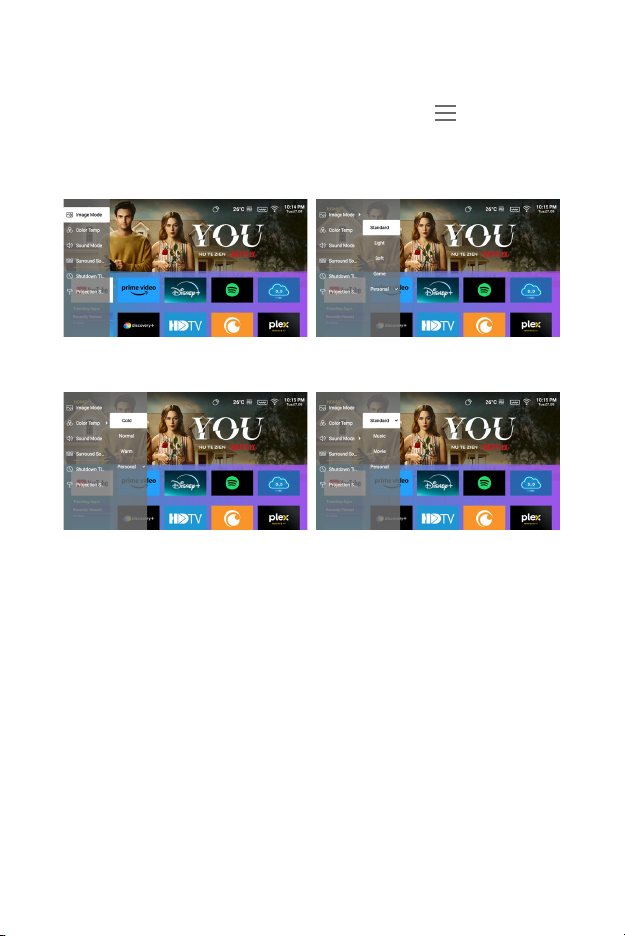
Menu Setting Instructions
• Menu Setting: Long press the “Menu” button until the
menu appears
• Image Adjustment:
• Color Temp. / Sound Mode / Shutdown Timer Adjustment:
13
Page 15

Common issues and solutions
Issues Solutions
No powe r, LED of f, and
the projector cannot
power on.
LED on bu t the pr ojec tor
canno t powe r on
Cannot screen mirror 1. Re fer to the user guide f or the c orre ct scr een mi rroring
Cannot str eam me dia Che ck the in tern et con nection fo r your sm art d evice.
Remote not responsive 1. Replace remote batteries.
Unabl e to pow er of f the
projector
Check the pow er cab le for l oose c onnec tion .
Check the pow er cab le for l oose c onnec tion , pres s the
Power butt on to tur n on the p roje ctor.
function.
2. Shorten t he dis tan ce bet ween the smart dev ice an d
projector for better screen mirroring quality.
3. Ensu re tha t the sm art p hone is conne cte d to the
corr ect Wi-Fi n etw ork SS ID.
2. Make s ure th e remo te control is align ed wit h the IR
se ns or.
Pres s and ho ld the Po wer bu tton for 5 sec onds u ntil t he
projector turns off.
Reminder
1. Th e proje ctor is main ly use d to wat ch nat ive vi deo or online v ideo, c anno t be use d as
a mobil e phon e or comp uter.
2. If th e remo te con trol c annot c ontr ol a third-p art y APP w hen in u se, you n eed to u se a
USB mou se to assis t in the o pera tion.
3. To downl oad a third- par ty vi deo AP P, please no te tha t you need to dow nloa d the T V
vers ion of th e prog ram, no t the mo bile ve rsio n or oth er ver sion s of the p rogra m.
4. Thi s machine doe s not su ppor t Dolby enco ded au dio and v ideo f ile s.
5. If you don’t u se it fo r a long time, you n eed to c over th e lens w ith a co ver to pr event
dust.
6. Do no t look in to the p roje ctor ’s lens w hen th e lamp i s on. Th e bright ligh t may hur t
your eye s.
7. For optimal performance, please use the supplied, certified power adapter.
Disposal Instructions
This s ymbol on the pr oduc t or on it s packagin g indi cate s that t he pro duct
must n ot be di spos ed of wi th oth er hou seho ld was te. Wh en dis posi ng of
used d evices, it i s your re spon sibility to brin g it to a co llec tion p oint that
recyc les us ed electr ical a nd ele ctro nic eq uipme nt. T he sep arat e collecti on
and recycling of us ed devi ces a t the time of dispos al helps to con ser ve
natu ral re sources and ensur es tha t they a re rec ycle d in a mann er tha t
recyc ling p oint s for us ed devices, p lease cont act y our loc al cit y offce, ho useh old wa ste
disp osal s erv ice, or t he sho p wher e you pur chas ed the p roduc t.
protects human h ealt h and th e envir onmen t. For m ore in form ation about
14
Page 16

Cleaning Methods
Befo re cle aning , ensure tha t the pow er soc ket is unplug ged. D o not us e pest icid es
or other vola tile c hemic als on t he pro ject or or le ns, and avoid le avin g rubb er or vin yl
produ cts i n cont act w ith th e projecto r for ex tend ed per iods o f time, a s this may dam age
or pee l off t he rem aining layers.
Cleaning the projector:
1. Us e a sof t and dr y cot ton cl oth to w ipe th e sur face o f the pr ojec tor.
2. Dampen a soft co tton cloth w ith a dilute d neutral cleane r, and gen tly wi pe the
proje ctor surface. D ry with a dr y cot ton cl oth.
3. Do no t use wa ter, benz ene, or o ther s olve nts on t he pro ject or.
4. Do no t scra tch th e main bo dy of the proj ecto r wit h fing erna ils or other ha rd obj ect s.
Cleaning the lens:
1. Bl ow of f the du st on th e lens s urf ace, and wipe off a ny sta ins wi th a so ft cl oth.
2. Use a p rofe ssio nal dr yer or l ens cl eanin g pape r spec ifi call y for ca mera a nd glasses .
REMARKS: Do not use ord inar y tis sue to c lean t he lens. Ordinar y tissue con tain s
Cleaning the outlet dust filter:
Turn off t he pow er and un plug t he powe r cord b efor e clea ning the out let du st fil ter
of vent s ever y thr ee mon ths. T his wi ll prev ent po or vent ilat ion fr om tri gger ing the
proje ctor LCD pan el and COB prot ect ion mechani sm.
large par ticles of impurities t hat may s cratch the l ens.
15
Page 17

Projector Specifications
Model QF18s
CPU MST9269
DDR/EEMC 1G/8G
Android System Android 9.0
WIFI 2.4G and 5 G dual b and wi fi6
Native Resolution 1920*10 80
Max Resolution Supported 10 80P
Contrast Ratio 1000:1
Aspect Ratio 16:9
Projection Size 3 5" -120"
Lcd Display 5 inch
Light Source LED
Zoom Function 50%-100%
Focusing auto focus
1*HDMI Port Support Chromecast/T V Stick/Roku/Xbox
1*US B Po r t Support USB Driver
1*Audio Port Speaker/Headset
Package Contents 1*Android Projector
1*Power Cord
1*HDMI Cable
Attention: If miss any par ts or recei ve the br oken pr oduc t in the p acka ge, ple ase conta ct
us, we wi ll sen d a new one to you for f ree.
16
 Loading...