

Page 1

Introduction
Thank you for choosing the AOpen PT80 Graphics & Video Accelerator.
AOpen PT80 is a state-of-art video adapter that provides you with
fast acceleration in both 2D/3D graphics and high quality scalable
video playback. Especially, AOpen PT80 will offer enhanced features
and fully support 3D Gaming and Multimedia Applications.
Item Checklist
n AOpen PT80 VGA Card
n AOpen Driver & Utility CD
n AOpen Mega Game Pack CD ( Option )
Features
u SiS6326 3D Graphics and Video Accelerator
u 8MB or 4MB Video Memory Onboard
u Windows 95/98/NT Direct3D and DirectDraw Acceleration
u 128-bit with dual rendering pipelines
u 5M triangles/sec peak
u 125M pixels/sec trilinear fill rate
u Enhanced 128-bit 2D graphics engine
u Flash ROM Programmable for BIOS Upgrade
u Up to 1024x768 32bit Color in 3D and 1280x1024 16bit Color in 2D
u On Chip Hardware IDCT and Motion Compensation for Software MPEG-
II Playback
u Optional High Quality TV Signal for NTSC/PAL
u User-Friendly Installation for Win95/Win98/NT
u Full Advanced 3D Enhancements
n Triangle Setup Engine
n Flat and Gouraud Shading
n MIP-Mapping with Bilinear Filtering
n Color Alpha Blending for Transparency
n Real Time Text Paging and Video Texturing
n Fogging and Atmospheric Effects
n Specular Lighting
n Edge Anti-Aliasing
n Stippling or “Screen Door” Transparency
n Backface Culling
Driver Support
u Windows 95 OSR2.1/98
u Windows NT 4.0/5.0
u Direct 3D, DirectDraw and DirectX
Page 2
Hardware Installation
Prepare Your Computer for Installation
Prior to working on your computer, make sure the power and any
related equipment is turned off.
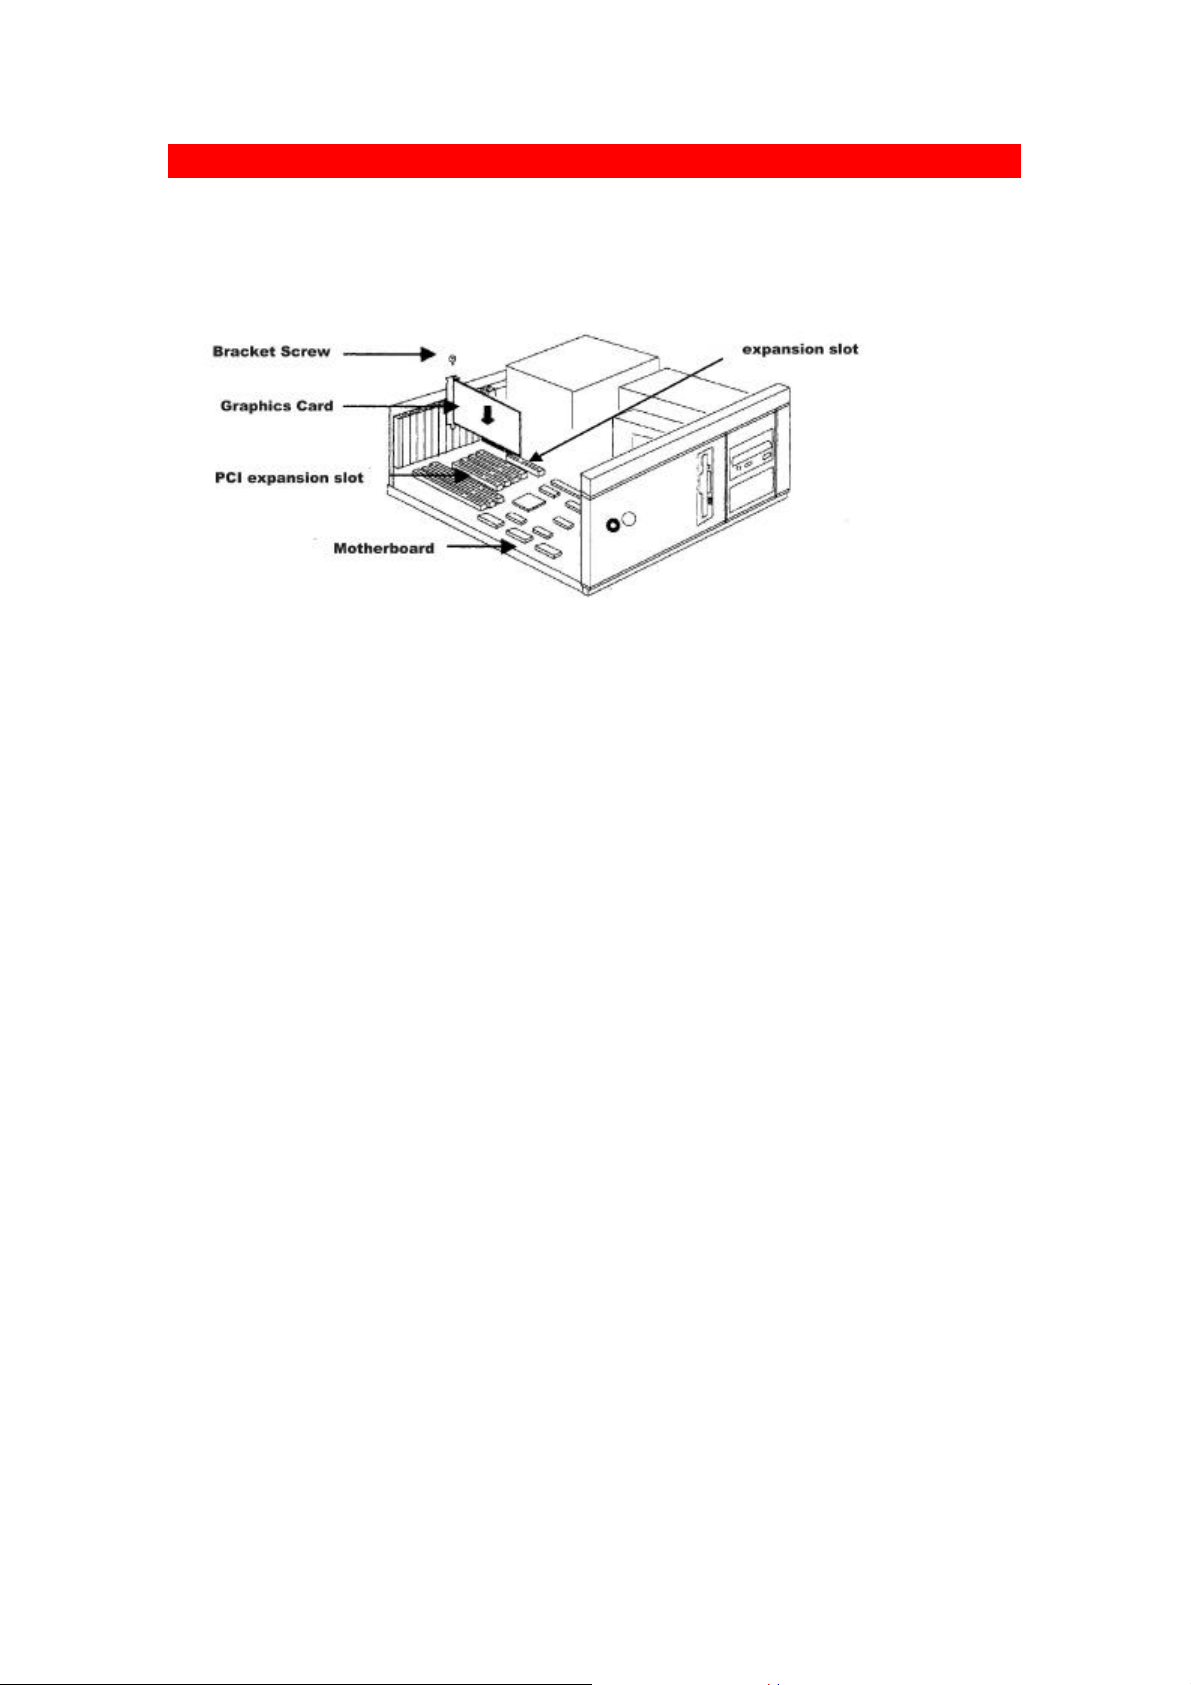
How to Insert Your AOpen PT80 Graphics Card
Installation Procedures
u For The First Time Installation
1. Locate bus expansion slot. Make sure the slot is unobstructed.
2. Remove the corresponding expansion slot cover from the computer
chassis.
3. Position the card directly over the slot and insert one end of
the card down into the slot. Be sure the metal contacts on the
bottom of the host adapter are securely seated in the slot.
4. Connect your analog monitor’s 15-pin VGA connector to the card
and fasten the retaining screws(if any).
5. Connect other cables and devices if available.
6. Now you are ready to install the software drivers and utilities.
u For Systems with Existing VGA Card
1. Change your display driver to Standard VGA.
2. Shut down your computer and unplug all electrical cords.
3. Replace the existing VGA card with the PT80 graphics card.
4. Restart your computer and install the PT80 display driver.
Page 3

Windows 95/98
Caution:
• Before installing the display driver, make sure your Windows 95/98 is
installed in VGA mode and work fine.
• To take advantage of all the eatures, please use Win95 OSR2.1 or Win98.
Otherwise, you can use OSR2.0 and install the USBSUPP.EXE from
Microsoft(http://www.microsoft.com) to upgrade to OSR2.1.
• D: present the drive containing the installation CD.
Setup VGA Mode (for First Time Installation)
1. Start Windows 95/98.
2. Update Device Driver Wizard
dialog will appear and detect
Standard PCI Graphic Adapter
(VGA). Click Next to let
Windows search driver.
3. Click Finish to install the
VGA driver. If the Windows
ask you for your Windows 95
CD, insert the CD or change
the path to \Windows\System
directory. Windows will
prompt you to restart your
Windows. Choose No and
follow the steps on the next
page.
Setup VGA Mode (for Upgrading)
1. Follow Setup VGA Driver steps 1~3.
2. When the Select Device dialog box
appears on screen, select Show
all devices item to show all VGA
devices.
3. Select Standard display types
from the manufacturers and select
Standard Display Adapter (VGA)
from the Models then click OK
button.
4. After you complete installing
Standard VGA driver, click Close
button and restart Windows to
enable the VGA driver.
Page 4

Windows 95/98
Setup VGA Driver (Manual Setup)
1. Start Win95/98 and insert the
Installation CD.
2. Click mouse right button on the
desktop and select Properties from
the pop-up menu, or double-click
on the Display icon from the
Control Panel folder.
3. Select Settings->Advanced
Properties for Win95 or select
Settings->Advanced for Win98, and
then click Change button.
4. In Win95/98, the Update
Device Driver Wizard dialog
box will appear, please
click Next button and follow
the instruction on screen to
install.
5. When the Select Device dialog box
appears on screen, click Have
Disk button and enter
D:\Driver\WIN9x then click OK.
6. Select the AOpen PT80 then
click OK.
7. After you complete
installing display driver,
click Close button and
restart Windows to enable
display driver.
Page 5

Windows 95/98
Setup VGA Driver
(Auto Setup)
1. Insert the
Installation CD,
the AOpen
Installation
Wizard will appear.
You can also run
D:\Setup.exe to
launch it. Please
click VGA Driver
to next step.
2. Click Yes when the
Confirm Setup
dialog box appears.
3. After you complete
installing AOpen
PT80 driver, click
Close button and restart Windows to enable AOpen PT80 driver.
Setup DirectX 6
1. Insert the installation CD, the AOpen Installation Wizard will
appear. You can also run D:\Setup.exe to launch it. Please click
DirectX 6 to enter DirectX 6 setup program.
2. After you complete installing DirectX 6, please restart Windows
to enable the DirectX 6 driver.
Setup SoftMpeg
Insert the installation CD, the AOpen Installation Wizard will appear.
You can also run D:\Setup.exe to launch it. Please click SoftMpeg to
enter SoftMpeg setup program.
Special Notes
Trouble Shooting
Problem : If system always finds new VGA hardware when you finish installing VGA driver & restart
the Windows, it might be due to wrong version of Windows 95.
Solution : If your Windows version is OSR2.0, follow below steps to upgrade your Windows:
1. Restart Windows OSR2.0.
2. Run usbsupp.exe to upgrade to OSR2.1. You can find this file on MSDN or Microsoft web site.
3. Restart Windows to install VGA driver again.
Page 6

Windows NT 4.0
Caution:
• Before installing the Display driver, make sure your Windows NT is
installed in VGA mode and work fine.
• Please install the Windows NT 4.0 service pack 3 before installing
the video driver. Otherwise, the system may cause setup failed
and won’t be able to start up.
• D: present the drive containing the installation CD.
Setup VGA Mode
1. Follow Setup Driver steps 1~3.
2. When the Select Device dialog
box appears on screen, select
Show all devices item to show
all VGA devices.
3. Select Standard display types
from the manufacturers and
select VGA compatible display
adapter from the Display then
click OK button.
4. After you complete installing
Standard VGA driver, click Close
button and restart Windows to
enable the VGA driver.
Setup VGA Driver (Manual Setup)
1. Start NT and insert the
Installation CD into the CD-ROM
drive.
2. Click mouse right button on the
desktop and select Properties
from the pop-up menu, or doubleclick Display icon from the
Control Panel folder.
3. Select Settings->Display Type and
then click Change button.
Page 7

Windows NT 4.0
4. When the Change Display
dialog box appears on screen,
click Have Disk button and
enter D:\Driver\WinNT then
click OK. Select the AOpen
PT80 Video Accelerator then
click OK.
5. After you complete installing
display driver, click Close button
and restart Windows to enable the
display driver.
Page 8

FCC Class B Radio Frequency Interference Statement
This equipment has been tested and found to comply with the limits for a Class B digital device,
pursuant to Part 15 of FCC Rules. These limits are designed to provide reasonable protection against
harmful interference in a residential installation. This equipment generates, uses, and can radiate radio
frequency energy and, if not installed and used in accordance with the instructions, may cause harmful
interference to radio communications. However, there is no guarantee that interference will not occur
in a particular installation. If this equipment does cause harmful interference to radio or television
reception, which can be determined by turning the equipment off and on, the user is encouraged to try
to correct the interference by one or more of the following measures:
1. Reorient or relocate the receiving antenna.
2. Increase the separation between the equipment and receiver.
3. Connect the equipment into an outlet on a circuit different from that to which the receiver is
connected.
4. Consult the dealer or an experienced radio/television technician for help.
Notice 1:
The changes or modifications not expressly approved by the party responsible for compliance could
void the user's authority to operate the equipment.
Notice 2:
Shielded interface cables must be used in order to comply with the emission limits.
 Loading...