

Page 1

Wireless Broadband Router
For xDSL/Cable Connections
User Guide
Wireless Broadband Router User Guide
October 2002
Page 2

Wireless Broadband Router User Guide
October 2002
Copyright
Information in this document is subject to change without notice and does not represent a commitment
on the part. The material contained herein is supplied without representation or warranty of any kind.
Therefore assumes no responsibility and shall have no liability of any kind arising from the supply or
use of this document or the material contained herein.
This copyright 2002. All rights reserved. No part of this document may be copied or re-used without
prior written consent
Wireless Broadband Router User Guide
2
Page 3

Warranty
Broadband Router Products are provided with a limited one-year Warranty. Details of the warranty and
return process are explained in the Warranty Policy below. Warranty service is subject to the terms and
conditions of company Warranty Policy.
1. WARRANTY:
Broadband Router (the "Product") carry a one (1) year limited warranty, except for the power supply
units, which carry a one (1) year limited warranty (collectively the Warranty).
The Warranty covers:
(1) Defects in materials and workmanship of the Product under normal use and service
(Product De fects).
(2) Failure of the Product to perform in accordance with product specifications published by company
(Product Performance).
This Warranty is in lieu of all other express warranties that might otherwise arise with respect to the
Product. No individual or organization of whatever form, connected to company or not, has authority to
change or add to this Warranty.
This Warranty does not apply to any failure of the Product, which results from accident, abuse,
misapplication, alteration, or failure due to attached equipment, and company assumes no liability as a
consequence of such events under the terms of this Warranty. While company has made every effort to
provide clear and accurate technical information about the application of the Product, company assumes
no liability for any event arising out of the use of this technical information.
INCIDENTAL AND CONSEQUENTIAL DAMAGES CAUSED BY MALFUNCTION, DESIGN
DEFECT, OR OTHERWISE WITH RESPECT TO BREACH OF THIS WARRANTY, OR ANY
OTHER EXPRESS OR IMPLIED WARRANTY, ARE NOT THE RESPONSIBILITY OF ACER
NETXUS AND ARE HEREBY EXCLUDED BOTH FOR PROPERTY AND FOR PERSONAL
INJURY DAMAGE.
2. PERIOD OF WARRANTY COVERAGE:
The period of coverage is one (1) year from the date the equipment is purchased. There shall be no
warranty after expiration of the period of coverage. ANY AND ALL IMPLIED WARRANTIES OF
MERCHANTABILITY OR FITNESS FOR PARTICULAR USE SHALL HAVE NO GREATER
DURATION THAN THE PERIOD OF COVERAGE STATED HEREIN AND SHALL
TERMINATE AUTOMATICALLY UPON THE EXPIRATION OF SUCH PERIOD.
3. REPAIR, REPLACEMENT AND REFUND:
In the event of a malfunction attributable directly to Product Defect or Product Performance, company
will, at its option, repair or replace the Product to whatever extent company deems necessary to restore
the Product to proper operating condition without charge to the customer. If in the company opinion, it is
Wireless Broadband Router User Guide
3
Page 4

impractical for any reason to repair or replace the product, company may at its option refund or pay an
amount equal to the lesser of (1) the purchase price paid for the product or (2) the then effective
company estimated purchase price for the Product. The company may replace the Product with a new or
re-manufactured functionally equivalent product of equal value at the company option.
4. HARDWARE SERVICE:
To obtain hardware service, contact the dealer from whom you purchased the Product. Product under
warranty will be repaired or replaced according to the terms of the company Warranty Policy. After
expiration of the warranty, you may elect to have the Product repaired, in accordance with the terms of
this Warranty, except that you shall be responsible for all costs of repair, replacement and shipping and
handling.
5. SHIPPING AND HANDLING:
For equipment covered by warranty, Customers are responsible for shipping of products requiring repair
or replacement to and from the company Center, and for all shipping and handling charges incurred.
Broadband Router Products are provided with a limited one-year Warranty. Details of the warranty and
return process are explained in the Warranty Policy below. Warranty service is subject to the terms and
conditions of company Warranty Policy.
Wireless Broadband Router User Guide
4
Page 5

Contents
1. INTRODUCTION .................................................... 1
VERVIEW OF THE WIRELESS ROUTER
O
EATURES AND SPECIFICATION
F
IRELESS ROUTER APPLICATIONS
W
............................... 1
Accessing the Internet............................................ 2
Accessing Servers from the Public Network .......... 2
ACKAGE CONTENTS
P
ARDWARE CONFIGURATION
H
................................................ 2
.................................. 3
Front View.............................................................. 3
LED Indicators: ..................................................... 3
Rear View............................................................... 3
2. BASIC INSTALLATION......................................... 5
.................. 1
......................... 2
Log On to the Router.............................................. 9
Set Your Local Time Zone and Local Data/Time
Information ..........................................................10
Set Router’s Operational Mode............................ 10
Set Router’s LAN IP Address ............................... 11
Configuring Your Internet Connection................. 12
Provide DNS Server Address Information ...........15
Configure Your Wireless LAN Connection ........... 16
Finish Setup Wizard and Save Your Settings........ 17
EVICE STATU S
D
....................................................... 18
System Log ........................................................... 19
DHCP Client Table .............................................. 20
DVANCED SETTINGS
A
.............................................. 21
YSTEM REQUIREMENTS
S
OW TO CONNECT CABLES TO YOUR WIRELESS
H
OUTER
R
..................................................................... 5
.......................................... 5
3. CONFIGURING THE WIRELESS ROUTER ..... 7
ONFIGURING A
C
PC R
UNNING
MS-W
INDOWS
95/98/ME: .................................................................. 7
ONFIGURING A
C
PC R
UNNING
MS-W
INDOWS
XP/2000:.................................................................... 7
ONFIRMING YOUR
C
ONFIGURING THE ROUTER VIA WEB BROWSER
C
PC’S IP C
ONFIGURATION
:..... 8
.. 8
4. BASIC SETUP.......................................................... 9
ETUP WIZARD
S
......................................................... 9
Password Settings ................................................ 21
System Management............................................. 22
DHCP Server Settings.......................................... 23
Virtual Server Settings .........................................24
MAC Filtering Settings ........................................25
IP Filtering Settings............................................. 26
Static Routing....................................................... 28
Special Applications............................................. 28
E-mail Alert Settings ............................................ 30
Dynamic DNS Settings......................................... 31
Firmware Upgrade...............................................32
Factory Default.................................................... 32
Reboot Router ......................................................32
Wireless Broadband Router User Guide
5
Page 6

1. Introduction
This manual provides detail instructions of setup and the functions of the wireless Internet Access
Router. This is a breakthrough for SOHO users who need to share a high-speed broadband Internet
connection to the Internet.
The wireless Internet Access Router enables your network to connect through any XDSL/Cable modem
to the Internet—providing a simple network solution for SMB and SOHO users.
Overview of the Wireless Router
The Wireless Router is a small desktop router that sits between your local Ethernet network and a
remote network (e.g., the Internet or a remote office). The Wireless Router contains an EWAN port
connecting to an external xDSL/Cable modem, and a four-port 10/100Mbps Ethernet switch for
connection to PCs on your local network.
Data comes into the Wireless Router from the local LAN and then is “routed” to the remote network,
and vice versa.
Features and Specification
LAN: 4*Port 10BaseT/100BaseT Ethernet switch
WAN: 1*10BaseT/100BaseT RJ-45 WAN port for connecting Internet through xDSL/Cable modem
Multiple users to share Internet access
IP routing and NAT/PAT support
VPN (Virtual Private Network) supporting for PPTP/L2TP/IPSec pass-through.
Supporting PPPoE client function for xDSL connections
Supporting MAC clone for cable modem connection
Supporting Multimedia application(ICQ, NetMeeting, CUSeeMe, Quick Time, etc)
Supporting Virtual Server
Compatible with UPnP (Universal Plug-and-Play)
Supporting Dynamic DNS
Seamless roaming by WLAN infrastructure
64-bit and 128-bit WEP(Wired Equivalent Privacy)
Supporting Cisco-like Command Line Interface (CLI)
Embedded Telnet server for remote Console management
Web-based GUI
Firmware upgrade via Web-based GUI
Configuration data upload and download via TFTP
Wireless Broadband Router User Guide
Page 7

Support DHCP server/client
SNMP MIB support, easily for MIS staff
MAC address filtering
IP Packet filtering (IP address/Protocol/Port number)
SYSLOG
Wireless Router Applications
Accessing the Internet
The most common use for the Wireless Router is to provide Internet access, so that everyone on your
LAN can surf the web and send/receive email or files. The Wireless Router automatically acquires the
necessary IP address when the connection to the Internet is established. You don’t need to apply for and
assign an IP address to each PC or workstation on your network.
Accessing Servers from the Public Network
If you want special servers to be accessible by remote users across the Internet (e.g., an e-mail server, an
FTP server, or a web server), you can configure the Wireless Router to proxy the service from its own
address. This means that the remote user can address the router as if it were the special server and the
Wireless Router will re-direct this connection to the appropriate computer on the network.
Package Contents
Your Broadband Router package contains the following items:
1 Broadband Router
1 802.11b Wireless PCMCIA AP card
1 DC Power Adapter, DC 5V 2A
1 CD-ROM containing the online documentation
1 Quick Start Guide
If any of the above items were damaged or missing, please contact your dealer immediately.
Wireless Broadband Router User Guide
2
Page 8
Hardware Configuration
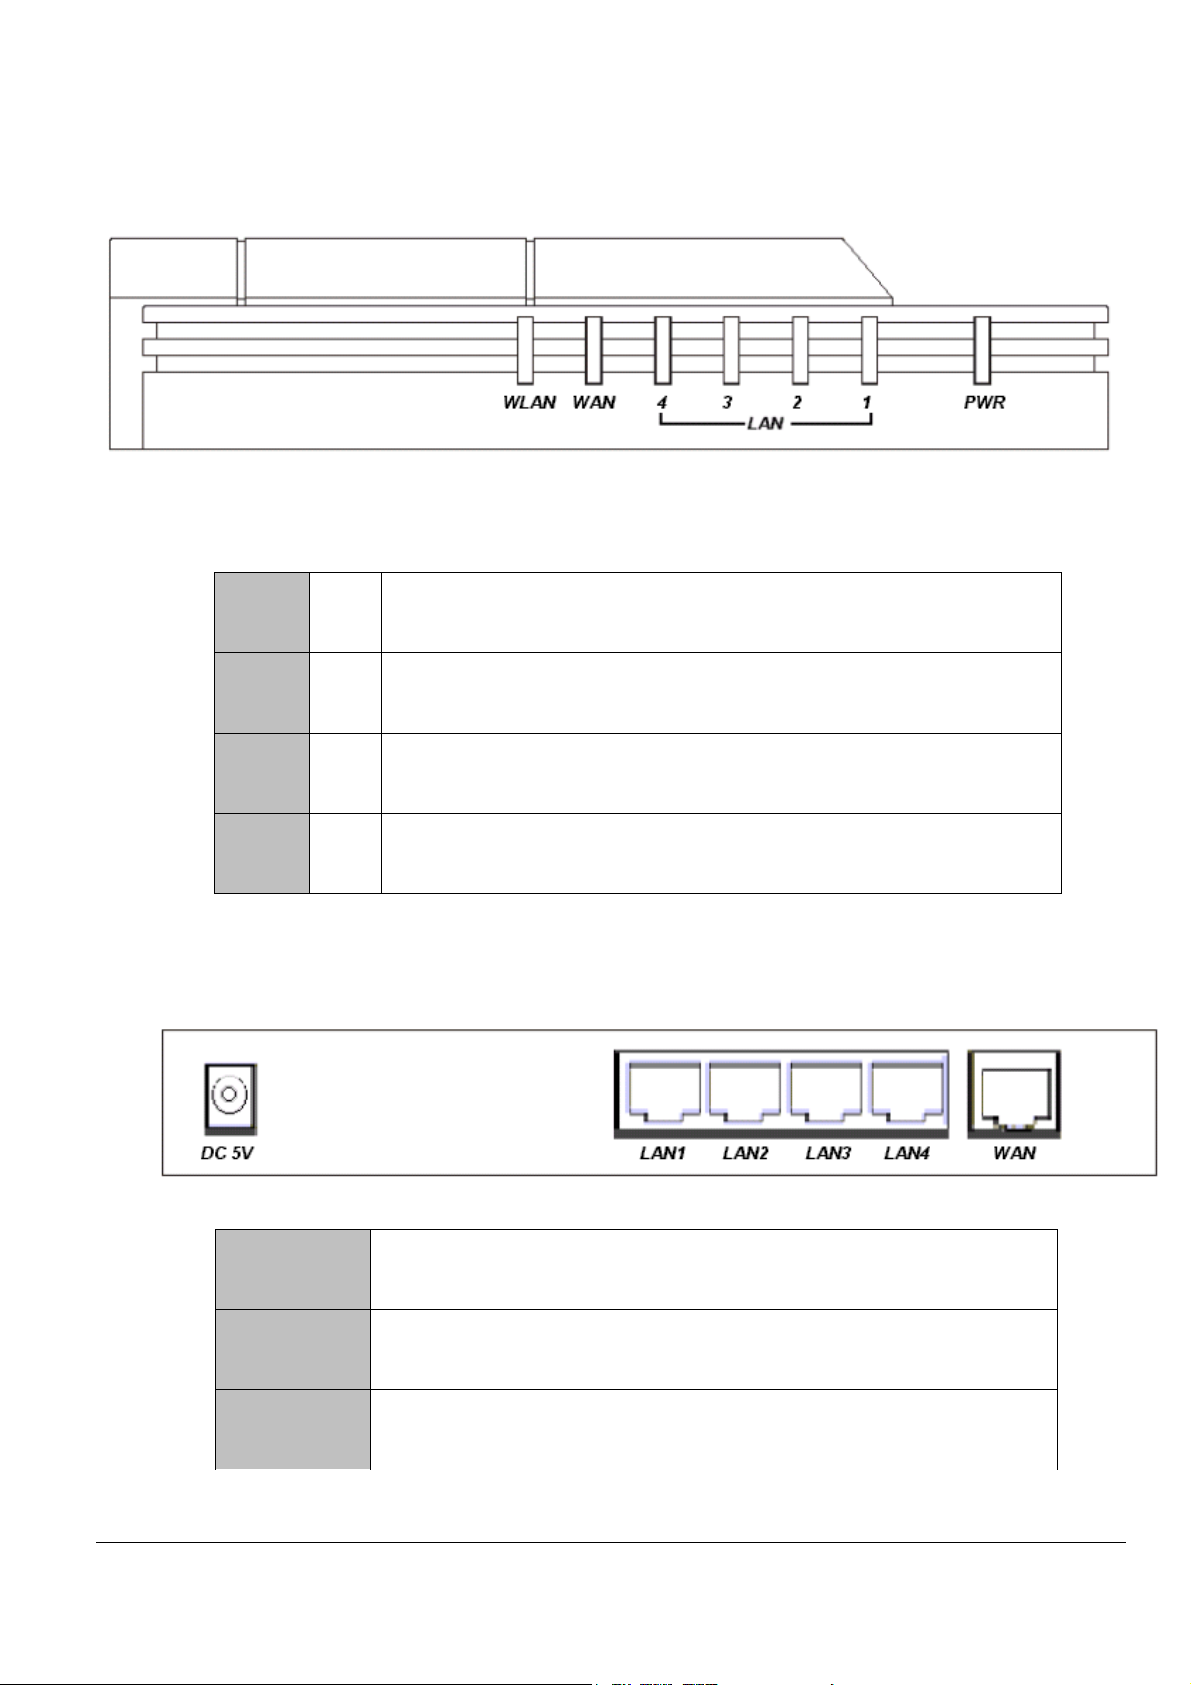
Front View
LED Indicators:
Rear View
LAN
1-4
WAN
WLAN
PWR
LINK
/ACT
LINK
/ACT
The green LED will LIGHT when a good link is established, and
BLINK when a packet is being transmitted or received.
The green LED will LIGHT when a remote carrier is connected, and
BLINK when a packet is being transmitted or received.
The green LED will LIGHT when wireless LAN is ready, and BLINK
when data are being transmitted or received.
The green LED will LIGHT if the router is receiving power.
DC5V Connect the DC power adapter
WAN Connect the xDSL/Cable Modem
LAN 1-4
Wireless Broadband Router User Guide
Connect any wired networking devices, such as PCs, printers or
servers
3
Page 9
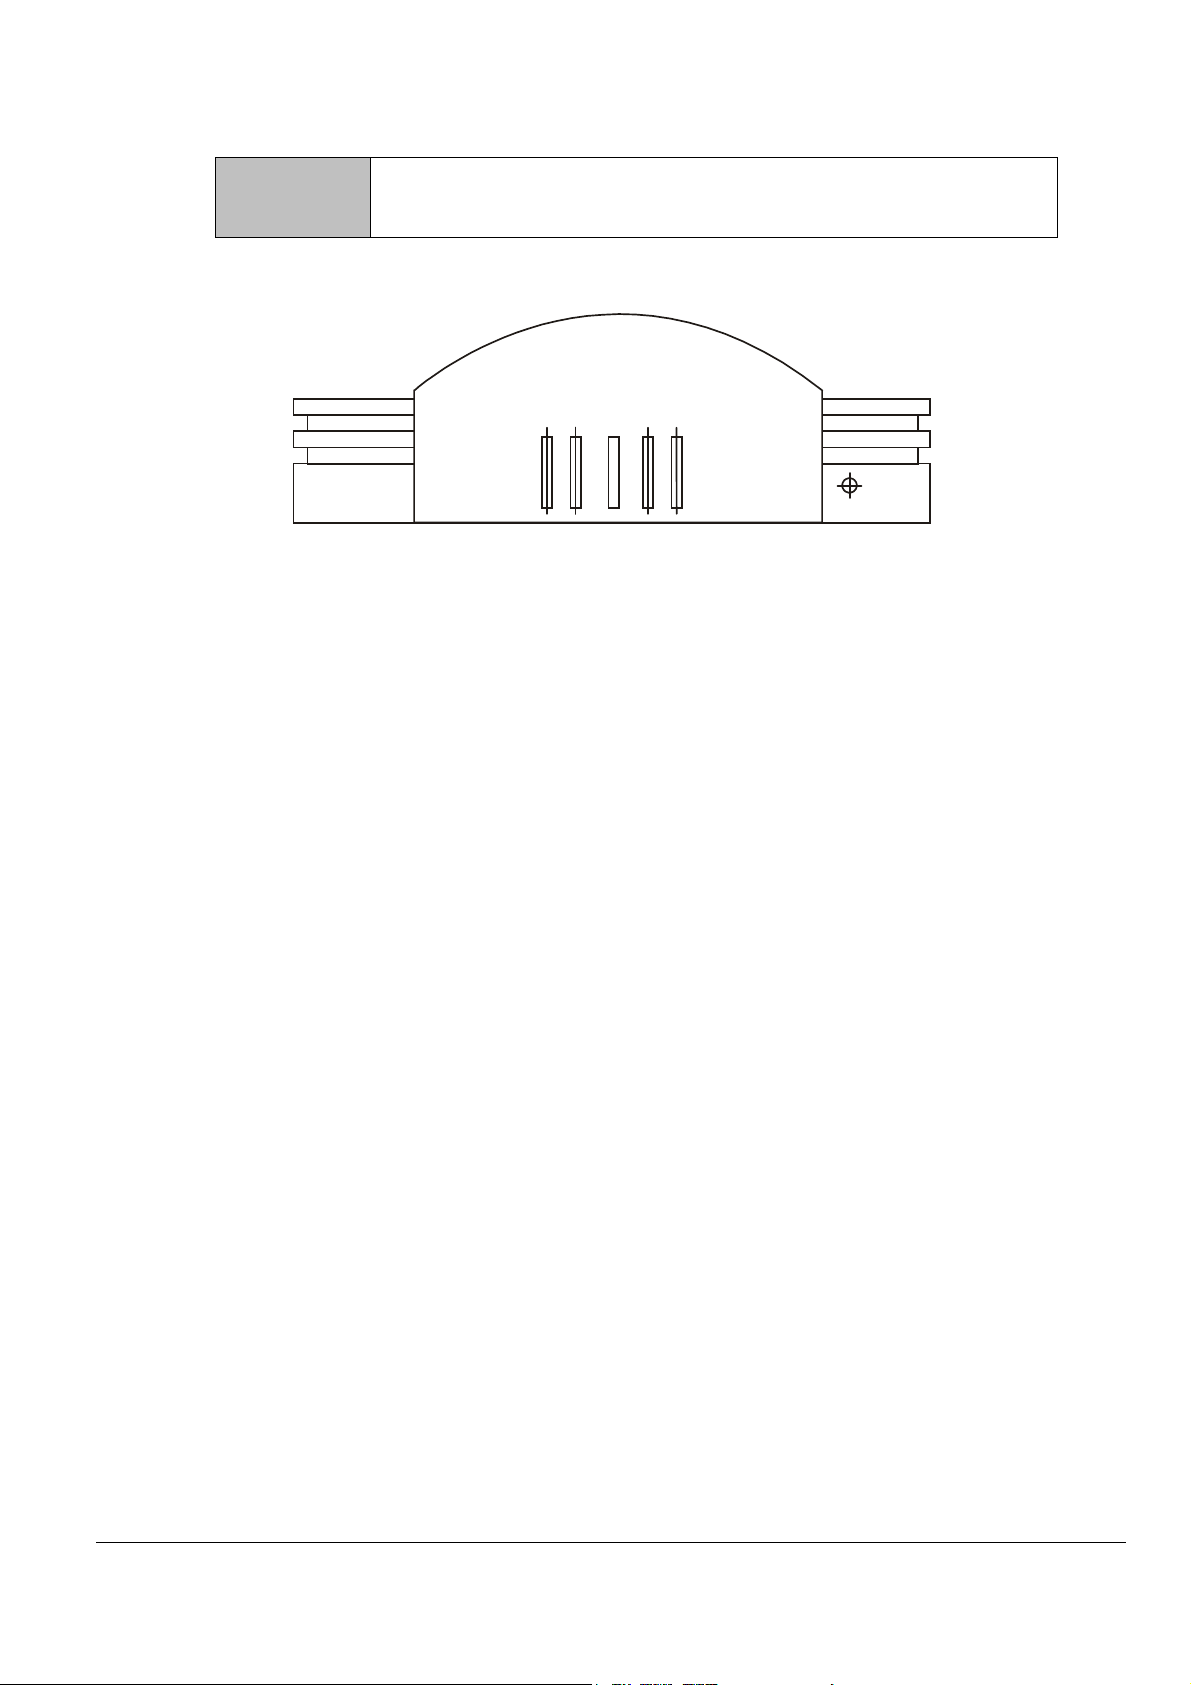
Side View
Restore Recover to the factory default.
Restore
Wireless Broadband Router User Guide
4
Page 10
2. Basic Installation
System Requirements
You must complete the following items before you configure your router:
Install an xDSL/Cable modem with service through an Internet Service Provider.
Obtain an Internet access account from an Internet Service Provider.
Obtain a Gateway server address and DNS server address from your Internet Service Provider.
Set up a PC with a fixed IP address or dynamic IP address assignment via DHCP. Install an
Ethernet network card or 802.11b wireless network card.
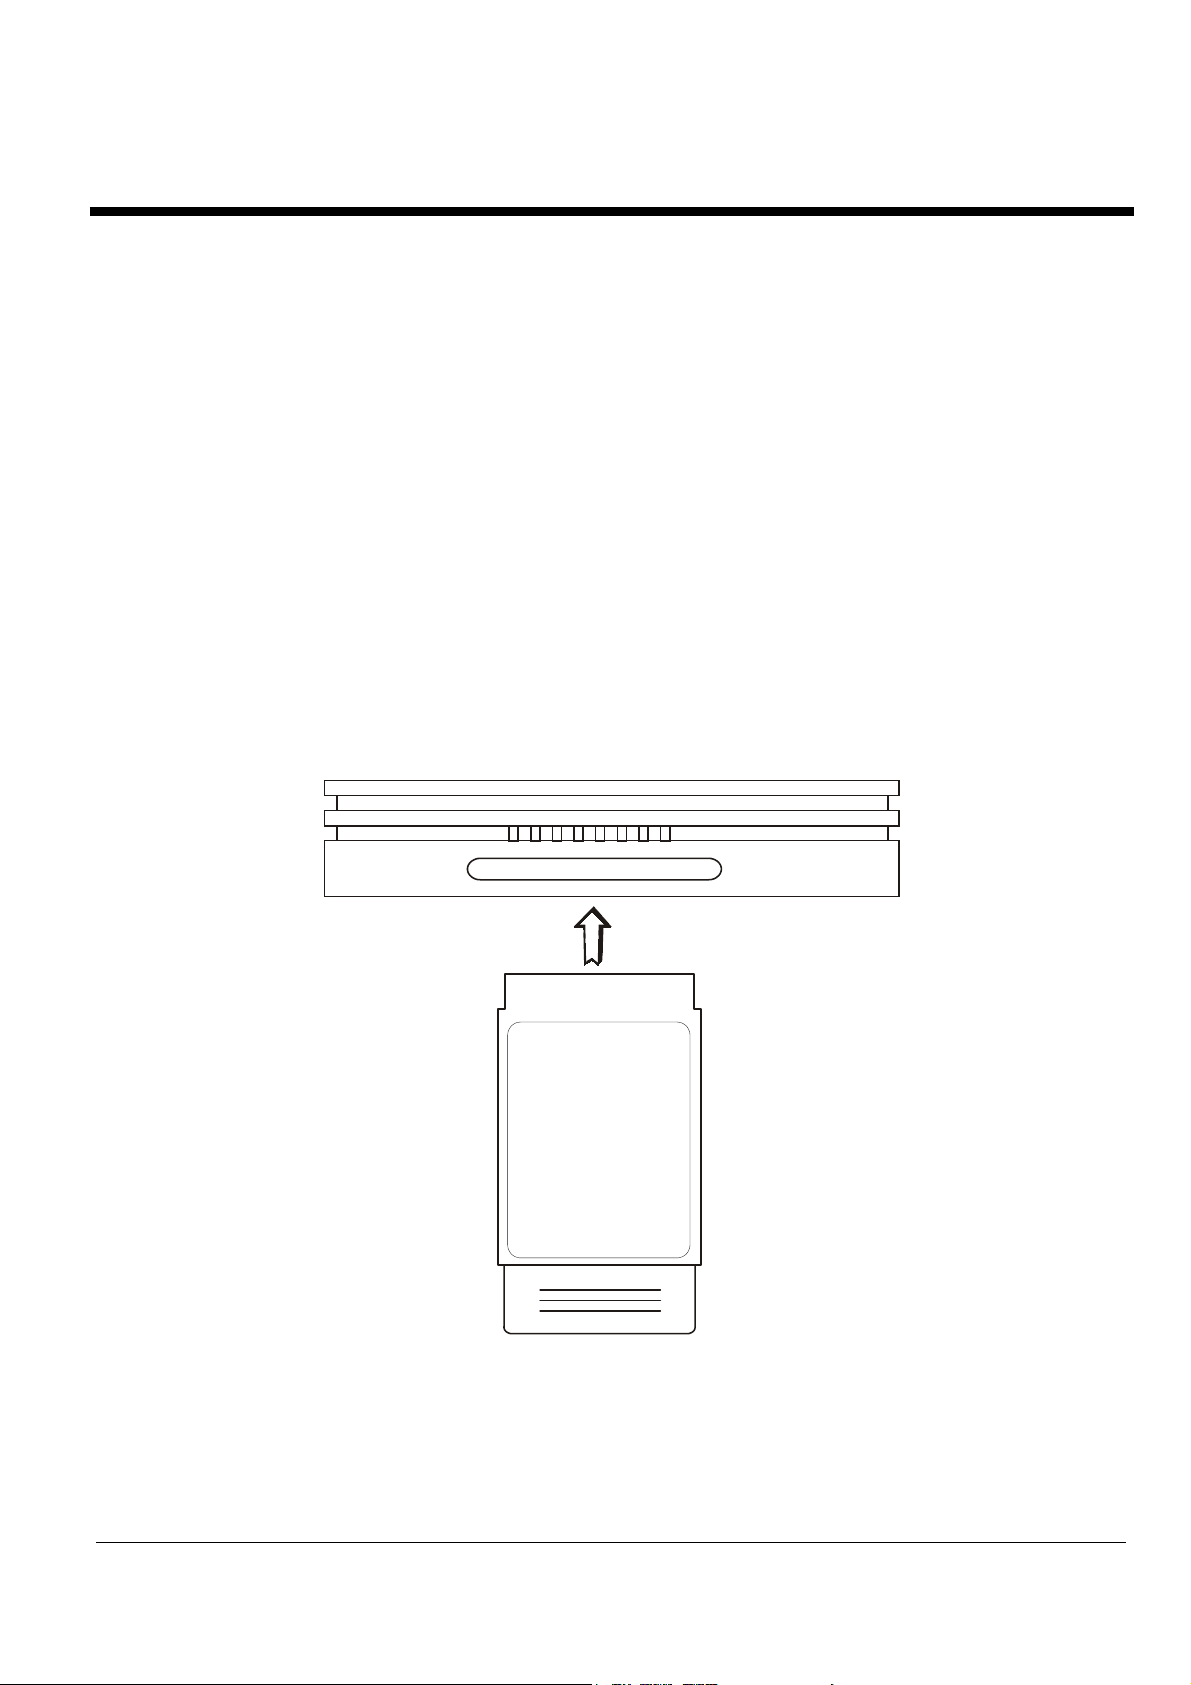
How to Connect Cables to Your Wireless Router
Stpe1. Insert PCMCIA AP card attached in the package to the router.
Stpe2. The following illustration shows the connectors on the back of the Wireless
Router.
Wireless Broadband Router User Guide
5
Page 11

Connect cables to these connectors as follows:
Connect up to four workstations to the RJ-45 LAN connectors
Connect to the xDSL or Cable device
Plug the DC adapter power cable to the Wireless Router and a wall electrical outlet
WARNING! Power supply (power adapter) must be removed before you remove or slide
in your PCMCIA Wireless Module into your Wireless Broadband Router.
Wireless Broadband Router User Guide
6
Page 12

3. Configuring the Wireless Router
You can configure your wireless router by a host PC in one of the following three ways.
Web browser via a local LAN
Command Line Interface via a telnet client
Configuring a PC Running MS-Windows 95/98/Me:
1. Click the Start Button, and select Settings.
2. Click the Control Panel. The Win95/98/Me Control Panel will appear.
3. Open the Network setup window by double-clicking the Network icon.
4. Check your list of Network items. If TCP/IP is already installed, proceed to step 5. Otherwise: (You
may need your Windows CD to complete the installation of TCP/IP.)
- Click the ADD button.
In the Network Component Type dialog box, select Protocol.
·
In the Select Network Protocol dialog box, select Microsoft.
·
In the Network Protocols area of the same dialog box, select TCP/IP and click OK.
·
5. With TCP/IP installed, select TCP/IP from the list of Network Components.
6. In the TCP/IP window, check each of the tabs and verify the following settings:
Bindings: Select Client for Microsoft Networks and Files and printer sharing for
MicrosoftNetworks
Gateway: All fields are blank.
DNS Configuration: Select Disable DNS.
WINS Configuration: Select Use DHCP for WINS Resolution.
IP address: Select the Obtain IP address automatically radio button.
7. Reboot the PC.
Configuring a PC Running MS-Windows XP/2000:
1. Click the Start button, and choose Control Panel (in Classic View).
2. In the Control Panel, double-click Network Connections.
3. Double-click Local Area Connection.
4. In the LAN Area Connection Status window, select Internet Protocol (TCP/IP) and click
Properties.
5. Select the Obtain an IP address automatically and the Obtain DNS server address
automatically radio buttons.
6. Click OK to finish the configuration.
Wireless Broadband Router User Guide
7
Page 13

Confirming Your PC’s IP Configuration:
There are two tools useful for finding out a computer's IP address and default gateway:
WINIPCFG (for Windows 95/98/Me) Select the Start button, and choose Run. Type winipcfg, and a
window will appear listing the IP configuration. You can also type winipcfg in the MS-DOS prompt.
Configuring the Router via Web Browser
To access the Broadband Router Management System, open an Internet browser and enter the following
URL: http://192.168.1.1
Wireless Broadband Router User Guide
8
Page 14

4. Basic Setup
The home page displays the main menu on the upper-side of the screen; the main menu links are used to
navigate to other menus that display configuration parameters and status.
The Router management system includes Setup Wizard, Device Status, System Tools, Advanced
Settings and Help choices.
Setup Wizard
Log On to the Router
Click the “Setup Wizard” button, the login screen will appear. Enter the default password “password”
(you may change the password through the Advanced Settings menu.) to enter the Broadband Router
Manager System.
Wireless Broadband Router User Guide
9
Page 15
The Setup Wizard will lead you through a series of configuration screens that will setup the basic
functionality of your router. After you finish configuring these screens and press the “FINISH” button
on the last screen, all of your configuration modifications will take effect.
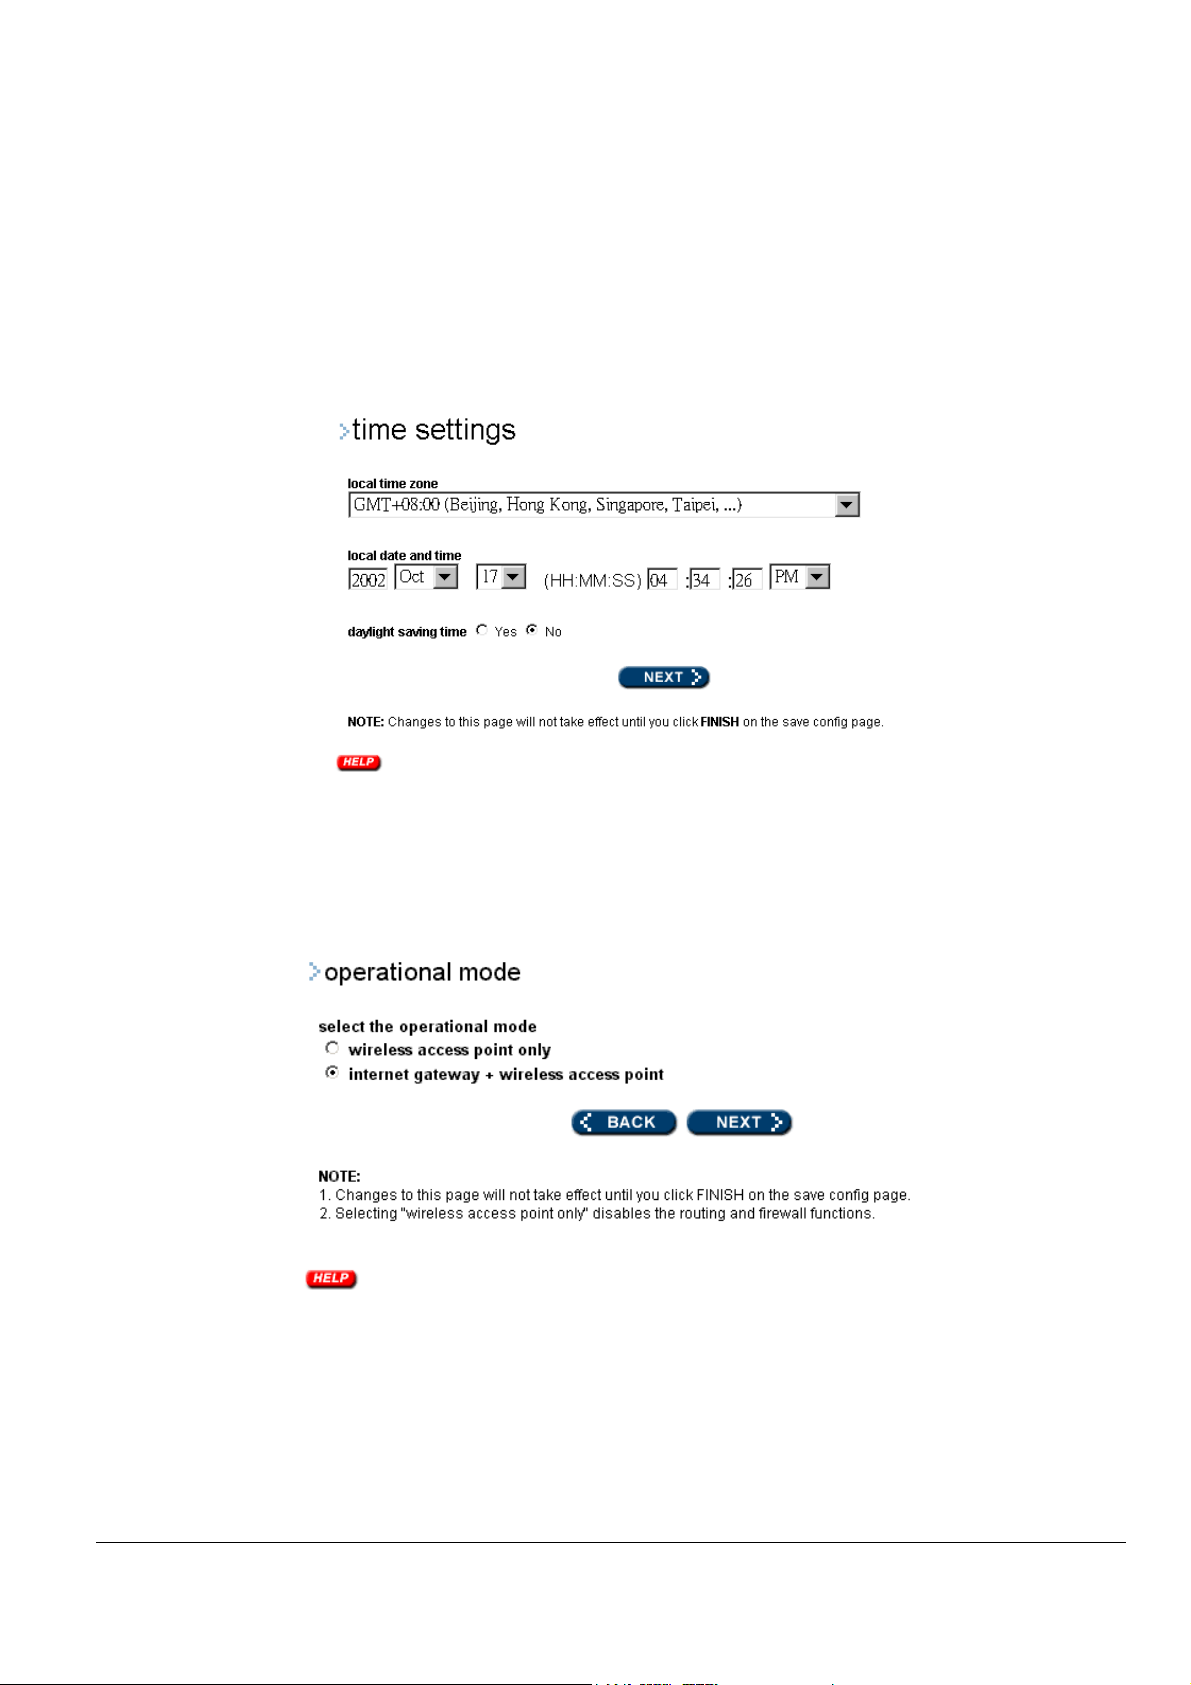
Set Your Local Time Zone and Local Data/Time Information
After logging in, the time settings page is the first page appears. The router time is automatically set to
the local time of the management PC the first time a connection is made. To modify the router’s clock,
modify the appropriate fields. Click on “NEXT” to continue.
Set Router’s Operational Mode
The operational mode screen now appears. You have two options to choose from. Your router may be
configured as a wireless access point or as an Internet gateway and a wireless access point.
Wireless Access Point Only: In this mode, the router will be used as an 802.11b access point. This
means that the device is used to connect wireless clients to the wired LAN connected to the four-port
10/100 Mbps switch. The Internet gateway connection is disabled. All routing, address translation
and DHCP server functions are also disabled.
Internet Gateway and Wireless Access Point: This setting enables all routing functions including
address translation and firewall features. Use this setting if you connect an XDSL or Cable modem
Wireless Broadband Router User Guide
10
Page 16

to the EWAN port of your router.
The next series of screens will now depend on the choice you selected above: if you selected “wireless
access point only”, the ISP Settings configuration screen will be skipped. Click on “NEXT” to
continue.
Set Router’s LAN IP Address
The device IP settings screen configures the IP address and subnet of the router on the LAN. The screen
that appears depends on whether you’ve configured the device as a wireless access point or as an
Internet gateway + wireless access point.
IP Settings if Internet Access + Wireless Access Point selected
This value defaults to the IP address 192.168.1.1 with a network mask of 255.255.255.0. It is important
to note that this type of address is termed a private IP address and is an essential security feature of the
router: this type of address cannot be seen or accessed from the Internet. The Wireless Router’s private
address of 192.168.xxx.yyy is called a Class C IP address. This means that changing “xxx” will change
the network while changing “yyy” will assign a different address in the same network.
Although its value may be changed to another address in the same or different private network, it is
recommended that this address not be changed unless necessary. For example, if you want to create your
own private network with another Wireless Router at remote office locations, you need to make sure that
each Wireless Router on each LAN is assigned an address in a unique private IP network.
Also note that if you do change this value to an address in a different subnet, you will lose contact with
the router until you change the address of your management PC to the same subnet as the newly
configured one.
Wireless Broadband Router User Guide
11
Page 17

If you selected wireless access point only, then an additional field appears in the device IP settings
screen showing as below. The Gateway IP Address is the address of a device on your LAN that is
used to access the Internet or any other IP network that is not in the locally attached LAN network.
Click on “NEXT” to continue.
IP Settings if Wireless Access Point Only selected
Configuring Your Internet Connection
The ISP settings configuration screen allows you to enter information the device uses to connect to the
Internet through your Internet Service Provider (ISP). You must tell the router what type of connection
to the Internet you have. You may also need to enter DNS server information if the router acts as a
DHCP server and this information not provided automatically by your type of connection.
Note: If you selected “wireless access point only” in the operation mode screen, this screen will not
appear.
Specify the WAN Connection Type Required by Your Internet Service Provider
There are four ways that you may be connection to the Internet:
1. Static IP: Check this box if your ISP assigns you a fixed IP address.
Wireless Broadband Router User Guide
12
Page 18
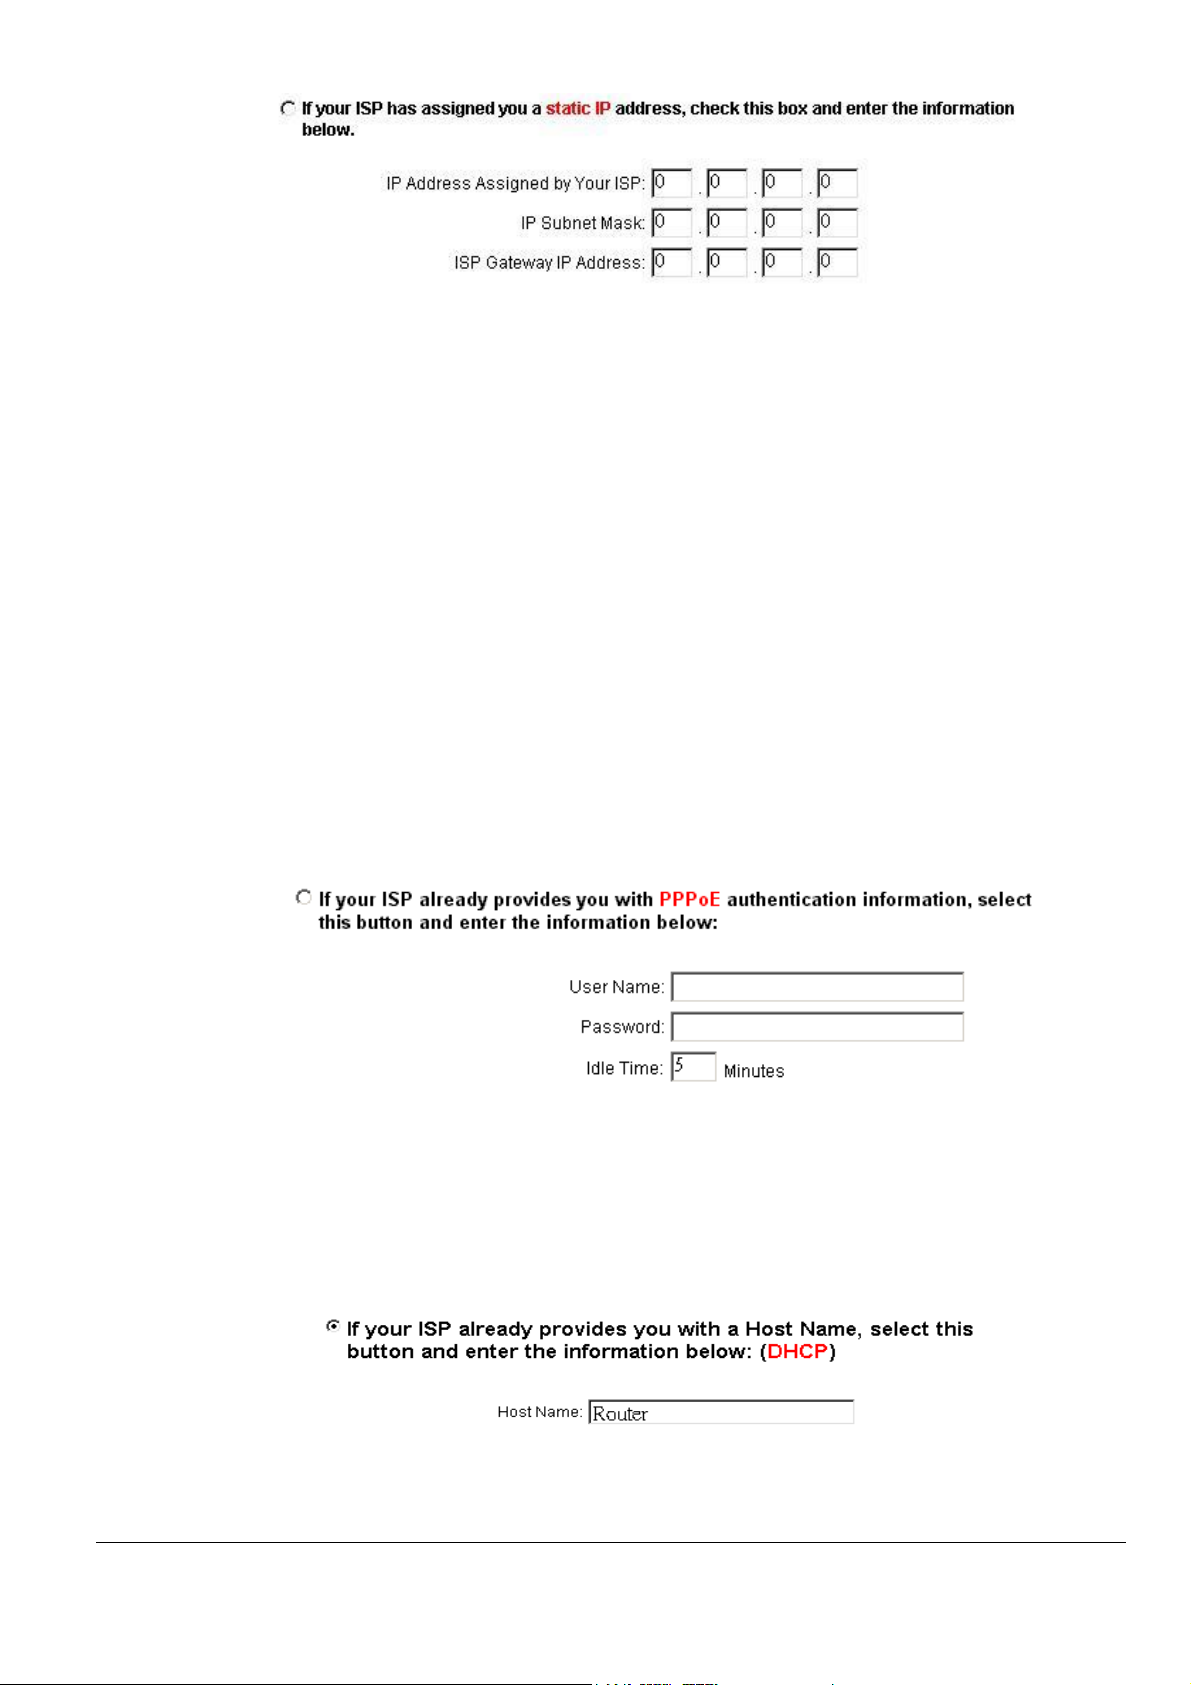
IP Address Assigned by Your ISP: Enter the address as provided by the ISP. This is the IP
address of your Internet connection and is normally reachable by anyone on the Internet.
IP Subnet Mask: The IP Netmask of your Internet connection IP address.
ISP Gateway address: The IP address of your ISP Gateway. This is provided by your ISP.
2. Dynamic IP via PPPoE: Your ISP assigns you an IP address dynamically. This setting requires
you to enter a user name to identify you and a password for authentication.
This type of connection is called a Point-to-Point over Ethernet (PPPoE) connection and is
normally used over XDSL modems.
User name: The username of your ISP account.
Password: The password of your ISP account.
Idle Time: After this period of inactivity, the router will disconnect from the ISP. The default
value of the idle timeout is 5 minutes. You can change the idle timeout value to anything
between 0 to 60 minutes. A value of zero means there is no idle timeout.
3. Dynamic IP via DHCP: This type of connection is normally used over Cable modems. It is the
default connection type to the ISP. It uses a method called the Dynamic Host Control Protocol
(DHCP). In order to identify your account, Your ISP may require you to enter a Host Name
and/or MAC Address.
Host Name: The Host Name is optional, but may be required by some ISPs.
Wireless Broadband Router User Guide
13
Page 19

4. Dynamic IP via PPTP: This type of connection is called the Point-to-Point Tunneling Protocol
over Ethernet (PPTPoE) and provides a secure connection over the Internet and is normally used
when connecting to a remote LAN through the Internet. In a manner similar to PPPoE, your ISP
requires you to enter a user name and password in order to identify you. You also need to enter
an IP address that is “tunneled” through the Internet.
PPTP Local IP address: The “tunneled” IP address provided by your ISP.
PPTP Local Net mask: the IP Network mask associated with the above address.
PPTP Remote IP address: the IP address from your ISP
User name: the user name of your ISP account.
Password: the password of your ISP account.
Important Note:
If you used WinPoET/ RASPPPoE (PPPoE Dial-up Software) or a Windows PPTP
·
application in your computer, you must remove or disable this software in order
to operate properly. The router replaces your PPPoE or PPTP software when
communicating with your ISP.
If you don’t know your connection type, please contact your Internet Service Pro-
·
vider.
MAC Address: Some ISPs may identify you by a specific MAC address. A MAC address is a
physical identifier of an Ethernet port, in this case the EWAN port that is connected to the Cable
modem. If this address is not the MAC address known to the ISP, you can substitute this address
with the MAC address of the Ethernet network card installed in your PC that was used to identify
your account. If you need to do this, check the Clone MAC Address selection to replace the
router MAC address by the MAC address of the Ethernet network card installed in your PC1.
1
Some ISPs may recognize your account using the LAN card MAC address on your PC that you used to access the Internet before the router
was installed. In this case, you have to copy the LAN card MAC address in the MAC address field. For WIN 95/98/Me, you can run
to see the LAN card MAC address. For WIN 2000/NT/XP, you can run “
Wireless Broadband Router User Guide
ipconfig/all
14
” to see the LAN card MAC address.
winipcfg
Page 20

Provide DNS Server Address Information
If your Wireless Broadband Router acts as a DHCP Server and assigns IP address information to other
PCs on your LAN, then you may need to configure DNS Server IP addresses in the router that are
transferred to these DHCP clients. Note that these addresses are often configured automatically. Your
ISP will tell you whether you need to configure these addresses.
The Domain Name System (DNS) is the technique that is used on the Internet to translate names like
“www.ebay.com” to IP addresses like 209.103.14.2. In order to do this, a query is made to special DNS
servers in the Internet that provide this information. Often, the addresses of these machines are sent to
the router automatically when it logs into the ISP. However, there may be instances where this is not
done, or where special addresses are required.
If your ISP requires you to manually enter DNS Server addresses, you can enter these addresses on this
page. Up to two DNS server IP addresses may be entered.
Wireless Broadband Router User Guide
15
Page 21

Configure Your Wireless LAN Connection
Network Name (SSID): The SSID is the unique name shared among all points in a wireless network;
the ID must be different from each other. The SSID can up to 35 characters.
Disable SSID Broadcasting: All wireless clients must use the same Network Name (SSID) in order
to associate with the wireless network.
Channel: Select the appropriate channel from the above list to correspond with your network settings.
All points in your wireless network must use the same channel, which means all points must share the
same bandwidth.
Note: The available channel numbers are varies from one region to another. Please be careful on the
available channel range for your location, when selecting the channel number for your wireless LAN.
The list below shows the available channel numbers in some regions.
USA and Canada: CH01~11
Europe: CH01~CH13
Japan: CH01~CH14
France: CH10~CH13
Span: CH10~CH11
You can use encryption to protect your data when you are transmitting data across wireless channels.
WEP Selection: The Wireless Router allows you to use data encryption to secure your data from
Wireless Broadband Router User Guide
16
Page 22

being eavesdropping by unauthorized wireless users. We allow up to four 40-bit encryption keys
(WEP40) and two 128-bit encryption keys (WEP128) to be configured (using either the ASCII or
Hexadecimal format). Please select the one you want to be used when communicating with the
Wireless Router.
WEP Key Setting: The length of a WEP40 key must be equal to 5 that of a WEP128 key 13. Once
you enable the WEP function, please make sure that the same WEP key is used on both the Wireless
Router as well as the wireless client stations.
Finish Setup Wizard and Save Your Settings
After stepping through the Wizard’s pages, you can go back to correct any modifications or you can
click “FINISH” at this page to end the Setup Wizard. Your modifications take effect when you click on
the “FINISH” button. This will also save your new settings. Congratulations! You are now ready to use
the Wireless Router.
Note: If you change the router’s private address (e.g., from the default of 192.168.1.1 to 192.168.3.1),
once you click on “FINISH” you will no longer be able to communicate with your Wireless Router.
You need to re-boot your computer to re-acquire a new IP address and the default Gateway from the
Wireless Router based on the new private IP network address.
Wireless Broadband Router User Guide
17
Page 23

Device Status
You can monitor the connection status and get general device information from this screen.
The diagram on the right shows the connection status of various interfaces of the router. The device
status information is shown on the left panel.
You can select System Log on the left to view log events recorded in the system. The System Log
entries are shown in the main screen along with the log level setting and the system uptime, which is the
amount of time since the router was last reset.
You can select DHCP Client Table on the left to view DHCP server configuration and the list of the
current DHCP client devices.
Wireless Broadband Router User Guide
18
Page 24

System Log
The log events are defined as 6 levels. The default level is level 2. When system Log Level is configured
at 2, it means only critical messages are displayed in the System Log table. When it is configured at
level 6, it means system log will show all 6 levels of System Log messages. At default level 2, the
System Log table will display events marked under level 2, which includes 3 kinds of events:
- System is unusable.
- Some action must be taken immediately.
- Critical conditions.
You can change the Log Level via command line interface, please refer to the CLI manual.
Furthermore, you can configure the specified log events to be sent to your E-mail box by clicking
“E-mail Alert” button.
Wireless Broadband Router User Guide
19
Page 25

DHCP Client Table
You can select DHCP Client Table to view the list of PCs that were given IP addresses by the router in
your network and get the related information.
The default of DHCP server release time is one day (86,400 seconds).
You can view your DHCP server settings by clicking “DHCP Server” button. It links to the DHCP
server settings configuration page.
Wireless Broadband Router User Guide
20
Page 26
Advanced Settings
The Advanced Settings tab on the top row of buttons will allow you to perform modifications that you
may not normally need for basic operations. The exception to this is changing your password from the
default factory setting. This is highly recommended for the security purposes.
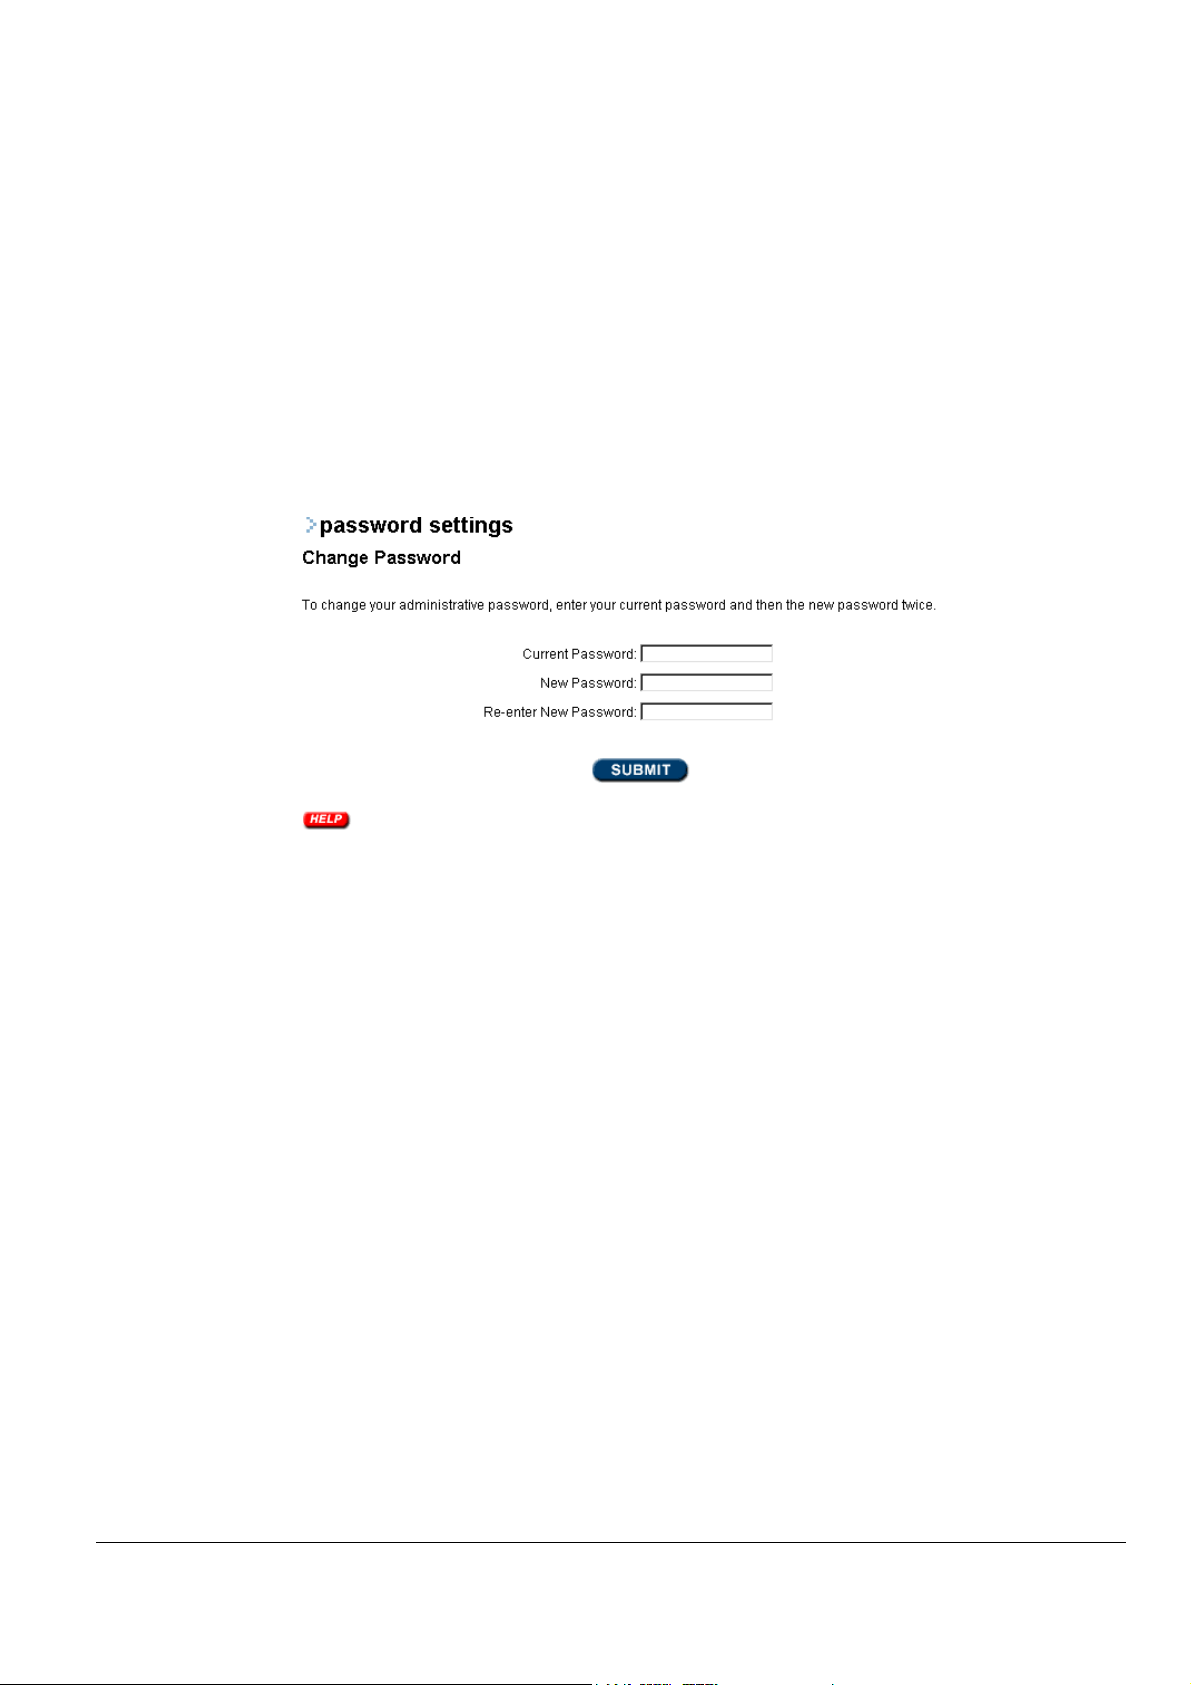
Password Settings
The default factory password is “password”, but you should change the password for security purposes.
The new password should be 6 to 15 characters. To change the system password, first enter the current
password followed by the new password twice. The entered characters will appear as asterisks.
Wireless Broadband Router User Guide
21
Page 27
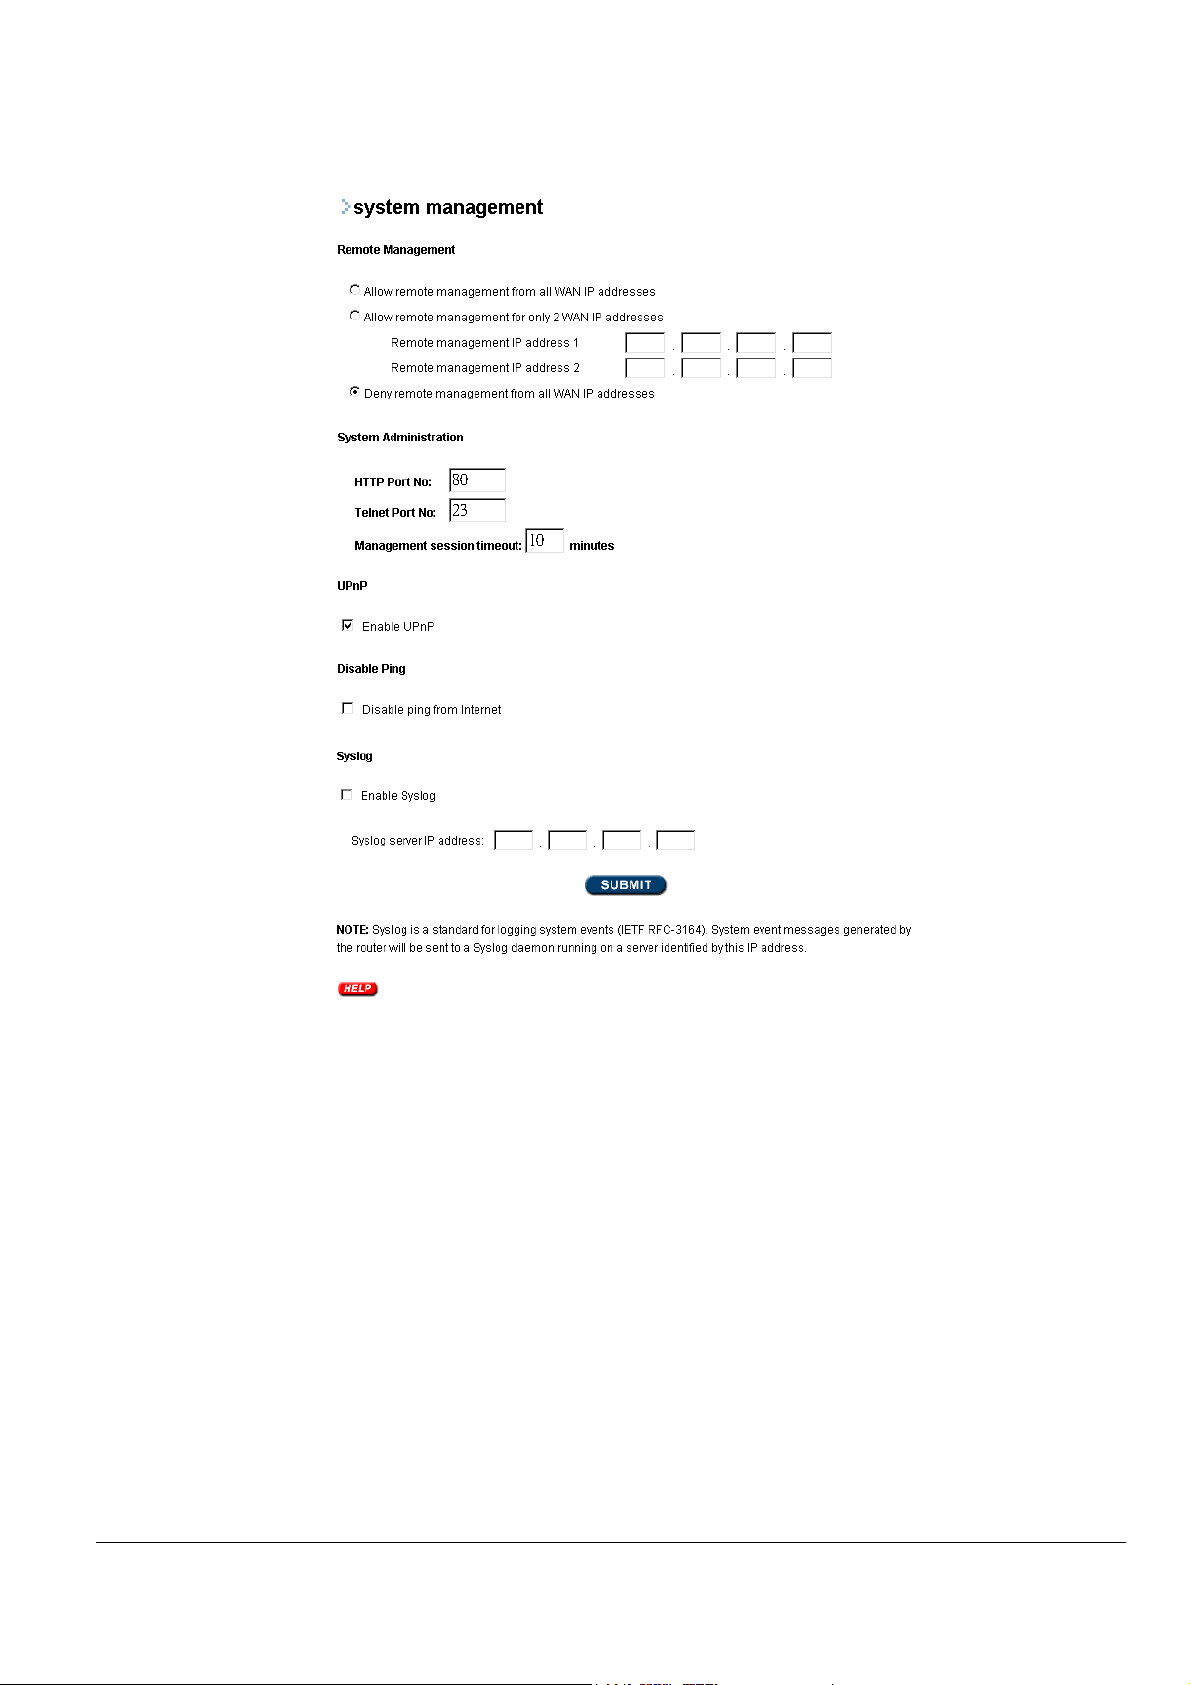
System Management
The System Management page presents several configuration items related to management of the router.
In the Remote Management section, you can place restrictions on remote devices allowed to manage the
router. You have the following three choices:
• Allow remote management from all WAN IP addresses – This will remove all
restrictions on IP addresses that may manage the router
• Allow remote management for only 2 WAN IP addresses – Here you can specify up to
two IP addresses that are allowed to manage the router remotely. Any other request
originating at another IP address will be denied
• Deny remote management from all WAN IP addresses – This choice will prevent any
management access from the Internet
Management Utility Port Definition: The standard port settings for the HTTP Web server and the
Telnet utility may be modified by entering the new port numbers in these fields
Management Session Time-out: This setting defines that amount of idle time before a web browser
Wireless Broadband Router User Guide
22
Page 28

or telnet management session times out. The default time-out for these sessions is 10 minutes
UPnP: Universal Plug and Play (UPnP) allows Windows XP/ME to discover and control the router
automatically.
Disable Ping: “Ping” is a utility of MS-DOS, used to test the physical connection between two
devices, to ensure the connection is working fine. The router has “Ping” enabled by default, it can be
configured as disabled in order not to be found on the Internet and not to be attacked.
Syslog: Syslog is an IETF (Internet Engineering Task Force - the Internet standards
body)-conformant standard for logging system events (RFC-3164). To remotely view logged system
events for the wireless router, you need a PC that is running the Syslog daemon (a daemon is a hidden
program that is always running on your PC in the background). System messages generated by the
router are sent to a Syslog daemon on the PC with the IP address specified here if the Enable Syslog
check box is checked.
Syslog server IP address: The IP address of the PC running the Syslog daemon.
DHCP Server Settings
The DHCP server within the Wireless Broadband Router assigns IP addresses to devices on your wired
or wireless LAN configured to obtain an IP address automatically. If you are using the wireless router as
an Internet Gateway, then the DHCP server is enabled by default.
Enable DHCP server: To enable the DHCP server and allow the router to automatically assign
private IP addresses to requesting device, check this box.
Dynamic IP Address Assignment: IP addresses are normally assigned from the entire pool of
Wireless Broadband Router User Guide
23
Page 29

available addresses in the IP “subnet” to which the router is attached. If you want to reserve some
addresses for other purposes you can modify this address pool in the From/To boxes and the press
“SUBMIT”.
From: Start IP address
To: End IP address
Static IP Address Assignment: If you require that specific PCs always obtain the same IP addresses,
enter the PC’s MAC address and the IP address to assign via the DHCP process and press “ADD”.
MAC address: The MAC address of the PC
IP address: The IP address to assign to the PC
DHCP Client List: All configured Static IP Address Assignment entries appear in the displayed table.
Selecting the entry and then pressing the “DELETE SELECTED” button may delete entries.
You can click the “DHCP Table” to view the list of PCs that were given IP addresses by the router.
Virtual Server Settings
By default, a privately addressed PC on your LAN or any program or service running in a privately
addressed PC on your LAN cannot neither be seen nor accessed from the Internet. However, if you have
a service, such as a Web server or an FTP server, on your LAN that you would like to be accessible
from the Internet, the settings on this page allows you to do so. Since each IP service uses a special
address called a “TCP/UDP Port”, the router can translate this request to a destination on your private
LAN. The remote Internet user uses the address of the router as if it were the LAN-resident server and
the router does the translation automatically. Thus, the Internet user is never in direct contact with the
PC providing the service and the router then acts as a proxy for this service to the Internet user. You may
define multiple entries by first entering the Public Port Number and then the Private Port Number and
Private IP Address to which the Public Port translates. The Drop-down list provides port numbers for
standard applications as well as a Customization entry for you define your own port numbers. A special
case is the DMZ server, or default virtual server. If you configure this device, all requests to ports that
are otherwise unrecognized are directed to the machine with the specified private IP address. You cannot
enter port numbers when you define the DMZ server.
Wireless Broadband Router User Guide
24
Page 30

Service Name: Choose the service to be redirected. You can select some of the popular TCP
services from the drop-down list. If you want to define your own Public Port Numbers, choose the
CUSTOMIZATION entry in the drop-down list.
Public Port: The destination port number as seen from the Internet using the Public IP address of the
router. This field is only changeable when CUSTOMIZATION is selected as the Service Name.
Private IP Address: The IP address of the private client to which the request will be redirected.
Private Port: The LAN side port number residing on the private client.
You can click “ADD” to add other services.
MAC Filtering Settings
MAC address filtering allows you to define a list of MAC addresses (for either wireless or LAN devices)
that are authorized to access or denied access to the network.
Wireless Broadband Router User Guide
25
Page 31
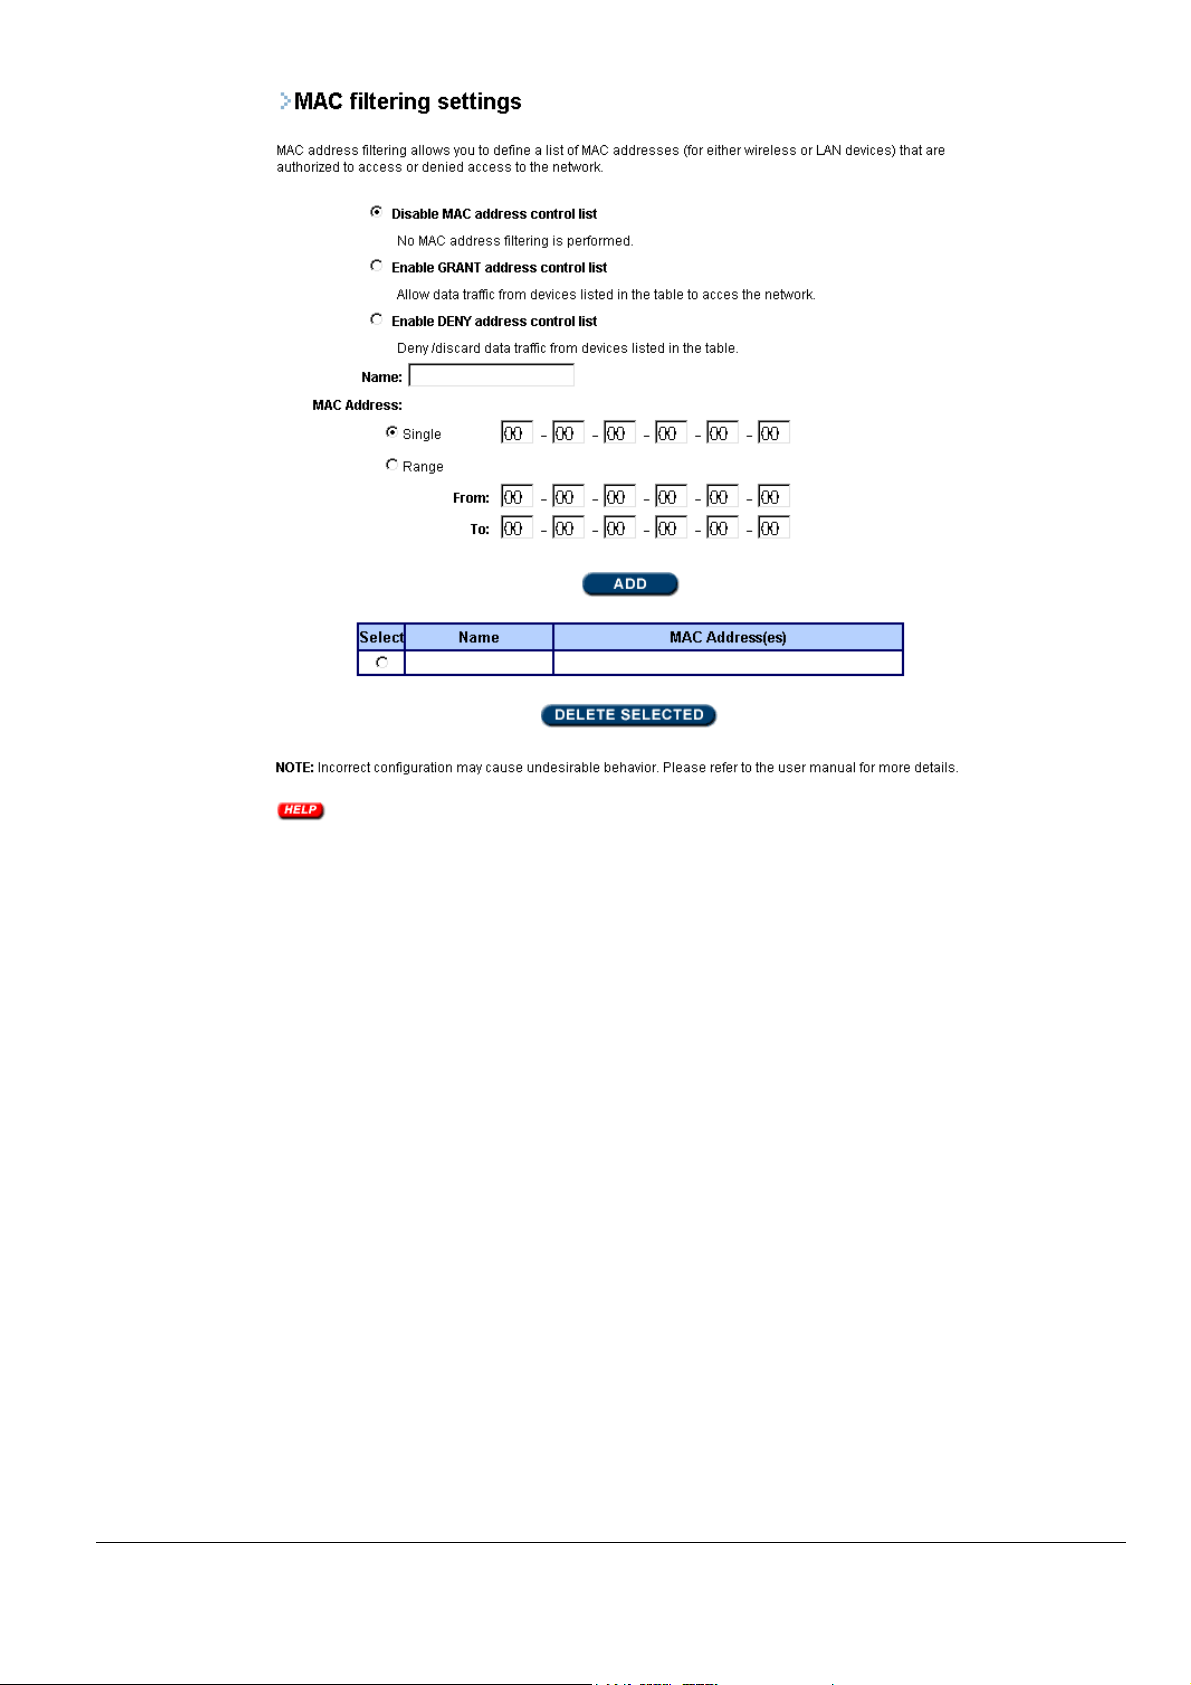
When Disable MAC address control list is selected, no MAC address filtering will be performed.
When Enable GRANT address control list is selected, data traffic from devices listed in the table will
be allowed to access the network.
When Enable DENY address control list is selected, data traffic from devices listed in the table will be
denied/discarded by the network.
The displayed table lists all configured MAC Filter entries. To delete entries, select the entries and press
“DELETE SELECTED”.
IP Filtering Settings
You can define IP filtering rules to control access between the local network and the Internet. You must
set which direction of traffic flow the rules apply to: to the Internet (Outbound) or from the Internet
(Inbound). You must then specify whether the data packet satisfying the rule should be forwarded to its
destination (Granted Access) or discarded (Denied Access).
Wireless Broadband Router User Guide
26
Page 32

Disable IP filtering: No IP filtering is performed.
Outbound: You can choose outbound filtering to filter outbound traffic.
Inbound: You can choose inbound filtering to filter inbound traffic.
Grant IP access: The IP listed in the table is allowed to pass between the local network and Internet.
Deny IP access: The IP listed in the table is blocked from passing between the local network and
Internet.
The displayed table lists all configured rules. To delete an IP filtering rule, select it and the press
“DELETE SELECTED”.
Wireless Broadband Router User Guide
27
Page 33

Important Note:
Errors in, or incorrect configuration of, IP Filtering Settings may have a pro-
foundly detrimental effect on the performance of your network. Please take
special care when using this facility.
Static Routing
You can manually configure a “static” route to remote networks. A static route will override any route
learned via the Routing Information Protocol (RIP), if activated. Note that the special entry, the Default
Route, is created automatically during the Setup Wizard process. If the default route is deleted
unintentionally, you must step through the Setup Wizard to restore it.
Destination IP address: The destination IP address of the route.
Subnet Mask: The subnet mask of the destination IP address.
Gateway IP address: Configure the IP address of the specified gateway that will be used to reach the
Destination IP address.
Hop Count: The sum of the hops for this route. This is usually the count of the number of routers an
IP packet must pass through to reach the destination IP address.
Special Applications
Some Internet applications such as Internet messaging and games, Videoconferencing, Internet phones,
etc. require special consideration when used from a privately addressed PC. When the router sees a
Wireless Broadband Router User Guide
28
Page 34

privately addressed PC attempting to make connection with a Trigger Port using the TCP, UDP, or
BOTH protocols, it will use the settings configured on this page to allow connections from the Internet
to multiple ports on the private PC. This screen specifies the public ports to be opened for these
applications.
Select an Application: From the drop-down list, select one of the standard applications listed, in
which case, the following information will be filled out for you, or select CUSTOM to enter the
following information yourself.
Trigger Port: Specify the port number for the application.
Trigger Type: Select the protocol type as TCP, UDP or BOTH.
Opened Ports: The ports are opened for inbound traffic.
Public Type: Select the protocol type as TCP, UDP or BOTH.
Wireless Broadband Router User Guide
29
Page 35

E-mail Alert Settings
E-mail Alert is a function to let the router send out alert events to specified e-mail receiver.
Only specified log events will be sent, you also can set the sending period time. If you have the column
be blank, the default period time is one day. However, when the log events are full, the router will sent
the log events automatically.
You can choose Enable/Disable to let this function become Active or Inactive.
After you finish the configuration, you can choose to click “SUBMIT” to make the configuration
effective or “Test E-mail” to make the configuration effective and send a test mail to confirm the
function is working. By clicking the “System Log” button, you can see the system log events.
SMTP server: Enter the FQDN (Fully Qualified Domain Name) of your SMTP server, e.g. xxxx.com
Send to Email Address: Enter the receiver’s E-mail address, e.g. mary@xxxx.com
Alert Event: To select the criteria that you prefer.
Invalid Access: While the invalid remote user is trying to use telnet or HTTP or SNMP
from remote site, the message will be logged and sent out.
Failed Login: When user login with wrong password, the message will be logged and
sent out.
Under Attack: When user is under “ping of death” and “ICMP” attack, the message will
be logged and sent out.
Wireless Broadband Router User Guide
30
Page 36

Dynamic DNS Settings
The Dynamic DNS service allows you to alias a dynamic IP address to a static hostname, allowing your
computer to be more easily accessed from various locations on the Internet. Before you configure this
function, you have to register an account and hostname on http://www.dyndns.org.
Hostname: Enter the specified name for your web server.
Username: Enter the authorized user name by DynDNS.
Password: Enter the authorized password by DynDNS.
Wireless Broadband Router User Guide
31
Page 37

System Tools
Firmware Upgrade
You can upgrade to the newest firmware for your router via this page. You can either enter the file name
in the entry field or browse for the file by clicking the “Browse” button. Please make sure that the new
firmware file is reachable from your management PC.
Important Note:
Do not shut down the power before “Firmware successfully upgraded” is dis-
played.
Factory Default
If you click “YES”, your entire configuration will be reset to the factory defaults (including the
password settings).
Reboot Router
If you want to reboot your system, click “YES” on this page.
Wireless Broadband Router User Guide
32
Page 38

Wireless Broadband Router User Guide
33
 Loading...