

Page 1
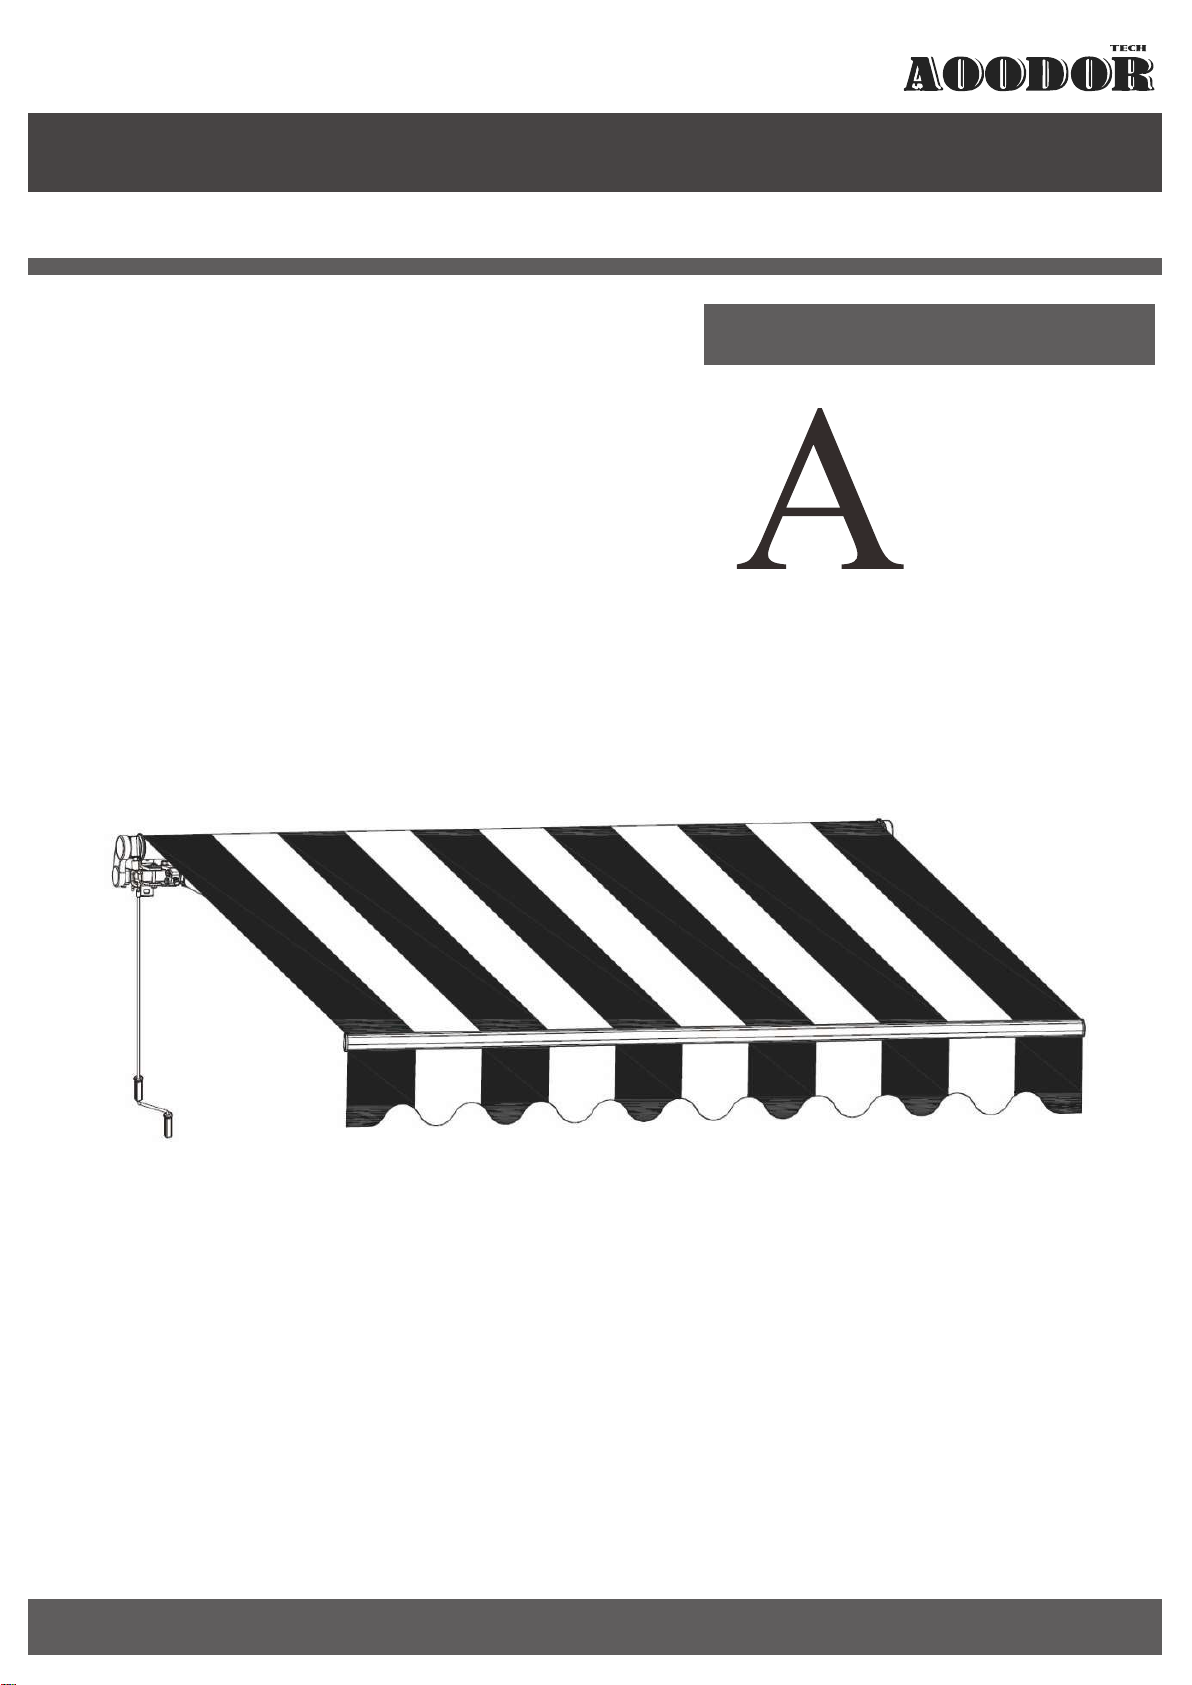
Assembly&Instruction Manual
SKU:800-048
SIZE 1 X0 8ft
wning
Installation
Guide
Save this manual for future reference
Page 2
INTRODUCTION
Thank you for purchasing ' Retractable Awning! We hope you will find joy in our Aoodor s
product for many years to come.
To ensure your personal safety during installation and to get the most out of your investment, please read this entire
manual before beginning the installation process. If you feel that this process is too di cult to do on your own, we advise ffi
that you seek assistance from a local building or home improvement contractor.
WARNING Improper installation and operation of your awning can result in
severe personal injury as well as product failure not covered by warranty. Please
follow all instructions carefully or contact technical support for assistaince.
We believe that installation can be a simple, streamlined process if you follow the instructions in this manual.
Please contact our customer support line for help any step of the way. If you need assistance with assembly, have
missing or defective parts, or any other issues, please email us at
INTRODUCTION
WARNINGS
❗ Failure to follow these instructions can result in a broken product or personal injury. Please be attentive to each
step.
customerservice aoodor@ .com
❗ Open the awning packaging carefully to avoid damaging the product or yourself.
❗ DO NOT remove the safety wrap that secures the awning arms until instructed to do so. The awning arms will spring
open and can cause serious injury if handled inappropriately.
❗ Be sure to install ALL screws for maximum security.
❗ Never install your awning in high, windy places. The awning could fall and cause injury or property damage.
❗ Do not install the awning in a place that receives excessive vibrations.
❗ Do not install the awning in places with high temperatures, such as walls near furnaces.
❗ Never place heavy items on the awning frame. This can cause it to fall down.
❗ Close the awning in storm conditions, such as excessive wind and rain.
❗ Two adults are required for successful and safe installation.
TOOLS REQUIRED FOR ASSEMBLY
1. Measuring tape
2. Non-metallic mallet
3. Phillips screw driver
6. Ribbon tube spanner
7. Chalk line leveler
8. Optional - (to change awning pitch):
17mm wrench &
4. Power drill with 19 millimeter drill bit
5. 8 millimeter hex key
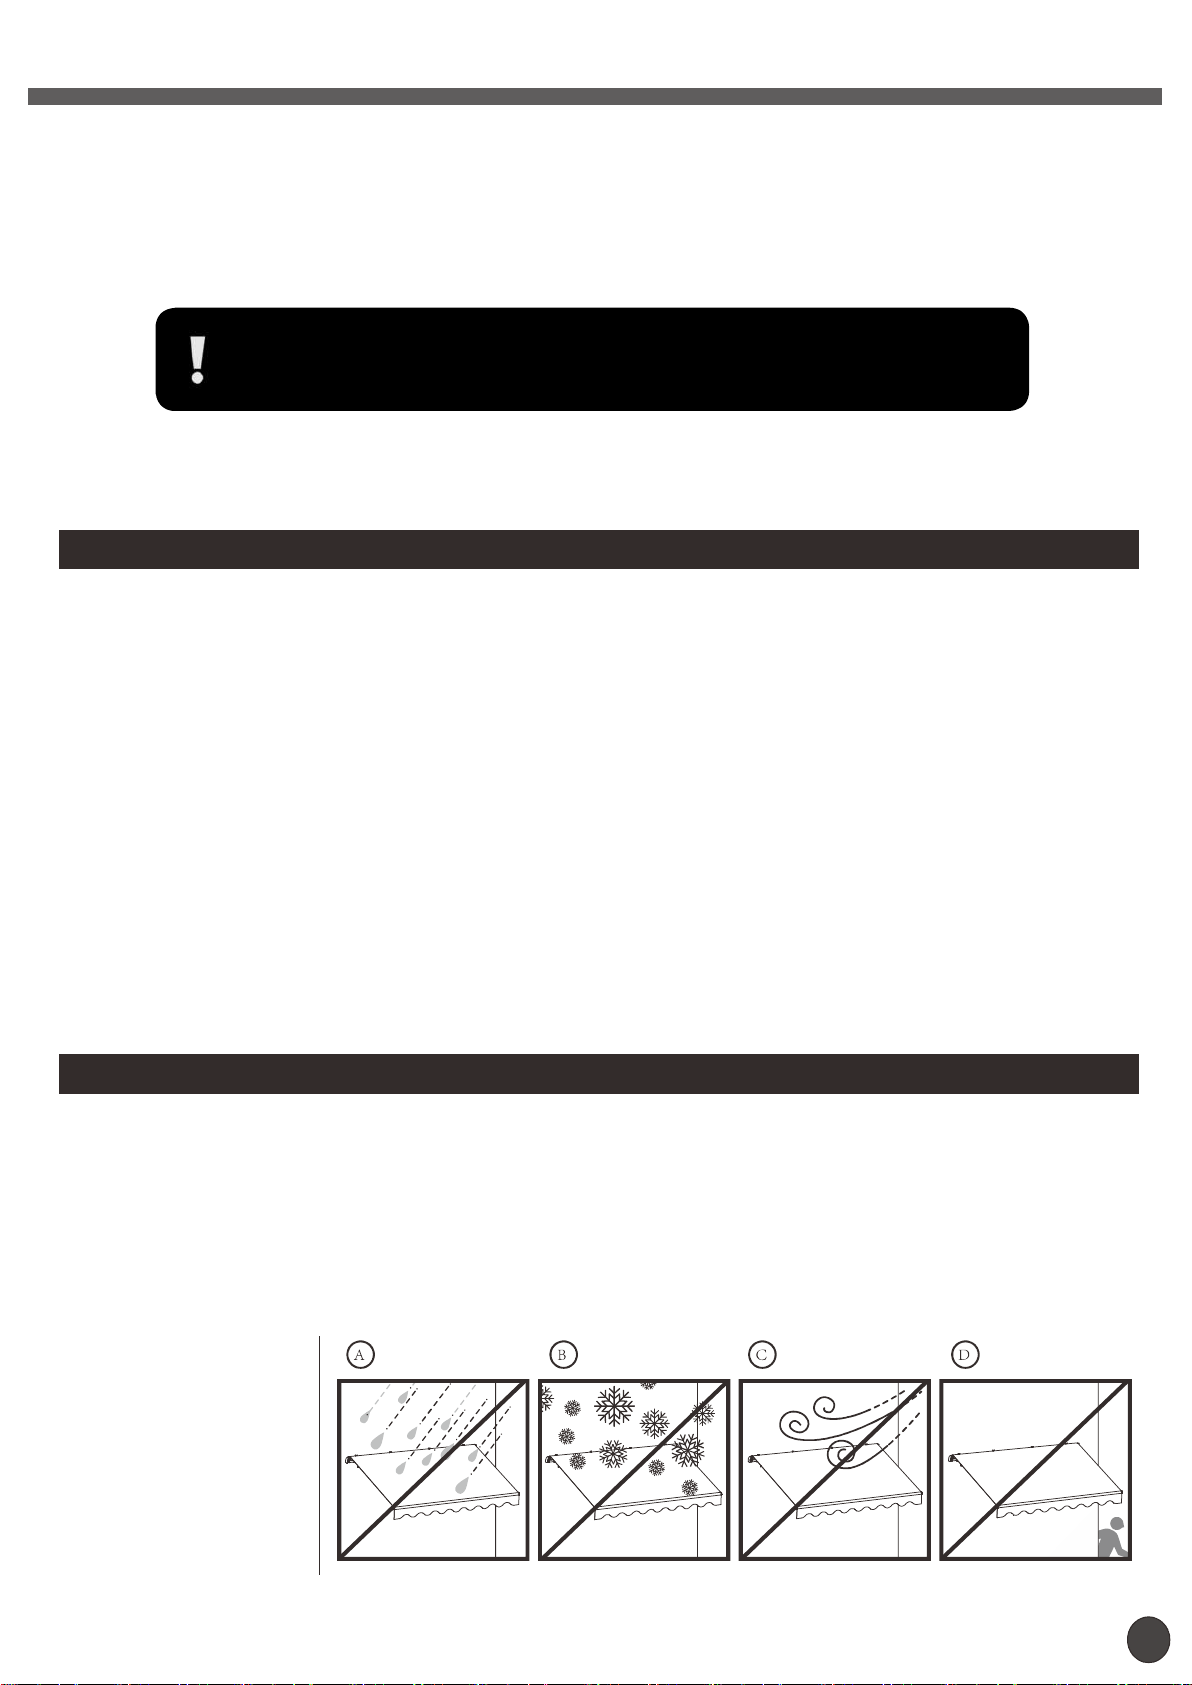
DO NOT keep the
awning open during:
A: RAIN
B: SNOW
C: STRONG WIND
D: AWAY FROM HOUSE
14mm wrench (M10 and M12)
9. Two ladders or very sturdy chairs
2
Page 3
3
Page 4
Preparing Your Work Space
1. Before you begin, it is best to lay out all necessary tools to make setup smoother. Consult the required tools section
for the list of necessary tools.
WARNING DO NOT remove the safety wrap that holds the awning arms down.
Serious injury can result from removing the wrap too soon.
2. Open the awning box and unwrap each piece carefully to avoid damaging the product.
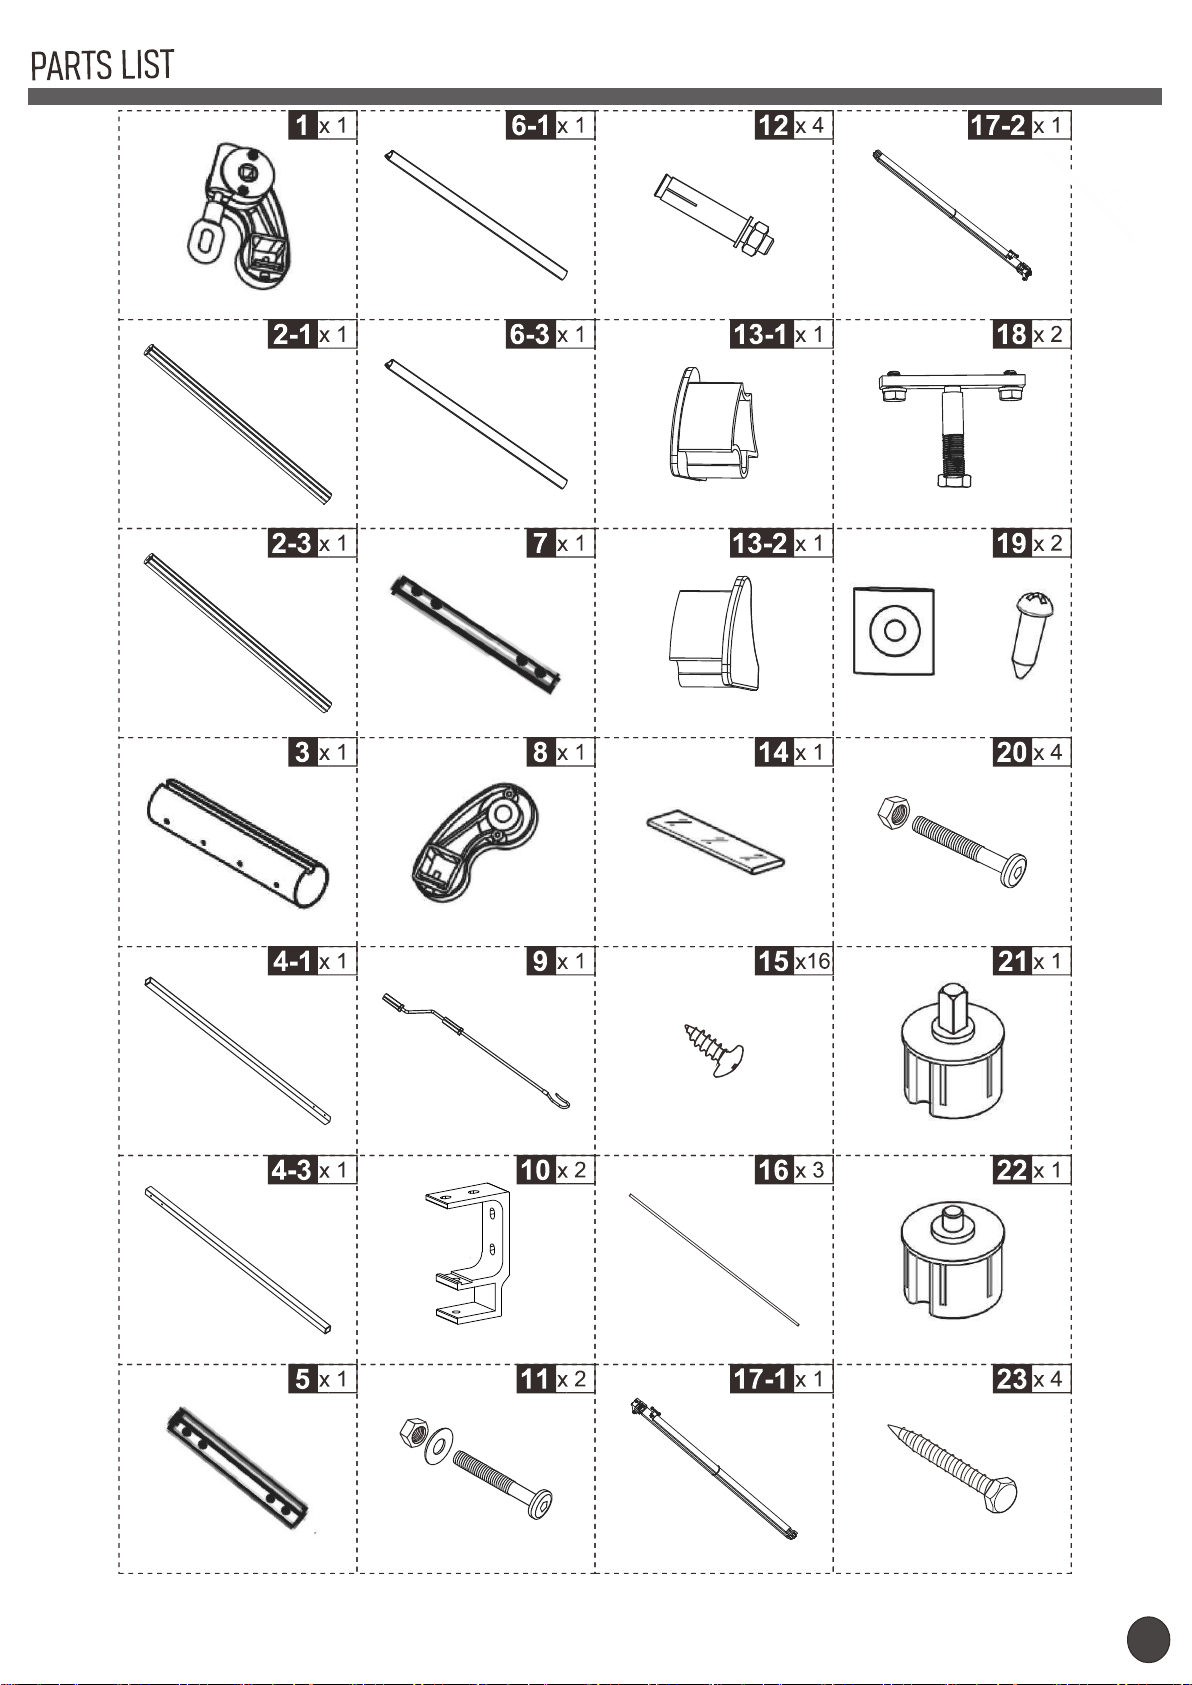
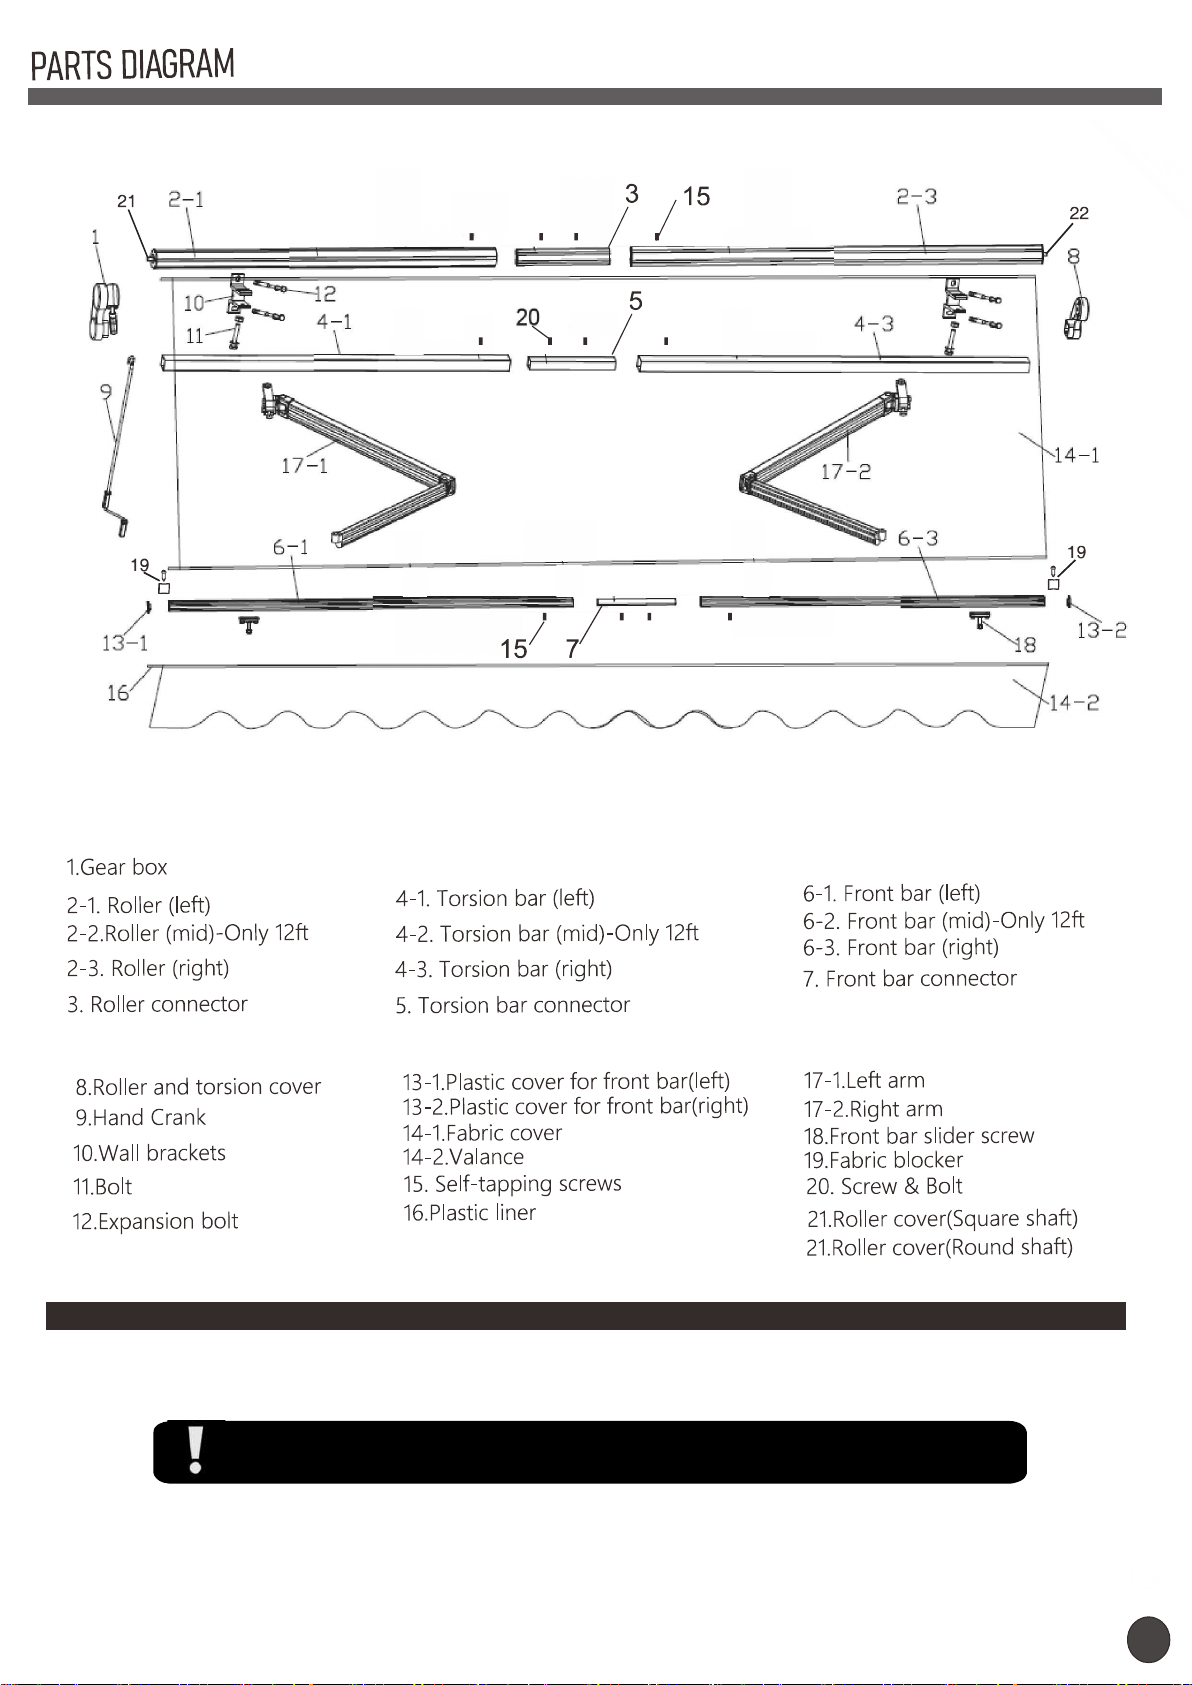
3. Lay out each piece of the awning to ensure that all pieces are present. Consult the parts diagram for detailed
information regarding parts.
4. Open the small, inner box that contains the small parts and lay them out as well.
4
Page 5
Assembly
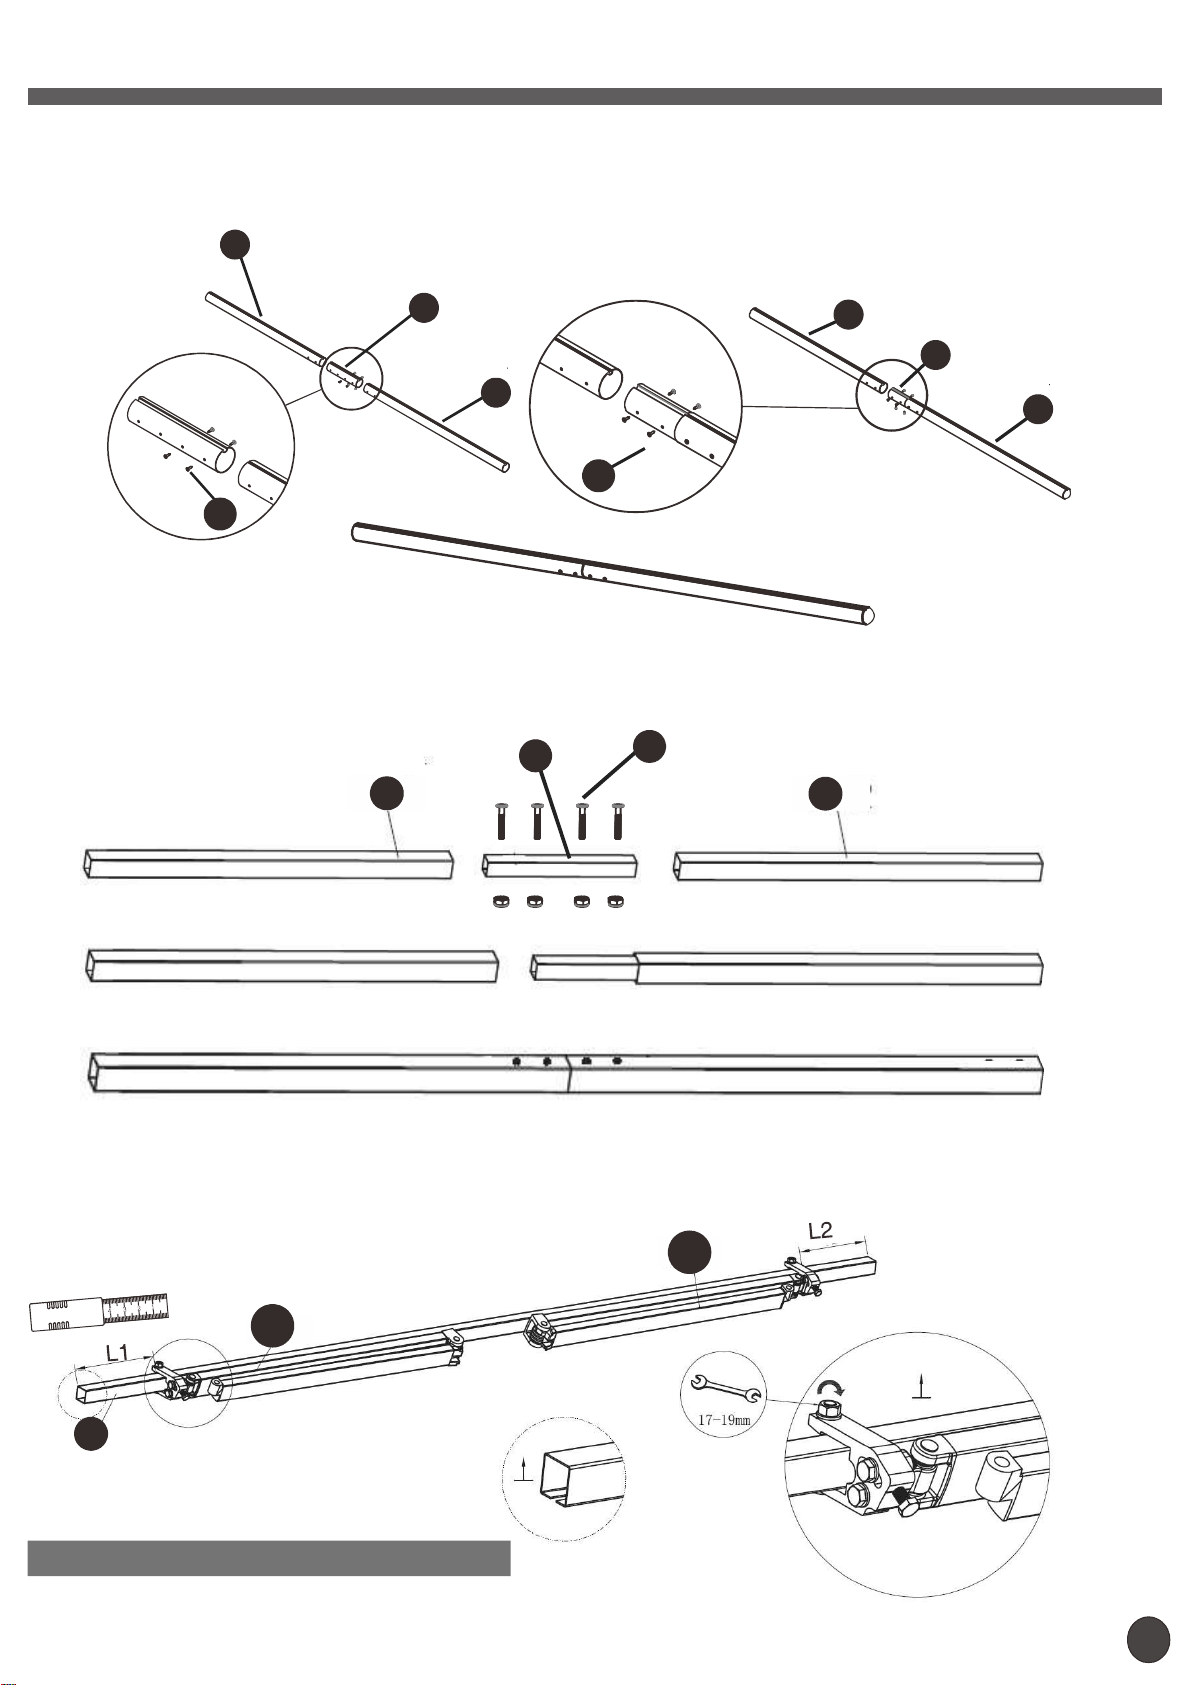
Step 1:Roller assembly:
keep roller aligned,assemble the roller (2-1),(2-3)with the connector(3) and secure it with corresponding
bolts(15) as figure below:
2-1
3
2-3
15
15
Step 2:Torsion bar and arm assembly:
keep the four face aligned, connect the torsion bar(4-1),(4-3) with the connectors piece(5) and secure it with
the corresponding bolts as figure below.
5
4-1
20
2-1
3
2-3
4-3
Then assembly the arm(17-1)and (17-2) to the torsion bar(4) as figure below.Two arms need in the same direction,
the rope of arm connot be unlocked until the whole assembly are complete.
17-2
17-1
4
Note:
For 10x8FT L1:5.51inch L2:3.54inch
5
Page 6
Assembly
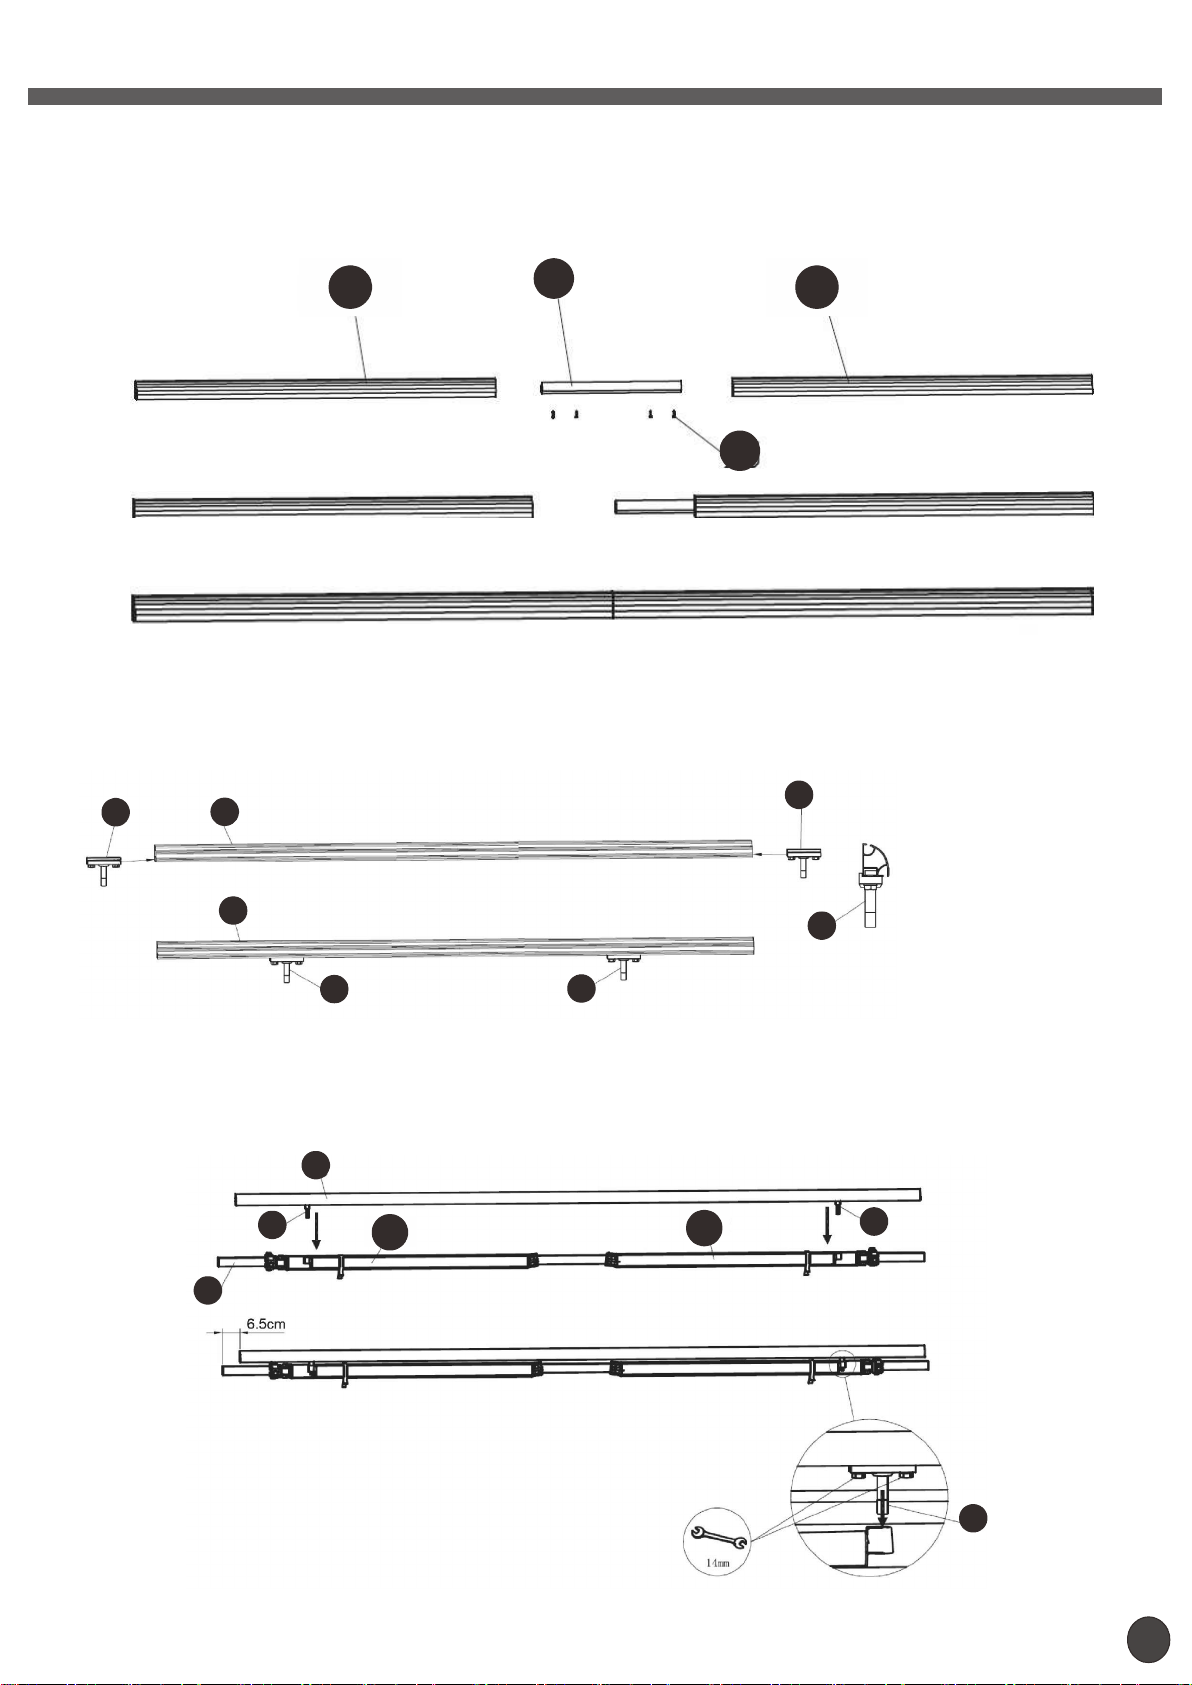
Step3:Front bar assembly
Connect the front bar(6-1)(6-3) with connectors(7) and secure it with the corresponding bolts(15) as
figure below.(Please keep the front bar aligned.)
6-1 6-3
7
15
Step4:Front bar wrist suppor t assembly
Slide the front bar feet into the front bar without tightening.As show in the figure below:
18
6
18
6
18
18
18
Step5:Arms with front bar assembly
Put the front bar feet bolt through the hole of small arm ,then position the front bar.After positioning,tighten
the nut with wrench as figure below:
6
18
4
17-1
17-2
18
18
6
Page 7
Assembly
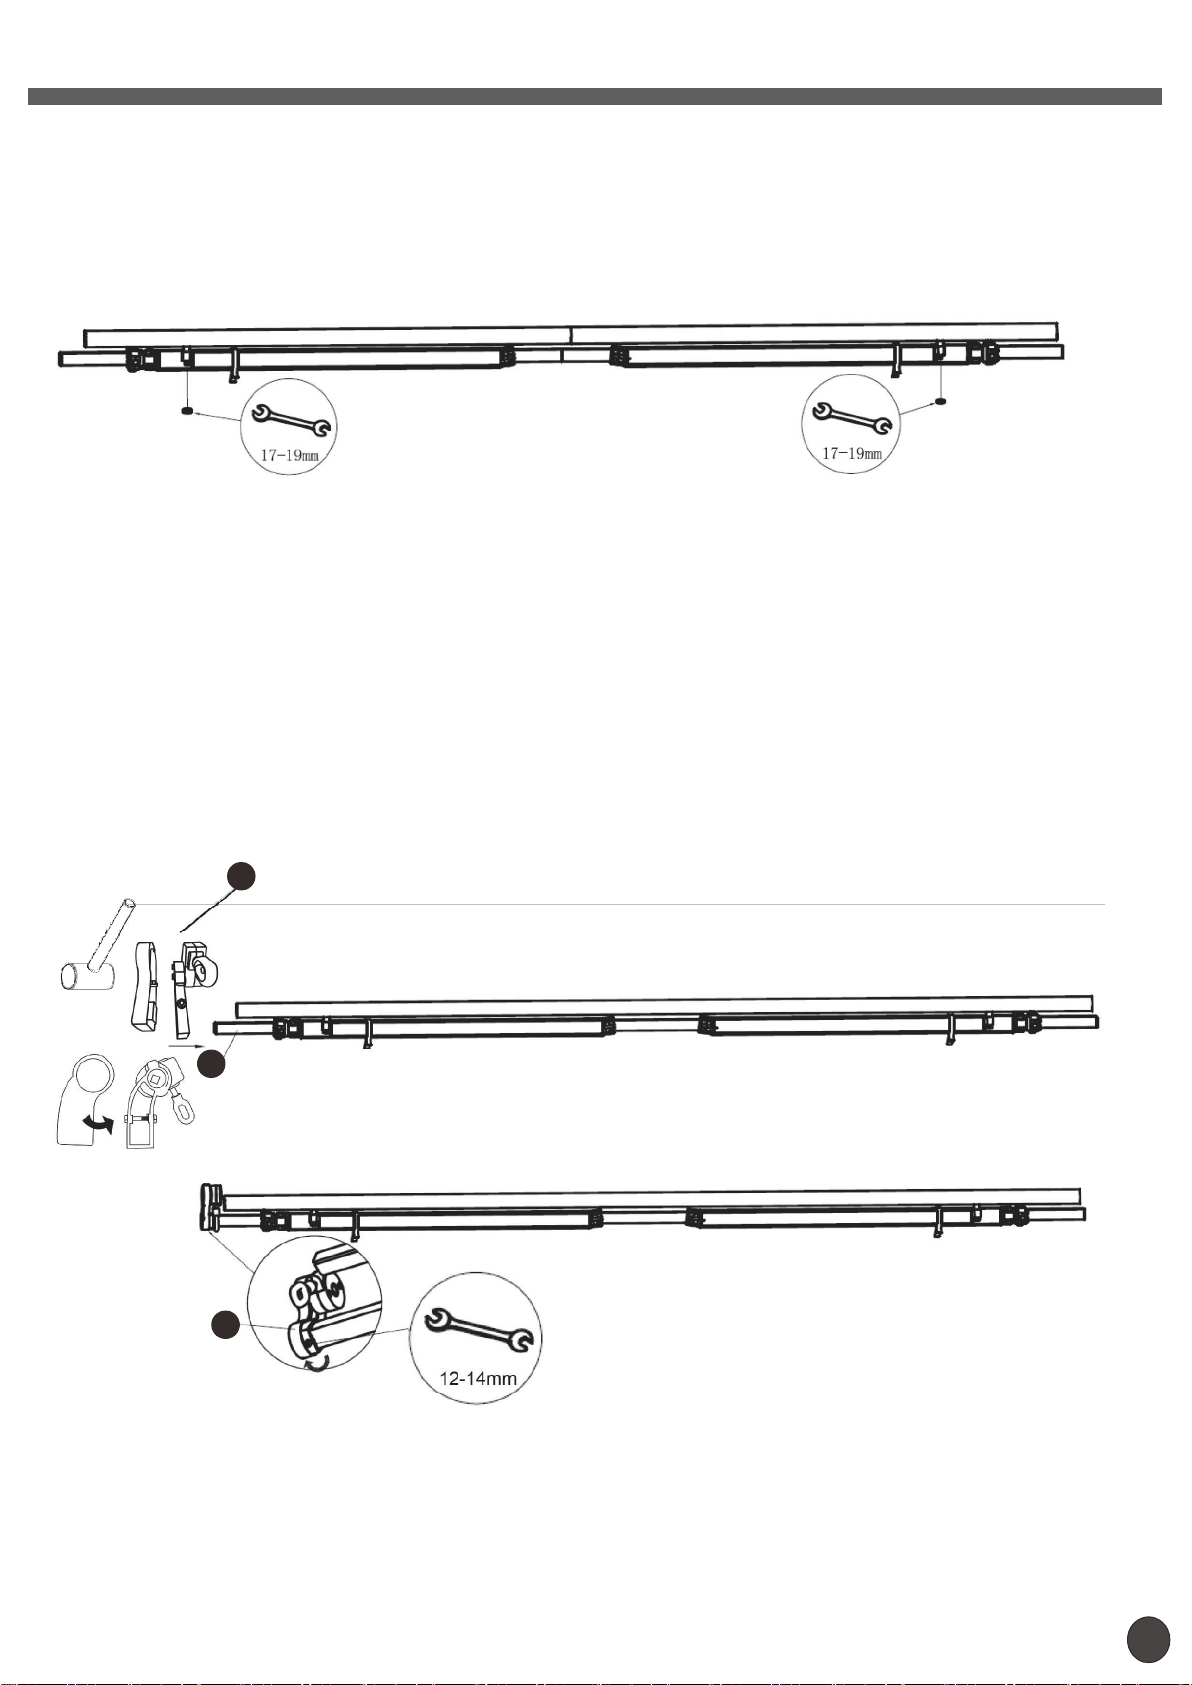
Step6:Link the self-locking nut
Link the self-locking nut into screw which at the bottom of the screw in front bar feet by a wrench,stop when the
thread leakage 1--2 laps.As show in the figure below:
ATTE NTI ON:BEFORE BLOCKING THE NUT, ENS URE T HAT THE ARM S ARE PROP ERLY ALIGNED.
Step7Left roller suppor t with gear box assembly
Hammer the left roller support with gear box into the left end of torsion bar wood hammer,then tighten the
left hexagon bolt by 5mm hexagon wrench.As shown in the figure below:
1
4
1
7
Page 8
Assembly
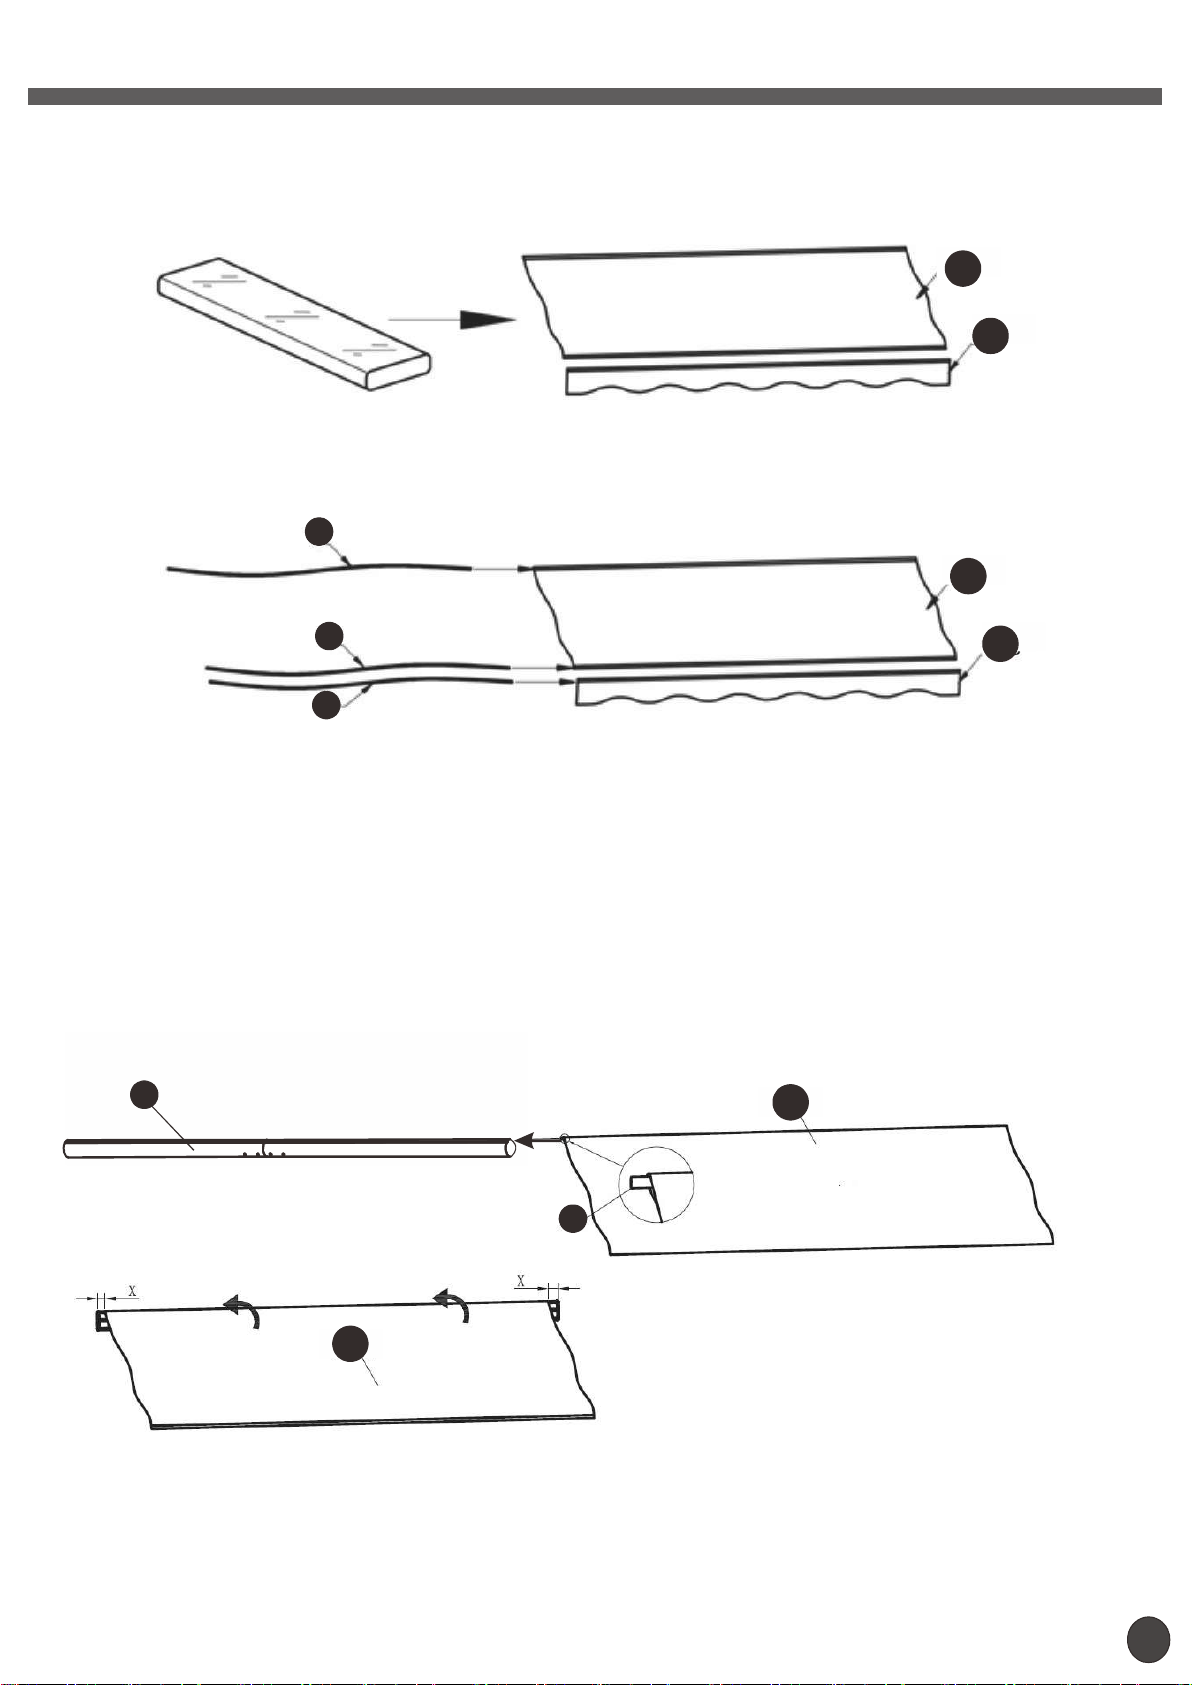
Step8:Fabric and valance asembly
Open the fabric bag and spread out both fabric (14A),(14B) and use the fabric guiding wire to line through the fabric.
As show in the figure below:
14-1
14-2
16
14-1
16
16
14-2
Step9:Roll in the fabric on the roller
Roll in the fabric on the roller,pay attention to the fabric direction needed,as shown in the figure below:
Pease face up the fabric when assembly.Keep the same spacing X at both ends.Spread the fabric slowly
in case of damage.
2-1
2
2-3
14-1
14-1
16
8
Page 9
Assembly
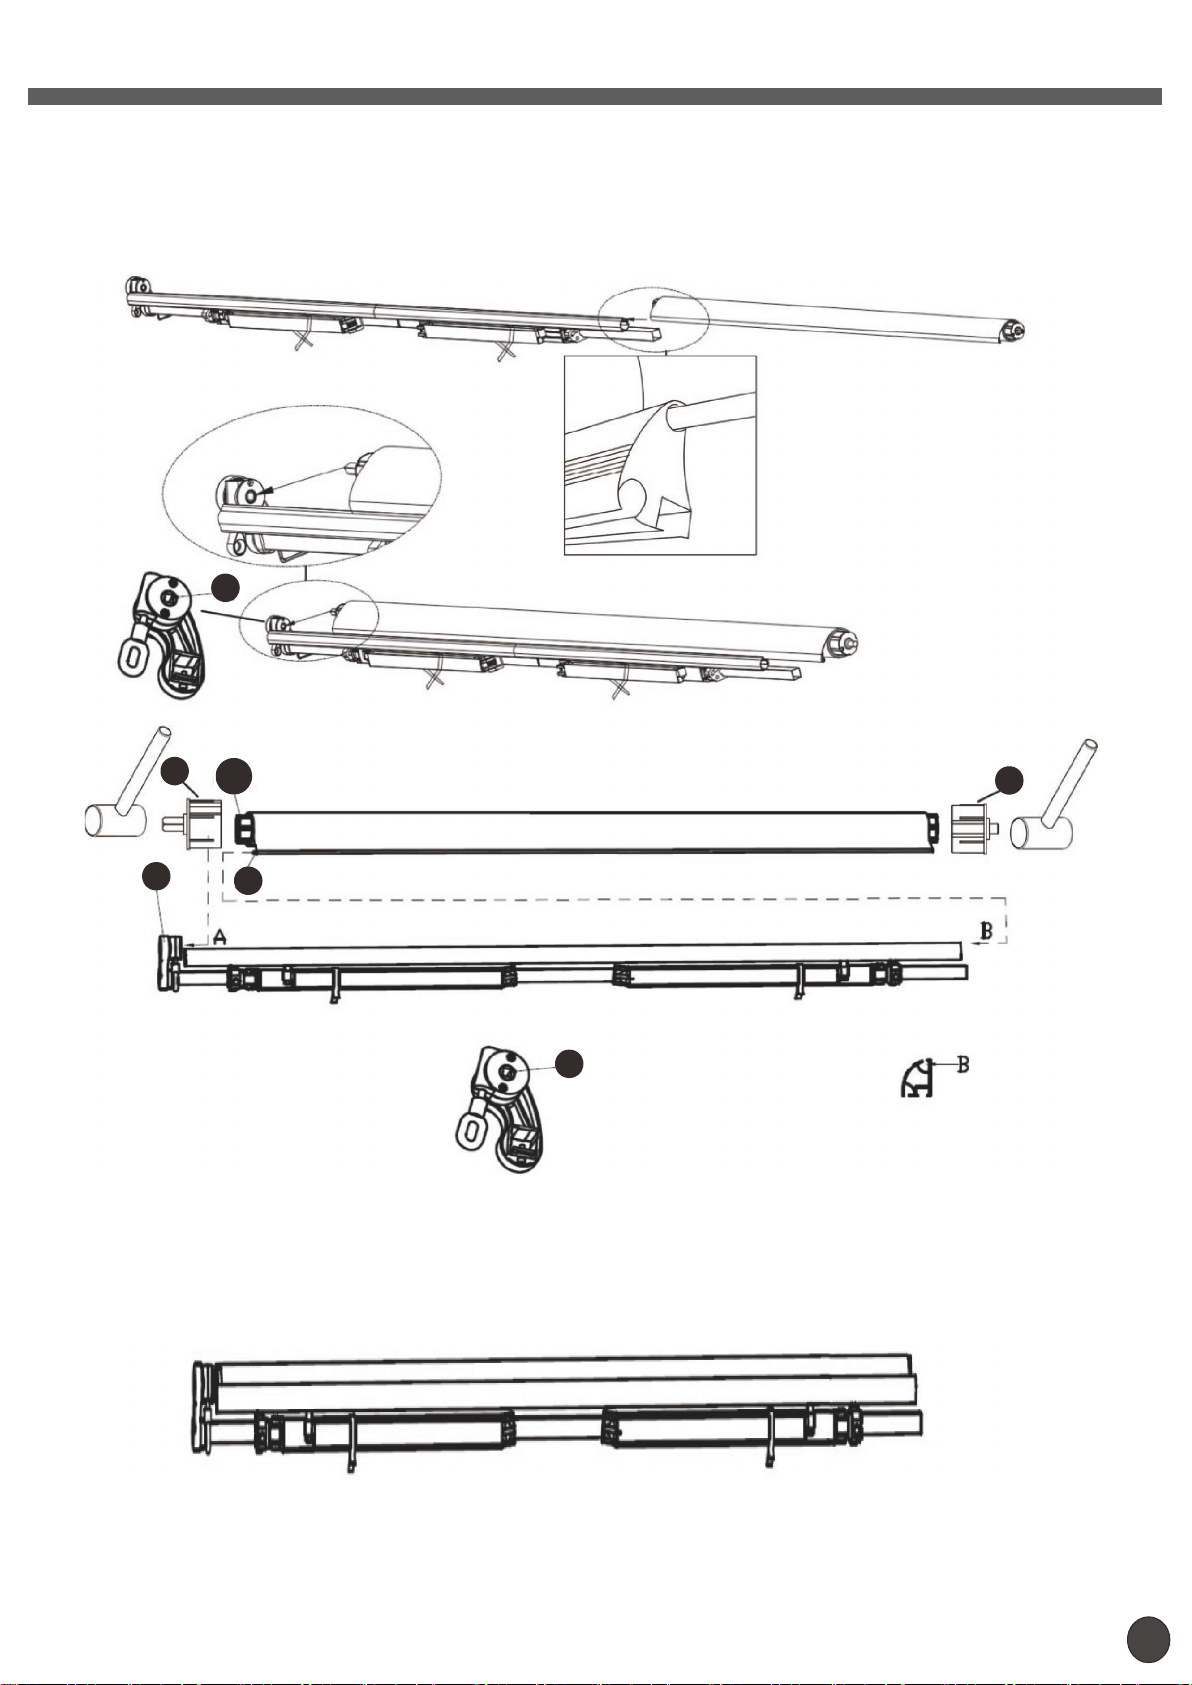
Step10:Fabric and valance asembly
One end of fabric through the groove of the front bar,well-distributed the fabric after pull in all fabric.Then
insert the shaft of roller into the square hole of gear case.As show in the figure below:
1
21
2-1
1
16
1
22
If the part of front bar is a little deformed,please adjust it with tools by youeelf.
9
Page 10
Assembly
Step11:Right roller suppor t assembly
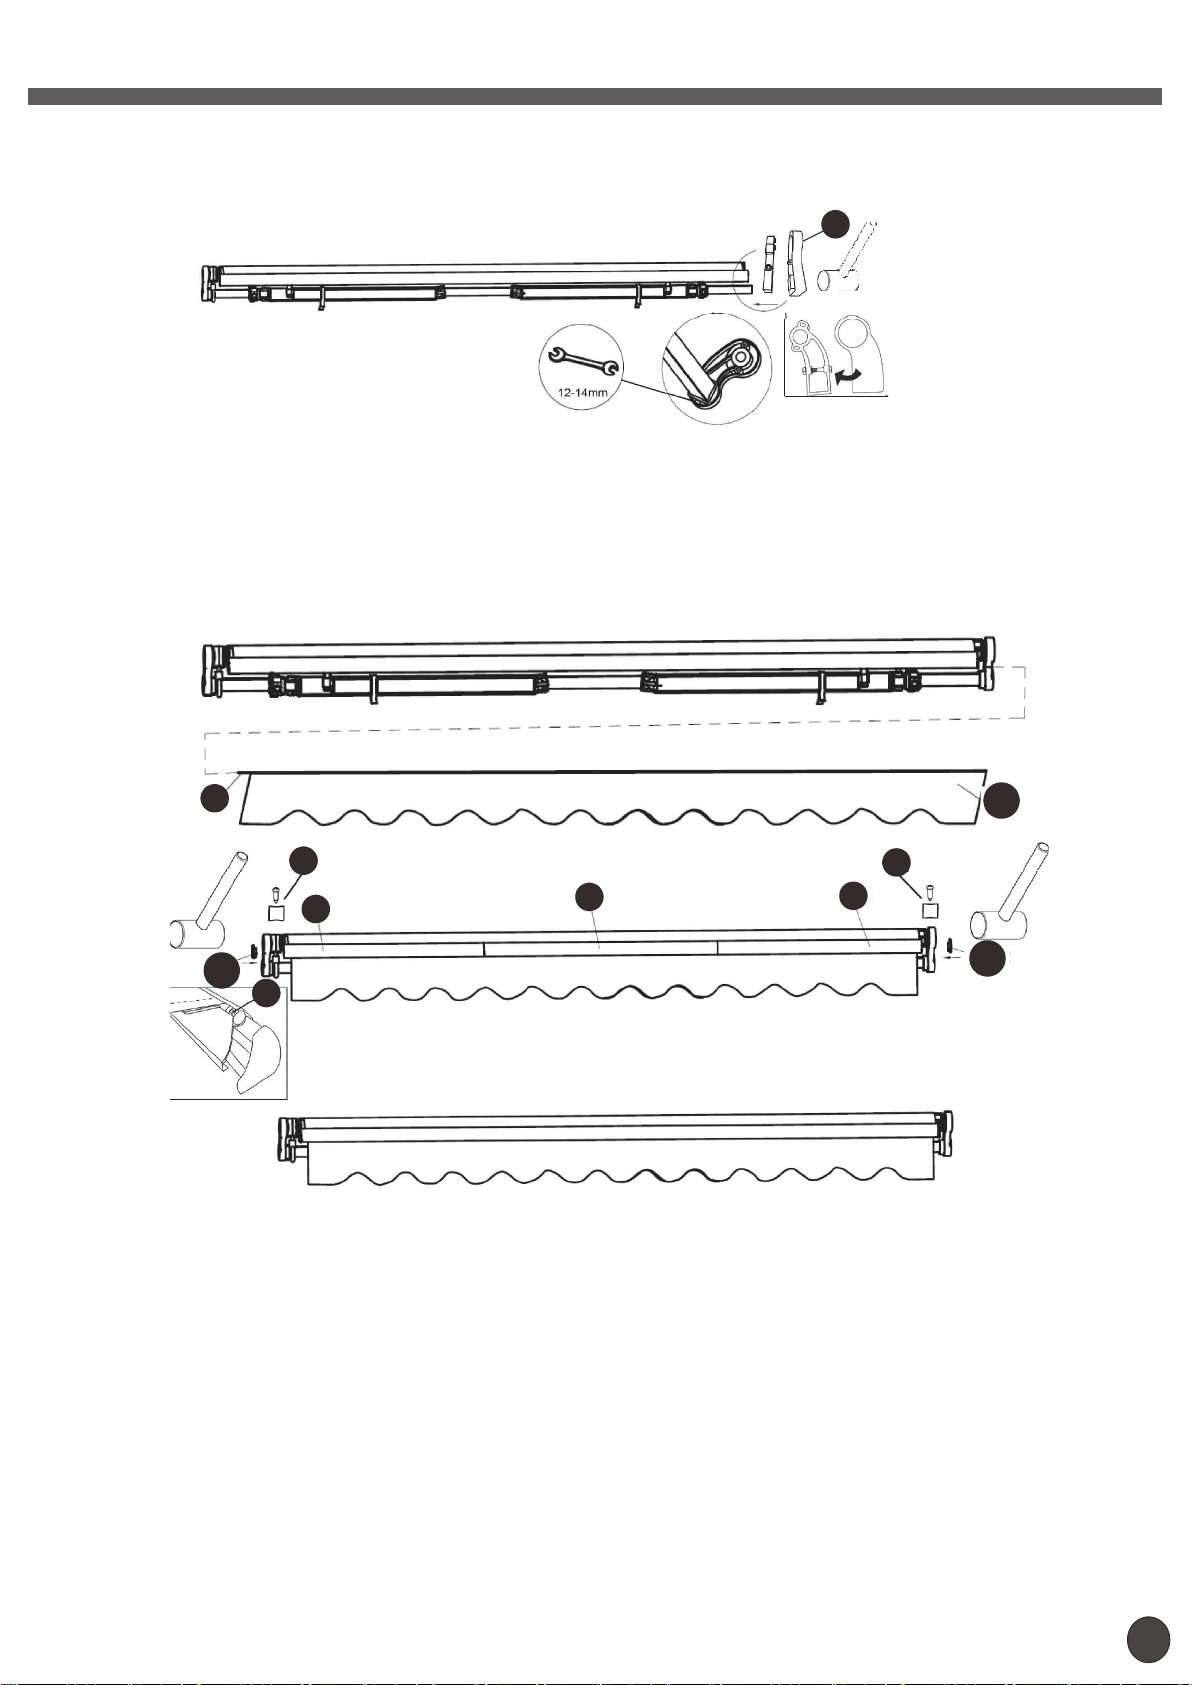
Insert the shaft of roller into roll tube plug,meanwhile insert the torsion bar into the right roller supports with htting
Then tighten the right hexagon bolt by 5mm hexagon wrench.As show in the figure below:
8
Step12:Assembly to make a whole awning
Make the valance through groove of front bar,pay attention to the directionan make sure the left and right sides on
average,then hitting the cover of front bar into the end of front bar.As show in the figure below:
16
19
6-1
13-1
19
If the part of front bar is a little deformed,please adjust it with tools by youself.
6-2
19
6-3
13-2
13-2
10
Page 11
Installation
2pcs
2pcs 4pcs 4pcs
1pc
11
Page 12
Installation
12
Page 13
Installation
STEP1
13
Page 14
Installation
STEP2
STEP3
14
Page 15
Installation
STEP4
15
Page 16
Installation
STEP5
16
Page 17
Installation
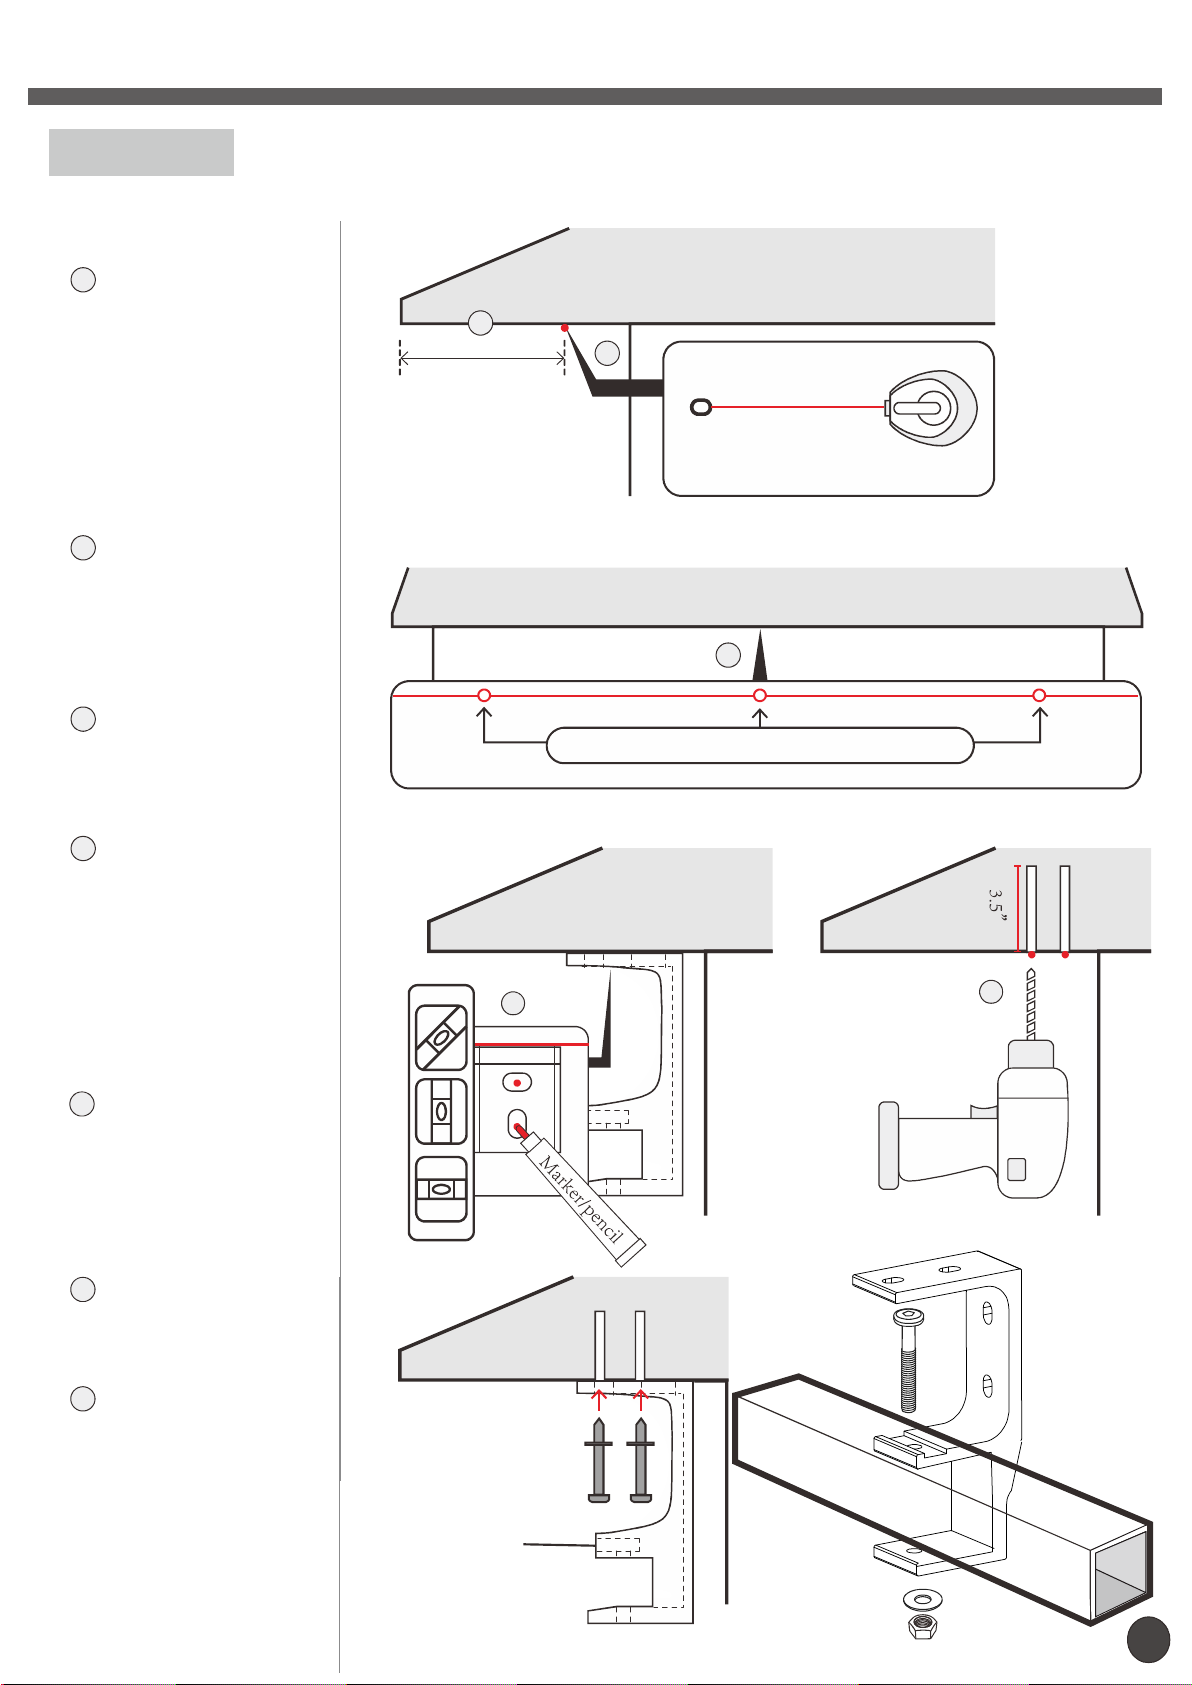
STEP6 INSTALLING CEILING BRACKETS
Locate a main
1
structural support (ex:
stud/truss), straight
flat and leveled edge
of your roof, eave
or overhang that
is clear and free of
obstructions.
2
Using a chalk line
or laser level, mark
a line that runs the
entire length of your
awning.
3
Use the bracket to determine
bracket locations for your
awning model along the line.
Place the ceiling
4
brackets in the
appropriate locations.
Use a level to make
sure the bracket is
straight and mark
the center of the
mounting holes.
1
Minimum10inch
clearspace
Level
4
wood r oof,eaveoroverhang
2
Chalkliner
Wood r oof,eaveoroverhang
3
Wood r oof,eaveoroverhang
5
5
Drill mounting holes
using a drill bit.
6
Place brackets over
the appropriate
holes.
7
Using a washer and
a lag screw, secure
the brackets to the
surface until snug.
bracket
Ceiling
bracket
17
Page 18
Installation
Fabric
Front Bar
Fabric
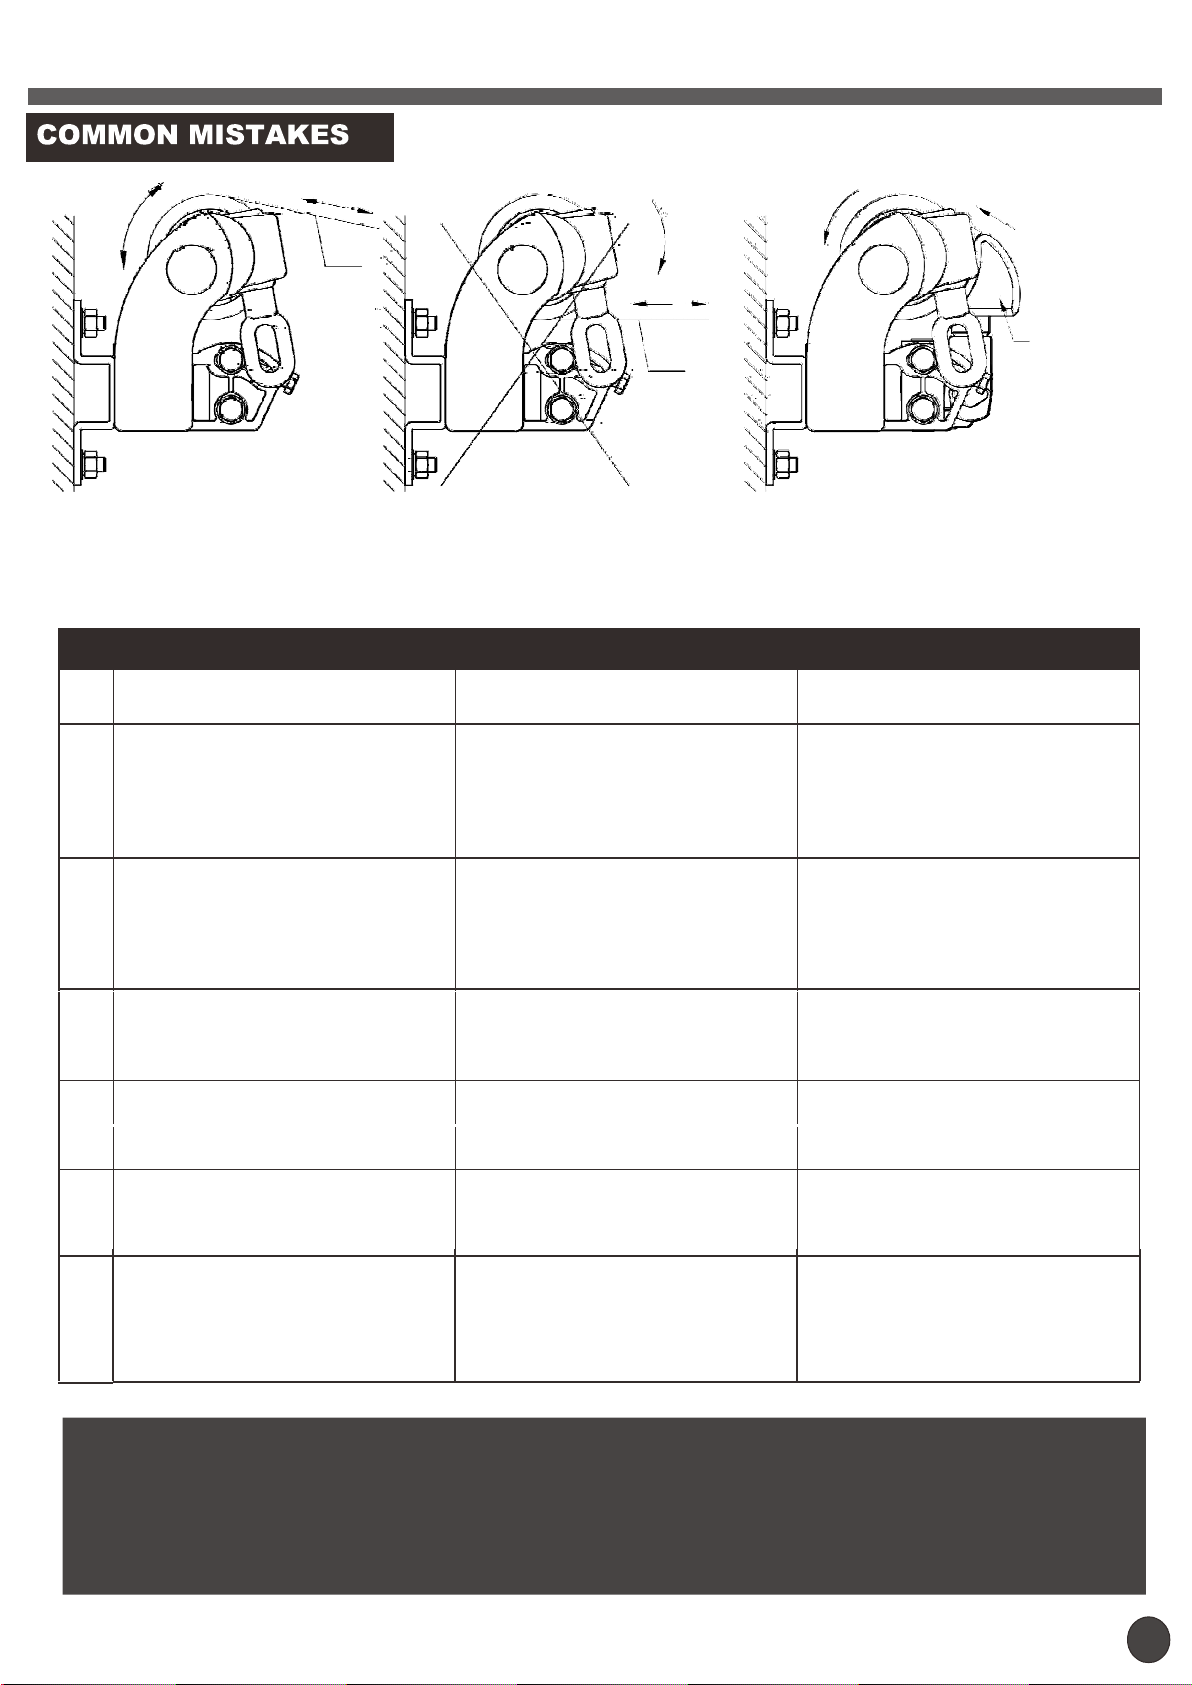
Correct operation Wrong operation
REPAIR MANUAL
CASE OF MALFUNCTION REASON REPAIR METHOD
The awning does not work when
1
operated by the remote control.
When operated by remote control,
the awning does not work, although
2
you can hear the signal sound from
the remote control receiver.
The fabric is loose, even though the
3
awning is extended entirely.
1. There is no power supply.
2. The residual current automatic
circuit breaker is turned to “off.”
3. The voltage is too low.
1. The remote receiver and motor
are switched or the wire from
the motor is disconnected.
2. The motor switched off due to
the overheat protection.
The path length is incorrectly ad justed.
WARNING: When the front bar
touches the roller as shown in
the figure, don't try to make them
closer, otherwise the product
may be damaged.
1. Checktheplugtoseewhether
it is properly connected.
2. Call a professional to inspect.
3. Call a professional to inspect
the voltage.
1. Check two places: fasten pins,
and the screws.
2. The motor will automatically
resume operation after approx
imately 20 minutes.
Readjust the path length according
to the direction of the motor.
The cassette can’t close completely.
4
There is unwanted noise when
5
operating the awning.
When operated by a remote con trol, the indicative lamp does not
6
work and there is no signal from
the receiver.
Pleasedon’thesitatetocontactusforanyfurther questions,
The connecting position between
the front bar and the front beam.
There is a loose screw.
1. The cell is exhausted.
2. The cell is disconnected.
yoursatisfactionisguaranteed.
https://www.aoodor.com/
Adjust the position of the front
beam until the cassette is entirely
shut.
Check all screws to ensure that they
are tightly fastened.
1. Replace with a new cell.
2. Reset the cell.
18
 Loading...