

Page 1
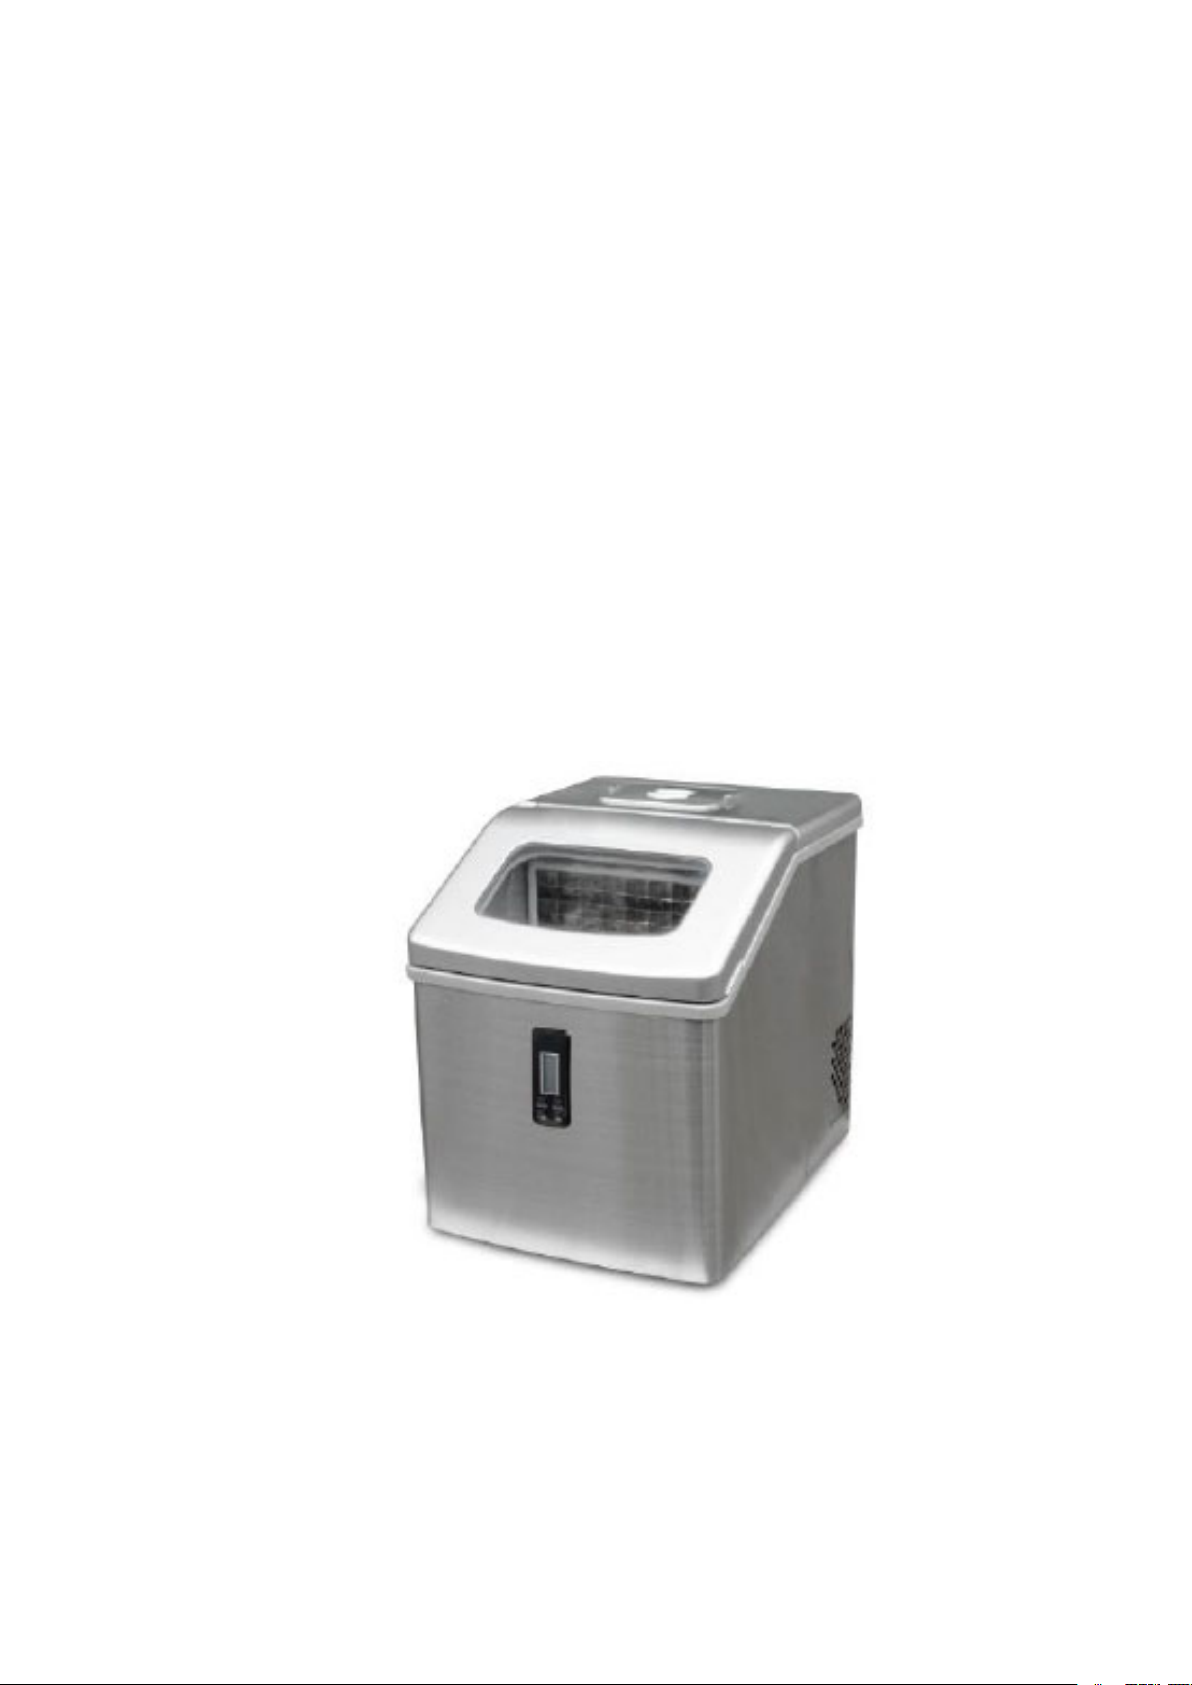
USER MANUAL
ICE MAKER
Page 2

1
IMPORTANT SAFETY INSTRUCTIONS……………………………………………….…2
PREPARING YOUR ICE MAKER FOR USE
IMPORTANT SAFETY TIPS……………………………………………………………………..3
GETTING TO KNOW YOUR UNIT
………………………………………………………
……………………………………………………….
..5
..5
OPERATING PROCEDURES & MAINTENANCE
UNPACKING
UNPACKING
YOUR
YOUR
ICE
ICE
MAKER
MAKER
…………………
…………………..
…………………………………………
…………………………………………
....
....66
CONNECTING
CONNECTING
YOUR
YOUR
ICE
ICE
MAKER
MAKER
………………
………………..
………
………..
…………………………………
…………………………………
....6
....6
CLEANING
CLEANING
AND
AND
MAINTAINING
MAINTAINING
YOUR
YOUR
ICE
ICE
MAKER
MAKER
……..………………………………………
………………………………………
...6
...6
USING YOUR ICE MAKER……………….……..………………………………………....8
TROUBLESHOOTING
TROUBLESHOOTING
…………………………….……………………………………………11
TECHNICAL PARAMETERS & CIRCUIT DIAGRAM……………………..….………...12
TABLE OF CONTENTS
Page 3
2
DANGER
WARNING
Your safety and the safety of others are important to us.
To ensure proper use and for your safety, please read the following instructions completely before
IMPORTANT SAFETY INSTRUCTIONS
operating this appliance.
This is the safety alert symbol:
!
All safety messages will follow the safety alert symbol and the word “DANGER” or “WARNING”.
Text under Danger and Warning informs
Disregarding the instructions may lead to serious injury or death, and damage to the ice
machine.
All safety messages alert you to a potential hazard and provide helpful information on how to
reduce the chance of injury.
Page 4

3
When using electrical appliances, basic safety precautions should be followed to reduce the risk
Do not operate this, or any other appliance with a damaged cord.
Do not run the power cord over carpeting or other heat insulators. Do not cover the cord.
We do not recommend the use of an extension cord, as it may overheat and become a risk of
Unplug the ice maker before cleaning or making any repairs or servicing.
Exercise caution and use reasonable supervision when appliance is used near children.
Do not use your ice-maker outdoors. Place the ice-maker away from direct sunlight and
Do not use other liquid to make the ice-cube other than water.
Do not clean your ice maker with flammable fluids. The fumes can create a fire hazard or
Do not tip over.
If the ice maker is brought in from outside in wintertime, give it a few hours to warm up to
PREPARING YOUR ICE MAKER FOR USE
IMPORTANT SAFETY TIPS
of fire, electric shock, and injury to person or property. Read all instructions before using any
appliance.
Connect to properly polarized outlets only. No other appliance should be plugged into the
same outlet. Be sure that the plug is fully inserted into the receptacle.
Keep cord away from traffic areas, and do not submerge it in water.
fire. If you must use an extension cord, use No.14 AWG minimum size and rated no less than
1875 watts.
make sure that there is at least 6 inches of space between the back of your unit and wall.
Keep a minimum distance of 6 inches on each side of your unit free.
explosion.
room temperature before plugging it in.
Page 5

4
WARNING: This appliance must be earthed.
DANGER – Risk of Fire or Explosion. Flammable Refrigerant Used. Do Not Use Mechanical
DANGER – Risk Of Fire Or Explosion. Flammable Refrigerant Used. To Be Repaired Only
CAUTION – Risk Of Fire Or Explosion. Flammable Refrigerant Used. Consult Repair
CAUTION – Risk Of Fire Or Explosion. Dispose Of Property In Accordance With Federal Or
CAUTION – Risk Of Fire Or Explosion Due To Puncture Of Refrigerant Tubing; Follow
The ice maker should be installed in accordance with the safety standard for Refrigeration
If the unit is with problem need to be maintained, that replacing with like components and
Devices To Defrost Ice Maker. Do Not Puncture Refrigerant Tubing.
By Trained Service Personnel. Do Not Puncture Refrigerant Tubing.
Manual/Owner’s Guide Before Attempting To Install or Service This Product. All Safety
Precautions Must be Followed.
Local Regulations. Flammable Refrigerant Used.
Handling Instructions Carefully. Flammable Refrigerant Used.
Systems, ASHRAE15. The ice maker shall not be installed in corridors or hallways of public
buildings.
that servicing shall be done by factory authorized service personnel, so as to minimize the
risk of possible ignition due to incorrect parts or improper service.
IMPORTANT:
Electrical wiring color code:
Green or Green with a strip yellow: Ground Line
White: Neutral Line
Black: Live Line
To avoid a hazard due to instability of the appliance, it must be placed on an even or flat surface.
Page 6
5
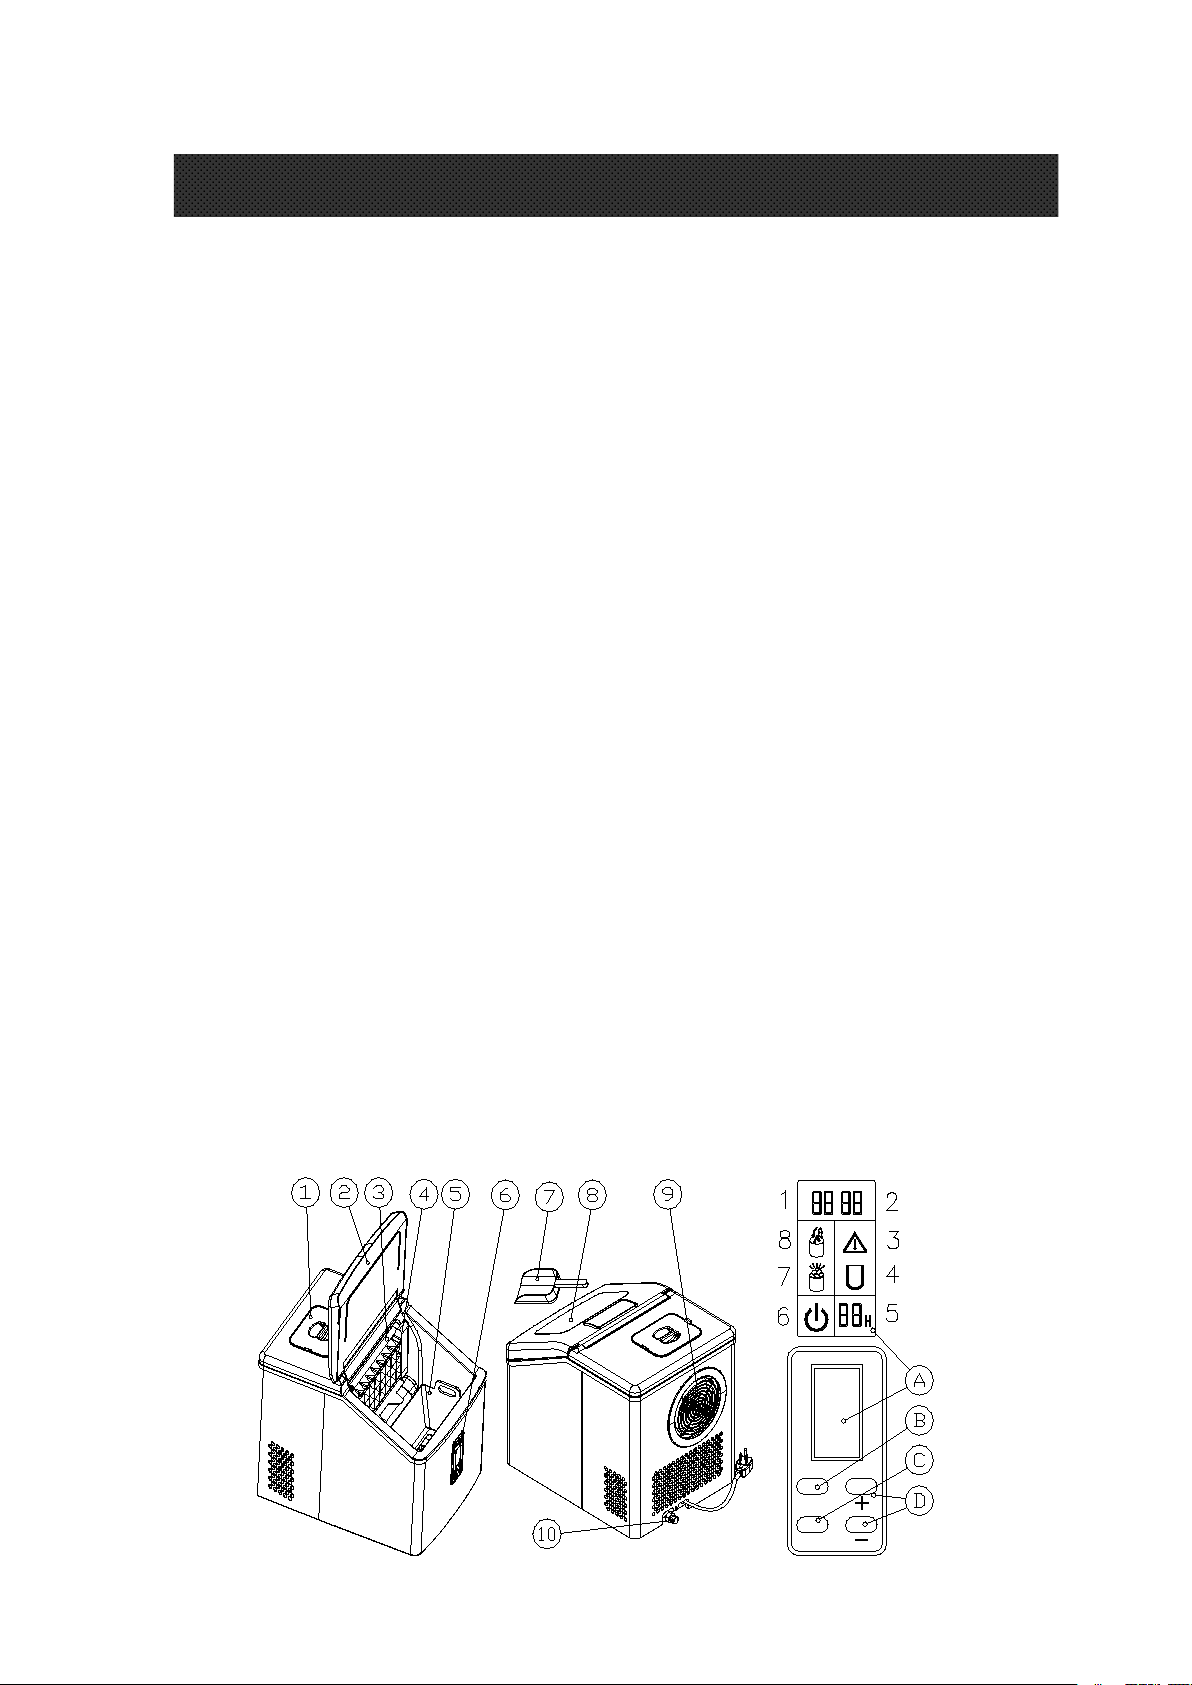
1. Water Tank Cover: Please make sure the water is not filled over "FULL" level.
1) Ambient Temperature
2) Time Indicator
3) Failure Indicator:
4) Ice making display area:
5) Time and Timer Display Area:
6) Power Indicator:
7) Ice Full Indicator: it’s turned on when the Ice Basket is full. Remove ice from the
8) Add Water Indicator:
GETTING TO KNOW YOUR UNIT
ON/OFF
TIMER
2. Cover
3. Water Pipe
4. Evaporator
5. Ice Basket
6. Control Panel
A. LCD Display Area
Flash: Intake air temperature sensor malfunction
Stay ON: Ice making malfunction
Flash: the machine is dumping ice
Zoom: the machine is making ice
It refers to ice making time if there’s only number in it.
It refers to the countdown time if there’s a letter “H” behind the number.
Flash: the machine is in standby mode
Stay ON: the machine is making ice
basket to ensure the machine works properly.
Flash: water is filling
Stay ON: there is insufficient water in water tank
B. Power Button:
Press this button to turn ON or turn OFF the machine.
To force start ice dumping, press and hold the Power Button for more than 5 seconds.
C. TIMER: This indicates the time has been set for the Ice Maker to automatically turn ON
or OFF.
D. “+” “--”: Set ice making duration and timer.
Increase or decrease 1 minute/hour with each press.
7. Ice Scoop
8. Viewing Window
9. Air Outlet: Please make sure there’s no object at least 20cm around the air outlet.
10. Water Outlet: For draining water from the water tank.
Page 7
6
DANGER
1. Remove the exterior and interior packaging. Check that ice basket and ice scoop is included.
If any parts are missing, please contact our customer service.
2. Clean the interior with lukewarm water and a soft cloth. Take out the ice basket and clean it
3. Place your ice maker on a level surface where is protected from direct sunlight and other
4. Allow one hour for the refrigerant fluid to settle before plugging ice maker in.
5. The appliance must be positioned so that the plug is accessible.
1. This unit should be properly grounded for your safety. The power cord of this appliance is
2. Plug your appliance into an exclusive, properly installed, grounded wall outlet. Do not under
3. This appliance requires a standard 110-120volt, 60Hz electrical outlet with three-prong
1. Take out the ice basket.
2. Clean the interior with diluted detergent, warm water and a soft cloth.
3. Rinse the inside part and drain out water through the draining port by unplugging the drain
4. The outside of the ice maker should be cleaned regularly with a mild detergent solution and
5. Dry the interior and exterior with a soft cloth.
6. When the machine is not in use for a long time, open the water drain cap to drain water
CONNECTING YOUR ICE MAKER
CLEANING AND MAINTAINING YOUR ICE MAKER
sources of heat (i.e.: stove, furnace, and radiator). Make sure that there is at least 6 inches of
space between the back and sides of your ice maker and the wall.
* Improper use of the grounded plug can result in the risk of electrical shock. If the
power cord is damaged, please call our customer service.
equipped with a three-prong plug which mates with standard three prong wall outlets to
minimize the possibility of electric shock.
any circumstances, cut or remove the third (ground) prong from the power cord. Any
questions concerning power and/or grounding should be directed toward a certified
electrician.
ground.
Clean it thoroughly before you use it for the first time.
Make sure the unit is unplugged before attempting to clean and allow it to warm up to room
temperature.
cap on the back.
warm water.
completely out from the water tank.
Page 8
7
To maintain maximum efficiency and to prevent bacterial growth, we suggest
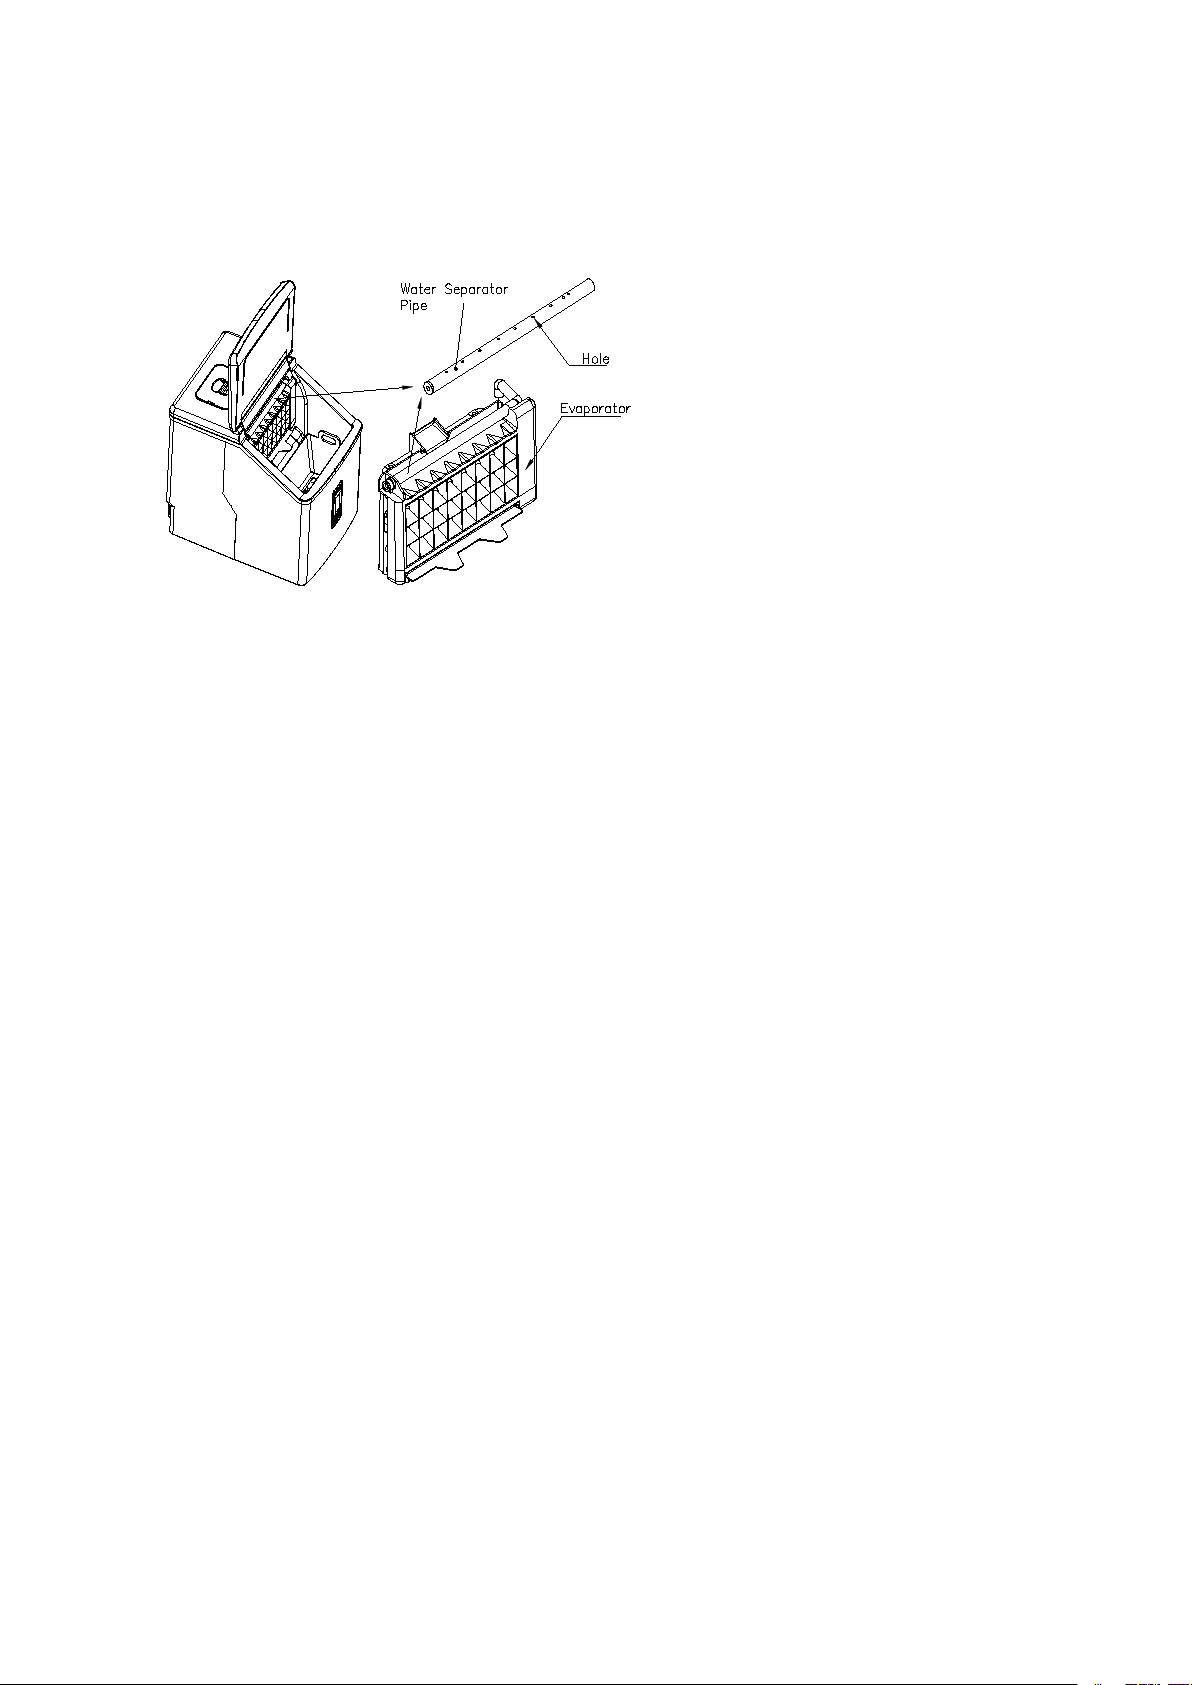
1. If there is no water flowing down but you can still hear the compressor and water pump are
working, the water pipe is probably
blocked. To clean it up, turn off the unit
first and then remove it from the unit.
Clean each hole on the pipe wall as
shown in the right picture. After cleaning
it up, make sure it’s replaced correctly
and the right end is connected to the
silicone pipe.
2. For both of the water tank and the big water reservoir, clean them with diluted detergent,
3. If you find there are ice left in evaporator and cannot be removed easily, press and hold the
you clean your unit regularly, especially the water pipe and water filters.
warm water and a soft cloth. Rinse the inside and drain out the water from the draining port
by unplugging the drain cap on the back. It will help you keep the unit and ice-cube clean and
maintain its efficiency.
power button for more than 5 seconds to activate ice dumping mode. The whole process
might take 1-3 minutes.
How to drain out the water from the internal tank and big water reservoir
completely
To drain out the water from both the big water tank and inner tank, unplug your unit and remove
the cap of the Water Outlet.
Page 9
8
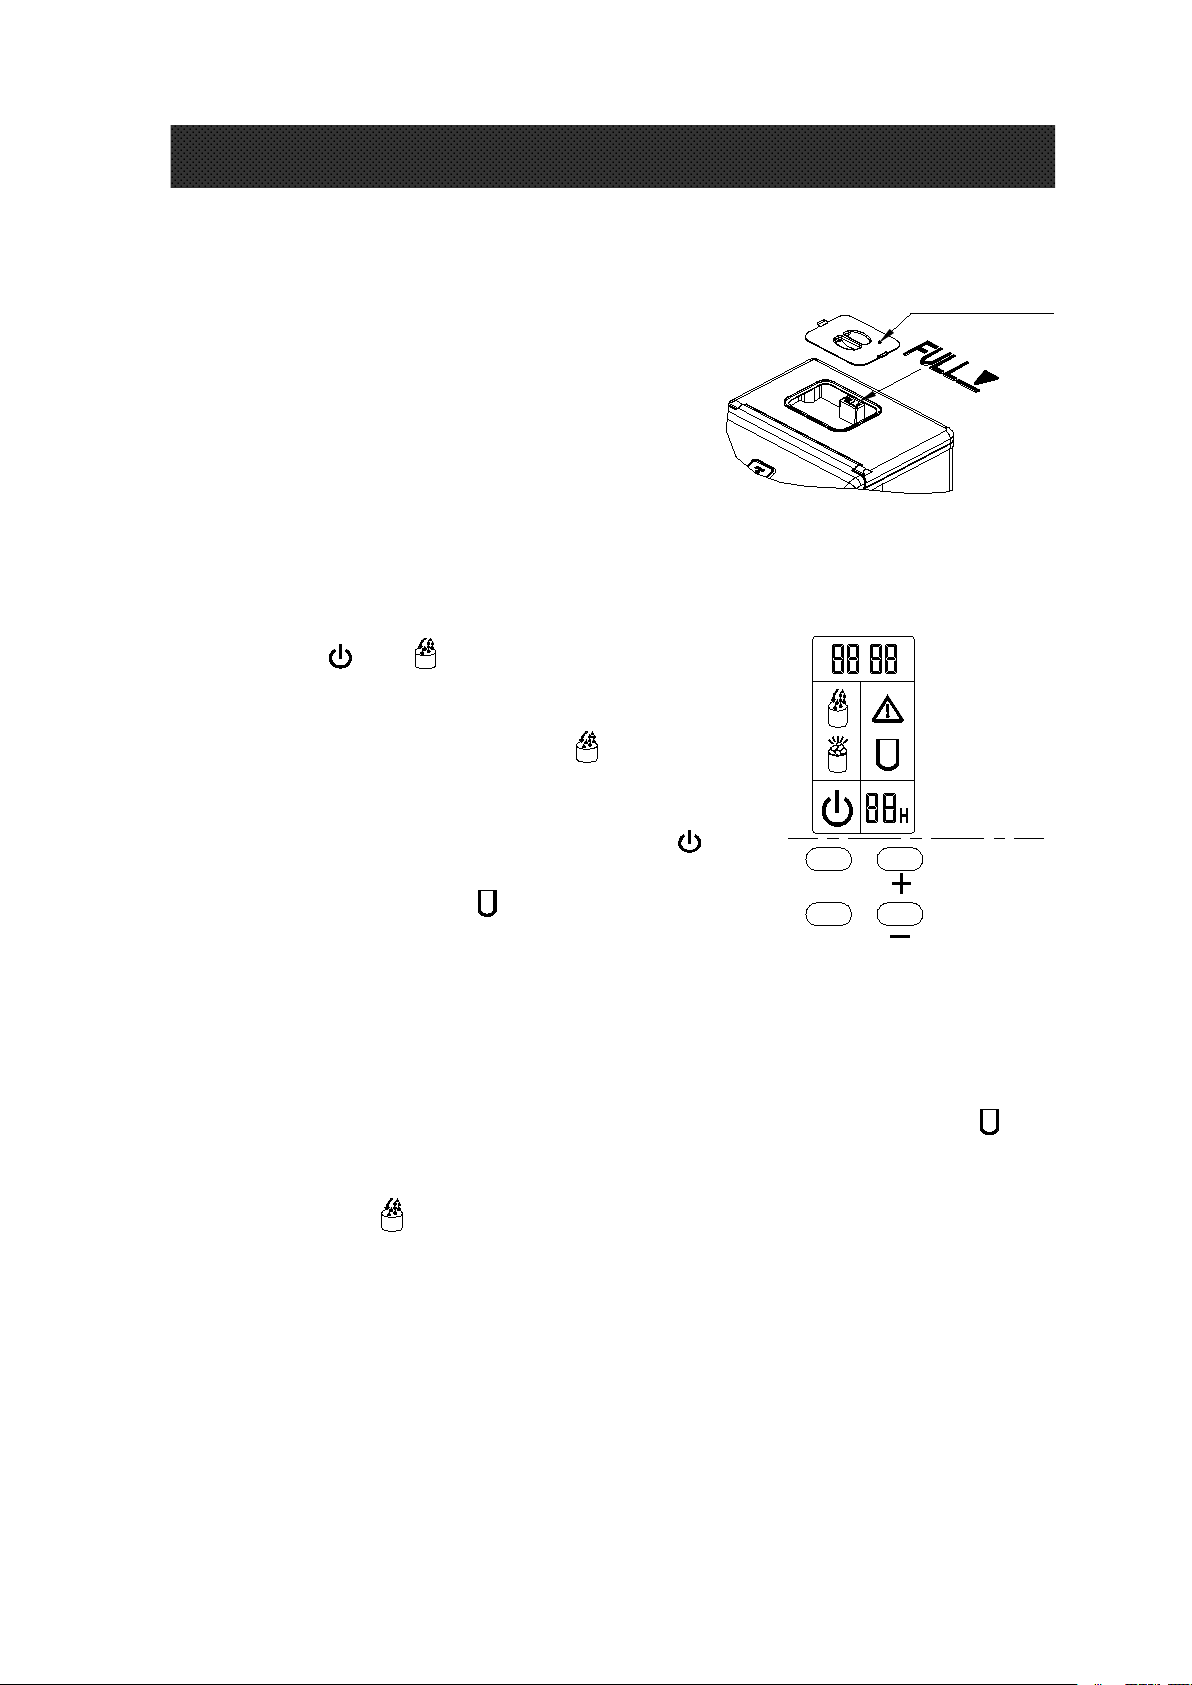
1. Adding Water
Remove the water reservoir cover and pour potable
water into the reservoir. Make sure the water level is
below the FULL mark as shown in the right picture.
Close the cover at once to avoid foreign matter enter.
Warning: Do not pour the water into the internal
water tank underneath the ice basket. This tank is
not big enough and will affect the ice making
performance.
2. Turn “ON”:
Operation Panel and Display Area
A. Plug the Ice Maker into the outlet, the Power
Indicator and will turn on and flash. The water
tank starts filling the inner tank under the ice basket until
it reaches required water level, and symbol turns off.
Press Power Button (ON/OFF) on the operation panel to
start making ice. During ice making process, stays
on, ice making symbol zooms, and the current
ambient temperature is shown on the upper left of the
B. It starts dumping ice after this ice making cycle finishes. The ice making symbol flashes,
C. Each ice making cycle lasts about 15-25 minutes. It varies according to the ambient
D. Adjustment of ice thickness: During the ice making cycle, the thickness of the ice cube is
USING YOUR ICE MAKER
OPERATION
AREA
DISPLAY
AREA
ON/OFF
TIMER
Co v e r fo r the
wa t e r re s e rvoir
display. For example, ”25” indicates that the current ambient temperature is 25 degrees
Celsius. After a few minutes of ice making, the number in Time Indicator starts to flash,
indicating the remaining time for this ice making cycle. For example, a flashing number “8”
means it will take 8 minutes to finish the ice making.
and the inner tank begins to replenish till the set value, then begins the next ice making
cycle. Symbol lights up if there is insufficient water in tank, and the machine stops
working. Add water, turn on the machine and you can continue making ice.
temperature and water temperature. The duration especially lasts longer when you use it
for the first time, or the water temperature is high.
can be adjusted by pressing “+” and “—” on the operation panel. The default figure at the
lower right of the display for ice making time is "0". Each time you press "+", the duration
adds 1 minute, and the ice cube will be thicker. The maximum time can be added is 6
minutes. The actual duration will be displayed in the lower right corner of the display. Each
Page 10

9
time you press "—", the duration decreases 1 minute, and the ice will be thinner. The
E. If the Ice Full Indicator lights up, the ice maker stops working. Remove ice from the
3. Shutdown
4. Timer Setting
A. How to set the timer
B. How to cancel the timer
5. Display Backlight settings
6. Machine Drainage
Unscrew the drain nut on the back of the machine
counterclockwise, and then pull out the silicone plug to
drain the water in the tank. The machine must be on
standby mode while draining the tank. Put back the
CLOSE
OPEN
maximum time can be reduced is 6 minutes. After the machine is powered on again, it
returns to the default setting "0". Please note the time you set takes effect from the next
ice making cycle.
basket and it will start working again.
During the ice making process, press the "ON/OFF" button on the operation panel to shut
down the machine and it enters standby mode. Press and hold the "ON/OFF" button for more
than 5 seconds during ice making cycle, the machine goes to the dumping process. This
function helps to remove ice from the icing pan. Press the "ON/OFF" button again and the
machine will shut down.
Setting range: 1-24 hours
Regular shutdown: Schedule an auto shutdown during the ice making cycle.
Regular start: Schedule a startup on standby mode.
Press the “TIMER” button on the operation panel, a flashing number “1H” appears at the
bottom right of the display, and then press “+” or “-” button to adjust the time you need. Each
press adds or reduces 1 hour. The letter “H” flashes while you’re adjusting time, and stops
flashing after the setting is done for 5 seconds. The “H” in the display indicates that the
machine is currently is on timer function. It starts counting down until the number turns to 0.
The machine enters the mode you preset after the countdown finishes.
When the machine is scheduled (the display has XX H), press the “TIMER” button, the timing
number on the screen will flash, and then press it again to cancel the timer.
Ice making duration and countdown time display alternatively every 5 seconds if the machine
is scheduled.
Press and hold the "TIMER" button for more than 5 seconds to set the blue backlight.
Mode 1: Light the blue backlight for a long time;
Mode 2: The blue backlight is on when the button is pressed, and goes out after 10 seconds.
Page 11

10
silicone plug and drain nut after draining out the water.
A. Make sure the water tank, water filter and the water separator pipe are cleaned regularly.
B. Water temperature will affect the performance of ice making. The lower the temperature is,
C. Ambient temperature will affect the performance of ice making. The cooler the ambient
D. Good quality water ensures a proper performance and relatively longer operational life.
E. There will be a three-minute delay if the compressor restarts.
Good hygiene is important for staying healthy. Please change water every 24 hours and clean
the water tank and inner tank every 3 days.
WARNINGS
Blockage may lead to poor performance of the unit.
the more ice cube produce.
temperature is, the more ice cube produce.
Purified water and distilled water are recommended. Bad quality water will not affect the
working of the unit, but it might be noisy while making ice.
Page 12
11
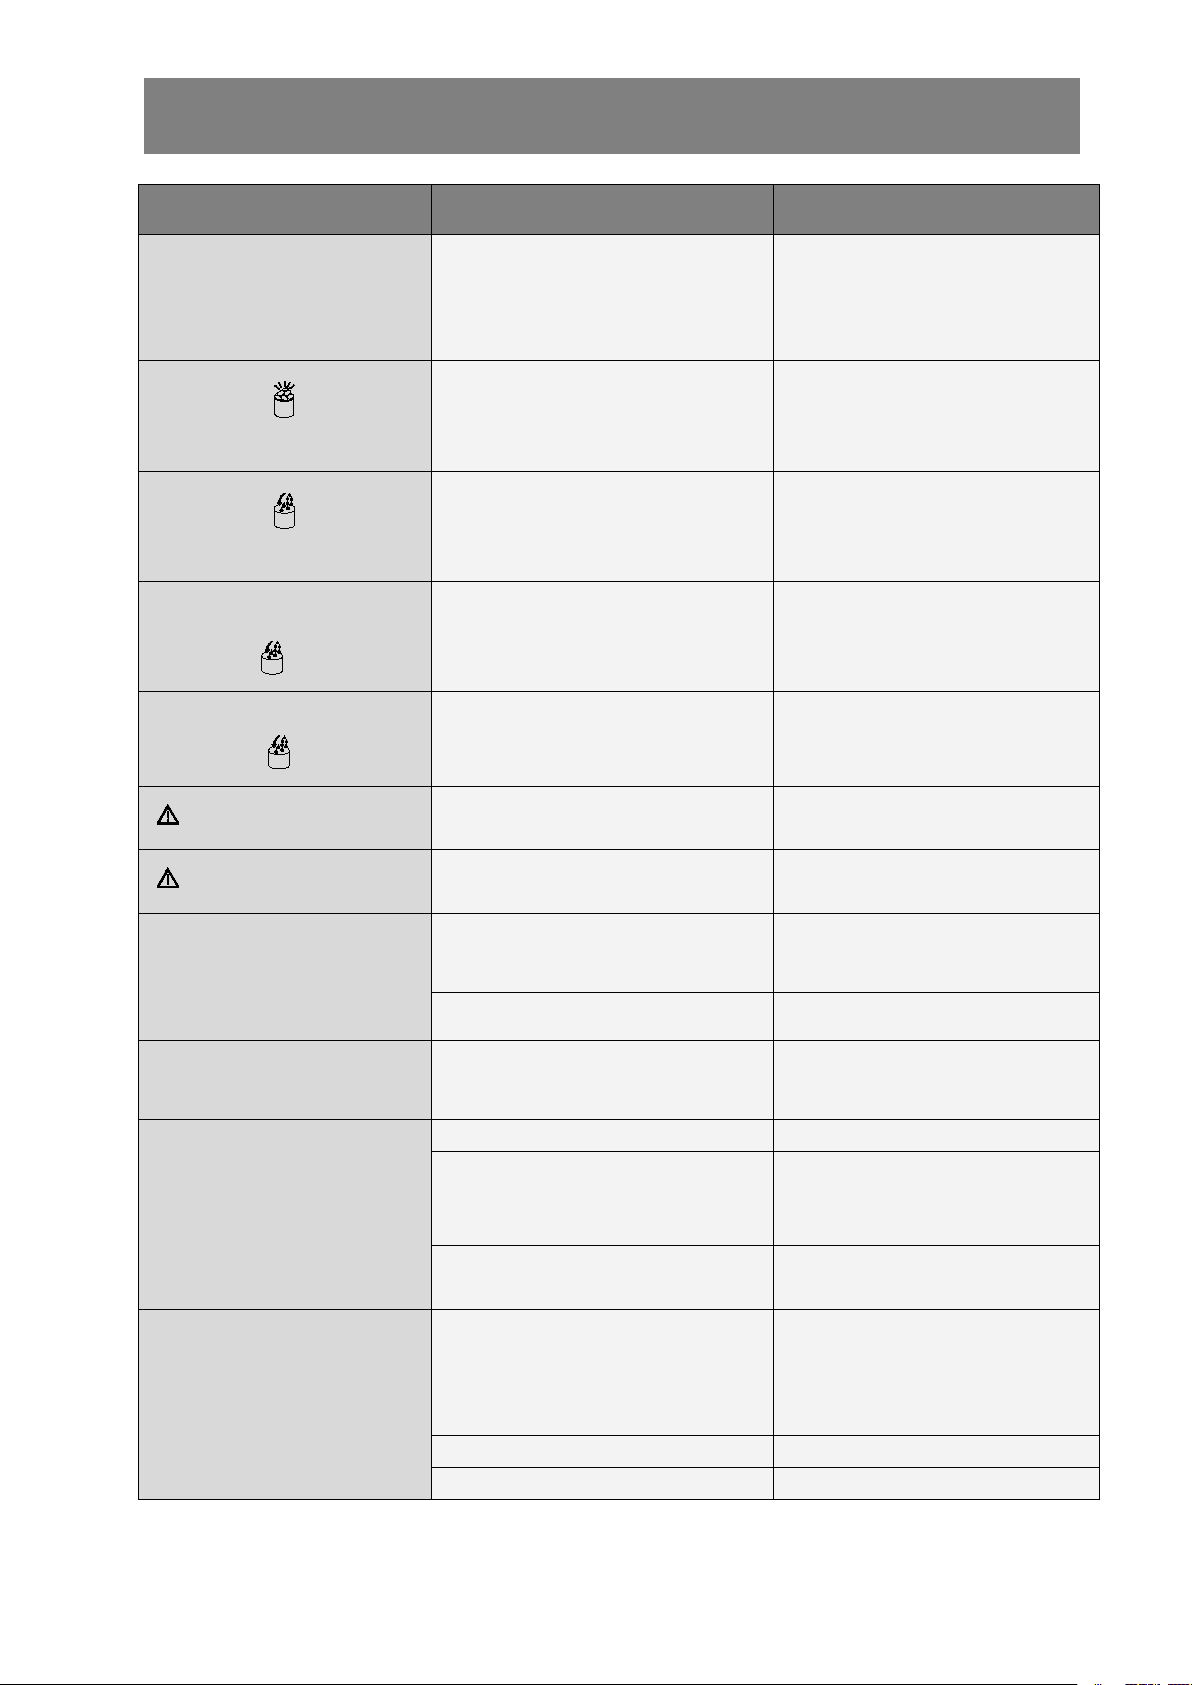
PROBLEM
POSSIBLE CAUSE
SOLUTION
Ambient temperature display
“E” on standby mode
The ambient temperature sensor
damaged
Turn on the machine, "E"
disappears and the ambient
temperature will no longer
display.
Ice Full Indicator Light is on
Too much ice cube in the basket
Remove ice from the basket
Add Water Indicator is on
Insufficient water in tank
Turn off the unit, add water to
<FULL> level, and re-start the
unit.
The water reservoir has
water, but is on
The inlet solenoid valve damaged
Need professional maintenance
Inner water level exceeds ice
basket, and is on
The water level switch in the inner
tank does not slide up and down
smoothly
Clean the water level switch until
it slides smoothly
is flashing
Ambient temp sensor damaged
The unit can still work, and you
need to change a new sensor
stays on
Refrigerating tube sensor
damaged
Need professional maintenance
No water come out from the
water pipe
The holes are blocked
Use slim wire to prick each hole
until water flow out easily
Water filter block
Clean the water filter
Ice cube is too thick and
can’t drop down
Ice making cycle is too long
Press “—” to decrease the ice
making duration
Ice making performance is
poor
Ambient temperature is too high
Move the unit to a cooler place
Water temperature is too high
The water temp should be no
higher
more than 77℉
Ice making duration is too short
Press “+” to increase the ice
making Duration
Unit works but there’s no ice
cube
Ambient temperature or water
temperature is too high
Move the unit to a cooler place
where the ambient temp. is
lower than 86 ℉ , and fill with
cooler water.
Refrigerant system leakage
Need professional maintenance
Refrigerant system is blocked
Need professional maintenance
TROUBLESHOOTING
Page 13
12
Protection
Protection
Type
Type
III
I
Rated
Rated
Voltage/Frequency
Voltage/Frequency
115
115V/V/66
0Hz
0Hz
115
115V/V/66
0Hz
0Hz
Ice
Ice
Making
Making
Current
Current
1.6A
1.6A
1.6A
1.6A
Ice
Ice
Harvest
Harvest
Current
Current
2.6A
2.6A
2.6A
2.6A
Refrigerant
Refrigerant//
Volume
Volume
R600a/3
R600a/322gg
R600a/3
R600a/322gg
Design
Design
Pressure
Pressure
High
High
Side
Side
260Psig
260Psig
Low
Low
Side
Side
88Psig
88Psig
Net
Net
Weight
Weight
110.5
0.5KgKg
11.
11.00KgKg
Enclosure
Enclosure
Plastic
Plastic
Stainless
Stainless
Steel
Steel
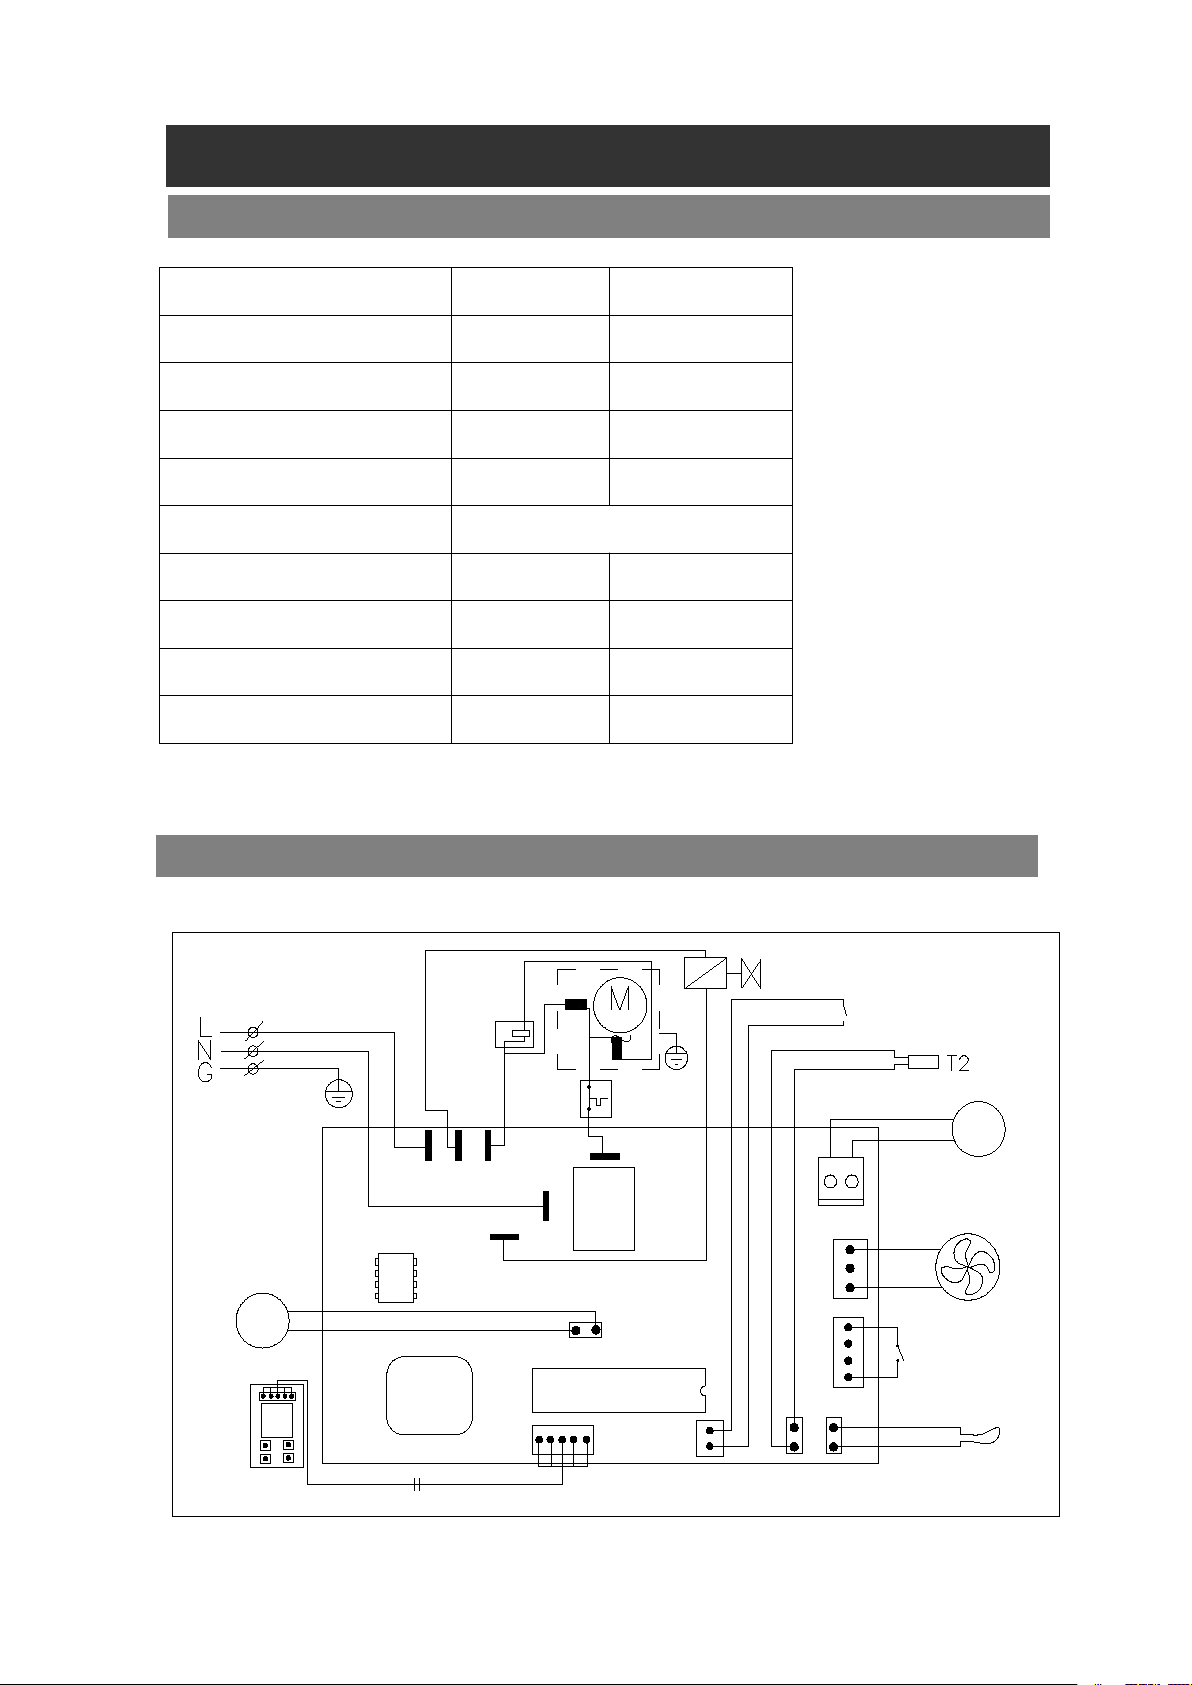
TECHNICAL PARAMETERS
CIRCUIT DIAGRAM
TECHNICAL PARAMETERS & CIRCUIT DIAGRAM
Relay
MCU
-PUMP+
-
FAN
+
DC Fan Motor
DC Water Pump
VALVE
Solenoid Valve
AW
MW
Start
Relay
Overload
Protector
COMPRESSOR
COMP
AC-L
POWER SUPPLY
sensor for suction pipe
sensor for
room temp.
AC-N 1 2
magneticcontrol
switch
WATERV
CKKG
ROOM
LNSR
CN6
ELECTRICAL DIAGRAM
FOR ICE-MAKER
T1
DC Water valve
T1
water
1
6C
control
panel
LCD
Liquid Level
Switch
 Loading...