

Page 1

Page 2

Regulatory Information
FCC Compliance Statement
1
This device complies with part 15 of the FCC Rules. Operation is subject to the
following two conditions: (1) This device may not cause harmful interference,
and (2) this device must accept any interference received, including interference
that may cause undesired operation.
Additional Information
This equipment has been tested and found to comply with the limits for a Class
B digital device, pursuant to part 15 of the FCC Rules. These limits are designed
to provide reasonable protection against harmful interference in a residential
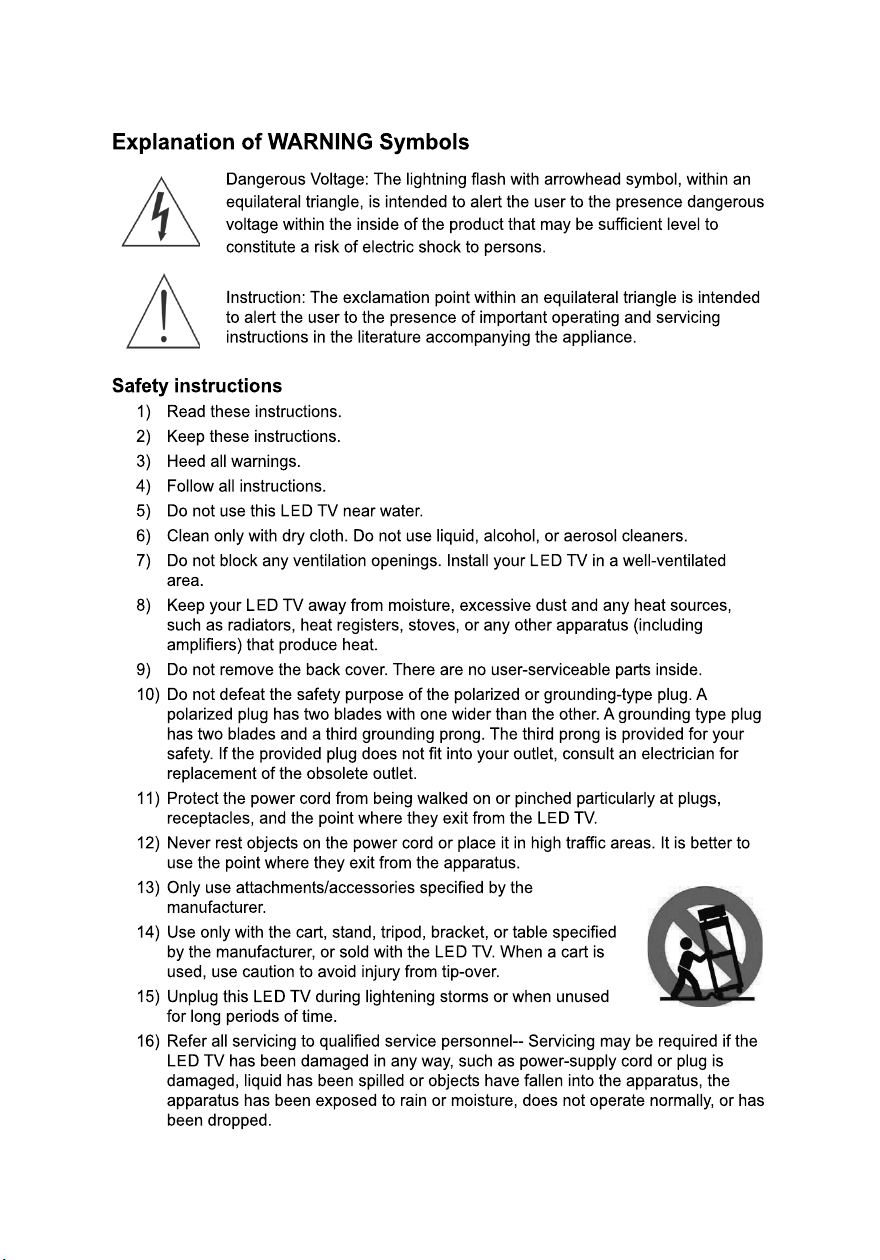
inst
allation. This equipment generates, uses and can radiate radio frequency
energy and, if not installed and used in accordance with the instructions, may
cause harmful interference to radio communications. However, there is no
guarantee that interference will not occur in a p
articular installation. If this
equipment does cause harmful interference to radio or television reception,
which can be determined by turning the equipment off and on, the user is
encouraged to try to correct the interference by one or more of the following
meas
ures:
• Reorient or relocate the receiving antenna
• Increase the separation between the equipment and receiver
• Connect the equipment into an outlet on a circuit different from that to which
the receiver is connected
• Consult the dealer or an experienced technician for help
Warning: The Federal Communications Commission warns that changes or
modifications of the equipment not expressly approved by the party responsible
for compliance could void your authority to operate the equipment.
DOC Compliance Notice
2
This digital apparatus does not exceed the Class B limits for radio noise
emissions from digital apparatus as set out in the Radio Interference
Regulations of the Canadian Department of Communications.This device
complies with Canada ICES-003 Class B.
1. applies only to products purchased in the United States of America
2. applies only to products purchased in Canada
English
Page 3
English
Page 4
English
Page 5
English
Page 6

English
Page 7

Table of Contents
.
INSTALLATION INSTRUCTIONS 1
1.11.
1.3
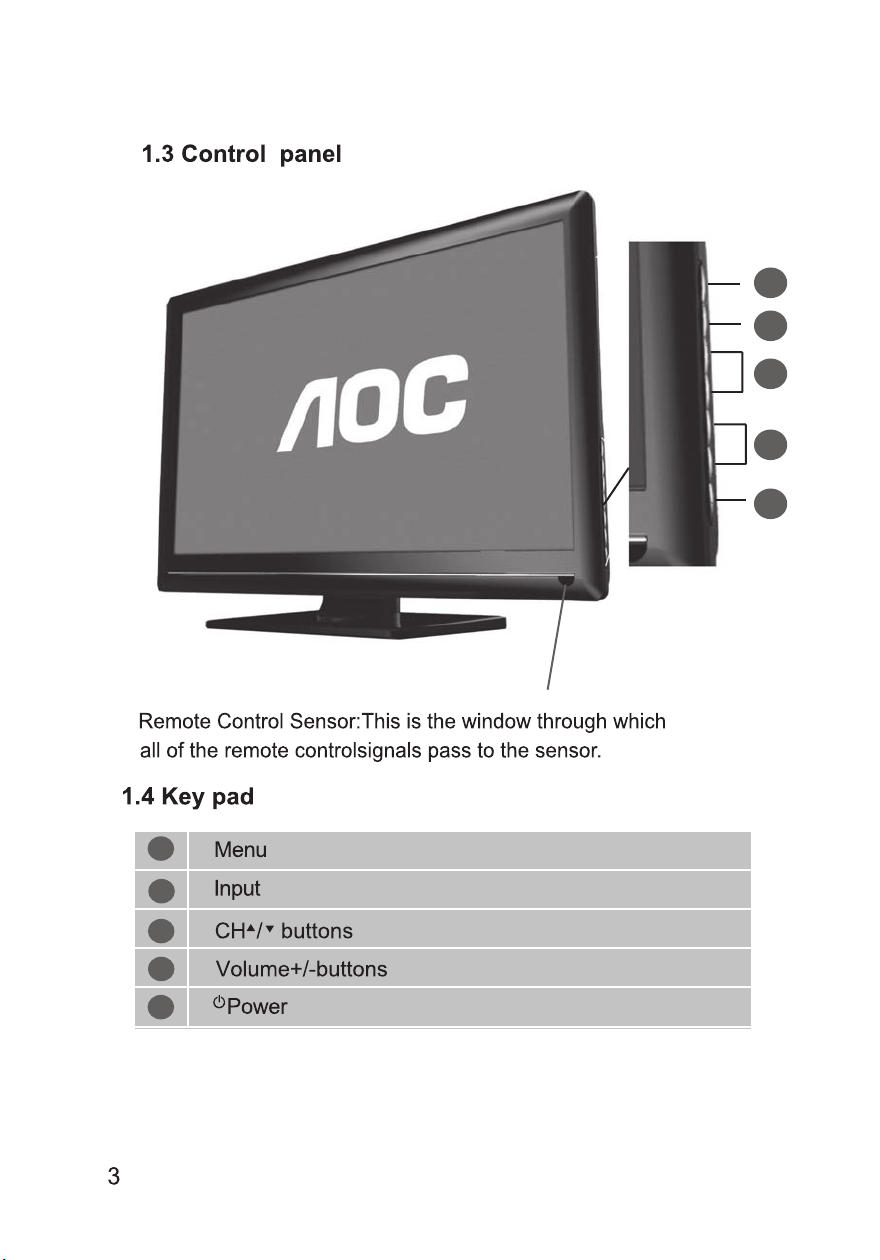
Control Panel ....................... ..............................3
Key pad ....................................................
1.4
1.5
Remote Control ...............................................................5
Input and Output Jacks
1.6
2.2 Connecting External Devices ...........................................9
2.2.1 Connecting External Earphones ..............................9
2.2.2 Connecting to AV Devices.......................................10
2.2.3 Connecting a VCR/ STB/ DVD Player
Using Component Video .........................................11
2.2.4 Connecting a VCR/ STB/ DVD Player
Using Composite Video...........................................11
2.2.5 Connecting a PC using VGA ...................................12
2.2.6 Connecting a PC using DVI.....................................12
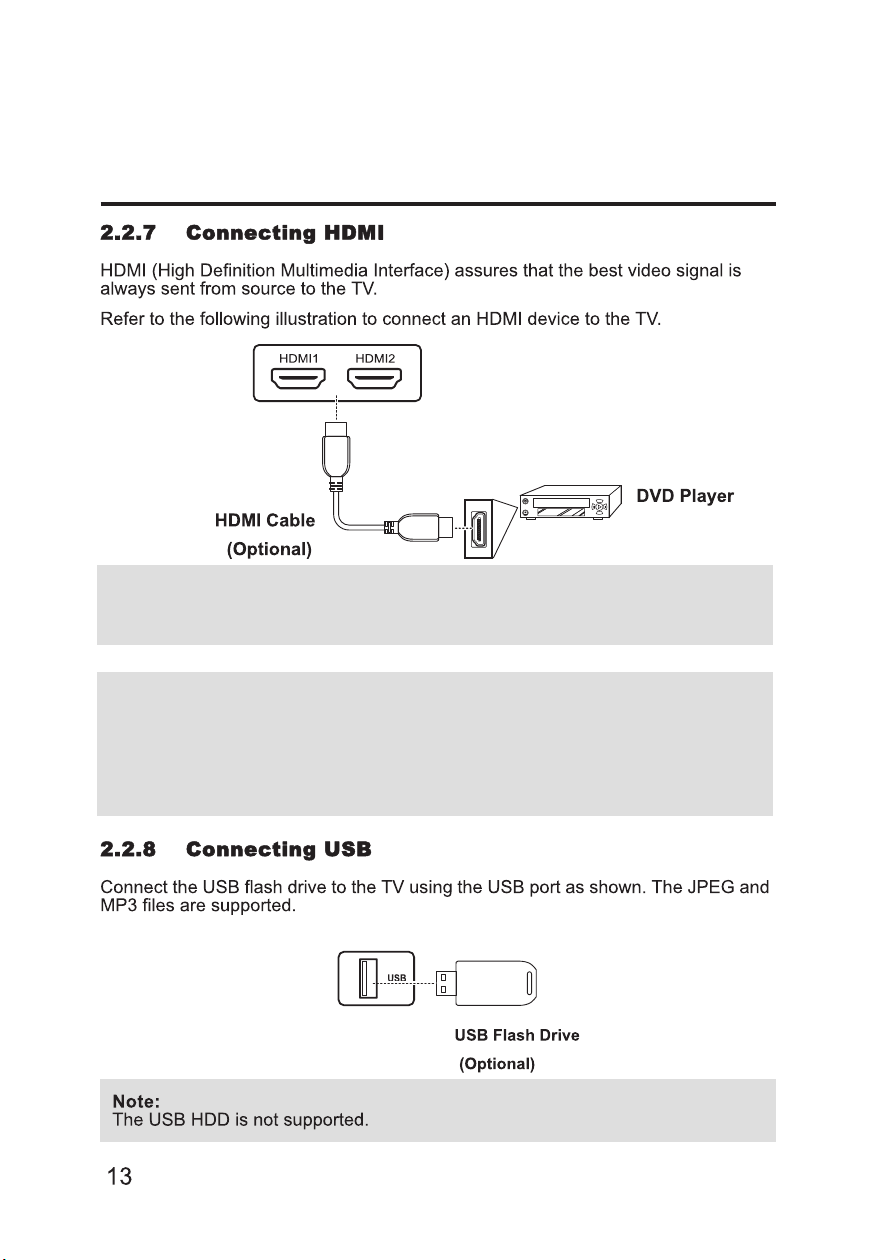
2.2.7 Connecting HDMI ...................................................13
2.2.8 Connecting USB ..................................................... 13
2.3 Using the TV ...................................................................14
2.3.1 Turning the TV On and Off ......................................14
2.3.2 Switching Source Signals........................................14
2.3.3 Performing an Automatic Channel Search................ 14
2.3.4 Selecting Channels.................................................14
2.3.5 Adjusting the Volume .............................................. 15
2.3.6 Editing the Channel List or Favorite List ..................15
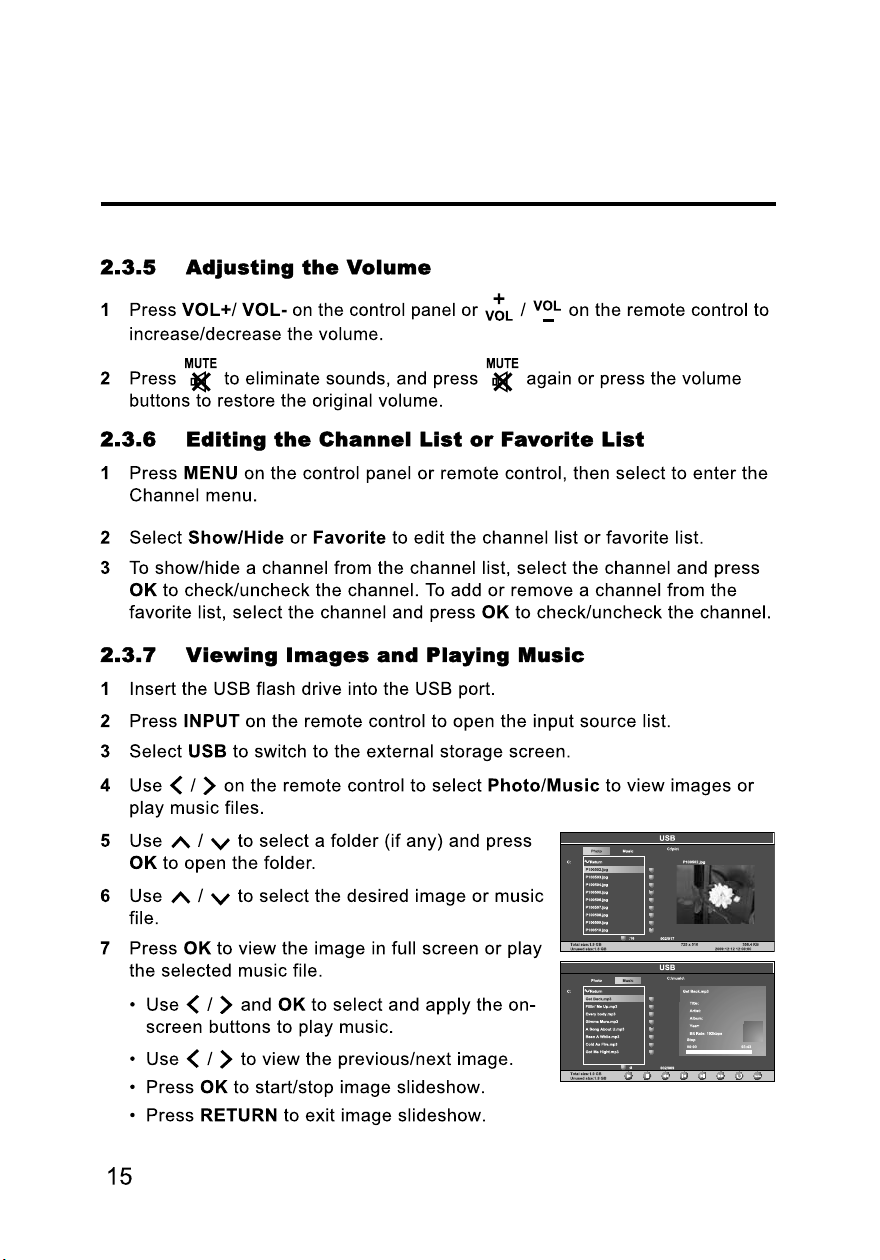
2.3.7 Viewing Images and Playing Music..........................15
3. Adjusting On-Screen Display (OSD) Settings ..........................16
3.1 OSD Setting Menus .........................................................17
3.2 Storing Channels into Memory .........................................17
3.3 Viewing the Menus ..........................................................18
3.4 Favorite Channel Setting .................................................18
3.5 Showing/Hiding Channel..................................................19
3.6 Channel Name Setting .....................................................19
3.7 Setting up Picture Options ...............................................20
3.8 Setting up Audio Options .................................................20
3.9 Configuring System Setting .............................................20
3.10 Setting up Time menu....................................................21
........
.............
.......................................
...................................
.............
............
4
7
English
English
Page 8

English
Table of Contents
3.11 Closed Caption Setting .................................................. 22
3.12 Using the Parental Controls ...........................................23
3.13 To Block Unrated Movie or TV Programs ........................25
3.14 To Set Rating Region Table ...........................................26
3.15 To Change Password .................................................... 26
3.16 To Block by Input Source ............................................... 27
3.17 To Restore Factory Setting ............................................27
3.18 Using PC Function ........................................................28
4. Specifications ........................................................................29
FACTORY PRESET TIMING TABLE(PC MODE)
SAFETY PRECAUTIONS
CARE AND MAINTENANCE.........................................................32
TROUBLESHOOTING......................................................... 32
............................................................ 31
.......... ...................... 30
.........
English
Page 9

1.1.1
INSTALLATION INSTRUCTIONS
RELEASE
LOCK
INSTALLATION:
1.Turn the TV over and set it upside down.
2.Align the TV to the slots on the stand.
3.Please note that the longer edge of the stand should be facing forward.
4.Pull the screw ring upwards,then turn the screw clockwise to secure.Wh
-en the stand is securely attached to the TV,pull down the screw ring to fla
-tten it with the base of the screw.
5.Check the underside of the stand to stand to ensure that the TV has been
firmly installed to the stand and that the screws do not loosen.
REMOVAL:
1.Turn the TV over and set it upside down.
2.Turn the screw countercolckwise to loosen it.
3.Detach the stand from the TV.
English
1
Page 10
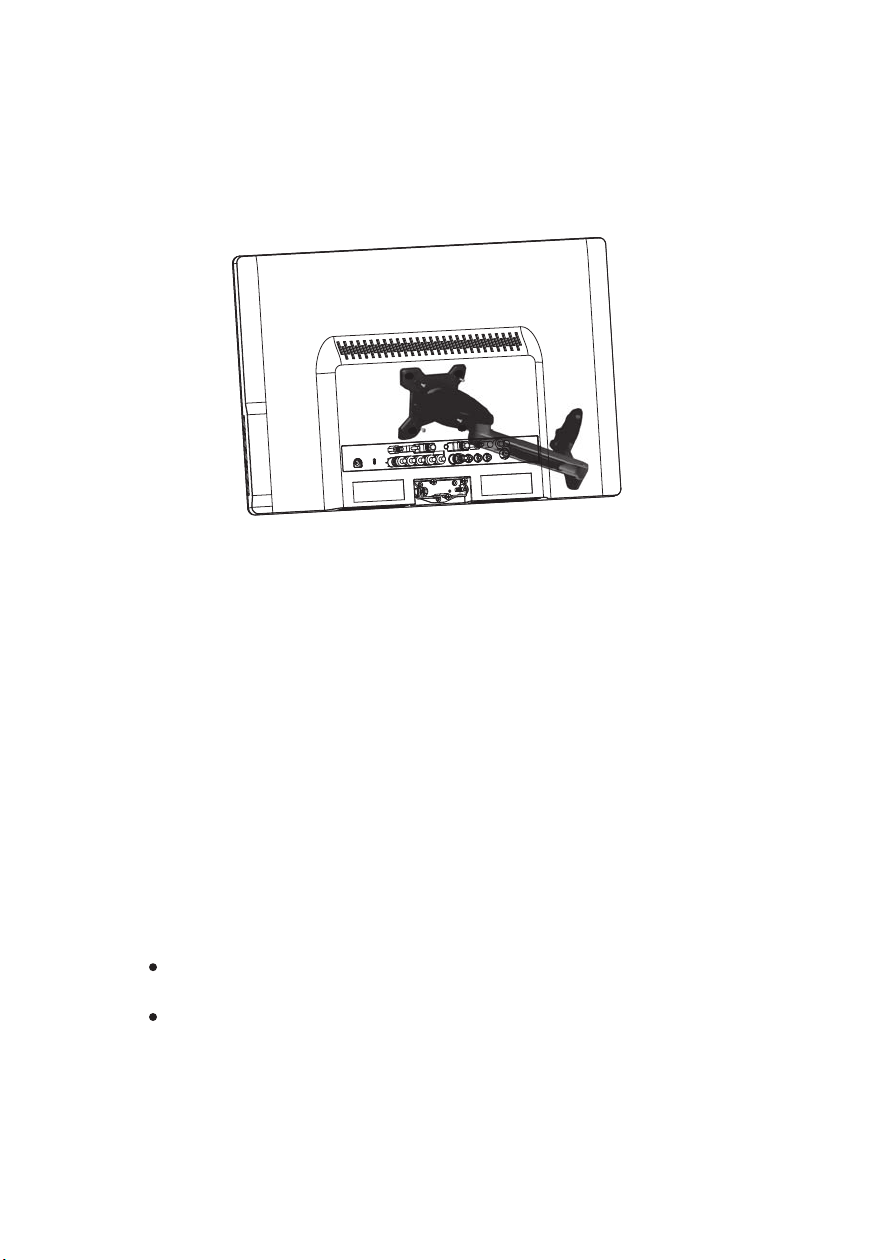
Follow these steps to finish installing the wall mounting arm:
1. Place the wall mounting arm onto the back of the TV.
2. Insert the 4 screws into the holes and tighten.Line up the holes of the arm
with the holes in the back of the TV.
3. Reconnect the cables.Refer to the user’s manual that came with the optional
wall mounting arm forinstuctions on attaching it to the wall.
NOTE
75mmx75mm VESA high hole(n=4),M4,pitch=0.7mm,deep=10mm screw mount
-ing kit not included.
Due to safety concerns,if the VESA mounting kit is purchased separately please
make sure the mountingkit is UL-Listed,and replaceable only by service personn
-el.
English
2
Page 11
1
2
3
4
5
1
2
3
4
5
English
Page 12
INFOMENU
RETURNGUIDE
FAV
MTS SLEEP ASPECT C.C.
LAST
MUTE
4
English
Page 13
English
V
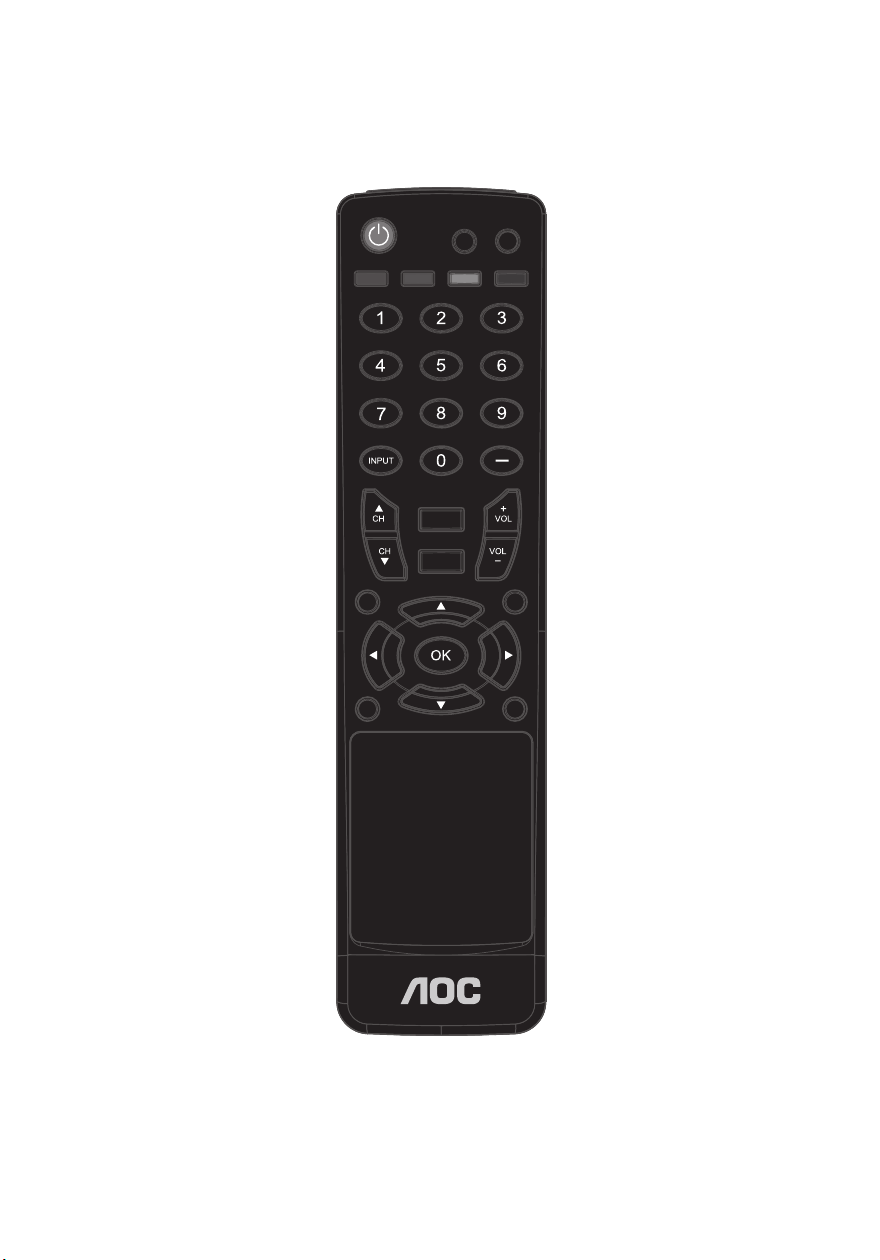
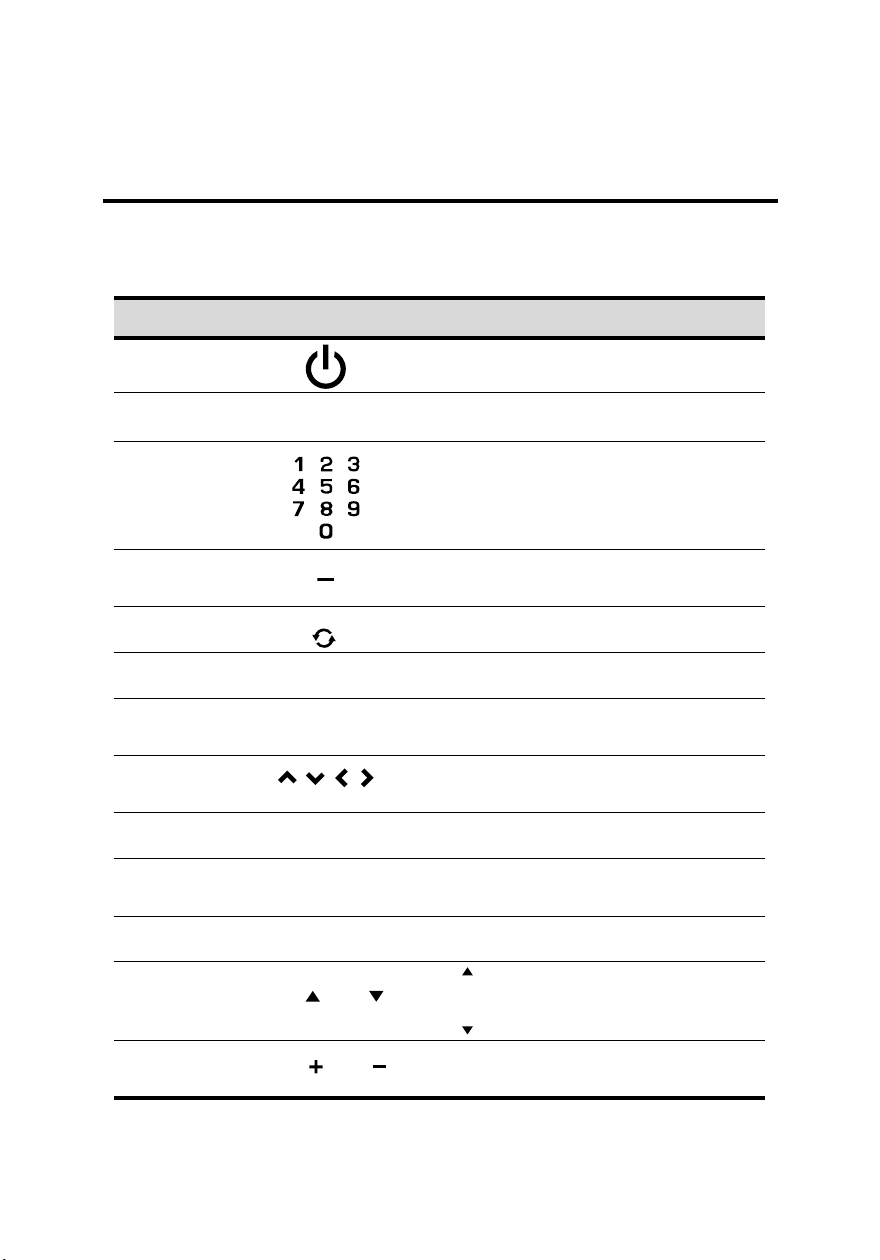
1.5 Remote Control
Description Icon Function
Power
Input source
Keypad
Program entry
Last Press to return to the last channel selected.
Information INFO Press to display program information.
Menu MENU
Arrows
Select OK Press to confirm your selection.
Guide channel
list
Return RETURN Press to return to the previous menu.
INPUT Press to open the input source list.
LAST
GUIDE
Press to turn the TV on or off.
Use to select a channel directly. Press 0-9
to enter the program numbers (press 1 and
0 for channel 10).
Press this button for entering DTV minor
channel.
Press to turn the on-screen display (OSD)
menu on/ off; confirm the setting.
Press up, down, left or right to scroll
through the on-screen display menus.
Press to view the Electronic Programming
Guide screen.
Press to increase the channel number.
Select channel
Volume adjust
English
5
CH / CH
OL / VOL
CH
CH
Press to decrease the channel number.
Press VOL
Press VOL
+ to increase audio volume.
- to decrease audio volume.
Page 14

Description Icon Function
Press repeatedly to set the sleep time
SLEEP
Sleep timer
(Sleep off, 5, 10, 15, 30, 45, 60, 90, 120,
180, or 240 minutes).
A Sleep Info appears on the middle of the
screen to show the remaining time.
Cancel the timer by pressing the button to
sleep off mode.
Multichannel
television
sound
Favorite
channels
Aspect ratio
Close caption C.C. Press to open or close the close caption.
MTS
FAV
ASPECT
Press to toggle the audio mode (Mono/
Stereo/ SAP) in ATV or the audio services
in DTV.
Press to switch to favorite channels.
Press to adjust the width-to-height ratio of
the image. The available options are: Full,
Normal, Zoom and Cinema.
English
6
Page 15
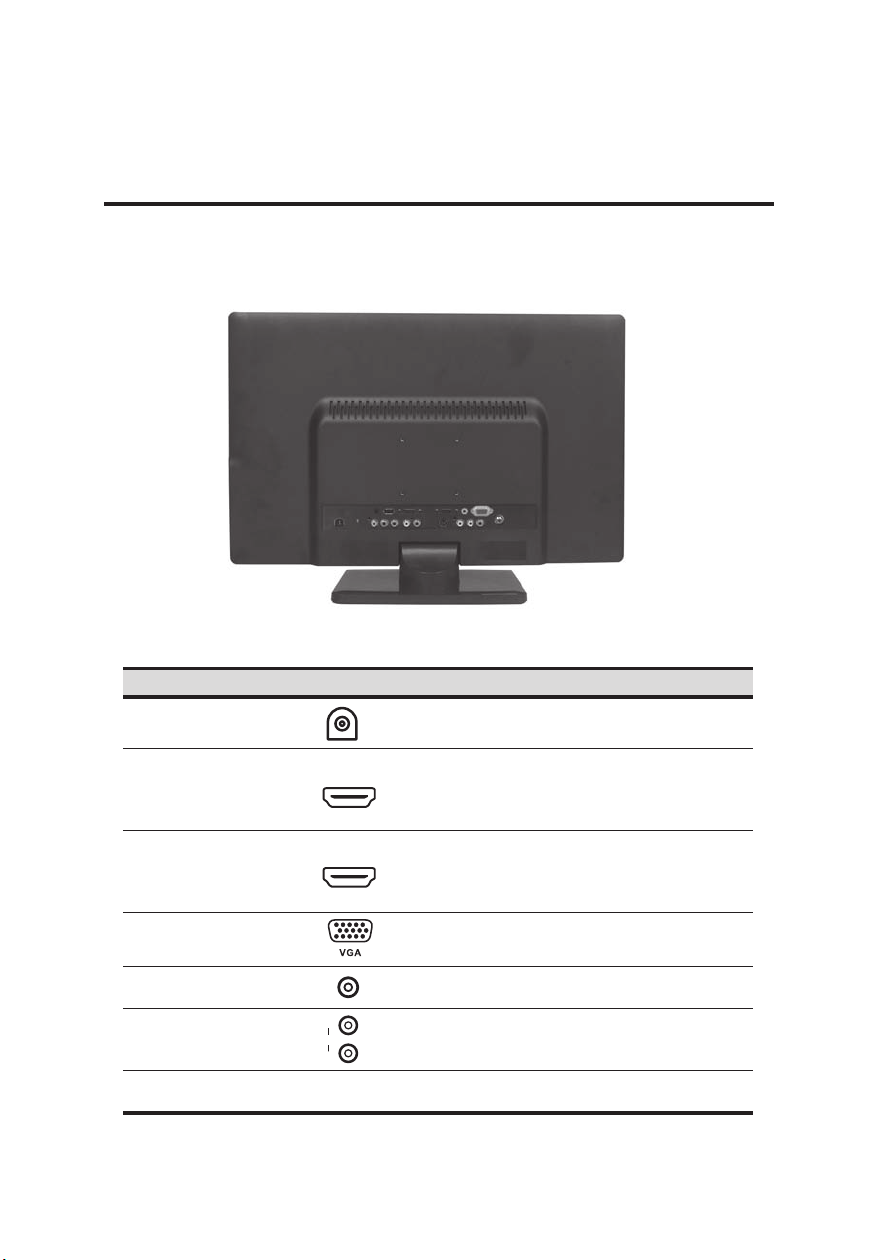
Input and Output Jacks
1.6
Description Connector Function
Power connector
HDMI 1 input
HDMI 2 input
VGA (PC) input
Audio input (PC)
Component inputs
(audio)
English
7
AUDIO
HDMI1
HDMI2
L
R
DC IN
AUDIO
Connect to the included Adaptor.
Connectto an external device, such as
a DVD player, set-top box, or a PC’s
DVI/ HDMI port.
Connectto an external device, such as
a DVD player, a Set-Top Box, or a
PC’s DVI/ HDMI port.
Connect to a PC’s VGA port.
Connect to a PC’s audio port.
Connectto an external device, such as
a VCR, Set-Top-Box, or a DVD player.
Page 16
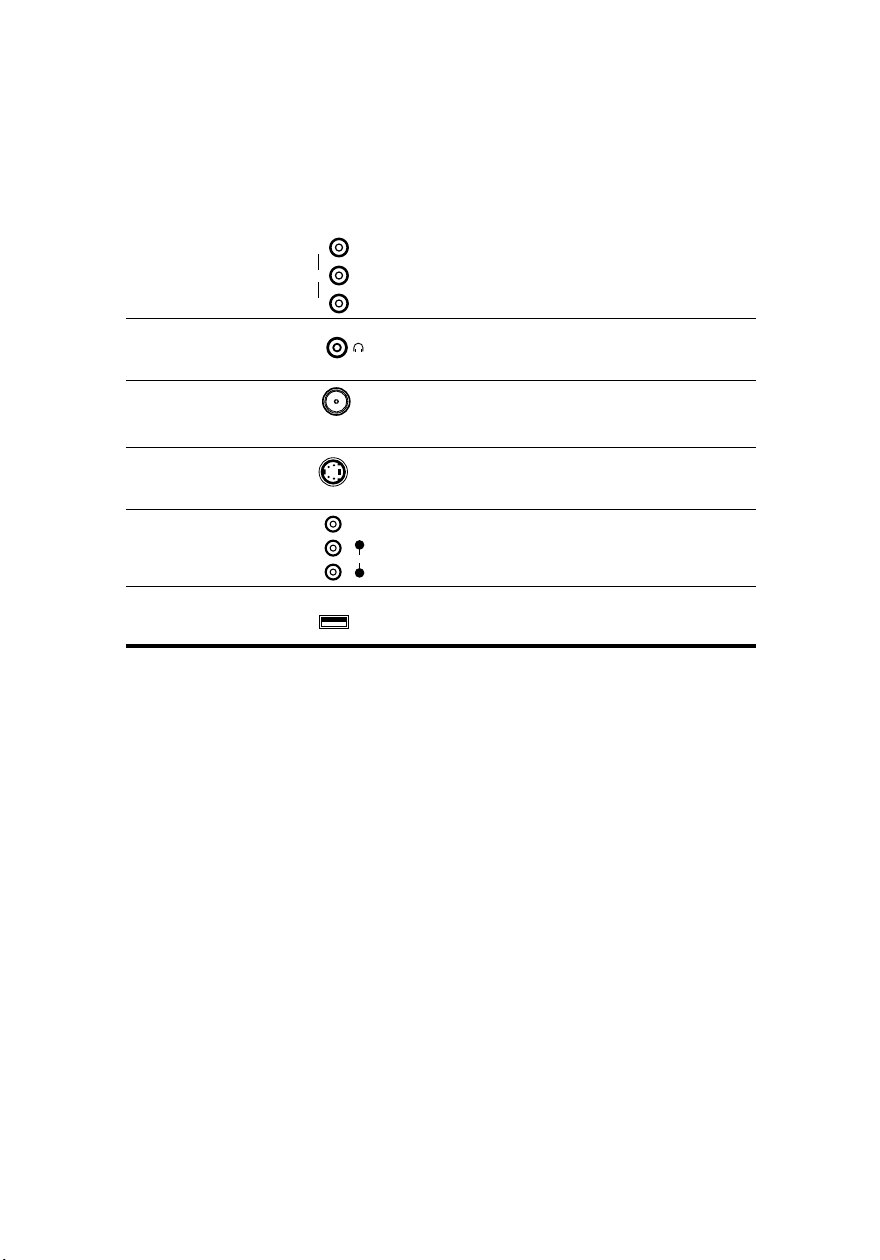
Component inputs
(video)
Connectto an external device, such as
a VCR, Set-Top-Box, or a DVD player.
Earphone output
Connect to earphones or external
speakers with built-in
amplifiers.
Cable/ Antenna
Connect to an antenna or cable TV.
S-Video input
Connectto an external device, such as
a VCR, Set-Top-Box, or a DVD player.
Composite inputs
Connectto a
n external device, such as
a VCR, Set-Top-Box, or a DVD player.
VIDEO
Y
P
B
P
R
TV
S-VIDEO
VIDEO
AUDIO
L
R
USB
Insert the USB flash drive into the USB
port.
English
8
Page 17
English
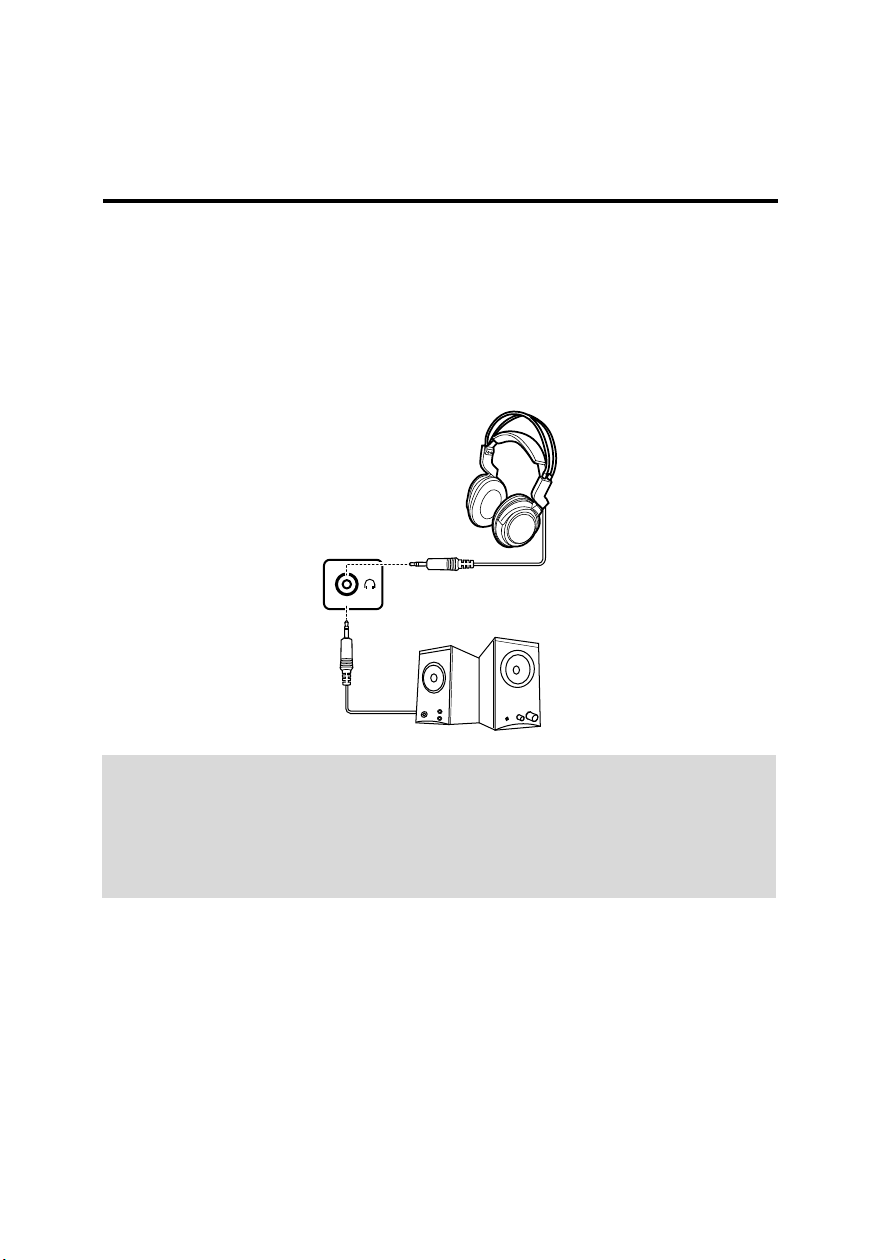
Speakers
Headphones
(Built-in Amplifiers)
2.2 Connecting External Devices
Connect external devices such as VCRs, Set-Top-Box, DVD players, video game
consoles, earphones, or a PC to the TV using the appropriate ports on the rear of the
TV.
2.2.1 Connecting External Earphones
Note:
• External speakers or headphones are not included with the TV.
• The internal TV speakers will not output sound when headphones are
plugged in.
• Use external speakers with built-in amplifiers only.
• Only one external device for sound can be connected at a time.
English
9
Page 18
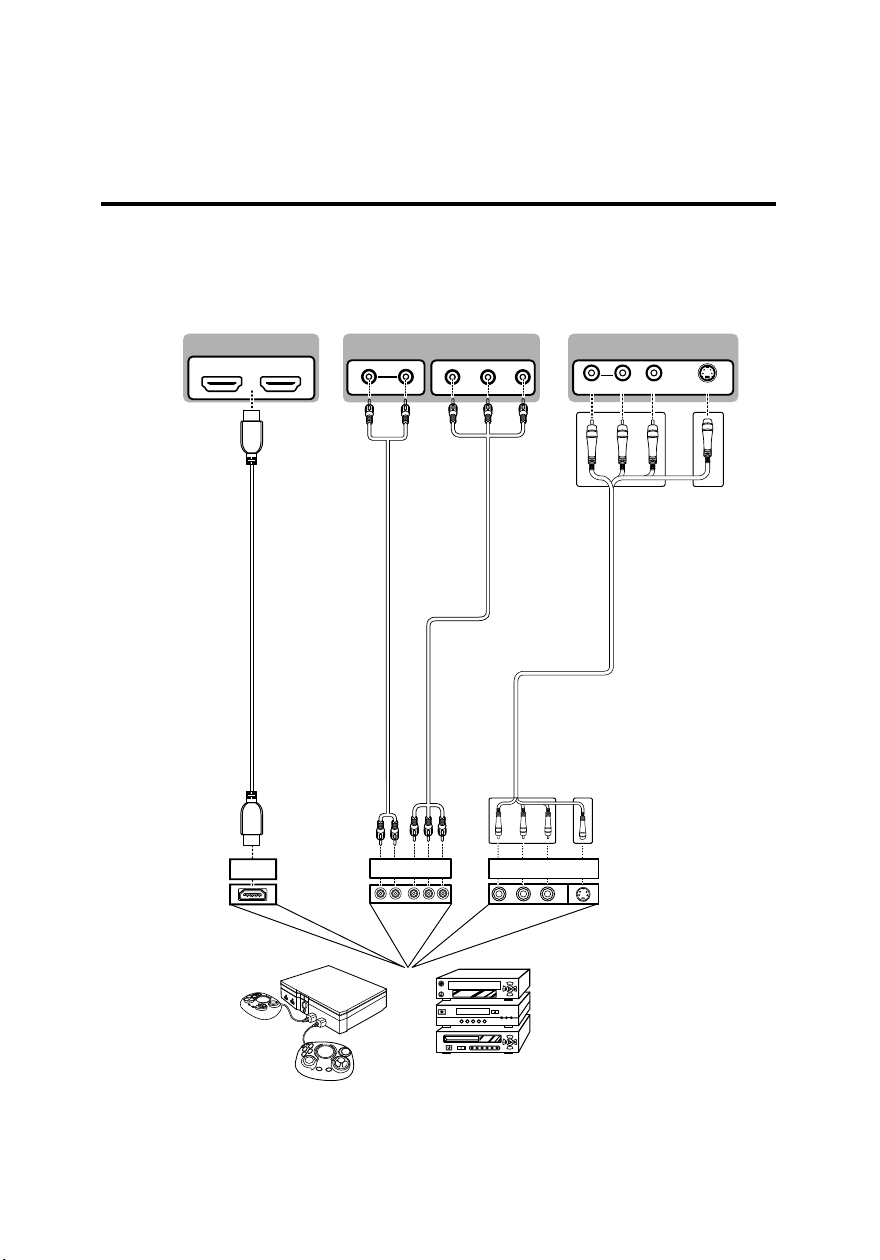
2.2.2 Connecting to AV Devices
Audio Cable
(Optional)
Video Cable
(Optional)
Audio/ Video Cable
(Optional)
HDMI Cable
(Optional)
VCR
STB
DVD
Game Console
A B C
HDMI 1 HDMI 2
AUDIO
RL
or
P
r
Pb
English
or
AUDIO
R L VIDEO
S-Video
Y
YLRHDMI PrP
b
or
RL
VIDEO
S-VIDEO
English
10
Page 19
English
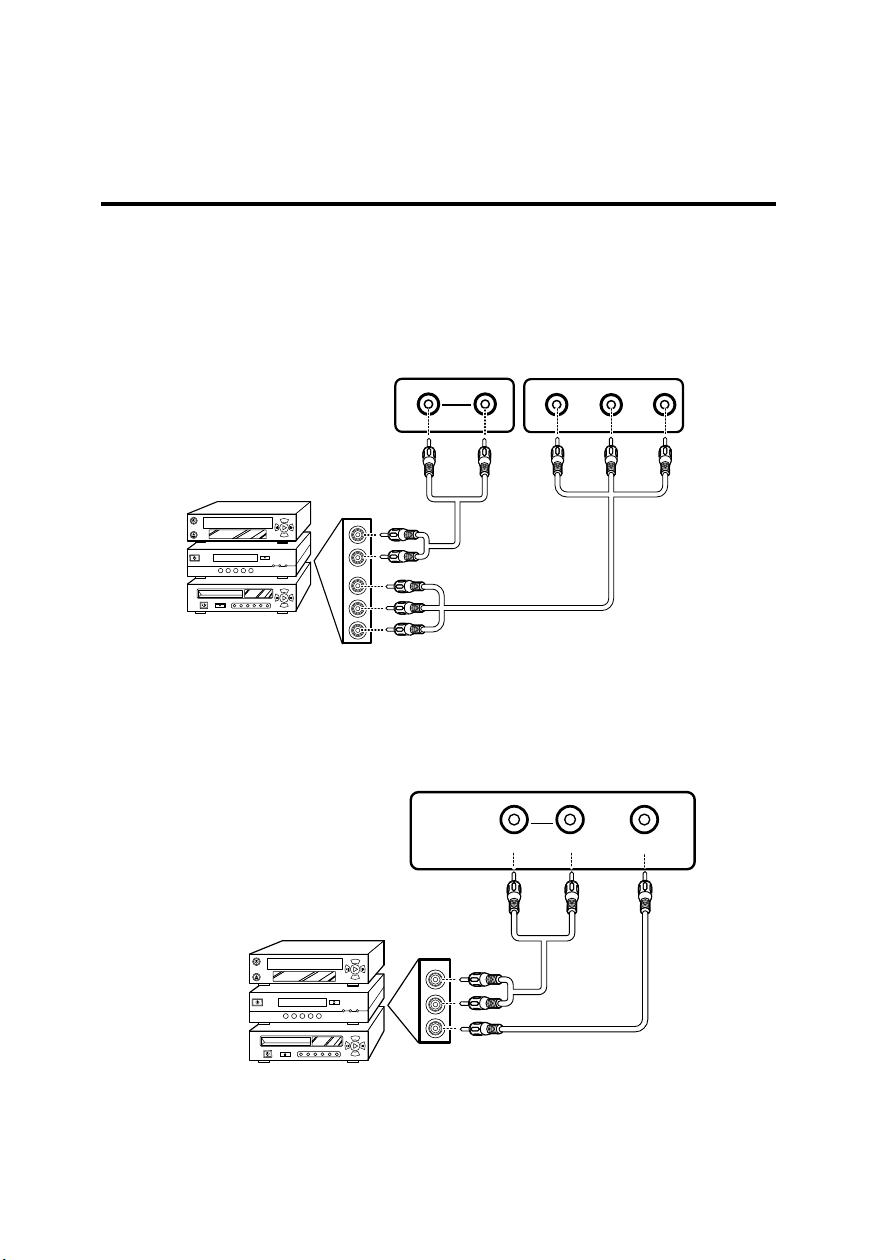
AUDIO
Y
P
b
RL
P
r
VCR
STB
DVD
Video Cable
Audio Cable
(Optional)
(Optional)
R L VIDEO
AUDIO
AV
DVD
Video Cable
Audio Cable
STB
VCR
(Optional)
(Optional)
2.2.3 Connecting a VCR/ STB/ DVD Player Using
Component Video
Connect the TV to a VCR/ STB/ DVD player using the component video inputs.
2.2.4 Connecting a VCR/ STB/ DVD Player Using
Composite Video
Connect the TV to a VCR/ STB/ DVD player using the composite video input.
11
English
Page 20
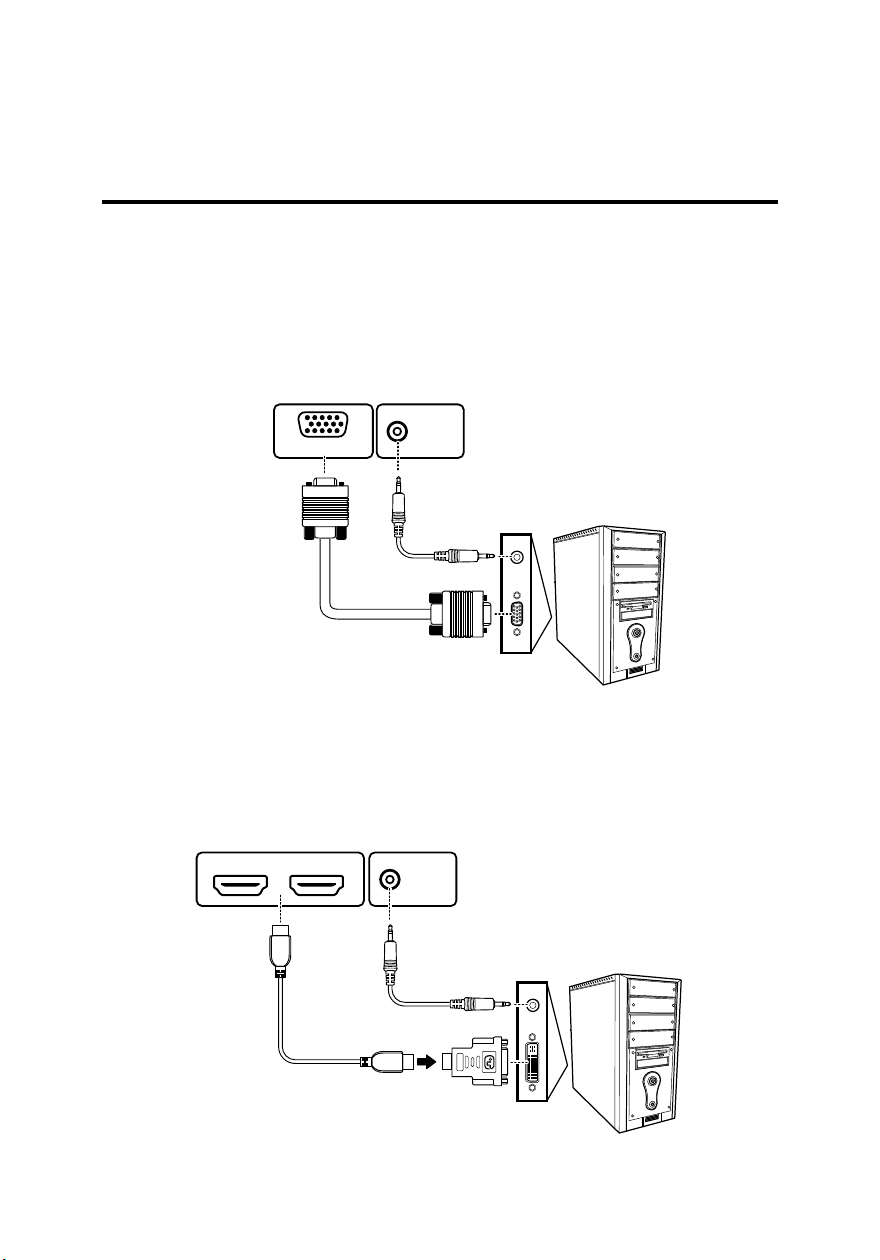
2.2.5 Connecting a PC using VGA
VGA Cable
Audio Cable
PC
(Optional)
(Optional)
PC
Audio Cable
HDMI to DVI Cable
(Optional)
(Optional)
Connect the TV to your PC to use it as the monitor using the VGA port as shown.
1
Connect the VGA port of the TV to the VGA output of the PC.
2 Connect the AUDIO port of your TV to the line out port of the PC to listen to
audio from the PC.
English
VGA
AUDIO
2.2.6 Connecting a PC using DVI
Connect the TV to your PC to use it as the monitor using the DVI port as shown.
Connect the HDMI 1 or HDMI 2 port of the TV to the DVI output of the PC.
1
2 Connect the AUDIO port of your TV to the line out port of the PC of your TV
to listen to audio from the PC.
HDMI1 HDMI2
AUDIO
HDMI
English
12
Page 21
Note1:
When the HDMI cable is connected,connecting the audio cable is not necess.ary.However,it is necessary to do so if a HDMI to DVI cable is connected.
Note2:
CEC FUNCTION
1.One Touch Play-Allows a device to be played and become the active source
with a single button press.
2.System Standby-Enables the user to switch all devices to standby with one
button press.
English
Page 22

2.3 Using the TV
2.3.1 Turning the TV On and Off
1
Press on the control panel or remote control. The power L ED indicator on
the TV changes from amber to bl ue, indi cating t hat the TV is on .
2
Press again . The po wer LED cha nges from b lue to a mber, indicating that
the TV is off
.
2.3.2 Switching Source Signals
Press INPUT on the control panel or remote control to select the incoming source
signal to set TV source for channel search. Press OK to confirm.
2.3.3 Performing an Automatic Channel Search
Before using the TV to view programs, you need to activate the channel search first.
1
Press
MENU
on the control panel or remote control, then select to enter the
Channel menu.
2
Select
Air/Cable
3 Select Auto Scan. Three options are available: Scan all channels, Digital
channel only, and Analog channel only.
• To search for digital channels only, select Digital channel onl y.
• To search for analog channels on ly, select Analog channel only.
• To search for both, select Scan all channels.
4 Press on the remote control to run the channel search.
to set the signal source. (
Air
or
Cable
, default is
Cable
)
English
2.3.4 Selecting Channels
•Press CHS on the control panel or on the remote control to increase the
channel number.
•Press CHT on the control panel or on the remote control to decrease the
channel number.
• Enter the specific channel number by pressing the number buttons on the
remote control.
CH
CH
English
14
Page 23
English
Page 24
English
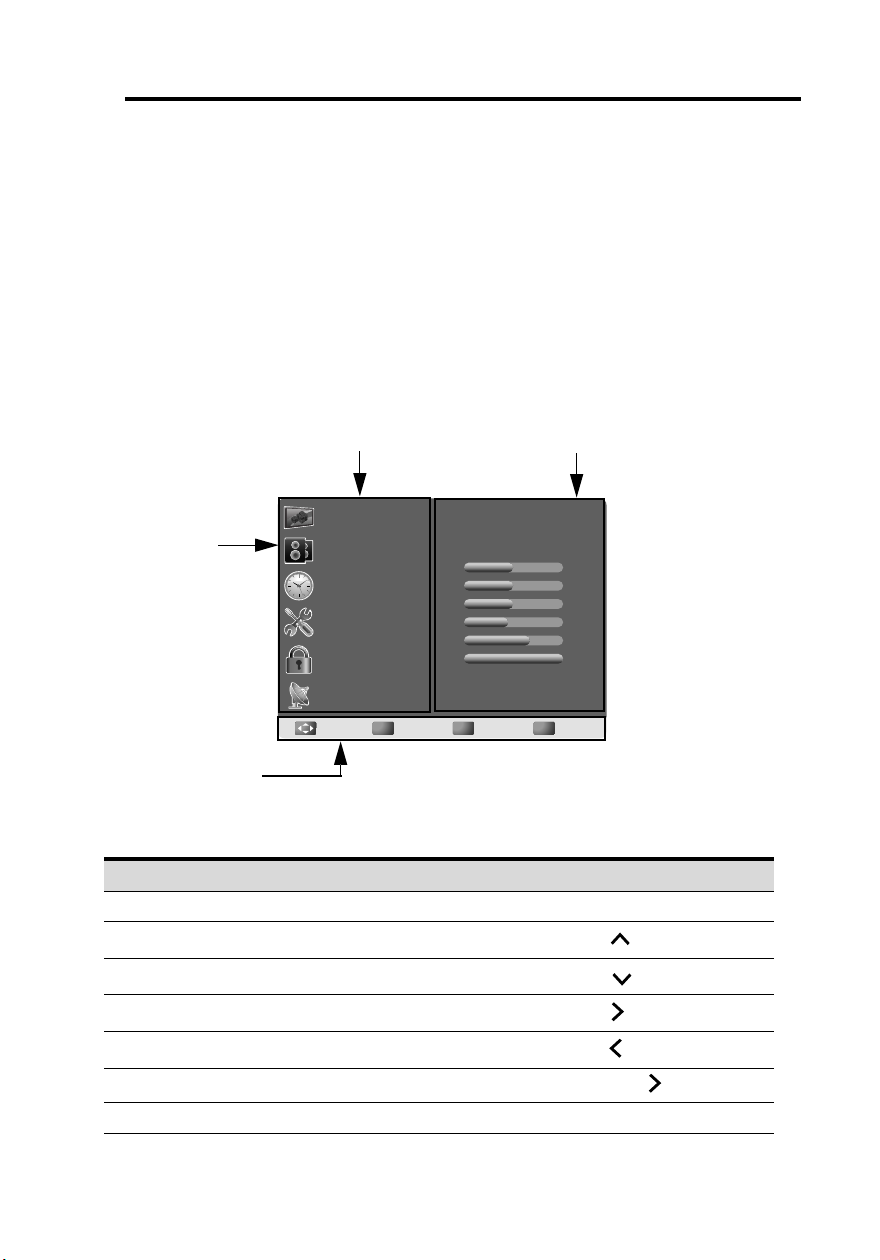
CURRENT MENU:
Displays the title of the
currently chosen menu.
MAIN MENU:
Displays a list of
menu items. The
chosen item is
marked by a
different color
than other menu
items.
INSTRUCTIONS:
Quick instructions
for adjusting the
settings.
ADJUSTABLE ITEMS:
Displays the settings/ values of the
adjustable items.
3 Adjusting On-Screen Display (OSD)
Settings
The On-Screen Display (OSD) menu system provides a quick and simple method to
adjust the TV settings. The OSD menu can be accessed through the buttons either
on the control panel or the remote control.
Before going to details of each OSD item, you may get acquainted with the
placement of the OSD system:
Picture
Return
Standard
Standard
Return
50
50
50
45
70
Menu
100
Exit
Off
Picture Mode
Contrast
Brightness
Sharpness
Tint
Color
Backlight
X-Contrast
Color Mode
OK
EnterMove
Function TV Control Panel Remote Control
OSD Menu MENU
Up
Down
Increase
Decrease VOL Select/ Apply MENU
Return INPUT
CH
S
CH
T
VOL +
MENU
Arrow
Arrow
Arrow
Arrow
OK/ Arrow
RETURN
English
16
Page 25
English
Cable
19
Channel
Air/Cable
Auto Scan
Favorite
Show/Hide
Channel No.
Channel Label
DTV Signal
OK
EnterMove
Return
Return
Menu
Exit
OK
EnterMove
Return
Return
Menu
Exit
Channel
Scan all channels
Digital channel only
Analog channel only
3.1 OSD Setting Menus
Follow the instructions indicated on the bottom of the OSD Function Menu. Press
/ on the control panel or /
CH CH
arrow keys on the remote control to scroll
through the menus. press VOL+ on the control panel or OK on the remote control to
select an item and then press MENU to exit the OSD menu. The following menus
can be set by different adjustment methods.
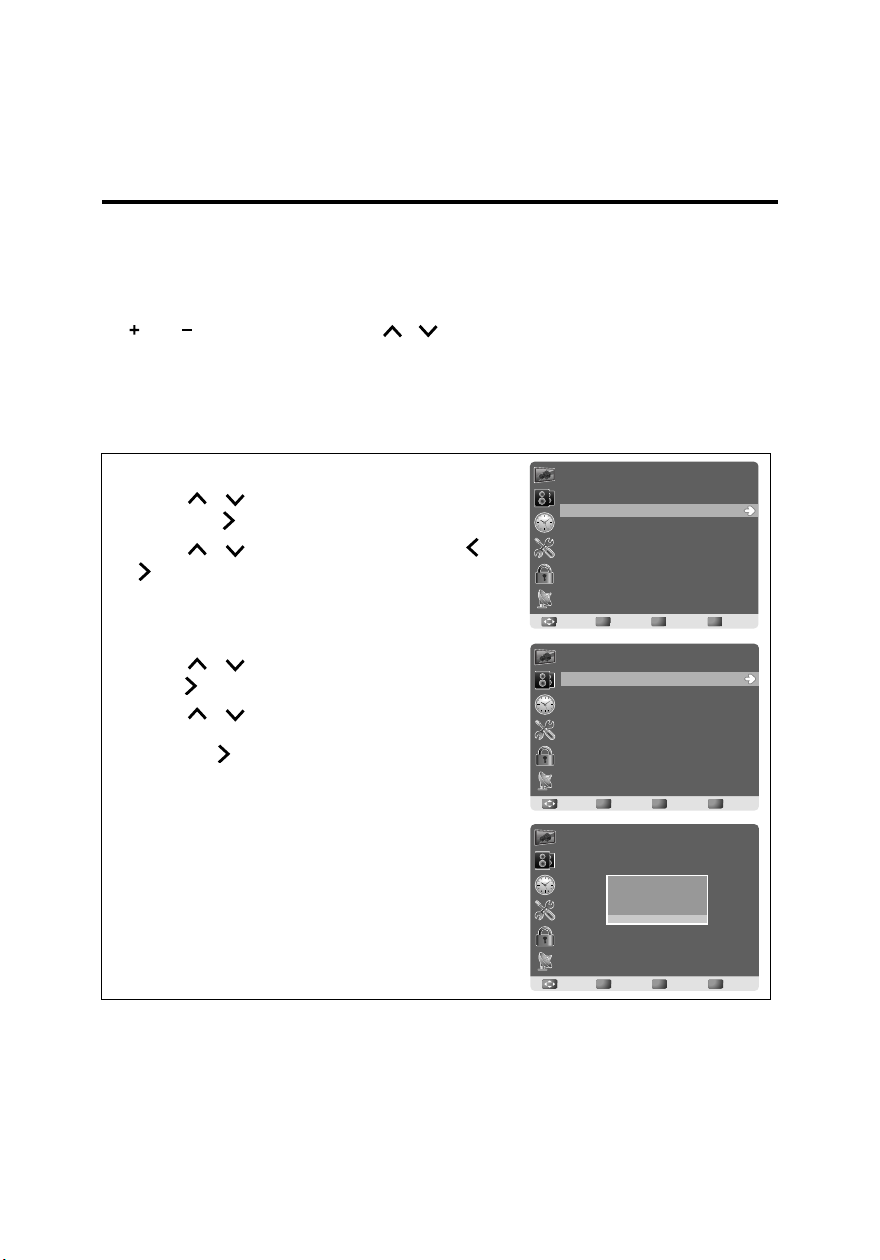
3.2 Storing Channels into Memory
1 Press MENU to display the OSD main menu.
2 Press / to select the Channel menu, and
then press to enter.
3 Press / to select Air/Cable and use /
to select Air or Cable.
Air: RF signal programs by air.
Cable: RF signal programs by cable.
4 Press / to select Auto Scan, and then
press to enter.
5 Press / to select Scan all channels,
Digital channel only, or Analog channel only,
and press to perform Auto Scan function. To
stop scanning, press MENU at any time.
6 The Auto Scan screen will be shown, and after it
is done, the screen will return t o the first fo und
channel.
Channel
17
English
RF CH : 1
RF CH :
Found : 0
Found :
Analog : 0
Analog :
Digital : 0
Digital :
OK
EnterMove
1
0
0
0
Return
Menu
Return
Exit
Page 26
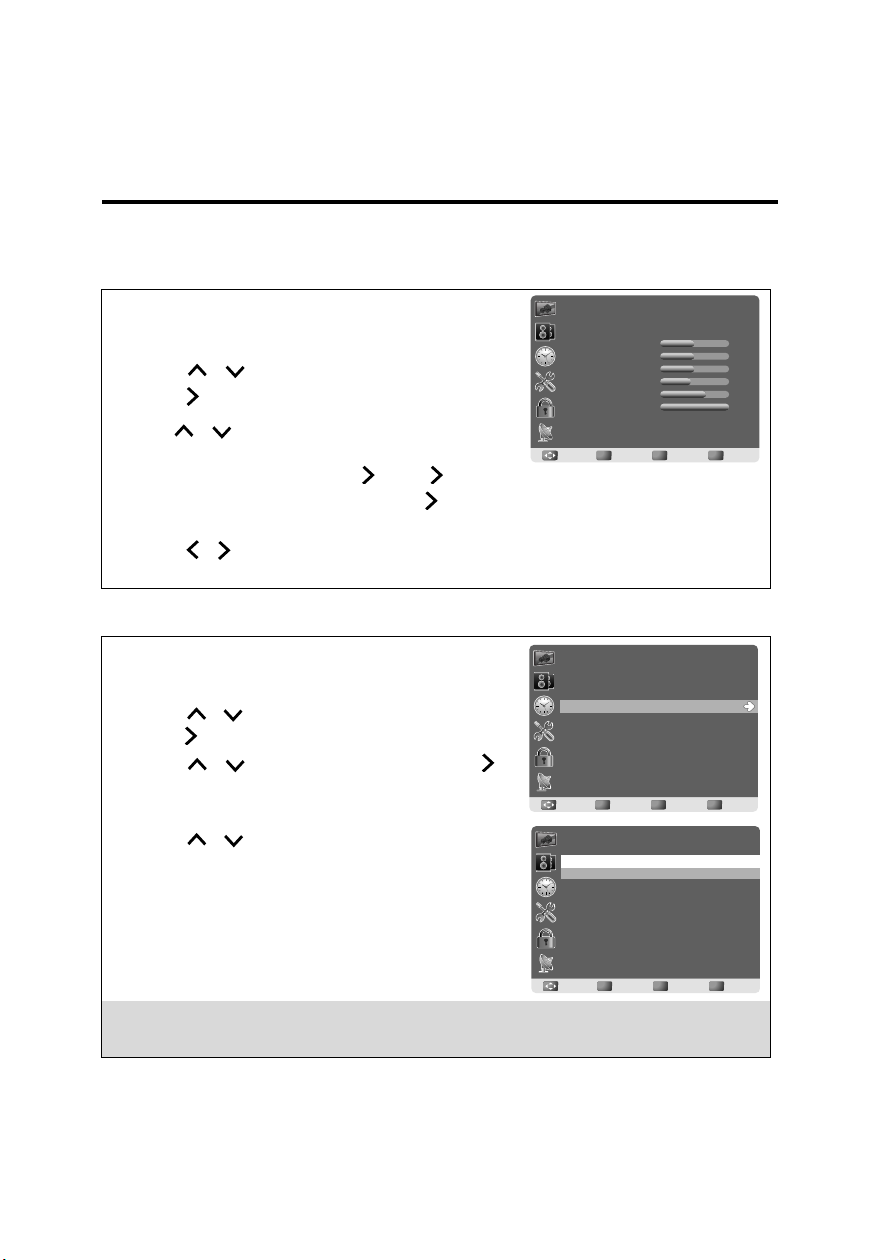
3.3 Viewing the Menus
50
50
50
45
70
100
Standard
Off
Standard
Picture
Picture Mode
Contrast
Brightness
Sharpness
Tint
Color
Backlight
X-Contrast
Color Mode
OK
EnterMove
Return
Return
Menu
Exit
1 Press MENU to display the OSD main menu.
There are six top menus on the screen: Picture,
Audio, Time, Setup, Lock, and Channel.
2 Press / to select your desired top menu.
3 Press to enter the menu you select.
4 Use / to select the control you want to
adjust.
5 When selecting the control with , press to enter
next level menu or enable the function. ( will only
appear when the control is highlighted)
6 Press / to adjust or select the settings.
7 Press MENU to exit from the OSD menu.
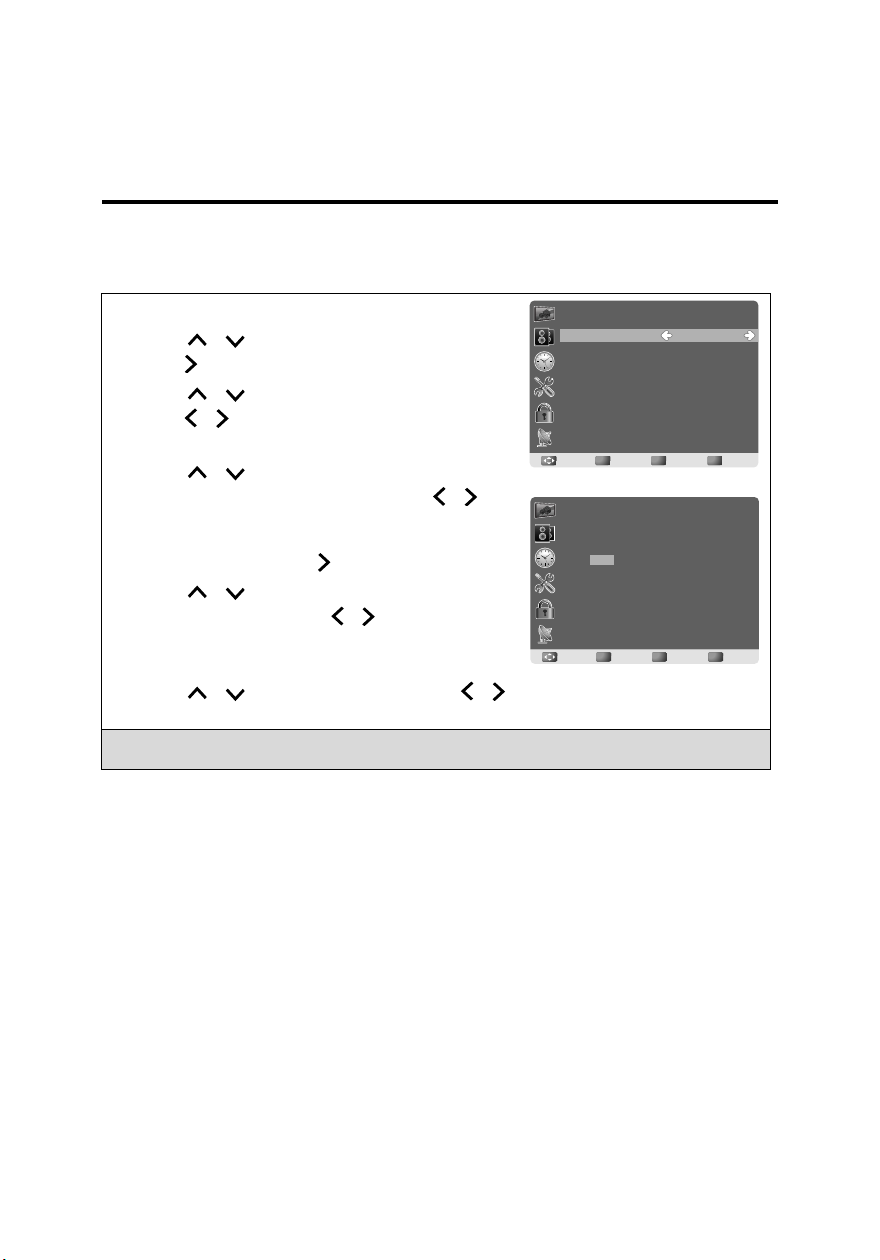
3.4 Favorite Channel Setting
English
To set your favorite chan nel into memo ry:
1 Press MENU to display the OSD main menu.
2 Press / to select Chann el menu, and then
press to enter.
3 Press / to select Favorite, then press
Channel
Air/Cable
Auto Scan
Favorite
Show/Hide
Channel No.
Channel Label
DTV Signal
Cable
19
to enter Favorite setting.
OK
Return
EnterMove
Return
4 Press / select the channel you’d like to be
your favorite channel. Press OK to confirm your
selection.
5 To cancel the selection, press OK again on the
selected channel.
6 Press MENU to exit.
Channel
Channel No.
8
8
9
10
11
12
13
14
15
16
17
Channel Name Favorite
OK
Return
EnterMove
Return
Note:
To view your favorite channels, press the FAV. button to show Favorite List and select
your favorite channels that have alread y been stor ed.
English
Menu
Exit
V
V
Menu
Exit
18
Page 27
English
Cable
19
Channel
Air/Cable
Auto Scan
Favorite
Show/Hide
Channel No.
Channel Label
DTV Signal
OK
EnterMove
Return
Return
Menu
Exit
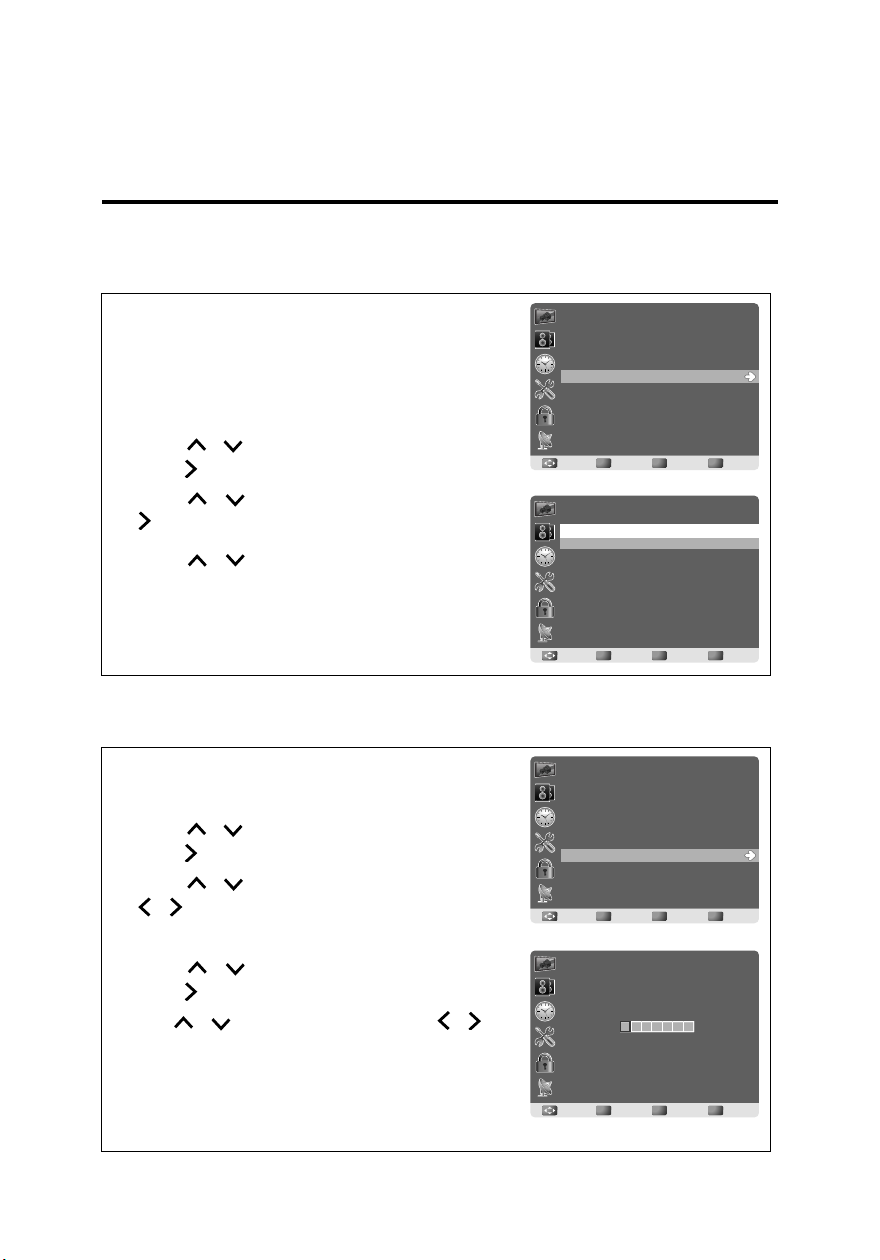
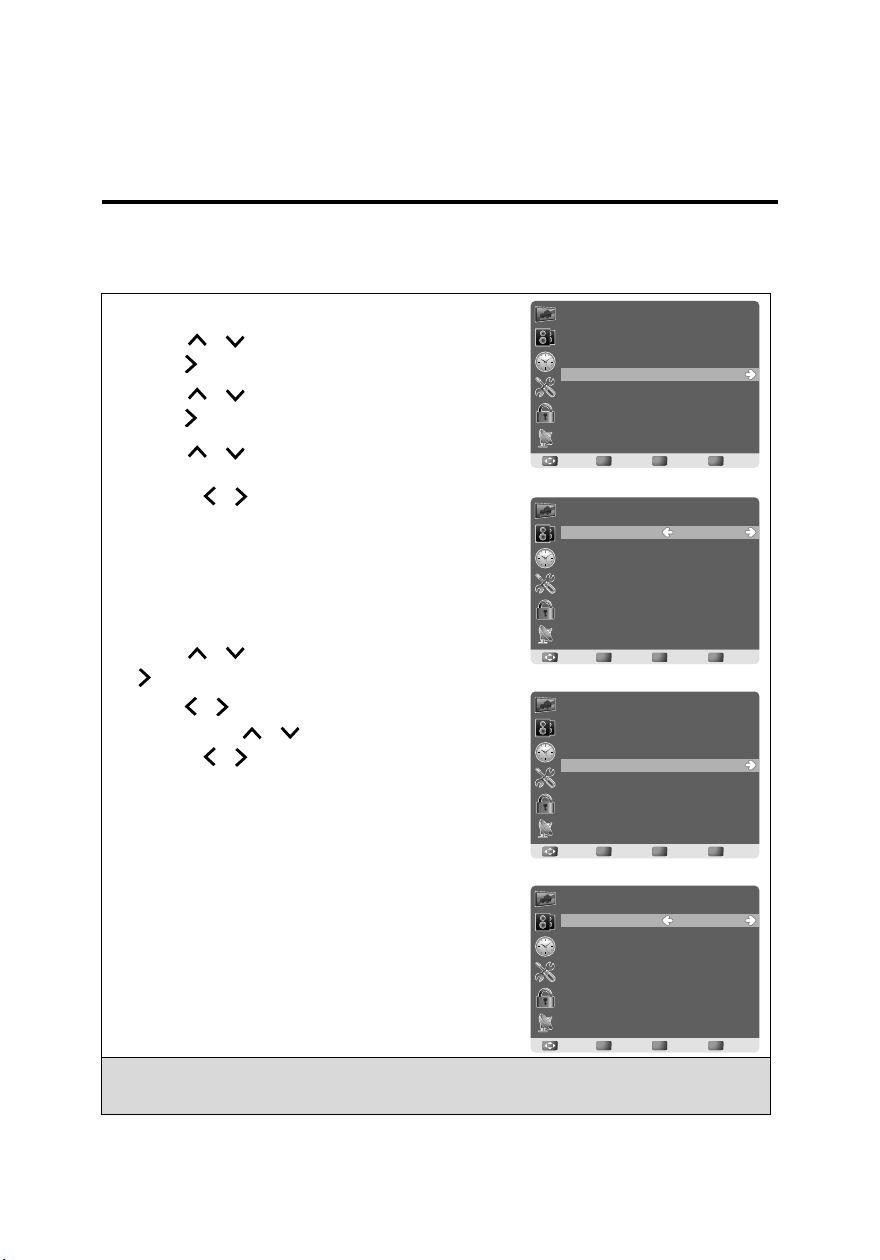
3.5 Showing/Hiding Channel
When the channel is hidden, it will not appear on the
screen when you browse the channels with CH S
/
CHT.
To show/hide a chan nel:
1 Press MENU to display the OSD main menu.
2 Press / to select Chann el menu, and then
press to enter.
3 Press / to select Show/Hide, then press
to enter Show/Hide setting.
4 Press / to select the channel you want to
Show/Hide, and check or uncheck it with OK.
5 Press RETURN to return back to previous menu
in Channel.
3.6 Channel Name Setting
Channel
Channel No. Channel Name Show/Hide
2
8
9
10
11
12
13
14
15
16
17
OK
EnterMove
V
V
V
V
V
V
V
V
V
V
Return
Menu
Return
Exit
To edit a name for the current ch annel:
1 Press MENU to display the OSD main menu.
2 Press / to select Chann el menu, and then
press to enter.
3 Press / to select Channel No., then press
/ t o select th e channel you want to edit the
name.
4 Press / to select Channel Label, then
press to enter Channel La bel setting.
5 Use / to choose letters or signs, / to
move forward or backward.
6 After you input the channel name, press
RETURN or OK to complete the setting.
7 Press RETURN to return back to previous menu
in Channel.
English
19
Channel
Air/Cable
Auto Scan
Favorite
Show/Hide
Channel No.
Channel Label
DTV Signal
OK
Channel
OK
Cable
19
Return
EnterMove
EnterMove
Menu
Return
Exit
Return
Menu
Return
Exit
Page 28
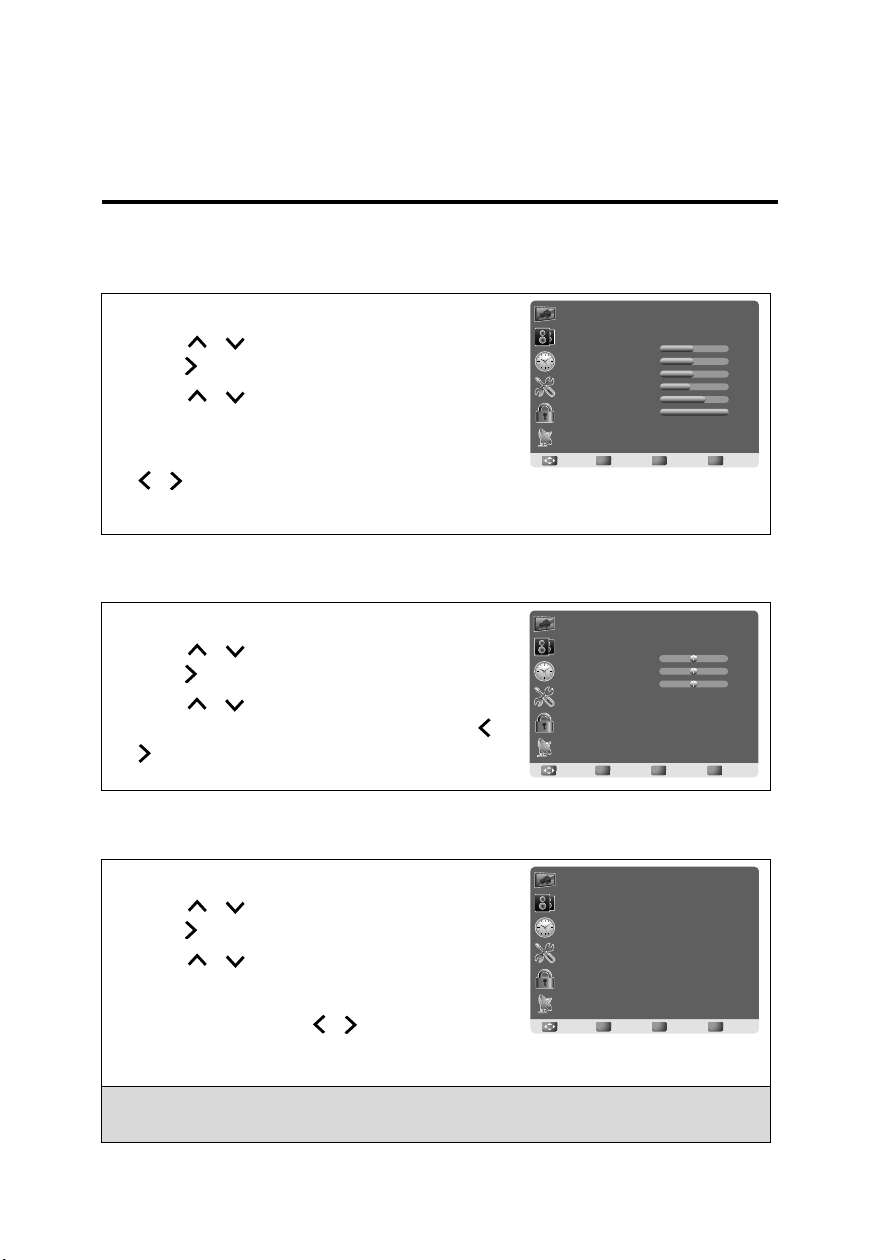
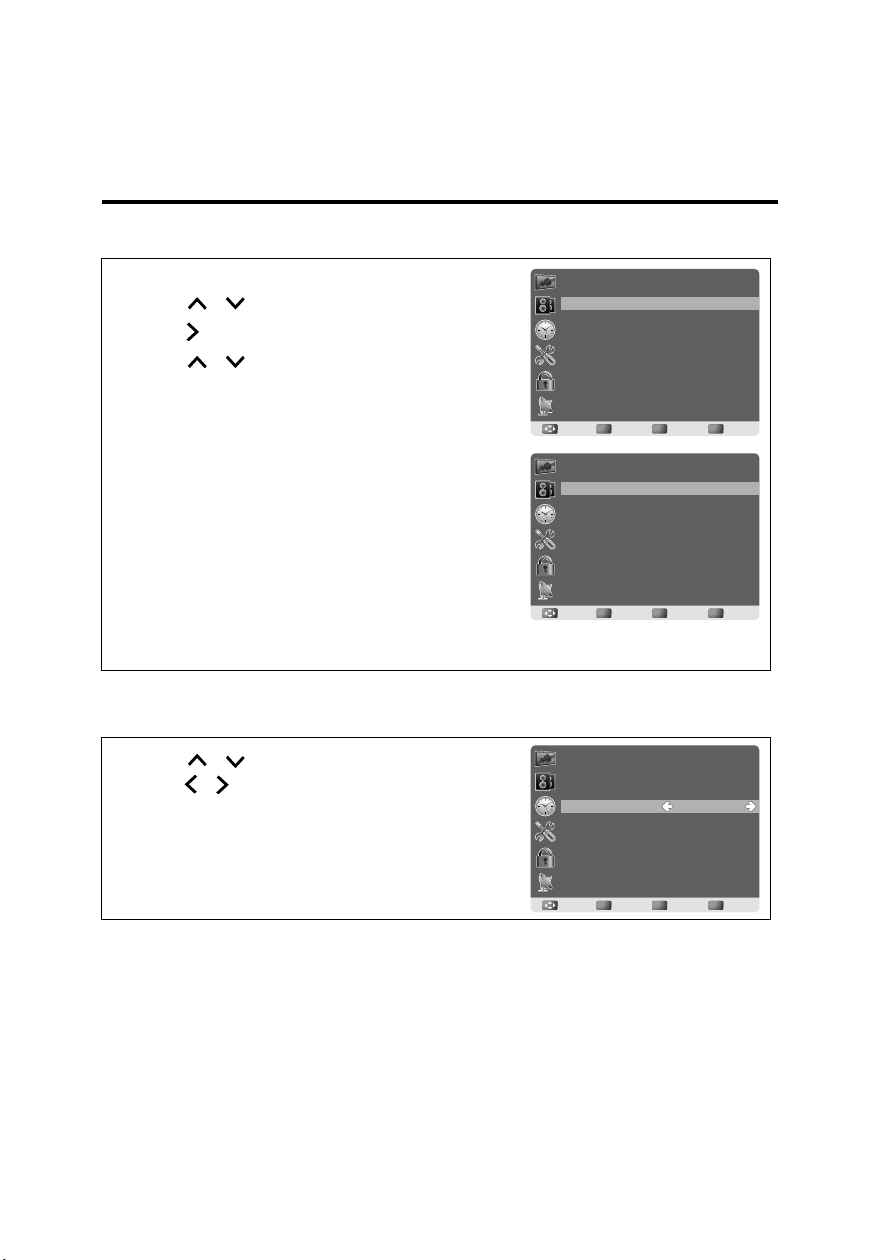
3.7 Setting up Picture Options
1 Press MENU to display the OSD main menu.
2 Press / to select Picture menu, and then
press to enter.
3 Press / to select the control of Picture
Mode, Contrast, Brightness, Sharpness, Tint,
Color, Backlight, X-Contrast, Color Mode,
Screen Mode, Noise R edu ction , and then press
/ to adjust the level.
4 Press RETURN to return back to previous menu in Picture.
3.8 Setting up Audio Options
Picture
Picture Mode
Contrast
Brightness
Sharpness
Tint
Color
Backlight
X-Contrast
Color Mode
OK
English
Standard
Standard
Return
EnterMove
Return
50
50
50
45
70
100
Off
Menu
Exit
1 Press MENU to display the OSD main menu.
2 Press / to select Audio menu, and then
press to enter.
3 Press / to select the control of Equalizer,
Audio
Equalizer
Balance
Treble
Bass
AVL On
Standard
Balance, Treble, Bass, AVL, and then press /
to select your desired option.
4 Press RETURN to return back to top menu.
OK
Return
EnterMove
Return
3.9 Configuring System Setting
1 Press MENU to display the OSD main menu.
2 Press / to select Setup menu, and then
press to enter.
3 Press / to select the control of Menu
Language, Transparent, OSD Time Out,
Closed Caption, Restore Default, Input Label,
Media, and then press / to select your
desired option.
4 Press RETURN to return back to top menu.
Note:
The Media is available only when a USB drive is connected and the input source is
switched to USB.
Setup
Menu Language
Transparent
OSD Time Out
Closed Caption
Restore Default
Input Label
Media
OK
EnterMove
Return
Return
English
English
25%
15 Sec.
0
0
0
Menu
Exit
Menu
Exit
20
Page 29
English
3.10 Setting up Time menu
1 Press MENU to display the OSD main menu.
2 Press / to select Time menu, and then
press to enter.
3 Press / to select Sleep Timer, and then
press / to to set Sleep Timer from 5~24 0
Time
Sleep Timer
Time Zone
Daylight Saving Time
Time Format
Auto Sync
Clock ----/--/-- --:--
Wake Up ----/--/-- --:--
Off
Pacific
Off
12-hour
On
Min, or Off.
OK
Return
4 Press / to select Time Zone, and select
EnterMove
Return
Menu
the correct time zone of your area with / .
The displayed time of Clock will be changed at
the same time automatically. To adjust Clock,
select Clock and press .
5 Press / to select Daylight Saving Time,
Time
Clock
2010 / /
01 01 08 : 26 PM
OK CANCEL
and select On or Off with / according to the
time zone of your area. The Clock time will
OK
Return
change automatically.
EnterMove
Return
Menu
6 Press / to select Time Format, and / to select 12-hour or 24-hour.
7 Press RETURN to return back to top menu.
Note:
The Clock time can only be adjusted manually when Auto Sync is set to Off.
Exit
Exit
21
English
Page 30
3.11 Closed Caption Setting
OK
EnterMove
Return
Return
Menu
Exit
Setup
CC Mode
Basic Selection
Advanced Selection
Option
CC Off
CC1
Basic
1 Press MENU to display the OSD main menu.
2 Press / to select Setup menu, and then
press to enter.
3 Press / to select Closed Caption, then
press to to enter Closed Caption setting.
4 Press / to select CC Mode, Basic
Selection, Adavanced Selectio n, or Option,
and use / to make your choice.
Basic Selection: To set basic analog closed
caption options. (CC1~CC4, Text1~Text4, Off)
Advanced Selection: To select closed caption
signal formats and set up caption modes for
digital TV channels. (Service1~6, Basic)
For detailed Close Caption setting:
1 Press / to select Option, and then press
to enter Option setting.
2 press / to select the Mode to be Custom,
and then use / to ad just desire d option s
and use / to adjust detailed settings.
Setup
Menu Language
Transparent
OSD Time Out
Closed Caption
Restore Default
Input Label
Media
HDMI CEC
OK
EnterMove
Setup
CC Mode
Basic Selection
Advanced Selection
Option
OK
EnterMove
English
English
25%
15 Sec.
On
Return
Menu
Return
Exit
CC Off
CC1
Basic
Return
Menu
Return
Exit
Setup
Mode
Font Style
Font Size
Font Edge Style
Font Edge Color
FG Color
BG Color
FG Opacity
BG Opacity
OK
EnterMove
Custom
Default
Default
Default
Default
Default
Default
Default
Default
Return
Menu
Return
Exit
Note:
When you select the Mode to be Default, you can not adjust the detailed settings and
those parameters would be set according to broadca st cont ent.
English
22
Page 31

English
OK
EnterMove
Return
Return
Menu
Exit
Lock
Change Password
System Lock
Unrated Lock
Input Block
US
Canada
RRT Setting
Reset RRT
On
Off
3.12 Using the Parental Controls
1 Press MENU to display the OSD main menu.
2 Press / to select Lock menu, and then
Lock
Enter Password
----
press to enter.
3 In th e Enter Password field, enter the password.
(The default password is 0000.)
4 Move to System Lock, and select On to enable
the detailed settings.
OK
Return
Return
Menu
Exit
EnterMove
5 Move to US or Canada rating system.
US: Press to set TV or MPAA ratings.
TV
1 Press / to select TV, and then press to
enter TV rating system setting.
The following screen will allow you to customize
the following TV ratings:
Y (all children)
Y7 (older children)
G (general audience)
PG (guidance suggested)
14 (strongly cautioned)
MA (mature audience)
You can also customize the T V ratings for the
following content:
Lock
Change Password
System Lock
Unrated Lock
Input Block
US
Canada
RRT Setting
Reset RRT
OK
EnterMove
On
Off
Return
Menu
Return
Exit
ALL (All types content)
FV (fantasy violence)
V (violence)
S (sexual situations)
Lock
TV
MPAA
L (adult language)
D (sexsual dialog)
2 Press OK to set or reset each area.
3 Press MENU to exit.
Note:
If you forget your password, use the super password, 70718512, to enter Lock menu
and reset your password.
English
23
OK
Return
Return
Menu
Exit
EnterMove
Page 32

MPAA
Press / to select MPAA, and then press
1
to enter MPAA rating system setting.
2 Press / to select your desired MPAA
ratings level.
The MPAA ratings level are defined as following:
G (general audience)
PG (parental guidance suggested)
PG-13 (recommended for children 14 years of
age or older)
R (mature audience)
NC-17 (no one under 17 years of age)
X (adult audience only)
3 Press OK to switch between Lock and Unlock.
4 Press MENU to exit.
Canada: Press to set Ca nadian English and
French ratings.
Canadian English
1 Press / to select Canada Eng.
2 Press to enter.
3 Press / to select yo ur desired Canadian
English rating level.
Lock
TV RATING
ALL FV V S L D
TV-Y
TV-Y7
TV-G
TV-PG
TV-14
TV-HA
:Block
OK
Return
EnterMove
Return
Lock
G Unlock
PG
PG-13
R Unlock
NC-17
X Unlock
OK
EnterMove
Unlock
Unlock
Unlock
Return
Return
Lock
Change Password
System Lock On
Unrated Lock Off
Input Block
US
Canada
RRT Setting
Reset RRT
OK
Return
EnterMove
Return
English
Menu
Exit
Menu
Exit
Menu
Exit
The Canadian English rating levels are defined as
following:
C (children)
C8+ (children eight years and older)
G (general progra mming, suitable for all
audiences)
PG (parental guidance)
14+ (viewers and older)
18+ (adult programming)
4 Press OK to switch between Lock and Unlock.
5 Press MENU to exit.
Lock
Canada Eng
Canada Fre
OK
Return
EnterMove
Menu
Return
English
Exit
24
Page 33
English
Canadian French
1 Press / to select Canada Fre.
Lock
2 Press to enter.
3 Press / to select yo ur desired Canadian
French rating level.
The Canadian French rating levels are defined as
following:
G (genenral)
OK
Lock
8ans+ (children eight years and older)
13ans+ (not appropriate for children of less t han
13 years)
16ans+ (not appropriate for children of less t han
16 years)
18ans+ (reserved to adults)
OK
4 Press OK to switch between Lock and Unlock.
5 Press MENU to exit.
3.13 To Block Unrated Movie or TV Programs
1 Press / to select Unrated Lock, then
press / to select On or Off. When On is
selected all programs that are not rated will be
blocked.
2 Press MENU to exit.
Lock
Change Password
System Lock
Unrated Lock
Input Block
US
Canada
RRT Setting
Reset RRT
C8+
PG
14+
18+
EnterMove
8ans+
13ans+
16ans+
18ans+
EnterMove
C
G
G
Unlock
Unlock
Unlock
Unlock
Unlock
Unlock
Return
Menu
Return
Exit
Unlock
Unlock
Unlock
Unlock
Unlock
Return
Menu
Return
Exit
On
On
25
English
OK
Return
Return
Menu
Exit
EnterMove
Page 34

3.14 To Set Rating Region Table
RRT Setting defines the rating standard for a
particular geographic region and/or country.
1 Press / to select RRT Setting, and then
press to enter PRT setting.
2 Select each adjustable setting with / , then
press / to select the sub-selection .
3 Press MENU to exit.
Note:
The picture here only shows an example of the content o f RRT Setting. How ever, the
selections and sub-selections of RRT Setting may be different in your OSD menu
according to the local broadcasting system.
To reset RRT setting, mo ve to Reset RR T, and press to reset.
Lock
Change Password
System Lock
Unrated Lock
Input Block
US
Canada
RRT Setting
Reset RRT
OK
EnterMove
On
Off
Return
Menu
Return
3.15 To Change Password
English
Exit
1 Press / to select Change Password, and
then press to enter Change Password
setting.
2 Move t o Enter Old Password, and then enter the
old password with number keys.
3 Enter your new password on Enter New
Password.
4 Enter your new password again on Confirm
Password. After you complete the last step, the
screen will return to the top page of Lock menu.
If so, the password has been changed
successfully.
Lock
Change Password
System Lock
Unrated Lock
Input Block
US
Canada
RRT Setting
Reset RRT
OK
EnterMove
Lock
Enter Old Password
Enter New Password
Confirm Password
OK
EnterMove
Return
Return
Return
Return
English
On
Off
Menu
Exit
----
----
----
Menu
Exit
26
Page 35

English
3.16 To Block by Input Source
1 Press / to select Input Block, and then
press to enter.
2 Press / to select the input source, then
/ to select from Block or UnBlock.
3 Press MENU to exit.
3.17 To Restore Factory Setting
1 Press MEMU to display the OSD main menu.
2 Press / to select Setup menu, and then
press to enter.
3 Press / to select Restore Default, and
then press to restore the factory default
setting.
4 Select Yes and press OK to confirm the setting
(Restore Factory Setting won’t reset pr ogram
data, for in c as e ne e d to g et l at e s t pr o g ra m da ta,
please execute Auto Scan in Channel menu
again).
Lock
Change Password
System Lock
Unrated Lock
Input Block
US
Canada
RRT Setting
Reset RRT
OK
EnterMove
Lock
TV
AV
S-Video
Component
HDMI
PC
OK
EnterMove
Setup
Menu Language
Transparent
OSD Time Out
Closed Caption
Restore Default
Input Label
Media
OK
EnterMove
On
Off
Return
Menu
Return
Exit
UnBlock
UnBlock
UnBlock
UnBlock
UnBlock
UnBlock
Return
Menu
Return
Exit
English
25%
15 Sec.
Return
Menu
Return
Exit
27
English
Page 36

3.18 Using PC Function
1 When in PC source, press MENU to display the
OSD main menu.
2 Press / to select the Picture menu, and
then press to enter.
3 Press / to select your desired controls,
and press / to adjust.
4 For advanced PC functions, select Advanced
(only in PC source), and then press to enter.
5 Press / to select Auto (Auto adjustment),
H-Pos (H-Position), V-Pos (V-Position), Clock,
or Phase, and adjust the level with / .
Note:
When in PC source, the other menus are the same as or similar to when in other
source.
When there is no signal in the PC mode, No Signal will be displayed on th e scree n an d
the TV will automatically turn into power-saving mode after a few seconds' idleness.
Press POWER on the remote control and the TV will return to VGA mode.
Picture
Picture Mode
Contrast
Brightness
Backlight
Advanced
Color Mode
OK
Standard
Standard
Return
Return
Menu
Exit
EnterMove
English
50
50
100
English
28
Page 37

4
LED Panel Size 23 inch TFT
Screen Format 16:9
Panel Resolution 1920 (H) x 1080 (V)
TV System ATV: NTSC DTV: ATSC
Video System
Photo System USB (JPEG)
Audio System
Built-in Stereo
Amplifier Output
ACInput 100V~240V / 50Hz~60Hz
Power Consumption
Standby Power
Consumption (W)
AC Power Supply
(Vac)
Dimension W x H x D 560.9(22.08”)mm x 388.1(15.28”) mm x 190.1 (7.48”)mm
Unit Weight
Unit Weight
(w/o stand & base)
Note: Specifications are subject to change without notice.
Specifications
HDMI Input x 2
YPbPr Input x 1
S-Video Input x1
Composite Input x 1
VGA (PC) Input x 1
Tuner Input x 1
AV/S-Video: (RCA x 1) R/L in
HDTV: (RCAx1) R/L in
HDMI: HDMI1/HDMI2
USB (MP3)
PC Audio in: Phone jack
Audio out: Earphone jack
Analog: MTS Digital: AC3
5W+5W
45W (Typical)
< 1 (W)
100~240
4.5 Kg
3.7 Kg
9.8 Ibs
8.1 Ibs
29
English
Page 38

FACTORY PRESET TIMING TABLE(PC MODE):
MODE RESOLUTION
1 640×480 @60Hz 31.469 59.941
2 800×600 @60Hz 37.879 60.317
3 1024×768 @60Hz 48.363 60.004
4 1152×864 @75Hz 67.5 75
5 1280×720 @60Hz 44.955 59.940
6 1280×960 @60Hz 60 60
7 1280×1024 @60Hz 63.981 60.020
8 1440×900 @60Hz 55.935 59.887
9 1680x1050 @60Hz 65.290 59.954
10 1920x1080 @60Hz 67.5 60.00
HORIZONTAL
FREQUENCY (KHz)
FREQUENCY (Hz)
Video mode
MODE RESOLUTION
1 720×480i @60Hz
2 720×480p @60Hz
VERTICAL
3 1280×720p @60Hz
4 1920×1080i @60Hz
5 1920×1080p @60Hz
6 1920×1080p @24Hz
7 1920×1080p @30Hz
English
30
Page 39

SAFETY PRECAUTIONS
This LED TV is manufactured and testd on a ground principle that a user’s
This LED TV is manufactured and testd on a ground principle that a user’s
safety comes first.However,improper use or installation may result danger
safety comes first.However,improper use or installation may result danger
to the LED TV as well as to the user .Carefully go over the following WAR
to the LED TV as well as to the user .Carefully go over the following WAR
-NINGS before installation and keep this guide handy.
-NINGS before installation and keep this guide handy.
Warnings
This LED TV should be operated only at the correct power sources indicated
on the label on the rear end of the LED TV . If you unsure of the power supply
in your residence,consult your local dealer or power company .
Do not try to repair the LED TV by yourself as it contains no user-serviceable
parts.The LED TV should be repaired by a qualified technician only.
Do not remove the LED TV cabinet.There is high-voltage parts inside that may
cause electric shock to human bodies,even when the power cord is disconnec
-ted.
Stop using the LED TV if the cabinet is damaged.Have it checked by a service
technician.
Put your LED TV only in a clean dry environment.Unplug the LED TV immediat
-ely if it gets wet,and consult your service technician.
Always unplug the LED TV before cleaning it.Clean the cabinet with a clean dry
cloth.Apply non-ammonia based cleaner onto the cloth,not directly onto the glass
screen.
Keep the LED TV away from magnetic objects,motors,TV sets,and transformer.
Do not place heavy objects on the cable or power cord.
For PLUG CABLE EQUIPMENT,the Socket-outlet shall be installed near the
equipment and shall be easily accessible.
English
31
Page 40

CARE AND MAINTENANCE
Care
Care
Avoid exposing your LED TV directly to sunlight or other heat source.
Place your LED TV away form the sunlight to reduce glare.
Put your LED TV in a well ventilated area.
Do not place anything heavy on top of your LED TV .
Make certain your LED TV is installed in a clean and moisture-free area.
Keep your LED TV away from magnets,motors,transformers,speakers,
Keep your LED TV away from magnets,motors,transformers,speakers,
and other TV sets.
and other TV sets.
Safety Tips
If smoke,abnormal noise or odor appears to arise from your LED TV.Rem
-ove the power cord immediately and call your service center.
CAUTION-Never remove the rear cover of your LED TV cabinet.The display
unit inside contains high-voltage and may cause electric shock to human
bodies.
Never try to repair your LED TV yourself.Always call your authorized service
center or a qualified technicain to fix it.
TROUBLESHOOTING
No Power
Make sure A/C power cord is securely connected to the power supply is firmly
connected to the TV.
Plug another electrical device into the power outlet to verify the outlet is working.
Power on but no screen image
Make sure the video are tightly secured.
Your have selected the correct video input.
Adjust brightness.
Make sure all cables are installed.
Wrong or abnormal colors
If any colors(red,green,blue) are missing,check the video cable to make sure it
is securely connected.Loose or broken pins in the cable connector could cause
an improper connection.
Connect the TV unit to another video source or use another TVs to make sure
the video source is no problem.
The design and specifications are subject to change without notice.All rights reserved.
English
32
Page 41

Explicación de los símbolos de ADVERTENCIA
Voltaje peligroso: El símbolo del relámpago con una punta de flecha dentro del trián
gulo equilátero tiene la intención de alertar al usuario acerca de la presencia de volt
aje peligroso dentro del producto que podría tener la magnitud suficiente como para
constituirse en un riesgo de descarga eléctrico para las personas.
Instrucciones: El signo de exclamación dentro del triángulo equilátero indica al usua
rio la presencia de instrucciones de funcionamiento y mantenimiento en la documen
ación que acompaña al producto.
Instrucciones de seguridad
1) Lea estas instrucciones.
2) Conserve estas instrucciones.
3) Preste atención a todas las advertencias.
4) Siga todas las instrucciones.
5) No utilice esta TV LED cerca de agua.
6) Limpie la TV sólo con un paño seco. No utilice limpiadores líquidos, con alcohol o en aerosol.
7) No bloquee ninguna de las aberturas de ventilación.Instale la TV LED en un área de buena ventila
ción.
8) Mantenga la TV LED alejada de la humedad, polvo excesivo y cualquier fuente de calor, tales como
radiadores, salidas de aire caliente, estufas u otros aparatos (incluidos amplificadores) que produz
can calor.
9) No extraiga la cubierta trasera. No existen piezas internas que el usuario pueda reparar.
10) No anule la seguridad de la clavija polarizada ni lade la clavija con conexión a tierra. Una clavija po
larizada tiene dos patillas, una más ancha que la otra. Una clavija con conexión a tierra tiene dos p
atillas y una espiga de conexión a tierra. La tercera espiga se proporciona para su seguridad. Si la
clavija proporcionada no entra en su tomacorriente, consulte a un electricista para reemplazar el to
macorriente obsoleto.
11) Proteja el cable de alimentación para que nadie lo pise ni quede aplastado, especialmente en las cl
avijas, tomas de corriente y puntos por donde sale de la TV LED.
12) Nunca apoye objetos sobre el cable de alimentación ni lo coloque en lugares por el que pasan muc
has personas. Se recomienda colocar el cable de alimentación en la ubicación desde donde sale d
el dispositivo.
13) Utilice solamente los accesoriossuministrados por el fabricante.
14) Utilice el producto solamente con el carrito, soporte, trípode,
ménsula o mesa especificado por el fabricante o vendido con el
TV LED. Cuando utilice un carrito, tenga cuidado para evitar
lesiones causadas por una caída.
15) Desenchufe esta TV LED durante las tormentas eléctricas o
cuando no lo utilice durante largos períodos de tiempo.
16) Solicite todos los trabajos de reparación sólo al personal
calificado.Las reparaciones serán necesarias cuando la TV
LED se haya dañado de alguna forma: cuando se haya estropeado el cable o la clavija de alimenta
ción, se hayan derramado líquidos o hayan caído objetos en el interior del producto, cuando éste h
aya estado expuesto a la lluvia o a la humedad, cuando no funcione normalmente o cuando se hay
a caído.
Español
Page 42

Información reguladora
Declaración de conformidad de la comisión FCC
Este dispositivo cumple con la Sección 15 de la Normativa de la FCC. El
funcionamiento está sujeto a las dos condiciones siguientes: (1) Este equipo no
causa interferencias electromagnéticas perjudiciales, y (2) este equipo tolera
cualquier interferencia recibida, incluidas las interferencias que puedan
provocar un funcionamiento no deseado.
1
Información adicional
Tras someterlo a las pruebas correspondientes, se ha determinado que este
equipo cumple los límites establecidos para dispositivos digitales de Clase B de
conformidad con la parte 15 de la Normativa de la FCC. Estos límites se han
establecido con el objetivo de aportar una protección razonable contra
interferencias perjudiciales en una instalación doméstica. Este equipo genera,
utiliza y puede emitir energía de radiofrecuencia y, a menos que se instale y se
utilice de acuerdo con las instrucciones, puede provocar interferencias
perjudiciales en las comunicaciones por radio y televisión Sin embargo, no
existe garantía de que éstas no se produzcan en determinadas instalaciones. Si
el equipo produjera interferencias perjudiciales en la recepción de radio o
televisión, lo cual puede probarse encendiendo y apagando el equipo, se
recomienda al usuario corregir dichas interferencias tomando una o varias de
las siguientes medidas:
• Cambie la orientación o ubicación de la antena de recepción
• Aumente la separación entre el equipo y el receptor
• Conecte el equipo a una toma de corriente situado en un circuito diferente al
del receptor
• Consulte a un distribuidor o un técnico especialista si necesita ayuda
Advertencia: La comisión de comunicaciones federales (FCC) advierte que
cualquier cambio o modificación que no disponga de aprobación expresa por la
parte responsable de la conformidad de podría invalidar su autoridad para
operar el equipo.
Nota de conformidad con la normativa de DOC
Este aparato digital no supera los límites establecidos por la Clase B para las
emisiones de ruido de radio procedentes de los aparatos digitales, según lo
estipulado en las Regulaciones de interferencias de radio del Departamento de
comunicaciones de Canadá. Este dispositivo cumple con lo estipulado para la
Clase B de la normativa ICES-003 de Canadá.
1. se aplica sólo a los productos adquiridos en los Estados Unidos de América
2. se aplica sólo a los productos adquiridos en Canadá
2
Español
Page 43

PRECAUCIONES Y RECORDATORIOS
Coloque la unidad en superficies niveladas. No coloque la TV en lugares cerrados o en una
caja cuando esté siendo utilizada.
6 pulgadas
Desenchufe de inmediato si existe un
funcionamiento defectuoso como una
desaparición de imagen, una desaparición de
vídeo/audio, humo u olores extraños
provenientes de la TV.
No arroje ningún objeto dentro de la TV, como
metales u otros materiales inflamables.
Español
Desenchufe de inmediato si se colocan otros
materiales extraños dentro de la TV o si ésta se
cae.
Prohíba/evite abrir la cubierta de la TV.
Page 44

17) No exponga la TV LED a salpicaduras ni coloque sobre ésta ningún recipiente que
contenga líquidos.
18) El panel posterior de esta unidad incluye la indicación de peligro de descarga eléctrica y su
símbolo gráfico asociado.
19) Este producto está diseñado sólo para el entretenimiento. Se encuentran excluidas las
tareas visuales.
20) Montaje en pared o techo: Cuando instale el producto en la pared o en el techo, asegúrese
de instalarlo de acuerdo con el método recomendado por el fabricante. Por razones de
seguridad, utilice sólo el accesorio de montaje indicado.
PRECAUCIÓN: Cualquier daño causado por un intento incorrecto de instalar
esta TV LED no se encuentra cubierto por los términos de la garantía del
fabricante.
ADVERTENCIA: Para reducir el riesgo de incendio o descarga eléctrica, no
exponga esta TV LED a la lluvia o humedad.
De acuerdo con la regulación de la directiva WEEE, este monitor no puede
desecharse como un residuo normal en Europa luego del final de su vida útil.
Consulte la información de reciclaje de nuestro sitio Web para la
manipulación de estos productos.
Español
Page 45

Recuerde desenchufar el cable de alimentación
Evite exponer la TV a la luz solar directa y a lugares
de CA del tomacorriente de CA antes de
efectuar la limpieza. No utilice limpiadores
líquidos o en aerosol para limpiar la pantalla.
Asegúrese de desenchufar la unidad cuando no
la utilice durante un período de tiempo extenso
(días).
No cubra ni bloquee cualquier rejilla y abertura.
polvorientos, de gran humedad y humosos.
Póngase en contacto con el personal de servicio
técnico para limpiar la parte interna de la TV una
vez por año.
No coloque la TV cerca de agua, por ejemplo, en
Una ventilación inadecuada podría acortar la
vida útil de la TV y causar un
sobrecalentamiento.
Aviso para el control remoto
Evite que se caiga
Español
Evite que esté expuesto a
lugares como bañeras, lavabos, fregaderos,
lavaderos, piscinas o subsuelos mojados.
Evite utilizar limpiadores en
líquidos
aerosol
Page 46

Tabla de Contenidos
1.
1.1INSTRUCCIONES DE INSTALACIÓN
1.3 Panel de control............................................................................. 3
1.4 Insertar las pilas del mando a distancia.........................................4
1.5 Mando a distancia..........................................................................5
1.6 Key pad ..................................................................................... 7
2.2 Conectar dispositivos externos...................................................... 9
2.2.1 Conexión de auriculares externos .......................................9
2.2.2 Conexión a dispositivos de AV ............................................10
2.2.3 Conectar una unidad VCR, STB o reproductor de DVD
mediante vídeo de componentes......................................... 11
2.2.4 Conectar una unidad VCR, STB o reproductor de DVD
mediante vídeo compuesto.................................................. 11
2.2.5 Conectar un PC mediante VGA........................................... 12
2.2.6 Conectar un PC mediante DVI............................................. 12
2.2.7 Conexión de HDMI............................................................... 13
2.2.8 Conectar con USB............................................................... 13
2.3 Usar el televisor ............................................................................. 14
2.3.1 Encender y apagar el televisor ............................................14
2.3.2 Conmutación de fuente de señal......................................... 14
2.3.3 Realizar una búsqueda automática de canales...................14
2.3.4 Selección de canales...........................................................14
2.3.5 Ajustar el volumen ............................................................... 15
2.3.6 Editar la lista de canales o la lista de favoritos .................... 15
2.3.7 Ver imágenes y reproducir música ......................................15
3. Ajuste de la configuración del menú en pantalla (OSD) ....................... 16
3.1 Menú de configuración OSD.......................................................... 17
3.2 Almacenar canales de memoria .................................................... 17
3.3 Ver los menús................................................................................ 18
3.4 Configuración del canal favorito..................................................... 18
3.5 Mostrar u ocultar canales............................................................... 19
3.6 Configurar el nombre del canal...................................................... 19
3.7 Configurar las opciones de imagen ...............................................20
3.8 Configurar las opciones de audio ..................................................20
3.9 Definir la configuración del sistema ............................................... 20
3.10 Configurar el menú Hora.............................................................. 21
.........................................1
Español
Page 47

Table of Contents
3.11 Configurar subtítulos ocultos .......................................................22
3.12 Utilizar los controles paternos......................................................23
3.13 Bloquear películas o programas de TV sin calificación................38
3.14 Establecer la tabla de regiones de calificación............................ 25
3.15 Cambiar la contraseña................................................................. 26
3.16 Bloquear mediante la fuente de entrada...................................... 27
3.17 Restaurar la configuración predeterminada de fábrica................ 27
3.18 Utilizar la función PC....................................................................28
4. Especificacioness.................................................................................. 29
TABLA DE FRECUENCIAS PREDEFINIDAS DE FÁBRICA(PC
MODO)
PRECAUCIONES DE SEGURIDAD
CUIDADO Y MANTENIMIENTO
RESOLUCIÓN DE PROBLEMAS
........................... ....................................................................
................................................31
.....................................................32
........................................... 32
.........
30
Español
Page 48

1.1.1
INSTRUCCIONES DE INSTALACIÓN
RELEASE
LOCK
INSTALACIÓN:
1. Dé la vuelta al TV y póngalo bocabajo.
2. Alinee el TV con las ranuras del soporte.
3. Recuerde que el lado más largo del soporte debe apuntar hacia delante.
4. Tire del aro del tornillo hacia arriba y, a continuación, gire dicho tornillo en el sentido de las
agujas del reloj para fijarlo. Cuando la base esté acoplada firmemente al TV, baje el aro del
tornillo para que quede al mismo nivel que la base de este.
5. Compruebe el lado inferior del soporte y asegúrese de que el TV ha quedado instalado
firmemente en el soporte, y que los tornillos no estén sueltos.
DESINSTALACIÓN:
1. Dé la vuelta al TV y póngalo bocabajo.
2. Gire el tornillo en sentido contrario a las agujas del reloj para aflojarlo.
3. Retire el soporte del TV.
Español
1
Page 49

Siga estos pasos para finalizar la instalación del brazo de montaje en pared:
1. Coloque el brazo de montaje en pared en la parte posterior de la TV.
2. Inserte los 4 tornillos en los orificios y apriete. Alinee los orificios del brazo con los orificios ubicados en
la parte posterior de la TV.
3. Vuelva a conectar los cables. Consulte el manual de usuario incluido con el brazo de montaje en pared
opcional para obtener instrucciones sobre su instalación en la pared.
NOTA
75 mm x 75 mm, VESA high hole (n=4), M4, espaciado = 0,7 mm, profundidad = tornillo de 10 mm.
Kit de montaje no incluido.
Por razones de seguridad, si se adquiere el kit de montaje VESA por separado, asegúrese de que
el kit de montaje posea clasificación UL y lo instale sólo personal de servicio técnico.
Español
2
Page 50

1.3 Panel de control
Sensor del control remoto: Ésta es la ventana a través de las que pasan todas
las señales del control remoto hacia el sensor.
1.4 Botones
1
Menu (Menú)
2
Input (Entrada)
3
Botones CH ▲/▼ (Subir/bajar de canal)
Botones Volume +/- (Subir/bajar volumen)
4
5
Encendido/apagado
Español
3
Page 51

INFOMENU
RETURNGUIDE
FAV
MTS SLEEP ASPECT C.C.
LAST
MUTE
4
Español
Page 52

English
VOL / VOL
1.5 Mando a distancia
Descripción Icono Función
Alimentación Presionar para encender y apagar el televisor.
Fuente de
entrada
Teclado
numérico
Introducción de
programa
Último
Información INFO
Menú MENU
Flechas
Seleccionar OK
Lista de canales
de guía
Volver RETURN
Selección de
canales
INPUT
LAST
GUIDE
CH / CH
Presionar para mostrar la lista de fuentes de
entrada.
Utilícelos para seleccionar un canal
directamente. Presione los números 0 a 9 para
insertar los números de programa (presione 1
y 0 para el programa 10).
Presione este botón para insertar el canal
secundario DTV
Presionar para volver al último canal
seleccionado.
Presionar para mostrar información de
programación.
Presionar para activar o desactivar el menú en
pantalla (OSD); confirmar la configuración.
Presione arriba, abajo, izquierda o derecha
para desplazarse por los menús en pantalla.
Presione este botón para confirmar la
selección
Presione este botón para ver la pantalla de la
Guía electrónica de programas.
Presione este botón para volver al menú
anterior.
Presione para aumentar el número del canal.
Presione para reducir el número de canal.
CH
CH
Ajuste de
volumen
Presione VOL + para subir el volumen de
audio.
Presione VOL - para bajar el volumen de
audio.
Español
5
Page 53

Descripción Icono Función
Presione repetidamente este botón para
configurar el temporizador de apagado
automático (Desactivado, 5, 10, 15, 30, 45, 60,
90, 120, 180, 240 minutos).
Aparecerá información de apagado
automático en el medio de la pantalla para
mostrar el tiempo restante.
Puede cancelar el temporizador presionando
el botón del temporizador de sueño.
Temporizador
de apagado
automático
SLEEP
Sonido de
televisión
multicanal
Canales
favoritos
Relación de
aspecto
Subtítulos C.C.
MTS
FAV
ASPECT
Presione este botón para alternar el modo de
sonido (Mono / Estéreo / SAP) en ATV o los
servicios de audio en DTV.
Presione este botón para cambiar a los
canales favoritos. No se se estableció un
canal favorito, el mensaje "No disponible"
aparecerá en la pantalla.
Presione este botón para ajustar la relación de
anchura con la altura de la imagen. Los
valores disponibles son: Pantalla completa,
Normal, Zoom y Cine.
Presione este botón para abrir o cerrar los
subtítulos.
6
Español
Page 54

1.6
Descripción Conector Función
Conector de
alimentación
Entrada HDMI 1
Entrada HDMI 2
Entrada VGA
(PC)
Entrada de audio
(PC)
Entrada en
componentes
(audio)
HDMI1
HDMI2
L
AUDIO
R
DC IN
AUDIO
Se conecta al cable incluido.
Le permite conectar un dispositivo
externo, como un reproductor de DVD,
un receptor o el puerto DVI / HDMI de
un PC.
Le permite conectar un dispositivo
externo, como un reproductor de DVD,
un receptor o el puerto DVI / HDMI de
un PC.
Conectar a un puerto VGA de su PC.
Conectar a un puerto de audio de su
PC.
Permite conectar undispositivo externo
como, por ejemplo, una unidad VCR,
un descodificador o un reproductor de
DVD.
aaddiillaass yy aaddaarrttnnee eedd sseennooiixxeennooCC
Adaptador
Español
7
Page 55

Entradas en
VIDEO
Y
P
B
P
R
TV
componentes
(vídeo)
Salida para
auriculares
Permite conectar un dispositivo externo
como, por ejemplo, una unidad VCR,
un descodificador o un reproductor de
DVD.
Le permite conectar auriculares o
altavoces externos con el amplificador
incorporado.
Cable/Antena
Entradas de
S-Vídeo
Entradas en
componentes
S-VIDEO
VIDEO
L
AUDIO
R
Conectar a una antena o televisor por
cable.
Permite conectar un dispositivo externo
como, por ejemplo, una unidad VCR,
un descodificador o un reproductor de
DVD.
Permite conectar un dispositivo externo
como, por ejemplo, una unidad VCR,
un descodificador o un reproductor de
DVD.
.3PM y GEPJ sovihcra etimdABSU
8
Español
Page 56

English
Auriculares
Altavoces
(Amplificadores integrados)
22..22 CC oo nn ee cc ttaarr ddiissppoossiitt iivvooss eexxtteerrnnoo ss
Conecte dispositivos externos, como VCR, descodificadores, reproductores de
DVD, videoconsolas, auriculares o su PC al televisor utilizando los puertos
adecuados situados en la parte posterior de dicho televisor.
22..22 ..11 CCoo nn eexxiióó nn ddee aauu rriicc uu llaarree ss eexx tt eerr nn ooss
Nota:
• Los altavoces o auriculares externos no se incluyen con la TV.
• Los altavoces internos del televisor no emitirán sonido cuando los
auriculares estén enchufados.
• Utilice sólo altavoces externos que dispongan de amplificadores
integrados.
• Sólo podrá conectar un dispositivo externo de sonido a la vez.
Español
9
Page 57

2.2.2 Conexión a dispositivos de AV
VCR
STB
DVD
oo
o
Cable de audio
(opcional)
Cable HDMI
(opcional)
Cable de vídeo
(opcional)
Cable de audio/vídeo
(opcional)
Consola de videojuegos
A B C
HDMI 1 HDMI 2
AUDIO
R L
P
r
Y
Pb
AUDIO
R L VIDEO
English
S-Video
10
Español
b
R L
YLRHDMI PrP
VIDEO
S-VIDEO
Page 58

English
Cable de
audio
(opcional)
Cable de vídeo
(opcional)
VCR
STB
DVD
Cable de audio
(opcional)
Cable de vídeo
(opcional)
STB
DVD
VCR
2.2.3 Conect ar una unidad VCR, ST B o reproduc tor de
DVD mediante vídeo de componentes
Conecte el televisor a una unidad VCR, STB o reproductor de DVD mediante las
entradas de vídeo de componentes.
AUDIO
R L
Y
2.2.4 Conect ar una unidad VCR, ST B o reproduc tor de
DVD mediante vídeo compuesto
Conecte el televisor a una unidad VCR, STB o reproductor de DVD mediante la
entrada de vídeo compuesto.
P
r
P
b
AV
AUDIO
R L VIDEO
Español
11
Page 59

2.2.5 Conectar un PC mediante VGA
Cable de audio
(opcional)
Cable VGA
(opcional)
PC
Cable de audio
(opcional)
Cable HDMI a DVI
(opcional)
PC
Conecte el televisor a su PC para usar este equipo como monitor utilizando el puerto
VGA como se indica a continuación.
Conecte el puerto VGA del televisor a la salida VGA de su PC.
1
2
Conecte el puerto AUDIO del televisor al puerto de salida de línea de su PC
para escuchar audio procedente de este equipo.
English
VGA
AUDIO
2.2.6 Conectar un PC mediante DVI
Conecte el televisor a su PC para usar este equipo como monitor utilizando el puerto
DVI como se indica a continuación.
Conecte el puerto HDMI 1 o HDMI 2 de la TV a la salida DVI del PC.
1
2
Conecte el puerto AUDIO del televisor al puerto de salida de línea de su PC
del televisor para escuchar audio procedente de este equipo.
HDMI1 HDMI2
AUDIO
Español
12
DMI
H
Page 60

2.2.7 Conexión de HDMI
HDMI (High Definition Multimedia Interface) asegura que siempre se envíe la mejor
señal de vídeo de la fuente al televisor.
Consulte la ilustración siguiente para conectar un dispositivo HDMI al televisor.
HDMI1 HDMI2
Reproductor de DVD
Cable HDMI
(opcional)
Nota1:
Al conectar el cable de HDMI, no es necesario conectar el cable de audio. Sin
embargo, es necesario conectarlo, si está conectado un cable HDMI a DVI.
Nota2:
FUNCIÓN CEC
1. Reproducción con sólo presionar un botón: Permite iniciar la reproducción de un
dispositivo y convertirlo en la fuente activa con sólo presionar un botón.
2. Espera del sistema: Permite al usuario colocar todos los dispositivos en espera
con sólo presionar un botón.
2.2.8 Conectar con USB
Conecte la unidad flash USB al televisor mediante el puerto USB tal y como se
muestra. Se admiten los archivos JPEG y MP3.
USB
Unidad flash USB
(opcional)
Nota:
El disco duro USB no es compatible.
Español
Page 61

2.3 Usar el televisor
2.3.1 Encender y apagar el televisor
1 Presione en el panel de control o en el mando a distancia. El indicador LED
de encendido ubicado en la TV cambiará de ámbar a azul, lo que indica que el
televisor está encendido.
2 Presione de nuevo. El indicador LED de encendido cambia de azul a ámbar,
lo que indica que el televisor está apagado.
2.3.2 Conmutación de fuente de se ña l
Presione INPUT en el panel de control o el mando a distancia para seleccionar la
señal de la fuente de entrada para establecer la fuente de TV para la búsqueda de
canales. Presione OK para confirmar la acción.
2.3.3 Realizar una búsqueda automática de canales
Antes de usar el televisor para ver programas, es necesario activar primero la
búsqueda de canales.
1 Presione MENU en el panel de control o en el mando a distancia y, a
continuación, entre en el menú Canal.
2 SeleccioneAire/Cable para establecer la fuente de la señal. (Aire o Cable; el
valor predeterminado es Cable)
3 SeleccioneBúsqueda automática Hay tres opciones disponibles: Buscar
todos los canales, Solamente los canales digitales y Solamente los canales
analógicos.
• Para buscar solamente los canales digitales, seleccione Solamente los
canales digitales.
• Para buscar solamente los canales analógicos, seleccione Solamente los
canales analógicos.
• Para buscar ambos tipos de canales, seleccione Buscar todos los canales.
4 Presione en el mando a distancia para ejecutar la búsqueda de canales.
2.3.4 Selección de canales
• Presione CH en el panel de control o el mando a distancia para aumentar
el número de programa.
• Presione CH
el número de programa.
• Introduzca el número de canal específico presionando los botones de número
del mando a distancia.
Español
14
en el panel de control o en el mando a distancia para reducir
CH
CH
Page 62

2.3.5 Ajustar el volumen
VOL
MUTE
MUTE
USB
Fotos
Volver
P100502.jpg
P100503.jpg
P100504.jpg
P100505.jpg
P100506.jpg
P100507.jpg
P100508.jpg
P100509.jpg
P100510.jpg
gpj.205001P:C
C:\pic\
002/017
BK 4.853015 x 527BG 9.1:latot oñamaT
00:00:21 21:21:9002BG 8.1:odasu on oñamaT
:16
Música
1 Presione VOL+/ VOL- en el panel de control o / en el mando a distancia
VOL
para subir o bajar el volumen.
2 Presione para desactivar el sonido y vuelva a presionar o los
botones de volumen para restaurar el volumen original.
2.3.6 Edita r la lista de c anales o la list a de favoritos
1 Presione MENU en el panel de control o en el mando a distancia y, a
continuación, entre en el menú Canal.
2 SeleccioneMostrar/ocultar o Favoritos para editar la lista de canales o la lista
de favoritos.
3 Para mostrar u ocultar la lista de canales, seleccione el canal y presione Aceptar
para activarlo o desactivarlo. Para agregar un canal a la lista de favoritos o
quitarlo de ella, seleccione el canal y presione Aceptar para activarlo o
desactivarlo.
2.3.7 Ver imágenes y reproducir música
1 Inserte una unidad flash USB en el puerto USB.
2 Presione el botón ENTRADA del mando a distancia para abrir la lista de fuentes
de entrada.
3 SeleccioneUSB para cambiar a la pantalla de almacenamiento externa.
4 Utilice / en el mando a distancia para seleccionar Foto/Música para ver
imágenes o reproducir archivos de música.
5 Utilice / para seleccionar una carpeta (si la
hay) y presione Aceptar para abrirla.
6 Utilice / para seleccionar la imagen o archivo
de música que desee.
7 Presione Aceptar para ver la imagen a pantalla
completa o reproducir el archivo de música
seleccionado.
• Utilice / y Aceptar para seleccionar y aplicar
los botones en pantalla para reproducir música.
• Utilice / para ver la imagen anterior o
siguiente.
Fotos
Volver
Get Back.mp3
Fillin' Me Up.mp3
Every body.mp3
Gimme More.mp3
A Song About U.mp3
Been A While.mp3
Cold As Fire.mp3
Got Me Hight.mp3
Tamaño total:1.9 GB
Tamaño no usado:1.8 GB
• Presione Aceptar para iniciar o detener la presentación de diapositivas.
• Presione VOLVER para salir de la presentación de diapositivas de imágenes.
USB
C:\music\
Música
:8
3pm.kcaB teG:C
Título:
Artista:
Álbum:
Año:
Tasa de bits: 192kbps
Detener
002/009
34:3000:00
Random
Español
Page 63

3 Ajuste de la configuración del menú
MENÚ ACTUAL:
Muestra el título del menú
seleccionado actualmente.
MENÚ PRINCIPAL:
Muestra una lista de
elementos del menú. El
elemento seleccionado
se marcará con un color
diferente que los demás
elementos del menú.
INSTRUCCIONES:
Instrucciones rápidas para
ajustar la configuración.
ELEMENTOS AJUSTABLES:
Muestra la configuración / valores de
los parámetros ajustables.
en pantalla (OSD)
El sistema de menús en pantalla (OSD) proporciona un método sencillo y rápido
para definir la configuración del televisor. Puede acceder al menú OSD a través de
los botones del panel de control o del mando a distancia.
Antes de pasar a los detalles de cada elemento del menú OSD, familiarícese con el
uso del sistema OSD:
Imagen
Desactivado
Return
Estándar
50
50
50
45
70
100
Estándar
Menu
Modo Imagen
Contraste
Brillo
Enfoque
Tinte
Color
Iluminación
X-Contrast
Modo Color
OK
Definir .laSrevloVrevoM
Función Panel de control del televisor Mando a distancia
Menú OSD MENU
Arriba CH
Abajo CH
Aumentar
Seleccionar/Aplicar MENÚ
Volver ENTRADA
16
Español
VOL +
MENU
Flecha
Fecha
Flecha
ahcelF- LOVriunimsiD
Aceptar/Flecha
VOLVER
Page 64

3.1 Menú de configurac ión OSD
Siga las instrucciones que se indican en la parte inferior del menú de Función OSD.
Presione los botones de la flecha / del panel de control o / del
CH CH
mando a distancia para desplazarse por los elementos. presione VOL+ en el panel
de control o Aceptar en el mando a distancia para seleccionar un elemento. A
continuación, presione MENÚ para salir del menú OSD. Es posible configurar los
siguientes menús por medio de distintos métodos de ajuste.
3.2 Almacenar canales de memoria
1 Presione MENU para ver el menú principal OSD.
2 Presione / para seleccionar el menú
Canales y, a continuación, presione para entrar.
3 Presione / para seleccionar Aire/Cable y
utilice / para seleccionar Aire o Cable.
Aire: programas de señal de RF por aire.
Cable: programas de señal de RF por cable.
4 Presione / para seleccionar Búsqueda
automática y, a continuación, presione para
entrar.
5 Presione / para seleccionar Buscar todos
los canales, Solamento canales digitales o
Solamento canales analógicos y presione para
llevar a cabo lo función Búsqueda automática. Para
detener la búsqueda, presione MENU en cualquier
momento.
6 Aparecerá la pantalla Búsqueda automática y, a
continuación, la pantalla regresará al primer canal
encontrado.
Canales
Aire/Cable
Búsqueda Auto
Favoritos
Mostr/Ocult
No. Canales
Siglas de Canales
Señal DTV
OK
Return
Definir .laSrevloVrevoM
Canales
Buscar todos los canales
Solamente canales digitales
Solamente canales analógicos
Return
OK
Definir .laSrevloVrevoM
Canales
RF CH : 1
Canales RF :
Found : 0
Hallado :
Analog : 0
Analógico :
Digital : 0
Digital :
OK
Return
Definir .laSrevloVrevoM
Cable
19
Menu
Menu
1
0
0
0
Menu
Español
17
Page 65

3.3 Ver los menús
50
50
50
45
70
100
OK
Return
Menu
Definir .laSrevloVrevoM
Estándar
Desactivado
Estándar
Imagen
Modo Imagen
Contraste
Brillo
Enfoque
Tinte
Color
Iluminación
X-Contrast
Modo Color
1 Presione MENU para ver el menú principal OSD.
Hay seis menús principales en la pantalla: Imagen,
Audio, Hora, Configuración, Bloqueo y Canal.
2 Presione / para seleccionar el menú
principal que desee.
3 Presione para entrar en el menú seleccionado.
4 Utilice / para seleccionar el control que
desee ajustar.
5 Cuando seleccione el control con , presione
para entrar en el menú de siguiente nivel o habilitar
la función. ( solamente aparece cuando se resalta
el control)
6 Presione / para ajustar o seleccionar la
configuración.
7 Presione MENU para salir del menú OSD.
4 Configuración del canal favorito
3.
Establecer el canal favorito en la memoria:
1 Presione MENU para ver el menú principal OSD.
2 Presione / para seleccionar el menú
Canales y, a continuación, presione para entrar.
3 Presione / para seleccionar Favoritos y, a
continuación, presione para entrar en el
parámetro Favoritos.
4 Presione / para seleccionar el canal que le
gustaría que fuera el canal favorito. Presione OK
para confirmar la selección.
5 Para cancelar la selección, presione OK de nuevo
en el canal seleccionado.
6 Presione MENU para salir.
Canales
Aire/Cable
Búsqueda Auto
Favoritos
Mostr/Ocult
No. Canales
Siglas de Canales
Señal DTV
OK
Definir .laSrevloVrevoM
Canales
No. Canales
8
8
9
10
11
12
13
14
15
16
17
OK
Definir .laSrevloVrevoM
Return
Nombre de canal Favoritos
Return
Nota:
Para ver los canales favoritos, presione el botón FAV. para mostrar Lista de favoritos y
seleccione los canales favoritos que ya se han almacenado.
18
Español
Cable
19
Menu
V
V
Menu
Page 66

3.5 Mostrar u oculta r c anales
Cuando el canal se borre, no aparecerá en la pantalla
cuando explore los canales con CH
/ CH .
Para mostrar u ocultar un canal:
1 Presione MENU para ver el menú principal OSD.
2 Presione / para seleccionar el menú
Canales y, a continuación, presione para entrar.
3 Presione / para seleccionar Mostr/Ocult y,
a continuación, presione para entrar en el
parámetro Mostr/Ocult.
4 Presione / para seleccionar el canal al que
desea aplicar el parámetro Mostr/Ocult y active o
desactive dicho parámetro con OK.
5 Presione VOLVER para regresar al menú
anterior en Canal.
6 Configurar el nombre del canal
3.
Para editar un nombre para el canal actual:
1 Presione MENU para ver el menú principal OSD.
2 Presione / para seleccionar el menú
Canales y, a continuación, presione para entrar.
3 Presione / para seleccionar No. canales y,
a continuación, presione / para seleccionar el
canal cuyo nombre desea editar.
4 Presione / para seleccionar Siglas de
canales y, a continuación, presione para entrar
en el parámetro Siglas de canales.
5 Utilice / para elegir letras o signos, /
para avanzar o retroceder.
6 Una vez especificado el nombre del canal,
presione VOLVER o Aceptar para completar la
configuración.
7 Presione VOLVER para regresar al menú
anterior en Canal.
Canales
Aire/Cable
Búsqueda Auto
Favoritos
Mostr/Ocult
No. Canales
Siglas de Canales
Señal DTV
OK
Definir .laSrevloVrevoM
Canales
No. Canales Nombre de canal Mostr/Ocult
2
8
9
10
11
12
13
14
15
16
17
OK
Definir .laSrevloVrevoM
Canales
Aire/Cable
Búsqueda Auto
Favoritos
Mostr/Ocult
No. Canales
Siglas de Canales
Señal DTV
OK
Definir .laSrevloVrevoM
Cable
19
Return
Menu
V
V
V
V
V
V
V
V
V
V
Return
Menu
Cable
19
Return
Menu
Canales
Return
OK
Definir .laSrevloVrevoM
Menu
Español
19
Page 67

3.7 Configurar las opciones de imagen
50
50
50
45
70
100
OK
Return
Menu
Definir .laSrevloVrevoM
Estándar
Desactivado
Estándar
Imagen
Modo Imagen
Contraste
Brillo
Enfoque
Tinte
Color
Iluminación
X-Contrast
Modo Color
1 Presione MENU para ver el menú principal OSD.
2 Presione / para seleccionar el menú Imagen
y, a continuación, presione para entrar.
3 Presione / para seleccionar el control Modo
imagen, Contraste, Brillo, Enfoque, Tinte, Color,
Iluminación, X-Contraste,Modo color, Modo de
pantalla, Reducción de ruido y, a continuación,
presione / para ajustar el nivel.
4 Presione VOLVER para regresar al menú anterior en Imagen.
8 Configurar las opciones de audio
3.
1 Presione MENU para ver el menú principal OSD.
2 Presione / para seleccionar el menú Audio y,
a continuación, presione para entrar.
3 Presione / para seleccionar el control de
Audio
Ecualizador
Balance
Agudos
Bajos
Estándar
Ecualizador, Balance, Agudos, Bajos, AVL y, a
continuación, presione / para seleccionar la
opción que desee.
Return
OK
DefinirMover
Volver
4 Presione VOLVER para regresar al menú superior.
3.
9 Definir la configuración del sistema
1 Presione MENU para ver el menú principal OSD.
2 Presione / para seleccionar el menú
Configuración y, a continuación, presione para
entrar.
3 Presione / para seleccionar el control
Opciones
Menú Lenguaje
Transparente
OSD Time Out
Cierre de Titulos
Valores predeterminados
Etiqueta de entrada
Medio
Menú Lenguaje, Transparente, OSD Time Out,
Cierre de Titulos, Valores predeterminados,
Etiqueta de entrada, Medio, y a continuación,
Return
OK
Definir .laSrevloVrevoM
presione / para seleccionar la opción que
desee.
4 Presione VOLVER para regresar al menú superior.
Nota:
La opción Medio solamente está disponible cuando se conecta una unidad USB y la
fuente de entrada se cambia a USB.
20
Español
Español
25%
15 Sec.
0
0
0
odidnecnELVA
Menu
Sal.
Menu
Page 68

3.10 Configurar el menú Hora
OK
Return
Menu
Hora
Reloj de Dormir
Zona
Verano
Formato de hora
Sincronización automáti.
--:-- --/--/----joleR
--:-- --/--/----ravitcaeR
Desactivado
Pacífico
Desactivado
12-hour
Encendido
Definir .laSrevloVrevoM
1 Presione MENU para ver el menú principal OSD.
2 Presione / para seleccionar el menú Hora y,
a continuación, presione para entrar.
3 Presione / para seleccionar Reioj de domir
y, a continuación, presione / para establecer
dicha opción en uno de los valores siguientes:
5~240 min o Desactivar.
4 Presione / para seleccionar Zona y
seleccione la zona horaria correcta de su área
mediante / . La hora mostrada en Reloj se
cambiará a la misma hora automáticamente. Para
ajustar la opción Reloj, selecciónela y presione .
5 Presione / para seleccionar Verano y
seleccione Activar o Desactivar mediante /
en función de la zona horaria de su zona. La hora
de la opción Reloj cambiará automáticamente.
6 Presione / para seleccionar Formato de hora y / para seleccionar el
formato de 12 ó 24 horas.
7 Presione VOLVER para regresar al menú superior
Nota:
La hora de la opción Reloj solamente se puede ajustar manualmente cuando la opción
Sincronización automática está establecida en Desactivar.
Hora
Reloj
2010 / /
OK
01 01 08 : 26 PM
OK CANCELAR
Return
Definir .laSrevloVrevoM
Menu
Español
21
Page 69

3.11 Configurar subtítulos ocultos
1 Presione MENU para ver el menú principal OSD.
2 Presione / para seleccionar el menú
Opciones y, a continuación, presione para
entrar.
3 Presione / para seleccionar Cíerre de
Opciones
Menú Lenguaje
Transparente
OSD Time Out
Cierre de Titulos
Valores predeterminados
Etiqueta de entrada
Medio
Español
25%
15 Sec.
titulos y, a continuación, presione para entrar en
OK
Return
el parámetro Cíerre de titulos.
Definir .laSrevloVrevoM
Menu
4 Presione / para seleccionar Modo CC,
Selección básica, Selección avanzada o
Opción y utilice / para elegir una opción.
Selección básica: permite establecer las
opciones de subtítulos ocultos analógicos.
(CC1~CC4, Texto1~Texto4, Desactivar)
Selección avanzada: permite seleccionar
formatos de señal de subtítulos ocultos y
configurar modos de subtítulos para canales de
TV digital. (Servicio1~6, Básico)
Para obtener opciones de configuración detalladas de
subtítulos ocultos:
1 Presione / para seleccionar Opción y, a
continuación, presione para entrar en el
parámetro Opción.
Opciones
Modo CC
Selección Básica
Selección Avanzada
Opción
OK
Definir .laSrevloVrevoM
Opciones
Modo CC
Selección Básica
Selección Avanzada
Opción
Return
CC Desactivado
CC1
Básica
Menu
CC Desactivado
CC1
Básica
2 Presione / para seleccionar Personalizado
OK
Return
para la opción Modo y, a continuación, utilice /
Definir .laSrevloVrevoM
para ajustar las opciones que desee y /
para ajustar la configuración que estime oportuno.
Opciones
Modo
Estilo de fuente
Tamano de fuente
Estilo de borde de fuent
Color de borde fuente
Color de primer plano
Color de fondo
alidez del Texto
Palidez del Fondo
OK
Definir .laSrevloVrevoM
Nota:
Si selecciona Defecto para la opción Modo, no podrá ajustar la configuración detallada y los
parámetros se establecerán conforme al contenido de transmisión.
Menu
Custom
Defecto
Defecto
Defecto
Defecto
Defecto
Defecto
Defecto
Defecto
Return
Menu
22
Español
Page 70

3.12 Utilizar los controles paternos
1 Presione MENU para ver el menú principal OSD.
2 Presione / para seleccionar el menú
Bloqueo
Entra Contraseña
----
Bloqueo y, a continuación, presione para entrar.
3 En el campo Entra contraseña, escriba la
contraseña. (La contraseña predeterminada es
0000.)
4 Desplácese a Sist. de bloqueo y seleccione
Activar para habilitar la configuración detallada.
OK
Return
Definir .laSrevloVrevoM
Menu
5 Desplácese al sistema de calificación EE.UU. o
Canadá.
EE.UU.: presione para establecer las calificaciones
TV o MPAA.
TV
1 Presione / para seleccionar TV y, a
continuación, presione para entrar en el
parámetro TV.
Aparecerá la siguiente pantalla en la que puede
personalizar la siguiente calificación de TV:
Y (todos los niños)
Y7 (niños mayores)
G (público en general)
PG (control recomendado)
14(advertencia para los padres)
MA (adultos)
También puede personalizar las calificaciones de
TV para el siguiente contenido:
TODO (contenido de todo tipo)
FV (violencia ficticia)
V (violencia)
S (escenas de sexo)
L (lenguaje para adultos)
D (lenguaje sexual)
Bloqueo
Cambiar Contraseña
Sist. de Bloqueo Encendido
No Clasificada Desactivado
Bloque entrada
EE.UU.
Canadá
RRT Para Ajustar
Restablecer RRT
OK
Return
Definir .laSrevloVrevoM
Menu
Bloqueo
Cambiar Contraseña
Sist. de Bloqueo Encendido
No Clasificada Desactivado
Bloque entrada
EE.UU.
Canadá
RRT Para Ajustar
Restablecer RRT
OK
Return
Menu
Bloqueo
TV
MPAA
Definir .laSrevloVrevoM
2 Presione OK para establecer o restablecer cada
área.
OK
Return
Definir .laSrevloVrevoM
Menu
3 Presione MENU para salir.
Nota:
Si olvida la contraseña, utilice la contraseña de supervisor (70718512) para entrar en el
menú Bloquear y restablezca la contraseña.
Español
23
Page 71

MPAA
1
Presione / para seleccionar MPAA y, a
continuación, presione para entrar en el
parámetro MPAA.
2 Presione / para seleccionar el nivel de
calificación MPAA que desee.
El nivel de calificación MPAA se define de la
siguiente manera:
G (público en general)
PG (control paterno recomendado)
PG-13 (recomendado para niños de 14 años o
niños mayores)
R (adultos)
NC-17 (no recomendado para niños menores de 17
años)
X (solamente para adultos)
3 Presione Aceptar para cambiar entre Bloquear y
Desbloquear.
4 Presione MENU para salir.
Canadá: Presione para establecer las calificaciones
para el inglés y francés de Canadá.
Inglés de Canadá
1 Presione / para seleccionar Inglés de
Canadá.
2 Presione para entrar.
3 Presione / para seleccionar el nivel de
calificación para Inglés de Canadá.
Los niveles de calificación de la opción Inglés de
Canadá se definen de la siguiente manera:
C (niños)
C8+ (niños de ocho años y niños mayores)
G (programación general, adecuado para todos los
públicos)
PG (control paterno)
14+ (telespectadores mayores de 14 años)
18+ (programación para adultos)
4 Presione Aceptar para cambiar entre Bloquear y
Desbloquear.
5 Presione MENU para salir.
Bloqueo
Evaluacion de TV
TOD FV V S L D
TV-Y
TV-Y7
TV-G
TV-PG
TV-14
TV-MA
:Block
Bloqueo
Bloqueo
Cambiar Contraseña
Sist. de Bloqueo Encendido
No Clasificada Desactivado
Bloque entrada
EE.UU.
Canadá
RRT Para Ajustar
Restablecer RRT
Return
OK
Definir .laSrevloVrevoM
G Desbloquear
PG
PG-13
R Desbloquear
NC-17
X Desbloquear
Return
OK
Definir .laSrevloVrevoM
OK
Return
Definir .laSrevloVrevoM
Menu
Desbloquear
Desbloquear
Desbloquear
Menu
Menu
Bloqueo
Inglés canadiense
Francés canadiense
OK
Return
Definir .laSrevloVrevoM
Menu
24
Español
Page 72
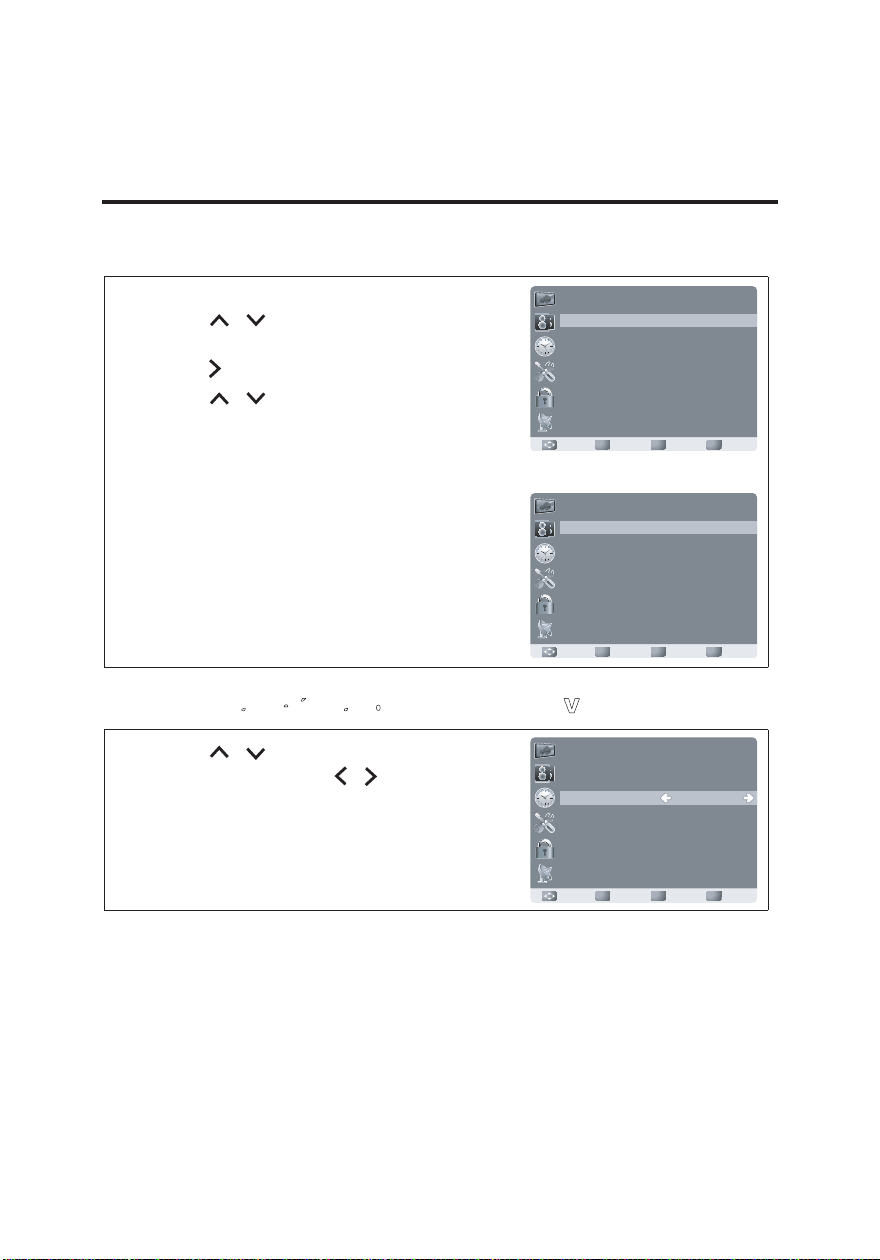
English
OK
Return
Menu
Definir .laSrevloVrevoM
Bloqueo
Cambiar Contraseña
Sist. de Bloqueo Encendido
No Clasificada Encendido
Bloque entrada
EE.UU.
Canadá
RRT Para Ajustar
Restablecer RRT
Francés de Canadá
1 Presione / para seleccionar Francés de
Canadá.
2 Presione para entrar.
3 Presione / para seleccionar el nivel de
Bloqueo
C
C8+
G
PG
14+
18+
Desbloquear
Desbloquear
Desbloquear
Desbloquear
Desbloquear
Desbloquear
calificación para Francés de Canadá.
OK
Return
Los niveles de calificación de la opción Francés de
Definir .laSrevloVrevoM
Menu
Canadá se definen de la siguiente manera:
G (público en general)
8ans+ (niños de ocho años y niños mayores)
13ans+ (inapropiado para niños menores de 13
años)
16ans+ (inapropiado para niños menores de 16
años)
Bloqueo
G
8ans+
13ans+
16ans+
18ans+
Desbloquear
Desbloquear
Desbloquear
Desbloquear
Desbloquear
18ans+ (reservado para adultos)
OK
Return
4 Presione MENU para salir.
Definir .laSrevloVrevoM
Menu
3.13 Bloquear películas o programas de TV sin calificación
1 Presione / para seleccionar No calificados
y, a continuación, presione / para seleccionar
Activar o Desactivar. Cuando elija Activar, todos
los programas que no estén calificados se
bloquearán.
2 Presione MENU para salir.
Español
25
Page 73

3.14 Establecer la tabla de re giones de calificación
La configuración RRT define la normas de calificación
para una región geográfica y/o país determinado.
1 Presione / para seleccionar RRT para
ajustar y, a continuación, presione para entrar
en el parámetro Configuración RRT.
Bloqueo
Cambiar Contraseña
Sist. de Bloqueo Encendido
No Clasificada Desactivado
Bloque entrada
EE.UU.
Canadá
RRT Para Ajustar
Restablecer RRT
2 Seleccione cada opción ajustable mediante /
OK
Return
y, a continuación, presione / para elegir la
Definir .laSrevloVrevoM
Menu
selección secundaria.
3 Presione MENU para salir.
Nota:
Esta imagen solamente muestra un ejemplo del contenido de la opción Configuración RRT.
Sin embargo, las selecciones y selecciones secundarias de dicha opción pueden ser
diferentes en su menú OSD en función del sistema de transmisión local.
Para restablecer la opción Configuración RRT, seleccione Restablecer RRT y presione .
3.15 Cambiar la contraseña
1 Presione / para seleccionar Cambiar
contraseña y, a continuación, presione para
entrar en el parámetro Cambiar contraseña.
2 Seleccione Entar contraseña y especifique la
contraseña anterior con números.
3 Inserte la nueva contraseña en el campo
Contraseña nueva.
4 Inserte la nueva contraseña de nuevo en el campo
Contraseña confirm. Después de completar el
último paso, la pantalla volverá a la página superior
del menú Bloqueo. Si es así, la contraseña se
habrá cambiado correctamente.
Bloqueo
Cambiar Contraseña
Sist. de Bloqueo Encendido
No Clasificada Desactivado
Bloque entrada
EE.UU.
Canadá
RRT Para Ajustar
Restablecer RRT
Return
OK
Definir .laSrevloVrevoM
Menu
Bloqueo
Entar Contraseña
Contraseña Nueva
Contraseña Confirm
----
----
----
26
Español
OK
Definir .laSrevloVrevoM
Menu
Return
Page 74

3.16 Bloquear mediante la fuente de entrada
OK
Return
Menu
TV
AV
S-Video
Component
HDMI
PC
Desbloquear
Desbloquear
Desbloquear
Desbloquear
Desbloquear
Desbloquear
Definir .laSrevloVrevoM
Bloqueo
1 Presione / para seleccionar el menú
Bloqueo entrada y, a continuación, presione
para entrar.
2 Presione / para seleccionar la fuente de
entrada y, a continuación, mediante / ,
seleccione Bloqueo o Desbloquear.
3 Presione MENU para salir.
Bloqueo
Cambiar Contraseña
Sist. de Bloqueo Encendido
No Clasificada Desactivado
Bloque entrada
EE.UU.
Canadá
RRT Para Ajustar
Restablecer RRT
OK
Return
Definir .laSrevloVrevoM
Menu
3.17 Restaurar la configuración predeterminada de fábrica
1 Presione MENU para ver el menú principal OSD.
2 Presione / para seleccionar el menú
Opciones y, a continuación, presione para
entrar.
3 Presione / para seleccionar Valores
predeterminados y, a continuación, presione
para restaurar la configuración predeterminada de
fábrica.
4 Seleccione Sí y presione OK para confirmar la
configuración. La restauración de la configuración
predeterminada de fábrica no restablecerá los datos
de programa. Si necesita obtener los datos de
programa más recientes, ejecute de nuevo la
función Búsqueda automática en el menú Canal.
Opciones
Menú Lenguaje
Transparente
OSD Time Out
Cierre de Titulos
Valores predeterminados
Etiqueta de entrada
Medio
OK
Definir .laSrevloVrevoM
Español
25%
15 Sec.
Return
Menu
Español
27
Page 75

3.18 Utilizar la función PC
1 Cuando la fuente es PC, presione MENU para ver el
menú principal OSD.
2 Presione / para seleccionar el menú
Imagen y, a continuación, presione para entrar.
Imagen
Modo Imagen
Contraste
Brillo
Iluminación
Avanzada
Modo Color
Estándar
Estándar
50
50
100
3 Presione / para seleccionar los controles
que desea y presione / para ajustarlos.
4 Para obtener funciones de PC avanzadas,
seleccione Avanzada (solamente si la fuente es
PC) y, a continuación, presione para entrar.
OK
Return
Definir .laSrevloVrevoM
Menu
5 Presione / para seleccionar Automático
(ajuste automático), Pos-H (posición horizontal),
Pos-V (posición vertical), Reloj o Fase y ajuste el
nivel mediante / .
Nota:
Cuando la fuente es PC, los otros menús son los mismos o similares a los disponibles en
otra fuente.
Si no hay señal en el modo PC, el mensaje No hay señal se mostrará en la pantalla y el
televisor entrará automáticamente en el modo de ahorro de energía después de un período
de inactividad de pocos segundos. Presione POWER en el mando a distancia y el televisor
volverá al modo VGA.
28
Español
Page 76

4 Especificaciones
Tamaño del panel LED TFT de 23 pulgadas
Formato de pantalla 16:9
Resolución del panel 1920 (H) x 1080 (V)
Sistema de TV TV analógica: NTSC TV digital: ATSC
Entrada HDMI x 2
Entrada YPbPr x 1
Sistema de vídeo
Sistema de fotografías USB (JPEG)
Sistema de audio
Salida del amplificador estéreo
incorporado
Entrada de CA 100 V~240 V / 50 Hz~60 Hz
Consumo de energía 45 W (típico)
Consumo de energía en espera
Suministro de alimentación de CA
(V CA)
Dimensiones (ancho x alto x
profundidad)
Peso de la unidad 4,5 Kg 9,8 Iibras
Entrada de S-Video x1
Entrada de vídeo compuesto x 1
Entrada VGA (PC) x 1
Entrada de sintonizador x 1
AV/S-Video: entrada RCA x 1 (D/I)
HDTV: entrada RCA x 1 (D/I)
HDMI: HDMI1/HDMI2
USB (MP3)
Entrada de audio de PC: conector telefónico
Salida de audio: conector de auriculares
Analógico: MTS Digital: AC3
5 W + 5 W
(W)
< 1 (W)
100~240
560,9 (22.08”) mm x 388,1(15.28”) mm x 190,1 (7.48”) mm
Peso de la unidad (sin base ni
soporte)
Nota: Las especificaciones se encuentran sujetas a cambios sin aviso previo.
3,7 Kg
8,1 Iibras
Español
29
Page 77

TABLA DE FRECUENCIAS PREDEFINIDAS DE
FÁBRICA(PC MODO):
MODO RESOLUCIÓN
FRECUENCIA
HORIZONTAL (kHz)
1 640×480 @60Hz 31.469 59.941
2 800×600 @60Hz 37.879 60.317
3 1024×768 @60Hz 48.363 60.004
4 1152×864 @75Hz 67.5 75
5 1280×720 @60Hz 44.955 59.940
6 1280×960 @60Hz 60 60
7 1280×1024 @60Hz 63.981 60.020
8 1440×900 @60Hz 55.935 59.887
9 1680x1050 @60Hz 65.290 59.954
10 1920x1080 @60Hz 67.5 60.00
FRECUENCIA
VERTICAL (Hz)
Modo video
MODO RESOLUCIÓN
1 720×480i @60Hz
2 720×480p @60Hz
3 1280×720p @60Hz
4 1920×1080i @60Hz
5 1920×1080p @60Hz
6 1920×1080p @24Hz
7 1920×1080p @30Hz
30
Español
Page 78

PRECAUCIONES DE SEGURIDAD
Esta TV LED se encuentra fabricada y probada basándose en el principio fundamental que la seguridad
del usuario es la mayor prioridad. Sin embargo, la utilización o instalación incorrectas podría derivar en un
peligro para la TV LED y para los usuarios. Se deberán repasar las siguientes INSTRUCCIONES antes
de la instalación y conservar esta guía en un lugar de fácil acceso.
Advertencias
Se deberá utilizar esta TV LED sólo con las fuentes de alimentación correctas que aparecen en la
etiqueta ubicada en la parte posterior de la TV LED. Si no está seguro del tipo de suministro de
energía de su hogar, consulte a su distribuidor local o a la empresa de energía.
No intente reparar usted mismo la TV LED ya que no contiene piezas que el usuario pueda reparar.
Sólo un técnico calificado deberá ser el encargado de reparar la TV LED.
No extraiga la cubierta de la TV LED. La TV LED posee piezas internas de alto voltaje que podrían
causar una descarga eléctrica a las personas, incluso si el cable de alimentación se encuentra
desenchufado.
Deje de utilizar la TV LED si la cubierta se encuentra dañada. Solicite su revisión a un técnico de
reparación.
Coloque la TV LED sólo en entorno seco y limpio. Desenchufe de inmediato la TV LED si se moja y
póngase en contacto con un técnico de reparación.
Desenchufe siempre la TV LED antes de efectuar la limpieza. Limpie la cubierta con un paño seco
y limpio. Coloque limpiador sin amoníaco en el paño y no directamente en la pantalla de vidrio.
Mantenga la TV LED alejada de objetos magnéticos, motores, TV y transformadores.
No coloque objetos pesados sobre el cable de TV o cable de alimentación.
Para la conexión del equipo de TV por cable, se deberá instalar la salida del conector cerca del
equipo y ésta deberá ser de fácil acceso.
Español
31
Page 79

CUIDADO Y MANTENIMIENTO
Cuidado
Evite exponer la TV LED a la luz solar directa u otra fuente de calor.
Coloque la TV LED alejada de la luz solar para reducir el reflejo.
Coloque la TV LED en un área bien ventilada.
No coloque ningún objeto pesado sobre la TV LED.
Asegúrese de que la TV LED esté instalada en un área limpia y libre de humedad.
Mantenga la TV LED alejada de imanes, motores, transformadores, altavoces y otras TV.
Recomendaciones de seguridad
Si se detecta la presencia de humo, ruido anormal u olor proveniente de la TV LED, desenchufe de
inmediato el cable de alimentación y póngase en contacto con el centro de servicio técnico.
PRECAUCIÓN: Nunca extraiga la tapa posterior de la cubierta de la TV LED. La unidad de
visualización contiene piezas de alto voltaje que podrían causar una descarga eléctrica a las
personas.
Nunca intente reparar usted mismo la TV LED. Comuníquese siempre con un centro servicio
técnico calificado o con un técnico calificado para efectuar la reparación de la TV LED.
RESOLUCIÓN DE PROBLEMAS
La TV LED no enciende
Asegúrese de que el cable de alimentación de CA esté conectado de forma correcta a la fuente de
alimentación y a la TV LED.
Enchufe otro dispositivo eléctrico al tomacorriente para verificar que éste funcione de forma
correcta.
La TV LED enciende, pero no aparece ninguna imagen en la pantalla
Asegúrese de que el conector de vídeo esté conectado de forma correcta.
¿Se ha seleccionado la entrada de vídeo correcta?
Ajuste el brillo.
Asegúrese de que todos los cables estén instalados.
Colores incorrectos o anormales
Si existe algún color (rojo, verde y azul) faltante, compruebe que el cable de vídeo esté conectado
de forma correcta. Las clavijas sueltas o dañadas del conector del cable podrían causar una
conexión incorrecta.
Conecte la TV LED a otra fuente de vídeo o utilice otra TV para asegurarse de que la fuente de
vídeo no esté causando el problema.
Las especificaciones y el diseño se encuentran sujetos a cambios sin aviso previo. Todos los derechos
reservados.
32
Español
Page 80

Informations réglementaires
Déclaration de conformité FCC
Cet appareil est conforme aux dispositions de la partie 15 du règlement de la
FCC. L’utilisation de cet équipement est soumise aux deux conditions suivantes :
(1) Cet équipement ne doit pas causer de brouillage préjudiciable et (2) cet
équipement doit accepter tout brouillage reçu, y-compris le brouillage pouvant
provoquer un mauvais fonctionnement.
1
Informations supplémentaires
A l’issue des tests dont il a fait l’objet, cet équipement a été déclaré conforme
aux normes des appareils numériques de classe B conformément à la partie 15
de la règlementation FCC. Ces limites sont conçues pour fournir une protection
raisonnable contre les interférences nuisibles dans les installations
résidentielles. Cet équipement génère, utilise et peut émettre des fréquences
radioélectriques et, s'il n'est pas installé ou utilisé conformément aux directives,
peut brouiller la réception des ondes radio et télévision. Cependant, aucune
garantie n'est donnée qu'il ne causera pas de brouillage dans une installation
particulière. Si cet équipement produit des interférences nuisibles sur la
réception de la radio ou de la télévision, ce que vous pouvez facilement
observer en éteignant et en rallumant l'équipement, nous vous encourageons à
prendre l'une ou plusieurs des mesures correctives suivantes :
• Réorienter ou déplacer l’antenne réceptrice.
• Éloigner l’équipement du récepteur.
• Branchez l’équipement sur une prise ou un circuit auquel le récepteur n’est
pas branché.
• Consultez votre revendeur ou un technicien qualifié pour plus d’informations.
Avertissement : La FCC vous avertit que toute modification ou altération de
l’équipement non expressément autorisée par l’entreprise qui doit garantir la
conformité aux normes précitées peut annuler la permission d’utilisation de
l’appareil.
Déclaration de conformité DOC
Cet appareil numérique ne dépasse pas les limites de bruit de la Classe B des
appareils radio numérique contenues dans le « Radio Interference Regulations »
du département des communications du Canada. Cet appareil a été déclaré
conforme à la classe B du règlement ICES-003 du Canada.
1. Seulement pour les appareils achetés aux États-Unis d’Amérique.
2. Seulement pour les appareils achetés au Canada.
2
Français
Page 81

Explication des symboles AVERTISSEMENT
Tension dangereuse : L'éclair accompagné d'une flèche dans un triangle équilaté
ral avertit
uffisante pour constituer un risque de choc électrique.
l'utilisateur de la présence dans l’appareil d'une tension dangereuse s
Instruction : Le point d'exclamation dans un triangle équilatéral avertit l'utilisateur
de la présence, dans la documentation qui accompagne l'appareil, d'importantes
instructions d'utilisation et d'entretien.
Instructions relatives à la sécurité
1) Lisez ces instructions.
2) Conservez ces instructions.
3) Prenez garde à tous les avertissements.
4) Suivez toutes les instructions.
5) Ne faites pas fonctionner le téléviseur à LED à proximité d’une source d’eau.
6) Ne nettoyez qu’avec un chiffon sec. N'utilisez ni nettoyeur liquide, ni alcool, ni nettoyeur en aér
osol.
7) Ne bloquez pas les ouvertures de ventilation. Installez votre téléviseur à LED dans un environn
ement bien ventilé.
8) N'installez pas votre téléviseur à LED près d'une source d'humidité, de poussière ou de chaleur,
comme un radiateur,un calorifère, un poêle ou tout autre dispositif (incluant les amplificateurs)
qui produit de la chaleur.
9) Ne retirez pas le couvercle arrière de l'appareil. L'appareil ne contient aucune pièce à entretenir
par l’utilisateur.
10) N’essayez pas de contourner la fonction de sécurité de la fiche polarisée ou avec mise à la terre.
Une fiche polarisée comporte deux lames dont l'une plus large que l'autre. Unefiche avec mise à
la terre comporte deux lames ainsi qu'une broche de mise à la terre. Cette broche est conçue po
urassurer votre sécurité. Si la fiche fournie ne s'insèrepas dans la prise murale, consultez un éle
ctricien pour le remplacement de la prise désuète.
11) Protégez le cordon d'alimentation pour éviter qu'on ne marche dessus, ou qu'il ne soit pincé, en
particulier au niveau des connexions, des prises de courant et à l'endroit où il sort du téléviseur
à LED.
12) Ne posez jamais d'objets sur le cordon d'alimentation et ne le disposez pas dans un endroit pas
sant. Débranchez les câbles uniquement en tirant sur leur connecteur, à la sortie de l'appareil.
13) Utilisez uniquement les éléments/accessoires spécifiés par le fabricant.
14) Utilisez uniquement un chariot, support, trépied, fixation ou table
recommandéspar le fabricant ou vendus avec le téléviseur à LED .
Lorsque vousutilisez un chariot, faites attention en déplaçant l'ens
emble afin d'éviter de faire basculer le téléviseur.
15) Débranchez ce téléviseur à LED durant les orages électriques ou
lorsqu'il estinutilisé pour de longues périodes.
16) Pour toute réparation, consultez un personnel de service qualifié. Des réparations sont
lorsque letéléviseur à LED a été endommagé d'une façon ou d'une autre, par exemple lorsque le
cordon d'alimentation est endommagé, si du liquide a été renversé ou si des objets sont tombés
dans l'appareil, si l'appareil a été exposé à lapluie ou à l'humidité, s'il ne fonctionne pas normale
ment, ou s'il a été échappé.
requises
Français
Page 82

PRÉCAUTIONS ET RAPPELS
Placez l'appareil sur une surface stable. Ne placez pas le téléviseur dans un espace
confiné ou dans une boîte lors de son utilisation.
6 pouc
Débranchez immédiatement si vous constatez
un mauvais fonctionnement, comme l'absence
d'image, de vidéo ou de son ou encore de la
fumée ou une mauvaise odeur.
Ne jetez aucun objet à l'intérieur du boîtier du
téléviseur comme un objet métallique ou un
objet ou matériau inflammable.
Débranchez immédiatement si un élément
extérieur est tombé dans le téléviseur ou si le
téléviseur est tombé.
Bannissez/Évitez d'ouvrir le boîtier du téléviseur.
Français
Page 83

17) Le téléviseur à LED ne doit pas être exposé à la pluie ou aux éclaboussures et aucun objet rempli de
liquide ne doit être placé sur le dessus du téléviseur.
18) Le marquage de risque de choc et le symbole associé sont placés sur le couvercle arrière de
l’appareil.
19) Cet appareil est uniquement conçu dans un but de divertissement et toute autre tâche est exclue.
20) Montage murale ou au plafond : Lors du montage de l'appareil au mur ou au plafond, assurez-vous
d'installer l'appareil selon la méthode recommandée par le fabricant. Utilisez uniquement la
quincaillerie de montage indiquée pour garantir la sécurité de l'installation.
MISE EN GARDE : Tout dommage causé par une installation inadéquate de ce
téléviseur à LED n'est pas couvert par les termes de la garantie du fabricant.
AVERTISSEMENT : Pour réduire les risques d'incendie ou de choc électrique,
n'exposez pas ce téléviseur à LED à la pluie ou à l'humidité.
Français
Selon la réglementation DEEE, ce moniteur ne peut pas être traité comme un déchet
normal en Europe lorsqu'il est hors d'usage. Veuillez consulter les informations de
recyclage sur notre site pour savoir quoi faire avec votre téléviseur.
Page 84

Rappelez-vous de débrancher le cordon
Évitez l'exposition directe à la lumière du soleil, à
d'alimentation de sa prise avant de nettoyer
l'appareil. N'utilisez ni nettoyeur liquide ni
nettoyeur en aérosol pour nettoyer l'écran.
Assurez-vous de débrancher l'appareil lorsque
vous ne comptez pas l'utiliser pour une longue
période de temps (de plusieurs jours).
Ne couvrez ni ne bloquez les ventilations et
la poussière, à une humidité élevée et à des
endroits enfumés.
Faites appel à un centre de service pour nettoyer
l’intérieur de la télévision une fois par an.
Ne placez pas l’appareil proche d’une source
ouvertures. Une ventilation inadéquate risque
de raccourcir la durée de vie de l’appareil et
causer une surchauffe.
Notice pour la télécommande
Évitez de la faire tomber
Évitez les liquides Évitez les nettoyeurs en aérosol
d’eau, comme une baignoire, un lavabo, un bac à
lessive, une piscine ou dans un sous-sol humide.
Français
Page 85

Table of Contents
1.11.
INSTRUCTIONS D'INSTALLATION
1.3 Panneau de commande................................................................. 3
1.4 Key pad.......................................................................................... 4
1.5 Télécommande .............................................................................. 5
1.6 Entrées et sorties........................................................................... 7
2.2 Branchement d’appareils externes ................................................ 9
2.2.1 Branchement d’écouteurs externes ..................................... 9
2.2.2 Connexion d’appareils AV................................................... 10
2.2.3 Branchement d’un magnétoscope/boîtier décodeur ou
lecteur DVD avec la vidéo composante...............................11
2.2.4 Branchement d’un magnétoscope/boîtier décodeur ou
lecteur DVD avec la vidéo composite.................................. 11
2.2.5 Brancher un ordinateur via le port VGA............................... 12
2.2.6 Brancher un ordinateur via le port DVI................................. 12
2.2.7 Branchement avec HDMI.....................................................13
2.2.8 Branchement USB............................................................... 13
2.3 Utilisation du téléviseur.................................................................. 14
2.3.1 Allumer et éteindre le téléviseur........................................... 14
2.3.2 Changer la source du signal ................................................ 14
2.3.3 Effectuer une recherche automatique des chaînes .............14
2.3.4 Choix des chaînes ............................................................... 14
2.3.5 Régler le volume..................................................................15
2.3.6 Editer la Liste des chaînes ou la Liste favorite..................... 15
2.3.7 Regarder des images et écouter de la musique .................. 15
3. Réglage des paramètres du système de menus OSD
(Affichage à l’écran)..............................................................................16
3.1 Menus de réglage OSD .................................................................17
3.2 Enregistrer des chaînes dans la mémoire...................................... 17
3.3 Affichage des menus .....................................................................18
3.4 Réglage des chaînes préférées..................................................... 18
3.5 Afficher/Cacher une chaîne ........................................................... 19
3.6 Réglage du nom des chaînes ........................................................19
3.7 Réglage des paramètres du menu Image...................................... 20
3.8 Réglage des paramètres du menu Audio ...................................... 20
3.9 Configuration des réglages du système.........................................20
3.10 Réglage du menu Heure.............................................................. 21
..................................
English
1
Français
Page 86

English
Table of Contents
3.11 Réglage du sous-titrage...............................................................22
3.12 Utilisation de la fonction Contrôle parental .................................. 23
3.13 Pour bloquer un film ou des émissions de TV sans
classification.................................................................................25
3.14 Pour régler le tableau de région de classification (RRT).............. 26
3.15 Pour changer le mot de passe..................................................... 26
3.16 Pour bloquer en fonction de la source d'entrée ...........................27
3.17 Pour restaurer les réglages d'usine .............................................27
3.18 Utilisation du mode PC ................................................................ 28
4. Caractéristiques techniques..................................................................
TABLEAU DES SYNCHROS DE PRÉRÉGLAGES D'USINE
(PC MODE)
PRÉCAUTIONS DE SÉCURITÉ
SOIN ET ENTRETIEN
DÉPANNAGE
.................... .............................................
.................... ..............................................
..................................................31
.................... ............................................
.........
.
.........
29
30
32
32
Français
Page 87

1.1.1
INSTRUCTIONS D'INSTALLATION
RELEASE
LOCK
INSTALLATION:
1.Installez le TV avec l’écran face au bureau.
2.Alignez le TV aux fentes du support.
3.Veuillez remarquer que le côté le plus long du support doit être tourné vers l’avant.
4.Tirez l’anneau de la vis vers le haut puis tournez la vis dans le sens des aiguilles d’une montre
pour la visser. Lorsque le support est bien attaché au TV, tirez l’anneau de la vis vers le bas
pour l’aplatir avec la base de la vis.
5.Contrôlez le dessous du support pour vous assurer de la bonne fixation du TV sur le support
et du serrage des vis.
DÉMONTAGE:
1.Installez le TV av ec l’écran face au bureau.
2.Tournez la vis dans le sens contraire des aiguilles d’une montre pour la dévisser.
3.Détachez le support du TV.
1
Français
Page 88

Suivez ces étapes pour terminer l'installation du support mural :
1. Placez le support mural à l'arrière du téléviseur.
2. Insérez et vissez les 4 vis dans les trous correspondants. Alignez les trous du bras avec les trous
situés à l'arrière du téléviseur.
3. Rebranchez les câbles. Reportez-vous au manuel de l'utilisateur fourni avec le système de montage
mural pour savoir comment le fixer au mur.
REMARQUE
trou de type VESA de 75 mm x 75 mm (n = 4), vis M4, pas de 0,7 mm, profondeur = 10 mm, kit de
vis de montage non fourni.
Par souci de sécurité, si le kit de montage VESA est acheté séparément, assurez-vous qu'il soit
homologué UL, et qu'il ne puisse être remplacé que par un centre de service.
Français
2
Page 89

1.3. Panneau de contrôle
Capteur de la télécommande : Il s'agit de la fenêtre à travers laquelle tous les signaux de
contrôle envoyés par la télécommande sont transmis au capteur.
1.4 Clavier
1
Menu
2
Entrée
3
Boutons CH ▲/▼ (Canal +/-)
4
Boutons Volume +/-
5
3
Alimentation
Français
Page 90

INFOMENU
RETURNGUIDE
FAV
MTS SLEEP ASPECT C.C.
LAST
MUTE
4
Français
Page 91

English
CH
1.5 Télécommande
Significations Icône Fonction
Alimentation
Source d’entrée
Pavé numérique
Entrée
programme
Dernier
Information
Menu
Flèches
Sélectionner
Guide de la liste
des chaînes
Retour
Appuyez sur cette touche pour allumer ou
éteindre le téléviseur.
INPUT
Appuyez sur cette touche pour afficher la liste
des sources d’entrée
Pour sélectionner directement une chaîne.
Utilisez les touches 0-9 pour entrer les numéros
de programme (appuyez sur 1 puis sur 0 pour la
chaîne numéro 10).
Appuyez sur ce bouton pour accéder à la
chaîne secondaire DTV
LAST
Appuyez sur cette touche pour retourner à la
dernière chaîne sélectionnée.
INFO
Appuyez sur cette touche pour afficher les
informations relatives au programme.
Appuyez sur cette touche pour
MENU
activer/désactiver l’affichage du menu à l’écran
(OSD) ; pour confirmer le choix.
Utilisez les flèches Haut, Bas, Gauche et Droite
pour vous déplacer dans le menu à l’écran.
OK Appuyez pour confirmer la sélection.
GUIDE
RETURN
Appuyez sur ce bouton pour afficher l’écran
Guide de programmation électronique.
Appuyez sur cette touche pour retourner au
menu précédant.
Sélectionner la
chaîne
Réglage du
volume
5
Français
CH / CH
VOL / VOL
Appuyez sur pour aller à la chaîne suivante.
Appuyez sur pour aller à la chaîne
CH
précédente.
Appuyez sur VOL + pour augmenter le volume.
Appuyez sur VOL - pour baisser le volume.
Page 92

Significations Icône Fonction
Appuyez plusieurs fois sur cette touche pour
régler le compteur Sommeil (Sommeil
désactivé, 5, 10, 15, 30, 45, 60, 90, 120, 180,
Compteur
Sommeil
SLEEP
240 minutes )
Les informations sur la fonction apparaissent au
milieu de l’écran et indiquent le temps restant.
Annuler le compteur en appuyant sur le bouton
et passer en mode Sommeil désactivé.
Son télévision
multicanaux
Chaînes
préférées
Format d’image
MTS
FAV
ASPECT
Sous-titre C.C.
Appuyez sur cette chaîne pour passer d’un
mode audio à un autre (Mono/Stéréo/SAP) en
ATV ou d’un service audio à un autre en DTV.
Appuyez sur ce bouton pour passer d’une
chaîne préférée à une autre. (si aucune chaîne
préférée n’a été paramétrée, la mention « Non
disponible » apparaît à l’écran)
Appuyez pour ajuster le format largeur/hauteur
de l’image. Les options disponibles sont : Full,
Normal, Zoom et Cinéma.
Appuyez sur ce bouton pour afficher ou
dissimuler les sous-titres.
Français
6
Page 93

Entrées et sorties
1.6
Significations Connecteur Fonction
Connecteur
d'alimentation
DC IN
Pour brancher
Adaptateur
fourni.
Entrée HDMI 1
Entrée HDMI 2
Entrées
composantes
(audio)
Français
7
AUDIO
HDMI1
HDMI2
L
R
AUDIO
Pour brancher un périphérique externe,
comme un lecteur DVD, un boîtier
décodeur, un port DVI/HDMI de PC
Pour brancher un périphérique externe,
comme un lecteur DVD, un boîtier
décodeur, un port DVI/HDMI de PC.
.CPnu’dAGVtropelrusrehcnarbruoPAGV)CP(eértnE
.CPnu’doiduatropelrusrehcnarbruoPoidua)CP(eértnE
À brancher à un périphérique externe,
comme un magnétoscope, un boîtier
décodeur ou un lecteur DVD.
Page 94

Entrées
S-VIDEO
composante
(vidéo)
Sortie écouteurs
VIDEO
Y
B
P
P
R
À brancher à un périphérique externe,
comme un magnétoscope, un boîtier
décodeur ou un lecteur DVD.
Pour brancher des écouteurs ou des
haut-parleurs externes avec
amplificateurs intégrés.
Câble/Antenne
Entrées S-vidéo
Entrées
composite
USB
TV
VIDEO
AUDIO
Pour brancher une antenne ou un câble
télé.
À brancher à un périphérique externe,
comme un magnétoscope, un boîtier
décodeur ou un lecteur DVD.
L
R
À brancher à un périphérique externe,
comme un magnétoscope, un boîtier
décodeur ou un lecteur DVD.
Prise en charge des fichiers JPEG
Français
8
Page 95

English
Écouteurs
Haut-parleurs
(Amplificateurs intégrés)
2.2 Branchement d’appareils externes
À brancher aux périphériques externes, comme les magnétoscopes, les boîtiers
décodeur, les lecteurs DVD, les consoles de jeux, les écouteurs, ou à utiliser pour
connecter un PC au téléviseur en utilisant les ports adéquats à l’arrière du téléviseur.
2.2.1 Branchement d’écouteurs externes
Remarque :
• Les haut-parleurs externes et le casque ne sont pas fournis avec le
téléviseur.
• Les haut-parleurs internes du téléviseur seront automatiquement coupés
lorsque des écouteurs sont branchés.
• Utilisez seulement des haut-parleurs externes avec un amplificateur
intégré.
• Un seul appareil externe peut être branché à n’importe quel moment.
Français
9
Page 96

2.2.2 Connexion d’appareils AV
HDMI 1 HDMI 2
A B C
AUDIO
P
r
Pb
R L
Y
S-VIDEO
R L
VIDEO
YLRHDMI PrP
b
S-Video
R L VIDEO
AUDIO
Magnétoscope
Boîtier décodeur
DVD
ou
uouo
Câble audio
(En option)
Câble HDMI
(En option)
Câble vidéo
(En option)
Câble audio/vidéo
(En option)
Console de jeu
Français
10
Page 97

English
Magnétoscope
Boîtier décodeur
DVD
Câble audio
(En option)
Câble vidéo
(En option)
DVD
Boîtier décodeur
Magnétoscope
Câble audio
(En option)
Câble vidéo
(En option)
2.2.3 Branchement d’un magnétoscope/boîtier décodeur
ou lecteur DVD avec la vidéo composante
Branchez le téléviseur à un magnétoscope, un boîtier décodeur ou un lecteur DVD
en utilisant les entrées vidéo composante.
AUDIO
R L
Y
2.2.4 Branchement d’un magnétoscope/boîtier décodeur
ou lecteur DVD avec la vidéo composite
Branchez le téléviseur à un magnétoscope, un boîtier décodeur ou un lecteur DVD
en utilisant les entrées vidéo composite.
P
r
P
b
11
Français
AV
AUDIO
R L VIDEO
Page 98

2.2.5 Brancher un ordinateur via le port VGA
PC
Câble audio
(En option)
Câble VGA
(En option)
PC
Câble audio
(En option)
Câble HDMI/DVI
(En option)
Branchez le téléviseur sur un PC avec le port VGA pour l’utiliser comme un moniteur.
1
Connectez le port VGA du téléviseur à la sortie VGA du PC.
2
Connectez le port AUDIO de votre téléviseur au port de sortie ligne du PC
pour écouter l’audio sur votre PC
.
English
VGA
AUDIO
2.2.6 Brancher un ordinateur via le port DVI
Branchez le téléviseur sur un PC avec le port DVI pour l’utiliser comme un moniteur
(voir illustration).
1
Branchez le port HDMI 1 ou HDMI 2 du téléviseur à la sortie DVI du PC.
2
Connectez le port AUDIO de votre téléviseur au port de sortie ligne de votre
téléviseur pour écouter l’audio sur votre PC
HDMI1 HDMI2
AUDIO
.
IMDH
Français
12
Page 99

2.2.7 Branchement avec HDMI
Le HDMI (interface multimédia haute définition) vous permet d’obtenir l’envoi d’un
signal vidéo optimal depuis la source vers le téléviseur.
Rapportez-vous à l’illustration suivante pour brancher un appareil avec une sortie
HDMI sur le téléviseur.
HDMI1 HDMI2
Lecteur DVD
Câble HDMI
(En option)
1.Remarque :
Lorsqu'un câble HDMI est branché, il n’est pas nécessaire d’utiliser un câble
audio. Par contre, il est nécessaire si vous utilisez un câble HDMI-DVI pour les
branchements.
2.Remarque :
Fonction CEC
1. Lecture à un bouton - permet d'activer la lecture d'un appareil et de le sélec
tionner comme source active, à l'appui d'un simple bouton.
2. Mise en veille du système - permet à l'utilisateur de mettre tous les appareils
en veille à l'appui d'un simple bouton.
2.2.8 Branchement USB
Branchez le lecteur flash USB au téléviseur, en utilisant le port USB comme le
montre l'illustration. Les fichiers JPEG et MP3 sont pris en charge.
USB
Lecteur flash USB
(en option)
Remarque :
Le disque dur USB n'est pas supporté.
Français
Page 100

2.3 Utilisation du téléviseur
CH
CH
2.3.1 Allumer et éteindre le téléviseur
1 Appuyez sur du panneau de commande ou de la télécommande. Le voyant
DEL d’alimentation du TV passe de l’orange au bleu, indiquant que le téléviseur
est allumé.
2 Appuyez à nouveau sur . Le voyant DEL d’alimentation passe de bleu à
orange, indiquant que le téléviseur est éteint.
2.3.2 Changer la source du signal
Appuyez sur INPUT du panneau de commande ou sur INPUT de la télécommande
pour choisir la source du signal d’entrée du téléviseur pour la recherche des
chaînes. Appuyez sur le bouton OK pour confirmer.
2.3.3 Effectuer une recherche automatique des chaînes
Avant d’utiliser le téléviseur et de regarder des programmes, vous devez
commencer par activer la recherche des chaînes.
1 Appuyez sur MENU du panneau de commande ou de la télécommande, puis
sélectionnez pour accéder au menu Chaîne.
2 Sélectionnez Air/Câble pour régler la source du signal. (Air ou Câble, le réglage
par défaut est Câble)
3 Sélectionnez Balayage auto. Trois options sont disponibles : Rechercher
toutes les chaînes, Uniquement les chaînes numériques, et Uniquement les
chaînes analogiques.
• Pour chercher uniquement les chaînes numériques, sélectionnez Uniquement
les chaînes numériques.
• Pour chercher uniquement les chaînes analogiques, sélectionnez
Uniquement les chaînes analogiques.
• Pour chercher les deux types, sélectionnez Rechercher toutes les chaînes.
4 Appuyez sur de la télécommande pour lancer la recherche des chaînes.
2.3.4 Choix des chaînes
English
• Appuyez sur CH du panneau de commande ou sur de la télécommande
pour passer au numéro de chaîne suivant.
• Appuyez sur CH
pour passer au numéro de chaîne précédant.
• Entrez directement le numéro de la chaîne désirée avec les touches numériques
de la télécommande.
du panneau de commande ou sur de la télécommande
Français
14
 Loading...