


USER MANUAL
TABLE OF CONTENTS
INSTALLATION ---------------------------------------------------------- 1
For Your Safety ---------------------------------------------------- 3
IMPORTANT SAFETY INSTRUCTIONS ------------------------ 4
PREPARATION ---------------------------------------------------------- 6
OPERATING INSTRUCTIONS -------------------------------------- 7
Use of the remote control --------------------------------------- 8
Teletext -------------------------- ----------------------------------- 9
Menus -------------------------------------------------------------- 10
Main menu ---------------------------------------------------------- 10
CONNECT PERIPHERAL EQUIPMENT -------------------------- 18
Front Panel Control Knobs -------------------------------------- 18
Preparation ---------------------------------------------------------- 18
AV sockets---------------------------------------------------------- 19
Headphone socket--------------------------------------------------- 20
PC IN socket---------------------------------------------------------- 21
Tips ------------------------------------------------------------------- 22
BEFORE CALLING SERVICE --------------------------------------- 23
Glossary ------------------------------------------------------------- 24
Thank you very much for choosing the LCD TV.
We recommend that you take a few minutes to read carefully through this manual
before installing and switching on the TV. Please keep this manual in a safe place
for your future reference.

Compliance Information
1
CE Conformity for European Countries
The device complies with the requirements of the EEC directive 89/336/
EEC as amended by 92/31/EEC and 93/68/EEC Art.5 with regard to
“Electromagnetic compatibility”, and 73/23/EEC as amended by 93/68/
EEC Art.13 with regard to “Safety.”
Following information is only for EU-member states:
The mark shown to the right is in compliance with the Waste Electrical and
Electronic Equipment Directive 2002/96/EC (WEEE).
The mark indicates the requirement NOT to dispose the equipment as unsorted
municipal waste, but use the return and collection systems according to local
law.
SRS WOW, SRS and
This product is designed using SRS technology with permission from SRS Labs, Inc.
are registered trademarks of SRS Labs, Inc.
AR46
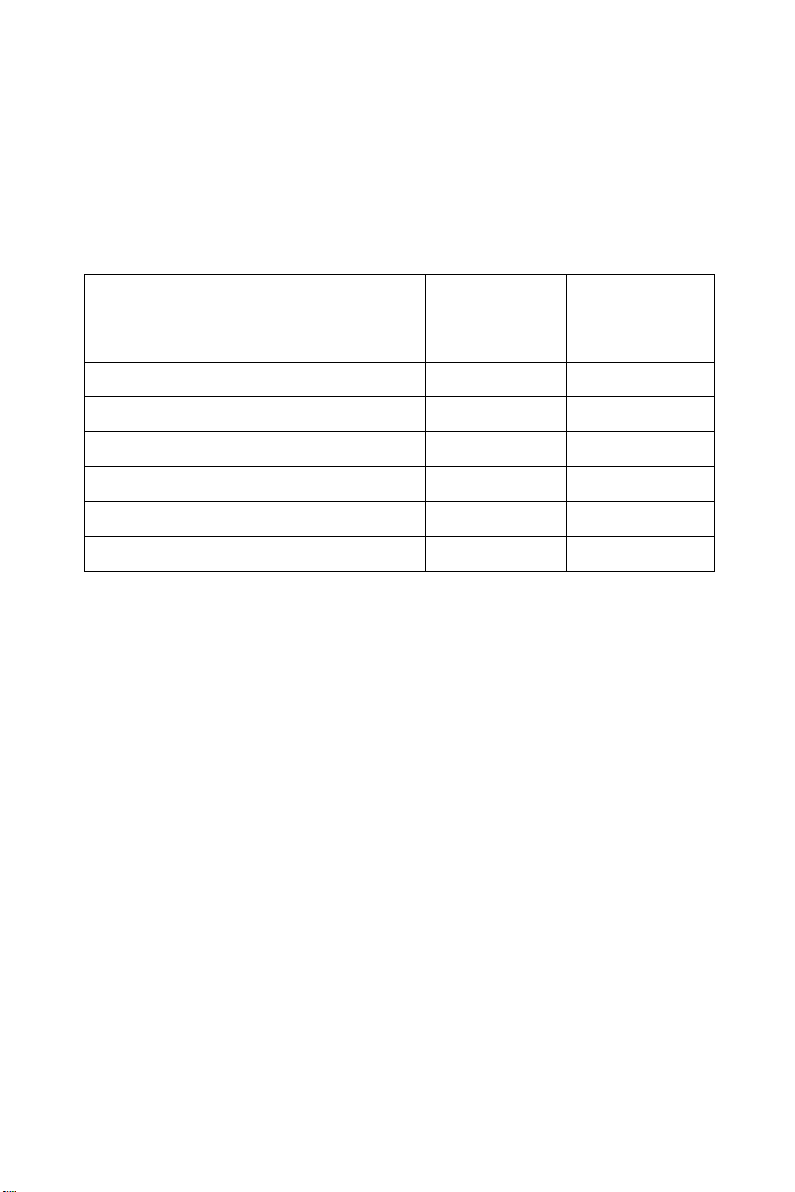
Declaration of RoHS Compliance
2
This product has been designed and manufactured in compliance with
Directive 2002/95/EC of the European Parliament and the Council on
restriction of the use of certain hazardous substances in electrical and
electronic equipment (RoHS Directive) and is deemed to comply with the
maximum concentration values issued by the European Technical Adaptation
Committee (TAC) as shown below:
Substance
Lead (Pb) 0.1% < 0.1%
Mercury (Hg) 0.1% < 0.1%
Cadmium (Cd) 0.01% < 0.01%
Hexavalent Chromium (Cr6+)
Polybrominated biphenyls (PBB) 0.1% < 0.1%
Polybrominated diphenyl ethers (PBDE) 0.1% < 0.1%
Certain components of products as stated above are exempted under the
Annex of the RoHS Directives as noted below:
Examples of exempted components are:
1. Mercury in compact fluorescent lamps not exceeding 5 mg per lamp and in
other lamps not specifically mentioned in the Annex of RoHS Directive.
2. Lead in glass of cathode ray tubes, electronic components, fluorescent
tubes, and electronic ceramic parts (e.g. piezoelectronic devices).
3. Lead in high temperature type solders (i.e. lead-based alloys containing
85% by weight or more lead).
4. Lead as an allotting element in steel containing up to 0.35% lead by weight,
aluminium containing up to 0.4% lead by weight and as a cooper alloy
containing up to 4% lead by weight.
Proposed
Maximum
Concentration
0.1% < 0.1%
Actual
Concentration

FOR YOUR SAFETY
3
Before operating the TV please read this manual thoroughly. This manual
should be retained for future reference.
NOTICE
The changes or modifications not expressly approved by the party responsible
for compliance could void the user's authority to operate the equipment.
Shielded interface cables and AC power cord, if any, must be used in order to
comply with the emission limits.
The manufacturer is not responsible for any radio or TV interference caused by
unauthorized modification to this equipment. It is the responsibilities of the
user to correct such interference.
WARNING:
To prevent fire or shock hazard, do not expose the TV to rain or moisture.
Dangerously high voltages are present inside the TV. Do not open the cabinet.
Refer servicing to qualified personnel only.
Disposal of Waste Equipment by Users in Private Household in
the European Union.
This symbol on the product or on its packaging indicates that
this product must not be disposed of with your other household
waste. Instead, it is your responsibility to dispose of your
waste equipment by handing it over to a designated collection
point for the recycling of waste electrical and electronic
equipment. The separate collection and recycling of your
waste equipment at the time of disposal will help to conserve natural resources
and ensure that it is recycled in a manner that protects human health and the
environment. For more information about where you can dr op off your waste
equipment for recycling, please contact your local city office, your household
waste disposal service or the shop where you purchased the product.

4
IMPORTANT SAFETY INSTRUCTIONS
Read before operating equipment
1. Read these instructions.
2. Keep these instructions.
3. Heed all warnings.
4. Follow all instructions.
5. Do not use this apparatus near water.
6. Clean only with a dry cloth.
7. Do not block any of the ventilation openings. Install in accordance with the
manufacturers instructions.
8. Do not install near any heat sources such as radiators, heat registers,
stoves, or other apparatus (including amplifiers) that produce heat.
9. Do not defeat the safety purpose of the polarized or grounding type plug.
When the provided plug does not fit into your outlet, consult an electrician
for replacement of the obsolete outlet.
10. Protect the power cord from being walked on or pinched particularly at
plugs, convenience receptacles, and the point where they exit from the
apparatus.
11. Only use attachments/accessories specified by the manufacturer.
12. Use only with a cart, stand, tripod, bracket, or table specified by the
manufacturer, or sold with the apparatus. When a cart is used, use caution
when moving the cart/apparatus combination to avoid injury from tip-over.
13. The TV should be operated only from the type of power source indicated
on the label. If you are not sure of the type of power supplied to your home,
consult your dealer or local power company.
14. Unplug this apparatus during lightning storms or when unused for long
periods of time.
15. Refer all servicing to qualified service personnel. Servicing is required
when the apparatus has been damaged in any way, such as power-supply
cord or plug is damaged, liquid has been spilled or objects have fallen into
apparatus, the apparatus has been exposed to rain or moisture, does not
operate normally, or has been dropped.
16. This product may contain lead or mercury. Disposal of these materials
may be regulated due to environmental considerations. For disposal or
recycling information, please contact your local authorities or the
Electronic Industries Alliance: www.eiae.org
17. Damage Requiring Service – The appliance should be serviced by
qualified service personnel when:
A. The power supply cord or the plug has been damaged; or
B. Objects have fallen, or liquid has been spilled into the appliance; or
C. The appliance has been exposed to rain; or
D. The appliance does not appear to operate normally or exhibits a
marked change in performance; or
E. The appliance has been dropped, or the enclosure damaged.
18. Tilt/Stability – All televisions must comply with recommended
5
international global safety standards for tilt and stability properties of its
cabinets design.
Do not compromise these design standards by applying excessive
pull force to the front, or top, of the cabinet, which could ultimately
overturn the product.
Also, do not endanger yourself, or children, by placing electronic
equipment/toys on the top of the cabinet. Such items could
unsuspectingly fall from the top of the set and cause product damage
and/or personal injury.
19. Wall or Ceiling Mounting – The appliance should be mounted to a wall or
ceiling only as recommended by the manufacturer.
20. Power Lines – An outdoor antenna should be located away from power
lines.
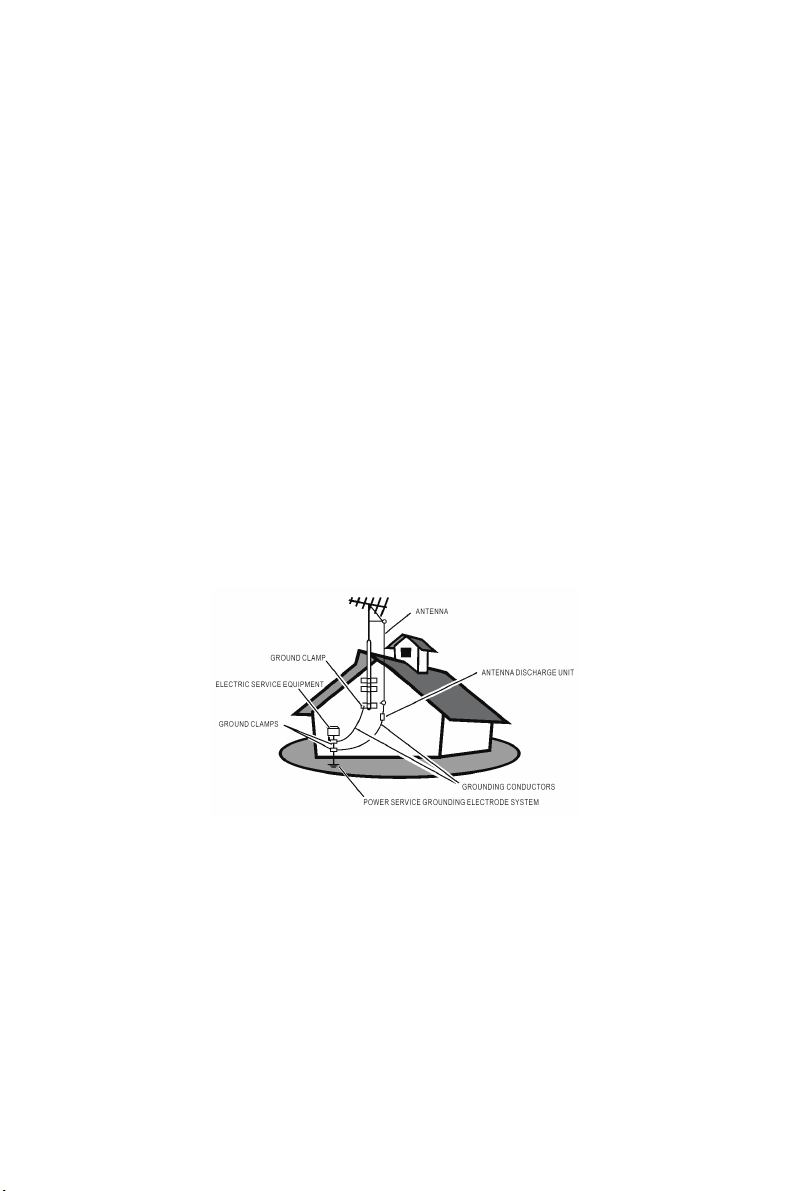
21. Outdoor Antenna Grounding – If an outside antenna is connected to the
receiver, be sure the antenna system is grounded so as to provide some
protection against voltage surges and built up static charges.
Section 810 of the National Electric Cord, ANSI/NFPA No. 70-1984,
provides information with respect to proper grounding of the mats and
supporting structure grounding of the lead-in wire to an antenna-discharge
unit, size of grounding connectors, location of antenna-discharge unit,
connection to grounding electrodes and requirements for the grounding
electrode. See Figure below.
EXAMPLE OF ANTENNA GROUNDING AS PER NATIONAL ELECTRICAL
CODE
Note to the CATV system installer: This reminder is provided to call the CATV
system installer’s attention to Article 820-40 of the NEC that provides
guidelines for proper grounding and, in particular, specifies that the cable
ground shall be connected to the grounding system of the building, as close to
the point of cable entry as practical.
Please, make sure to connect the power plug to the wall outlet socket after
connecting the TV to the adapter!
22. Objects and Liquid Entry – Care should be taken so that objects do not
fall and liquids are not spilled into the enclosure through openings.
6
PREPARATION
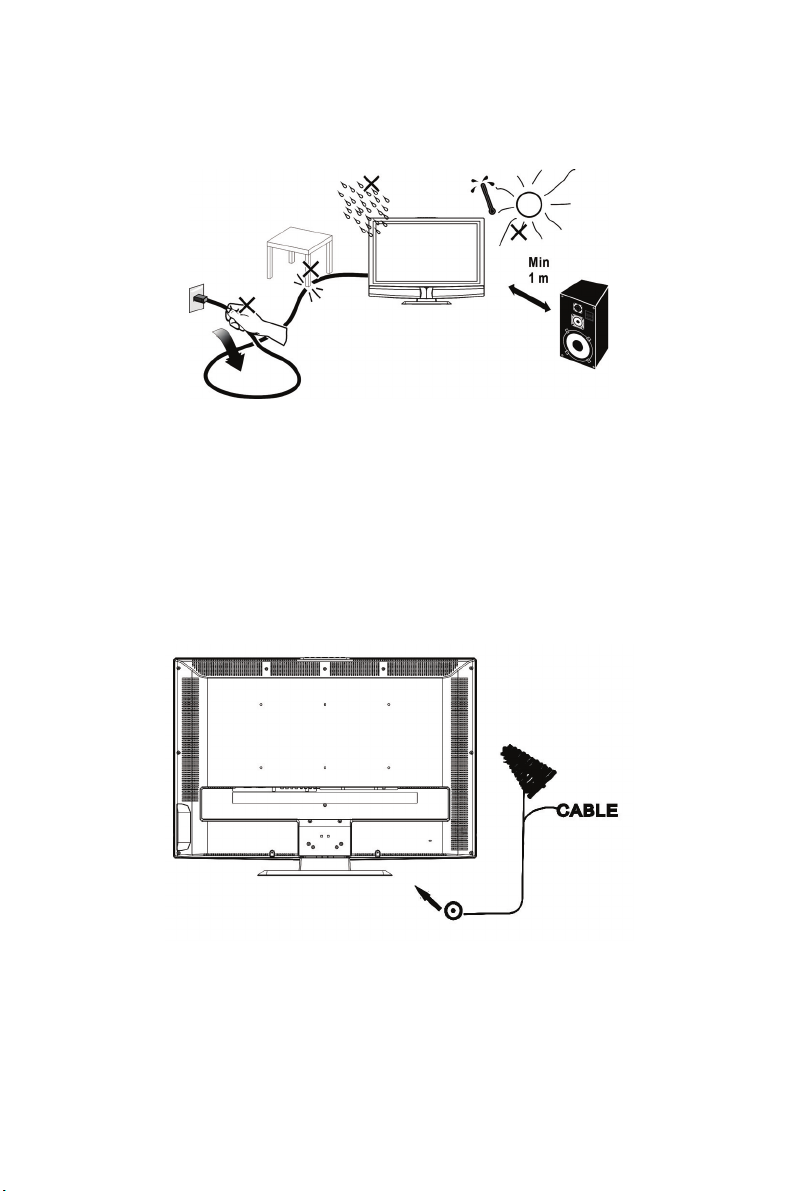
1. Place the TV on a solid surface. 1. Place the TV on a solid surface.
Ensure that the TV is placed in a position to allow free flow of air. Do not
Ensure that the TV is placed in a position to allow free flow of air. Do not
cover the ventilation openings on the back cover.
cover the ventilation openings on the back cover.
To prevent any unsafe situations, no naked flame sources, such as lighted
To prevent any unsafe situations, no naked flame sources, such as lighted
candles, should be placed on or in the vicinity.
candles, should be placed on or in the vicinity.
Avoid heat, direct sunlight and exposure to rain or water. The equipment
Avoid heat, direct sunlight and exposure to rain or water. The equipment
shall not be exposed to dripping or splashing.
shall not be exposed to dripping or splashing.
2. Insert the aerial plug firmly into the aerial socket ANT IN 75Ω at the back
2. Insert the aerial plug firmly into the aerial socket ANT IN 75Ω at the back
of the TV.
of the TV.
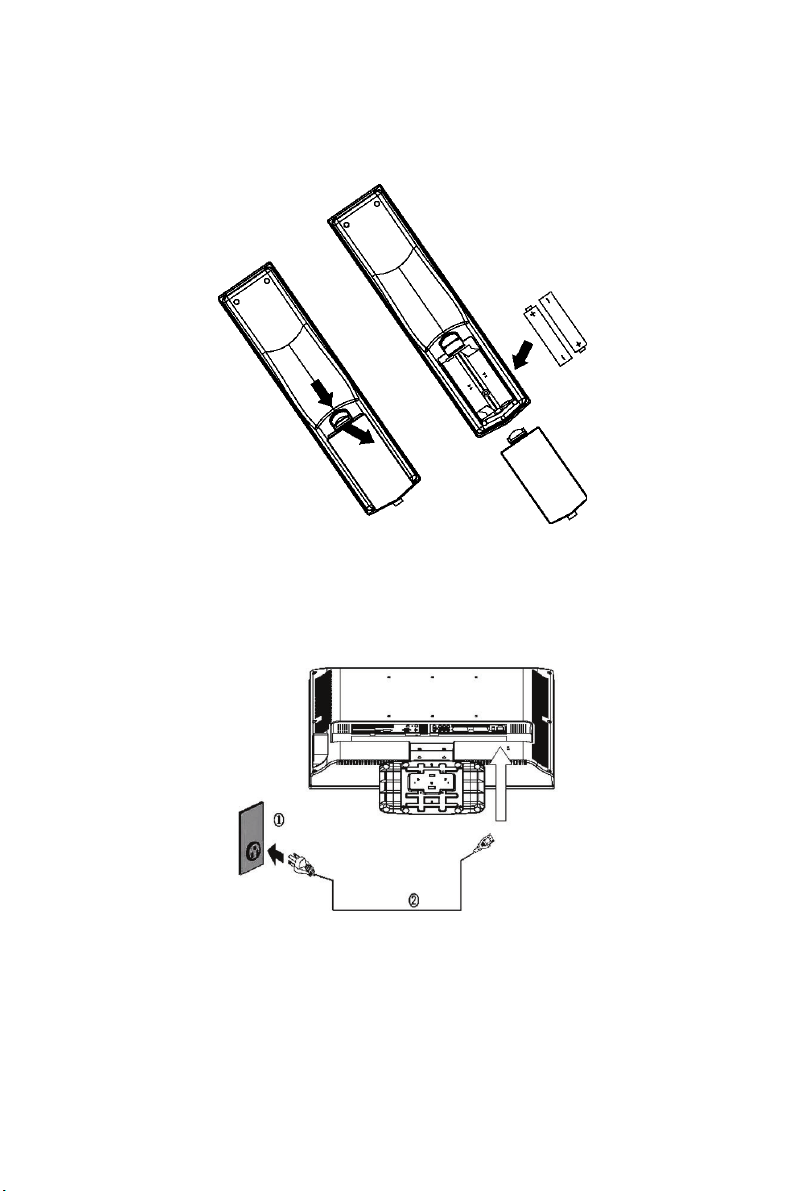
3. Remote control:
7
Remove the cover of the battery compartment. Insert the 2 batteries
supplied (Type AA 1.5V).
4. Power:
Insert the power cord in the wall socket having an AC power supply .
5. Turn the TV on:
Press the On/standby button at the topside or on the front of the TV to turn it on,
the indicator in front turns green
If the TV is in power off, the indicator in front of the TV red.
.

Remote Control
8
POWER:
Press to turn on/off the TV. The
TV is never completely powered
off unless it is physically
unplugged.
VIDEO
Press this key you could select
AV3,AV3-S,CMP and HDMI.
SCART
Press this key you could select
AV1,AV2 and AV2-S.
0~9 DIGIT BUTTONS
To select a TV channel.
SUBPAGE
Teletext Sub-page function.
Source
Select your input source: press
repeatedly to select TV, PC,
AV 1, AV2 ,AV 2- S ,AV 3 ,AV 3- S or
HDMI mode, according to where
you connected your external
source.
SOUND
To select Mono/ Stereo/Dual from
TV RF input.
SWAP
Press this key to swap POP/PIP
screen.
Zoom +,-.
Press these key to select desired
picture format.
(Auto, 4/3 Format, 14/9 ZOOM,
16/9 ZOOM, 16/9 ZOOM
up, Cinerama,16/9 Format)
VOL
Press + or – (or MENU
button) to increase or decrease
the volume.
MENU
Press this key to display main
menu.
or
< > button
Use this button to confirm
selection or adjust the
desired parameter;
otherwise, to increase
/decrease the volume.
button
When in menu mode, use
this button to select to the
up/down; otherwise, to
change TV channels.
DISPLAY
Press this key to display:
(1) the channel number when
watching a TV program.
(2) the input source when
watching an AV program.
MUTE
Temporarily interrupt the sound
or restore it.
PC
Display PC mode
TV
Display TV mode
PRE-CH
To display the previously
selected TV channel.
PIP
Press this key to display
PIP/POP screen.
SLEEP
With this key you can set a time
period after which the TV
should switch itself to standby.
Press the key repeatedly to
select the number of minutes.
The counter runs from off, 15,
30,45,60, 90,120 minutes. The
timer begins to count down from
the number of minutes selected
after the display has
disappeared.
CH
Press + or - (or MENU ▲/▼
button) buttons to scroll through
the channels.
EXIT
Press this key to exit main
menu.
OK
Press this KEY to validate your
selected.
Teletext function and buttons will be described on next page.

TELETEXT
9
Teletext is an information service organized like a magazine, which is provided by some
TV stations in addition to regular television broadcasting.
PAGE SELECTION
Page can be selected in two ways.
a. Press ▼or ▲ to increase or decrease the page number by one.
b. By entering the page number, using digit buttons 0~9.
SUBPAGE ACCESS
When Teletext information exceeds more than one page, press SUBPAGE first then
select the required page number using digit buttons 0~9.
TELETEXT
Press TELETEXT. The Teletext screen appears.
To turn off the Teletext mode, press TELETEXT again.
MIX
Press MIX to superimpose the Teletext over a normal broadcast
picture. Press again to return to Teletext mode.
SIZE
Press SIZE repeatedly to display the upper Teletext part, the
lower Teletext part and then to return to the normal.
RED / GREEN / YELLOW / BLUE
Use the COLOURED BUTTONS to operate the Teletext screen.
i INFO
Press i-INFO to show DTV information.
INDEX
Press INDEX to return to the main index page.
SUBTITLE
Press SUBTITLE to select the next page marked as a subtitle
page and request it as the display page.
HOLD
Press HOLD to hold the Teletext page when viewing
information. Press again to return to automatic page update.
REVEAL
Press REVEAL to display reveal hidden words e.g. quiz page
answers. Press a
gain to hide.
MENUS
10
MAIN MENU
Press the MENU button to display the Main menu. It offers the following options :
Picture adjustments, Audio adjustments, PIP/POP adjustments, TV channels search
menu (only in TV mode) and PC adjustments (only in PC mode). It also allows to
define your preferences in the Setup menu.
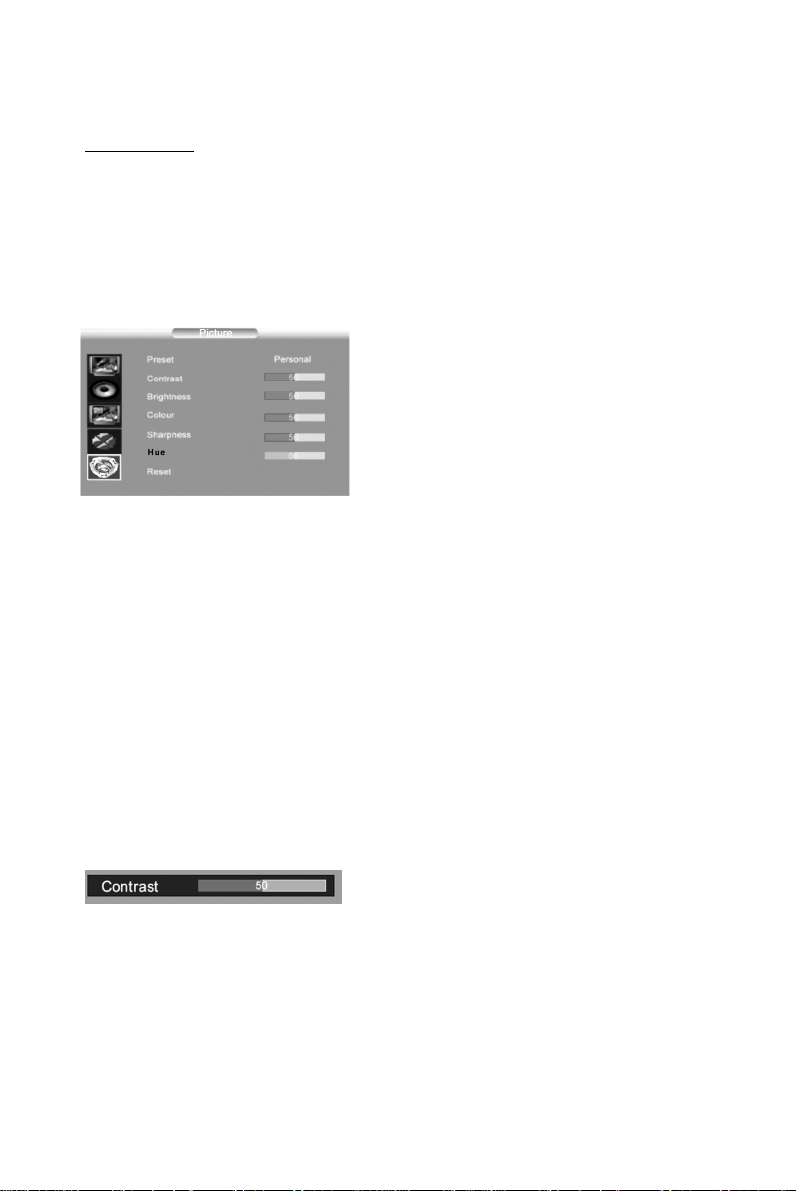
ICTURE ADJUSTMENTS
P
Preset: choose between Personal, Vivid, Standard or Mild.
Personal gives access to following adjustments.
Contrast, Brightness, Colour and Sharpness: adjust these settings as required using
the / buttons.
Hue
This option is only available for NTSC audio-visual sources.
:
Adjust the tint of the picture using the / buttons.
Reset: Return to default settings. Press OK button to return to default settings.
Press the MENU button to exit the Picture menu.
Note : this menu is removed automatically after a few seconds without using the
remote control.
Display the Main menu by pressing MENU
button.
Select the Picture menu using the /
buttons.
Press the OK button to confirm.
Use the / buttons to select each option.
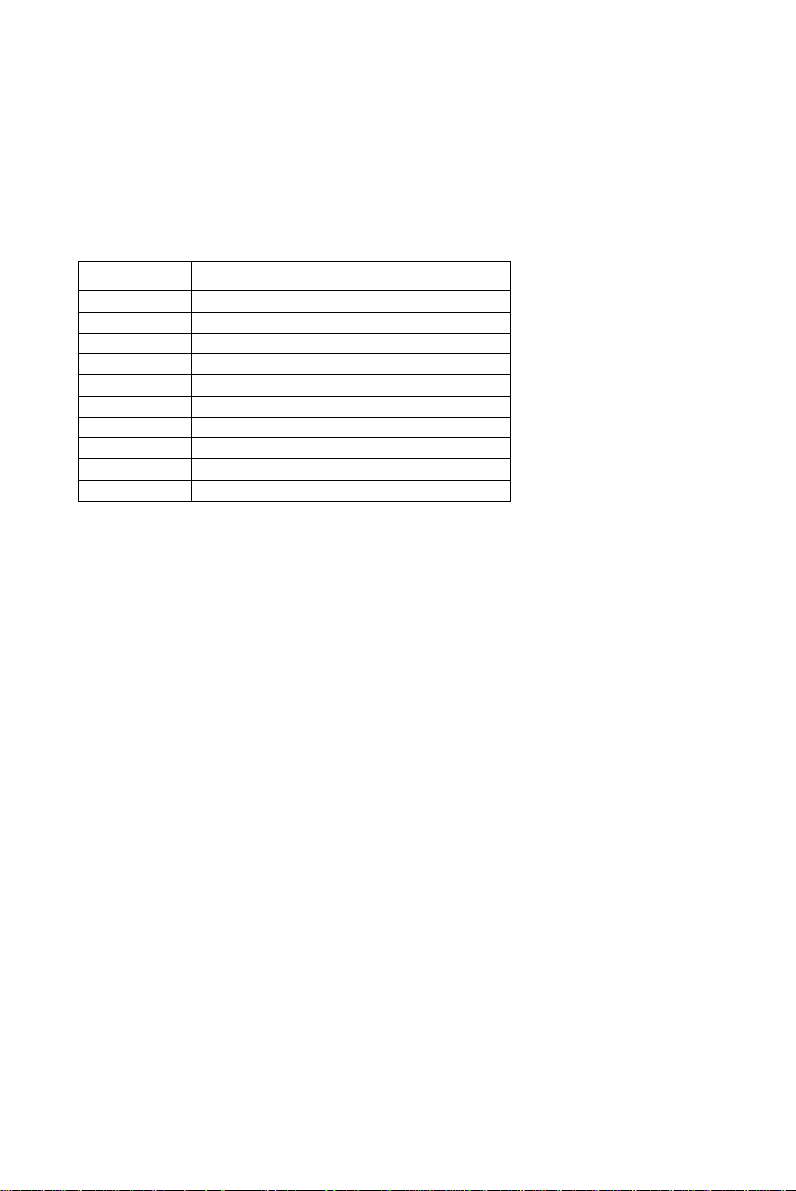
When you adjust a menu option (Contrast for
example), the menu is replaced by a sub-menu as
illustrated. Press the OK button to return to the
Picture menu.

A
11
UDIO ADJUSTMENTS
Display the Main menu by pressing MENU
button.
Select the Sound menu using the button.
Press the OK button to confirm.
Use the / buttons to select each option.
Balance : adjust the balance between left/right channels as required using the /
buttons.
Bass : adjust the bass level as required using the / buttons.
Treble: adjust the treble level as required using the / buttons.
SRS WOW : Using / , activate (On) or deactivate (Off) SRS function.
SRS is an audio technology which improve the sound quality.
Reset: Return to default settings. Press OK button to return to default settings.
Press the MENU button to exit the Sound menu.
Note : this menu is removed automatically after a few seconds without using the
remote control.
SRS WOW, SRS and
This product is designed using SRS technology with permission from SRS Labs, Inc.
are registered trademarks of SRS Labs, Inc.

PIP/POP
12
ADJUSTMENTS
Press the MENU button to display the Main
menu
Select the PI
Press the OK button to confirm.
Use the / buttons to select each option.
P/POP menu using the button.
Dual mode: Using / buttons
function.
Following options are available if you have selected PIP or POP at the PIP line.
Position : use the / buttons to change the position of the PIP frame on the
screen.
Source : to select video source of the PIP/POP, use the / buttons to select video
source of the picture in the PIP/POP frame (TV or TV/VIDEO).
You can insert a TV picture while you are viewing an TV/VIDEO program or insert
an TV/VIDEO
Video source can also b e selected without the menu, using button on the
remote
Audio select : to select audio source: MAIN (Main picture) or SUB (PIP/POP
picture), use the / buttons to select audio source.
Press the MENU button to exit the PI
Note : this menu is removed automatically after a few seconds without using the
remote control.
picture while you are viewing a TV program.
control.
activate (PIP/POP) or deactivate (Off) the PIP
TV/VIDEO
P/POP menu.

C
13
HANNELS SEARCH
Channels search
and store all the channels you can receive.
Make sure that the television is switched on and follow all the steps in turn specified
on this page.
Automatic set-up
Country: Select the relevant country using the / buttons.
This is the country you are in, or the country whose channels you want to receive if
you live near its borders.
Start: Press OK button to start channels searching
Manual set-up
involves selecting all the settings required to be able to search for
Display the Main menu by pressing MENU
button.
Select the Installation menu using the button.
Press the OK button to confirm.
Use the / buttons to select each option.
Select Auto. installation using the button.
Press the OK button to display the Auto.
installation menu.
Use the / buttons to select each option.
If you do not find your country, select Auto.
Select Man. installation using the button.
Press the OK button to display the Man.
installation menu.
Use the / buttons to select each option.
Prog. number: Allows to select the program on which you want save a new channel
or a program you want to modify.
- Using the / buttons, select the program.
Frequency : Allows to enter a specific frequency for tuning.
- Using the button, select the Frequency option and press the OK button.
Using the 0~9 digit and / buttons, enter desire frequency and press the OK button.
Name : Allows to edit the channel name.
- Using the button, select the Name option.
- Using the button select the first letter field.
- By pressing the 0~9 digit repeatedly and using the following table select the first
character.
Repeat the procedure for each letter field.
Press the OK button to confirm.
BUTTON
AVAILABLE CHARACTERS
1
1 Space — • !
2
2 A B C @
3
3 D E F #
4
4 G H I $
5
5 J K L %
6
6 M N O ^
7
7 P Q R &
8
8 S T U V
9
9 W X Y Z
0
0 * # ( )
Store prog.: Allows to Save a channel on a new Program N°, to Insert a channel on
an already existing Program No (the channel previously saved on this program n° will
be shifted to the upper program n°) or to Delete the Program No.
- Once a channel has been found and named, use the button to select the Store
prog. option.
- Using the / buttons, select Save, Insert or Delete and press the OK button to
confirm.
Swap prog.: Allows to swap 2 programme numbers.
- Using the / buttons select the Prog. number option.
- Using the / buttons, select the program to be moved.
- Using the button, select the Swap prog. option.
- Using the button, enter the swap function.
- Using the the 0~9 digit, enter the new programme number (3 digits).
- Press the OK button to confirm, the programme numbers are swapped.
Norm : Allows to change the audio norm.
- Using the button, select the Norm option.
- Using the / buttons, select the norm.
Note: the following norms are available to choose from: I for the UK and Ireland, L/LP for
France and Luxembourg, D/K for Eastern Europe, the Middle East and Asia, B/G for Western
Europe, Australia and New Zealand.
Skip : Allows to skip a channel.
- Using the button, select the Skip opt
ion.
- Using the / buttons,
select On, the channel will be skip.
Repeat this procedure to skip other channels.
14
Skip:Allows to skip next channel when it is on,and Using the ½ / ¾
buttons,select store prog:ok.

Fine tuning : If the picture is not clear, you can adjust the setting.
15
- Using the button, select the Fine Tuning option.
- Use the / buttons to find the good tuning point.
Man. search : Allows to launch a manual search.
- Using the button, select the Man. search option.
- Using the / buttons, start the search in decreasing or increasing order.
The menu is replaced by a sub-menu showing the progression of the search.
- The search will stop at the first channel found, Man. installation menu is
displayed again (within 3 seconds).
- If you wish to memorise the channel, select Store Program option using button
and proceed as indicated in previous page. Otherwise, continue the search using
/ buttons.
INPUT SELECTION
To select TV/VIDEO source:
To select desire input source, press the
button to
Use the / buttons to select each input sources.
Press the OK button to display the desire input source.
display the selection menu.
TV/VIDEO
To select input source in PIP/POP mode
To select desire input source in PIP/POP mode, press the
TV/VIDEO
Use the / buttons to select either MP source (to
modify Main picture source) or PIP source (to modify
PIP source).
Press the OK button to display the selection menu in PIP
mode .
Use the / buttons to select the input source.
Press the OK button to display the desire input source.
button to display the selection menu.

16
SETUP
This menu allows to select the language for the menus as well as the colour of the
screen when there is no video input. It allows also to set an automatic shut-off time.
Display the Main menu by pressing MENU
button.
Select the Options menu using the button.
Press the OK button to confirm
Use the / buttons to select each option.
Menu language : To select the language for the menus.
Menu timeout : To set an automatic shut-off time for Menu. Using / buttons
select 5 > 10 > 20 > 30 > 40 > 50 seconds.
Menu background : Select Opaque or Transparent type.
Sleep Timer : To set an automatic shut-off time. Using / buttons select Off > 15
> 30 > 45 > 60 > 90 > 120 minutes.
Once the time is ended, TV set automatically switch on standby mode .
If you turn the TV on standby mode after setting the sleep timer, setting will be
erased. Set it again.
Blue Screen : To have a blue screen when there is no video input or when the RF
signal is very bad.
Using the / buttons select On.
Select Off if you do not want the blue screen.
Teletext language: Using / buttons, select the character set that wil be used for
Teletext on this channel.
The following character sets are available: West Europe, East Europe, Cyrillic
(Russia), Greek, Arabic, Persian,.
The character set determines how characters are displayed on Teletext screen.
Reset : Return to default settings. Press the OK button to return to default settings.
Press the MENU button to exit the Options menu.
Note : this menu is removed automatically after a few seconds without using the
remote control.

17
PC MODE
In PC mode, main menu is different from the one in TV mode.
Please select PC as main input.
PC SETTINGS
H. position : use the / buttons to move the picture horizontally on the screen.
V. position : use the / buttons to move the picture vertically on the screen.
Focus : Adjust as required to improve the picture quality.
Auto adjust: this function is used to automatically adjust the VGA input. Press the
/ buttons to start the adjustment process.
Tone: to adjust the colour temperature at your convenience.
Reset : Return to default settings. Press OK button to return to default settings.
Display the Main menu by pressing MENU
button.
Select the PC menu using the button.
Press the OK button to confirm.
Use the / buttons to select each option.

18
CONNECT PERIPHERAL EQUIPMENT
FRONT PANEL CONTROL KNOBS
Power Key : Press to turn on or off the TV.
MENU Key : Press to show the OSD menu and exit OSD menu at the TV.
CH ( / ) : Press to perform select function and channel.
Vol (- / +) : Press to confirm your function selection and adjustment.
Source Key : Press to select your input source.
There is a wide range of video and audio equipment that can be connected to
your TV. The following connection diagrams show you how to connect them.
PREPARATION
PREPARATION
Remove the back plate at the back of the TV as shown on the illustration
opposite.
Lay the LCD TV with the screen down on a table, as it will be easier to connect
your peripheral equipment. Please take your precautions not to damage the
screen.

AV sockets (Located at the back of the TV set, on the leftside)
19
AV2 SCART socket
To connect a VCR, a camcorder, a
DVD player or a satellite receiver.
AV2 SCART socket is an input socket.
AV1 SCART socket
To connect a VCR, a camcorder,
a DVD player, a satellite receiver,
a decoder or a games console.
AV1 SCART socket is an input/output
socket.
Audio CINCH sockets (Audio
output)
To connect to an audio amplifier.
Adjust output level by using
+ / – buttons on the remote
.
control
Component Video CINCH sockets
(CMP)
To connect a DVD player or set top box.
To display images from the connected appliance, select the input source by pressing
the button on the remote control .
TV/VIDEO
For some appliances, connected to the SCART socket, this selection is made
automatically.
S-Video socket (AV3-S )
To connect an S-Video VCR or an
S-Video camcorder.
Shared Audio CINCH sockets
(Audio input) (AV3,AV3-S, CMP)
Video CINCH sockets (AV3)
To connect a VCR, a camcorder, a
DVD player or a satellite receiver.

H
20
EADPHONE SOCKET (LOCATED AT THE BACK OF THE
TV
SET, ON THE RIGHTSIDE
)
When headphones are connected, the sound
of TV set is cut.
Adjust headphones volume level by using
+ / - buttons on the remote control.
To switch off the sound of the headphone
press the button on the remote control.
HDMI
SOCKET
(L
OCATED AT THE BACK OF THE
(High-Definition Multimedia Interface)
SET, NEAR THE POWER INPUT SOCKET)
TV
This socket allows the connection to all appliances fitted with an HDMI socket.
The standard HDMI allows a digital transmisson of video and audio data using only
one connector.
It gives you the possibility to obtain very high quality images.
In this case it is necessary to use an HDMI connecting cable.
Make sure the appliance output is set to be HDMI output.
To display images from the connected appliance, select the input source (HDMI) by
pressing the button on the remote control.
TV/VIDEO
HDMI, the HDMI logo and "High-Definition Multimedia Interface" are trademarks or
registered trademarks of HDMI Licensing LLC."

PC IN
21
SOCKET (LOCATED AT THE BACK OF THE
Allows to connect a PC to the TV set
TV
SET, NEAR THE
HDMI
SOCKET)
Connect the PC IN D-sub socket located at the back of the TV set to the output of PC
equipment through a mini D-sub 15 pin cable .
Connect the stereo PC IN audio jack located at the back of the TV set (near the D-sub
socket) to the audio output socket on the computer through an audio cable.
To display images from the connected appliance, select the input source (PC) by
pressing the button on the remote control.
TV/VIDEO

22
TIPS
Care of the screen
Do not rub or strike the screen with anything hard as this may scratch, mar, or
damage the screen permanently.
Unplug from the mains before cleaning the screen. Dust the TV by wiping the
screen and the cabinet with a soft, clean cloth. If the screen requires additional
cleaning, use a clean, damp cloth. Do not use liquid cleaners or aerosol
cleaners.
Mobile telephone warning
To avoid disturbances in picture and sound, malfunctioning of your TV or even
damage to the TV, keep away your mobile telephone from the TV.
End of life directives
We are paying a lot of attention to produce environmentally friendly in green
focal areas. Your new receiver contains materials which can be recycled and
reused.
At the end of its life specialized companies can dismantle the discarded
receiver to concentrate the reusable materials and to minimize the amount of
materials to be disposed of.
Please ensure you dispose of your old receiver according to local regulations.

23
BEFORE CALLING SERVICE
Please make these simple checks before calling service. These tips may save
you time and money since charges for receiver installation and adjustments of
customer controls are not covered under your warranty.
Symptoms Items to Check and Actions to follow
“ Ghost ” or double
image
*This may be caused by obstruction to the
antenna due to high rise buildings or hills. Using
a highly directional antenna may inprove the
picture.
No power *Check that the TV’s AC power cord is plugged
into the mains socket.
*Unplug the TV, wait for 60 seconds. Then
re-insert plug into the mains socket and turn on
the TV again.
No picture *Check antenna connections at the rear of the TV
to see if it is properly connected to the TV.
*possible broadcast station trouble. Try another
channel.
*Adjust the contrast and brightness settings.
*Check the Closed Captions control. Some TEXT
modes could block the screen.
Good picture but no
sound
*Increase the VOLUME.
*Check that the TV is not muted; press the button
on the remote control.
Good sound but poor
*Adjust the contrast, color and brightness settings.
color
Poor picture *Sometimes, poor picture quality occurs when
having activated an S-VHS camera or camcorder
connected and having connected another
peripheral at the same time. In this case switch
off one of the other peripherals
Snowy picture and
*Check the antenna connection
noise
Horizontal dotted line *This may be caused by electrical interference
(e.g. hairdryer, nearby neon lights, etc.)
*Turn off the equipment.
Television not
responding to remote
control
*Check whether the batteries are working.
Replace if necessary
*Clean the remote control sensor lens on the TV.
*You can still use the buttons at the front of your
TV.
*Select the TV mode to be sure your remote
control is in the TV mode.
*Remove plug from mains for 5 seconds then
replug to power on again.

GLOSSARY
24
Audio / Video Inputs
Located on the rear and the front of the receiver these connectors (RCA phono
type plug) are used for the input of audio and video signals. Designed for use
with VCRs (or other accessories) in order to receive higher picture resolution
and offer sound connection options.
S-Video Input
Allows direct connection of high-resolution video sources, such as a Super
VHS videocassette recorder, Laser Disc player, etc. Provides improved picture
resolution, sharpness, and clarity.
Menu
An on-screen listing of feature controls shown on the TV screen that are made
available for user adjustments.
Programming
The procedure of adding or deleting channel numbers into the TV’s memory.
In this way the TV’ remembers’ only the locally available or desired channel
numbers and skips over any unwanted channel numbers.
SRS
SRS audio solutions provide greater listening enjoyment for compressed
Internet radio or clear speech that enhances the users experience and overall
satisfaction.
RF
Radio Frequency or modulated signal design used as the carrier for television
broadcasts.
Sleep Timer
Function with which you can set a time period after which the TV should turn
itself off.
 Loading...