

Page 1
LCD Monitor User Manual
E2251FWU
www.aoc.com
©2011 AOC.All Rights Reserved.
Page 2

Safety ........................................................................................................................................................................ 2
National Conventions ......................................................................................................................................... 2
Installation
Cleaning ............................................................................................................................................................. 4
Other .................................................................................................................................................................. 5
Setup
Contents in Box ................................................................................................................................................. 6
Setup Stand
Adjusting Viewing Angle ..................................................................................................................................... 9
Connecting the Monitor .................................................................................................................................... 10
Installation of USB Graphic software on your computer
For Microsoft ® W indows® 7 ........................................................................................................................... 11
For Microsoft® W indows Vista® ...................................................................................................................... 13
For Microsoft® W indows® XP
Setting the USB Monitor .................................................................................................................................. 16
To Control the Display ............................................................................................................................................. 17
For Microsoft® W indows® 7
For Microsoft® W indows® XP and Microsoft® Windows Vista® ..................................................................... 17
Disconnecting the LCD Monitor
Cleaning the LCD Monitor ................................................................................................................................ 17
Supported Media Player .................................................................................................................................. 18
PC Requirements
Troubleshooting ...................................................................................................................................................... 22
Specification ............................................................................................................................................................ 23
General Specification
Regulation ............................................................................................................................................................... 24
FCC Notice ...................................................................................................................................................... 24
WEEE Declaration
EPA Energy Star .............................................................................................................................................. 25
Service
Warranty Statement for Europe ........................................................................................................................ 26
Warranty Statement for North & South America (excludin g Braz il) .................................................................. 28
.......................................................................................................................................................... 3
........................................................................................................................................................................ 6
....................................................................................................................................................... 7
.......................................................................................... 11
......................................................................................................................... 15
............................................................................................................................ 17
....................................................................................................................... 17
............................................................................................................................................ 19
....................................................................................................................................... 23
........................................................................................................................................... 25
.................................................................................................................................................................... 26
Page 3

Safety
National Conventions
The following subsections describe notational conventions used in this document.
Notes, Cautions, and Warnings
Throughout this guide, blocks of text may be accompanied by an icon and printed in
bold type or in italic type. These blocks are notes, cautions, and warnings, and they
are used as follows:
NOTE:
your computer system.
A NOTE indicates important information that helps you make better use of
CAUTION:
data and tells you how to avoid the problem.
A CAUTION indicates either potential damage to hardware or loss of
WARNING:
avoid the problem. Some warnings may appear in alternate formats and may be
unaccompanied by an icon. In such cases, the specific presentation of the warning is
mandated by regulatory authority.
A WARNING indicates the potential for bodily harm and tells you how to
Page 4
Installation
Do not place the monitor on an unstable cart, stand, tripod, bracket, or table. If
the monitor falls, i t can injure a person and ca use se ri ous damage to this product. Use
only a cart, stand, tripod, bracket, or table recommended by the manufacturer or sold
with this product. Follow the manufacturer’s instructions when installing the product
and use mounting accessories recommended by the manufacturer. A product and cart
combination should be moved with care.
Never push any object into the slot on the monitor cabinet. It could damage
circuit parts causing a fire or electric shock. Never spill liquids on the monitor.
Do not place the front of the product on the floor.
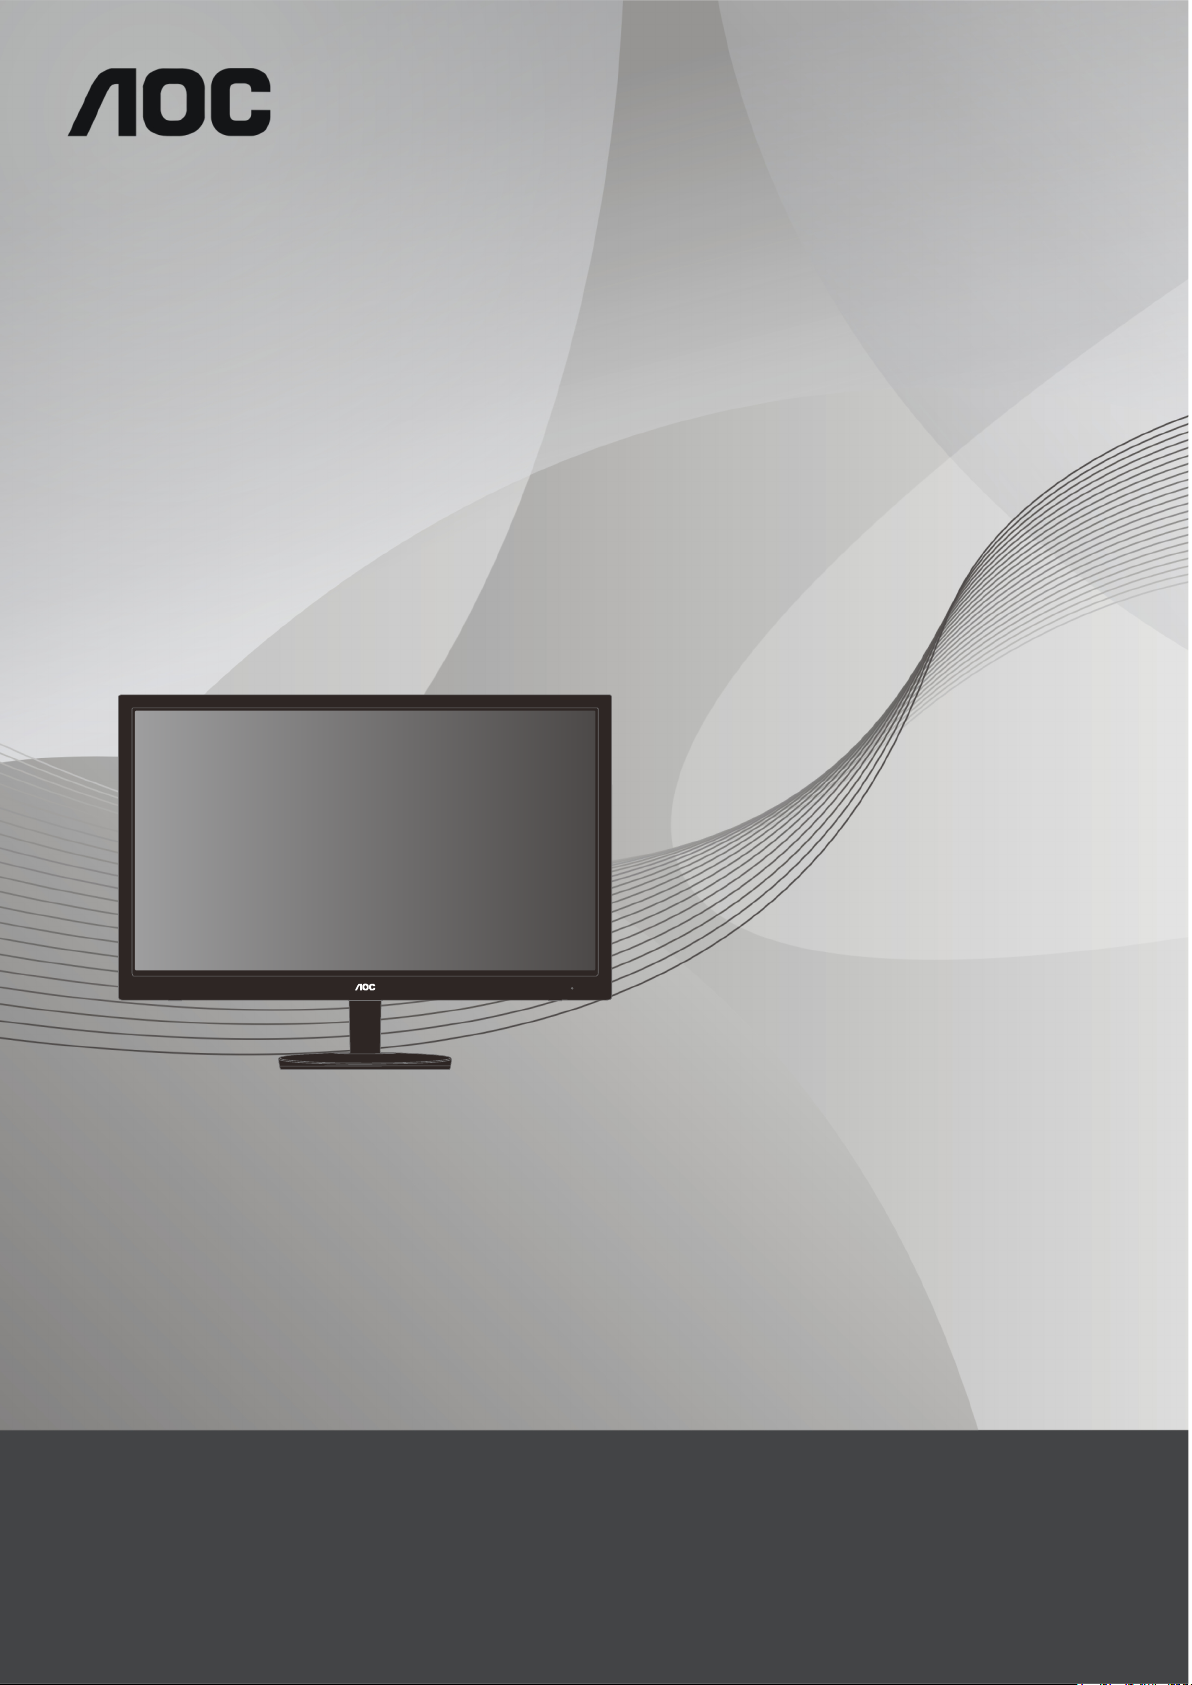
Leave some space around the monitor as shown below. Otherwise,
air-circulation may be inadequate hence overheating may cause a fire or damage to
the monitor.
See below the reco mmend ed v entilat ion ar ea s ar ound t he mo nitor when the monitor i s
installed on the wall or on the stand:
Page 5
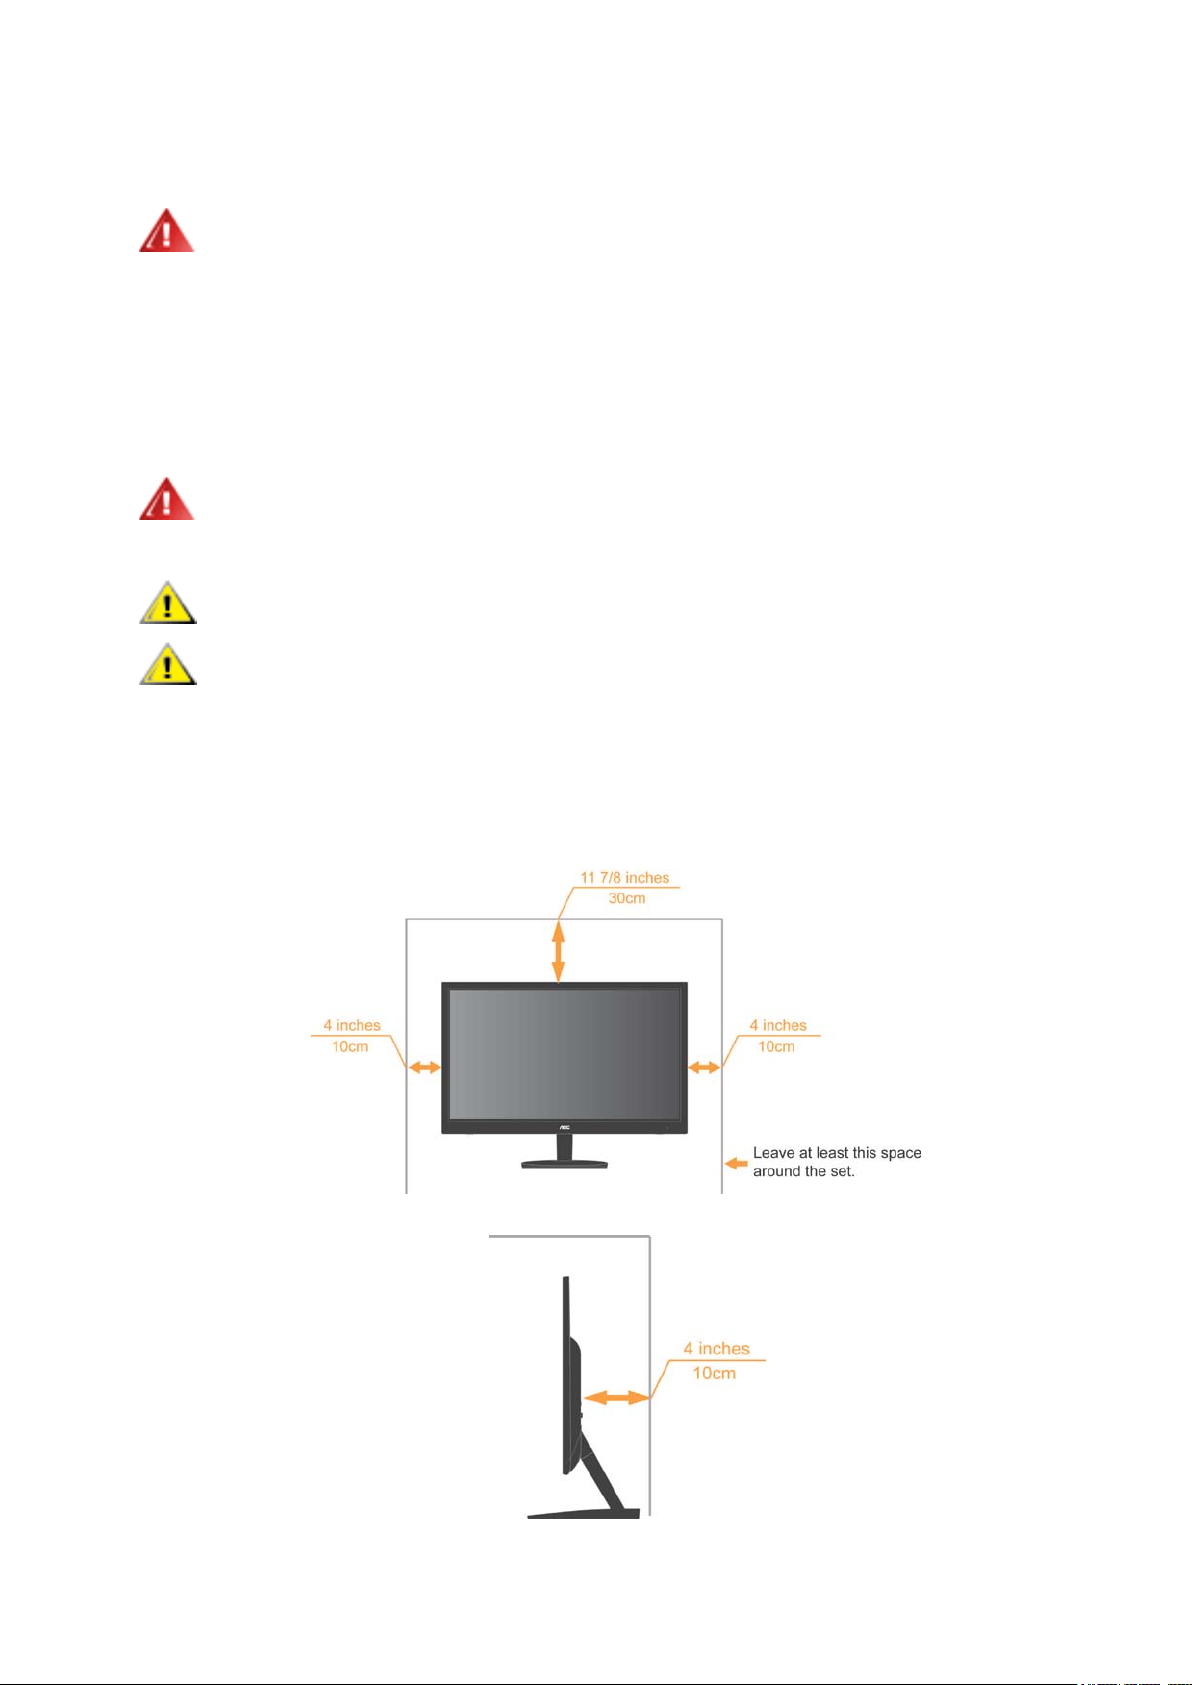
Cleaning
Clean the cabinet regularly with cloth. You can use soft-deterg ent t o wipe out
the stain, instead of strong-detergent which will cauterize the product cabinet.
When cleaning, make sur e no det erg ent is le aked i nto t he prod uct. The cl e aning
cloth should not be too rough as it will scratch the screen surface.
Page 6

Other
If the product is emitting a strange smell, sound or smoke, disconnect the power
plug IMMEDIATELY and contact a Service Center.
Make sure that the ventilating openings are not blocked by a table or curtain.
Do not engage the LCD monitor in severe vibration or high impact conditions
during operation.
Do not knock or drop the monitor during operation or transportation.
Page 7

Setup
Contents in Box
Page 8

Setup Stand
Please setup the stand following the steps as below.
Setup:
Remove:
Page 9

Caution:
Must put unit in flat surface. Any uneven or sloped surface may result in unit damage
or injury to user.
Page 10

Adjusting Viewing Angle
For optimal viewing, it is recommended to look at the full face of the monitor, and then
adjust the monitor's angle to your own preference.
Hold the stand so you will not topple the monitor when you change the monitor's
angle.
You are able to adjust the monitor's angle as bel ow.
NOTE:
Do not touch the LCD screen when you change the angle. It may cause damage or
break the LCD screen.
Page 11

Connecting the Monitor
Cable Connections In Rear of Monitor to Connect PC/Laptop:
Important!! Follow the software installation described on page 11 to 15 before
connecting the USB monitor to your Laptop/PC.
1 Connecting the LCD monitor to your computer
To protect the equipment, always turn off the computer before connecting.
- Connect one end of the USB cable to the LCD monitor and the end of USB
cable to the computer.
- Your computer should detect the USB Monitor automatically.
Follow the procedure described starting on page 16 to configure your USB Monitor.
2 Power
Note:Some computers may not provide enough power to the LCD monitor for one
USB port.
If so, connect the other USB connector on the Y end of the cable into another USB on
your computer or conn ect the DC i nput port w ith an ex ternal ap proved ada pter w ith the
output rating of DC 5V, 3A.
Page 12

Installation of USB Graphic software on your computer
For Microsoft ® Windows® 7
Important!! Install the USB Graphic software first before connecting the USB
monitor to your computer.
1. Double click on Setup.exe
The Windows User Account Control window opens (if enabled in the OS).
2. Click Yes
The USB Monitor software end user license agreement window opens.
.
.
3. Click I Accept
DisplayLink Core software and DisplayLink Graphics installs.
Note: The screen may flash or go black during the installation. The installation box
above will disappear but no message will be shown at the end of the installation.
.
Page 13

4. Connect your AOC USB Monitor v i a th e U SB cable to your PC/Note book. Installing
device driver message will be shown on the taskbar.
The Windows User Account control window opens.
5. Click YES
.
DisplayLink will automatically install the AOC USB Monitor .
The DisplayLink software end user license agreement windows opens (see
above).
6. Click I Accept
.
The DisplayLink USB Graphics software installs, without notification that it has
completed.
Note: On some machines you may need reboot before you can use your AOC USB
Monitor.
Page 14

For Microsoft® Windows Vista®
Important!! DO NOT connect USB Monitor to your PC/Notebook before the
software install.
1. Double click on Setup.exe
The Windows User Account Control window opens (if enabled in the OS).
2. Click Yes
The USB Monitor software end user license agreement window opens.
.
.
3. Click I Accept
DisplayLink Core software and DisplayLink Graphics installs.
.
Note: The screen may flash or go black during the installation. The installation
box above will disappear but no message will be shown at the end of the
installation.
Page 15

4. Connect your AOC USB Monitor v i a th e U SB cable to your PC/Note book. Installing
device driver message
The Windows User Account control window opens.
5. Click YES
DisplayLink automatically installs the AOC USB Monitor.
The DisplayLink software end user license agreement windows opens (see
above).
6. Click I Accept
The DisplayLink USB Graphics software installs, without notification that it has
completed.
.
.
Note: On some machines you may need reboot before you can use your AOC USB
Monitor.
Page 16

For Microsoft® Windows® XP
Important!! DO NOT connect USB Monitor to your PC/Notebook before the
software install.
1. Double click on Setup.exe
The Windows User Account Control window opens (if enabled in the OS).
2. Click I Accept
.
.
DisplayLink core software and DisplayLink Graphics installs.
Note: The screen may flash or go black during the installation.
3. Connect your AOC USB Monitor via the USB cable to your PC/Notebook. The
following message (or similar) will be seen.
Windows installs the AOC USB Monitor device.
Note: The screen may flash or go black during the installation.
Page 17

Setting the USB Monitor
Menu
Sub-Menu
Description
Use the drop down list to select a display to be
Use the drop down list and user the slider to choose a
Landscape
Set the display to landscape view
Portrait
Set the display to portrait mode
Landscape (flipped)
Set the display to upside down landscape mode
Portrait (flipped)
Set the display to upside down portrait mode
Duplicates these
Extend these displays
Extends the main display on the secondary display
Follow this procedure to configure the AOC Monitor
1. Open screen resolution
2. Set the display options. Refer to the table below for details on each option.
Display
Resolution
Orientation
Multiple
Displays
displays
Show Desktop only on 1
Shows Desktop only on 2 The desktop appears on the display marked 2. The
configured.
resolution
Reproduces the main display on the second display
The desktop appears on the display marked 1. The
display marked 2 become blank.
display marked 1 become blank.
To control the behavior of an attached AOC USB monitor, it is also possible to use
Windows Key ( ) + P to display a menu (and cycle through it) to switch mode.
Page 18

To Control the Display
You can use the A OC USB LCD monitor in mirror mode or extended mode. Settings
may vary depending on your operating system.
For Microsoft® Windows® 7
Press the Windows® key ( ) + P to switch between different modes as shown bel ow.
For Microsoft® Windows® XP and Microsoft® Windows Vista®
Right-click the “ ”icon in the system tray of your Windows ® desktop to configure the
display settings.
Disconnecting the LCD Monitor
1. For Microsoft® Windows® 7 only, you can turn the monitor OFF by pressing the
Windows key ( ) + P, and then selecting “Computer only”.
For Microsoft® Windows vista® and Windows® XP, you can select OFF by
right-Clicking the “ ” icon in the system tray.
2. Remove the USB cable from the computer and monitor.
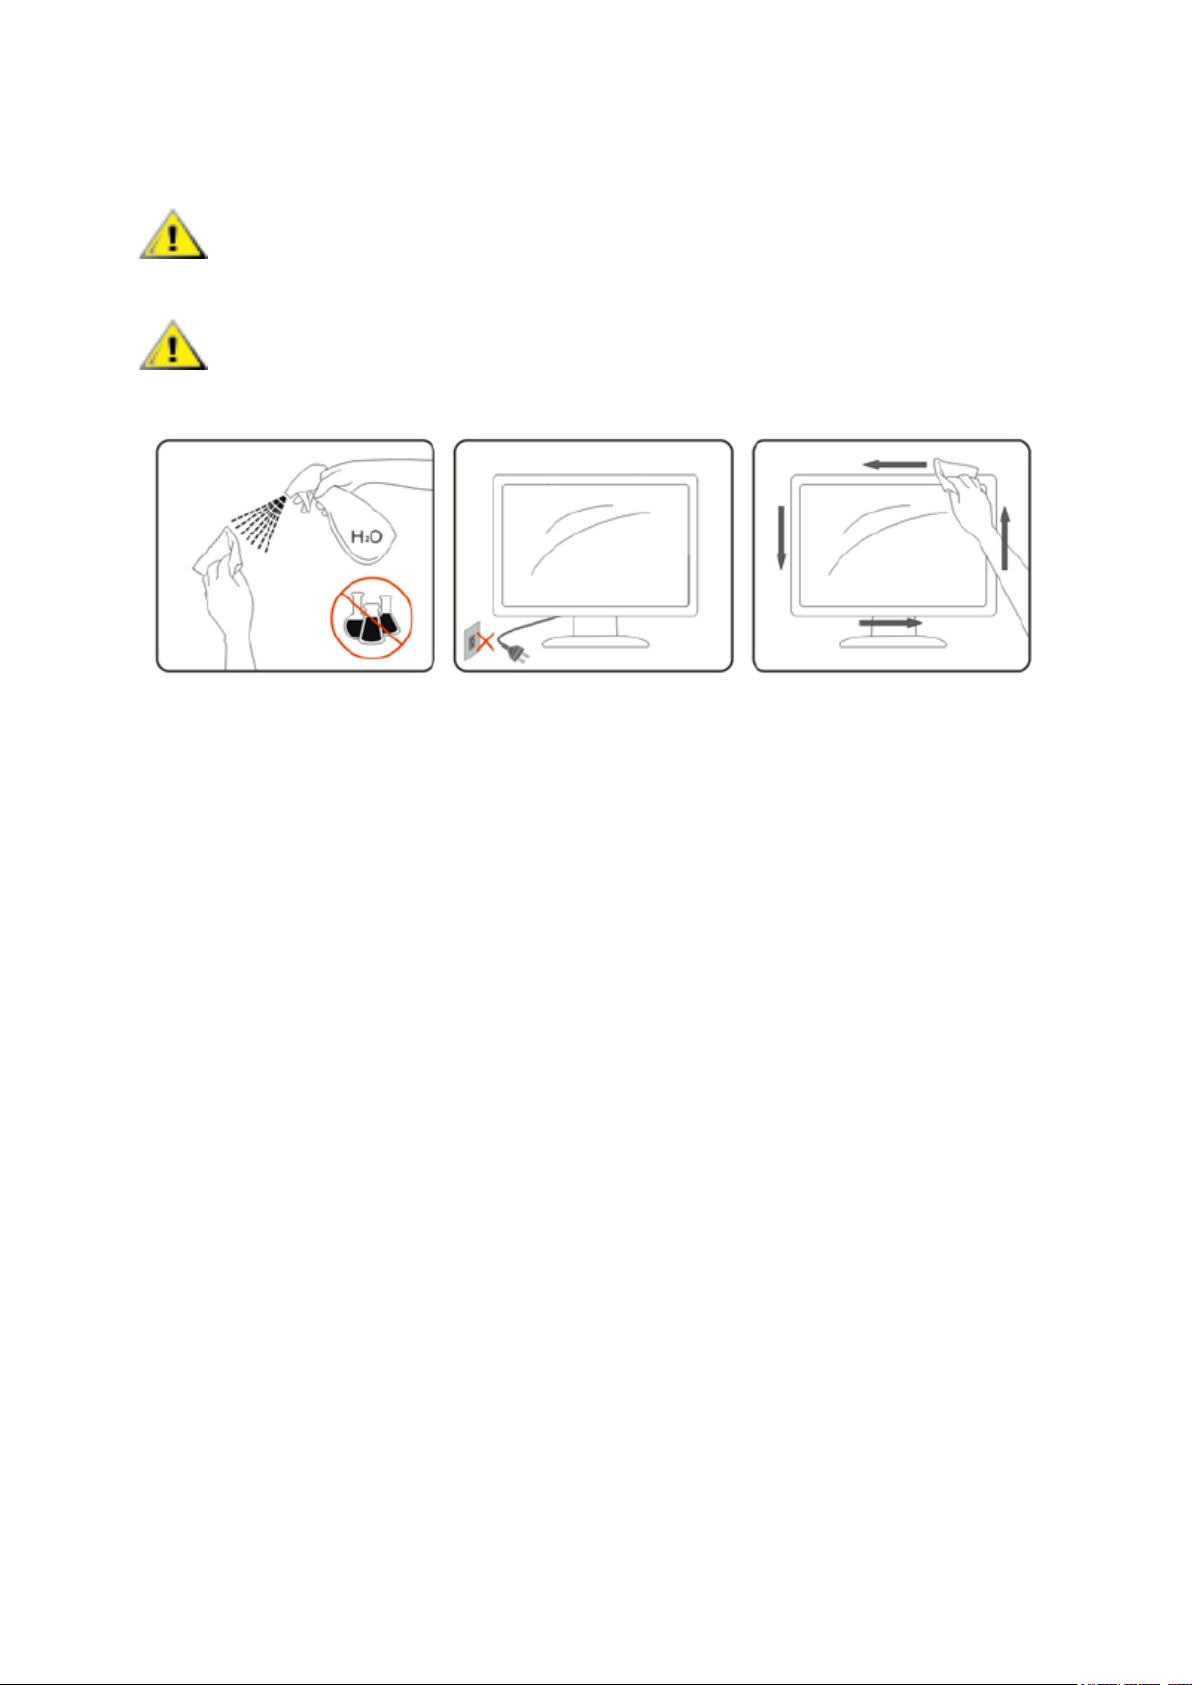
Cleaning the LCD Monitor
Please follow the guidelines below when cleaning the LCD Monitor:
- Always unplug the monitor before cleaning.
- Use a soft cloth to wipe the screen and other parts of the monitor
- Never spray liquids directly onto the LCD screen or use harsh chemical
products to clean it.
Page 19

Precautions:
for Microsoft ® Windows® XP, Windows Vista® and Windows® 7
Due to the configurations of computers and Windows® operating systems available,
functionality may differ slightly than stated in the user manual. This may be due to the
computer manufacture's BIOS and other custom configurations of the hardware,
pre-installed software or operating system installed at time of production. If you have
specific problems, you may need to contact the computer manufacturer to inquire
about BIOS, hardware driver or operating system updates.
- The AOC USB Monitor utilizes an advanced video graphics controller to display
the video. However, due to USB 2.0 transfer speed limitations, some or all portions of
DVD playback may appear slow or choppy. This is not a malfunction of the Mobile
LCD monitor. Move the video playback from the Mobile LCD monitor to your computer
display for optimal video performance when viewing DVDs.
- On Windows ® XP systems, DVDs may not display correctly on the Mobile LCD
monitor. Use your computer's built-in monitor to view DVDs.
- This product does not support 3D progr a ms.
- In some software application programs that utilize certain direct draw commands
such as some 2D-Ga mes, the displ ay on the M obile LC D monitor w ill not be su ppor ted.
If you want to play these games in full screen, we suggest you disconnect the Mobile
LCD monitor.
- This product is unable to enter full screen DOS mode when using the Mobile LCD
monitor.
- To play DVDs, use the Media Player included with your operating system.
Supported Media Player
Windows Media Player 11 (Windows Media Player 12. For windows 7)
WinDVD 10
PowerDVD 9 (Only for Windows Vista and 7)
RealPlayer 11
The DisplayLink USB Graphics device can display media files and DVDs using most
media players. But can’t guarantee performance, Media playback in mirror mode (XP)
or in Basic mode (Vista and Windows 7) is not recommended.
Page 20

PC Requirements
DisplayLink software can be used on PCs, from Netbooks, Notebooks/Laptops to
Desktops. The driver will run on processors ranging from Atom N270 based PCs,
basic single Core CPUs, and of course the latest Dual, Quad Core and Core i3/i5/i7
CPUs.
The performance of the software is dependent upon the processing power available,
as well as the operating system in use. More capable systems offer higher
performance.
DisplayLink software is available for PCs running one of the following Windows
operating systems:
Windows 7 (32-bit or 6 4-bit)
Windows Vista with Service Pack 1 or 2 (32-bit or 64-bit)
Windows XP Home or Professional (including Tablet edition) with Service Pack 2
or 3
Windows Server 2003, 2008 and 2008 R2
DisplayLink provide a version of Software for Windows Multipoint server. Please visit
http://www.displaylink.com/support/downloads_wms.php to download software for
Windows Multipoint Server.
Note: 64-bit editions of XP are not supported. Mac OS X support can be found
at http://www.displaylink.com/mac
Windows 7
For Windows 7, the Windows Experi ence Index ( WEI) is a useful me asure of har dware
level. The WEI is accessible from Computer > Proper ti es, or fro m Contr ol Panel >
System.
The recommended typical hardware requirements for the PC are:
WEI score of at least 3 in the ‘Graphics; Desktop performance for Windows Aero’
category.
Overall WEI score of at least 3 as recommended by Microsoft.
At least one USB 2.0 port.
30 megabytes (MB) of free disk space.
Computer screen for use with the DisplayLink device, if it is not integrated.
Network access for software downloads, or access to a CD-ROM drive.
 Loading...