

Page 1
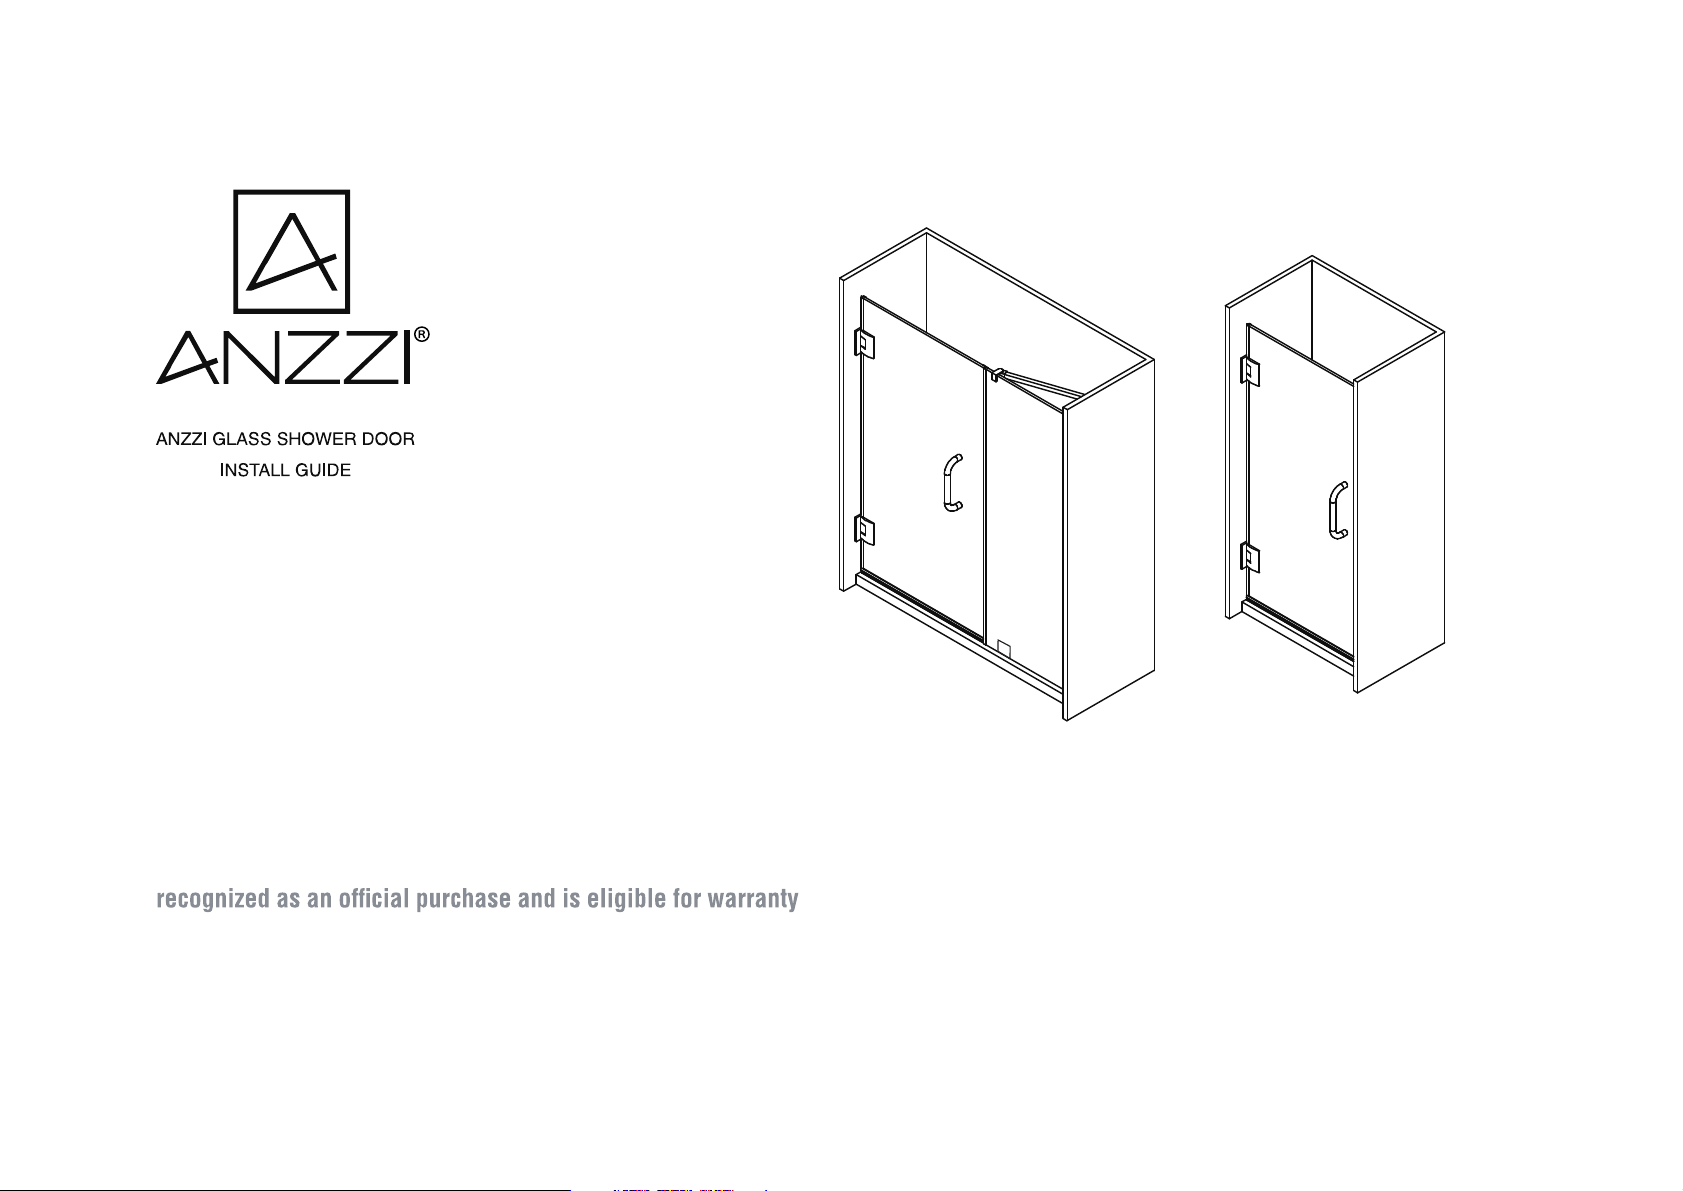
Models:
SD-AZ07-01 (SD-AZ8073-01)
SD-AZ09-01 (SD-AZ8075-01)
SD-AZ09-02 (SD-AZ8075-02)
DON’T WAIT!
REGISTER NOW!
Register your product within 30 days to ensure your bathtub is
coverage.
Mail in the completed registry card (Pg. 2) or register online
at www.ANZZI.com/register.
Need help? For technical support call 305-614-4070 or visit us at www.ANZZI.com
SD-AZ07-01 (SD-AZ8073-01)
This version supersedes all previous versions as of 05/10/2022
SD-AZ09-01 (SD-AZ8075-01)
SD-AZ09-02 (SD-AZ8075-02)
Page 2

PRODUCT REGISTRATION*
IMPORTANT: YOUR WARRANTY WILL NOT BE
RECOGNIZED UNLESS THIS CARD IS FULLY
COMPLETED AND RETURNED OR ONLINE
REGISTRATION IS COMPLETED.
1. Register online at www.ANZZI.com/register. You will be asked to fill out the same
information you would in the registration card. Registering online is fast, secure and
ensures we receive your information.
2. Complete, cut-out and mail the registration card below. By returning this registration
card we confirm the date of purchase for your new product. This confirmation will allow
us to process any warranty claims.
Mail the card to: 5701 NW 35 Avenue, Miami, FL 33142
CUT ALONG
DOTTED LINE.
Product Registration Card
Name ..................................................................................... Address ...........................................................................................................................
City ................................................................. State ................................................ Zip ......................................
Phone ............................................................ Email ..........................................................................
Date of Purchase........................... Order or Purchase #..................................................... SKU or Model #..........................................................
Installer’s Name ..................................................................... Phone ................................................................................
I have read the Owner’s Manual carefully and understand and agree that any installation, operation or maintenance of the bathtub must be done strictly
in accordance with instructions and guidelines contained in the owner’s manual and installation guide.
Signature____________________________________________________________Date ______________________________________________
Need help? For technical support call 305-614-4070 or visit us at www.ANZZI.com
Page 3

GETTING STARTED
Notice:This assembly requires two people due to the weight of the glass doors.
Professional installers are highly recommended.
1.Carefully inspect all boxes and packages to make sure
no damage occurred during shipping. If you find a unit has
been damaged, is missing parts, or has finishing defects,
immediately contact customerservice.
2. Once all boxes and packages are inspected and
opened, thoroughly read through this instruction manual.
Take time to view the "Detailed Diagram of Shower Door
Components" page and mark each piece as you ensure all
necessary parts required for assembly are included in the
package. Note: Keep in mind that we are not responsible
for code compliance standards for your project and we will
not accept any returns. Plumbing and building codes differ
from one location to another, so it is crucial to review your
local building codes before installation to help answer any
questions you have about installation compliance
standards.
3.For installation in a newly constructed area, be sure to
install all required drainage and plumbing before shower
installation. Check local code requirements for plumbing
installation as some areas require installation by a
licensed and experienced plumber.
4. Make sure the installation surface area is level, solid,
and can support the entire weight of the unit and the walls
are plumb before beginning installation. Leveling
adjustments and drilling may be necessary depending on
the unit being installed. Major problems may occur if the
surface area isn't level and installation is abnormal. It is
recommended that all primary surfaces of the unit be
protected during installation. Avoid setting the glass
directly onto a tile floor. For best protection practice, use a
piece of cardboard or wood to keep the bottom edge and
corners of the glass from becoming damaged.
5. CAUTION: Ensure your walls are at right angles as
doors under 30" do NOT have out-of-plumb adjustments.
6. NOTE: Commonly used parts are packed inside the
carton and there may be some unused or remaining parts.
7.Due to the weight and hinges of this door, it MUST be
attached to the studs or preinstalled behind-the-wall 2x6
wood reinforcement.
Page 4
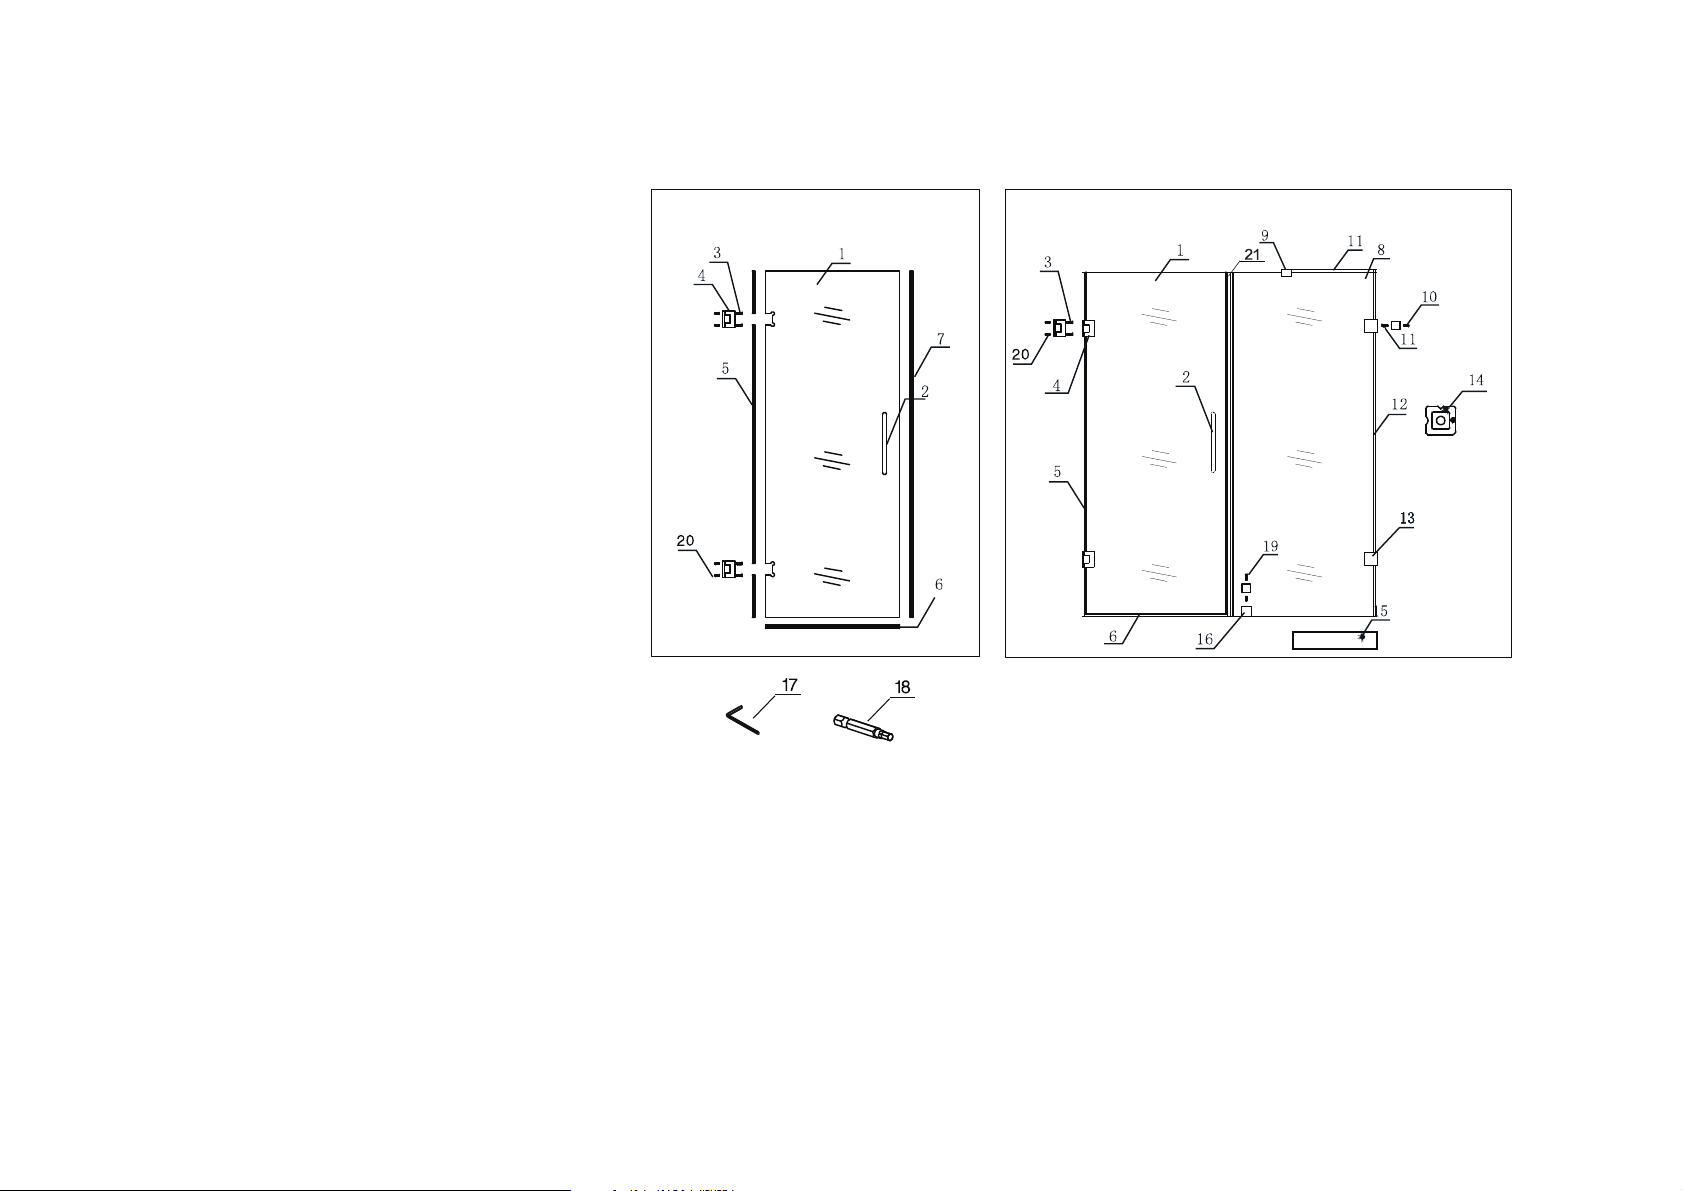
PARTS LIST
(1x)
1.
2.
3.
4.
5.
6.
7.
8.
9.
10.
11.
12.
13.
14.
15.
16.
17.
18.
19.
20.
21.
(1x)
(8x)
(2x)
(1x)
(1x)
(1x)
(1x)
(1x)
(4x)
(3x)
(1x)
(2x)
(1x)
(2x)
(1x)
(1x)
(1x)
(1x)
(8x)
(1x)
Glass panel
Handle
Cross screw ST5x40
Hinge
Side Anti-water strip
Bottom water proof strip
Bumper strip
Glass panel
Support bar
Wall anchor
Hexagon socket screw ST5x40
Water proof strip for Door
Wall bracket
Silicone cleaner
Glass bottom protection seal
Ground clamp
Allen keys 4 mm
Hexagonal wind bit 4mm
Cross screw ST4,2x20
Wall anchor ST 5x40
Magnetic strip
SD-AZ09-01 (SD-AZ8075-01)
SD-AZ09-02 (SD-AZ8075-02)
Design A
SD-AZ07-01 (SD-AZ8073-01)
Design B
TOOLS YOU'LL NEED
Caulk Tape Measure, Pencil, Phillips
Screwdriver Drill Bits D=5/16", Wood
Level, Caulking Gun, Electric Drill, Hammer
Mallet, Knife
ATTENTION! Magnetic strip is only for installation of SD-AZ07-01
Page 5
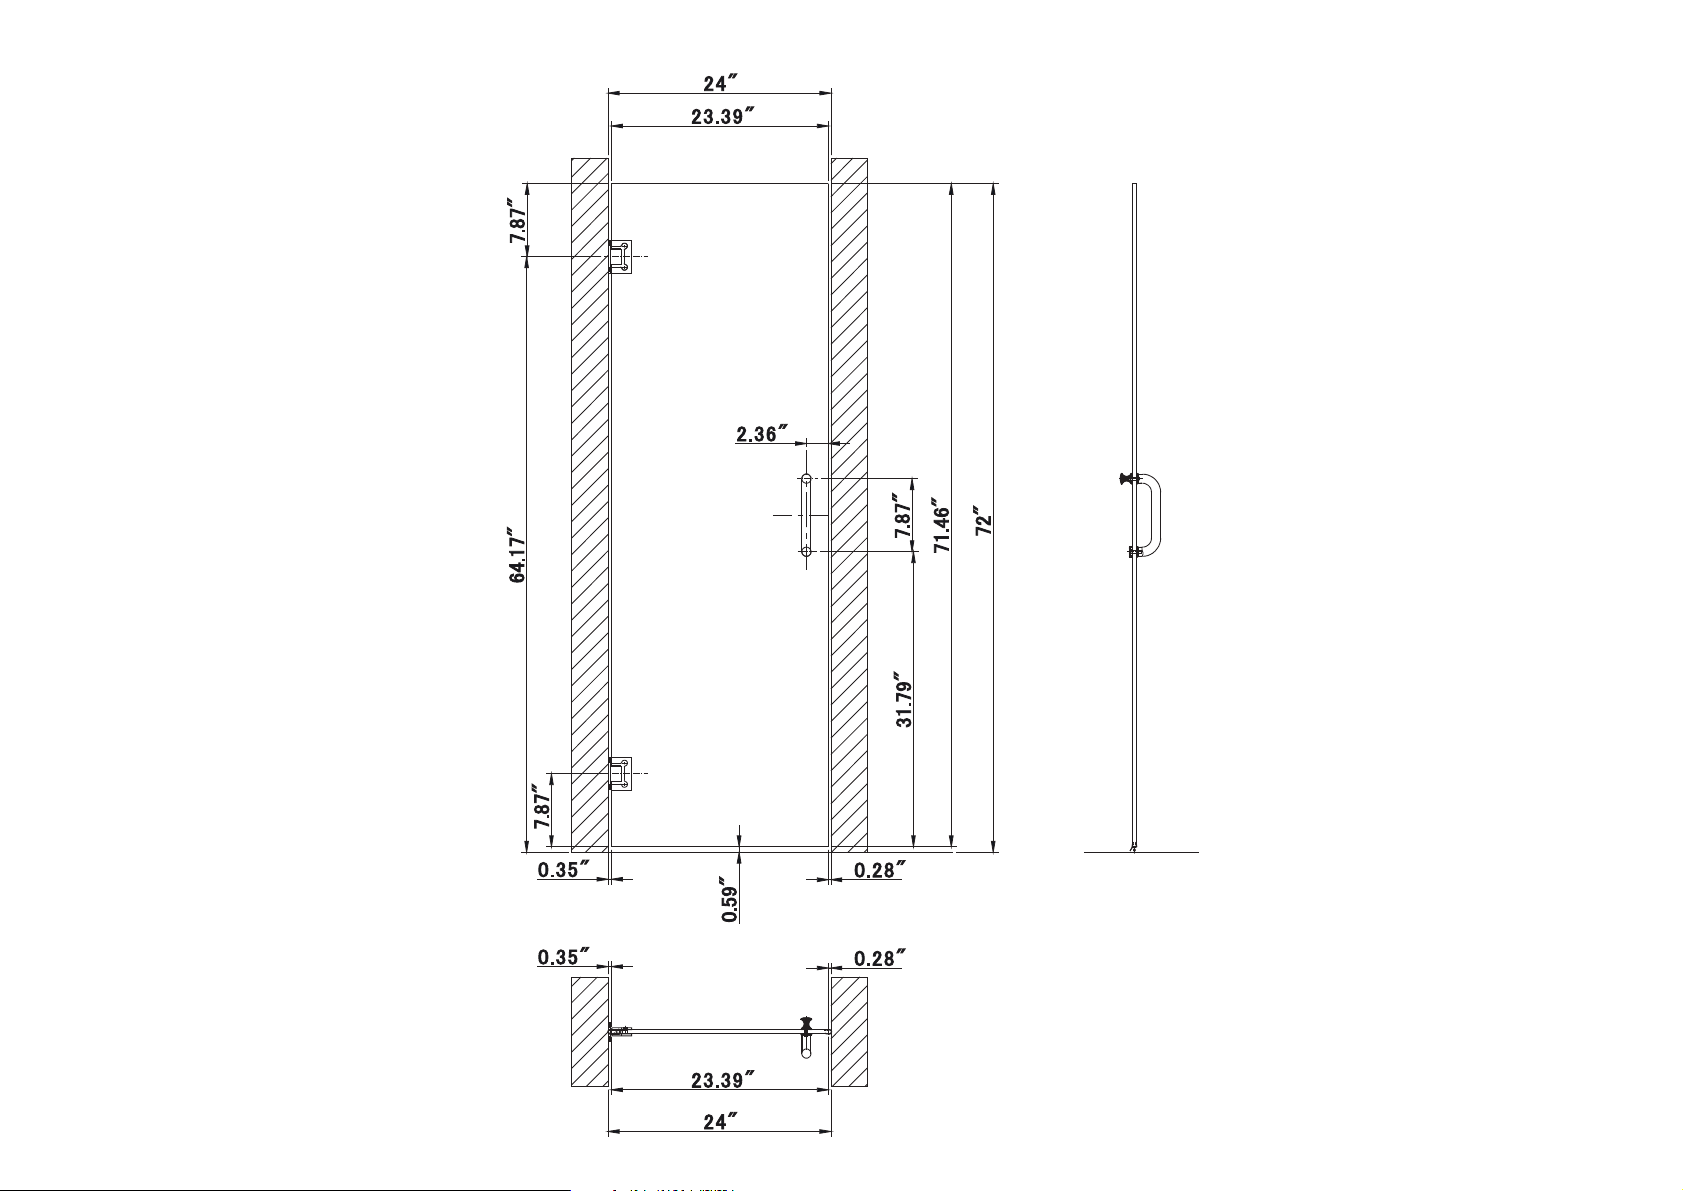
SD-AZ09-01 (SD-AZ8075-01)
Page 6
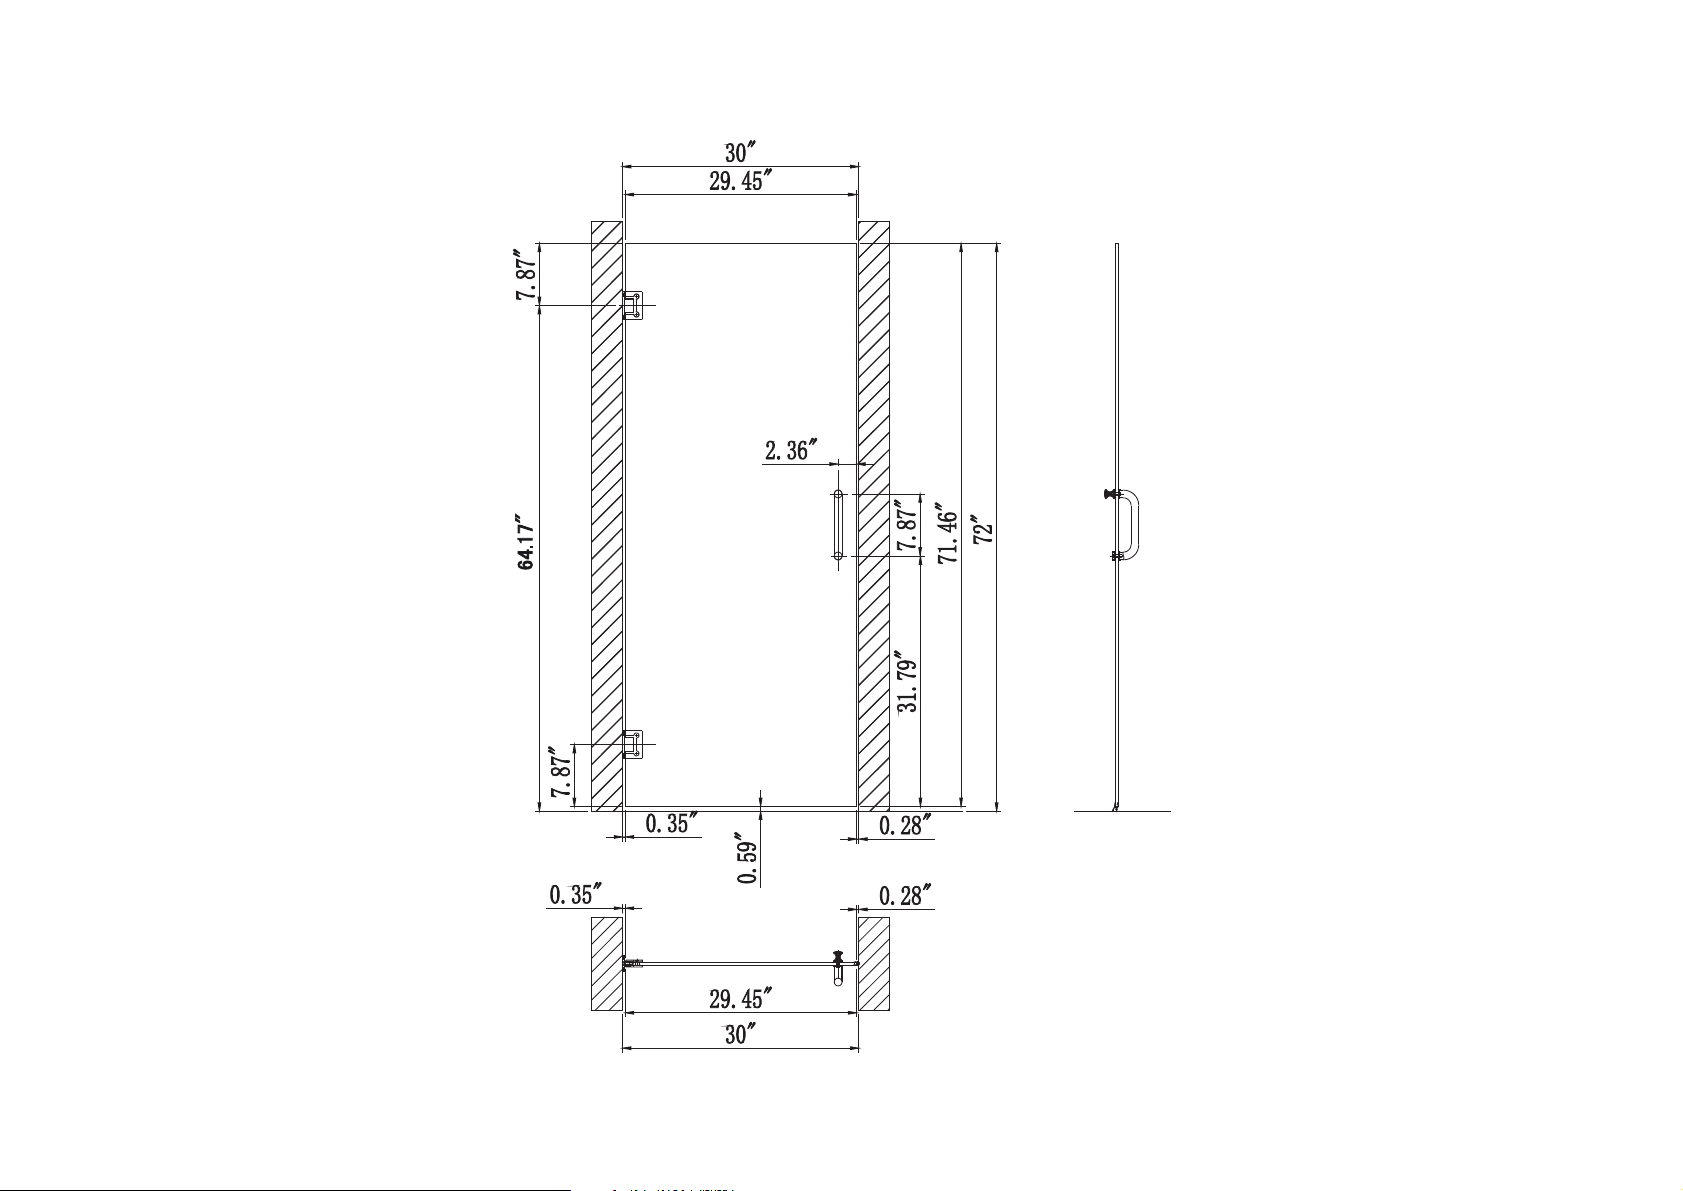
SD-AZ09-02 (SD-AZ8075-02)
Page 7
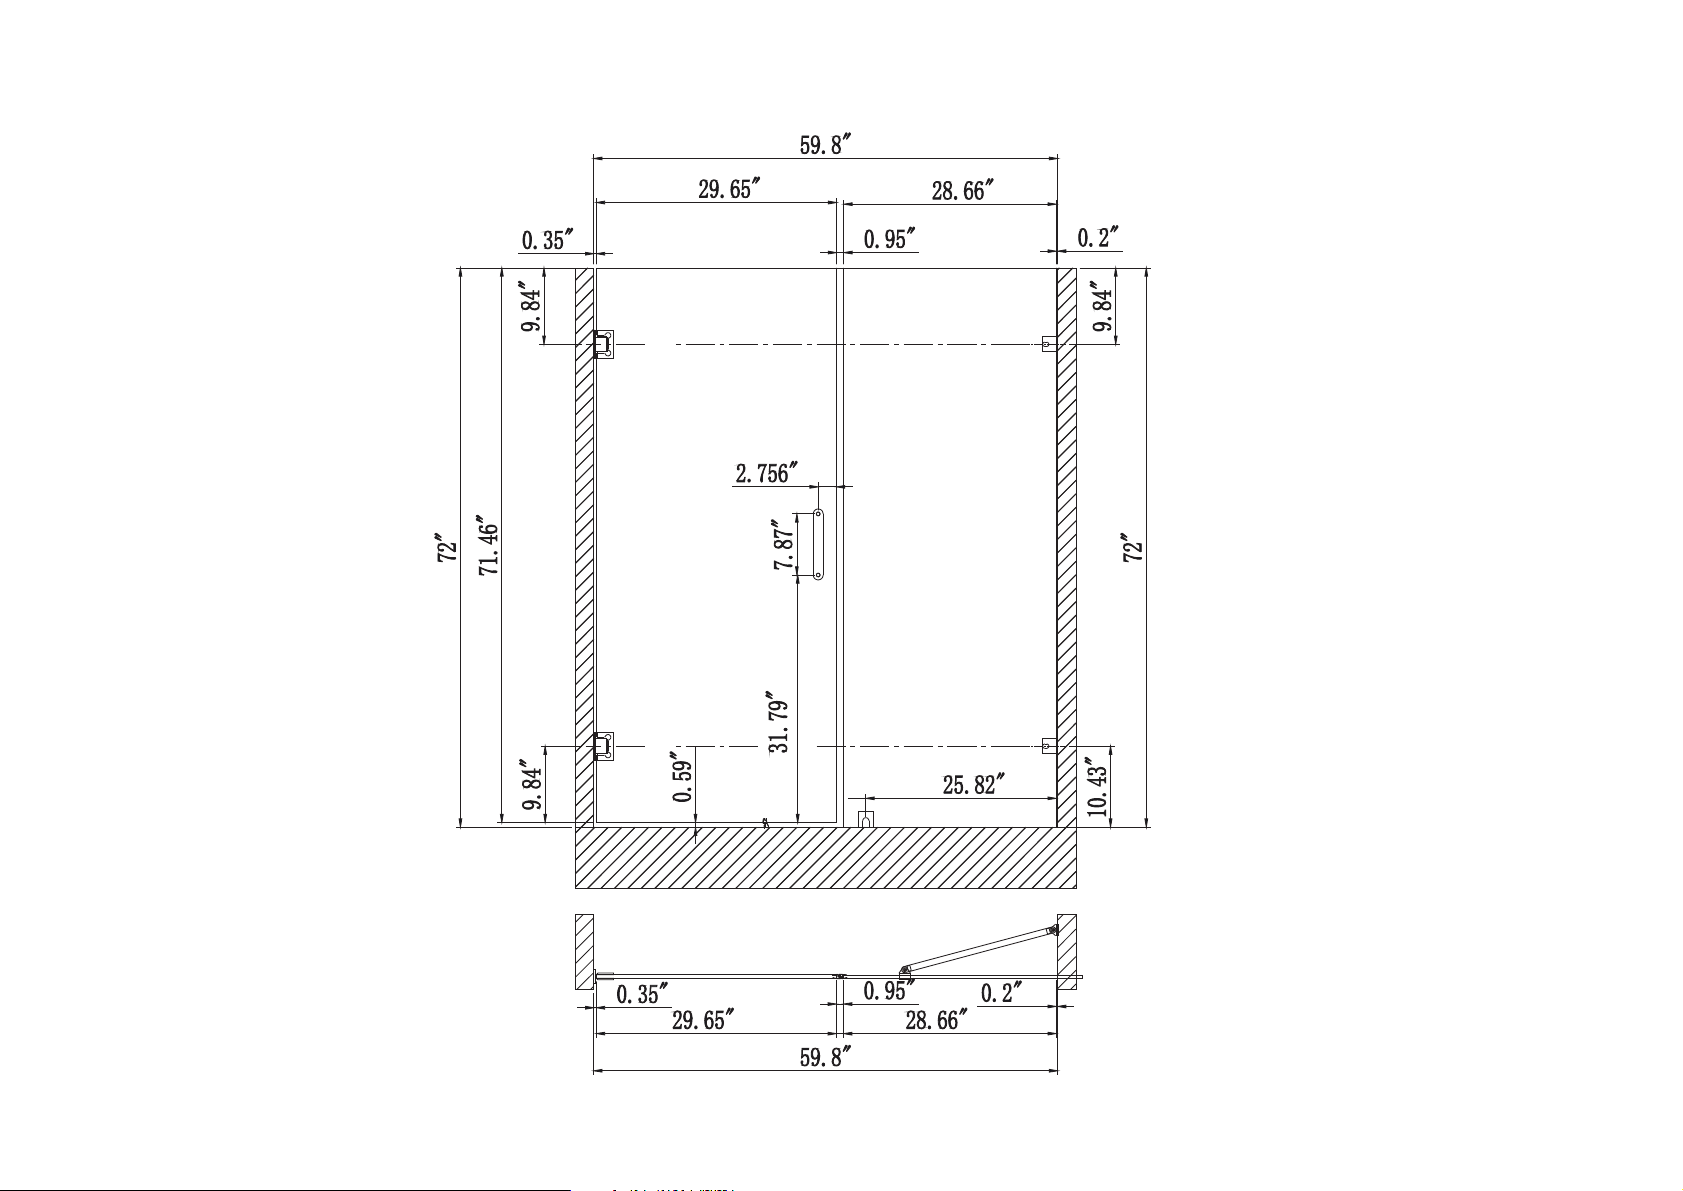
SD-AZ07-01 (SD-AZ8073-01)
Page 8
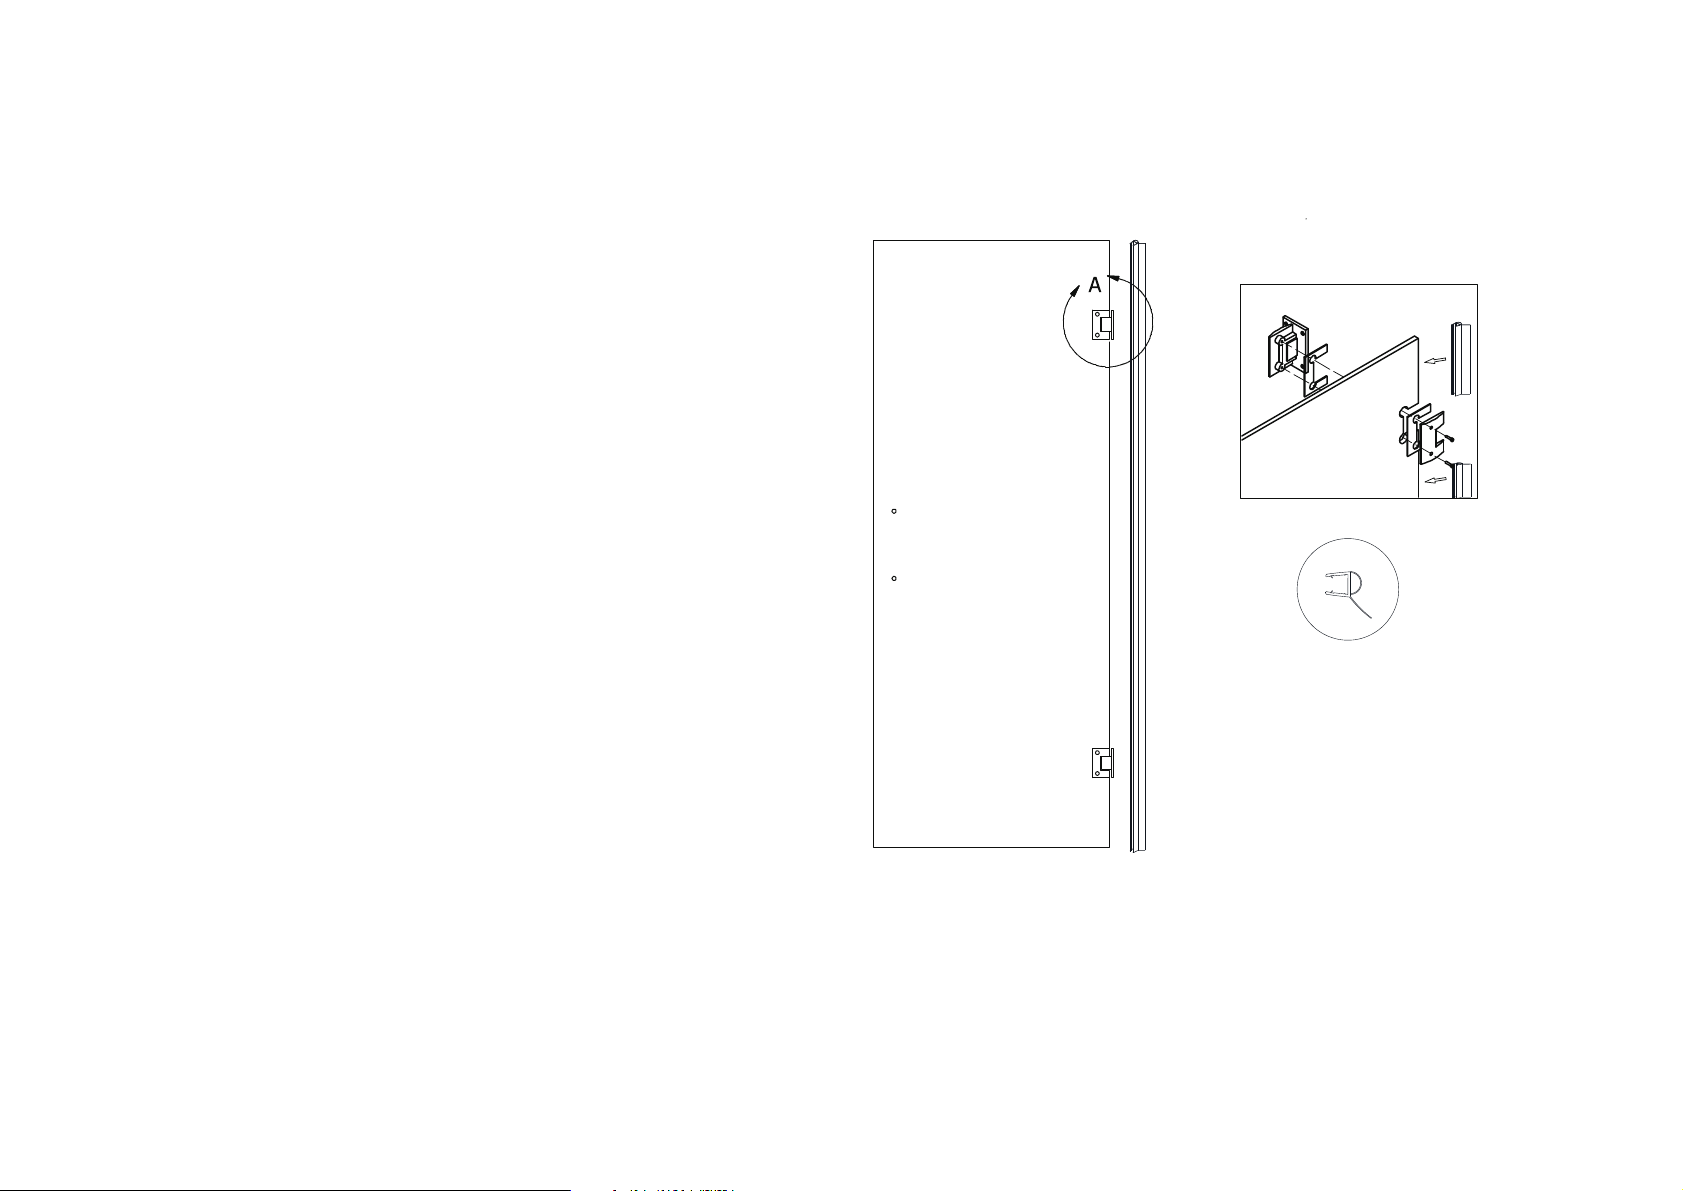
TUB DOOR
DESIGN "A":
ATTENTION:This assembly portion only requires the parts from
Diagram "A" for the assembly and installation of the Single
Shower Door.
Single Shower Door 24"-30"
Diagram "A" is required for assembly
1.Secure the Hinges (04) to the Glass Panel (01).Refer to Figure
1 for details.
NOTICE: Do NOT place glass directly on a tile surface.To best
protect the glass, ALWAYS lay the glass on a piece of cardboard
or wood. Protect the edges and corns of the glass by keeping the
corner pads on the glass until it becomes necessary to remove
them for installation.
DETAIL A
OUTSIDE
2.Position a flat piece of timber (5/8" thick) on the shower base or
threshold.Carefully remove the corner pads from the Glass Panel
(01) and place the Glass Panel gently on the timber piece. Place
the hinged side of the door adjacent to the wall and carefully butt
them together. Make necessary adjustments to the door position
and make sure it is vertically level.
NOTICE:To ensure the door is perfectly plumb, use a leveler tool.
ATTENTION! If what you chose is the frosted glass, The Tsunami
Guard coated side of the glass panel should face into the shower
while the uncoated side faces out of the shower. The Fixed panel
[1] has a sticker(s) indicating which side should face in and out.
Fig. 1
Page 9
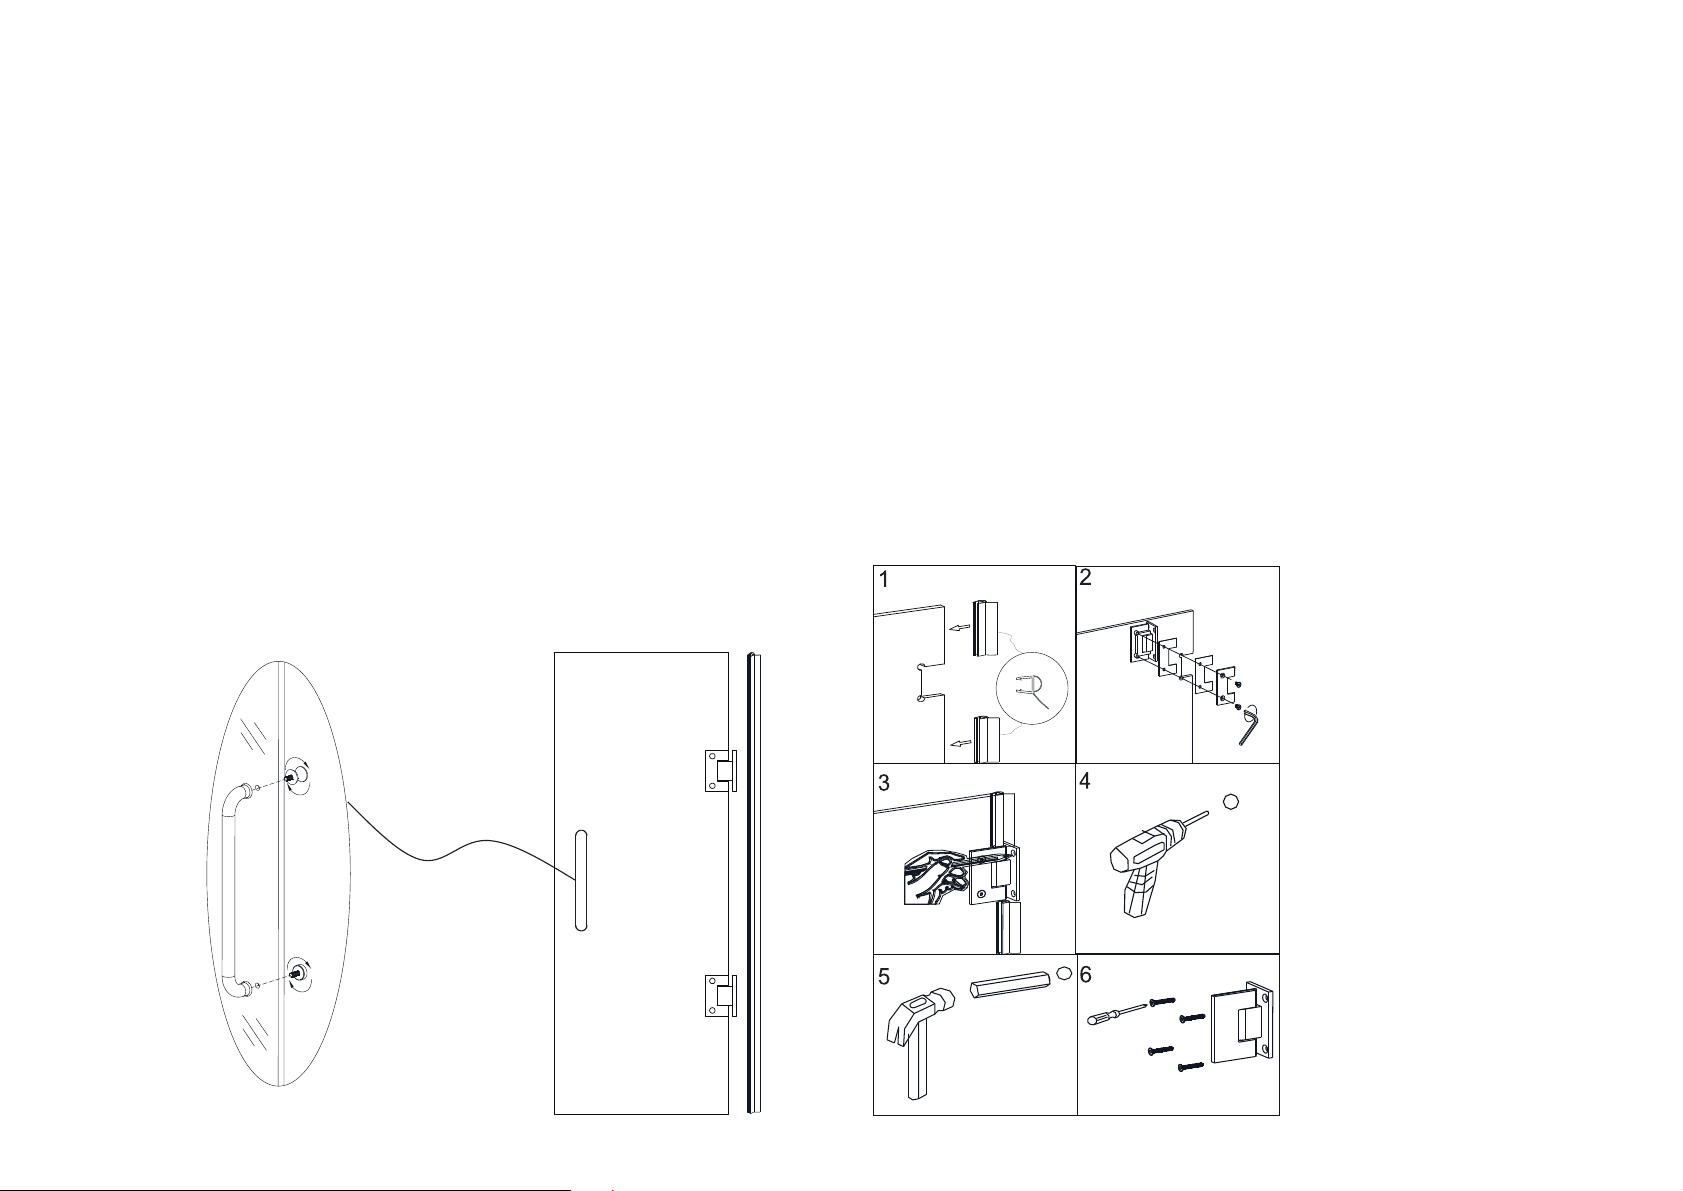
HINGES
1. Securely hold the glass door in place and mark drill holes on
the wall for both Hinges (04). With holes marked, set the door
aside and use a Φ ¼" drill bit to drill the holes in the wall. Gently
set the Glass Panel (01) back on the flat timber and adhere the
hinges to the wall using two Cross screw ST5x40 (03) on the
hinge from the shower's exterior.
NOTICE: Due to the heavy weight and hinges on the door, it
MUST be affixed to the studs in the wall or, if necessary, a 2x6
wood reinforcement preinstalled behind the wall.
NOTICE: The drilled holes in the wall are very close to the back
plate of the hinge. If care is not taken when installing the long
screws or screwdriver may scratch the back plate.
2. (OPTIONAL) Gently remove the back plates from the Hinges
(04) and place the Glass Panel(01) in a safe and secure place.
Screw in the remaining Cross screw ST5 x 40 (03) into the wall.
Carefully replace the Glass Panel to its prior position and
reassemble the Hinges.
3. Attach the Handle (02) to the Glass Panel (01). Refer to Figure
2 for details.
inside outside
Fig. 2
Page 10
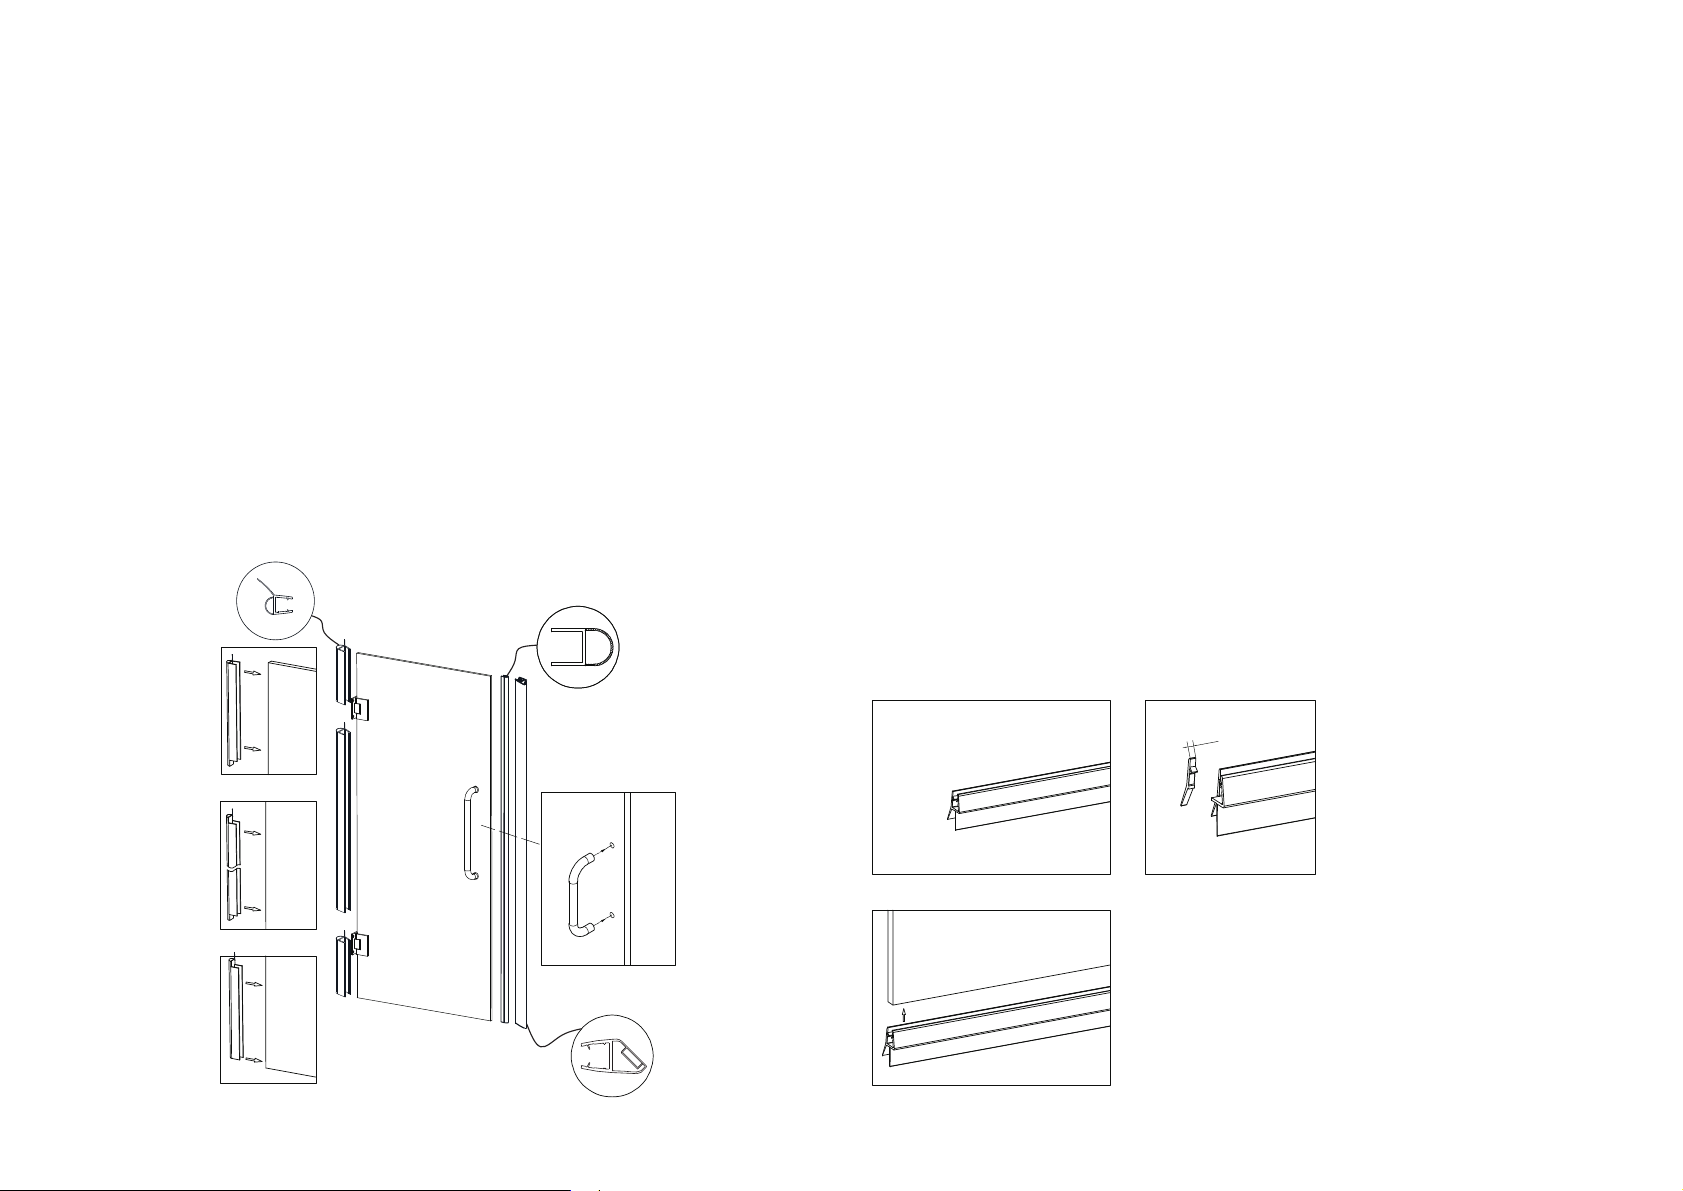
GLASS PANEL(01)
1. Obtain the following measurements:
• Top edge of Glass Panel (01) to the upper portion of the top
Hinge (04)
• Lower portion of the upper Hinge to the upper portion of the
bottom Hinge
• Lower portion of the bottom Hinge to 1/16" above the shower
base.
Use the above measurements to cut the Side Anti-water strip
(05). To cover the space to the wall, create a notch in the cut strip
to allow them to slide into the Hinge. Take off the timber plate.
With Glass Panel opened fully, carefully press the cut strips onto
the vertical edge of the Glass Panel.
this is for SD-AZ09-01/02
2.Precisely measure the lower portion of the Glass Panel (01)
from the Side Anti-water Strip (05) to the vertical edge on the side
with the Handle(02).
Using this measurement, cut the Bottom Water proof Strip (06) to
size and create a 3/8" notch in the interior side of the Bottom
Water proof Strip.
ATTENTION: When the door is shut, the Handle side of the Glass
Door should be tight to the Water proof Strip (06) along the
vertical edge. Refer to Figure 3 for details.
ATTENTION: Before moving to the next step, ensure the portion
of the wall involved in installation of the Bumper Strip (07) is
clean, void of any construction debris, oil, or soap, and the area is
fully dry.
3.Close door and press the Bumper Strip (07) along the edge of
the door.
4. This is the final step for Design "A" products.
Inside
Handle side
strip end
3/8”
Fig. 3
Outside
this is for SD-AZ07-01
Page 11
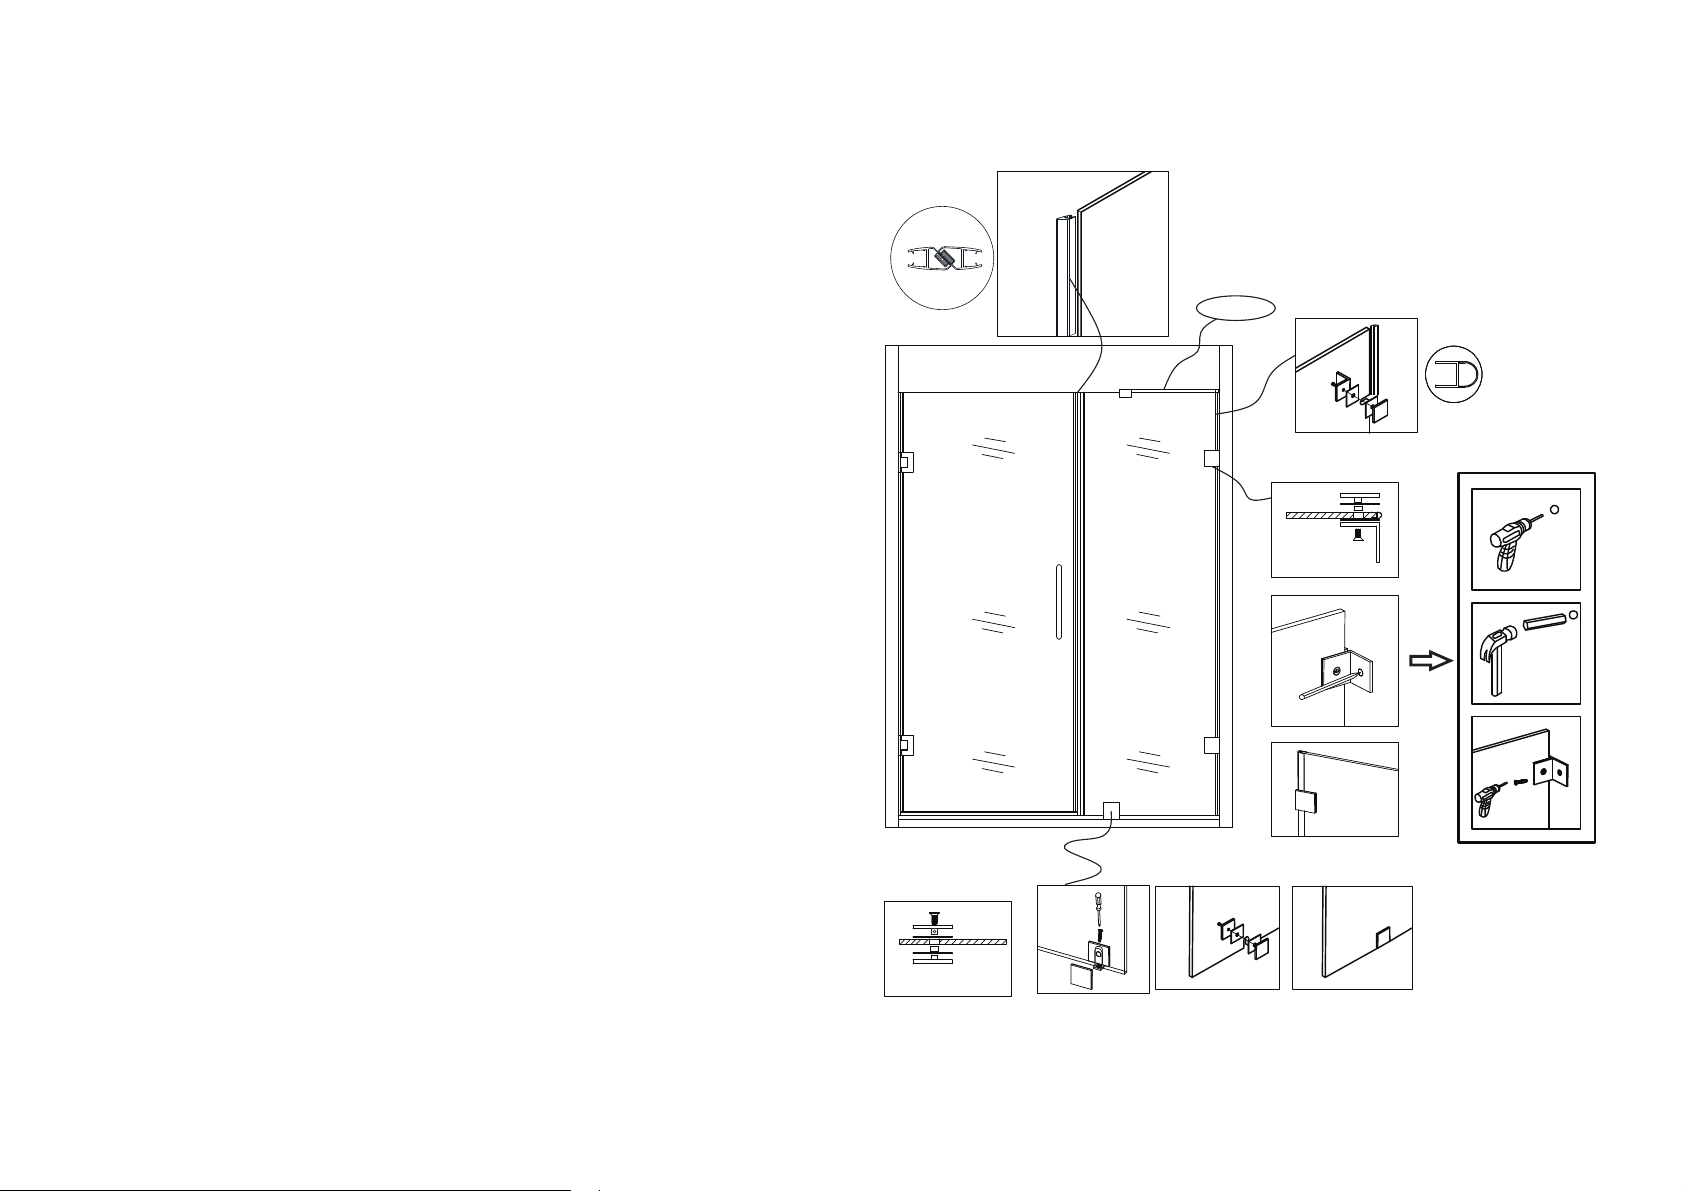
GLASS PANEL(08)
1.Gently butt the vertical edge of the Glass Panel (8) against the
wall.
2.Securely hold the Glass Panel (8) in place and close the Glass
Pane (01) while aligning it with the Stationary Glass. It may be
necessary to adjust the position of the Magnetic strip (21) to
ensure a tight fit with the top and bottom of the Glass Door. From
the interior of the shower, precisely outline the placement of the
Wall Brackets (13) and the position of the bottom clip(16).
ATTENTION: Make sure the top of the Stationary Glass and top
of the Glass Door are level.
3.Extent the Glass Panel (01) open and gently place the Glass
Panel (8) nearby. Take the Wall Brackets (13) off the Stationary
Glass and bottom clip(16).
DESIGN “B”
Inside
Outide
Inside
Place the wall bracket and the bottom clip in the marked position
to drill holes. Using a Φ 5/16" drill bit, drill a hole and insert the
Wall Anchor(10). Use hexagon screw ST4.2x35 to fix the glass
supporter, cross screw ST4.2x20 to fix the ground clamp
4.Replace the Glass Panel (8) into its proper spot and position it
tightly up to the Wall Bracket (13) and bottom clip(16).Refer to
Figure4 for details.
Outdoor
Fig. 4
Page 12
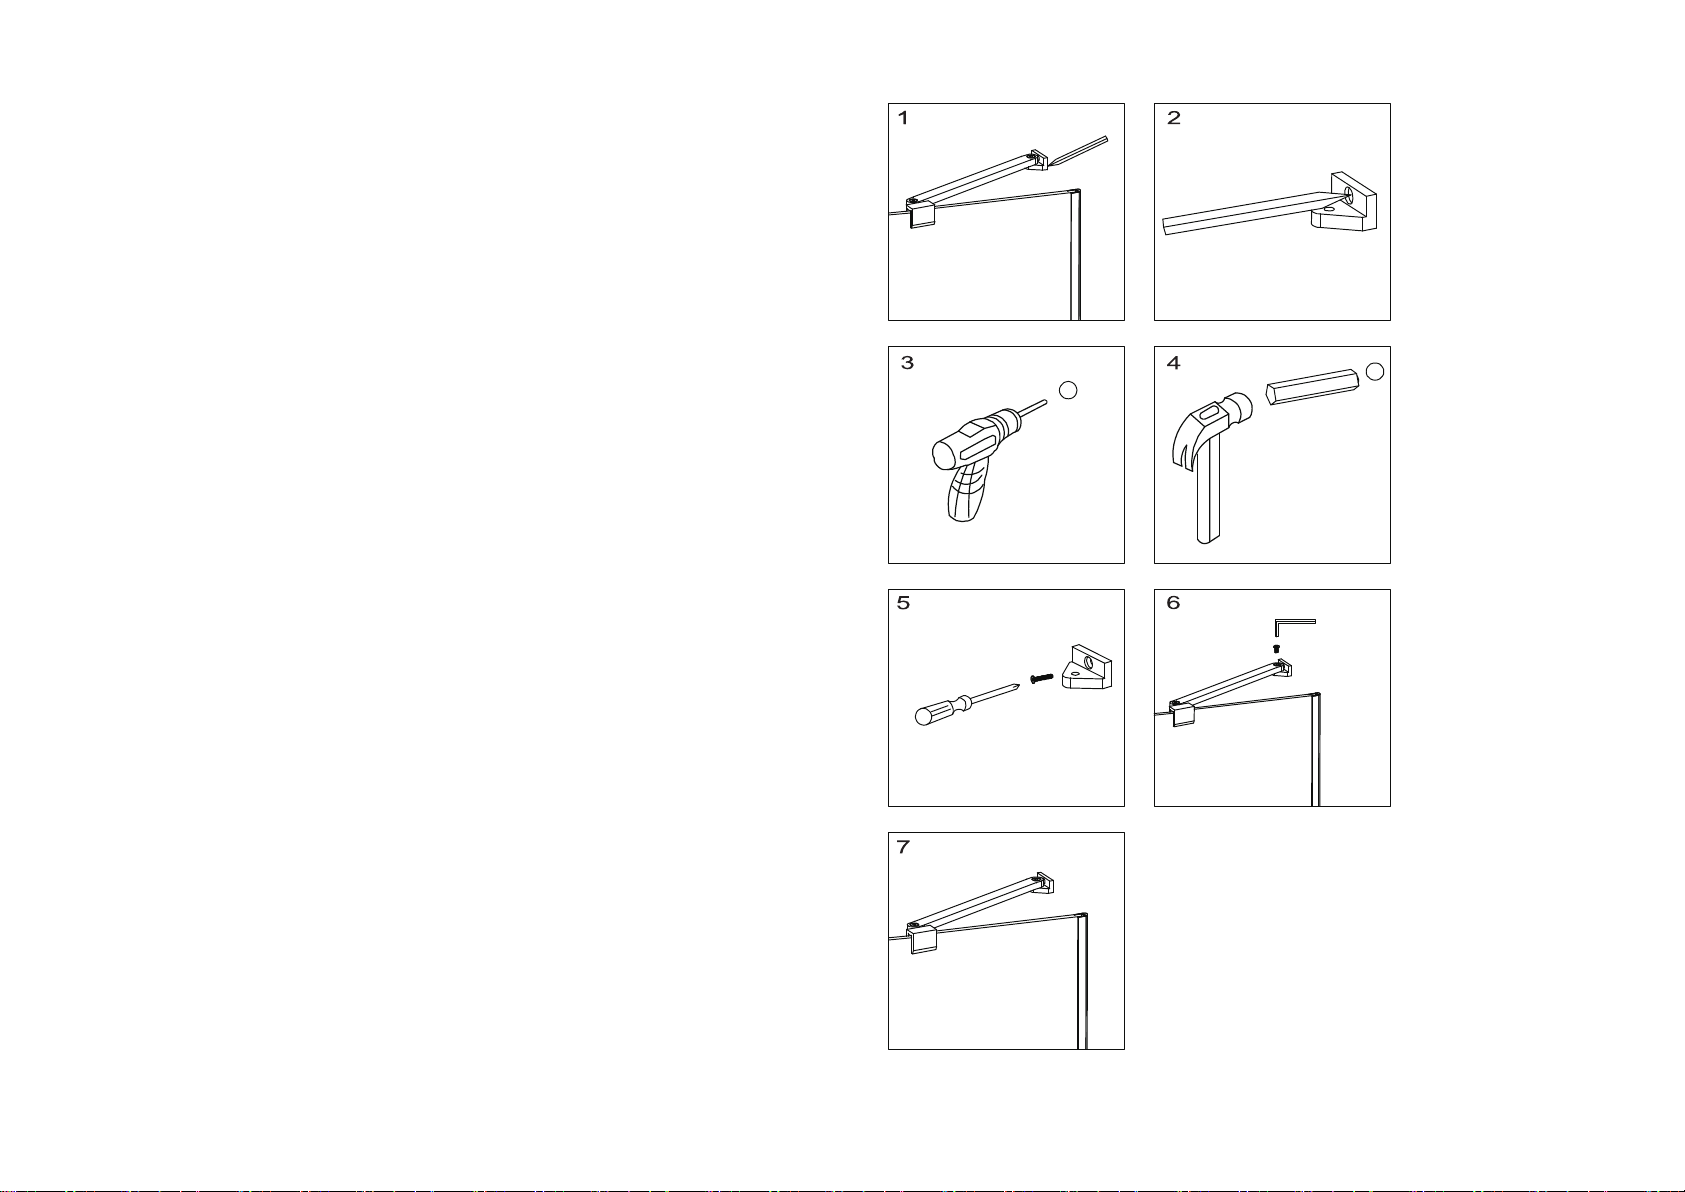
SUPPORT BAR
ATTENTION: This assembly portion only requires the parts from
Diagram "B" for the assembly and installation of the Support Bar.
NOTICE: The Support Bar* MUST be installed to allow for greater
stability.
1.Find the Support Bar* (9) and adjust it to an appropriate position
on the glass and wall then level it horizontally. While holding it
firmly in place, make a precise outline of the position of the
brackets on the wall. Carefully remove the Support Bar* and
disassemble the wall bracket. Hold the bracket up to the position
you outlined on the wall and mark the drilling hole.
Using a Φ 5/16" drill bit, drill the hole and insert the Wall
Anchor(13).Use cross head screw ST5x40(11) to attach the wall
bracket to the wall.View Figure 20.393" then secure the glass by
fastening the Support Bar to the wall and tighten the set screws
and the glass-holding screw.
2.Carefully add the sealant along the area where the Stationary
Glass meets the wall and along the Shower Base or Threshold.
Clean the silicone using the tool Silicone Cleaner (14).
WARNING: WAIT 24 HOURS BEFORE USING THE SHOWER
ENCLOSURE TO ALLOW THE SILICONE GEL TO DRY
COMPLETELY.
Refer to Figure 5 for details.
Fig. 5
Page 13

MAINTENANCE
Guarantee a longer life of the hardware finish by wiping off the metal parts with a soft cloth
after each use. Avoid using abrasive cleaners and products especially those that contain
bleach, acid, or ammonia. In the case that these chemicals are used, thoroughly rinse the
surface as soon as possible and wipe dry with a soft cloth. Stainless-steel surfaces should
be cleaned once a week or as needed. When applying a stainless-steel polish or cleaner,
work with the grain and not against it. Avoid the use of abrasive tools such as wired brushes,
abrasive cloths or sponges, or steel wool.
Tempered Glass: Nonabrasive bathroom cleaners and your usual glass cleaner may be
used to clean tempered glass. Be sure to thoroughly rinse off any cleaner. Do NOT strike the
glass with any hard or sharp object as it could can cause immediate damage or cause the
glass to eventually break.
Wheel Maintenance: To keep the roller movement smooth, apply a small amount of
lubricating oil. Periodically adjust the wheel screw to ensure the moving door slides smoothly
and the bearing functions effectively.
The sealant should be applied to the interior edge.
Allow 24 hours for silicone to dry before use.
 Loading...