

Page 1
Rhaus & Jaguar
INSTALL GUIDE
Model#
SP-AZ029
SP-AZ8089
PERFECTION IS OUR TRADITION™
v2.0516
Page 2

TABLE OF CONTENTS
Parts List Pg. 1
Before You Start Pg. 2
Spec Drawing Pg. 3
Installation Pg. 4
Care & Maintenance Pg. 11
Warranty Pg. 12
Registration Final Page
YOUR REVIEWS MATTER!
The ANZZI™ Family thanks you for your purchase and hopes you enjoy your very own ANZZI
product for years to come! In the meantime let us know about your experience? We would love
to hear your thoughts from the packaging to the quality and function of the product.
Leave a review on www.ANZZI.com/reviews and let everyone know how satised you are with
ANZZI!
Also, we humbly request submitting as many pictures as possible along with your review.
Millions of shoppers will want to know about your experience with our products. Don’t just tell
but show, too!
For more information please call 1-844-44-ANZZI
or email us at [email protected]
Page 3
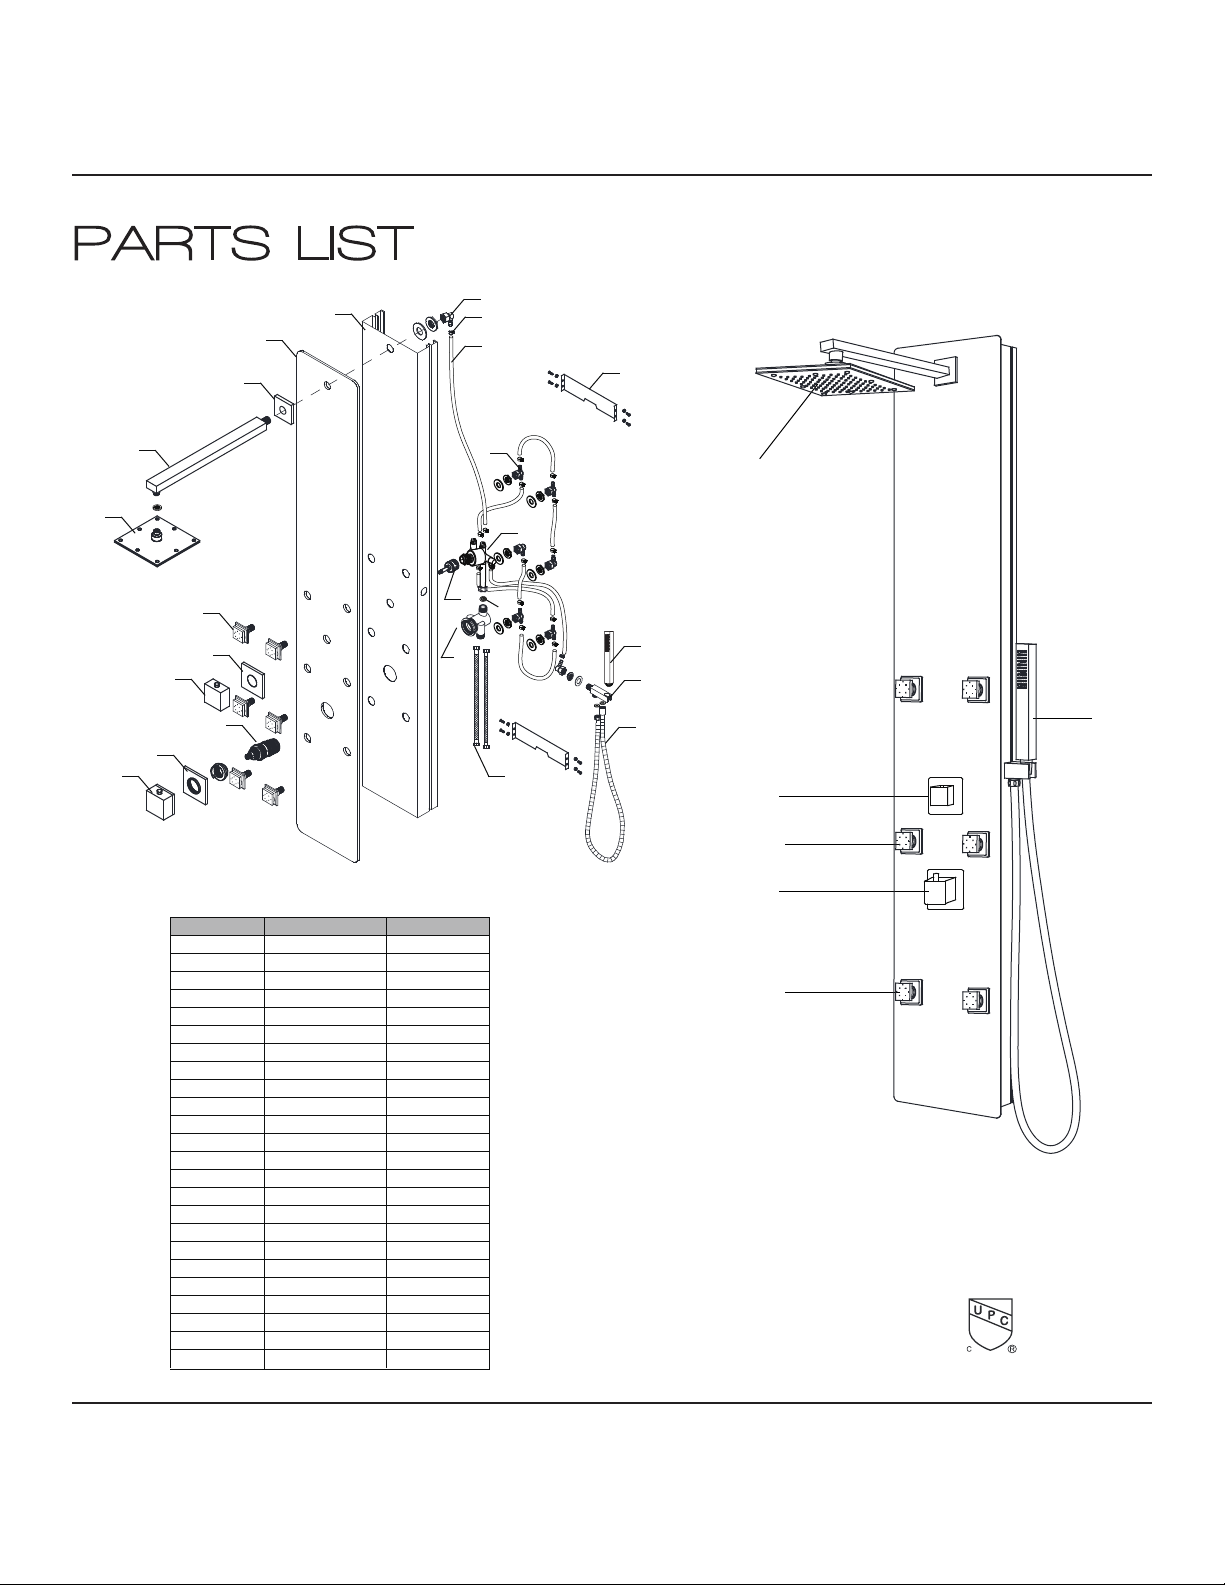
PARTS LIST
Component no.
Component
Material
1
head s hower
s/s
2
arm ba r
bras s
3
flange
bras s
4
front body
tempe red glass
5
backs ide body
PVC
6
one way joint
ABS
7
clip
s/s
8
pvc hose
pvc
9
body jets
bras s
10
knob pla te cover
bras s
11
knob
zinc
12
13
ABS
14
handl e plate cover
bras s
bras s
15
handl e
zinc
16
two way joint
ABS
17
faucet body 2
faucet body 1
bras s
18
function cartridg e
ABS
19
braide d hose
s/s
20
fixing bar
s/s
21
ABS
ABS
ABS
22
23
s/s
hand sho wer
hand sho wer holde r
flexible
flow restricter
24
5
4
3
2
6
7
8
20
16
1
1
9
10
17
11
13
14
15
12
18
24
21
22
23
5
19
2
3
4
3
thermo static cartridge
1. Shower Head
2. Diverter
3. Body Jets
4. Mixer
5. Hand Shower
ASME A112 .18.1/C SA B125.1
PERFECTION IS OUR TRADITION™
pg. 1
Page 4
BEFORE YOU START
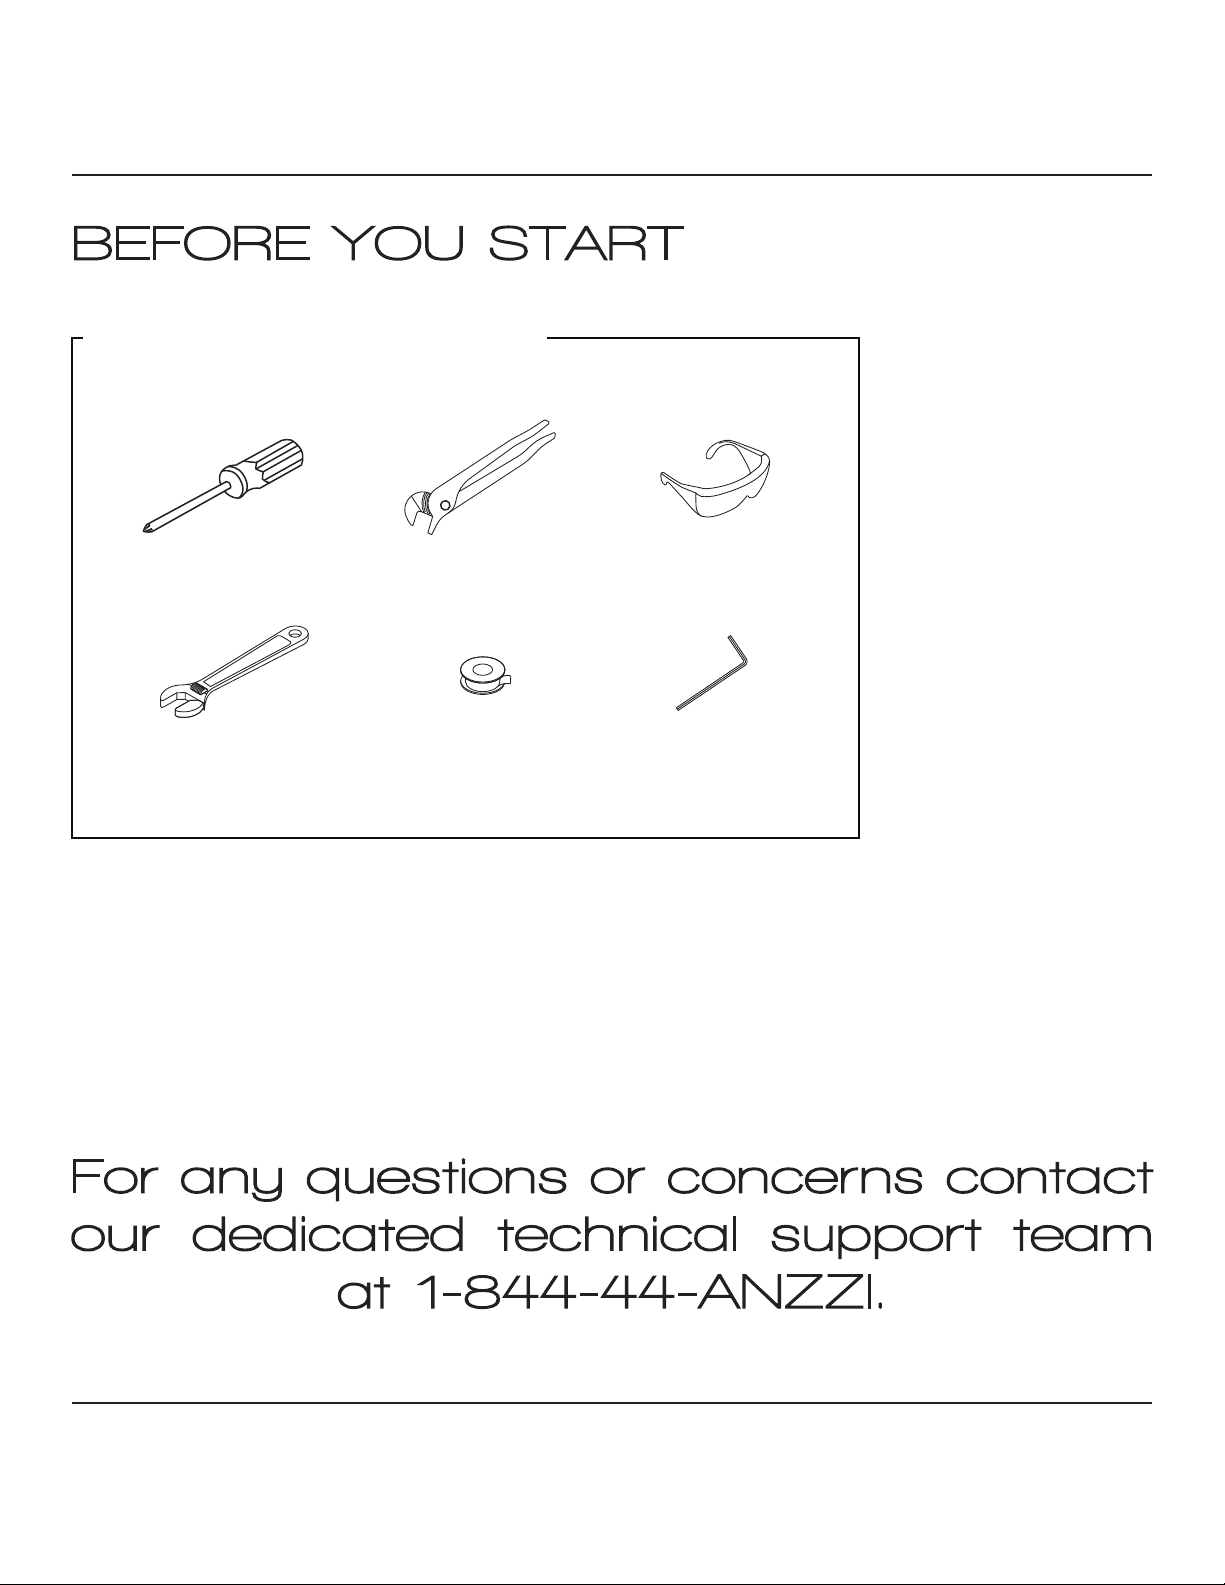
Recommended Items
Screwdriver Channel Locks
Adjustabl e Wrench
Teflon tape
Goggles
Allen key
ATTENTION: Please read all instructions thoroughly
including all warnings, attentions and notes before
beginning installation.
For any questions or concerns contact
our dedicated technical support team
at 1-844-44-ANZZI.
PERFECTION IS OUR TRADITION™
pg. 2
Page 5
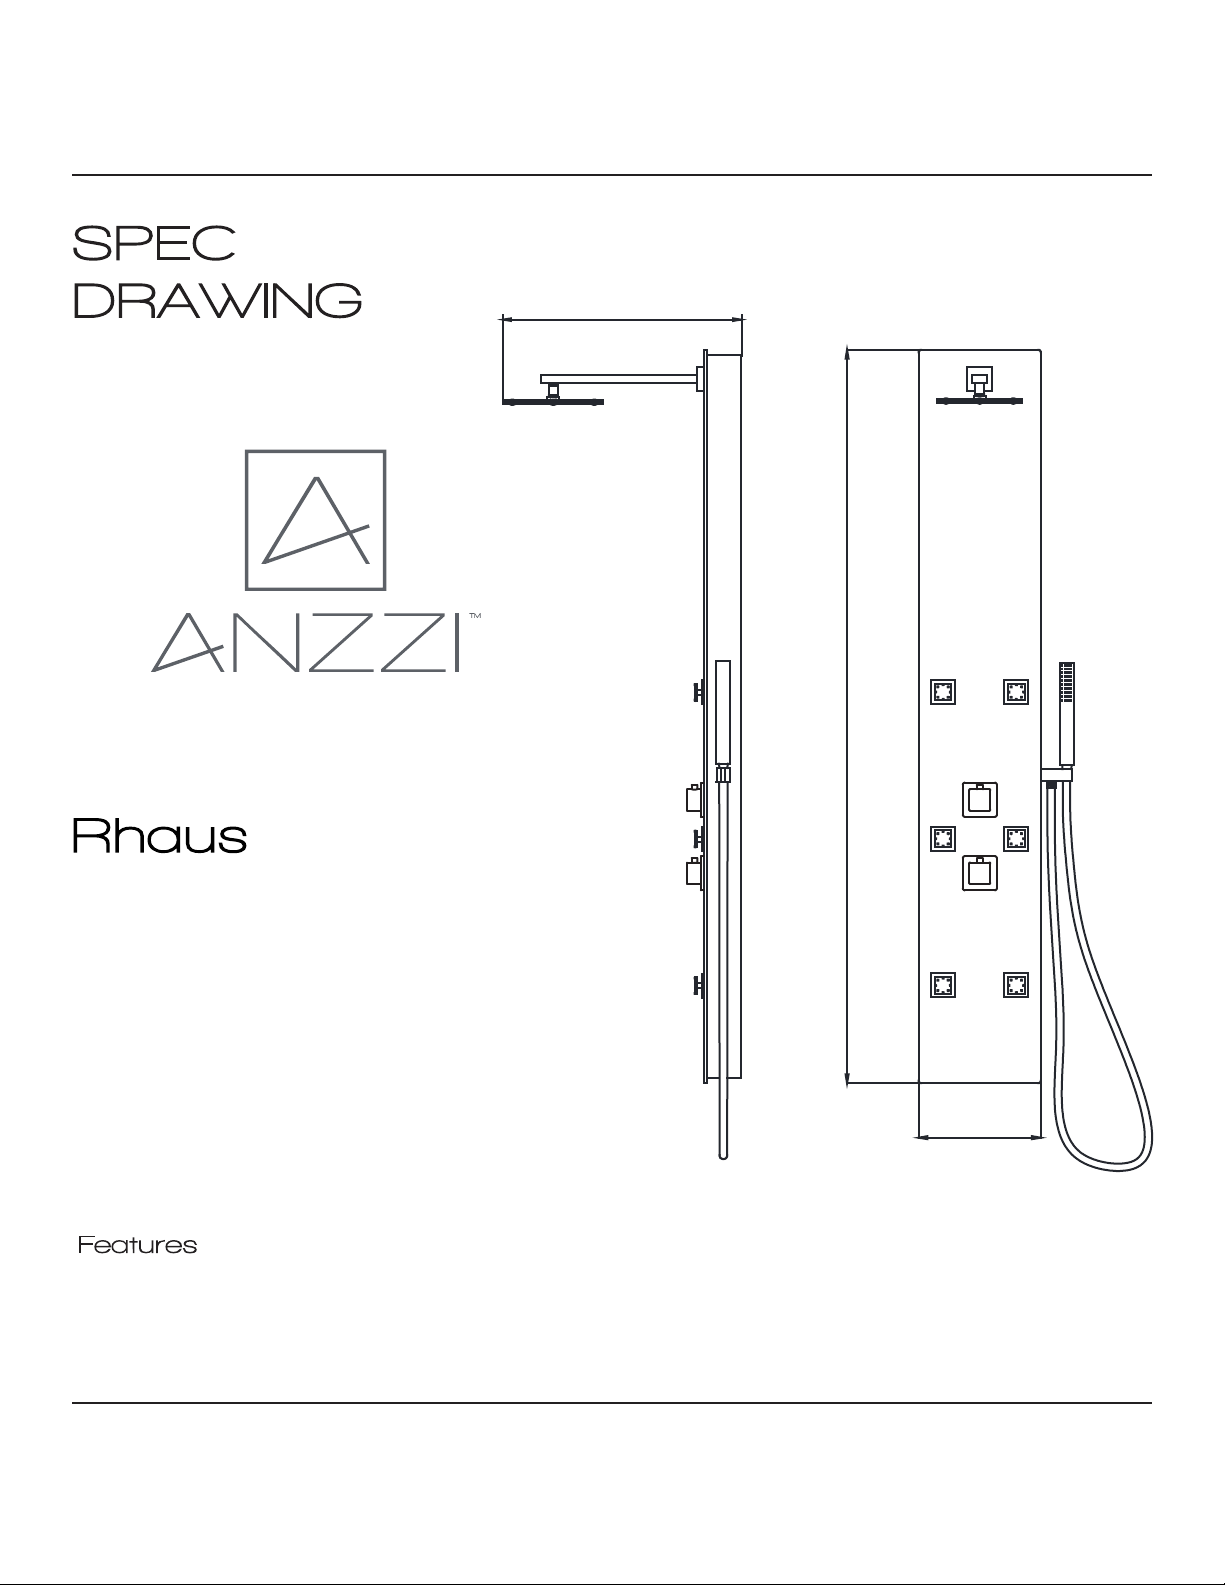
SPEC
DRAWING
Perfection is our Tradition™
Rhaus
SP-AZ029
20.61"
59.06"
Material: Tempered Glass
Finish: White Tempered Glass
Handles: 2
Jets: 6
Shower: 6.89” x 6.89”
Sprayer: 60” reach
Weight: 30.20 lbs
Height: 59.06”
Supply: 1/2” connections
Flow: 2.5 gpm
Features
Heavy Rain™ Showerhead
Acu-Stream™ high pressure body jets
Euro-Grip™ hand held sprayer
Rhino Alloy™ certified materials
PERFECTION IS OUR TRADITION™
9.84"
pg. 3
Page 6
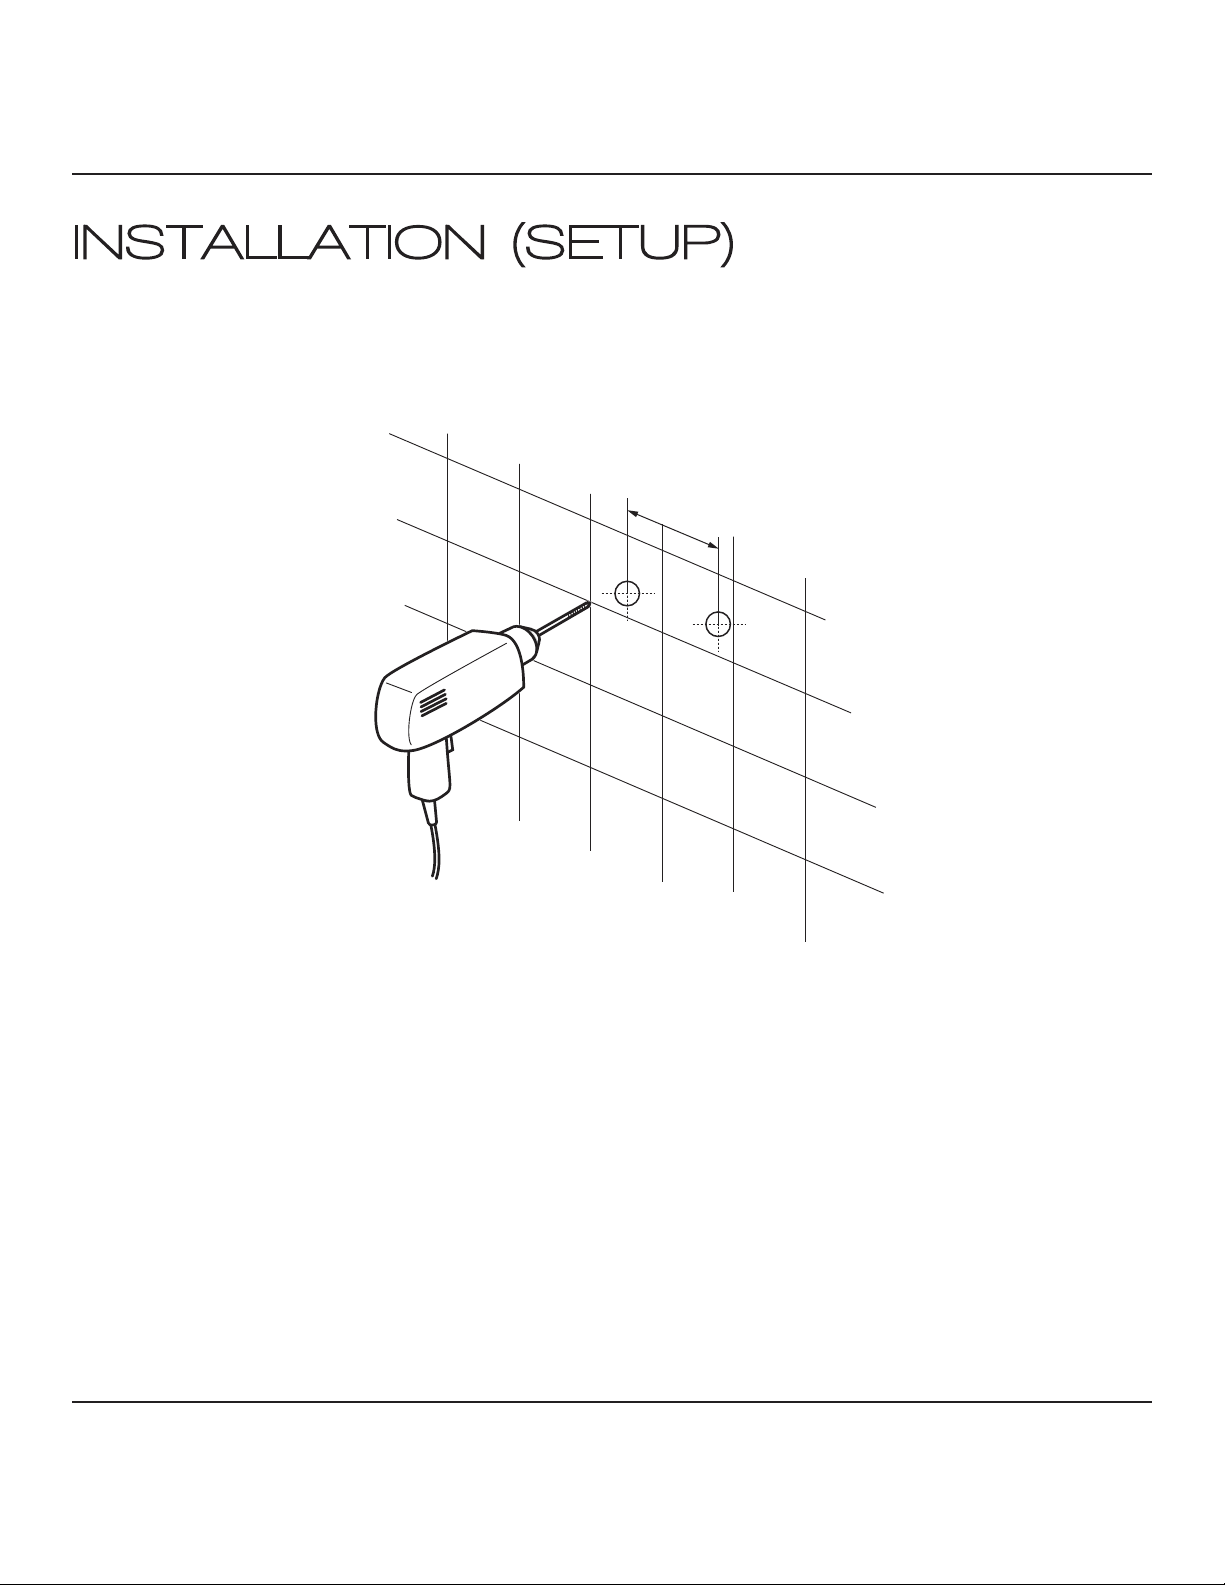
INSTALLATION (SETUP)
Figure A
1 INCH
IMPORTANT
Step A
Step A.2
Ø 6mm Drill
Before drilling any holes for the shower panel brackets, ensure there are no hidden cables or
pipelines aligned with the desired drilling position.
Drill the two holes for the top bracket 1” apart at the desired height.
Drill the two holes for the bottom bracket 1” apart below the top bracket.
PERFECTION IS OUR TRADITION™
pg. 4
Page 7
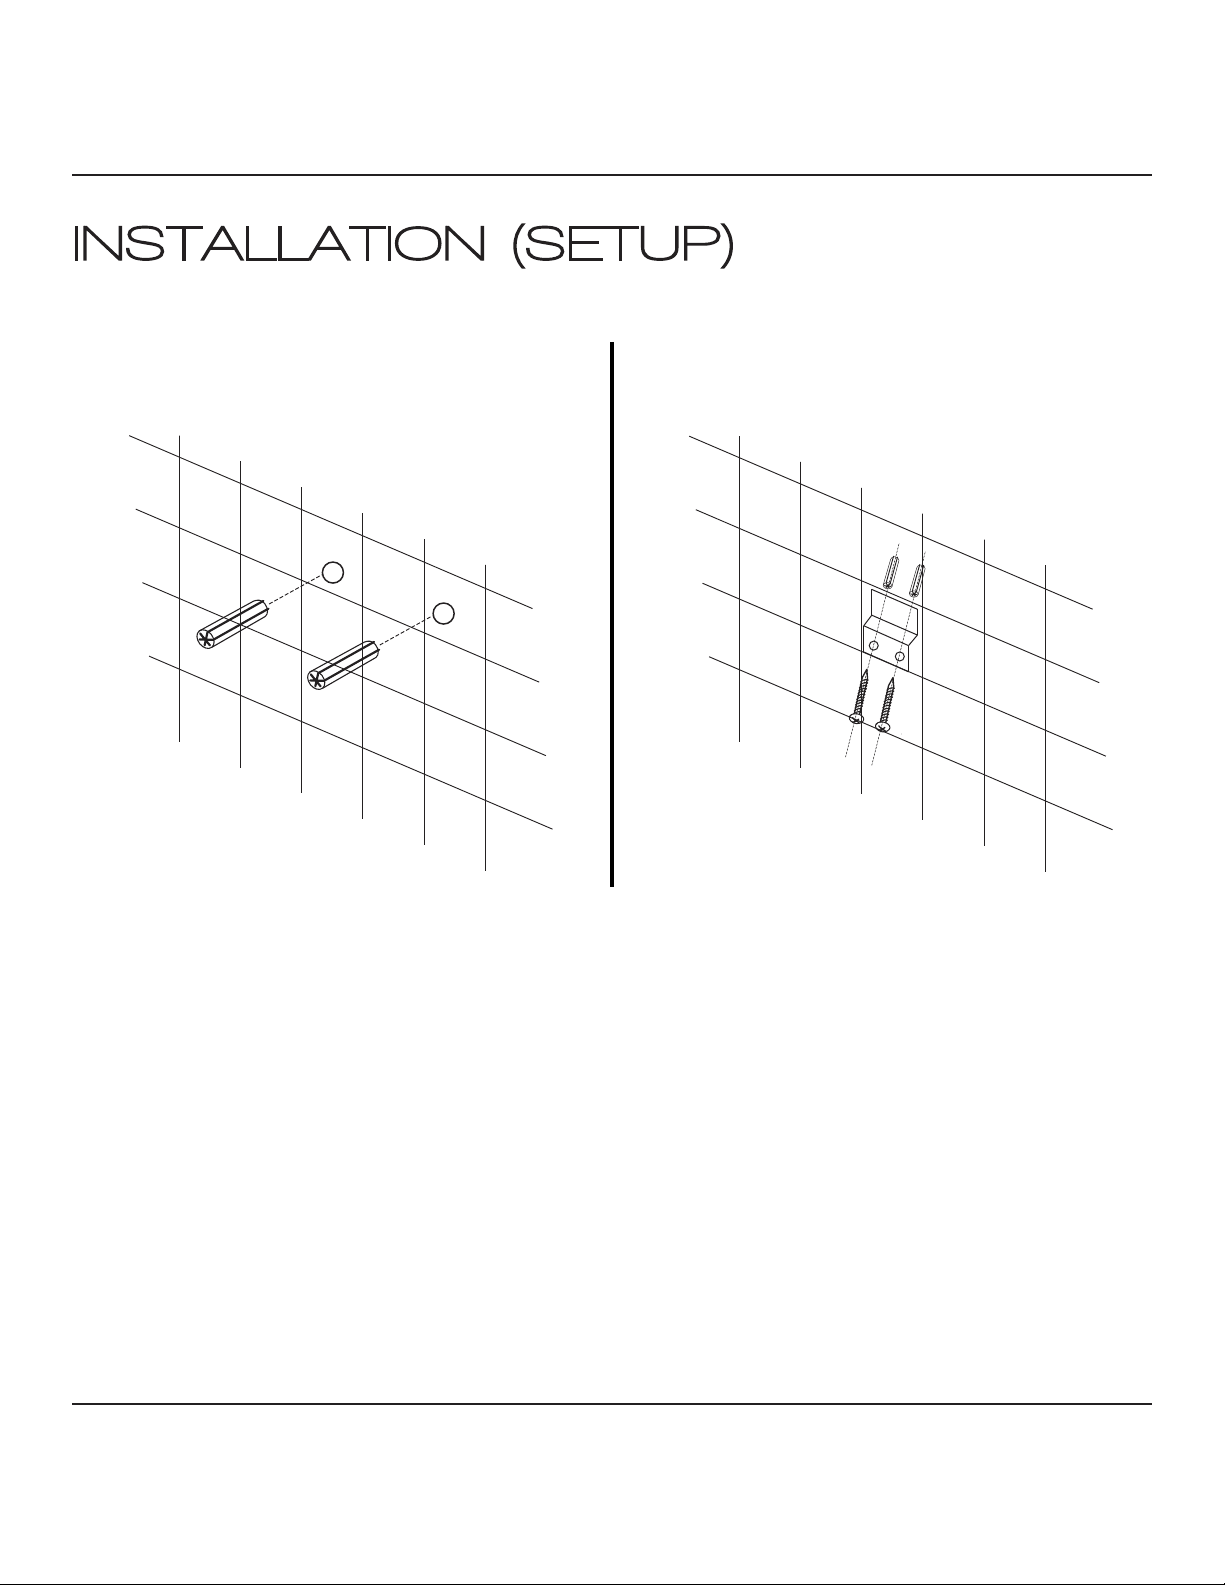
INSTALLATION (SETUP)
Figure B
Figure C
Step B
Step C
Insert the wall anchors into the pre-drilled holes as shown in Figure B.
Place the shower panel brackets aligned with the drilled holes and using a Philips screwdriver tighten the screws to secure the brackets.
PERFECTION IS OUR TRADITION™
pg. 5
Page 8
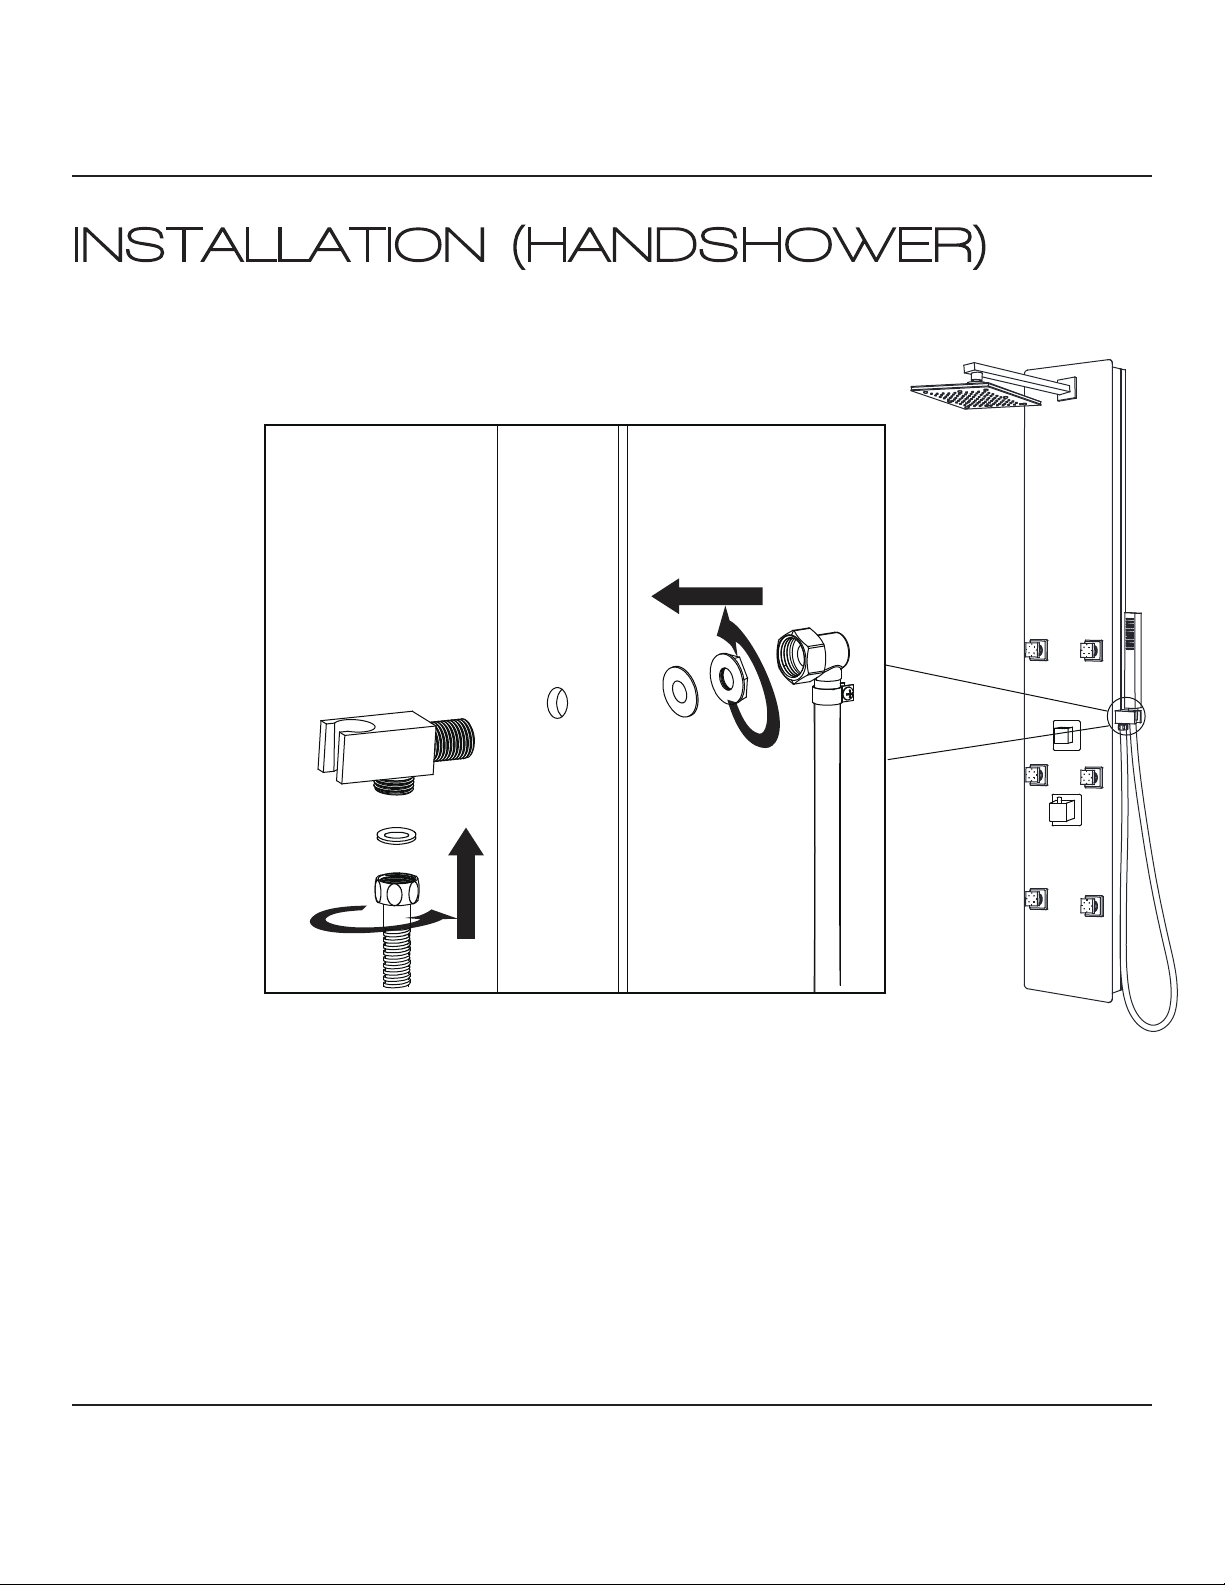
INSTALLATION (HANDSHOWER)
Figure 1
Step 1A
Step 1B
Step 1C
Step 1D
Insert the hand shower holder through the pre-drilled hole on the shower panel.
Install the water supply hose for the hand shower onto the holder, as shown.
Make sure all O-rings are inserted to prevent leakage.
Once the shower panel is fully installed and hung on the bracket, you can install the hand
shower hose to the holder connection.
PERFECTION IS OUR TRADITION™
pg. 6
Page 9
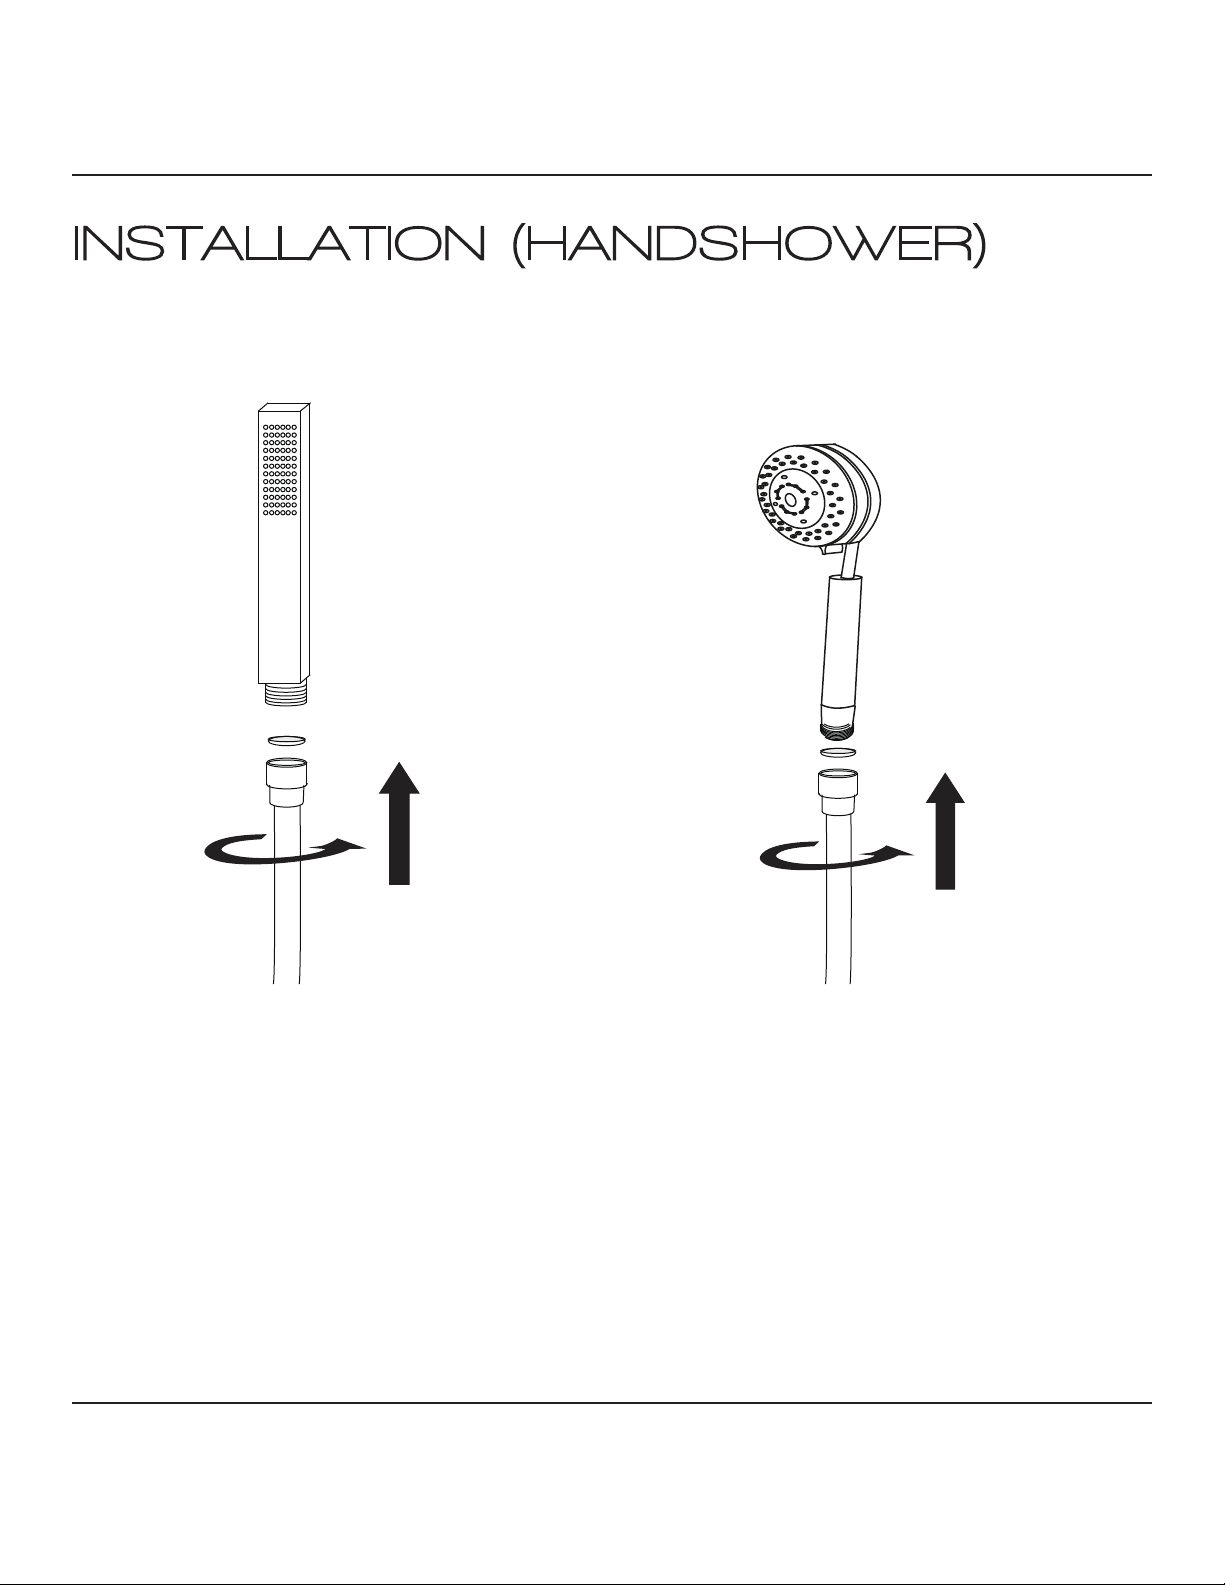
INSTALLATION (HANDSHOWER)
Figure 2
1 Setting
Hand
Shower
or
3 Setting
Hand
Shower
Finally, install the hand shower to the hose, as shown.Step 2A
PERFECTION IS OUR TRADITION™
pg. 7
Page 10
INSTALLATION (SHOWER HEAD)
Figure 3
Step 3A
Step 3B
Step 3C
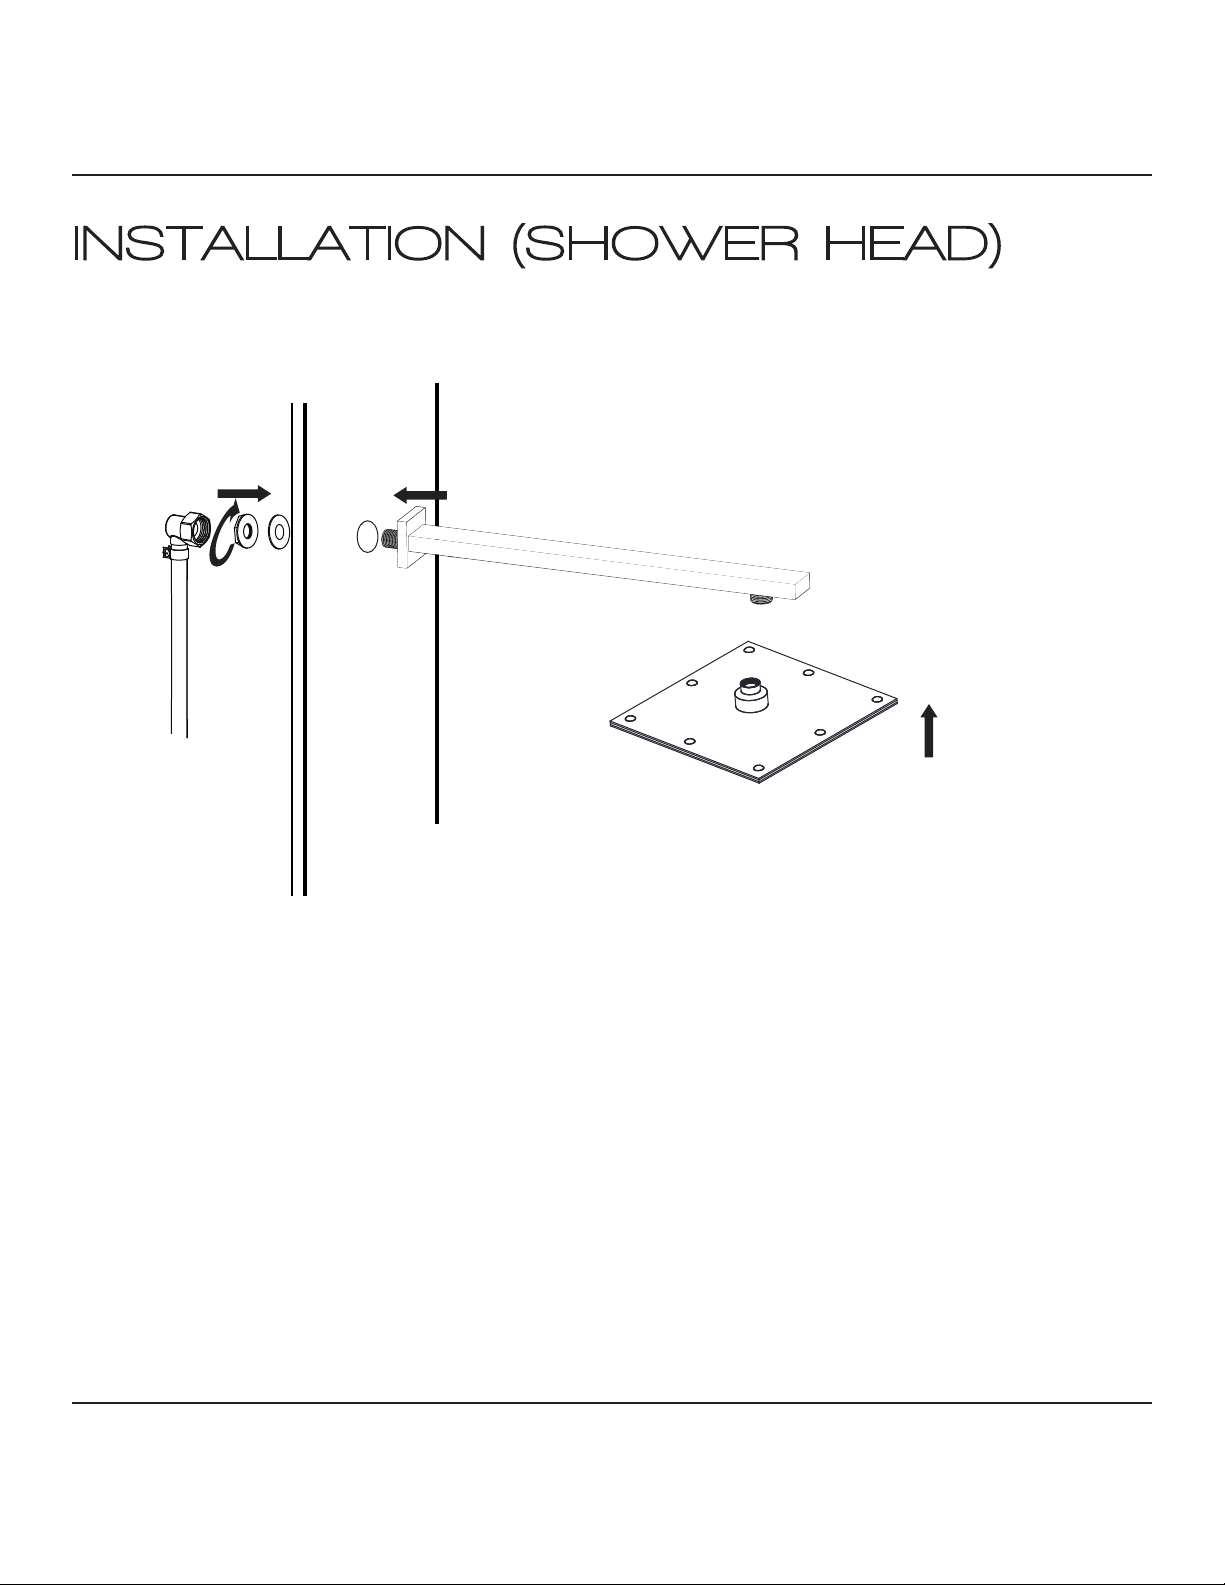
Install the shower arm to the shower panel, using the rubber washer and nut on the opposite
side to tighten.
Makes sure the shower arm is sitting correctly before installed the shower head.
Screw the shower head onto the shower arm.
PERFECTION IS OUR TRADITION™
pg. 8
Page 11
INSTALLATION (WALL MOUNTING)
Figure 4
Cold
Hot
Step 4A
Step 4B
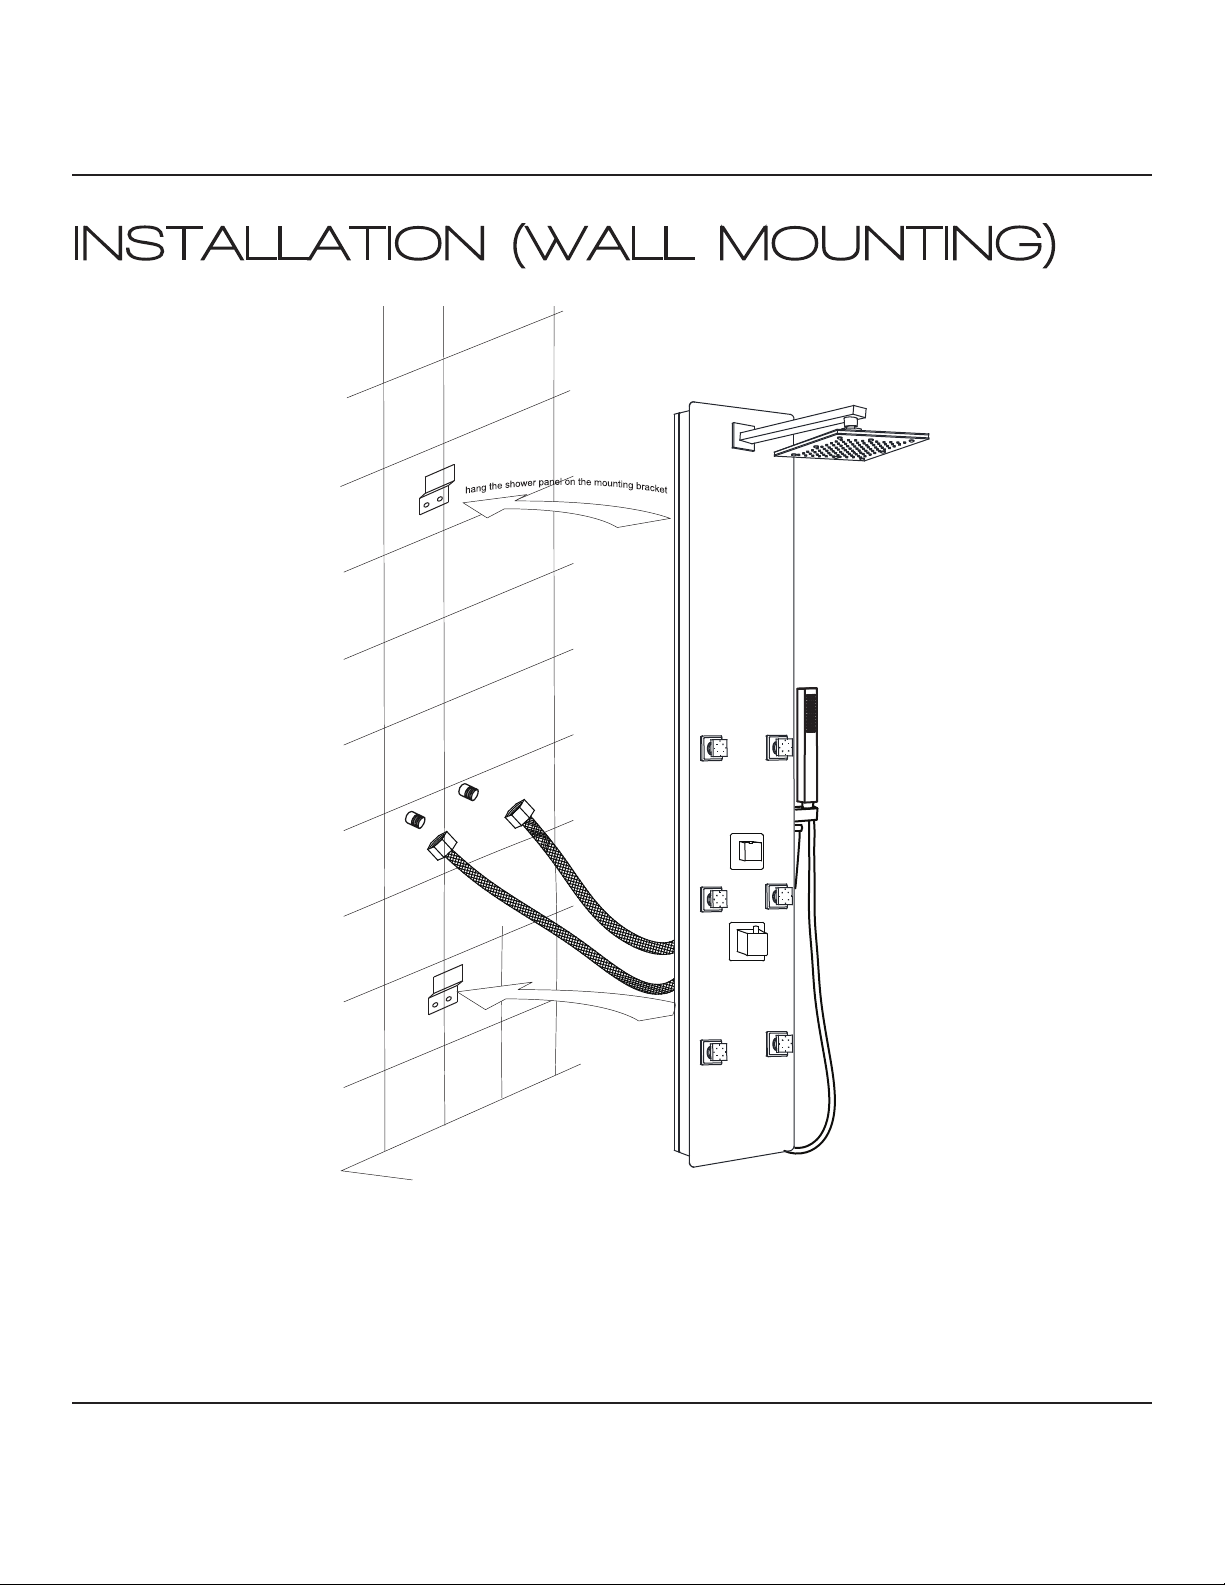
Screw the cold and hot water hoese from the shower panel to the supply lines in the wall.
Carefully hang the shower panel on the secured mounting brackets as shown in Figure 4.
PERFECTION IS OUR TRADITION™
pg. 9
Page 12
DISASSEMBLE (GPM REDUCER)
Reducer
5A-5B
faucet body 1
faucet body 2
5C
NOTE:
Setp 5A
Setp 5B
Setp 5C
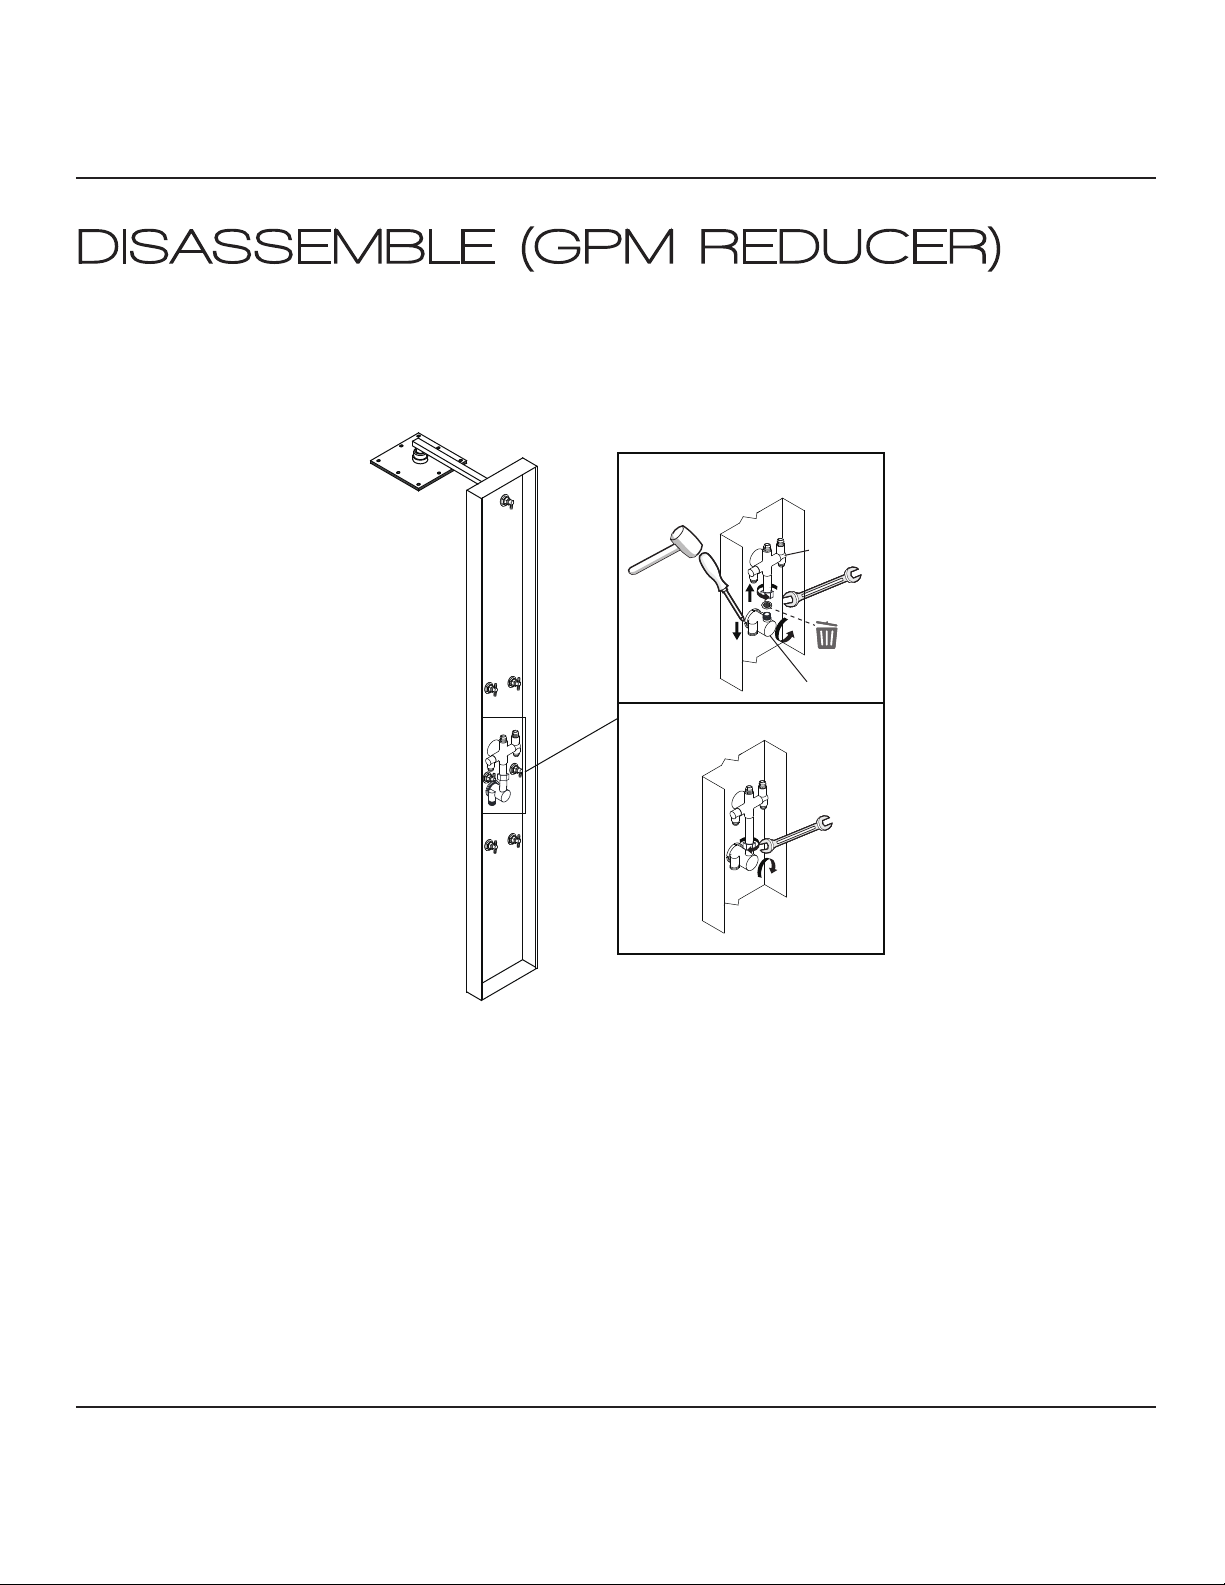
Due to water conservation laws, this unit is equipped with a GPM reducer. If your local
code doesn’t have a restriction requirement, you can use the following steps to remove
the reducer.
Loosen the fastening nut of the faucet body 1
unscrew the hexagon nut from the faucet body 2.
Use hand to pull the faucet body 1 and press the faucet body 2 to take the reducer out.
Tighten the fastening nut and the hexagon nut.
PERFECTION IS OUR TRADITION™
pg. 10
Page 13

CARE AND MAINTENANCE
ANZZI™ products are crafted with superior quality standards and workmanship and are engineered to
stand the test of time. However, that does not mean the product can be neglected and will need some
care and cleaning.
It is recommended to use regular soap and hot water along with a non-abrasive cloth or sponge to
regularly clean the product. This avoids any nasty build up or deposits which would be tougher to
remove.
If you feel the use of stronger cleaning solutions or chemicals is necessary always test the cleaning
solution or chemical on an inconspicuous area before applying to the entire surface.
Wipe all surfaces clean and rinse completely with water immediately after applying cleaner. Rinse and
dry any overspray that lands on nearby surfaces.
DO NOT ALLOW THE CLEANER TO SOAK.
Following these simple principles will ensure you ANZZI™ product will remain as lustrous and stunning as the day it was first received. ENJOY!
Sincerely,
La Familia ANZZI™
Perfection is our Tradition™
Perfection is our Tradition™
For more information visit us at www.ANZZI.com
For more information visit us at www.ANZZI.com
pg. 11
Page 14

LIMITED LIFETIME WARRANTY
ANZZI™ products are manufactured with superior quality standards and workmanship and are
backed by our limited lifetime warranty. ANZZI™ products are warranted to the original consumer
purchaser to be free of defects in materials or workmanship. We will replace FREE OF CHARGE* any
product or parts that proves defective. Simply call 1-844-44-ANZZI (1-844-442-6994) to submit a
warranty claim and request an RMA. Proof of purchase (original sales receipt) from the original consumer purchaser must be made available for all ANZZI™ warranty claims.
This warranty excludes incidental/inconsequential damages and failures due to misuse, abuse or
normal wear and tear. This warranty excludes all industrial, commercial & business usage, whose
purchasers are hereby, extended a five year limited warranty from the date of purchase, with all other
terms of this warranty applying except the duration of warranty.
Some states and provinces do not allow the exclusion or limitation of incidental or consequential
damages, so the above limitations may not apply to you. This warranty gives you specific legal rights
and you may also have other rights that vary from state to state and province to province. Please contact 1-844-44-ANZZI (1-844-442-6994) or visit www.ANZZI.com/Warranty for more details.
Sincerely,
La Familia ANZZI™
Perfection is our Tradition™
*Shipping and handling fees are not covered under the ANZZI™ Warranty.
This warranty is in eect as of January, 2016. This warranty supersedes all previous warranties and/or claims
is subject to change without notice.
both stated and implied. This warranty
pg. 12
Page 15
PRODUCT AND WARRANTY REGISTRATION
To register your product and activate your Limited Lifetime Warranty contact us at 1-844-44-ANZZI
or email us at [email protected]. Or, if preferable, fill out the form below then scan/fax/mail us a
copy.
Email: [email protected]
Fax: 1-866-560-1060
In need of replacement parts?
Visit www.SpaWorldParts.com
Mail: ANZZI™
5701 NW 35th Ave.
Miami, FL 33142
ANZZI™ Product Registration Card
Name.....................................................................................
Address ............................................................................................................................
City ............................................... State ........................... Zip ..............................
Phone ......................................................................................
Email......................................................................................
Date of Purchase........................... Dealer .........................
Address ............................................................................................................................
Installed by .............................................................................
Address ............................................................................................................................ State ...............
Phone .................................................................................... State........................... Zip..........................
Email......................................................................................
I have read the ANZZI™ Owner’s Manual carefully and understand and agree that any installation, operation or maintenance of the product
must be done strictly in accordance with instructions and guidelines contained in the ANZZI™ owner’s manual and installation guide.
Signature____________________________________________________________Date_______________________________________________
Page 16

Perfection is our Tradition™
 Loading...