

Page 1
SHOWER TRAY INSTALLATION & CARE GUIDE
SB-AZ005WN
SB-AZ006WN
SB-AZ007WL
SB-AZ008WR
Have questions? Visit us at www.ANZZI.com or call us at 1-844-44-ANZZI.
SB-AZ009WC
SB-AZ010WC
SB-AZ011WC
SB-AZ012WR
SB-AZ013WL
SB-AZ014WC
SB-AZ015WV
C0431
1
Page 2
1. Prior to installation, examine all boxes and packages for shipping damage and
compare the piece count with your packing slip. After opening all boxes and
packages, read this introduction carefully. Check that all of the needed parts are
included in the package by checking offthe components on the "Detailed Diagram
of Shower DoorComponents". If the unit has been damaged, has a finishing d
or has missing parts, please contact our customer support department within 5
business days of the delivery date. Please note that
damaged products or missing parts free of charge after 10business days or if the
product has been installed.
2. Install all of the required plumbing and drainage before installing the
showerbase
for all plumbinginstallation.
3. Shower bases must be installed by a licensed plumber. Please note that you
should consult your local building codes with questions on installation compliance
standards. Building and plumbing codes may vary by location, and we are not
responsible for code compliance standards for your project.
4. Please insure that prior to the installation the installation surface is leveled and
solid and will be able to support the total weight of the unit. Also make sure the
walls are at right angles.While some adjustment in leveling of the trayis possible,
irregular installation surface level or improper angle of side walls will result in
serious problems for your installation. Please, note that some ad
necessary during the installation process.
.Use a competent and licensed ( if required by local code) plumber
Preparation
efect,
we will not replace any
justments maybe
IMPORTANT NOTE:Dimensions provided are for reference
only. You must measure the actual shower tray sizes
before installation, this includes overalldimensions and
drain location. Allowed tolerance for center of the drain is
2
Page 3
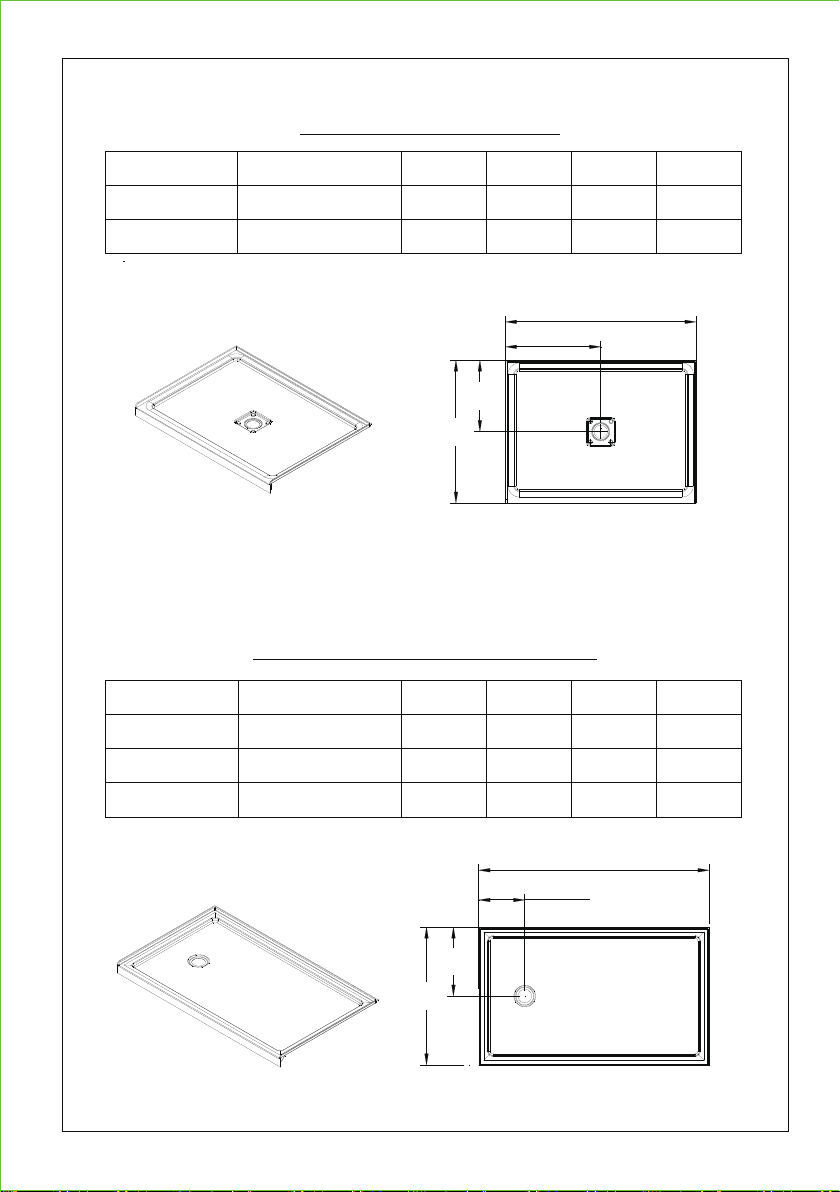
SINGLE THRESHOLD SHOWER BASE
Center Drain Configuration
MODEL
SB-AZ011WC
SB-AZ014WC
SINGLE THRESHOLD SHOWER BASE
MODEL
SB-AZ007WL
SB-AZ013WL
SB-AZ015WV
SPECIFICATION
D(in) W(in) D1(in) W1(in)
48"X36" 36" 48" 18" 24"
60"X36" 36" 60" 4 4/5" 30
W
W1
D1
D
Left/Right-Hand Drain Configuration
SPECIFICATION
D(in) W(in) D1(in) W1(in)
60"X36" 36" 60" 18" 12"
60"X32" 32" 60" 18"
48"X32" 32" 48" 16"
4 4/5"
12"
W
W1
D1
D
3
Page 4
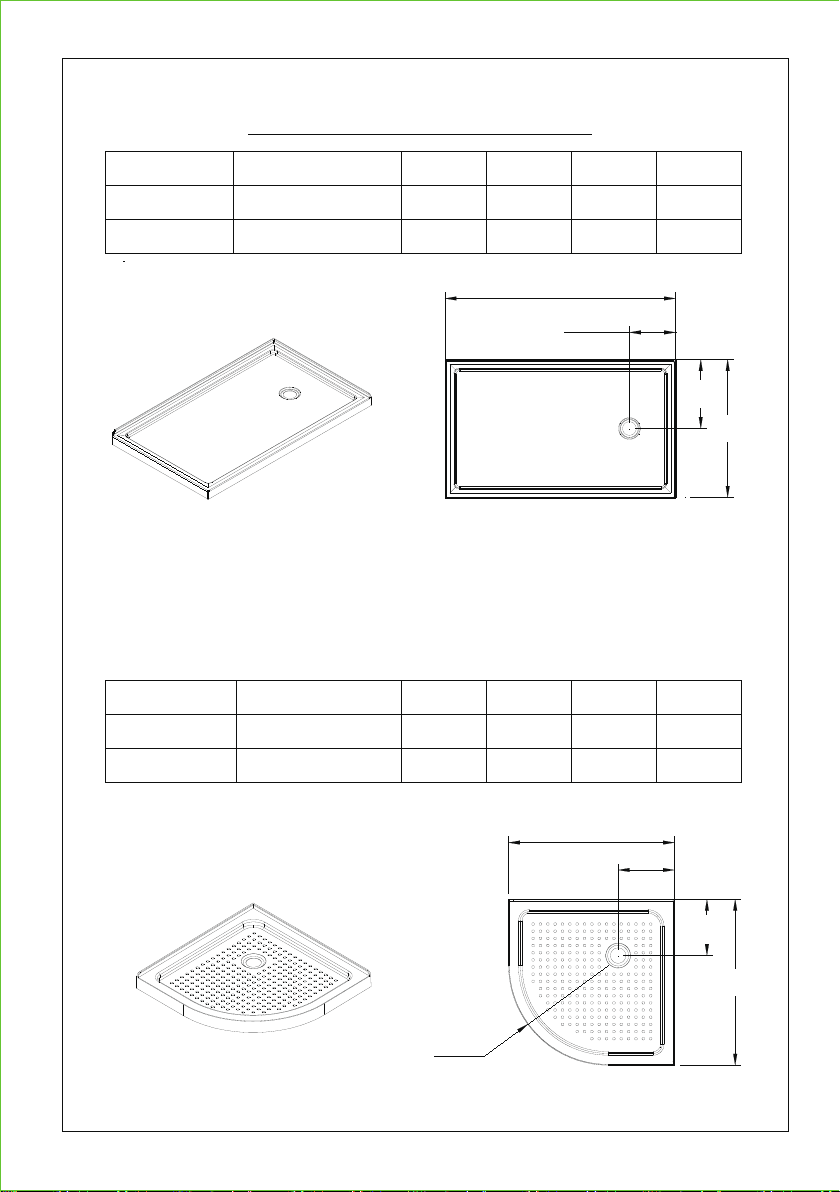
DOUBLE THRESHOLD SHOWER BASE
Left/Right-Hand Drain Configuration
MODEL
SB-AZ008WR
SB-AZ012WR
QUARTER ROUND SHOWER BASE
MODEL
SB-AZ005WN
SB-AZ006WN
SPECIFICATION
D(in) W(in) D1(in) W1(in)
60"X36" 36" 60" 18" 12"
60"X36" 36" 60" 18"
W
W1
SPECIFICATION
W(in) C(in) R(in)
36"X36" 36" 12" 22"
38"X38" 38" 12" 22"
4 4/5"
D1
D
W
C
C
W
R
4
Page 5
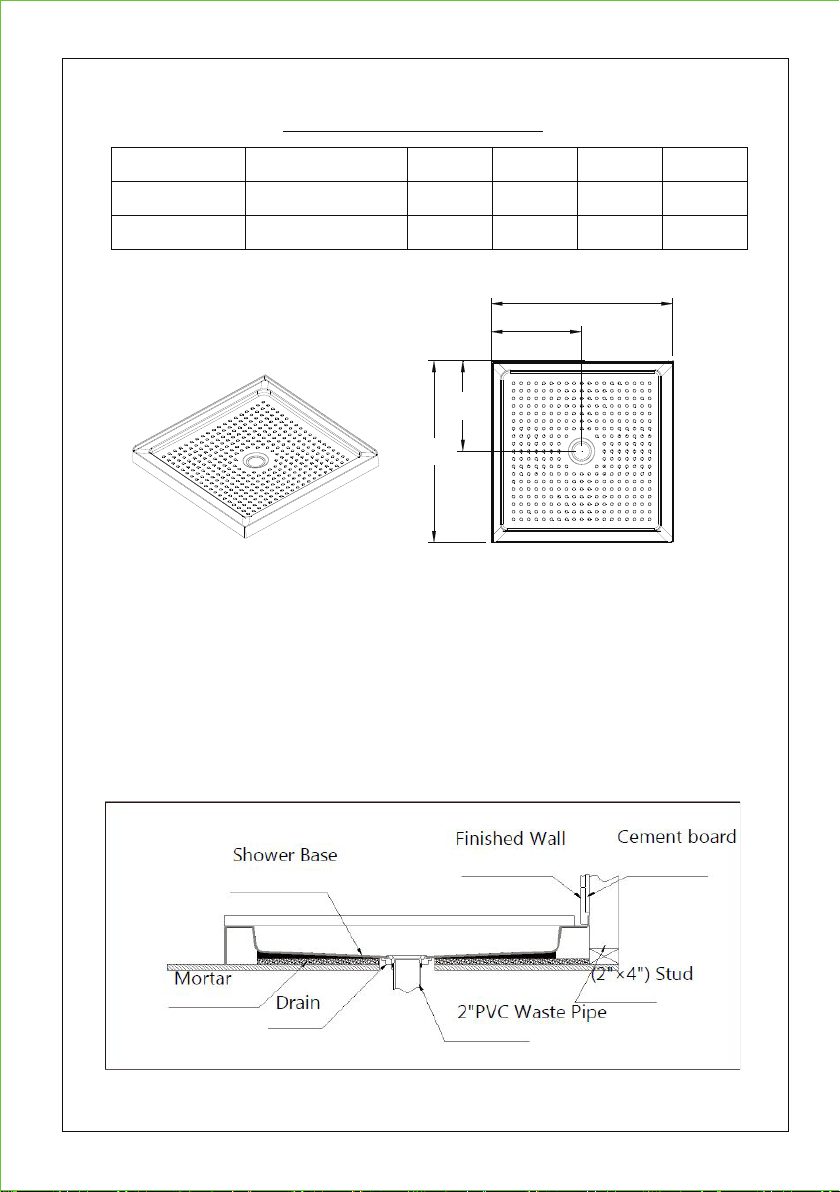
SQUARE SHOWER BASE
Center Drain Configuration
MODEL
SB-AZ009WC
SB-AZ010WC
Shower Base Cross Section Diagram
SPECIFICATION
W(in) C(in)
36"X36" 36" 18"
38"X38" 38" 19"
C
W
W
C
5
Page 6

Shower Base Installation-Preparation
1. Ensure that the floor and the studs are at right angles.
Provide a 5"×5" opening in the sub-floor for the drain.
The 2" PVC waste pipe should extend above the surface of the
sub-floor according to the drain installation instructions and the
height of the Shower base.
Refer to the product drawings and tables in these installation
instructions
See Fig. 1 and Fig. 2 for details.
for the drain location.
2"PVC Waste Pipe
(5"×5") Opening
(See Product Chart for Drain Location)
Fig. 1
2"PVC Waste Pipe
(5"×5") Opening
(See Product Chart for Drain Location)
Fig. 2
6
Page 7
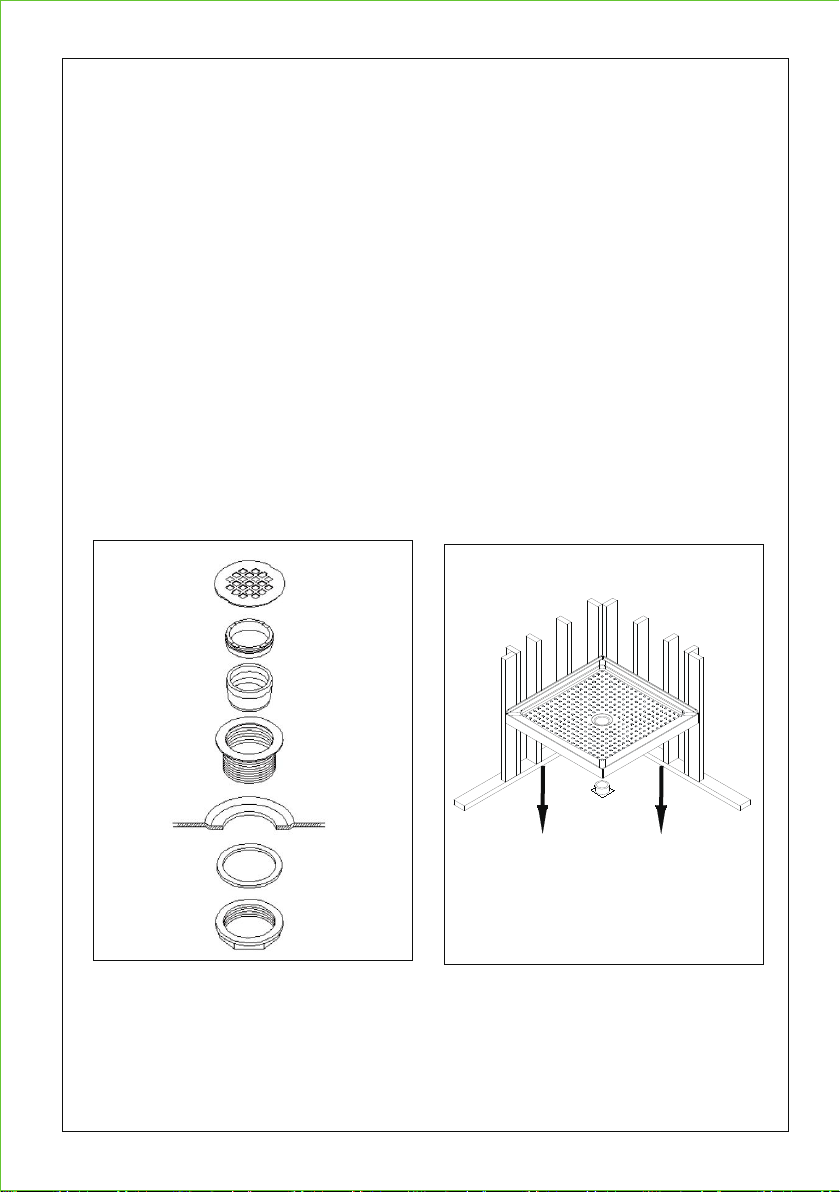
2. Install the shower drain (NOT INCLUDED)according to the drain
installation manual (supplied with the drain).
See Fig. 3 for example
3. Place the tray into the designated position so that the Drain
Body drops around the Drain Pipe and butt the Shower Base up
against the studs.
See Fig. 4 for details.
Fig. 3
Lower the base over the drain pipe
and set it into placeagainst the studs.
Fig. 4
7
Page 8
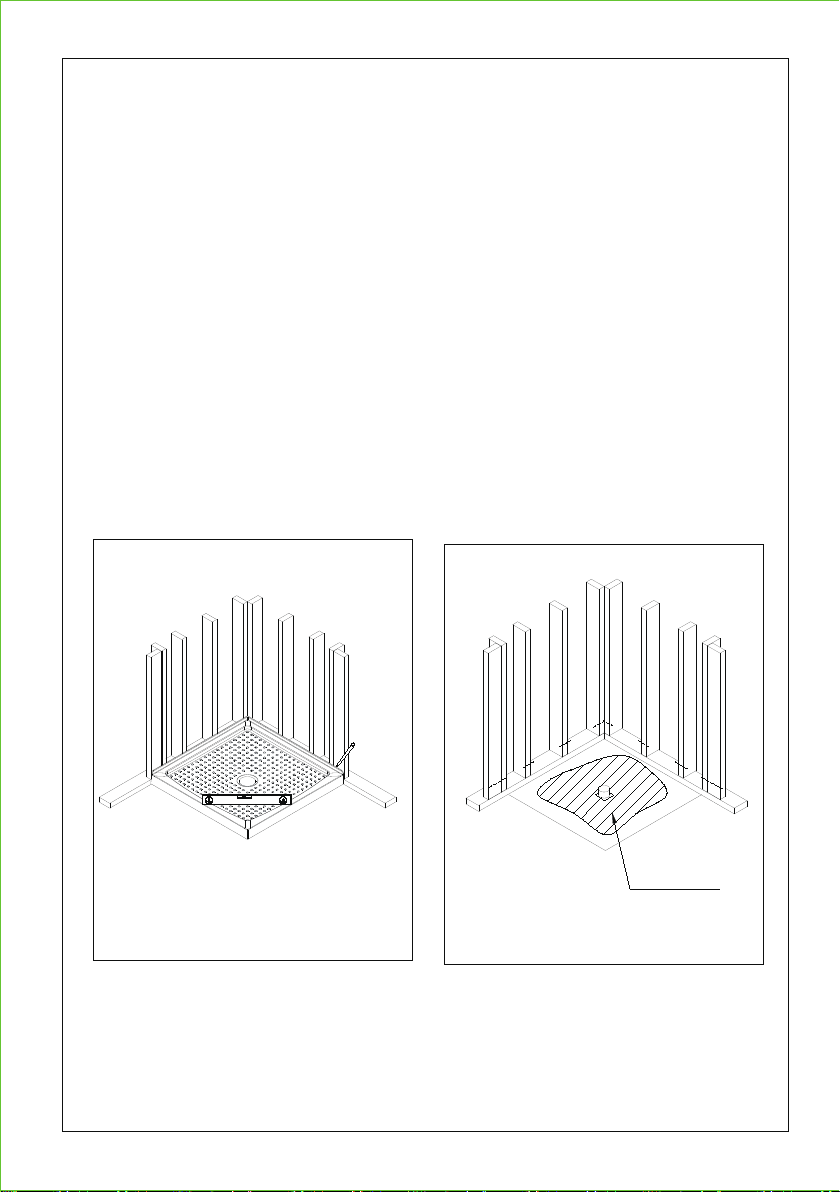
4. Level the tray and place marks on the studs above the upper
edge of the tile flange.
See Fig. 5 for details.
5. Mix the bedding material (Mortar, cement-sand mix,etc.)Concrete
or plaster is not recommended.
Apply enough bedding material to support the entire bottom of
the shower base.This will add additional stability and prevent the
base from shifting position.
See Fig. 6 f
Level base in two directions
or details.
Mortar
Fig. 5
Fig. 6
8
Page 9
4.
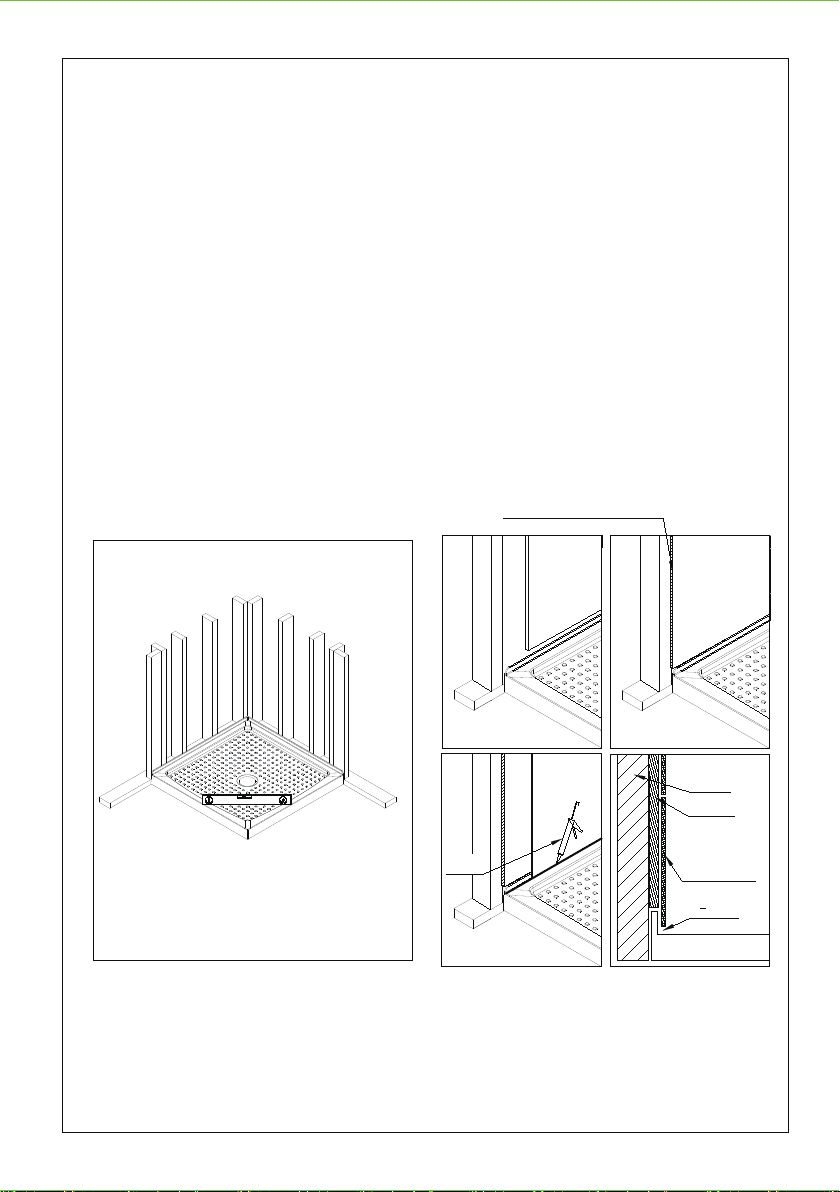
After the bedding material has been poured and beforeit sets, place the shower
base into the position with the drain assembly sliding over the PVC waste pipe. It
will be necessary to push the shower base until the top of the tile flange aligns with
the marks drawn on the studs and the front edge is contacting the rough floor
along the entire length of the shower base. Ensure tha
t the base is level in all
directions. You may need to use shims to hold the tray in the level until the bedding
settles and supports the tray. Remove all excessmortar.
See Fig. 7 for details.
5.
Allow the bedding material to completely harden before applying weight to the
bottom of the shower base.Install the cement board (or the wallboard) above the
tile flanges and secure it
to the studs.Put the tiles (or other finishing wall material)
over the cement board leaving 1/8" gap between the bottom of the tile and the
splash rim of the shower base.Use caulk to fill that gap.
See Fig. 8 and Fig. 9 for details.
Level base in two directions
Fig. 7
Caulk
Waterproof Drywall to
the top of the tile flange
8.1 8.2
8.3
Fig. 8
8.4
Stud
Drywall
Finished wall
overlaps the
dry wall adn
tile flange
1
"gap
8
Base
9
Page 10
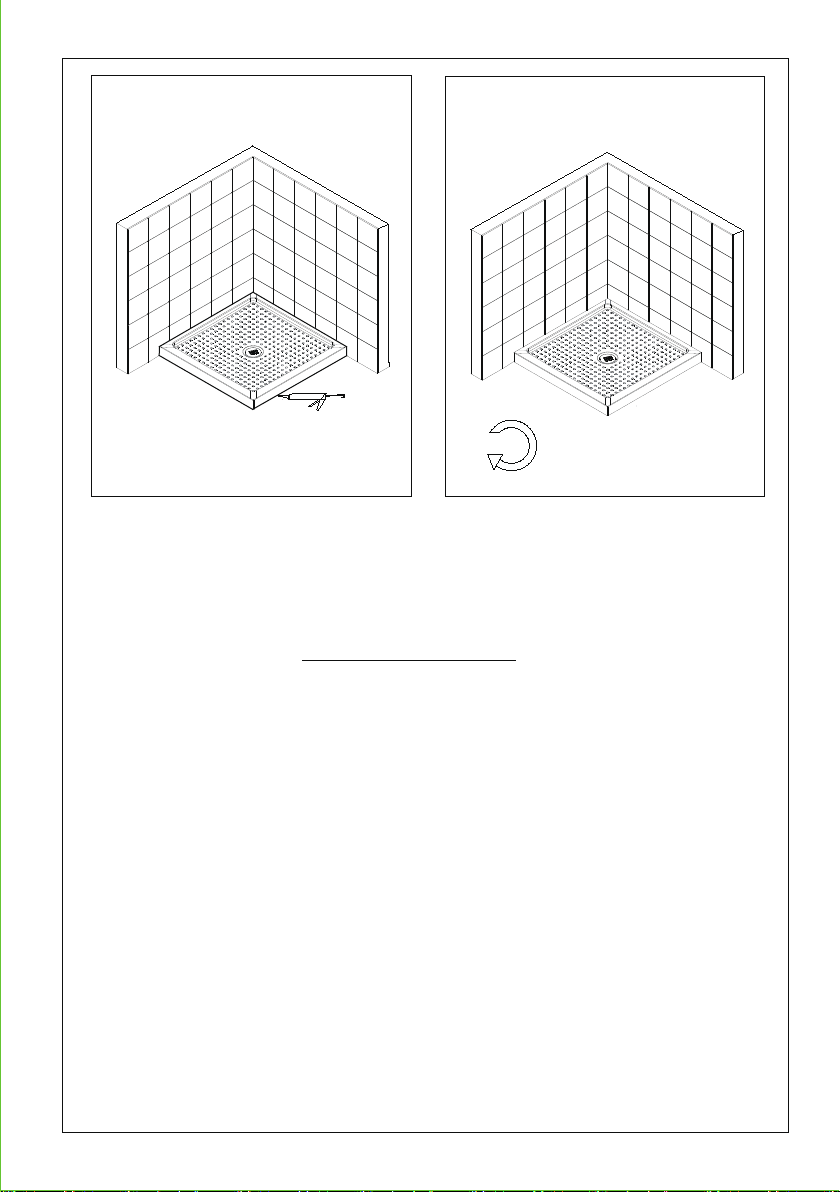
Fig. 9
24 Hours
Wait 24 hours before
using the shower
To ensure long lasting life for your acrylic back walls, wipe them off after each use
with a soft cloth. To clean the acrylic back walls use non-abrasive sprays or cream
based cleaners. Never use abrasive cleansers, metal brushes or scrapers that could
scratch ordull the surface.
To ensure long lasting life for your glass shower products, wipe them off after each use
with a soft clo
prevent soap buildup. Never use abrasive cleaners and cleaning products that
contain scoring agent because this may scratch the surface. Never use bristle brushes
or abrasive sponges.
To assure a long lasting finish wipe off the metal parts after each use with a soft cloth.
Do not use abrasive cleaners or cleaning products containin
acid. If accidentally used, rinse the surface as soon as possible to prevent finish
peeling or corrosion. After cleaning the shiny finishes, rinse thoroughly and wipe dry
with soft cloth. Clean stainless steel surfaces at least once a week. When applying
stainless steel cleaner or polish, work with (not across) the grain. Never use abrasive
sponge or cloth, steel wool or wired brus
th. Rinse and wipe of the glass using either soft cloth or squeegee to
Product maintenance
g ammonia, bleach or
hes.
10
 Loading...