

Page 1
MODEL
T1-AZ065
INSTALL GUIDE
‘’Complies with ASME
A112.19.2-2013
‘’Conforme à ASME
A112.19.2-2013’’
Certied by
IAPMO R&T
For more information visit us at www.ANZZI.com or call us at 1-844-44-ANZZI
Page 2

Please leave these instructions with the end user.
installation.
invalidate the guarantee.
- We strongly recommend the use of a qualified and registered plumber.
iub wen nI -
surface of the taps and toilet seats. It is recommended that the room is well ventilated.
heads, taps, inlet valves etc.
tightness, they may have loosened in transit. Check the operation of the valves.
deposits.
taB -
plastic or chrome components.
- Lire attentivement cette notice avant de commencer l’installation
- Vérifier si certaines pièces sont manquantes o abîmées.
- Toute altération qui sera effectuée à la sanitaire rendra invalide la garantie.
- Nous recommandons fortement l’installation du produit par du personnel qualifié.
que la robinetterie et les abattants ne s’oxydent ou ne jaunissent à cause de gaz corrosif. Nous
recommandons de laisser un espace très aéré.
- Purger les tuyauteries avant l’installation.
- Vérifier le fonctionnement du mécanisme du réservoir du WC.
- Grâce à un entretien régulier, on peut éviter la formation de calcaire.
comme les charnières et enjoliveurs.
.ecnerefer erutuf rof niater dna noitallatsni gnitrats erofeb ylluferac snoitcurtsni eseht daer esaelP -
eht gnitrats erofeb segamad dna strap gnissim rof tcudorp eht kcehc dna gnigakcap lla evomeR -
lliw dna snoitaluger retaw eht egnirfni yam sgnittfi sti dna tcudorp siht ot edam snoitaretla ynA -
eht edorroc ton od sesag cixot erusne ot spart eht llfi retaw ot dednemmocer si ti sgnidl
rewohS .g.e ,secnailppa lanimret fo noitallatsni eht ot roirp krow epip lla hguorht hsufl ylhguorohT -
dna noitisop rof dekcehc eb dluohs sevlav teltuo dna telni sa hcus stnenopmoc dettfi yrotcaF -
elacs emil gnigamad fo pu dliub eht diova ot desu eb dluohs ecnanetniam dna gninaelc cidoireP -
dna segnih taes sa hcus ,slairetam emos egamad yam slaudiser tnega gninaelc hsrah moorh
retivé ruop stedib te sobaval ,CW sel uae ne erttem tuaf li ,sevuen snoitcurtsnoc ed sac el snaD -
,seriatinas sed seuqillatém secèip sel remiba tnevuep egayotten te setteliot sed sleudisér stiudorP -
- Lea atentamente estas instrucciones antes de comenzar la instalación.
- Compruebe el producto por si faltasen piezas o estuviesen dañadas.
- Cualquier alteración que se realice al sanitario invalidaría la garantía.
- Le recomendamos la instalación por parte de personal cualificado.
evitar que la grifería y los asientos se oxiden o amarilleen por el efecto de la subida de gases
corrosivos. Se recomienda que el espacio esté muy aireado.
- Purgar las tuberías antes de la instalación.
- Compruebe el funcionamiento del mecanismo de la cisterna del inodoro.
- Gracias a un cuidado periódico se puede evitar la formación de restos calcáreos.
como bisagras y embellecedores.
2
arap auga ed stedib y sobaval ,sorodoni ed senofis sol ranell nebed es senoiccurtsnoc saveun nE -
,soiratinas sol ed sacilátem sazeip sal rañad nedeup azeipmil y oesa ed sotcudorp ed soudiseR -
Page 3
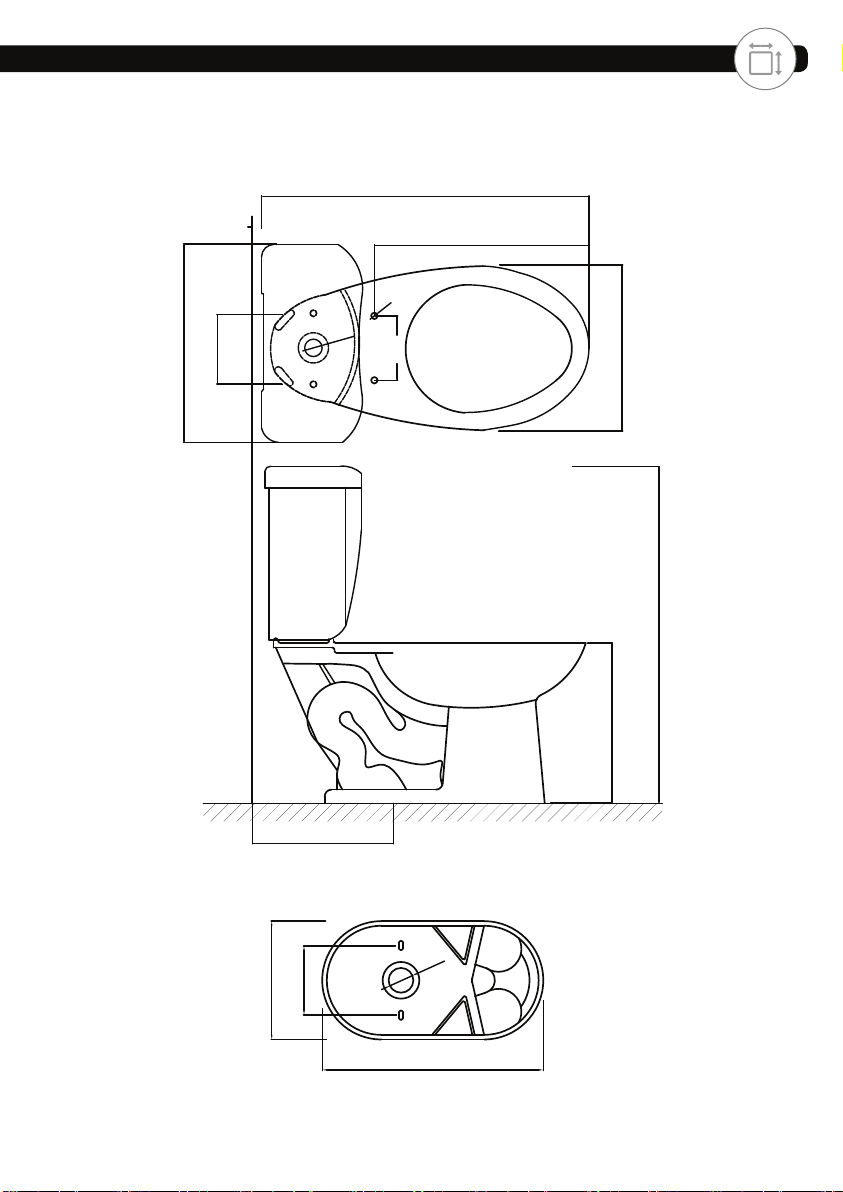
6.1in.(155mm)
16.4in.(417mm)
28.5in.(724mm)
18.5in.(470mm)
.5in.
Ø1.5in.
5.5in.
14.17in.(360mm)
29in.(738mm)
<12in.(305mm)
6in.(152mm)
10.25in.(260mm)
15in.(379mm)
Ø2.1in.
20in.(517mm)
3
Page 4
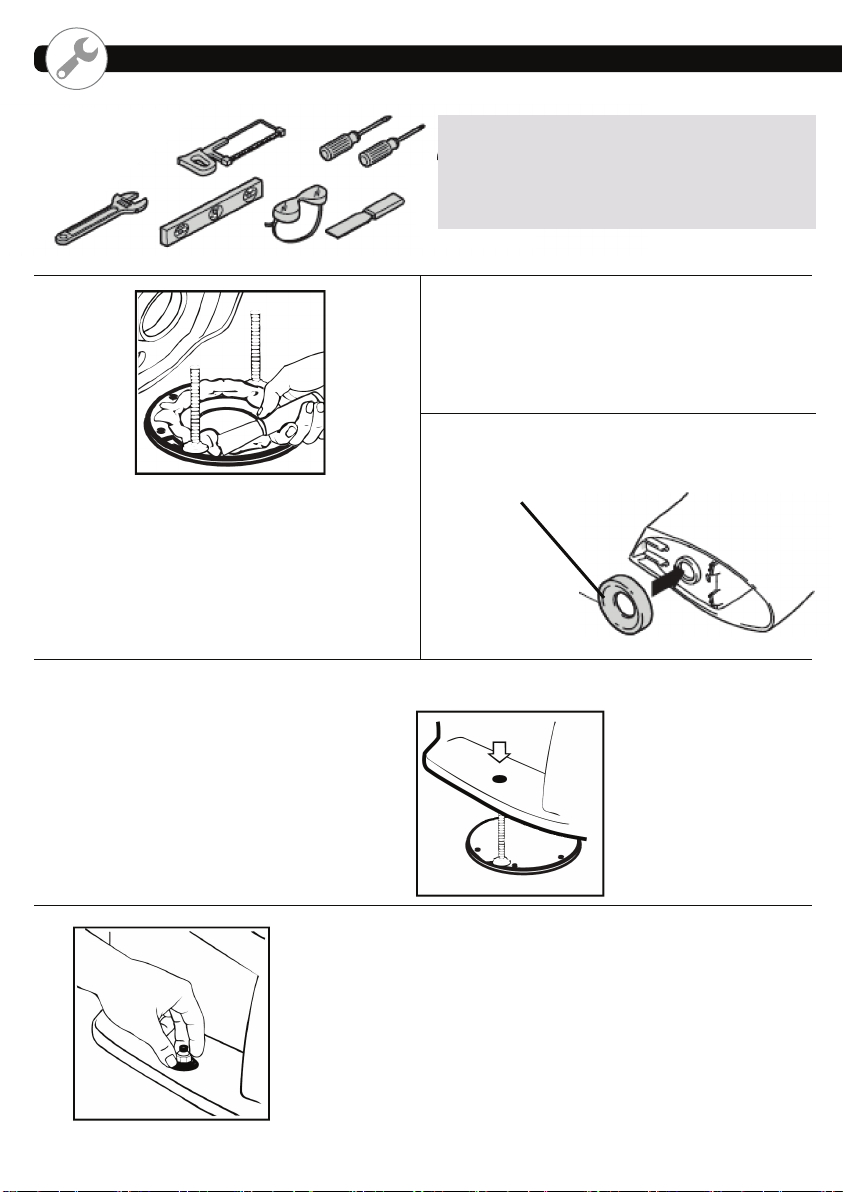
ATTENTION: INSTALLATION FITTINGS NOT INCLUDED.
ATENCION: MATERIAL NECESARIO PARA LA INSTALACION NO INCLUIDO.
ATTENTION: MATERIEL NECESSAIRE A L’INSTALLATION
NON INCLUS.
1 2
-If replacing a toilet, remove the old wax.
-Si va a reemplazar el inodoro, quite la cera
vieja.
-En cas de remplacement du W.C., retier
l’ancienne cire
.
4
-Do not move after placement! Watertight seal
may be broken!
-¡No mueva despues de colocar! ¡Se puede
romper el sello hermético!
-Ne pas bouger après avoir placé! Le joint
d’étanchéité pourrait être casse !
-Install the fl oor screws.
-Instale los tornillos de fi jacion a suelo.
-Installez les vis au sol.
Wax seal
3
Sello de cera
Joint en cire
-Apply weight evenly.
-Aplique peso uniformemente.
-Appliquer du poids également.
5
4
-Block the WC. Do not overtighten.
-Fijar el inodoro. No apriete demasiado.
-Fixer le WC. Ne pas trop serrer
Page 5
6
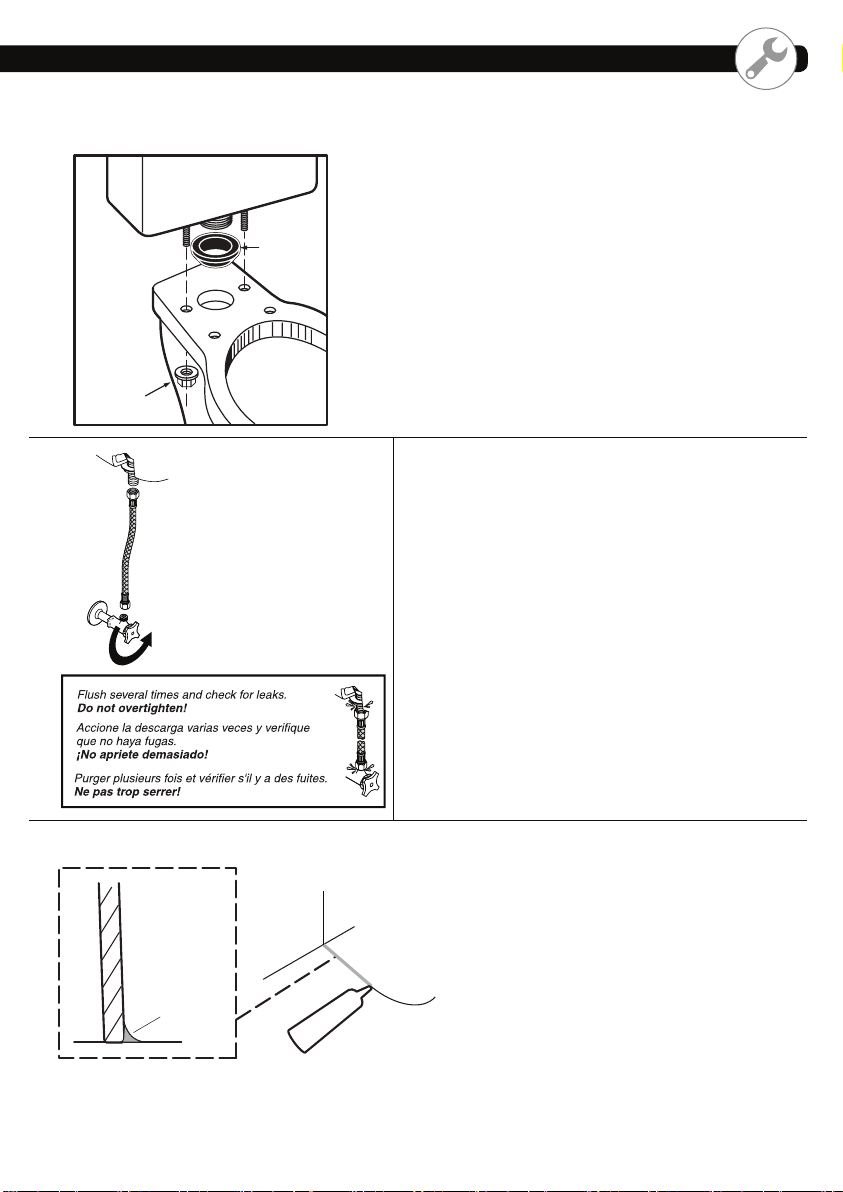
-Instale la junta cónica y el kit fi jación cisterna como mos-
trado en la fi gura.
7
WASHER/
NUT
COMBO
RUBBER
GASKET
- Connect supply.
- Conecte el suministro.
-Connecter l’alimentation.
-Install the rubber gasket and fi xing tank kit as show in
the picture.
-Installez le joint en caoutchouc cône et le kit de fi xation
du réservoir comme montré dans l’image.
8
- Install the seat & cover
- Instalar el asiento
- Installez l’abattant
9
-Caulk around base (neutral anti-moisture silicone must be used)
-Appliquer du mastic autour de la base. (avec silicone neutre)
-Aplique sellador en la base del inodoro (usar silicona neutra antihumedad)
Mastic
Sellador
Caulk
5
 Loading...