

Page 1
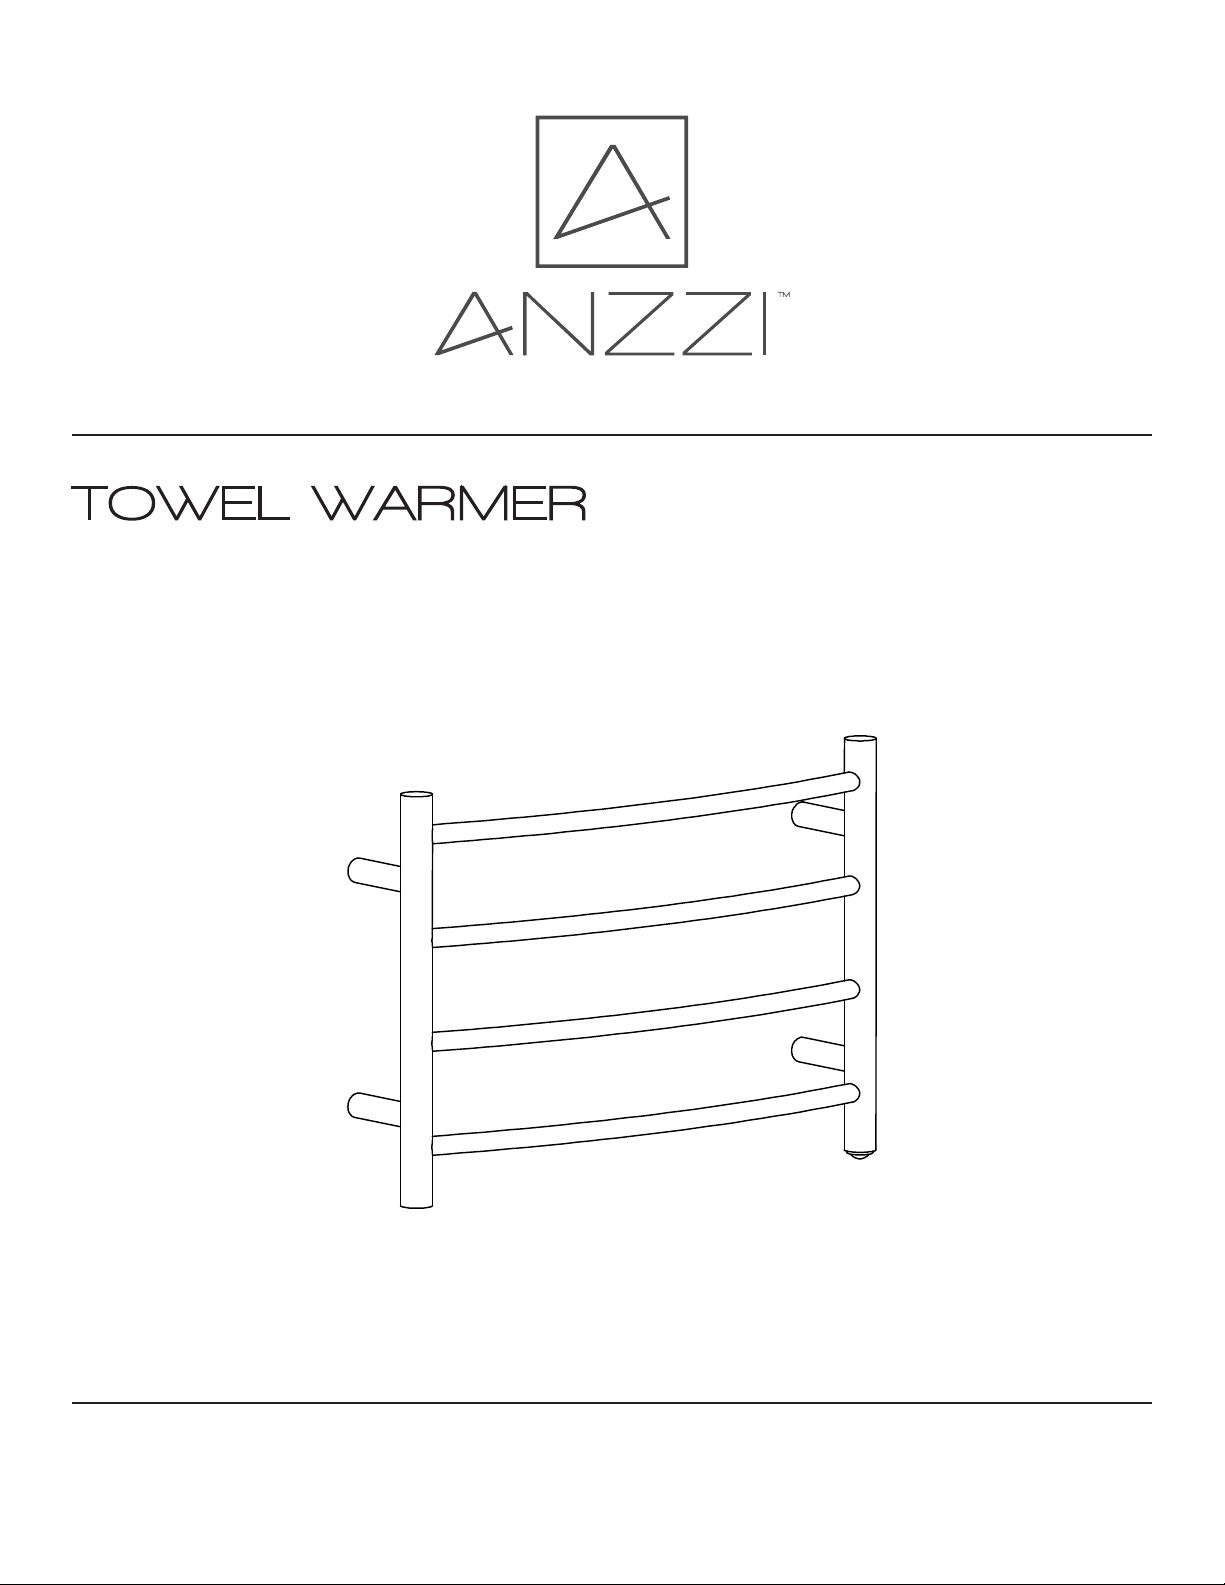
TOWEL WARMER
INSTALL GUIDE
PERFECTION IS OUR TRADITION™
v2.0516
Page 2

TABLE OF CONTENTS
Before You Start Pg. 1
Parts List Pg. 2
Installation Pg. 3
Care & Maintenance Pg. 9
Warranty Pg. 10
Registration Final Page
YOUR REVIEWS MATTER!
The ANZZI™ Family thanks you for your purchase and hopes you enjoy your very own ANZZI
product for years to come! In the meantime let us know about your experience? We would love
to hear your thoughts from the packaging to the quality and function of the product.
Leave a review on www.ANZZI.com/reviews and let everyone know how satisfied you are with
ANZZI!
Also, we humbly request submitting as many pictures as possible along with your review.
Millions of shoppers will want to know about your experience with our products. Don’t just tell
but show, too!
For more information please call 1-844-44-ANZZI
or email us at [email protected]
Page 3

BEFORE YOU START
Before you begin, read the installation instructions below. Observe all local building and safety
codes.
Unpack and inspect the product for any shipping damages and ensure that none of the
required pieces are missing. If you find damages, DO NOT INSTALL. Contact Customer Service
at 1-866-44-ANZZI, if you need assistance or have questions while installing your towel
warmer. ANZZI™ accepts no liability for any damage to the towel warmer, wall, or personal
injury during installation.
TOOLS AND MATERIALS
Safety glasses • Tape Measure • Level • Drill • Screwdriver • Pencil
WALL MOUNT INSTALLATION
1. Attach the wall supports to the towel warmer.
2. Using a level and tape measure, determine and mark the installation location of the wall
supports. Drill mounting holes and install wall anchors in these locations.
3. Secure the mounting brackets onto the wall using the provided mounting screws.
4. Hang and adjust the towel warmer onto the mounting brackets. Ensure the towel warmer is
firmly and safely fixed.
5. Plug the towel warmer into the wall socket.
OPERATION AND MAINTENANCE
The red light indicates the towel warmer is in the on position. Always turn the power off when
the towel warmer is not in use.
Note: Fabrics that contain soap or detergent residue may show what appears to be scorch
marks. These marks are simply the discoloration of the residue.
PERFECTION IS OUR TRADITION™
pg. 1
Page 4
PARTS LIST
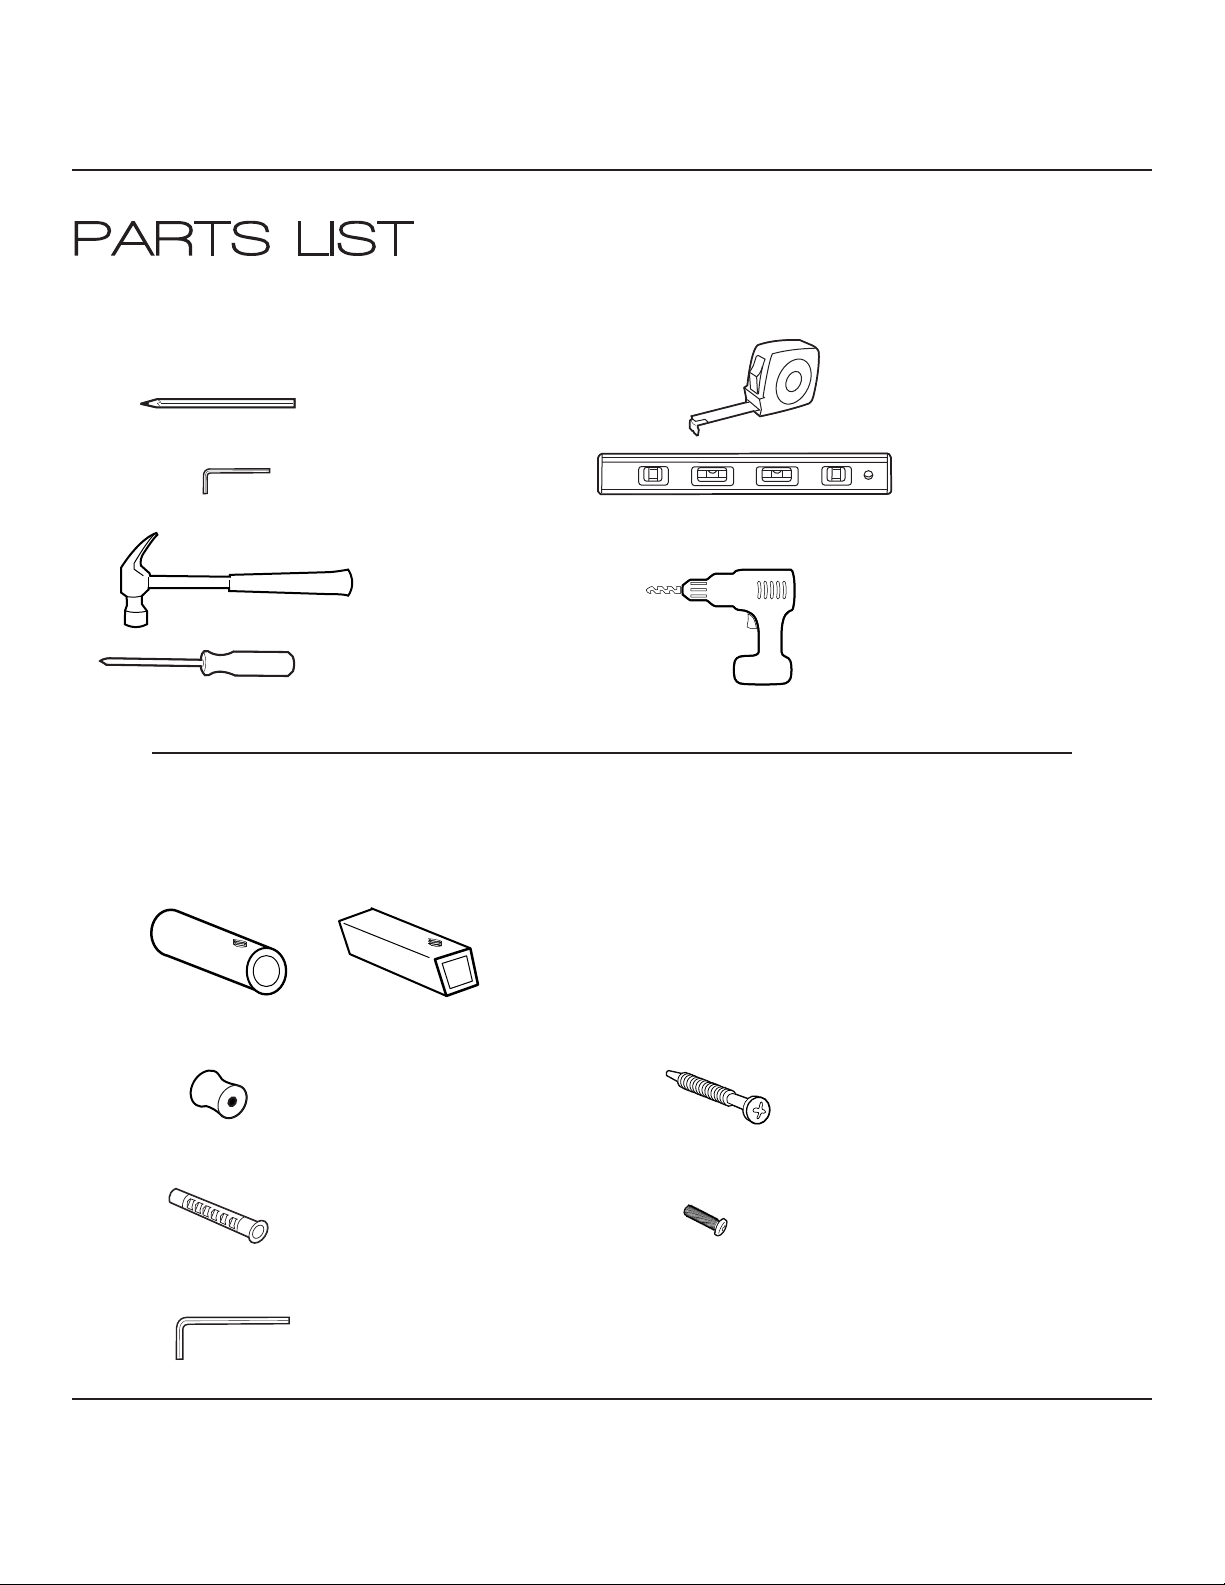
Required Items
Pencil
Allen Tool
Hammer
Philips ScrewDriver
Included Hardware
1. & 2.
or
Measuring Tape
Leveler
Power Drill
4x Wall Mounting Brackets w/ Screw Set
(Rounded or Squared depending on model)
3. 4.
4x Bracket Tub
5. 6.
4x Wall Anchor
7.
1x Allen Tool
PERFECTION IS OUR TRADITION™
4x Long Screws
4x Short Screws
pg. 2
Page 5
INSTALLATION
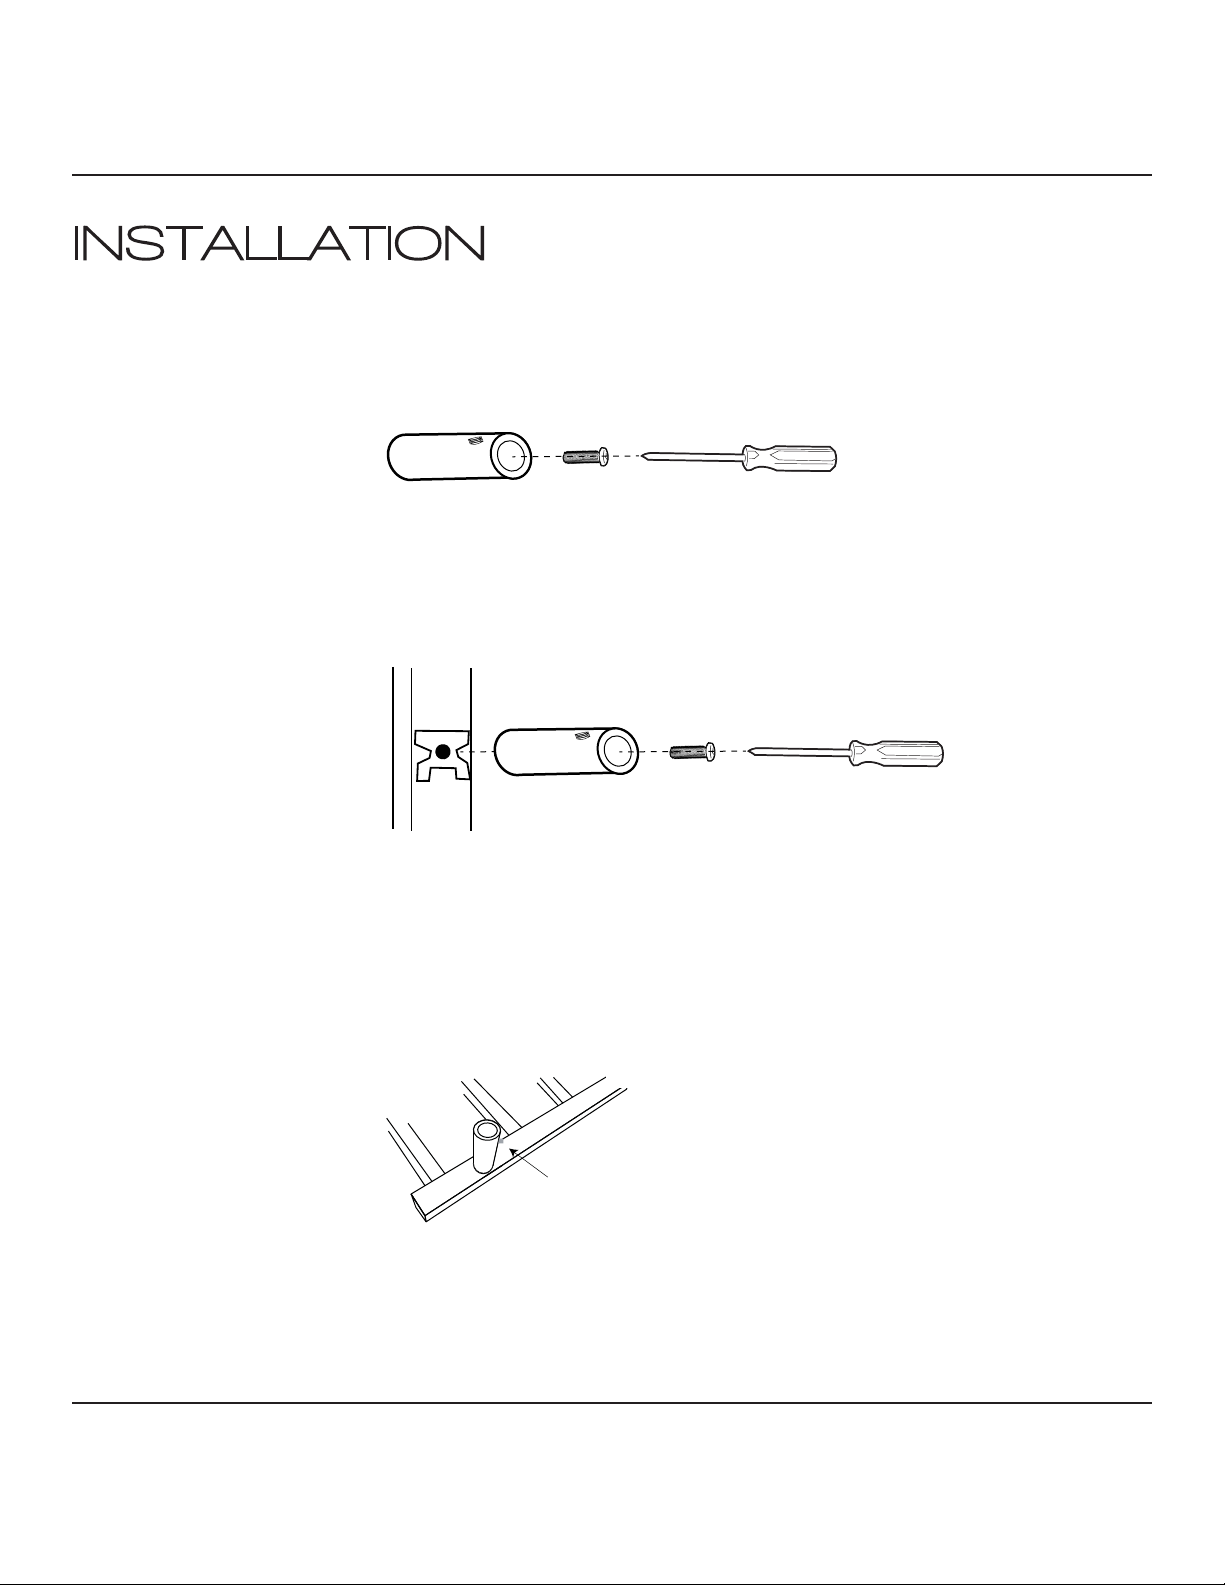
Fasten wall bracket to towel warmer body.
Step 1
As shown in the picture, drill the short screw (6) through the hole in the metal bracket (1).
Step 2
Use the short screw (6) to secure the bracket onto the metal pad on the vertical bar of the
towel warmer.
Make sure hole Allen Screw
is facing toward floor.
Step 3
Fasten the short screw (6) using a screwdriver. Make sure the hole of the bracket (1) faces
towards the floor when the towel warmer is mounted.
PERFECTION IS OUR TRADITION™
pg. 3
Page 6
INSTALLATION
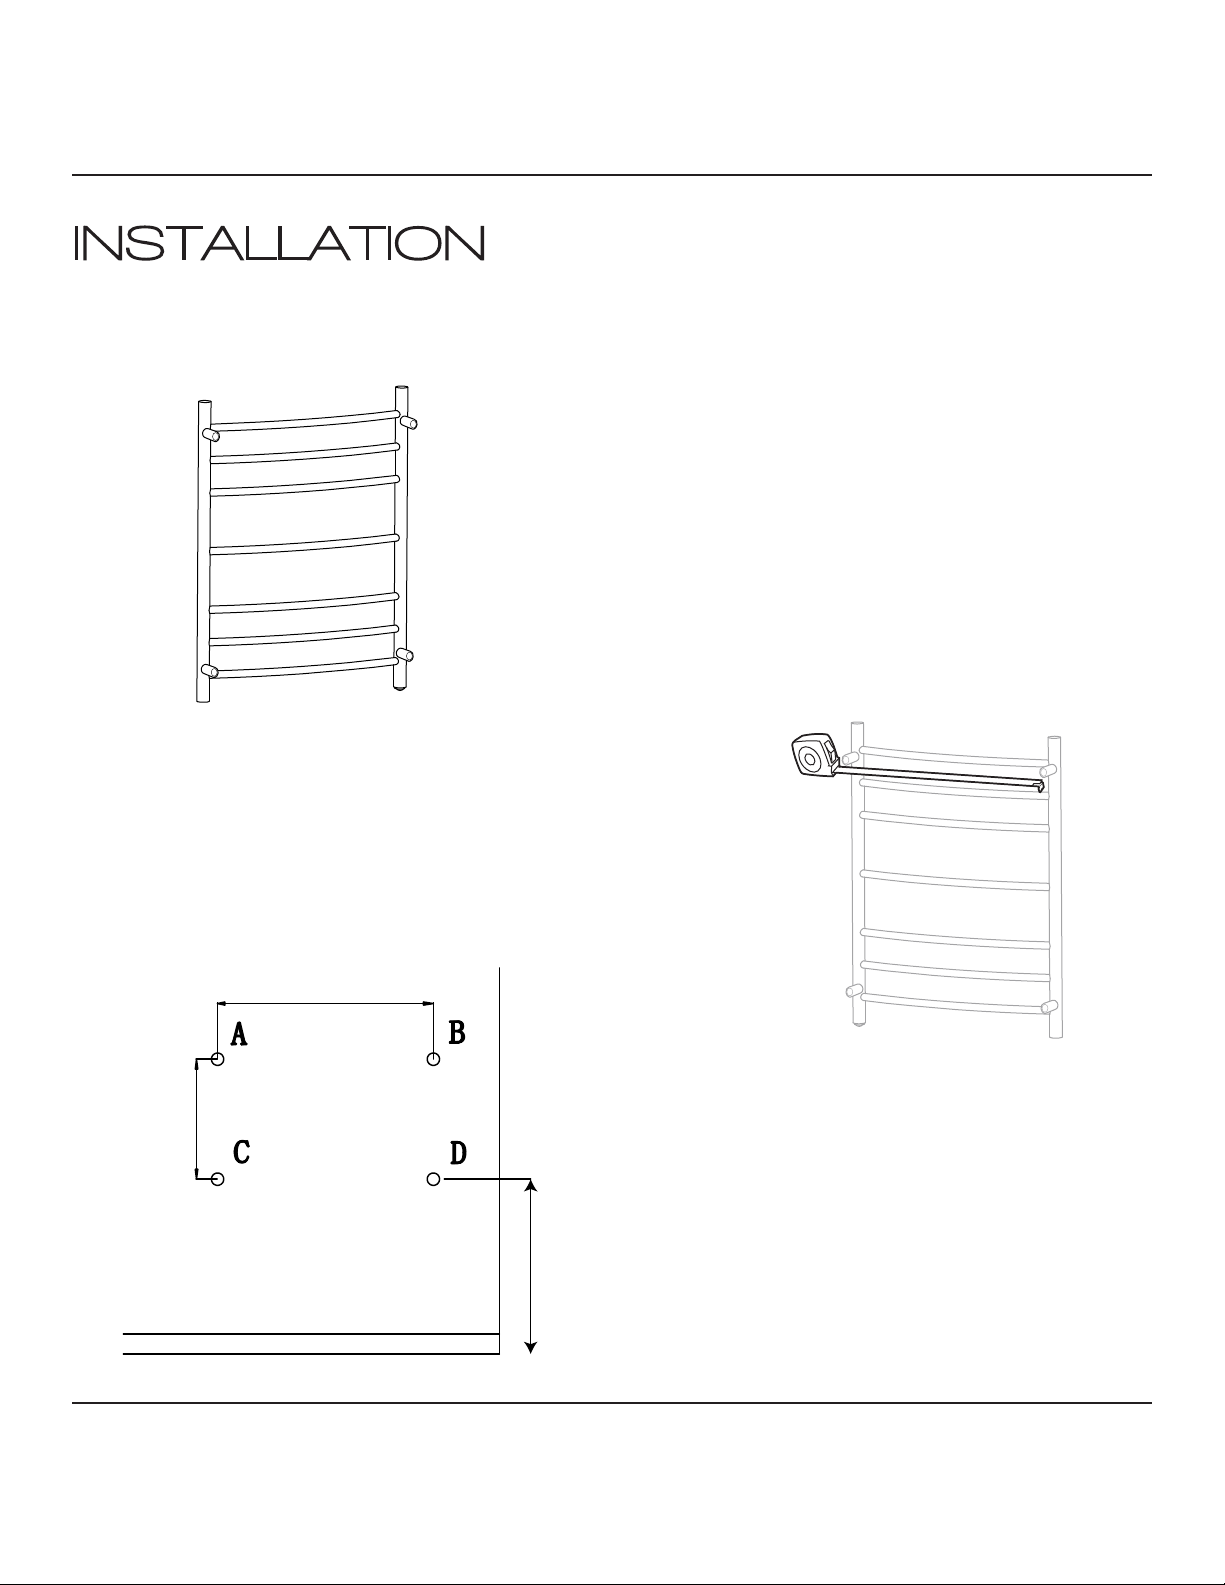
Prepare for wall mounting.
Step 4
Attach the remaining three brackets (1) to the vertical bars
by repeating steps 1, 2, and 3..
Step 5
B
Using the measuring tape & level, measure and mark the four anchor
locations. You will need to measure from A to B, A to C, D to D, and
finally B to D. It’s recommended to install the towel warmer a minimum
of 24” (2’) from the floor.
Step 6
Once all the anchor points are marked on
the wall (A, B, C, & D). Confirm the towel
24”
warmer brackets will align correctly with
the markings.
D
C
PERFECTION IS OUR TRADITION™
pg. 4
Page 7
INSTALLATION
Figure 3
Step 7
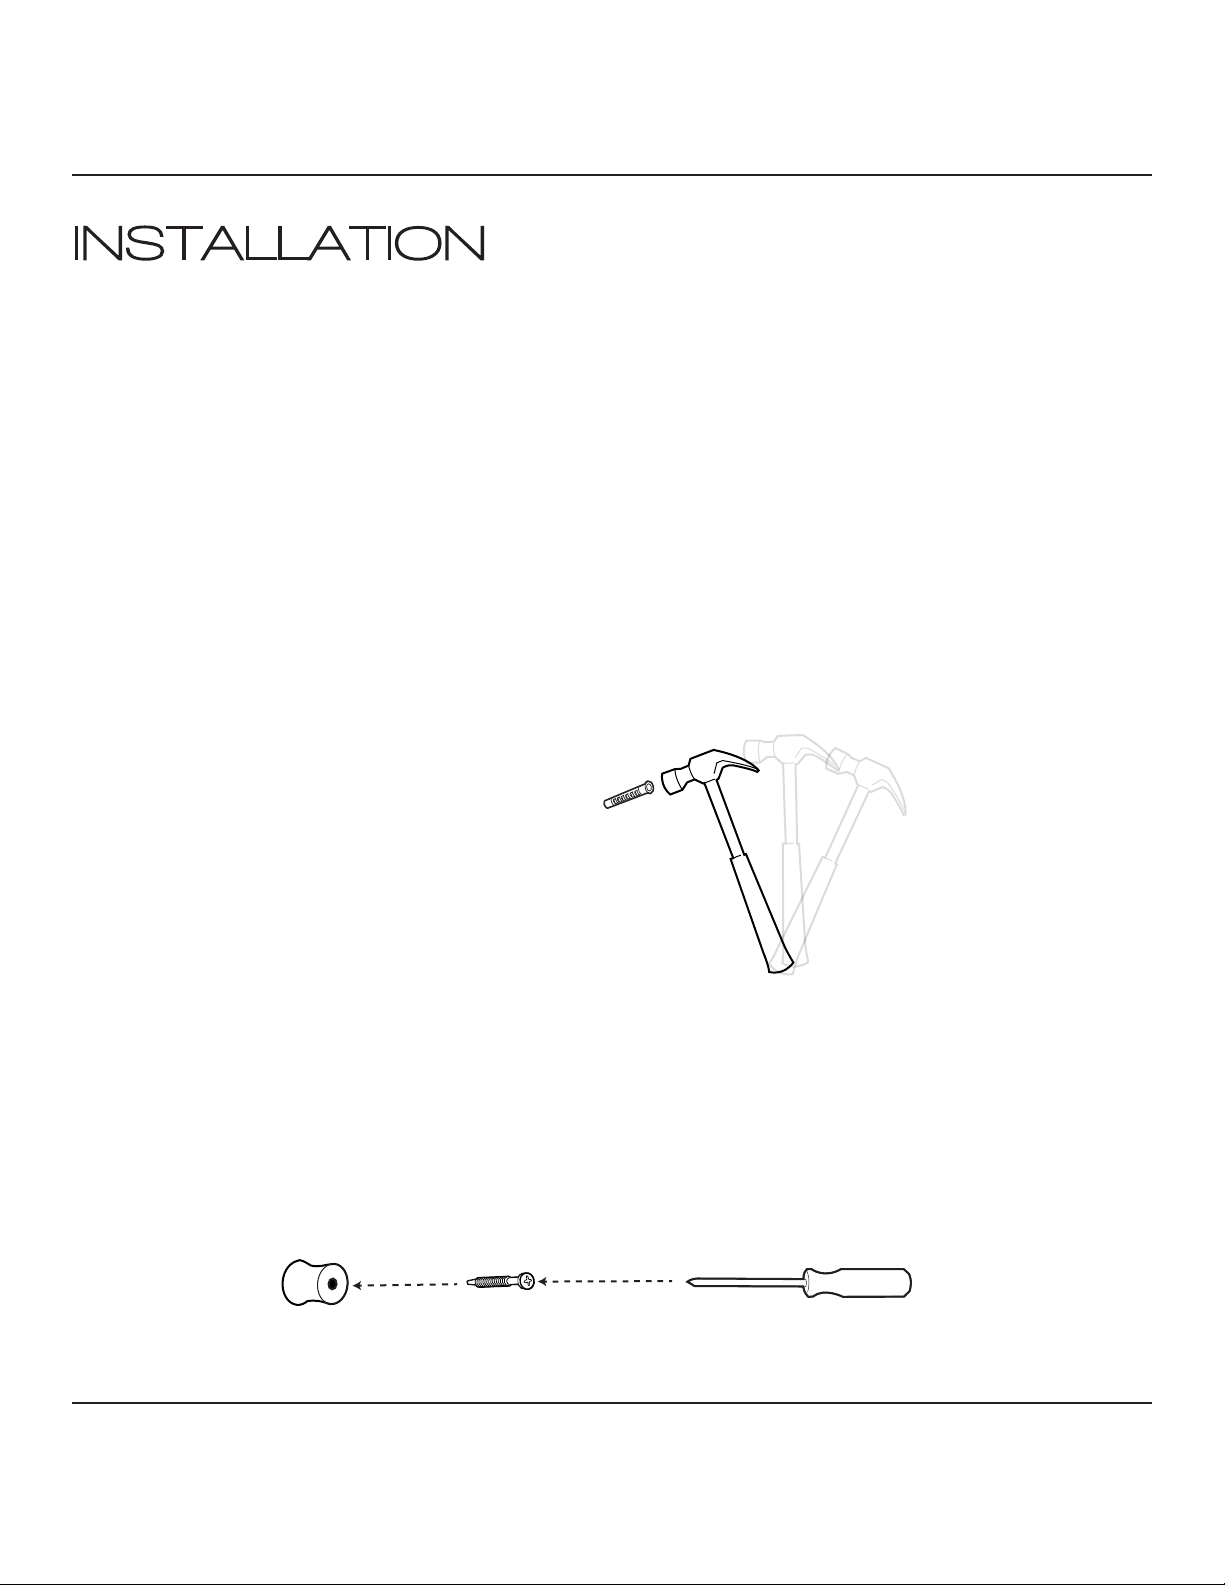
Using a drill, make a pilot hole into each marked point. Use a 5/16th drill bit.
Step 8
Using the wall anchors supplied (5),
hammer each one into the pilot holes.
Step 9
Insert the long screw (4) through the short bushing (3) provided. Then using the screwdriver
secure it to the wall anchors (5).
PERFECTION IS OUR TRADITION™
pg. 5
Page 8
INSTALLATION
Figure 4
Step 10
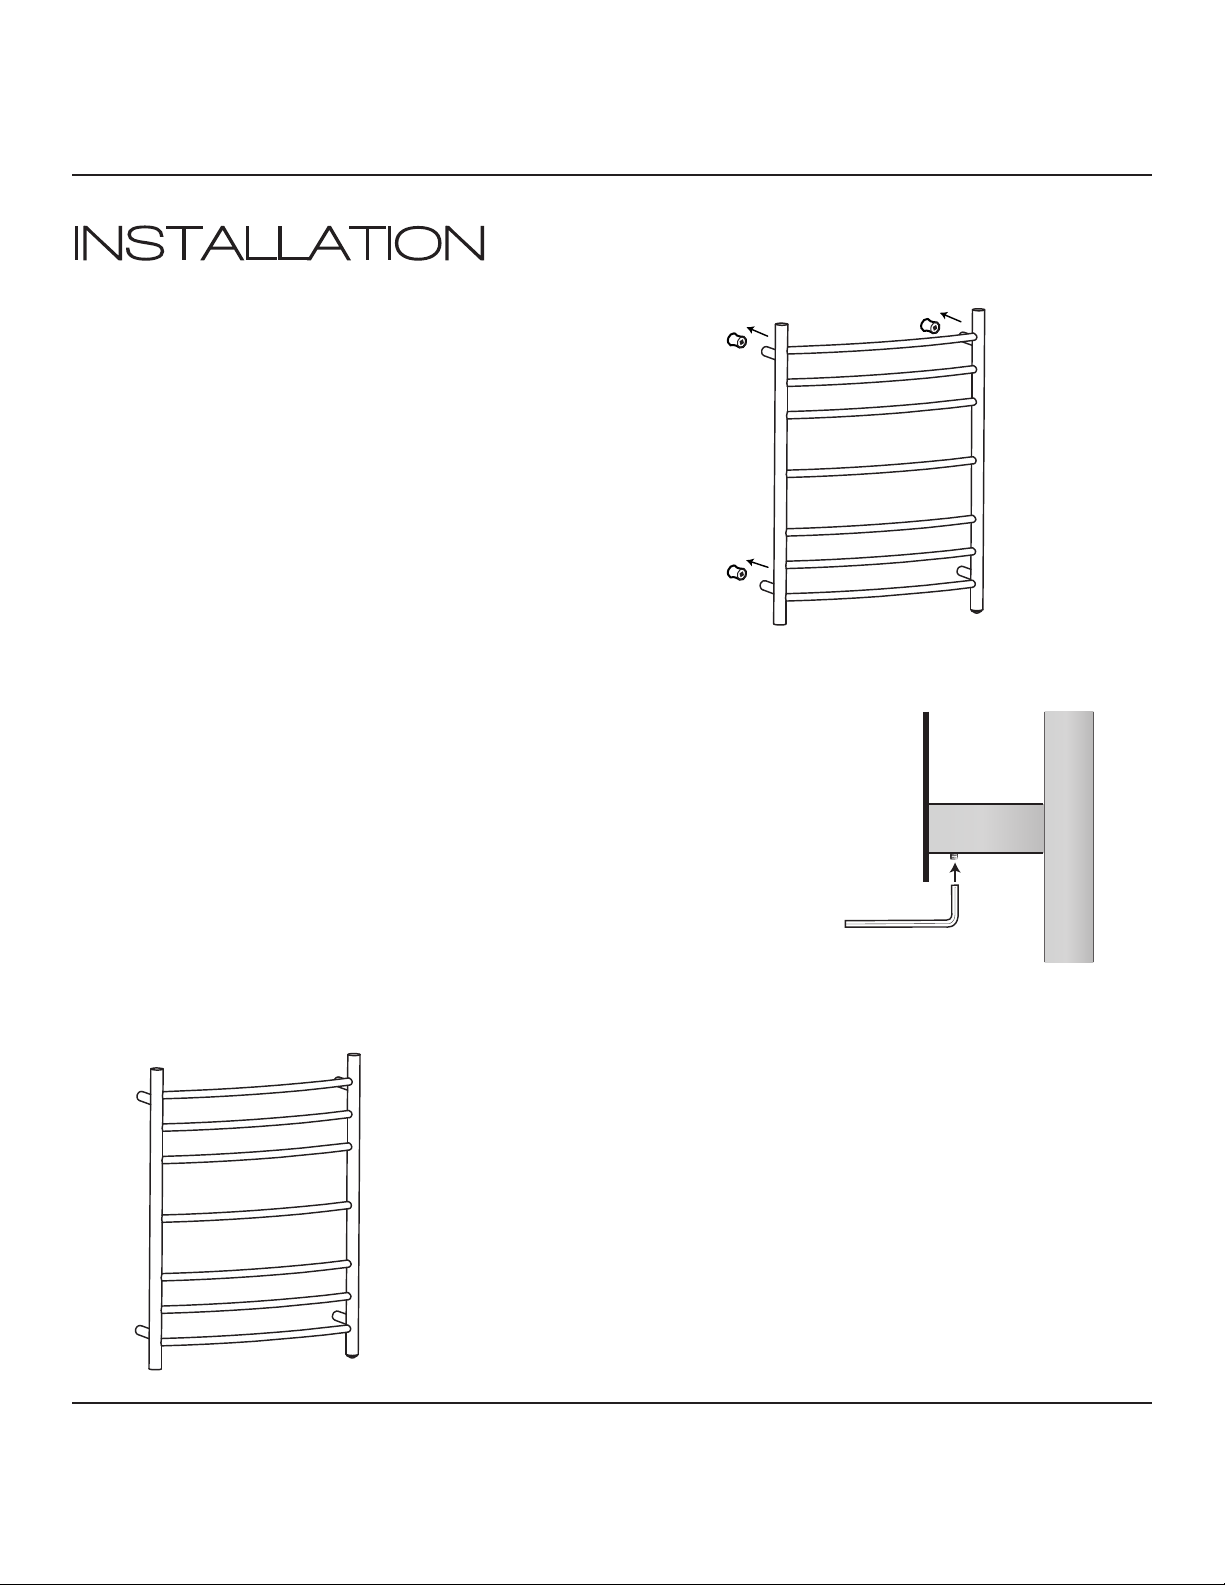
Install the bracket onto the bushing on the wall.
Step 8
As shown in the pricture, fasten the set screw (2) into the bracket hole (1) using the allen tool provided. Brefore fully tightening
the set screws, make sure all brackets are set properly onto the
short bushings (3).
Step 9
Double check all forn connections and using the level confirm the
towel warmer is secured and aligned correctly.
And you’re done!
PERFECTION IS OUR TRADITION™
pg. 6
Page 9
INSTALLATION
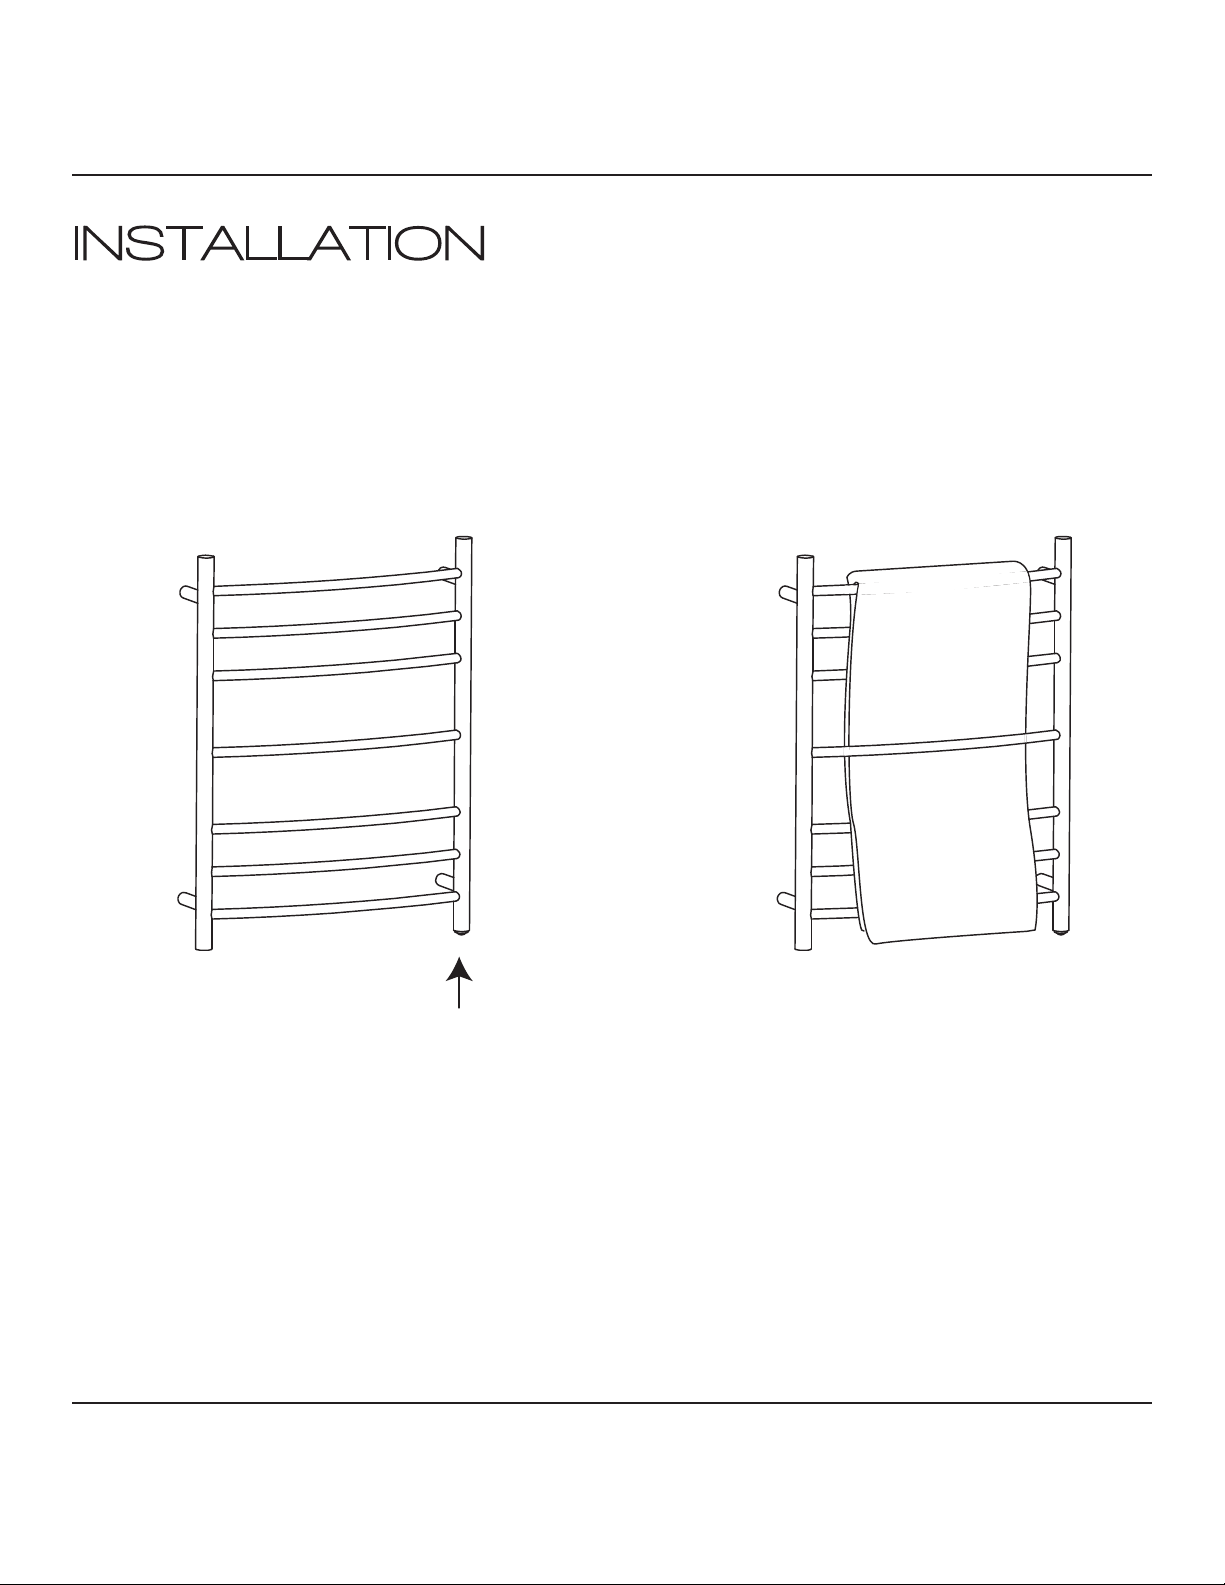
On/Off Switch Located Below
PERFECTION IS OUR TRADITION™
Maximum Warmth
For best results maximize the areas of
contact between your towel and newly
insatlled towel warmer by weaving the
towel through the bars.
pg. 7
Page 10

INSTALLATION
Blank Page
PERFECTION IS OUR TRADITION™
pg. 8
Page 11

CARE AND MAINTENANCE
ANZZI™ products are crafted with superior quality standards and workmanship and are engineered to
stand the test of time. However, that does not mean the product can be neglected and will need some
care and cleaning.
It is recommended to use regular soap and hot water along with a non-abrasive cloth or sponge to
regularly clean the product. This avoids any nasty build up or deposits which would be tougher to
remove.
If you feel the use of stronger cleaning solutions or chemicals is necessary always test the cleaning
solution or chemical on an inconspicuous area before applying to the entire surface.
Wipe all surfaces clean and rinse completely with water immediately after applying cleaner. Rinse and
dry any overspray that lands on nearby surfaces.
DO NOT ALLOW THE CLEANER TO SOAK.
Following these simple principles will ensure you ANZZI™ product will remain as lustrous and stunning as the day it was first received. ENJOY!
Sincerely,
La Familia ANZZI™
Perfection is our Tradition™
Perfection is our Tradition™
For more information visit us at www.ANZZI.com
For more information visit us at www.ANZZI.com
pg. 9
Page 12

LIMITED LIFETIME WARRANTY
ANZZI™ products are manufactured with superior quality standards and workmanship and are
backed by our limited lifetime warranty. ANZZI™ products are warranted to the original consumer
purchaser to be free of defects in materials or workmanship. We will replace FREE OF CHARGE* any
product or parts that proves defective. Simply call 1-844-44-ANZZI (1-844-442-6994) to submit a
warranty claim and request an RMA. Proof of purchase (original sales receipt) from the original consumer purchaser must be made available for all ANZZI™ warranty claims.
This warranty excludes incidental/inconsequential damages and failures due to misuse, abuse or
normal wear and tear. This warranty excludes all industrial, commercial & business usage, whose
purchasers are hereby, extended a five year limited warranty from the date of purchase, with all other
terms of this warranty applying except the duration of warranty.
Some states and provinces do not allow the exclusion or limitation of incidental or consequential
damages, so the above limitations may not apply to you. This warranty gives you specific legal rights
and you may also have other rights that vary from state to state and province to province. Please contact 1-844-44-ANZZI (1-844-442-6994) or visit www.ANZZI.com/Warranty for more details.
Sincerely,
La Familia ANZZI™
Perfection is our Tradition™
*Shipping and handling fees are not covered under the ANZZI™ Warranty.
This warranty is in effect as of January, 2016. This warranty supersedes all previous warranties and/or claims both stated and implied. This warranty
is subject to change without notice.
pg. 10
Page 13
PRODUCT AND WARRANTY REGISTRATION
To register your product and activate your Limited Lifetime Warranty contact us at 1-844-44-ANZZI
or email us at [email protected]. Or, if preferable, fill out the form below then scan/fax/mail us a
copy.
Email: [email protected]
Fax: 1-866-560-1060
In need of replacement parts?
Visit www.SpaWorldParts.com
Mail: ANZZI™
5701 NW 35th Ave.
Miami, FL 33142
ANZZI™ Product Registration Card
Name.....................................................................................
Address ............................................................................................................................
City ............................................... State ........................... Zip ..............................
Phone ......................................................................................
Email......................................................................................
Date of Purchase........................... Dealer .........................
Address ............................................................................................................................
Installed by .............................................................................
Address ............................................................................................................................ State ...............
Phone .................................................................................... State........................... Zip..........................
Email......................................................................................
I have read the ANZZI™ Owner’s Manual carefully and understand and agree that any installation, operation or maintenance of the product
must be done strictly in accordance with instructions and guidelines contained in the ANZZI™ owner’s manual and installation guide.
Signature____________________________________________________________Date_______________________________________________
Page 14

Perfection is our Tradition™
 Loading...