

Page 1
Per fection is our Tradition
MT
L-AZ0 06
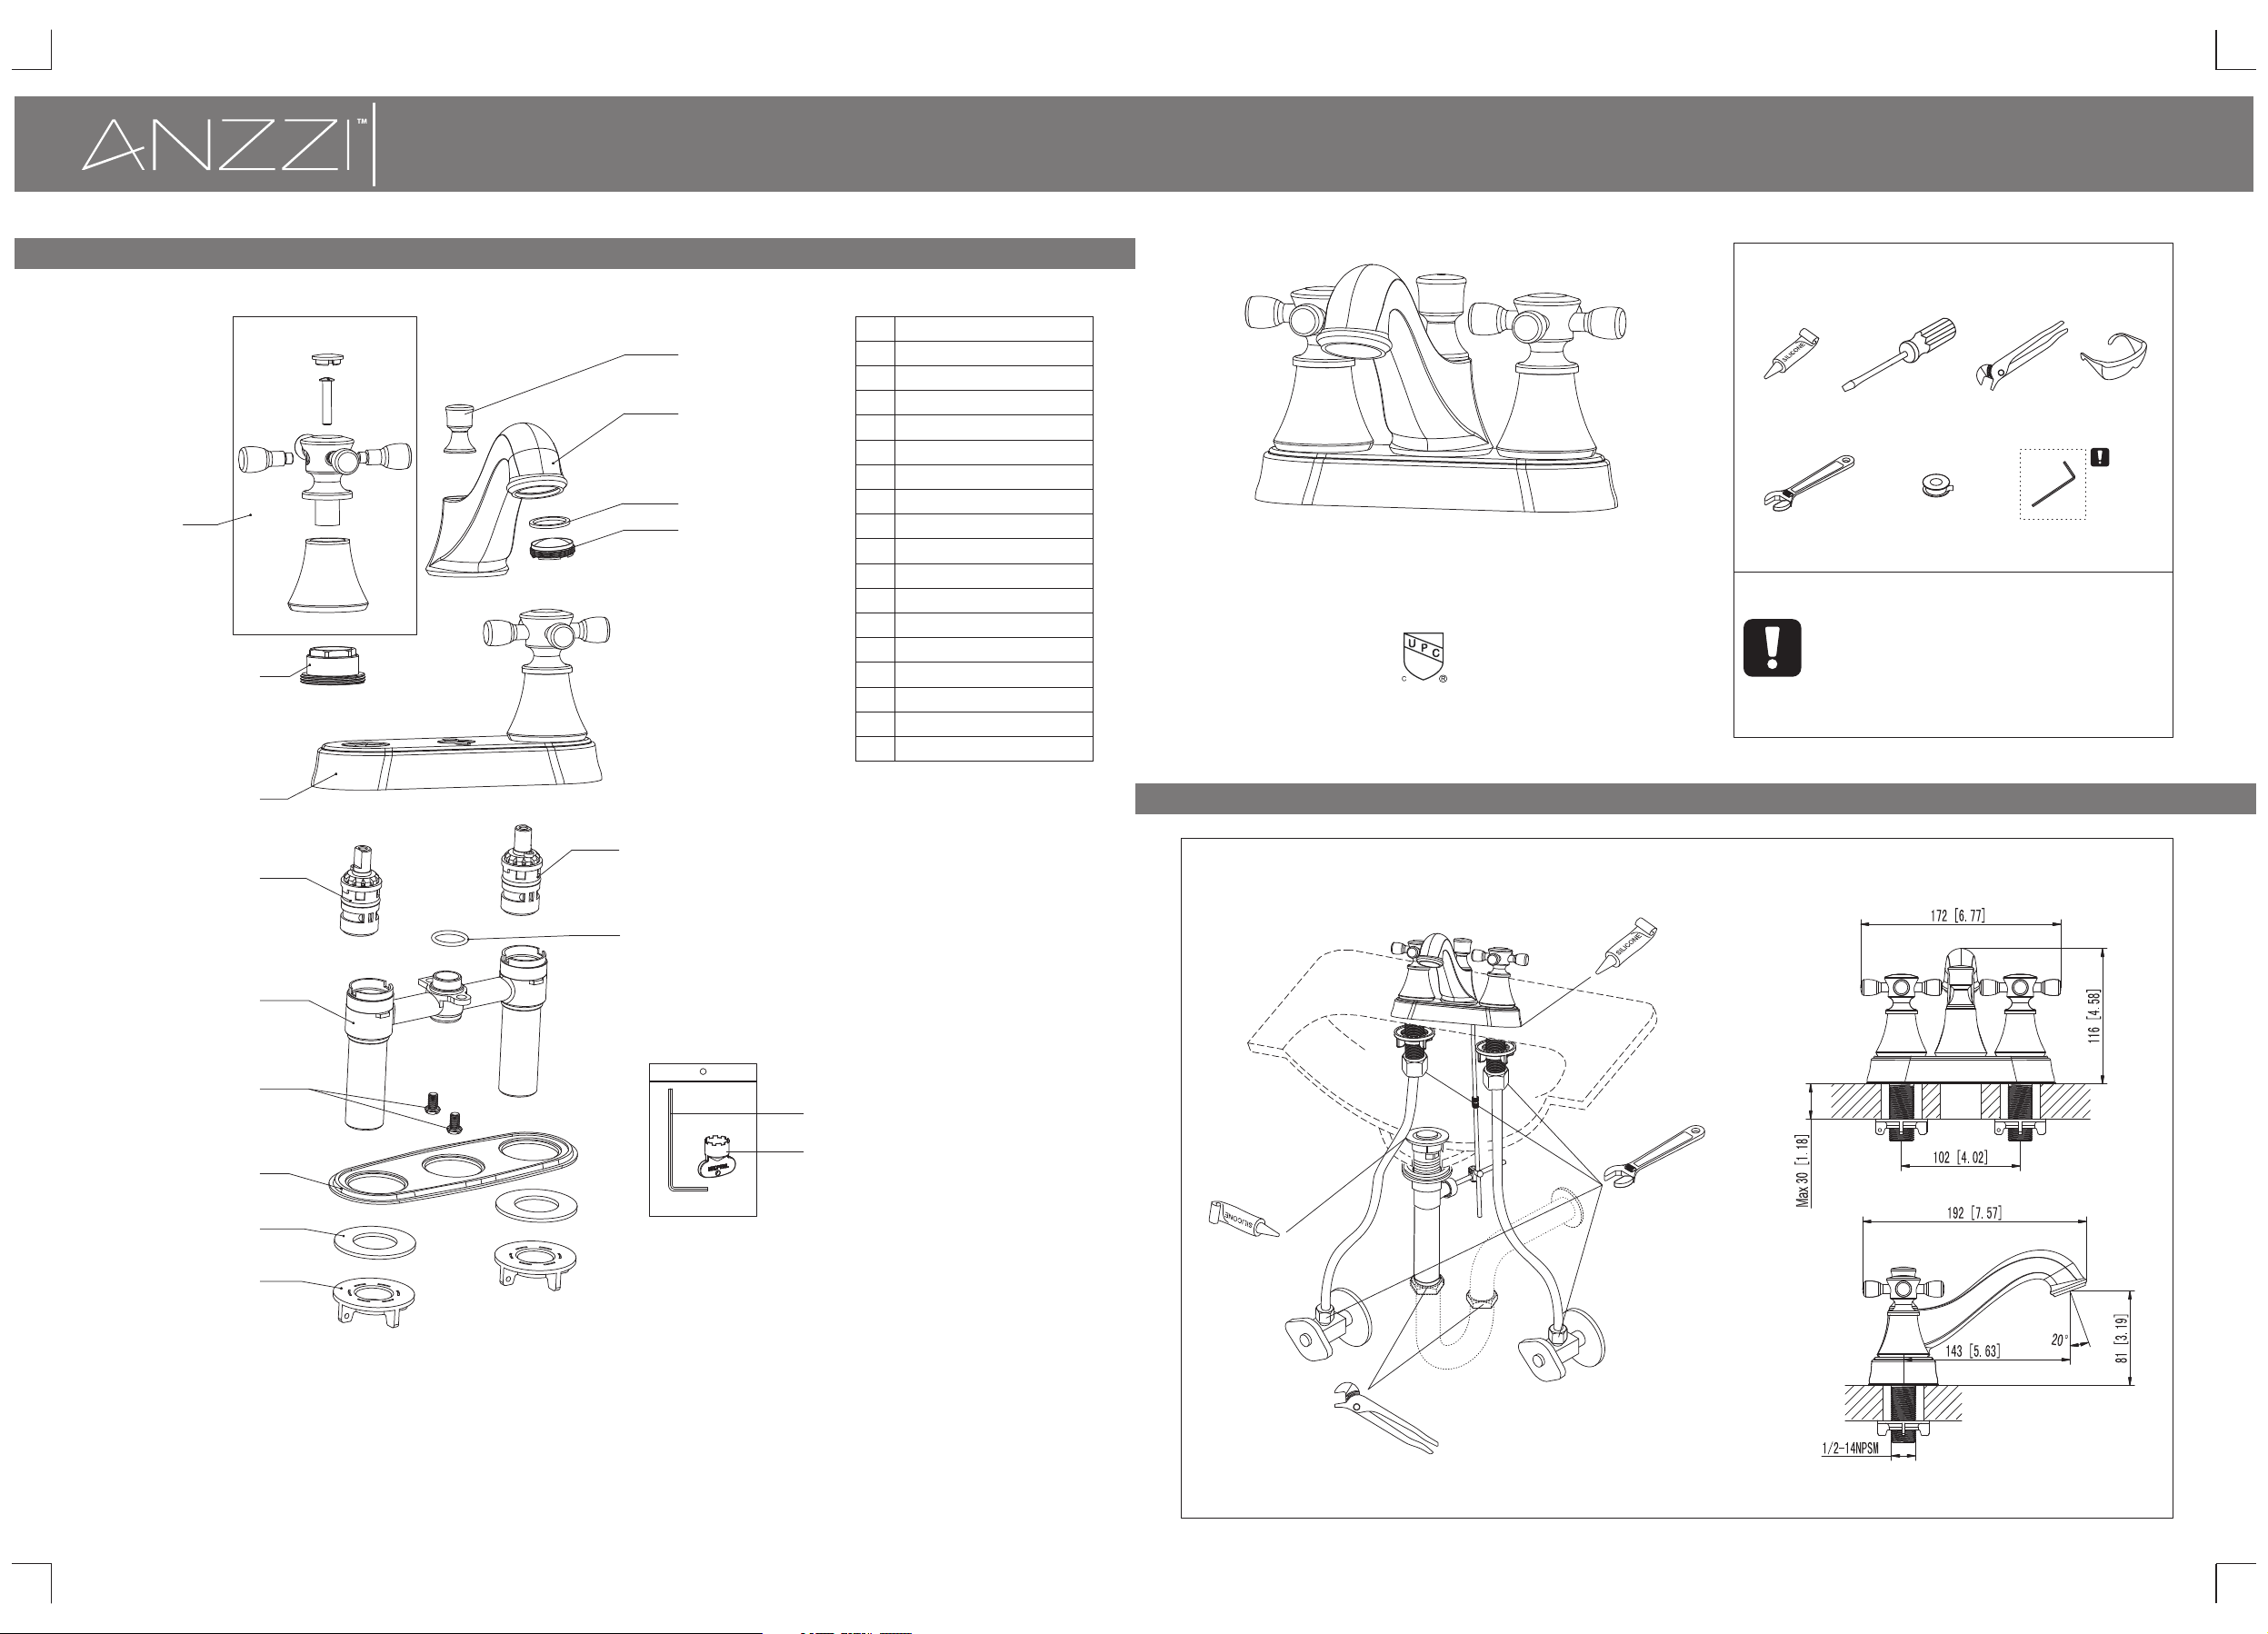
Step 4 Parts list
1
2
1-8 44-4 4-AN ZZI or v isit w ww.ANZ ZI.c om
17
10
11
12
PA RT N AM ENO .
1
Handle assemb ly
2
Lock nut
3
Plate
Cartridge(h ot w at er)
4
Shank
5
6
Screw
7
Gasket
8
Was he r
9
Lock nut
10
Spout
11
Was he r
12
Aerator
Cartridge(c ol d wa ter)
13
14
O-ring
Allen key
15
Aerator wrenc h
16
Diverter cove r
17
TWO HANDLE LAVATORY FAUCET
ASME A112.18.1/CSA B125.1
INSTALLATIO N MANUAL
RECOMMEND ED TOOLS
Silic one
Adjustab le Wren ch
Attention:
for easy installation, you will need:
1.To read all the installation instruction completely before
beginning.
2.To read all the warning, attention and maitenance
information.
3.To purchase the proper supply lines.
Scr ew K nif e Chann el Lo cks
Teflon ta pe
Allen k ey
Gog gl es
WARN ING:
Ple ase kee p the
too l for fut ure
use !
3
13
4
14
5
6
15
16
7
8
9
The tools might be applied to the following places:
Page 2
Step 1 Faucet and pop-up installation
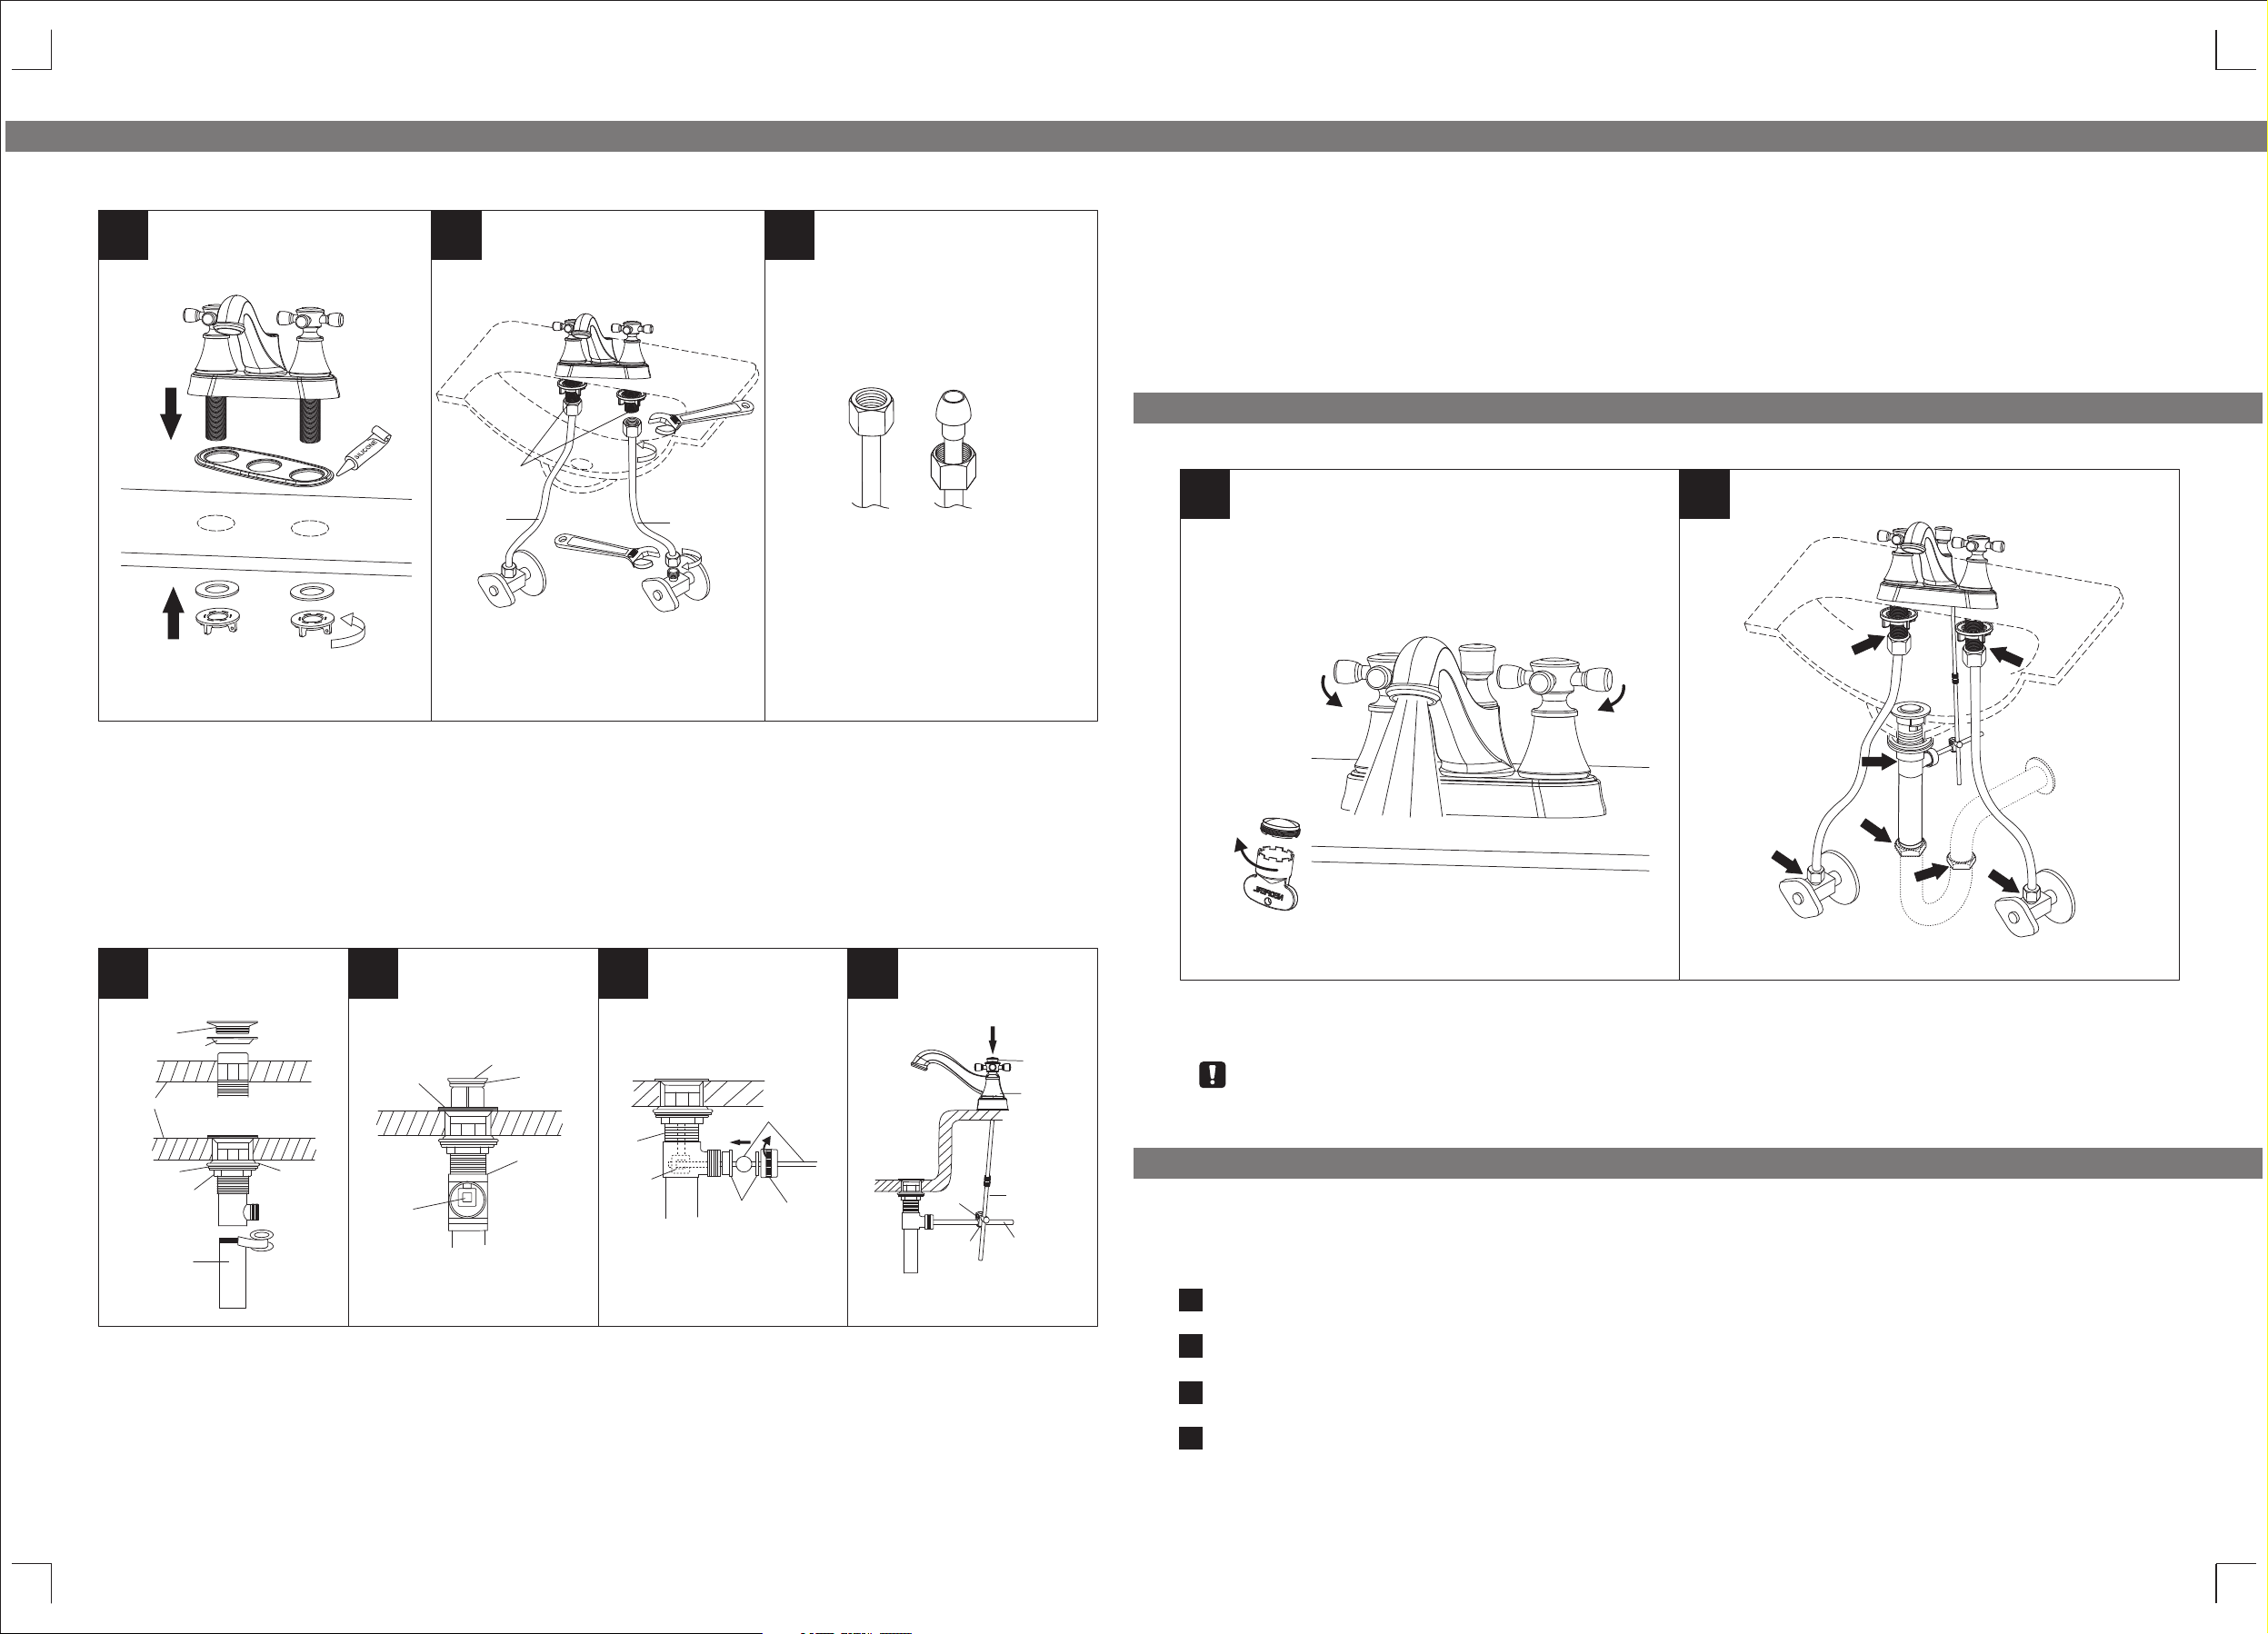
Faucet installation
1
2
1/2”( 13mm) IP S
1
4.Insert lift rod through hole on faucet body. Connect extend rod to lift rod. Attach horizontal rod to extend rod using
3
fittings, tighten screw.
Step 2 Checking and testing
1
2
A B
2
1.
Place the fau cet and gasket on th e basin, from underside of basin, assembl e the washer and loc k nut, tighten
the lock nut by h and. If the basin is u neven, please us e silicone under t he gasket.
2.Connect t he supply lines to t he faucet and secure the nuts by .adjustabl e wrench
Warning: S upply line #1 is for h ot water, supply li ne #2 is for cold wate r, don't mix up.
3.You can use 1/2” IPS faucet connections A, or use the coup ling nuts with 3/8 " O.D.ball-nose risers B.
Warning: T he supply lines me ntioned in the pre vious step are not i ncluded. Pleas e purchase them from
the plumbsh op.
Pop-up installation
1
fla nge
top r ubber w asher
sin k base
was her
loc knut
tai lpiec e
dra in body
bot tom
rub ber
was her
2
fla nge
ali gn hole i n
dra in stop per
wit h guide r od
ope ning
(po inted t oward
bac k wall)
dra in stop per
o-r ing
sin k
dra in body
3 4
hor izont al rod
dra in body
dra in
sto pper
hol e
pla stic
gas ket
rod g uide nu t rod b all
scr ew
fitti ngs
lift ro d
fauce t
body
exten d rod
horiz ont al ro d
Remove the ae rator by aerator w rench. Turn the faucet handle all the way on, tu rn on hot and cold wat er supply
1.
and flush wat er lines for one min ute. Reinstall aerator by aerator wrenc h.
2.Check all c onnections at ar rows for leaks, re-tighten it if necessar y.
BUT DON'T OV ER TI GH TE N
Step 3 Cleaning and care
Daily cleaning and care are required in order to keep the product shining and
properly working.
1.Remove pop-up drain stopper, and flange with top rubber washer for pop-up assembly. Insert drain body from
underneath of sink drain hole. Replace flange and top rubber washer back to drain body. Tighten flange as far as
possible. Remove and put silicone along bottom of. (Optional) Slide bottom rubber washer on drain body up against
bottom of sink. Tighten washer and locknut firmly against base for tight seal. Remove tailpiece from drain body, add
Teflon tape, replace tailpiece.
2.Replace pop-up drain stopper to drain body with o-ring in place, and align stopper hole with guide rod opening.
3.Remove rod guide nut and rod ball plastic gasket. Insert horizontal rod into drain body and through hole in drain
stopper. Replace rod guide nut with rod ball plastic gasket and tighten it.
1
Clean it with water and dry it with soft cloth.
2
Clean the product with gentle liquid or glass cleaner.
Don't use acid cleaner.
3
Don't clean with abrasive material, abrasive paper or knife.
4
 Loading...