

Page 1
1
Page 2

Compliance Information
FCC Notice
The following statement applies to all products that have received FCC approval.
Applicable products bear the FCC logo, and/or an FCC ID in the format FCC ID: P4M-AMD120 on the product label.
The mobile device complies with part of 15 of the FCC rules. Operation is subject to the following two conditions:
(1) This mobile device may not cause harmful interference, and (2) this mobile device must accept any interference
received, including interference that may cause undesirable operation. This mobile device has been tested and
found to comply with the limits for a Class B digital device, pursuant to Part 15 of the FCC Rules. These limits are
designed to provide reasonable protection against harmful interference in a residential installation. The
equipment generates uses and can radiate radio frequency energy and, if not installed and used in accordance
with the instructions, may cause harmful interference to radio communications. However, there is no guarantee
that interference will not occur in a particular installation. If this equipment does cause harmful interference to
radio or television reception, which can be determined by turning the equipment off and on, the user is
encouraged to try to correct the interference by one or more of the following measures
Reorient or relocate the receiving antenna.
Increase the separation between the equipment and receiver.
Connect the equipment into an outlet on a circuit different from that to which the receiver is connected.
Consult the dealer or an experienced radio/TV technician for help.
Changes or modifications not expressly approved by the party responsible for compliance could void the user’s
authority to operate the equipment.
The Antenna(s) used for this transmitter must not be collocated or operating in conjunction with any other
antenna or transmitter.
RF Exposure Information (FCC SAR)
DEVICE MEETS THE GOVERNMENT’S REQUIREMENTS FOR EXPOSURE TO RADIO WAVES. This device is designed
and manufactured not to exceed the emission limits for exposure to radio frequency (RF) energy set by the Federal
Communications Commission of the U.S. Governments.
The exposure standard for wireless mobile devices employees a unit of measurement known as the Specific
Absorption Rage, or SAR. The SAR limit set by the FCC is 1.6W/kg. Test for SAR are conducted using standard
operating positions accepted by the FCC with the device transmitting at its highest certified power level in all
tested frequency bands. Although the SAR is determined at the highest certified power level, the actual SAR level
of the device while operating cane be well below the maximum value. This is because the device is designed to
operate at multiple power levels so as to use only the poser required to reach the network. In general, the closer
you are to a wireless base station antenna, the lower the power output. The highest SAR value for the device as
reported to the FCC when tested for use when worn on the body, as described in this guide, is 0.657W/kg (Bodyworn measurements differ among device models, depending upon available accessories and FCC requirements.)
2
Page 3

While there may be difference between the SAR levels of various devices and at various positions, they all meet
the government requirement.
The FCC has granted an Equipment Authorization for this device with all reported SAR levels evaluated as in
compliance with the FCC RF exposure guidelines. SAR information on this device is on file with the FCC and can be
found under the Display Grant Section of www.fcc.gov/oet/ea/fccid/ after searching on FCC ID: P4M-AMD120
3
Page 4

Contents
What’s in the Box............................................................................................................................................ 6
Before Getting Started ................................................................................................................................... 6
Charging the Battery ....................................................................................................................................... 7
Welcome to Android ...................................................................................................................................... 9
Setting your location preferences .................................................................................................................. 9
Signing into your Google account ................................................................................................................. 10
Home and Android basics ............................................................................................................................. 11
Using the Touchscreen ................................................................................................................................. 12
Monitoring your Tablet’s status ................................................................................................................... 13
Status Icons ................................................................................................................................................... 13
Notification Icons ......................................................................................................................................... 13
Working with Quick settings ......................................................................................................................... 14
Securing your tablet ..................................................................................................................................... 15
Encrypt your tablet ....................................................................................................................................... 15
Customizing the Homescreen ....................................................................................................................... 16
Changing Homescreen Wallpaper ................................................................................................................ 16
Working with Apps ....................................................................................................................................... 17
Uninstall an App............................................................................................................................................ 17
Working with Widgets .................................................................................................................................. 18
Searching your tablet and the web ............................................................................................................. 19
Using the Android keyboard ......................................................................................................................... 20
Enter text by speaking .................................................................................................................................. 20
Connecting to Networks and Devices ........................................................................................................... 20
Connecting to WiFi Networks ...................................................................................................................... 21
Turn WiFi on and Connect to a Network ..................................................................................................... 22
Modify how you connect to a WiFi Network ............................................................................................... 22
Add a WiFi Network ...................................................................................................................................... 23
Forget a WiFi Network .................................................................................................................................. 23
Set a Wi-Fi disconnect policy ........................................................................................................................ 23
Connecting to Bluetooth devices ................................................................................................................. 24
4
Page 5

Changing your tablet’s Bluetooth name: ..................................................................................................... 24
Pairing your tablet with a Bluetooth device: ................................................................................................ 25
Connect to a Bluetooth device: .................................................................................................................... 25
Connect to a Camera: ................................................................................................................................... 26
Connecting to a Windows computer via USB ............................................................................................... 26
Connecting to a Macintosh computer via USB ............................................................................................. 27
Optimizing battery life .................................................................................................................................. 27
Accounts ....................................................................................................................................................... 28
Contacts ........................................................................................................................................................ 29
Connecting quickly with your contacts ........................................................................................................ 30
Gmail ............................................................................................................................................................. 31
Calendar ........................................................................................................................................................ 32
Google Talk ................................................................................................................................................... 33
Email ............................................................................................................................................................. 34
Browser ......................................................................................................................................................... 35
Maps, Navigation, Places, and Latitude ....................................................................................................... 36
Camera .......................................................................................................................................................... 36
Gallery ........................................................................................................................................................... 36
Movie Studio ................................................................................................................................................. 36
Music............................................................................................................................................................. 37
Opening Music and working with your library ............................................................................................. 38
Playing Music ................................................................................................................................................ 39
Books ............................................................................................................................................................ 39
Clock.............................................................................................................................................................. 40
Calculator ...................................................................................................................................................... 40
Market .......................................................................................................................................................... 41
Settings ......................................................................................................................................................... 41
Accessibility settings ..................................................................................................................................... 49
5
Page 6
What’s in the Box
Your device box contains the following items:
Device with battery
Charger
USB cable
Quick start guide
Warranty card/Repair policy
Before Getting Started
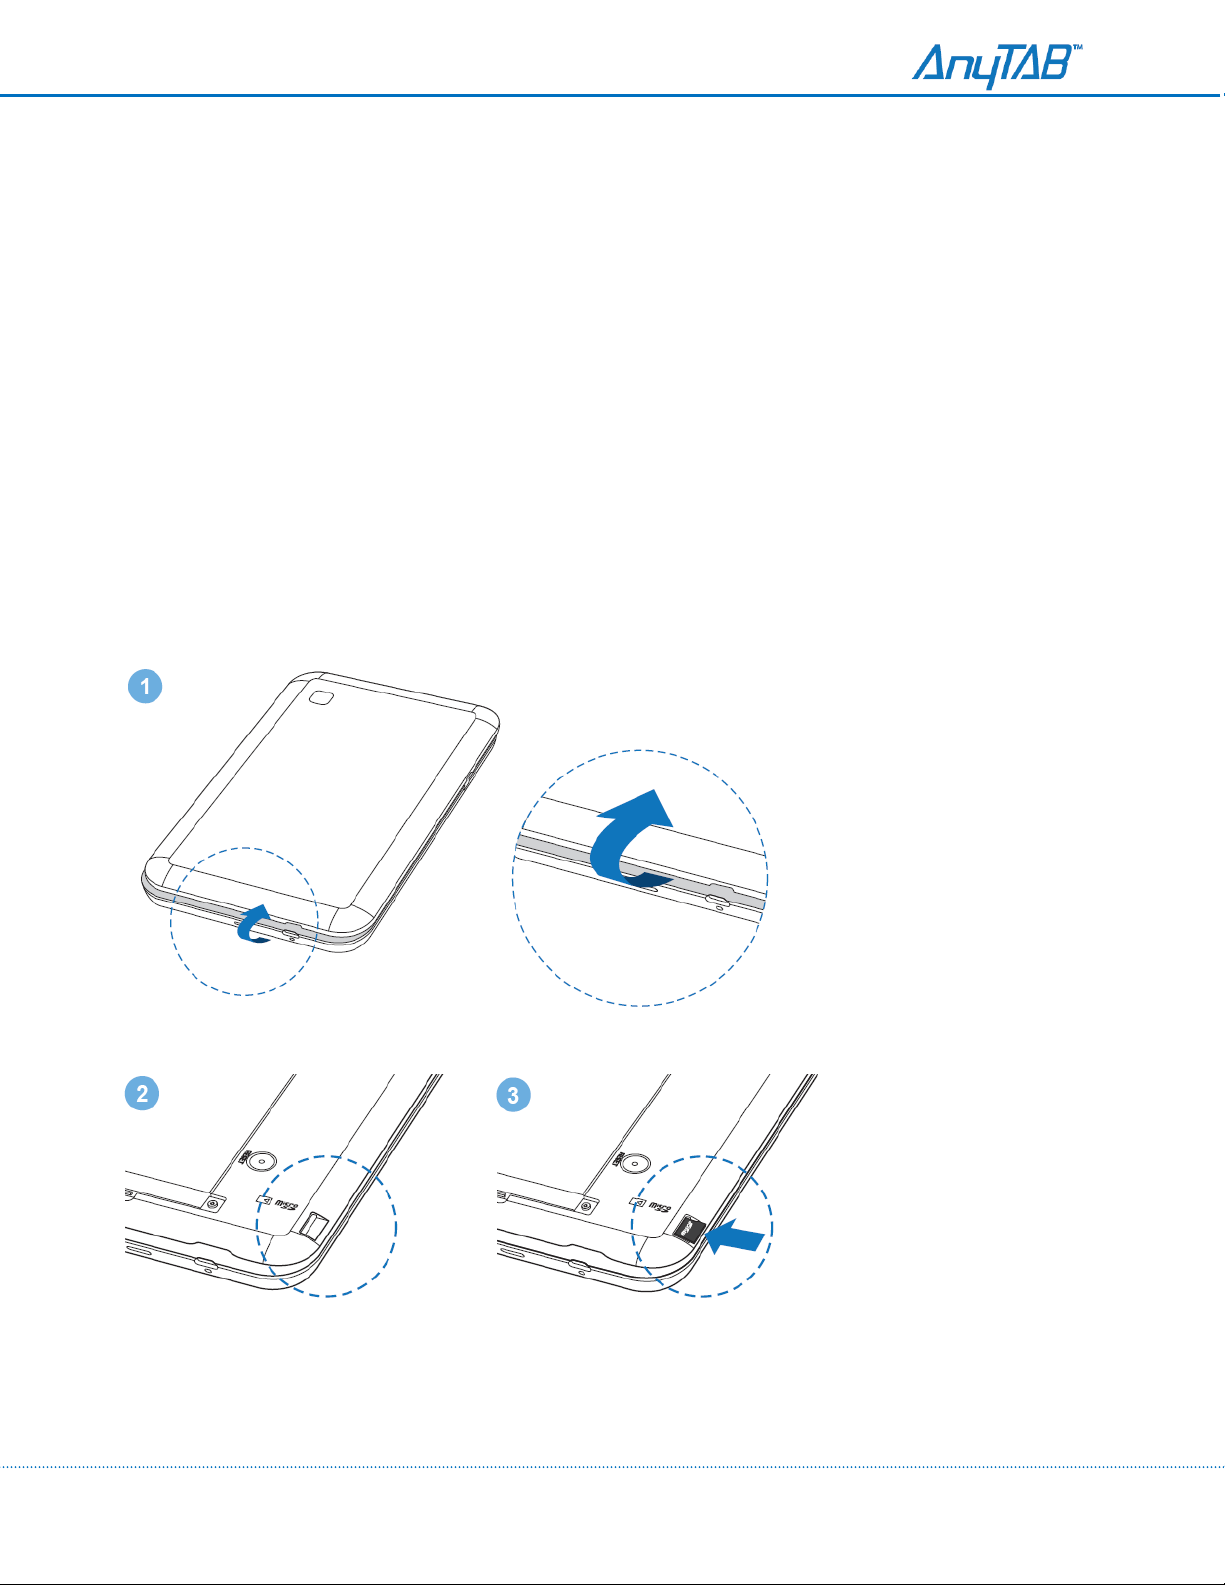
Installing the micro SD Card
Using both thumbs, slide the back cover upward
6
Page 7
Charging the Battery
Before charging the battery, make sure that the battery has been properly inserted into your device.
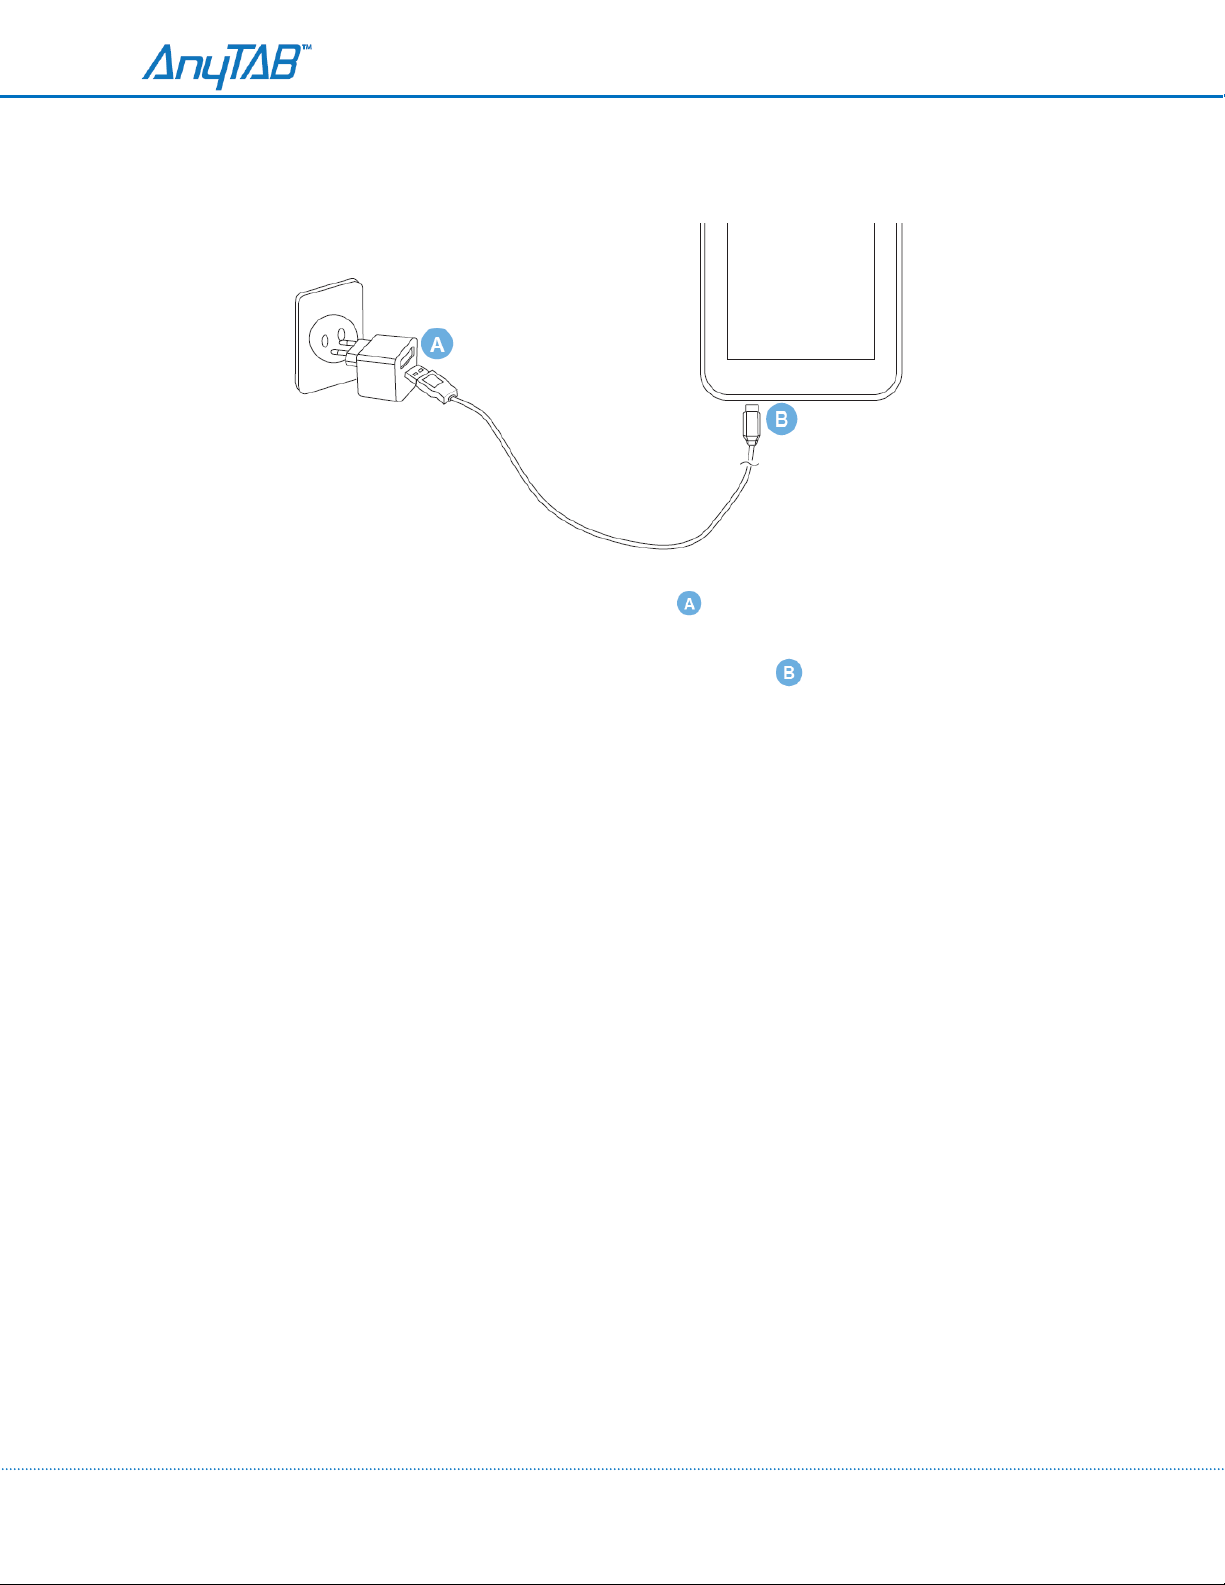
Connect your USB cable to the charger, as shown in .
Plug the charger into a power socket.
Connect the other end of the cable to your device, as shown in . The device begins charging.
If your device is charged when it is powered off, then a RED LED (next to the USB port) is lighted on. When
the LED color changes to BLUE, it indicates that your device is fully charged.
If you pull out charger while the device is powered off and charging, the device will power down.
If you push the power key while the device is powered off and charging, the device will be powered on.
But if the battery voltage is lower than a proper voltage level, the device will not power on. In this case
you should wait until the battery voltage reaches a proper voltage level.
If your device is charging while it is powered on, the battery icon in the Notification bar shows the charging
status and the LED color next to the USB port is RED while charging. When the battery icon is changed to
GREEN, it indicates that your device is fully charged.
When you are not using functions such as, Wi-Fi, GPS, Bluetooth, and data service, you should switch them
off to reduce power consumption.
7
Page 8
Powering On Your Device
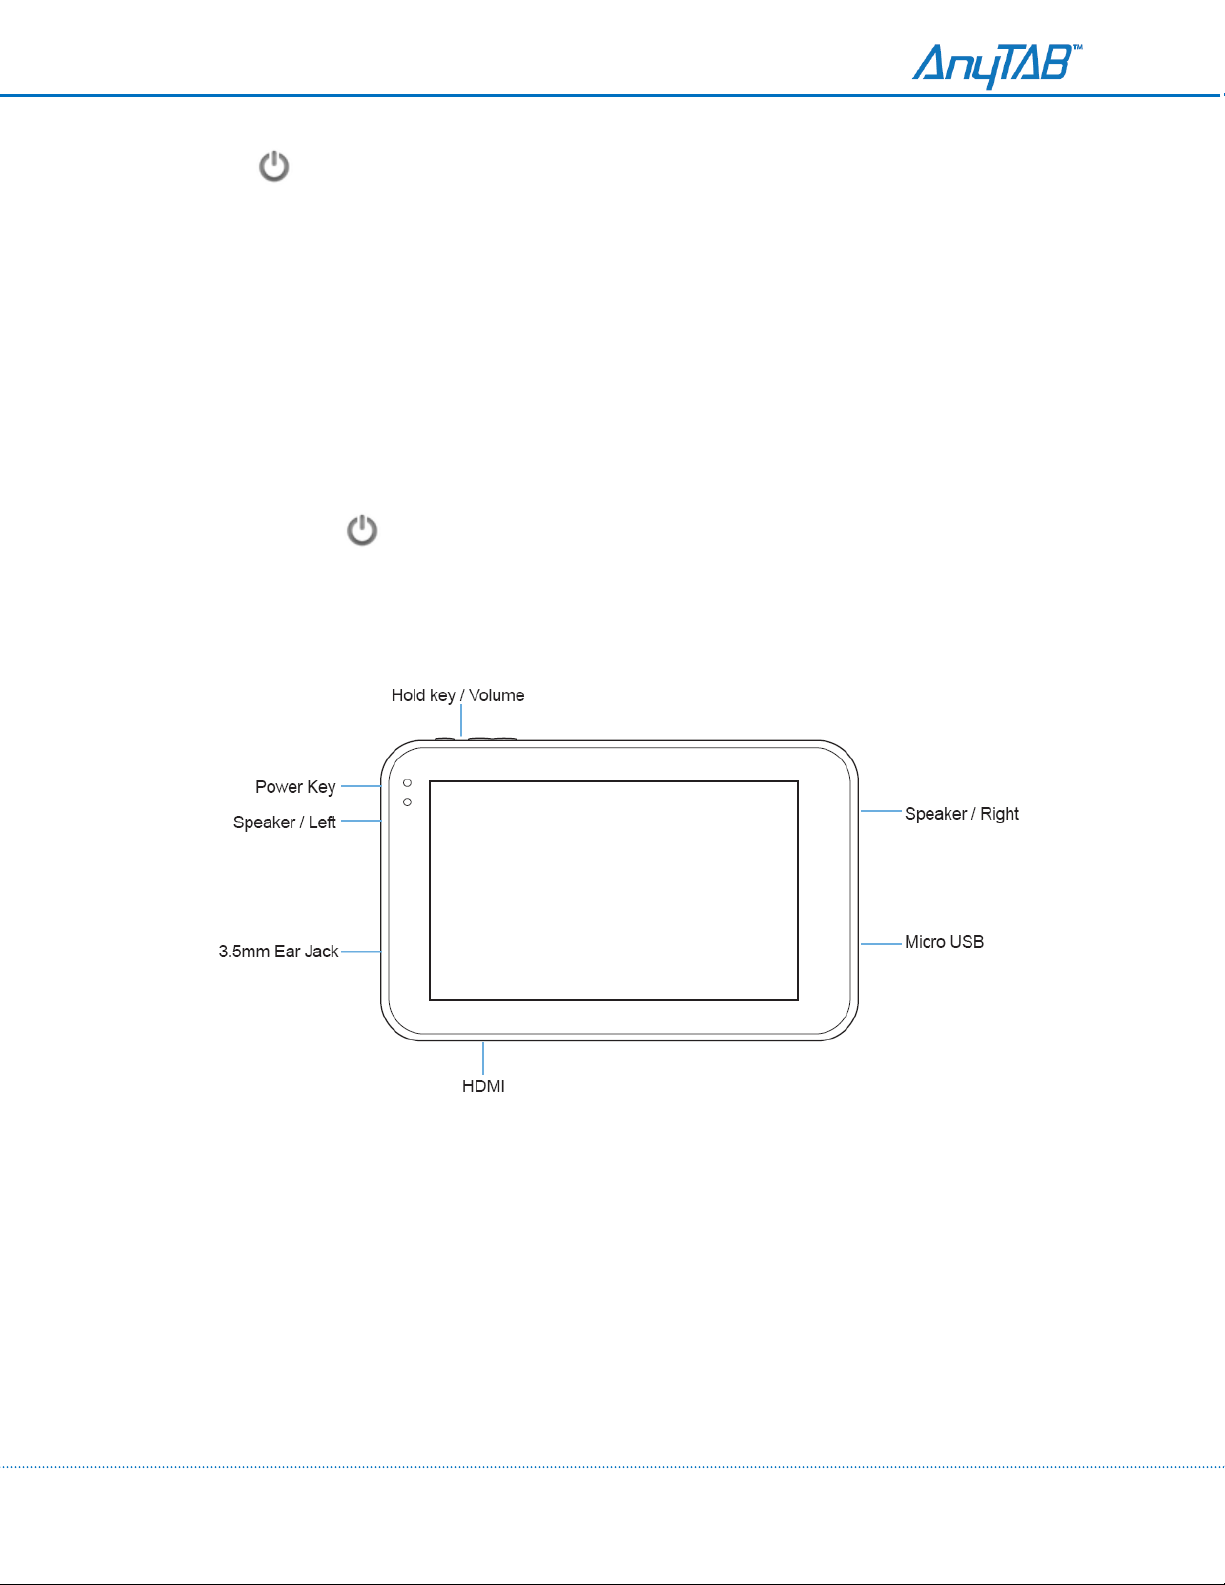
Press .
The first time you do this, you will be asked to sign in to your account and set up your device
Using the onscreen keyboard
Setting up your accounts
Other important settings.
Note. You need an internet connection to set up accounts.
Powering Off Your Device
Press and hold
Touch OK when prompted to power off the device
8
Page 9
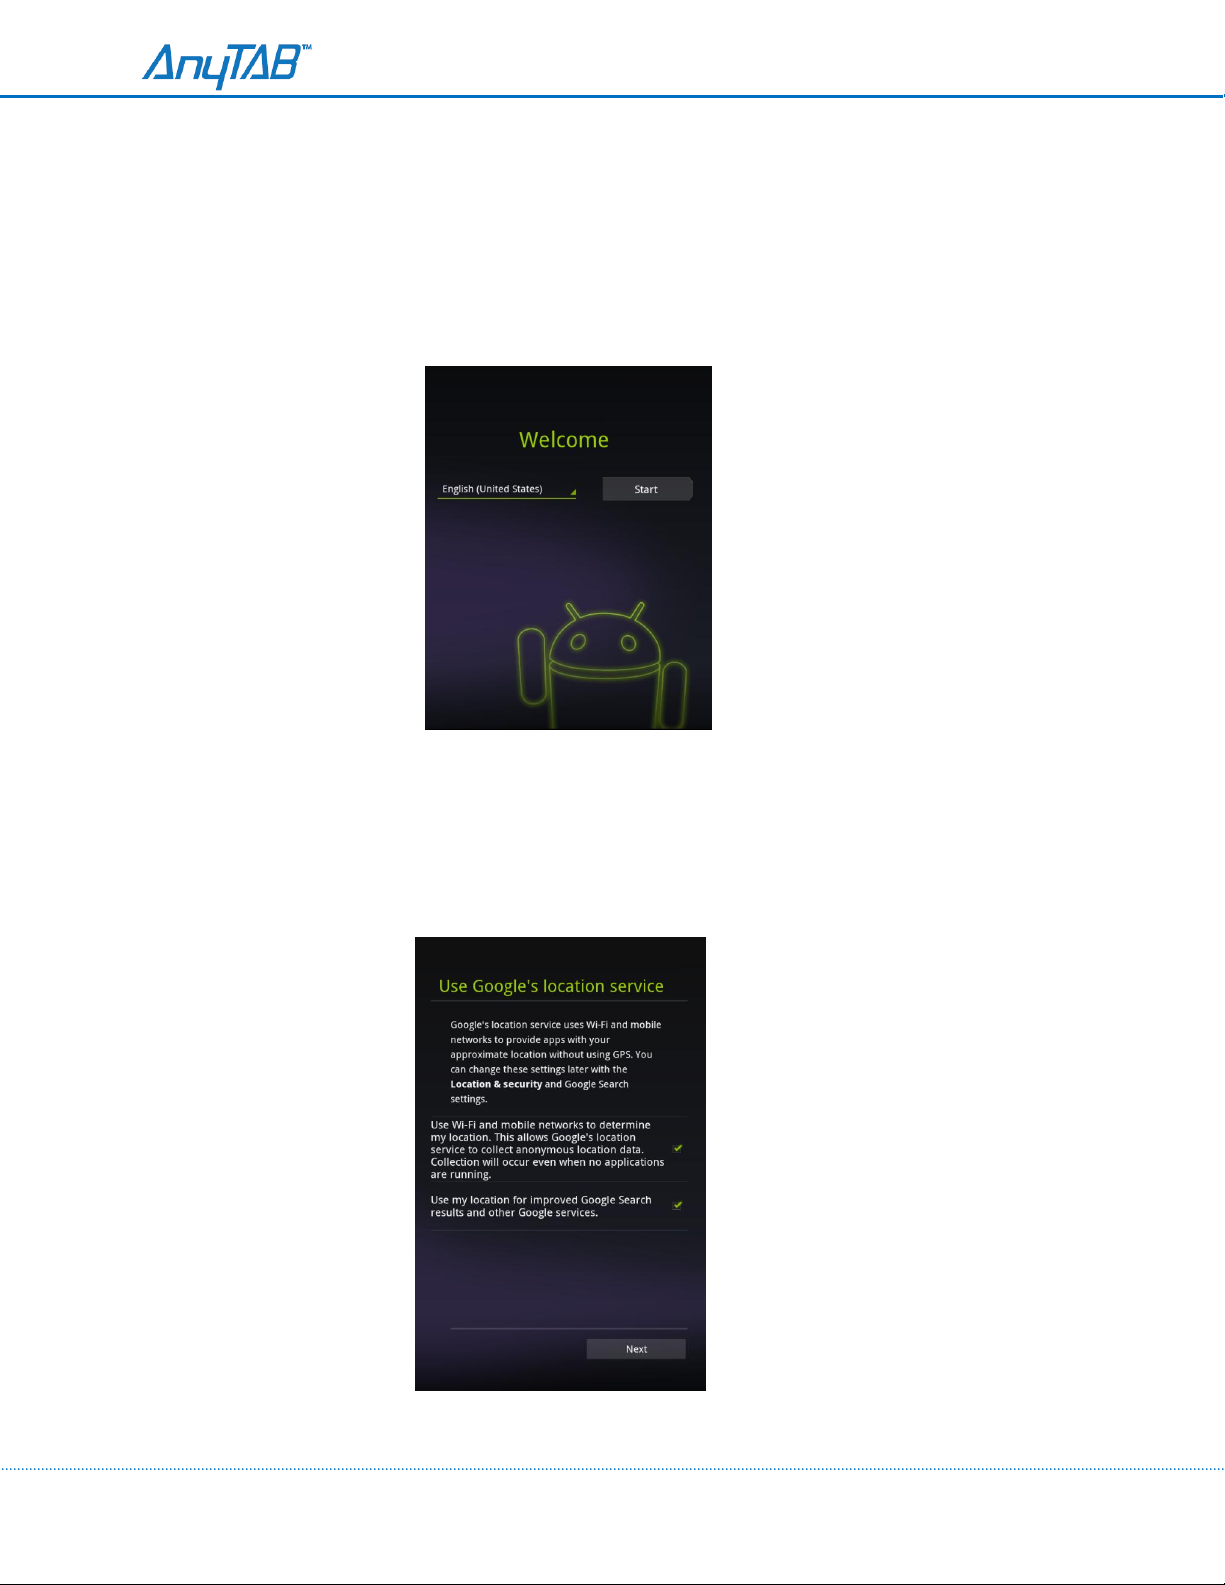
Welcome to Android
The first time you power on your AnyTAB device, you’re welcomed to Android and invited to pick a language
to work in and to start setting up and using your tabl
Touch English if you want to work in a different language.
Touch Start to start setting up your
tablet.
et.
Setting your location preferences
Google’s location service uses the Wi-Fi network near you
your apps. This location information can make finding your precise locat i o n by GPS much faster; it can also
provide
your location to apps when GPS isn’t
ava
ilable.
to
make your approximate loca t ion available to
9
Page 10
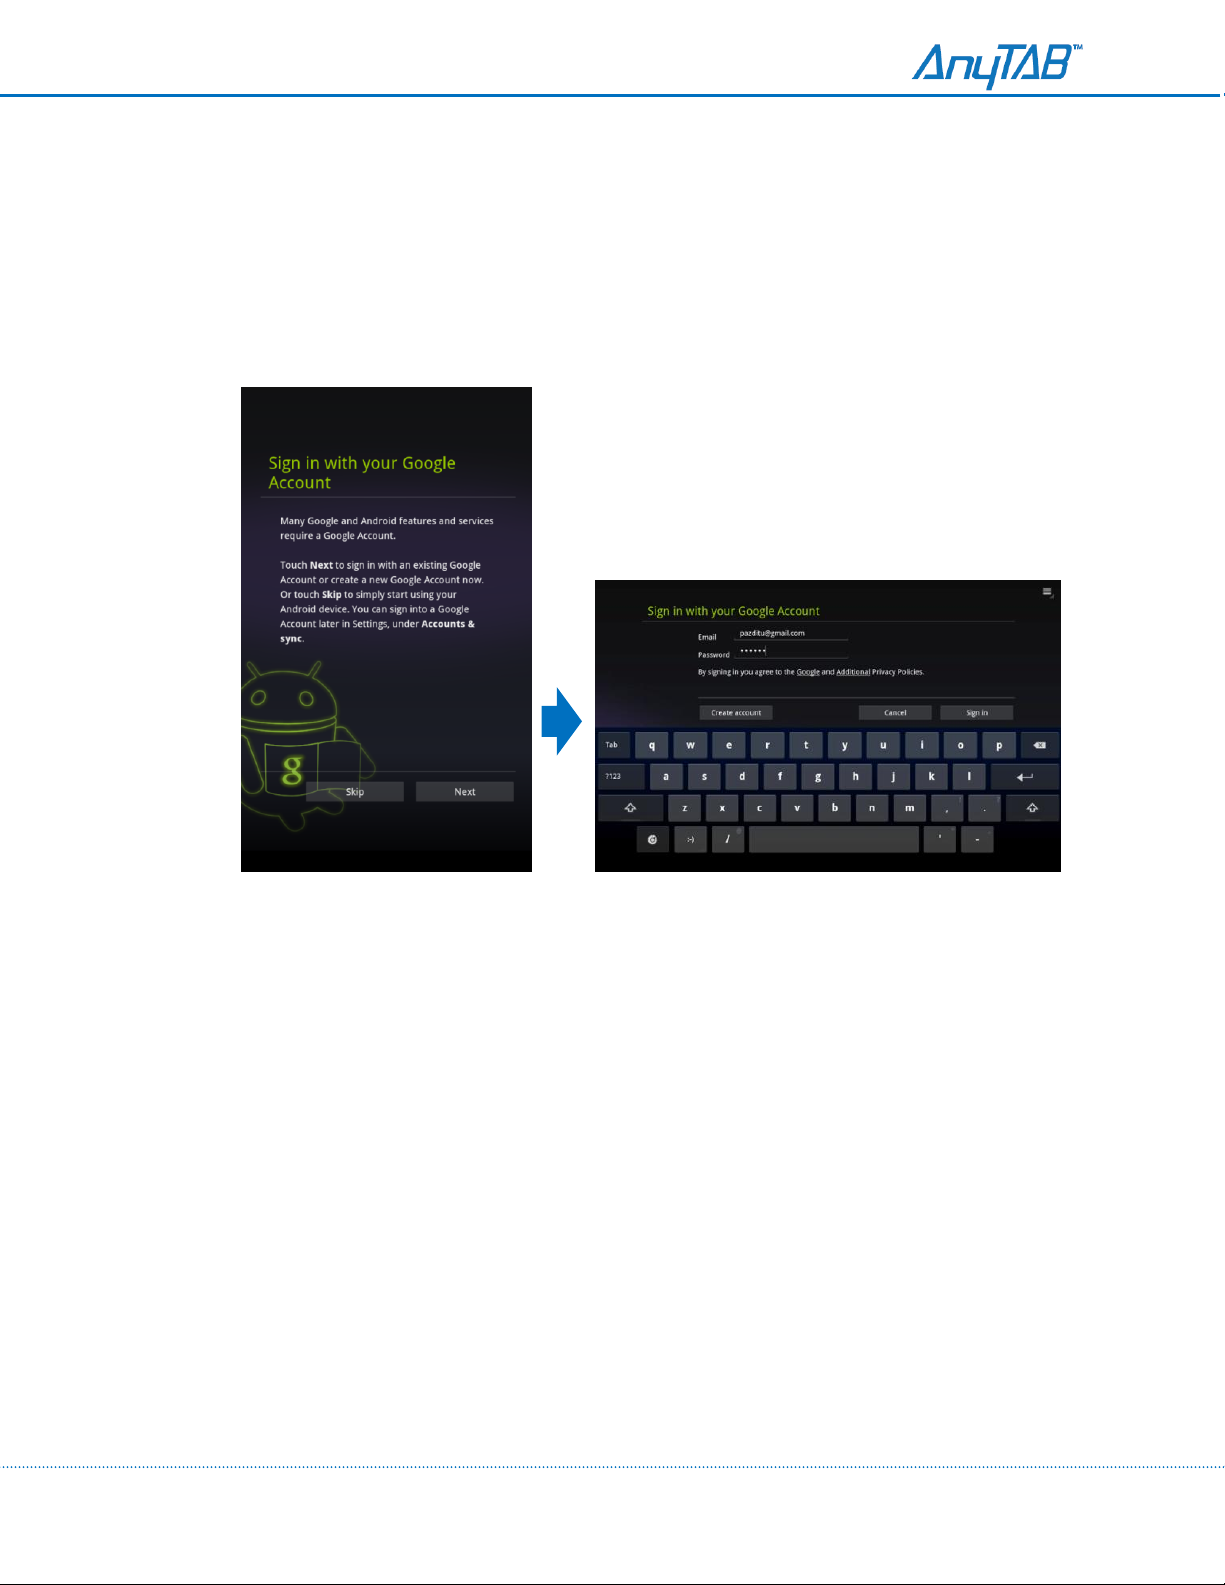
Signing into your Google account
You
must sign into a Google Account to use Gmail, Google Talk, and other Google Apps; to download apps
from Android Market; to back up your settings a nd other
other Google services on your tabl
et.
data to Google servers; and to take
advantage
of
If you don’t have a Google Account, you can also create one by touching Create Account
.
10
Page 11
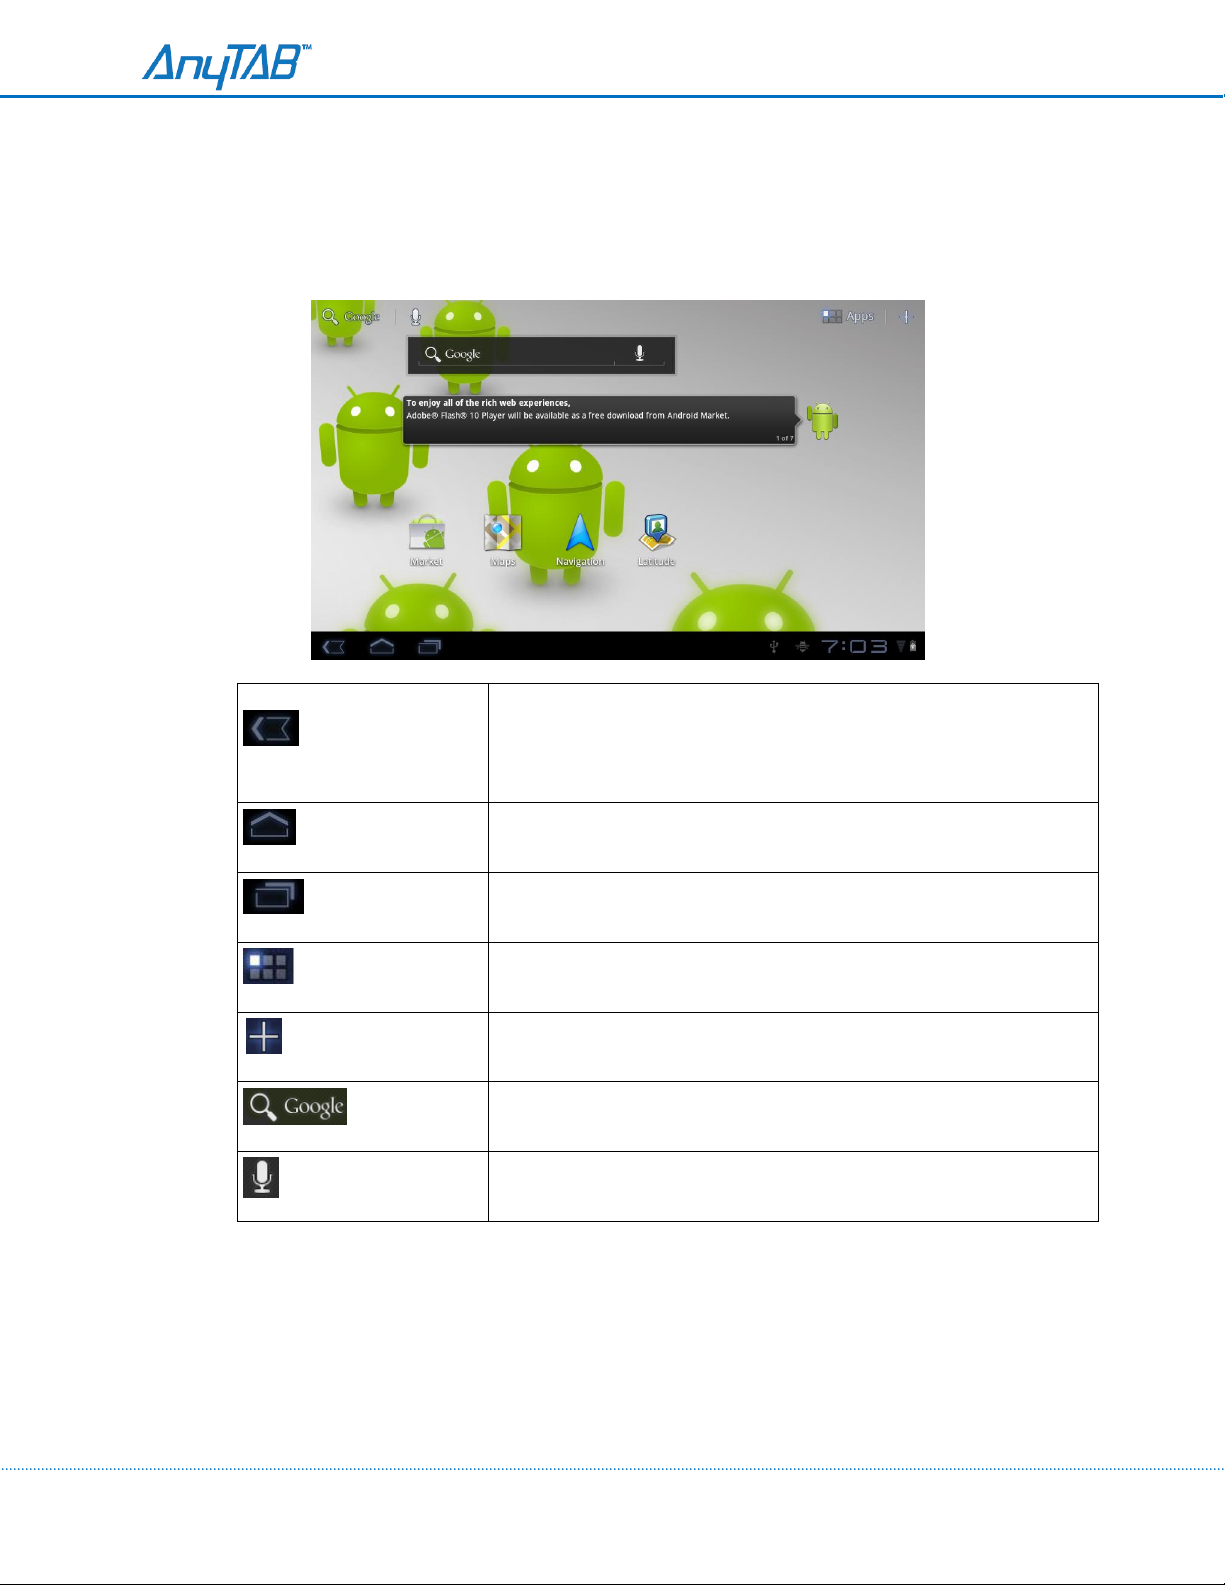
Back
Opens the previous screen you were working in. If the
onscreen
keyboard is open, the button changes to a down
arrow and touching it closes the keyboard.
Home
Opens Home. If you’re viewing a left or right Home
screen,
opens the central Home
screen.
Recent A
pps
Opens a list of
thumbnail
images of apps you’ve
work
ed
with
recently; touch an app to open it.
Apps
Opens a thumbnail list of all of your installed apps
Customize
You can use the customize button to add shortcuts to apps and
widgets to your Home screens and to change the wallpaper.
Search
Touch and add an entry to search your Tablet or the web
Voice Search
Search your Tablet or the web by speaking and voice commands
Home and Android basics
Once you’ve finished se tting up your
basics of your tablet and how to use it—Home and
tablet,
monitoring and
responding
tablet,
to
status
Home opens. It’s a good idea
its
Home
and
notification messages,
screens,
the
to
become familiar with the
touch screen,
and so
on.
securing your
11
Page 12

Using the Touchscreen
The main way to control Android
the
onscreen
keyboard, and other items on the
Touch To act on items on the
using the
fi
nger.
onscreen
Touch & hold Touch & hold an item on the screen by touching it and not
action occurs.
Drag Touch & hold an item for a moment and then, without lifting your finger, move your finger
on the screen until you reach the target position. For
screen to reposition them.
Swipe or slide To swipe or slide, you quickly move your finger across the
without pausing when you first touch it (so you don’t drag an it
the Home screen left or right to view the other parts, and in some Calendar views you slide to view
earlier or later periods.
Double-tap Tap quickly twice on a webpage, map, or other screen to zoom. For example, you
double-tap
Double-tapping
screen.
a section of a webpage in Browser to zoom that section to fit the width of the
after pinching to zoom in some
Pinch In some apps (such as Maps, Browser, and Gallery), you can zoom in and
two fingers on the screen at once and pinching them together
apart (to zoom in).
Rotate the screen On most
turn it. You have the optio n to turn this feature on and off.
features
is by using your finger to mani
screen,
such as app and
keyboard, or to press
screens,
the orientation of the screen rotates with the tablet as you
touch screen.
settings
onscreen buttons,
example,
apps
reflows a column of text to fit the width of the
pulate icons, buttons, menu items,
icons, to ty
pe
letters and symbols
you simply touch them with your
lif
ting your finger until an
you drag items on the Home
surfa
ce
em
instead).
of the
For example, you slide
screen,
screen.
out by placing
(to
zoom out) or spreading them
12
Page 13
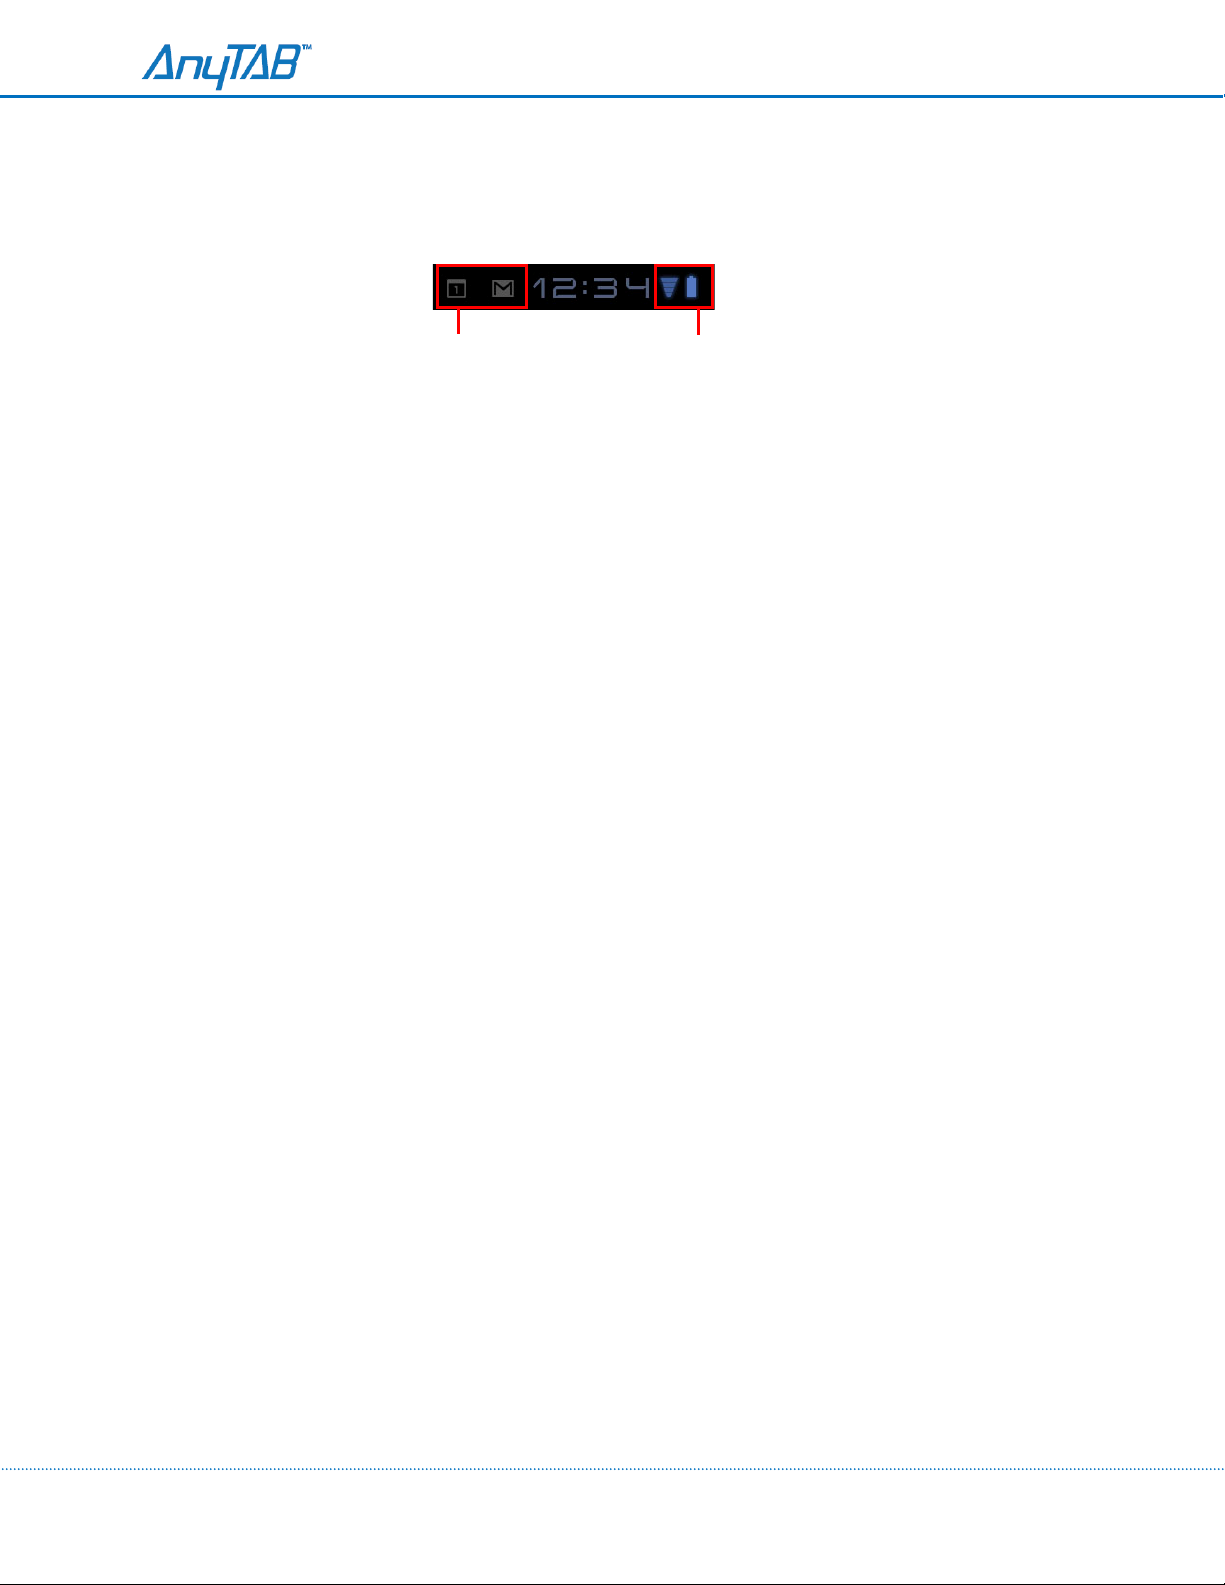
Monitoring your Tablet’s status
The right side of the System bar displays icons indicating that you’ve
and icons indicating th e tablet’s stat
If you have more
Notifications pane l to view them all.
notifications
than can fit in the System bar, a plus icon
us.
Notification icons
Status icons
recei
ved
notifications,
prompts
the current time,
you to open the
Status Icons
Status icons indicate the status of your tablet at the right edge of the System bar and in the Status Detail panel
(which opens if you touch the time). Network Status icons turn blue if you have a Google Account added to your
tablet and the tablet is connected to Google services. Otherwise the network icons are gray.
Notification Icons
Notification icons
appear to the left of the time in the System bar. In addition, these icons and apps you install on your tablet
may use th
eir
indicate
own notification i c on s
that you’ve received a
notification
.
from the system or from an
application.
They
13
Page 14
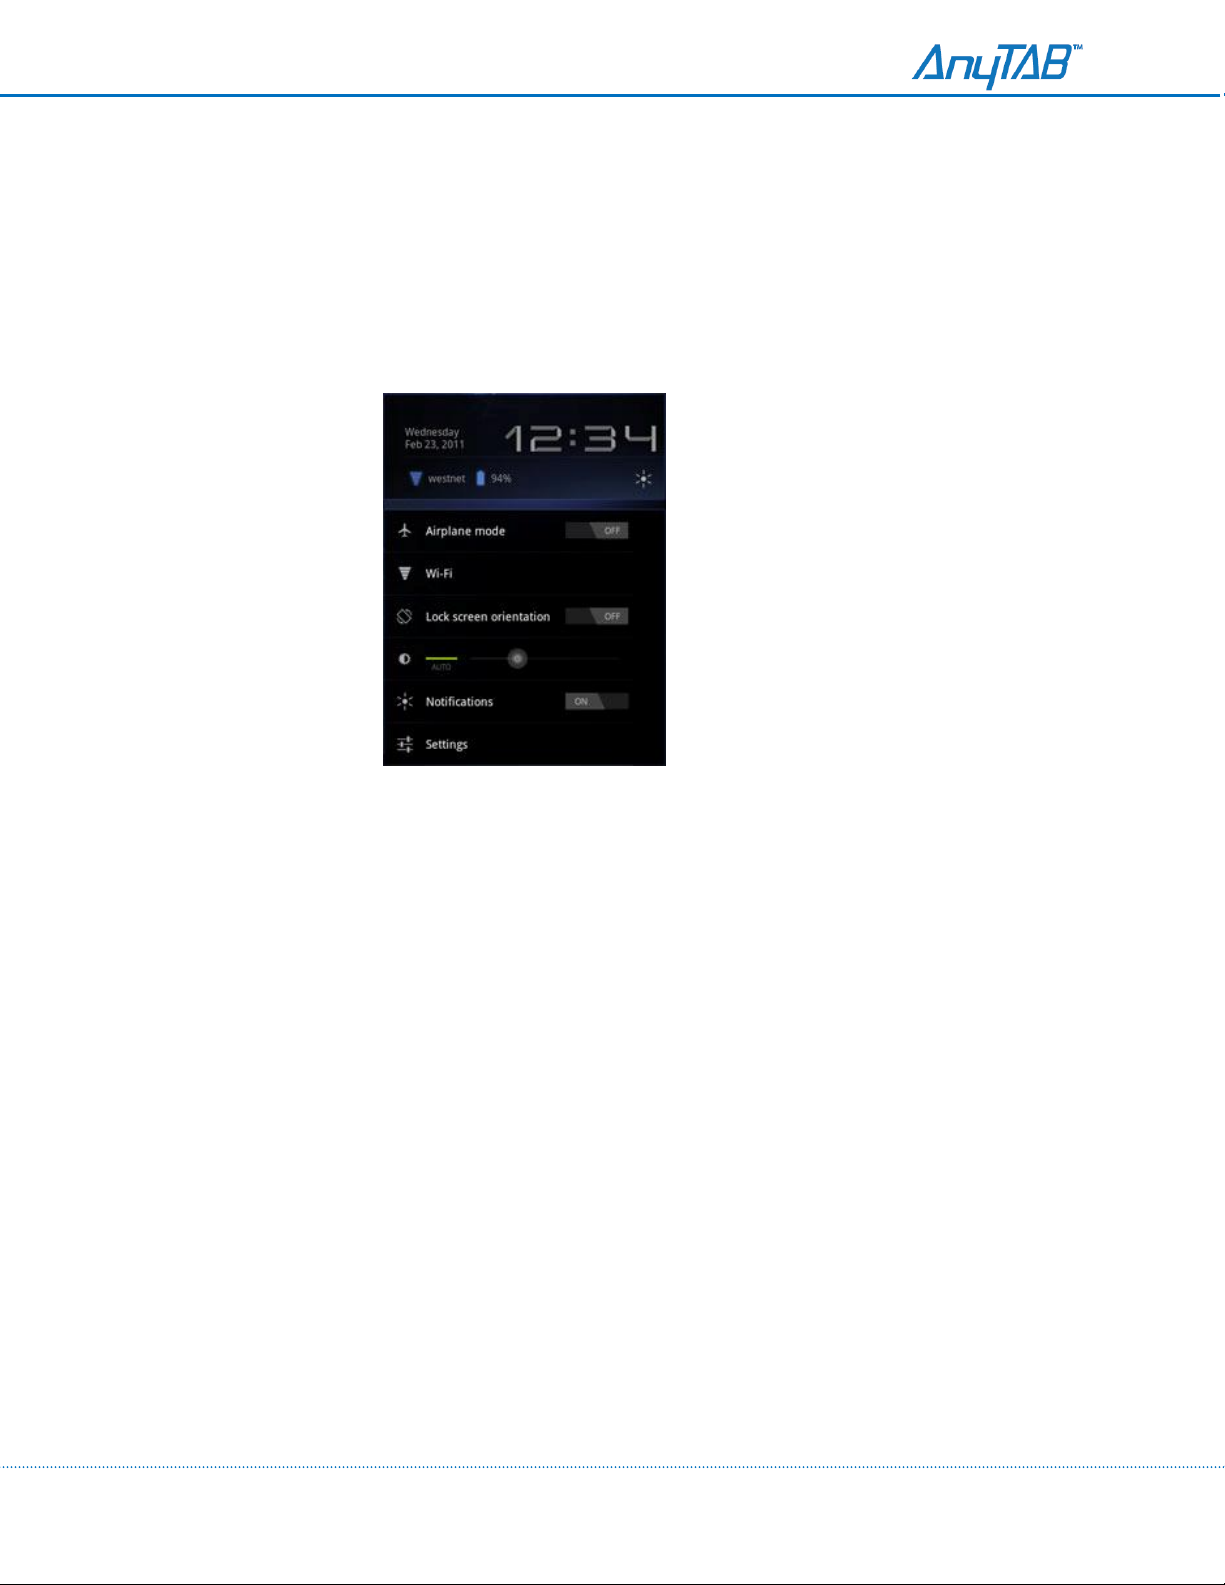
Working with Quick settings
The Quick Settings m ake it
the full Settings ap
Open the
Touch anywhere in the
the list of
p.
Status
curre
convenient
Details.
Status
nt notifications.
to view or change the most common
Details.
The Quick Settings o pe n below the
tablet
settings
Status
and to open
Details, replacing
View
or change the
else on th
The Quick Settings a re:
Airplane mode Drag the switch to On to turn off all the tablet’s radios
including mobile data and Wi-Fi.
Wi-Fi T o u c h to open the Wi-Fi
Lock screen
doesn’t rotate when you turn the
Brightness Drag the slider to change the
tablet set screen brightness
surroundings.
Notifications
notifications
e screen.
orientation
settings
Drag the slider to Off if you don’t want to be
about new mail, invitations to chat, and so on.
you
want. You can close the Quick Settings ag ai n by touching anyw here
settings.
Drag the switch to On to lock the screen in
tablet.
automatically,
brightness
using its sensors to
of the
landsc
screen.
measure
disturbed
that transmit
ape
orientation,
Or touch
the amount of light in your
by
system
data,
Auto
to have the
or
application
so it
14
Page 15
Securing your tablet
Initially, when you turn on or wake the
screen.
password, so only you can
secure
But you can secure the lock screen by requiring that
acce
ss
your data, buy apps from Market, and so on. You may also be required to
you lock screen by a policy set by an email
You
can also encrypt the data on your
decrypt it each time you power it
Touch Location & security
Touch Configure lock screen
Touch Pattern, PIN, or Password
tablet,
on.
the lock screen requires you to drag a lock icon to unlock the
account
tablet,
you draw a
or other
so you must enter a numeric PIN or a password to
pattern
account
or enter a numeric PIN or
you add
to
your
tabl
et.
If you touch
Pattern,
you are guided to create a pattern you must draw to unlock the screen. If
you touch PIN or Password, you’re prompted to set a numeric PIN or password you must enter to
unlock your screen. The next time you turn on your tablet or wake up the screen, you must draw
your unlock pattern or enter your PIN or password to unlock the screen.
Encrypt your tablet
You can encrypt all the data on your tablet including Google accounts, application data, music, and other media.
However, if you do, you must enter a numeric PIN or password each time you power on your tablet.
WARNING! Encryption is irreversible. The only way to revert to an unencrypted tablet is to perform a factory
data reset, which erases all data on the tablet.
Before you can start encrypting your tablet, you must set a lock screen PIN or password and ensure that your
tablet is plugged in. Schedule an hour or more for the encryption process: you must not interrupt it or you will
lose some or all of your data.
Open Settings and touch Location & security > Encrypt tablet.
Read the information on the Encrypt Tablet screen carefully.
Warning!
You must not
interrupt
the encryption process or you will lose
data.
15
The Encrypt
in. If you change your mind about encrypting your
Touch the Encrypt
Enter your lock screen PIN or password and touch Continue
Touch the Encrypt
The encryption process starts and displays its
which time your tablet may restart
enter your PIN or
power
on
tablet
your
button is dimmed if your battery is not charged or if your tablet is not plugged
tablet,
password.
tablet,
tablet
tablet
to decrypt it.
button.
button again, to confirm you want to continue.
several
Subsequently,
progress.
times.
you must enter your PIN or password each time you
Encryption can take an hour or more, during
When encryption is
touch Back .
.
complete,
you’re prompted to
Page 16
Customizing the Homescreen
You
can add app icons, shortcuts, widgets, and other items to any part of
free
space. You can also change the wallpaper
Open the Home screen where you want to add the item.
Touch the Customize button at the top-right of the screen.
Touch the category of the item you want to add.
If there are no empty spots on the Home screen,
delete or move an item before you can add another.
In the menu that opens, touch the tab for the category of the item you want to
add.
.
any
Home screen where
Add
is dimmed and you must
there’s
Changing Homescreen Wallpaper
You
can add app icons, shortcuts, widgets, and other items to any part of
free
space. You can also change the wallpaper
.
any
Home screen where
there’s
Touch the Customize button at the top-right of the screen.
Touch
Touch Gallery, Live
Touch Gallery to use a picture that you have
tablet.
Touch Live
tablet.
the
button.
Touch
come with the
Touch a sample to view a larger version.
You
Touch Save or Set
Wallpapers
wallpapers
Some live wallpapers change according to the time of day,
screen,
can a l s o download
tell the time, or offer other information. Some
Wallpapers
wallpapers, or Wallpapers.
captured
to open a scrolling list of
to open a screen where you can sample the wallpaper
tablet.
Slide the miniature im age s left and right
additional
wallpaper.
wallpapers from Android Market.
animated
using the camera or copied to your
wallpapers installed on your
live wallpapers have a
to
in
response
view the
to touching
Settings
images that
samples.
16
Page 17
Working with Apps
Home’s Apps screen has icons for all of the apps on your
installed fr o m Android Market or other
don’t stop; they keep
on
running: playing music, op e ning
source
s.
When you open an app, the other apps you’ve been using
among your apps, to work with several at once. The Android operating system
ensure that apps you aren’t
needed.
mi
sbehaving
For this reason, there’s
.
using don’t
no
need to stop apps unless you’re certain that one you downloaded is
consume
Open the Apps Screen
In Home, touch the Apps button at the top right of the screen.
resour
tablet,
including any
web pages,
and so on. You can quickly
ces unnecessarily, stopping and starting them as
apps
that you downloaded and
and
apps work together to
switch
If you have more apps than can fit on the Apps
You
can add
outlines of the Home
shortcut
to an app to a Home screen by touching & holding the app
screens
appear below the
you pause before releasing your finger on a Home
shortcut
where you want it
.
screen,
app
icons. Then drag the app icon to the Home
screen,
Uninstall an App
You
can uninstall app s you downloaded from Market and other
Open the Manage Applications screen
Touch the
Touch the app you want to
Touch the
Touch
Downloads
Uninstall button.
OK
in the screen that asks you to confirm you want to uninstall t h e app.
tab.
unin
stall.
you can slide the scre
en
left or right to view more.
on the Apps screen until
that Home screen enlarges, so you can
sources.
.
screen.
place the
If
17
Page 18

Working with Widgets
Widgets are
applications,
information or controls for their
miniature
apps that you can place on your Home
screens. Some
widgets are
standalone
some open a related applicat i o n when you touch them, and others provide a subset of useful
related app lications
.
Stock widgets include a clock, a Gmail widget that displays recent messa ge s
a
calendar
Ma
rket.
such as the Picture Frame
Some widgets give you controls to view and manage their
the Music Player
You
can scroll information displayed by different widgets in different ways, for example, you can scroll up or
that shows upcoming appointments
, and
so on. You can also download widgets from Android
Some widgets simply display information and or act as
widget.
application’s
widget.
shortcuts
down among events in the Calendar widget, or with a carousel ef fect in the Books widget.
If you touch & hold some widgets, such as the Gmail widget,
handles
, a
for opening
conte
nt,
appear at
music player, a picture frame,
their
applications,
such as the Clock widget or
its
edges so you can resize
it.
18
Page 19
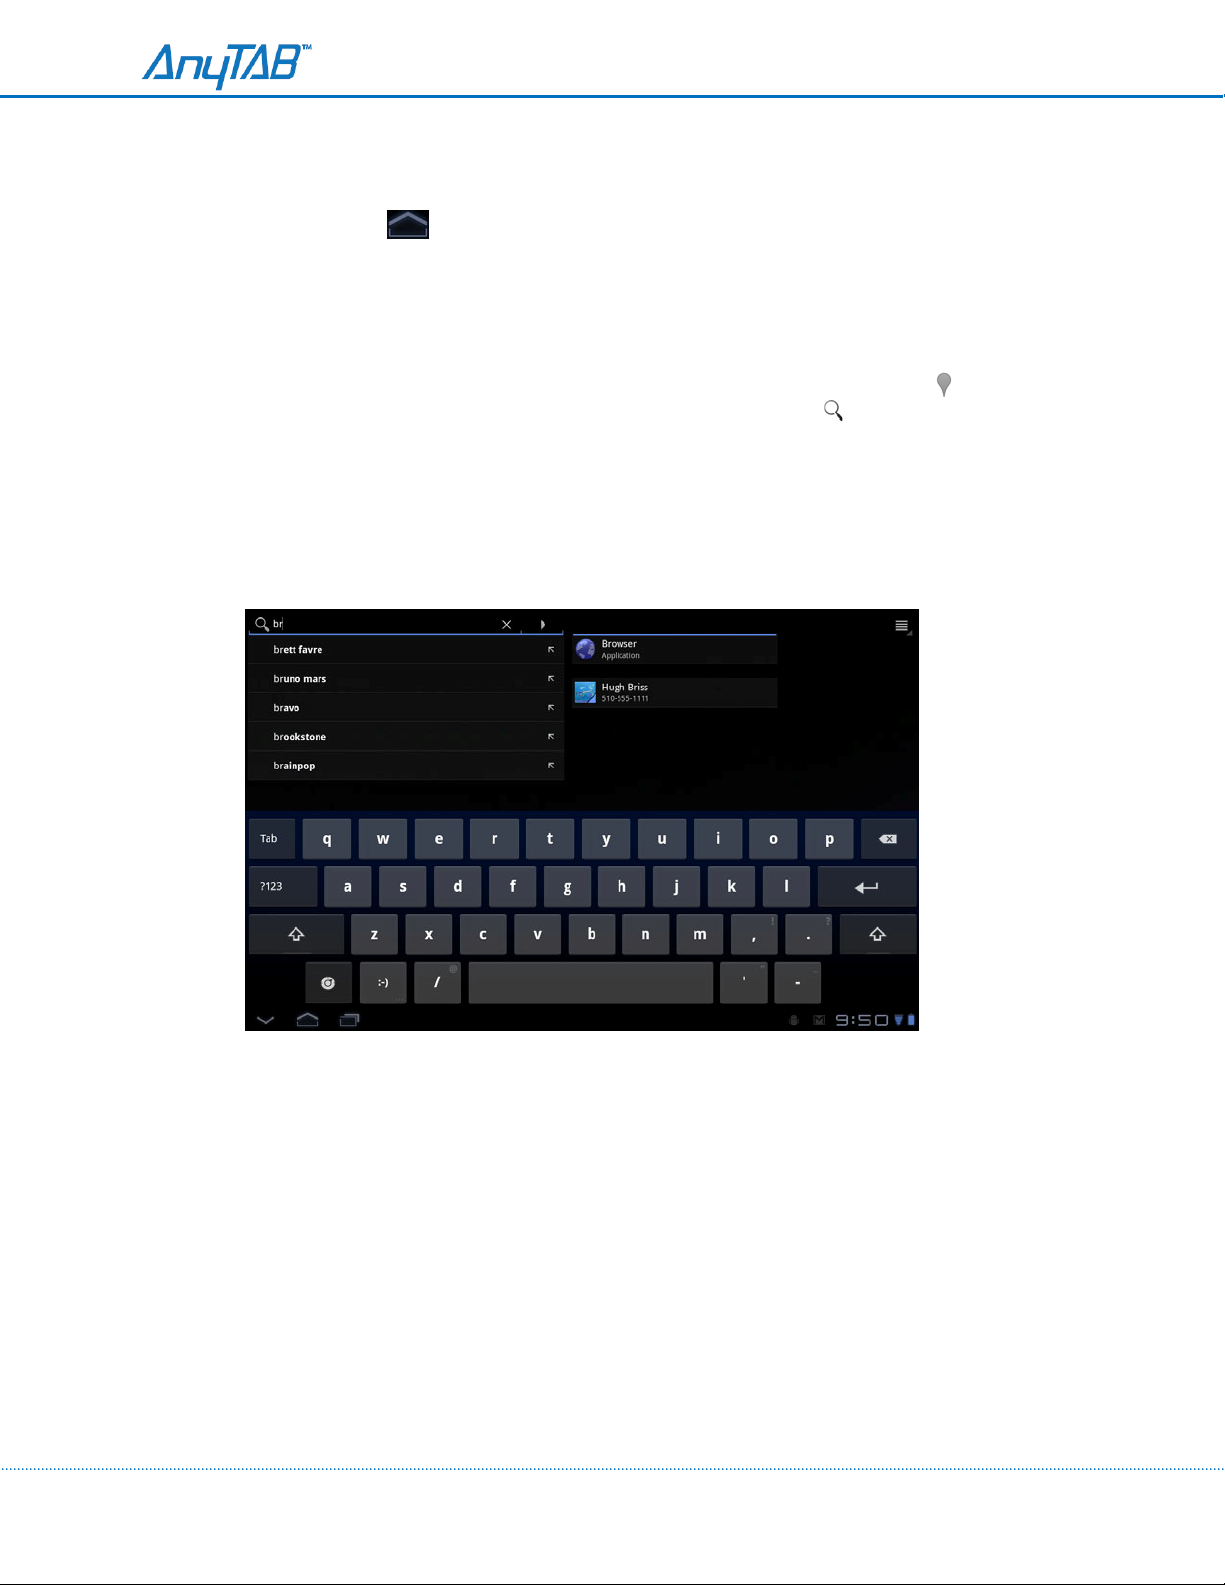
Searching your tablet and the web
You
can use Google Search to find information on your tablet and the web.
1. Return Home
2. Touch the Google Search button at the top left of the screen
3. Start typing what you want to search for
As you type,
tablet and local
Search box. If you do,
subsequent suggestions
icon. Touch one to open
or add the
search box opens when you touch the Search button.
suggestions
business
from Google web search appear below the Search box, and results from your
searches
new
to your
.
appear to the
suggestions
to quickly refine your
a business
contacts.
right. You can touch a suggestion’s arrow icon to enter it in the
appear and you can enter more text or touch the arrow ic
listing panel, with icons you can touch to call, map, get details abou
In
applications
.
search.
Business
such as Gmail and Contacts, the
listings are
indicated
on
next
by a Maps marker
application’s
own
t,
19
Page 20
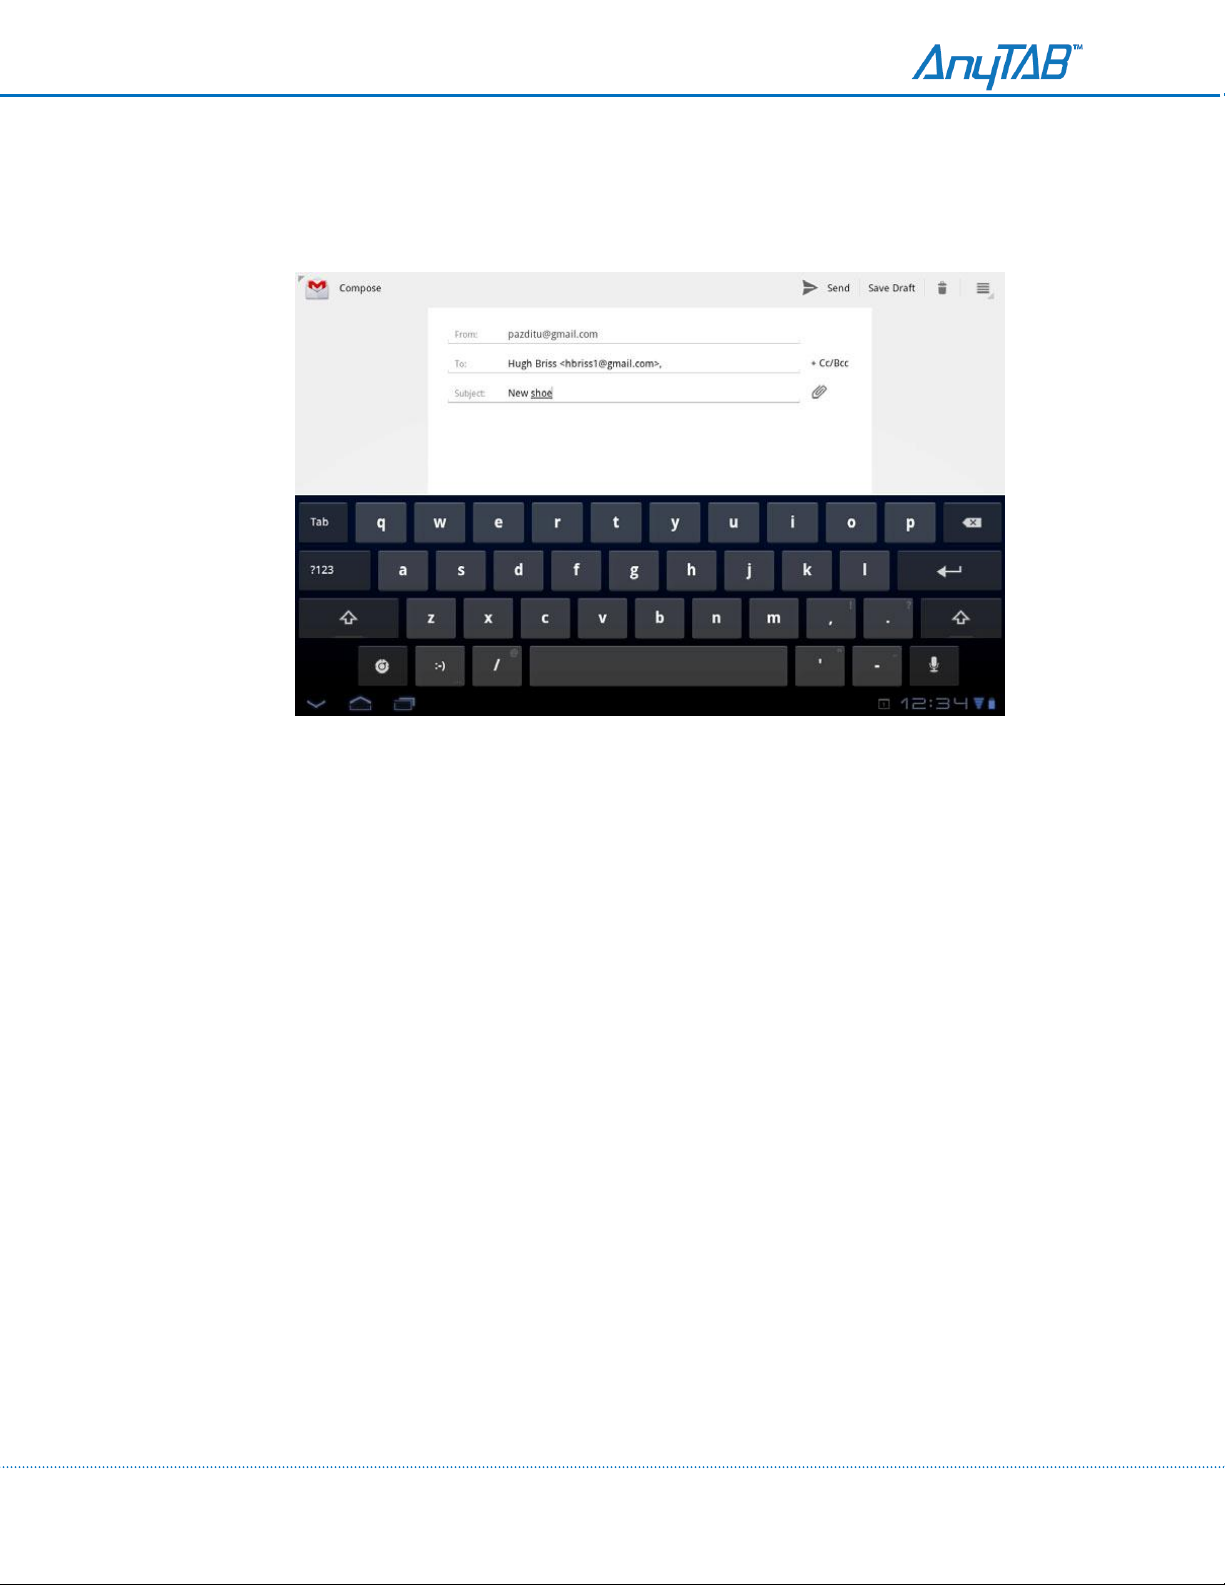
Using the Android keyboard
You
can enter text using the
you touch a text field where you want to enter text to open
ke
yboard. The onscreen k e y b oa rd
onscreen
opens.
keyboard. Some apps open the keyboa
the keyboard.
Touch a text field to open the
rd automatically.
In others,
Touch the keys on the keyboard to enter text.
underli
keyboard. The
strip to enter it
are
ned.
If you set the keyboard to show correction
underlined
instead. You can turn the suggestion feature on or off and change whether
shown with the Android keyboard
word in the strip is the
settings.
As you type, words that the keyboard has
suggested
Enter text by speaking
You
can use voice input to enter text by
speech-recognition
service, so you must have a data
speaking. Voice
connection
Connecting to Networks and Devices
Your
tablet can
connect
or to a keyboard, mouse, other
your tablet to a
connect to
computer,
Wi-Fi data networks, and Bluetooth devices,
to transfer files from your
input
devices, or to a camera to import its photos.
suggestions
suggestions,
word. You can also touch another word in the
input is an
they appear in a
experimental
on a mobile or Wi-Fi network to use it
such
as
tablet,
using a USB
strip
above the
suggestions
feature that uses Google’s
headsets. You can
connection
for are
or
Bluetooth,
.
20
Page 21
Connected to a Wi-Fi network (waves
indicate connection strength)
Notification that an open Wi-Fi network is in
range
Connecting to WiFi Networks
Wi-Fi is a wireless networking technology that can provide
meters, depending
on the Wi-Fi router and your surroundi
Internet access
ngs.
at
distances
of up to
100
To use Wi-Fi on your
and you can simply
tablet so it can
There are
certificates
Turn off Wi-Fi when you’re not using it, to extend the life of your battery
whether you want to
The
Network
connected
settings,
network that is
numerous
or other
Status
bar displays icons that
status
to Google services, for syncing your Gmail, Calendar
and so on. If you don’t have a Google Account or if, for example,
tablet,
connect
connect
systems for securing Wi-Fi
schemes
disconnect
icons turn blue if you have a Google Account added to your
not
connected
you
connect
to them. Others im
to them
.
to ensure that only authorized
from Wi-Fi ne
to the
to a wireless
indicate
Internet,
plement
connections,
tworks when your tablet is sleeping.
Wi-Fi
status.
the network icons are
access
security
point, or
features,
including some
users
can
events,
“hotspot.”
so you must configure your
connect.
between charges. You can also set
tabl
contacts,
you’re
gray
.
Some
hotspots
that
rely on secure
et
and the tablet is
for backing up your
connected
are open
to a Wi-Fi
21
Page 22

Turn WiFi on and Connect to a Network
Open the Settings app.
Touch
Wireless & networks > Wi-Fi
Check Wi-Fi to turn it on.
setti
ngs.
The tablet scans for available
Secured networks are
If the tablet finds a network that you
Touch a network to
connect
to
indicated
it.
Wi-Fi
networks and displays the names of those
with a Lock icon.
connected
If the network is open, you are prompted to confirm that you want to
Connect.
If the network is
administrator
By
default,
You
can touch
details manually, if you or your
secured,
for
details.)
you obtain an
DHCP
to change the IP
you’re prompted to enter a password or ot
address
on the network from the network itself,
netw
settings
ork
administrator
to
Static, so you can enter
require it. If you do, you must
An IP address for your tablet that is valid and unique for your Wi-Fi
The Gateway for the
ne
twork
The network prefix length (a number between 0 and 32, such as 24 for
16 for a Class B, or 8 for a Class A network)
At least one DNS server for the
network
to previously, it
connect to
her
credentials.
that network by touching
using the DHCP
an
address and other network
connects
to
(Ask your network
protocol.
enter:
network
a Class C network,
it
finds.
it.
When you’re
details about the
connected
speed,
to a network, you can touch its name in the Wi-Fi settings screen for
security,
address,
and
related
settings.
Modify how you connect to a WiFi Network
Touch & hold a network in the
Touch Modify
Change the
22
Touch
Save
network
settings
.
list
in the dialog that opens.
you
want.
Page 23

Add a WiFi Network
You can add a Wi-Fi network so the tablet will remember it, along with any security credentials and connect
to it automatically when it is in range. You must also add a Wi-Fi network to connect to it, if the network
does not broadcast its name (SSID), or to add a Wi-Fi network when you are out of range of it
To join a
scheme
secured
network, you need to
contact
the network’s
is deployed on it and to obtain the password or
administrator
other required
to
security
.
learn
what security
credentials.
Turn on Wi-Fi, if
If you’re adding a Wi-Fi network when first setting up your
on
automatica
In the Wi-Fi
discovered
Enter the SSID (name) of the
If
necessary,
Touch
Save.
The information about the network is saved, so you are
it’s
not already on.
tablet,
lly.
settings screen,
networks).
touch Add
Wi-Fi
network
(at the bottom of the list of
network.
enter security or other network configuration details.
connected automatica
Wi-Fi
is
turned
lly
the next time you
come within range of this network.
Forget a WiFi Network
You can make the tablet forget about the details of a Wi-Fi network if you don’t want the tablet to connect
to it automatically, or if it’s a network you no longer use.
Turn on Wi-Fi, if
In the Wi-Fi
Touch Forget in the dialog that
it’s
not already on.
settings screen,
touch the name of the network.
opens.
Set a Wi-Fi disconnect policy
By
default,
network
You
can change this policy to stay
battery life isn’t a problem), or never to
network data
.
23
the tablet
instead.
disconnects
from Wi-Fi when the screen turns off
It does this to conserve battery power, and
connected
disconnect
use.
On the Wi-Fi
settings screen,
Touch the policy you want
and
to
reconnects
Wi-Fi
when the tablet is connected
to Wi-Fi again when you wake
from Wi-Fi, which trades battery life for
touch Wi-Fi
disconnect p
olicy
connects
to a mobile data
to a charger (when
.
reduced
it.
mobile
Page 24

Connecting to Bluetooth devices
Bluetooth is a short-range wireless
information over a
making calls or listening to music,
distance
of about 8
communications
meters.
hands-free
The most
kits for cars, and other portable devices, including laptops.
technology that devices can
common
Bluetooth devices are
use to exchange
headsets
for
There are several Bluetooth profiles that define the
devices. To
you use a new device with your
know how to
Turn off Bluetooth when you’re not using it, to extend the life of your
also be required to turn Bluetooth off in some locations.
Airplane
System bar icons
connect
connect
mode.
To turn Bluetooth on or off:
to a Bluetooth device, you must turn on your tablet’s Bluetooth
tablet,
securely to each
indicate
Bluetooth
Open the Settings
you must “pair” the devi
other. After that, you can simply
status.
appli
cation.
features
and
comm
ce
with your
Bluetooth is turned off when you switch to
Touch wireless and networks
Check or uncheck Bluetooth
Changing your tablet’s Bluetooth name:
Your tablet has a generic Bluetooth name by
them. You can change the name so that it is
default,
more re
which is visible to
cog
nizabl
e.
uni
cations standards
tablet,
connect
batt
ery
between charges. You may
other
devices when you
for Bluetooth
radio.
The first time
so that both devices
to a paired device.
connect
Open the Settings
appli
cation.
Touch wireless and networks – Bluetooth settings.
Check Bluetooth to turn it on.
Touch Device name , enter a name, and touch OK.
24
Page 25

Pairing your tablet with a Bluetooth device:
You
must pair your tablet with a device before you can
they stay paired unless you unpair
them.
connect
to it. Once you
pair your tablet with a device,
Open the Settings
appli
cation.
Touch Wireless & networks > Bluetooth settings.
Check Bluetooth to turn it on.
Your tablet scans for and displays the IDs of all available Bluetooth devices in range.
If the device you want to pair with isn’t in the list, ensure that the other device is turned on and
set to be discoverable.
If your tablet stops scanning before your other device is ready, touch Find nearby devices and
then Scan for devices.
Touch the ID of the other device in the list in the Found list to pair them.
The devices pair with each other. If you’re prompted to enter a passcode, try entering 0000 or
1234 (the most common passcodes), or consult the documentation that came with the device to
learn its passcode, or what other procedures it requires for pairing.
If the pairing is successful, your tablet connects to the device.
Connect to a Bluetooth device:
Once paired you can connect to a Bluetooth for example, to switch devices, or to re-connect to a device that has
come back into range.
25
Open the Settings
Touch
Check
Wireless & networks > Bluetooth
Bluetooth
appli
cation.
to turn it
on.
In the list of devices, touch a paired but
- If the device you expected isn’t
- When the tablet and the device are
in the list.
displayed,
connected,
sett
ings.
unconnected
touch Scan for
the device is displayed as
device in the list.
devices.
connected
Page 26

Connect to a Camera:
If you have a camera or other device that
USB port and import the
pictures
on the camera
supports
into
the PTP protocol, you
Gallery your
tablet.
can
connect
it to your tablet’s
Be sure to read the owner’s guide for your camera to learn what protocols
use PTP over USB. You may need an
your tablet’s owner’s
guide.
Connect your camera to your tablet using your
adapter
from your tablet’s
adapter
cable
manufacturer
to
connect
camera’s USB cable and, if
for its USB port.
your camera’s USB cable to your tablet: see
Gallery opens, with your cameras’ photos added as an album, labeled Touch
Touch the album of your
The album opens with all of your camera’s photos
Gallery on your
tablet.
Select the photos you want to
The number of photos
You
can touch the menu and touch
import. If all photos
You
Touch
Touch
can also touch individual photos to select or
Import
A dialog displays the progress of importing the photos you
Done
at the top-right of the Application bar.
in the Application bar and
selected
aren’t
camera’s
photos.
selected
import.
(initially, all) is displayed as the title of a
selected,
Deselect
Deselect
disconnect
all if you want to select just
all
changes
deselect them.
to
sel
your
for importing to
Select
ected.
camera.
it supports
necessary,
menu
in the Application
the
photos you want to
all in the menu.
and whether it can
an
to
import.
bar
.
Connecting to a Windows computer via USB
You
can use the USB cable that came with your tablet to
music,
protocol, which is
Use the USB cable that came with your tablet to
pictures,
and other files between your tablet and
supported
by
most
recent versions of Wi
connect
tablet’s USB storage or SD card is mounted as a drive on your
forth as you would using any other
co
mputer. When you’re done, simply
external
disconnect
device. For more information, see the
the tablet from your
cable.
connect
the
computer.
ndows.
the tablet to a USB port on your
computer. You
it to a Windows
This
connection
can now copy files back and
computer
by unplugging the USB
computer,
to transfer
uses the MTP
computer. Your
documentation
for your
26
Page 27

Connecting to a Macintosh computer via USB
You
can
connect
and other files between your tablet and the
This
connection
install the free Android File Transfer
http://www.android.com/filetransfer,
your tablet to a
computer
running Mac OS X with a USB cable,
computer
uses the MTP protocol, which is not
application on
along with
instructions
.
supported
your
Macintosh.
by Mac OS X natively, so you first need to
on how to install it.
to
transfer music,
It’s available from
pictures,
Use the USB cable that came with your tablet to
tablet’s USB storage or SD card is mounted as a drive on your
forth as you would using any other
co
mputer. When you’re done, simply
cabl
e.
external
disconnect
connect
the tablet to a USB port on your
computer. You
can now copy files back and
device. For more information, see the
the tablet from your
computer
by unplugging the USB
computer. Your
documentation
Optimizing battery life
You
can extend your battery’s life between charges by turning off features you don’t need. You can also monitor
how apps and system resources consume battery power. If you don’t need them, turn off
for Gmail, Ca
lenda
r
Turn off radios that you aren’t
If you aren’t using Wi-Fi, Bluetooth, or GPS, use the Settings app to turn
Turn down screen
If you
don’t
and other
need them, turn off
apps.
brightness
Use the Quick Settings to check and control the
brightness,
and
syncing.
using.
and set a shorter screen timeout.
automatic
syncing for Gmail, Ca
status
of radios, the
If you know you won’t be near a mobile or Wi-Fi network for a while, switch
mode.
automatic
lendar,
display
syncing
them off.
Contacts,
to
Airplane
for your
27
Page 28
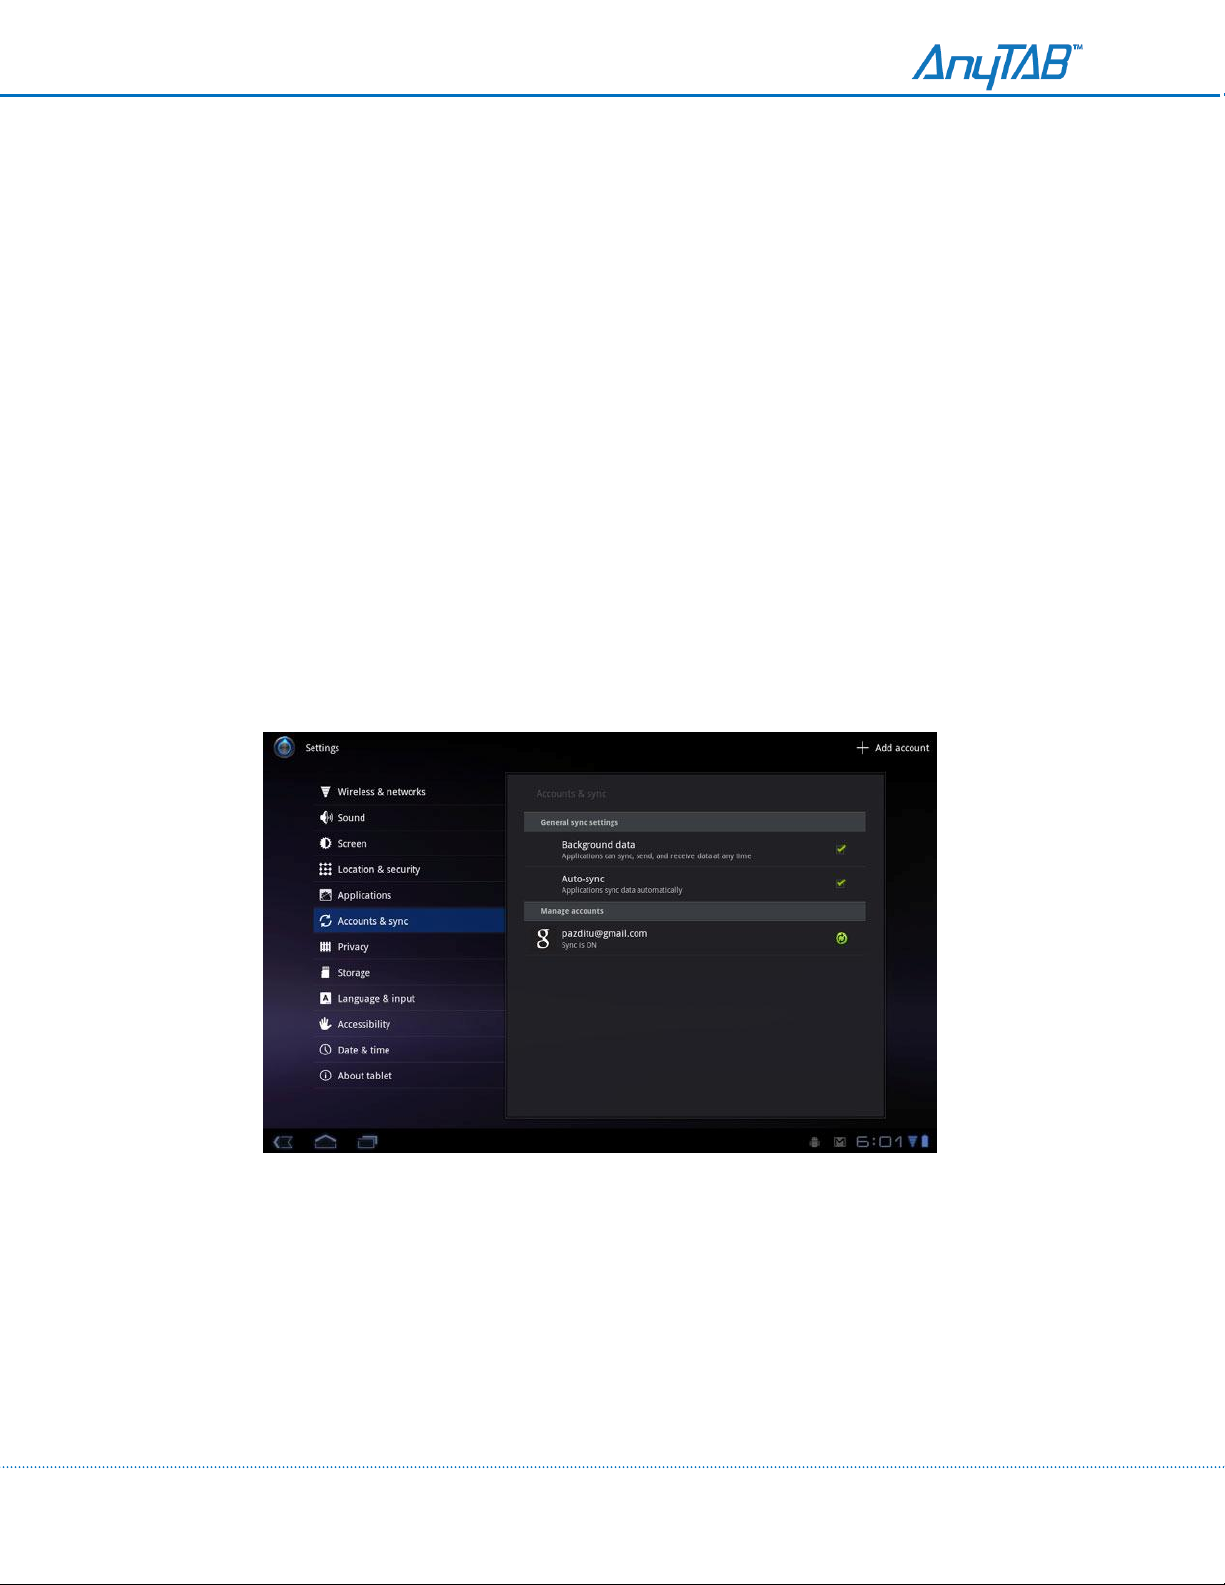
Accounts
You
can sync
Google Accounts or other kinds of
contacts,
email,
calendar
events, and other information with your tablet from multiple
accounts, depending
on
the
applications installed
on your
tablet.
For example, you could start by adding your personal Google Account, so your personal email,
and
calendar
email and have your work
You
configure how your
settings
your password and other
are always available. Then you could add
contacts
account interacts
handy
.
with the
an
applications
and the setting s in Gmail, Calendar, Email, and
general
account settings.
account
on your tablet
other
applications.
from work, so you can read your work
using
the Account & Sync
Use a web browser to change
Adding accounts.
You
can do this by opening the
have an Accounts button or menu item on
Contacts application
you can touch the Menu button in the top-right of the Application bar and then
The Accounts & Sync Settings screen displays your current sync
Settings application
the
screens
and touching Accounts & sync. Many
where you work with
settings
accounts.
touch
For example, in the
Accounts.
and a list of your current
applications
contacts,
acco
unts.
also
28
Page 29

Removing accounts.
You
can do this by opening the
have an Accounts button or menu item on
Contacts application
you can touch the Menu button in the top-right of the Application bar and then
You can remove an account to delete it and all information associated with it from your tablet,
including email, contacts, settings, and so on.
1. Open the Accounts & Sync
2. Touch the
3. Touch
4. Confirm that you want to remove the
Settings application
account
Remove
account.
to
delete.
the
setti
and touching Accounts & sync. Many
screens
where you work with
ngs.
acc
ount.
accounts.
touch
applications
For example, in the
Accounts.
also
Contact
Contacts gives you quick and easy
tablet and sign into a Google Account, any existing
tablet.
on the web, or on another device are made everywhere the next time you
Information about your
If you have more than one
You
can also manage that process
Touch the Contacts icon on the Apps screen or touch a shortcut icon on a Home screen. Your
contacts
contact
You
can drag the list of
s
After that, your
are displayed
in the main part of the
contacts are
contacts
account
alphabeti
contacts
access
is shared with other
manually.
cally at left, in a scrolling list, with the
screen.
up or down to scroll it, or drag the scroll
to the people you want to reach. When you first turn on your
synchronized:
with
contact information,
contacts
any
applications,
from that
changes
account
you make to your
such a Gmai
Contacts
are downloaded to your
contacts
sync.
l,
Google Talk, and so
joins
duplicates
details of the currently
knob
to scroll quic
on the
into a single entry.
selected
kly.
tablet,
on.
29
Page 30
Connecting quickly with your contacts
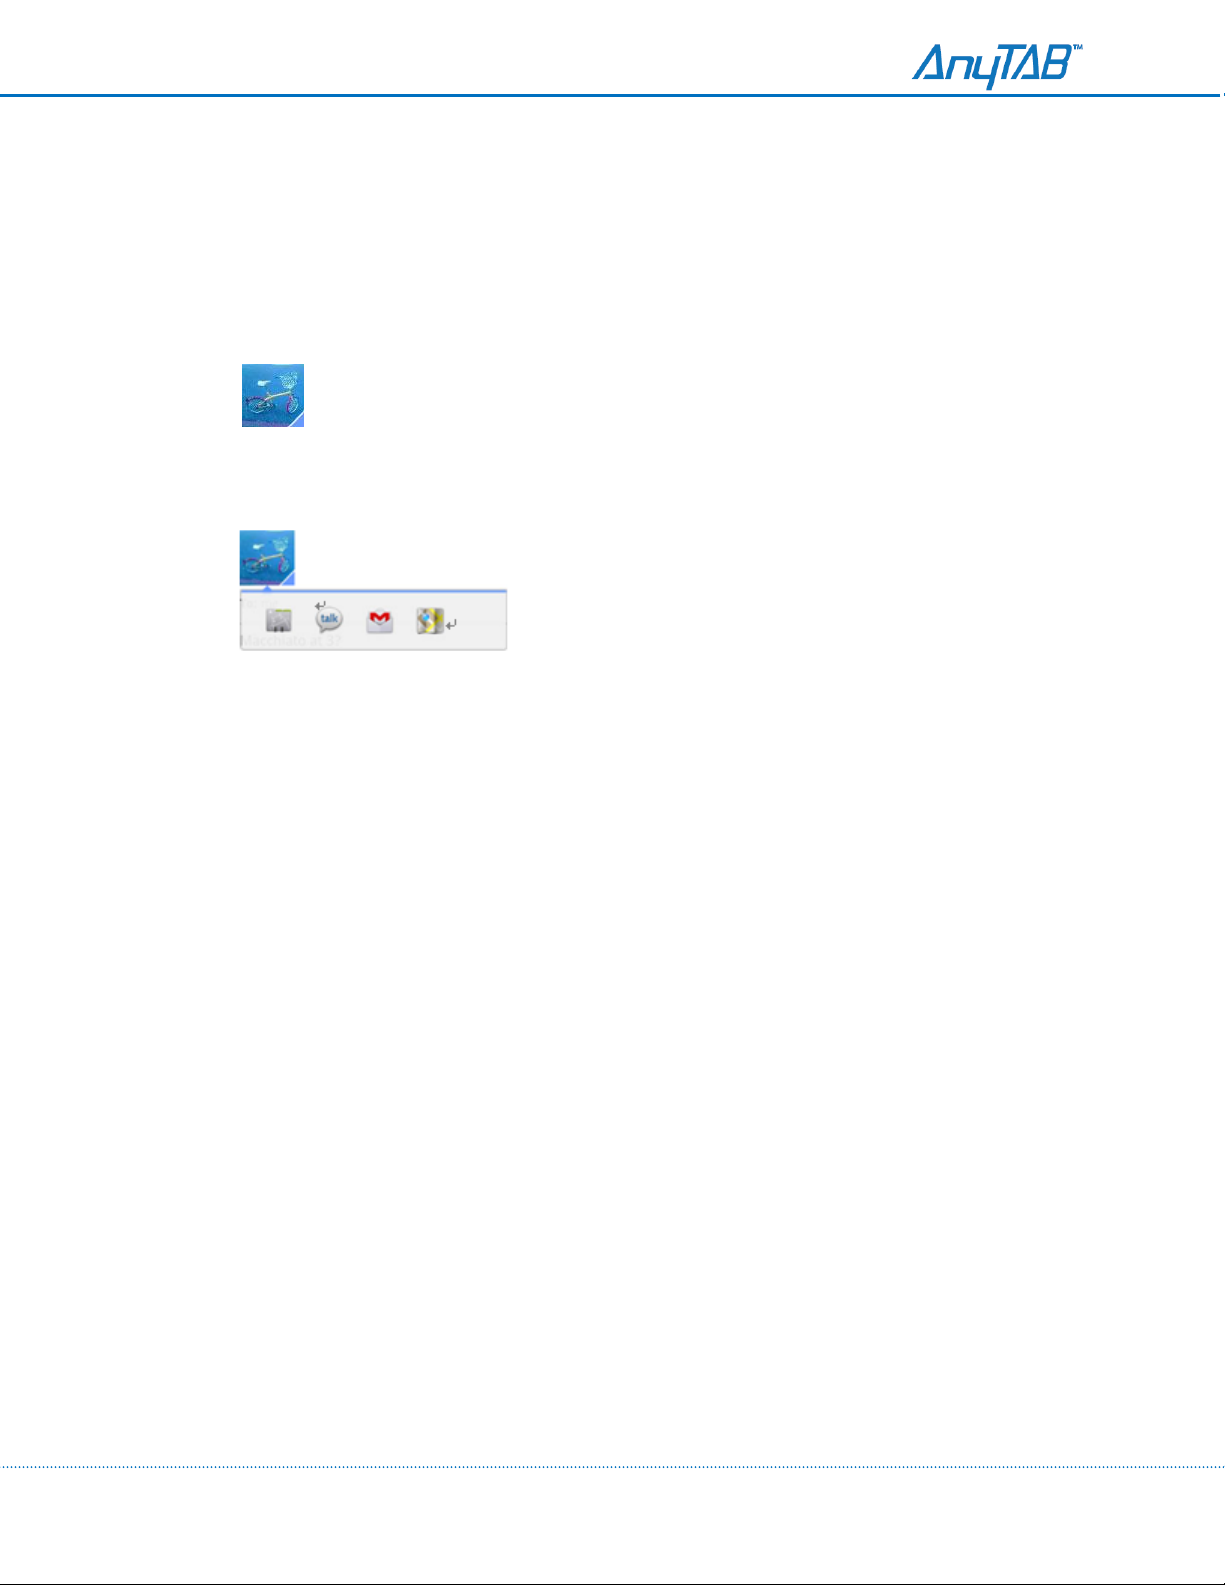
As you build up your list of
chat, email, or to locate your
Identify a Quick Contact icon by its
contacts,
contacts
you can use Quick Contact for Android
on a
map.
frame.
in
many apps to quickly start a
Contacts that you can
but usually with a picture frame that looks like
Touch a Quick Contact icon to open a bubble with icons for all the ways you
with the co
If there are more icons than can fit in the bubble, drag them left and right
Touch an icon to open its app, where you can start
away.
You
can also touch an icon to edit the
address
your
tablet.
You
can add a shortcut for a
Quick Contact for Android for that
ntact.
in Google Maps, and so on,
access
with Quick Contact are displayed differently
this:
contact
contact.
contact’s
depending
to your Home
communicating
information in Contacts, to view the contact’s
on which apps and accounts
screen,
which you can
with your
in
different apps,
can
communicate
to
view them
contact
are configured on
then touch to open
all.
right
30
Page 31
Gmail
Gmail is an Android
your
tablet,
you were
application
prompted
for working with Google’s web-based email
to sign into an
existing
service.
When you first set up
Google Account or to create a new
messages
Information about your
from your Gmail
contacts
accounts
When you open Gmail, your most recent
Gmail after using other
applications,
account.
on the
When you open Gmail on your
web.
is shared with other
conversations
the last screen you we
Touch the Gmail icon on the Apps screen or touch a
applications,
such a Gmai
are displayed in your
re
working with is
shortcut
icon on a Home screen.
tablet,
Inbox.
your Inbox contains the
l,
Google Talk, and so
When you return to
displayed.
on.
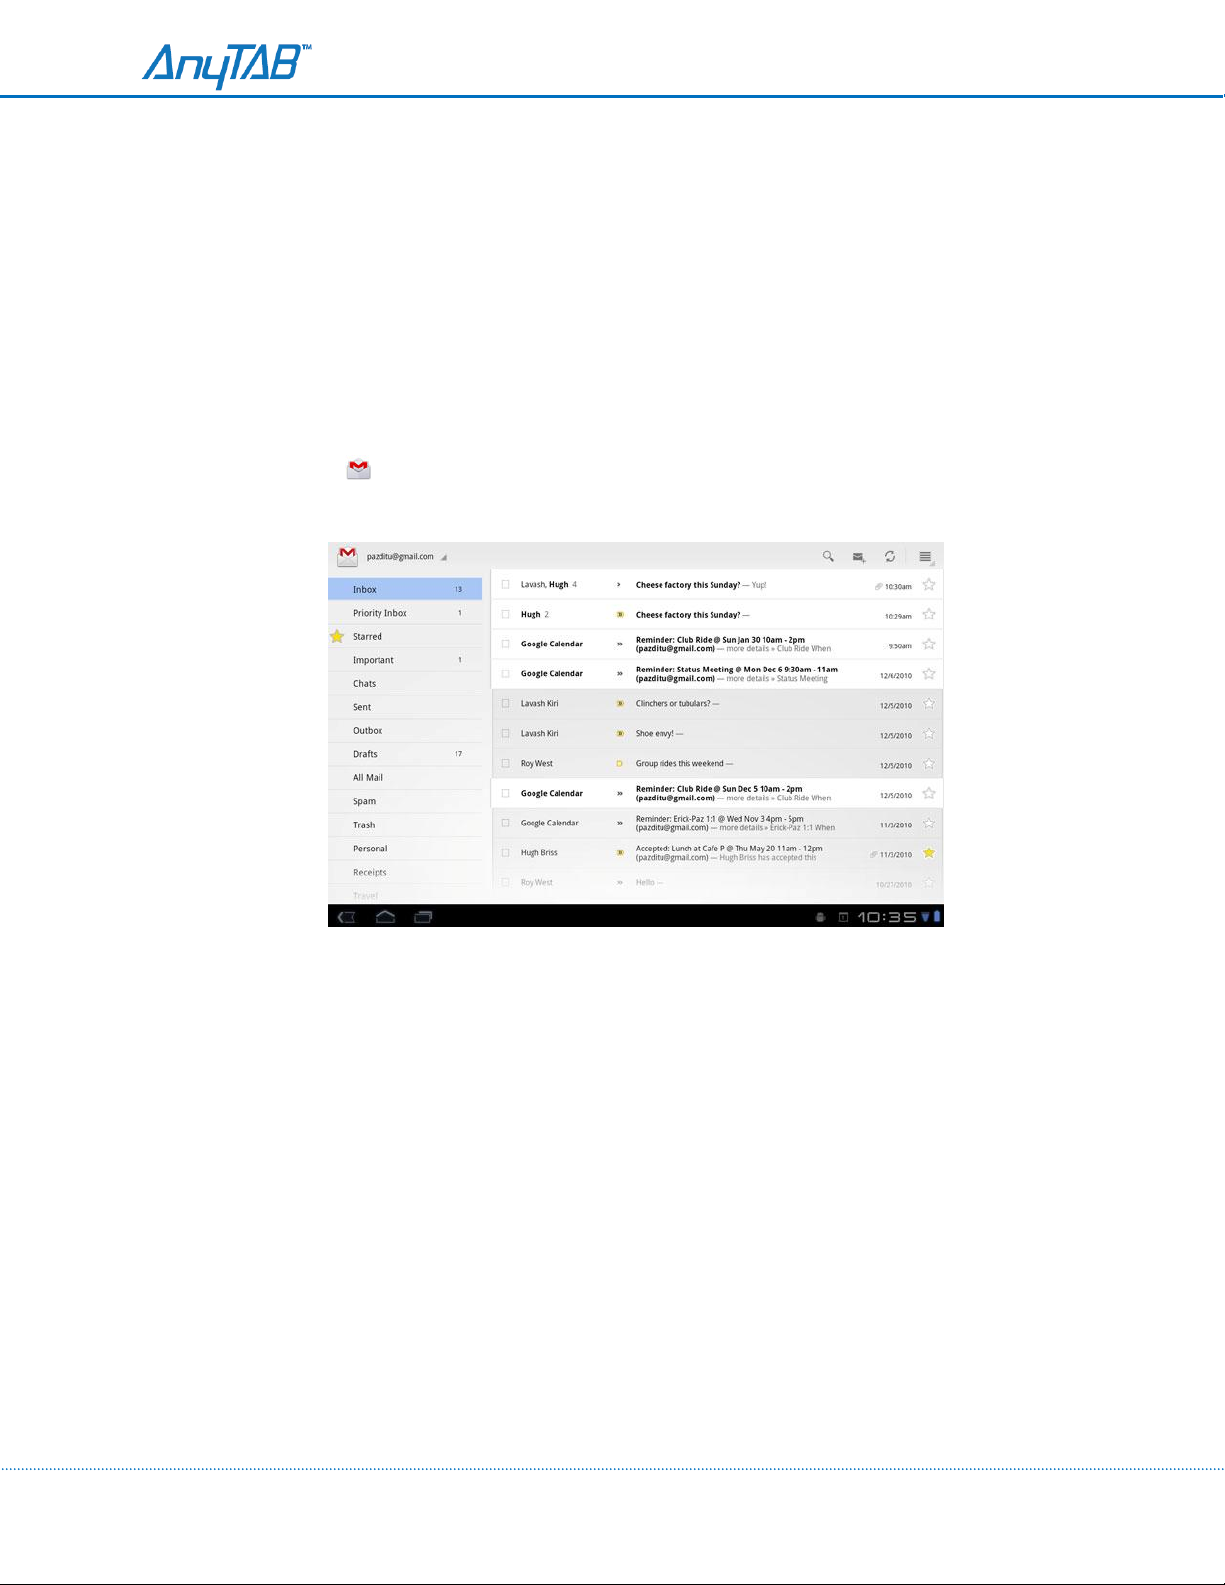
Gmail opens with a scrolling list of labels on the left and the contents of your Inbox on the right, with the
conversation with the newest messages on top. All of your conversations are displayed in the Inbox unless you
Archive, Delete, or Filter them.
31
Page 32

Calendar
Calendar on your tablet works with the web-based Google Calendar
managing events,
meetings,
and
appointments.
calendaring
service for creating and
Calendar on the tablet is optimized for the
are only available in Google Calendar on the web (visit
features
of the web version of
Calendar).
tablet.
Some Calendar
http://
calendar.google.com
features,
such
as
creating Calendars,
to learn about the
Viewing your calendar and events
Open Calendar to view events you’ve
tablet,
Account, or you created a new
displays any existing
You
them to display in Calendar.
When you first set up Calendar to synchronize events on your
month through one year in the future. Subsequently, Calendar keeps a year’s worth of future events
synchronized between your
Calendar on
you configured it to use an existing Google
calendar
can add
additional accounts
tablet and the web, plus any later events that you add to your
your
tabl
et.
created
account.
events from your Google Account on the
with Google Calendar or other
or that others have invited you to. When you first set up your
The first time you open the Cale
calendars
tablet,
ndar
application
web.
to your
it includes
on your
tablet,
events from the previous
and configure
calendar
tablet,
it
using
32
Page 33
Google Talk
Google Talk is Google’s
in real time with other people who also use Google Ta
computer
.
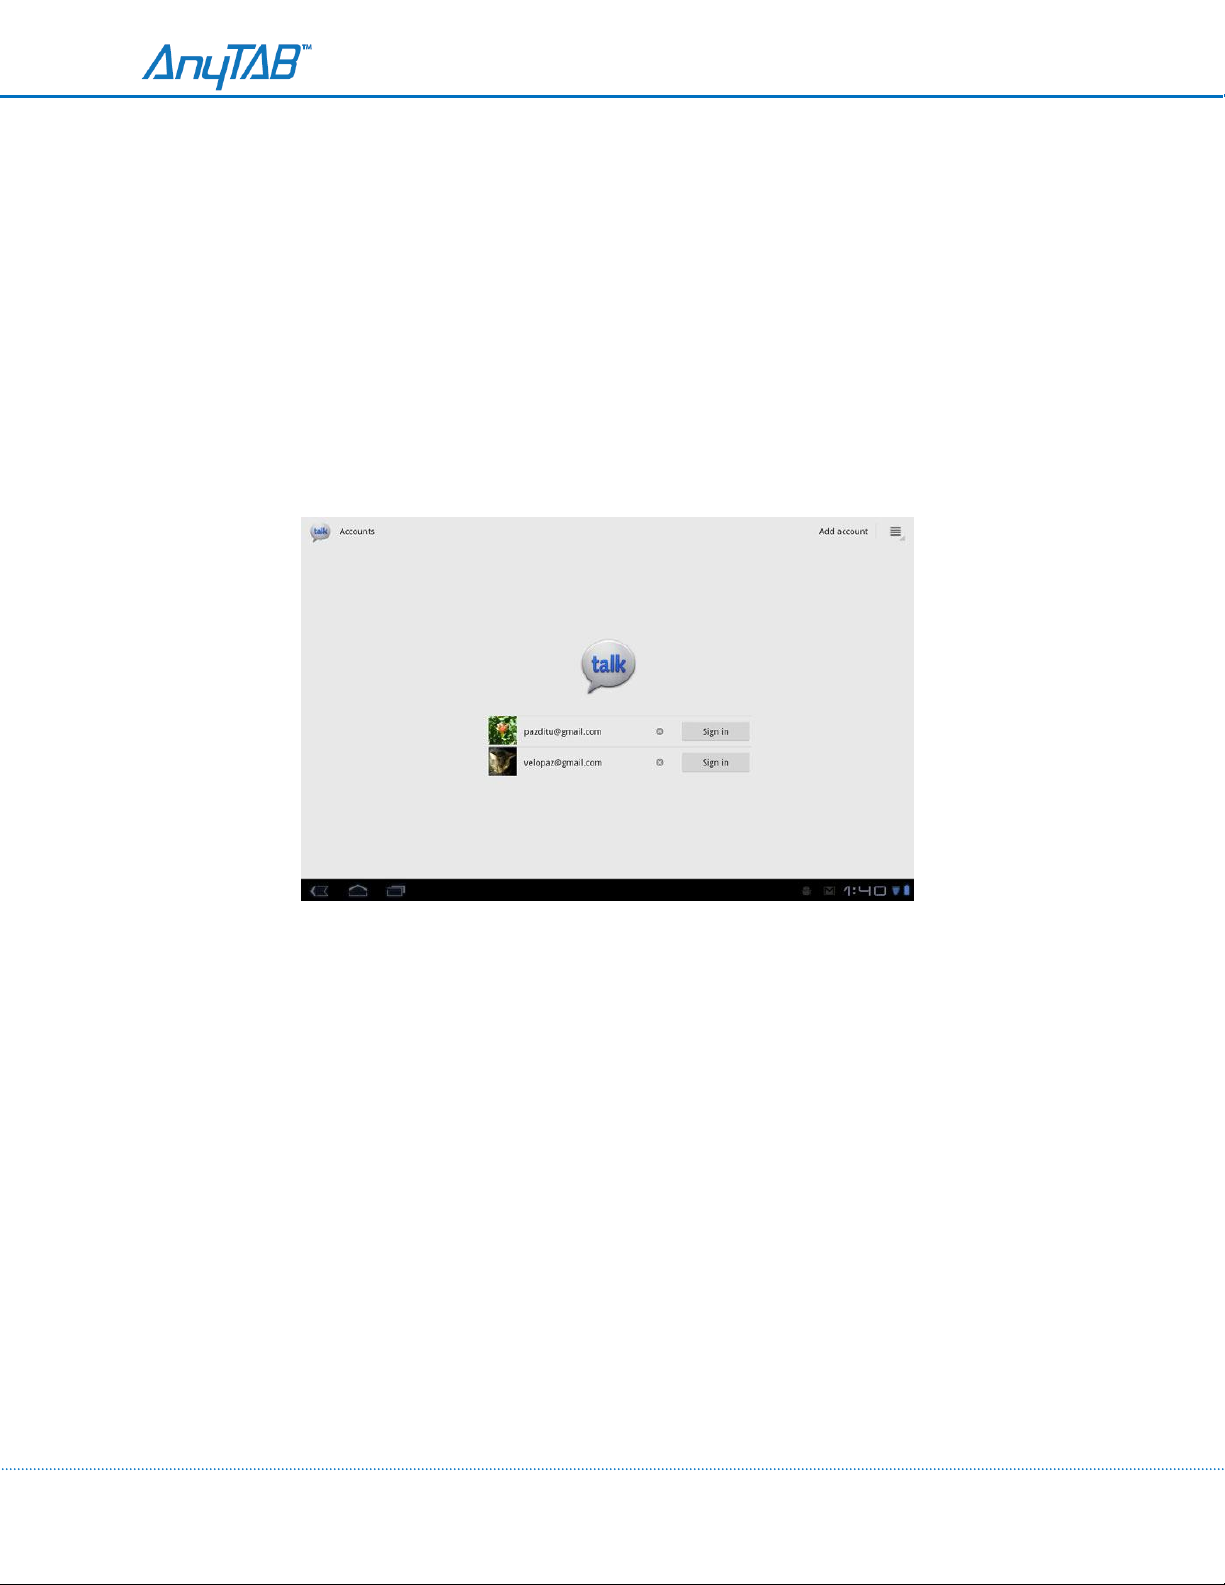
Signing in and opening your Friends list
Touch the Google Talk icon on the Apps screen or a shortcut icon on
If you are not already signed into Talk, you’re prompted to sign into a Google Account you added to your
tablet. You remain signed in, even when you’re
instant
messaging and audio and video chat service. You can use it to
lk,
on another Android tablet or phone or on a
using
other
a Home screen.
applications,
until you deliberately
communicate
sign
out.
You
can add a Google Account by touching the Add
to open the Accounts & Sync
Once you sign into Google Talk, your Friends list is displayed on the left
information is displayed in the main part of the screen. Your
added by using
application.
Google Talk on the web, on your tablet or other Android device, or with a desktop Talk
settings.
account
button at the
Friends list includes all of the friends you’ve
top-
and
your current
right of the Accounts
status
screen,
and other
33
Page 34

Email
You
use the Email
wizard that makes it easy to configure it for
on IMAP and
POP3.
application
to read and send email from services other
several
popular email service providers, including those based
than
Gmail. Email
includes
a
Touch the Email icon on the Apps screen or touch a
shortcut
icon on a Home
The first time you open Email, a setup wizard opens to help you add an
After the initial
recently, it displays the
You
can also add an Email
from that Home
Each
supported
setup,
Email opens to the last screen you were viewing or, if you have not used Email
contents
account shortcut
screen.
account
- Switch to the
- The
has Inbox, Outbox, Sent, and Drafts folders. Depending on the
by your
account’s service provider, you may have
account
accounts
folders are listed in the left column.
- Touch an account’s
-
The
messages
in that folder are
of the Inbox for the
to a Home
you want to work with.
folder.
displaye
acco
unt
screen,
d.
you picked to send email from by default.
so that you
additi
Switching Accounts
If you have more than one email
Application bar when you are viewing your
bar and then
touch
the
account
account,
the current
mail.
Touch the name of the current account in the Application
account
whose email you want to view.
is displayed at
email
can
onal fold
screen.
account.
open that
features
ers.
the
top-left in the
account
directly
Adding and Changing Email accounts
The first time you open Email,
Email to send and receive email from
in the Accounts
screen.
The Email setup wizard helps you set up your
based on
Thunderbird,
requires
IMAP
and POP3, so you can read and work with the same email as you do on a computer in
Mac Mail, in a web
additional settings,
details manually, though you will typically need to
settings
for your account.
34
you’re
prompted to set up an email
additional acco
account
unts.
The
for many popular
browser, or with another email
account.
accounts
email systems,
application.
or if your service provider is unknown to Email, you can
contact
your email
service provider to
After that, you can configure
that you configure are displayed
including those
If your service provider
enter
determine
the necessary
the right
Page 35
Adding an Email Account
- Touch the Menu button in the Applications bar and touch Account Settings.
- Touch Add Account in the Application bar.
- In the Setup Email screen, enter your email address and password.
- Touch Next. Or, if you need to enter email account settings the wizard can’t configure for you touch
Manual setup.
- If you touch Next, Email attempts to communicate with your email service provider to validate your
account for sending and receiving mail, using just your email address and password. This is sufficient
for most email services.
Change an Account’s settings
You
can change a number of
how you’re notified of new mail, and details about the servers the
receive
- Touch the Menu button in the Application bar and touch Acc
- Touch the name of the account whose
- When you’re finished changing
mail.
settings
settings,
for an
account,
settings
touch Back .
including how often you check for email,
you want to
account
o
change.
uses to send and
unt
settings.
Browser
You
use Browser to open webpages and to search for information on the
Touch the Browser icon on the Apps screen or touch a shortcut icon on
Browser also opens when you touch a web link—for example, in an email or
When you open Browser, the last webpage you were viewing is displayed. If you haven’t used Browser
recently, your homepage
The web address (URL) of the current page is displayed at the top of
URL bar off the top of the screen; if so,
opens.
just
touch the down-arrow in the tab to show it
web.
a Home screen.
chat.
the
window, unless a site scrolls the
again.
35
Page 36

Maps, Navigation, Places, and Latitude
You
use Maps to find your current location; to view real-time traffic
by foot, public
instructions
You
can find street
directly on a street map or
and
neighborhoods.
your
location
transportation,
through Google
bicycle, or car; and
Maps
Navigation
addresses, landmarks,
satellite
With Google
image. In some areas, you
Latitude,
and other information with
to
navigate by using spoken, turn-by-turn driving
(Beta).
and places of
business,
you can view your friends’ locations on your maps and share
them.
conditions, to
and locate
can
view
get
these
street-level
detailed directions
points-of-interest
imagery of
businesses
The Maps app also contains three
features
and Latitude; these appear as app icons in
Maps does not have information about every
Camera
Camera is a
Pictures
computer.
You
can view your
combination
camera and
camcorder
and videos are stored on your tablet’s internal storage. You can copy your
pictures
and videos on your
Gallery
You
use Gallery to view
your
tablet. You can also view
pictures
wi
th
and set them as your wallpaper or
friends, via email or
pictures
pictures
messaging,
and play videos that you’ve taken with
in a Picasa
or by uploading them to the Picasa and YouT
that allow for quick
the
Launcher
.
access
to Google
Places,
location.
that you use to shoot and
share pictures
pictures
tablet,
edit them, share them,
and
so on with Gallery.
Camera, downloaded,
web
album. You can perform basic editing tasks on
contact picture. You can also share your
ube
Navigation (Beta),
and
videos.
and videos to a
or copied to
pictures
web
and videos
sites.
Movie Studio
Use Movie Studio to edit the videos you take with Camera or copy onto your
cut and order
scenes,
add a sound track, and so
on.
36
tablet
into movies. You can
Page 37

Music
Use Music to listen to music and other audio files that you copy from your
Internet.
Transferring music files to your tablet
Music plays audio files that are stored on your tablet’s internal storage, so
must copy audio files from your computer
.
computer
before
you open Music, you
or download from the
Music supports a wide variety of audio file formats, so it can play music that you
stores, music that you copy from your CD
Music
AMR
supports
, MIDI, and
audio files in
OGG Vo
rbis.
numerous
collection,
formats, including MP3, M4A (iTunes application
and
so
on.
Copy music files from your computer
1. Connect your tablet to your
By
default, your
Music will find your music files anywhere you put them on your tablet, except the
Ringtones
2. Copy music and other audio files from your
You
3. If the music files have
albumart.jpg
4. If you have
copy the playlists into
5.
can use
Disconnect
and include it in the same folder as the music files.
created
your tablet from your
tablet stores music in the Music folder at the root of its file
folder.
subfolders
any playlists, create a subfolder for them in your music
it.
computer.
computer
to organize your music files.
accompanying
artwork in JPEG format, rename the
computer.
to your tablet.
purchase
AAC,
art
from online
DRM-free),
system.
file
folder and
But
37
When you next start Music, it
library.
searches
your
tablet’s storage and adds the
music
to your
Page 38
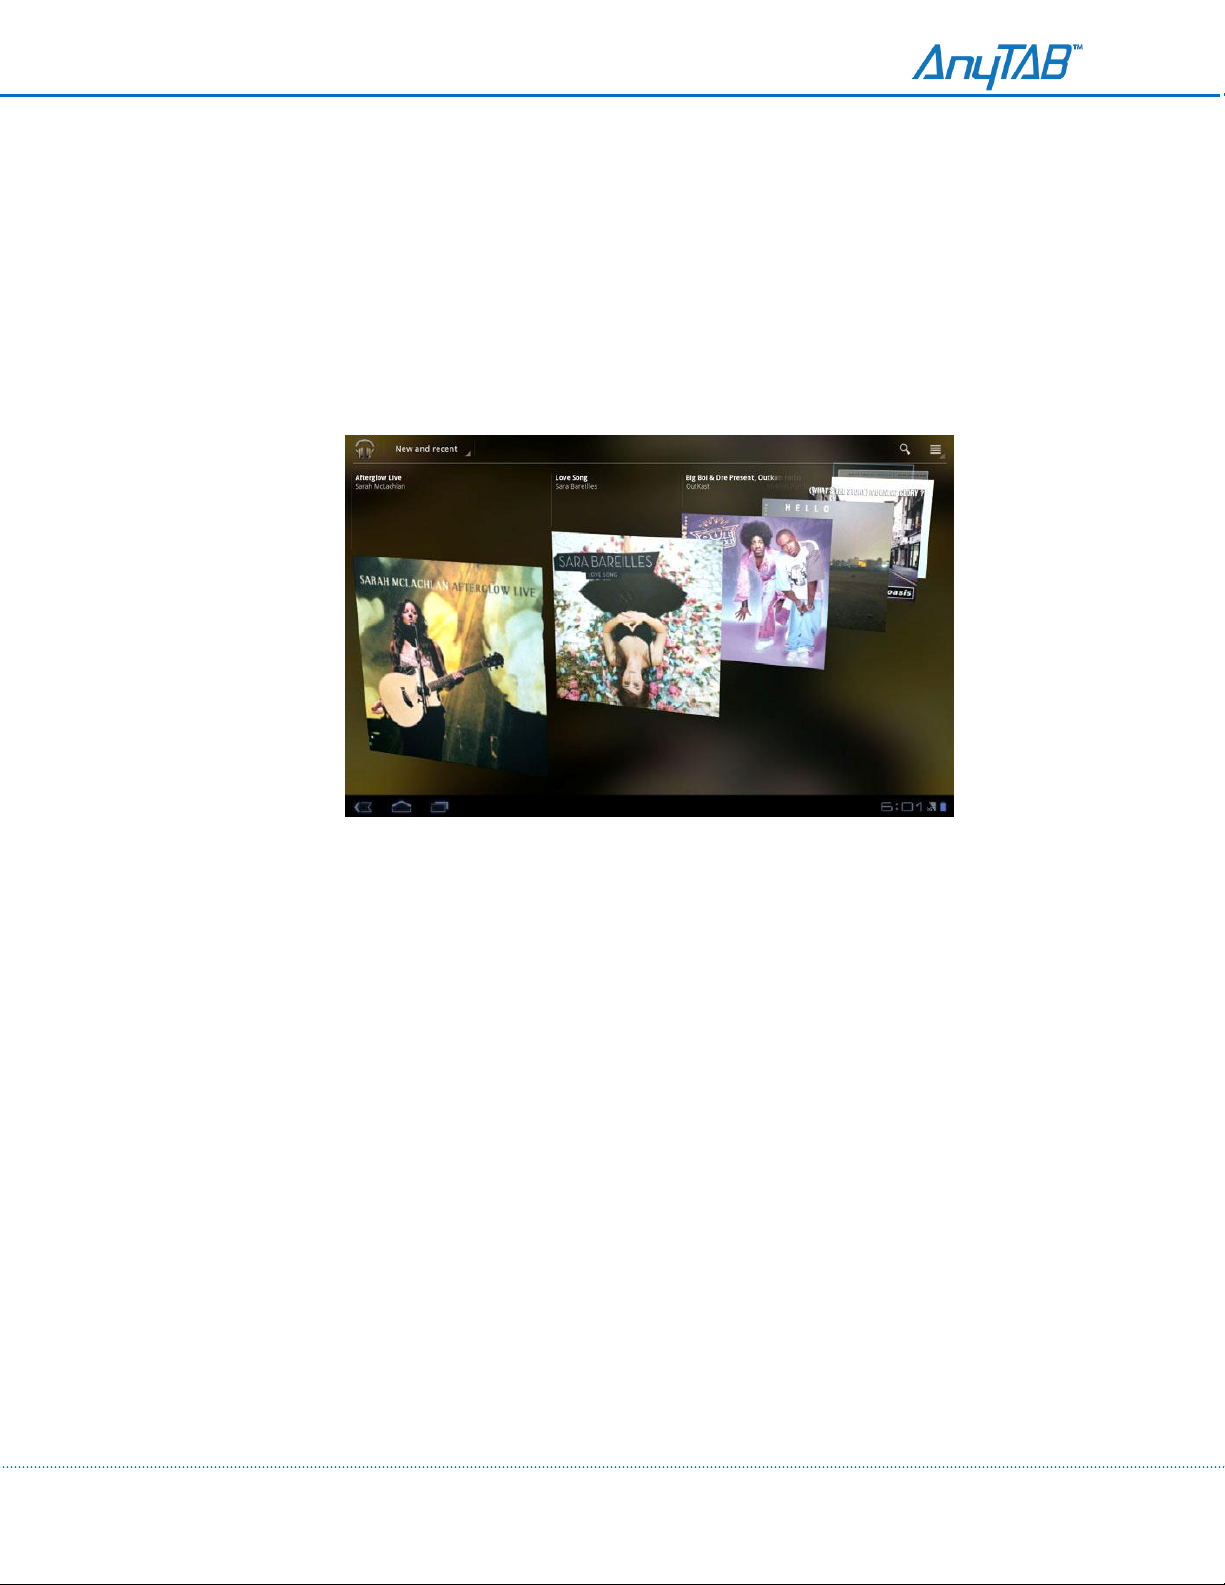
Opening Music and working with your library
After you’ve copied some music onto your
source, you can open Music and see your library of music files.
Touch the music icon on the Apps screen, or touch a shortcut icon on a Home screen .
tablet’s internal storage, or downloaded music from another
When you copy music to your
based on information about each file that
several
opens, displaying a carousel view of your new and recent music, organized by
Swipe left or right to spin the carousel and browse through your new and rece
minutes,
depending
tablet,
on the number of
Music
searches
is
stored in the file itself. This can take from a few
it for music files and
files.
When the catalog is
builds a catalog of your music,
complete,
seconds
the Music library screen
album
nt music.
to
You
can return to Music’s Library screen from most other
Music app icon at the top-left of the
Appl
ication bar.
screens
in the
Music
application
by touching the
38
Page 39
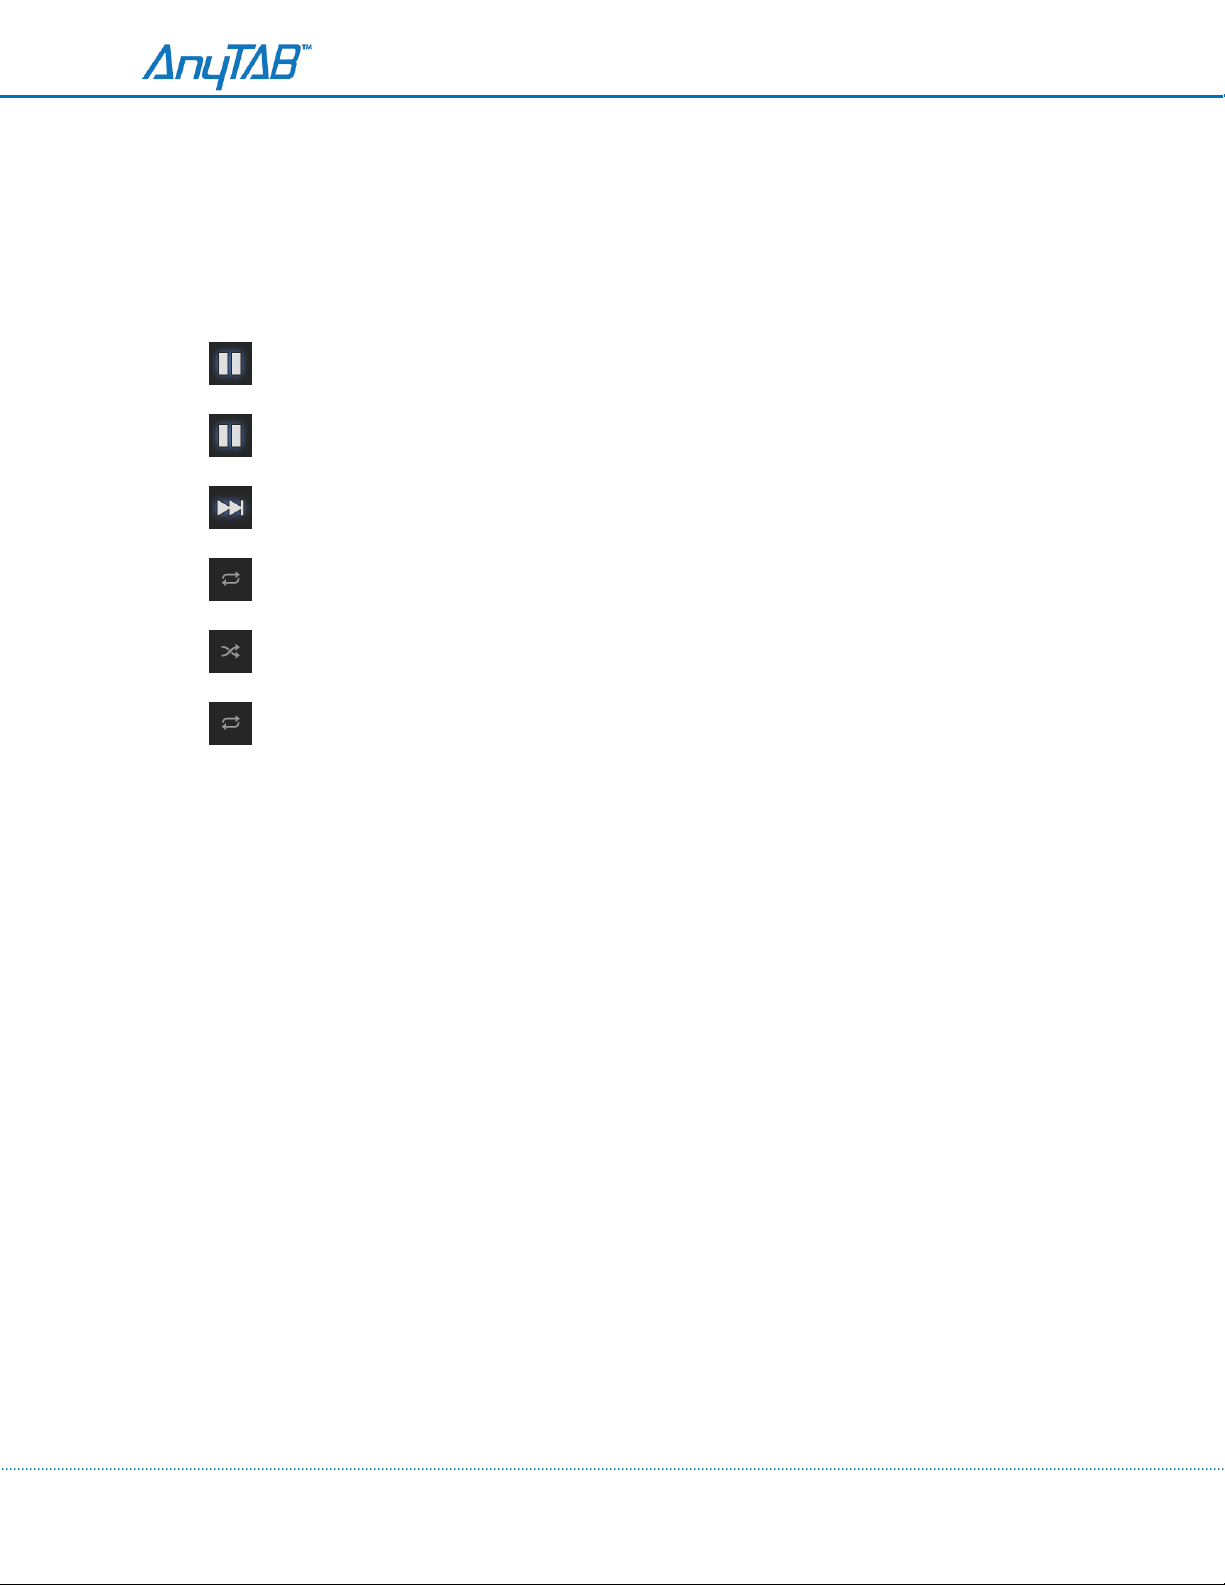
Touch to pause playback
Touch to resume playback
Touch to skip to the next track in the album, playlist, or
shuffle.
Touch to skip to the previous track in the album, playlist, or
shuffle.
Touch to play the current playlist in shuffle mode (tracks
are
played in random order).
Touch to toggle repeat mode: Don’t
repeat,
repeat the current list, or repeat the
current
track.
Playing Music
Touch a song in your library to listen to it. The Playback screen opens and the song you
song in the
end of the playlist (unless you choose a repeat option).
when you switch
the playback of songs,
album or other list starts to play. The tracks in the current list play in order
applications.
albums,
The Playback screen
and playlists:
Otherwise,
contains
playback stops only if you stop it, even
several icons that you can touch to control
touched
until you reach the
or the first
Books
Use the Books app to read eBooks from the web-based Google Books service. You can read books online
or mark them for availability offline, so you can read
(such as on an
on
line.
airplane). You can
also
use Books as your starting point for browsing or
them
when you don’t have an
Internet connection
searching
for books
39
Page 40
Clock
The Clock
clock.
application
displays the date and time. You can also use it to turn your tablet into an alarm
Touch the clock icon on the Apps screen or touch a
shortcut
icon on a Home
Clock opens displaying the date and time, along with date and time of the
If Clock is open when your screen darkens, it reopens when you wake
screen.
your
If you have
tablet.
secured
your lock
screen, touch
Back to open the lock screen so you can unlock
the
Setting and changing alarms
The Clock
clock.
application
1. Touch Set alarm or Alarm
displays the date and time. You can also use it to turn your tablet into an alarm
set
2. Touch Add alarm.
3. Use the up and down arrows to set the
A dialog with details about the alarm
4. Touch
alarm to
5. Touch
Repeat
to open a dialog where you can check the days on which you want the
sound.
Ringtone
to select a ringtone for the alarm.
(if you have an alarm already set) on the Clock
time. Then
opens.
touch
screen.
next
scheduled alarm.
phone,
instead
Set.
of the lock
screen.
The ringtone plays briefly when you select it.
6. Touch Label to open a dialog where you can type a label for the
7.
Touch
Done.
alarm.
Calculator
Use Calculator to solve simple
equations.
Touch the Calculator icon on the Apps screen or touch a shortcut icon on a Home screen.
Enter
numbers
calculator.
Touch & hold the
in another
or operators to figure
Calculator’s
app.
arithmetic
problems or use its
arithmetic
display to copy the
advanced
and trigonometric
contents
of the display, so you can paste it into a text field
operators
probl
to
solve more complex
ems,
just as on a pocket
40
Page 41

Market
Android Market provides direct
download and install on your
access
tablet.
to free and paid
Settings
You
use the
your privacy, and operates in many other ways.
Many
applications
Opening Settings
The Clock
clock.
Settings application
also have their own
application
displays the date and time. You can also use it to turn your tablet into an alarm
to configure how your tablet looks,
settings;
for
applications,
details,
see the
games,
sounds, communicates, protects
documentation
and
books that you can
for those
applications.
Touch the time in the lower-right of the System bar to open the
to open Quick
OR Touch the Settings icon on the Apps screen or touch a shortcut icon on a
Wireless & networks
Use Wireless & Network settings to configure and manage
Bluetooth, mobile networks, and via a USB
configure
the
Internet using
- Airplane Mode: Check to turn off all the tablet’s radios that transmit data.
- Wi-Fi: Check to turn on Wi-Fi so you can connect to Wi-Fi networks.
- Bluetooth: Check to turn on Bluetooth so you can connect to Bluetooth devices
- VPN setting
Settings,
connections
your tablet’s mobile data
and then touch
settings
between your
Settings
tablet and virtual private networks (VPNs), to
.
connection. You also use Wireless & Network
connection,
and to turn off all radios with Airplane mode
Status Details,
connections
to networ
touch in the
Home
screen.
ks
and devices via Wi-Fi,
settings
connect
Status
other devices to
Details
to
.
41
Page 42

Wi-Fi settings screen
Wi-Fi: Check to turn on Wi-Fi so you can
connect
to Wi-Fi networks. When
connected
to a
network, displays the network’s name.
Network
network becomes av
WiFi disconnect policy: opens a dialogue where you can set when you want
networks and
data), never when plugged in, or never (uses
notification:
connect
Check to receive a notification in the System bar when
ail
able.
to
to mobile data networks: when
more battery power)
the
screen turns off (uses more mobile
.
an
open Wi-Fi
disconnect
from Wi-Fi
Wi-Fi networks: Displays a list of Wi-Fi networks you’ve previously
detected
when the tablet last
scanned
for Wi-Fi networks.
conf
igured
and those
Add Wi-Fi network: Opens a dialog where you can add a Wi-Fi network by entering its SSID (the
name it
broadcasts),
security type, and other
properties.
Bluetooth settings screen
Bluetooth: Check to turn on Bluetooth so you can
Device name: Opens a dialog where you can give your tablet a name that is
Bluetooth devices. The current name is displayed.
Discoverable: Check to make your tablet discoverable by other Bluetooth devices
Bluetooth devices: Displays a list of Bluetooth devices that you’ve previously configured and those
detected
when the tablet last
scanned
for Bluetooth devi
Find nearby devices: Touch to search for and display information about nearby
Bluetooth devi
ces.
connect
ces.
to Bluetooth devi
ces.
visible on some
for
120
seconds.
VPN settings screen
Add VPN: Opens a screen that prompts you to select the type of VPN to add. You are then
prompted
VPNs: The list of VPNs that you’ve previously configured
42
for VPN configuration deta
ils.
.
Page 43

Sounds settings screen
Use the Sound
audio, notification
prefer and whether you
settings
ringtones,
to configure how, and at what volume, the tablet
hear
pla
ys
music or other media with
and alarms. You also
audible feedback when touching or locking and unlocking the screen.
use
these
settings
to pick the notification ringtone you
Volume: Opens a dialog with three sliders for
audio, notification
Notification ringtone: Opens a dialog where you can select the ringtone to sound
receive a
Audible
items.
Screen lock sounds: Check to play a sound when the screen is locked or
selection: Check to play a sound when you touch
Screen settings
Use the Screen
Brightness: Opens a dialog for
brightness
sensor. Or
when using the
bright
Auto-rotate screen: Check to
tablet sideways or upright.
Animation: Opens a dialog where you can set whether you want to enjoy animated
some effects (such as opening
screen to
not control animation in
Screen timeout: Opens a dialog where you can set how long to wait after you touch the screen
or press a button before the screen
the
settings
ness.
shortest
adjusting
ringtones,
notification.
to set the tablet to adjust the brightness automatically,
uncheck
tablet.
screen),
convenient
Touch a ringtone to listen to it.
to configure
that option to
or to enjoy a tablet without any
and
alarms.
brightness
adjusting
use
For the longest battery life between charges, use the dimmest comfortable
automatically
menus),
all appl
timeout.
icatio
and other screen
the
brightness
the slider to set a
switch the orientation of the
for all
supported effects (including when navigating from
ns).
darkens.
For the longest
the volume of music
buttons,
settings.
of the
brightness
optional
animation
and
other media
when you
icons,
screen. You
using the tablet’s built-in light
level you want at all times
battery life between charges, use
and
other
unlo
cked.
can
scre
en
effects (this setting does
onscreen
check Au
as you turn the
tomatic
transitions
for
Location and Security settings
Use the Location & Security settings to configure how you want the tablet to
affects accuracy) and how you want to share your location with Google and others. You can also configure
settings
that help
Use wireless networks: Check to use information from Wi-Fi networks
approximate location, for use in Maps and
search,
location
Use GPS
pinpoint your location to within accuracy as close as several meters
accuracy
secure
and so on. When you
anonymously
satellites: Check to use your tablet’s global positioning system (GPS)
depends
your tablet and its
check
with Google’s location service, to help improve the servi
on a clear view of the sky
data.
other
geographically aware
this option, you’re asked whether you
and
other
factors.
determine
to
determine
applications,
consent
(“street
level”). Actual GPS
your location (this
your
when you
to sharing your
ce.
satellite
receiver to
43
Page 44

Use location for Google Search: Check to use include information about your location when you
use Google Search, Vo
ice
Search, and so on.
Configure lock screen: Touch to configure your lock screen to require a pattern,
to unlock your
screen,
or never to show the lock screen at all.
PIN, or password
Owner info: Opens a screen where you can set whether you want to
yourself (such as your
you want to
display.
contact
information) on the lock scre
en
and where you can enter the text
display
information about
Encrypt tablet: Touch to encrypt the
contents
of your tablet and to require a numeric PIN or
password to decrypt your tablet each time you power it on.
Set up SIM card lock: (Only for
configure the tablet to require entering the SIM PIN to use the tablet,
change the SIM
PIN.
tablets
that use a SIM card.) Opens a
scre
en
where you can
and where you can
Visible passwords
: Check to briefly show each character of passwords as you enter them so that
you can see what you enter.
Device
administrators
that you granted this authority to, when you ad
that requires the ability to
application
you added will typically lose some functionality in its
email or
Applications whose device
accounts
authority when you try to
administrators: Opens a screen with a list of the
for your
in this
tablet.
This is typically an email, cale
ded
impl
ement
list
to disable its authority to be a device
security policies on any devices that
an account hosted by an
applications,
calendar
that require them to be a devi
events, until you restore the
administration
authority you disable in this way, but that have
ce
administrators,
application’s authority
use them, unless you delete those
applications
ndar, or other
administrator;
you
have
enterprise application
connect
if you do, the
such as the
as a device
authorized to be
enterprise
service
to it. Touch an
account
abili
ty
to sync new
administrator.
typically notify you how to restore their
accounts.
Use secure
secure
establish
devices” on page 57. If you have not set a password for the
di
mmed.
credentials:
certificates
Check to allow
and related passwords and other
some kinds of VPN and Wi-Fi
applications
connections,
to
access
cre
dential
as
described
your
tablet’s encrypted
s. You use
in
“Connecting
credential
store of
credential
storage to
to networks and
storage, this setting is
Install from storage: Touch to install a secure
described
in “Working with secure
certificates”
certificate
on page
from your
81.
tabl
et’s storage, as
Set password: Opens a dialog where you can set or change the password for your secure
credential
certificates”
storage. Your password must have at least 8
on page
81.
characters. See
“Working with secure
Clear storage: Deletes all secure
storage’s own password, after prompting you to confirm that you want to do
certificates
and related
credentials
and
erases
this.
the
credential
44
Page 45

Applications settings
You
use the Applications
their data, to force them to stop if they
applications
that you obtain
settings
to view details about the
from web sites and
misbehave, and
email.
applications installed on your
to set whether you want to permit
tablet,
to manage
installation
of
Running services: Opens a list of
running or are
Storage use: Opens a list of all
they use.
Battery use: Opens a list of the
charged your
Unknown sources: Check to permit
email, or other locations other than Android
Warning!
To protect your tablet and personal data, download
such as Android
Manage
your
tablet,
cached.
tablet.
applications
along with their sizes and tools for managing them.
Mark
et.
Opens a list of all the
Account and synch settings
Use the Accounts & Sync
You
also use these
own
schedules, and
settings
settings
whether
to control how
applications
applications, processes,
applications
applications
installation
to add, remove, and manage your Google Accounts and other
and
can synchronize user data
on your tablet with information about the storage
that have used battery power since
of
applications
Market.
applications
whether
applications
applications
and services,
that you
only from trusted
and other
send, receive, and sync data on their
automatically.
services that are currently
obtain from web sites,
software
installed
you last
sources,
on
accounts.
Gmail, Calendar, and other
data; see the
Background data: Check to permit
not you are actively working in them. Unchecking
(but does not
Auto-sync: Check to permit
this
for that
In that case, AutoManage
added to the
documentation
setting,
you must touch an
account.
accounts
applications
eliminate)
Synchronizing data automatically is
sync is dimmed
The rest of this screen lists the Google Accounts and
tablet.
for those
data
may also have their own
applications
applications
use.
applications
account
.
for details.
to synchronize data on their own
in the list on
settings
to synchronize data in the
this
setting can save battery power and lowers
this
screen and touch to synchronize data
disabled
to
control
if
Background
how they synchronize
background,
schedule.
data is
other
accounts
If you uncheck
unchecked.
whether or
you’ve
45
Page 46

Privacy settings
You
use the Privacy
servers, using your Google
performing a factory data
Back up my data: Check to back up some of your personal data to Google
Google Account. If you replace your
time you sign in with your Google Account. If you check this option, a wide variety of your personal
data is backed up, including your Wi-Fi
you’ve
keyboard, and most of the
party
reinstall an
and any existing backups are deleted
Backup
with. This is the
want to restore the
Automatic restore: Check this option to restore
application.
that the
Factory data reset: Opens a dialog where you can erase all of your personal data
tablet storage, including information about your Google Account,
and
application settings,
other files. If you reset
prompted to reen
settings
instal
led
applications
application.
account: Displays the Google Account that your
This feature requires that you are backing up your
application
to manage whether your
account. You also use
reset.
tablet,
passwords,
from Market, the words you’ve added to the user dictionary used by the
settings
may also take advantage of this
If you
account
ter
you need to sign into on a new
settings
is using the backup servi
any
the
tablet in this way, the next time you turn on your tablet
the same kind of information as when you first
that you configure with the Settings
uncheck
from Google
from this tablet to th
downloaded
settings
these settings
you can restore
Browser bookmarks, a list of the
this option, you
servers.
at
settings
ce.
applicatio
and other data
to erase all the data on your tablet by
the
data you’ve backed up, the first
feature,
device.
ns,
so you can
stop
backing up your data to your
settings
Android tablet or other device, if you
and other data when you reinstall an
data
as well as your music, photos, videos, and
are
backed up to Google
servers,
appli
cation.
restore your data if you
and other data
with your Google Account and
any
other
accounts,
started
with your
applications
Some third-
are backed up
from internal
your system
you’re
Android.
onscreen
account,
Storage settings
Use the Storage
You
can also view and manage the storage used by
you’ve downloaded with Browser, Gmail, or Email with the Downloads
46
settings
to monitor the used and available space on your
applications. You can view, reopen, and delete files
application.
tablet’s internal
storage.
Page 47

Language and input settings
Use the Language & Input
You
can also configure the Android voice input
that
can take advantage of it, such as TalkBack.
You
can configure the
added to the user
dictionary.
settings
onscreen
to select the language you want to work with
keyboard or other input
feature
and the
methods. You can also add
text-to-speech synthesizer,
on
your
tabl
et.
for
applications
or remove words you’ve
Select language: Opens the Language
text on your
User dictionary: Opens a list of the words you’ve added to the dictionary,
the
onscreen
delete it. Touch the Plus button at the top-right of the Application bar to add a word.
Voice
recognizer
Text-to-speech settings:
Current input method: Opens a dialog where you can select the input
if you have more than one
where you can configure the current input
other input methods from Andr
Input method selector: Opens a dialog where can set whether you want
Input Selector button to appear in the System bar, to the left of the time
tabl
et.
keyboard” on page 48. Touch a word to edit it. Touch the red X next to a word to
settings: See “Google Voice Recognition
See “Text-to-Spe
installed,
oid
or touch
Mark
Google voice recognition settings screen
Language: Opens a screen where you can set the language you use when
speak
ing
SafeSearch: Opens a dialog where you can set whether you want Google
block some results when you use Google Vo
offensive images
Block offensive words: When
words many people consider offensive, when you enter text by
voice recognition
symbols ( # ).
Personalized
when using Voice
own voice. Touch More
Google Account
can view and manage information stored on Google servers that
Account.
(moderate),
replaces
recognition: Check if you want Google to store and use recordings
Search and when entering text by
information
dashboard: Touch to open your Google Account
or
both
unchecked,
those words
in the dialog that opens to learn more.
explicit or offensive text and images (strict).
screen,
et.
in
where you can select the
settings
ech settings
Configure input
meth
od. You can download alternative keyboards and
ice Se
arc
Google voice recognition will
transcriptions
screen”.
h:
Block no search results (off), only explicit or
with a
speaking, to
language
as
screen”.
method you want to use,
methods
speaking.
placeholder comprised
improve voice recognition for your
dashboard in
is
associated
to open the screen
the
.
ente
SafeSearch
rec
ognize
When
to use for the
described
ring
and
checked,
of what you speak
Browser, where you
with your Google
in “Using
text by
filtering to
transcribe
Google
of hash
47
Page 48

Text-to-speech settings screen
Speech rate: Opens a dialog where you can select how fast you want the synthesizer to speak
Listen to an example: Plays a brief sample of the speech
Always use my
synthesizer settings
Default engine: Opens a dialog where you can set the
if you have more than one
Install voice data: If your tablet does not have
Android Market and guides you through the process of
setting is not available if the data is already
Language: Opens a dialog where you can select the language of the text you wa
to read. This is particularly useful in
ensure that text is spoken correctly in a variety of appl
Engines: Lists the
its
settings.
settings: Check to use the
available in other
instal
led.
text-to-speech
engines installed on your
settings
applicatio
instal
combination
on this screen in place of
ns.
speech
led.
with the Always Use My Settings setting, to
synthesizer,
text-to-speech ap
synthesizer data
downl
oading and
icatio
ns.
tablet.
Touch one
using your current
speech
plic
ation
installe
installing the data. This
d,
connects
nt
the synthesizer
to
view or change
settings.
you want to use,
to
Android keyboard settings
The Android Keyboard
The correction and
Auto-capitalization:
letter of the first word after a period, the first word in a te
fi
elds.
Sound on keypress: Check to play a brief sound each time you touch a key on
keyboard.
Auto-correction: Check to
the keyboard, when you enter a space or
Show correction
keyboard as you type.
settings
capitalization features
Check to have the
suggestions:
apply to the
onscreen
automatically
Check to show
onscreen
affect only the English
enter a
punctuation.
suggested
keyboard that is included with your
keyboard automatically capitalize
xt
field, and each word in name
suggested
words in a strip ab
version of the ke
the
word, highlighted in
ove
the
tablet.
yboard.
the first
onscreen
the strip above
onscreen
48
Page 49

Accessibility settings
You
use the Accessibility
settings
to configure any
accessibility
plug-ins you
have
installed
on your tablet.
Accessibility: Check to enable all
KickBack: Check to have the tablet vibrate briefly as feedback as you navi
interface,
feature.
TalkBack: Check to have an
as you navigate the tablet’s user
SoundBack: Check to play a sound as you navigate the tablet’s user interface.
Accessibility scripts: Check to allow
Goog
le.
touch
buttons,
and so on. This setting is only
Date and Time settings
Use Date & Time settings to set your
settings
ne
to set your own time and time zone, rather than
twork.
Automatic date & time: Uncheck to set the date and time on the tablet manually, rather
than obtaining the current time from the mobile
Automatic time zone: Uncheck to set the time zone on the tablet
obtaining the local time zone from the mobile
Set date: If
the
tablet’s
Set time: If
Select time zone: If
the tablet’s time
Use
24-hour
rather than
Select date format: Opens a dialog where you can select the format for displaying
Automatic date & time
date.
Automatic
zone.
format: Check to display the time using
1:00 pm.
is
unchecked,
Automatic time zone
installed accessibility
installed speech
interfa
preferences
ce.
applications
for how dates are displayed. You can also use these
is
unchecked,
opens a dialog where you can set
plug-ins.
included
synthesizer speak the labels or names of items
to download
obtaining the current time from the mobile
network.
network.
is
unchecked,
opens a dialog where you can manually set
24-hour
gate
the user
if your tablet has a vibration
acce
ssib
ility
scripts from
manually,
opens a dialog where you can set
time format—for
rather than
the tablet’s
example,
dates.
time.
13:00
49
Page 50

About Tablet
About tablet includes information about your
tablet.
System
updates.
updates: Opens a screen that reports on the availability of
Status: Opens the
connection,
and other details.
Status
Battery use: Opens a list of the
since you last charged the
Legal information: Opens a screen where you can obtain legal information
included
with your
tablet.
Version
information: Lists details about the model numbers and versions of your tablet’s
hardware and operating system software. This information is useful if you need to work with your
carrier’s support team.
screen with information about your battery, mobi
tablet,
applications
sorted by the amount of
and operating system
power
they have used.
Android system software
le
network
components
you have used
about
the software
50
Page 51

51
 Loading...