

Page 1
Industrial WLAN/LTE Router
USER MANUAL
SCM-1202-150 1.10 en-US ENGLISH
Page 2

Important User Information
Disclaimer
The information in this document is for informational purposes only. Please inform HMS Industrial Networks of any
inaccuracies or omissions found in this document. HMS Industrial Networks disclaims any responsibility or liability
for any errors that may appear in this document.
HMS Industrial Networks reserves the right to modify its products in line with its policy of continuous product
development. The information in this document shall therefore not be construed as a commitment on the part of
HMS Industrial Networks and is subject to change without notice. HMS Industrial Networks makes no commitment
to update or keep current the information in this document.
The data, examples and illustrations found in this document are included for illustrative purposes and are only
intended to help improve understanding of the functionality and handling of the product. In view of the wide range
of possible applications of the product, and because of the many variables and requirements associated with any
particular implementation, HMS Industrial Networks cannot assume responsibility or liability for actual use based on
the data, examples or illustrations included in this document nor for any damages incurred during installation of the
product. Those responsible for the use of the product must acquire sufficient knowledge in order to ensure that the
product is used correctly in their specific application and that the application meets all performance and safety
requirements including any applicable laws, regulations, codes and standards. Further, HMS Industrial Networks will
under no circumstances assume liability or responsibility for any problems that may arise as a result from the use of
undocumented features or functional side effects found outside the documented scope of the product. The effects
caused by any direct or indirect use of such aspects of the product are undefined and may include e.g. compatibility
issues and stability issues.
Industrial WLAN/LTE Router User Manual
SCM-1202-150 1.10 en-US
Page 3

Table of Contents
Page
1 Preface ................................................................................................................................. 3
1.1 About This Document ...................................................................... ........... ........... ........... 3
1.2 Document Conventions ........... ........... ........... ........... ........... ........... ........... ........... .............3
1.3 Trademarks... ........... ........... ........... ........... ......................................................................4
2 Safety ................................................................................................................................... 5
2.1 Intended Use.. ................................................................................................................. 5
2.2 General Safety............................ ........... ........... ...............................................................5
2.3 Wireless LAN Radio Regulations................................ ........... ........... ........... ........... ........... ... 5
3 Installation........................................................................................................................... 6
3.1 Mounting ....................................................................................................................... 6
3.2 Terminal Block... ........... ........... ........................................................................................ 7
3.3 Ground Screw...... ........... ........... ........... ........... ........... ........... ........... ........... .................... 7
3.4 Ethernet ................................. ........................................................................................ 8
3.5 Antennas ........................................................................................................................9
3.6 SIM Cards ................................. ........... ........... ........... ........... ........... ........... .................. 10
4 Configuration..................................................................................................................... 11
4.1 Submit and Save Configuration.. ........... ........... ........... ........... ........................................... 11
4.2 System ........................................ ........... ........... ........... ........... ........... ........... ............... 11
4.3 Ethernet Port ............... ........... ...................................................................................... 15
4.4 Redundancy .................................................................................................................. 16
4.5 Cellular .............. ........... ........... ........... ........... ........... ................................... ........... ..... 17
4.6 GPS Coordinates .................................................................................... ........... ........... .. 19
4.7 Wireless LAN......................................................... ........... ........... ........... ........... ............ 20
4.8 Security.... ........... ........... ........... ........... ........... .............................................. ........... .... 27
4.9 Routing ....................................................................... ........... ........... ........... ........... ..... 31
4.10 Warning .................. ........... ........... ........... .................................................................... 32
4.11 Diagnostics ........................................................... ........... ........... ........... ........... ........... . 34
4.12 IoT............................ .................................................................... ........... ........... ......... 36
4.13 Backup/Restore ............................................................................................................. 37
4.14 Firmware Upgrade ........... ........... ........... ........... ............................................................. 38
4.15 Reset to Default........ ................................... ........... ........... ........... ........... ........... ........... 39
5 Verify Operation................................................................................................................ 40
A Wireless Technology Basics .............................................................................................. 41
Industrial WLAN/LTE Router User Manual
SCM-1202-150 1.10 en-US
Page 4

This page intentionally left blank
Page 5
Preface 3 (42)
1 Preface
1.1 About This Document
This document describes how to install and configure the Anybus Industrial WLAN/LTE Router.
For additional documentation and software downloads, FAQs, troubleshooting guides and
technical support, please visit www.anybus.com/support.
1.2 Document Conventions
Numbered lists indicate tasks that should be carried out in sequence:
1. First do this
2. Then do this
Bulleted lists are used for:
• Tasks that can be carried out in any order
• Itemized information
► An action
→ and a result
User interaction elements (buttons etc.) are indicated with bold text.
Program code and script examples
Cross-reference within this document: Document Conventions, p. 3
External link (URL): www.hms-networks.com
WARNING
Instruction that must be followed to avoid a risk of death or serious injury.
AVERTISSEMENT
Instruction à suivre pour éviter tout risque de décès ou de blessure grave.
Caution
Instruction that must be followed to avoid a risk of personal injury.
Attention
Instruction à suivre pour éviter tout risque de blessure.
Instruction that must be followed to avoid a risk of reduced functionality and/or damage
to the equipment, or to avoid a network security risk.
Additional information which may facilitate installation and/or operation.
Industrial WLAN/LTE Router User Manual
SCM-1202-150 1.10 en-US
Page 6

Preface 4 (42)
1.3 Trademarks
Anybus®is a registered trademark of HMS Industrial Networks. All other trademarks mentioned
in this document are the property of their respective holders.
Industrial WLAN/LTE Router User Manual
SCM-1202-150 1.10 en-US
Page 7
Safety 5 (42)
2 Safety
2.1 Intended Use
The intended use of this equipment is as a communication interface and gateway. The
equipment receives and transmits data on various physical levels and connection types.
If this equipment is used in a manner not specified by the manufacturer, the protection provided
by the equipment may be impaired.
2.2 General Safety
Caution
Ensure that the power supply is turned off before connecting it to the equipment.
Attention
Assurez-vous que l’alimentation électrique est coupée avant de la brancher sur
l’équipement.
Connecting power with reverse polarity or using the wrong type of power supply may
damage the equipment. Make sure that the power supply is connected correctly and of
the recommended type.
This equipment contains parts that can be damaged by electrostatic discharge (ESD). Use
ESD prevention measures to avoid damage.
To avoid system damage, the equipment should be connected to ground.
2.3 Wireless LAN Radio Regulations
Applicable for the WLAN router.
To comply with the European Radio Equipment Directive (RED) and local radio regulations
you must configure the country/region settings before the router is brought into use.
Refer to the Anybus Industrial WLAN/LTE Router User Manual for instructions on how to
configure the country/region settings.
Industrial WLAN/LTE Router User Manual
SCM-1202-150 1.10 en-US
Page 8
Installation 6 (42)
3 Installation
3.1 Mounting
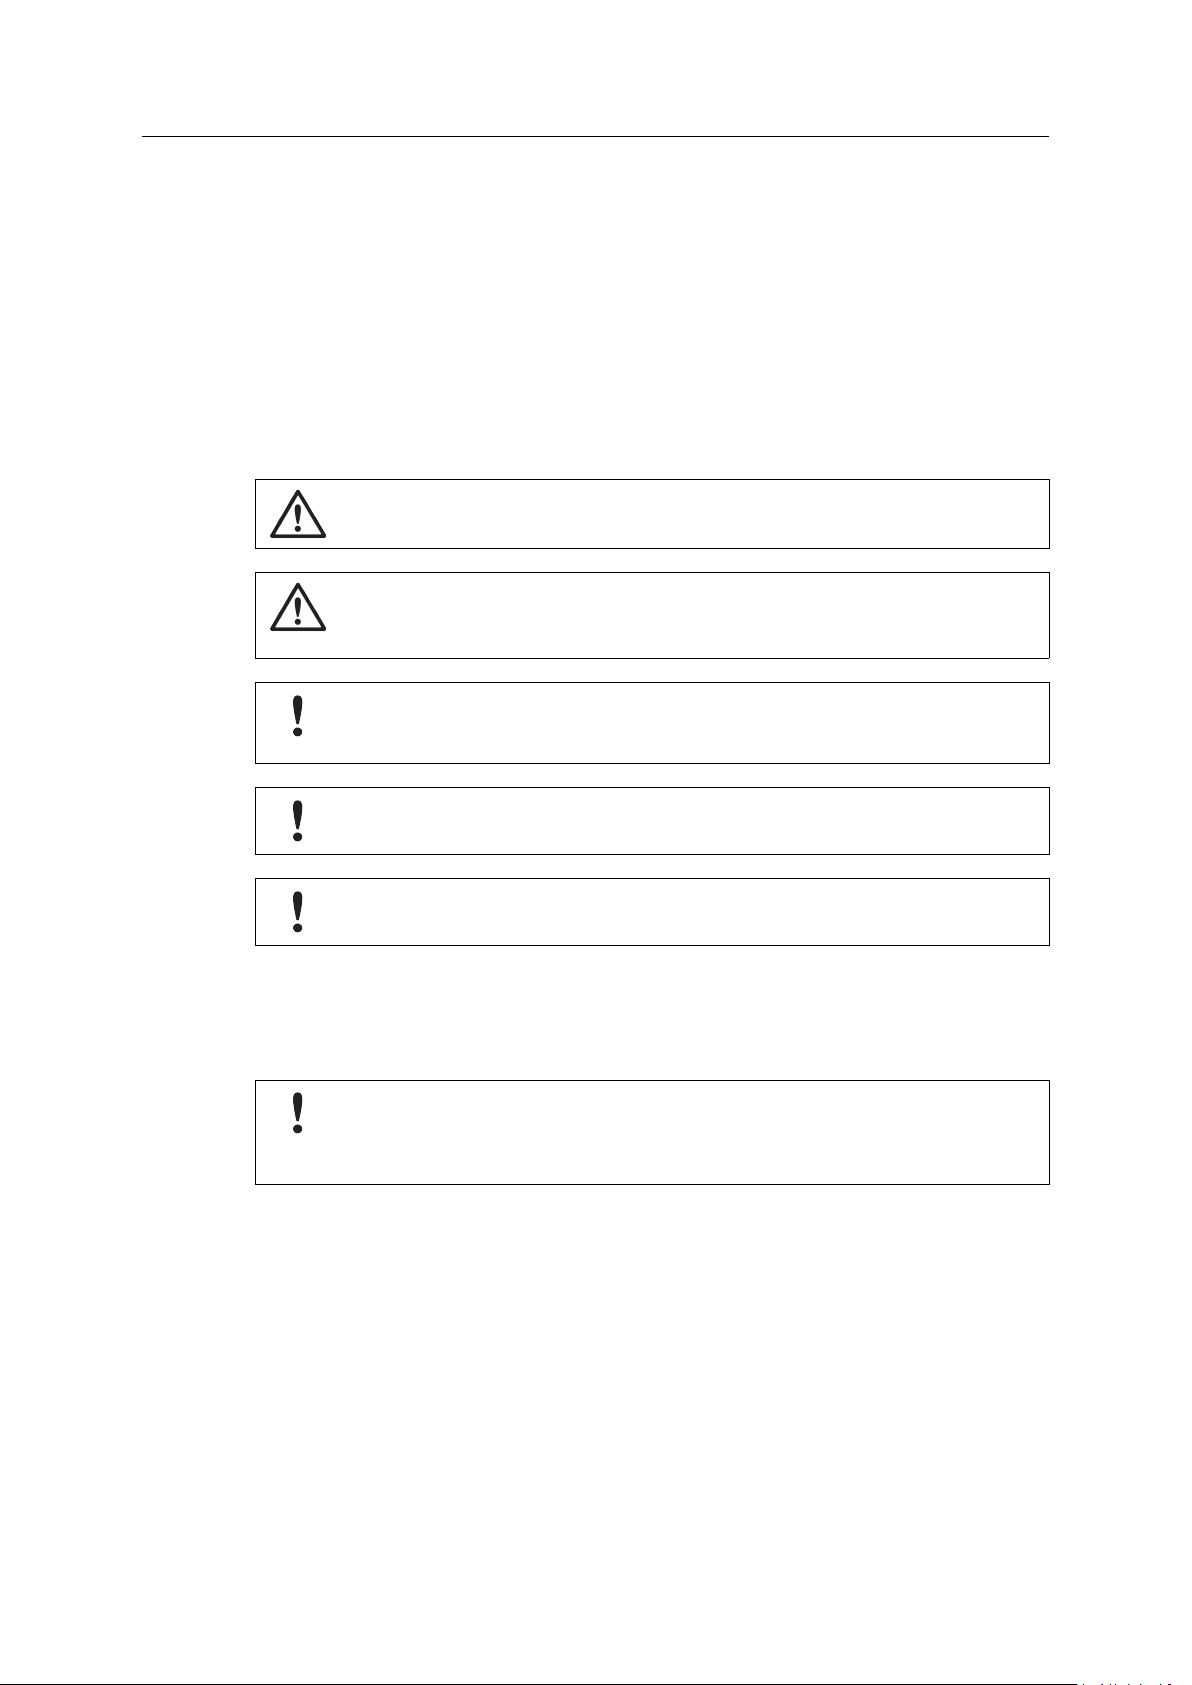
3.1.1 Wall Mounting
Fig. 1 Wall mounting option
1. Use the four hook holes at the corners of the wall mounting bracket to hang the router on
the wall.
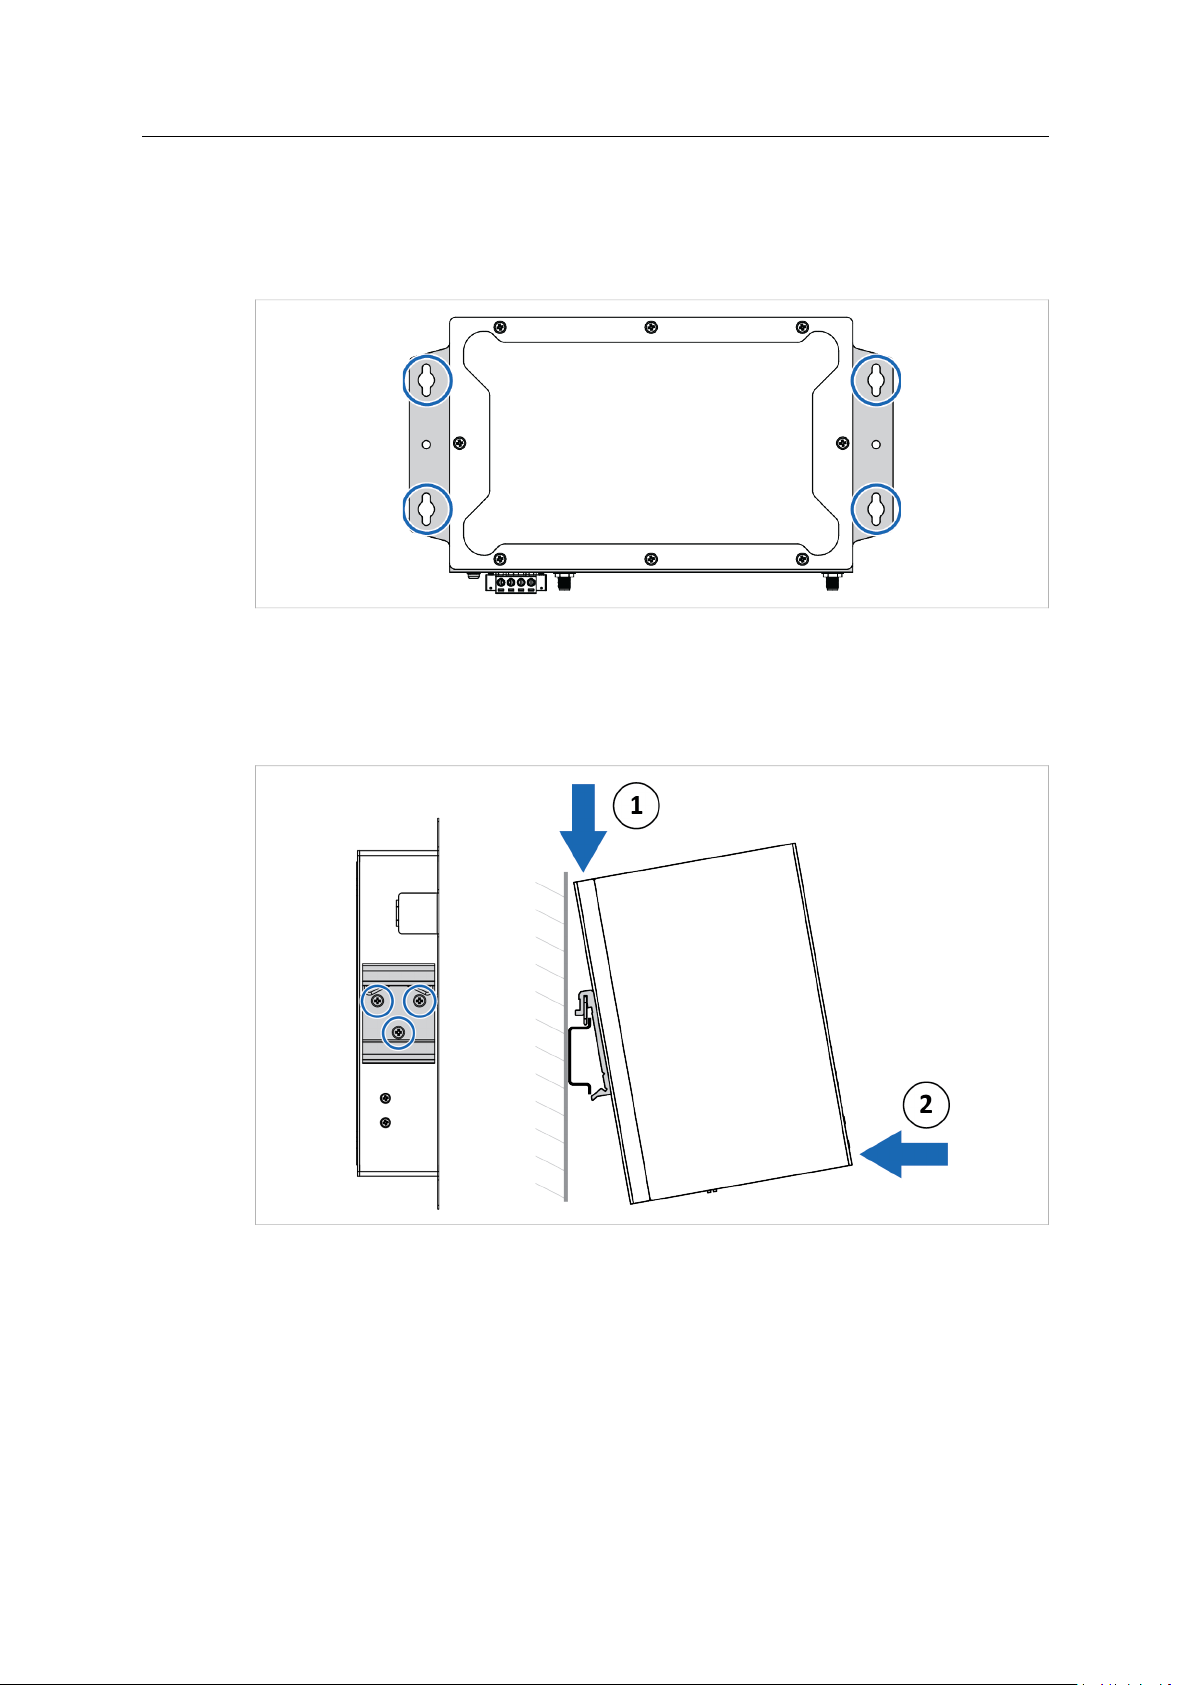
3.1.2 DIN Rail Mounting
Fig. 2 DIN rail mounting option
1. Fasten the DIN clip with 3 (M3x6 flat head) screws on the rear side of the router.
2. Insert the upper end of the DIN rail clip into the DIN rail.
3. Push the bottom of the DIN rail clip into the DIN rail.
Industrial WLAN/LTE Router User Manual
SCM-1202-150 1.10 en-US
Page 9
Installation 7 (42)
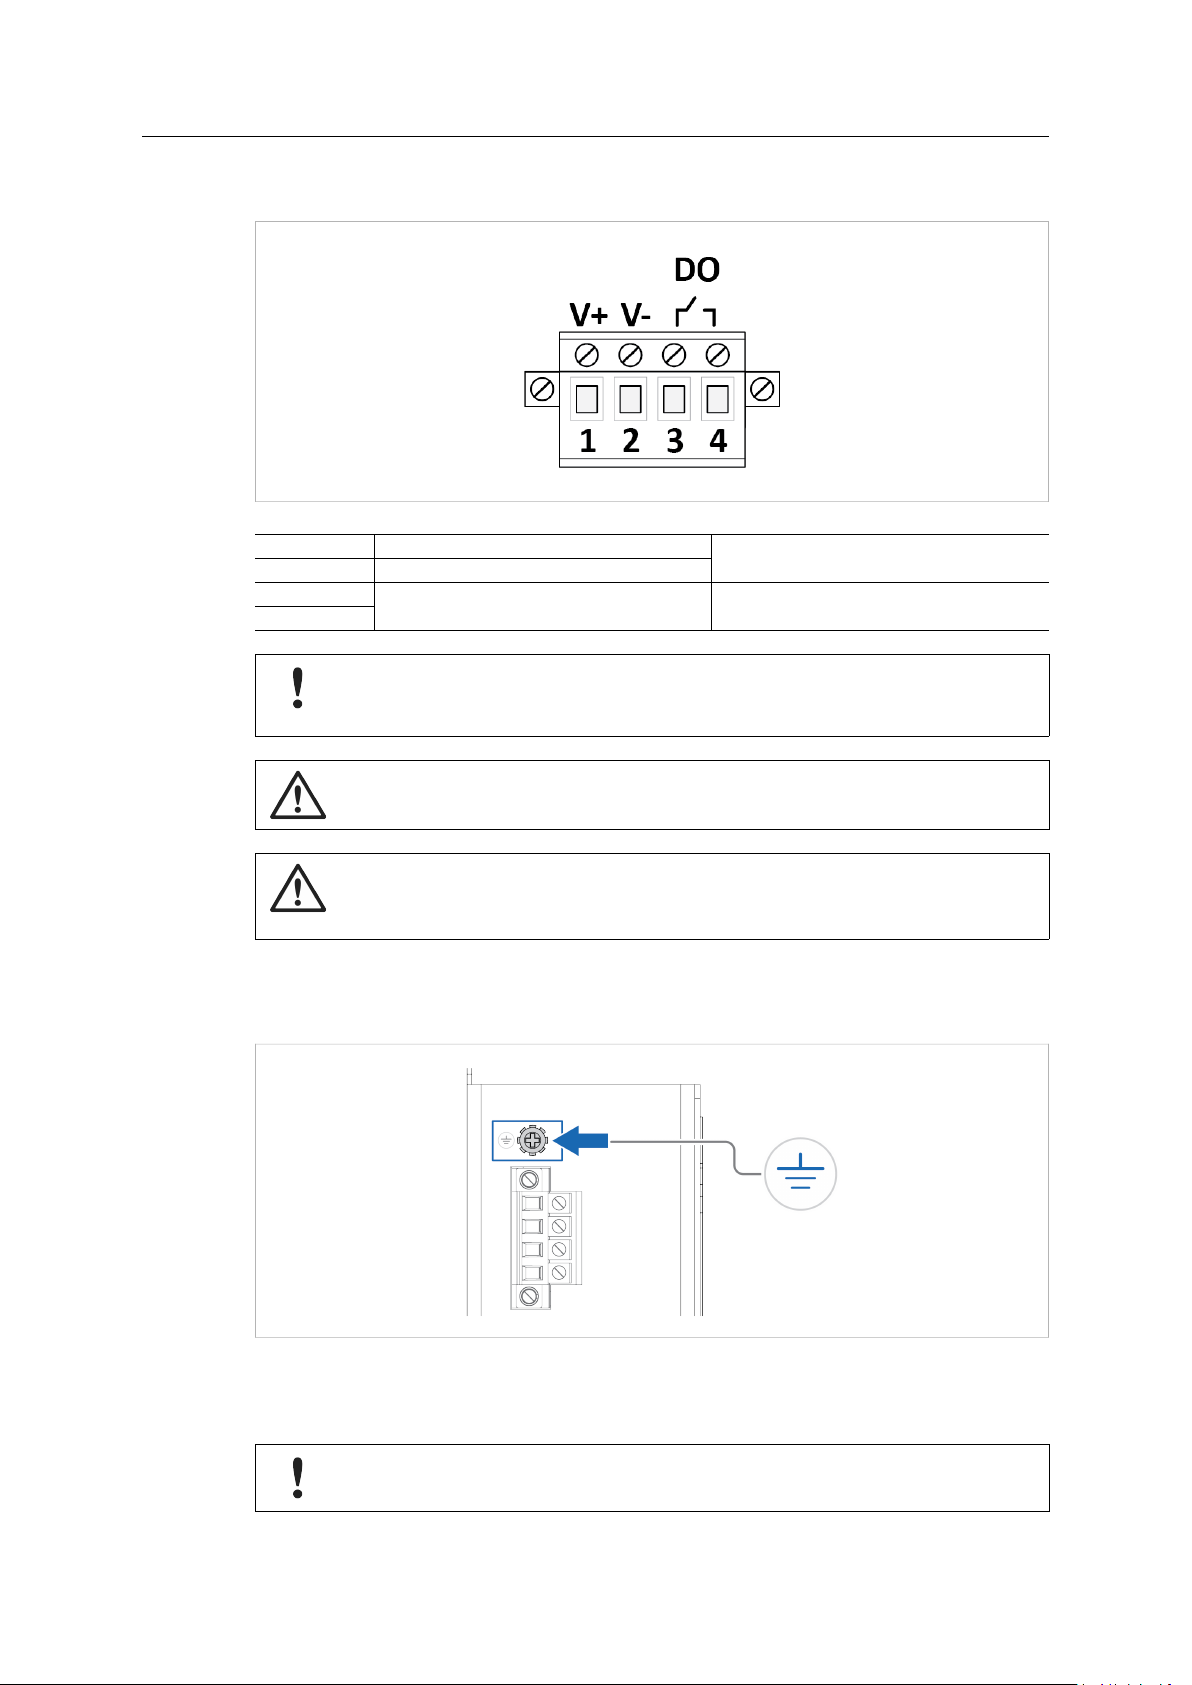
3.2 Terminal Block
Fig. 3 Terminal block
1 V+
2 V-
3
4
DO, Digital Output
Connecting power with reverse polarity or using the wrong type of power supply may
damage the equipment. Make sure that the power supply is connected correctly and of
the recommended type.
8–32 VDC Max. 11.2 W
Max 0.5 A / 24 VDC
Caution
Ensure that the power supply is turned off before connecting it to the equipment.
Attention
Assurez-vous que l’alimentation électrique est coupée avant de la brancher sur
l’équipement.
3.3 Ground Screw
Fig. 4 Ground screw
Establish a direct connection between the ground screw and the grounding surface prior to
connecting devices.
To avoid system damage, the equipment should be connected to ground.
Industrial WLAN/LTE Router User Manual
SCM-1202-150 1.10 en-US
Page 10
Installation 8 (42)
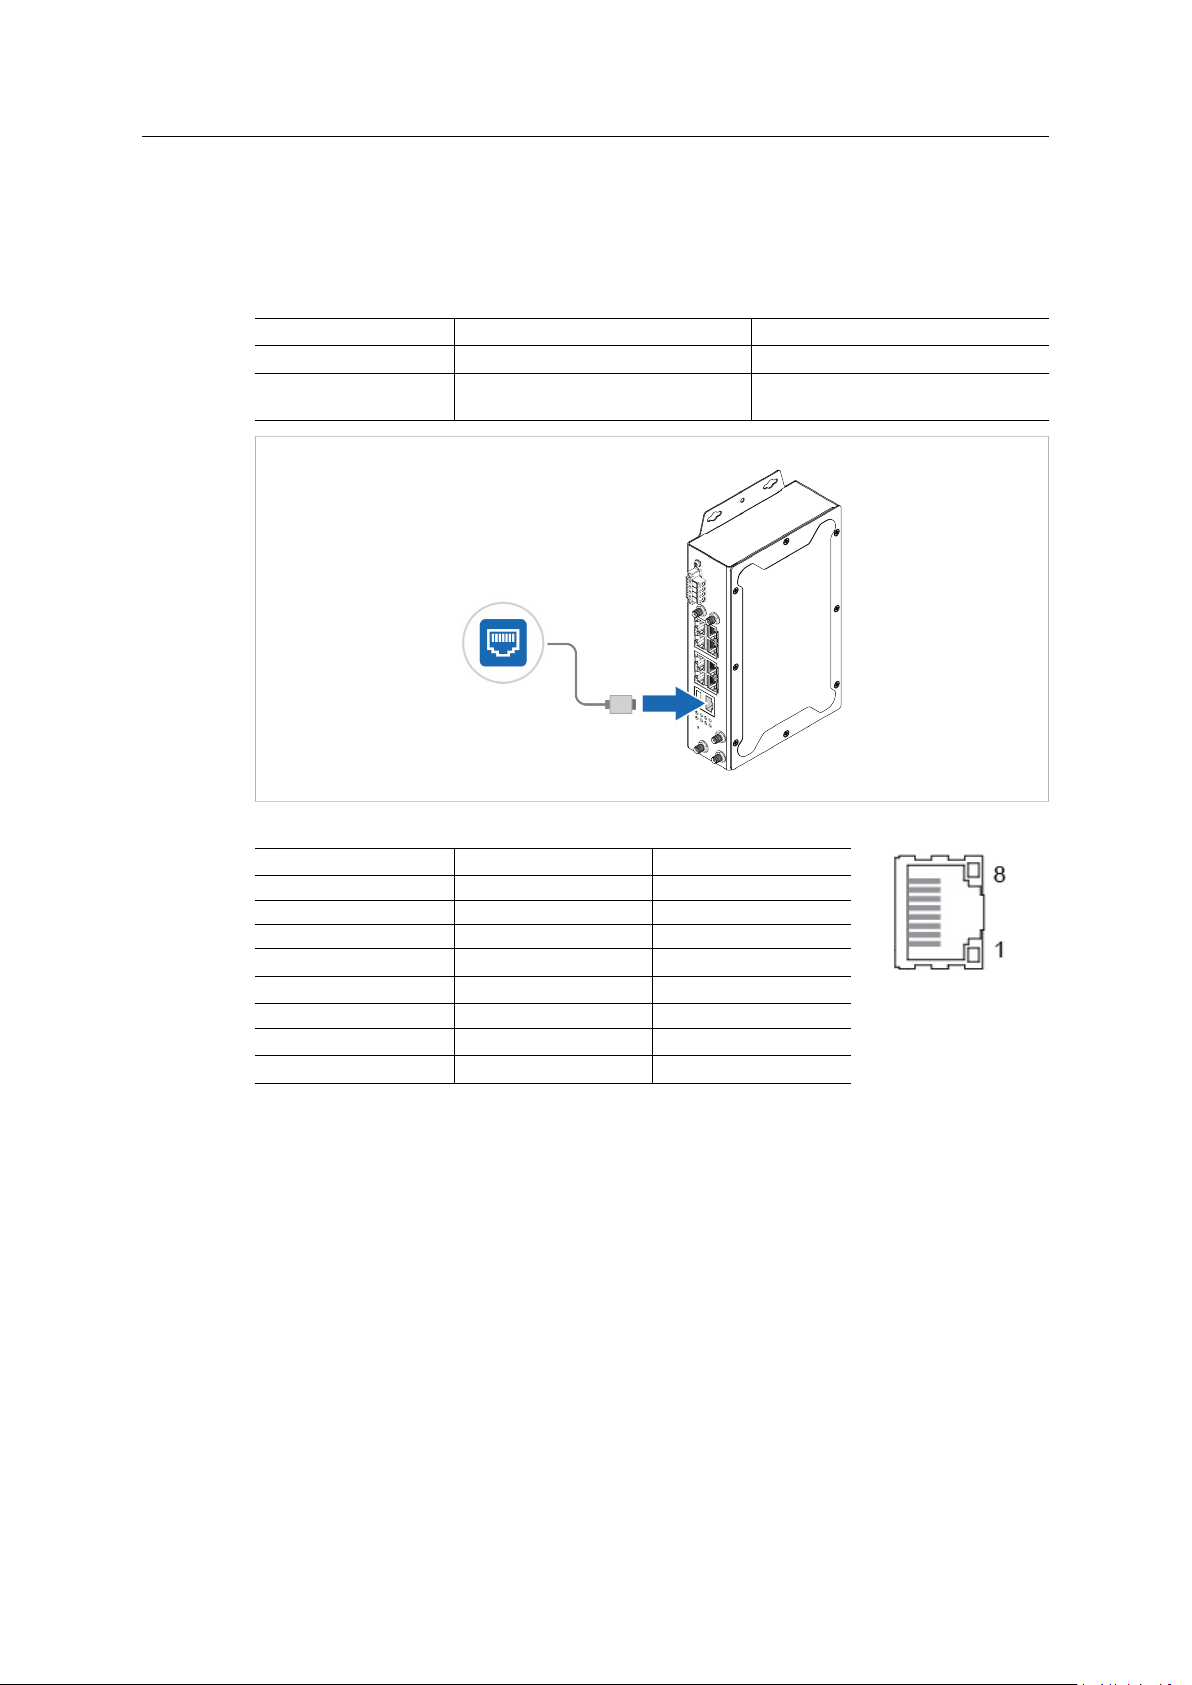
3.4 Ethernet
The Anybus Industrial WLAN/LTE Router has a built-in Ethernet LAN switch with 8 individually
configurable 10/100 Mbit/s ports and a 1 Gbit/s WAN port.
See also Ethernet Port, p. 15.
Port
1–8 LAN
9
Fig. 5 WAN port in router mode
Pin
1 TD+ DA+
2 TD- DA-
3 RD+ DB+
4
5
6 RD- DB-
7
8
Function Speed
Router mode: WAN
Bridge mode: LAN
10/100 Mbit/s 1 Gbit/s
(reserved)
(reserved)
(reserved)
(reserved)
10/100 Mbit/s
100 Mbit/s or 1 Gbit/s
DC+
DC-
DD+
DD-
Industrial WLAN/LTE Router User Manual
SCM-1202-150 1.10 en-US
Page 11
Installation 9 (42)
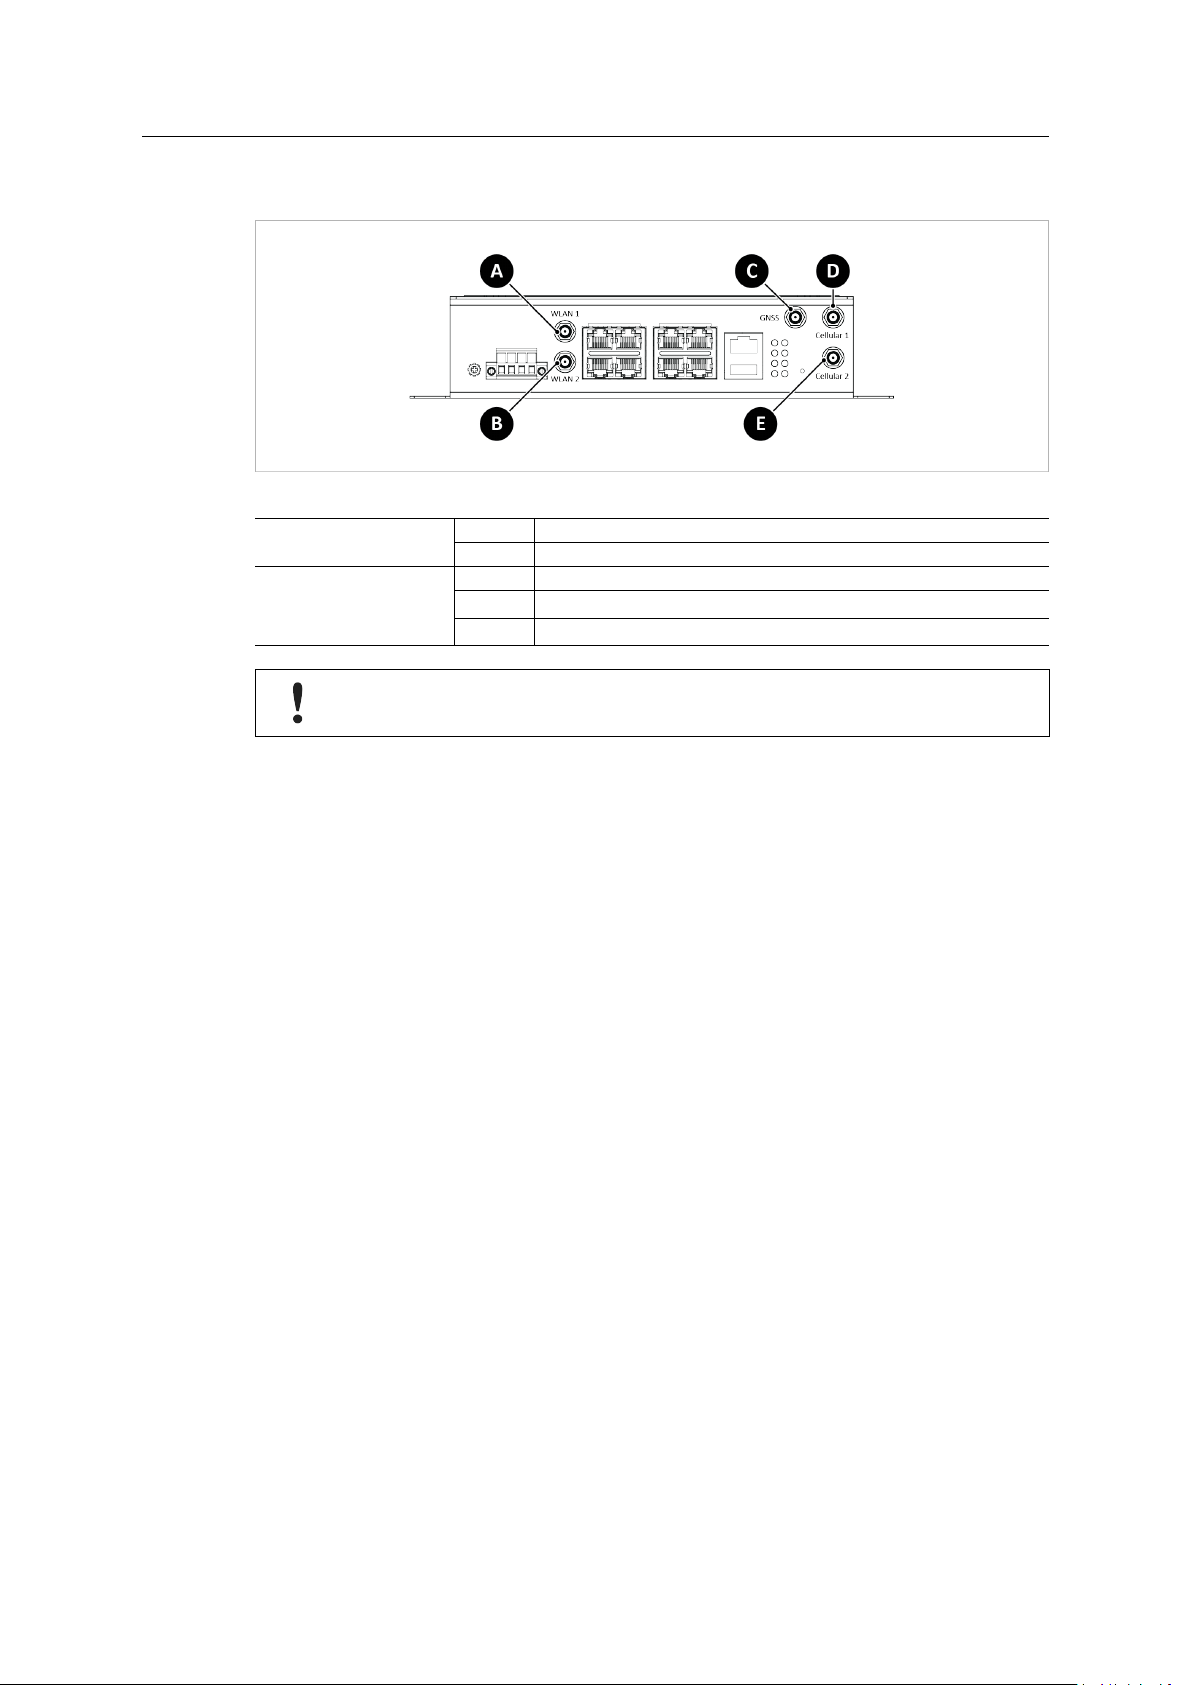
3.5 Antennas
Fig. 6 Antenna connectors
AWB5121 (WLAN)
AWB5221 (LTE)
If only one antenna is used for WLAN, the antenna must be connected to WLAN 1.
A WLAN 1
B WLAN 2
C GNSS
D
E
Cellular 1/LTE-Main
Cellular 2/LTE-Aux
Industrial WLAN/LTE Router User Manual
SCM-1202-150 1.10 en-US
Page 12
Installation 10 (42)
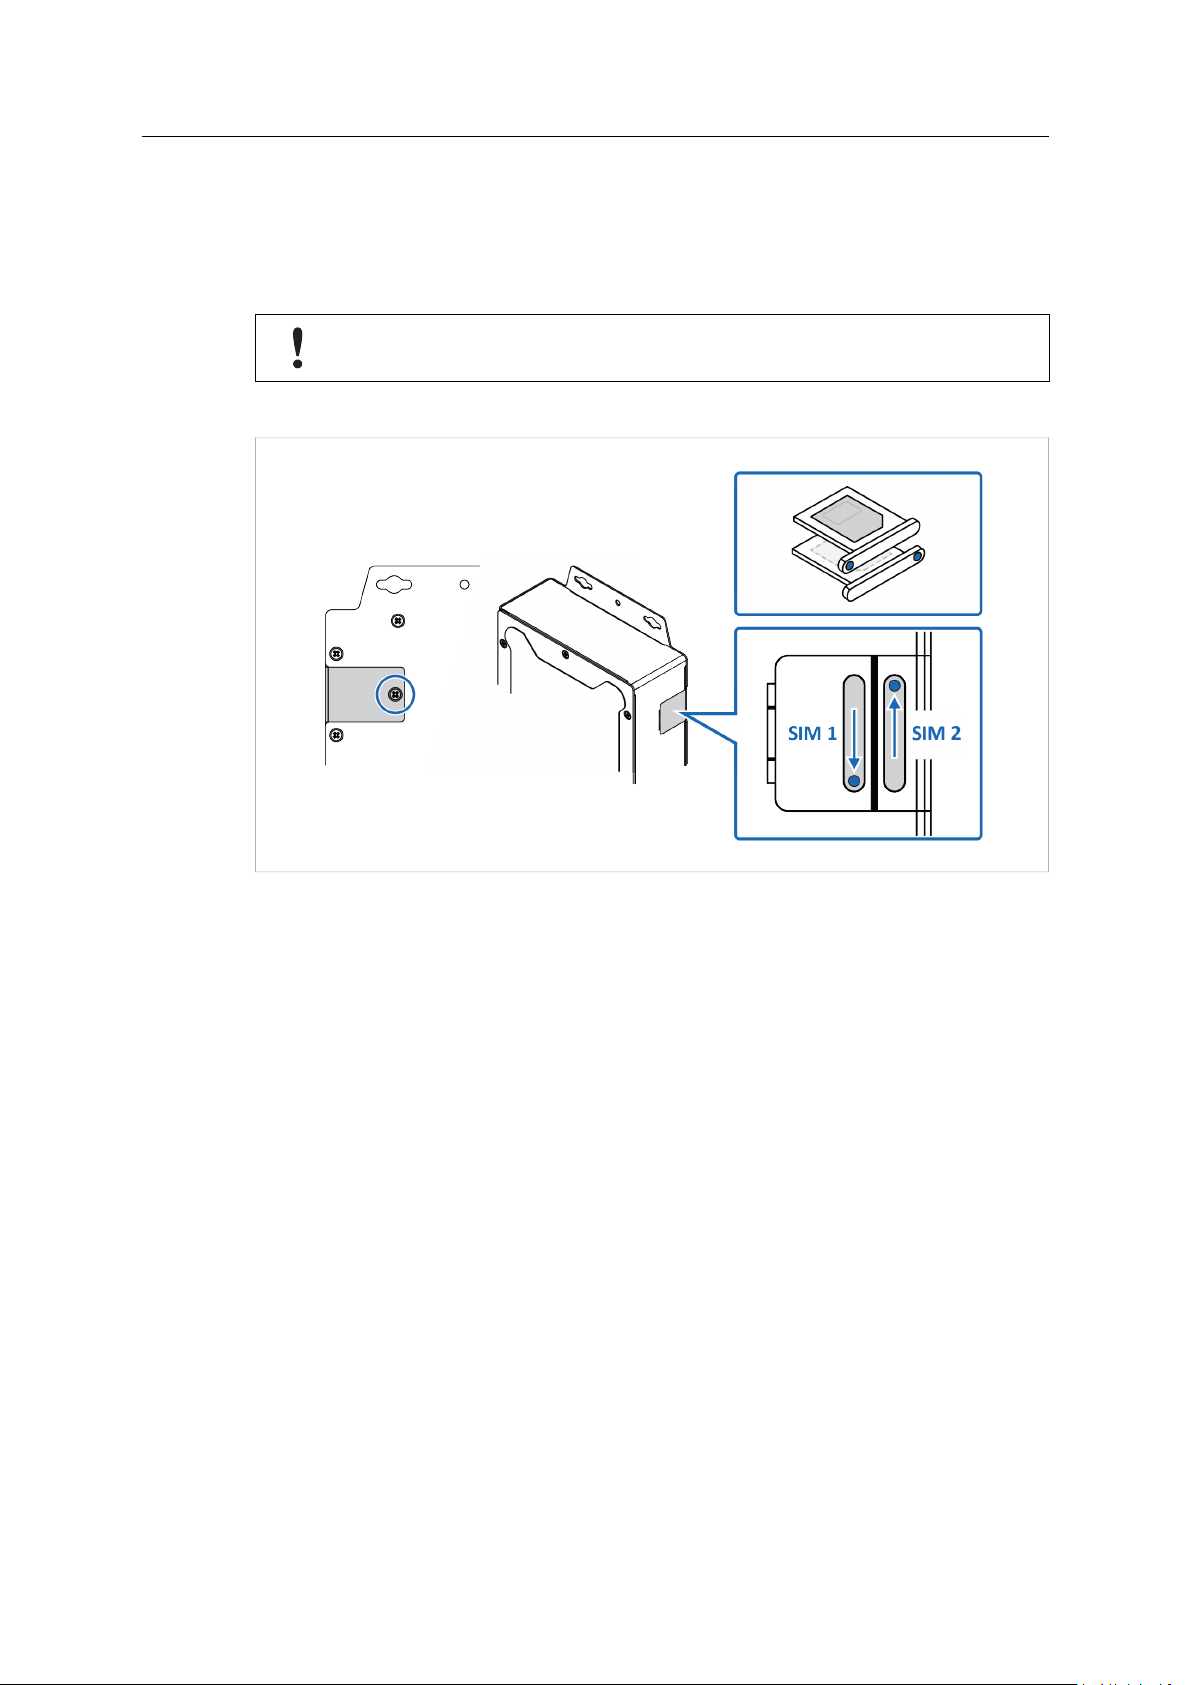
3.6 SIM Cards
Applicable for the LTE router.
Install a SIM card in the router to connect it to a cellular data network. The router supports dual
SIM cards. See also Cellular, p. 17.
Ensure that the SIM card is installed correctly to avoid damage to the SIM card or the
router.
Procedure
Fig. 7 SIM card installation
1. Loosen the screw locking the SIM card cover, located at the back of the router, and remove
the cover.
Installing SIM 1:
2. Grab hold of the SIM card tray and pull straight out.
3. Place a SIM card in the SIM card tray, following the mechanical print out of the tray.
4. Place the SIM card tray with the pinhole facing in the right direction and carefully re-insert
the tray.
Installing SIM 2:
5. To use dual SIM cards, repeat step 2 to 4.
6. Remount the SIM card cover and fasten the screw.
Industrial WLAN/LTE Router User Manual
SCM-1202-150 1.10 en-US
Page 13
Configuration 11 (42)
4 Configuration
4.1 Submit and Save Configuration
To apply changes made on a configuration page/tab, click on the Submit button at the bottom of
the page. To discard the changes, click on Cancel. Some pages have additional buttons that are
described in the respective sections in this manual.
To save changed settings permanently, click on Save at the top of the configuration page. The
recent changes will otherwise be discarded if the router is rebooted.
Fig. 8 Top menu
4.2 System
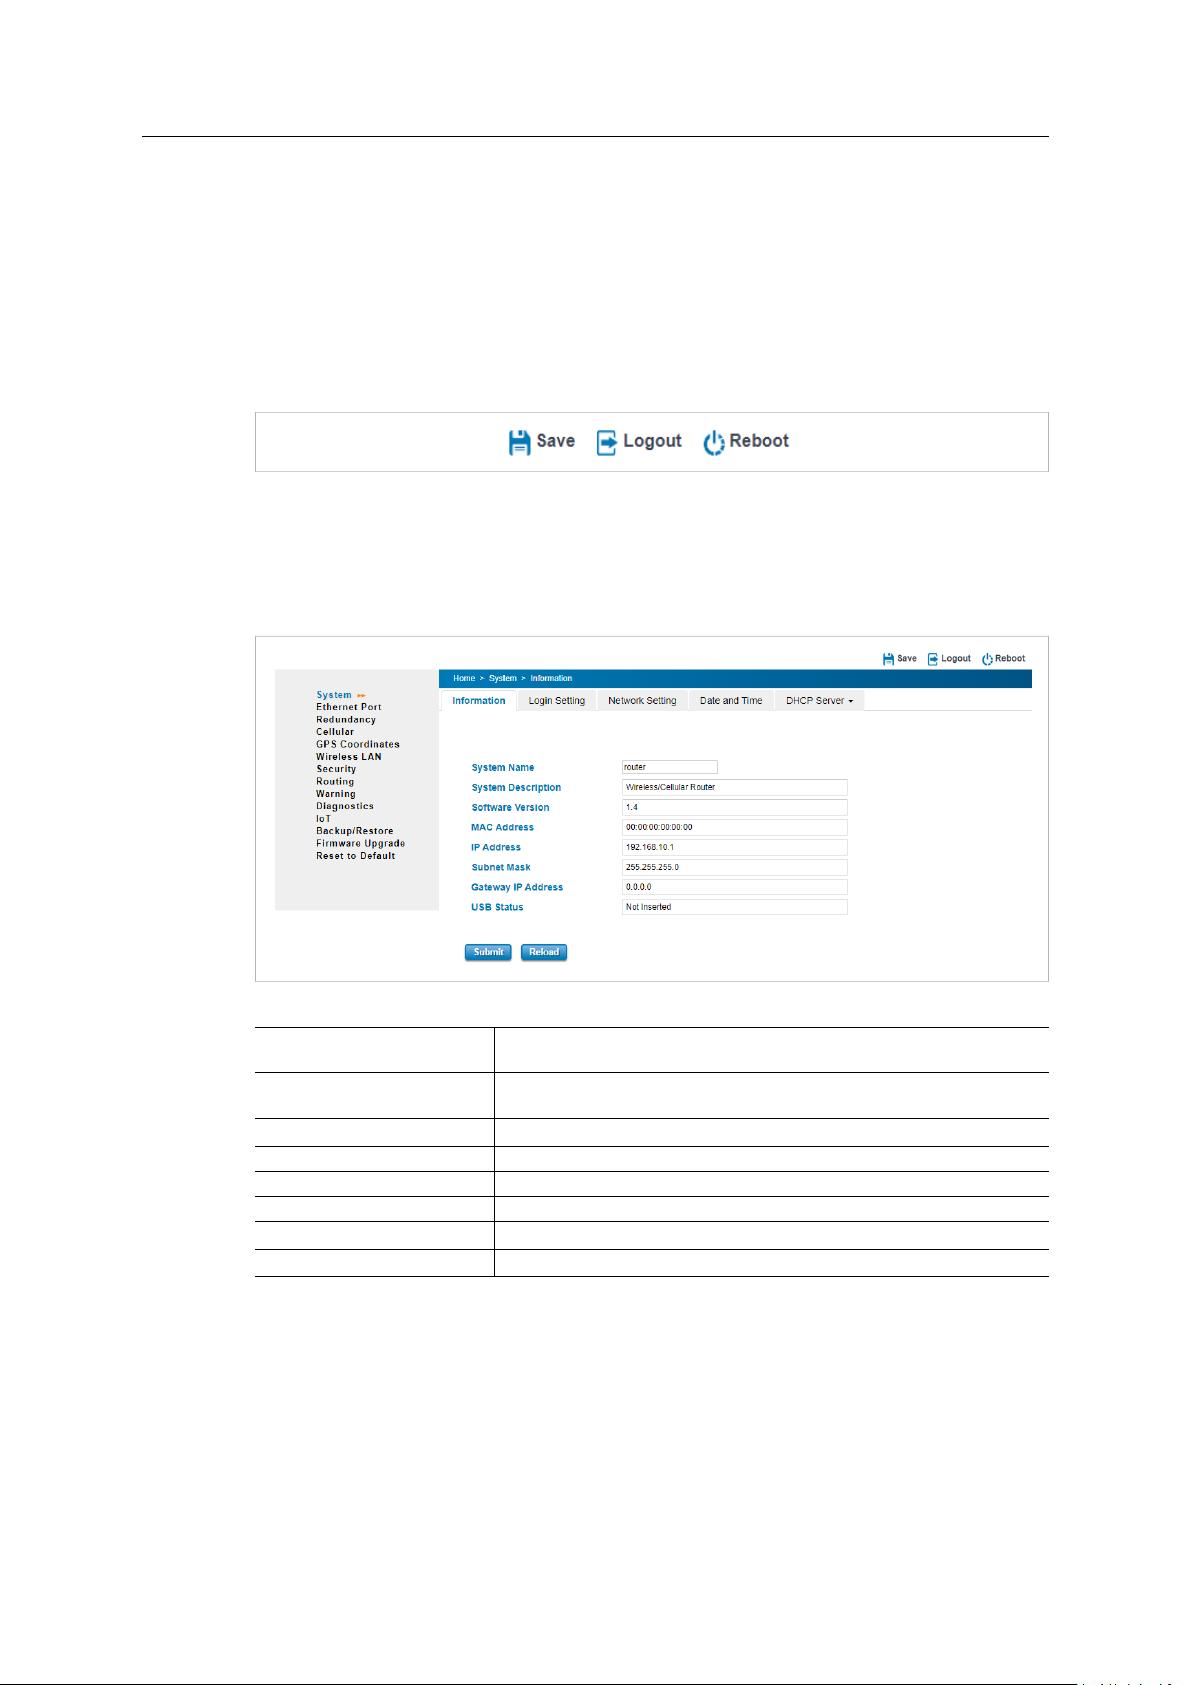
4.2.1 Information
Fig. 9 System configuration page
System Name
System Description
Software Version The currently installed firmware version
MAC Address MAC address of the Ethernet network interface
IP Address IP Address of the Ethernet network interface
Subnet Mask Subnet mask of the Ethernet network interface
Gateway IP Address Default gateway for the Ethernet network interface
USB Status USB port status
Name of the unit
Default: router
A short description of the unit for easier identification
Default: Wireless/Cellular Router
Industrial WLAN/LTE Router User Manual
SCM-1202-150 1.10 en-US
Page 14

Configuration 12 (42)
4.2.2 Login Setting
User Name / Guest Name
New Password Enter a password for accessing the web interface
Confirm Password Re-type the new password again to confirm it
Names for the normal user account and the guest account
Default: admin/guest
Setting a secure password for the unit is strongly recommended.
RADIUS Authentication Settings
RADIUS Server IP
Shared Key Shared key for RADIUS authentication
Server Port
TACPLUS Authentication Settings
Authentication Type Select TACACS+ authentication type
Authentication Timeout The maximum number of seconds allowed establishing a TCP connection between
TACPLUS Server IP
Shared Key Shared key for TACACS+ authentication
Server Port
IP Address of the RADIUS authentication server
Communication port for the RADIUS server
Default: TCP 1812
Default: ASCII
the device and the TACACS+ server. If the server cannot be reached within the
limit time it will change to Local. This configuration is applied to TACPLUS Local
mode only.
Default: 5
IP Address of the TACACS+ authentication server
Communication port for the TACACS+ server
Default: TCP 49
Industrial WLAN/LTE Router User Manual
SCM-1202-150 1.10 en-US
Page 15

Configuration 13 (42)
4.2.3 Network Setting
IPv4 Configuration
IP Assignment
IP Address Static IP address for the unit
Subnet Mask Subnet mask when using static IP
Gateway IP Address Default gateway when using static IP
DNS 1
DNS 2
WAN Setting (Router Mode)
WAN Access Type
IP Address Static IP address for the unit
Subnet Mask Subnet mask when using static IP
Gateway IP Address Default gateway when using static IP
DNS 1
DNS 2
Select static or dynamic IP addressing (DHCP)
Default: 192.168.10.1
Default: 255.255.255.0
Default: 0.0.0.0.
IP address of primary DNS server when using static IP
IP address of secondary DNS server when using static IP
Select static or dynamic IP addressing (DHCP)
Default: 192.168.1.1
Default: 255.255.255.0
Default: 0.0.0.0.
IP address of primary DNS server when using static IP
IP address of secondary DNS server when using static IP
Proxy ARP
Proxy ARP allows the Anybus Industrial WLAN/LTE Router to respond to ARP queries for a
specified IP address. The router will act as a proxy for the target IP address and forward traffic to
it. The MAC address of the Anybus Industrial WLAN/LTE Router will be shown as the destination
instead of the MAC address of the target node.
4.2.4 Date and Time
Current Time
Get PC Time
Time Zone
NTP
Set the date and time manually
Click to update the date and time from the connected PC
Select the desired time zone
When enabled, the date and time will be updated automatically from a specified
NTP server.
Select an NTP server in the dropdown list or enter the IP address for the NTP
server.
Industrial WLAN/LTE Router User Manual
SCM-1202-150 1.10 en-US
Page 16

Configuration 14 (42)
4.2.5 DHCP Server
Do not enable DHCP Server if there is already an active DHCP server on the network, as
this may result in IP address conflicts.
DHCP Setting
IP Address Start
IP Address End
Subnet Mask Subnet mask for the DHCP Server
Gateway
WIN S1
WIN S2
Primary DNS Server
Secondary DNS Server IP address of secondary DNS server
Lease Time
Enable/disable the internal DHCP server
Set the range of IP addresses that can be allocated by the DHCP Server
Default: 255.255.255.0
Default gateway for the DHCP Server.
IP address for primary WINS Server
IP address for secondary WINS Server
IP address of primary DNS server
Maximum DHCP lease time in minutes (range: 15-44640 minutes)
Default: 1440
DHCP Leased Entries
IP Address IP address assigned by the DNS server
MAC Address MAC Address of the node
Time to expire(s) Remaining DHCP lease time for the node
Industrial WLAN/LTE Router User Manual
SCM-1202-150 1.10 en-US
Page 17

Configuration 15 (42)
4.3 Ethernet Port
Fig. 10 Ethernet Port configuration page
4.3.1 Port Status
Port
Link Link Up = Ethernet link established
Speed/Duplex Speed (10/100/1000 Mbit/s) and duplex mode (Half/Full) for the port.
Flow Control Ports 1–8 (Fast Ethernet) only.
Ethernet port number (label)
Link Down = no Ethernet link
Indicates if Flow Control is enabled for the port.
4.3.2 Port Setting
Port
State
Speed/Duplex
Flow Control Ports 1–8 (Fast Ethernet) only
4.3.3 Traffic Control
Enable Traffic Control
Incoming Rate Limit
Incoming Burst
Outgoing Rate Limit
Outgoing Burst
Ethernet port number (label)
Enable or disable this port
Default: Enable
Select the speed and duplex mode for the port.
Ports 1–8 (Fast Ethernet) can be set to AutoNegotiation, 100 full, 100 half, 10 full,
10 half.
Port 9 (Gigabit Ethernet) can be set to AutoNegotiation, 100 Full, 100 Half.
Default: AutoNegotiation
Enable/disable manual flow control setting for the port.
Default: Disable
Enable/disable traffic control
Maximum incoming data rate
Default: 1024000 kbit/s
Maximum incoming burst size
Default: 20 kB
Maximum outgoing data rate
Default: 1024000 kbit/s
Maximum outgoing burst size
Default: 20 kBytes
Industrial WLAN/LTE Router User Manual
SCM-1202-150 1.10 en-US
Page 18

Configuration 16 (42)
4.4 Redundancy
Fig. 11 Redundancy configuration page
4.4.1 VRRP
VRRP Setting
Enable VRRP
Virtual Router ID Virtual ID range from 1 to 255. The switches within the same VRRP domain should
Virtual IP Virtual IP of the VRRP domain. This is the default gateway IP for the clients.
Priority
Adv. Interval Advertisement time interval = how often the device exchanges VRRP settings on
Preempt Mode Sets behaviour after recovery from a link failure when the Anybus Industrial
Virtual Router Interface Status
Interface Show the interface for the VRRP domain.
VirtualID Virtual ID range from 1 to 255. The network nodes within the same VRRP domain
Virtual IP Virtual IP of the VRRP domain. This is the default gateway IP for the clients.
Priority
Adv. Interval Advertisement time interval = how often the device exchanges VRRP settings on
VRRP Status VRRP master status
VRRP MAC
Enable/disable VRRP
have the same Virtual ID.
Priority in the VRRP domain for the device. The node with the highest priority will
become the master on the VRRP domain.
Range is from 1 to 254. The owner of the physical MAC address of the domain will
always have priority 255. Default: 100.
the domain
WLAN/LTE Router is VRRP master.
Enable: The Anybus Industrial WLAN/LTE Router will be automatically reinstated as
master.
Disable: The backup will act as master until next reboot.
should have the same Virtual ID.
Priority in the VRRP domain for the Anybus Industrial WLAN/LTE Router.
the domain
MAC address for the VRRP domain
Industrial WLAN/LTE Router User Manual
SCM-1202-150 1.10 en-US
Page 19

Configuration 17 (42)
4.5 Cellular
Applicable for the LTE router.
Fig. 12 Cellular configuration page
4.5.1 Cellular Status
Cellular/ETH.WAN Redundancy
Modem Status Cellular modem status
Interface Status Cellular interface status
Network Search Mode
Current SIM Index SIM card currently in use (1 or 2)
Provider Network operator name
APN
Service Type
IMEI
Signal Strength 0 dBm = default value (no signal)
SIM Status
Connection Status
Redundancy mode (see Cellular Setting)
Network search mode (Auto/2G Only/3G Only/LTE Only)
The APN (Access Point Name) is the identifier for the mobile network. The APN is
supplied by the network operator for the SIM card.
Possible service types are GSM – 2G, UMTS – 3G, GSM W/EGPRS, UTRAN W/
HSDPA (download), UTRAN W/HSUPA (upload), UTRAN W/HSDPA and HSUPA
(download & upload), E-UTRAN - LTE
The International Mobile Equipment Identity (IMEI) for the cellular modem
-113 dBm or less = poor signal
-111 dBm = acceptable signal
-109 to -53 dBm = good signal
-51 dBm or greater = excellent signal
SIM OK: SIM card is working
SIM not inserted: SIM card is not correctly inserted
SIM PIN Locked: SIM card locked – PIN code not entered or wrong PIN code
SIM PUK Locked: SIM card locked – wrong PIN code entered 3 times in a row.
Contact the ISP to resolve the issue.
Cellular interface connected/not connected
Click on Reload to refresh the status page.
Industrial WLAN/LTE Router User Manual
SCM-1202-150 1.10 en-US
Page 20

Configuration 18 (42)
4.5.2 Cellular Setting
Cellular/ETH.WAN Redundancy
Cellular Interface
SIM Selection Select which SIM card to use.
Cellular Redundant When enabled, the other SIM card will be used if there is a problem with the
Network Type Select 2G Only, 3G Only, LTE Only or Auto
SIM1/2 APN
SIM1/2 User Name
SIM1/2 Password
SIM1/2 Authentication CHAP: Challenge Handshake Authentication Protocol. CHAP uses a challenge/
4.5.3 SIM Setting
ETH-WAN First, Cellular-WAN Backup: Ethernet preferred for WAN, switching to
cellular interface if Ethernet connection fails.
Cellular-WAN First, ETH-WAN Backup: Cellular interface preferred for WAN,
switching to Ethernet if cellular connection fails.
Default: Disabled
Enable/disable the cellular interface
Default: SIM1
currently selected SIM card.
Period: The timeout value before switching to the other SIM card on loss of
connection. Default: 30 seconds
Number of Entries: The number of reconnection attempts using the selected SIM
card before switching to the other SIM card. Default: 3
Default: Disable
The APN (Access Point Name) is the identifier for the mobile network. The APN is
supplied by the network operator for the SIM card.
Set the SIM card user name (if required)
Set the SIM card password (if required)
response authentication metod.
PAP: Password Authentication Protocol. PAP (less secure) uses a user name and
password for authentication.
Current SIM Index SIM card currently in use (1 or 2)
SIM Status
Number of Retries Remain The remaining number of tries to enter the PIN code before the SIM card is PUK
SIM1/2 PIN
Confirm SIM1/2 PIN
Remember PIN Click to save the new PIN code
PIN Protection
4.5.4 DDNS Setting
Enable Dynamic DNS
Service Provider Select the domain service provider from the dropdown list
Domain Name
Login Name
Password Enter the password for the domain
Confirm Password Enter the password again to confirm
SIM OK: SIM card is working
SIM not inserted: SIM card is not correctly inserted
SIM PIN Locked: SIM card locked – PIN code not entered or wrong PIN code
SIM PUK Locked: SIM card locked – wrong PIN code entered 3 times in a row.
Contact the ISP to resolve the issue.
locked.
Enter a new PIN code for the SIM card
Confirm the new PIN code for the SIM card
Disable PIN: Disable PIN code security
Enable PIN: Activate PIN code security
Change PIN: Change PIN code to the code entered in the SIM 1/2 PIN field above
Enable/disable Dynamic DNS
Enter the DDNS domain name
Enter the login name for the domain
Industrial WLAN/LTE Router User Manual
SCM-1202-150 1.10 en-US
Page 21

Configuration 19 (42)
4.6 GPS Coordinates
Fig. 13 GPS configuration page
4.6.1 GPS Status
Status
Date
UTC Current UTC time
Latitude Current latitude
Longitude Current longitude
Altitude(m) Current altitude over sea level
Speed over ground(Km/h)
Number of satellites Number of satellites currently used
Status of the GPS interface
Current date
Current speed over ground
4.6.2 GPS Setting
Disable Disable the GPS interface
GPS
User input
Enable the GPS interface
Enter coordinates manually
Industrial WLAN/LTE Router User Manual
SCM-1202-150 1.10 en-US
Page 22

Configuration 20 (42)
4.7 Wireless LAN
Fig. 14 WLAN configuration page
4.7.1 WLAN Status
Operation Mode Operation mode of the WLAN interface (see WLAN Setting, p. 20)
Wireless Mode WLAN mode
SSID
Encryption
WMM Enable
Noise Floor Background noise level (dBm)
4.7.2 WLAN Setting
To comply with the European Radio Equipment Directive (RED) and local radio regulations
you must configure the country/region settings before the router is brought into use.
Common Settings
WLAN Interface Check the box to disable the WLAN interface.
Operation Mode Select the operation mode for the WLAN interface:
Wireless Mode Select the wireless mode (protocol).
Channel Mode
Maximum Output Power
Data Rate Data transmission rate
Extension Channel Protection Enable CTS-Self or RTS-CTS channel protection.
SSID of the WLAN interface
Encryption mode used
WMM enabled/disabled
AP (access point), Wireless Client, WDS-AP, or WDS-Client
Default: AP
Default: 802.11g/n
Select 20 MHz, 20/40 MHz or 40 MHz channel bandwidth.
Default: 20 MHz
Transmission output power can be set in stages from minimum to full power.
Default: Half
Default: Auto
Default: None
Industrial WLAN/LTE Router User Manual
SCM-1202-150 1.10 en-US
Page 23

Configuration 21 (42)
The following additional settings are specific for each operation mode.
AP (Access Point)
SSID
Multi SSID Click to configure multiple profiles (see Multi SSID, p. 22).
Broadcast SSID
Wireless Separation When enabled, wireless clients connected to the access point cannot communicate
WMM Support
Max Station Num
Country
HT Protect
Channel Select WLAN channel
Extension Channel
Enter an SSID (network name) for the router.
Default: Wireless
Enable/disable broadcasting the SSID on the network.
Default: Enable
directly with each other.
Default: Disable
Enhances quality of service (QoS) on the wireless network by prioritizing data
packets depending on category.
Default: Enable
The maximum number of clients allowed to connect to the access point.
Select the country or region where the router is operating.
Enable High Throughput protection.
Default: Disabled
Default: 2437MHz (Channel 6)
Available in 802.11n mode when the bandwidth is set to 20/40 MHz or 40 MHz,
and in 802.11ac mode when bandwidth is set to 40 MHz or 80 MHz.
A lower or upper extension channel will be set by the router based on the selected
control channel. If the selected control channel is in the middle range of the
channel band, the user can choose between the upper or lower extension channel.
Wireless Client
Site Survey
SSID
Click to scan for wireless networks, select the desired network from the Wireless
Site Survey list, then click Selected to connect the network.
The SSID of the currently selected wireless network. If the SSID of the desired
network is not broadcasted it can be entered here manually.
WDS-AP
SSID
Broadcast SSID
HT Protect
Enter an SSID (network name) for the router.
Default: Wireless
Enable/disable broadcasting the SSID on the network.
Default: Enable
Enable High Throughput protection.
Default: Disabled
WDS-Client
Site Survey
AP MAC Address Enter the MAC address of the WDS-AP to connect to.
Click to scan for wireless networks, select the desired network from the Wireless
Site Survey list, then click Selected to connect the network.
Industrial WLAN/LTE Router User Manual
SCM-1202-150 1.10 en-US
Page 24

Configuration 22 (42)
4.7.3 Multi SSID
The router can have multiple active WLAN profiles with individual SSIDs and authentication
settings. Profile 1 is the default profile and is always enabled. To set up a profile: check the box
to enable the profile, then click on the profile name.
Fig. 15 WLAN Profiles
Fig. 16 WLAN profile settings
Industrial WLAN/LTE Router User Manual
SCM-1202-150 1.10 en-US
Page 25

Configuration 23 (42)
Multi SSID
Profile Name Name of the profile
SSID
Security
Enable Check the box to enable the profile
SSID (network name) for the profile
Security mode to use for the profile
Security settings are set individually for each WLAN profile. The security settings for the default
profile (Profile 1) can also be set on the WLAN Security page.
Security Setting
Profile Name Enter a name for the profile
SSID
Broadcast SSID
Max Station Number The maximum number of clients allowed to connect to the access point.
Encryption
Cipher
Key Type
Default Key Select the default key.
Key 1~4
Default: Profile1
Enter an SSID (network name) for the router.
Default: Wireless
Enable/disable broadcasting the SSID on the network.
Default: Enable
No encryption No encryption or authentication
WEP
WPA Enterprise
WPA2 Enterprise
WPA & WPA2 Enterprise
WPA-PSK
WPA2-PSK
WPA-PSK & WPA2-PSK
None
64 bits WEP
128 bits WEP
TKIP
AES
Select hexadecimal or ASCII format for WEP keys.
Default: Hex
Default: Key 1
Enter the encryption keys.
Data encryption and shared key
WPA-Enterprise
Uses a RADIUS server for authentication.
WPA-Personal/Pre-Shared Key
Uses a password or passphrase for
authentication.
Can only be combined with No encryption
Used with WEP authentication
Used with WPA-PSK authentication
Used with WPA2-PSK authentication
Industrial WLAN/LTE Router User Manual
SCM-1202-150 1.10 en-US
Page 26

Configuration 24 (42)
4.7.4 WLAN Security
The security settings on the WLAN Security page only apply to the default profile (Profile 1).
SSID
Broadcast SSID
Max Station Number The maximum number of clients allowed to connect to the access point.
Encryption No encryption
Cipher
Key Type
Default Key Select the default key.
Key 1~4
Enter an SSID (network name) for the router.
Default: Wireless
Enable/disable broadcasting the SSID on the network.
Default: Enable
No encryption or authentication
WEP
WPA with RADIUS
WPA2 with RADIUS
WPA & WPA2 with RADIUS
WPA-PSK
WPA2-PSK
WPA-PSK & WPA2-PSK
None
64 bits WEP
128 bits WEP
TKIP
AES
Select hexadecimal or ASCII format for WEP keys.
Default: Hex
Default: Key 1
Enter the encryption keys.
Data encryption and shared key
WPA-Enterprise
Uses a RADIUS server for authentication.
WPA-Personal/Pre-Shared Key
Uses a password or passphrase for
authentication.
Can only be combined with No encryption
Used with WEP authentication
Used with WPA-PSK authentication
Used with WPA2-PSK authentication
Industrial WLAN/LTE Router User Manual
SCM-1202-150 1.10 en-US
Page 27

Configuration 25 (42)
4.7.5 Advanced
Normally these settings are left at the default values. Incorrect settings may reduce
performance or prevent communication with the device.
A-MPDU/A-MSDU aggregation
Short GI Short guard interval can improve the data rate.
RTS Threshold
Fragment Threshold The maximum size for a packet before data is fragmented into multiple packets.
Beacon Interval The interval between broadcast packets.
DTIM Interval The interval between Delivery Traffic Indication Messages.
Preamble Type Preamble Type controls the additional data header strings that are used to check
IGMP Snooping
Antenna Number Select the number of antennas to use.
Can improve performance in AP mode.
Do not enable this function if the wireless clients do not support A-MPDU/A-MSDU
aggregation.
The guard interval is used to introduce immunity to propagation delays, echoes
and reflections, to which digital data is normally very sensitive.
Threshold value for triggering a RTS/CTS handshake.
Default: 2347 (bytes)
Setting it too low may result in poor network performance.
Default: 2346 (bytes)
Default: 100 (ms)
Default: 1 (frame)
for data transmission errors.
Default: Long
IGMP Snooping allows the ports to detect IGMP queries, report packets, and
manage multicast traffic through the AP. IGMP Snooping provides the ability to
limit multicast traffic so that it travels only to those end destinations that require
that traffic.
Default: Enable
This setting must be set to One Antenna if only a single antenna is used.
Antenna 1 is active when One Antenna is selected.
Default: Two Antenna
If only one antenna is used for WLAN, the antenna must be connected to WLAN 1.
4.7.6 Access Control
Option for router with AP Mode.
Access Control Mode Allow List – Allow only the specified MAC addresses to access the WLAN
MAC Address MAC address of device
Select Select a MAC address list
Edit Click to change the Access Control Mode for the specific MAC address
4.7.7 Radius Server
Option for router with AP Mode.
IP Address IP address for the RADIUS server
Server Port
Shared Key Shared key for authentication
Deny List – Deny the specified MAC addresses to access the WLAN
Default: Disable
UDP port for the RADIUS server
Default: 1812
Industrial WLAN/LTE Router User Manual
SCM-1202-150 1.10 en-US
Page 28

Configuration 26 (42)
4.7.8 Certificate File (Client Mode)
Delete User Key Delete the currently selected RADIUS server certificate
Upload User Key Upload a certificate file from a specified file location
Industrial WLAN/LTE Router User Manual
SCM-1202-150 1.10 en-US
Page 29

Configuration 27 (42)
4.8 Security
Fig. 17 Security configuration page
4.8.1 Access Control
Remote Management
Telnet Allow remote login and configuration of the device using Telnet.
SNMP
SSH
HTTPS Only
Allow remote login and configuration of the device using SNMP.
Allow remote login and configuration of the device using SSH.
Require SSL/TLS encryption for access to the web configuration interface.
WAN Access
Access from the WAN can be enabled for Web (HTTP/HTTPS), Telnet, SSH and/or SNMP.
Custom Exception
Access to the configuration can be restricted to specific IP addresses and port ranges.
4.8.2 Outbound Firewall
Firewall rules for outbound traffic can be set up based on source and destination IP address,
source port range and protocol (TCP/UDP).
Industrial WLAN/LTE Router User Manual
SCM-1202-150 1.10 en-US
Page 30

Configuration 28 (42)
4.8.3 NAT Setting
Port Forwarding Check the box to enable port forwarding.
Public Port Range
IP Address IP address that traffic on the public ports will be redirected to
Protocol Allow only TCP or UDP packets, or both (default)
Port Range Target port range
Comment
DMZ
DMZ
DMZ Host IP Address IP address of the DMZ host
Port Mapping Policy
Port Mapping Policy Reuse: Use the same port number when the same remote device connects again.
1 to 1 NAT
1 to 1 NAT
Local IP Address Target IP Address
WAN IP Address Incoming IP Address
Comment
Range of public TCP/UDP ports for this entry
Enter a description of this entry (optional).
Check the box to enable DMZ.
Randomize: Change the port number randomly for each connection attempt.
Default: Reuse
Check the box to enable 1 to 1 NAT
Enter a description of this entry (optional).
4.8.4 OpenVPN
OpenVPN Status
Enabled
Connection Status OpenVPN connection status
OpenVPN Client
Enable VPN Client Check the box to enable VPN Client
Encryption Mode Static Key: Use a pre-shared static key.
Server 1
Server 2
Port
Tunnel Protocol Select TCP or UDP
Encryption Cipher Select encryption cipher
Hash Algorithm Select hash algorithm
ping-timer-rem
persist-tun
persist-key Keep the first used key if VPN restarts after keepalive timeout.
LZO Compression
Keepalive
Ping Interval Interval between pings (1–99999 seconds).
Retry Timeout
OpenVPN enabled/disabled
TLS: Use SSL/TLS + certificates for authentication and key exchange.
Primary IP address of the VPN server
Secondary IP Address of the VPN server
VPN port number (1–65535)
Default: 1194
Prevents unnecessary restart of server/client on network failure.
Default: Enable
Keep tun (layer 3) device linkup after keepalive timeout.
Default: Enable
Default: Enable
Uses compression of data to decrease the traffic (CPU intensive).
Default: Disable
Detect connection status
Default: Enable
Default: 10
Time between retries after failed ping (1–99999 seconds).
Default: 60
Industrial WLAN/LTE Router User Manual
SCM-1202-150 1.10 en-US
Page 31

Configuration 29 (42)
OpenVPN Client (continued)
nobind When enabled, source ports will be assigned randomly.
ifconfig
Route
Save Log File Click Save... to save the VPN Client Log.
Local/remote IP addresses for the VPN tunnel
Route IP address and netmask. This is the target IP domain that can be accessed
through the VPN tunnel.
OpenVPN Server
Enable VPN Server Check the box to enable VPN Server
Encryption Mode Static Key: Use a pre-shared static key.
Server 1
Server 2
Port
Tunnel Protocol Select TCP or UDP
Encryption Cipher Select encryption cipher
Hash Algorithm Select hash algorithm
ping-timer-rem
persist-tun
persist-key Keep the first used key if VPN restarts after keepalive timeout.
LZO Compression
Keepalive
Ping Interval Interval between pings (1–99999 seconds).
Retry Timeout
ifconfig
Route
Save Log File Click Save... to save the VPN Server Log.
TLS: Use SSL/TLS + certificates for authentication and key exchange.
Primary IP address of the VPN server
Secondary IP Address of the VPN server
VPN port number (1–65535)
Default: 1194
Prevents unnecessary restart of server/client on network failure.
Default: Enable
Keep tun (layer 3) device linkup after keepalive timeout.
Default: Enable
Default: Enable
Uses compression of data to decrease the traffic (CPU intensive).
Default: Disable
Detect connection status
Default: Enable
Default: 10
Time between retries after failed ping (1–99999 seconds).
Default: 60
Local/remote IP addresses for the VPN tunnel
Route IP address and netmask. This is the target IP domain that can be accessed
through the VPN tunnel.
OpenVPN Certificate
Delete VPN Key Delete the selected certificate.
Upload VPN Key Upload a certificate file from a specified file location.
Industrial WLAN/LTE Router User Manual
SCM-1202-150 1.10 en-US
Page 32

Configuration 30 (42)
4.8.5 IPSec Setting
Enable IPsec Check the box to enable IPsec
IPsec Status IPsec connection status
Authentication Method Default: PSK
Pre-shared key Default: 12345678
IPsec Cipher Suites Default: AES128-SHA1-DH2
Local IP IP Address of the local side of the tunnel.
Local Subnet
Remote Host
Remote Subnet
Use 0.0.0.0 if WAN uses DHCP.
IPsec local protected subnet/netmask
Example: 192.168.10.0/24
IP adress of the IPsec remote host
Use 0.0.0.0 if remote host uses DHCP
IPsec remote protected subnet/netmask
Example: 192.168.10.0/24
4.8.6 GRE Setting
GRE
Remote IP Address Remote real IP address of GRE tunnel
Virtual Remote IP Address Remote virtual IP address of GRE tunnel
Virtual Local IP Address Local virtual IP address of GRE tunnel
Virtual Local Subnet Mask Remote virtual netmask of GRE tunnel
Tunnel Route Default: 0.0.0.0
Tunnel Route Subnet Mask Subnet mask for the route.
Key
Comment
Check the box to enable GRE.
Enter the key for the GRE tunnel.
Enter a description of the configuration (optional).
Industrial WLAN/LTE Router User Manual
SCM-1202-150 1.10 en-US
Page 33

Configuration 31 (42)
4.9 Routing
Fig. 18 Routing configuration page
4.9.1 Route (Static Route)
Destination
Netmask Subnet mask of the destination network
Gateway
Metric
Interface The outgoing network interface (LAN, WAN, or Cellular).
IP address of the destination network
Default gateway
Can be used to assign a cost factor to each available route.
The WAN interface is only available in Router Mode.
Industrial WLAN/LTE Router User Manual
SCM-1202-150 1.10 en-US
Page 34

Configuration 32 (42)
4.10 Warning
Fig. 19 Warning configuration page
4.10.1 Email Alert
Email Alert Check the box to enable email alerts
SMTP Server IP Address IP address of the SMTP (outgoing) email server
Email Account
Authentication Select authentication mode (None, Plain, Login)
User Name
Password Password for the SMTP account (if required)
Confirm Password Type the password again to confirm
Email 1 To Two email addresses can be set up to receive email notifications from the Anybus
Email 2 To
SMTP account name
User name (if required by the authentication mode)
Note: The user name cannot be longer than 40 characters.
Industrial WLAN/LTE Router.
Note: The email addresses cannot be longer than 40 characters.
4.10.2 Ping Watchdog
The Anybus Industrial WLAN/LTE Router can be configured to regularly ping another device on
the network. If the remote device is not reachable, the router will reboot.
Enable Ping IP Address 1
Enable Ping IP Address 2
Ping Interval The interval between each ping.
Watchdog Deferred
Ping Fail Counter The number of consecutive failed pings that will indicate a lost connection.
4.10.3 Syslog Setting
Enable Remote Syslog Server Check the box to enable sending system logs to a syslog server on the network.
IP Address The IP address of the syslog server.
Port
Two IP addresses can be set up as targets. The Anybus Industrial WLAN/LTE Router
will send a ping command to each of them at the interval configured below.
Default: 300 (seconds)
The delay before the Anybus Industrial WLAN/LTE Router reboots after the
number of failed pings have been reached.
Default: 120 (seconds)
Default: 30
The port number of the syslog server
Default: 514
Industrial WLAN/LTE Router User Manual
SCM-1202-150 1.10 en-US
Page 35

Configuration 33 (42)
4.10.4 Relay Output
Relay ON if any kind of failure is detected. OFF if the status is normal.
Link Failure Monitoring port link down event
4.10.5 Event Type
Authentication Failure An event will be logged for each failed authentication attempt.
Configuration Changed An event will be logged each time the configuration of the Anybus Industrial
WLAN/LTE Router is changed.
4.10.6 SNMP
Enable SNMP Check the box to enable SNMP
Protocol Version Select the SNMP protocol version.
Server Port SNMP port
Get Community
Set Community
SNMP Trap Server
SNMP Trap
Trap Server
Trap Community
Default: V2c
Default: 161
Default: public
Default: private
Check the box to enable sending data in real time to the SNMP trap server.
IP address of the SNMP trap server
Default: 0.0.0.0
Default: public
SNMP v3
SNMPv3 Admin Check the box to enable SNMPv3 Admin functions.
Admin User Name Set up the user name for SNMPv3 Admin
Admin Password Set up the password for SNMPv3 Admin
Confirm Password Repeat the password to confirm
Access Type
Authentication Protocol Select authentication based on MD5 or SHA algorithms.
Privacy Protocol Specify the encryption method for SNMP communication.
SNMPv3 User
User Name
Password Set up the password for the SNMPv3 User
Confirm Password Repeat the password to confirm
Access Type
Authentication Protocol Select authentication based on MD5 or SHA algorithms.
Privacy Protocol Specify the encryption method for SNMP communication.
Default: SNMPv3Admin
Access type for SNMPv3 Admin
Default: MD5
None: No encryption is applied.
DES: Data Encryption Standard, applies a 58-bit key to each 64-bit block of data.
Check the box to enable SNMPv3 User functions.
Set up the user name for the SNMPv3 User
Default: SNMPv3User
Access type for the SNMPv3 User
Default: MD5
None: No encryption is applied.
DES: Data Encryption Standard, applies a 58-bit key to each 64-bit block of data.
Industrial WLAN/LTE Router User Manual
SCM-1202-150 1.10 en-US
Page 36

Configuration 34 (42)
4.11 Diagnostics
Fig. 20 Diagnostics configuration page
4.11.1 Event Logs
#
Time
Source Event source
Message Event message
4.11.2 ARP Table
This page shows the active ARP table for the Anybus Industrial WLAN/LTE Router. The ARP table
contains recently cached MAC addresses of devices that have been communicating with the
router.
4.11.3 Port Statistics
Statistics for transmitted and received packets on each Ethernet port.
Index
Event time (uses the date/time setting of the Anybus Industrial WLAN/LTE Router)
Industrial WLAN/LTE Router User Manual
SCM-1202-150 1.10 en-US
Page 37

Configuration 35 (42)
4.11.4 Ping
Can be used to to test connectivity by sending ping packets to a remote host.
Fig. 21 Ping tool
4.11.5 Trace Route
Can be used to diagnose the connection to a remote host using the traceroute command.
4.11.6 Network Statistics
Statistics for transmitted and received packets on the WLAN interface/cellular interface.
4.11.7 Association List
Shows the status of connected wireless clients when the router is in Access Point mode.
SSID
MAC Address The MAC Address of the client
Signal Strength Connection signal strength
Noise Floor Background noise level
Connection Time
Last IP
Action
The SSID used by the client
The time when the client connected to the AP
The IP Address of the client.
Select kick to immediately disconnect the client.
Industrial WLAN/LTE Router User Manual
SCM-1202-150 1.10 en-US
Page 38

Configuration 36 (42)
4.12 IoT
Fig. 22 IoT configuration page
Anybus Industrial WLAN/LTE Router supports the use of IoT cloud services such as Amazon Web
Services (AWS) and Microsoft Azure.
To set up an IoT connection you must supply the required certificates and other authentication
and connection information for the respective cloud service accounts. For more information,
please refer to the documentation from the cloud service provider.
Industrial WLAN/LTE Router User Manual
SCM-1202-150 1.10 en-US
Page 39

Configuration 37 (42)
4.13 Backup/Restore
Fig. 23 Backup/Restore page
The configuration settings can be saved and restored over the current network connection (WEB)
or using a flash drive connected to the local USB port.
After restoring a configuration, you will be asked to log in to the router again.
4.13.1 WEB
To save the current configuration:
1. Click on Download Backup to open a file dialog.
2. Click on Save to save the configuration to a location on your computer.
To restore a saved configuration:
1. Click on Choose file to open a file dialog.
2. Select the configuration file and click on Open.
3. Click on Restore to apply the configuration.
4.13.2 USB
To save the current configuration:
1. Connect a USB flash drive to the USB port.
2. Enter a name for the configuration file. Example: router.conf
3. Click on Backup. The configuration will be saved to the USB device.
To restore a saved configuration:
1. Connect the USB flash drive that contains the saved configuration file to the USB port.
The USB port does not support USB hard drives, only flash drives (pen drives).
2. Enter the name of the configuration file. Example: router.conf
3. Click on Restore to apply the configuration.
Industrial WLAN/LTE Router User Manual
SCM-1202-150 1.10 en-US
Page 40

Configuration 38 (42)
4.14 Firmware Upgrade
Fig. 24 Firmware Upgrade page
The firmware of the Anybus Industrial WLAN/LTE Router can be upgraded over the current
network connection (WEB) or using a flash drive connected to the local USB port.
The latest firmware can be downloaded from www.anybus.com/support.
Do not disconnect the Anybus Industrial WLAN/LTE Router while the upgrade procedure
is running.
4.14.1 WEB
1. Click on Choose file to open a file dialog.
2. Select the firmware file and click on Open.
3. Click on Upgrade to start the firmware upgrade procedure.
4.14.2 USB
1. Connect the USB flash drive that contains the firmware file to the USB port.
2. Enter the name of the firmware file.
3. Click on Restore start the firmware upgrade procedure.
The Anybus Industrial WLAN/LTE Router will reboot automatically when the upgrade procedure
has finished.
The Anybus Industrial WLAN/LTE Router will reboot automatically when the upgrade
procedure has finished.
The USB port does not support USB hard drives, only flash drives (pen drives).
Industrial WLAN/LTE Router User Manual
SCM-1202-150 1.10 en-US
Page 41

Configuration 39 (42)
4.15 Reset to Default
Fig. 25 Factory Reset page
Click on Reset to restore the factory settings. The current IP settings will be kept if the box
Restore factory default IP setting is unchecked.
The IP address of the router will be reset to the default address 192.168.10.1.
Industrial WLAN/LTE Router User Manual
SCM-1202-150 1.10 en-US
Page 42

Verify Operation 40 (42)
5 Verify Operation
Fig. 26 LED Indicators
Front Panel LED
LED Status
PWR Green On Power On
Off
SYS Green On
Green Blinking Firmware Updating
Off Not Ready
DO
1000M Green On
WAN/9
Red On Failure
Off No failure
Off
Green On
Green Blinking
Description
No Power
Ready
Ethernet port 9 speed is 1 Gbit/s
Ethernet port 9 speed is 100 Mbit/s
Ethernet port 9 link established
Ethernet port 9 packets transmitting/receiving
Radio LED (WLAN)
LED Status
Ra
Rb
Rc Green On
-
-
Green blinking STA connected
Off
Radio LED (LTE)
LED Status
Ra Green On
Off SIM not detected
Rb
Rc
Green On 4G connection
Green blinking
Off Disconnected
-
RJ45 LED
LED Status
Port 1–8 Green On
Green Blinking
Off Link inactive
Description
Reserved for future use
Reserved for future use
AP mode
STA disconnected / Radio disabled
Description
SIM detected
2/3G connection
Reserved for future use
Description
Link established
Packets transmitting/receiving
Industrial WLAN/LTE Router User Manual
SCM-1202-150 1.10 en-US
Page 43

Appendix A: Wireless Technology Basics 41 (42)
A Wireless Technology Basics
Wireless technology is based on the propagation and reception of electromagnetic waves. These
waves respond in different ways in terms of propagation, dispersion, diffraction and reflection
depending on their frequency and the medium in which they are travelling.
To enable communication there should optimally be an unobstructed line of sight between the
antennas of the devices. However, the so called Fresnel Zones should also be kept clear from
obstacles, as radio waves reflected from objects within these zones may reach the receiver out
of phase, reducing the strength of the original signal (also known as phase cancelling).
Fresnel zones can be thought of as ellipsoid three-dimensional shapes between two wireless
devices. The size and shape of the zones depend on the distance between the devices and on the
signal wave length. As a rule of thumb, at least 60 % of the first (innermost) Fresnel zone must
be free of obstacles to maintain good reception.
Fig. 27 Fresnel zones
Area to keep clear of obstacles (first Fresnel zone)
Distance (d)
100 m 1.7 m 1.2 m
200 m 2.5 m 1.7 m
300 m 3.0 m 2.1 m
400 m 3.5 m 2.4 m
2.4 GHz (WLAN or Bluetooth) 5 GHz (WLAN)
Fresnel zone radius (r)
The wireless signal may be adequate even if there are obstacles within the Fresnel zones, as it
always depends on the number and size of the obstacles and where they are located. This is
especially true indoors, where reflections on metal objects may actually help the propagation of
radio waves. To reduce interference and phase cancelling, the transmission power of the unit
may in some cases have to be reduced to limit the range.
It is therefore recommended to use a wireless signal analysis tool for determining the optimal
placement and configuration of a wireless device.
Industrial WLAN/LTE Router User Manual
SCM-1202-150 1.10 en-US
Page 44

last page
© 2020 HMS Industrial Networks
Box 4126
300 04 Halmstad, Sweden
info@hms.se SCM-1202-150 1.10 en-US / 2020-03-13 / 17651
 Loading...