

Page 1

ASSEMBLY INSTRUCTIONS
48" Wide AnthroCart
Product Part#
48" Wide AnthoCart GT12
Anthro Corporation® | 10450 SW Manhasset Dr. | Tualatin, OR 97062
Toll-free: 800.325.3841 | Fax: 800.325.0045 | email: sales@anthro.com | anthro.com
Outside the U.S. | Tel: 503.691.2556 | Fax: 503.691.2409
Page 2
14
01
13
02
15
WELCOME
Thank you for purchasing 48" Wide
AnthroCart.
Before proceeding, please review
the Assembly Instructions of all
Anthro Products you purchased
and are planning to include in this
installation.
Decide on the shelf configuration
that works best for you. Generally,
customers place the large shelf at
the top of the legs and the small
shelf at the bottom of the legs,
and that’s how these instructions
are organized. This configuration
leaves 18” clearance between the
shelves.
Shelves can be installed at any
height (in 1” increments), so find
the best configuration for you.
08
07
12
11
10
05
03
04
06
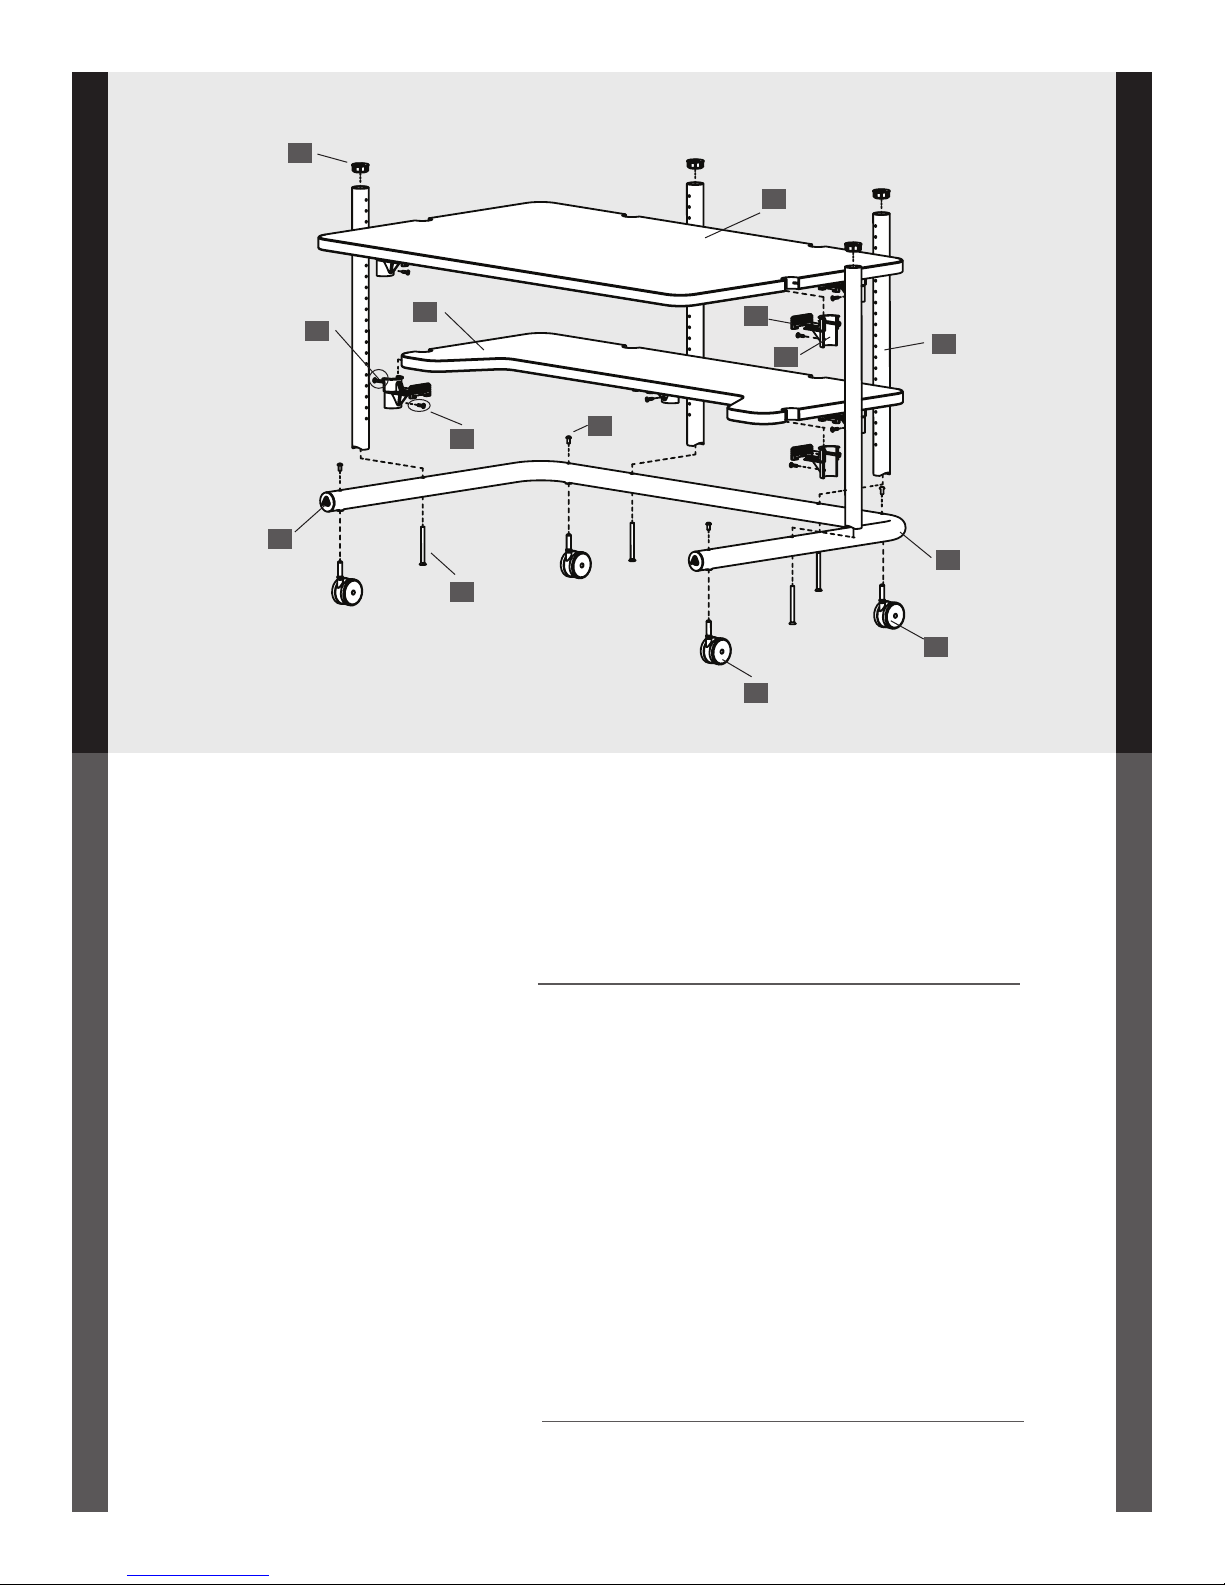
PARTS LIST
Before beginning assembly of your 48" Wide AnthroCart,
please review the parts list to verify that your shipment is
complete.
Detailed views of all hardware are provided with each Assembly Step. All fastener
quantities listed here are the minimum needed for your cart assembly. Your
shipment may include a few extras.
Product Quantity Part Number
01 48" Wide Large Shelf 1 100-6035-xx
02 48" Wide Small Shelf 1 100-6034-xx
03 Vertical Legs 4 125-5020-xx
04 Base Tube 1 125-5012-xx
05 2 3/8" Locking Caster 2 150-5003-xx
06 2 3/8" Non-locking Caster 2 150-5002-xx
07 Base Tube Screws 4 325-5000-00
08 Self-threading Screws 8 325-5010-00
09 Caster Inserts (not shown) 4 525-1000-00
10 Caster Insert Screws 4 325-5052-00
11 Shelf Supports 8 175-5060-xx
12 Shelf Clamps 8 175-5059-xx
13 Button Head Screws 8 325-5086-00
14 Small End Caps 4 175-5020-xx
15 Large End Caps 2 175-5021-xx
If you have any questions or if we
can help you in any way, please
contact us at 800.325.3841.
2
To make the assembly of your cart even easier, we have included all of the
required tools . Use the Hex Driver Bit in your electric drill in place of the
Hex Driver.
Tools Quantity Part Number
Hex Driver 5/32” (not shown) 1 375-5000-00
Hex Driver Bit 5/32” (not shown) 1 375-5003-00
8 oz. Rubber Mallet (not shown) 1 375-5022-00
Page 3

STEP 1
Attach 4 shelf supports to each shelf. Begin by first
installing a shelf clamp into the shelf notch. Be sure
the pointed barbs face towards the outer shelf edge.
Next, slide a shelf support into the recesses of the
shelf clamp and shelf. Push in as far as possible.
Finally, secure with a Button Head screw.
Barbs
First
Next
1-5/8" Screw
325-5086-00
STEP 2
Loosely attach the large shelf to hole 2 from the top of
the two vertical legs (non-coped end) using one
Self-threading Screw per support leg. These fasteners
are cutting threads into the leg, so the first few turns
will require some force.
NOTE: This will place your large shelf 28” from the floor
using the standard 2 3/8” casters.
Self-threading Screw
325-5010-00
STEP 3
Loosely attach the small shelf at the desigred height
on two vertical legs using one Self-threading Screw
per support leg.
NOTE: Handle the shelf assembly carefully until the
cart is fully assembled.
Finally
Self-Threading Screw
Top (Non-Coped) End
Bottom (Coped) End
Self-threading Screw
325-5010-00
STEP 4
Loosely attach the 3rd and 4th vertical legs to the
shelf assembly (from step 3) using one Self-threading
Screw per shelf support.
Self-threading Screw
325-5010-00
Self-Threading Screw
48" Wide AnthroCart Assembly Instructions
Self-Threading Screw
Bottom (Coped) End
Bottom (Coped) End
3
Page 4

STEP 5
Install all four caster inserts into the base tube and
secure with one Caster Insert Screw per insert.
Push the casters (locking ones in front) into the caster
inserts. This is a friction fit and will require some
effort. You may find it helpful to tap the bottom of
the caster with the rubber mallet provided.
1/2” Caster Insert Screw
325-505 2-00
Caster Insert Screw
Locking Casters
STEP 6
Carefully rotate the shelf assembly (from Step 4)
upside down as shown. Place the base tube assembly
(from step 5) onto the vertical legs of the shelf
assembly.
Attach the base tube to each leg using a total of 4
Base Tube Screws.
Tighten all support, caster and base tube screws.
3-1/2” Bolt
325-500 0-00
STEP 7
Rotate your cart onto the casters.
Pop the 1.5” small end caps into the vertical legs and
the 1.75” large end caps into the base tube.
After you add your equipment to the cart, select the
cable management components that suit.
Base Tube Screws
1.5" Small End Cap
To install the Cable Alleys, expand each sleeve and fit
it over a cart leg. Align the mounting hole(s) in the
sleeve with the holes on the leg, then install with selfthreading screws.
To install the Cord Handler, snap the large end around
any cart leg, then route cables through the small end.
CONGRATULATIONS! YOUR 48" WIDE ANTHROCART ASSEMBLY IS COMPLETE!
Notices:
Technology Furniture and AnthroCart
are trademarks of Anthro Corporation.
Anthro reserves the right to modify
the design and specifications
without prior notice.
4
1.75" Large End Cap
*300-5632-00*
300-5632-00
Rev A January 2015
For warranty information, please visit:
Warranty:
http://www.anthro.com/support/warranty
 Loading...