

Antelope Audio Orion Studio HD Owner`s manual


Owner’s Manual
1

2

Contents
1. Safety Notes 5
2. Introduction 6
3. Features 7
4. Quick Start 8
6. Activation Guide 8
5. Front and Rear Panels Explained 9
7. Software Control Panel 12
8. Advanced User Tips 21
9. In The Box 21
10. Troubleshooting 21
11. Technical Specications 23
12. Antelope Audio Support Resources 25


1. Safety Notes
To reduce the risk of electrical shocks, re, and related hazards:
● Do not remove screws, cover, or cabinet. There are no user serviceable parts inside.
Refer servicing to qualied service personnel.
● Do not expose this device to rain, moisture or spillover of liquid of any kind.
● Should any form of liquid or a foreign object enter the device, do not use it. Switch o
the device and then unplug it from the power source. Do not operate the device again
until the foreign object is removed or the liquid has completely dried and its residues fully
cleaned up. If in doubt, please consult the manufacturer.
● Do not handle the power cables with wet hands!
● Make sure the device is switched o when plugging/unplugging it to/from the power
source.
● Avoid placing things on the cabinet or using the device in a narrow and poorly
ventilated place which could aect its operation or the operation of other closely located
components.
● If anything goes wrong, turn o the device rst and then unplug the power. Do not
attempt to repair the device yourself: consult authorized service personnel or your dealer.
● Do not install near any heat sources such as radiators, stoves, or other apparatus
(including ampliers) that produce heat.
● Do not use harsh chemicals to clean your Unit. Clean only with specialized cleaners for
electronics equipment.
● Connect all your devices before powering your Unit.
● This unit is connected via its power cord to the mains safety earth.
● Never operate the unit without this earth connection.
● AC power supply cable should be routed so that it is not likely to be walked on or
squeezed by items placed upon or against it.
● To completely turn o the device, unplug the power cable rst from the outlet and then
from the rear panel of the unit.
● Both, occasional and continued exposure to high sound pressure levels can cause
permanent ear damage via headphones and monitors.
● Your unit should always be un-racked when traveling or in a ight case.
● The device is designed to operate in a temperate environment, with a correct Operating
Temperature of: 0-50 °C, 32-122 °F
5

2. Introduction
Thank you for purchasing Orion Studio HD
from Antelope Audio.
Orion Studio HD is the newest star in an
already established line of top audio interfaces.
Now with HDX connectivity it’s a preferred
choice for the higher level Pro Tools setups.
With extended analog I/O, 12 Class A Mic Pres
and enhanced conversion, Orion Studio HD
can t any DAW workow and recording and
producing environment thanks to a fast USB
3.0 port.
It comes fully equipped with our full library of
Real-Time Field-Programmable Gate Array
(FPGA) FX. Not only is that vast array of
EQs, compressors, guitar amps and cabinets
plus AuraVerb reverb coming to you for free,
but also features 40+ authentic models of
legendary units from BAE, Grove Hill, Gyraf
Audio, Lang and more are yet to come.
Orion Studio HD is using best in class AD
converters, which are boosted to dynamic
range to spectacular 124 dB. The audio world’s
favorite clocking accuracy is also a part of
Orion Studio HD package as well. Powered
by our acclaimed 64-bit Acoustically Focused
Clocking (AFC) jitter management technology
it’s a guarantee for incomparable stability, sonic
accuracy and audio detail. We’re talking highend pro studio language here so expect OCX
HD and Trinity style clocking perfection here.
Beside connectable via the Pro Tools friendly
HDX port, Orion Studio HD oers USB 3.0
connection making the device compatible with
any DAW in business. The interface comes
with a plethorа of analog and digital I/O options
among which 12 high-end mic pres, a pair of
mastering grade monitor outs, 16 analog outs,
2 transformer reamp outputs, plus 8 channels
I/O via ADAT and 2 channels I/O on S/PDIF.
Like everything Antelope Audio, Orion Studio
HD allows for fast device control via multiple
computers via OS & Windows compatible
desktop app. Functionality highlights include
switching between two routing matrix view
modes and Full Session Saving functionality.
Yes, Orion Studio HD allows you to quickly
save, load and share any routing, monitoring,
and FX settings. These presets can be then
easily exchanged between studio facilities,
which are part of the global Antelope Audio
family.
Control and use as many Orion Studio HD
devices as you want via the S/N selector inside
the software control panel or open multiple
panels on the same computer. Orion Studio
HD is suitable for large studio facilities and
oers exible device management from various
access points.
Want even greater freedom? An iOS / Android
mobile app gives you full mic pres control from
a smartphone or tablet.
For the latest information and updates visit:
www.antelopeaudio.com
Enjoy working with the new Orion Studio!
All the best,
The Antelope Team
6

3. Features
● HDX port for Pro Tools & Native setups compatibility
● Now 40+ FPGA FX including Compressors, EQs, Guitar Amps & Cabinets
● Best in class AD converters with dynamic range boosted to 124 dB
● Fast USB 3.0 connectivity compatible with both MAC OS & Windows
● New Black Faceplate
● 12 Class A mic preamps with individual phantom power
● 2 Reamp outputs
● A/B Mastering-grade Monitor Outputs
● 2 Independently assignable headphone outputs
● Digital I/O on ADAT and S/PDIF
● Talkback functionality
● Flexible routing and mixing with real-time FPGA vintage eects
● Antelope’s renowned 64-bit Acoustically Focused Clocking
● Antelope’s proprietary Oven Controlled Oscillator for supreme clocking stability
● 1 Word Clock output and 1 Word Clock input
● 5 Presets for fast and easy recall of favorite setups
● 1U rack size device consuming only 25 Watts keeping the heat low
● Controllable via user-friendly desktop and mobile apps
7
4. Quick Start
5. Activation Guide
Connect the DC power source on the rear
panel.
1. Connect the USB 3.0 cable to the USB
3.0 port on your computer.
2. Download the Orion Studio HD launcher
from http://www.antelopeaudio.com/
products/orion-studio-hd/
3. Start the application, the launcher will
automatically download the Software
Control Panel.
4. Open your Control Panel by double
clicking and follow the device activation
procedure.
5. Connect your inputs and outputs of
choice to Orion Studio HD.
6. Open your preferred DAW and ensure
the device is selected as an input and
output.
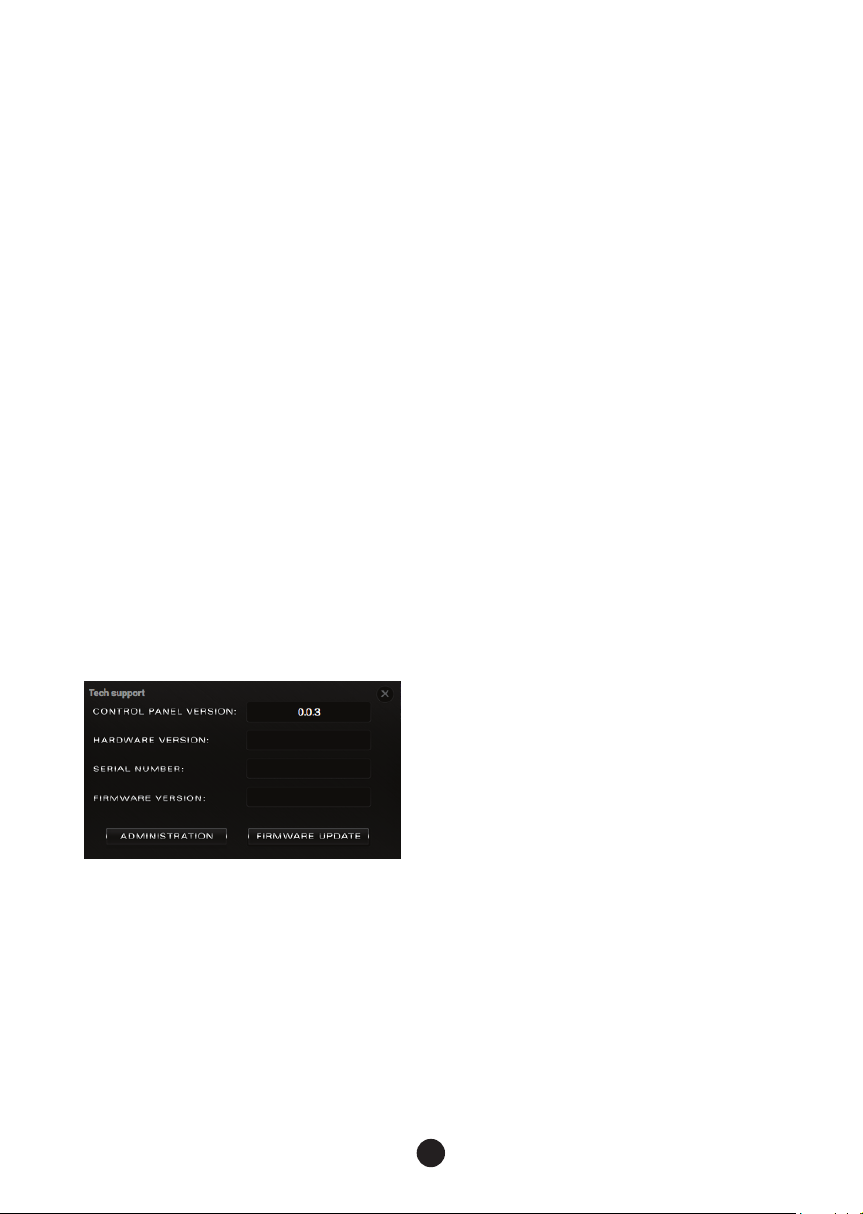
Note: Make sure your Orion Studio HD has
the most recent rmware installed. Check this
by selecting the Info panel and clicking on the
Firmware Update button.
It is essential to activate Orion Studio HD
before using it. Once the DC power source is
plugged and the device is connected to your
computer via USB 3.0 and follow the steps
below:
7. Navigate to http://en.antelopeaudio.com/
support/download/.
8. Download the Orion Studio HD Launcher.
9. Start the application (If you are on a PC
install the launcher). The launcher will
automatically download the Software
Control Panel.
10. You will be greeted by an Activation
Screen. If you already have an Antelope
Audio account click on “Use existing
Antelope ID”. Enter your information and
click Continue.
If you don’t have an Antelope Audio account
please enter a user ID, e-mail and password,
then click Done.
Check your email for the activation link mail
and click on it. If the email does not appear in
your Inbox, please check your Spam folder.
11. Go back to the launcher and enter the
required information. Click Done.
12. You’re good to go!
Orion Studio HD System Requirements:
Computer:
USB 3.0 equipped Mac or PC
Processor:
Core 2 Duo minimum,
Core i3/i5/i7/E5 recommended
Memory:
4 GB RAM minimum,
8 GB RAM recommended
OS X:
10.9.3 or greater
8
 Loading...