

Page 1

Support By Phone
US time:
00:00 a.m. (midnight) – 08:00 p.m. (CST), Monday – Friday
European time:
06:00 a.m. – 02:00 a.m. (GMT), Monday – Friday.
US Phone Number
(916) 238-1643 /
UK Phone Number
+44 1925933423
Live Chat
US time:
00:00 a.m. (midnight) – 02:00 p.m. (CST), Monday – Friday
European time:
06:00 a.m. – 08:00 p.m. (GMT), Monday – Friday.
If you’re trying to reach us outside working hours, we advise you to file a ticket in our customer support system or leave a
voice message.
How can we be of help?
Enter your search term here...
Search
Edge Strip User Manual
Modified on: Tue, 26 Jun, 2018 at 7:39 AM
Introducing the new Edge Strip
Thank you for purchasing Edge Strip from Antelope Audio!
Introducing the new Edge Strip — an all-in-one solution for high-quality studio recordings with vintage analog sound.
This compact package delivers the same audio quality as a locker full of vintage mics and a rack full of outboard gear.
The days of spending tens of thousands of dollars on a vintage mic collection are over. Most engineers only ever dream of
using such expensive microphones. The Edge Strip makes that dream a reality. Now you can add high-end studio
equipment to your collection for a fraction of the price.
The Edge Strip is designed to model a variety of vintage microphones, preamps, and even signal processors such as EQs
and compressors. It contains Antelope Audio’s renowned Edge Modeling Microphone — a dual-capsule condenser large-
diaphragm microphone, specifically designed to reproduce the expressiveness and character of expensive classic
microphones.
It also includes the Discrete MP — an all-analog dual-channel microphone pre-amplifier, designed to deliver Antelope’s
signature pristine audio quality.
Edge Strip owners also enjoy a package of free native effects plug-ins, including a compressor designed by Antelope
Audio founder Igor Levin — Stay-Levin.
"
In the Box
Discrete MP Preamp
Edge Modeling Microphone
Activation Code Leaflets
Shock Mount with Pop Filter
!
1 of 24
Page 2

USB Type-B Cable
Y-XLR Cable
Quick Start Guide
Power Supply
Warranty Card
System requirements
Mac:
Apple Mac 2012 or [newer] with available USB 2.0/USB3.0 port.
Minimum "macOS 10.10 "El Yosemite Recommended macOS 10.13 High Sierra"
Available Hard Drive Storage Space
Memory (RAM): 4GB Minimum (8GB or more recommended)
Windows:
PC computer with available "USB 2.0/USB3.0 orUSB C port
Windows 10 x64 Bit "with latest Microsoft Updates
Available Hard Drive Storage Space
Memory (RAM): 4GB Minimum (8GB or more recommended)
(Minimum) CPU: Intel Core i3™ "or AMD FX or Higher.
All:
USB 2.0 Cable "[included with the purchase ]
Minumum 4 GB available Storage Space [Hard Disk Space]
Stable Internet connection to download and update your Antelope Software.
Core i7 "or better processor recommended
All plug-ins are iLok protected. An iLok 2 or 3 (sold separately!) is required in order to use them.
Notes:
Changes to system requirements may apply at any time. Antelope Audio reserves the right to delete/change/modify
content under the System Requirements page to ensure up-to-date compatibility information.
We do recommend Internet connection to be Active all the time. We do use a server update system which works on the
auto-detection process. The internet connection is required to ensure the normal update process of the Antelope
Launcher Software."
In cases where internet connection can't be provided. The user will be able to use the latest installed software from the
Antelope Launcher, but it may miss critical software updates."
New users of Discrete 4 must enable internet connection for Activation Process and Software Update. The device will not
be operational if it's not updated & activated when newly purchased.
"All Listed operating systems are supported, not listed operating systems may still work but we won't be able to
guarantee their stability.
Antelope Audio Technical Support Reserves the right to reject troubleshooting when Recommended "Operating System
Requirments are not met.
Additional Info
2 of 24
Page 3

Internet connection required for product activation.
All plug-ins are iLok protected. An iLok 2 or 3 (sold separately!) is required in order to use them.
VST PlugIn Technology by Steinberg Media Technologies GmbH.
(
https://www.steinberg.net/en/extras/copyrights.html
)
Safety Notes
To r ed uc e t h e r is k o f e l ec tr ic a l s ho c ks , fi re , a nd re la te d h a za rd s:
⦁ Do not remove screws, cover, or cabinet. There are no user serviceable parts inside. Refer servicing to qualified service
personnel.
⦁ Do not expose the device to rain, moisture or spillover of liquid of any kind. Should any form of liquid or a foreign object
enter the device, do not use it. Switch off the device and unplug it from the power source.
⦁ Do not use the device until the foreign object is removed or the liquid has completely dried and its residues fully cleaned
up. If in doubt, please consult with the manufacturer.
⦁ Do not handle the power cables with wet hands! Make sure the device is switched off when plugging and unplugging it
from the power source.
⦁ Avoid placing any objects on the cabinet or using the device in a narrow and poorly ventilated place. Doing so could
affect its operation or the operation of other closely located components. If anything goes wrong, turn off the device first
and unplug the power.
⦁ Do not attempt to repair the device yourself: consult authorized service personnel or your dealer.
⦁ Do not install the unit near any heat sources such as radiators, stoves, or other apparatus (including amplifiers) that
produce heat.
⦁ Do not use harsh chemicals to clean your Unit. Clean only with specialized cleaners for electronics equipment. Connect
all your devices before powering your Unit. This unit is connected via its power cord to the mains safety earth. Never
operate the unit without this earth connection.
⦁ Power supply cable should be routed so that it is not likely to be walked on or squeezed by items placed upon or
against it.
⦁ To completely turn off the device, unplug the power cable first from the outlet and then from the rear panel of the unit.
⦁ Both, occasional and continued exposure to high sound pressure levels can cause permanent ear damage via
headphones and monitors.
⦁ The device is designed to operate in a temperate environment, with a correct Operating Temperature of: 0-50 °C, 32-
122 °F
Features
Discrete MP
⦁ Perfectly complements the Antelope Audio Edge modeling microphone.
⦁ Two-channel microphone preamp with console-grade discrete circuitry.
⦁ Remotely controlled, digitally adjustable Gain: 0 – 61dB.
3 of 24
Page 4

⦁ Inputs: Two combo XLR / TRS connectors for mic/line signals.
⦁ Outputs: Two ¼ inch balanced line outs.
⦁ Calibration oscillator of 1kHz/0dBu for accurate gain calibration.
⦁ 48V DC phantom power.
⦁ Software control panel for Mac & PC.
"
Edge Modeling Microphone
⦁ Large-diaphragm condenser microphone with excellent transient response.
⦁ Hand-selected, dual edge-terminated capsules for a smooth, natural sound.
⦁ Carefully crafted metal enclosure.
⦁ Fully discrete electronic components.
⦁ Multiple polar pattern switching.
⦁ Mic Emulation FX offers a growing collection of classic microphones.
Technical Specifications
"
Discrete MP
Analog Inputs
2 x Mic Inputs (combo 3-pin)
Mic (XLR only): max 20dBu balanced
Mic input impedance : 1.2kOhm
Line (1/4 /TRS/ only): max 29dBu balanced
Line input impedance : 21kOhm
Analog Outputs
2 x TRS (22 dBu max)
Output impedance: 56 ohms
Mic Preamp
Remotely controlled, digitally adjustable gain
Preset Gain – when you press and turn the button you set the preset gain. When you press it, the gain goes to the
preset value
<0.1% difference between the gain of Channels 1 and 2
Gain Range
0dB to 61dB; 1dB step
48V Phantom Power
"
THD + N (Total Harmonic Distortion + Noise)
-106.0 dB @ 10 dBu, 1kHz sine, 50 ohm balanced input
EIN (Equivalent Input Noise)
-128 dBu (A – weighted)
Frequency Response
10Hz – 200kHz /-3dB @ 200kHz/
Dynamic Range
-126 dBu
Callibration Oscillator
4 of 24
Page 5

Calibration oscillator of 6dBu @ 1kHz for accurate gain calibration
Digital Connectivity
USB 2.0 I/O with Type B connector – only used for remote control
Operating Temperature
0-50°C, 32-122°F
Weight (Approx)
Unit weighs 950 grams
Adaptor weighs 180 grams
Total weight: 1,130 grams
Dimensions (Approx)
Width: 190mm
Depth:157mm
Height: 46.5mm
Power Consumption
5 Watts"
"
"
Edge Modeling Microphone
Diaphragm
Condenser – double-sided, with 10 microns gold-sputtered membranes
Frequency Response
20HZ ~ 20KHZ
Sensitivity
-36dB (-1 to +3dB)
THD+N (Total Harmonic Distortion + Noise)!
-116dB
Power Requirements
48V DC Phantom Power
"
"
In the Box
⦁ Discrete MP Preamp
⦁ Edge Modeling Microphone
⦁ Activation Code Leaflets
⦁ Shock Mount with Pop Filter
⦁ USB Type-B Cable
⦁ Y-XLR Cable
⦁ Quick Start Guide
⦁ Power Supply
⦁ Warranty Card
Quick Start
5 of 24
Page 6

Connect the DC power source to the Discrete MP’s rear panel. Once the DC power source is plugged in, connect the
device to an USB 2.0 (or greater) port on your computer with the included USB Type-B cable. Finally, connect the Edge
microphone to the Discrete MP inputs with the included Y-XLR cable. * Press the 48V button on the preamp’s front panel
to power the microphone. Then, follow the steps below:
Visit antelopeaudio.com.
1.
Click LOG IN and create your Antelope Audio account. If you already have one, please log in using your
credentials.
2.
Go to the
Antelope Audio Download page
(
https://en.antelopeaudio.com/support/download/
)
to download and
install the Antelope Audio launcher.
3.
Use the Antelope Audio Registration Wizard to register the DiscreteMP. Simply follow the on-screen instructions.
4.
Once you are finished, start the Antelope Audio Launcher and launch the DiscreteMP Control Panel.
5.
Press the Update button in the Antelope Audio Launcher to download the latest version of the Edge Strip Native
AFX and software.
6.
Start your DAW. It should discover the newly installed VST/AU plug-ins. Loading any of the plug-ins will prompt for
activation. Use the activation codes and iLok (iLok dongle sold separately!) codes that came with the Edge Strip.
7.
* "The cable for the Edge microphone is a 5-pin XLR to two 3-pin XLRs. The two 3-pin XLRs are colored in white and red.
The white cable is the output of the front capsule of the Edge and the red is the output of the back.
The white cable should be connected to the “Left” input of the Discrete MP and the red to the “right”.
If cables are switched, the signal will be recorded as if the microphone is turned 180 degrees. If there is someone in front
of the microphone it would sound as if he’s behind the microphone.
You’re good to go! Need more help? Contact our
tech support crew
(
http://en.antelopeaudio.com/support/
)
.
Authorizing the AFX Fusion Pack with the Pace iLok dongle
Using the AFX Fusion Pack requires authorization with a Pace iLok USB dongle (sold separately!) Here’s how to proceed
with the authorization:
1. Visit
www.ilok.com
(
http://www.ilok.com/
)
and create an account.
2. Download and install the iLok License Manager Software.
3. Insert the hardware dongle into a USB port on your computer.
4. Launch the iLok License Manager Software.
5. Click Sign In and enter your credentials. If you are asked whether you want to register your iLok dongle, click Yes.
6. Click Licenses > Redeem Activation Code and enter the Activation Code that comes with your Edge Strip bundle to
authorize the AFX Fusion Pack.
Having trouble with the iLok authorization? Feel free to get in touch with the
Antelope Audio technical support
(
https://en.antelopeaudio.com/support
)
via e-mail, live chat, or phone!
Layouts explained
Discrete MP - Front Panel
6 of 24
Page 7
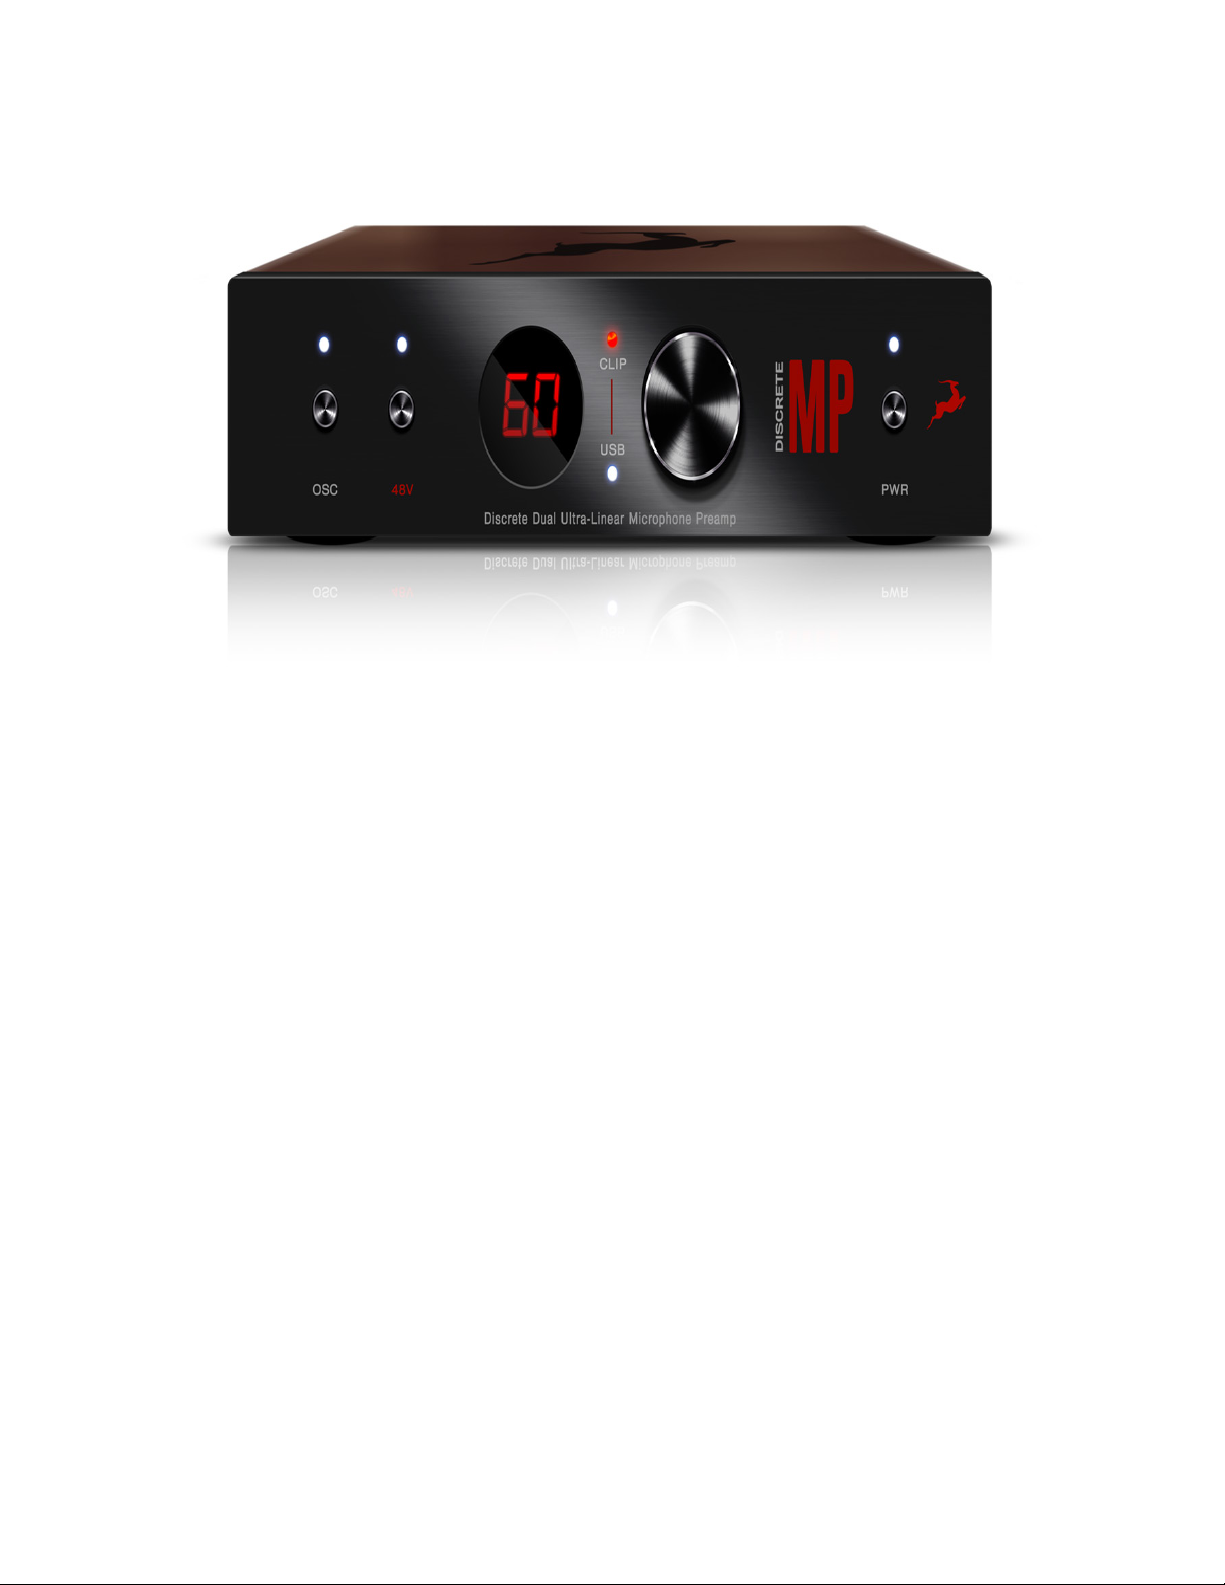
1
Calibration Oscillator On/Off Button & Diode
Turns the calibration oscillator On and Off. The Diode lights up when the oscillator is On.
2
48V Phantom Power On/Off button & Diode
Turns the 48V phantom power On and Off. The diode lights up when 48V power is on.
3
Display
Indicates preamp gain in dB.
4
USB Indicator Diode
Indicates whether the USB connection is active at the moment.
5
Clip Indicator Diode
Warns when the input signal is too hot, resulting in unwanted clipping.
7 of 24
Page 8
6
Gain Control Encoder
Lets you adjust the preamp gain in 1dB step increments.
7
Power Button and Diode Indicator
Turns the Discrete MP On and Off. The diode lights up when DiscreteMP is On.
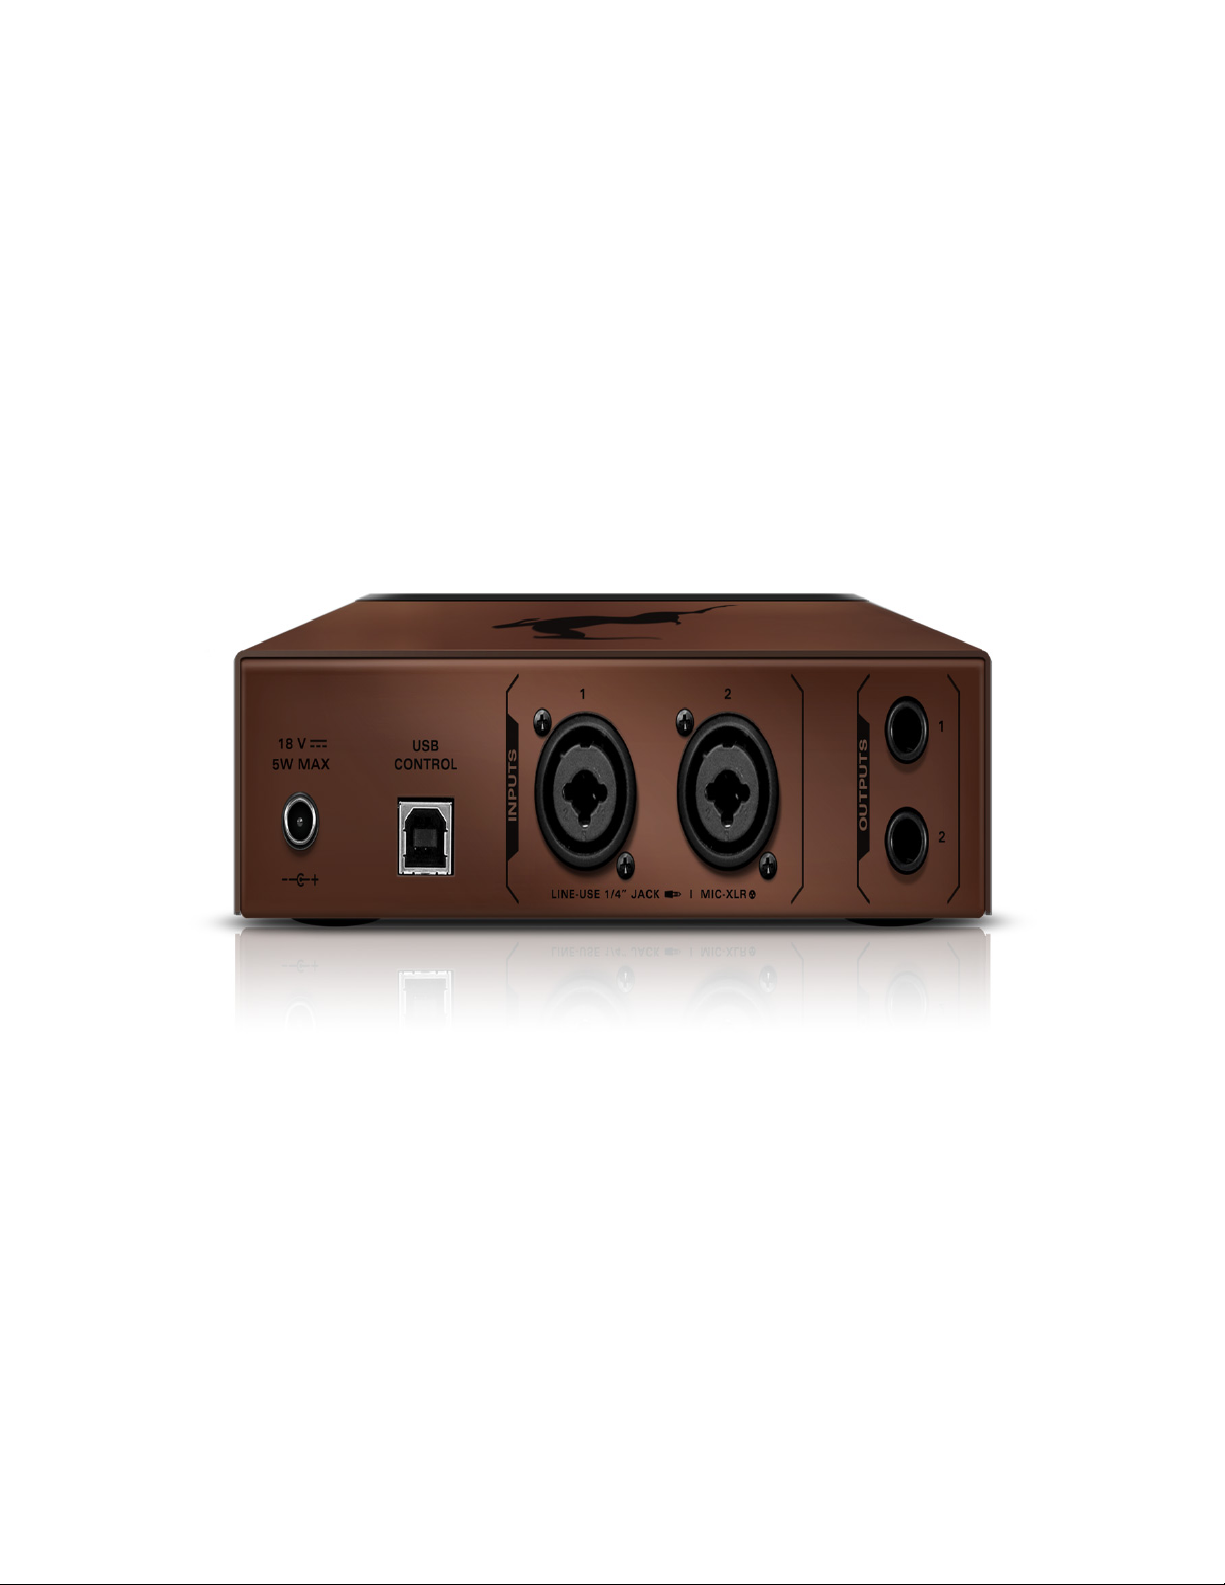
Discrete MP - Back Panel
1
DC Adapter Input
This is where you plug in the included power supply.
2
USB 2.0 Type B Port
This is where you connect the Discrete MP to your computer for remote control.
3
8 of 24
Page 9
Mic/Line XLR Inputs 1 & 2
This is where you connect the Antelope Audio Edge modeling microphone, or another mic or instrument for recording.
4
Outputs 1 & 2
This is where you take the Discrete MP’s output signal out for recording or monitoring.
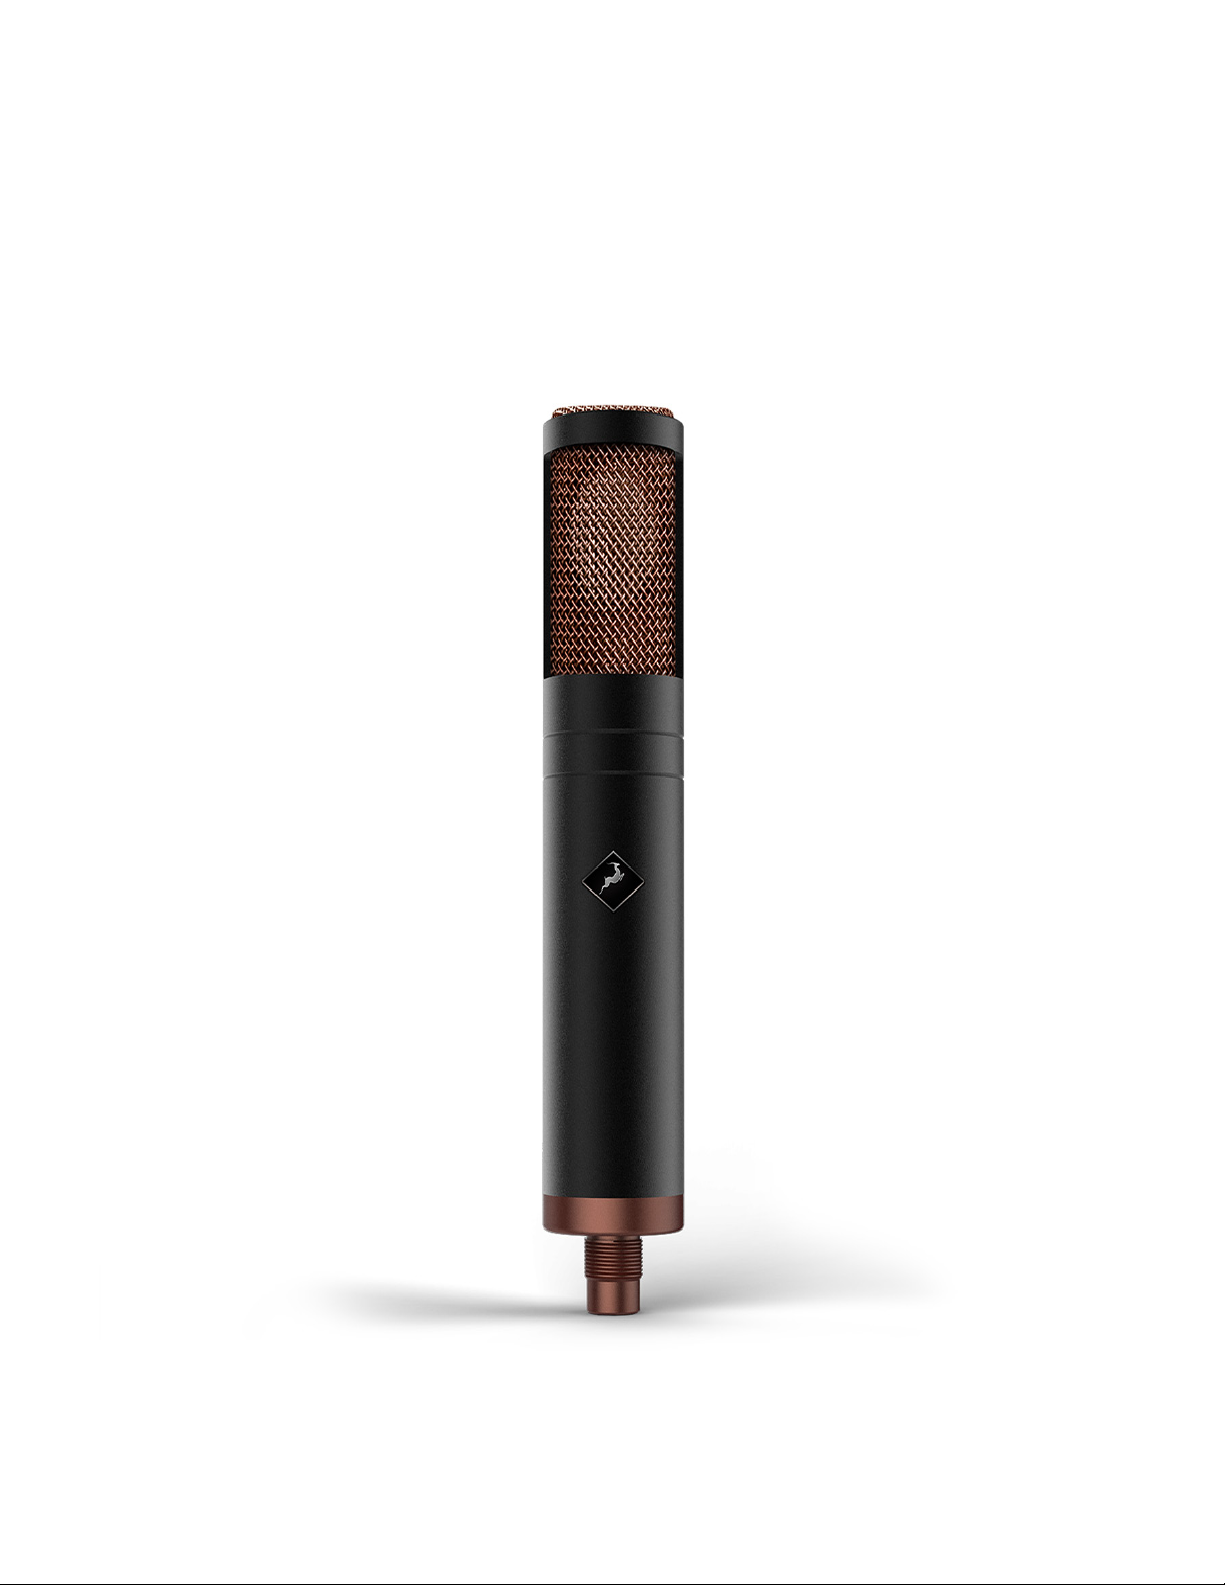
Edge Modeling Microphone
1
Diaphragm
9 of 24
Page 10

Protected by woven steel.
2
Body
Houses the Edge microphone’s discrete components.
3
Mount
Used for mounting the Edge microphone to a mic stand.
Best Recording Practices
There is a clear purpose behind the dual-channel design of the Discrete MP. Since the Edge microphone has a dual-
capsule architecture, it is mandatory that the output from both capsules is recorded simultaneously. Otherwise, the
bundled mic simulations won't work as intended! That's because many of the classic microphones we emulate happen to
be dual-capsule designs, too.
To properly record the Edge microphone with the Discrete MP, we suggest setting up a Stereo track in your DAW. This
way, you will end up with a single Stereo track containing all the necessary information for our mic simulation to function.
While recording the Edge in Mono is perfectly possible, we truthfully don't see the point. Depending on how you connect
the microphone and set up your DAW, you will most likely end up with a single Mono track, or a pair of identical Mono
recordings on two separate tracks. Both variants are unsuitable for our mic emulations. Though if you want to record the
Edge like a standard mono condenser mic for some reason, we certainly won't try and stop you!
DiscreteMP Control Panel Explained
10 of 24
Page 11
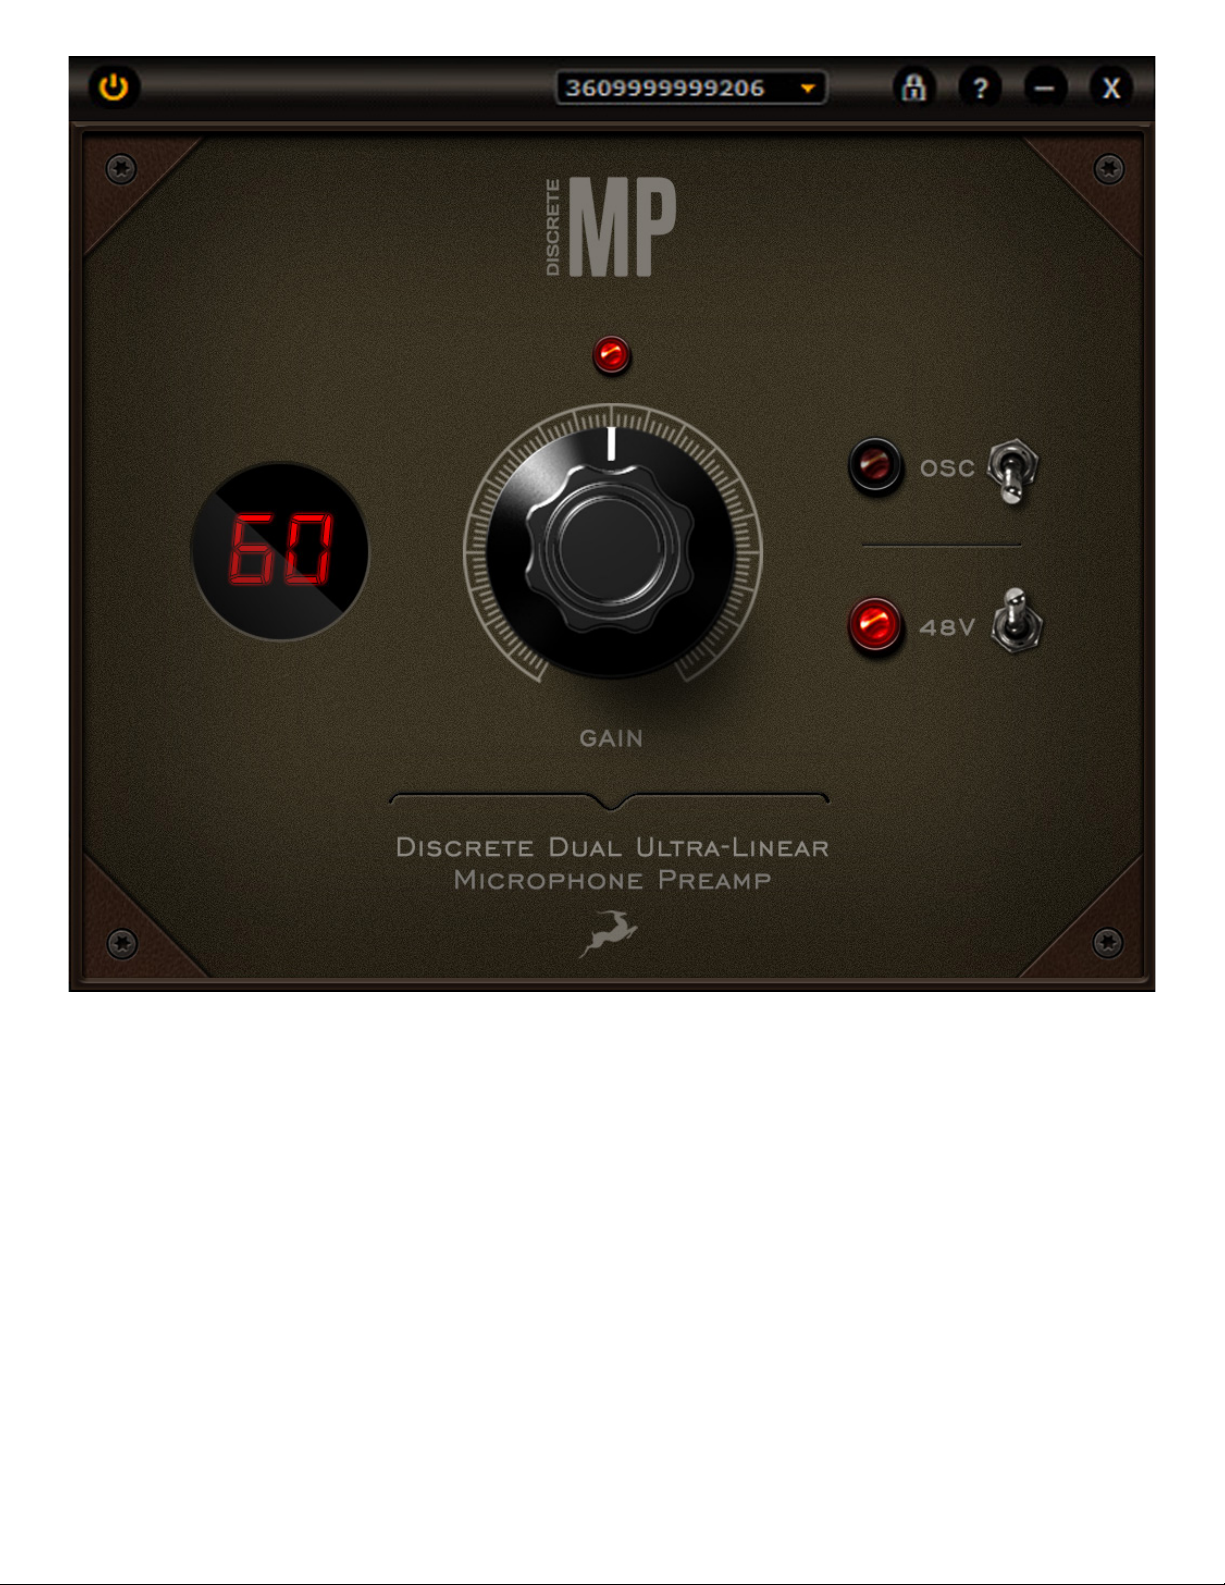
1
Power Button
Turns the DiscreteMP On and Off.
2
Clipping Diode
Lights up when clipping occurs due to excess input signal level.
3
Gain Control Knob
Controls the gain of Preamps 1 & 2 simultaneously. Ranges between 0 – 61dB.
4
Display
11 of 24
Page 12

Shows the current Gain level in dB.
5
Device Selector
Lets you choose the current working device by serial number.
6
USB Lock Button
Locks the DiscreteMP.
7
Help Button
Opens a window with the following information: • Control Panel Version • Hardware Version • Serial Number • Firmware
Version The window also gives you access to the Antelope Registration Wizard via the Administration button. There, you
can Register or Un-Register your DiscreteMP, or Log Out of your Antelope Audio account.
8
Minimize Button
Minimizes the DiscreteMP Control Panel.
9
Close Button
Closes the DiscreteMP Control Panel.
1011
Using the Virtual Preamps
Since the DiscreteMP is fully analog, it doesn’t utilize our proprietary FPGA chip. Hence, the Virtual Preamps, Mic
Emulations, Stay-Levin Compressor and BAE 1073 EQ are available as native plugins for use within your preferred DAW
or VST host.
You don't have to connect the DiscreteMP over USB to use the Virtual Preamps & Mic Emulations. They run natively on
your recording computer.
A typical recording chain with the Edge Microphone and Discrete MP would look as follows:
Edge Microphone > DiscreteMP > Audio Interface > Computer > DAW
As mentioned prior to this chapter, the 'dry' signal from the Edge microphone is best recorded via the DiscreteMP onto a
single Stereo track inside your DAW. On it, you shall insert the Preamp & Mic emulations. The resulting audio with
emulations applied ('wet' signal) can always be bounced onto a separate track for mixing or other purposes.
Onto the preamps!
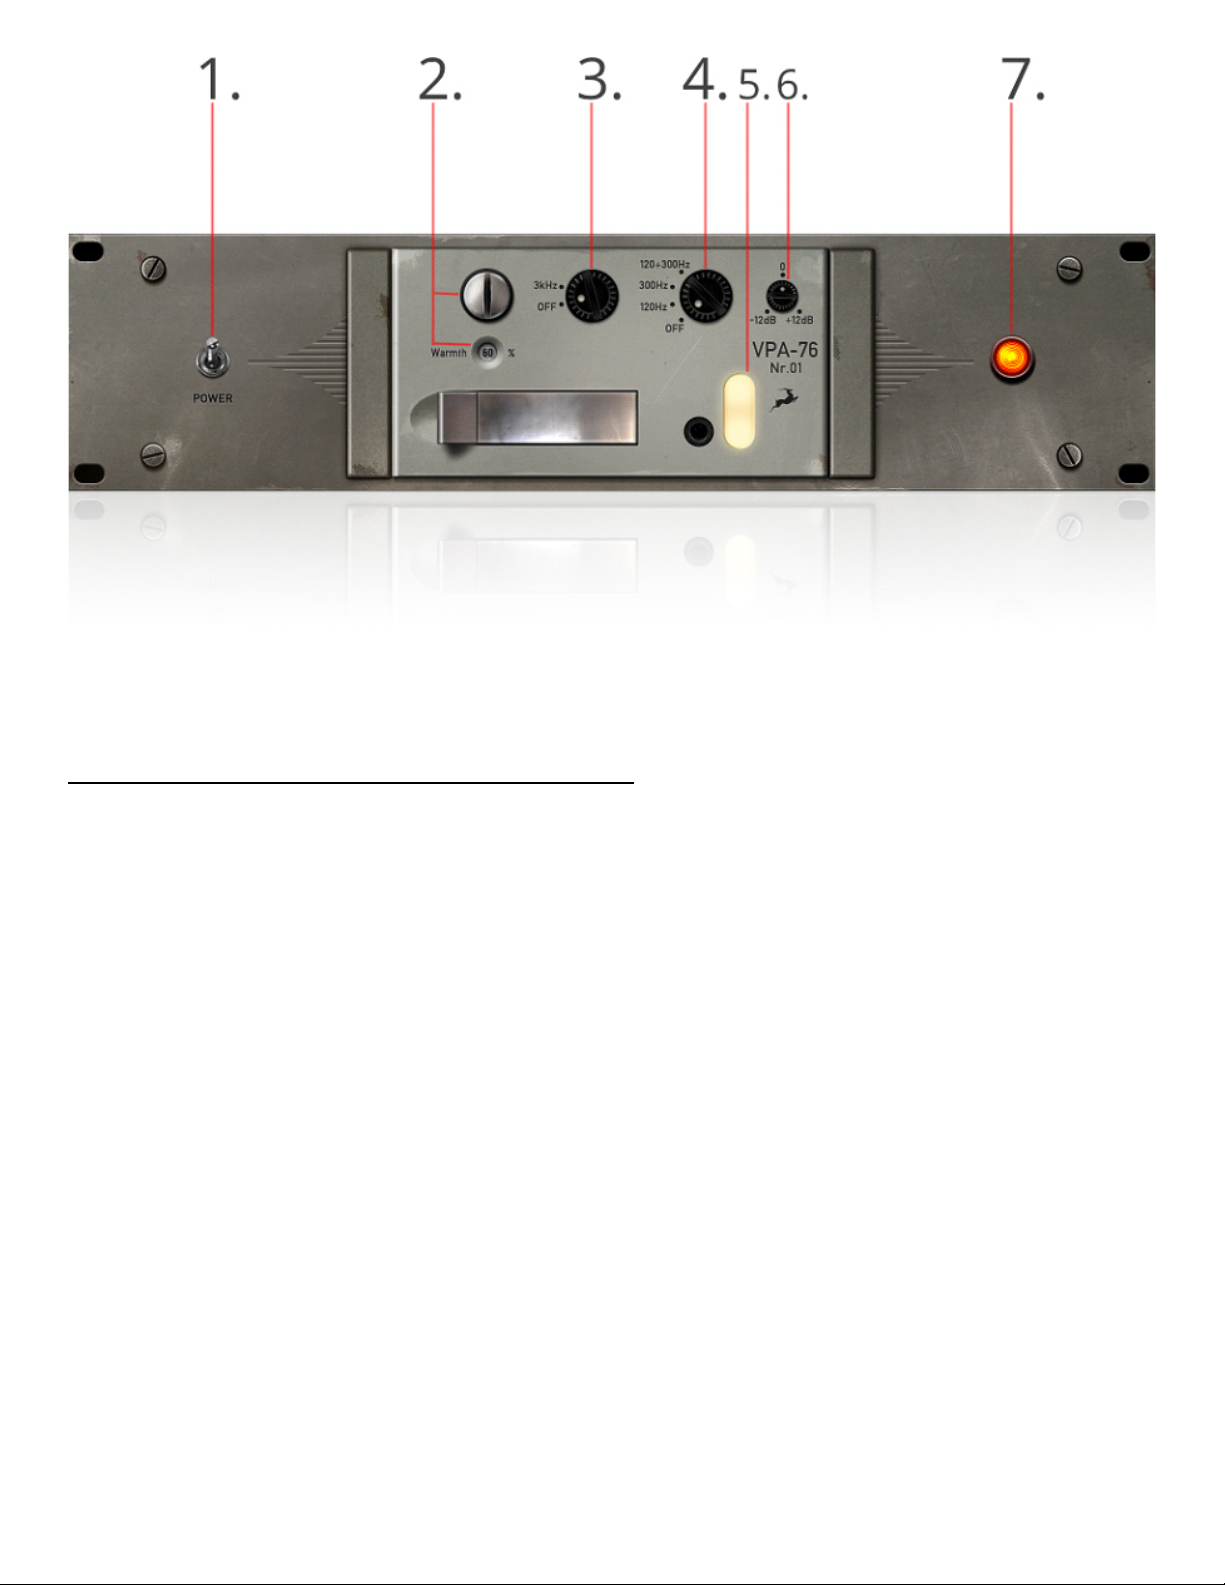
Antelope Audio VPA76
The Antelope Audio VPA 76 is based on a vintage German microphone preamp hailed as the "Rolls-Royce" of tube mic
preamps. It was built from 1958 onwards and used widely in German TV & Radio broadcast studios. The technical and
engineering standards the V76 was built to were exceedingly high at the time. Today, the hardware original remains a rare
and coveted unit. If you happen to own one in working condition, consider yourself lucky!
12 of 24
Page 13
(
https://en.antelopeaudio.com/wp-content/uploads/2018/03/1.jpg
)
1. Power On/Off Switch
Bypasses the virtual preamp.
2. Warmth Adjustment and Indicator
Adjusts the amount of saturation added to the signal. The indicator visualizes this amount in percentages.
3. 3kHz Roll-Off Filter On/Off Knob
Engages the 3kHz roll-off filter for a sound that’s less bright.
4. Low-Cut Filter Knob
Applies one of three low-cut filtering options (120Hz, 300Hz, 120 – 300Hz).
5. Input Gain Indicator
Visualizes input gain.
6. Input Gain Control Knob
Adjusts input gain.
7. Power On/Off Indicator
13 of 24
Page 14
Lights up when the virtual preamp is active.
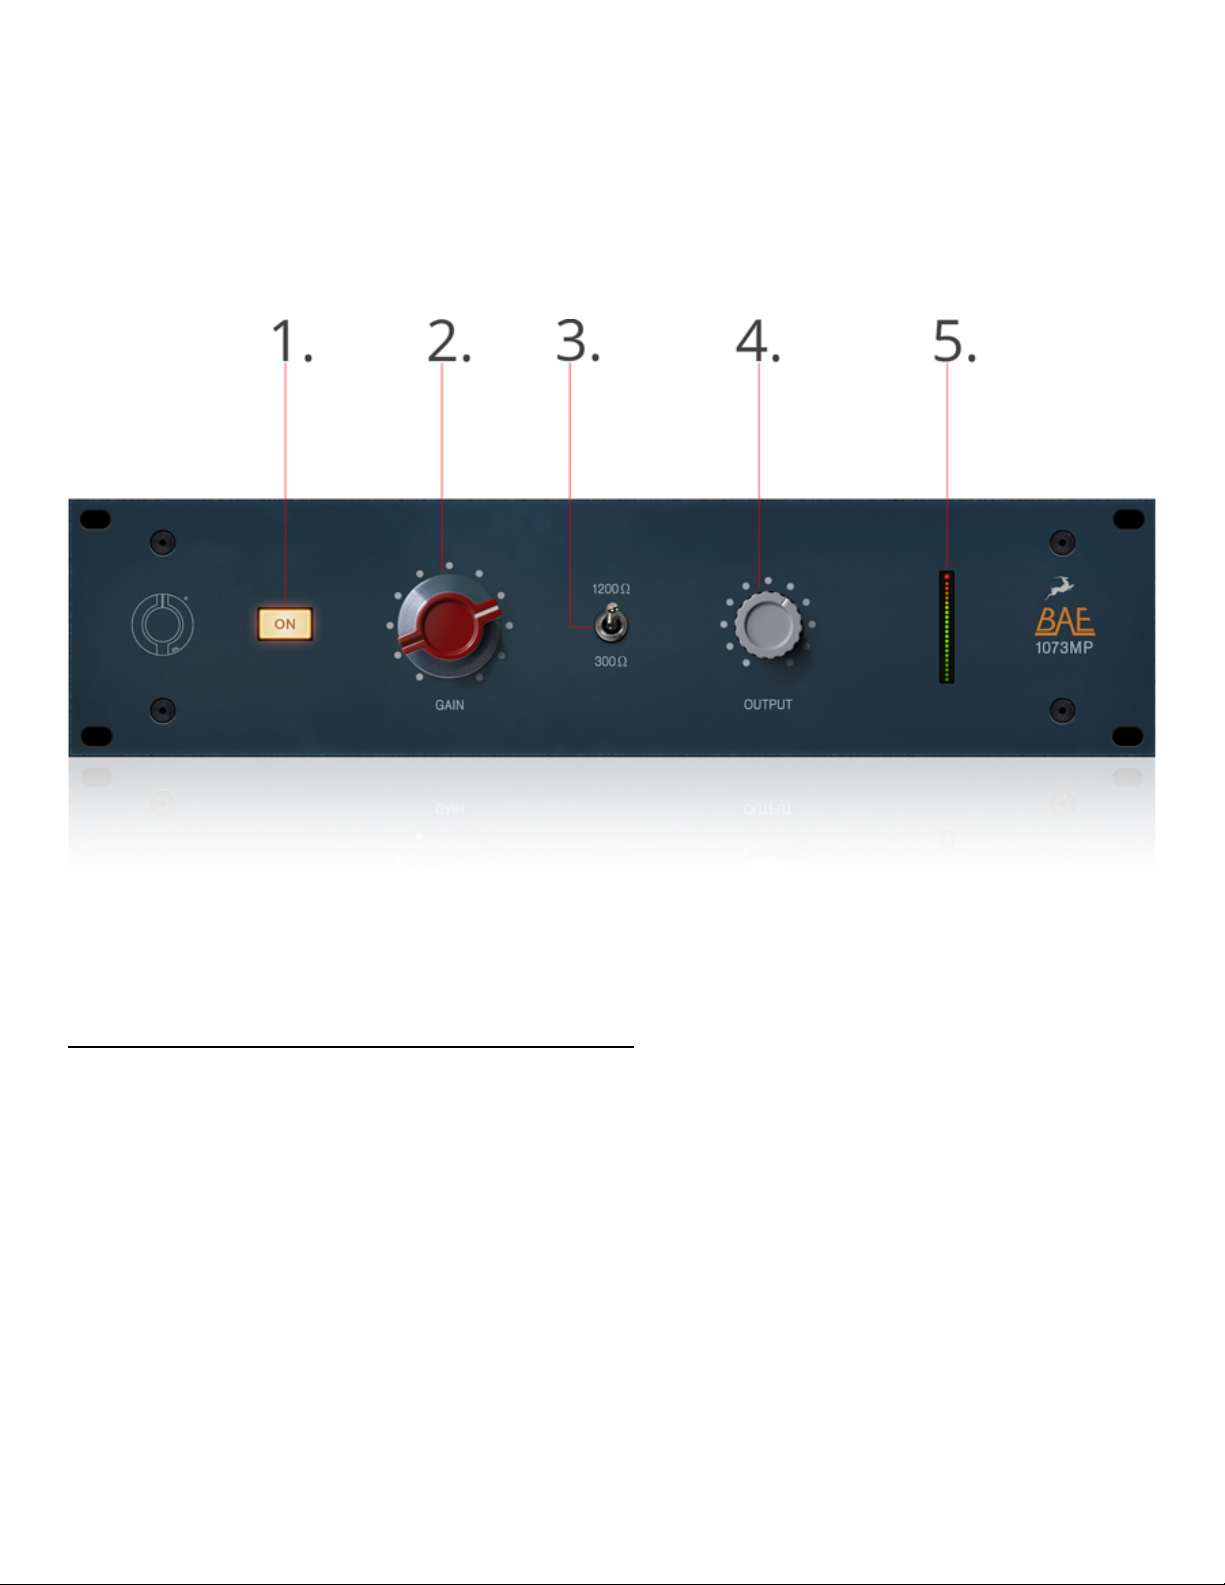
BAE 1073
The BAE 1073 virtual preamp is modeled after a 'gold-standard' British analog preamp known for its warmth and
musicality. You have heard this one on countless classic records across all popular genres of music. Its sonic signature is
ubiquitous to the point of needing no further introduction, and it's borderline impossible to make it sound bad.
Furthermore, the preamp's brilliant simplicity makes it extremely easy to use!
The BAE 1073 is laid out like this:
(
https://en.antelopeaudio.com/wp-content/uploads/2018/03/2.jpg
)
1. Power On/Off Button
Lights up when the preamp is active. Otherwise, the effect is bypassed.
2. Input Gain Control
Adjusts Input Gain.
3. Impedance Control
Changes the gain structure. Experiment with the sound and use the setting you like most!
4. Output Control
Trims the output signal.
14 of 24
Page 15
5. Output Gain Meter
Visualizes Output Gain
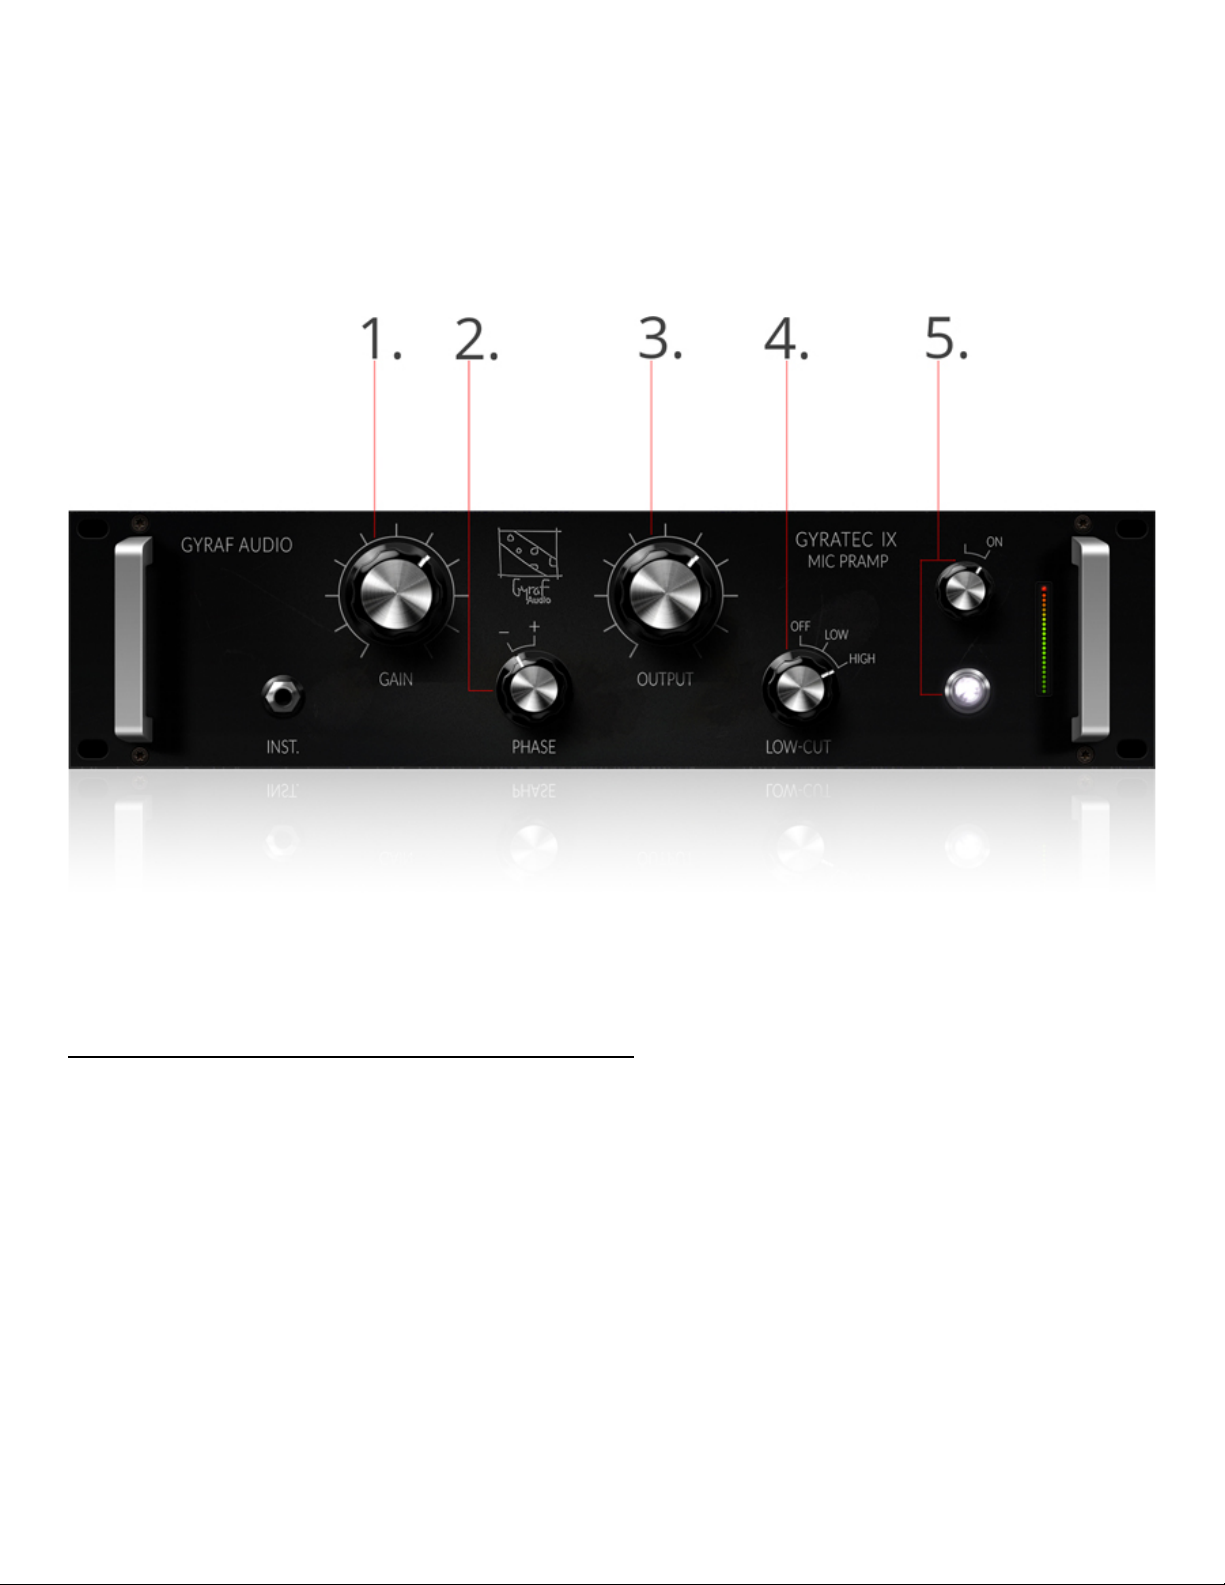
Gyraf Gyratec G9
The Gyratec G9 by Gyraf Audio is a true tube microphone preamp — a simple, yet powerful unit based on a variable-gain
input tube stage driving a tube SRPP output stage. We are talking real tube audio here!
The Gyraf Gyratec G9 is laid out as follows:
(
https://en.antelopeaudio.com/wp-content/uploads/2018/03/3.jpg
)
1. Gain Control
Adjusts input gain.
2. Phase Switch
Inverts signal phase. Use it to correct issues like lack of bass or the signal sounding like its ran through a phaser effect.
3. Output Control
Adjusts output signal gain.
4. Low-Cut Switch
Engages a gentle high-pass filter. The ‘Low’ setting is wired to 80Hz cutoff, the ‘High’ setting is wired to 160Hz cutoff.
15 of 24
Page 16
5. Power On/Off Switch & Diode
Turns On or bypasses the preamp. The diode lights up when the preamp is On.
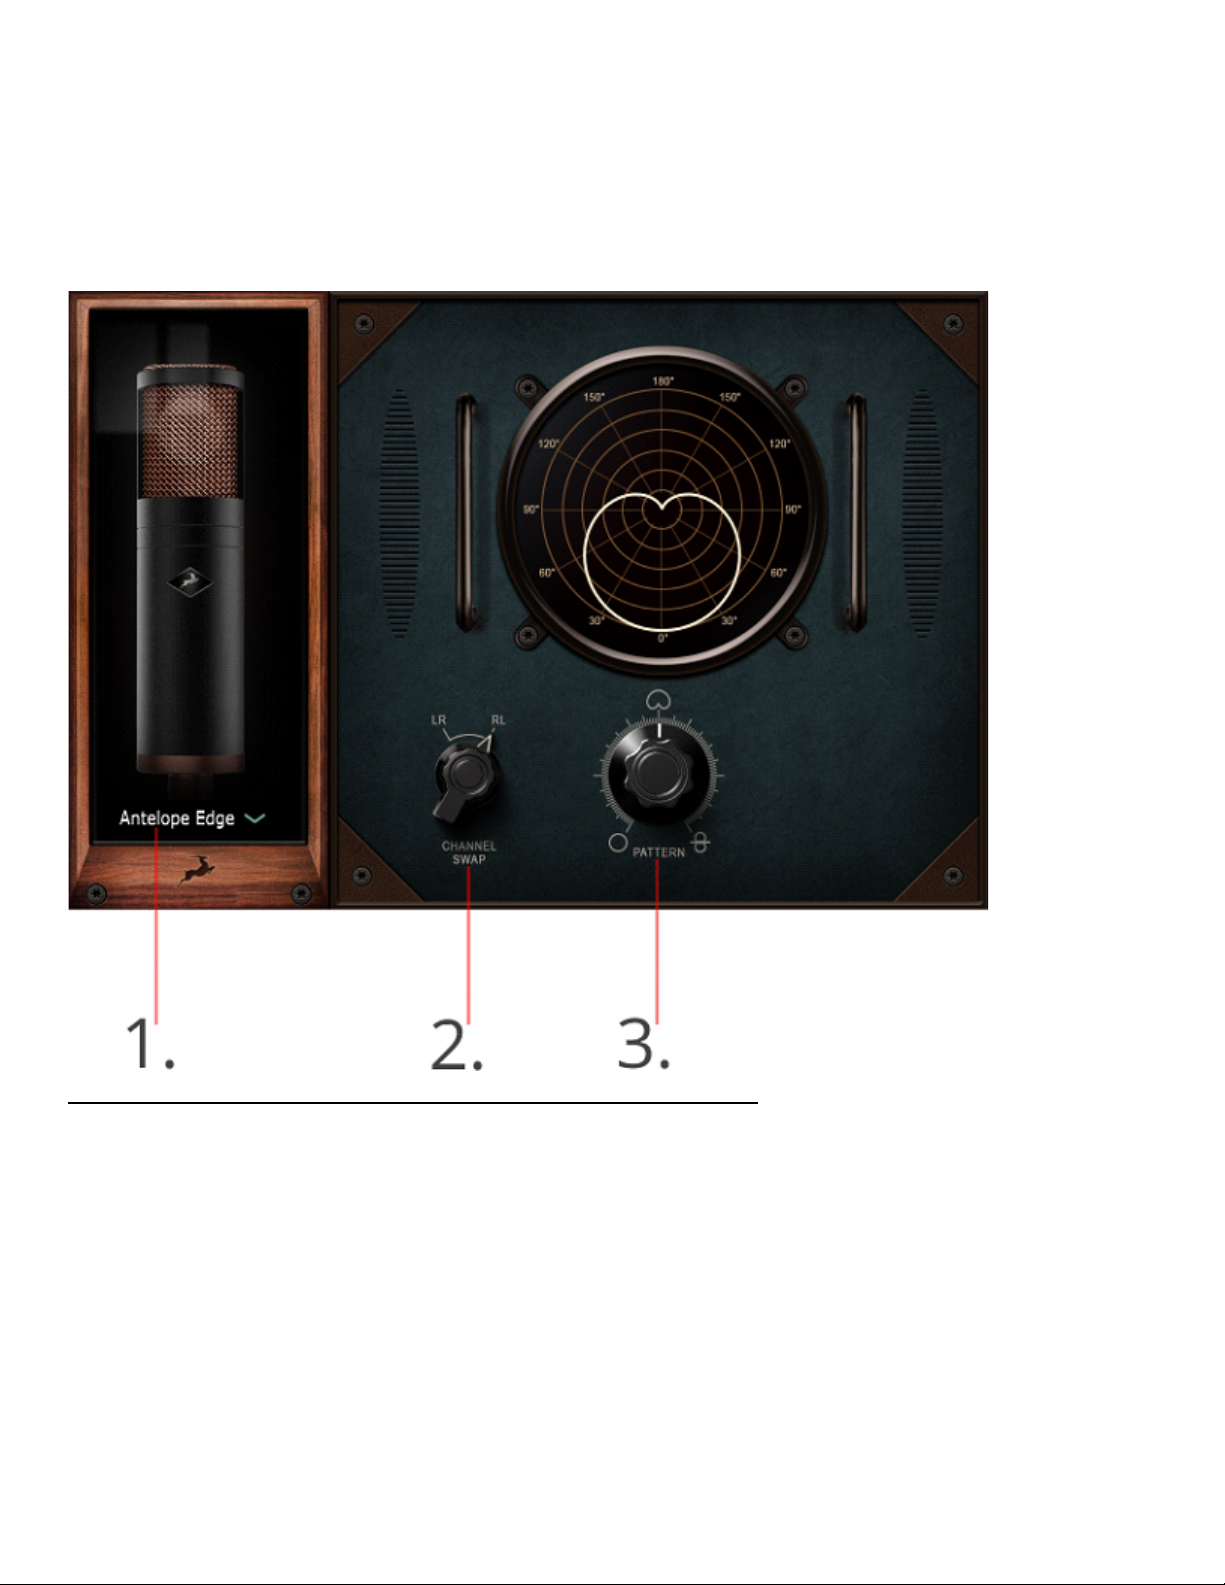
Using the Mic Emulations
Load the Edge Emulations plug-in on a track in your DAW. The following window will appear:
(
https://en.antelopeaudio.com/wp-content/uploads/2018/03/mic-emulations.jpg
)
1. Emulation select
Choose the microphone emulation you wish to use. Currently, there are 5 mic models to choose from, with more to come
in the future. They are explained later in this manual.
2. Channel Swap
Switches the channels order between Front-Back (Left-Right) or Back-Front (Right-Left).
3. Polar Pattern Adjustment
Adjusts the Edge’s polar pattern.
16 of 24
Page 17

"
"
Classic Mic Emulations for the Edge Modeling Mic
Microphone emulation is quickly ushering in a new era of recording. Thanks to modern technology, the coveted sounds of
expensive, finicky, and rare “gold standard” microphones of the past are now available to everyone willing to invest in a
mic modeling system like the Edge Strip. Currently, our mic emulation package offers 5 models to choose from, with more
to come in the near future. These are:
"""""
"
17 of 24
Page 18
"
"
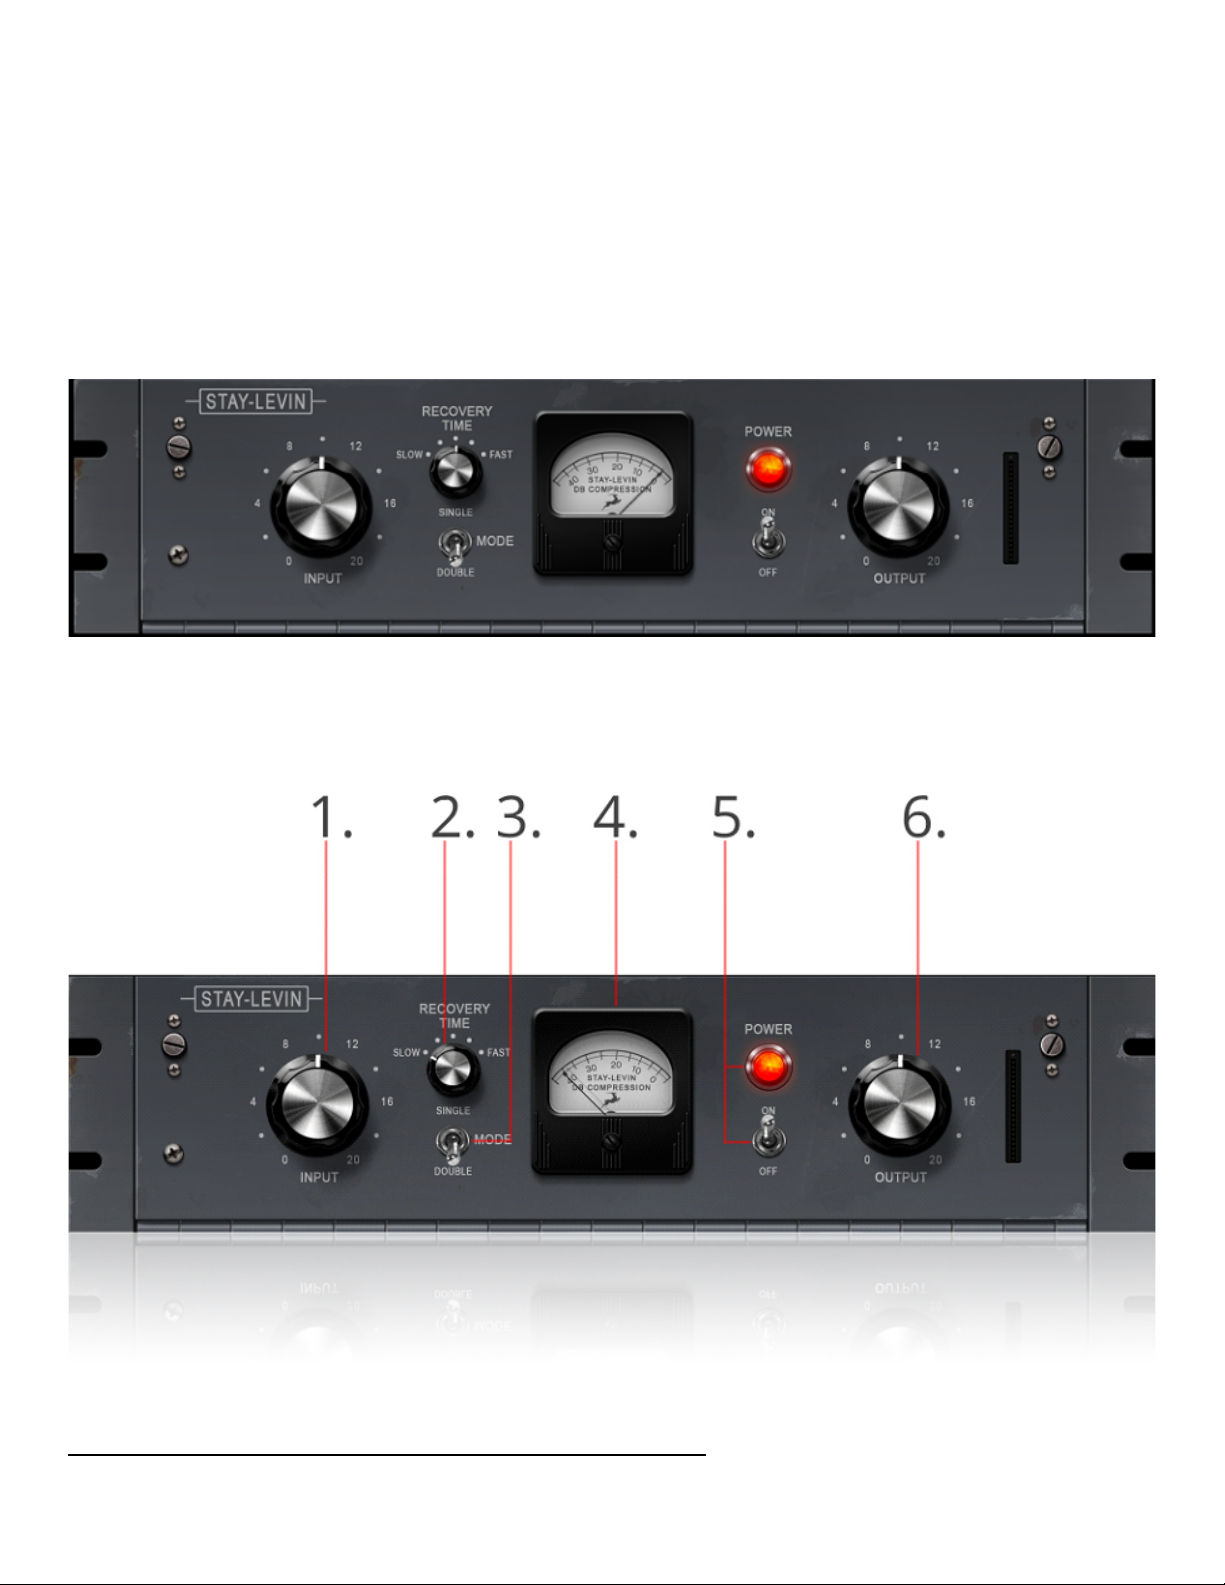
Using the Stay-Levin Compressor
Stay-Levin is based on a 1956 American tube compressor. It's a great partner for the Edge mic and we're confident you
are going to like the warm, vintage character it will impart on vocals, instruments, and anything else you point the Edge
microphone at.
(
https://en.antelopeaudio.com/wp-content/uploads/2018/03/stay-levin.jpg
)
18 of 24
Page 19

""
1. Input Gain Control
Adjusts the input gain.
2. Recovery Time Control
Switches between Slow and Fast recovery (release) times.
3. Mode Switch
Switches between Single and Double recovery times mode.
4. Gain Reduction Meter
Visualizes the gain reduction occuring as the result of compression.
5. Power On/Off Switch & Diode
Bypasses the compressor. The diode lights up when the compressor is On.
6. Output Gain Control
Adjusts output gain.
"
"
Quick Start & Usage Tips
1. Get a -12dB to -10dB signal from your microphone going into your computer.
2. Adjust input gain until the meter is reading around 15 on peaks.
3. With the compression meter peaking on 15, adjust the output gain control until you have a satisfactory signal level.
Different types of musical content require different recovery times. That’s why Stay-Levin has a switch marked “Double”
19 of 24
Page 20
and Single for changing the recovery time. In the Single position, the recovery time is fixed and does not change much
with occasional short peaks or steady re-occurring peaks. It is best used on classical music or material requiring the most
dynamic range. For speech and most popular music, it is best to use the Double recovery time position.
"""""
"
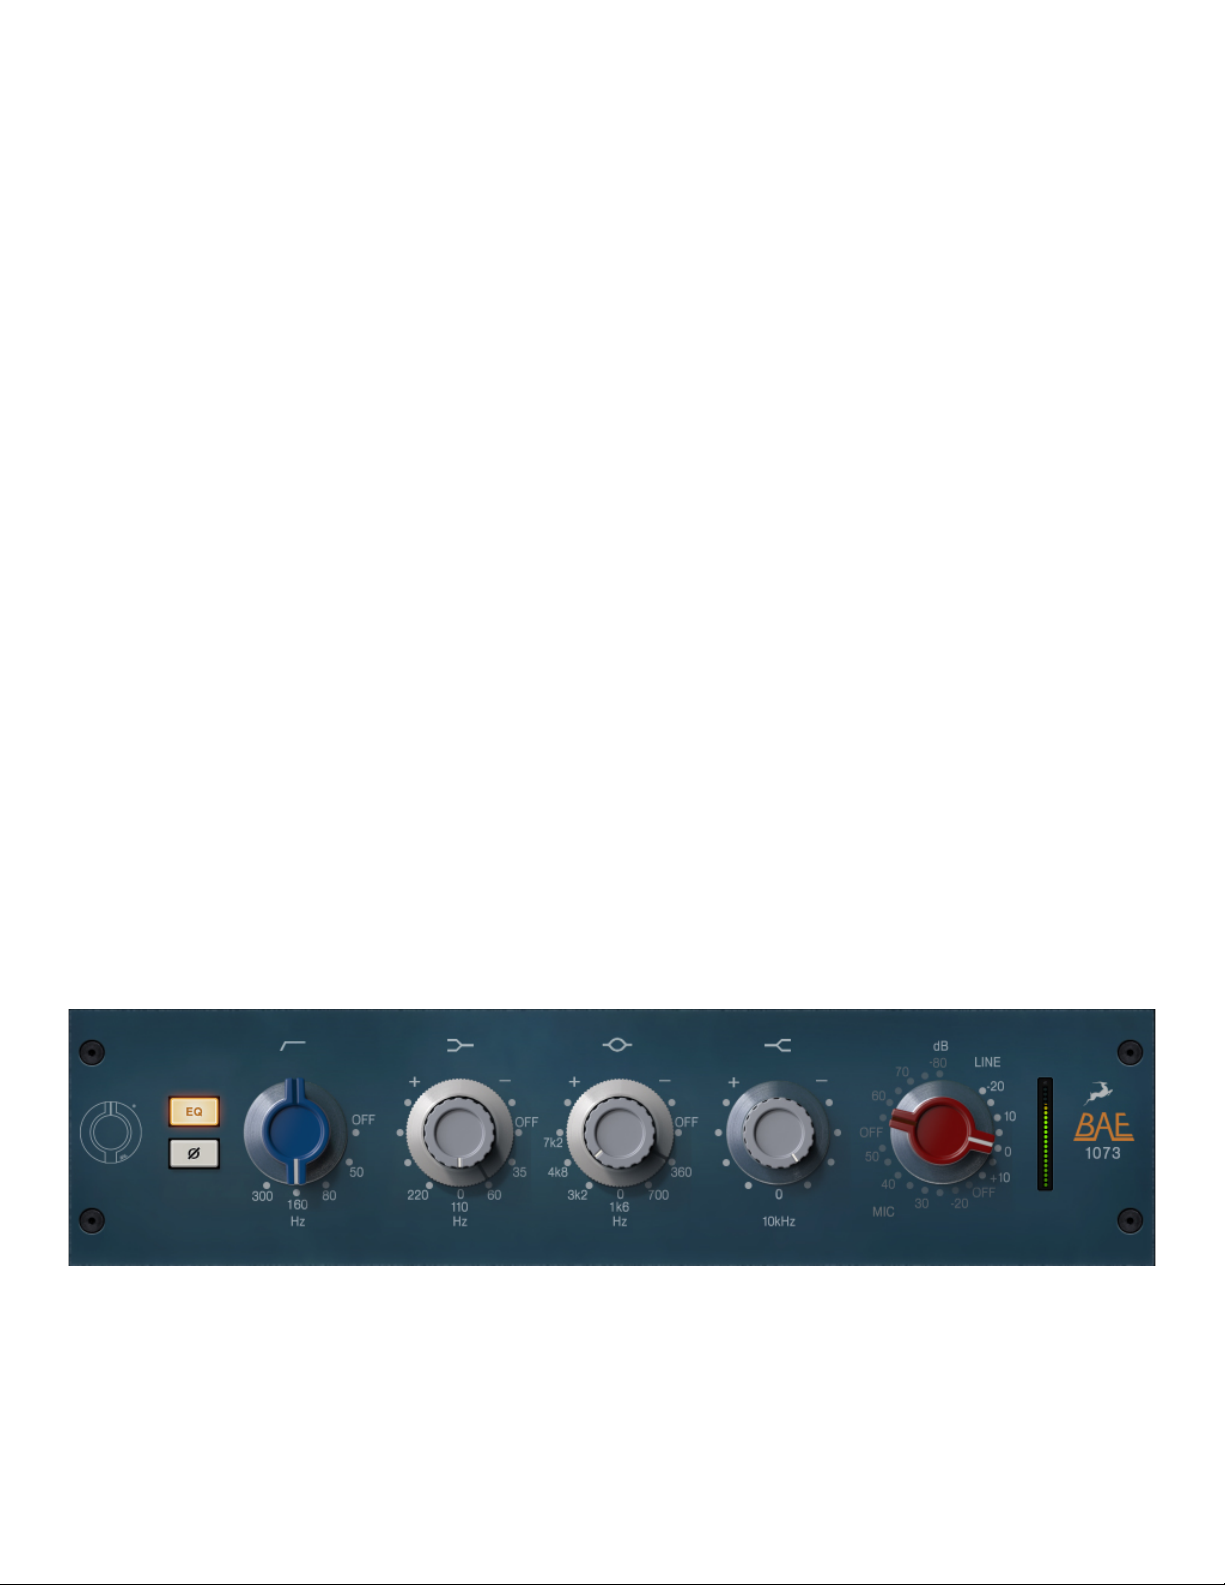
Using the BAE 1073 EQ
The BAE 1073 EQ is based on the parametric equalizer from the channel strip of a very distinct and musical analog British
console from the 70s. It's an excellent tool for broad strokes across your frequency range. Use it to liberally cut and boost
desired regions of your audio. Paired with the 1073 preamp and the Stay-Levin compressor, the EQ makes for a complete
analog channel strip that will make your vocals or instruments sound absolutely delightful!
20 of 24
Page 21
(
https://en.antelopeaudio.com/wp-content/uploads/2018/03/bae.jpg
)
""
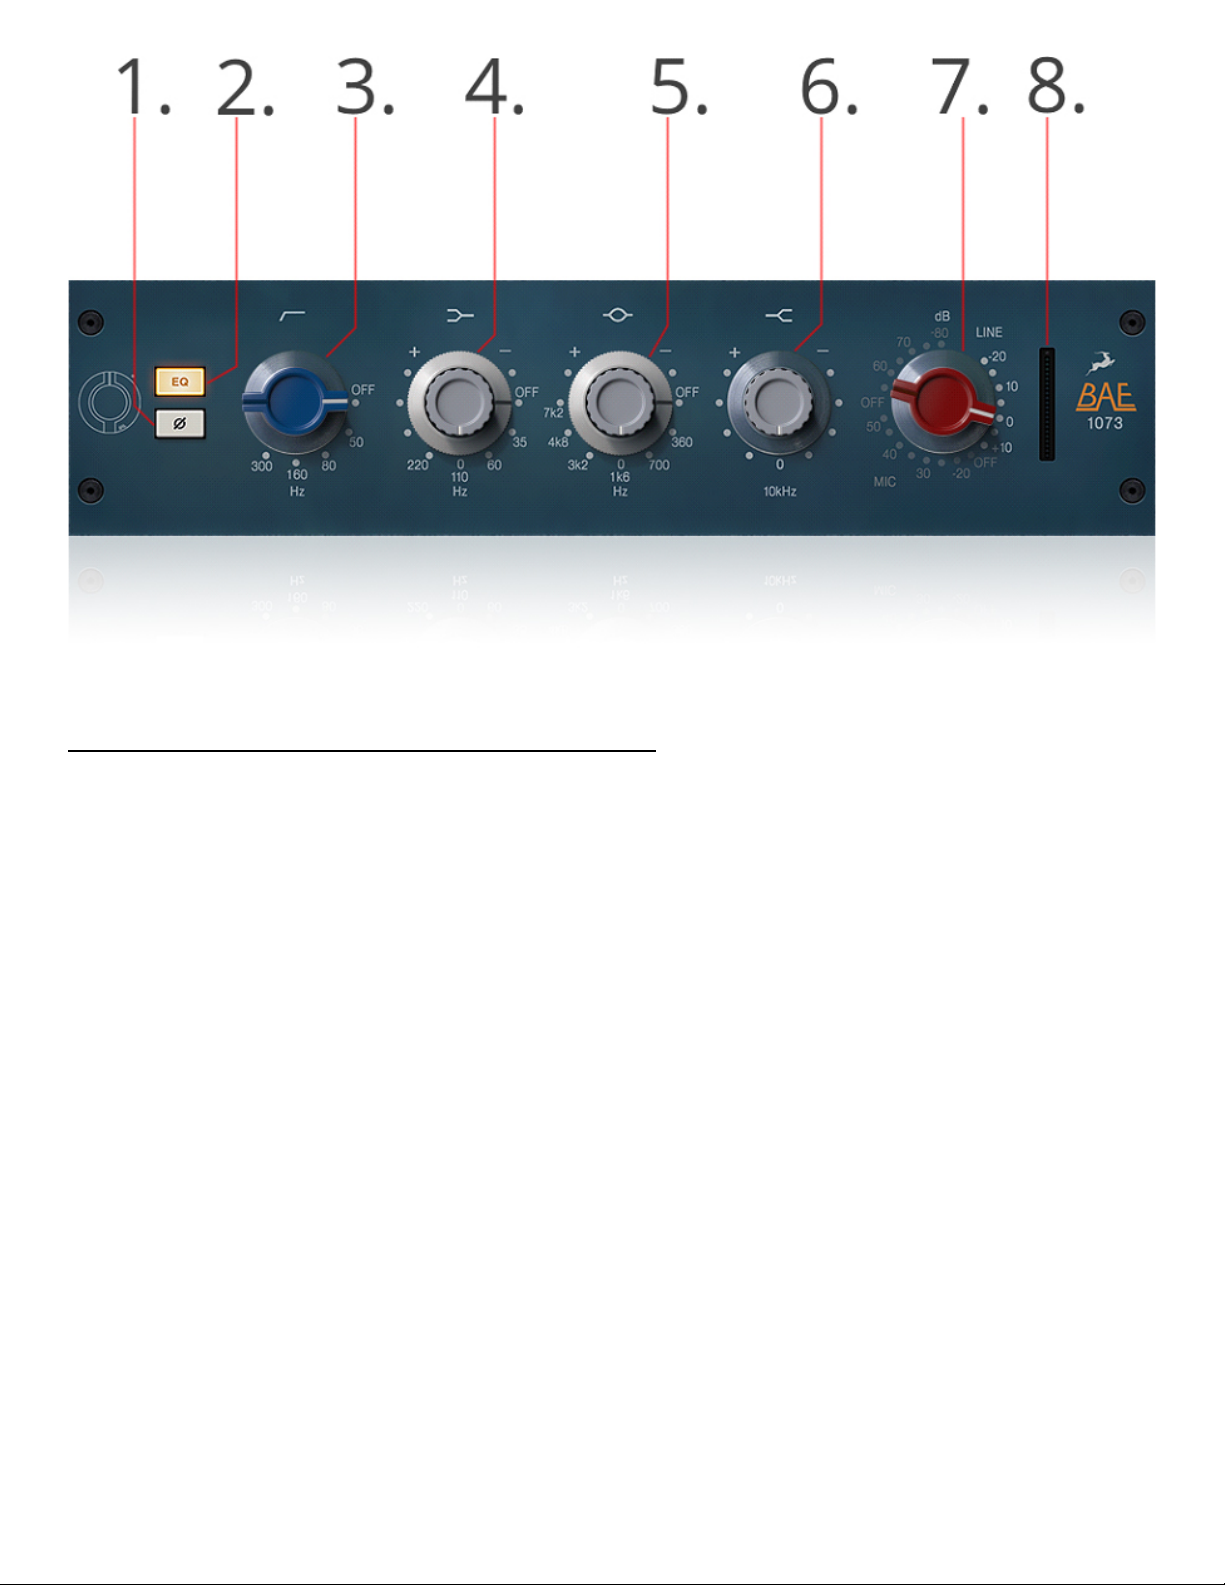
1. Phase Flip Button
Flips the signal phase. Use it to correct phasing problems, such as lack of bass or things sounding like they are ran
through a phaser.
2. Power On/Off Button
When lit, the equalizer is turned On. When not lit, the EQ is bypassed. The button doubles as the BP button in the AFX
Rack.
3. Low Cut Switch
Low-cut filter ranging from 50Hz to 300Hz.
4. Low-Frequency Filter
21 of 24
Page 22

+/-16dB shelving with selectable frequencies of 35Hz, 60Hz, 110Hz & 220Hz.
5. Mid-Frequency Filter
+/-18dB peaking, fixed ‘Q’ with, selectable centre frequencies of 0.36kHz, 0.7kHz, 1.6kHz, 3.2kHz, 4.8kHz & 7.2kHz.
6. High-Frequency Filter
+/-16dB fixed frequency shelving at 10kHz.
7. Gain Control
Ranges from 0dB to 80dB.
8. Output Monitor
Visualizes output signal.
"""""
"
Troubleshooting
Discrete MP Not Connecting? Here are some options!
Check the device’s USB port.
22 of 24
Page 23

Check if there are red messages at the bottom of the software control panel.
Edge microphone or mic emulations not recording properly?
Check if the mic is properly connected to DiscreteMP. White cable end – Left preamp. Red cable end – Right
preamp.
Check that you are recording both microphone capsules in your DAW.
"""
"
Contacts
Having difficulties with the Edge Strip or anything else Antelope? Get in touch with us by the following means:
European Direct Support Line
+44 2039578550
10:00 a.m. – 10:00 p.m. (EET), Monday – Friday
USA Direct Support Line
+1 734 418 8661
7:00 a.m. – 6:30 p.m. (EST), Monday – Friday
Online (live chat and e-mail)
Antelope Audio Support Page
(
https://en.antelopeaudio.com/support/
)
23 of 24
Page 24

24 of 24
 Loading...