

Page 1

Edge Go User Manual
1. Safety Notes
To reduce the risk of electrical shocks, fire, and related hazards:
Do not remove the screws, cover, or cabinet. There are no user-serviceable parts inside.
Refer servicing to qualified service personnel.
Do not expose this device to rain, moisture or spillover of liquid of any kind.
Should any form of liquid or a foreign object enter the device, do not use it. Do not operate the
device again until the foreign object is removed or the liquid has completely dried and its residues
fully cleaned up. If in doubt, please consult the manufacturer.
Do not handle cables with wet hands!
Avoid using the device in a narrow and poorly ventilated place, which could affect its operation or
the operation of other closely located components.
If anything goes wrong, unplug the device first. Do not attempt to repair the device yourself.
Consult authorized service personnel or your dealer.
Do not install near any heat sources such as radiators, stoves, or other devices
(including amplifiers) that produce heat.
Do not use harsh chemicals to clean your unit. Clean only with specialized cleaners for
electronics equipment.
To completely turn off the device, unplug the cable.
Both occasional and continued exposure to high sound pressure levels from headphones and
speakers can cause permanent ear damage.
The device is designed to operate in a temperate environment, with a correct operating
temperature of 0-50 °C, 32-122 °F
2. Quick Start
Congratulations on purchasing your Antelope Audio Edge Go bus-powered modeling microphone!
There are just a couple of steps to go through before you are ready to begin recording.
1. Download and install the Edge Go USB Driver and Antelope Audio Launcher for your operating
system.
2. Place the Edge Go into the shockmount or desktop stand and connect the microphone to your
computer using a standard USB C cable (one is provided in the box), or USB C to USB Type-A
(male) cable.
3. Start the Antelope Audio Launcher. Once it's running, update the device firmware and install the
PC/Mac Control Panel for Edge Go. It all happens inside the Launcher.
4. Head to the Software tab and install the EdgeDuo package to get the mic emulations and effects
(FPGA) for Edge Go. Yes, they are the same as in our coveted Edge Duo large-diaphragm
condenser modeling mic.
5. Should you wish to use the mic emulations and effects as native plug-ins in your DAW, download
and install the PACE iLok License Manager software. Plug in an iLok v2/v3 USB dongle (sold
separately) and use the activation codes from the leaflet to download and authorize the plug-ins.
Page 2
Congratulations! You are now ready to turn Edge Go into the heart of your recording setup.
Thank you for choosing Antelope Audio.
Tip: Use Antelope Launcher for download and installation, iLok License Manager for
authorization.
Tip: Never used audio software (DAW) before? Plug in a pair of headphones into the 3.5mm jack
and explore the presets inside the Control Panel as you talk or play into the microphone. Hear the
difference made by the real-time mic emulations and effects. Experiment with stacking effects and
adjusting parameters to taste. As long as it sounds good, you are doing it right!
Experiencing any difficulties with the initial setup? Head to support.antelopeaudio.com for a Live
Chat session with a Customer Support specialist, or reach out over phone and e-mail. Availability
times are as follows:
• Support By Phone
US time: 00:00 a.m. – 08:00 p.m. (CST), Monday – Friday
European time: 06:00 a.m. – 02:00 a.m. (GMT), Monday – Friday.
US Phone Number (916) 238-1643 / UK Phone Number +44 1925933423
• Live Chat
US time: 00:00 a.m. – 02:00 p.m. (CST), Monday – Friday
European time: 06:00 a.m. – 08:00 p.m. (GMT), Monday – Friday.
If you’re trying to reach us outside working hours, we advise you to file a ticket in our customer
support system or leave a voice message.
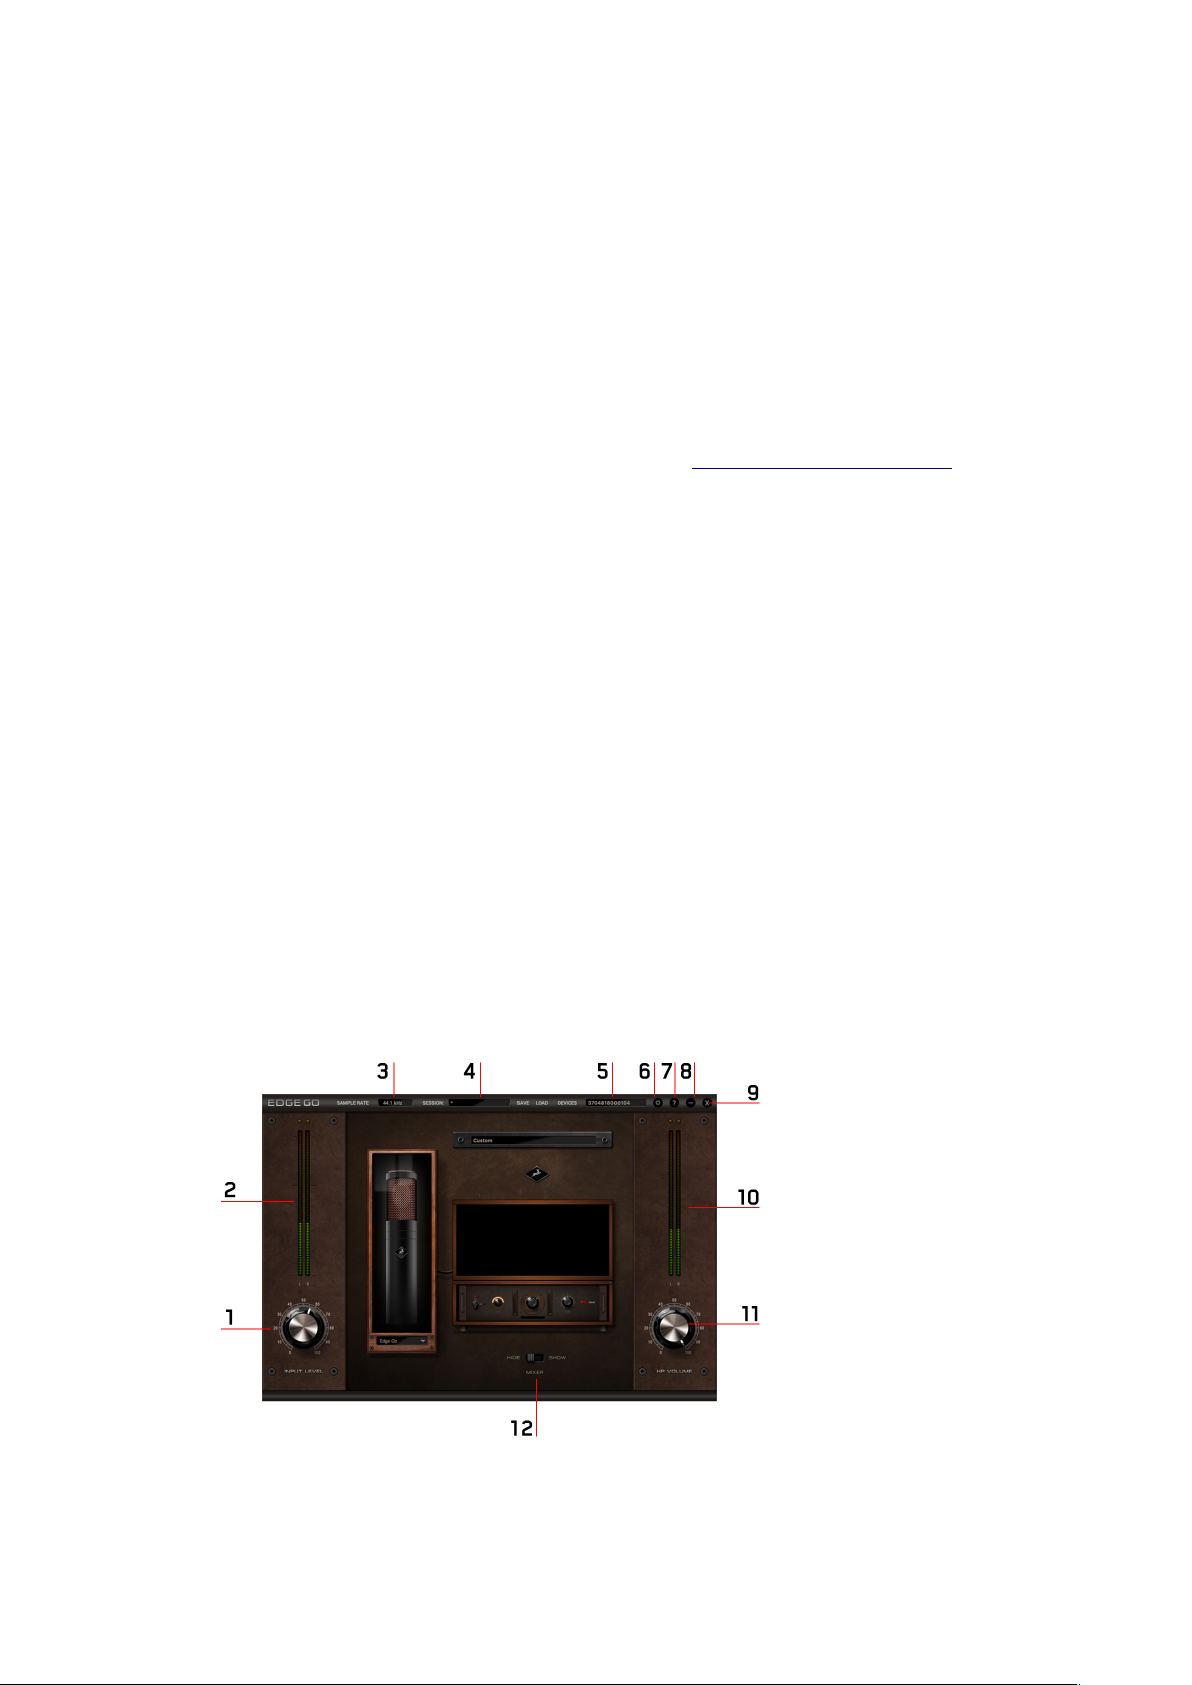
3. The Control Panel and You
Page 3

1. Input Level Knob
Adjusts mic gain.
Tip: Don’t push the meters into the red. It means you are overdriving the Edge Go’s built-in preamp
and clipping occurs, distorting your recording in an audible and unpleasant manner.
Tip: For voice recordings, adjust mic gain according to the nominal (regular) level of your speaking
or singing voice. If your performance is particularly dynamic (it has big changes in volume),
calibrate to the loudest parts, making sure the meters don’t go into the red. This way, you are
leaving enough headroom to capture the entirety of your performance without unwanted clipping.
2. Input Level Meters
A visual representation of your input signal level. As mentioned above, avoid pushing the meters
into the red to avoid distortion.
Tip: Edge Go is a dual-membrane microphone which records in Stereo by summing the input from
both membranes. Hence the two L/R meters.
3. Sample Rate Selector
Adjusts the sample rate, starting at 44.1kHz (CD Audio quality) and reaching up to 192kHz. The
higher the sample rate, the higher the recording fidelity, at the cost of additional computer
processing power.
Tip: A good practice is to record at a higher sample rate and export at a lower sample rate. This
method is called “downsampling” and results in higher fidelity than if you were to record at a lower
sample rate.
For a visual example of downsampling in action, watch a YouTube video recorded in 4K resolution
and played back at 1080p resolution, then watch a video shot in regular 1080p. The difference in
quality tends to be very noticeable, and it’s exactly the same with digital audio.
Tip: Another good practice (though not mandatory) is to export at half the sample rate you recorded
at. For example, record at 96kHz and export at 48kHz.
4. Session Recall
Save and load Sessions – think of them as convenient snapshots of the entire Control Panel,
including presets, effect settings, gain adjustments, and all other parameters.
5. Device Selector
Lets you choose among multiple Edge Go microphones connected to your computer.
Page 4

6. Settings Button
Opens the Settings Panel with the following parameters:
1. Buffer size (samples)
Adjust the buffer size. The lower it is, the lower latency you will experience at the cost of computer
processing power.
2. ASIO Control (Windows only)
Opens the ASIO driver control panel for tweaking.
3. USB Streaming mode
Choose the one which suits your computer the best.
Back to the Control Panel overview:
7. About Button
Provides device, firmware and software information.
8. Minimize Button
Minimizes the Edge Go Control Panel.
9. Close Button
Closes the Edge Go Control Panel.
10. Headphone Output Level Meters
Page 5

A visual representation of your headphone output signal level. Avoid pushing the meters into the red
to avoid unpleasant distortion and risking your hearing.
11. Headphone Output Level Knob
Adjusts headphone output level.
Tip: Avoid exposing yourself to loud sounds, especially for long durations. You might damage your
hearing.
Tip: Take a 15-minute break from monitoring or mixing once every 45 minutes to keep your ears
fresh.
12. Mixer Hide/Show Switch
Extends the Edge Go Control Panel to include the following parameters:
1. Reverb sends
Adjust the amount of reverb sent to each mix bus.
2. USB ½ & USB ¾ Outputs
Control the amount of system audio (web browser, YouTube, media apps, DAWs) sent to the Edge
Go’s headphones output.
3. Edge Go Output
Adjust the amount of processed audio from the Edge Go heard through its headphones output.
Tip: Mute buttons are available for each mix bus.
Page 6
Tip: You cannot add effects processing to system audio, other than reverb.
Tip: Configure your system audio outputs from Audio & MIDI Settings in macOS, or the Windows
Control Panel. Edge Go has four outputs which can be assigned to the Left and Right channels in
your operating system.
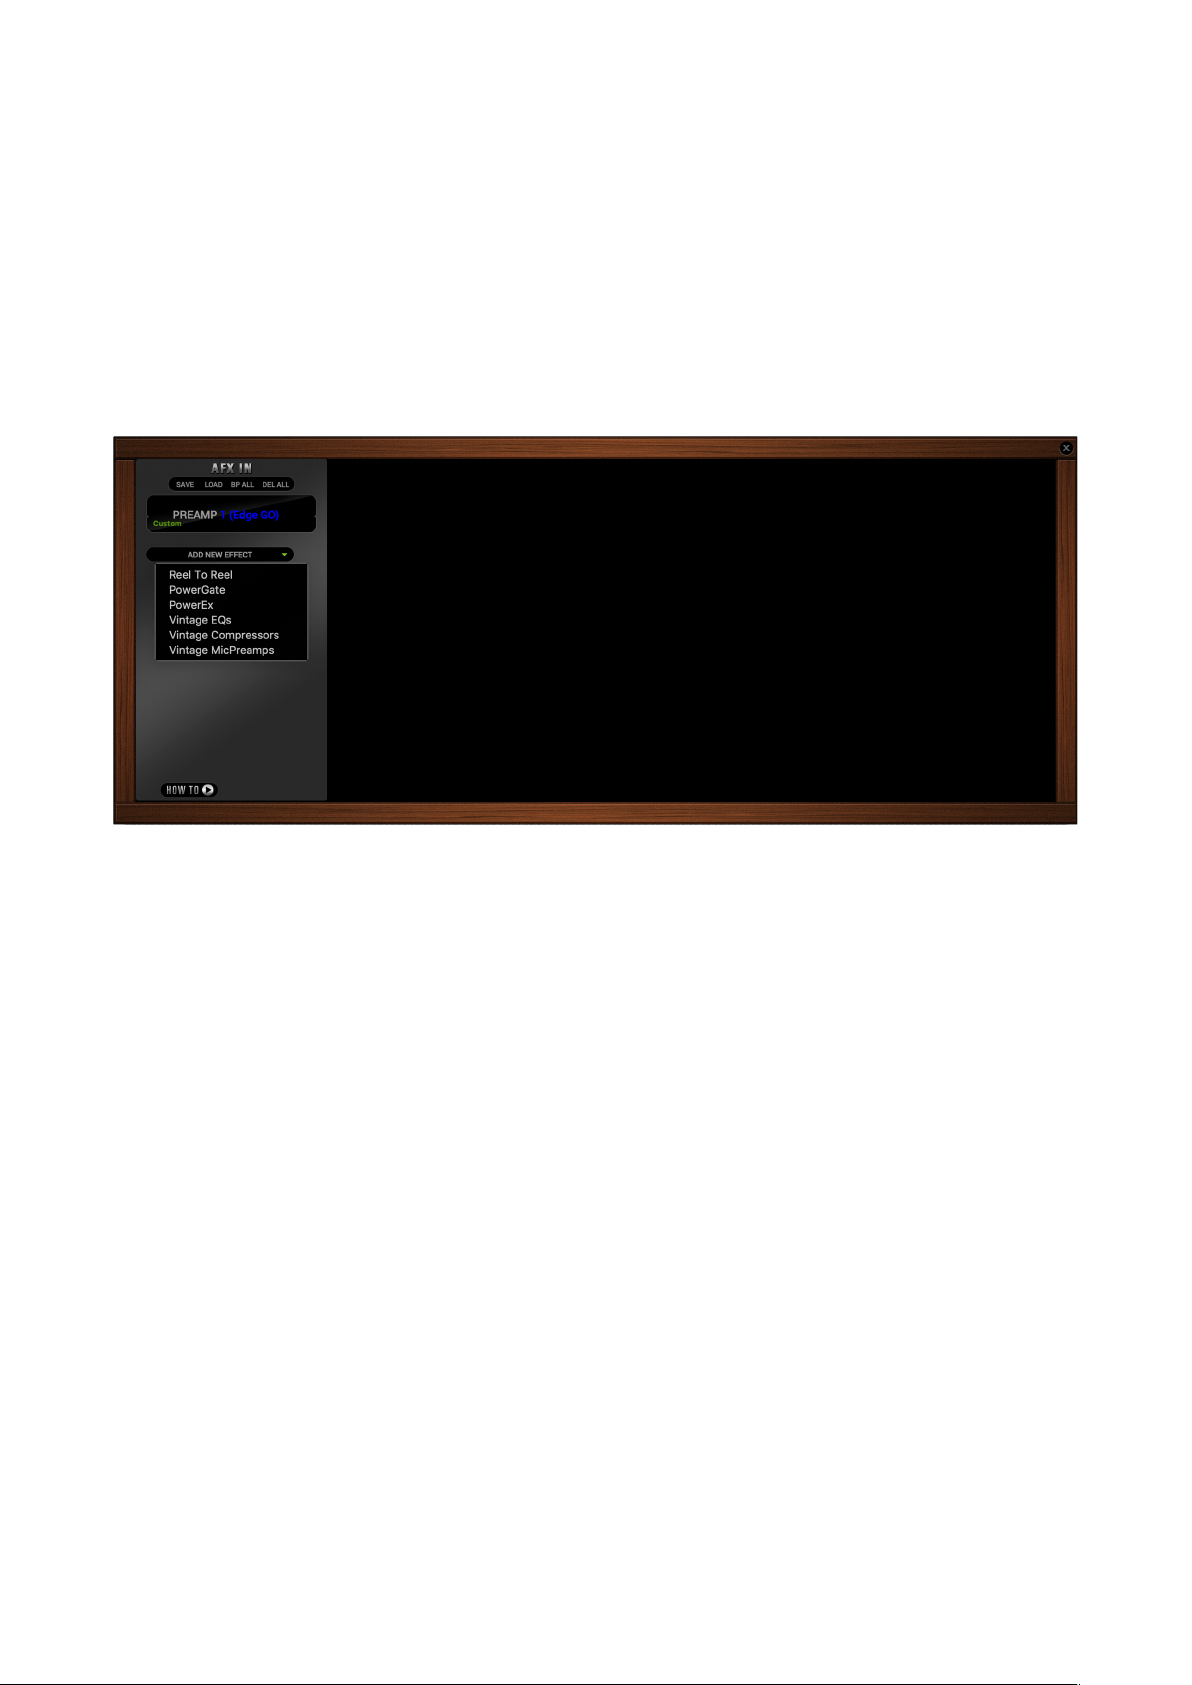
14. Effects Rack
Click to launch the Effects Rack where you can stack audio effects and adjust their parameters to
taste. It looks like this when empty:
You are given the ability to save and load presets; bypass or delete all effects simultaneously; and
stack effects from the categories inside the drop-down menu. All effects can be re-ordered in the
virtual rack by dragging and dropping them in place.
Tip: Unless you prefer the natural sound of the Edge Go’s built-in preamp, always start your effects
chain with a preamp emulation.
Tip: Add EQ before compression. This way, you will be compressing the equalized signal. This is
not a hard and fast rule, but a reliable starting point.
Tip: Manuals for the effects that come with the Edge Go are available in the Customer Support
section on the Antelope Audio website.
15. Preset Selector
Use presets designed by studio professionals as a starting point towards nailing the type of sound
you are after.
Page 7

16. Mic Emulation & Polar Pattern Selector
Choose the active microphone emulation from the drop-down menu. Use the Edge Go model to
disable mic modeling. Click the microphone visual to access the polar pattern selector. Use the knob
to dial in your preferred polar pattern, which may be Omni, Cardioid, Figure-8 and anything in
between.
Tip: With Native plug-ins, it is possible to add mic emulations and effects to existing Edge Go
recordings in a DAW. For optimum results, said recordings must be Stereo and “dry” - that is,
recorded without mic emulations and effects. Simply load the plug-ins on the recorded track and go
to town.
Page 8

You now know enough to master the Edge Go. With recording quality and production ease no
longer an obstacle, you are free to unleash the slickest-sounding recordings upon the unsuspecting
world.
We wish you fun and productive times with this brilliant microphone.
With compliments,
Team Antelope
 Loading...