

Page 1
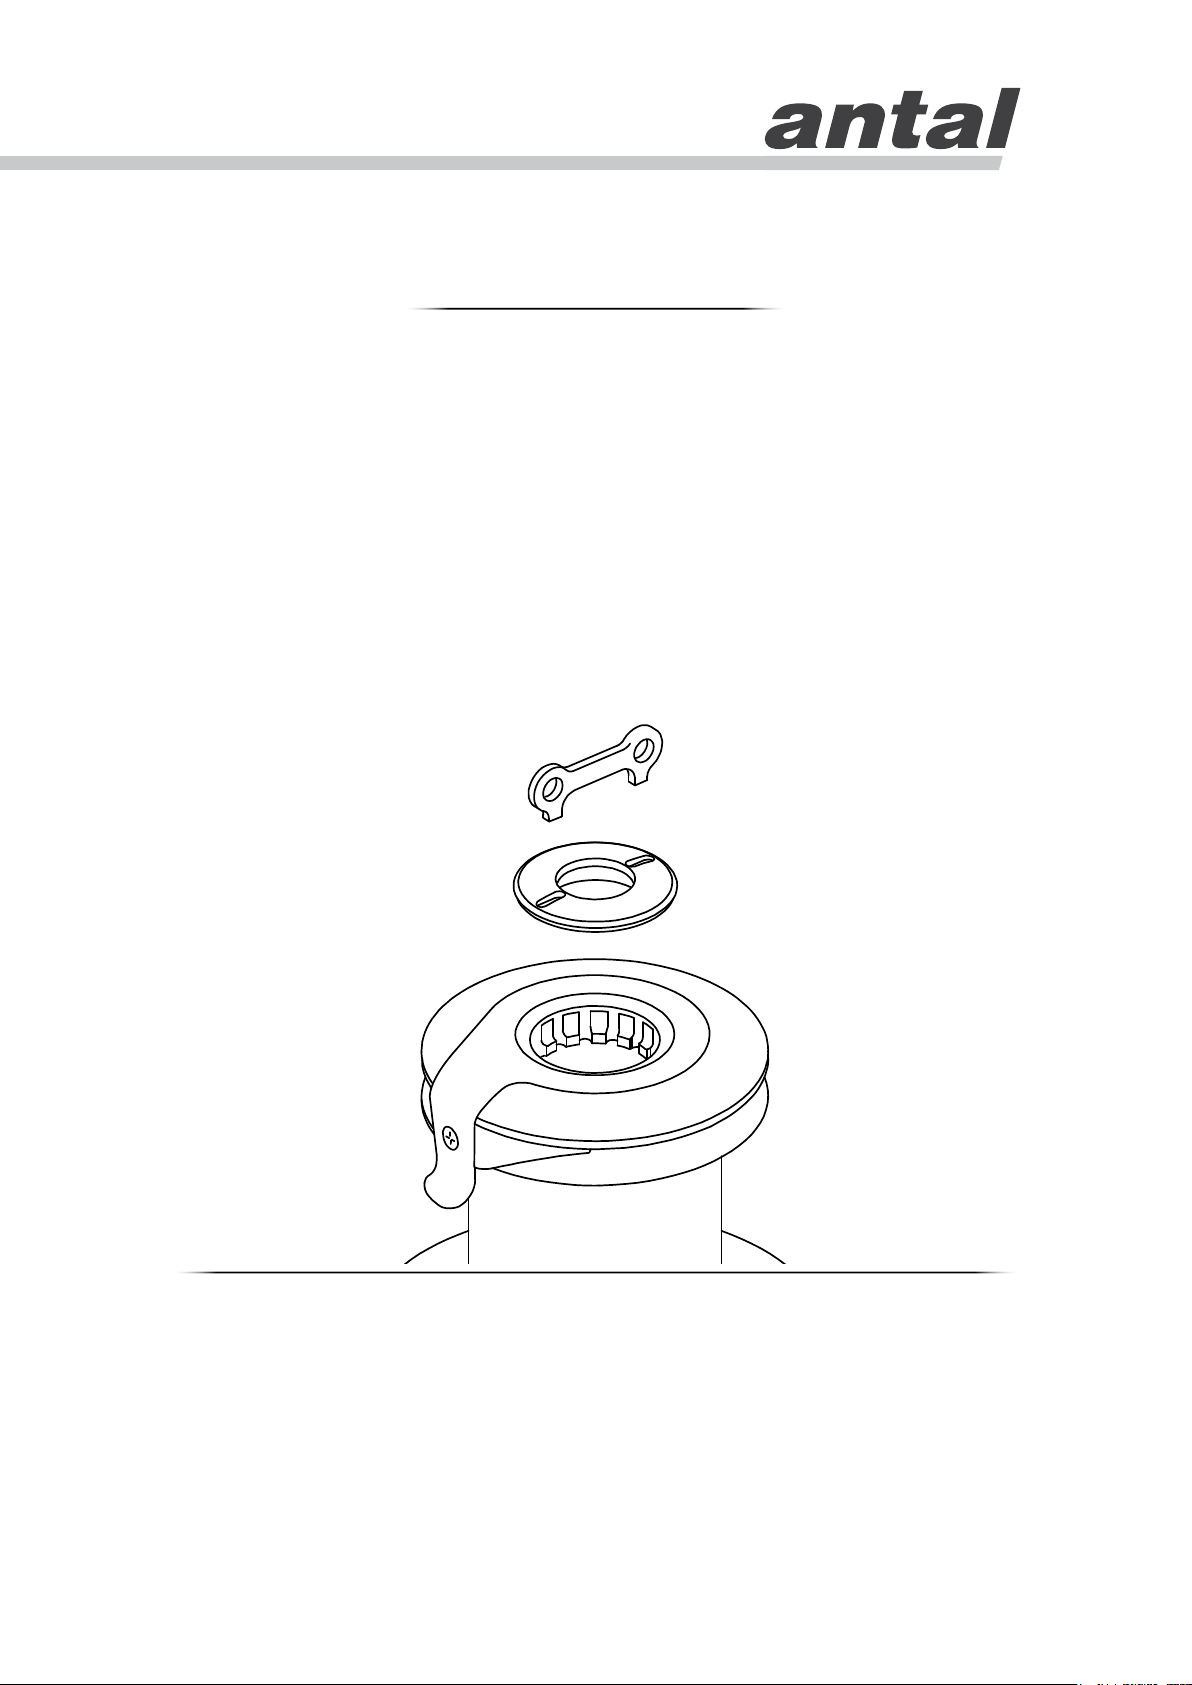
XT Winches
Installation and Maintenance Manual
For Models
XT40AL, XT40CH, XT40R
Antal srl unipersonale, Via del Progresso, 10, 35127, Padova, Italy.
Tel. +39 049 8701265. Fax: +39 049 760906. web: www.antal.it
Technical service: [email protected]
Page 2
Installation and Maintenance
XT40
Installation and Maintenance Manual for Antal XT Winches
Contents
1. About XT Winches p. 3
2. Use p. 4
3. Installation p. 4
4. Maintenance p. 8
5. Video p. 11
6. Warranty p. 12
7. Exploded Views p. 12
Before You Read This Guide
The present Installation and Maintenance Manual contains important
information for the correct use of the XT winch and you are therefore
advised to read it carefully before using the product.
The present manual gives technical information for the installation and
the maintenance of the following XT winch models: XT40AL, XT40CH,
XT40R. In case of technical queries, contact [email protected].
Powered winches. The installation of powered XT winches does
not pertain to the purposes of this manual. For the sole maintenance
operations, however, it is advised to refer to the indications contained
in the section 4 of this manual.
Contacts
Antal srl unipersonale, Via del Progresso, 10, 35127, Padova, Italy.
Tel. +39 049 8701265. Fax: +39 049 760906. web: www.antal.it
Technical service: [email protected]
2
Page 3
Installation and Maintenance
XT40
1. About XT Winches
Important Concepts
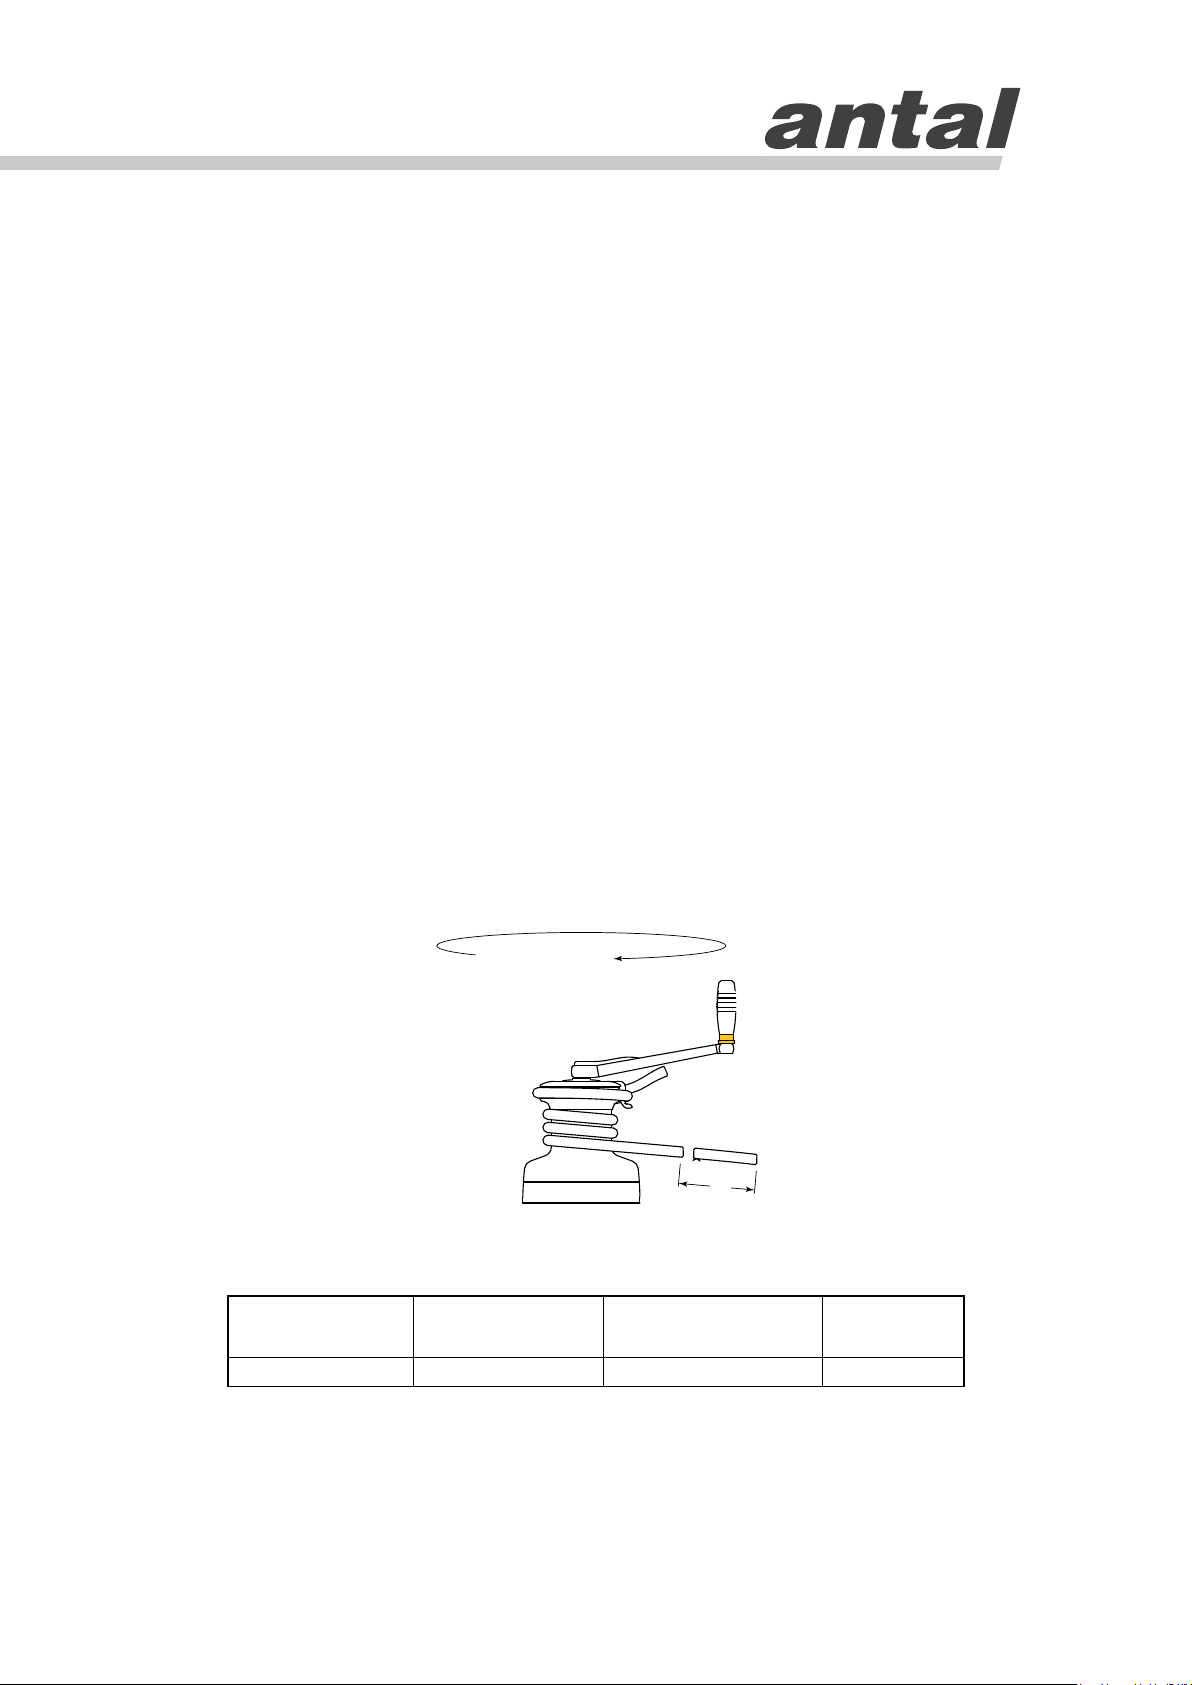
Power. Winches are distinguished by power values. The ratio between
the force exerted on the handle and the power dispensed by the winch,
is said power. For example: if a winch has power 52, it means that
when I exert a force 1 on the handle, I get a power of recovery of 52 on
the drum (theoretical value that disregards friction).
Recovery speed. To a high power of the winch, there corresponds a
reduced recovery speed. On the contrary, to a reduced power, there
corresponds a high recovery speed.
Multi-speed. The use of a winch for the recovery of maneuvers
requires both speed (in the initial moment) and power (in the final
moment). Thus, to maximize the effectiveness of the winch, there are
multi-speed winches.
Reduced speed. Recovery speed ratio can be direct or reduced.
It is direct when one turn of the handle corresponds to a complete
revolution of the drum. On the contrary, the speed is reduced when
you need more turns of the handle to complete one revolution of the
drum. Thanks to a reduced speed, it does not ‘fatigue’ and recovery
is ‘slower’.
All models of the winches XT40 have two reduced speeds.
Table of Models
Model Power
XT40 12.8 40 125 40 6 - 12
1 turn
1 2
S
Speed (S) - mm per Turn
1 2
Line
mm
3
Page 4
Installation and Maintenance
XT40
2. Use
The XT winch is designed for the recovery of a maneuver (halyard,
sheet or other line). To use the winch, wind the maneuver with at least
four turns around the drum of the winch. After winding to the drum,
the maneuver must enter through the ST arm between the two selfregulating disks. In case of slippage of the maneuver, increase the
number of turns on the drum.
Diameter of the maneuver in the self-tailing. The lower disk of the
self-tailing automatically adapts to the diameter of the maneuver. The
movement of the disk is limited to a certain range of diameters for each
winch. Lower diameters than those allowed can cause slippage of the
maneuver. Conversely, larger diameters may damage the self-tailing.
Refer to the table of the models to know the minimum and maximum
diameters of maneuvers for each winch.
Use of the winch. All XTs are self-tailing winches and therefore
require the sole action of the handle for the recovery of the maneuver.
To operate the first power (high speed) insert the handle at the top of
the winch, then turn it clock wise. To operate the second speed (high
power), invert the rotation of the handle and turn counterclock wise.
3. Installation
Installation is the responsibility of professional personnel. The installer
must ensure the good state of the deck where the winch is to be
installed. Antal assumes no responsibility for an incorrect installation
of the winch.
Warning: an incorrect installation of the winch may cause injuries
or damages to things. In case of doubt on how to properly install the
winch, contact specialized personnel.
Respect the two following principles for the correct installation of the
winch on the deck. Position of the winch on the deck and Placement
of the skirt. Only after you have applied these two principles, procede
with installation.
4
Page 5
Installation and Maintenance
XT40
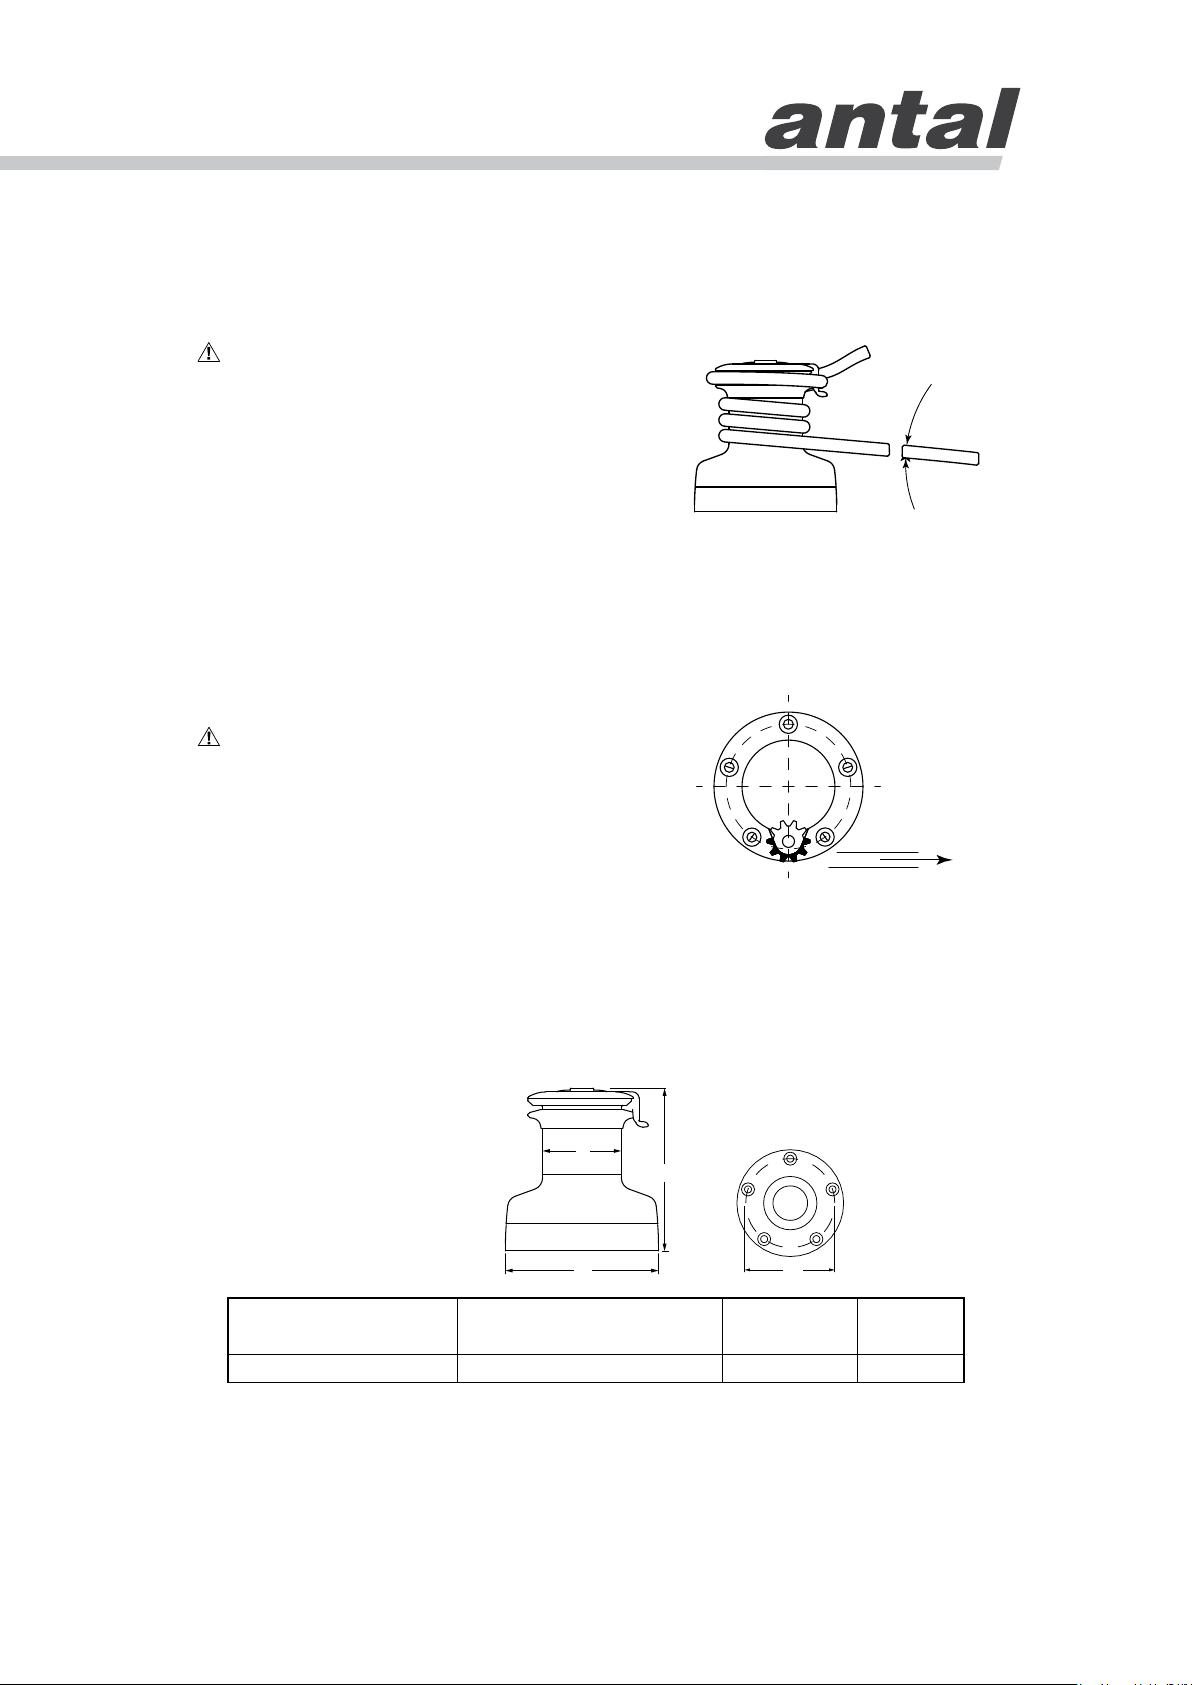
Position of the winch on the deck.
Before installing the winch you must
choose a location on the deck that
allows the maneuver which you
intend to use, to reach the winch at
an angle between 2 and 10 degrees.
2° - 10°
Placement of the skirt.
Position the winch so that the
output gear is in the area shown in
the figure, i.e., tangent to the pull
direction of the maneuver.
Table of Technical Characteristics
d
H
ØD
Model D d H
mm
XT40 153 80 157 118 5 x 8
5
Ø
mm
Screws
N x mm
Page 6
Installation and Maintenance
XT40
Tools Needed
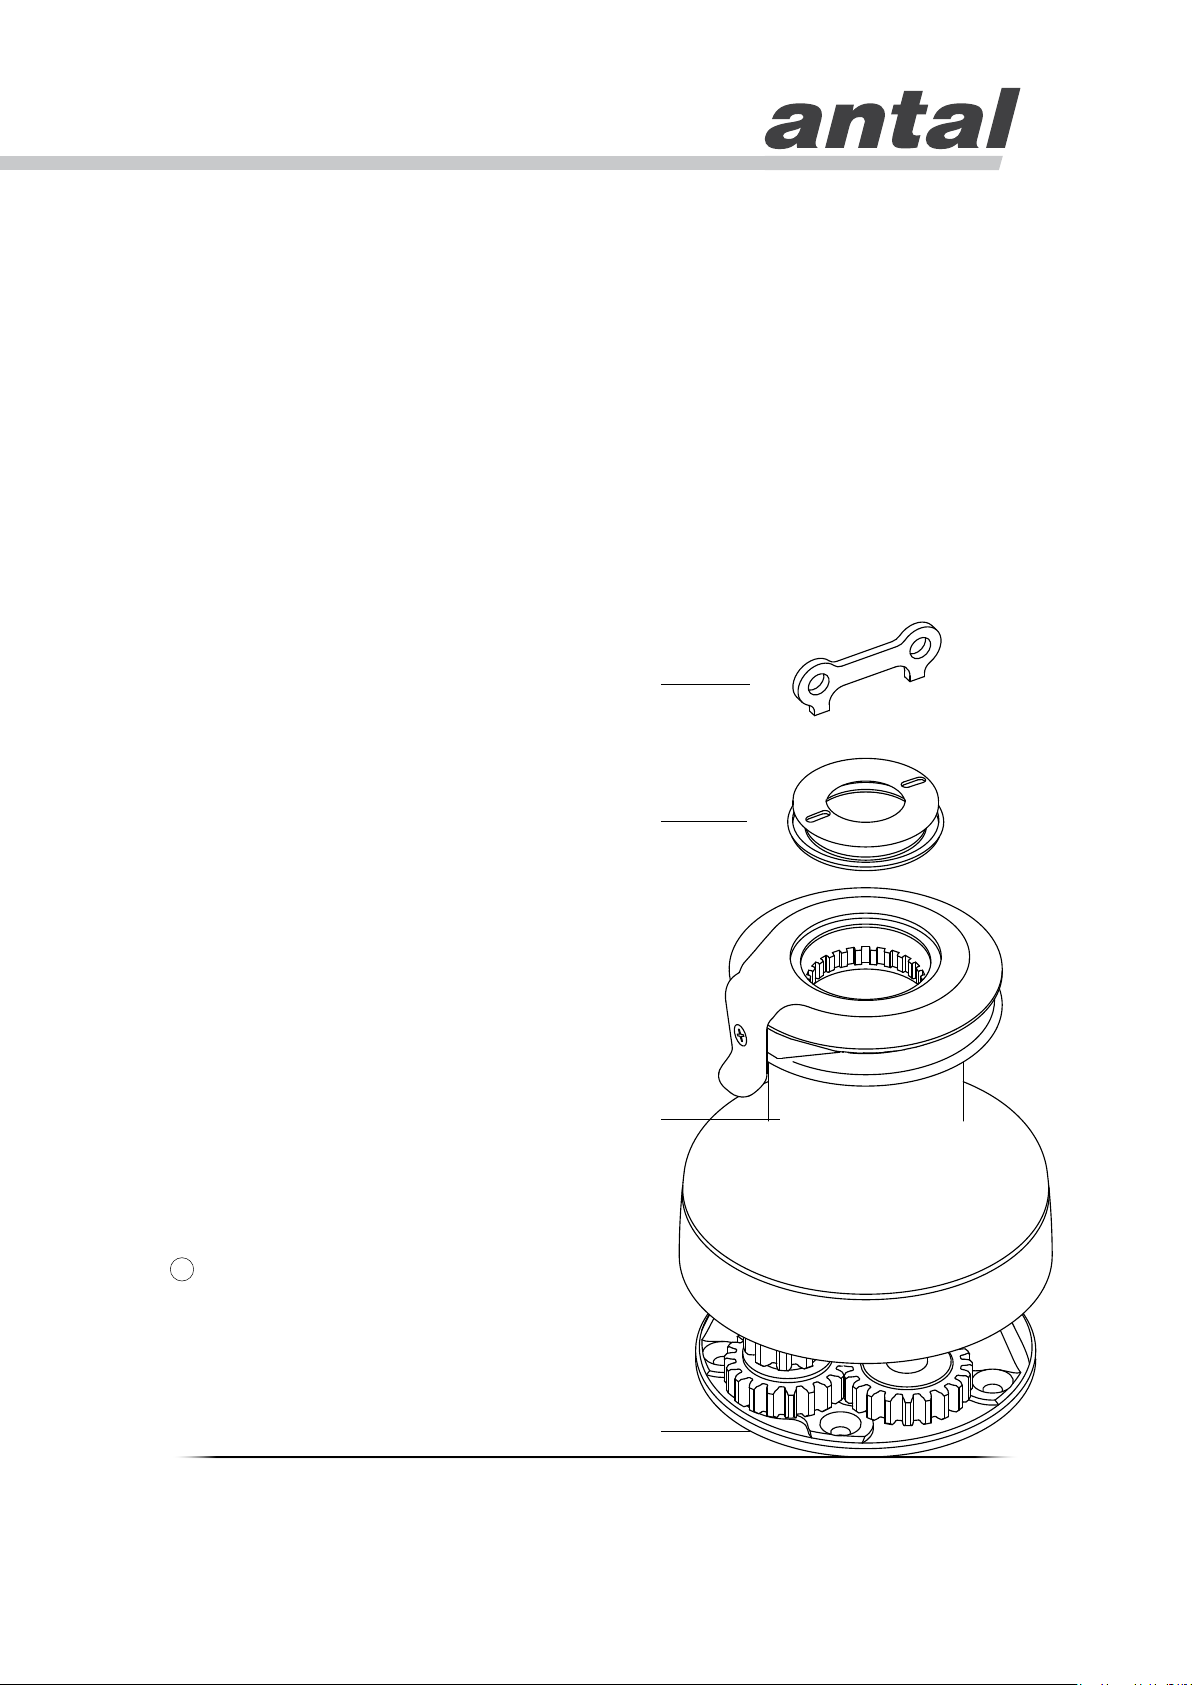
To install the winch, you will need: supplied key (K) for the opening of
the upper ring (R), drill, sealant, screws, bolts and washers.
Screws. Antal does not supply the anchoring screws needed to
install the winch. The length of the screws depends on the thickness
of the deck. Use screws, washers and bolts in stainless steel
AISI 316. Pay attention to the type of screws required UNI5933 Hexagonal socket countersunk head screws. To learn the screw
diameter, see table of technical characteristics above.
Installation Procedure
K
1
The installation of the XT winch
requires that you lift the drum. First
of all, unscrew the upper ring (R)
with the provided key (K). Thus
lift the drum (D) to access the
anchoring holes on the skirt (S) of
the winch.
R
D
S
6
Page 7
Installation and Maintenance
XT40
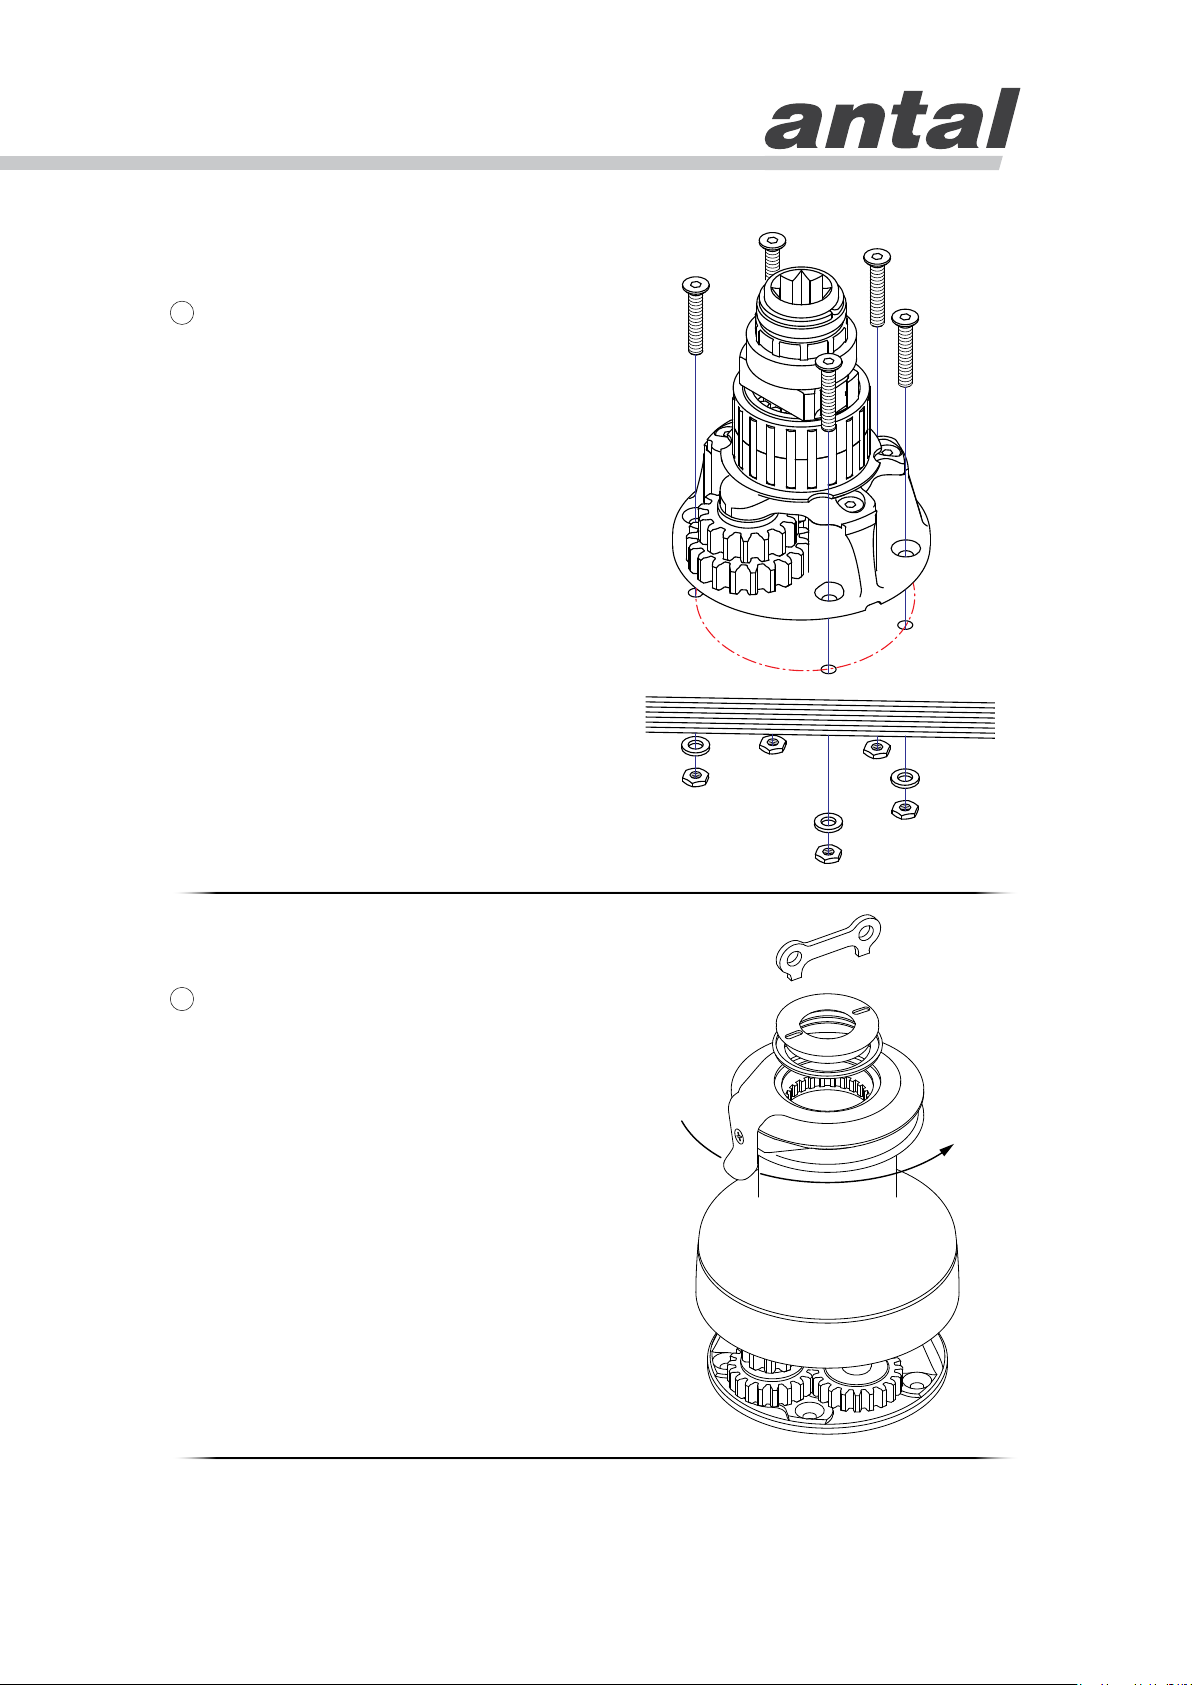
Fixing the skirt.
2
Once you have determined the
location of the skirt on the deck (see
p.5), you can drill the anchoring
holes. To determine the position
of the holes, mark the deck using
the winch’s skirt’s holes directly.
Alternatively, you can download the
drilling templates from the internet,
at www.antal.it.
Then drill the deck.
In order to prevent water seepage,
put sealant around the anchoring
holes. Be careful not to obstruct with
the sealant the drainage channels
at the bottom of the winch.
Thus, tighten the bolts.
Mounting the winch and
3
orientation of the ST arm.
Once you have fixed the winch skirt
in the correct position, re-insert the
drum.
The XT winches accept a number
of possible positions of the drum.
Choose the desired rotation of the
drum based on the orientation of the
ST arm. The orientation of the ST
arm depends on where you want to
gather the maneuver.
Once the drum is positioned, tighten
the upper ring.
7
Page 8
Installation and Maintenance
XT40
4. Maintenance
Frequent maintenance. All XT winches should be washed frequently,
and in any case after each use, to avoid the accumulation of salt. Use
plenty of fresh water and clean it on all visible surfaces. Ensure the
cleaning of the drainage channels placed at the bottom of the winch,
to avoid water stagnation.
Complete maintenance. With seasonal frequency XT winches should
be inspected visually inside.
Important Concepts
The complete maintenance includes the opening of the winch,
the cleaning of the parts from old lubricants and the new lubrication
of all moving parts.
Parts in need of maintenance. The most relevant parts are those
subject to movement and rubbing. These are the roller bearings, the
gears and pawls, the stem and the inside of the drum. For the complete
maintenance of the winch, disassemble the winch in order to access
the relevant parts.
TFL 400 Antal Grease. We recommend the use of Antal Grease, a
Teflon grease expecially made for lubrication of winches and protection
of aluminum parts in the marine environment (Mod. TFL400).
Cleaning. Remove old lubricant. In order to do so use a soft bristle
brush and solvent (use diesel in case you do not have other solvents).
Lubrication. It increases the performance and prolongs the life
of the winch. Also, it prevents the natural accumulation of salt to
obstruct the inner mechanism. Also, if you are using the TFL 400
Antal Grease, it also protects the aluminum parts from galvanic
corrosion, too.
Thus we advise to put a thin layer of TFL 400 Antal Grease; not only
to lubricate all moving parts, but also to protect the aluminum surfaces
in contact with s.steel parts, e.g. screws.
Kit Winch. Antal provides a repair kit winch containing pawls and
springs (Mod. Kit Winch).
8
Page 9
Installation and Maintenance
XT40
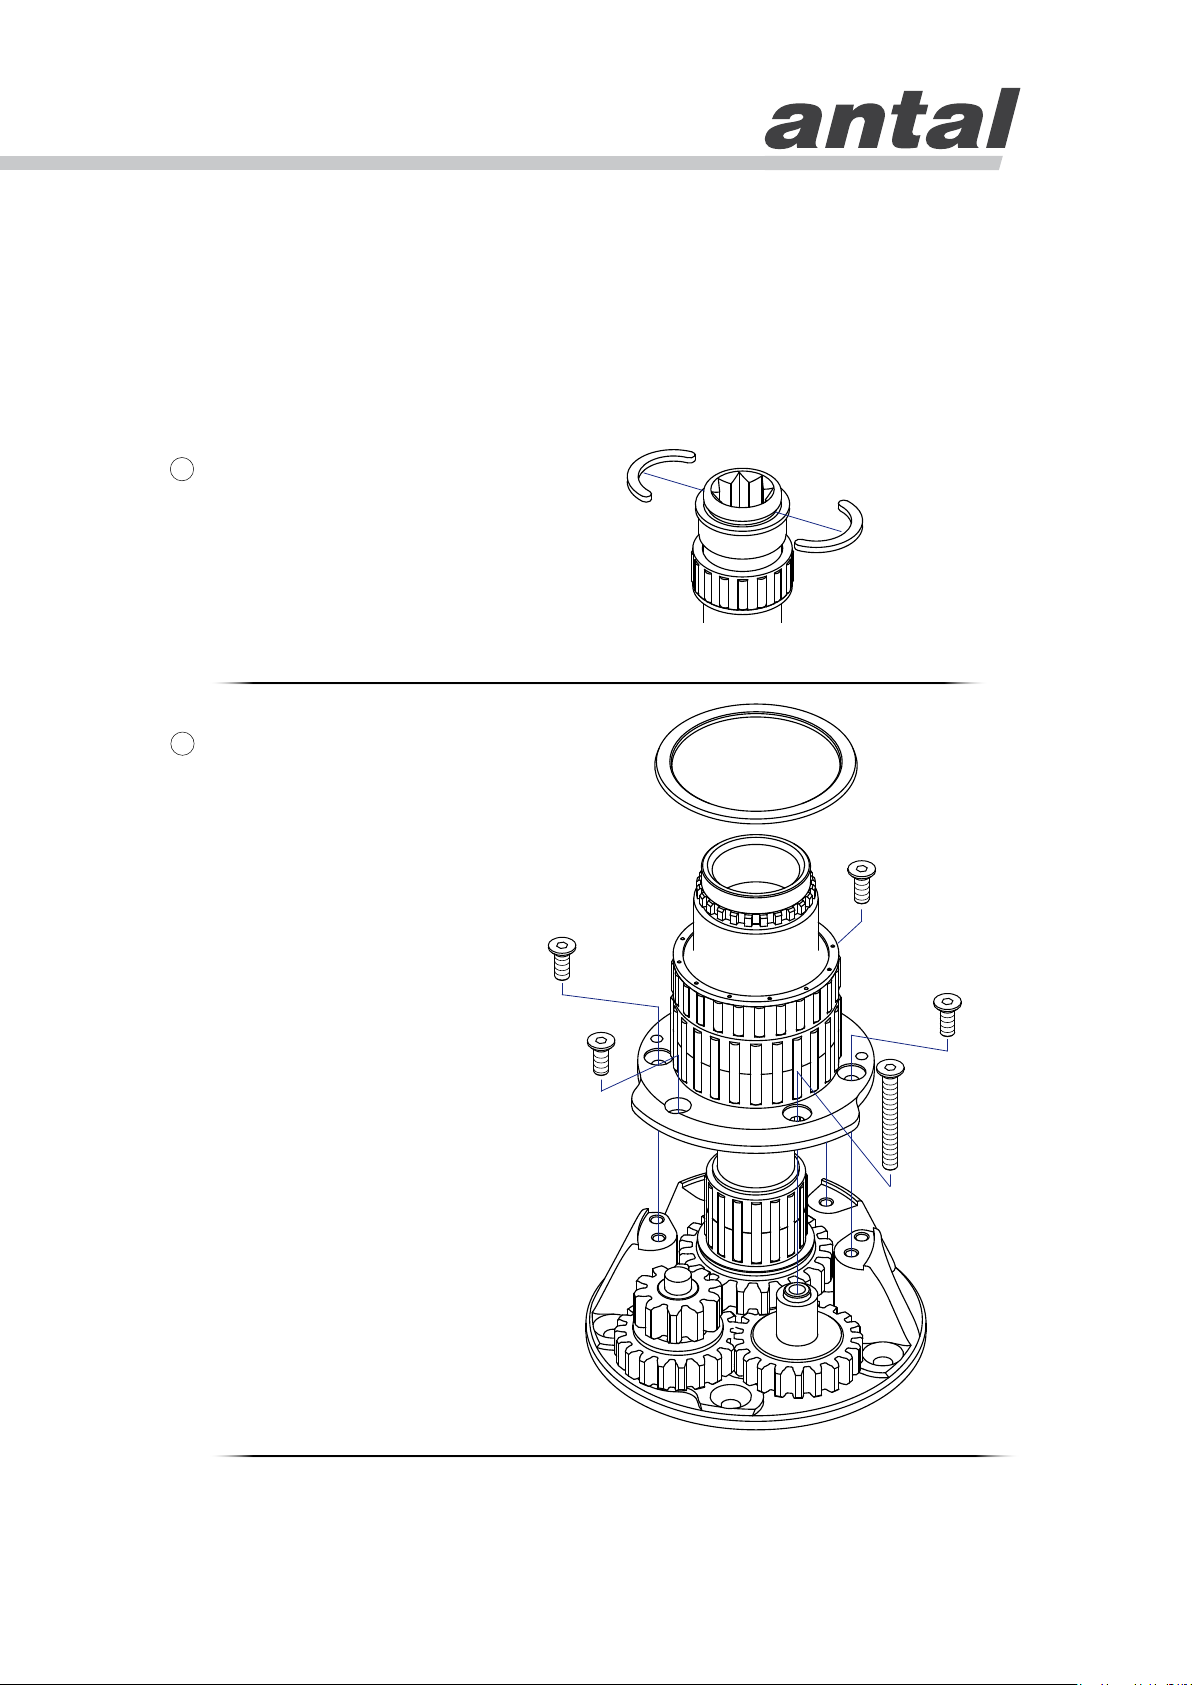
Maintenance Sequence
The inner part of the
1
winch.
Remove the two half rings
at the top of the center rod.
2
Unscrew the 5 screws on
the base and lift the basestem block.
Cleaning.
Clean the old lubricant from
the roller bearings; check
the well-being of the stem
where the bearings slide;
clean the screw-holes on
the base, the screws and
the washers.
(When re-mounting, it will
be necessary to put new
grease on all these parts,
including the screws’
threads. the Antal Grease
also serves the function of
protection of the aluminum
from the risk of galvanic
corrosion.)
9
Page 10
Installation and Maintenance
XT40
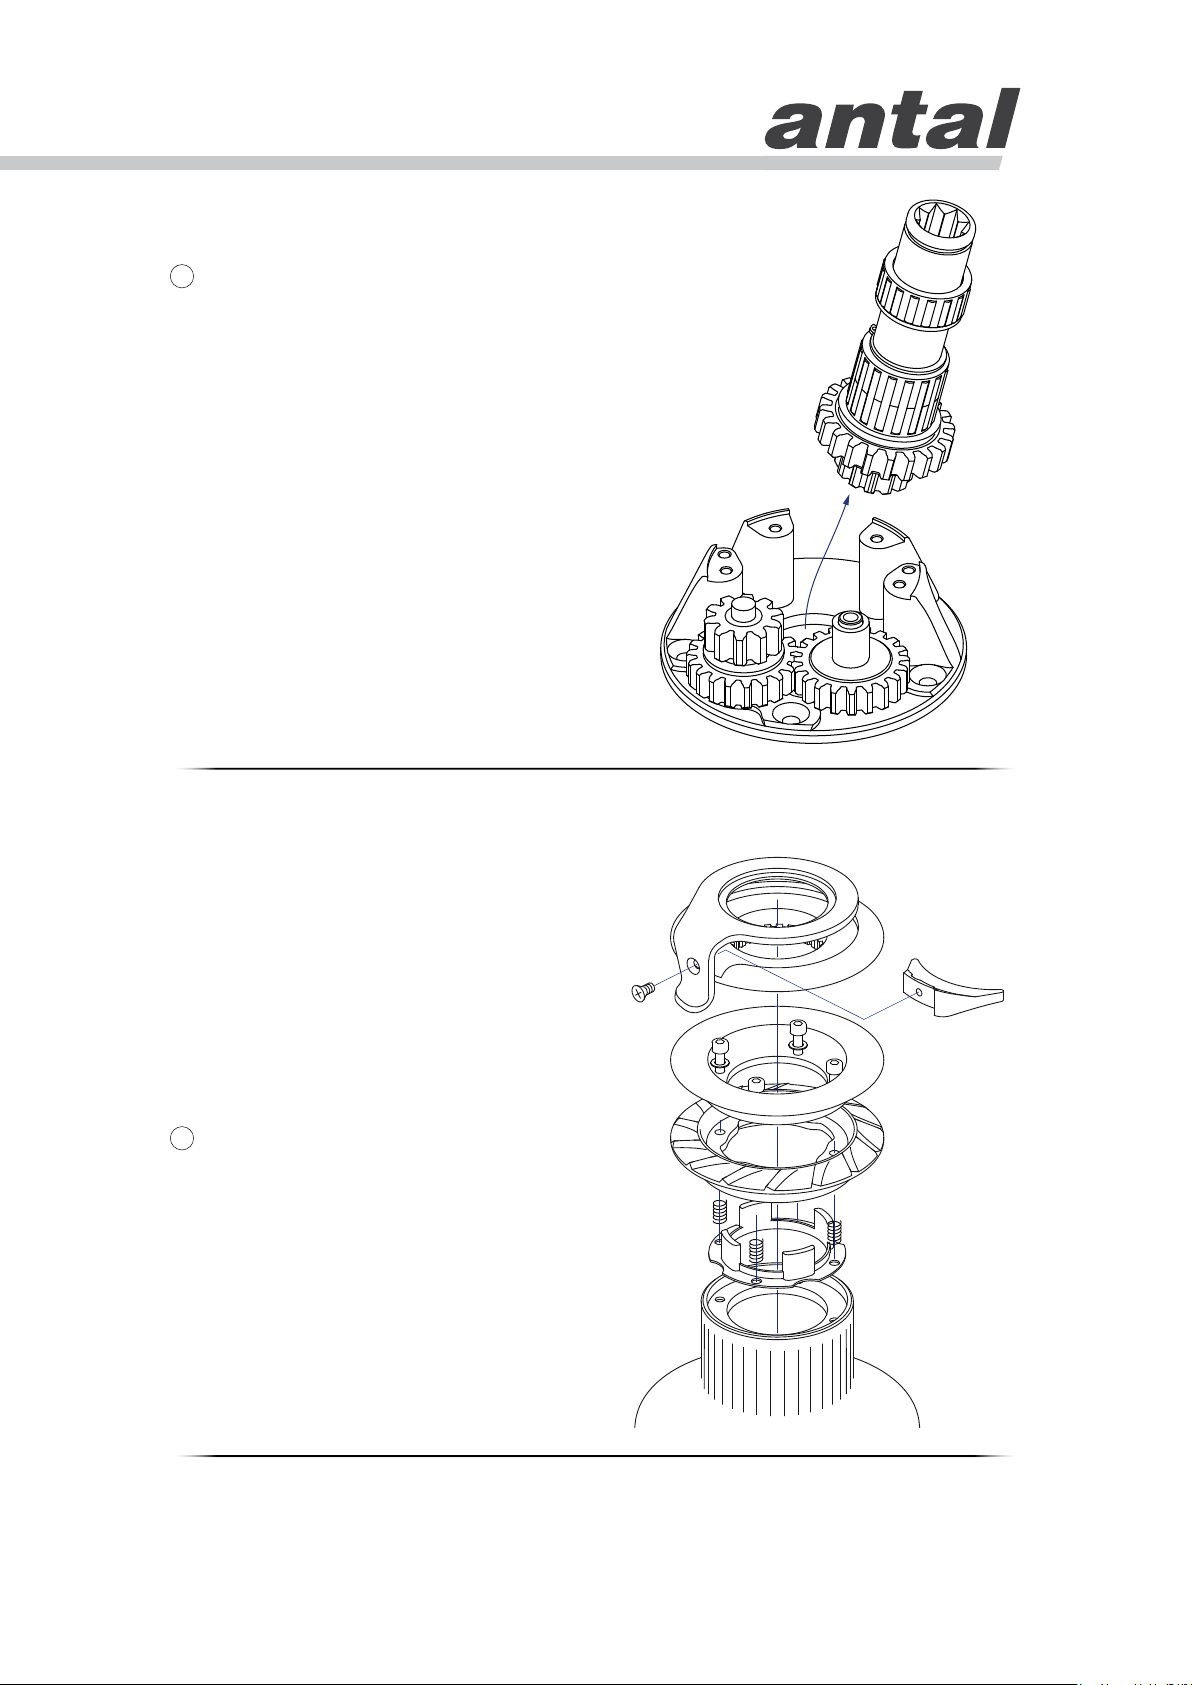
Cleaning.
3
Now, simply remove the
center rod.
Clean the old lubricant from all
parts. Lift the roller bearings,
the spacers (in case of
presence) and the washers.
Carefully clean all these parts
with a soft bristle brush and
solvent.
The cleaning of the gear
section and of the gears at
the base of the center rod
does not require further
dismanteling. It will be enough
to use a soft bristle brush and
solvent.
4
Complete inspection.
In case of complete inspection
or of the substitution of parts,
it is necessary to lift the selftailing disks to check the good
state of the springs, spacers
and pawls.
See also exploded view
drawings at section 7.
10
Page 11
Installation and Maintenance
XT40
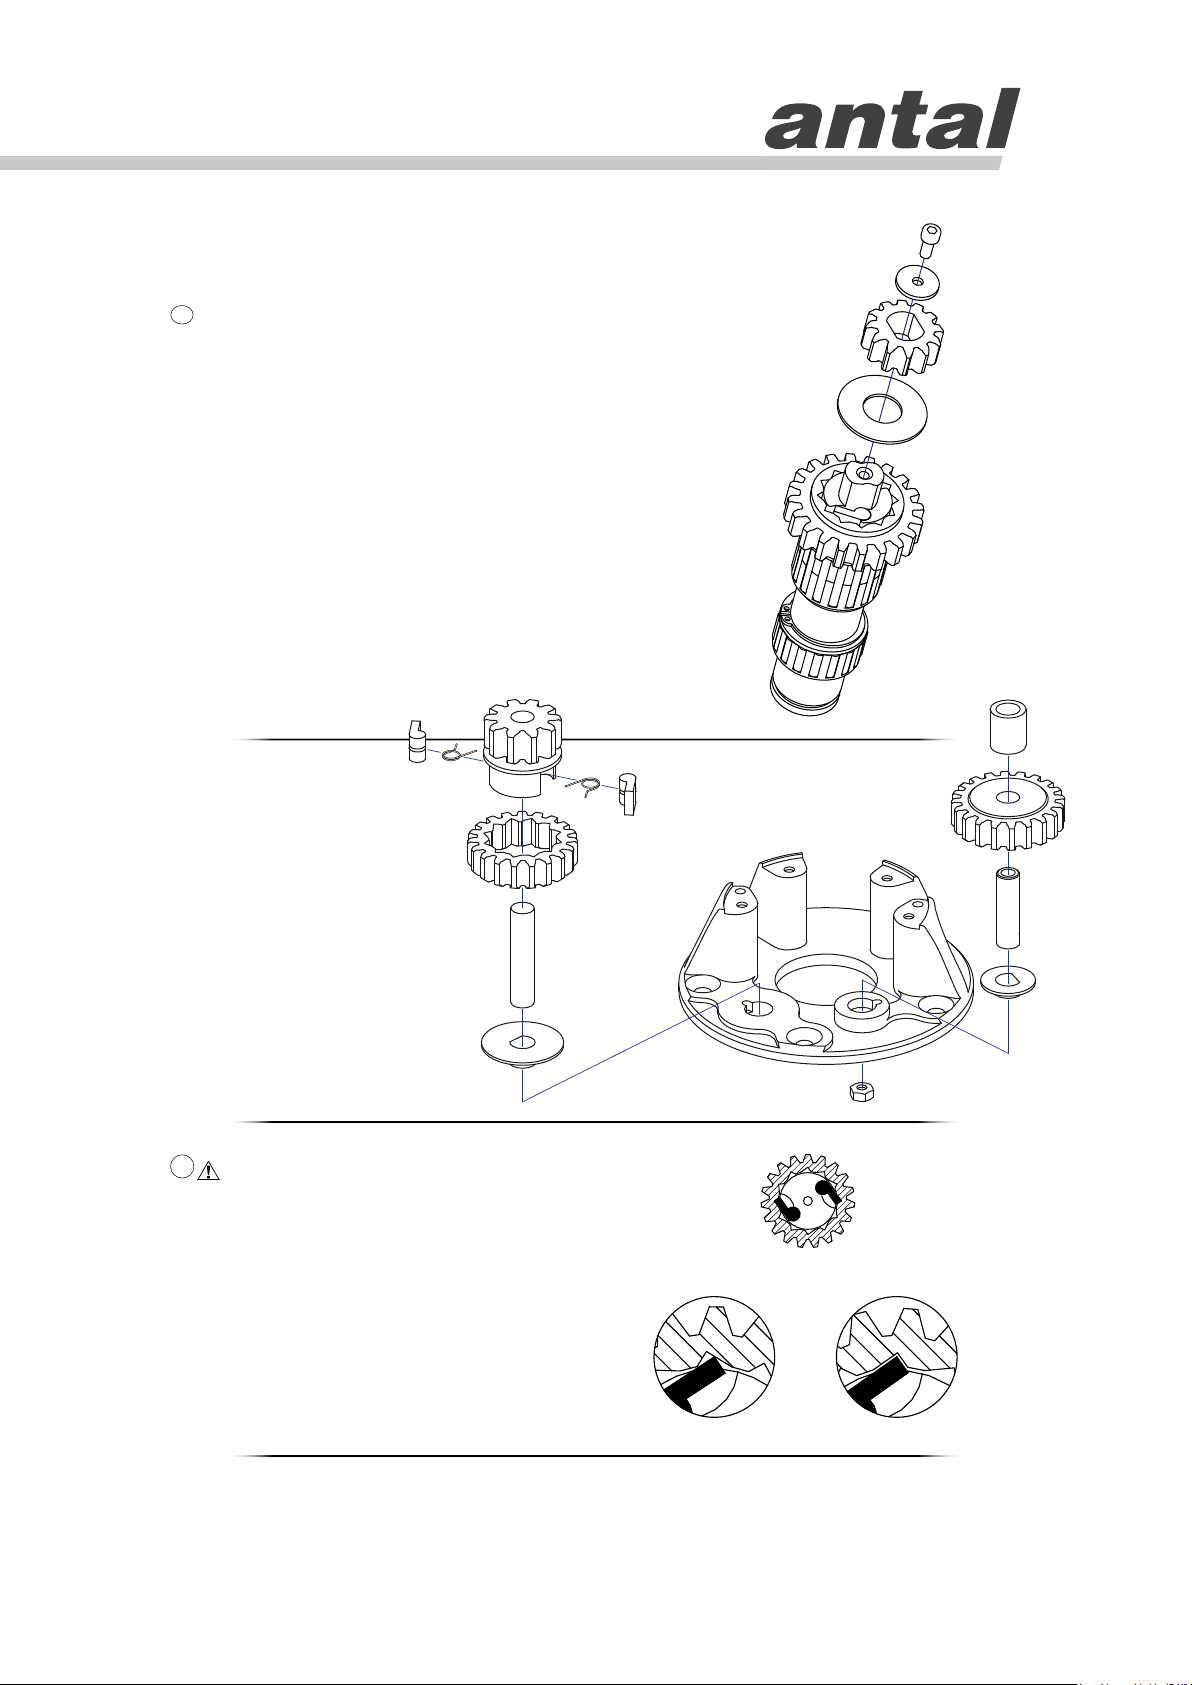
5
Complete inspection.
For the dismantling of the gear
section at the bottom of the
center rod of XT16, proceed
by removing parts 36-39 of the
exploded view drawing.
Furthermore, open the gear
section. The steel axels are
isolated from the aluminum
parts of the winch thanks to
resin insulating gaskets shaped
like a hat.
See section 7.
6
The pawls.
The bronze gears, the pawls
and the springs compose a
system that transmit motion in a
specific way.
While re-mounting the gear
section, pay attention to the
correct positioning of the outer
gear according to the pawls
direction.
NO YES
11
Page 12
Installation and Maintenance
XT40
Spare Parts
Inspect with seasonal frequency the wear status of the internal parts
of the winch. In case of damaged parts, order the spare parts from
Antal. To identify them, refer to the exploded view drawings at the end
of this guide.
Mounting
Reassemble the winch following the steps of the maintenance
sequence, in reverse order! In this manual you can also find the
exploded view drawings of each model. In case of doubt, contact Antal
at [email protected].
5. Video
Much more information on the
Series of Antal XT winches is
available in this video.
6. Warranty
Antal guarantees its equipment to be free of defects in material and
workmanship for 3 years from the date of purchase. During this period
defective parts will be repaired or replaced by Antal. Warranty does
not cover: products incorrectly installed; products used in applications
for which they are not intended; products used under loads exceeding
the product’s stated loads; products not properly maintained. Also,
warranty does not cover defects due to corrosion, U-V degradation,
and normal wear and tear.
Products subject to warranty claim will be returned to Antal for
examination and possible repairing or replacement. Antal is not
responsible for installation or shipping costs.
12
 Loading...