

Page 1
ENGLISH
Antal - XT Winches USER GUIDE
INTRODUCTION
The present User Guide contains important information for the
correct use of the XT winch and you are therefore advised to read
it carefully before using the product.
All XT winches are available in: Aluminium (AL), with a black
anodized aluminium drum, Chrome (CH), with chrome-plated
drum and Race (R), designed for high performance and maximum
lightweight.
XT 40 and larger models can all be powered. The electric motor of
the winches can be both horizontal and vertical, or hydraulic. XTs
can also be powered in a second moment.
INSTALLATION
Installation
is the responsibility of professional personnel. The
installer must ensure the good state of the deck where the winch
is to be installed. Antal assumes no responsibility for an incorrect
installation of the winch.
What you need
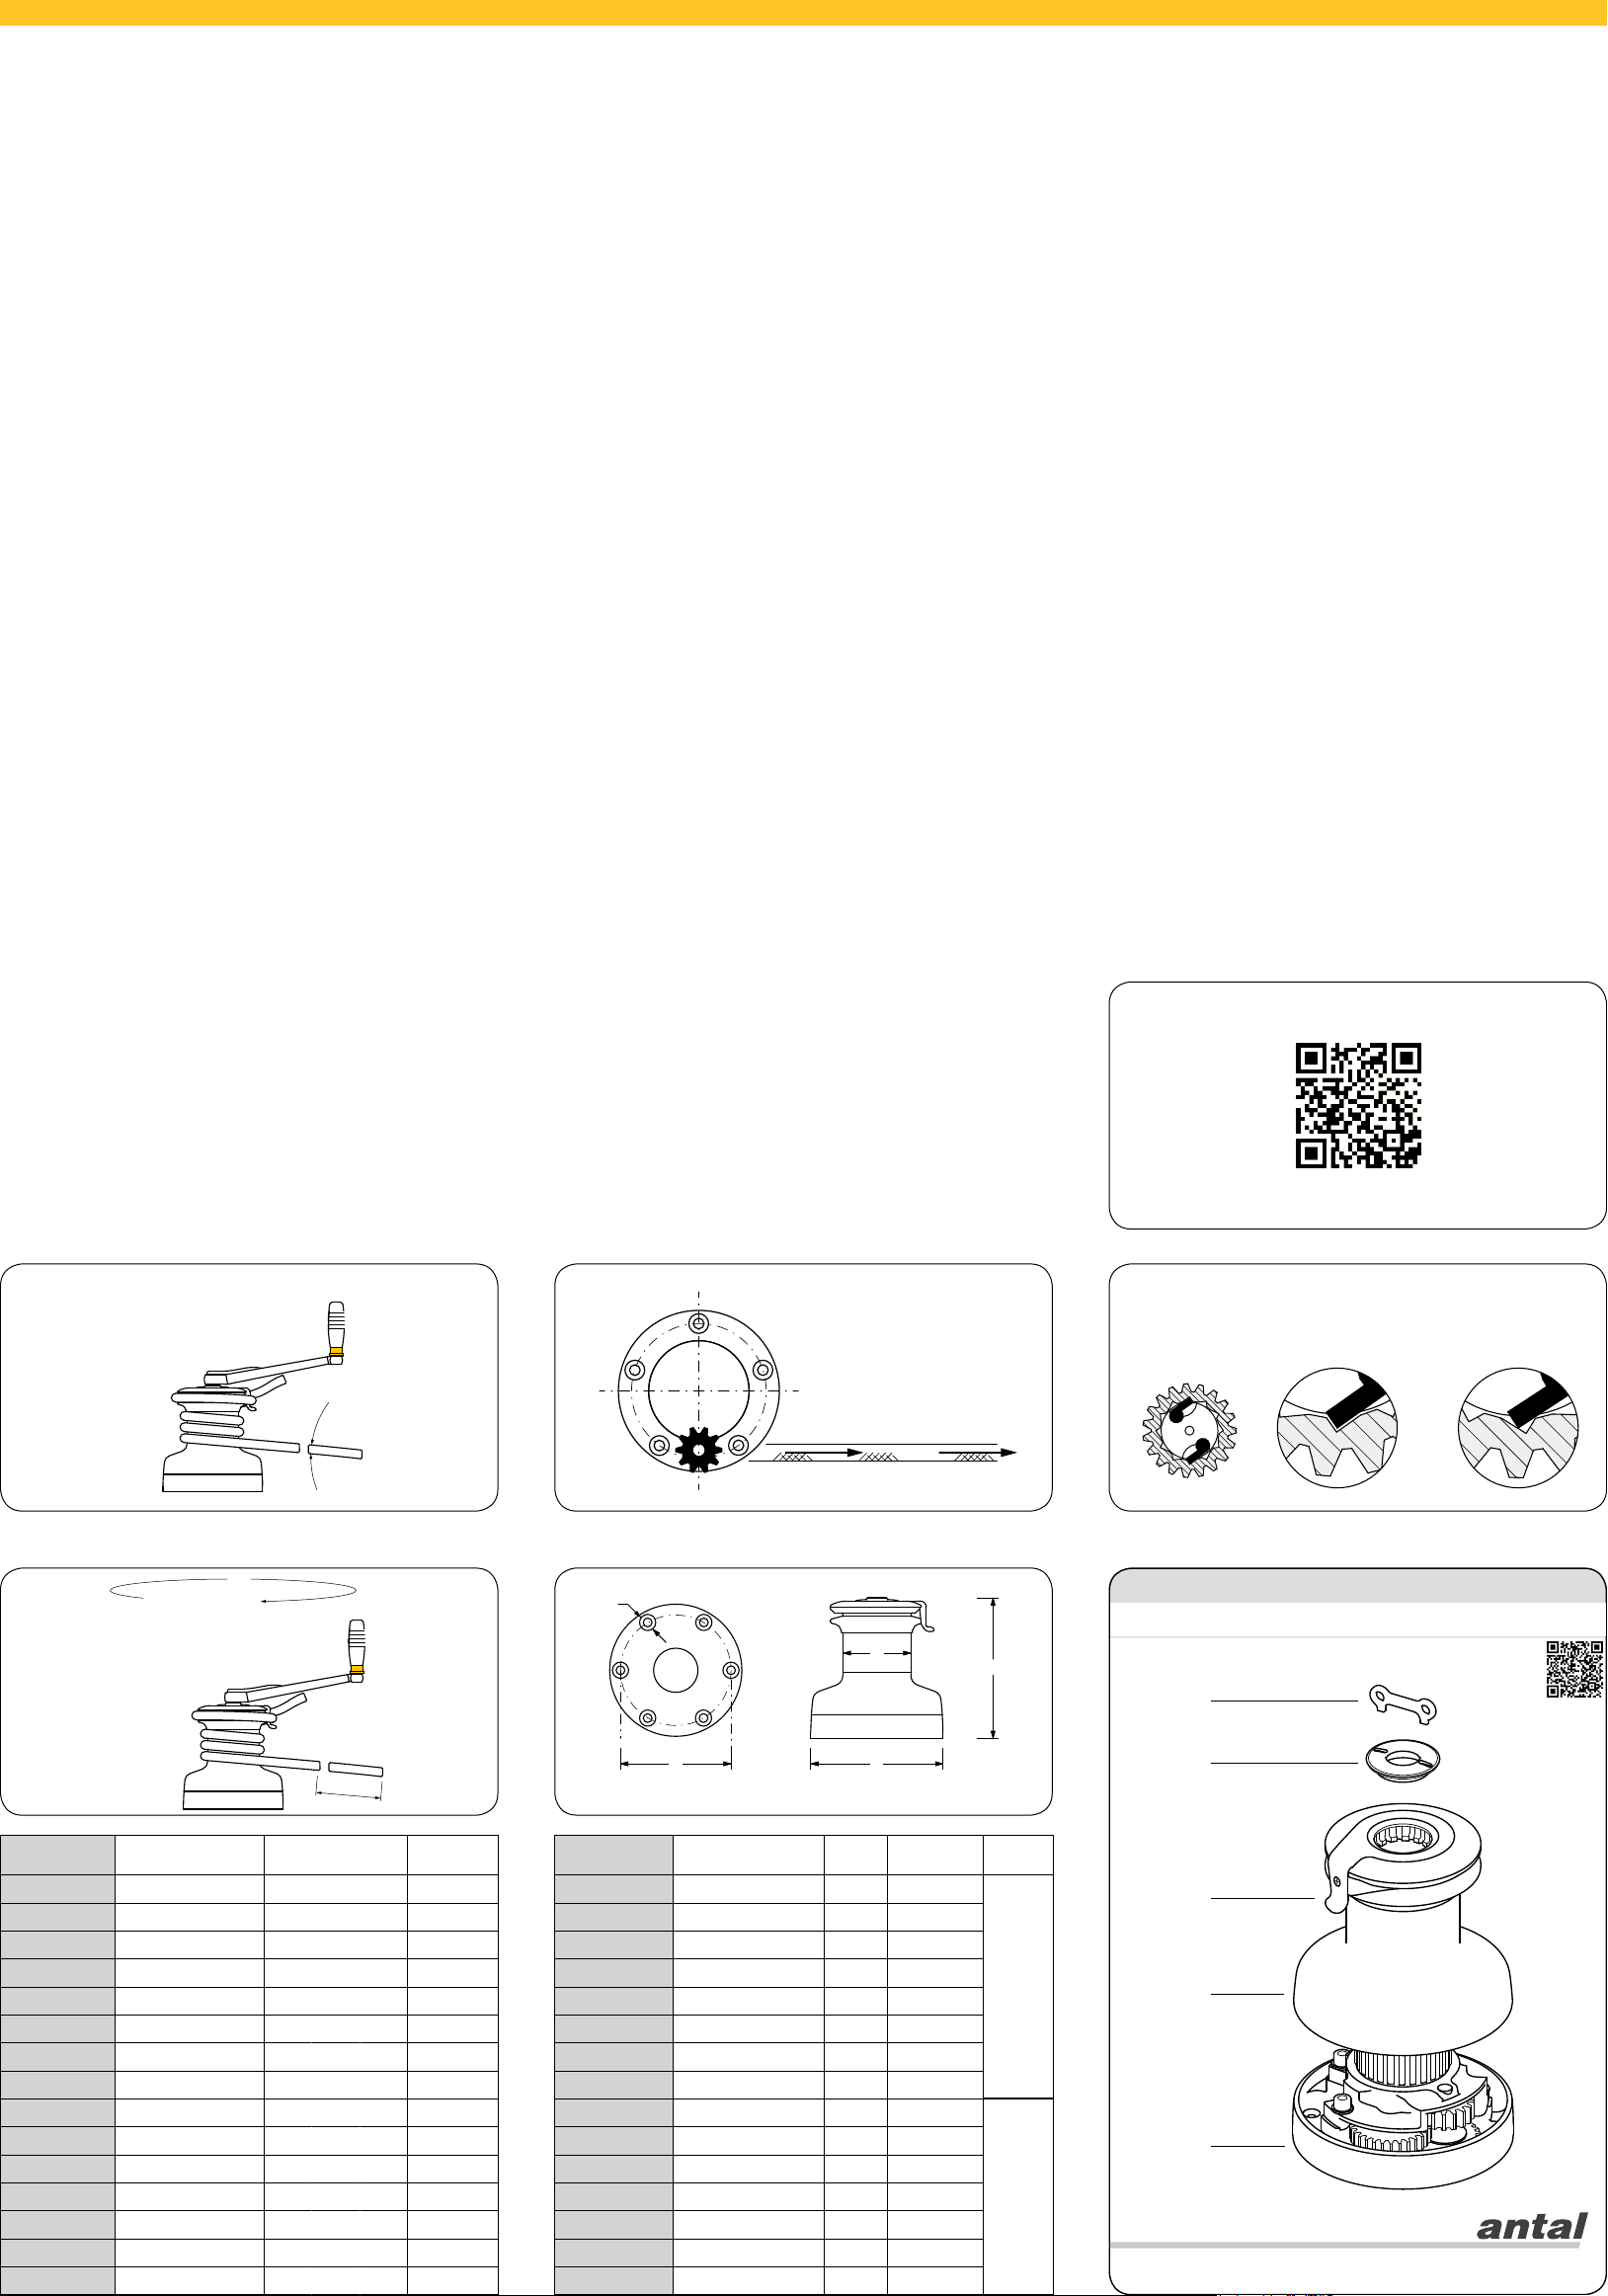
: (fig.1) Supplied Key (K) for the opening of the
upper ring (R), drill, sealant, screws, bolts and washers.
Screws
. Antal does not supply the anchoring screws needed
to install the winch. The length of the screws depends on the
thickness of the deck. See table 1. Use screws, washers and
bolts in stainless steel AISI 316. The required type of screws is
hexagonal socket countersunk head UNI5933 for sizes up to 52
and cap head DIN912 for sizes 62-80.
Opening
. (Fig. 1) The installation of the XT winch requires that
you lift the drum. First of all, unscrew the upper ring (R) with the
provided key (K). Thus lift the drum (D) to access the anchoring
holes on the skirt (S) of the winch.
Three speed Winch
. In the case of a three-speed winch, it is also
necessary to remove the Knob from the skirt of the winch before
installation. The Knob must be re-installed at last, i.e., at the end of
the winch installation. Refer to the Winch Knob Installation Guide
for the correct procedure .
Position of the winch on the deck
. (fig.2) Before installing the
winch you must choose a location on the deck that allows the
maneuver which you intend to use, to reach the winch at an angle
between 2 and 10 degrees.
Placement of the skirt. (fig.3) Position the winch so that the
output gear is in the area shown in the figure, i.e., on the side of
the pull direction of the maneuver.
Drilling of the deck. Once you have determined the location
of the skirt on the deck, you can drill the anchoring holes. To
determine the position of the holes, mark the deck using the
winch’s skirt’s holes directly. Alternatively, you can download the
drilling templates from the internet, at www.antal.it.
Fixing the skirt. Then drill the deck. In order to prevent water
seepage, put sealant around the anchoring holes. Be careful not
to obstruct with the sealant the drainage channels at the bottom of
the winch. Thus, tighten the bolts.
Mounting the winch and orientation of the ST arm. Once you
have fixed the winch skirt in the correct position, re-insert the
drum. The XT winches accept a number of possible positions of
the drum. Choose the desired rotation of the drum based on the
orientation of the ST arm. The orientation of the ST arm depends
on where you want to gather the maneuver. Once the drum is
positioned, tighten the upper ring (fig.1).
USE
Power. (fig.4) Winches are distinguished by power values. The
ratio between the force exerted on the handle and the power
dispensed by the winch, is said power. For example: if a winch has
power 52, it means that when I exert a force 1 on a 250 mm long
handle, I get a power of recovery of 52 on the drum (theoretical
value that disregards friction).
Recovery speed. (fig.4) To a high power P of the winch, there
corresponds a reduced recovery speed S. On the contrary, to a
reduced power, there corresponds a high recovery speed.
Multi-speed. The use of a winch for the recovery of maneuvers
requires both speed (in the initial moment) and power (in the final
moment). Thus, to maximize the effectiveness of the winch, there
are multi-speed winches.
Reduced speed
. Recovery speed ratio can be direct or reduced.
It is direct when one turn of the handle corresponds to a complete
revolution of the drum. On the contrary, the speed is reduced when
you need more turns of the handle to complete one revolution of
the drum. Thanks to a reduced speed, it does not ‘fatigue’ and
recovery is ‘slower’.
Speed of all XT models
. The series of XT winches has the
following speed ratio: One reduced speed winches: XT16, XT30.
Two speed winches, direct and reduced: XT16.2, XT30.2. Two
reduced speed winches: XT40, XT44, XT48, XT52, XT62, XT66,
XT70. Three reduced speed winches XT62.3, XT66.3, XT70.3,
XT80.3. To learn power and recovery speed values of XT winches,
refer to the table (tab.2).
The maneuver
. The XT winch is designed for the recovery of a
maneuver (halyard, sheet or other line). To use the winch, wind the
maneuver with at least four turns around the drum. After winding to
the drum, the maneuver must enter through the ST arm between
the two self-regulating disks. In case of slippage of the maneuver,
increase the number of turns on the drum.
Diameter of the maneuver in the self-tailing disks
. The lower
disk of the self-tailing automatically adapts to the diameter of the
maneuver. The movement of the disk is limited to a certain range
of diameters for each winch. Lower diameters than those allowed
can cause slippage of the maneuver. Conversely, larger diameters
may damage the self-tailing. Refer to the table of models (tab.2)
to know the minimum and maximum diameters of maneuvers for
each winch.
Use of the XT winch
. All XTs are self-tailing winches and
therefore require the sole action of the handle for the recovery of
the maneuver. To operate the first power (high speed) insert the
handle at the top of the winch, then turn it. To operate the second
speed (high power), invert the rotation of the handle.
Three speed winches
. To operate the first power (high speed)
push the button on the skirt of the winch and turn the handle
counterclock wise. Invert the direction of rotation to operate the
second and third speeds. The button is automatically disabled
during the operation of inversion of the turn.
MAINTENANCE AND SPARE PARTS
Frequent maintenance
. All XT winches should be washed
frequently, to avoid the accumulation of salt. Use plenty of fresh
water and clean it on all visible surfaces. Ensure the cleaning of
the drainage channels placed at the bottom of the winch, to avoid
water stagnation.
Complete maintenance
. With seasonal frequency XT winches
should be inspected visually inside. The complete maintenance
includes the opening of the winch, the cleaning of the parts from
old lubricants and the new lubrication of all moving parts.
Parts in need of maintenance
. The most relevant parts are those
subject to movement and rubbing. These are the roller bearings,
the gears and pawls, the stem and the inside of the drum. For
the complete maintenance of the winch, disassemble the winch in
order to access the relevant parts. It’s possible to request exploded
views to [email protected].
Removing old lubricants
. In order to remove old lubricants use a
soft bristle brush and solvent (use diesel in case you do not have
other solvents).
Lubrication
. Once you have removed the old lubricants, put a thin
layer of Hidrolub Antal Grease; not only to lubricate all moving
parts, but also to protect the aluminium surfaces in contact with
s.steel parts, e.g. screws.
Fig.2
Hidrolub Antal Grease. We recommend the use of Antal Grease
(Mod. Hidrolub), a grease especially made for lubrication of winches
and protection of aluminium parts in the marine environment.
! Attention: the pawls. (fig.5) While re-mounting the gear section,
pay attention to the correct positioning of the outer gear according
to the pawls direction. For the correct positioning of the pawls,
refer to fig.5 in this manual.
Spare parts. Inspect with seasonal frequency the wear status of
the internal parts of the winch. In case of damaged parts, order the
spare parts from Antal. To identify them, refer to the Installation
and Maintenance Manuals on www.antal.it. In case of doubt,
contact Antal at [email protected].
Kit Winch. Antal provides a repair kit winch containing 4 pawls
and springs (Mod. KIT WINCH XT). To order the kit, contact Antal.
WARRANTY
Antal guarantees its equipment to be free of defects in material
and workmanship for 3 years from the date of purchase. During
this period defective parts will be repaired or replaced by Antal.
Warranty does not cover: products incorrectly installed; products
used in applications for which they are not intended; products used
under loads exceeding the product’s stated loads; products not
properly maintained. Also, warranty does not cover defects due to
corrosion, U-V degradation, and normal wear and tear.
Products subject to warranty claim will be returned to Antal for
examination and possible repairing or replacement. Antal is not
responsible for installation or shipping costs.
VIDEO More information on the Series of Antal XT winches.
Fig.6
Fig.5Fig.3
OK NO
2° - 10°
P
Fig.4
Tab.2
MODEL POWER
XT16 14 115 6 → 10
XT30 28 58 6 → 10
XT16.2 7 14 229 115 6 → 10
XT30.2 7 28 229 58 6 → 10
XT40 12.8 40 125 40 6 → 12
XT44 20 43 80 38 8 → 14
XT48 19 47.4 84 34 8 → 14
XT52 15.9 52.8 100 30 8 → 14
XT62 17,8 62.1 89 26 8 → 16
XT66 18 65.6 89 24 10→ 18
XT70 27.1 69.8 59 23 10→ 18
XT62.3 6,6 17.8 62.1 241 89 26 8 → 16
XT66.3 10.7 20.8 65.3 151 77 24 10 → 18
XT70.3 10.7 27.1 69.8 151 59 23 10 → 18
XT80.3 11 30.0 81.4 147 53 20 12 → 20
1 turn / 1 giro
1 tour
1 2 3
S
S - Recovery Speed LINE
1 2 3
(mm)
Ø
d
C
D
Tab.1
MODEL D d H
XT16 112 71 119 82 5 x 6
XT30 128 73 135 92 5 x 6
XT16.2 112 71 119 82 5 x 6
XT30.2 128 73 135 92 5 x 6
XT40 153 80 157 118 5 x 8
XT44 173 93 185 147 6 x 8
XT48 182 93 197 156 6 x 8
XT52 204 105 217 174 6 x 8
XT62 224 120 219 194 6 x 8
XT66 248 144 256 208 6 x 10
XT70 290 144 285 229 6 x 10
XT62.3 224 120 245 194 6 x 8
XT66.3 248 144 293 208 6 x 10
XT70.3 290 144 312 229 6 x 10
XT80.3 339 210 326 276 8x 10
(mm)
C
(mm)
SCREWS
N°x Ø (mm)
H
SCREW
type
UNI5933
Hexagonal
socket
countersunk head
screws
DIN912
Hexagonal
socket
cap head
screws
Antal - XT Winches
Self Tailing Winches - User’s Guide
Date 05/2018 Rev. 1
K
R
ST
D
S
Fig.1
Antal srl - Via del Progr esso, 10 - 35127 Padova - Ital y
Tel. +39 049 8701265 / 8702655 - Fax: +39 049 760906 - [email protected]
- www.antal.it
Page 2

Antal - Winchs XT GUIDE DE L’UTILISATEUR
ITALIANO
Antal - Winch XT MANUALE D’USO
INTRODUZIONE
Il presente manuale d’uso contiene informazioni importanti per il
corretto uso del winch XT e pertanto si raccomanda di leggerlo
attentamente prima di utilizzare il prodotto.
Tutti i winch XT sono disponibili nelle versioni: Alluminio (AL) con
campana in alluminio ossidato nero, Cromo (CH) con campana
cromata e Race (R) studiato per dare prestazioni da competizione
e per la massima leggerezza.
A partire dal winch XT 40, tutti i winch sono motorizzabili. Il motore
del winch può essere elettrico orizzontale ed elettrico verticale,
oppure idraulico. I winch XT sono motorizzabili anche in un
secondo momento.
INSTALLAZIONE
L’installazione
L’installatore deve assicurarsi dello stato di integrità strutturale
della coperta dove il winch verrà installato. Antal non è responsabile
di una installazione scorretta del winch.
Cosa serve: (fig.1) chiave in dotazione (K) per l’apertura dell’anello
superiore (R), trapano, sigillante, viti, bulloni e rondelle.
Viti. Antal non fornisce le viti di fissaggio per l’installazione del
winch. La lunghezza delle viti dipende dallo spessore della
coperta. Vedi tab.1. Utilizzare viti, rondelle e bulloni in acciaio inox
AISI 316. Il tipo di viti richieste è a cava esagonale e testa svasata
UNI5933 fino alla taglia 52, a testa cilindrica DIN912 per le taglie
62-80.
Apertura
sollevi la campana. Svitare l’anello superiore (R) con la chiave in
dotazione (K). Quindi, sfilare la campana (D) per avere accesso ai
fori di fissaggio alla base (S) del winch.
Winch a tre velocità.
necessario anche sfilare il bottone alla base del winch prima delle
operazioni di installazione. Il bottone va re-installato da ultimo;
ovvero dopo aver rimontato il winch. Riferirsi alla guida Winch
Knob Installation Guide per la corretta procedura.
Posizione del winch sulla coperta.
all’installazione del winch, si deve scegliere una posizione del
winch sulla coperta che permetta alla manovra che si intende
utilizzare di raggiungere il winch con un angolo tra i 2 e i 10 gradi.
Posizionamento della base.
che l’ingranaggio che trasmette il moto alla campana si trovi
nell’area indicata in figura, ovvero dalla parte della direzione di tiro
della manovra.
Foratura della coperta.
base sulla coperta, si può procedere alla foratura. Per determinare
la posizione dei fori segnare la coperta utilizzando direttamente
i fori di fissaggio alla base del winch. In alternativa si possono
scaricare le maschere di foratura alla sezione download di www.
antal.it.
Fissaggio della base.
fissaggio è consigliato porre del sigillante per prevenire infiltrazioni
d’acqua. Fare attenzione a non ostruire con il sigillante i canali di
drenaggio ricavati nella parte inferiore della base. Infine bloccare
i bulloni.
Montaggio del winch e orientamento del braccio ST.
fissata la base del winch nella posizione corretta, re-inserire la
campana. I winch XT accettano un numero di posizioni possibili
della campana. Scegliere la rotazione della campana desiderata in
base all’orientamento del braccio ST. L’orientamento del braccio
INTRODUCTION
Ce guide de l’utilisateur contient des informations importantes pour
une utilisation correcte des winchs XT et il est de ce fait important
de le lire attentivement avant d’utiliser les produits.
Tous les winchs XT sont disponibles en versions : Aluminium (AL)
avec la poupée en aluminium anodisé noir, Chromé (CH) avec
la poupée chromée et Race (R) conçu pour des performances
élevées associé à un important gain de poids.
A partir du winch XT 40, tous les winchs peuvent être motorisés. Le
moteur du winch peut être électrique en horizontal ou en vertical
ou encore hydraulique. Les winchs XT peuvent être motorisés
dans un deuxième temps.
INSTALLATION
L’installation
L’installateur devra s’assurer du bon état du pont où le winch
sera monté. Antal ne peut être tenu responsable d’une mauvaise
installation du winch.
Le nécessaire:
coupelle supérieure (R), perceuse, joint, vis, écrous et rondelles.
Vis.
Antal ne fourni pas les vis de fixation nécessaires au montage
du winch. La longueur des vis dépend de l’épaisseur du pont. Voir
tab.1. Utiliser des vis, des rondelles et des écrous en acier inox
AISI 316. Les vis sont du type hexagonale creuse à tête fraisée
UNI5933 pour tailles jusqu’à 52 et tête cylindrique DIN912 pour
tailles 62-80.
Ouverture
la poupée. Dévisser tout d’abord la coupelle supérieure (R) avec la
clé fournie (K). Ensuite retirer la poupée (D) pour avoir accès aux
trous de fixation de l’embase (S) du winch.
Winch à trois vitesses.
il est nécessaire de retirer également le bouton de l’embase du
winch avant les opérations de montage. Ce bouton sera ré installé
en dernier ; p.e. à la fin du montage du winch. Se référer au guide
d’installation du bouton pour une procédure correcte de montage.
Position du winch sur le pont.
il faut définir la position du winch sur le pont afin de permettre à
toutes les manœuvres prévues d’être utilisées sur ce winch avec
un angle compris entre 2 et 10 degrés.
Position de l’embase.
sorte que le pignon de transmission de la poupée se trouve dans
la position indiquée sur le schéma, soit tangent à la direction de la
manœuvre principale (celle ayant le plus d’effort).
Perçage du pont.
le pont, les trous de fixation peuvent être percés. Il est préférable
de marquer tous les trous de perçage à l’aide de la pointe du forêt,
et de percer le pont sans l’embase. Il est également possible de
télécharger un gabarit de perçage sur le site www.antal.it.
Fixation de l’embase.
fraiser très légèrement les trous et de placer un anneau de joint
d’étanchéité autour de chacun des trous pour prévenir les fuites
d’eau. Attention à ne pas obturer les petits canaux d’évacuation
d’eau en appliquant trop de joint. Serrer les écrous.
Montage du winch et orientation du doigt de ST.
l’embase du winch montée à sa position, replacer la poupée. Les
winchs XT acceptent un certain nombre de position de la poupée.
Déterminer la rotation de la poupée par rapport à l’orientation du
doigt de ST. L’orientation du doigt de ST dépend de l’endroit ou
l’on souhaite l’accès à la manœuvre. Une fois la poupée en place,
è responsabilità di personale specializzato.
. (fig.1) L’installazione dei winch XT prevede che si
Nel caso di un winch a tre velocità è
(fig.2) Prima di procede
(fig.3) Posizionare il winch in modo
Una volta determinata la posizione della
Forare quindi la coperta. Attorno ai fori di
Una volta
FRANÇAIS
est de la responsabilité d’un monteur professionnel.
(fig.1) la clé fournie (K) pour le démontage de la
. (fig.1) L’installation des winchs XT demande de retirer
Dans le cas d’un winch à trois vitesses
(fig.2) Avant d’installer le winch,
(fig.3) Il faut placer l’embase du winch de
Une fois déterminée la position de l’embase sur
Le perçage terminé, il est recommander de
Une fois
ST dipende da dove si vuole raccogliere la manovra. Una volta
posizionata la campana, avvitare l’anello superiore con l’apposita
chiave in dotazione (fig.1).
USO
Potenza. (fig.4) I winch si distinguono per la potenza. Il rapporto tra
la forza esercitata sulla manovella e la potenza erogata dal winch,
si dice potenza. Ad esempio: quando un winch porta l’indicazione
di potenza 52, significa che esercitando una forza di 1 su una
manovella lunga 250 mm, ottengo una potenza di recupero di 52
sul winch (valore teorico che trascura gli attriti).
Velocità di recupero. (fig.4) Ad una potenza P del winch elevata
corrisponde una velocità di recupero S ridotta. Viceversa, ad una
potenza ridotta, corrisponde una velocità elevata.
Multi-velocità. L’utilizzo del winch per il recupero di una manovra
richiede sia la velocità (nel momento iniziale) che la potenza (nel
momento finale). Per ottimizzare l’efficacia del winch si danno
quindi winch multi-velocità.
Velocità ridotta. Il rapporto della velocità di recupero può essere
diretto o ridotto. La velocità è diretta quando ad un giro di manovella
corrisponde un giro completo della campana. Diversamente,
la velocità è ridotta quando servono più giri di manovella per
completare un giro della campana. Grazie ad una velocità ridotta,
si fa meno ‘fatica’ ed il recupero è più ‘lento’.
Velocità di tutti i modelli XT. La serie dei winch XT ha le seguenti
combinazioni di rapporti: Winch a una velocità ridotta: XT16, XT30.
Winch a due velocità, diretta e ridotta: XT16.2, XT30.2. Winch a
due velocità ridotte: XT40, XT44, XT48, XT52, XT62, XT66, XT70.
Winch a tre velocità ridotte: XT62.3, XT66.3, XT70.3, XT80.3. Per
conoscere i valori di Potenza e Velocità di recupero di ciascun
winch, consultare la tabella (tab.2).
La manovra. Il winch XT è progettato per il recupero di una
manovra (drizza, scotta o altra cima). Per l’uso del winch,
avvolgere la manovra con almeno quattro giri attorno al tamburo.
Dopo l’avvolgimento al tamburo, la manovra deve entrare grazie al
braccio ST tra i due dischi autoregolanti. Qualora si verificassero
scivolamenti della manovra, aumentare il numero di giri sul
tamburo.
Diametro della manovra nel self-tailing. Il disco inferiore del
self-tailing si adatta automaticamente al diametro della manovra.
Il movimento del disco è limitato ad un certo range di diametri
in ciascun winch. Diametri inferiori a quelli consentiti possono
causare lo scivolamento della manovra. Viceversa, diametri
superiori possono danneggiare il self-tailing. Consultare la tabella
dei modelli (tab.2) per conoscere i diametri minimo e massimo
delle manovre per ciascun winch.
Utilizzo del winch XT. Tutti i winch XT sono self-tailing e
necessitano quindi della sola azione della manovella per il
recupero della manovra. Per azionare il primo rapporto di potenza
(velocità elevata) inserire la manovella nell’apposita sede, quindi
agire girando la manovella. Per l’innesco del secondo rapporto
(potenza elevata) invertire il senso di rotazione della manovella.
Winch a tre velocità. Per azionare il primo rapporto (velocità
elevata) spingere il bottone presente alla base del winch e agire in
senso anti-orario con la manovella. Invertire il senso di rotazione
per azionare gli altri due rapporti, secondo e terzo. Il bottone viene
automaticamente disattivato durante l’operazione di inversione del
giro.
MANUTENZIONE E PARTI DI RICAMBIO
visser la coupelle avec la clé fournie (fig.1).
UTILISATION
Puissance. (fig.4) Les winchs se différencient par leur puissance.
Le rapport entre la force appliquée à la manivelle et la puissance
délivrée par le winch, s’appelle puissance. Par exemple: quand
un winch possède une valeur de 52, cela signifie que lorsque
l’on applique un effort de 1 sur une manivelle de 250 mm, on
obtient une puissance de 52 sur le winch (valeur théorique faisant
abstraction des pertes dues à la friction).
Vitesse de récupération. (fig.4) À une puissance P élevée
d’un winch correspond une vitesse de récupération S réduite. Et
inversement, à une puissance réduite, correspond une vitesse
élevée.
Vitesses multiples. L’utilisation d’un winch pour la récupération
de manœuvres requiert autant de la vitesse (au démarrage) que
de la puissance (à la fin). Pour optimiser l’efficacité du winch il
existe des winchs à vitesses multiples.
Vitesse réduite. Le rapport de vitesse de récupération peut être
direct ou réduit. La vitesse est dite «directe» lorsqu’avec un tour
de manivelle, la poupée tourne elle aussi d’un tour. À contrario, la
vitesse est dite «réduite» lorsqu’il faut plusieurs tours de manivelle
pour un tour de la poupée. Grâce à la vitesse réduite, il y a moins
«d’efforts» à fournir et de fait la récupération est plus «lente».
Vitesses de tous les winchs XT. La série de winchs XT offre les
rapports de vitesse suivants: Winchs à une vitesse réduite : XT16,
XT30. Winchs à deux vitesses, directe et réduite: XT16.2, XT30.2.
Winchs à deux vitesses réduites: XT40, XT44, XT48, XT52, XT62,
XT66, XT70. Winchs à trois vitesses réduites: XT62.3, XT66.3,
XT70.3, XT80.3. Pour connaître les valeurs de puissance et de
vitesse de chacun des winchs, consulter le tableau des modèles
(tab.2).
La manœuvre. Le winch XT est conçu pour la récupération de
manœuvres (drisses, écoutes et autres cordages). Pour l’usage
du winch, enrouler la manœuvre avec au moins 4 tours sur la
poupée. Après l’enroulement sur la poupée, la manœuvre s’insère
entre les deux disques supérieurs auto ajustables par le doigt de
ST. Au cas où il y aurait du ripage, faire un tour supplémentaire
sur la poupée.
Diamètre de la manœuvre dans le self-tailing. Le disque
inférieur s’adapte automatiquement au diamètre de la manœuvre.
Le débattement du disque est limité à une certaine plage de
diamètres pour chacun des winchs. Des diamètres inférieurs
à ceux prévus pour le winch peuvent provoquer du ripage. À
l’inverse, des diamètres supérieurs peuvent endommager le
ST. Consulter le tableau des modèles (tab.2) pour connaître les
diamètres minimum et maximum pour chaque winch.
Utilisation des winchs XT. Tous les winchs XT sont self-tailing
et nécessite de ce fait seulement l’action sur la manivelle pour
récupérer une manœuvre. Pour actionner le premier rapport de
puissance (vitesse rapide) insérer la manivelle dans la cavité en
étoile et tourner. Pour actionner le second rapport de puissance
élevée) inverser le sens de rotation de la manivelle.
Winch à trois vitesses. Pour actionner le premier rapport (vitesse
élevée) appuyer sur le bouton situé sur l’embase du winch et tourner
la manivelle dans le sens antihoraire. Inverser successivement les
sens de rotation pour obtenir, seconde et troisième. Le bouton se
désactive automatiquement à la première inversion de sens de
rotation de la manivelle.
Manutenzione frequente.
frequenza, onde evitare l’accumularsi di salsedine. Utilizzare
acqua dolce in abbondanza e pulire tutte le superfici visibili del
winch. Accertarsi della pulizia dei canali di drenaggio posti nella
base del winch, onde evitare la stagnazione dell’acqua.
Manutenzione completa.
vanno ispezionati visivamente al loro interno. La manutenzione
completa prevede l’apertura del winch, la rimozione dei vecchi
lubrificanti e la nuova lubrificazione di tutte le parti in movimento.
Parti interessate a manutenzione.
interessate sono quelle soggette al movimento ed allo sfregamento.
Queste sono i cuscinetti a rulli, gli ingranaggi, il collo e la parte
interna della campana. Per la manutenzione completa del winch,
smontare il winch fino ad accedere alle parti interessate.
Si possono richiedere gli esplosi ad [email protected].
Rimozione dei vecchi lubrificanti.
lubrificanti utilizzare un pennello a setole morbide e del solvente
(utilizzare gasolio in caso di mancanza di altri solventi).
Lubrificazione.
sottile strato di grasso Hidrolub Antal con un pennello. Questo è
utile non solo per lubrificare le parti in movimento, ma anche per
proteggere l’alluminio dal contatto con le parti in acciaio, ad es.
le viti.
Grasso Hidrolub Antal.
Antal (Mod. Hidrolub); un grasso studiato appositamente per la
lubrificazione dei winch e la protezione dell’alluminio in ambiente
marino.
! Attenzione: i cricchi.
winch, prestare attenzione al corretto posizionamento dei cricchi
all’interno degli ingranaggi, in particolare al senso di rotazione
degli ingranaggi. Per il corretto posizionamento dei cricchi riferirsi
alla fig.5 di questo manuale.
Parti di ricambio.
di usura delle parti interne del winch. In caso di parti danneggiate
e/o a rischio di danneggiamento, ordinare i ricambi presso Antal.
Per individuare le parti di ricambio, consultare gli Installation
and Maintenance Manuals disponibili in internet su www.antal.it.
In caso di dubbio contattare Antal a [email protected].
Kit Winch.
contenente 4 cricchi e molle (Mod. KIT WINCH XT). Per ordinare
il kit contattare Antal.
GARANZIA
Antal garantisce i propri prodotti privi di difetti dei materiali e di
lavorazione per 3 anni. Durante questo periodo le parti difettose
verranno riparate o sostituite da Antal. La garanzia non copre
prodotti che: siano installati non correttamente; siano stati utilizzati
in modo improprio; siano stati utilizzati con carichi oltre il limite
previsto; non siano stati sottoposti ad una corretta manutenzione.
La garanzia non copre: difetti dovuti alla corrosione, alla
degradazione UV, alla normale usura.
I prodotti per i quali è richiesto un intervento in garanzia devono
essere restituiti all’Antal per l’ispezione ed eventuale riparazione
o sostituzione. Le spese e le responsabilità del trasporto relativo a
richieste di garanzia non competono all’Antal.
VIDEO
Molte altre informazioni sulla serie di winch XT di Antal sono
disponibili al video dal codice QR (fig.6).
ENTRETIEN ET PIÈCES DE RECHANGE
Entretien fréquent.
fréquemment, pour éviter l’accumulation de dépôts salins. Utiliser
de l’eau claire en abondance et bien rincer les parties visibles.
Vérifier le nettoyage des canaux de drainage sous l’embase, afin
d’éviter la stagnation d’eau dans le winch.
Entretien complet.
doivent être inspectés visuellement à l’intérieur. La maintenance
complète requiert l’ouverture du winch, le nettoyage des graisses
anciennes et la lubrification de toutes les pièces en mouvement.
Pièces concernées par l’entretien.
sont celles sujettes aux mouvements et aux frottements. Ce sont
les cages de roulements, les pignons, l’axe central et l’intérieur
de la poupée. Pour l’entretien complet du winch, il faut démonter
le winch jusqu’à atteindre chacune des pièces. Vous pouvez
demander des vues éclatées à [email protected]
Nettoyage des anciennes graisses.
graisses, utiliser un pinceau avec du solvant (il est possible
d’utiliser du gazole à la place de solvants).
Lubrification.
à l’aide d’un pinceau une fine couche de Hidrolub Antal. Ceci
est utile non seulement pour les pièces en mouvement, mais
également pour protéger l’aluminium en contact avec les pièces
en inox, comme les vis par exemple.
Graisse Hidrolub Antal.
Antal (Mod. Hidrolub); un lubrifiant adapté spécialement au
graissage des winchs et à la protection des pièces aluminium dans
un environnement marin.
! Attention ! : les cliquets.
du winch, prendre garde à la position correcte des cliquets dans
les pignons, en particulier au sens de rotation des pignons. Pour
un montage correct des cliquets se référer à la fig.5 de ce manuel.
Pièces de rechange. Inspecter à une fréquence saisonnière
l’état d’usure des pièces internes du winch. En cas de pièces
endommagées et/ou avec le risque de l’être, commander les
pièces de rechange Antal. Pour identifier les pièces de rechange,
consulter le manuel d’Installation et de Maintenance disponible
sur le site www.antal.it. En cas de doute contacter Antal à:
[email protected].
Kit Winch.
cliquets et ressorts (Mod. KIT WINCH XT). Pour commander ce
kit contacter Antal ou un revendeur Antal.
GARANTIE
Antal garanti ses produits contre les défauts de matériaux et de
montage pendant 3 ans. Sur cette période les pièces endommagées
seront réparées ou remplacées par Antal. La garantie ne couvre
pas les produits: mal montés; utilisés de manière non appropriée;
utilisés au delà de la limite définie d’utilisation; mal entretenus. La
garantie ne couvre pas: les dégâts dû à la corrosion; la dégradation
dû aux UV; l’usure normale du matériel.
Les produits pour lesquels est demandé une prise sous garantie
devront être envoyés à Antal pour inspection et éventuelles
réparations ou substitutions. Les coûts et responsabilités du
montage/démontage et du transport ne sont pas à charge de Antal.
VIDÉO
Plus d’information encore sur les winchs XT Antal sont visibles en
vidéo avec le code QR ci-joint (fig.6).
Una volta rimossi i vecchi lubrificanti, stendere un
Ispezionare con frequenza stagionale lo stato
Antal fornisce un kit di riparazione per winch
Une fois les anciennes graisses retirées, appliquer
Antal propose un kit de réparation composé de 4
Tutti i winch XT vanno lavati con
Con frequenza stagionale i winch XT
Le parti maggiormente
Per rimuovere i vecchi
Consigliamo l’utilizzo del grasso
(fig.5) Nell’operazione di ri- montaggio del
Tous les winchs XT doivent être rincés
Sur une fréquence saisonnière, les winchs XT
Les pièces les plus concernées
Pour retirer les anciennes
Nous conseillons d’utiliser la graisse
(fig.5) lors de l’opération de remontage
 Loading...