


Description – Fidenza 3W LED Bricklight
p
® Installation Instructions
General Installation Instructions
These instructions should be read carefully prior to any installation and retained after completion for further
reference and maintenance. Please give these instructions to the building owner/occupier after installation.
Important Safety
1. Before installation, maintenance or lamp replacement, ensure that the mains supply to the luminaire is switched off and the circuit supply fuses
are removed or the circuit breaker is turned off.
2. It is recommended that only a qualified electrical contractor carries out the installation of this luminaire and that the luminaire is ins t alled in
compliance with the current edition of the IEE Wiring Regulations.
3. The person carrying out the installation is to check and verify that the total load on the circuit, including that of this luminaire does not exceed
the rating of the circuit cable, fuse or circuit breaker.
4. Where a luminaire incorporates discharge control gear (inductive load), the circuit capacity and ratings require careful sizing to avoid nuisance
tripping of the protective device used in the installation.
5. Where applicable, careful consideration should be taken during installation to ensure that all fixings and/or suspensions are of a suitable siz e
for the luminaire being installe d.
Ratings
1. All luminaires are manufactured & tested in compliance with the requirement contained within BS EN 60598 and are CE marked.
2. All luminaires that are of Class 1 construction and that are marked accordingly, MUST be earthed.
3. All luminaires are designed to operate at 230Volts AC -6%/+10% = 216Volts to 252Volts. Do not operate outside these voltages.
4. All luminaires are only suitable for applications within their rated Ingress Protection limits as stated.
Exclusions to Warranty
Please Note - The limited warranty shall be null and void in the following circumstances:-
Failure by the installer, end user or any third party to exercise caution to protect any covered product or part from outside damage, adverse temperature (normal operating ambient temperature 0 25°C), humidity conditions, fluctuations in the electrical system or physical abuse as well as failure related to workmanship in the installation of the products or parts.
---------------------------------------------------------------------------------------------------------------------------------------------------------------------------------------------------------------------------------
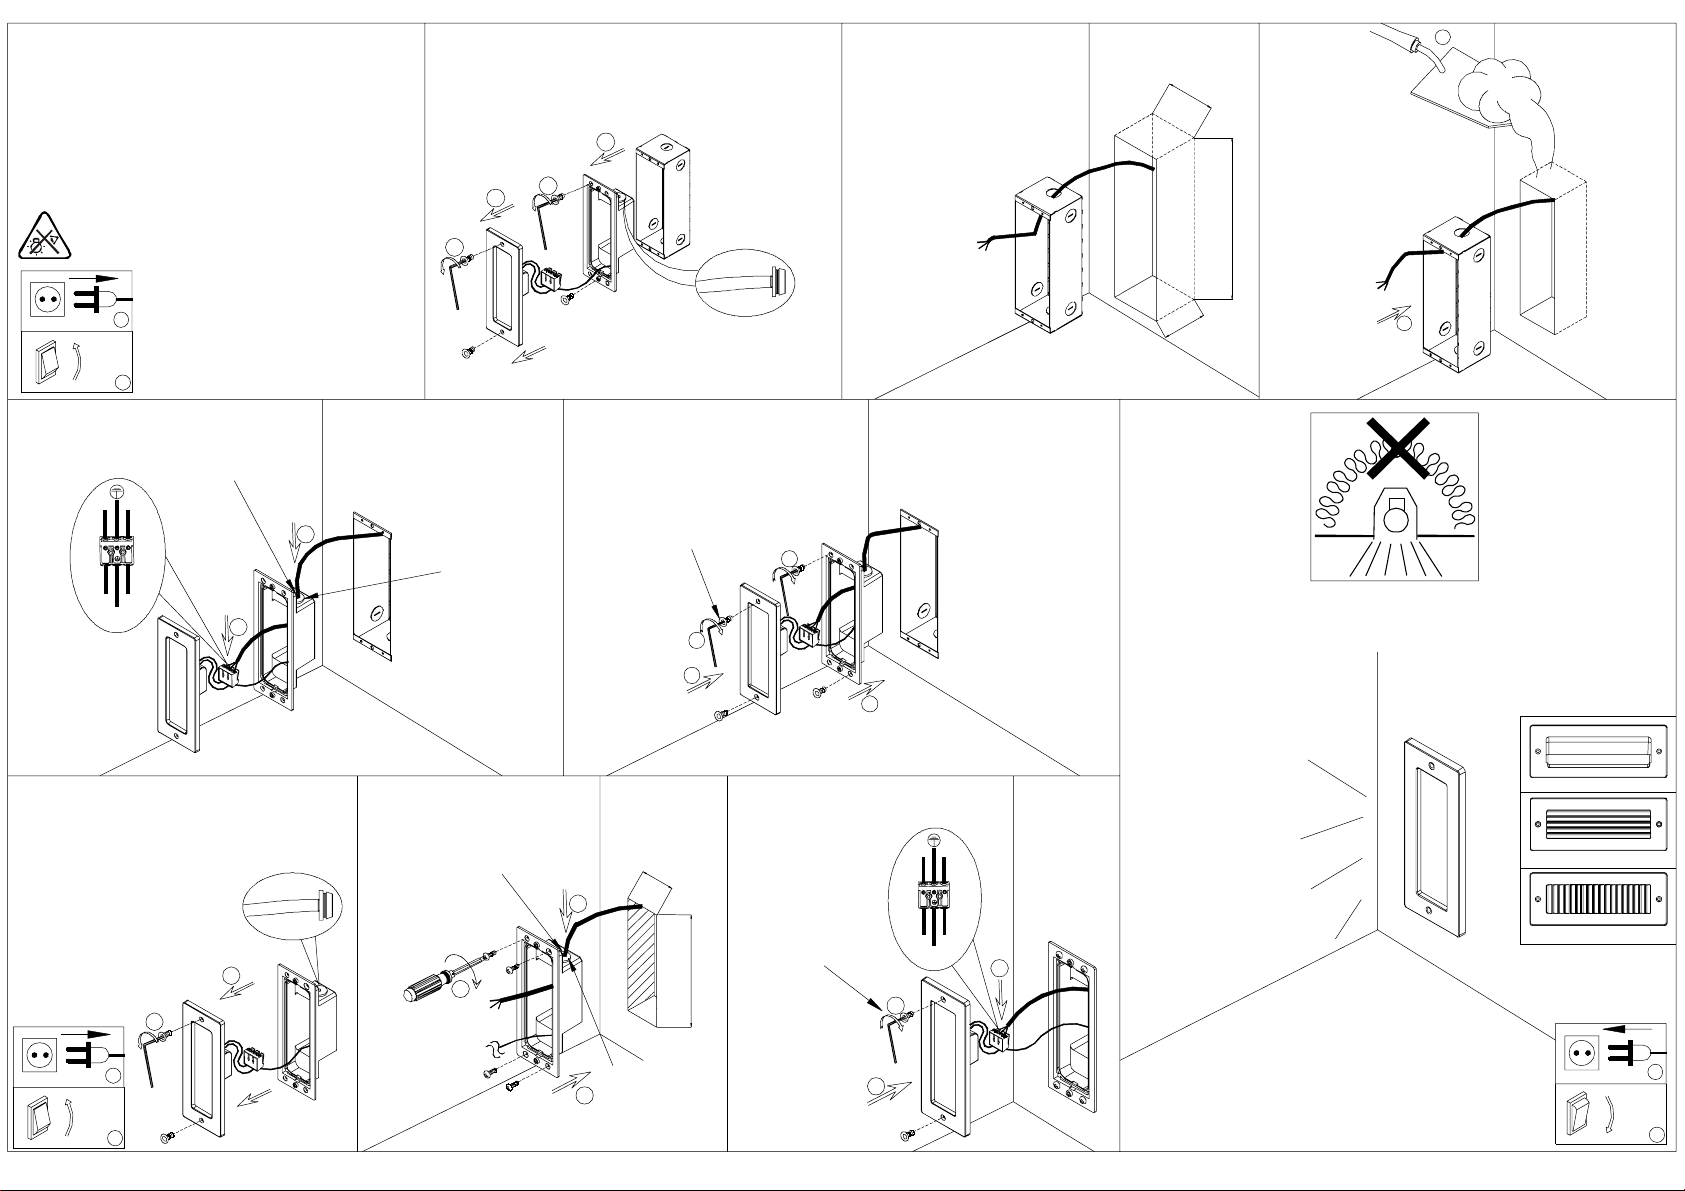
Installation
Select a suitable mounting location to install luminaire.
Bring a cable, suitable for application, from the mains to the position where the luminaire is to be installed. (H07RN-F for external
application).
Cut a 208mm x 71mm cavity hole for installation. Concrete metal back box into position ensuring sufficient H07RN-F rubber insulated
cable is exposed for termination inside luminaire. (A rubber grommet can be used at cable entry on back box to offer extra protection
to supply cable).
With a sharp blade, cut a cross in the IP66 rated rubber gland(s) sufficiently to allow insertion of mains cable.
The fitting has the capability to loop in-loop out with double push-fit terminal block and two IP66 glands. Insert cable(s) through the
rubber glands(s) and mount the housing into the installed back box; tighten allen bolts to secure.
Connect as follows: LIVE (L) BROWN OR RED
EARTH GREEN / YELLOW
The luminaire has an integral LED Driver therefore only a mains supply is required at the luminaire. Connect Live, Earth and Neutral
to the respective push-fit terminations.
Place and secure the front plate onto the installed housing using the two allen bolts.
Do not install the luminaire onto new plaster or wet paint.
Restore the power supply and test for correct operation.
NEUTRAL (N) BLUE OR BLACK
Luminaire Code(s) – AFBLLED
IP65
-------------------------------------------------------------------------------------------------------------------------------------------------------------------------------
Maintenance:
1. This luminaire contains no serviceable parts.
Black / Blue
Disposal of Electronic Equipment WEEE Directive 2002/96/EC
This product falls within the scope of the Waste Electrical & Electronic Equipment Directive
(WEEE), which means the product should not be disposed of as normal household waste.
Ensure that this luminaire and lamp is disposed of in accordance with the WEEE Directive.
Contact a local Council Waste Dept. Local Amenity Site, or the Environment Agency for
further information. RoHS - All components and materials used in this product are RoHS
2002/95/EC com
liant.
Brown / Red
-------------------------------------------------------------------------------------------------------------------------------------------------------------------------------
www.anselluk.com Issue Date: td 20141218
KR-104A/B/C/D
If the external flexible cable
or cord of this luminaire is
damaged, it shall be exclusively
replaced by the manufacturer or
his service agent or a similar
qualified person in order
to avoid a hazard.
FIG-1-A1
Concrete Installation
4
3
2
FIG-1-A2 FIG-1-A3
1
75MM
212MM
Do not stare at the light source
1
OFF
ON
2
FIG-1-A4
Note: In or der to reach the req uired IP,
the input cable for the lum inaries m ust
be H05RN -F 3G1.0mm², and thread ing
through be fore strip ping.
N
L
NL
brown
blue
green/yello w
2
FIG-1-B1
Wood board Installation
Please make sure the
thickness of the wood
board no less than 5mm
4
3
H05RN-F 3G1.0 mm²
1
H05RN-F 3G1.0 mm²
2
70MM
FIG-1-A5
FIG-2
Torque﹕
1
Note: Please k eep
the cable outlet in
the same vertical
direction with the
inlet to luminaries
FIG-1-B2
Note: In or der to reach the req uired IP,
the input cable for the lum inaries m ust
be H05RN -F 3G1.0mm², and thread ing
through be fore strip ping.
1
8-8.5kgf.cm
4
3
67MM
187MM
2
FIG-1-B3
Torque﹕
8-8.5kgf.cm
Luminaires not suitable for covering with
thermally insulating material.........
1
KD-104B
N
L
L
brown
green/ye llow
N
blue
KD-104C
KD-104D
1
3
3
OFF
ON
1
2
Note: Please k eep
the cable outlet in
2
the same vertical
direction with the
inlet to luminaries
2
OFF
ON
1
2
ver:1.3
 Loading...