

Page 1
Disposal of Electronic Equipment WEEE Directive 2002/96/EC
This product falls within the scope of the Waste Electrical & Electronic Equipment Directive
(WEEE), which means the product should not be disposed of as normal household waste.
Ensure that this luminaire and lamp is disposed of in accordance with the WEEE Directive.
Contact a local Council Waste Dept. Local Amenity Site, or the Environment Agency for
further information. RoHS - All components and materials used in this product are RoHS
Description – Brooklyn LED Bi-Directional Panel
® Installation Instructions
Luminaire Code(s) – ABROLED- 1-10V Dimmable
General Installation Instructions
These instructions should be read carefully prior to any installation and retained after completion for further
reference and maintenance. Please give these instructions to the building owner/occupier after installation.
Important Safety
1. Before installation, maintenance or lamp replacement, ensure that the mains supply to the luminaire is switched off and the circuit
supply fuses are removed or the circuit breaker is turned off.
2. It is recommended that only a qualified electrical contractor carries out the installation of this luminaire and that the luminaire is
installed in compliance with the current edition of the IEE Wiring Regulations.
3. The person carrying out the installation is to check and verify that the total load on the circuit, including that of this luminaire does
not exceed the rating of the circuit cable, fuse or circuit breaker.
4. Where a luminaire incorporates discharge control gear (inductive load), the circuit capacity and ratings require careful sizing to
avoid nuisance tripping of the protective device used in the installation.
5. Where applicable, careful consideration should be taken during installation to ensure that all fixings and/or suspensions are of a
Ratings
1. All luminaires are manufactured & tested in compliance with the requirement contained within BS EN 60598 and are CE marked.
2. All luminaires that are of Class 1 construction and that are marked accordingly, MUST be earthed.
3. All luminaires are designed to operate at 230Volts AC -6%/+10% = 216Volts to 252Volts. Do not operate outside these voltages.
4. All luminaires are only suitable for applications within their rated Ingress Protection limits as stated.
5. This luminaire is designed for internal use only.
Exclusions to Warranty
Please Note - The limited warranty shall be null and void in the following circumstances:-
Failure by the installer, end user or any third party to exercise caution to protect any covered product or part from outside damage, adverse
temperature (normal operating ambient temperature -10°C - 50°C), humidity conditions, fluctuations in the electrical system or physical abuse
as well as failure related to workmanship in the installation of the products or parts.
-------------------------------------------------------------------------------------------------------------------------------------------------------------------------------
Installation
Electrical Connections:-
Please note- Suitable for 1-10V dimming protocol ONLY.
suitable size for the luminaire being installed.
Select a suitable mounting location to install luminaire.
Luminaire should not be installed where the illuminated surface is within 0.5m from the front of the fitting.
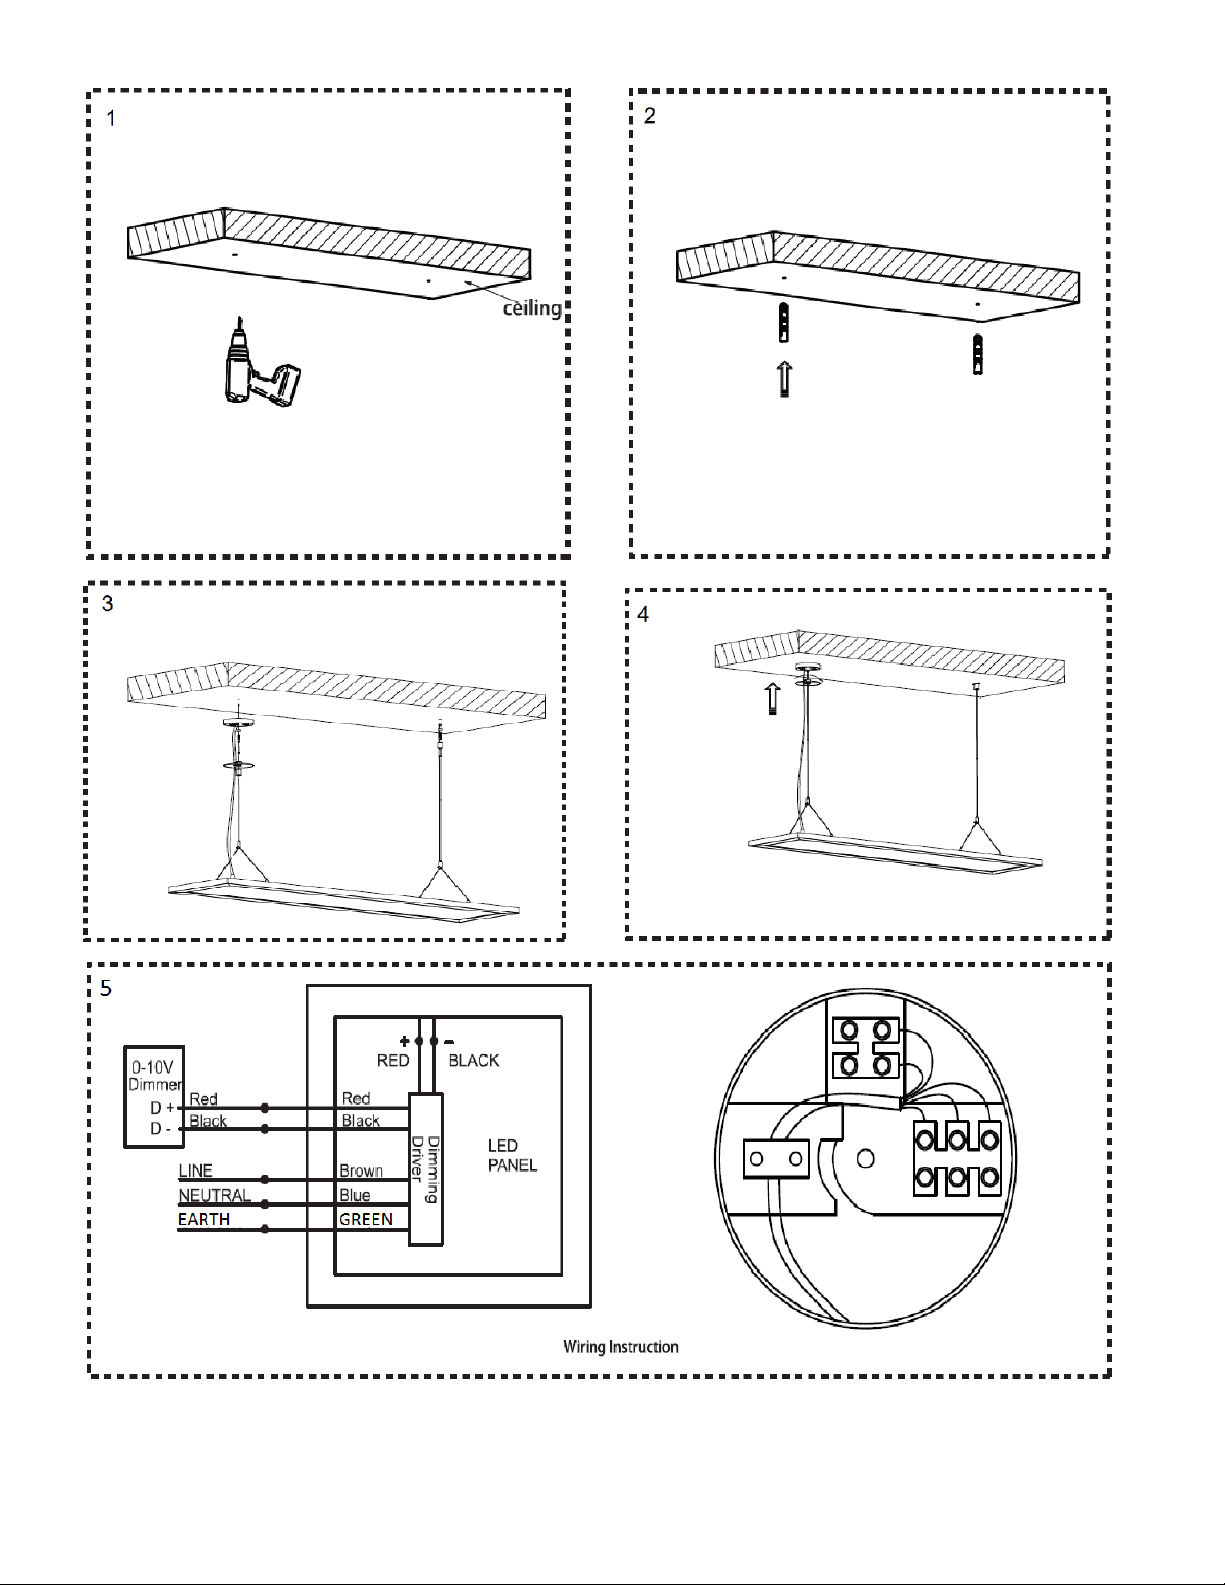
Position and fix the supplied suspension kit to a suitable solid surface, include the ceiling rose base on one side. See fig. 1 and 2
Connect the incoming power supply to the attached terminal in the ceiling rose observing correct polarity is observed. This luminaire is
CLASS I; THEREFORE, MUST BE EARTHED
LIVE (L) BROWN OR RED
NEUTRAL (N) BLUE OR BLACK
EARTH GREEN / YELLOW
Optional Connections for 1-10V Dimming:
1-10V NEGATIVE (-) 1-10V SIGNAL (Polarity Sensitive)
1-10V POSITIVE (+) 1-10V SIGNAL (Polarity Sensitive)
Do not connect 1-10V dimming pair if dimming is not required. Luminaire at full output if dimming pair are not connected.
Connect the clutch assembly to the top of the luminaire. See fig. 3 and 4
Adjust the luminaire to desired mounting height removing any excess suspension cable.
Ensure the luminaire hangs horizontal when suspended. Care should be taken to ensure that the fixing points are suitable to take the weight of
the luminaire.
IP20
-------------------------------------------------------------------------------------------------------------------------------------------------------------------------------
Maintenance:
1. This luminaire contains no serviceable parts.
-----------------------------------------------------------------------------------------------------------------------------------------------------------------------------Ansell Lighting Products, Unit 6B, Stonecross Ind. Park, Yew Tree Way, Warrington, WA3 3JD www.anselluk.com
Page 2
Ansell Lighting Products, Unit 6B, Stonecross Ind. Park, Yew Tree Way, Warrington, WA3 3JD www.anselluk.com
 Loading...