

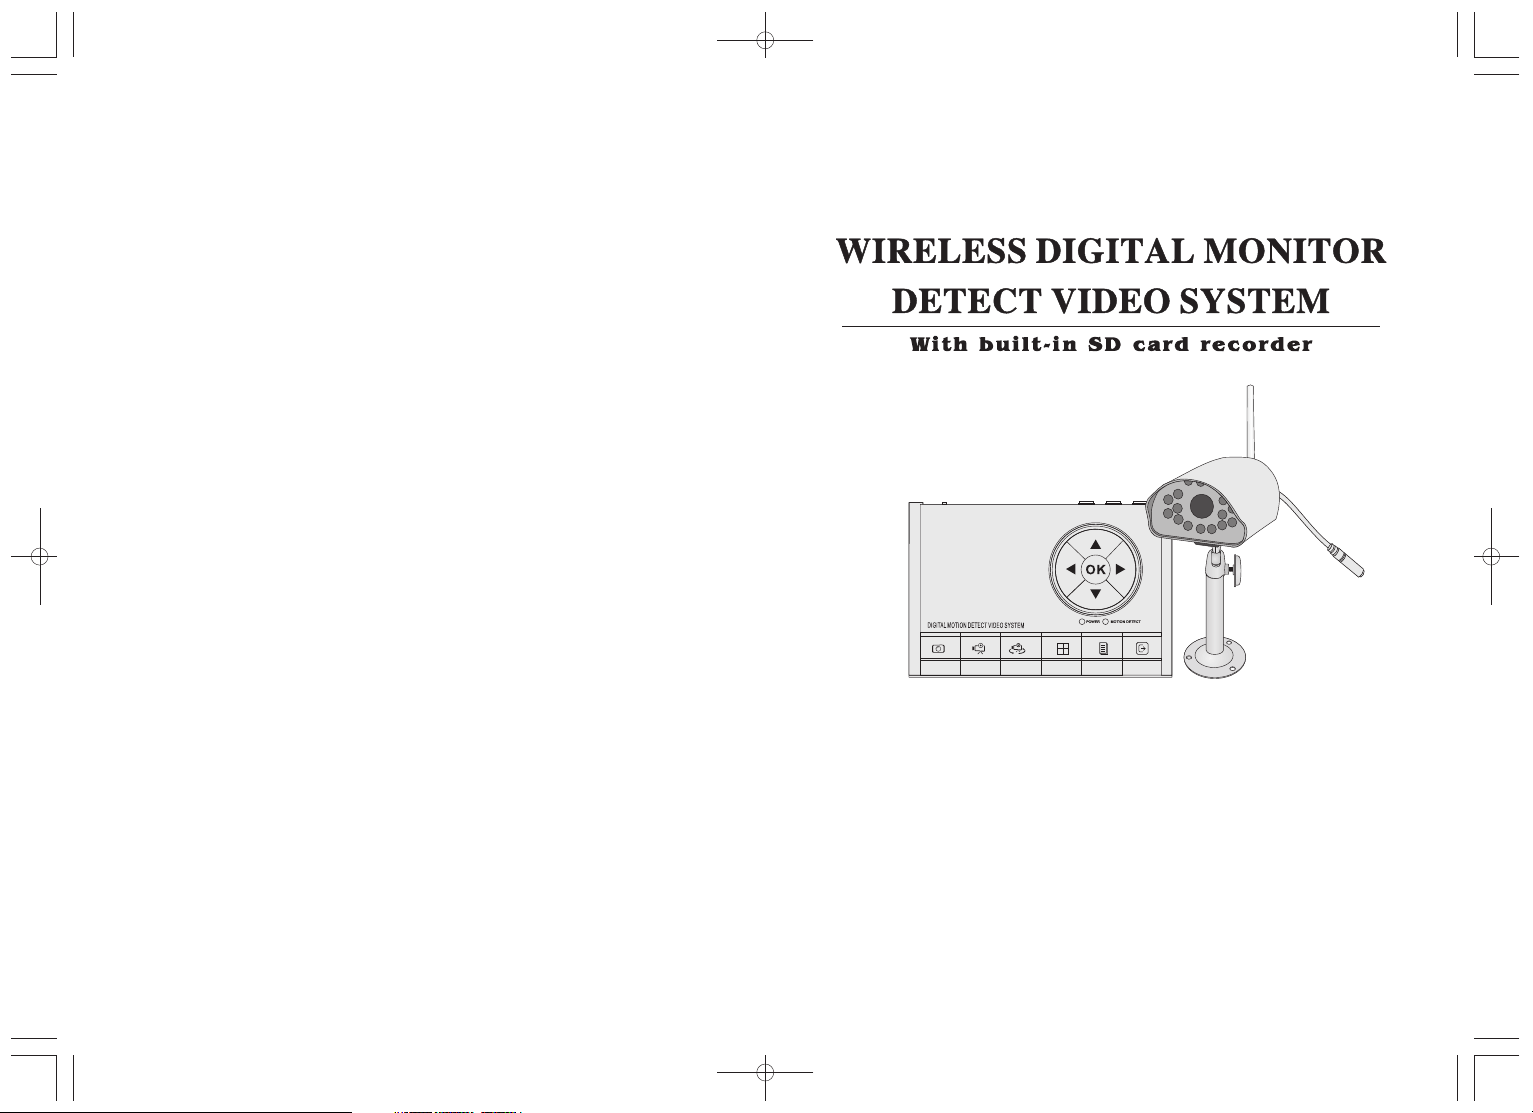
(D804TH) (D816TH)
Installation and
Operation Manual
Product Overview
The basic functions of these models can be summarized as: Moving objects in the
camera's field of vision, are automatically (or manually) set to record or take photos
of the images and stored in SD card. It can be widely used in homes, offices,
small supermarkets, etc.
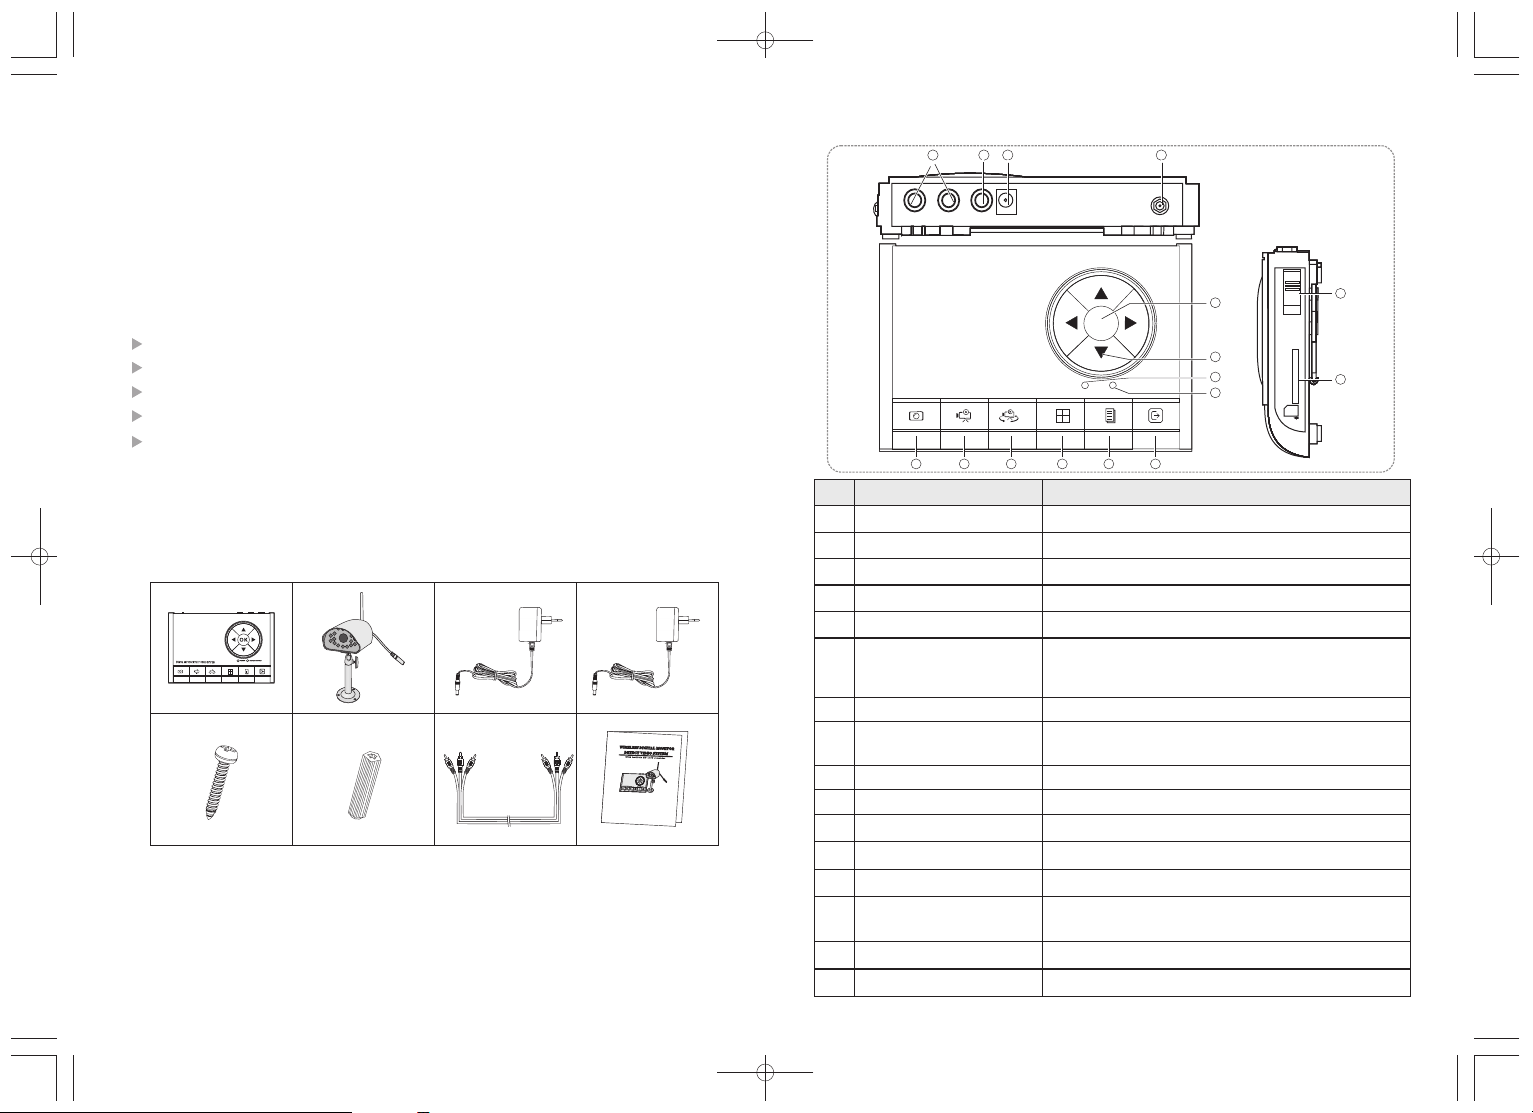
Button Functions of monitor
2
1
AUDIO
AUDIO
OUT 1
OUT 2
3
VIDEO
DC IN
OUT
4
Installation environment
Keep away from heat sources and high-temperature places
Avoid direct sunlight
Keep away from humid places
Avoid violent vibration
Be installed in ventilated environment
Packing list
1
11
15
OFF ON
POWER
OKOK
12
NO
Audio -OUT
1
Video -OUT
2
DC input
3
Antenna
4
Take Photo
5
D
IG
ITA
L
M
O
T
IO
N
D
E
T
E
C
Description
T V
ID
E
O
S
YS
T
E
65
M
7 8 9
POWER MOTION DETECT
10
Audio output Jack
Video output Jack
DC 12V input Jack
Rotation for better quality
Press the button will take a photo.
13
14
Function
16
SD CARD
SD
Press the button start to recording ,press again
6
Recording
then stop the recording. Under the playback mode,
press the button to enter into delete dialog
7
Switch the camera
Quad
8
MENU
(
D
8
0
4
T
H
)
(
D
8
1
6
T
H
)
I
n
s
t
a
l
l
a
t
i
o
n
a
n
d
O
p
e
r
a
t
i
o
n
M
a
n
u
a
l
9
Exit
10
OK
11
Direction key
12
Power indicator LED
13
Motion detect indicator LED
14
ON / OFF
15
SD CARD
16
Switching the input channel
Switching display mode, under the quad mode, press the
button switching the input channel, That the icon is
displayed b current channel.lue background for
Enter to main menu setting
Exit to menuprevious
Confirm key
Menu features adjustment
After Turn On ,The LED Will Light
Moving objects in the camera's field of vision,
The LED Will Light
Power ON/OFF
Insert SD card to store files or player the file .
2
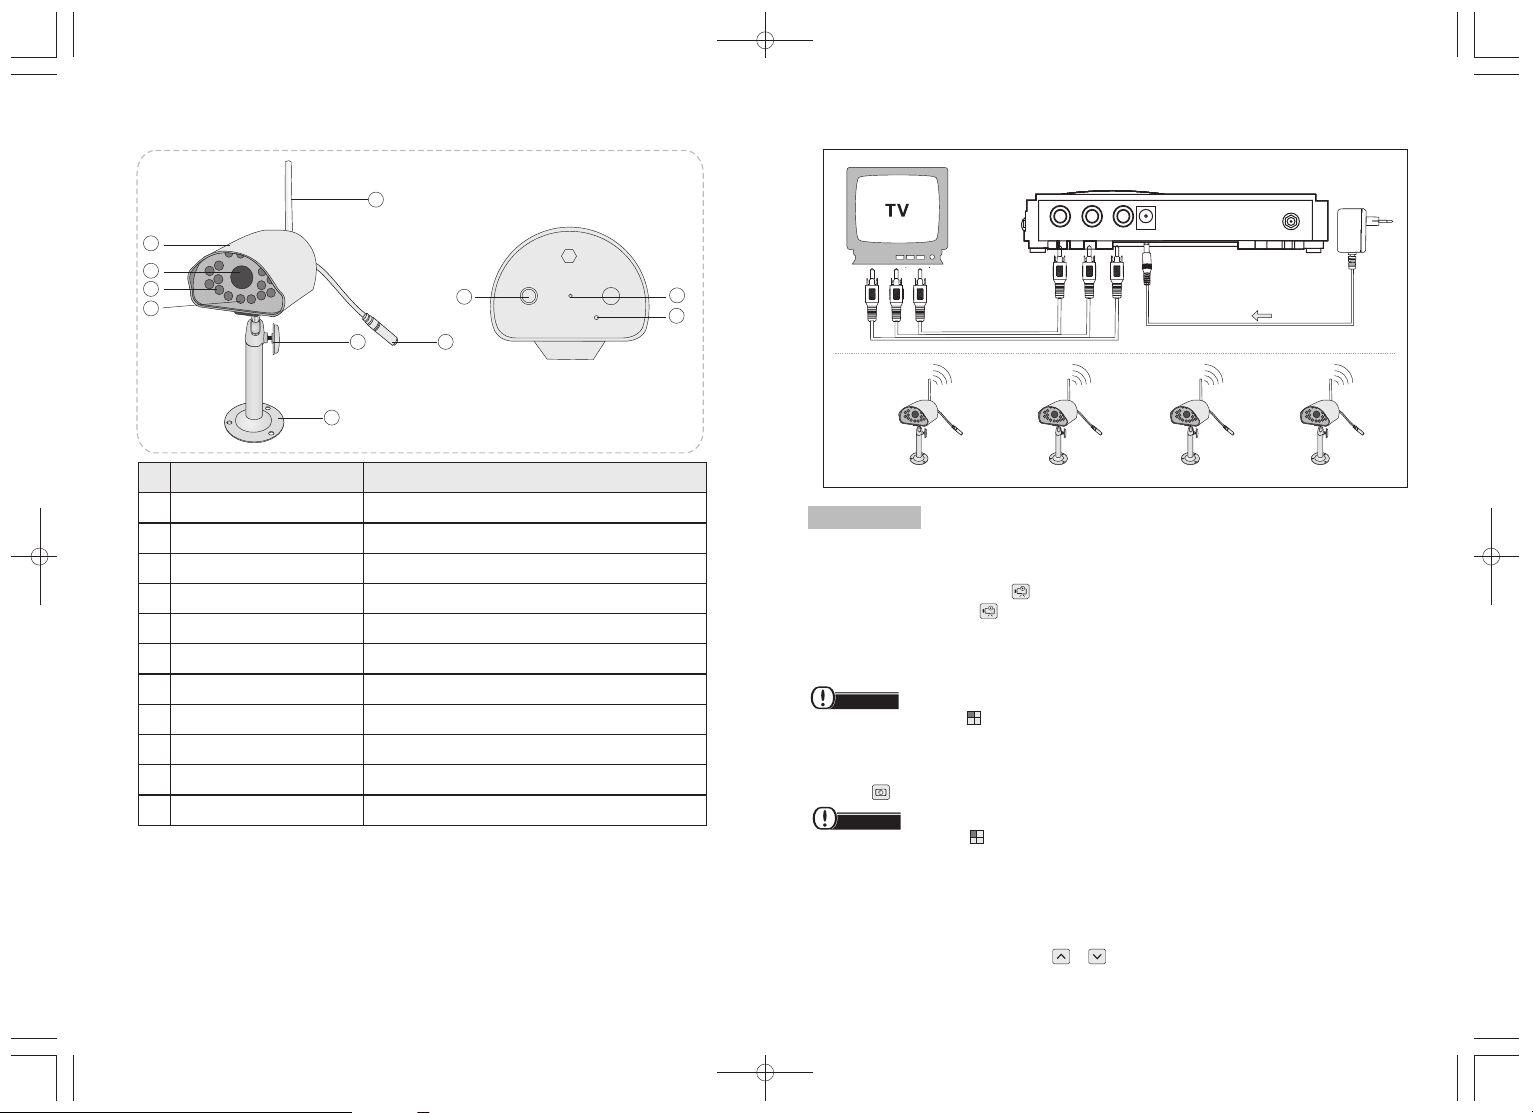
Button Functions of camera
1
2
3
4
6
8
Connection
5
AUDIO
OUT 1
9
10
11
7
VIDEO
AUDIO
DC IN
OUT
OUT 2
NO
10
11
Description
Rain cover
1
Camera Image Sensor
2
Infrared LED
3
Photosensitive diode
4
Antenna
5
Camera angle adjust screw
6
DC In
7
Camera Bracket Base
8
Match Code Button
9
Indicator LED
Microphone
3
Function
Waterproof
Transmit picture to Receive
Infrared Light enables working in the dark
Control infrared light
Adjust its Angle According Picture Clarity
Adjust Angle of Camera
Power Jack
Connecting Role
Click it Automatic adjustment of coding
After Turn On ,The LED Will Light
Monitor Around Voice
Camera 4Camera 3Camera 2Camera 1
Operation
1. Recording
Recording manually
If it is not recording, press tton, then it begins recording. The recorded time is
also displayed. Press tton again, then recording stops.
Motion detection record
If motion detection recording turn on, when system detects the motion in the motion
detection area, it begins to record about 15 seconds..
NOTICE
2.Take photo
In quad mode, Manual video recording is only on the current channel .
That the icon is displayed b current channel.
12
34
In quad mode, can not listen to the sound.
Photograph manually
Press button, then it will take a photo.
NOTICE
In quad mode, Manual take photo is only on the current channel .
That the icon is displayed b current channel.lue background for
Motion detection photograph
If motion detection photograph turn on, when system detects the motion in the
motion detection area, it will take a photo.
3. Adjustment the sound
Under the monitor status ,press or tton adjust it.bu
bu
bu
lue background for
12
34
4
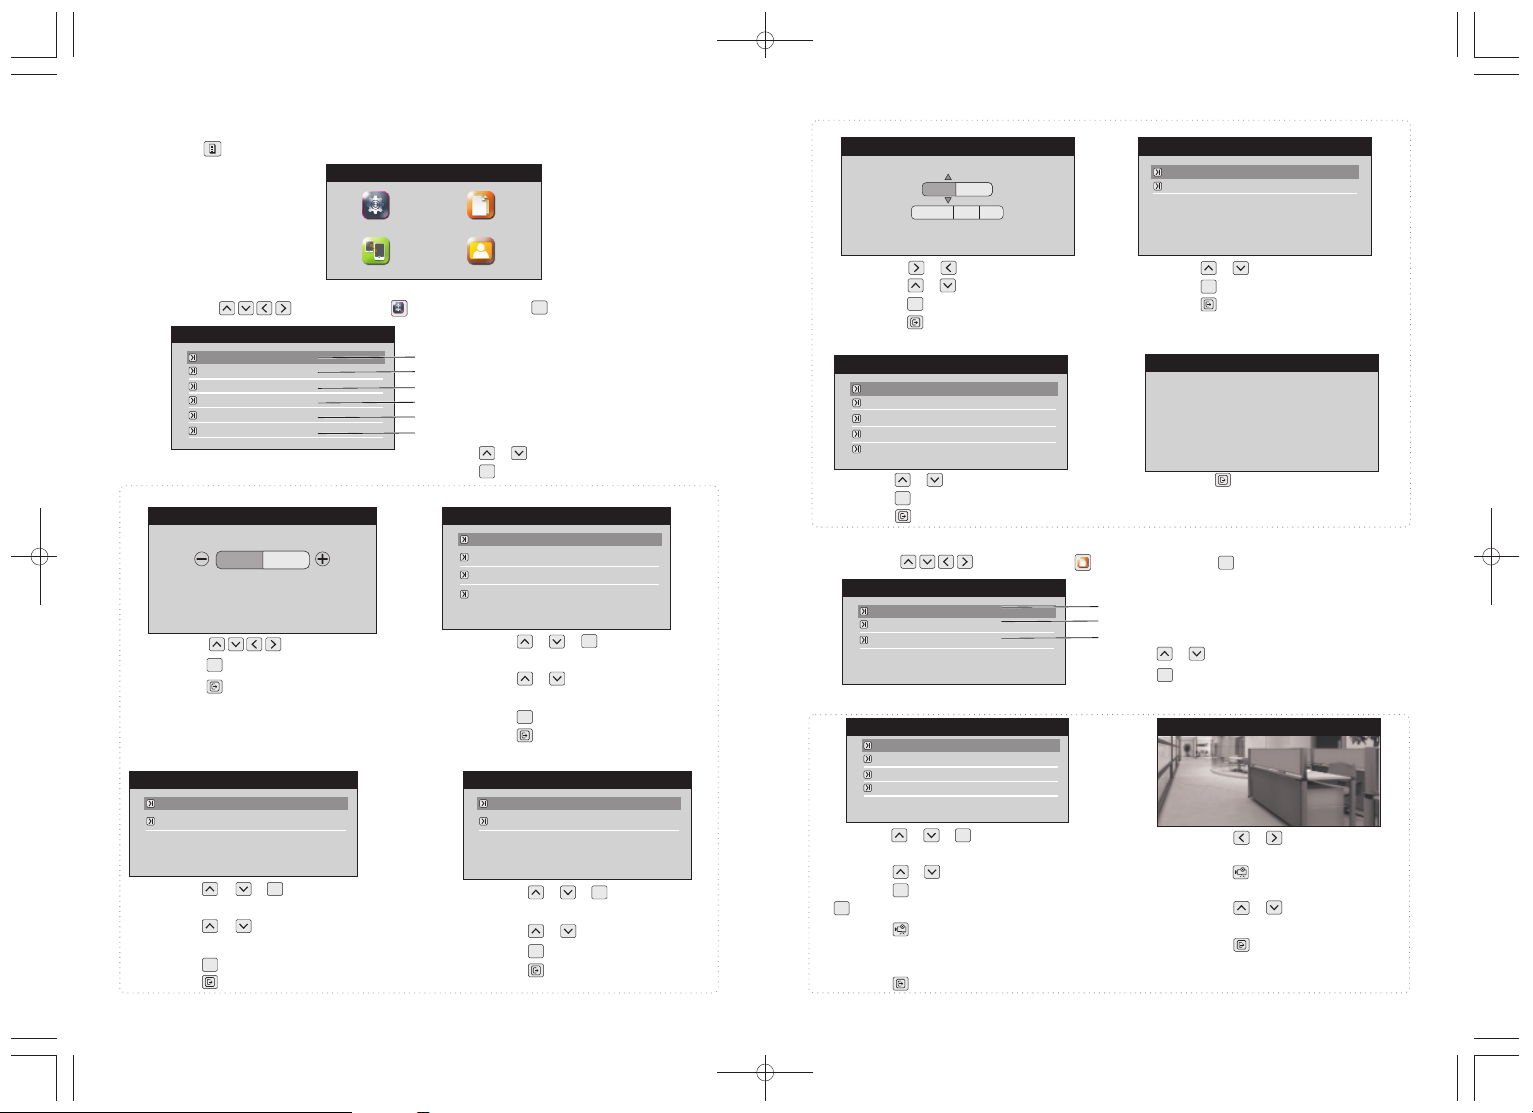
4. System setting
Press the button will pip up system setting menu.
2011-07-28 Thu 11:30
Settings
Memory Card
4.1.3Date and Time Setting
Date and Time
15:52
2011 07 28
4.1.4 N/P Standard
N/P Standard
NTSC
PAL
Camera
4.1 Setting
Press the button to select icon, then press the button will pip up the menu.
Setting
Brightness
Motion detection
Date and Time
N/P Standard
Language
System Information
Monitor
OK
4.1.1 Brightness Setting
4.1.2 Monitor Detection Sensitivity Setting
4.1.3 Date and Time Setting
4.1.4 N/P Standard
4.1.5 Language Setting
4.1.6 System Information
Press the or button to select submenu.
OK
4.1.2.1 Monitor Detection Sensitivity Setting
Never
Low
Medium
High
1.Press the or or button to select
OK
Motion Detection > Motion Detection item
2.Press the or button to select
Never/Low/Medium/High.
Press the button to confirm the select.
3.
OK
4.1.1 Brightness Setting
Brightness Monitor Detection
1.Press the button to adjust it.
2.Press the button to confirm the set.
OK
3.Press the button to setup return.
Press the button to confirm the select.
4.Press the button to setup return.
4.1.2.2 Monitor Detection Action Setting
Monitor Detection Actions
Video Recording
Take Pictures
1.Press the or or button to select
OK
Motion Detection > action item
2.Press the or button to select
take picture/video recording .
Press the button to confirm the select
3.
4.Press the button to setup return.
5
OK
4.1.2.3 Monitor Detection Alert Setting
Monitor Detection Alert
On
Off
1.Press the or or button to select
OK
Motion Detection > alert item
2.Press the or button to select on/off
3.
Press the button to confirm the select.
OK
4.Press the button to setup return.
1. Press the or button to select options
2. Press the or button to adjust it.
3. Press the button to confirm.
OK
4. Press the button to setup return.
4.1.5 Language Setting
Language
English
French
Deutsch
Italiano
Espanol
1.Press the or button to select language
Press the button to confirm the select.
2.
OK
1.Press the or button to select opitions
Press the button to confirm the select.
2.
OK
3.Press the button to setup return.
4.1.6 System Information
System Information
System ID: EB9F13B6
Firmware: V1.1.0
Total Size: 121M
Space Size: 17M
Press the button to setup return.
3.Press the button to setup return.
4.2 Memory Card
Press the button to select icon, then press the button will pip up the menu.
Memory Card
Folder
SD Unmount
SD Format
4.2.1 Folder
4.2.2 SD Unmount
4.2.3 SD Format
Press the or button to select submenu.
Press the button to confirm the select.
OK
OK
4.2.1.1 Player the movies file
09-14-09-1.mp4
09-44-16-2.mp4
09-14-46-1.mp4
09-40-26-2.mp4
1.Press the or or button to select
Folder
OK
Folder >movies
2.Press the or button to select file
3.Press the button to player the file. Press the
button again, then return to the previous menu
4 Press the button to go into delete dialog box.
.
OK
OK
5.Select YES to delete this file.
6.Select NO to give up delete this photo.
7.Press the button to setup return.
Press to select
1. the or button
previous /next the file.
.
2 Loop play, press
Press the button
again then cancel the loop.
3.Press to adjust
the volume
4
.Press the button to setup return.
Movies
the or button
6

4.2.1.2 Player the photo file
09-14-09-1.JPG
09-44-16-2.JPG
09-14-46-1.JPG
09-40-26-2.JPG
1.Press the or or button to select
Folder
OK
Folder >photo
2.Press the or button to select file
3.Press the button to player the file.Press the
OK
button again,then return to the previous menu
.
4 Press the button to go into delete dialog box.
OK
5.Select YES to delete this file.
6.Select NO to give up delete this photo.
7.Press the button to setup return.
NOTICE
The file name of - means that input channel, For example: - 1, express that
it is 1 channel input.
*
1. the button
Press to select
previous /next the file.
.
Press the button
2 Loop play, press
again then cancel the loop.
3
.Press the button to setup return.
Photo
4.2.2 SD Unmount 4.2.3 SD Format
SD Unmount
Unmount?
Yes No
Press the or button to select YES or No
Press the button to confirm the select.
OK
Select "YES". At boot status can be inserted or pull
out the SD card. Select "NO". Then can not inserted
or pull out the SD card.
Press the or button to select YES or No
Press the button to confirm the select.
NOTICE
4.3 Camera
Press the button to select icon, then press the button will pip up the menu.
Auto scan
Register Camera
Anti-flicker
Camera
4.3.1 Auto Scan
4.3.2 Registration Camera
4.3.3 Anti-Flicker
Press the or button to select submenu.
Press the button to confirm the select.
OK
SD Format
Format?
Yes No
OK
Formatting will delete all the files
in storage medium
OK
4.3.1 Auto Scan
Auto Scan
Never
10 seconds
20 seconds
30 seconds
60 seconds
7
1.Press the or button to select Never/10 seconds
/20 seconds/30 seconds/60 seconds
2.Press the button to confirm select.
OK
3.Press the button to setup return.
When has registered multiple camera, it will
NOTICE
automatically switch according to the set time
4.3.2 Registration Camera
Register Camera
Camera 1
Camera 2
Camera 3
Camera 4
1.Press the or button to select camera
2.Press the button to confirm select. And
OK
pip-up interface of Register Camera?
1. Select the icon and press button
to registration camera,
urn on the camera and click the match
2. T
code button.
3. If the register is successful, the interface
will be shown Camera Registered;
4. If the register fail, the interface will be
showed Operation Failed, then need to
re-register.
Register Camera
Register Camera
Yes No
Yes
OK
Unregister of Camera
Registration Camera
Camera 1
Camera 2
Camera 3
Camera 4
1.Press the or button to select has
been registered camera.
2.Press the button to confirm select. And
OK
pop-up interface of Unregister Camera?
4.3.3 Anti-Flicker
Anti -Flicker
50HZ
60HZ
1.Select YES to unregister camera.
2.Select NO to give up unregister camera.
Press the or button to select 50HZ or 60HZ
Press the button to confirm the select.
OK
NOTICE
Unregister Camera
Unregister Camera
Yes No
If the LCD image displays regular stripe, please
revise it by adjusting 50/60Hz.
4.4 Monitor
Press the button to select icon, then press the button switch to monitor status.
OK
8

Specifications
Operating Frequency 2.4GHz
Transmission rate 25fps(only for with effective distance)
General
Camera
Monitor
Unobstructed Effective Range 100m(Min.)
Operating Temperature
Storage Temperature
Operating Humidity 85%RH
Imaging Sensor Type
View Angle
Supply Voltage
Consumption Current
Weight
Supply Voltage
Consumption Current
Image format
Video format
SD card
Video System
Weight
-10 ~ +50 / +14 ~+122
-20 ~ +60 /+14 ~+140
CMOS
45
DC 5V 1A
300 100mA
300g
12V 1A
400 100mA
JPEG
Mp4
SDHC (2GB~32GB)
PAL/NTSC
140g
Warning
This device complies with part 15 of the FCC Rules and Industry Canada
licence-exempt RSS standard (s). Operation is subject to the following two conditions:
(1) This device may not cause harmful interference, and (2) this device must accept
any interference received, including interference that may cause undesired operation.
Any Changes or modifications not expressly approved by the party responsible for
compliance could void the user’s authority to operate the equipment.
Note: This equipment has been tested and found to comply with the limits for a Class
B digital device, pursuant to part 15 of the FCC Rules. These limits are designed to
provide reasonable protection against harmful interference in a residential installation.
This equipment generates uses and can radiate radio frequency energy and, if not
installed and used in accordance with the instructions, may cause harmful interference
to radio communications. However, there is no guarantee that interference will not
occur in a particular installation. If this equipment does cause harmful interference to
radio or television reception, which can be determined by turning the equipment off
and on, the user is encouraged to try to correct the interference by one or more of the
following measures:
--Reorient or relocate the receiving antenna.
--Increase the separation between the equipment and receiver.
--Connect the equipment into an outlet on a circuit different from that to which the
receiver is connected.
--Consult the dealer or an experienced radio/TV technician for help.
This transmitter must not be co-located or operating in conjunction with any other
antenna or transmitter.
FCC Radiation Exposure Statement:
This equipment complies with FCC radiation exposure limits set forth for an
uncontrolled environment.
This equipment should be installed and operated with minimum distance 20 cm between the
Radiator & your body .
1 We will maximize to provide more accurate information.There are only small
differences between the pictures of description and the actuall product.relating
9
Notice:
to the specification,appearance and color,to offer subject to the actuall product.
2 If need be, our products and related data are constantly updated and new elements
added.This amendment can be changed without notice.
S/N:11.08.19A0

OK
(M371TH)
(D816TH)
Installation and
Operation Manual

Product Overview
The basic functions of these models can be summarized as: Moving objects in the
camera's field of vision, are automatically (or manually) set to record or take photos
of the images and stored in SD card. It can be widely used in homes, offices,
small supermarkets, etc.
Installation environment
Keep away from heat sources and high-temperature places
Avoid direct sunlight
Keep away from humid places
Avoid violent vibration
Be installed in ventilated environment
Packing list
OK
X1 X1 X1 X1
O
K
(
M
3
7
1
T
H
)
(
D
8
1
6
T
H
)
I
n
s
t
al
l
at
i
o
n
a
n
d
O
p
er
a
t
i
o
n
M
a
n
u
a
l
X3 X3 X1 X1
Button Functions of monitor
1
2
3 4 5 7 8 10
Description
NO
Antenna
1
7" LCD
2
Take photo
3
Recording
4
Switch the camera
5
Quad
6
MENU
7
Exit
8
Direction key
9
OK
10
ON / OFF
11
AV-OUT
12
13
DC input
14
SD CARD
6
Pull out for better quality
Identify Visitor
Press the button will take a photo.
Press the button start to recording ,press again then
stop the recording. Under the playback mode, press
the button to enter into delete dialog
Switching the input channel
Switching display mode, under the quad mode, press the
button switching the input channel, That the icon is
displayed b current channel.lue background for
Enter to main menu setting
Exit to previous menu
Menu features adjustment
Confirm key
Power ON/OFF
AV output Jack
DC 12V input Jack
Insert SD card to store files or player the file .
OFF
11
ON
AV-OUT
12
13
14
SD
OK
CARD
9
Function
12
34
1
2

Button Functions of camera
Connection
1
2
3
4
NO
10
11
Description
Rain cover
1
Camera Image Sensor
2
Infrared LED
3
Photosensitive diode
4
Antenna
5
Camera angle adjust screw
6
DC In
7
Camera Bracket Base
8
Match Code Button
9
indicator LED
Microphone
5
9
6
8
7
Function
Waterproof
Transmit picture to Receive
Infrared Light enables working in the dark
Control infrared light
Adjust its Angle According Picture Clarity
Adjust Angle of Camera
Power Jack
Connecting Role
Click it Automatic adjustment of coding
After Turn On ,The LED Will Light
Monitor Around Voice
OFF
ON
AV OUT
10
11
Power DC 12V
AV-OUT
DC 12V
OK
MONITOR
Camera 4Camera 3Camera 2Camera 1
Operation
1. Recording
Recording manually
If it is not recording, press tton, then it begins recording. The recorded time is
also displayed. Press tton again, then recording stops.
Motion detection record
If motion detection recording turn on, when system detects the motion in the motion
detection area, it begins to record about 15 seconds..
NOTICE
In quad mode, Manual video recording is only on the current channel .
That the icon is displayed b current channel.
12
34
In quad mode, can not listen to the sound.
2.Take photo
Photograph manually
Press button, then it will take a photo.
NOTICE
In quad mode, Manual take photo is only on the current channel .
That the icon is displayed b current channel.lue background for
bu
bu
lue background for
12
34
Motion detection photograph
If motion detection photograph turn on, when system detects the motion in the
motion detection area, it will take a photo.
3. Adjustment the sound
Under the monitor status ,press or tton adjust it.bu
3
4

4. System setting
Press the button will pip up system setting menu.
2011-07-28 Thu 11:30
Settings
Memory Card
4.1.3Date and Time Setting
Date and Time
15:52
2011 07 28
4.1.4 N/P Standard
N/P Standard
NTSC
PAL
Camera
4.1 Setting
Press the button to select icon, then press the button will pip up the menu.
Setting
Brightness
Motion detection
Date and Time
N/P Standard
Language
System Information
Monitor
OK
4.1.1 Brightness Setting
4.1.2 Monitor Detection Sensitivity Setting
4.1.3 Date and Time Setting
4.1.4 N/P Standard
4.1.5 Language Setting
4.1.6 System Information
Press the or button to select submenu.
OK
4.1.2.1 Monitor Detection Sensitivity Setting
1.Press the or or button to select
Monitor Detection
Never
Low
Medium
High
OK
Motion Detection > Motion Detection item
2.Press the or button to select
Never/Low/Medium/High.
Press the button to confirm the select.
3.
OK
4.1.1 Brightness Setting
Brightness
1.Press the button to adjust it.
2.Press the button to confirm the set.
OK
3.Press the button to setup return.
Press the button to confirm the select.
4.Press the button to setup return.
Monitor Detection Actions
Video Recording
Take Pictures
1.Press the or or button to select
OK
Motion Detection > action item
2.Press the or button to select
take picture/video recording .
Press the button to confirm the select
3.
4.Press the button to setup return.
5
OK
4.1.2.3 Monitor Detection Alert Setting4.1.2.2 Monitor Detection Action Setting
Monitor Detection Alert
On
Off
1.Press the or or button to select
OK
Motion Detection > alert item
2.Press the or button to select on/off
3.
Press the button to confirm the select.
OK
4.Press the button to setup return.
1. Press the or button to select options
2. Press the or button to adjust it.
3. Press the button to confirm.
OK
4. Press the button to setup return.
4.1.5 Language Setting
Language
English
French
Deutsch
Italiano
Espanol
1.Press the or button to select language
Press the button to confirm the select.
2.
OK
1.Press the or button to select opitions
Press the button to confirm the select.
2.
OK
3.Press the button to setup return.
4.1.6 System Information
System Information
System ID: EB9F13B6
Firmware: V1.1.0
Total Size: 121M
Space Size: 17M
Press the button to setup return.
3.Press the button to setup return.
4.2 Memory Card
Press the button to select icon, then press the button will pip up the menu.
Memory Card
Folder
SD Unmount
SD Format
4.2.1 Folder
4.2.2 SD Unmount
4.2.3 SD Format
Press the or button to select submenu.
Press the button to confirm the select.
OK
OK
4.2.1.1 Player the movies file
09-14-09-1.mp4
09-44-16-2.mp4
09-14-46-1.mp4
09-40-26-2.mp4
1.Press the or or button to select
Folder
OK
Folder >movies
2.Press the or button to select file
3.Press the button to player the file. Press the
button again, then return to the previous menu
4 Press the button to go into delete dialog box.
.
OK
OK
5.Select YES to delete this file.
6.Select NO to give up delete this photo.
7.Press the button to setup return.
Press to select
1. the or button
previous /next the file.
.
2 Loop play, press
Press the button
again then cancel the loop.
3.Press to adjust
the volume
4
.Press the button to setup return.
Movies
the or button
6

4.2.1.2 Player the photo file
09-14-09-1.JPG
09-44-16-2.JPG
09-14-46-1.JPG
09-40-26-2.JPG
1.Press the or or button to select
Folder
OK
Folder >photo
2.Press the or button to select file
3.Press the button to player the file.Press the
OK
button again,then return to the previous menu
4 Press the button to go into delete dialog box.
.
OK
5.Select YES to delete this file.
6.Select NO to give up delete this photo.
7.Press the button to setup return.
NOTICE
The file name of - means that input channel, For example: - 1, express that
it is 1 channel input.
*
1. the button
Press to select
previous /next the file.
.
Press the button
2 Loop play, press
again then cancel the loop.
3
.Press the button to setup return.
Photo
4.2.2 SD Unmount 4.2.3 SD Format
SD Unmount
Unmount?
Yes No
Press the or button to select YES or No
Press the button to confirm the select.
OK
Select "YES". At boot status can be inserted or pull
out the SD card. Select "NO". Then can not inserted
or pull out the SD card.
Press the or button to select YES or No
Press the button to confirm the select.
NOTICE
4.3 Camera
Press the button to select icon, then press the button will pip up the menu.
Auto scan
Register Camera
Anti-flicker
Camera
4.3.1 Auto Scan
4.3.2 Registration Camera
4.3.3 Anti-Flicker
Press the or button to select submenu.
Press the button to confirm the select.
OK
SD Format
Format?
Yes No
OK
Formatting will delete all the files
in storage medium
OK
4.3.1 Auto Scan
Auto Scan
Never
10 seconds
20 seconds
30 seconds
60 seconds
7
1.Press the or button to select Never/10 seconds
/20 seconds/30 seconds/60 seconds
2.Press the button to confirm select.
OK
3.Press the button to setup return.
When has registered multiple camera, it will
NOTICE
automatically switch according to the set time
4.3.2 Registration Camera
Register Camera
Camera 1
Camera 2
Camera 3
Camera 4
1.Press the or button to select camera
2.Press the button to confirm select. And
OK
pip-up interface of Register Camera?
1. Select the icon and press button
to registration camera,
urn on the camera and click the match
2. T
code button.
3. If the register is successful, the interface
will be shown Camera Registered;
4. If the register fail, the interface will be
showed Operation Failed, then need to
re-register.
Register Camera
Register Camera
Yes No
Yes
OK
Unregister of Camera
Registration Camera
Camera 1
Camera 2
Camera 3
Camera 4
1.Press the or button to select has
been registered camera.
2.Press the button to confirm select. And
OK
pip-up interface of Unregister Camera?
4.3.3 Anti-Flicker
Anti -Flicker
50HZ
60HZ
1.Select YES to unregister camera.
2.Select NO to give up unregister camera.
Press the or button to select 50HZ or 60HZ
Press the button to confirm the select.
OK
NOTICE
Unregister Camera
Unregister Camera
Yes No
If the LCD image displays regular stripe, please
revise it by adjusting 50/60Hz.
4.4 Monitor
Press the button to select icon, then press the button switch to monitor status.
OK
8

Specifications
Operating Frequency 2.4GHz
Transmission rate 25fps(only for with effective distance)
General
Camera
Monitor
Unobstructed Effective Range 100m(Min.)
Operating Temperature
Storage Temperature
Operating Humidity 85%RH
Imaging Sensor Type
View Angle
Supply Voltage
Consumption Current
Weight
Supply Voltage
Consumption Current
Image format
Video format
SD card
Video System
Weight
-10 ~ +50 / +14 ~+122
-20 ~ +60 /+14 ~+140
CMOS
45
DC 5V 1A
300 100mA
300g
12V 1A
400 100mA
JPEG
Mp4
SDHC (2GB~32GB)
PAL/NTSC
140g
Warning
This device complies with part 15 of the FCC Rules and Industry Canada
licence-exempt RSS standard (s). Operation is subject to the following two conditions:
(1) This device may not cause harmful interference, and (2) this device must accept
any interference received, including interference that may cause undesired operation.
Any Changes or modifications not expressly approved by the party responsible for
compliance could void the user’s authority to operate the equipment.
Note: This equipment has been tested and found to comply with the limits for a Class
B digital device, pursuant to part 15 of the FCC Rules. These limits are designed to
provide reasonable protection against harmful interference in a residential installation.
This equipment generates uses and can radiate radio frequency energy and, if not
installed and used in accordance with the instructions, may cause harmful interference
to radio communications. However, there is no guarantee that interference will not
occur in a particular installation. If this equipment does cause harmful interference to
radio or television reception, which can be determined by turning the equipment off
and on, the user is encouraged to try to correct the interference by one or more of the
following measures:
--Reorient or relocate the receiving antenna.
--Increase the separation between the equipment and receiver.
--Connect the equipment into an outlet on a circuit different from that to which the
receiver is connected.
--Consult the dealer or an experienced radio/TV technician for help.
This transmitter must not be co-located or operating in conjunction with any other
antenna or transmitter.
FCC Radiation Exposure Statement:
This equipment complies with FCC radiation exposure limits set forth for an
uncontrolled environment.
This equipment should be installed and operated with minimum distance 20 cm between the
This equipment should be installed and operated with minimum distance 20 cm between the
Radiator & your body .
Radiator & your body .
1 We will maximize to provide more accurate information.There are only small
9
Notice:
differences between the pictures of description and the actuall product.relating
to the specification,appearance and color,to offer subject to the actuall product.
2 If need be, our products and related data are constantly updated and new elements
added.This amendment can be changed without notice.
S/N:11.08.19A0
 Loading...