

Page 1
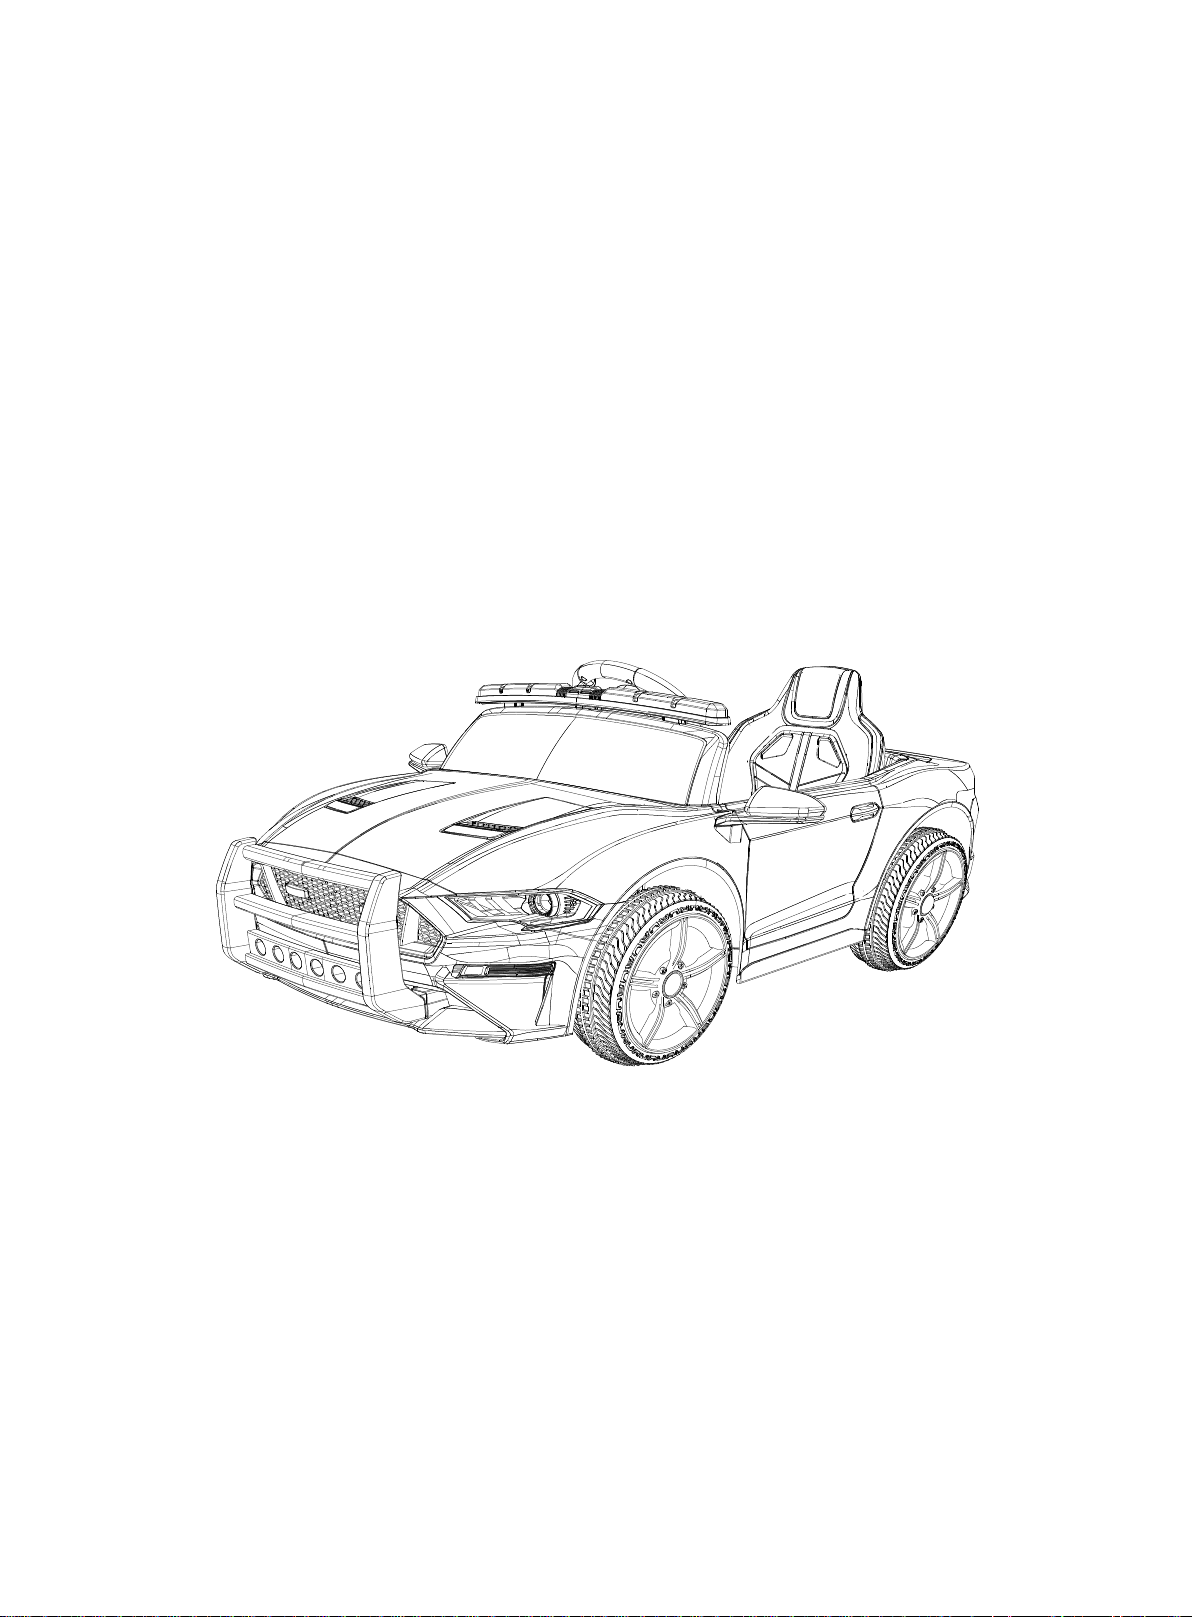
ELECTRIC RIDE ON CAR
Installation and Operation Instruction
All pictures shown are for reference purpose only.
Actual product may vary due to the production.
Page 2

Please read this specification carefully before installation in
order to avoid operating errors or damages. Make sure that the
kid will be safe. The user should safekeeping the specification.
Specification
Car type
Storage battery
Electric motor 12V 390*2 (drive) 12V380*1 (turn)
Suit age 3 years+
Max weight 30Kg
Size 1128X671X524mm
Speed 3.0-5. 0km/h
Utility 8-12hours (charge), 60-80minutes (use)
Charger
AC100-240V 50-60Hz(input), DC12V(output)
BBH-0007
12V4.5AH*1
Battery of
remote control
Two pieces of AAA 1.5V
Warning
Small parts. Not suitable for children under 36 months !
Products should be adult assembly!Before the assembly screw split
pin and other dangerous sharp tips!
Small parts in order to avoid damage and ingestion may cause a choking
hazard, please send small parts away from children under 3 years old!
The children can not drive alone without adults,and caregivers in use
process shall not be allowed to leave!
After charging the storage battery by the adults,before using this product,
please recharge!
In order to avoid harming the children, please will pack materials such as
plastic bags away from children!
Please check the product regularly to make sure that the electric wire, plugs,
outer case and other parts are normal. If something is damaged, please
stop using the car until it is fixed!
Two AAA dry cells are for the remote controller!
Use all the cells or batteries in the right way!
If the line with no connection, d
The packaging and instructions must be retained since it contains
important information!
o not insert the output socket!
1
Page 3
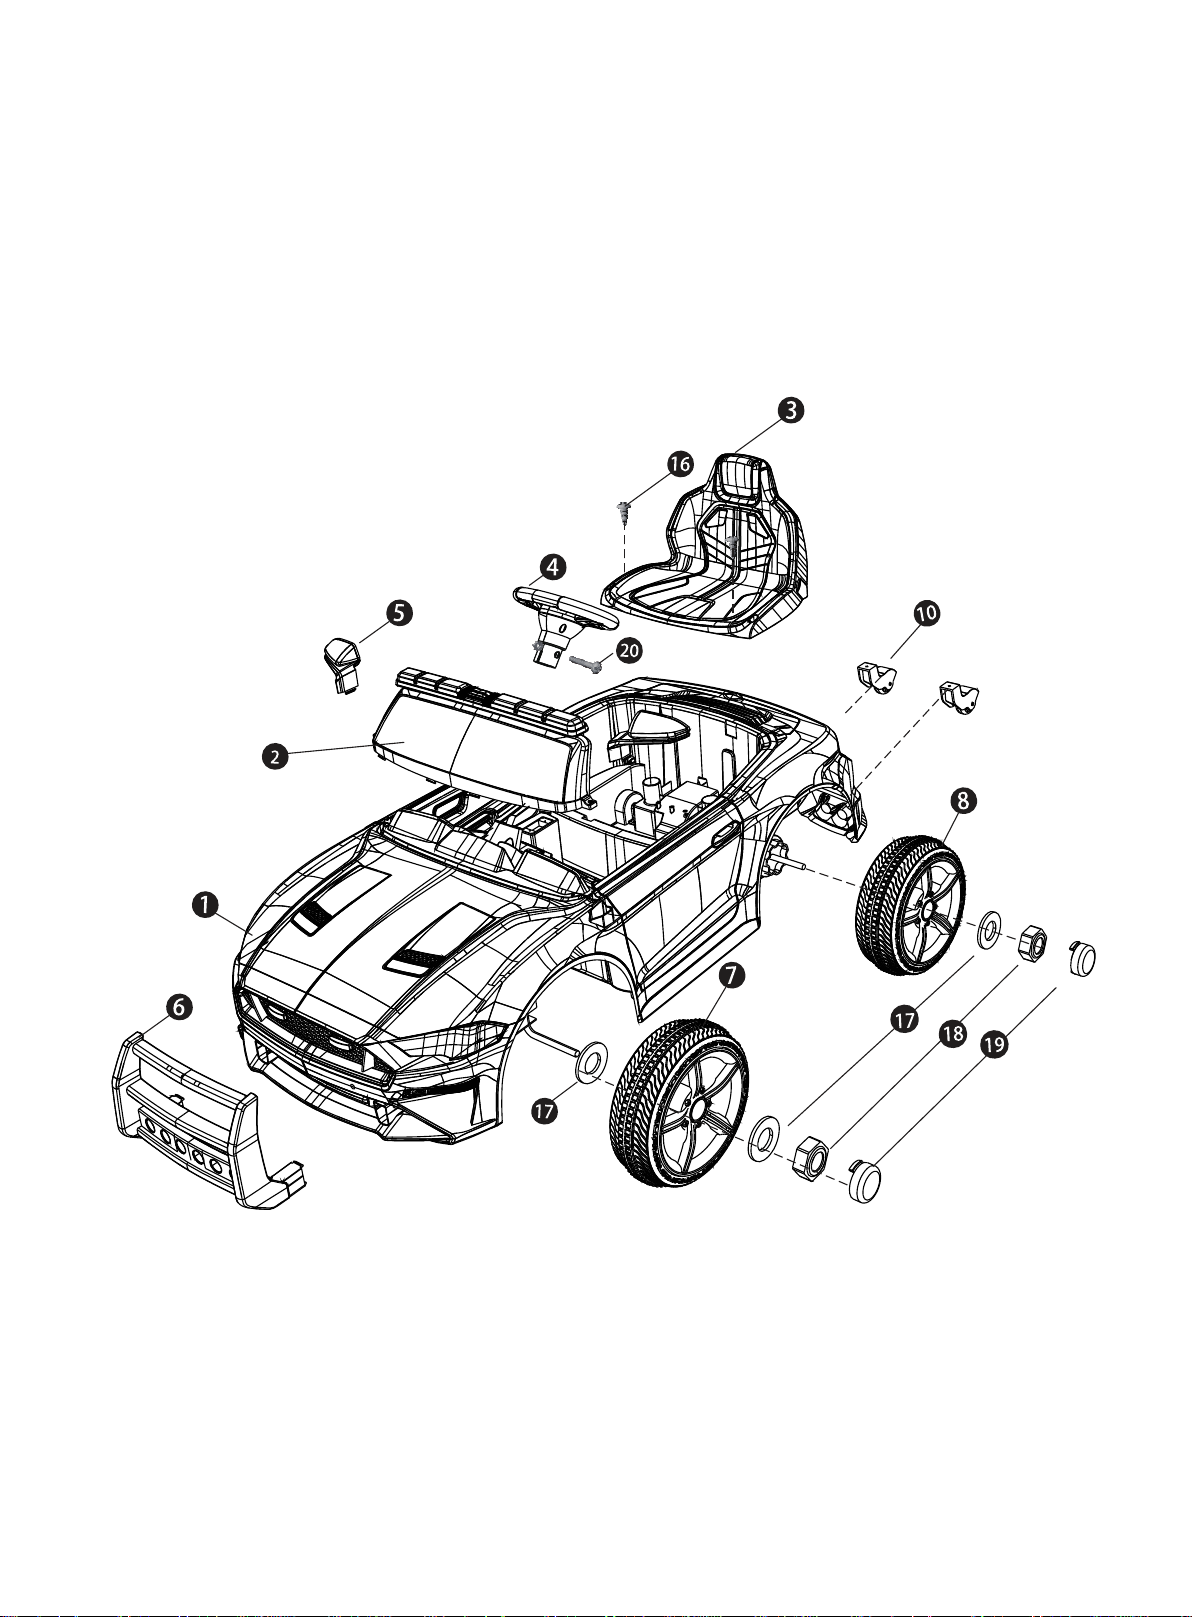
Parts Names
2
Page 4
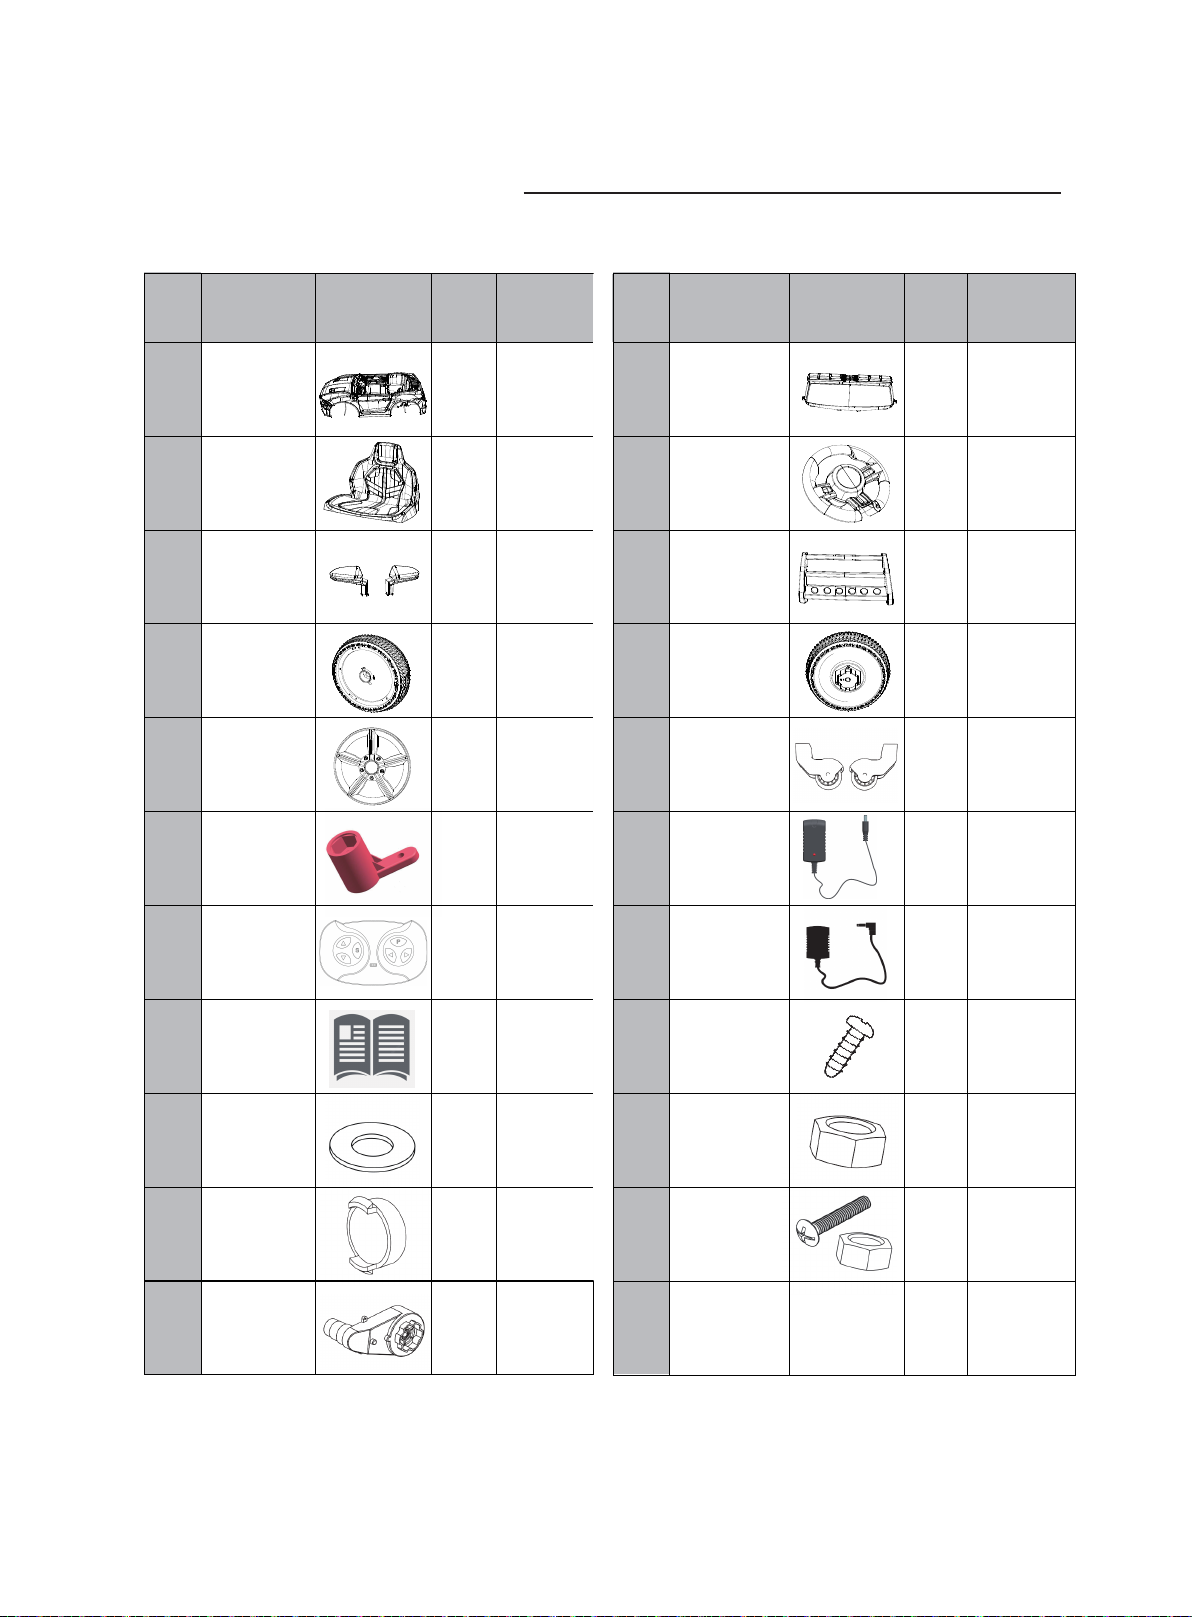
Parts List
PART
NO
1
3
5
7
9
11
PART
NAME
Vehicle
body
Seat
Rearview
mirror
wheel
Wheel
hub
Spanner
PICTURE
Qty
(pcs)
1
1
1pair
4
2
REMARKS
Left&
Right
Stuck
on the
wheel
PARTNOPART
2
4
6
8
10
12
NAME
Windshield
Steering
wheel
Bumper
Driving
wheel
Trainging
wheel
Charger
PICTURE
Qty
(pcs)
1
1
1
2
2
1
REMARKS
13
15
17
19
21
Remote
control
Instruction
Manual
M10
Washer
Wheel
shaft
cover
Gear
box
1
1
6
4
14
16
18
20
Megaphone
M4x12
Screw
M8 Nut
M5x35
bolt
+M5 Mut
1
2
4
1
Placed
vehicle
body
Placed
in the
rear and
front axle
Placed
in the
steering
wheel
2
3
Page 5
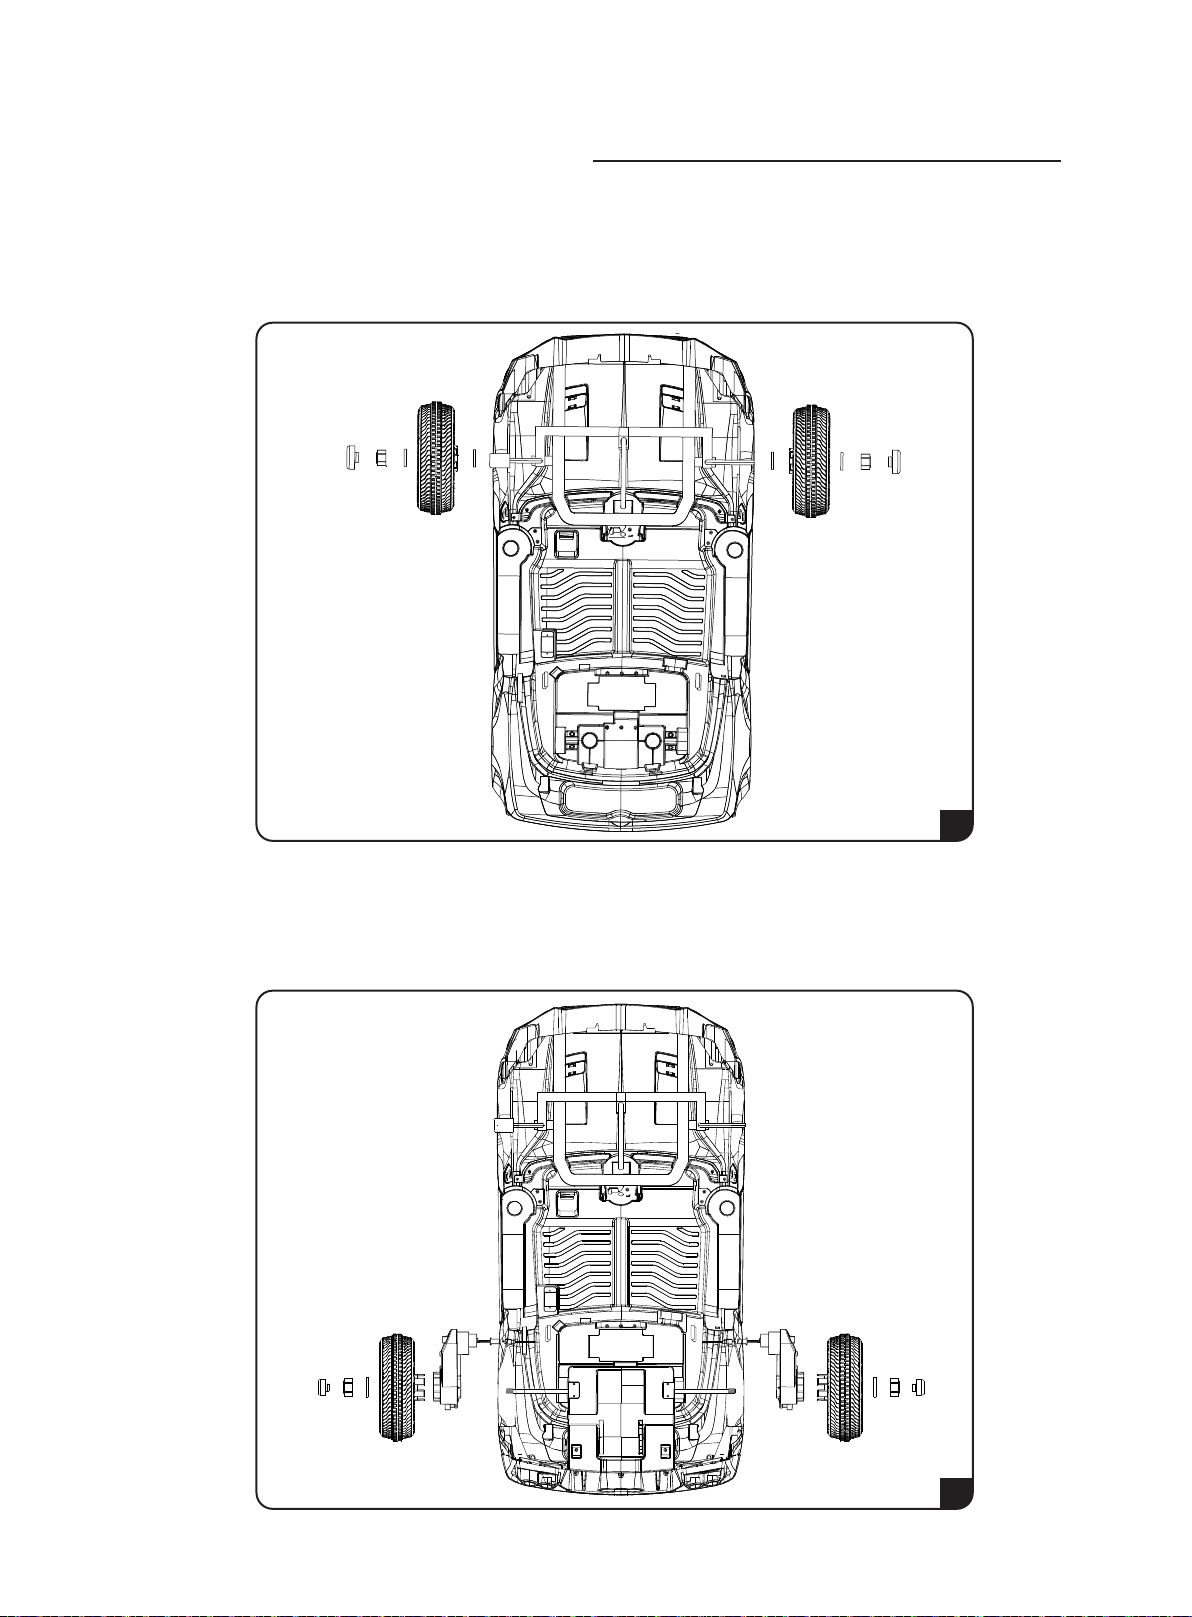
Installation Steps
1.Install front wheel
Put one washer on the front wheel axle and install the front wheel,
then put another washer on the front wheel
the wheel cover.(Refer to PIC1)
. Fix it with M8 Nut. Clamp
1
2.Install rear wheel
The drive motor has been installed on the car body, install rear wheel
and put one M10 washer then fix with one M8 nut, finally clamp the
wheel core cover. (Refer to PIC 2).
2
4
Page 6
Installation Steps
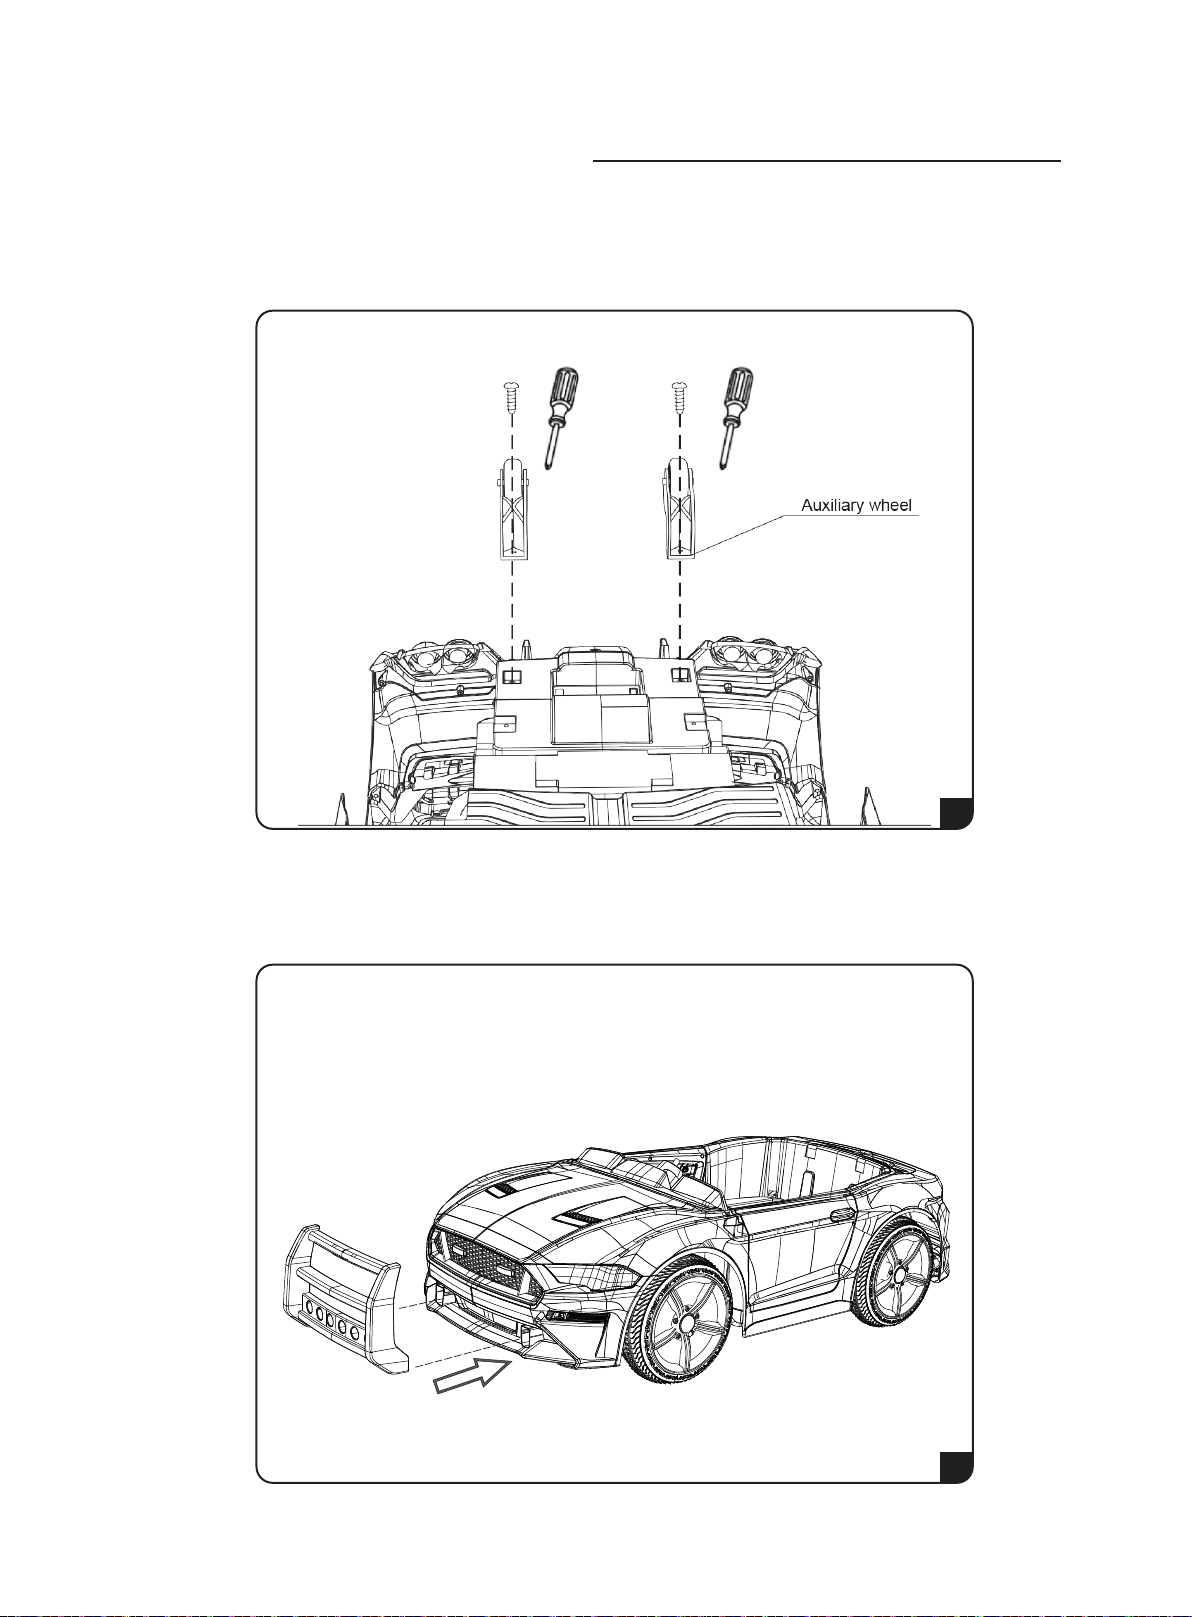
3.Install the auxiliary wheel
Remove the screw from the rear of the body, and fix the auxiliary wheel
with screw.(Refer to PIC 3 )
4.Install bumper
Place the bumper in front of car body.(Refer to PIC 4)
3
4
5
Page 7
Installation Steps
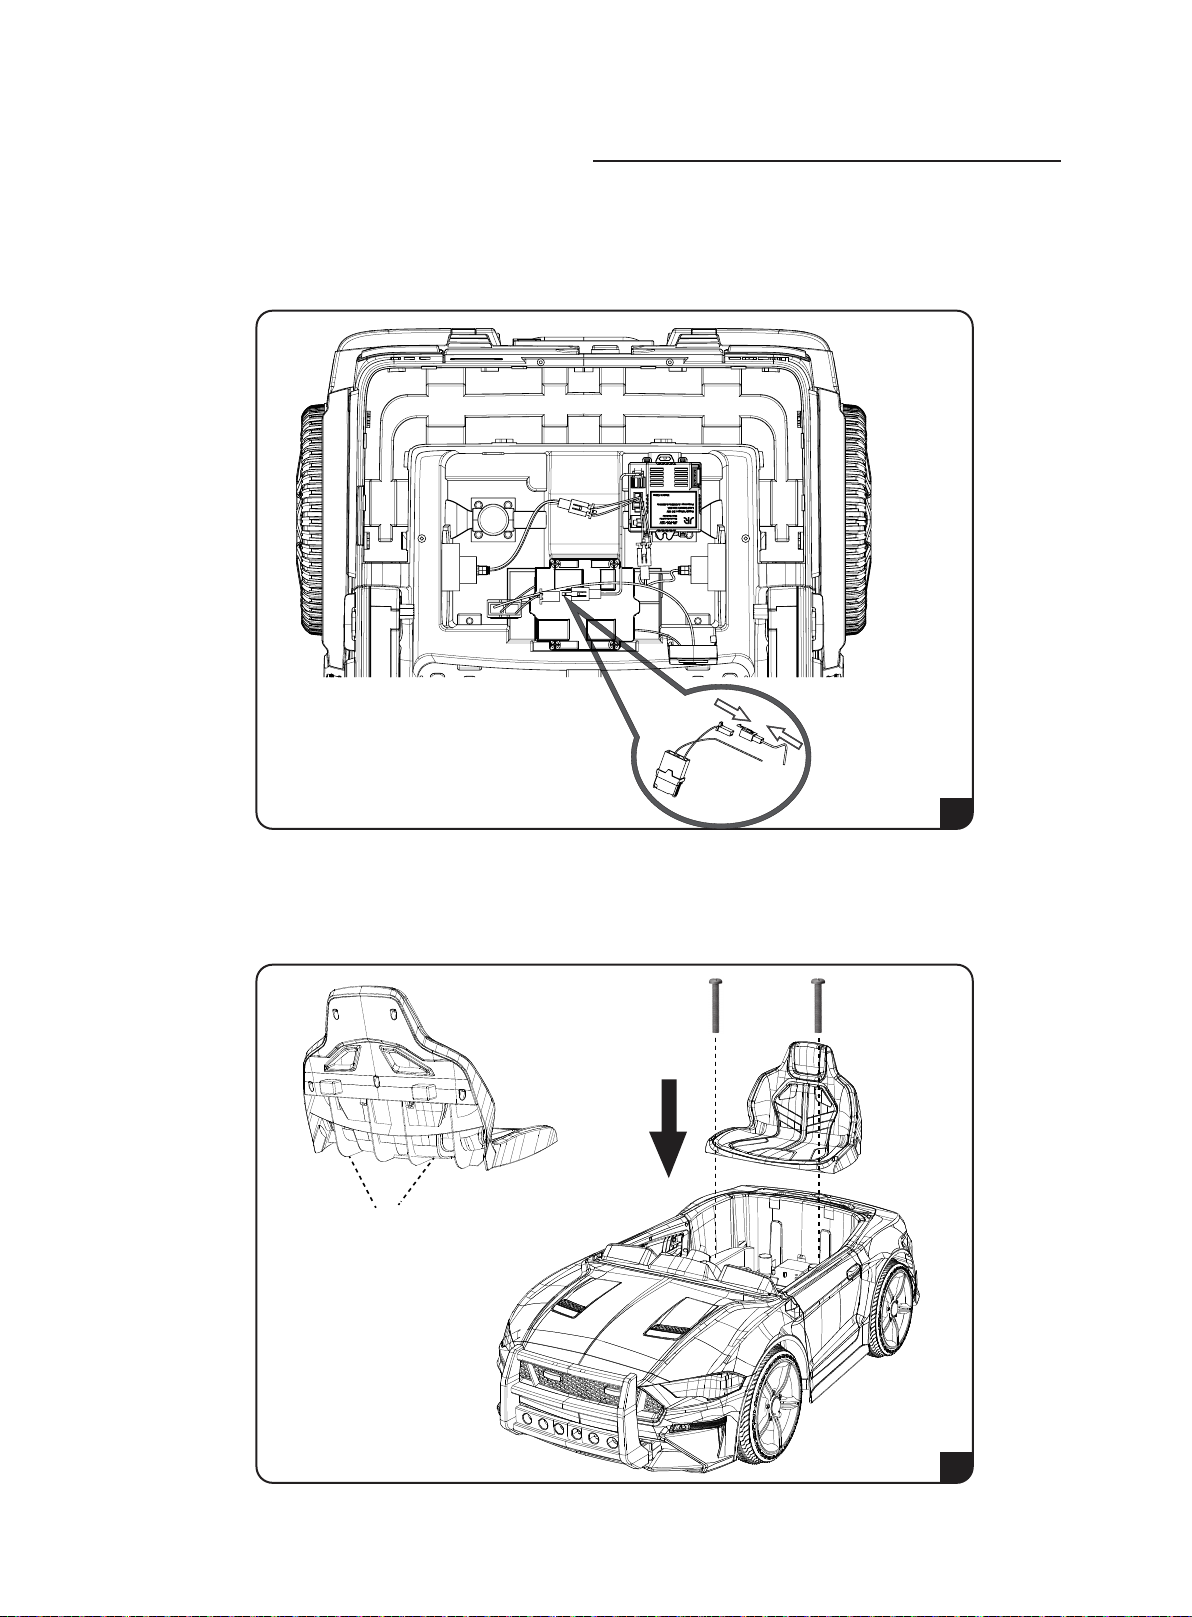
5.Connect the power supply
Dock the docking plug before installing the seat. (Refer to PIC 5)
Note: Power plugs cannot be operated in reverse.
6.Install the seat
The back of the seat hook into the body of the card slot.
Screw two pieces M4x30 screw seat. (Refer to PIC 6)
A hook on the back of the cushion
5
6
6
Page 8
Installation Steps
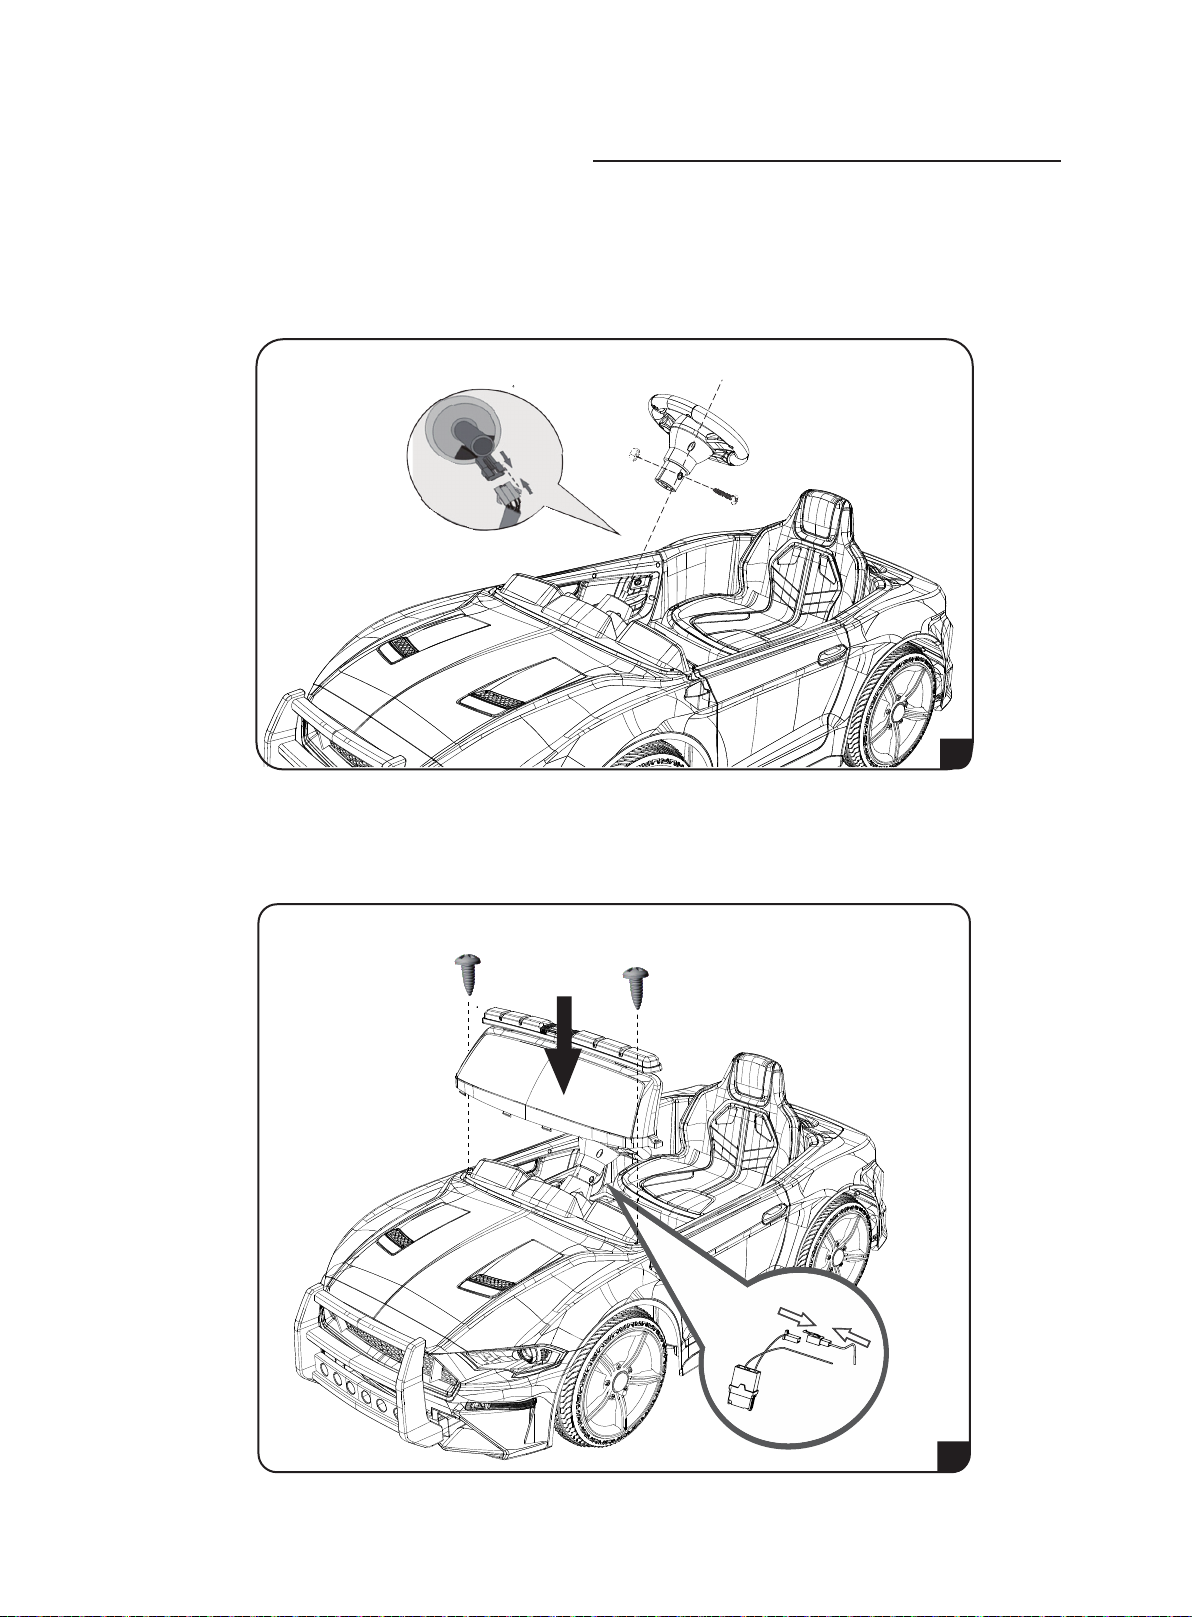
7.Install the steering wheel
Connect the plug and install the steering wheel on the steering
shaft, then fixed with M5x35 bolt and M5 nut.(Refer to PIC7)
Note: Before installation, distinguish the front and rear positions
of the steering wheel to avoid reverse installation.
7
8.Install the windshield
First connect the plug-in and install the windshield into the card slot
of the car. (Refer to PIC 8)
8
7
Page 9
Installation Steps
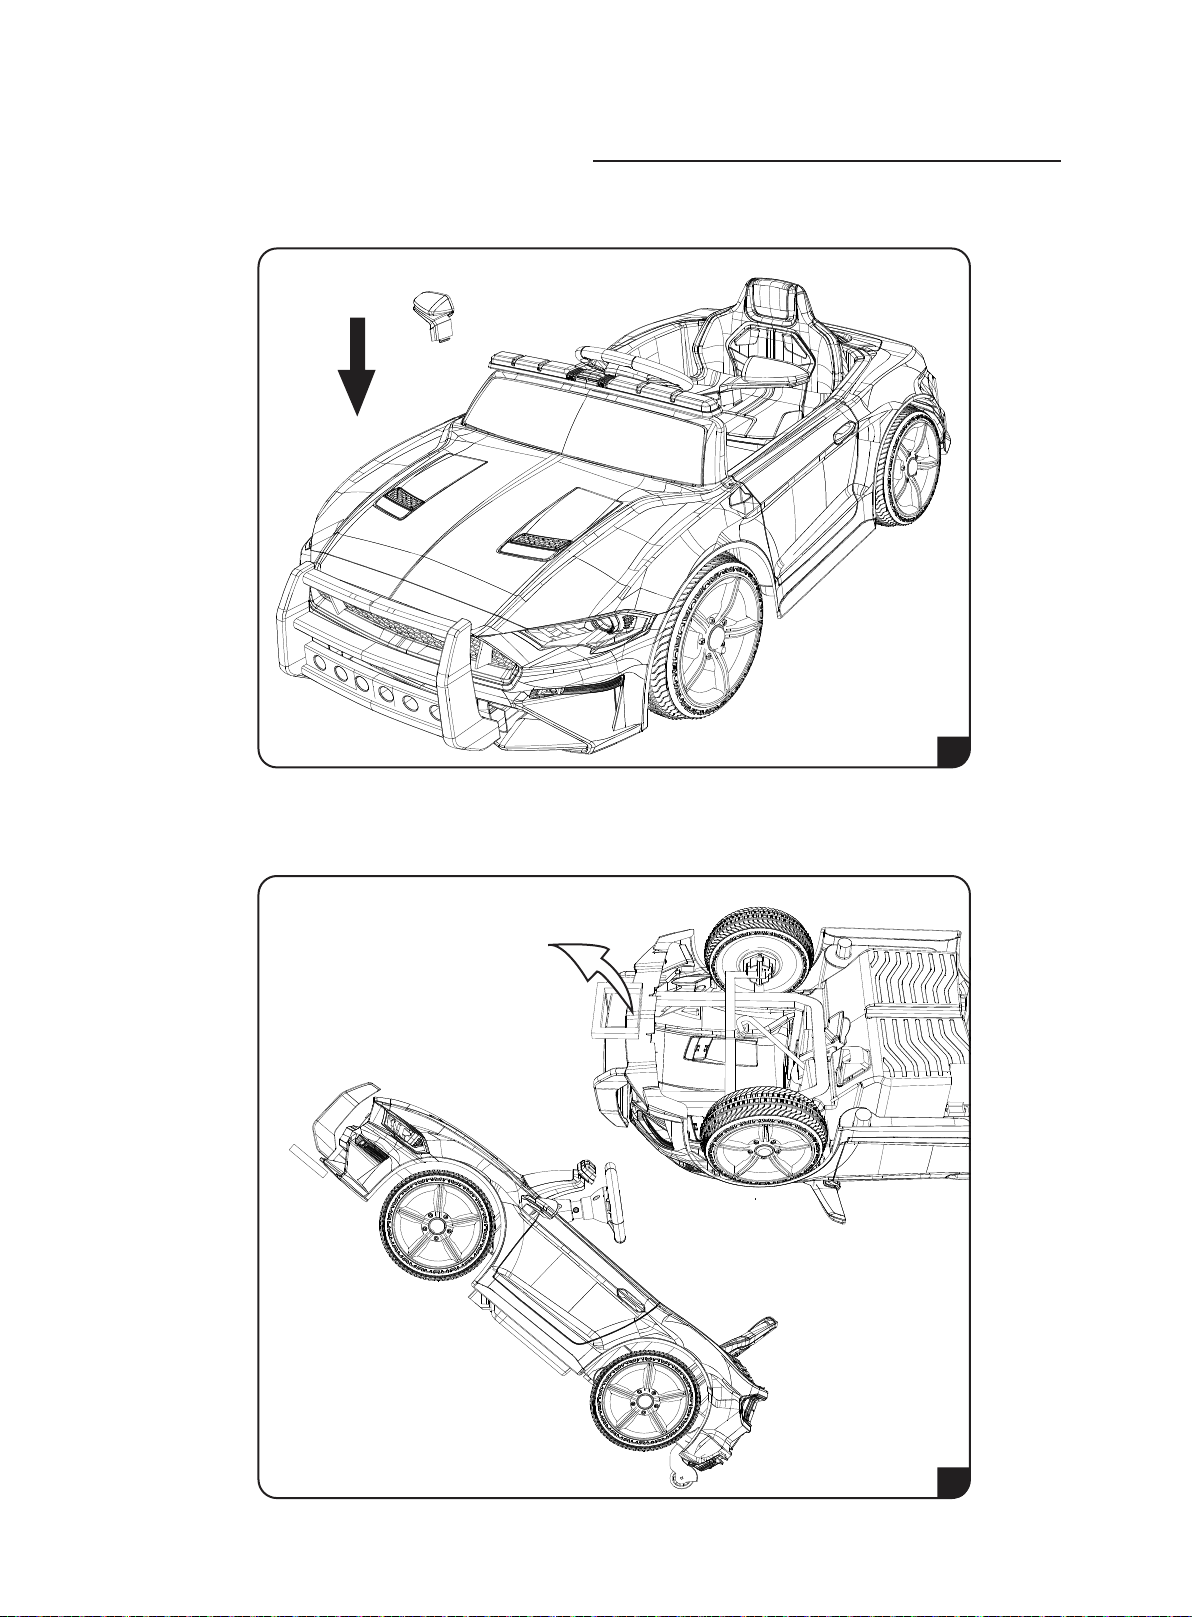
9.Install the rear view mirror
Insert the mirror directly into the body.(Refer to PIC 9)
10.Use the Pull Handle &Remove the battery
Rotate the Pull handle out. (Refer to PIC10)
Rotate the Pull handle out
9
You can move the vehcle by pulling
10
8
Page 10
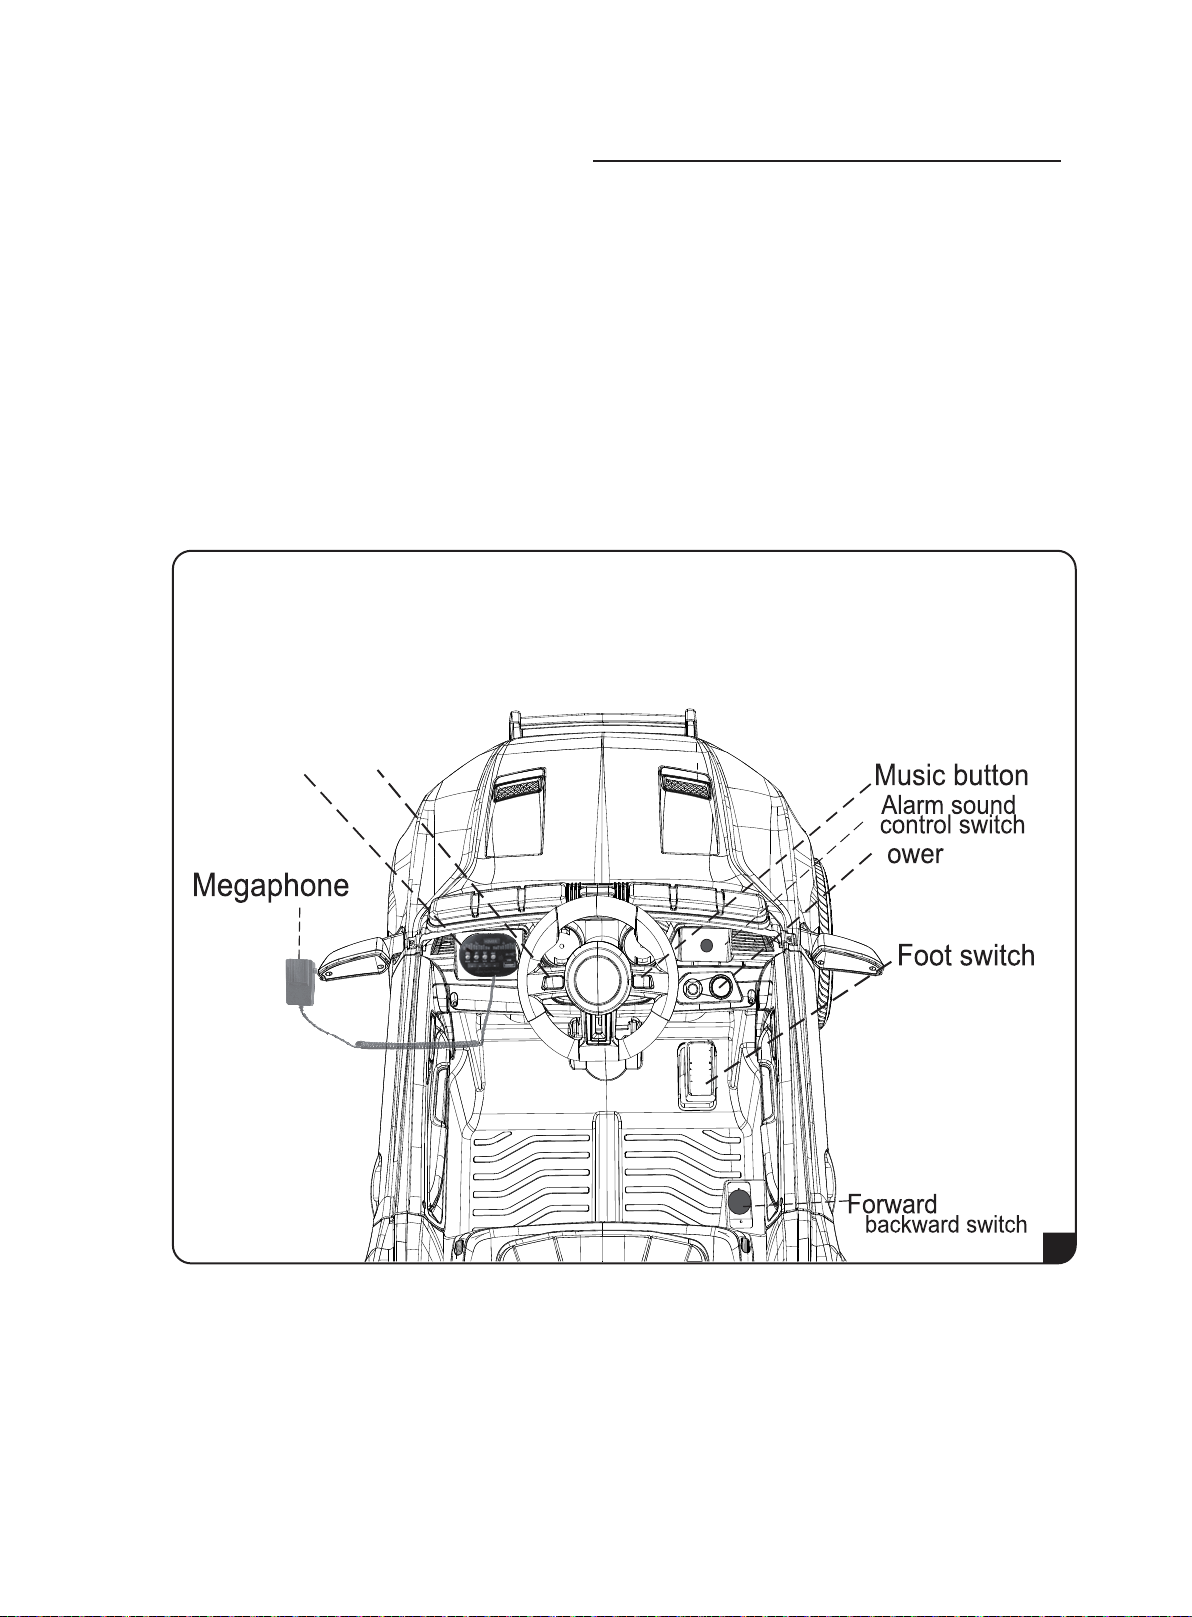
Installation Steps
11.Dashboard indication
a. Power Switch ---(1)Turn on power switch ,the light will be bright and there
is an engine sound.
b. Dashboard equipped with music function and it can connected cellphone,
adjust the volume, power display, etc.
c. Steering wheel ---The steering wheel equipped with music and horn,
Children can adjust by themselves.
d. Go forward/ Stop/ Back forward switch-When manual for driving
it can control to go forward or backward when they step on the foot pedal.
(Refer to PIC 11)
Mp 3
player
Horn button
P
sw itch
11
9
Page 11
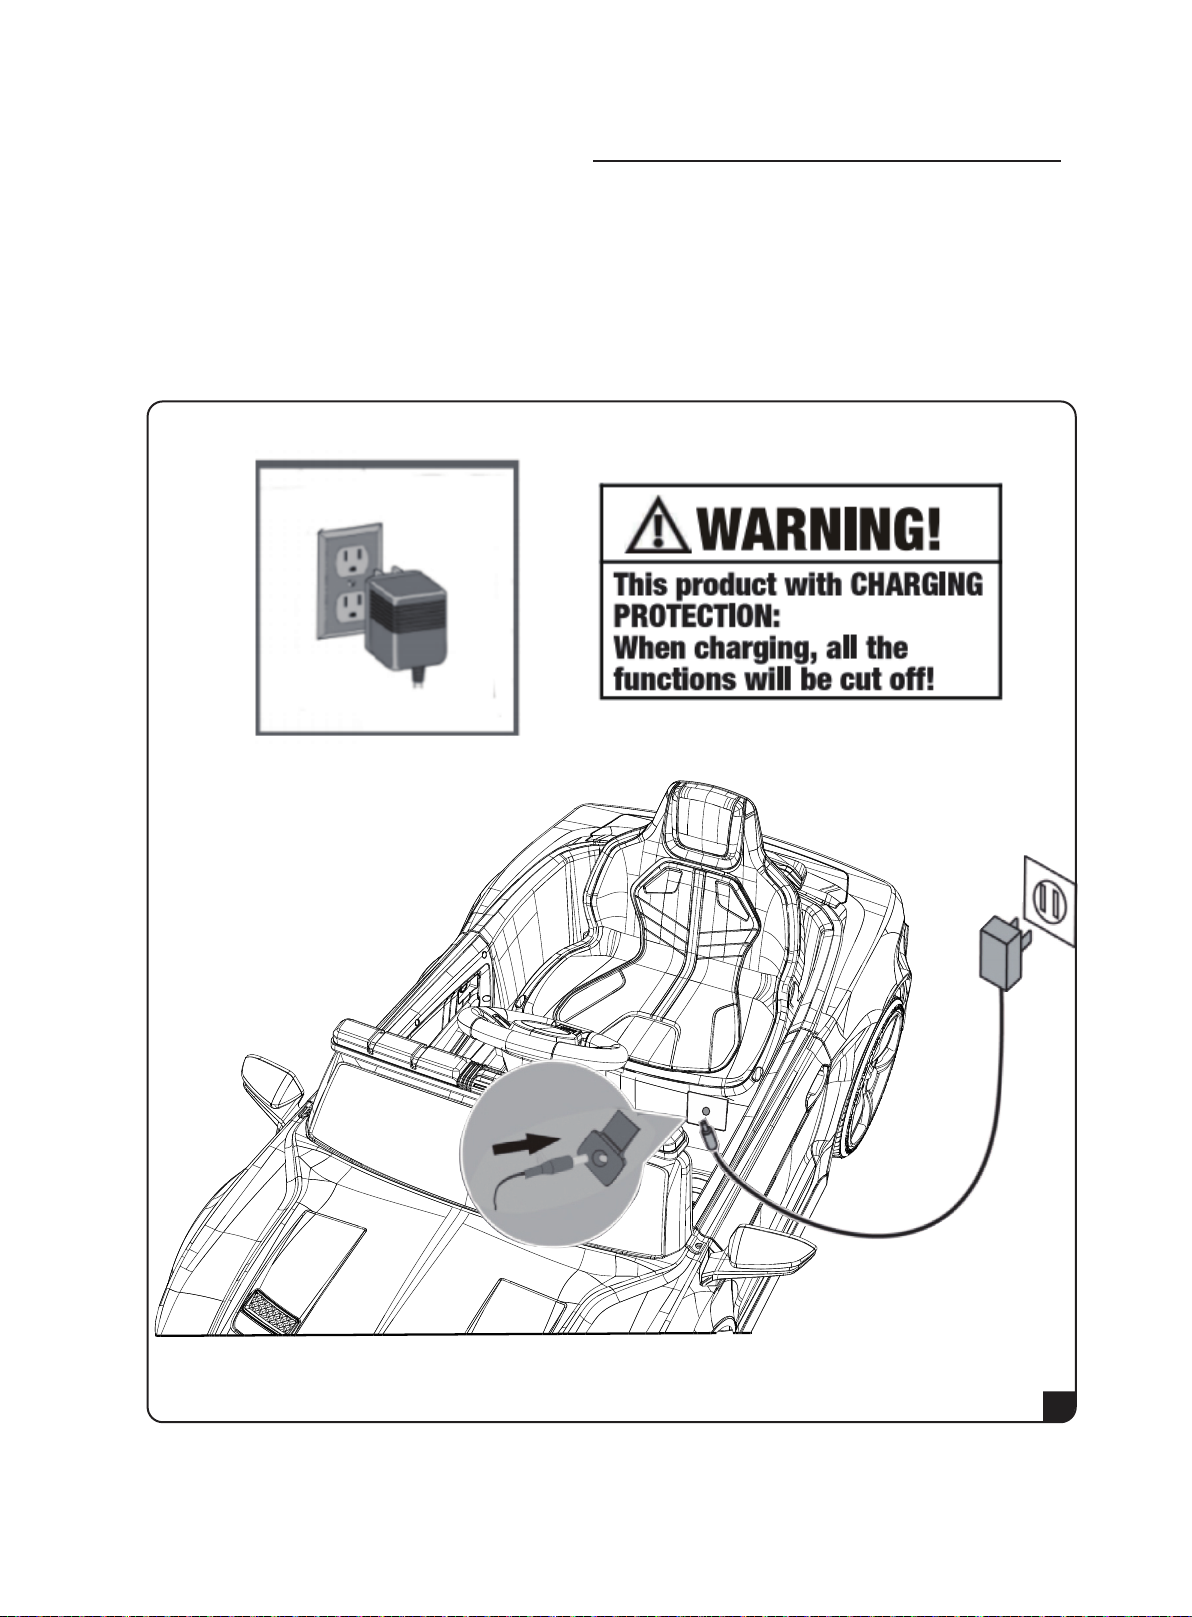
Installation Steps
12.Charging indication
When the power display shows lower power, please charge the battery in
time. Find the charging input socket below the seat. Plug the charger port
into the input socket. Plug the charger plug into a wall outlet. The battery
will begin charging.(Refer to PIC 12)
101211
Page 12
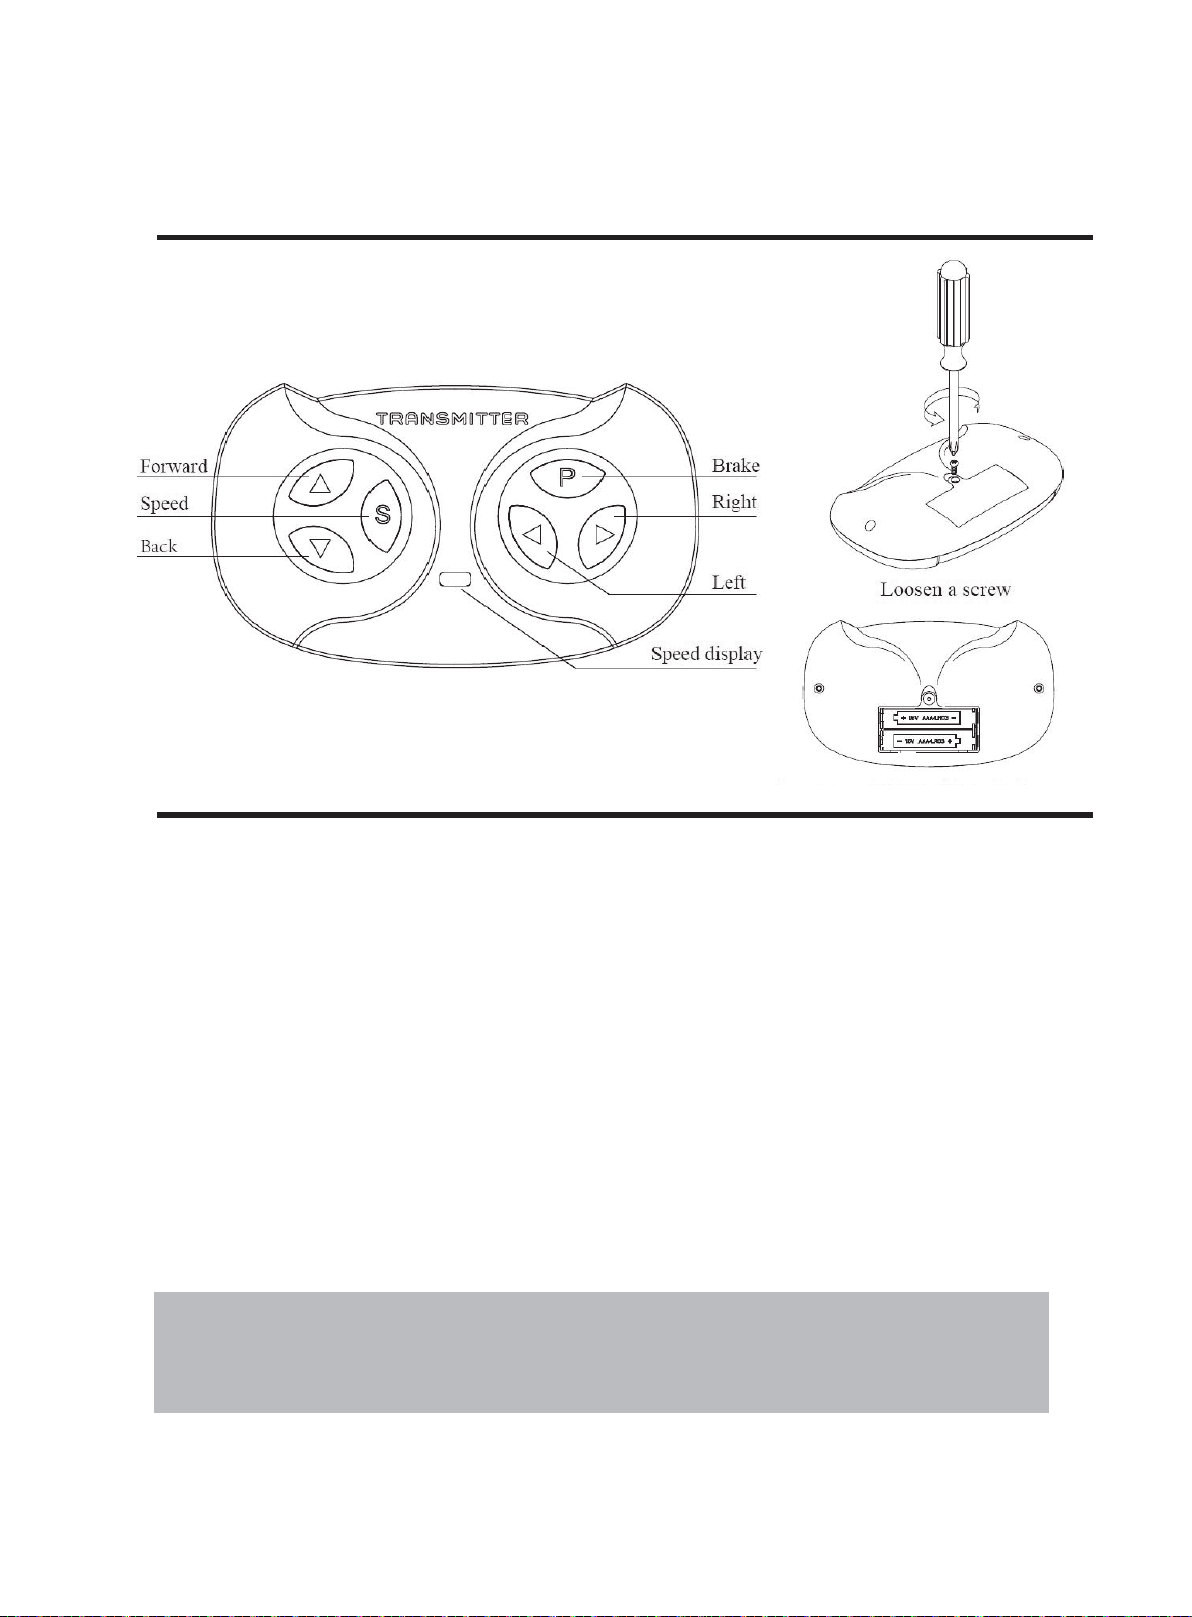
13.Remote controler operation
Step 1: Open the battery cover of the remote controler and load into 2pcs AAA
(1.5V) batteries;
Step 2: Turn off the power switch on the car;
Step 3: Hold down Forward and Back buttons at the same time, the
Speed display will flash. Wait for a moment, the Speed display red
light stop flashing, control success.
Speed button:
A red light for low speed, two red lights for medium speed, three red lights for
high speed.
Brake button: press this button for stoppi
will flashing. Press brake button once again, the car can work.
When the remote control is operated, the pedal switch of the
product is invalid; when the remote control is cut off,
the pedal switch can be used.
ng the car, red speed light
Page 13

14.Fault and solutions
Type of fault
The car
can’t move
The battery
can’t be
charged
Running
distance per
charge is
short
The battery is below
normal level
Safety protection of line
The screw on the wheels
has fell off
The battery connector
has fell off
The battery is damaged
The electrical equipment
is damaged
The motor is damaged
Battery connector has fell off
Battery charger is powered off
Battery charger is damaged
Battery is not full
Battery is old
SolutionsType of Analysis of causes
Charge the battery
Wait for a moment
Tight the screw again
Change the battery
Bring it to repair
Contact the seller
Plug into again
Plug into again
Change the battery
charger
Charge the battery
again
Change the battery
There is noise
and heat when
charge the battery
The speed
is low
The car shakes
when it goes
forward
Drive without
music
If you can’t solve the problem, please contact us.
Chemical reaction
Battery is old
Battery is out of power
Over weight
Driving on uneven road
The gear is broken
Bad connection of the
motor connector wires
Something wrong with
the motor
There isn’t battery in
the steering wheel
It is normal
Change the battery
Charge the battery again
Lighten the weight to
less than 30Kg
Driving on flat road
Bring it to repair
Connect the wires
well Bring it to repair
Put the battery
12
Page 14

15.Kind reminder
Before the first use, make sure that the battery has been charged over
12hours, otherwise it will be damaged forever.
Do not drive the car on the slipped street, road, slop and other dangerous places.
Do not drive the car on the smooth surface, such as marble and floor tile.
The car is only for one person. Do not be overweight. The maximum load is 30Kg
Do not transfer the switch from "Forward” to "Backward" during the advance.
Do not change the line and model of charged device.
Keep the remote controler and the car away from the rain and fire.
When the car meets some obstacle, it will stop. The car will move again when the
obstacle is removed.
Do not drive the car in the water. Do not put the water or liquid into the car.
Do not drive the car in the room to protect children and furniture.
When the battery is in low power, the car just go forward, but not drive left or right.
When it can't go or shake, you should change the new battery at once.
Please turn off the power when the car is not driven. If the car is not driven for a
long time, please plug out the battery connector.
16.Kind reminder for charging
1.Make sure the battery has been charged over 12 hours before the first use.
2.Connect the charger connector to the battery connector, then insert the
charger on the plug.
3.After using 1 hour, you should charge in time. It takes 8 to 12 hours to
charge normally.
4.Do not charge over 20 hours.
5.It is normal to have some heat for charger and battery when it is charging.
(low than 60°C)
6.In order to protect charger, battery and circuit, please use the special charger
and battery from the seller.
7.The connecting terminal can't be in short circuit.
8.Make the battery charge once a month at least when the car is not driven for
long time.
9.Charge the battery by adults.
13
Page 15

Chargers and battery maintenance:
1.Take away the seat first, and urscrewing the battery cover,finally get out
of or put in the battery,and then screwing the battery cover,finally put the seat
as well as screwing the bolt.
2.Must be charged under Adults’ inspection.
3.Battery poles must be connected correctly,(Red to Red, Black to Black)
4.Being short circuit is not allowed.
Battery usingmaintenance:
Battery for remote control
1.Please use two pieces of 1.5VAA batteries.
2.Open the battery cover and insert two1.5VAAA batteries, then close the
cover; Remove the battery in the same way.
3.Either different styles of batteries or new and old batteries can't be used
together.
Battery for the car
1.Battery poles must be connected directly.
2.Not allow short circuits.
Maintenance:
1.Before the installation,make sure the parts are complete, If you have any
questions,please feel free to contact us.
2.Make sure every part is complete when installing and using.
3.Please clean the product regularly. Do not damage to the electrical
equipment.
4.Please check and maintain the car for the children’s safety.
14
Page 16

EXECUTION STANDARD : EN 71 EN62115 ASTM F963 CPSIA
 Loading...