

Page 1

Startup Guide
anonab x
Page 2

2
Startup Guide
Page 3

3anonabox PRO
Table of Contents
2 welcome to PRO
3 PRO at a glance
4 what’s in the box
4 what you need
6 setting up your PRO
7 Step 1 GETTING STARTED
9 Step 2 ACCESSING THE USER INTERFACE
11 Step 3 CONFIGURE WIFI
14 Step 4 CONNECT TO THE INTERNET
19 Step 5 CONFIGURE VPN
21 Step 6 CONFIGURE Tor
23 tips & troubleshooting
31 declaration of conformity
Welcome! We’ve been
expecting you.
Page 4

Page 5

1anonabox PRO
meet PRO
Page 6

2
Startup Guide
welcome to PRO
Congratulations! In your possession is the anonabox PRO - a portable VPN and
Tor-enabled router. Both Tor and VPNs are effective tools for remaining anonymous when browsing online, accessing blocked content, and deterring big data
collection and hackers. With PRO, you can access a VPN and/or route your trafc
over the Tor network wherever you have an Internet connection. Whether you’re
at home, in the ofce or on the go, set up and use is easy.
what is a VPN?
A VPN, or Virtual Private Network, is an increasingly common privacy and censorship bypassing tool. You can think of a VPN as a tunnel over the Internet,
one where all of your trafc is sent encrypted to another point of your choosing. An entity attempting to listen in on your trafc will be able to tell you are
using a VPN, but not much else.
VPNs work by routing your Internet trafc through a user-specied server maintained by the VPN provider. This allows the end user to appear as if their trafc
is originating from a remote location. This prevents snoopers from being able to
discern the proper end user, thus protecting your privacy. Being able to specify
a particular server also allows the user to gain access to content that may be
systematically blocked locally or otherwise specic only to users within the region
of the given server.
what is Tor?
Tor provides many of the same privacy benets as a VPN, but routes your trafc
over a series of volunteer maintained relays all over the world in a random fashion. Using Tor also provides access to .Onion domains, also known as the Deep or
Dark Web.
For more on VPNs and Tor, please visit our website: https://www.anonabox.com.
Page 7
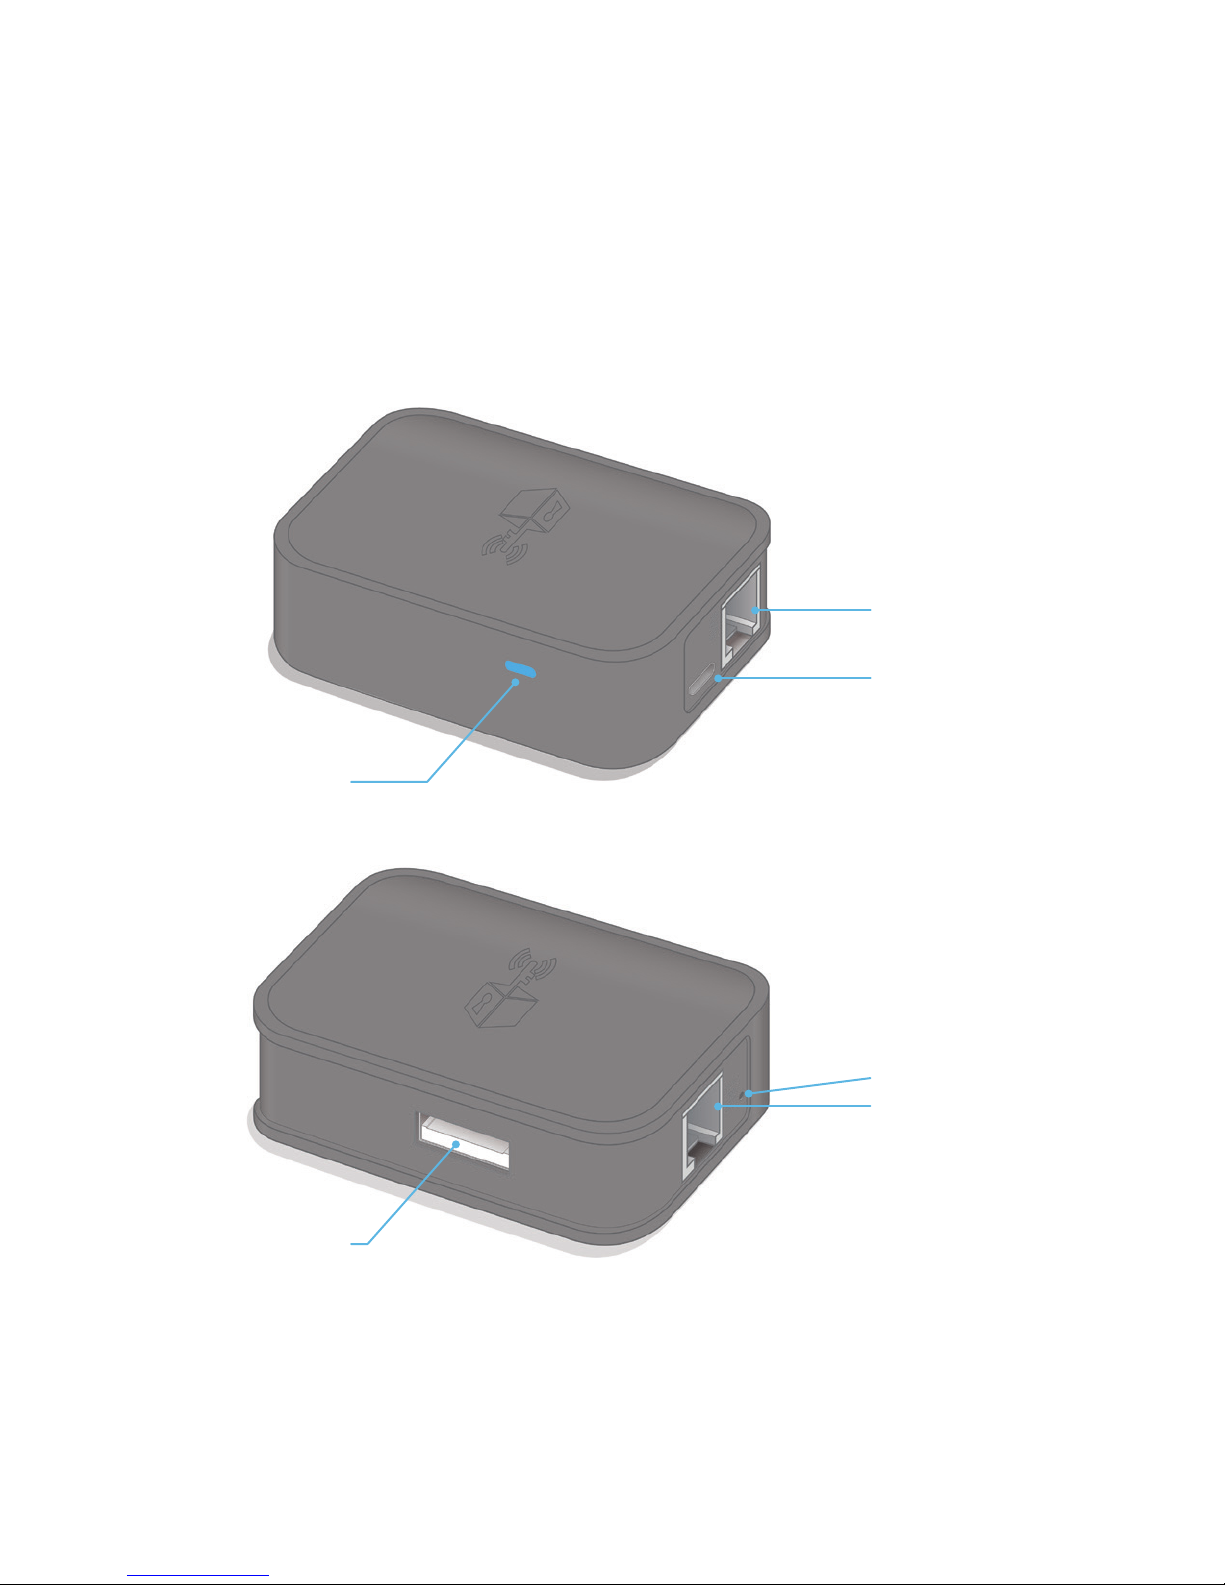
3anonabox PRO
WAN Port
(Uplink)
Micro USB
(Power)
Status Indication LED
LAN Port
PRO at a glance
Device Reset Port
File Sharing USB Port
Page 8
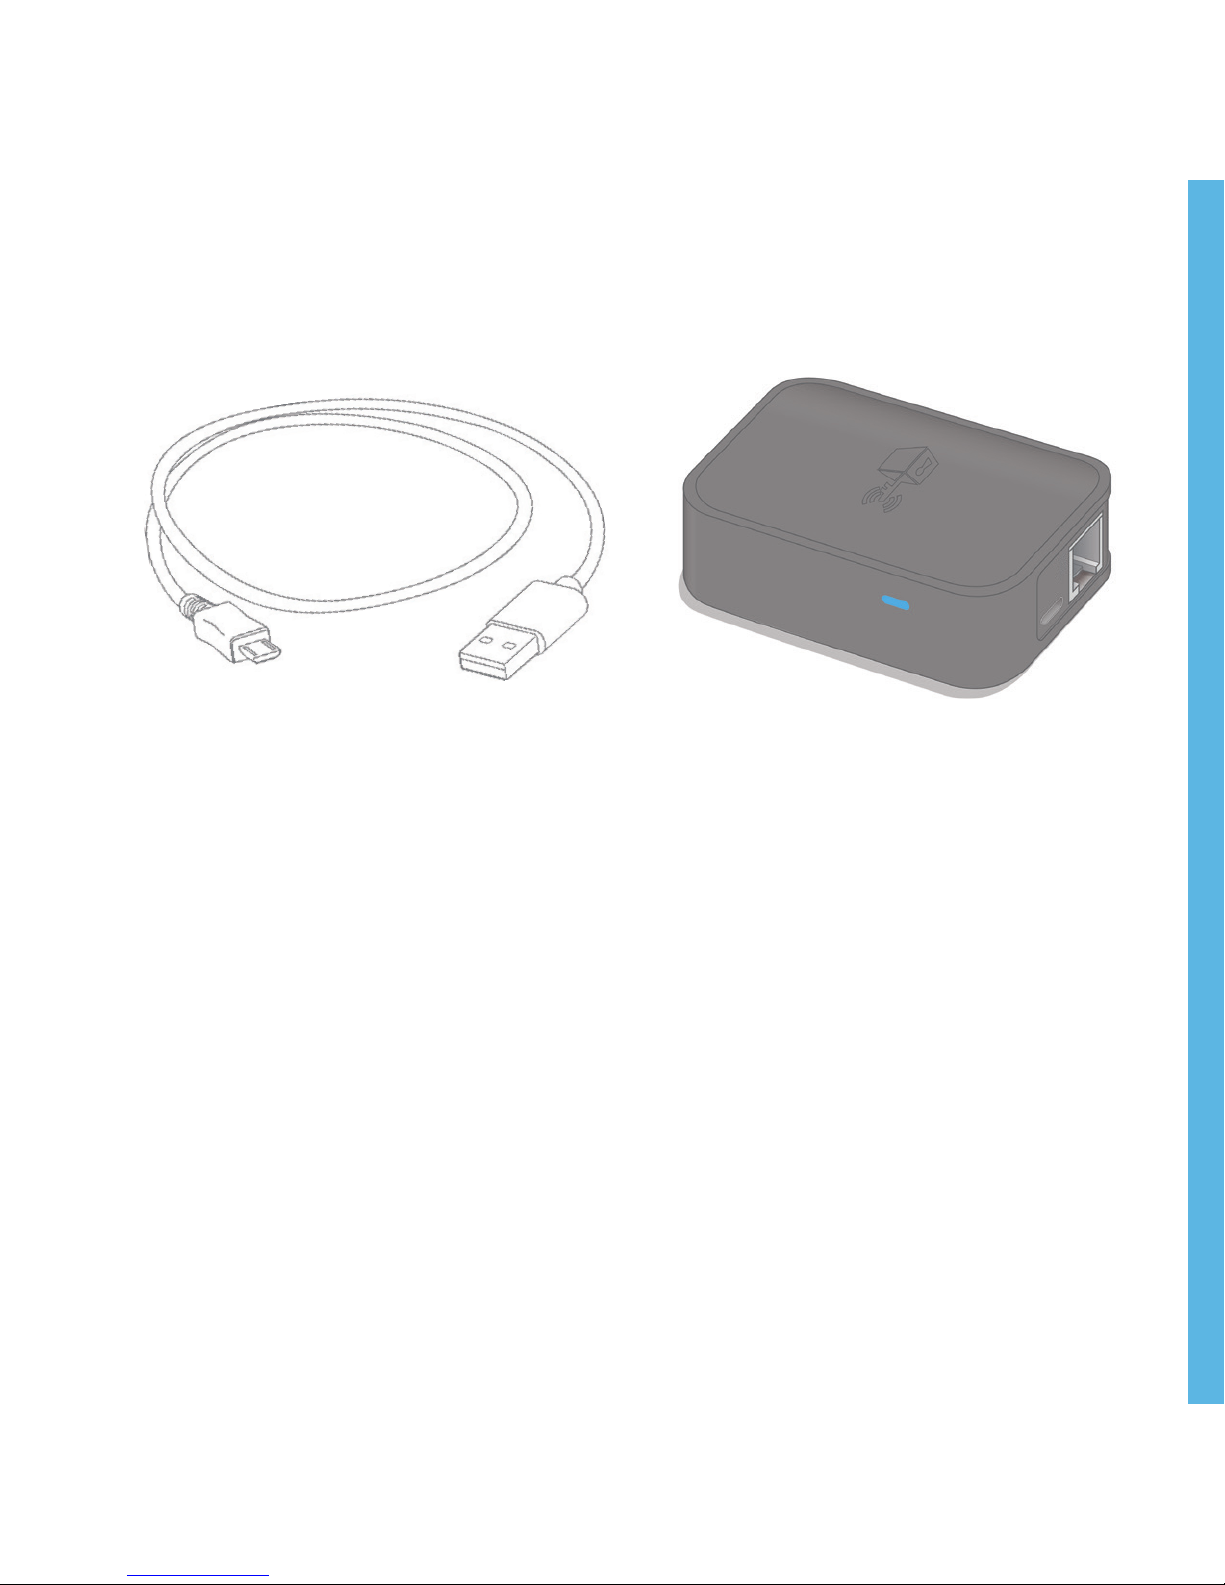
4
Startup Guide
what’s in the box
what you need
Standard Ethernet cable (recommended) WAN + LAN Connections
are available through Ethernet connections. With WiFi uplink, connections
can be completely wireless, but we recommend carrying an Ethernet cord
for easy and direct access to the User Interface and for added security.
An available USB port to power anonabox.
anonabox PROmicro usb power cable
Page 9

5anonabox PRO
getting started
Page 10

6
Startup Guide
setting up your PRO
anonabox PRO is a portable, WiFi–enabled VPN and Tor router. This innovative
device will provide security and exibility of both VPN and Tor. Use VPN and Tor
simultaneously or independently. You can connect to a wide range of WiFi devices, or
directly through an Ethernet LAN connection. For the novice and professional alike,
we’re sure you’ll love your anonabox PRO. Let’s get started!
Page 11
7anonabox PRO
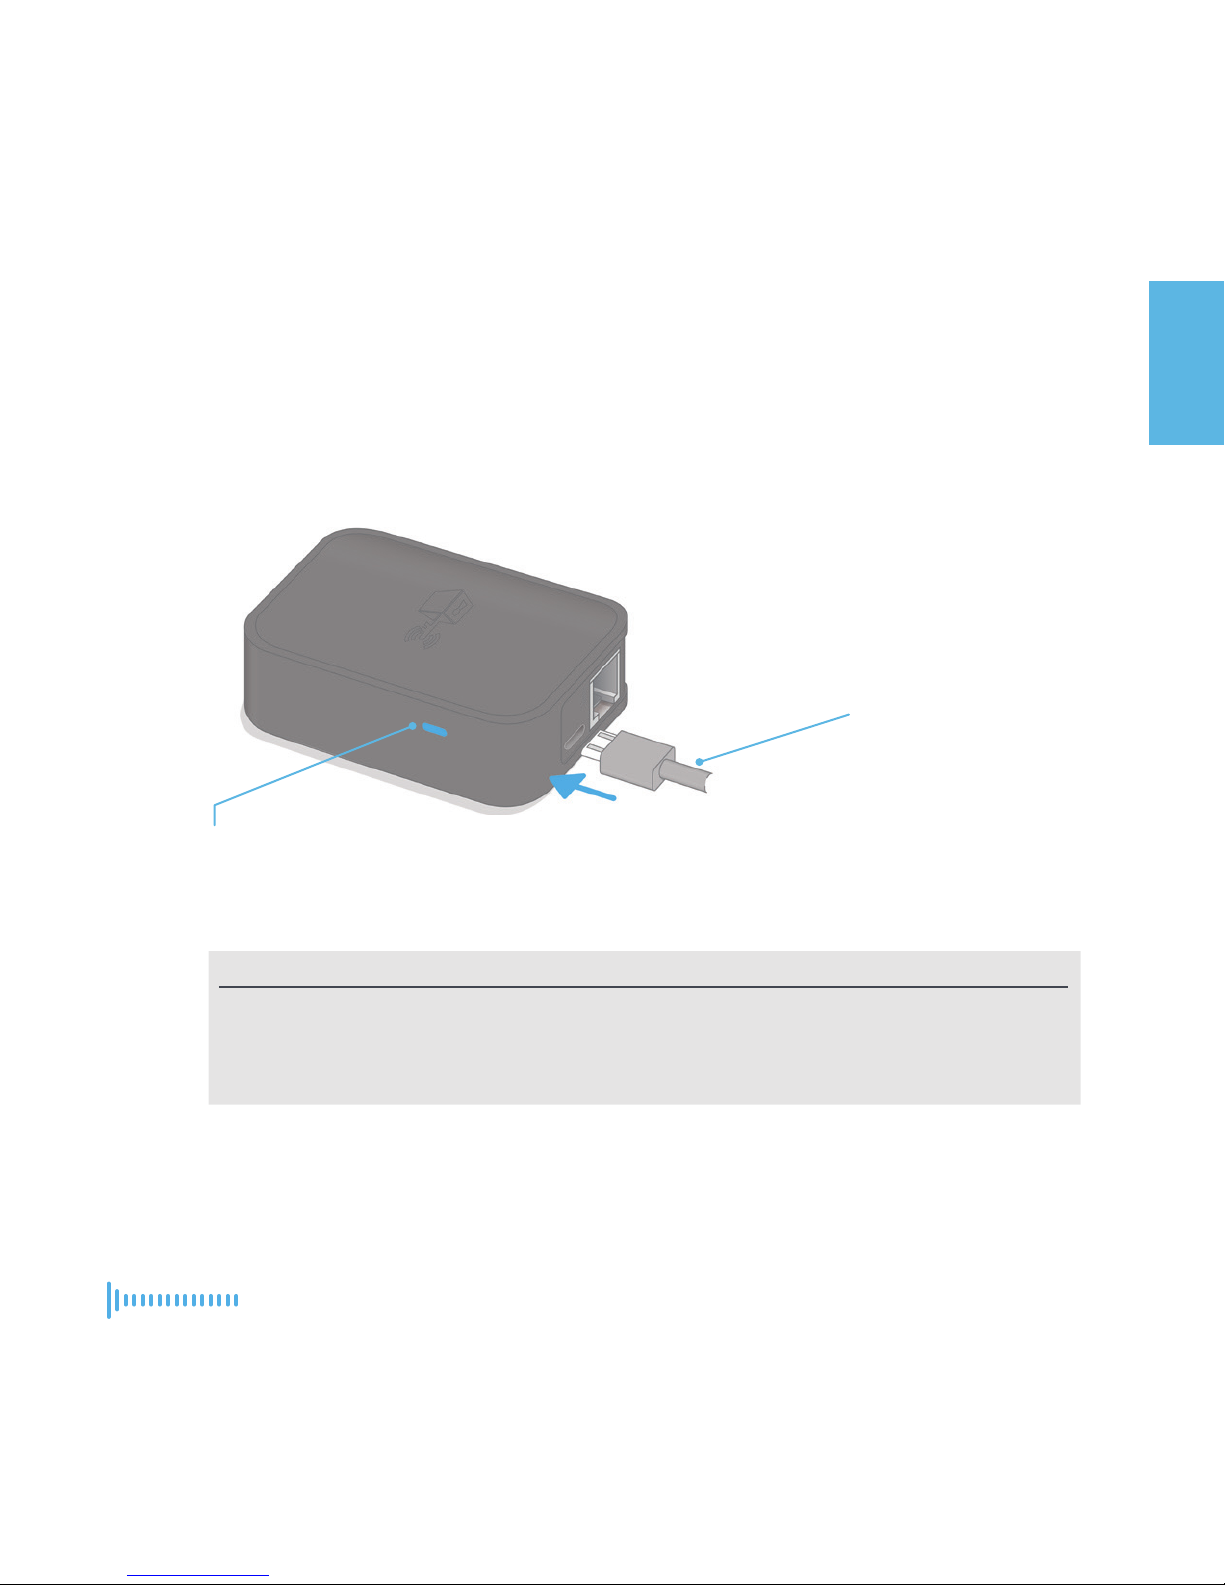
Plug in your PRO into your computer, or other USB ports, using the provided
USB power cord. Other power cords may not be compatible. The Status
Indication LED will blink while power is supplied.
Troubleshooting
Returning Users: If your anonabox does not seem to stay on, try utilizing an
Ethernet LAN connection, or using the reset button (located next to LAN port).
Be sure to only use the supplied power cable.
+
STEP 1 GETTING STARTED
Micro USB
(included)
Status Indication LED
Page 12
8
Startup Guide
Connect to the PRO
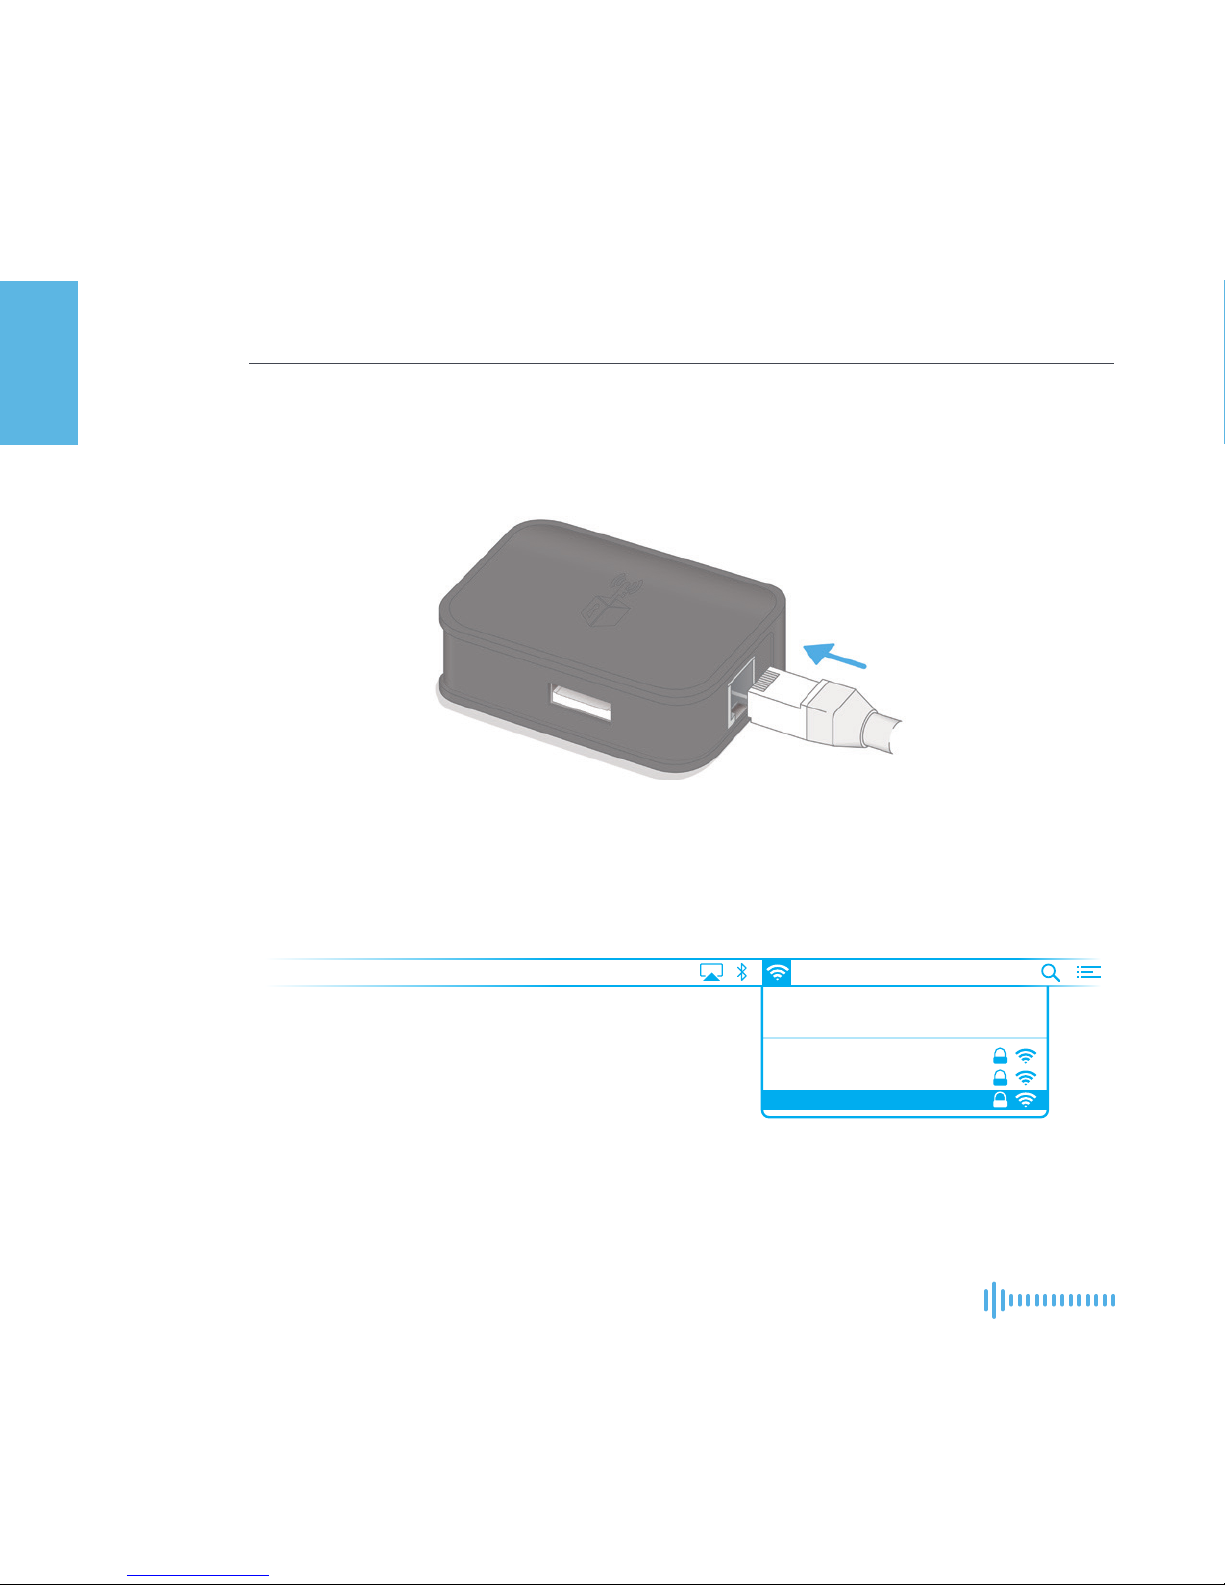
OPTION 1: LAN Connection (Recommended. For WiFi Skip to Option 2)
Connect the PRO to your device with an Ethernet cable via the LAN port.
OPTION 2:
Wireless WiFi Connection:
Make sure your device’s WiFi is active and select anonabox-pro from
available WiFi networks.
Wi-Fi: Looking for Networks...
Turn Wi-Fi Off
Tue 6:08 PM Primary User
Home Wi-Fi Network
Neighbor Joe’s Wi-Fi
anonabox-pro
* You will not have general Internet access at this point if connecting wirelessly
and/or haven’t saved Internet settings.
+
+
setting up your PRO (contin.)
LAN Port
Page 13
9anonabox PRO
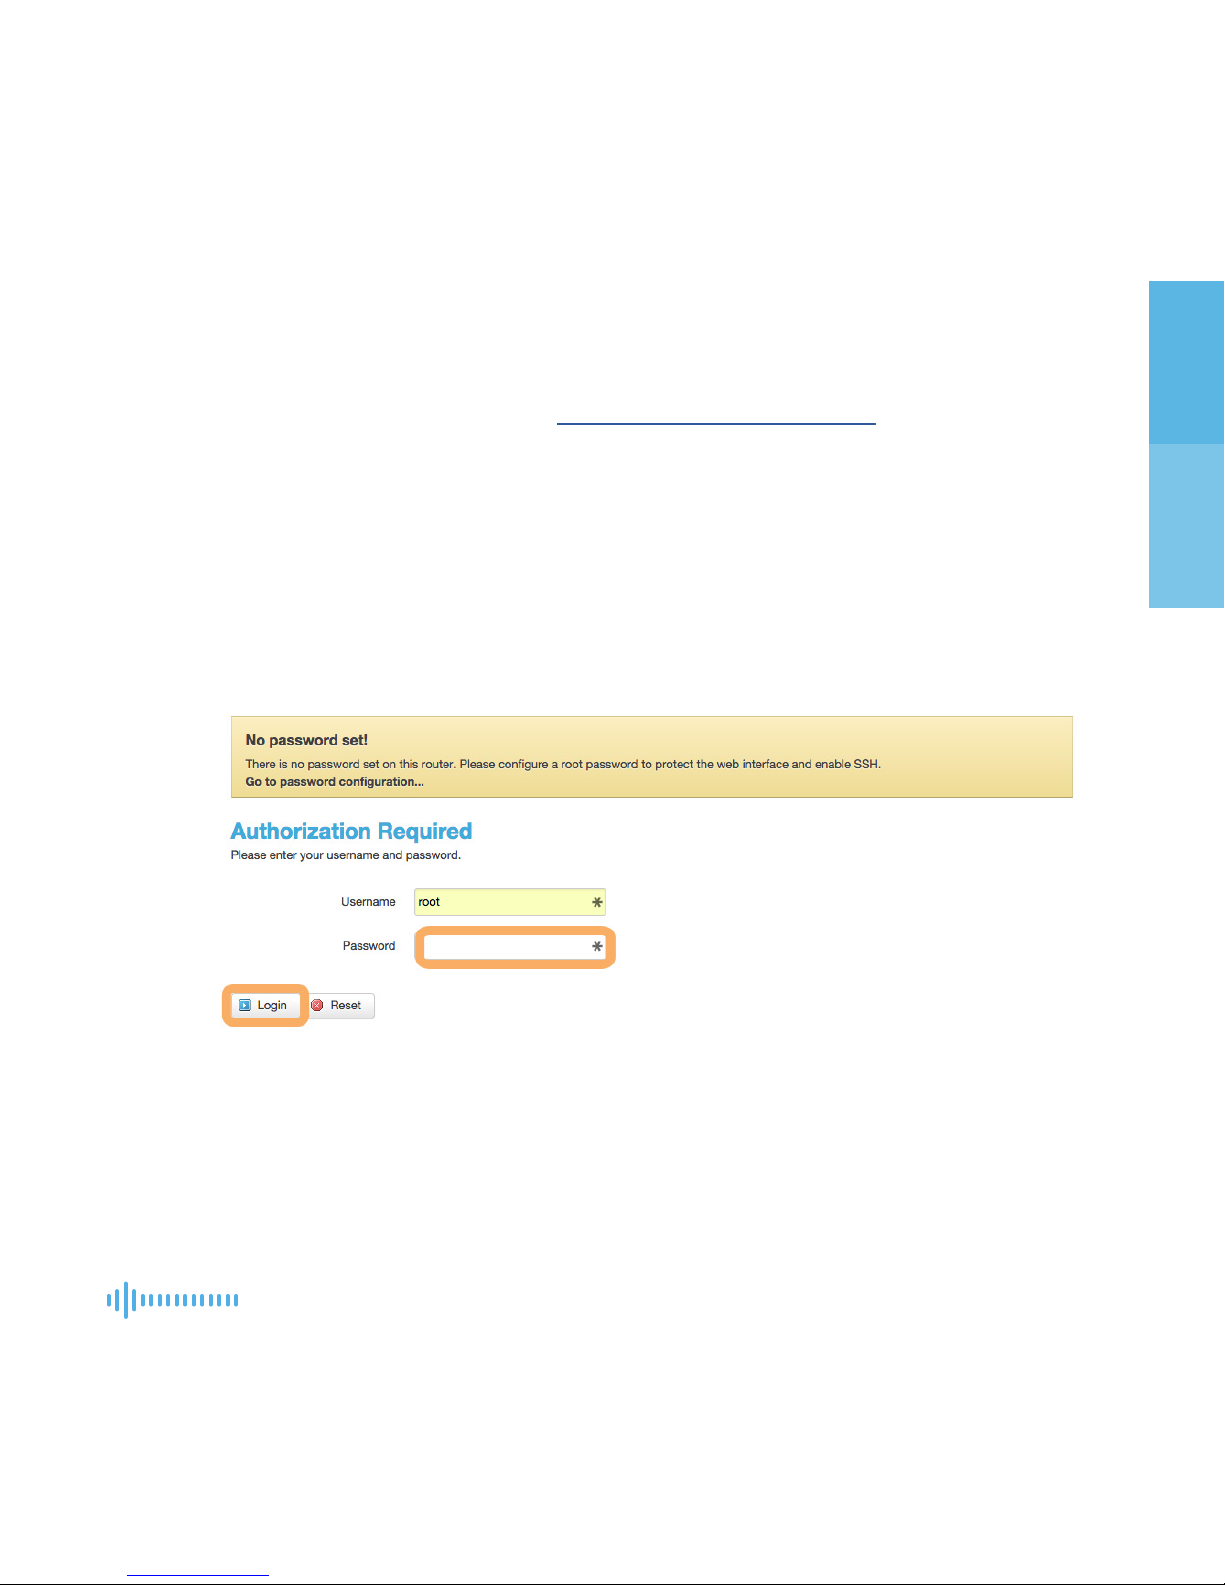
Open a web browser and go to http://192.168.19.84:1776.
OPTION 1: Returning Users (New Users Skip to Option 2):
Login with your previously selected admin password. You’re now
in the User Interface and can move on to Step 3 (Pg11).
OPTION 2: New Users /After a Reset:
You’ll see a yellow box indicating that you do not have an admin
password. Click login with a blank password eld.
STEP 2 ACCESSING THE USER INTERFACE
+
+
+
Page 14

10
Startup Guide
Set Admin Password (Recommended)
Use the ‘System’ tab and select ‘Administration’.
Admin password. Choose a new password using a combination of letters,
numbers, and characters for best security. Make sure you remember this! If you
ever forget it, you will need to reset the device to regain access.
Click ‘Save & Apply’. A spinning wheel will briey appear while your changes are
applied to your device.
Congrats! You’re now password protected and in the User Interface. Continue
onwards to Step 3. (Pg 11)
+
+
+
setting up your PRO (contin.)
Page 15
11anonabox PRO
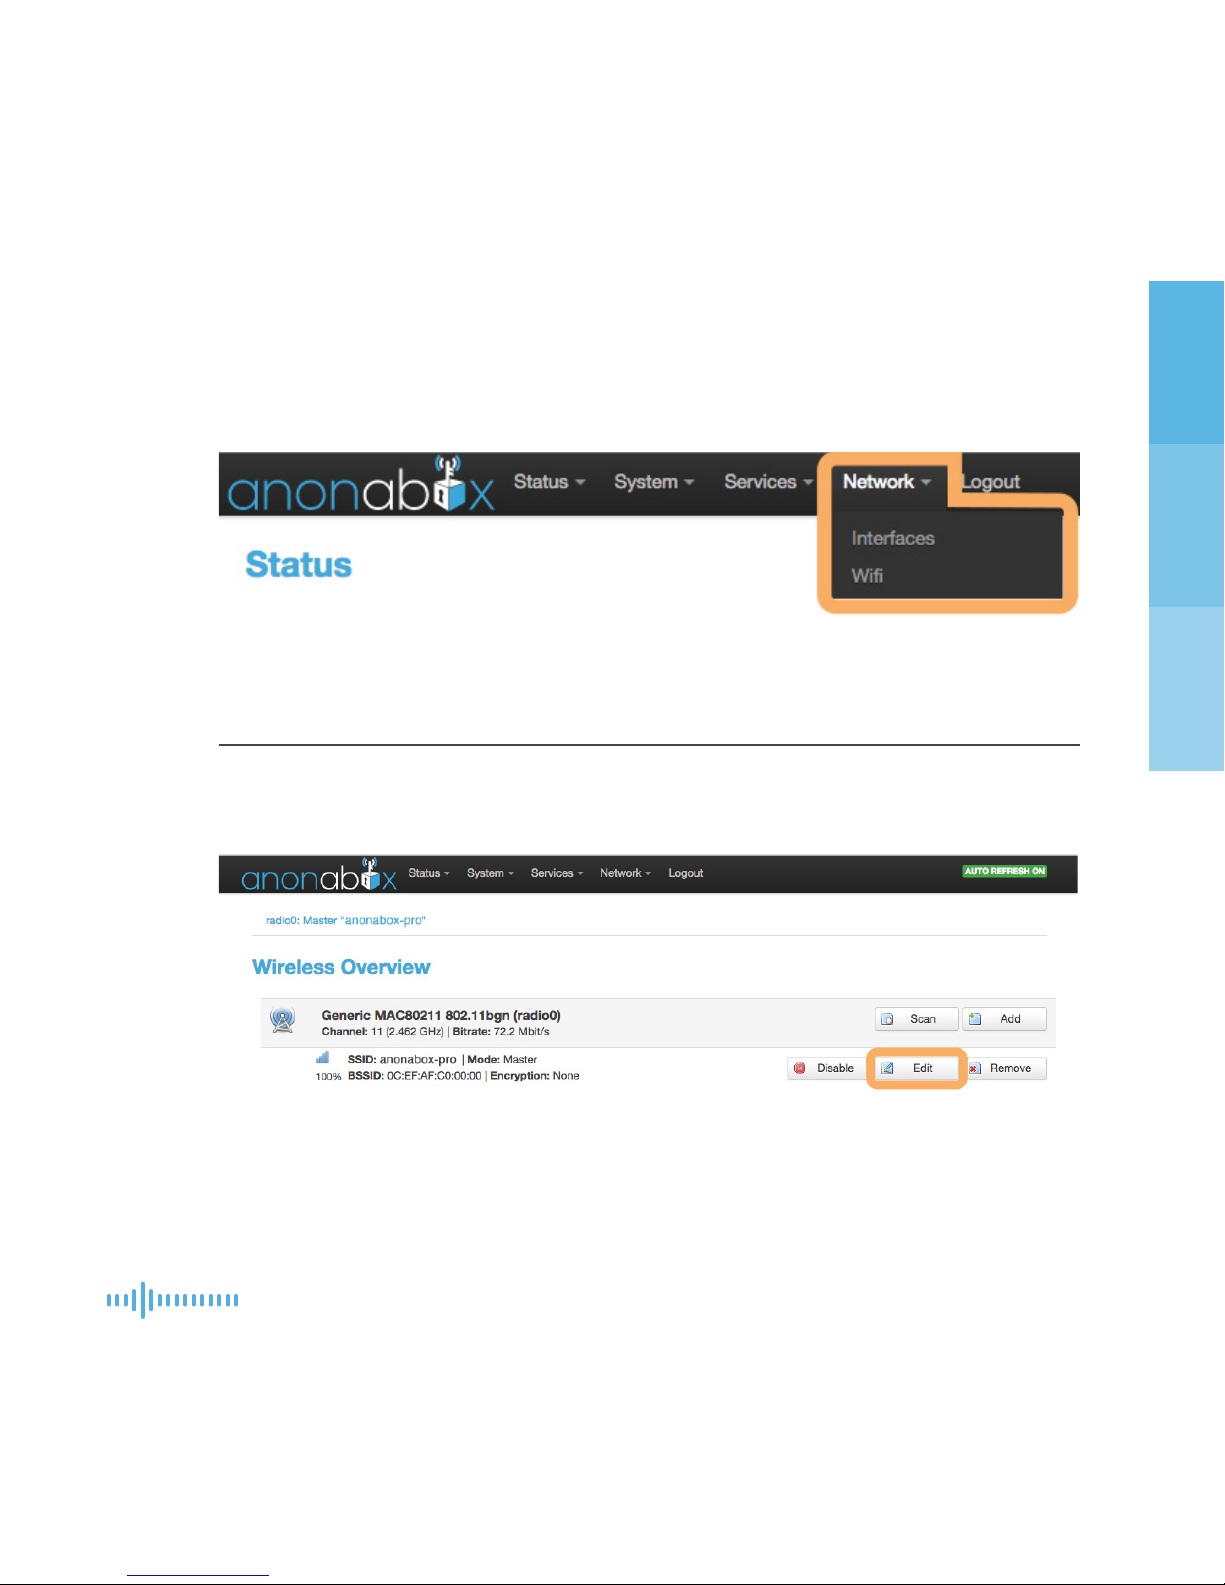
From the User Interface, use the ‘Network’ drop down and select ‘WiFi’.
Set WiFi Network Name (Optional)
Click the ‘Edit’ button to the right of the SSID anonabox-pro listed in the ‘Wireless
Overview’ section.
STEP 3 CONFIGURE WIFI (RECOMMENDED)
+
+
Page 16
12
Startup Guide
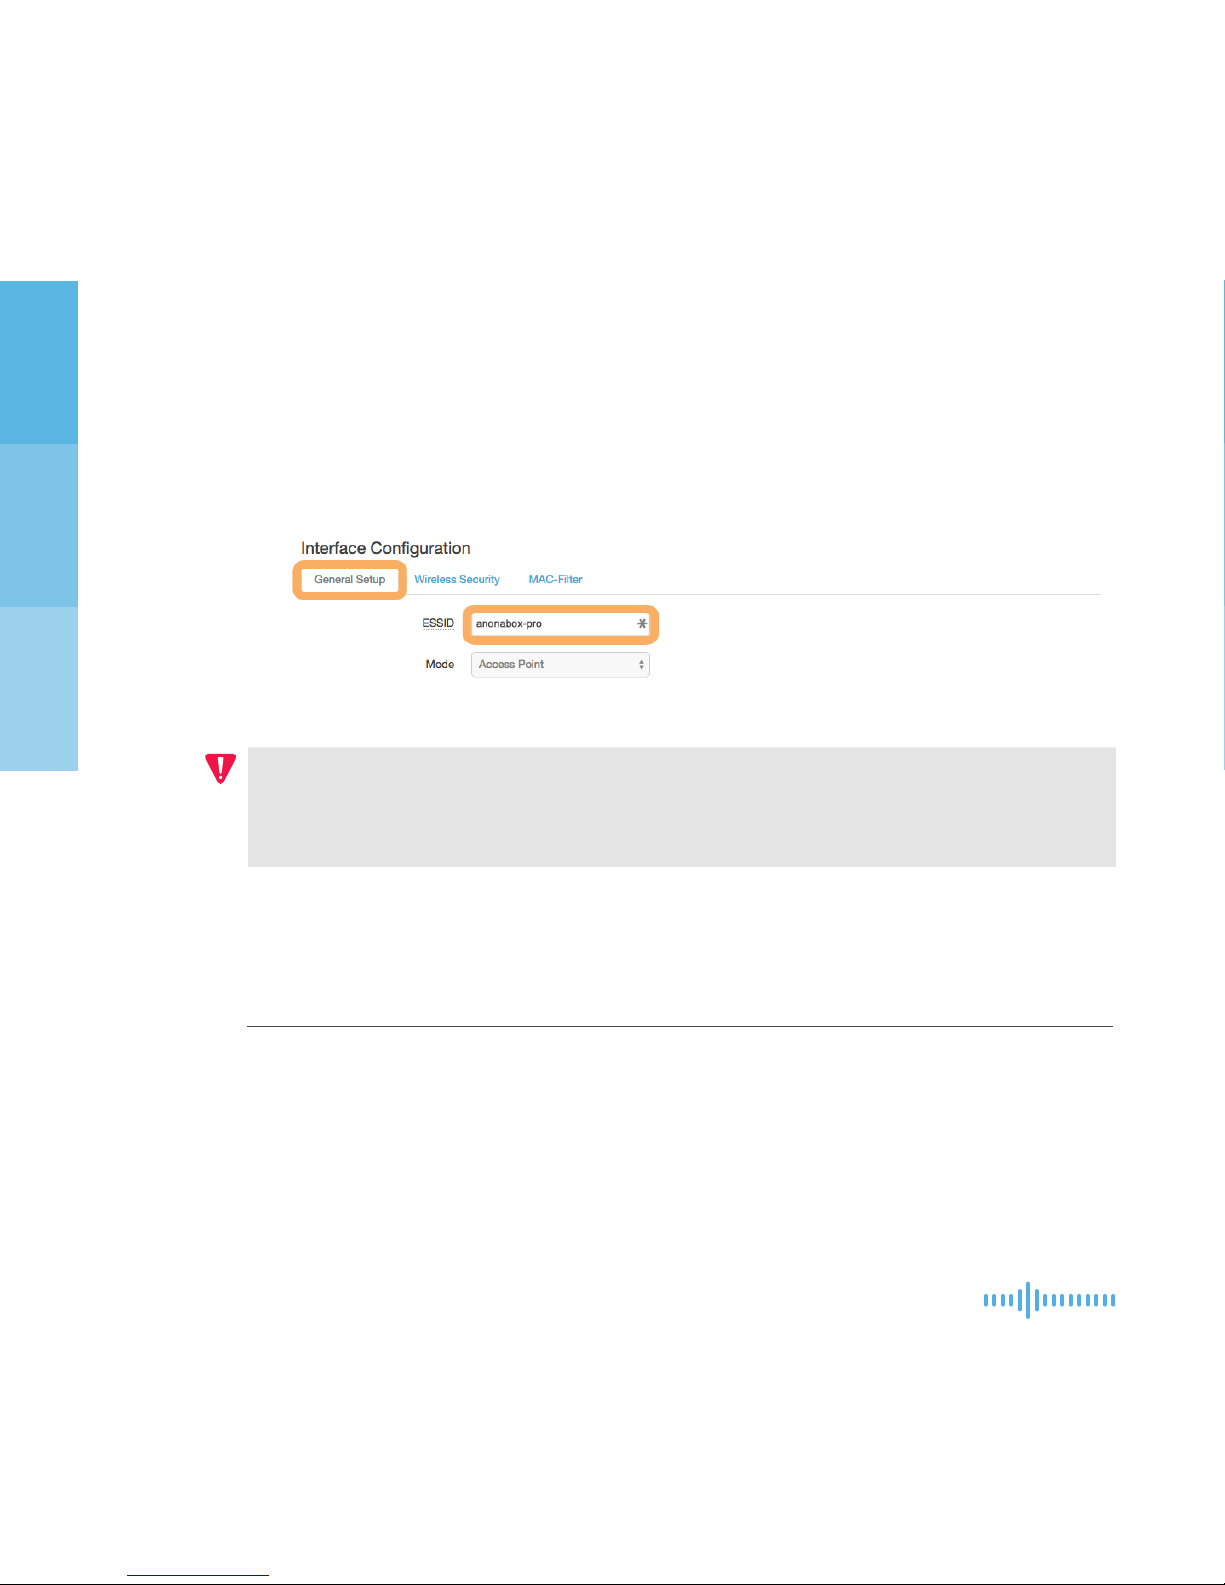
Move down the screen to the ‘Interface Conguration’ section.
Under the ‘General Setup’ tab you’ll see a box labelled ESSID. Re-name the
network name that your anonabox will broadcast in this eld. Recommended
defaults are already selected.
Click ‘Save & Apply.’
IMPORTANT: Users connected wirelessly will need to reconnect to the
renamed PRO by selecting the named network from their device’s WiFi/Air
Port. You do not need to wait for the spinning status wheel to resolve.
Refresh page after connecting to new WiFi name.
Set WiFi Password (Recommended)
From the User Interface, use the ‘Network’ drop down and select ‘WiFi’.
Click the ‘Edit’ button to the right of your anonabox network.
Move down the screen to the ‘Interface Conguration’ section. Use the ‘Wireless
Security’ tab.
+
+
+
+
+
+
+
setting up your PRO (contin.)
Page 17
13anonabox PRO
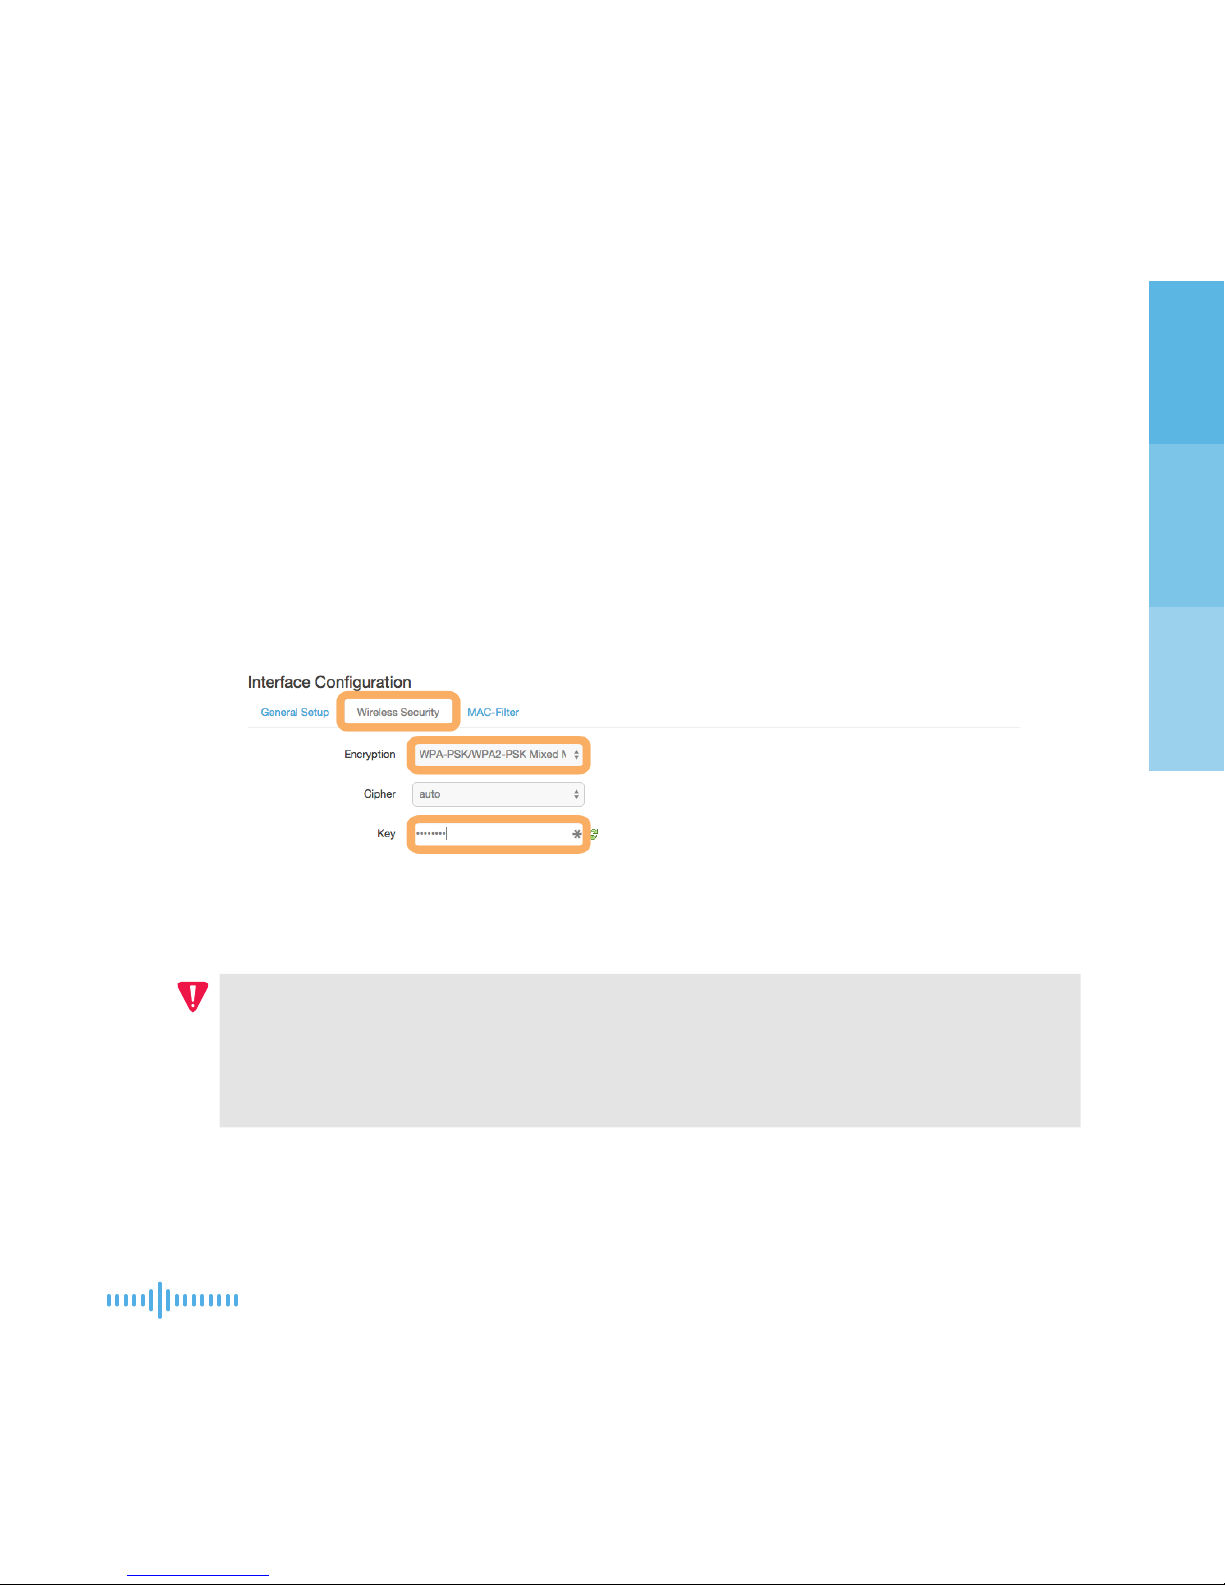
Select the desired encryption type for your WiFi network connection. We
recommend WPA-PSK/WPA2-PSK Mixed Node.
*Two additional elds will appear after selecting your encryption
type. We recommend you leave Cipher to the ‘auto’ default unless
you are an advanced user.
Set your new WiFi password in the box labelled ‘Key’ using a combination of
letters, numbers, and characters for best security. Make sure you remember
this!
Click ‘Save & Apply.’
IMPORTANT: Users connected wirelessly will need to reconnect to their PRO
by selecting the named network from their device’s WiFi/Air Port. You will be
prompted for your new password. You do not need to wait for the spinning
status wheel to resolve.
Now that you have congured your wireless network settings, it’s time to connect
to the Internet. Continue onto Step 4. (Pg 14)
+
+++
+
Page 18
14
Startup Guide
Returning Users, Your anonabox PRO will automatically implement any saved
settings, including connecting to saved WiFi connections that are enabled and
within range. Check the ‘Wireless Overview’ page for current connectivity or
follow these steps to connect to a new wireless network.
IMPORTANT: Read ‘Maximize Portability’ in the ‘Tips &
Troubleshooting’ section following the setup guidelines. (Pg 24)
PRIVATE BROWSERS: We recommend using a private browser
window for best results. Private browsing is a user-specied mode
available within most commonly used web browsers. A quick Internet search should provide adequate instructions for accessing
this mode if you are unfamiliar.
OPTION 1: Ethernet WAN (For WiFi LAN Uplink, Skip on to Option 2) (Pg 15)
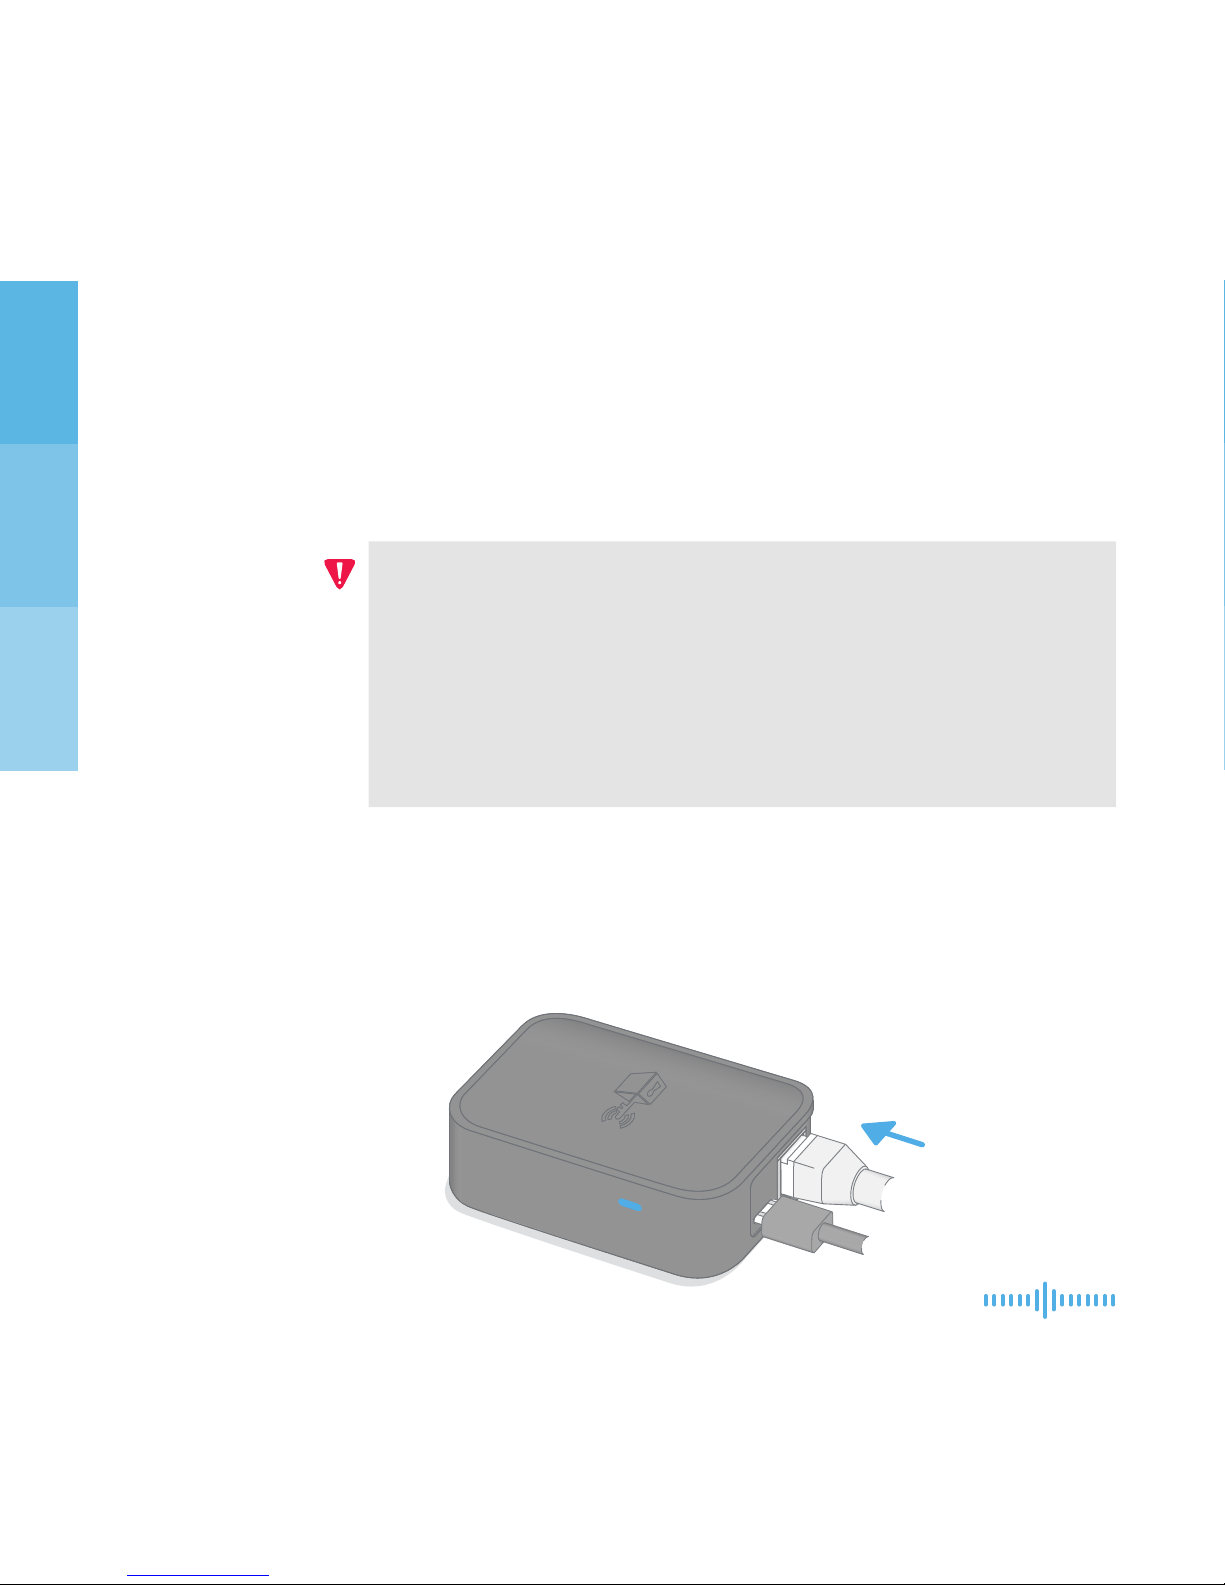
Use an Ethernet cable to connect to an existing router or Internet
connection using the WAN port on your PRO.
WANWAN
STEP 4 CONNECT TO THE INTERNETSTEP 4 CONNECT TO THE INTERNET
+
setting up your PRO (contin.)
WAN Port
Page 19
15anonabox PRO
Open a private web browser to conrm you have an Internet connection.
Congrats, you’re connected to the Internet! Proceed on to Step 5. (Pg 19)
OPTION 2: Setup WiFi Uplink and Connect to WiFi Internet
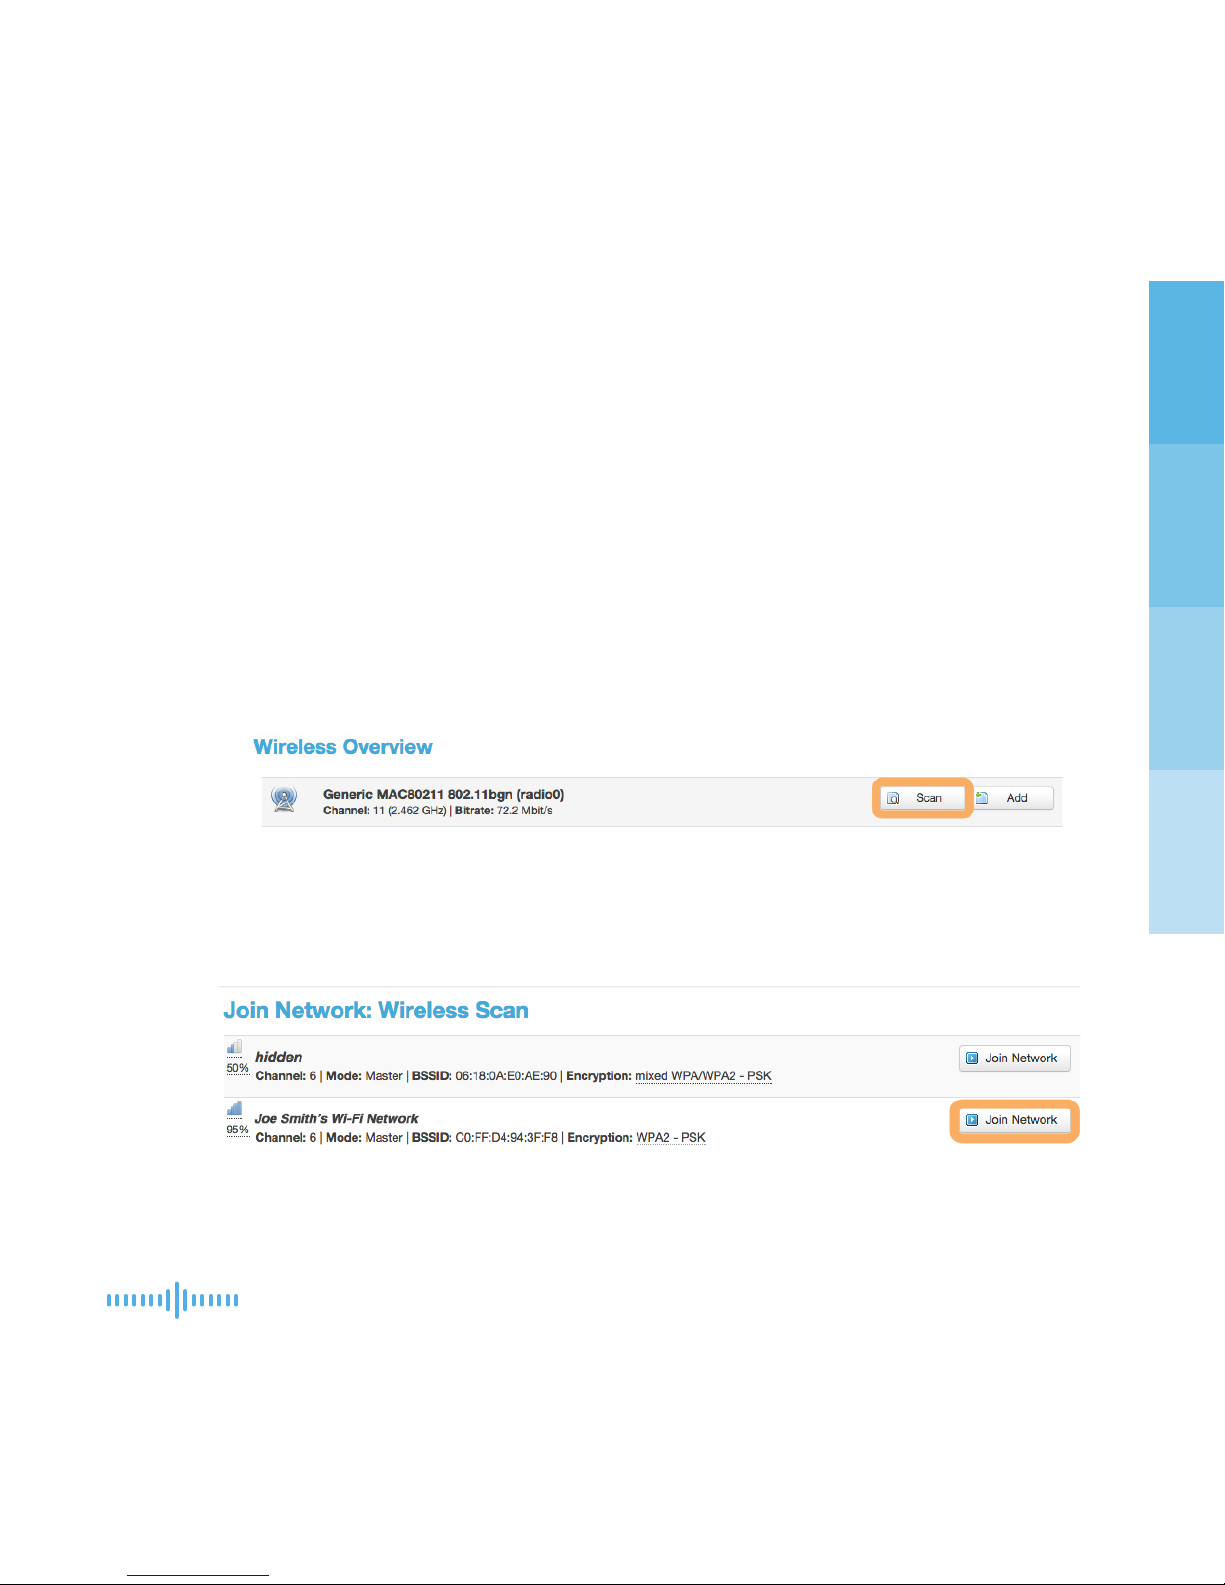
From the User Interface, use the ‘Network’ drop down and select ‘WiFi’.
From the ‘Wireless Overview’ Page, click the ‘Scan’ button to nd
wireless networks that are within range.
Select the desired network you’d like to connect to by clicking the
appropriate ‘Join Network’ button.
Make sure the ‘Replace Wireless Conguration’ box is unchecked.
+
+
+
+
+
Page 20

16
Startup Guide
Specify the ‘WPA pass phrase,’ AKA password, specic to the network
you are joining.
*The data shown in the ‘Interface Conguration’ section is
auto-populated. Do not change this information or you will not
connect successfully to the wireless network you’re joining.
Click ‘Submit’ at the bottom of the page.
Review the ‘Network Info’ and Click ‘Save and Apply.’
Conrm Internet Connectivity
OPTION 1: LAN Connection (For WiFi Skip to Option 2) (Pg 18)
You’ll automaticaly be taken back to the ‘Wireless Overview’ page when
using an Ethernet LAN connection. You’ll see the wireless connection
you’ve congured and should see a positive status. Open a private web
browser and verify Internet connectivity.
If Internet connection is conrmed, proceed on to Step 5. (Pg 19)
Troubleshooting
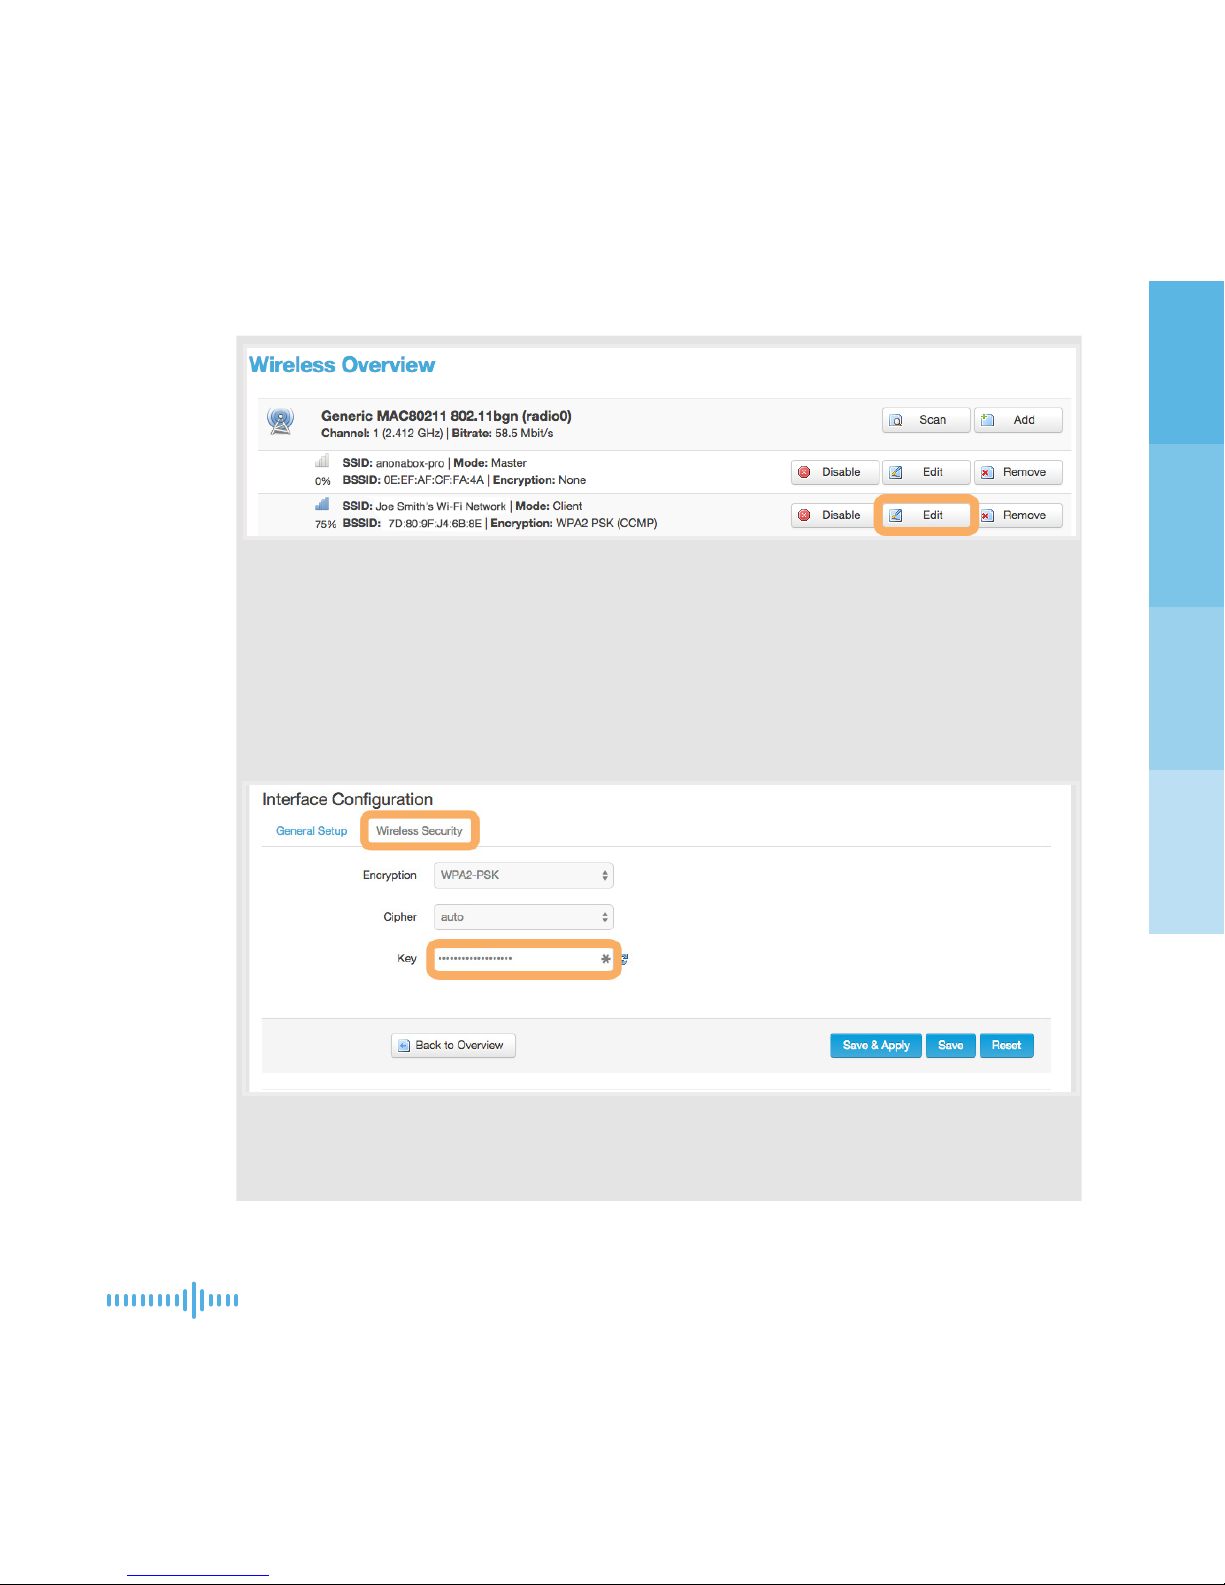
Use the ‘Network Dropdown’ and select ‘WiFi’.
Click ‘Edit’ to the right of the connection you’re conguring.
+
+
+
+
+
+
setting up your PRO (contin.)
Page 21
17anonabox PRO
Under the Interface Conguration Section, click on the ‘Wireless Security’
tab.
Conrm and/or re-enter the appropriate password for the Internet
connection in the eld labelled ‘Key’.
Click ‘Save & Apply ‘and re-check connection.
+
+
+
Page 22

18
Startup Guide
OPTION 2: WiFi Connection
Reconnect to your PRO by selecting the named network from your
device’s WiFi/Air Port. You do not need to wait for the spinning status
wheel to resolve.
Open a private web browser and verify Internet connectivity.
Troubleshooting
If your device’s WiFi/Air Port no longer shows your PRO, or you are
unable to reconnect to the PRO, there may have been an error
when conguring the Internet connection. You will need to use an
Ethernet cable to connect your device to the PRO via LAN or perform a hard reset to access the User Interface. See Option 1 for LAN
troubleshooting. A hard restart will reset the device to defaults, and all
steps will need to be performed again.
IMPORTANT:Read ‘Maximize Portability’ in the ‘Tips & Troubleshooting’
section following the setup guidelines. (Pg 24)
Congrats! You’re connected to the Internet. But wait, don’t you want to
connect to your VPN or run Tor? Continue to Step 5 (Pg 19) to congure your
VPN and/or Step 6 to congure Tor. (Pg 21)
+
+
setting up your PRO (contin.)
Page 23

19anonabox PRO
IMPORTANT: You will need to be connected to the Internet BEFORE you can
activate your VPN. We recommend checking that you are actively using the
VPN service after ANY reconguration to the device or change in Internet
connectivity as an interruption in Internet service will disable the VPN and it
will need to be reactivated. If you did not connect to the Internet, go back to
Step 4. (Pg 14)
Activate your VPN service account by following the instructions on the included
insert.
Use the ‘Services’ tab in the User Interface and select your VPN provider.
Important: ‘OpenVPN’ conguration is intended for advanced users only.
Check with your VPN service provider for conguration support for
‘OpenVPN’ or ‘OpenWRT’ before attempting to congure.
Click the ‘Enable’ box.
Put in your account credentials (user name and password).
Select desired server location.
Click ‘Save & Apply’.
STEP 5 CONFIGURE VPN
+
+
+
+
+
+
Page 24

20
Startup Guide
Verify VPN Connection
Check that ‘Yes’ appears next to ‘Started’ in the ‘VPN Status’ section when page
refreshes.
‘Public IP’ should reect the VPN location in about 30 seconds.
Conrm that you were successful. Go to http://whatismyip.com or
http://whatismyipaddress.com.
Troubleshooting your VPN connection
Try your VPN account credentials again.
Check your wireless connection and see if you have a positive connection to your
PRO.
Try a different server location. Some servers may be periodically ofine.
Disabling VPN
Use the ‘Services’ tab in the User Interface and select the your VPN service
provider.
Unselect the ‘Enable’ box.
Click ‘Save & Apply’.
+
+
+
+
+
+
+
+
+
setting up your PRO (contin.)
Page 25
21anonabox PRO
All users will need to activate Tor if this feature is desired. The Tor rewall
within the PRO is not maintained after a reboot or power interruption. We
recommend re-checking to ensure Tor is active before proceeding to use the
Internet.
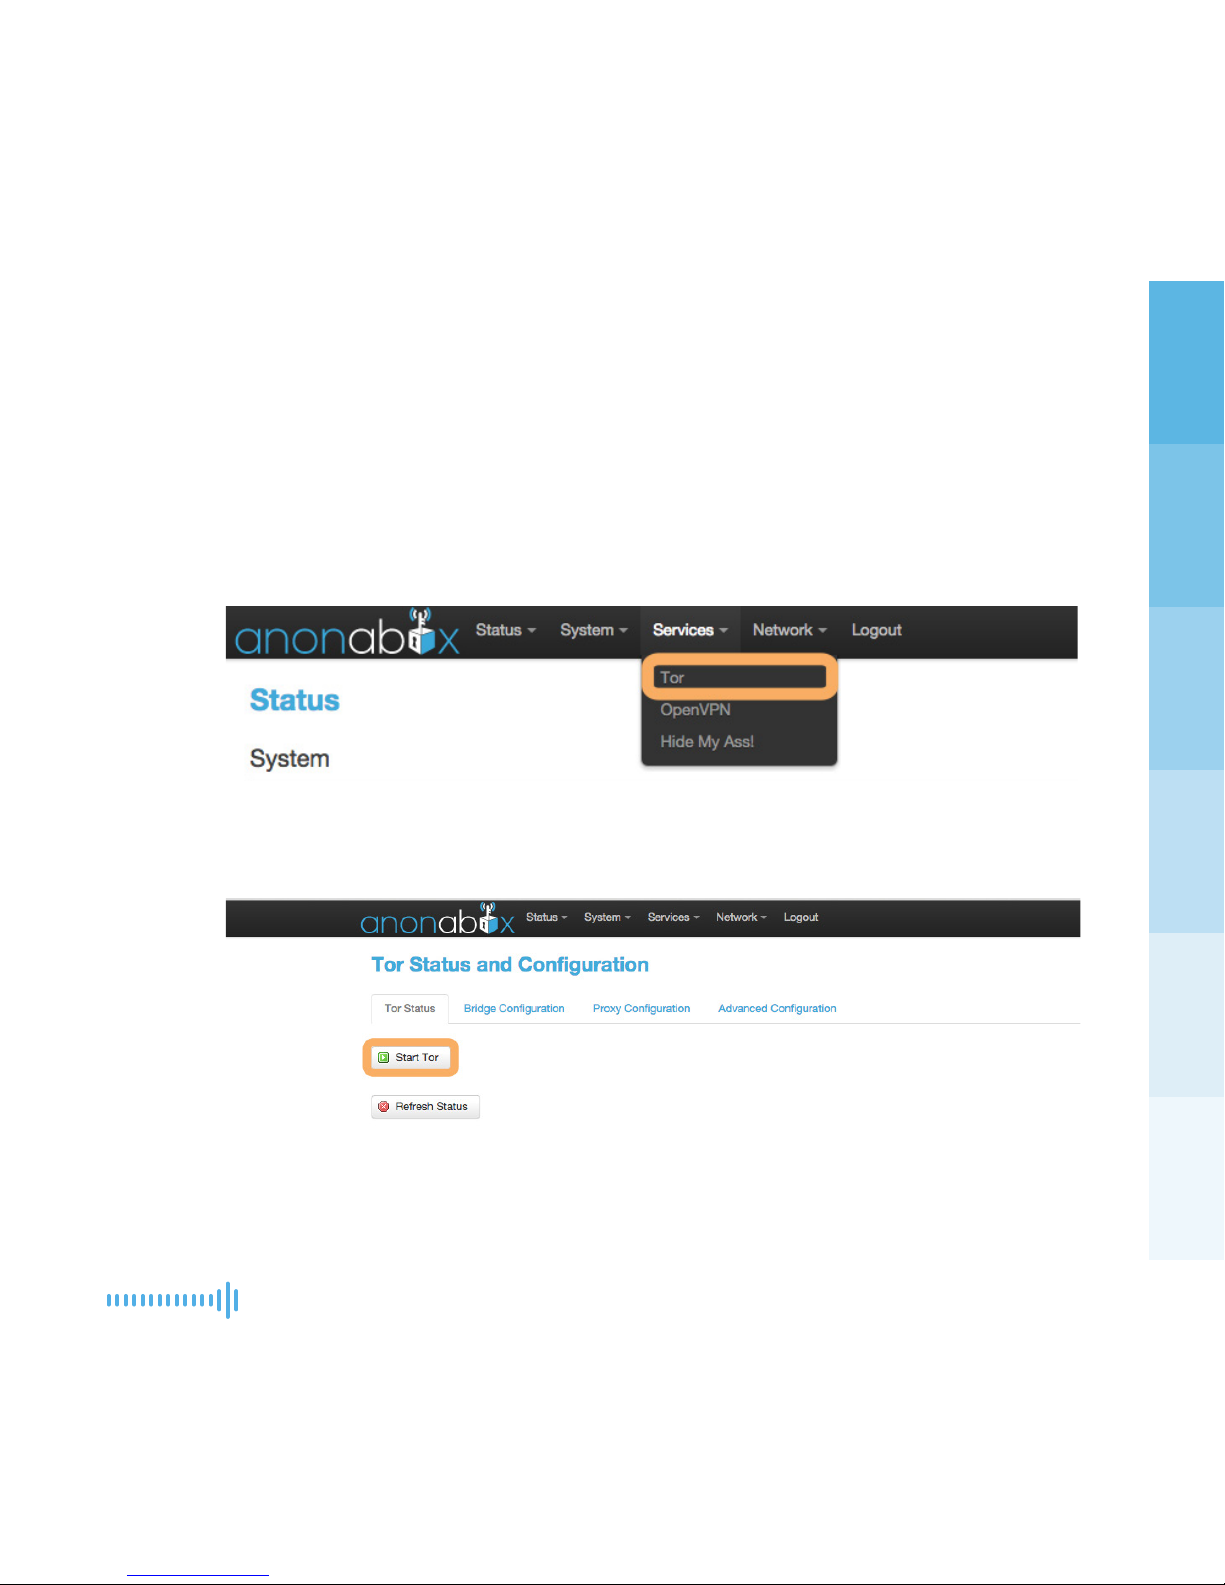
Use the ‘Services’ tab in the User Interface and select ‘Tor’
Click ‘Restart Tor’ or ‘Start Tor.’
*Connecting to Tor may take up to 2-5 minutes, depending on the current
status of the Tor network.
STEP 6 CONFIGURE TOR
+
+
Page 26
22
Startup Guide
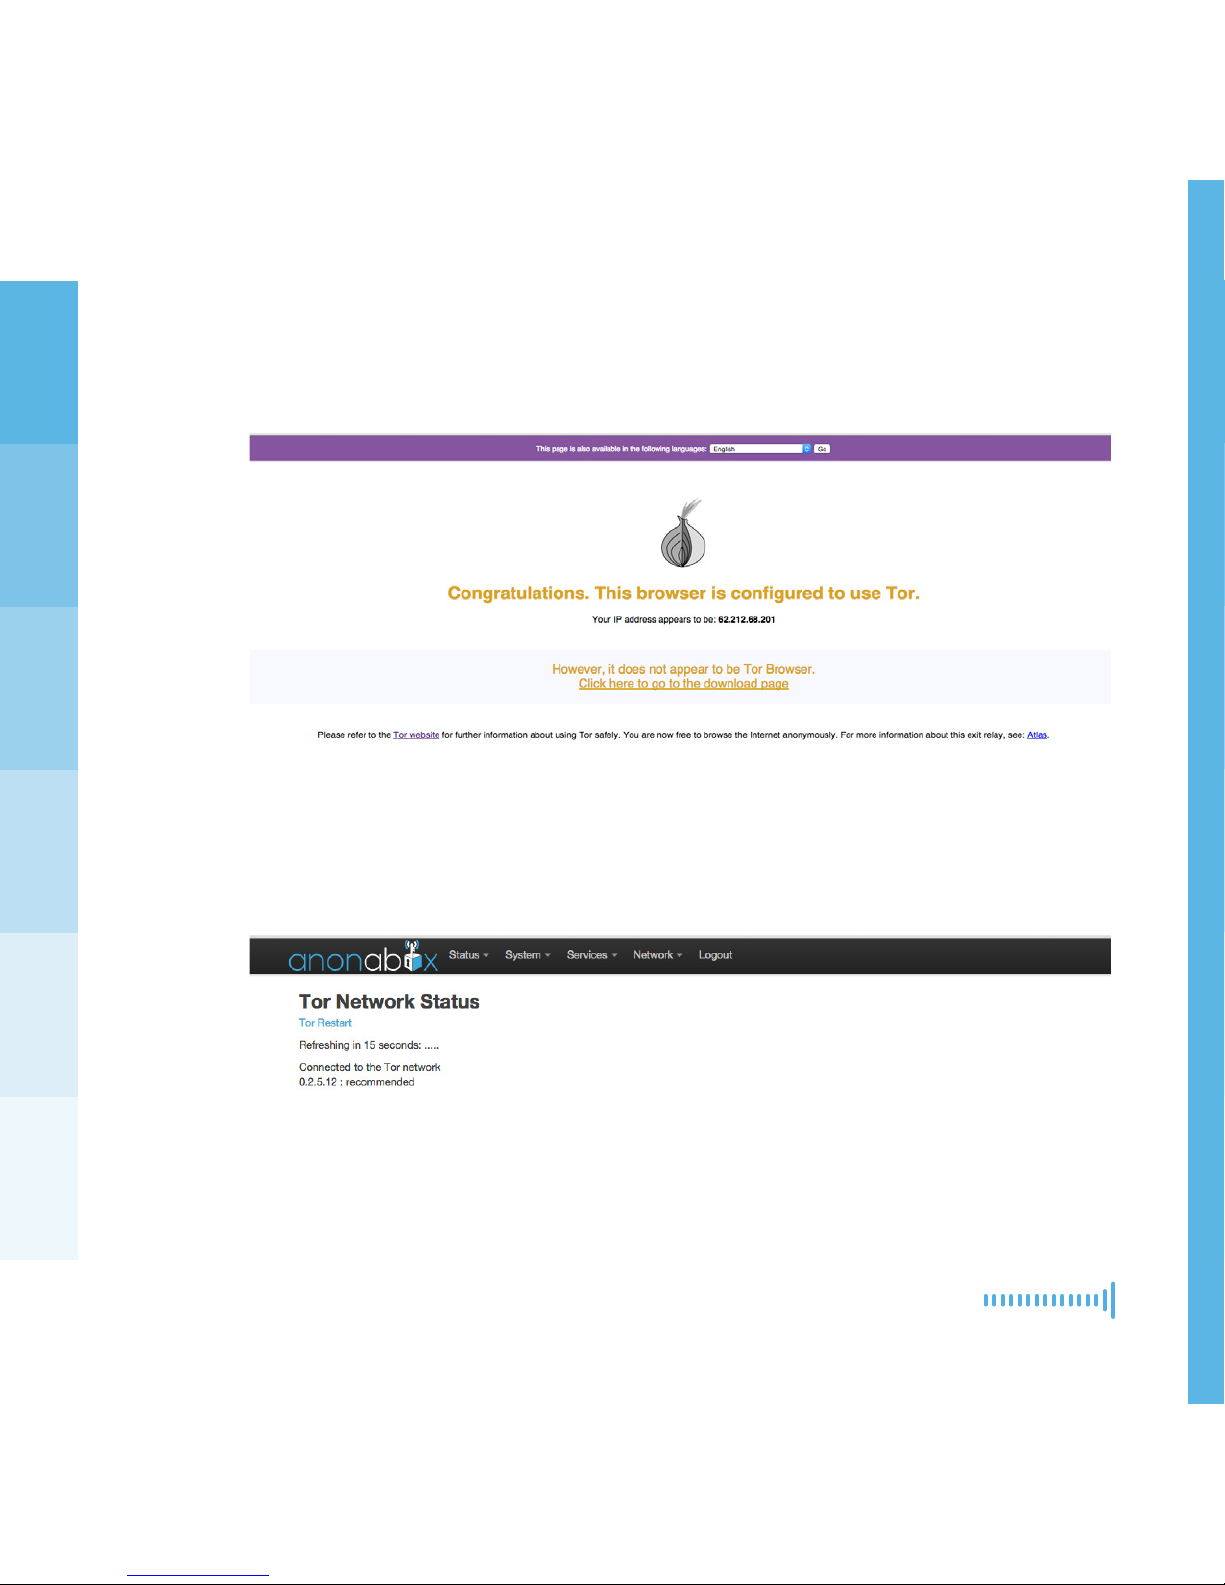
Check if you’re connected to Tor by navigating to https://check.torproject.org/
You should see this screen:
*You can also verify your connection to Tor by using the ‘Status’ tab in the User
Interface and select ‘Tor’. Under Tor Circuit Status, you should see something
like this:
Disconnect the same way, but click ‘Stop Tor’.
+
+
setting up your PRO (contin.)
Page 27

23anonabox PRO
tips &
troubleshooting
Page 28

24
Startup Guide
FAQ/troubleshooting
Seeing the welcome page, but can’t access the User Interface? Your browser
has likely cached this page and you’ve lost your connection to the PRO. If the
device does not show as an available network and has power, you will need to
connect the PRO to your device via LAN or force reset. NOTE: if daisy-chained,
or if the PRO was connected via LAN to another device, try unplugging this
connection to see if the WiFi appears as an available network in the next 60-90
seconds.
More FAQs may be found online at anonabox.com.
Maximize Portability
If you plan on utilizing PRO’s portability, it’s important to know that PRO will
remember previous WiFi congurations. This is useful if you frequent certain
locations, but it can also hinder quick access if you leave an old conguration ac-
tive. Follow these easy steps to make future access to your PRO easy and quick.
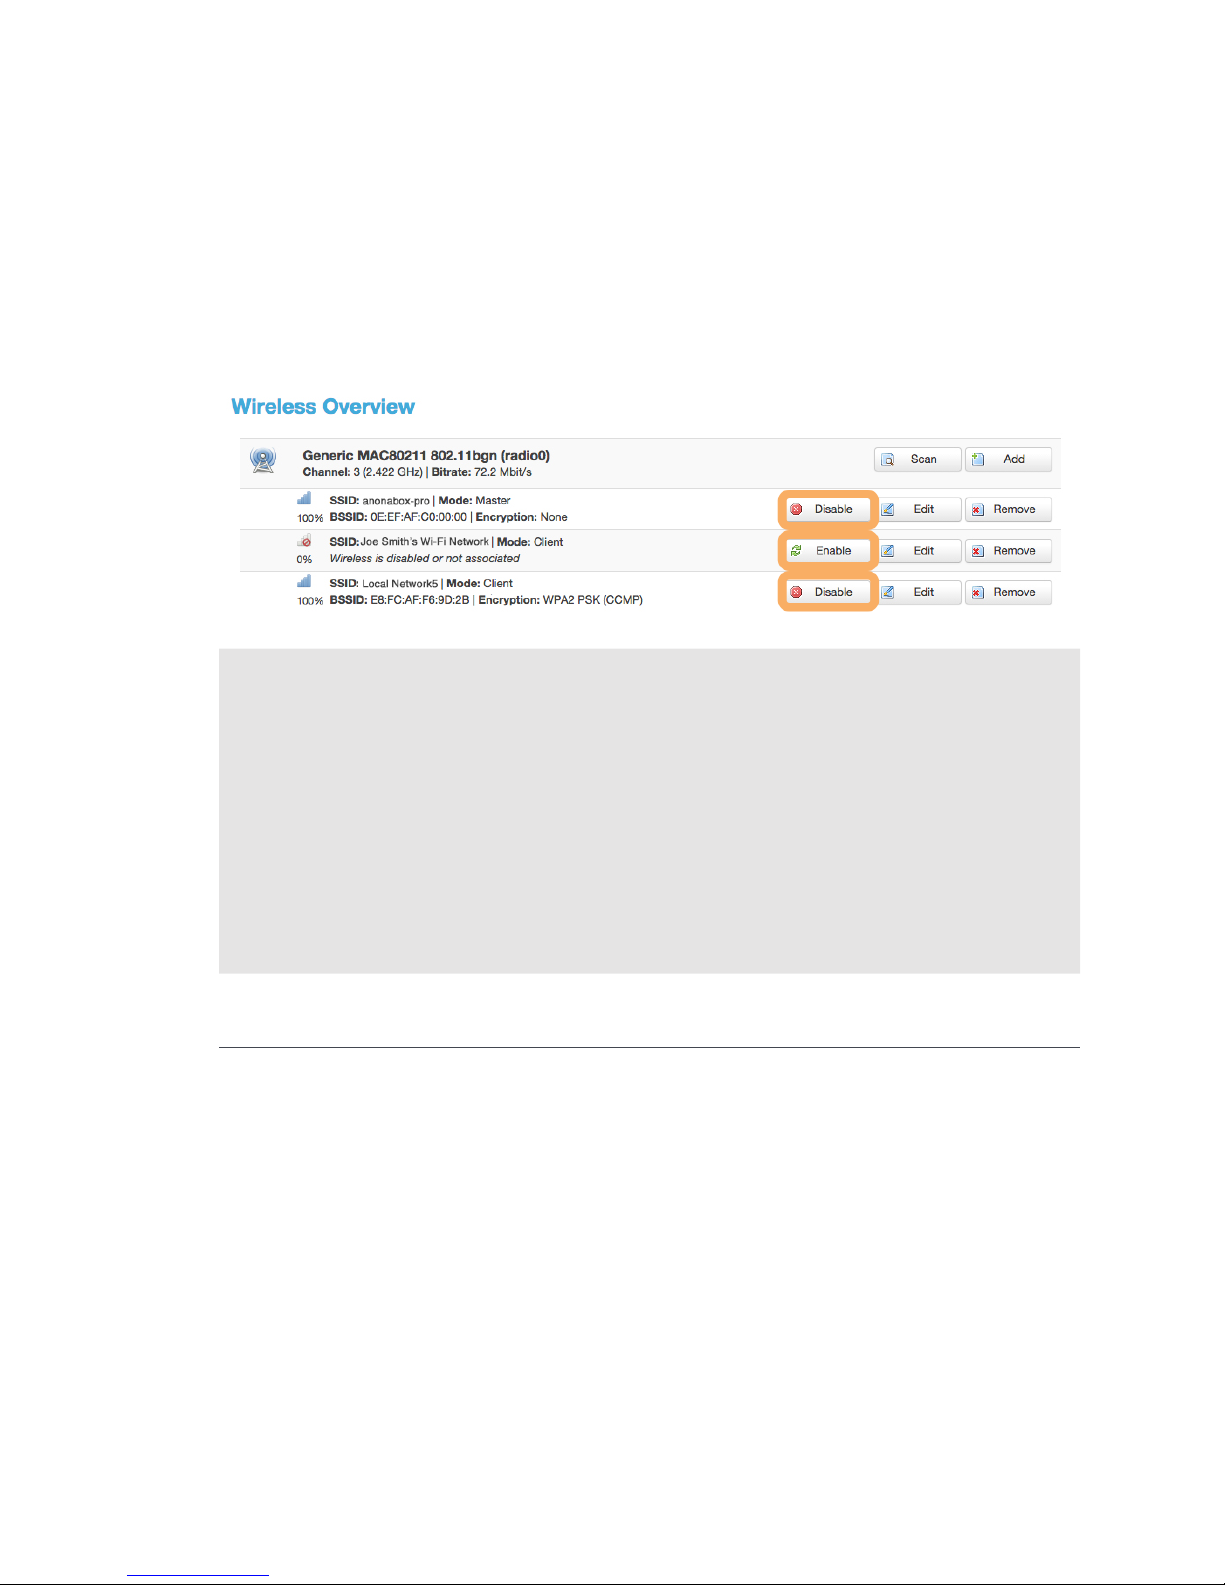
Before powering down the PRO, use the ‘Network’ tab and select ‘WiFi’.
From the ‘ Wireless Overview’ screen, nd the network you’re currently
connected to and click ‘Disable’.
Save your favorite Internet connections in the same manner. Remember to
disable any other connection you may have before reconnecting to a saved
Internet connection.
Reconnect by clicking ‘Enable’ when you are back within range of this network.
+
+
+
+
Page 29
25anonabox PRO
NOTE: If you do not disable your network connection before powering down,
the PRO will default to this last conguration. If you are unable to connect to
this Internet connection when you try and use the PRO thereafter, the PRO
will not broadcast a WiFi network signal and you will be required to access the
User Interface via a LAN Ethernet connection, or will be forced to reset the
device to connect wirelessly. If you plug your PRO in and do not see an active
indicator light at start-up, this may be a sign that your previous conguration could not be reactivated. We advise getting in the habit of disabling your
Internet connections and carrying a small Ethernet cable.
Update Firmware
We are continually working to keep the PRO up to date of any potential security
risks and are always looking to develop additional features and streamline
your user experience. New users should follow these steps immediately. To stay
abreast of our updates and ensure the best security and user experience, we
recommend you periodically check our website for rmware updates.
Page 30

26
Startup Guide
Go to anonabox.com/Updates.
Select your anonabox (PRO).
Read the information and default to instructions online for the latest updates.
Updates usually require you to download the rmware to a computer.
Connect to the PRO User Interface through the computer that you’ve
downloaded the updated rmware.
Use the ‘System’ tab and select ‘Backup/Flash Firmware.’
Unselect ‘Keep Settings’.
Use the ‘Choose File’ button and select the rmware le you downloaded. Click
‘Flash Image’.
Please be patient and give the update 3-5 mins to complete.
Re-establish a WiFi LAN access point
There are many reasons you may nd yourself in need of a new LAN access
point. If you have lost the WiFi LAN connection and don’t have an Ethernet
cable, we recommend resetting the PRO. Otherwise you can proceed as
outlined:
Connect via LAN connection with an Ethernet cable to your device. This allows
direct access to the User Interface when issues may make connecting wirelessly
difcult or impossible.
+
+
+
+
+
+
+
++
+
+
Page 31
27anonabox PRO
Access the User Interface at http://192.168.19.84:1776.
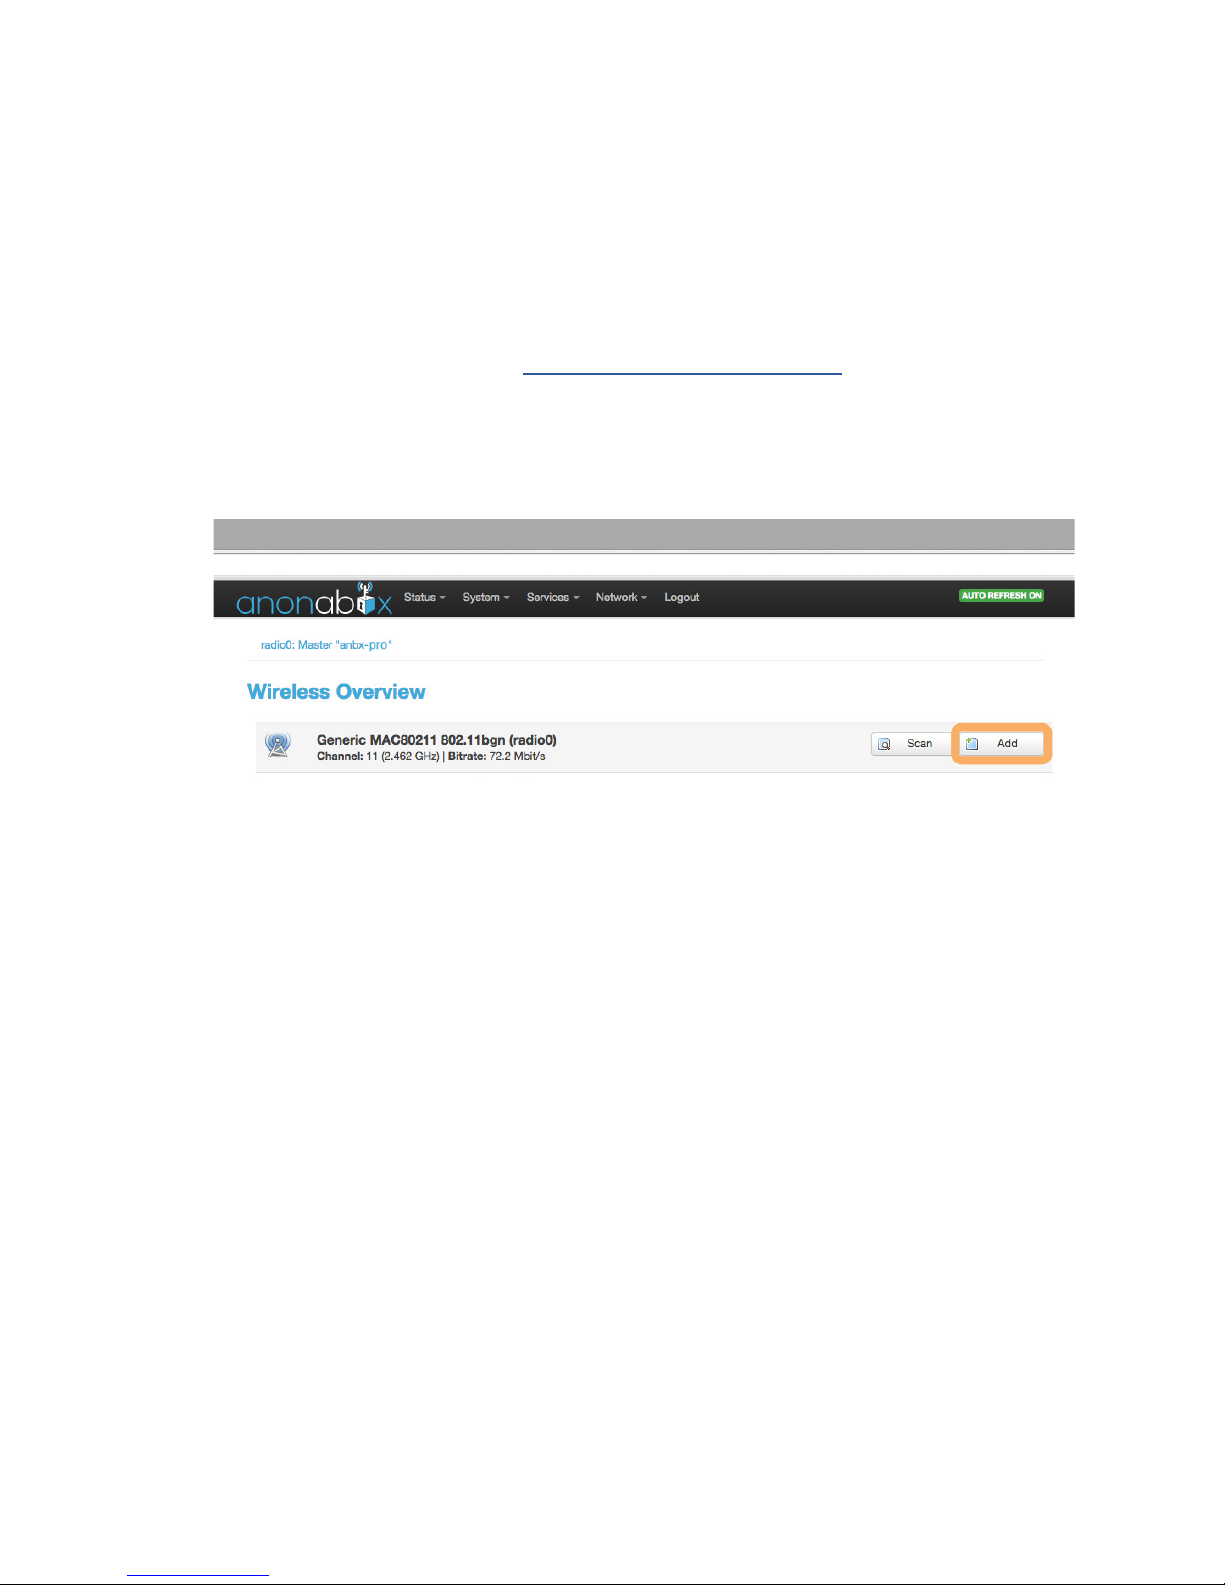
From the User Interface, use the ‘Network’ drop down and select ‘WiFi’.
Click the ‘Add’ button above any networks in the status section.
Name your network in the ESSID eld.
Make sure ‘Access Point’ is selected in the ‘Mode’ drop down.
Select the LAN box in the ‘Network’ eld.
Click ‘Save & Apply’.
+
+
+
+
+
+
+
Page 32

28
Startup Guide
Other Troubleshooting
anonabox.com is a great resource for common issues. Check here regularly.
Carry an Ethernet cable for connection via LAN. This provides you direct access
to the User Interface in case conguration issues disallow access wirelessly.
Reset button. Seriously, this might be your best troubleshooting tool.
Unfortunately, restoring defaults and any conguration will need to be redone.
Depressing the button for 5-10 seconds should sufce.
Email us at [email protected].
Filesharing and USB Port Use
Uses for the included USB port are truly endless. As such we can not provide
documentation for all possible uses. If you are interested in some of the possible
uses for this feature please visit our website for the current documentation on
how to utilize this advanced feature. If you’re interested in using the USB device
for a particular purpose and you can not nd adequate support on our website,
please feel free to email us at [email protected]. We will try and assist you as
best as we can. To you get started:
Plug-in your USB device into the USB port.
Use the ‘System’ tab and select ‘Mount Points.’
Click ‘Add’ and select your device.
Reboot the anonabox PRO if you have any connectivity issues.
+
+
+
+
+
+
+
+
Page 33

29anonabox PRO
Page 34

30
Startup Guide
Page 35

31anonabox PRO
delcaration of conformity (FCC)
This Device complies with Part 15 of the FCC Rules. Operation is subject to
the following two conditions: (1) This device may not use harmful interference, and, (2) This device must accept any interference received, including
interference that may cause undesired operation.
delcaration of conformity (Europe)
Hereby, anonabox.com, declares that this device is in compliance with the
essential requirements and other relevant provisions of Directive
1995/5/EC.
© 2015 anonabox, LLC. All rights reserved.
The anonabox logo and any or all images containing and or
pertaining to the anonabox product are considered property of
anonabox, LLC and may not be used without written expressed
permission of anonabox, LLC. Usage of these assets without
said permission may be considered a violation of copyright
infringement, resulting in possible legal action.
anonabox, LLC.
3259 Esplanade Suite #103
Chico, CA 95973
www.anonabox.com
Terms of Use: http://www.anonabox.com/Terms
Privacy Policy: http://www.anonabox.com/Privacy
E-Mail: [email protected]
Page 36
 Loading...