

Page 1
Operator’s Manual
II
Daisy
Incubator
D200, D200I
2052 O’Neil Rd Macedon NY 14502
Telephone: (315) 986-8090 · Fax: (315) 986-8091
www.ankom.com
Page 2

2
TABLE OF CONTENTS
Introduction. . . . . . . . . . . . . . . . . . . . . . . . . . . . . . . . . . . . . . . . . . . . . . . . . .3
Safety Precautions. . . . . . . . . . . . . . . . . . . . . . . . . . . . . . . . . . . . . . . . . . . . 4
Warranty. . . . . . . . . . . . . . . . . . . . . . . . . . . . . . . . . . . . . . . . . . . . . . . . . . .4
Instrument Description and Setup. . . . . . . . . . . . . . . . . . . . . . . . . . . . . . . . 5
Operation. . . . . . . . . . . . . . . . . . . . . . . . . . . . . . . . . . . . . . . . . . . . . . . . . . .6
Periodic Maintenance. . . . . . . . . . . . . . . . . . . . . . . . . . . . . . . . . . . . . . . . . .6
Troubleshooting. . . . . . . . . . . . . . . . . . . . . . . . . . . . . . . . . . . . . . . . . . . . .6-7
Appendix
Weighing Procedure. . . . . . . . . . . . . . . . . . . . . . . . . . . . . . . . . . . . . . . . . . A
(pages 8-9)
Controller Menu Set Up. . . . . . . . . . . . . . . . . . . . . . . . . . . . . . . . . . . . . . . B
(page 10)
Daisy Assemblies and Parts. . . . . . . . . . . . . . . . . . . . . . . . . . . . . . . . . . . . C
(pages 11-12)
Assay Procedures. . . . . . . . . . . . . . . . . . . . . . . . . . . . . . . . . . . . . . . . . . . . D
(pages 13-15)
Daisy Wiring Diagram . . . . . . . . . . . . . . . . . . . . . . . . . . . . . . . . . . . . . . . E
(page 16)
REV B (10-17-13)
Page 3

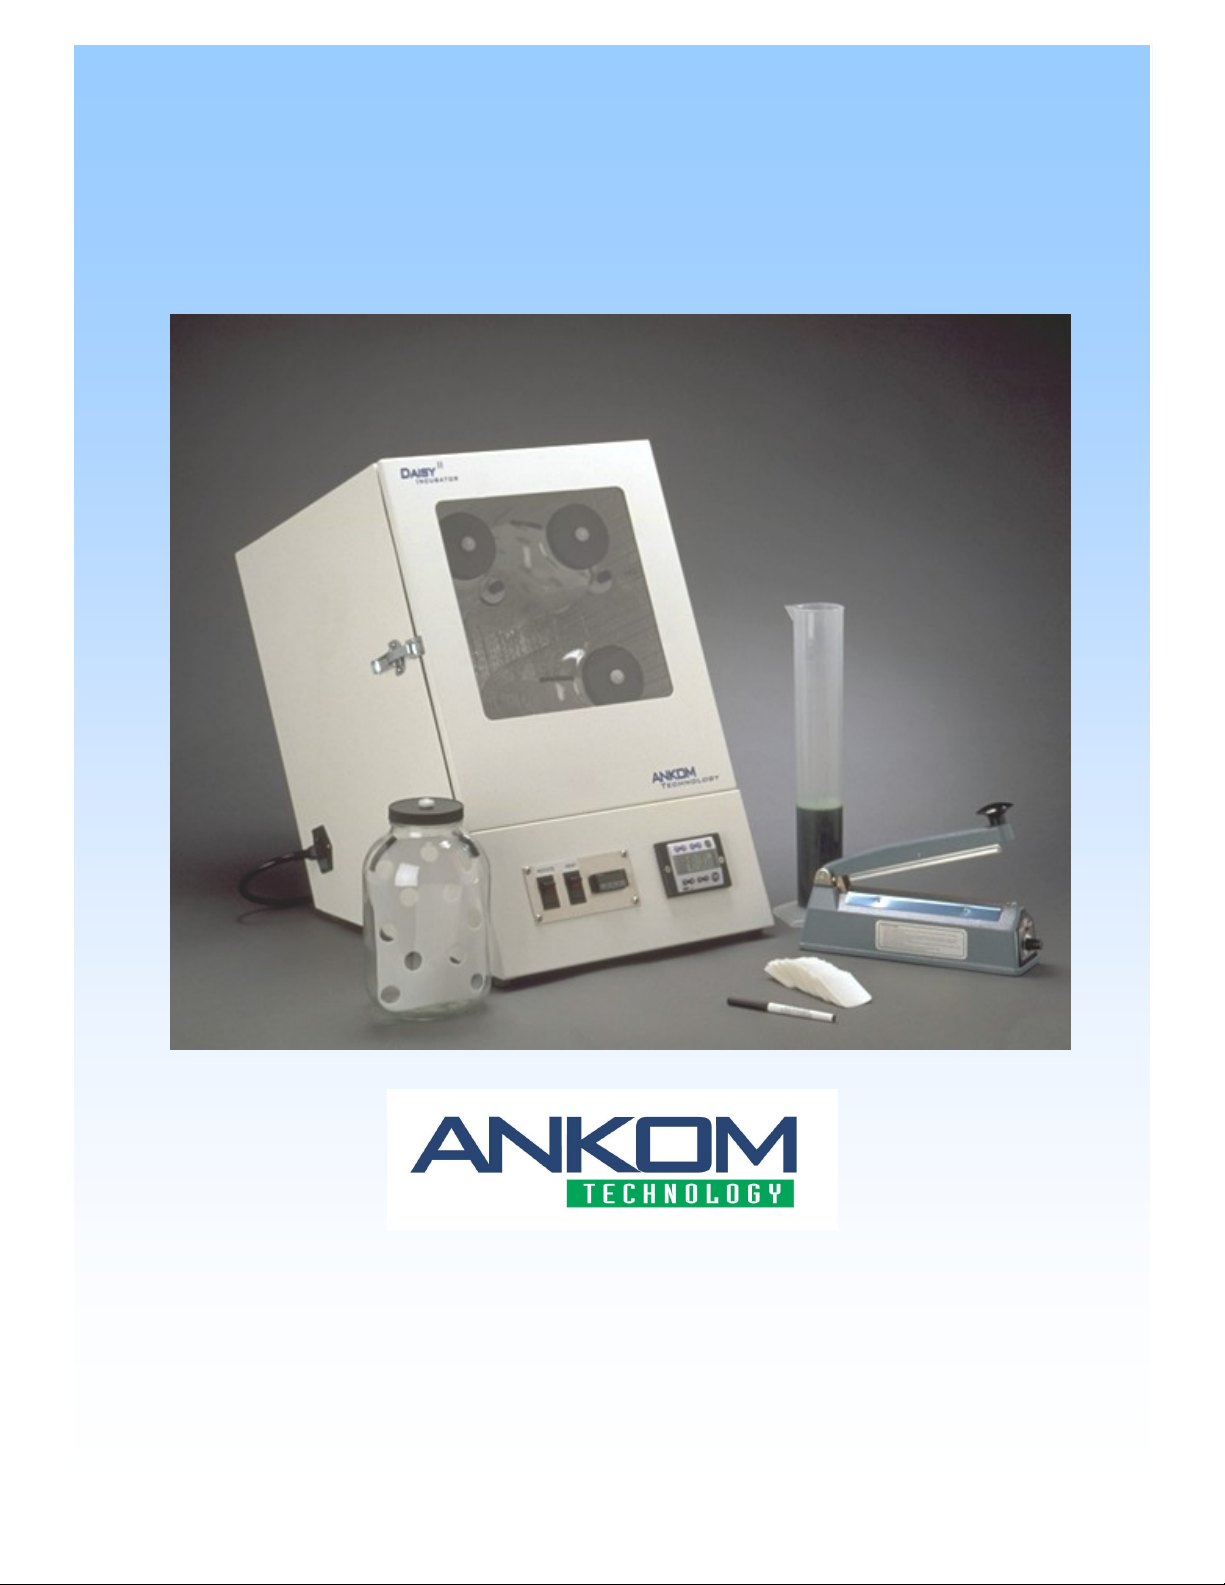
Congratulations on your purchase of an ANKOM Tec hno l og y DaisyII Incubator.
Your selection of an ANKOM system indicates that you are looking to increase your wet chemistry
efficiency and maintain the highest levels of precision and accuracy possible.
The DAISYII Incubator was designed to efficiently and accurately analyze up to 100 samples individually
enclosed in filter bags. You can perform either rate studies or total digestion studies in a batch operation. The
DAISYII instrument will free you from some of the labor requirements associated with the conventional
methods. With the ANKOM system, you divide your assays between four (4) digestion jars versus a
comparable conventional method, which requires 100 test tubes. Proper anaerobic conditions are easier to
maintain, because the CO2 purging process is simplified. The DAISYII Incubator can perform digestibility
studies using enzymes or rumen inoculum. The sequential NDF assay required for In Vitro True Digestibility
(IVTD) assays can easily be processed using the ANKOM
same for both instruments. The ANKOM DAISYII Incubator maintains an incubation temperature of 39.5° C,
while providing agitation.
If you own one of our earlier models of the DAISYII Incubator you will note some slight changes in
appearance. Although originally designed to provide the US research market with a low cost and efficient
method for accomplishing IVTD studies, we found that the appeal for this product extended around the world.
This required that we design a product that could support commercial laboratory needs. The product also
needed to be able to withstand the impact of international shipments. We know that you will be pleased with
these changes. Make sure that you read this manual carefully before you proceed. As a result of recent
modifications and some inter-lab studies, we have made some modifications to the assay procedure. These
changes provide for precise and accurate rate and digestion study results.
ANKOM T ec h no l og y is committed to your total satisfaction. We are always available to assist you get the
most out of your ANKOM products. Feel free to contact us with your questions and suggestions. We also
provide a full range of products to support fiber analysis and in situ studies. We offer chemicals and other
ancillary products that will assist you in getting accurate results at a reasonable cost.
200/220
Fiber Analyzer because the filter bags are the
3
Page 4

4
Safety Precautions
Caution, Lift Hazard- Lift and move using two people only.
Rear Surface:
Caution, Hazardous Voltages- Do not operate the instrument with the back cover
removed - hazardous voltages are present during operation. The power cord must be
connected prior to rear panel removal. Electrical shock or electrocution may result if
ignored.
General:
All switches should be in the off position before plugging the power cord into
the electrical outlet. The Rotate and Heat switches are in the OFF position
when they are pressed down.
An electrical fuse will disconnect the electrical power supply in case of
malfunction.
Specifications:
DAISY
DAISY
Environment Operating Range:
Temperature: 15-30°C (60-85°F)
Humidity: 20-60% RH
II (D200)
II-(D200I)
100 - 120V~ 3A 60Hz
220 - 240V~ 3A 50Hz
WARRANTY
ANKOM Technology warrants the ANKOM DAISYII Incubator against any defects due to faulty
workmanship or material for a one-year period after the original date of consumer purchase. This
warranty does not include damage to the instrument resulting from neglect or misuse. If the instrument
is damaged as a result of defects in the workmanship or materials during the warranty period, ANKOM
Technology will repair or replace the instrument free of charge. Glassware is not covered under
warranty.
For questions regarding the warranty or instrument, please contact ANKOM Technology at
PHONE: 315 986-8090 FAX: 315 986-8091 service@ankom.com
Page 5
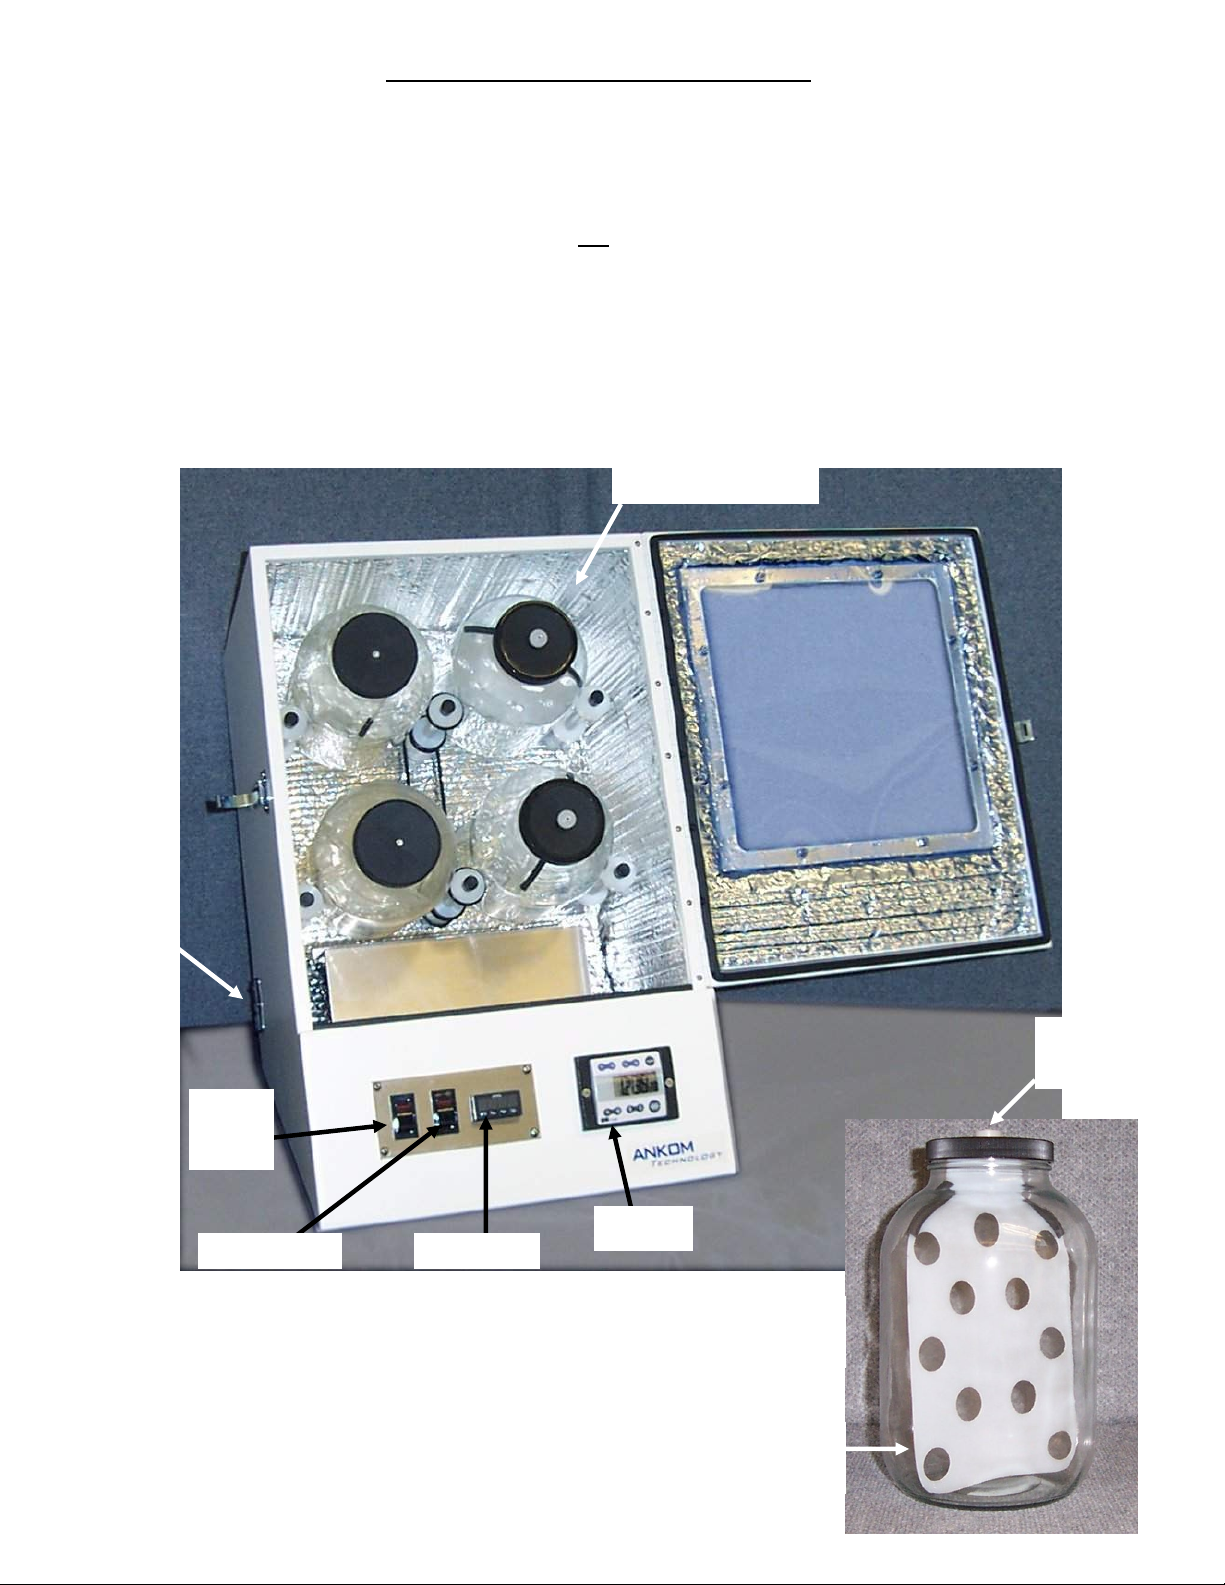
Instrument Description and Set-up:
5
Your instrument comes complete with a power cord and digestion jars.
- Set the instrument on a firm, level surface. Place the back of the instrument no closer
than one inch from a wall. NOTE: Do not locate this instrument where it will be subject
to excessive shock, vibration, dirt, moisture, oil, or other fluids.
- Plug the power cord into the plug outlet and then into an electrical outlet.
- The Rotate button controls the rotation of the digestion jars.
- The Heat button allows the controller to heat the digestion jars, samples, and rumen
inoculum.
- The Controller maintains the temperature inside the chamber at 39.5°C+/-.5. Do not
adjust without consulting ANKOM Technology.
Digestion Chamber
On/Off
Switch,
Fuse
Rotate
Switch
Heat Switch Controller
Timer
One-way
Valve
Digestion
Jar
Agitator
Baffle
Page 6

Operation
6
Your DAISYII Incubator is designed to provide incubation and agitation of samples at a constant 39.5C+/-.5.
The controller is preset to 39.5°C. Consult ANKOM Technology if a different temperature setting is desired.
To Start the Cycle:
1) Turn the instrument’s Main Power Switch on.
2) Add samples and solution to digestion jars as per procedure.
3) Turn the Heat and Rotate buttons on. Visually confirm the jars are rotating and the heat
lamps are on.
To End the Cycle:
1) Turn the Heat and Rotate buttons off.
2) Empty fluid from each jar and process the samples according to the specific procedure.
Periodic Maintenance
1) Check to make sure the Heat lamps are both operating.
2) To ensure jars don’t slip on drive belt clean the outside of the jars with window cleaner.
Troubleshooting
Your ANKOM instrument has been designed for long service and ease of maintenance. Most problems are
easily diagnosed and fixed. If you experience problems that are not addressed in the information below or if
you have any questions, contact ANKOM Technology for assistance. We are committed to fast and reliable
service.
Fuse Replacement:
Replace both fuses- 120V (3A) or 220V (3A). Install the Fuse Holder with the correct voltage right side up.
This is oriented for 220v
operation.
Pry Fuse
Holder out of
Power Switch.
Problems:
Problem: The jars are slipping.
Cause: Jars are dirty; belts are positioned poorly, not enough friction between jars and rollers.
Solution: Clean and dry jars. Check belt positioning. Apply white surgical tape to the roller contact areas of the
jars. The belt can be twisted in a figure “8” to increase belt tension.
Page 7

Troubleshooting (Continued)
Problems (Continued):
Problem: The temperature controller reading does not match the actual temperature. The
temperature controller reading is low.
Cause: A bulb is not working, the air flow is obstructed.
Solution: Make sure both heat bulbs are working. Check for an obstruction of hot air flow.
Make sure the Daisy is not under a cold air vent. If this does not solve the problem,
contact ANKOM Technology.
Problem: Controller reads “no load.”
Cause: A power surge has occurred.
Solution: Reprogram your controller using the controller menu setup sheet in the Appendix B.
Problem: Low Digestibility values.
Cause: Sample size is too large, bags were not acetone rinsed, the rubber baffle spacers fell off
Solution: Ensure that the procedure is followed completely. Reduce sample size to .025
per procedure, check baffle spacers, rinse bags with acetone and thoroughly
dry prior to filling.
7
Note:
For problems relating to the results of your analyses using the ANKOM DAISYII Incubator, first check to
ensure the procedures sent with your machine were followed. Some possible variables that may affect
your results are:
- Improper solution concentrates.
- The assay procedure was not carefully followed.
- Oven drying temperatures were too high
(drying temperatures higher than 105o C may affect results).
- Improper calculation of blank bag correction or using the wrong values in the formula.
- Modifying the settings on the temperature controller.
Page 8

Appendix A
8
W-1 ANKOM Technology Fiber Weighing Procedure
For In Vitro Determinations
Electronic Balance-
We recommend a four place readout on the balance and suggests “Balance
Talk™” or other LIMS software for data input and management.
Heat Sealer
# 1915 (100V - 120V)
# 1920 (220V - 240V)
Sample
1. Wash and dry filter bags as
per procedure. Number all
bags using a solvent resistant
marker.
MoistureStop
Weigh Pouch # X45
2. Weigh and record filter
bag weights.
Filter
Bags
# F57
Solvent
Resistant Marker # F08
3. Tare weight of filter bag
and Bag Holder.
Page 9

Appendix A (Continued)
9
W-1 ANKOM Technology Fiber Weighing Procedure (Continued)
For In Vitro Determinations
4. Add 0.25g to .05g of sample to
bag using a spatula. Be careful
not to get sample particles on top
edge of the bag sealing area.
5. Weigh sample and record
weight
6. Heat sealer dial should
be set between 4 and
5. The setting may
vary from sealer to
sealer.
7. Seal each filter bag no more than
4mm from it’s open end. Hold
down handle for 2-3 seconds after
the red light turns off.
9. Perform the extraction as
per procedure.
8. The seal can be seen
as a solid melted
stripe along the top
edge.
10. After digestion is complete,
a ce to n e- r in s e an d d ry
acco rd i ng to pro ced ure .
Remove from oven and
immediately store in the
MoistureStop Pouch
11. Cool to room temperature and
re-weigh each bag.
Page 10

Appendix B
10
Page 11

Appendix C
11
Daisy Assemblies and Parts
D1.5 - Temperature Probe
D6 - 120 Motor
F17 - Timer
D2 - Jar Assembly D2.5 - Jar Lid
D7 - 220 Motor
629 - Relay (120V)
D13 - XT32 Controller
630 - Relay (220V)
806 - Red Bulb (220V) 816 - Red Bulb (120V)
808 - O-Ring 322 BUNA 814 - Fan (120V) 815 - Fan (220V)
807 - Viton Drive Belt 304 O-Ring
Page 12

Appendix C (Continued)
12
Daisy Assemblies and Parts (Continued)
832 - Roller 2A Idler 833 - Roller 2B Drive Idler 100.5 - On/Off Switch
835 - Roller 2D Drive with Set Screw 836 - Roller E Pivot Bumper 834 - Roller 2C Drive
853 - 3A Fuse-Dual Voltage 5653 - Heat/Rotate Switch 851 - Valves one way for jars
Page 13

Appendix D
ANKOM Technology Method 3
In Vitro True Digestibility using the DAISYP
ANKOM
A. Reagents
(a) UBuffer Solution A:U Ug/literU
KHB
MgSOB
NaCl 0.5
CaClB
Urea (reagent grade) 0.5
(b) UBuffer Solution B:
NaB
NaB
(c) Neutral Detergent Solution
B. Apparatus
(a) DAISYP
(b) Filtration device - F57 Filter Bags
(c) Impulse bag sealer - 1915/1920 Heat Sealer.
(d) Thermos
(e) ANKOMP
C. Procedure
UPreparation of Filter Bags and Sample:
POB
10.0
2
4
B
B
•7HB
O 0.5
4
2
B
B
•2HB
O 0.1
2
2
B
B
COB
15.0
2
3
B
B
S•9HB
2
B
O 1.0
2
B
II
P
Incubator
200/220
P
Fiber Analyzer
T e c h n o l o g y
II
P
Incubator
- 08/05
13
Pre-rinse F57 filter bags in acetone for three to five minutes and completely air-dry. The acetone
rinse removes a surfactant that inhibits microbial digestion. Weigh each F57 filter bag and record
weight (WB
48 hr studies a sample size of 0.5 g is acceptable. Heat seal bag closed and place in the DaisyP
). Zero the balance and weigh 0.25g of sample (WB
1
B
) directly into filter bag. NOTE: For
2
B
II
P
In-
cubator digestion jar (up to 25 samples per jar). Samples should be evenly distributed on both sides
of the digestion jar divider. Include at least one sealed blank bag for correction factor (CB
).
1
B
UPreparation of (combined) Buffer Solution:U (For each digestion jar)
(a) Pre-warm at 39°C both buffer solutions (A & B). In separate container add ~266 ml of solu-
tion B to 1330 ml of solution A (1:5 ratio). The exact amount of A to B should be adjusted
to obtain a final pH of 6.8 at 39°C. No further adjustment of pH is necessary. Add 1600 ml
of combined A/B mixture to each digestion jar.
II
(b) Place the digestion jars with samples and buffer solution into DaisyP
P
Incubator and turn on
heat and agitation switches. Allow temperature of digestion jars to equilibrate for at least
twenty to thirty minutes.
Page 14

Preparation of Inoculum and Incubation:
Maintain all glassware at 39°C
(a) Preheat two 2L thermos bottles by filling with 39° C water. Empty heated water just prior to
collection of rumen inoculum. Using the appropriate collection procedure, remove at least
2000 ml of rumen inoculum and place in thermos. Include approximately two "fistfuls" of
the fibrous mat from the rumen with your collection in one thermos.
(b) Preheat a blender by filling with 39P
the rumen inoculum from the thermos into the blender. Purge the blender container with COB
gas and blend at a high speed for 30 seconds. The blending action serves to dislodge microbes that are attached to the mat and assure a representative microbial population for the in
vitro fermentation. Filter the blended digesta through four layers of cheesecloth into a fiveliter flask (pre-heated 39° C). Filter the remaining rumen fluid in the other thermos through
four fresh layers of cheesecloth into the same five-liter flask. NOTE: Allow for extra cheesecloth around the edges to facilitate squeezing contents of filtered mat. The flask should be
continually purged with COB
(c) Remove one digestion jar from the DaisyP
buffer solution and samples. Purge the digestion jar with COB
cure lid.
Appendix D (continued)
o
P
C water. Empty the heated water just prior to pouring
and continued during the transfer of the inoculum.
2
B
II
P
Incubator and add the 400ml of inoculum to the
gas for thirty seconds and se-
2
B
14
2
B
(d) Repeat process for all digestion jars to be used. NOTE: Do not allow COB
through the buffered inoculum, rather use the COB
tents of the jar.
(e) Incubate for 48 hours. The DAISYP
If temperature of jars varies greater than one degree then move incubator to a warmer location or place blanket or similar insulator over incubator.
(f) At completion of incubation, remove jars and drain fluid. Rinse bags thoroughly with cold
tap water until water is clear. Use a minimum of mechanical agitation.
(g) When determining True Digestibility it is necessary to remove microbial debris and any re-
maining soluble fractions using Neutral Detergent Solution. After rinsing the bags in water
place them in the ANKOMP
200
NDF. Record the post in vitro NDF weight as WB
erator or freezer until NDF determinations can be performed.
D. Calculate:
% IVTD (as received basis) = 100 – (WB
WB
% IVTDB
(DM basis) = 100 – (WB
B
DM
(WB
Where: WB
WB
WB
CB
= Bag tare weight
1
B
= Sample weight
2
B
= Final bag weight after In Vitro and sequential ND treatment
3
B
= Blank bag correction (final oven-dried weight/original blank bag weight)
1
B
gas to bubble
2
B
to form a gaseous blanket over the con-
2
B
II
P
Incubator will maintain a temperature of 39.5°C ± 0.5.
P
Fiber Analyzer and follow the procedure for determining
. NOTE: Bags can be stored in the refrig-
3
B
- (WB
B
3
-B
(WB
B
B
3
x DM)
B
2
B
2
x CB
B
1
x CB
)) x 100
B
1
B
1
)) x 100
B
1
Page 15

Appendix D (continued)
15
Page 16

Appendix E
16
Daisy Wiring Diagram
Inlet Power: 100-120V
220-240V
 Loading...