

Page 1

Welcome Guide
Bluetooth Folio Keyboard Case for iPad Air
Page 2

Package Contents
■
Anker Bluetooth Folio Keyboard Case for iPad Air
■
USB charging cable
■
Welcome guide
Features
■
Notebook design resembles a laptop and complements your iPad Air.
■
Premium exterior synthetic leather cover with inner microfiber unibody keyboard
delivers a unique touch experience.
■
Once paired via Bluetooth, iPad connects to the keyboard automatically whenever
snapped to the embedded magnetic strip.
■
iPad Air snaps to a built-in magnetic viewing angle designed for typing and media
playback.
■
Opening and closing the case automatically triggers sleep or wake modes.
■
Rechargeable high capacity lithium battery lasts for over 6 months between charges
(based on 2 hours of use per day).
■
Molded key caps deliver whisper-quiet and comfortable typing.
1
Page 3
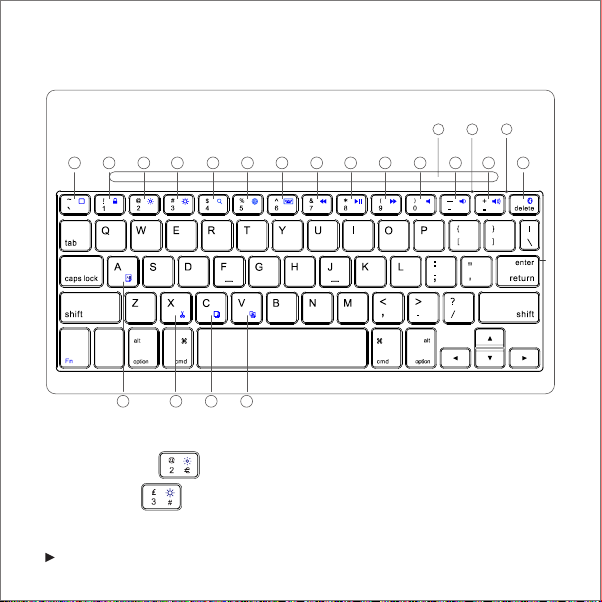
Product Overview
1 2 3 4 5 6 7 8 9
ctrl
1518 16 17
(1) Back to Home
(2) Screen Lock / Unlock
(3) Brightness Down ( for the UK keyboard)
(4) Brightness Up( for the UK keyboard)
(5) Search
(6) Switch Input Language
2
19 20 21
10 11 12 13 14
(7) Keyboard Display
(8) Previous Song
(9) Play/Pause
(10) Next Song
(11) Mute
(12) Volume Down
(13) Volume Up
Page 4

(14) Bluetooth Pairing
(15) Cut
(16) Copy
(17) Paste
(18) Select All
(19) Magnet
(20) Caps Lock / Bluetooth Indicator
(21) Power Indicator
Specifications
Bluetooth Specification Bluetooth 3.0
Product Dimensions 251 × 178 × 18mm / 9.9 × 7.0 × 0.7in
Product Weight 402g / 14.2oz
Operating Range Up to 10m / 33ft
Modulation System GFSK
Standby Time 300 days
Charge Time 2.5 hours
Uninterrupted Work Time 300 hours
Working Temperature -10 - +55
Lithium Battery Capacity 800mAh
Battery’s Lifespan 400 charge cycles
Key Life 5 million clicks
℃
3
Page 5

Pairing Instructions
Once installed in the case, release the bottom half of the iPad Air from the lower
1.
edge bracket while keeping the top half installed in the corner brackets.
Lock the lower edge of the iPad Air into position on the magnetic strip to create an
2.
upright viewing angle. The green Power Indicator will go on for 2 seconds.
Simultaneously press the Fn and Bluetooth keys to enter pairing mode. The blue
3.
Bluetooth Indicator will start to flash rapidly.
Activate your device’s Bluetooth function and search for the keyboard case.
4.
Once the Bluetooth keyboard case has been found, click on its name to connect.
5.
Enter the password code as displayed on the screen.
6.
Once the Bluetooth keyboard case has successfully connected to your device, the
7
.
Bluetooth Indicator will turn off.
After pairing for the first time, your device will connect to the keyboard automatically
when snapping the tablet to the keyboard.
Note: In case of connection failure, delete the pairing record from your device, and
repeat the procedures above.
Power Saving Mode
The keyboard case will enter sleep mode after being idle for 10 minutes. To activate it,
press any key and wait for 2 seconds.
4
Page 6

Charging Instructions
When battery power is low, the Power Indicator will turn red and begin to blink,
indicating that it is time to recharge the keyboard case.
Connect the micro end of the USB power cable to the micro USB port on the keyboard case.
1.
Connect the other end of the cable to a power adapter or computer USB port.
2.
The Power Indicator will turn red while the keyboard case is charging. Once it is fully charged,
3.
the Power Indicator will turn green.
Usage Tips
■
Do not place heavy objects on the keyboard case.
■
Do not drop the product, bump it against hard surfaces, or dismantle it.
■
Keep the product away from oil, chemicals, and liquids.
■
Clean the keyboard by lightly wiping it with a slightly damp cloth.
■
Dispose of batteries according to local laws.
5
Page 7

Warranty
Our company provides customers with a warranty of 18 MONTHS from the date of
purchase.
Contact Us
For any inquiries or comments concerning our products, please send an email to
support@ianker.com, and we will respond to you as soon as possible. If there is any
quality-related issue with the product, you may request a REPLACEMENT OR REFUND
by submitting a request form at www.ianker.com/support.
Statement
■
We’re only able to provide after-sales service for purchases made directly
from Anker. If you purchased through a different retailer, please contact them for any
exchange or refund requests.
■
Please note that unauthorized reselling of Anker products is prohibited.
6
Page 8

Packungsinhalt
■
Anker Bluetooth Keyboard Case für iPad Air
■
USB Ladekabel
■
Bedienungsanleitung
Features
■
Notebook Design lässt Ihr iPad Air wie einen Laptop aussehen.
■
Die Kombination aus PU Leder auf der Aussenseite und Mikrofaser im Innenteil
liefert soliden Halt beim Tragen.
■
Tastatur verbindet sich automatisch mit Ihrem iPad Air.
■
iPad Air rastet dank magnetischer Halterung automatisch ein um direkt einen idealen
Blickwinkel zum Schreiben und für Medienwiedergabe.
■
Einsetzen und Herausnehmen des Geräts schaltet das Keyboard automatisch ein und
aus.
■
Wiederaufladbare Lithium Batterie kann das Keyboard 6 Monate mit Strom versorgen
(basierend auf einer täglichen Verwendungszeit von 2 Stunden).
■
Geformte Tasten bieten leises und geräuscharmes Schreiben.
7
Page 9

Produktübersicht
1 2 3 4 5 6 7 8 9
ctrl
1518 16 17
19 20 21
10 11 12 13 14
(1) Home Button
(2) Bildschirm sperren / Entsperren
(3) Helligkeit runter
(4) Helligkeit hoch
(5) Suche
(6) Eingabemethode (Sprachspezifisches Tastaturlayout) ändern
(7) Keyboard Display
8
(8) Vorheriger Track
(9) Play/Pause
(10) Nächster Track
(11) Stumm
(12) Lautstärke Runter
(13) Lautstärke Hoch
(14) Bluetooth Pairing
Page 10

(15) Ausschneiden
(16) Kopieren
(17) Einfügen
(18) Alles auswählen
(19) Magnet
(20) Caps Lock / Bluetooth Anzeige
(21) Power Anzeige
Spezifikationen
Bluetooth Spezifikationen Bluetooth 3.0
Produktmaße 251 × 178 × 18mm
Produktgewicht 402g
Arbeitsreichweite bis zu 10m
Modulationssystem GFSK
Standby Zeit 300 Tage
Ladedauer 2. 5 Stunden
Ununterbrochene Betriebsdauer 300 Stunden
Arbeitstemperatur -10 - +55
Kapazität des Akkus 800mAh
Lebensdauer der Batterie 400 Ladezyklen
Lebensdauer der Tasten 5 Millionen Klicks
℃
9
Page 11

Pairing Anweisungen
Sobald in das Case eingesetzt, lösen Sie die untere Hälfte des iPad Airs von der
1.
Halterung während die obere Hälfte mit der Halterung verbunden bleiben muss.
Setzen Sie die untere Kante des iPad Air auf den magnetischen Streifen um einen
2.
aufrechten Betrachtungswinkel zu erhalten. Die grüne Energieanzeige wird für 2
Sekunden leuchten.
Betätigen Sie die Fn und Bluetooth Tasten gleichzeitig um in den Pairing Modus zu
3.
gelangen. Die blaue Bluetooth Anzeige wird schnell zu blinken beginnen.
Aktivieren Sie die Bluetooth Funktion auf Ihrem Gerät und suchen Sie nach dem Keyboard.
4.
Sobald die Bluetooth Tastatur gefunden wurde, klicken Sie auf den entsprechenden
5.
Eintrag um eine Verbindung zu herstellen.
Geben Sie den Code ein, welcher auf dem Bildschirm erscheinen wird.
6.
Sobald die Verbindung erfolgreich hergestellt wurde, wird die Statusanzeige erlöschen.
7.
Nachdem Sie das erste Mal gepairt haben wird Ihr Gerät sich automatisch mit dem
Keyboard verbinden, sobald Sie es in das Keyboard einsetzen.
Hinweis: Sollte die Verbindung nicht hergestellt werden können so löschen Sie den
Eintrag von Ihrem Gerät und wiederholen Sie den Pairing Vorgang.
Stromsparmodus
Das Tastatur Cover wird in den Ruhemodus gehen, nachdem es für 10 Minuten inaktiv
war. Um es zu aktivieren betätigen Sie bitte eine Taste und warten Sie für 2 Sekunden.
Ladeanweisungen
Sollte der Ladestand der Batterie zu gering sein, so wird die Ladeanzeige rot zu blinken
beginnen um anzuzeigen, dass die Tastatur aufgeladen werden sollte.
10
Page 12

Verbinden Sie das Ende mit dem Micro USB Anschluss des Kabels mit dem Micro
1.
USB Port der Tastatur.
Verbinden Sie das andere Ende des Kabels mit einem Netzteil oder einem USB Port
2.
eines Computers.
Die Ladeanzeige wird eingeschaltet bleiben während die Tastatur lädt. Sobald die
3.
Ladung abgeschlossen ist, wird die Ladeanzeige grün leuchten.
Benutzungshinweise
■
Legen Sie keine schweren Teile auf die Tastatur.
■
Öffnen Sie das Gerät nicht.
■
Halten Sie das Produkt fern von Öl, Chemikalien und organischen Flüssigkeiten.
■
Säubern Sie die Tastatur indem Sie mit einem weichen Tuch drüberwischen.
■
Entsorgen Sie Batterien gemäß lokaler Vorschriften.
Federal Communication Commission Interference Statement
Dieses Gerät erfüllt Teil 15 der FCC-Regularien. Der Betrieb unterliegt den folgenden
zwei Voraussetzungen:
1.
Dieses Gerät darf keine Störungen verursachen.
2.
Dieses Gerät muss jegliche empfangenen Störungen akzeptieren, einschließlich
Störungen, die zu einem unbeabsichtigtem Betrieb führen können. Warnung:
Sämtliche vom Benutzer vorgenommenen Änderungen und Modifikationen, denen
die für die Einhaltung der Richtlinien verantwortliche Partei nicht ausdrücklich
zugestimmt hat, können zum Entzug der Betriebserlaubnis für das Gerät führen.
11
Page 13

Garantie
Unser Firma bietet unseren Kunden eine Garantie von 18 Monaten ab Kaufdatum.
Kontakt
Für Fragen betreffend unserer Produkte, schicken Sie bitte eine Email an
support@ianker.com, und wir werden Sie so schnell wie möglich kontaktieren. Sollte es
irgendein qualitätsbezogenes Problem mit dem Produkt geben, können Sie ein Formular
für Ersatz oder Rückgabe einreichen unter www.ianker.com/support.
Stellungnahme
■
Wir sind nur in der Lage after-Sales Dienstleistungen für Käufe anzubieten, welche
direkt über Anker getätigt wurden. Wenn Sie Ihr Produkt woanders erworben
haben, kontaktieren Sie den entsprechenden Verkäufer bitte bezüglich
Umtausch-und Rückgabefragen.
■
Bitte nehmen Sie zur Kenntnis, dass der unauthorisierte Weiterverkauf von Anker
Produkten nicht gestattet ist.
FCC STATEMENT :
This device complies with Part 15 of the FCC Rules. Operation is subject to the following
two conditions:
(1) This device may not cause harmful interference, and
(2) This device must accept any interference received, including interference that may
cause undesired operation.
Warning: Changes or modifications not expressly approved by the party responsible for
compliance could void the user's authority to operate the equipment.
12
Page 14

NOTE: This equipment has been tested and found to comply with the limits for a Class B
digital device, pursuant to Part 15 of the FCC Rules. These limits are designed to provide
reasonable protection against harmful interference in a residential installation.
This equipment generates uses and can radiate radio frequency energy and, if not
installed and used in accordance with the instructions, may cause harmful interference to
radio communications. However, there is no guarantee that interference will not occur in a
particular installation. If this equipment does cause harmful interference to radio or
television reception, which can be determined by turning the equipment off and on, the
user is encouraged to try to correct the interference by one or more of the following
measures:
Reorient or relocate the receiving antenna.
Increase the separation between the equipment and receiver.
Connect the equipment into an outlet on a circuit different from that to which the
receiver is connected.
Consult the dealer or an experienced radio/TV technician for help.
RF warning statement:
The device has been evaluated to meet general RF exposure requirement. The device
can be used in portable exposure condition without restriction.
1-800-988-7973 (U.S.) Mon-Fri 9:00-5:00 (PST)
069-9579-7960 (DE) Mon-Fri 6:00-11:00
www.ianker.com
support@ianker.com
 Loading...