

Page 1
115V
M4×6
4pcs
M5×20
8pcs
①
②
ASSEMBLY GUIDE
①
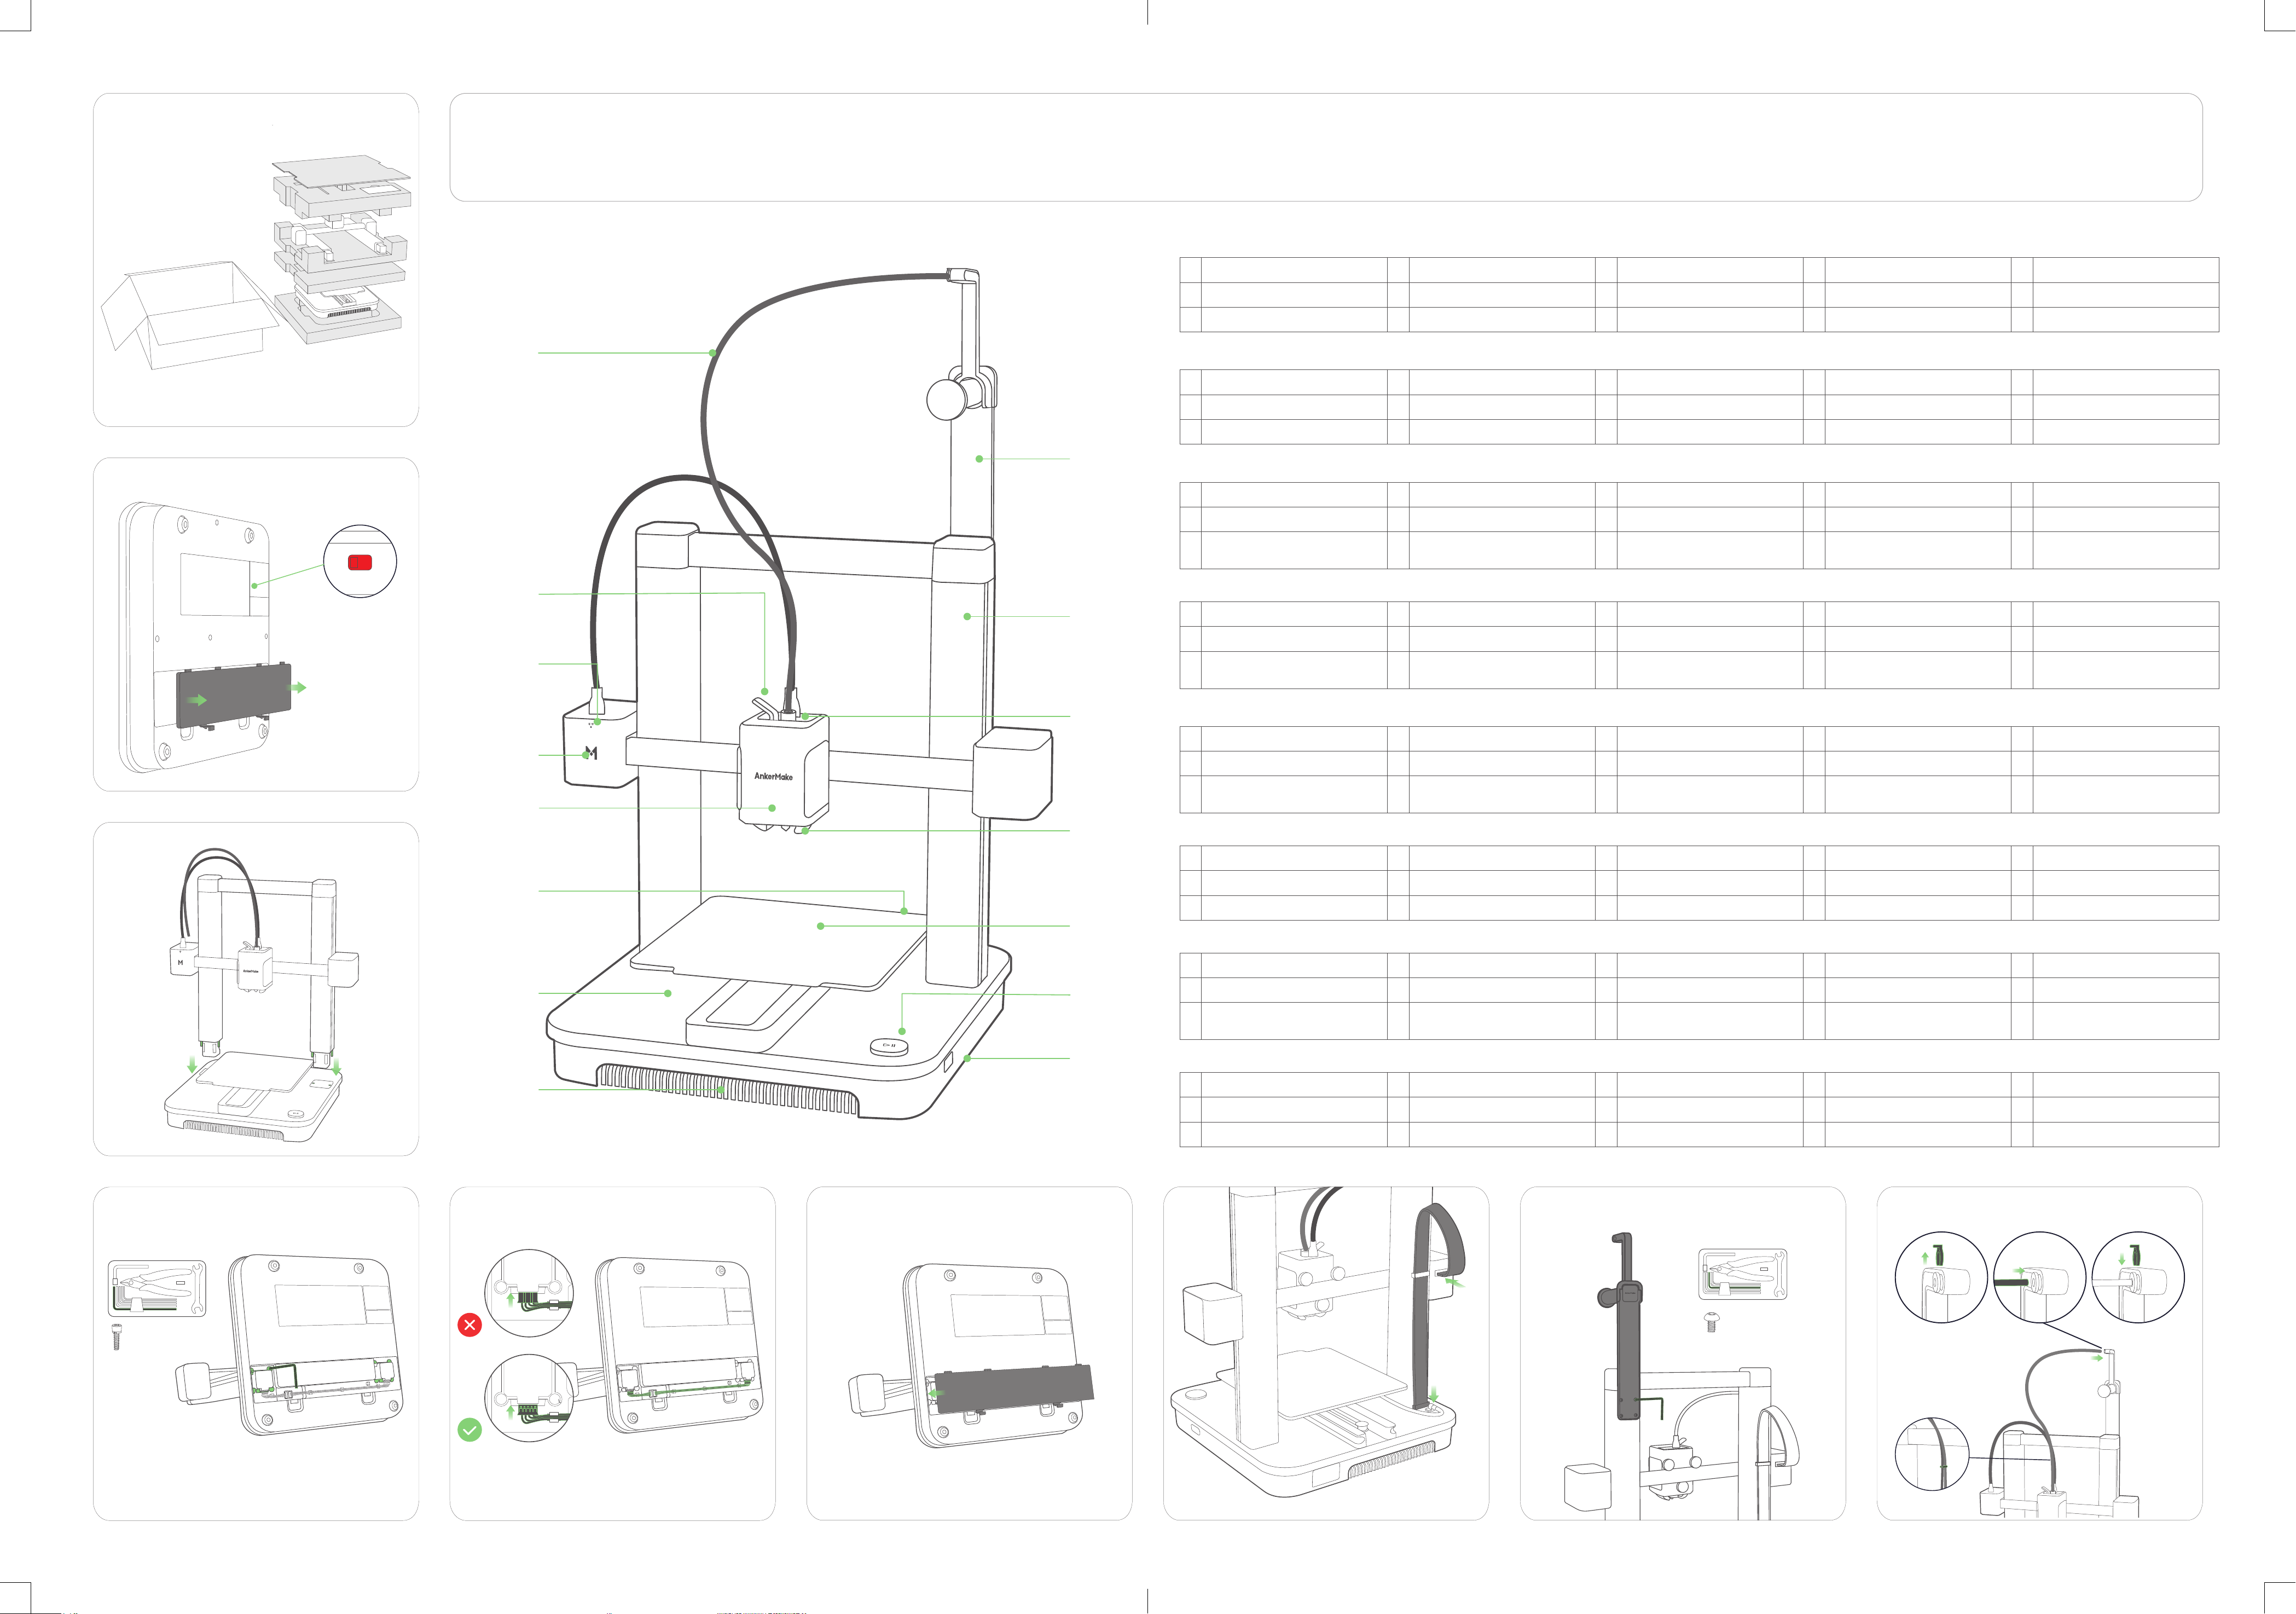
AnkerMake M5C
EN
⑨
PTFE Feeding Tube
①
Extrusion Clip
②
Wi-Fi/Bluetooth Indicator
③
DE
PTFE-Zuführschlauch
①
Extrusionsclip
②
Wi-Fi/Bluetooth-Anzeige
③
ES
Tubo de alimentación de PTFE
①
LED Indicator
④
Extruder
⑤
Power Socket / Power Switch
⑥
LED-Anzeige
④
Extruder
⑤
Stromsteckdose / Netzschalter
⑥
Indicador LED
④
Platform
⑦
Ventilation Holes
⑧
Filament Holder
⑨
Plattform
⑦
Lüftungslöcher
⑧
Filamenthalter
⑨
Plataforma
⑦
Gantry Frame
⑩
Filament Slot
⑪
Nozzle
⑫
Gerüstrahmen
⑩
Filament-Schlitz
⑪
Düse
⑫
Marco de grúa
⑩
Model:V8110
PEI Plate
⑬
Operation Button
⑭
USB-C Port / Reset Slot
⑮
PEI-Platte
⑬
Betriebstaste
⑭
USB-C-Anschluss / Reset-Slot
⑮
Placa PEI
⑬
③
②
③
④
⑤
⑩
⑪
⑫
Clip de extrusión
②
Indicador de Wi-Fi/Bluetooth
③
FR
Tube d'alimentation en PTFE
①
Clip d'extrusion
②
Indicateur Wi-Fi/Bluetooth
③
IT
Tubo di alimentazione in PTFE
①
Clip d'estrusione
②
Indicatore Wi-Fi/Bluetooth
③
NL
PTFE-Voedingssonde
①
Extrusor
⑤
Enchufe de corriente / Interruptor
⑥
de encendido
Indicateur LED
④
Extrudeur
⑤
Prise électrique / Interrupteur
⑥
d'alimentation
Indicatore LED
④
Estrusore
⑤
Presa elettrica / Interruttore di
⑥
alimentazione
LED-indicator
④
Rejilla de ventilación
⑧
Soporte de lamento
⑨
Plateforme
⑦
Trous d’aération
⑧
Porte-lament
⑨
Piattaforma
⑦
Fori di ventilazione
⑧
Portalamento
⑨
Platform
⑦
Ranura del lamento
⑪
Boquilla
⑫
Cadre de portique
⑩
Emplacement de lament
⑪
Buse
⑫
Telaio a ponte
⑩
Fessura del lamento
⑪
Ugello
⑫
Brugkader
⑩
Botón de operación
⑭
Puerto USB-C / Ranura de reinicio
⑮
Plaque PEI
⑬
Opération Bouton
⑭
Port USB-C / Fente de réinitialisation
⑮
Piastra PEI
⑬
Pulsante di funzionamento
⑭
Porta USB-C / Slot di ripristino
⑮
PEI-plaat
⑬
⑥
⑦
⑧
⑬
⑭
⑮
Uitdrijvingsklem
②
Wi-Fi/Bluetooth-indicator
③
PT
Tubo de alimentação PTFE
①
Clipe de extrusão
②
Indicador de Wi-Fi/Bluetooth.
③
AR
)PTFE
①
②
③
Wi-Fi/Bluetooth
Extruder
⑤
Stopcontact / Stroomschakelaar
⑥
Indicador LED
④
Extrusora
⑤
Tomada elétrica / Interruptor de
⑥
energia
④
⑤
⑥
LED
Ventilatiegaten
⑧
Filamenthouder
⑨
Plataforma
⑦
Orifícios de ventilação
⑧
Suporte de lamento
⑨
⑦
⑧
⑨
Filamentsleuf
⑪
Nozzle
⑫
Estrutura de pórtico
⑩
Ranhura do lamento
⑪
Bical
⑫
⑩
⑪
⑫
Bedieningsknop
⑭
USB-C poort / resetsleuf
⑮
Placa PEI
⑬
Botão de Operação
⑭
Porta USB-C / Ranhura de Reiniciar
⑮
⑬
⑭
⑮
USB-C
PEI
④ ⑤ ⑥
⑦ ⑧ ⑨
Page 2
ankermake
QUICK START GUIDE
ankermake.com/software
45°
①
②
③
AnkerMake M5C
https://support.ankermake.com/s/
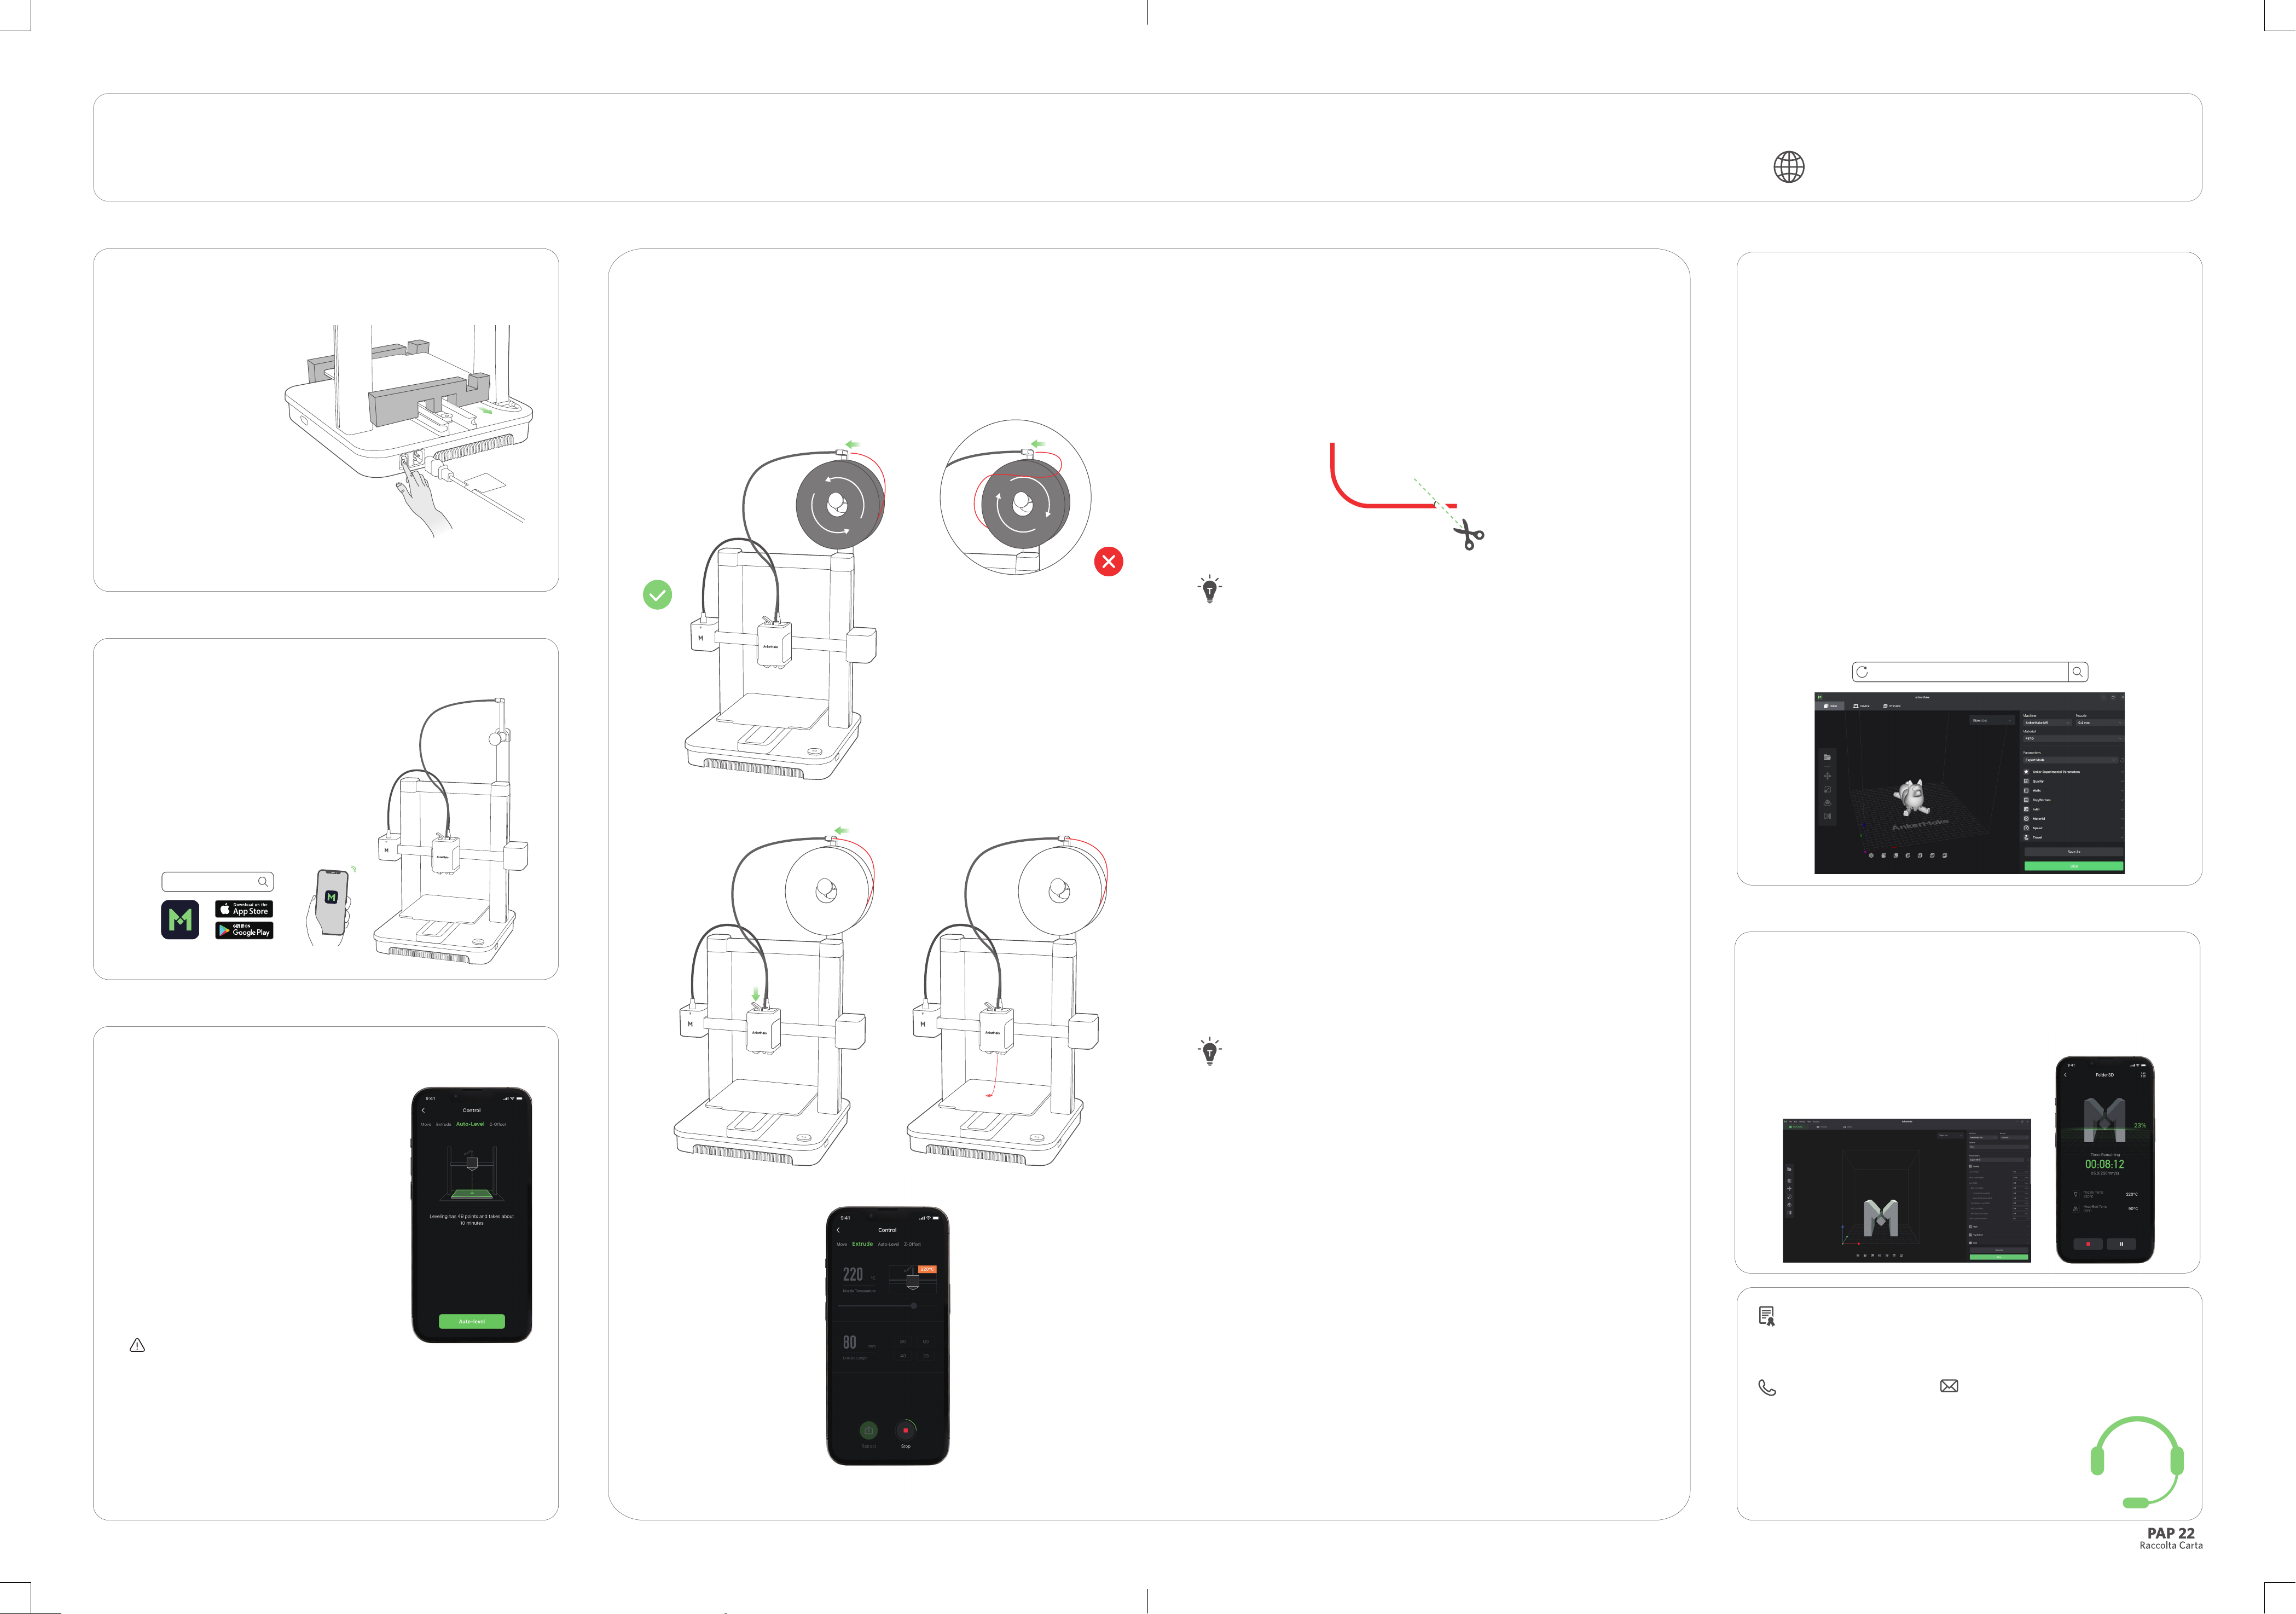
Powering On
❶
Einschalten
Encendido
Mise sous tension
Accensione
Inschakelen
Ligar
❹ Loading
Filament laden
Carga del lamento
Chargement de lament
Caricamento del lamento
Filament laden
Filamento de carregamento
Filament
AnkerMake Slicer
❺
AnkerMake-Schneidemaschine
AnkerMake Slicer
AnkerMake Trancheuse
AnkerMake Slicer
AnkerMake Snijder
AnkerMake Slicer
AnkerMake
For the best printing experience, download and install the AnkerMake Slicer to your computer from
Für das beste Druckerlebnis laden Sie den AnkerMake Slicer auf Ihren Computer herunter und
installieren Sie ihn
Para obtener la mejor experiencia de impresión, descargue e instale el AnkerMake Slicer en su
computadora desde
Pour une expérience d'impression optimale, téléchargez et installez le trancheur AnkerMake sur votre
ordinateur à partir de
Per ottenere un risultato migliore di stampa, scaricare e installare AnkerMake Slicer sul computer da
Para a melhor experiência de impressão, descarregue e instale o AnkerMake Slicer no seu
computador a partir da
Setting up the System
❷
Einrichten des Systems
Conguración del sistema
Mise en place du système
Congurazione del sistema
Het opzetten van het systeem
Conguração do sistema
Straighten the lament at least 0.78 inches / 2 cm and cut the tip of the
lament at a 45° angle.
Glätten Sie mindestens 2cm des Filaments und schneiden Sie die Spitze
des Filaments in einem Winkel von 45° ab.
Enderece el lamento al menos 2 cm y corte la punta del lamento en
un ángulo de 45°.
Redressez le lament d'au moins 0,78 pouces / 2 cm et coupez
l'extrémité du lament en biais à un angle de 45°.
Raddrizzare il lamento per almeno 0,78 pollici / 2 cm e tagliare la
punta del lamento con un angolo di 45°.
Endireite o lamento pelo menos 0,78 polegadas/2 cm e corte a ponta
do lamento num ângulo de 45°.
Maak de lament ten minste 0,78 inch / 2 cm recht en snijd de punt van
de lament onder een hoek van 45° af.
45
Download en installeer de AnkerMake Snijder op uw computer vanaf voor de beste afdrukervaring.
AnkerMake Slicer
Leveling Heatbed
❸
Nivellierung des Heizbetts
Nivelado de la cama caliente
Nivellement du lit chauffant
Livellamento del piano riscaldato
Het nivelleren van het heatbed
Nivelamento do colchão térmico
Press and hold the extruder clip while continuing to insert the lament.
Stop when you feel some resistance.
Drücken und halten Sie den Extruder-Clip, während Sie das Filament weiter
einführen. Stoppen Sie, wenn Sie Widerstand spüren.
Presione y mantenga presionado el clip del extrusor mientras continúa
insertando el lamento.Arrêtez lorsque vous ressentez une certaine
résistance.
Appuyez et maintenez le clip de l'extrudeur tout en continuant à insérer le
lament.Fermarsi quando si sente una certa resistenza.
Premere e tenere premuto la clip d'estrusione mentre si continua ad
inserire il lamento.Fermarsi quando si sente una certa resistenza.
Printing
❻
Drucken
Impresión
Impression
Stampa
Afdrukken
Impressão
Avoid moving the printer during the auto-leveling process.
Vermeiden Sie es, den Drucker während des automatischen
Nivellierungsprozesses zu bewegen.
Procure no mover la impresora durante el proceso de nivelación
automática.
Évitez de déplacer l'imprimante pendant le processus d'auto-nivellement.
Evitare di spostare la stampante durante il processo di auto-livellamento.
Evite mover a impressora durante o processo de nivelamento
automático.
Verplaats de printer niet tijdens het automatische nivelleringsproces.
Pressione e segure o clipe da extrusora enquanto continua a inserir o
lamento.Pare quando sentir alguma resistência.
Houd de extruderklem ingedrukt terwijl je de lament blijft insteken.Stop
wanneer je weerstand voelt.
12-month limited warranty | 12 Monate eingeschränkte Garantie | Garantía limitada de 12 meses |
Garantie limitée de 12 mois | 12 mesi di garanzia limitata | 12 meses de garantia limitada |
通常保証 12 ヶ月
Lifetime technical support | Technischer Support für die Produktlebensdauer | Asistencia
técnica de por vida | Assistance technique à vie | Supporto tecnico per l’intero ciclo di vita |
Suporte técnico ao longo da vida útil do produto |
(US) +1 (800) 221-0126
(UK) +44(0)1604 936200
(DE) +49(0)69 9579 7960
(Middle East & Africa) +971 520750842
(UAE) +971 8000320817
(KSA) +966 8008500030
(Kuwait) +965 22069086
(Egypt) +20 8000000826
(AU) +61 3 8331 4800
(TR) +90 (850) 460 14 14
(RU) +8(800)511-86-23
+86 400 0550036
(中国)
( 日本 ) 03 4455 7823
+82 02-1661-9246
(한국)
| 1
2 개월 제한 보증
|
Anker Innovations Limited
Room 1318-19, Hollywood Plaza,
610 Nathan Road, Mongkok,
Kowloon, Hong Kong
テクニカルサポート
|
평생 기술 지원
(中国)
(日本)
|
51005003983 V1
 Loading...