

Page 1
Quick Start Guide
+ HomeBase
+ eufyCam
+ Entry Sensor
Anker Innovations Limited. All rights reserved. Eufy and the Eufy logo are
trademarks of Anker Innovations Limited, registered in the United States
and other countries. All other trademarks are the property of their respective
owners.
51005001158 V01
1 Charge =
365
Days
Page 2

Tabel of Content
What's include 01
At a glance 03
Installing the eufy Security App 07
Setting Up the System 07
Charging eufyCam 09
Mounting the Camera Outdoors 09
Mounting the Camera Indoors 13
Installing the Sensor 15
F&Q 16
Safety 18
Customer Service 22
Page 3
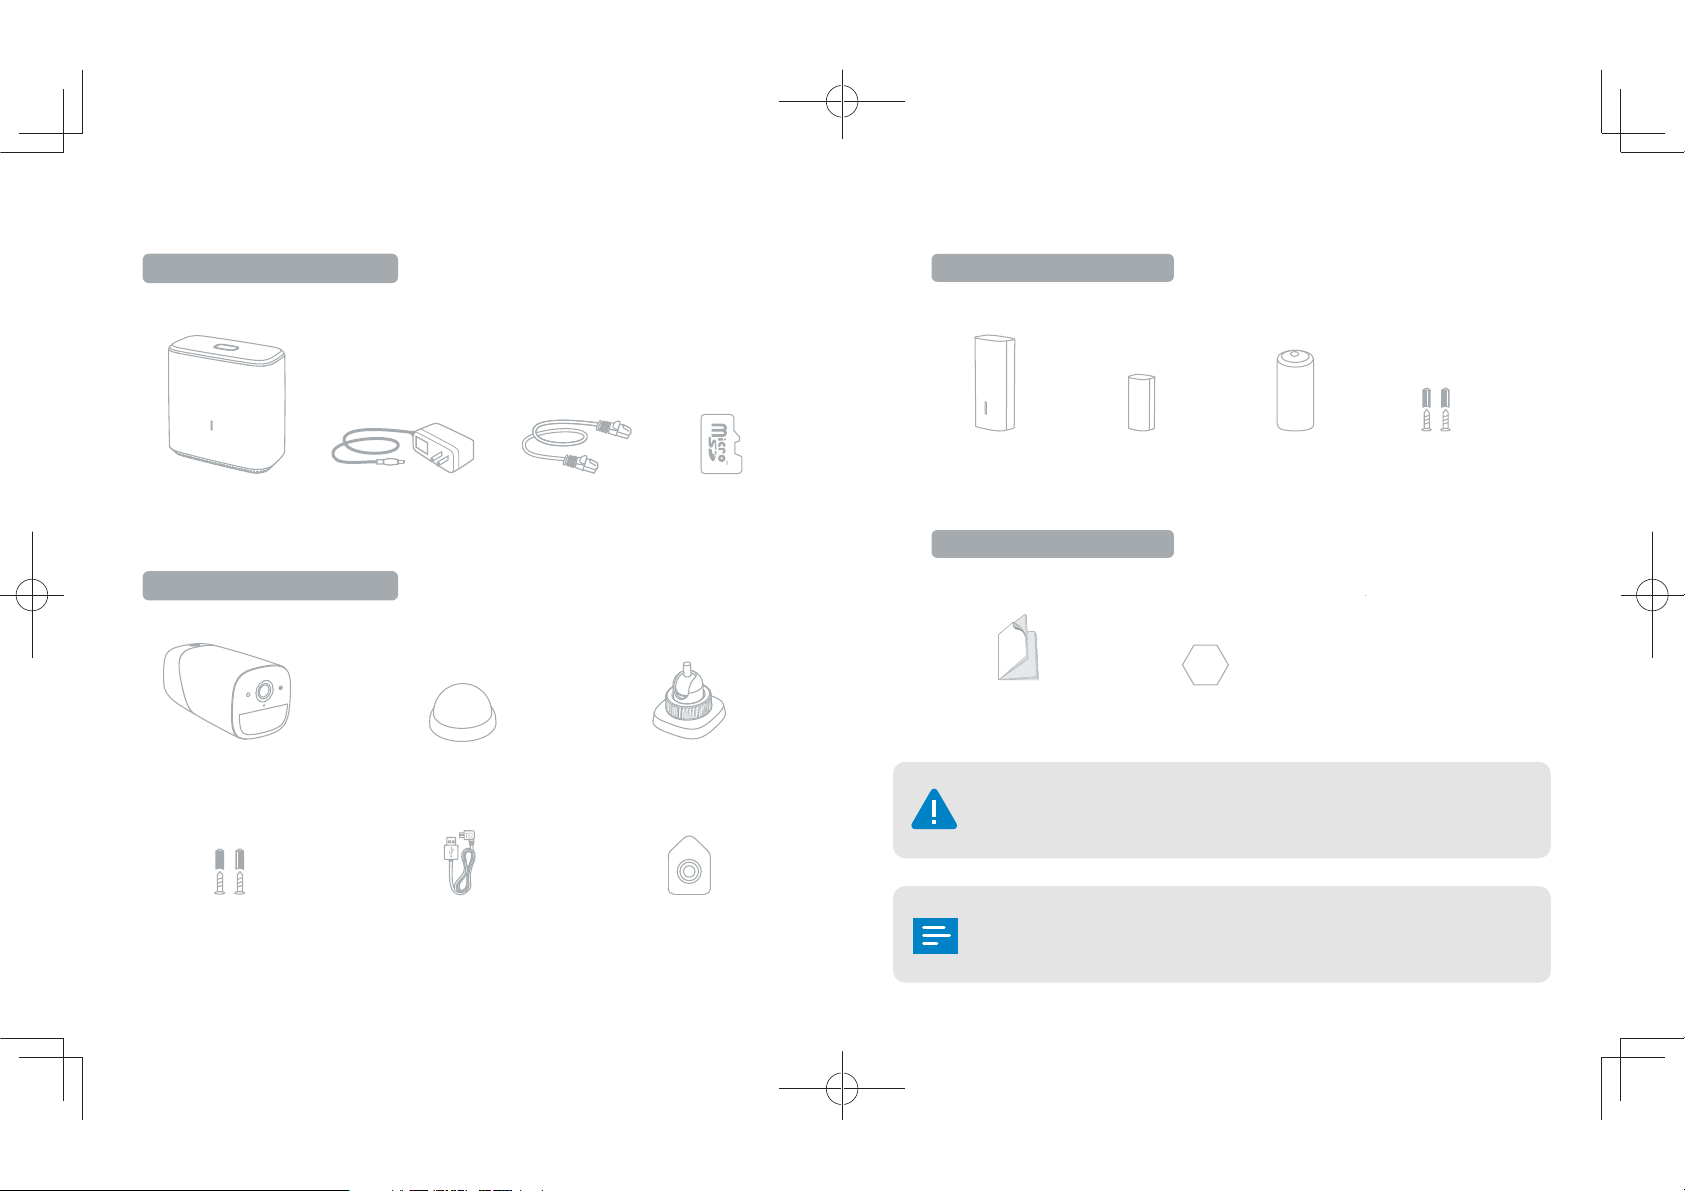
What's include
For HomeBase Installation:
HomeBase
For eufyCam Installation:
eufyCam
HomeBase
Power Adapter
Ethernet Cable microSD Card
Indoor Mount Secure Outdoor Mount
For Entry Sensor Installation:
Entry Sensor Sensor Magnet
Document:
Quick Start Guide Warning Sign
CR123 Battery Mounting Screws
and Anchors
The camera contains strong magnet. We can not guarantee it won't
damage the mechanical hard drives or data on it. Please keep the
camera at least 1 ft away from your internal / external hard drives.
Mounting Screws
and Anchors
Micro-USB
Charging Cable
Hook
(for Indoor Mount)
The power adapter varies by region.
The number of devices and accessories vary by bundle packages.
01 02
Page 4
At a glance
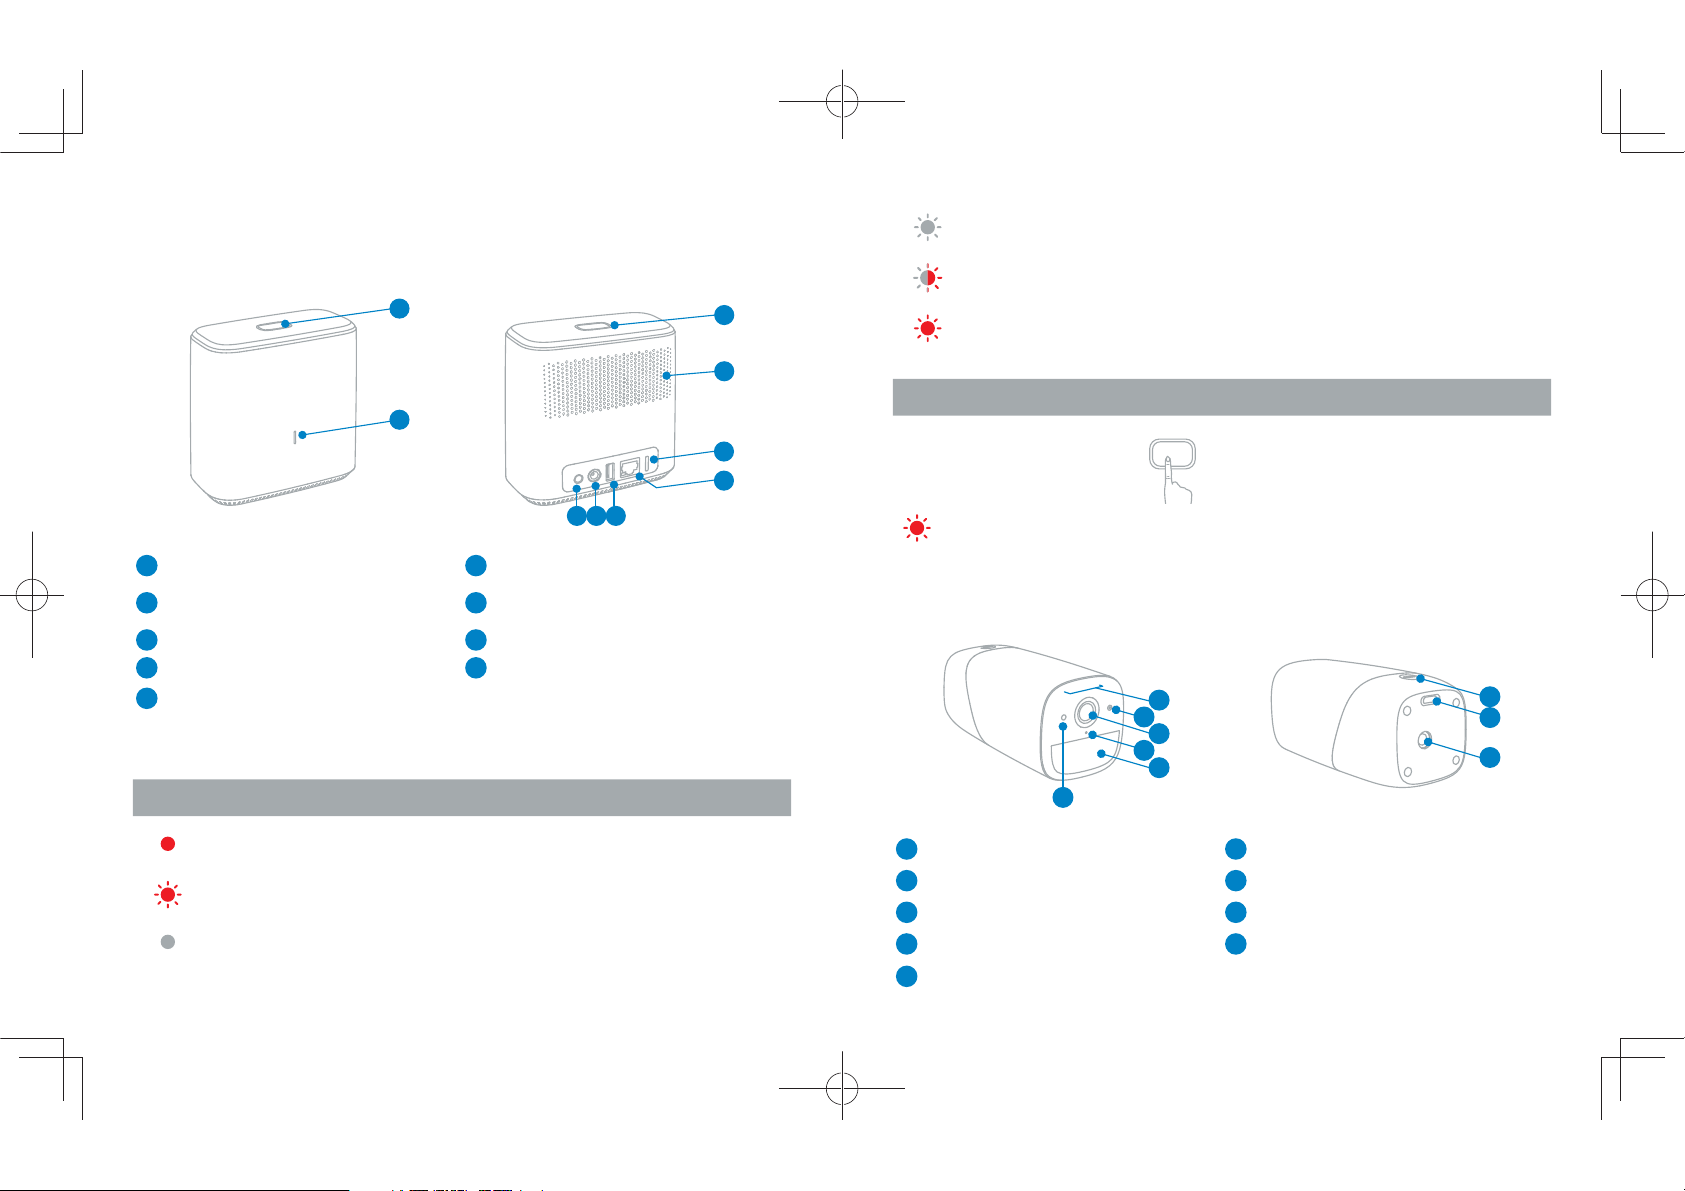
HomeBase
Flashing white
Flash red and white
simultaneously
1
3
Alarm LED indicator
flashing red
4
HomeBase is connected to internet
and ready for setup
Firmware upgrading
Alarm is triggered
Alarm LED indicator color HomeBase status
2
5
Alarm is not activated / Alarm is
6
9
8
7
LED indicator off
Flashing red Alarm is activated
X1
dismissed
1
Alarm off button
2
Front LED indicator
3
Alarm LED indicator
4
Speaker
5
MicroSD card slot
HomeBase LED indicators
Front LED indicator color HomeBase status
Solid red
Flashing red No internet
Solid white
6
Ethernet port
Camera charging port (with
7
Anker Power IQ Technology)
8
Power port
9
Restart button
HomeBase is not connected to internet.
HomeBase is connected to internet and
operating
eufyCam
1
IR light
2
eufyCam LED indicator
3
eufyCam lens
4
Microphone
5
Motion sensor
1
2
3
4
5
6
6
Ambient light sensor
7
Sync button
8
USB charging port
9
Screw hole
7
8
9
03 04
Page 5
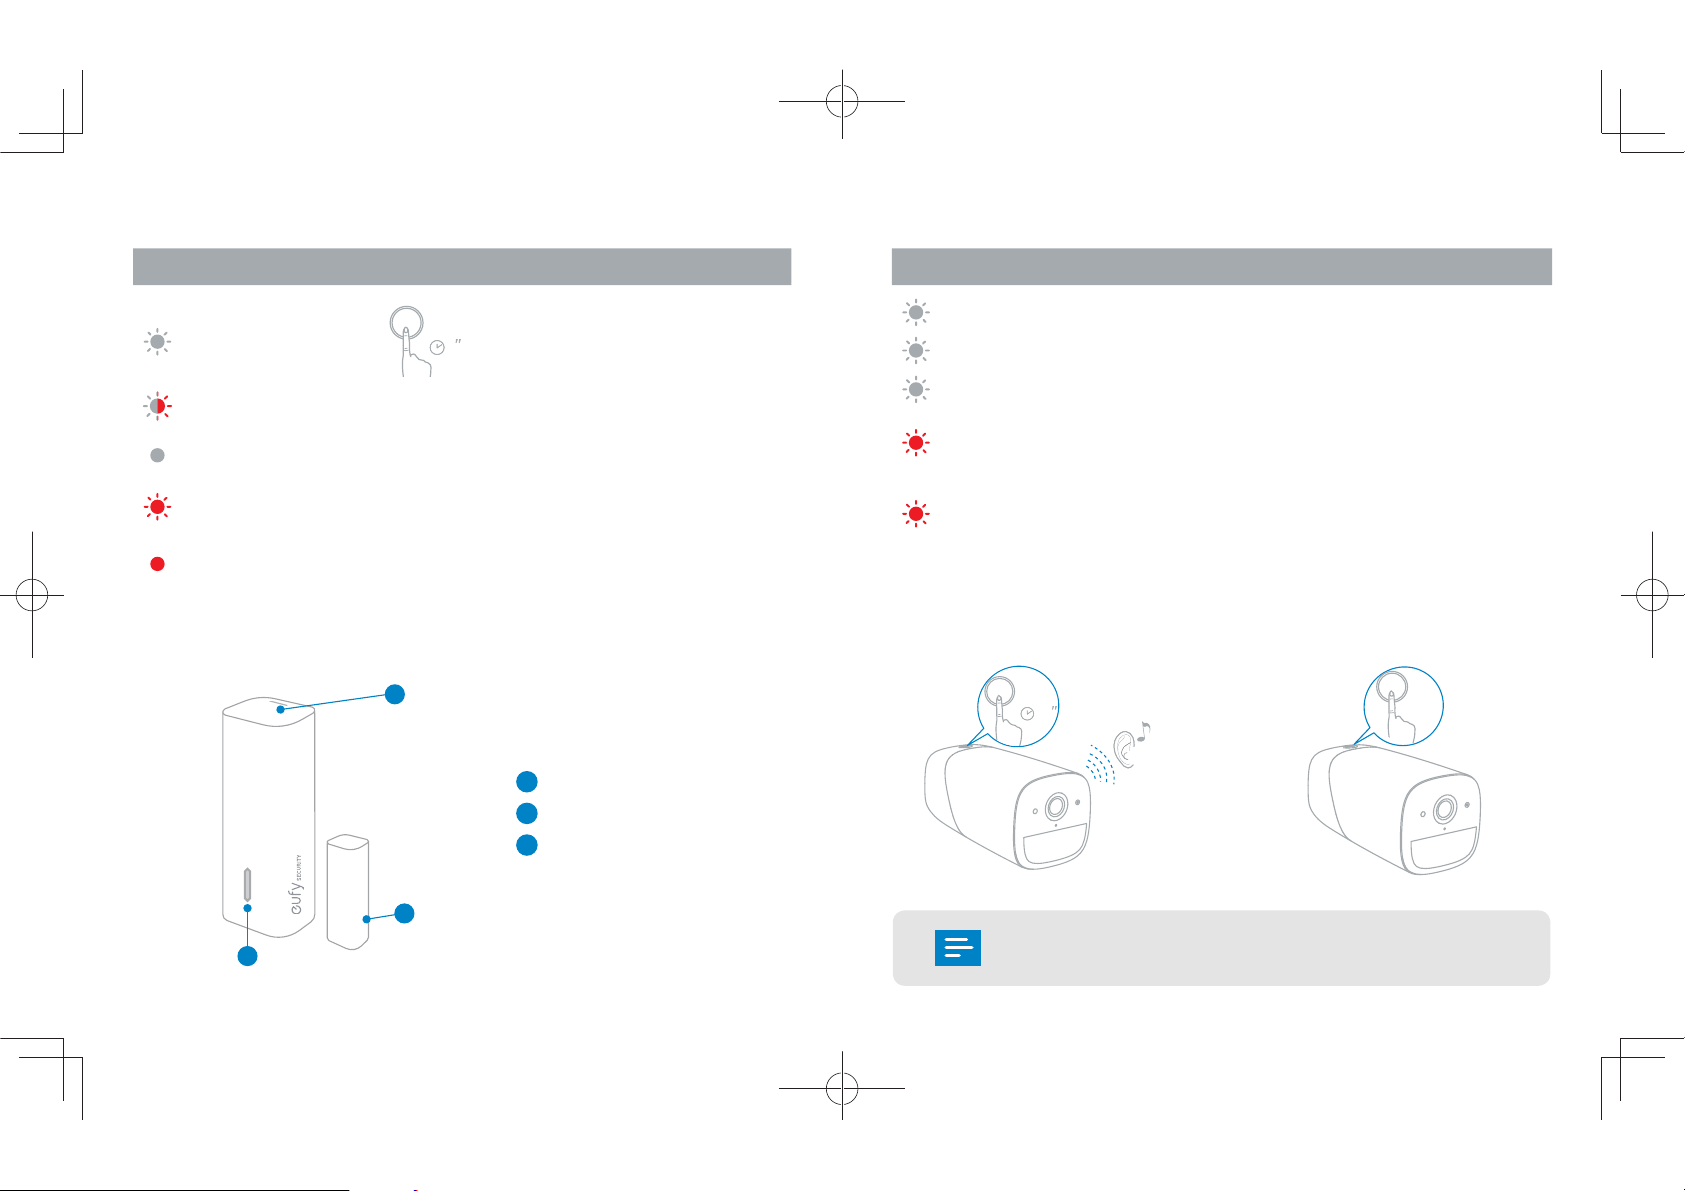
eufyCam LED indicator
SYNC
10
>
SYNC
X5
Entry Sensor LED indicator
eufyCam LED indicator color Camera status
Flashing white
Flash red and white
simultaneously
Solid white
SYNC
Firmware upgrading
Camera is successfully connected to HomeBase
Syncing with HomeBase / Camera
>
2
live streaming / Camera recording
The camera or system is about to switch off /
Flashing red
Anti-theft function activated / Camera battery
is low
Solid red Camera is charging
Sensor
1
1
SYNC button
2
LED indicator
3
Sensor Magnet
Sensor LED indicator color Sensor status
Flashing white Connecting to HomeBase
Flashing white (Twice)
Flashing white (Once)
Door / Window is opened
Door / Window is closed
Door / Window is opened and sensor needs
Flashing red (Twice)
attention: Low battery / Disconnected from
HomeBase
Door / Window is closed but sensor needs
Flashing red (Once)
attention: Low battery / Disconnected from
HomeBase
Press the sync button on the
camera and hold it for 10
seconds to reset the camera.
Press the sync button on the camera
5 times within 3 seconds to switch
off the camera.
3
2
the app before you mount the cameras outdoors.
It’s necessary to set up the HomeBase
and cameras on
05 06
Page 6
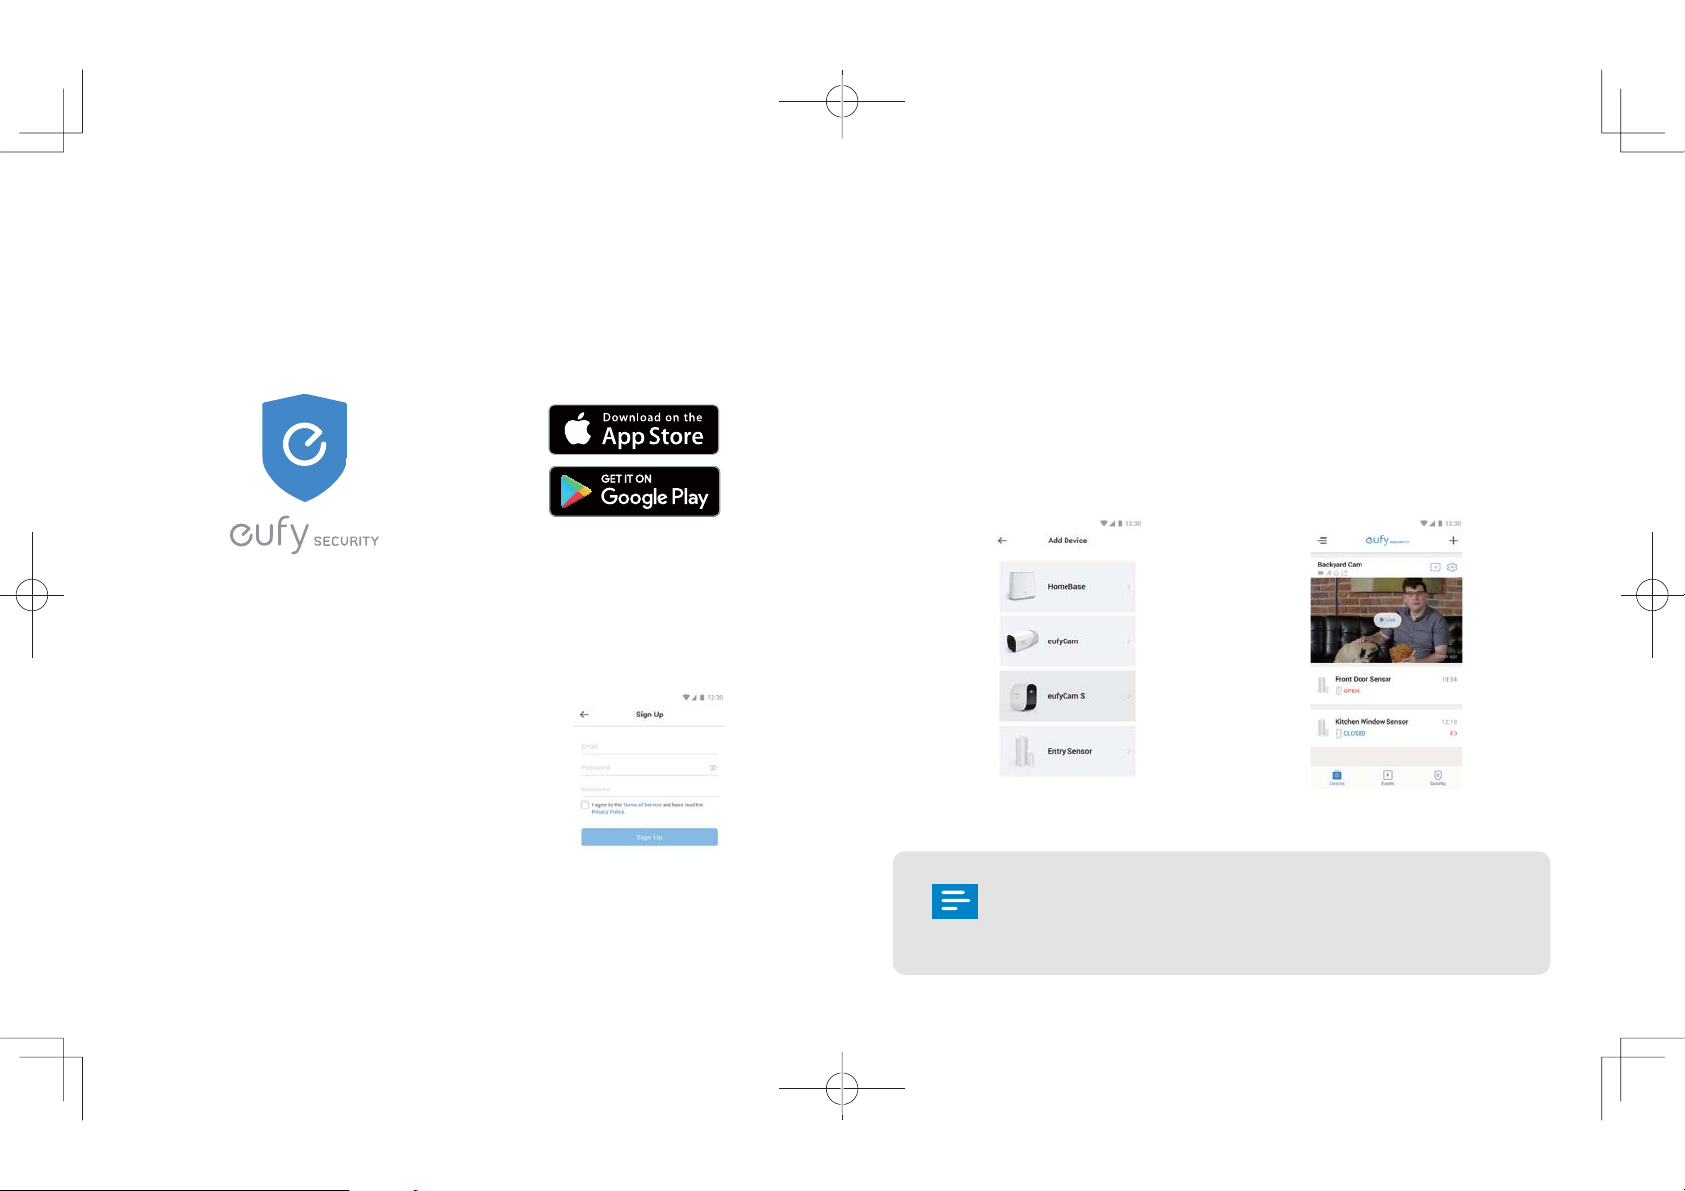
Installing the eufy Security App
• System Setup
• Download the eufy Security App
Download the eufy Security app from the App Store (iOS devices) or Google
Play (Android devices).
Setting Up the System
• Log in or sign up
1. If you have a eufyLife or
eufyHome account, you can login
to the eufy Security app using the
same login information.
2. However, if you are new to eufy,
please sign up for a new account
first and then log in.
3.
1. Follow the onscreen instructions to add your eufy Security devices. Always
start with the HomeBase, then eufyCam or sensor; eufyCam cameras and
sensors can be purchased separately.
2. You will be able to use eufyCam’s live view feature once it has been
successfully added to the system; sensors will also appear in the device
when successfully added.
3. Make sure the devices are working properly before mounting them to your
desired spot.
HomeBase and eufyCam are not fully charged when
shipping out of the factory (to ensure the safety during
transportation). It is recommended to fully charge the
HomeBase and eufyCam before start using them.
07 08
Page 7
Charging eufyCam
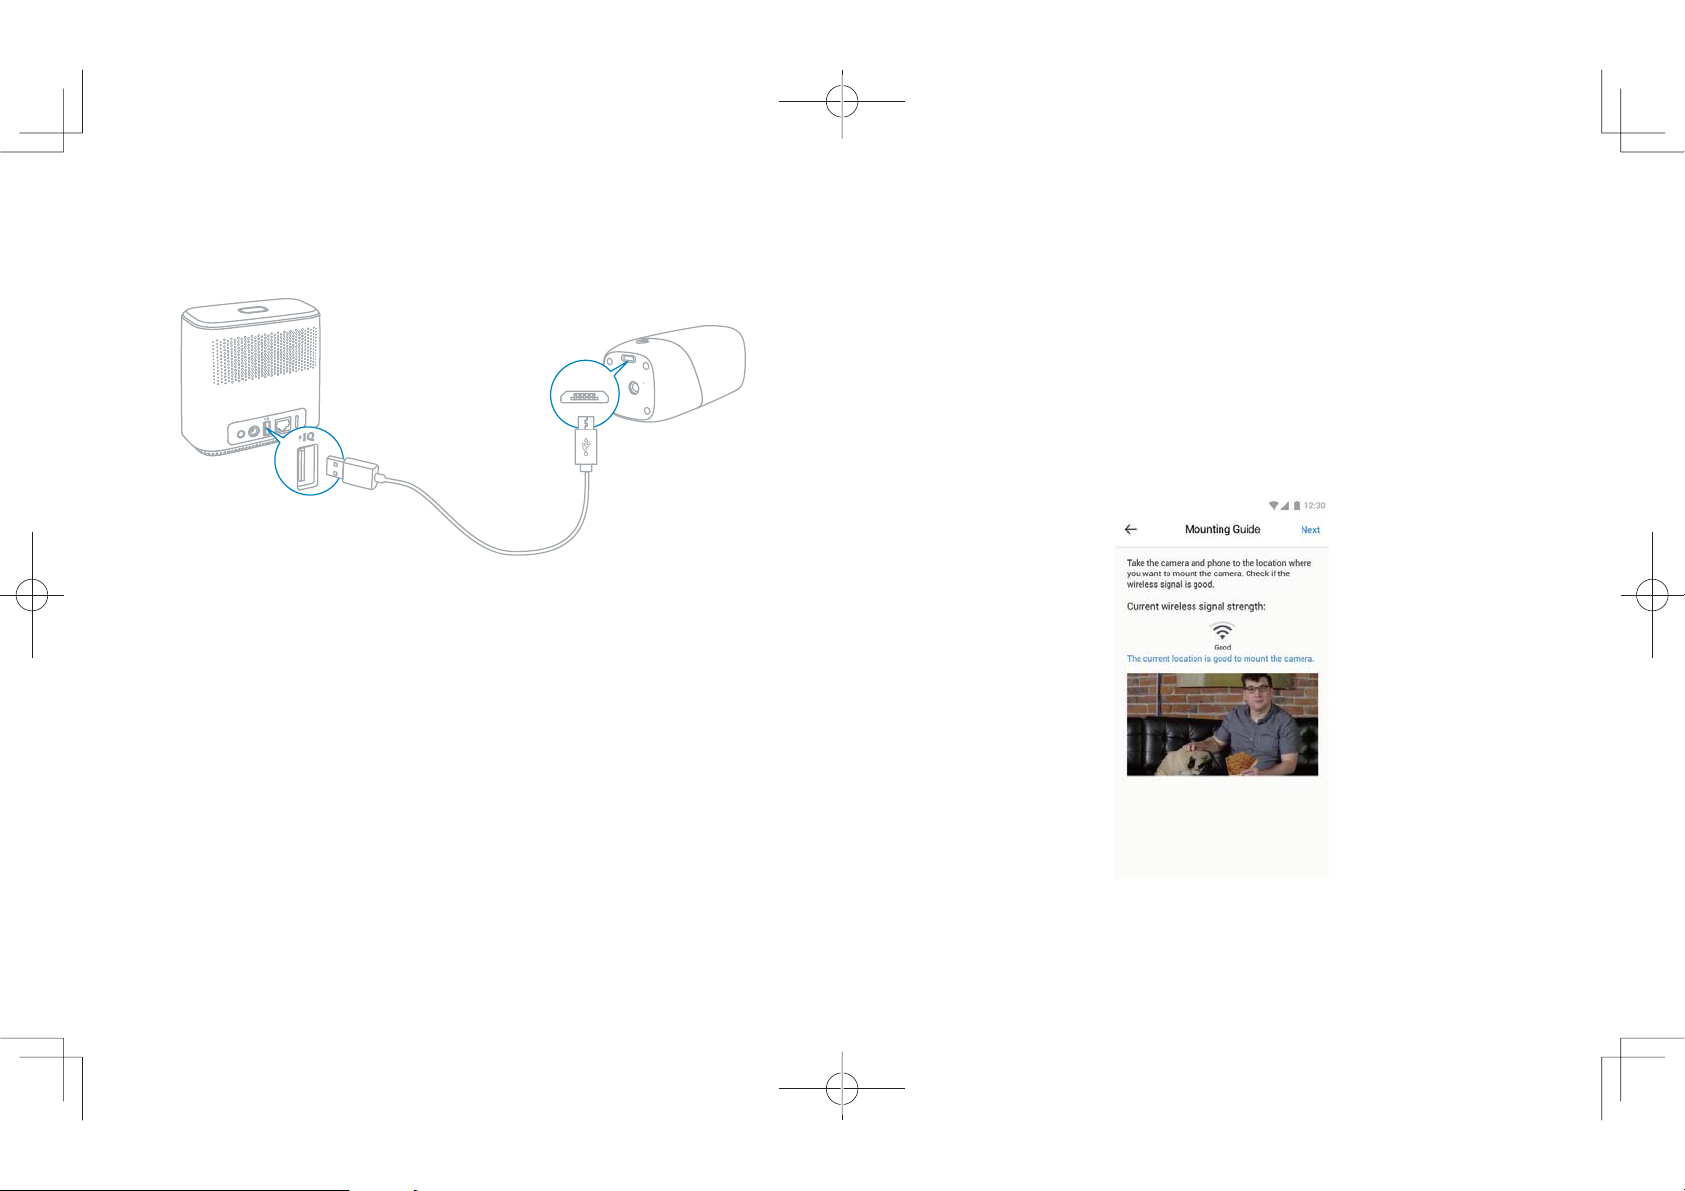
eufyCam does not come fully charged. It is recommended that you fully
charge eufyCam before mounting it to your desired spot.
To charge the camera, use the provided micro-USB charging cable to connect
eufyCam to the camera charging port on the backside of the HomeBase. The
camera LED indicator will blink white while charging. Charging a camera from
0% to 100% takes approximately 4 hours; it will take longer if you charge the
camera via a universal 5V USB charger.
1. Here are some things to consider when looking for a good spot to mount
your eufyCam:
a. Mount your camera in a spot that has a clear view of what you want to
surveil.
b. Use the “Mounting Guide” function, found at the end of the setup
process or under Camera Settings > Mounting Guide, to test the
wireless signal strength of eufyCam at the location you wish to mount
the camera. Make sure the location has a strong wireless signal
strength so that your camera stays connected to the HomeBase. Move
the camera as close to the HomeBase as possible if the wireless signal
strength is weak.
Mounting the Camera Outdoors
c. Hang eufyCam between the recommended mounting height of 7-10
You can mount eufyCam to your selected outdoor location once you have
successfully added it to your list of devices in the eufy Security app.
09 10
ft (2-3 m) above the ground. This height gives eufyCam a wide fieldof-view and maximizes the detection range of the motion sensor of
eufyCam.
Page 8
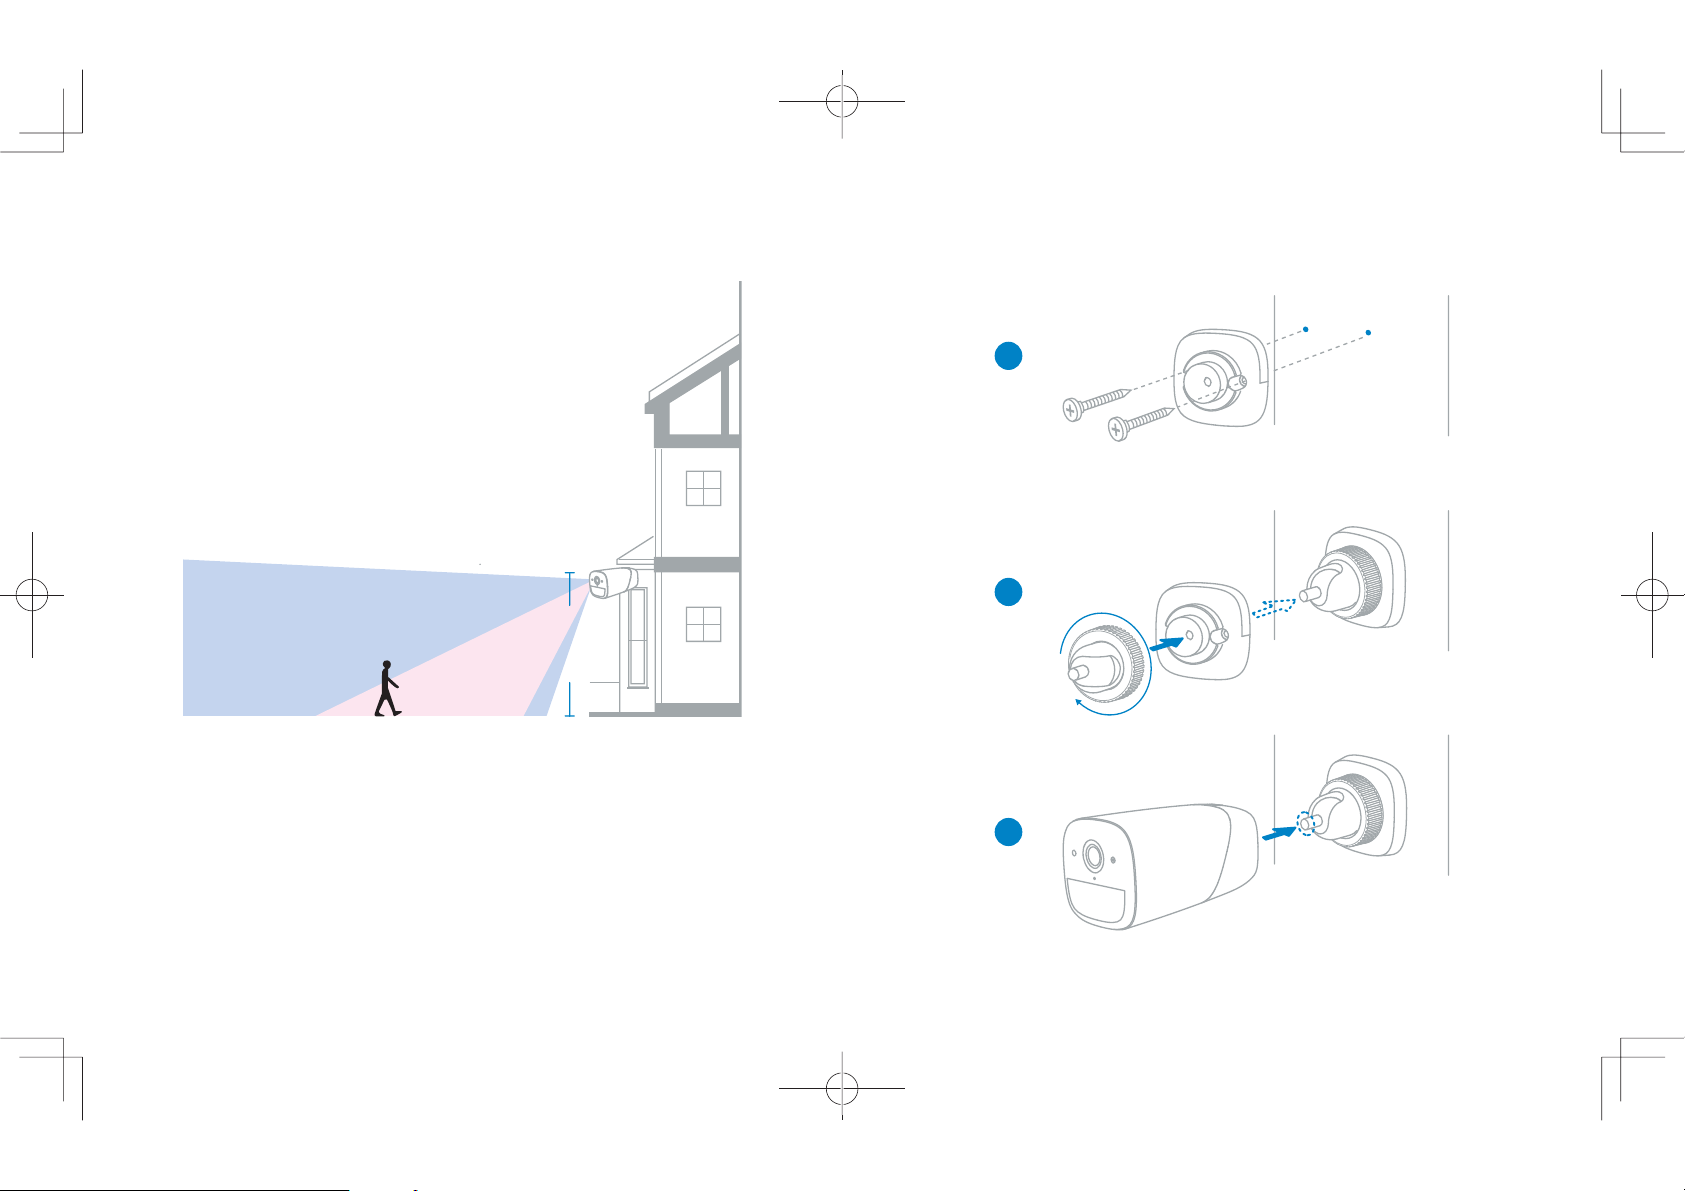
d. Avoid placing eufyCam under direct sunlight.
e. Use the secure outdoor mount to secure eufyCam in outdoor environments.
c. Fasten eufyCam to the secure outdoor mount and adjust the viewing
angle by checking the live stream feed in the eufy Security app.
a
Camera field of view
Motion Detection Zone
7-10 ft
(2.13-3.04 m)
b
2. Outdoor camera installation:
a. Drill holes with a 15/64 in (6 mm) drill bit in your desired spot and then
c
insert the anchors into the holes; anchors are necessary for walls that
are made out of hard materials such as concrete, brick, or stucco.
b. Screw the base of the secure outdoor mount onto the wall. Fasten the
ball bracket of the secure outdoor mount to the base of the secure
outdoor mount.
11 12
Page 9
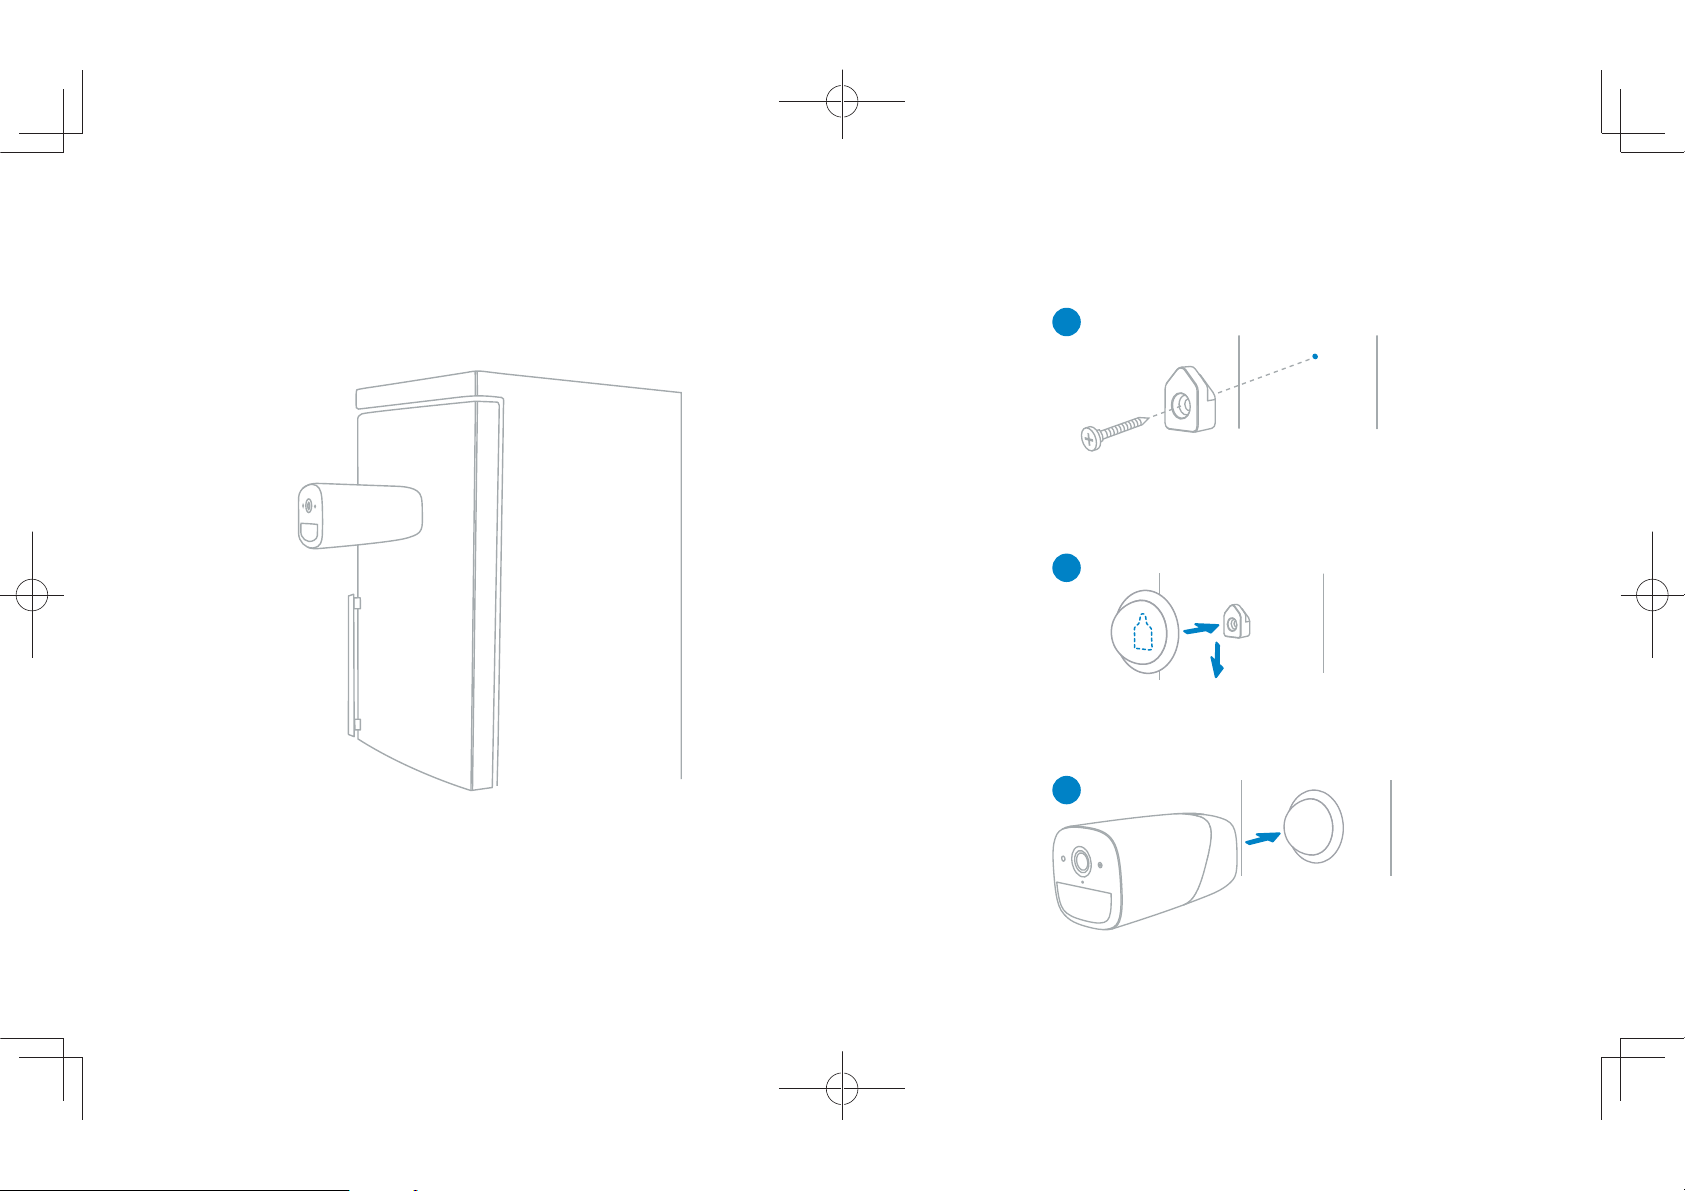
Mounting the Camera Indoors
Indoor camera installation:
1. You can stick the camera directly to a metal surface (Any flat surface
made out of iron).
c. Attach eufyCam to the indoor mount and adjust the viewing angle by
checking the live stream feed in the eufy Security app.
a
b
c
or
2. You can use the indoor mount to mount the camera:
a. Drill a hole in your desired spot. Use the included anchor if it’s drywall
and fasten the hook at your desired spot.
b. Hang the indoor mount on the hook.
13 14
Page 10
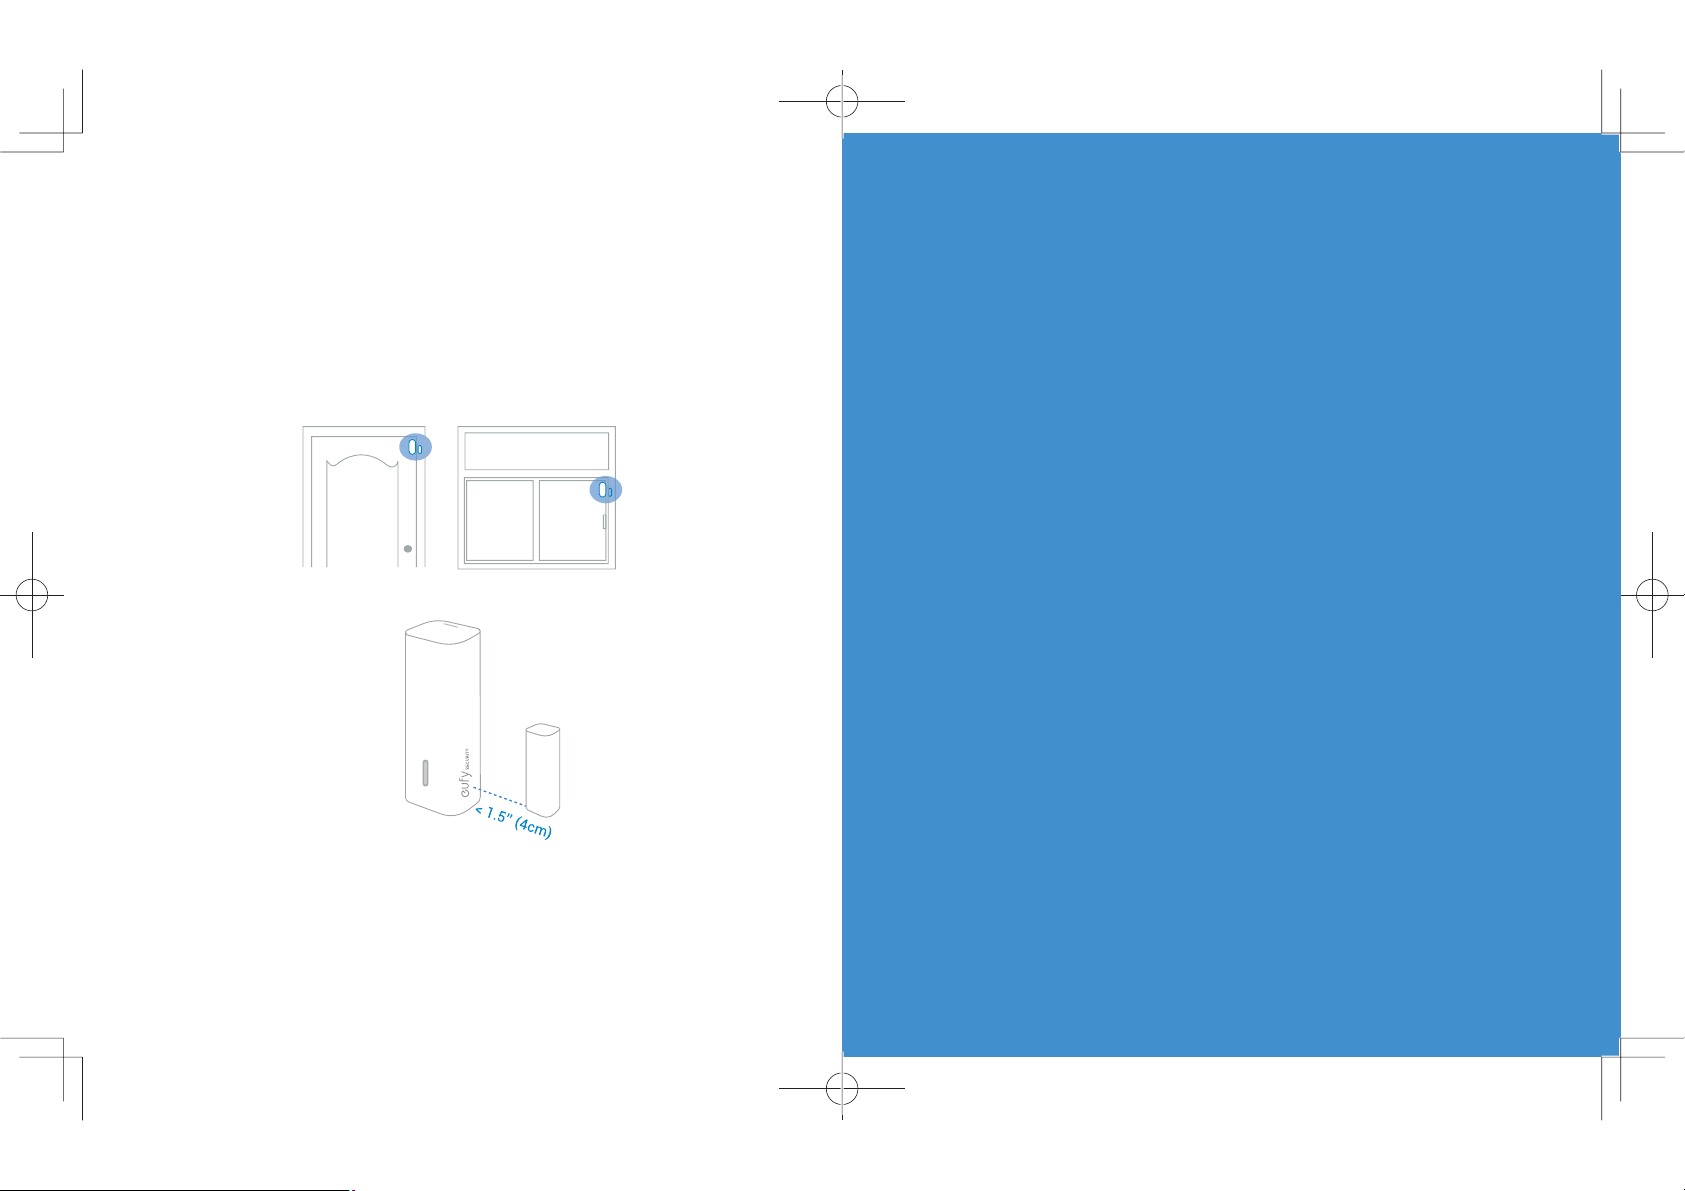
Installing the Sensor
F&Q
Place the sensor on a door or window frame inside your home. Use the
adhesive strip on the sensor or screws provided to mount the sensor.
Close the door or the window and place the sensor magnet on the edge of
the door or window.
1. Why did the device setup process fail?
• Make sure your smartphone and HomeBase are connected to the same
wireless router.
• Make sure eufyCam or the sensor is in the same room HomeBase is in
during the setup process.
• Make sure you follow the onscreen instructions during the setup
process.
2. Why did eufyCam miss recording some events?
• eufyCamutilizes a passive infrared (PIR) sensor to detect motion from
moving objects that emit body heat. Only moving objects that enter the
PIR sensor’s detection zone will trigger eufyCam to start recording.
• If eufyCam is placed behind a glass or a weatherproof box, the PIR
sensor will not be able to detect moving objects. Make sure there are no
obstacles or transparent materials placed in front of eufyCam.
3. Why am I receiving so many false alerts?
• Check to see if youenabled eufyCam’s Human Detection feature, which
ensures eufyCam will send you an alert only when it detects humans on
your property. To enable this feature, go to
Detection
• You may lower the level of sensitivity to reduce the range of the motion
sensor, so that objects at further distances won’t trigger the camera. To
set the level of sensitivity, go to
and tap the
Enable / Disable
Camera Settings ĺ Motion Detection
Camera Settings
toggle switch.
ĺ
Motion
.
Make sure the gap between the sensor and the sensor magnet is less than
1.6 in (4 cm) when the door or window is closed. The bottom of the sensor
magnet should align with the bottom of sensor.
4. How can I extend eufyCam’s battery life?
• Make sure the wireless signal strength to the HomeBase is good.
• Shorten the video recording time.
• Lower the quality videos are recorded in.
• Lower the sensitivity level of the PIR sensor.
1615
Page 11

5. Why do I experience significant delays when I watch a live-stream feed ?
• There are several factors that can cause delays when watching a livestream feed, such as how fast the Internet speed on your smartphone
is, if the upload speed of HomeBase is less than 1Mbps, and if the signal
strength between eufyCam and HomeBase is low.
• Check to see if your smartphone has a strong cellular or Wi-Fi
connection. Make sure your phone has strong cellular signal or is
connected to a stable Wi-Fi network.
• If your Internet upload speed is under 1Mbps and you cannot upgrade
the speed, try lowering the quality videos are recorded in.
• If the signal strength on the camera is weak, try to mount closer to the
HomeBase or move the HomeBase closer to eufyCam.
6. How do I grant eufyCam viewing access to other users?
• Owners 0can grant eufyCam viewing access to other users. They can
view at anytime on their phones.
• First, the new user will have to download the EufySecurity app to their
smartphone and then create a eufy account or sign into an existing
account. Then, the owner must go to Grant Access in their EufySecurity
app’s menu and enter the new user’s eufy account information to send
an invite.
7. Can I add camera or sensor to the system?
• Yes, the system supports up to 16 cameras and 16 entry sensors.
Please check the region code on the bottom of your HomeBase before
purchasing add-on camera or add-on sensor. On the bottom it will show
“Region A” or “Region B”. Please purchase the add-on device according
to the region code of your HomeBase.
Please visit our official website to download the user manual: www.eufylife.com
Safety
FCC Statement
This device complies with Part 15 of the FCC Rules. Operation is subject to the
following two conditions: (1) this device may not cause harmful interference,
and (2) this device must accept any interference received, including
interference that may cause undesired operation.
Warning:
responsible for compliance could void the user's authority to operate the
equipment.
Note:
a Class B digital device, pursuant to Part 15 of the FCC Rules. These limits are
designed to provide reasonable protection against harmful interference in a
residential installation.
This equipment generates uses and can radiate radio frequency energy and,
if not installed and used in accordance with the instructions, may cause
harmful interference to radio communications. However, there is no guarantee
that interference will not occur in a particular installation. If this equipment
does cause harmful interference to radio or television reception, which can
be determined by turning the equipment off and on, the user is encouraged
to try to correct the interference by one or more of the following measures:
(1) Reorient or relocate the receiving antenna. (2) Increase the separation
between the equipment and receiver. (3) Connect the equipment into an outlet
on a circuit different from that to which the receiver is connected. (4) Consult
the dealer or an experienced radio/TV technician for help.
FCC Radio Frequency Exposure Statement
The device has been evaluated to meet general RF exposure requirements.
The device can be used in fixed/mobile exposure condition. The min separation
distance is 20cm.
Changes or modifications not expressly approved by the party
This equipment has been tested and found to comply with the limits for
1817
Page 12
Notice:
Shielded cables
All connections to other computing devices must be made using shielded
cables to maintain compliance with FCC regulations.
This product complies with the radio interference requirements of the
European Community.
Declaration of Conformity
Hereby, Anker Innovations Limited declares that this device is in compliance
with the essential requirements and other relevant provisions of Directive
2014/53/EU.For the declaration of conformity, visit the Web site www.
SeeNebula.com/certification.
Due to the used enclosure material, the product shall only be connected to a
USB Interface of version 2.0 or higher. The connection to so called power USB
is prohibited.
A statement regarding the AC/DC adapter as disconnect device is missing in
the user manual.
The statement shall require a socket outlet that is installed near equipment
and that shall be easily accessible.
The adapter shall be installed near the equipment and shall be easily
accessible.
Do not use the Device in the environment at too high or too low temperature,
never expose the Device under strong sunshine or too wet environment.
The suitable temperature for the product and accessories is -20°C-50°C.
When charging, please place the device in an environment that has a normal
room temperature and good ventilation.
It is recommended to charge the device in an environment with a temperature
that ranges from 5°C~25°C.
Please ensure to use only the charger offered by the manufacturer. Using
unauthorized charger may cause danger and violate the authorization of the
projecter and the guarantee article.
This charger is for indoor use only
The charger output voltage/current is 5Vdc/2A. The plug considered as
disconnect device of adapter.
RF exposure information:
The Maximum Permissible Exposure (MPE) level
has been calculated based on a distance of d=20 cm between the device and
the human body. To maintain compliance with RF exposure requirement, use
product that maintain a 20cm distance between the device and human body.
CAUTION RISK OF EXPLOSION IF BATTERY IS REPLACED BY AN INCORRECT
TYPE. DISPOSE OF USED BATTERIES ACCORDING TO THE INSTRUCTIONS
Wi-Fi Operating Frequency Range:2412~2472MHz for EU, AU;
2412~2462MHz for US/CA;
SUB-1G Operating Frequency Range: 868MHz for EU; 915MHz for US,AU
ES
LU
FR
DK
RO
HU
HR
BG EE BE
CZ
SI
This product is designed and manufactured with high quality materials
and components, which can be recycled and reused.
This symbol means the product must not be discarded as household
waste, and should be delivered to an appropriate collection facility for
2019
Page 13
recycling. Proper disposal and recycling helps protect natural resources,
human health and the environment. For more information on disposal and
recycling of this product, contact your local municipality, disposal service, or
the shop where you bought this product.
This device complies with Industry Canada licence-exempt RSS standard(s).
Operation is subject to the following two conditions:
(1) this device may not cause interference, and
(2) this device must accept any interference, including interference that may
cause undesired operation of the device."
Le présent appareil est conforme aux CNR d'Industrie Canada applicables
aux appareils radio exempts de licence. L'exploitation est autorisée aux deux
conditions suivantes:
(1) l'appareil nedoit pas produire de brouillage, et
(2) l'utilisateur de l'appareil doit accepter tout brouillage radioélectrique subi,
même si le brouillage est susceptible d'en compromettre le fonctionnement."
Customer Service
• Warranty
12-month limited warranty
• Call Us
United States +1 (800) 988 7973 Mon-Fri 9AM-5PM (PT)
United Kingdom +44 (0) 1604 936 200 Mon-Fri 6AM-11AM (GMT)
Germany +49 (0) 69 9579 7960 Mon-Fri 6:00-11:00
• Email Us
Customer Support: [email protected]
2221
Page 14

23 24
 Loading...