

Page 1
Owner’s Manual
Nebula Capsule
+1 (800) 988 7973 (US) Mon-Fri 9:00 - 17:00 (PT)
+44 (0) 1604 936200 (UK) Mon-Fri 6:00 - 11:00 (GMT)
+49 (0) 69 9579 7960 (DE) Mo-Fr 6:00 - 11:00
+81 03 4455 7823 (日本) 月-金 9:00-17:00
www.SeeNebula.com
For FAQs and more information, please visit:
© Anker Innovations Limited. All rights reserved.
NEBULA and the NEBULA logo are trademarks of
Anker Innovations Limited, registered in the
United States and other countries.
Mode: D
4111
51005000960
V
01
FCC ID:2AOKB-D2421
51005000960_D4111_Manual_60X110mm_20181218-V01.indd 1-2 2018\12\18 星期二 15:48:50
Page 2
01 English
23 Deutsch
43 Español
63 Français
83 Italiano
103
122
142
日本語
한국어
ةيبرعلا
Safety Instructions
Read all instructions before you use this device. Do
not make any changes or create settings that are not
described in this manual. If physical injury, loss of data
or damage is caused
warranty does
Setup
• To reduce the risk of re and/or electric shock, do
not expose the device to rain or moisture. Objects
lled with liquids, such as vases, should not be
placed on this device.
• Do not place this device on soft surfaces such as
tablecloths or carpets, otherwise the device could
be a re hazard.
• Do not place this device in areas susceptible to
excessive dust and dirt or near any appliance
generating a strong magnetic eld.
• To prevent overheating do not block or clog the
ventilation openings.
• Never place this device in a conned space.
Always leave enough space around this device
for ventilation.
• Protect this device from overexposure to direct
sunlight, heat, large temperature fluctuations
and moisture. Avoid extreme temperatures. The
suitable operations and storage temperature for
this device and its accessories is 0°C to 35°C/ 0°F
to 95°F).
• When this device is running for a long period of
time, the surface may become hot. Shut it down
immediately and unplug the charger.Resume
operation after this device has cooled down.
• Always handle this device with care. Avoid
touching the lens. Do not allow children to handle
the device without supervision.
by failure to follow instructions, the
not apply.
EN
01
51005000960_D4111_Manual_60X110mm_20181218-V01.indd 3-1 2018\12\18 星期二 15:48:50
Page 3
EN
• Never place heavy or sharp objects on this device.
• To avoid electric shock, do not disassemble.
• Use attachments or accessories specied by the
manufacturer only.
• Avoid extreme vibrations as they may damage
the internal components.
Hearing Safety
• To avoid hearing damage, do not listen for
extended periods at high volume. Set the volume
to a safe level.
Charging
• The charger type is Q183 with output voltage/
current of DC 9V/2A. The plug comes as a
separate piece from the adaptor.The charger
should be installed near this product and should
be easily accessible.
• This charger is for indoor use only.
• When charging, place this device in an
environment that has a normal room temperature
(ranges from 5°C to 25°C/ 41°F to 77°F
recommended) and good ventilation.
• Due to the enclosure material used, this device
shall only be connected to a USB interface of
version 2.0 or higher.
Battery
• Do not replace the built-in battery yourself.
Contact an authorized service center to replace it.
• The remote control contains a button cell battery,
which can be swallowed. Keep the remote control
out of reach of children.
• Risk of explosion! Keep batteries away from heat,
direct sunlight or re. Never dispose of batteries
by burning.
• When the remote control is not used for a long
period of time, remove the battery.
• Replace the remote control battery only with the
same or an equivalent type.
• Batteries contain chemical substances and
should be disposed of properly.
• Charge this device regularly. Do not store this
device with a completely discharged battery.
Cleaning
• Use a soft, lint-free cloth. Never use liquid,
gaseous or easily flammable cleansers (sprays,
abrasives, polishes, alcohol) to clean.
• Do not use any liquid cleaning agents to clean the
lens to avoid damaging the coating lm on the
lens. Use lens cleaning paper to clean the lens.
Repairs
• Do not make any repairs to this device yourself.
Only have your device repaired by an authorized
service center.
• Improper maintenance can result in injuries or
damage to this device.
• Refer all servicing to qualied service personnel.
Caution:
• Possibly hazardous optical radiation emitted from
this device.
• Do not stare at the operating beam. The bright
light may damage your eyes.
EN
02
51005000960_D4111_Manual_60X110mm_20181218-V01.indd 2-3 2018\12\18 星期二 15:48:51
03
Page 4
EN
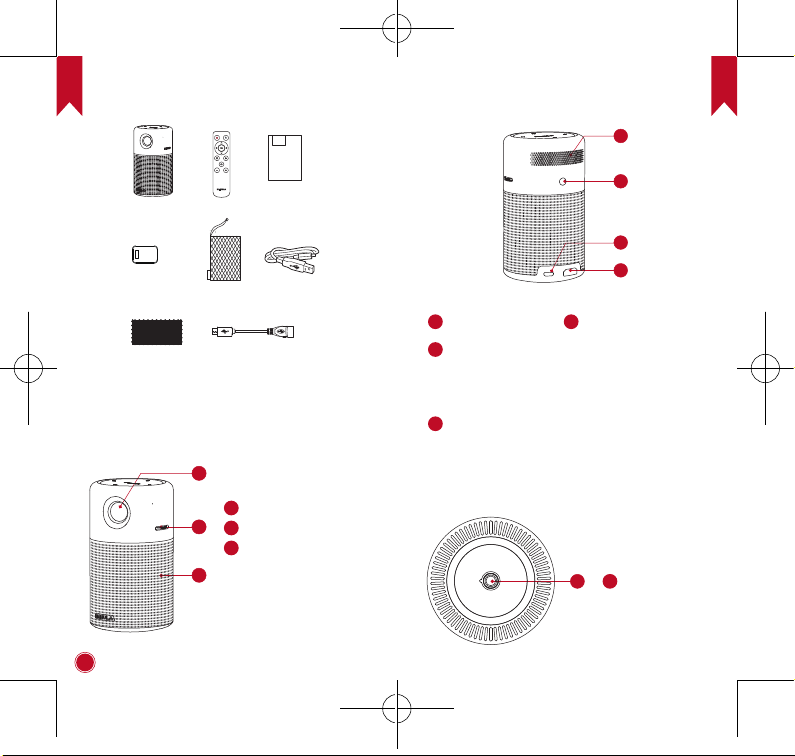
What’s Included
2. Rear View
EN
Overview
1. Front View
04
1
1
Lens
2
2
Focus Adjusting knob
3
Speaker
3
NEBULA
BY ANKER
Owner’s Manual
1
2
3
4
1
Air ventilation (outlet)2Infrared Receiver
3
INPUT
• Connect to power supply
• Connect to a USB flash drive (via supplied OTG
cable)
4
HDMI
Connect to a playback device via HDMI output
3. Bottom View
1
Tripod socket
1
05
51005000960_D4111_Manual_60X110mm_20181218-V01.indd 4-5 2018\12\18 星期二 15:48:54
Page 5
EN
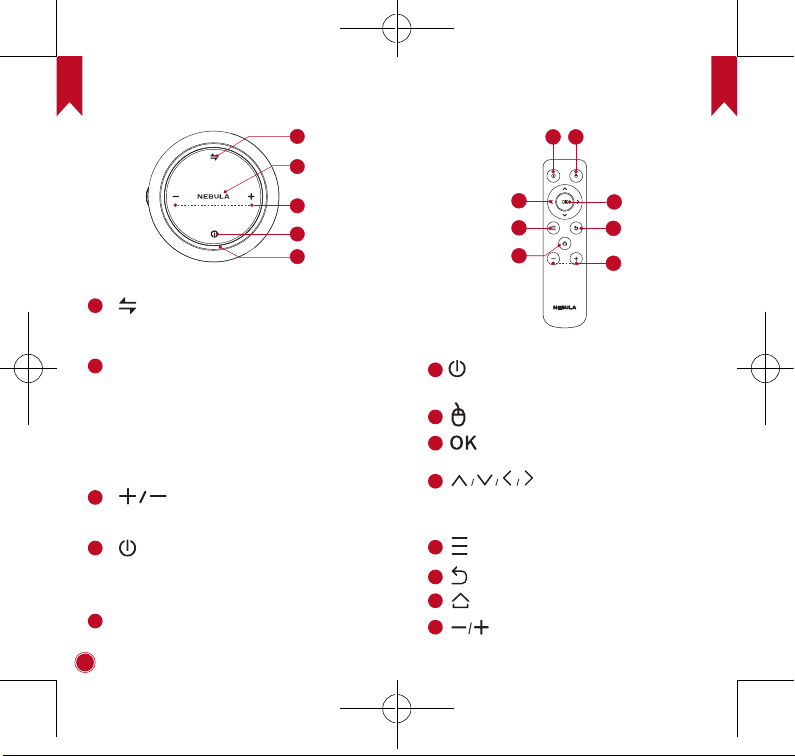
4. Top View
5. Remote Control
EN
1
• Press to switch between Bluetooth speaker
mode and projector mode.
LED indicators
2
• Solid blue: Operating in projector mode.
• Flashing blue: Ready to pair / Bluetooth
pairing (Bluetooth speaker mode).
• Solid blue: Bluetooth connected (Bluetooth
speaker mode).
• Solid red: Charging.
• Solid green: Fully charged.
3
• Press to turn volume up / down.
4
• Hold for 2 seconds to power on / off.
• Press to switch between standby and
resume when powered on.
5
Air ventilation (inlet)
06
1
2
3
4
5
1
2
3
4
• Press to select an option: shutdown,
• Press to enter / exit mouse key mode.
• Press to conrm a selection or entry
• Pause / resume play
• Navigate menus or adjust the selected
5
6
7
8
• Access more options during play
• Return to the previous menu.
• Open the home menu.
• Volume down / up
2
1
4
5
7
standby, reboot or enter Bluetooth
Speaker mode.
3
6
8
Navigation buttons
content.
(available depend on the source).
07
51005000960_D4111_Manual_60X110mm_20181218-V01.indd 6-7 2018\12\18 星期二 15:48:55
Page 6
EN
Getting Started
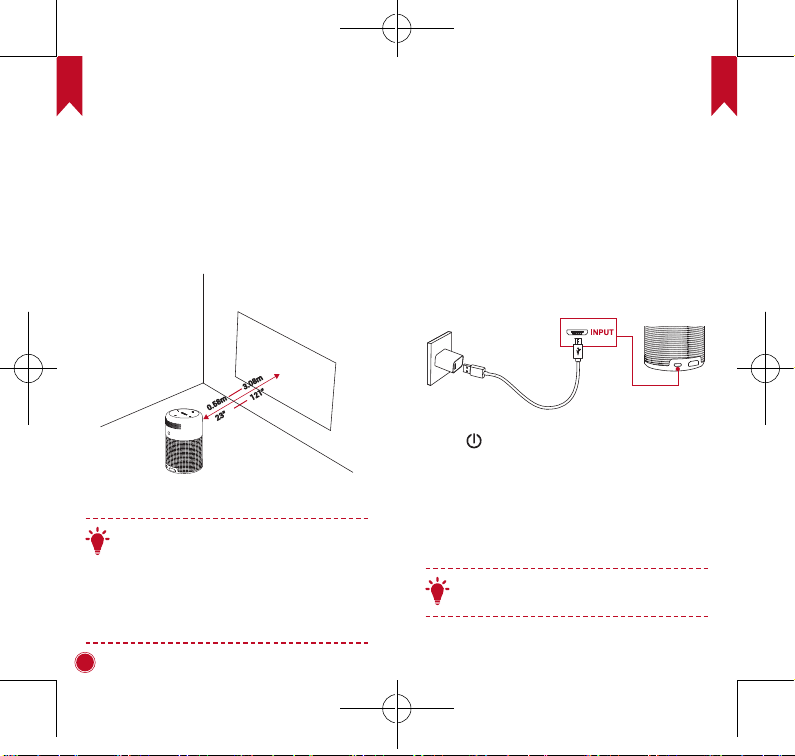
1. Placement
Place this device on a surface table, flat table in
front of the projection surface. For best results, the
projection surface should be white and flat. The
distance between this device and the projection
surface must be a minimum of 0.58 meters (23”) and
a maximum of 3.08 meters (121”) to get a projection
image from 20 to 100 inches.
3.08m
121”
0.58m
23”
• It is unnecessary to tilt it towards the
T
projection surface. You can correct the
projection image with the built-in keystone
correction.
• The distance between the device and the
projection surface determines the projection
image size. For the best result, set the
projection image ranging from 40 to 80 inches.
2. Preparing the Remote Control
For rst time use, remove the protective tab to
①
activate the remote control battery.
To replace the battery, unlock and open the battery
②
compartment, insert a new battery positioning the
polarity (+/-) as indicated, and then close and lock
battery compartment.
the
3. Getting Started
Fully charge the built-in battery before using for the
①
rst time by using the provided cable and charger.
Hold
for 2 seconds on the projector to power on.
②
Turn the device towards a suitable projection
③
surface or wall.
Rotate the focus by adjusting knob to get the best
④
focus.
For first time use, follow the on-screen instructions
⑤
to complete the basic settings.
To give your Nebula Capsule Pro the fastest,
T
safest charge, use the supplied charger only.
EN
08
51005000960_D4111_Manual_60X110mm_20181218-V01.indd 8-9 2018\12\18 星期二 15:48:57
09
Page 7
EN
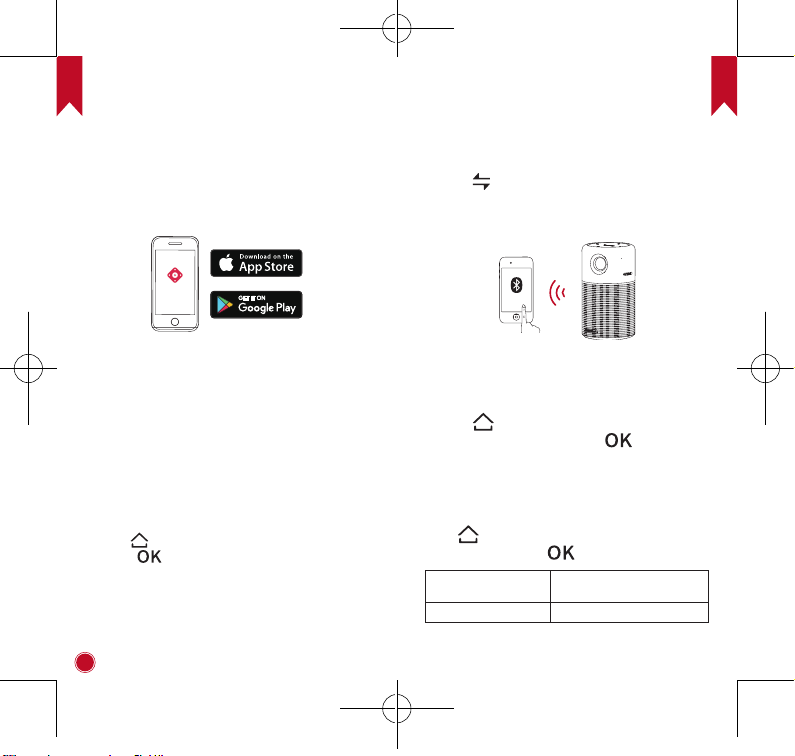
4. Nebula App
To easily control this device, we recommend you to
download the devoted Nebula App, Capsule Control.
Using this app, you can use your smartphone’s
keyboard to input text and use the screen as a mouse .
Download the Capsule Control app from the App
①
Store (iOS devices) or Google Play (Android devices).
Enable Bluetooth on your smartphone.
②
Open the Capsule Control app and follow the on-
③
screen instructions to complete connection setup.
Settings
Finish the main settings when you power on the device
for the rst time.
1. Network
This device can be connected to the Internet via a
wireless (Wi-Fi) connection.
Press to access the home menu, select [Network]
①
and press .
Follow the on-screen instructions to complete the
②
network connection.
2. Bluetooth
A. Bluetooth Speaker Mode
You can use this device as a standalone Bluetooth
speaker.
Press to switch to Bluetooth speaker mode.
①
Enable Bluetooth on your smartphone and select
②
[Nebula Capsule Pro] as the device to be added.
Nebula capsule
B. Projector Mode
You can connect Bluetooth headphones or a speaker
to Capsule Pro while in projector mode.
Press to access the home menu, select
①
[Settings] > [Bluetooth] and press .
Follow the on-screen instructions to complete the
②
Bluetooth connection.
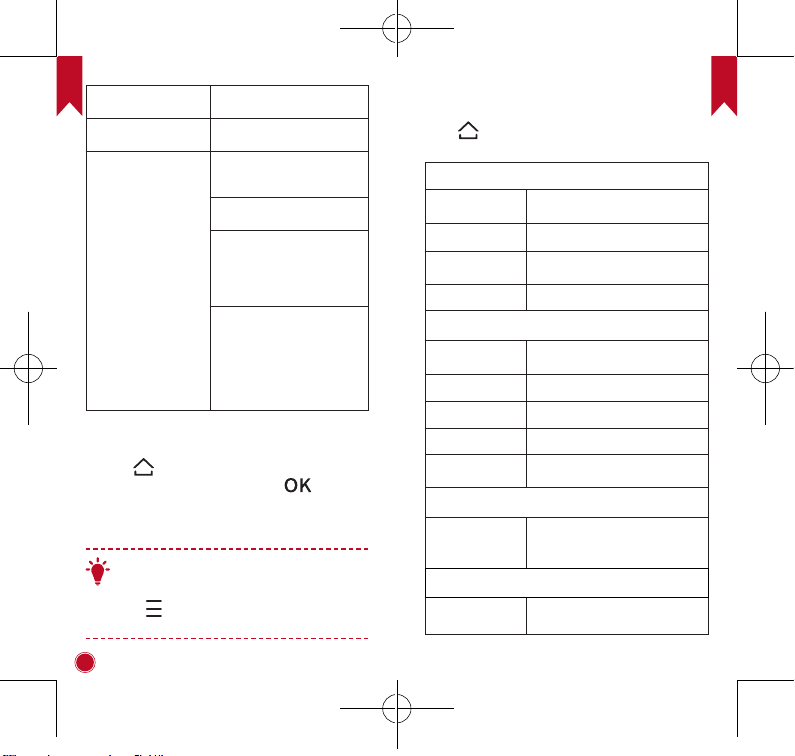
3. Projector
Press to access the home menu, select [Settings]
> [Projector] and press .
[Image Mode]
[Color Temperature] [Normal] / [Cool] / [Warm]
[Auto] / [Standard Mode] /
[Battery Mode]
EN
10
51005000960_D4111_Manual_60X110mm_20181218-V01.indd 10-11 2018\12\18 星期二 15:48:58
11
Page 8
EN
[Auto Keystone
Correction]
[Keystone Correction]
[Projector mode]
Enable / disable auto
keystone correction.
Correct keystone manually.
Default value is 0.
[Front]: The device is located
in front of the projection
surface.
[
Rear]: The device is located
behind the projection surface.
[Front Ceiling]: The device
is hanging from the ceiling
in an upside down position.
The image is rotated by 180
degrees.
[Rear Ceiling]: The device
is hanging from the ceiling
in an upside down position
behind the projection
surface. The image is
rotated by 180 degrees and
horizontal mirrored.
4. App Manager
Press to access the home menu, select
①
[Settings] > [App Manager] and press .
Select an app and check the current version, open
②
or force stop, check the storage used or clear data, or
uninstall it.
When more than 3 apps are installed, you can
T
select [All] at the bottom line of the home page
to enter the [Apps] page. Select an app and
in the remote control, and then you
press
can select [Move To Home] or [Uninstall].
12
5. Other
Press to access the home menu, select [Settings]
nd more settings.
[General]
[Language]
[Keypad Tone] Turn on / off the keypad tone.
[Automatic Sleep
Interval]
[Background] Select a background.
[Automatic
Date&Time]
[Date] Manually set date.
[Time] Manually set time.
[Select time zone] Select time zone.
[Use 24-hour
format]
[Check Update]
[Recovery]
Select an on-screen display
language.
5 min / 15 min / 30 min
[Date&Time]
Enable / disable automatic date
and time.
Select 24-hour format or 12-hour
format.
[Upgrade]
Check if it is the latest version.
Follow the on-screen instructions
to upgrade the software version.
[About]
All data on the built-in storage
will be erased.
EN
13
51005000960_D4111_Manual_60X110mm_20181218-V01.indd 12-13 2018\12\18 星期二 15:48:59
Page 9
EN
Enjoy
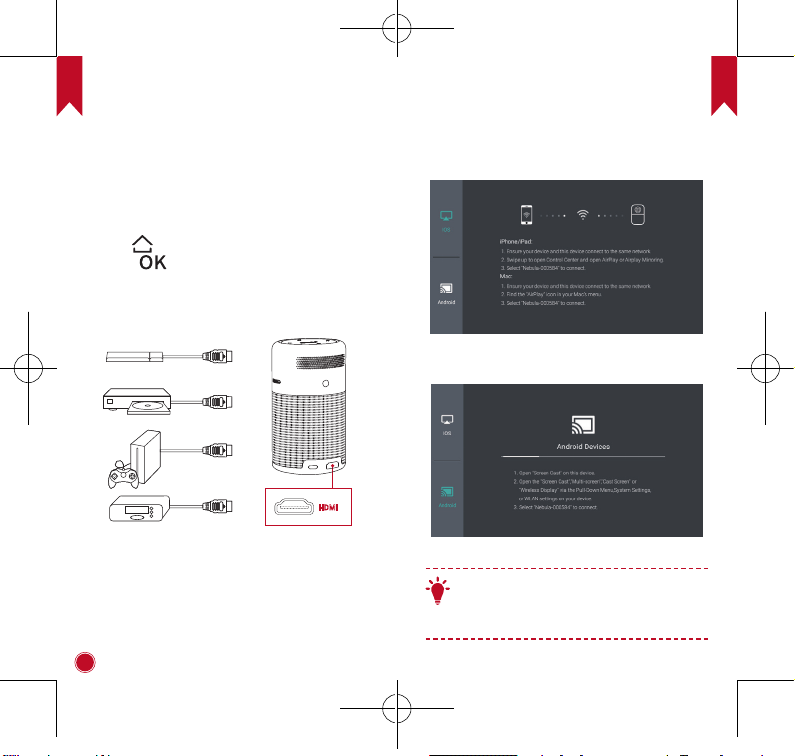
1. Connect to HDMI Playback Devices
This device supports connections with various HDMI
playback devices such as TV stick, TV box, DVD
player, set-top box (STB), game machine or other
devices.
Connect this device to an HDMI playback device
①
with an HDMI cable (not provided).
Press to access the home menu, select [HDMI]
②
and press . (* It will automatically start the HDMI
playback when connected to an HDMI playback
device for the rst time.)
HDMI
2. Screen Cast
You can wirelessly cast the screen of your
smartphone or tablet onto the projection surface.
For iOS devices:
For Android devices:
Certain content may be unavailable to be casted
T
due to copyright restrictions. In this case, you
can stream those content via the same app
installed in your Nebula Capsule Pro.
EN
14
51005000960_D4111_Manual_60X110mm_20181218-V01.indd 14-15 2018\12\18 星期二 15:49:01
15
Page 10
EN
USB
21
3. Apps
Once connected to a wireless network, you can
access online services, enjoy movies, music and
pictures, and browse internet. Apart from the apps
installed, you can also install any other apps either
from the Nebula App Store or by a USB flash drive.
Press to access the home menu.
①
Select an Internet service, and press .
②
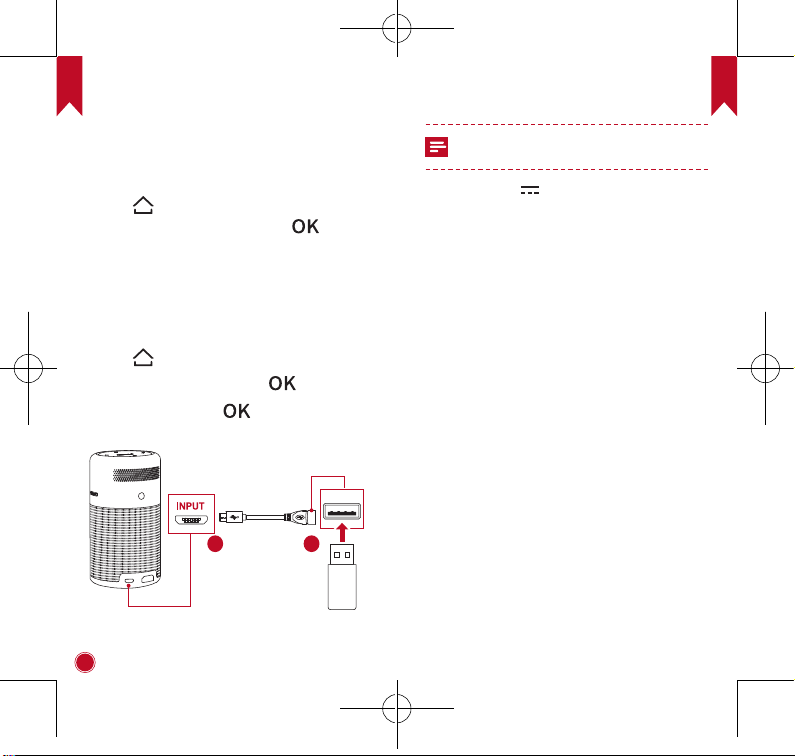
4. Connect to USB Storage Device
With this device, you can enjoy music, video, and
picture, or install apps that are stored on a USB 2.0
storage device by using the supplied OTG cable.
Press to access the home menu.
①
Select [File Manager] and press .
②
Select a le, then press .
③
16
Specications
Specications and design are subject to
change without notice.
Power supply: 9V 2A (QC2.0)
Power consumption: < 10W
Standby power consumption: < 0.5W
Display technology: 0.2inch 854*480p DLP
Light source: RGB LED
Projection image size: 20 - 100 inch
Resolution: 854 x 480 Pixel
Brightness: 150 ANSI Lumens
Contrast ratio: 400:1
Throw ratio: 1.3
Throw distance: 0.58m to 3.08m
CPU: Quad core A7
OS: Android 7.1
RAM: 2GB DDR
ROM: 16GB eMMC
Speaker drivers: 5W
Wi-Fi: IEEE802.11a/b/g/n Dual Frequency 2.4G/5G
Bluetooth version: V4.0
USB le system: FAT32
Built-in battery type: Li-Polymer
Capacity: 5200mAh 3.85V
Movie playtime: approximate 4 hours in battery mode
Music playtime: approximate 30 hours in Bluetooth
speaker mode
Remote control batteries: CR2032 x 1
Recommended ambient: 5°C to 35°C / 41°F to 95°F
Relative humidity: 15% ~ 85% (non-condensing)
Storage temperature and humidity: < 65°C / 149°F, <
90% humidity
Dimensions ((H*D)): 120 * 68 mm / 4.72*2.67 inch
Weight: 470 g / 16.6 oz
EN
17
51005000960_D4111_Manual_60X110mm_20181218-V01.indd 16-17 2018\12\18 星期二 15:49:03
Page 11
EN
Troubleshooting
Fail to power on by the remote control?
①
• Hold for 2 seconds on the projector to power
on.
• When powered off, you cannot use the remote
control to power on.
The remote control doesn’t work?
②
• Remove the protective tab to activate the remote
control batteries.
Blurred image?
③
• Rotate the focus adjusting knob to get the best
focus.
Reversed projection image?
④
• Press to access the home menu, select
[Settings] > [Projector Mode] and switch to a
correct state.
Cannot connect to a Wi-Fi network?
⑤
• Refresh the list of available networks and retry.
• Reboot the wireless router or the device and retry.
How do I update the rmware?
⑥
• When new version is detected, you will be asked
to reboot and update.
18
Notice
Declaration of Conformity
This product complies with the radio
interference requirements of the European
Community. Hereby, Anker Technology
Co., Limited. declares that this device is in
compliance with the essential requirements
and other relevant provisions of Directive
2014/53/EU. For the Declaration of
Conformity, visit the Web site www.
SeeNebula.com/certication.
BT Maximum output power: 8 dBm; BT
Frequency band: 2402~2480 MHz;
Wi-Fi Max Output Power: 16 dBm (2.4G); 10
dBm (5G);
Wi-Fi Frequency Band: 2412~2472 MHz (2.4G);
5150~5250 MHz, 5725~5850 MHz (5G).
5150~5250 MHz can be used indoor only.
BG EE BE
This product is designed and manufactured
with high quality materials and components,
which can be recycled and reused.
This symbol means the product must not be
discarded as household waste, and should be
delivered to an appropriate collection facility
for recycling. Follow local rules and never
dispose of the product and rechargeable
batteries with normal household waste.
Correct disposal of old products and
rechargeable batteries helps prevent negative
consequences for the environment and
human health.
EN
ES
LU
RO
CZ
FR
HU
SI
DK
HR
19
51005000960_D4111_Manual_60X110mm_20181218-V01.indd 18-19 2018\12\18 星期二 15:49:03
Page 12
EN
FCC notice
This device complies with the FCC rules, Part 15.
Operation is subject to the following two conditions: (1)
This device may not cause harmful interference, and
(2) This device must accept any interference received,
including interference that may cause undesired
operation.
Warning: Changes or modications not expressly
approved by the partly responsible for compliance
could void the user’s authority to operate the
equipment.
Note: This equipment has been tested and found to
comply with the limits for a Class B digital device,
pursuant to part 15 of the FCC Rules. These limits are
designed to provide reasonable protection against
harmful interference in a residential installation.
This equipment generates, uses and can radiate
radio frequency energy and, if not installed and used
in accordance with the instruction manual, may
cause harmful interference to radio communications.
However, there is no guarantee that interference will
not occur in a particular installation. If this equipment
does cause harmful interference to radio or television
reception, which can be determined by turning the
equipment off and on, the user is encouraged to
try to correct the interference by one or more of the
following measures:
• Reorient or relocate the receiving antenna.
• Increase the separation between equipment and
receiver.
• Connect the equipment into an outlet on a circuit
different from that to which the receiver is connected.
• Consult the dealer or an experienced radio/TV
technician for help.
FCC Radiation Exposure Statement:
This equipment complies with FCC radiation exposure
limits set forth for an uncontrolled environment. This
equipment should be installed and operated with a
minimum distance of 20cm between the radiator and
your body. This transmitter must not be co-located
or operated in conjunction with any other antenna or
transmitter.
Notice: Shielded cables
All connections to other computing devices must be
made using shielded cables to maintain compliance
with FCC regulations.
EN
20
51005000960_D4111_Manual_60X110mm_20181218-V01.indd 20-21 2018\12\18 星期二 15:49:04
21
Page 13
EN
Trademarks
HDMI, and HDMI logo and High-Denition Multimedia
Interface are trademarks or registered trademarks
of HDMI licensing LLC in the United States and other
countries.
The Bluetooth® word mark and logos are registered
trademarks owned by Bluetooth SIG, Inc.
Other trademarks and trade names are those of their
respective owners.
Warranty
30-Day Money-Back Guarantee for Any Reason
You may return your undamaged product and
packaging within 30 days of purchase to receive a
FULL REFUND for any reason. If the reason for return
isn’t quality-related, the customer must pay for the
return shipping.
12-Month Warranty for Quality-Related Issues
Nebula’s products are warrantied to be free from
material and workmanship defects for 12 months
from the date of purchase. Within this period, Nebula
will provide a replacement and cover any return
shipping costs for products that fail in normal use.
Please Note: Any provided shipping labels must be
used within 20 days from the date they’re issued by
Nebula Support.
22
51005000960_D4111_Manual_60X110mm_20181218-V01.indd 22-23
 Loading...