

Page 1
/i
ComBi-line
user manual
Page 2

Copyright
© 2018 Animo®
No part of this document may be reproduced and/or made public in print, microfilm, electronic media or
any other form without the manufacturer’s prior consent. This also applies to the corresponding
diagrams and/or charts.
Animo retains the right to alter parts at any given time without prior or immediate announcement to the
consumer. The content of this manual can also be changed without any prior warning. This manual is
valid for the standard model of the device. Animo can therefore not be held liable for possible damage
resulting from specifications deviating from the standard model for the device supplied to you.
This manual was created with the utmost care, but the manufacturer cannot be held responsible for any
mistakes in this document or their consequences.
This manual was originally written in English. All other languages in this document are a translation of
the English source text.
EN 2 2018/07 Rev 3.0
Page 3

ComBi-line
TABLE OF CONTENTS
Copyright ................................................................................................................................... 2
1 Safety .......................................................................................................................................... 5
1.1 Important information ......................................................................................................... 5
1.2 Warning signs ..................................................................................................................... 5
1.3 Intended use ....................................................................................................................... 6
1.4 Modifications ...................................................................................................................... 6
1.5 Safety devices .................................................................................................................... 7
1.6 Safety precautions .............................................................................................................. 8
1.7 Users ................................................................................................................................ 10
1.8 Directives .......................................................................................................................... 10
1.9 Guarantee ........................................................................................................................ 11
1.10 Disposal ............................................................................................................................ 11
1.11 Further help and information ............................................................................................ 11
2 Description ............................................................................................................................... 12
2.1 Overview .......................................................................................................................... 12
2.2 Working principle .............................................................................................................. 18
2.3 Specifications ................................................................................................................... 21
2.4 Display .............................................................................................................................. 29
2.5 Operator system configuration ......................................................................................... 29
3 Transport and Installation ...................................................................................................... 35
3.1 Transport .......................................................................................................................... 35
3.2 Preparation for transport .................................................................................................. 35
3.3 Drain the coffee brew system ........................................................................................... 36
3.4 Drain the boiler system of W models ................................................................................ 36
3.5 Installation ........................................................................................................................ 37
3.6 First-time use .................................................................................................................... 44
4 Operation ................................................................................................................................. 47
4.1 Preparation ....................................................................................................................... 47
4.2 Prepare a container for coffee .......................................................................................... 47
4.3 Prepare a container for tea ............................................................................................... 47
4.4 Switch the machine on ..................................................................................................... 48
4.5 Prepare the boiler system for use .................................................................................... 48
4.6 Select the brewing amount for coffee ............................................................................... 49
4.7 Select the brewing amount for tea .................................................................................... 50
4.8 Start the brewing process ................................................................................................. 50
4.9 Complete the coffee brewing process .............................................................................. 52
4.10 Serve the beverage .......................................................................................................... 53
4.11 Use the timer function ...................................................................................................... 54
4.12 Complete the tea brewing process ................................................................................... 55
5 Maintenance ............................................................................................................................. 56
5.1 Cleaning and disinfecting detergents ............................................................................... 56
5.2 Cleaning ........................................................................................................................... 56
5.3 Descale the machine ........................................................................................................ 60
2018/07 Rev 3.0 3 EN
Page 4

ComBi-line
6 Troubleshooting ...................................................................................................................... 66
6.1 Error codes and problems ................................................................................................ 66
6.2 Temperature protection .................................................................................................... 67
2018/07 Rev 3.0 4 EN
Page 5
ComBi-line
1 Safety
1.1 Important information
This user manual is intended to help you operate this machine safely and effectively. This manual gives
information about installation, operation and maintenance of the equipment. Make sure to read and
understand the manual before use.
It is your responsibility to operate this machine in accordance with all the safety instructions and
procedures in this manual, and with all other safety procedures in your workplace. It is the user's
responsibility to make sure that the machine is correctly installed, configured, commissioned, operated,
serviced and maintained and that such actions are only carried out by people who have been fully and
properly trained for those tasks. It is also the user's responsibility to make sure that the machine is only
used in full accordance with laws - and regulations, which have the force of law - in the jurisdiction in
which the machine is installed.
WARNING
Before attempting to use the machine, read, understand and know all the safety information in
this chapter. Pay particular attention to all warnings and cautions throughout this manual. If
you do not follow all the warnings and procedures in this manual, this could lead to serious
injury to yourself or others, including death.
WARNING
If there is any safety instruction or procedure that you do not understand, do not use the
machine. Contact your supervisor and arrange proper training on the use of the machine. Use
of the machine without understanding and following all the safety instructions and procedures
in this manual could lead to serious injury to yourself or others, including death.
WARNING
Do not use the machine until you have received adequate and proper training in its safe and
effective use. If you are unsure of your ability to use the machine safely and effectively, do not
do so. Never attempt to remove, modify, over-ride or frustrate any safety device on the
machine. Interfering with safety devices could lead to fatal or other serious personal injury.
Note
The A-weighted sound pressure level of the machine is below 70 dB.
1.2 Warning signs
Safety signs are attached to the machine to give safety information. All safety signs are repeated and
usually further explained in this manual.
1.2.1 Classification of safety signs
Safety signs are of the internationally accepted types and described below.
WARNING
Warning sign that identifies a hazard.
2018/07 Rev 3.0 5 EN
Page 6
ComBi-line
1.2.2 Warning, caution and note
WARNING
‘Warning' identifies a hazard that could lead to personal injury, including death.
Caution
'Caution' identifies a hazard that could lead to damage to the machine, damage to other
equipment and/or environmental pollution.
Note
’Note' is used to highlight additional information.
1.3 Intended use
The machine makes coffee or tea. Any other or additional use will be considered to be not in conformity
with the intended use. The manufacturer cannot be held liable for any damages caused by use for any
other purposes than what is described above or by incorrect operation.
WARNING
Do not use products that do not comply with the applicable foodstuffs regulations.
Note
This machine may only be used for commercial settings. This is not a household appliance.
1.4 Modifications
WARNING
Do not attempt to make any modifications or alterations to the machine without the prior
express agreement of Animo. Unauthorised modifications or alterations to the machine could
lead to serious personal injury, including death.
WARNING
Do not attempt to change, remove or defeat the safety features.
WARNING
Do not attempt to apply changes that violate local, regional or national regulations.
WARNING
Make sure the main switch and operating button are freely accessible.
WARNING
Only connect the container(s) to the power socket(s) on the tower. Do not connect any other
appliance(s).
Animo is always willing to discuss improving the value of its machines to users by means of
modifications or alterations. Refer to 1.11.
2018/07 Rev 3.0 6 EN
Page 7
ComBi-line
A
A
1.5 Safety devices
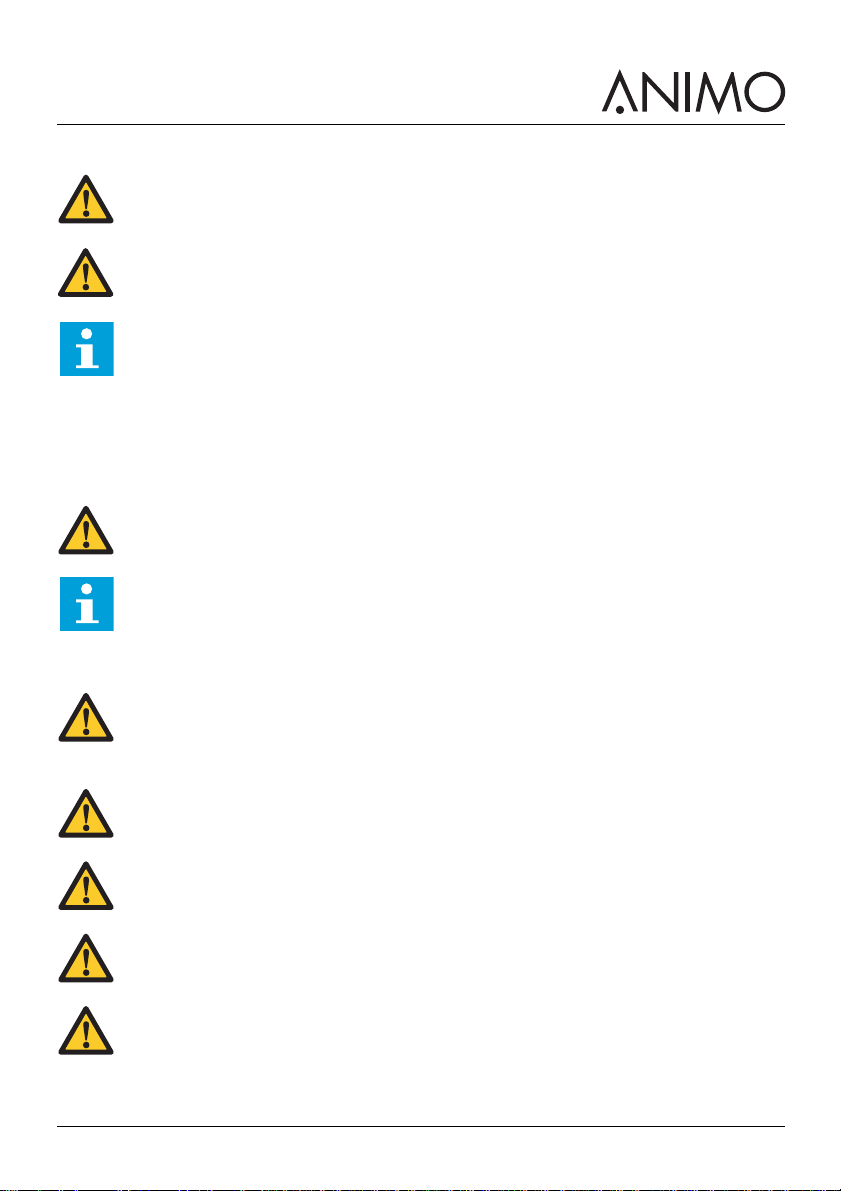
1.5.1 On/Off switch
The on/off switch (A) puts the machine in the on/off position. The machine can still be charged after the
machine is switched off. Unplug the machine to make sure that the machine is entirely uncharged.
WARNING
The on/off switch does not switch off all internal parts. Always disconnect the machine from
the electricity before opening it.
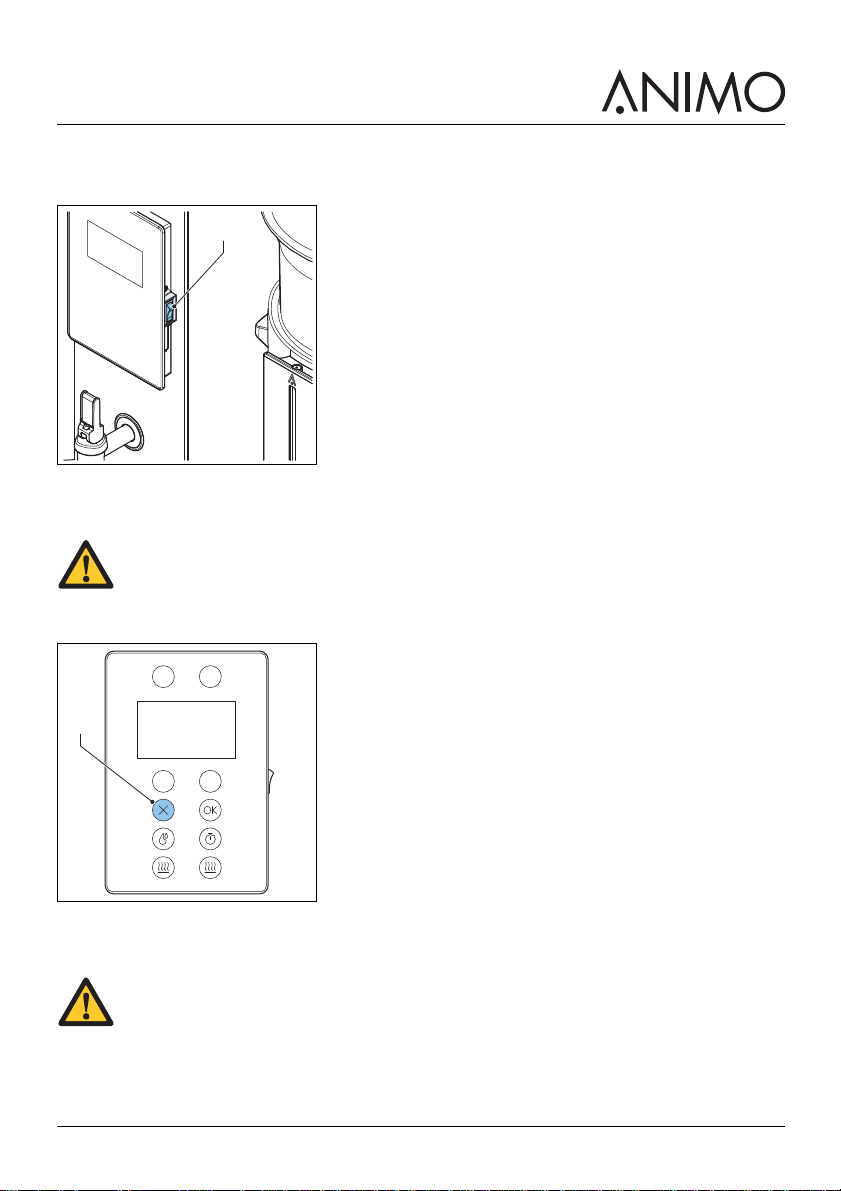
1.5.2 Stop button on the control panel
The stop button (A) stops the brewing process. The machine is still charged after the brewing process is
stopped. Unplug the machine to make sure that the machine is entirely uncharged.
1.5.3 Swivel arm and container detection
The brewing process only starts if the swivel arm and container are in the correct position. During
operation, the brewing process automatically stops if the swivel arm or container is moved.
2018/07 Rev 3.0 7 EN
WARNING
The stop button does not switch off all internal parts. Always disconnect the machine from the
electricity before opening it.
Page 8

ComBi-line
A
1.5.4 Swivel arm protection for wall mounted CB and CB W models
The wall mounted CB and CB W models have an adjustable stop at the bottom of the swivel arm. The
stop prevents the starting of a brewing process when the swivel arm is not in the correct pre-set
position.
1.5.5 Boiler system steam outlet for CB W models
All CB W models have a steam outlet at the top of the tower. The steam outlet lets excess steam
escape from the boiler system. Do not touch the boiler steam outlet while the machine is switched on.
The boiler steam outlet is hot.
1.5.6 Temperature safety device in the coffee brew system
A temperature safety device in the coffee brew system turns off the heating element if the temperature
of the system is too high.
1.5.7 Temperature safety device in the boiler system
A temperature safety device in the boiler system turns off each the heating element if the temperature of
the system is too high.
1.5.8 Current overload switch
A current overload switch isolates the mains power supply to the machine if there is a current overload.
1.5.9 Display
The display (A) shows technical malfunctions with error codes. The display also provides additional
user information or warnings.
1.6 Safety precautions
1.6.1 General safety precautions
• Make sure that the environment around the machine is dry, clean and lit sufficiently well.
• Only persons that have specific knowledge and practical experience with the machine, particularly
in regard to safety and hygiene, should be permitted into the service area where the beverage(s)
are prepared.
• Keep away from moving parts.
2018/07 Rev 3.0 8 EN
Page 9

ComBi-line
• Use Animo replacement parts only.
• Use Animo recommended products only.
1.6.2 During installation
• Observe local regulations and use approved materials and parts.
• Only install the machine in locations where it can be overseen by trained personnel.
• Do not place the machine in an area with temperatures below 0 °C.
• Do not place the machine in an area where a water jet could be used.
• The machine can be used outdoors if all the relevant safety conditions specified in section 1 of this
manual are met.
• Place the machine at work top height on a firm and flat surface.
• Plug the machine into a safety-grounded power outlet.
• Make sure the machine does not leak.
• Check if the details on the type plate correspond to the country.
• Always use the new hose-set that was supplied with the machine. Do not use old hose-sets or other
hose-sets.
1.6.3 During normal operation
• Inspect the machine for damage before use.
• Do not tilt the machine.
• Do not submerge or hose down the machine.
• Do not use sharp objects to operate the machine.
• Keep the operating controls free of dirt and grease.
• Do not heat the container with open fire or an external heating element or device.
• Unplug the machine before you move the container.
• Switch off the machine and unplug the water supply when the machine is not used for a longer
period of time.
1.6.4 During maintenance and repair
• Perform regular maintenance on the machine.
• Wear protective gloves and safety glasses when performing maintenance.
• Do not clean the machine using a water jet.
• Do not leave the machine during maintenance.
• Make sure that the repairs are performed by trained and authorised personnel only.
• Unplug the machine to perform maintenance regarding error messages.
• Descale the elements regularly or when alerted by the display.
WARNING
To entirely uncharge the machine, unplug the machine.
1.6.5 Electrical connection
• An expert, competent electrician must attach the correct plug for your location for first-time use. The
connection must have an RCD of 30mA with all phases, including the zero point. The connection
must also be able to be easily disconnected (contact distance at least 3mm).
• The machine must be connected to a properly grounded power socket in accordance with
applicable national regulations.
• If the power cable is damaged or worn after use:
2018/07 Rev 3.0 9 EN
Page 10

ComBi-line
- If the machine has a separate, detachable power cable, replace the damaged power cable with
a new supply cable. Only use an Animo replacement part. Refer to 2.3.14
- If the machine has a fixed power cable, the damaged power cable must be replaced by Animo,
an official Animo service agent, or a similarly qualified person.
WARNING
To entirely uncharge the machine, unplug the machine.
1.7 Users
1.7.1 Personnel qualifications
• The machine is designed only for personnel being 8 years or older. Consider the respective national
regulations for occupational safety and health.
• This appliance can be used by children aged from 8 years and above and persons with reduced
physical, sensory or mental capabilities or lack of experience and knowledge if they have been
given supervision or instruction concerning use of the appliance in a safe way and understand the
hazards involved.
• Children must not play with the machine.
• Cleaning and user maintenance shall not be made by children without supervision.
• Only personnel who have been given permission are allowed to work with the machine.
• All personnel must only carry out the work they have been trained to perform. This applies to both
maintenance work and the normal machine operation.
• All personnel working with the machine must have free access to the applicable manuals.
• The operators must be familiar with all situations that may occur so that they can act rapidly and
effectively in the event of emergencies.
1.7.2 Personal and food hygiene
The machine processes drinks for human consumption. So the highest standards of hygiene are to be
maintained within the process area.
Caution
As an operator, you should have received training in personal and food hygiene from your
employer(s). If you have not, do not use the machine or enter the process area. Arrange
training with your supervisor or training manager. Working in the process area without a good
understanding of hygiene can lead to contamination of drinks.
• Wash your hands thoroughly before entering the process area.
• Remove your watch and any loose jewellery before entering the process area.
• Make sure that the machine is cleaned regularly.
1.8 Directives
This machine meets the following EC directives:
EMC directive: 2014/30/EC
Low voltage directive: 2014/35/EC
Machinery directive: 2006/42/EC
2018/07 Rev 3.0 10 EN
Page 11

ComBi-line
/i
RoHS directive: 2011/65/EC
WEEE directive: 2012/19/EC
/i
Food contact directive: 1935/2004/EC
1.9 Guarantee
The guarantee provisions that apply to this machine are part of the general terms of delivery.
1.10 Disposal
The use and maintenance of the machine includes no environmental dangers. Most parts can be
disposed in the regular way.
Note
Ensure compliance with local legislation, regulations, instructions and precautions concerning
health, safety and environment.
1.11 Further help and information
Animo is committed to provide the highest level of support to users and operators of its products.
Contact the dealer for information regarding settings, maintenance and repair work, which is not
included in this document.
2018/07 Rev 3.0 11 EN
Page 12
ComBi-line
EFG H
ABC D
2 Description
2.1 Overview
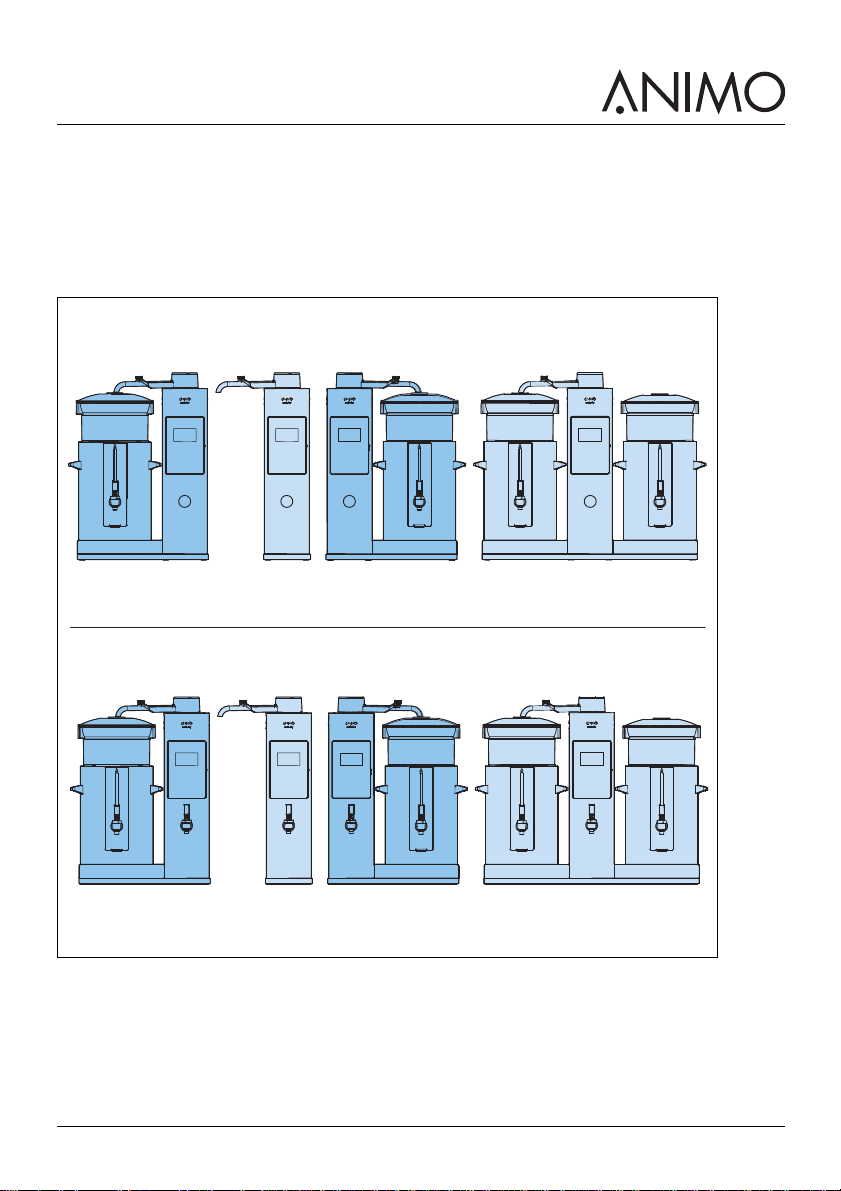
2.1.1 Models
The illustrations in this manual typically show a CB 2x W model. Disregard the illustrations, the
descriptions, and the instructions that do not relate to your model.
A: Model CB 1x L
B: Model CB
C: Model CB 1x R
D: Model CB 2x
E: Model CB 1x W L
F: Model CB W
G: Model CB 1x W R
2018/07 Rev 3.0 12 EN
Page 13
ComBi-line
C
B
A
D
E
G HF
J
I
H: Model CB 2x W
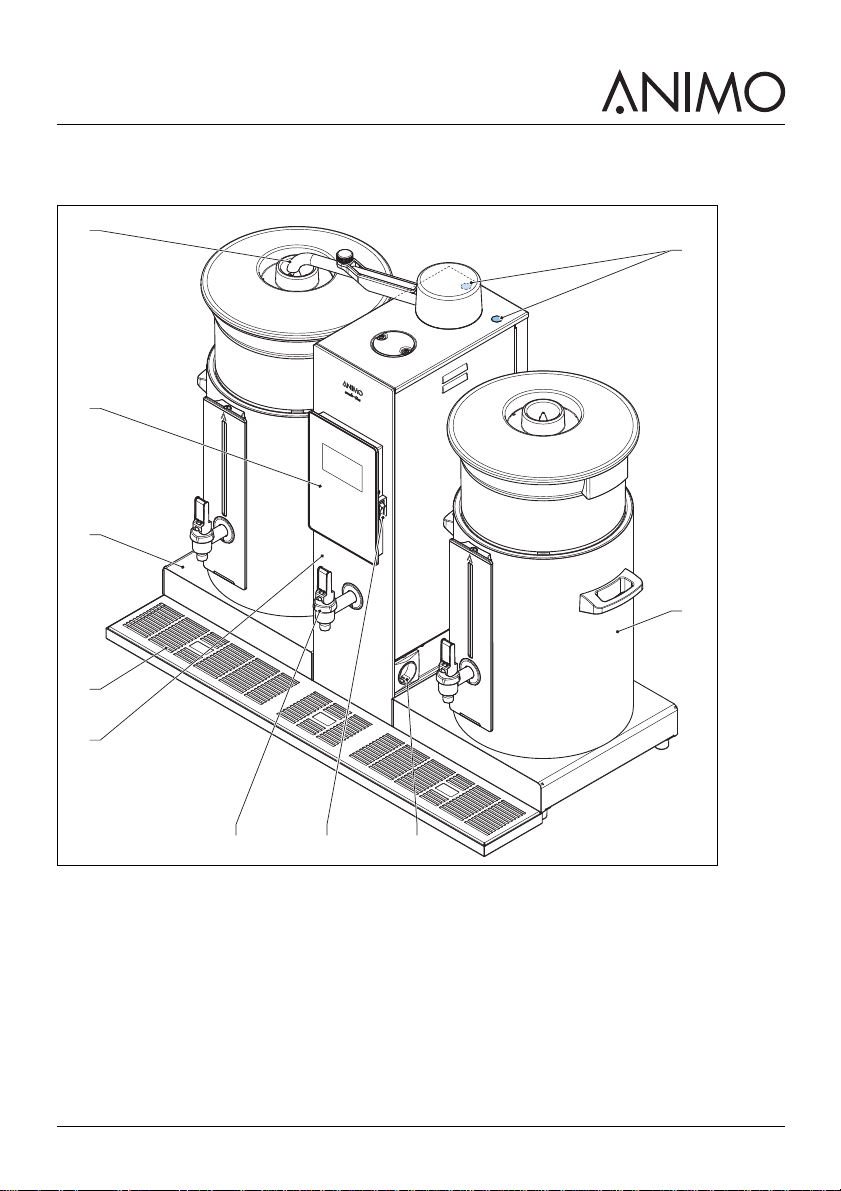
2.1.2 Front
A: Swivel arm
B: Control panel (refer to 2.1.5)
C: Base plate (only on models with a ’1x’ or ’2x’ designation in the model name)
D: Drip tray with grid
E: To w e r
F: Hot water tap (only on models with a ’W’ designation in the model name)
G: On / Off switch
H: Socket for container heating
I: Container (refer to 2.1.6)
J: Descale filling openings
2018/07 Rev 3.0 13 EN
Page 14
ComBi-line
A
B
C
D
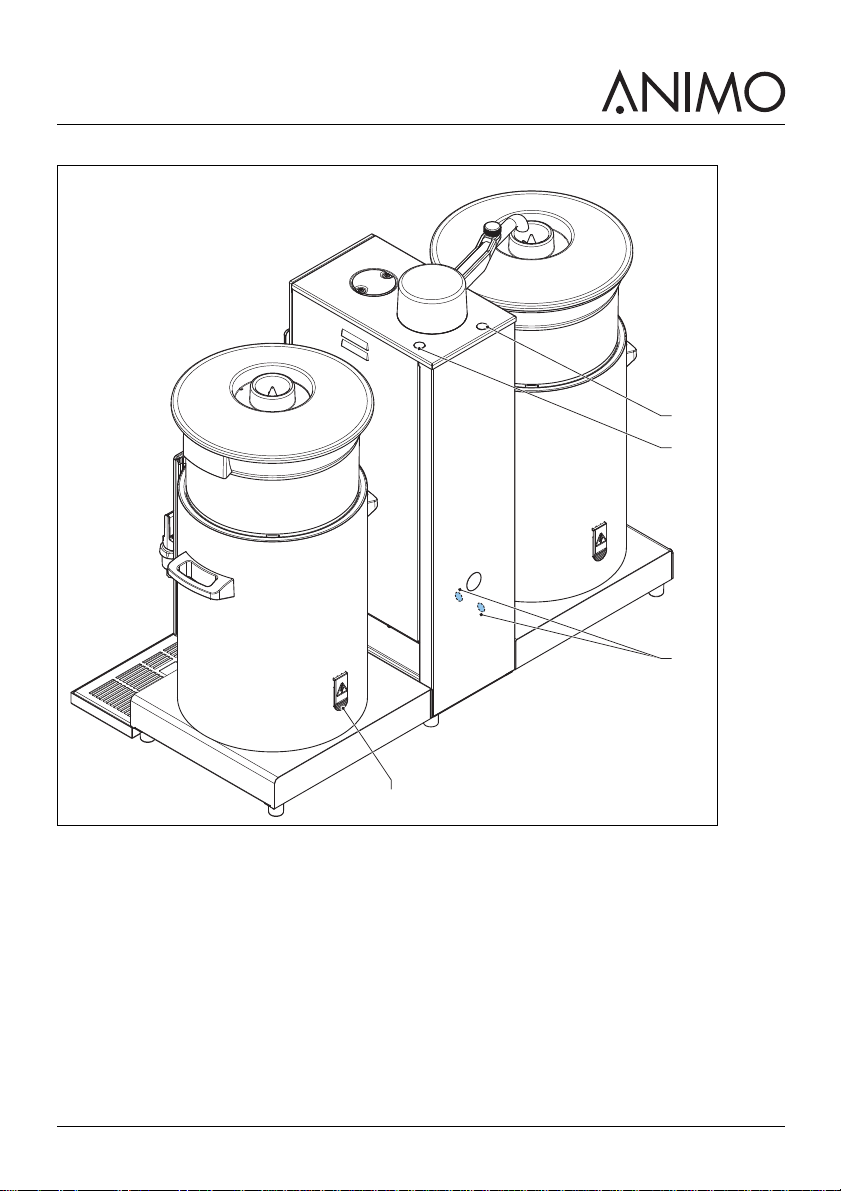
2.1.3 Back
A: Descale filling opening for the coffee brew system
B: Descale filling opening for the boiler system
C: Covers of the temperature safety devices
D: Socket with splash protection (only on a container CNe model)
2018/07 Rev 3.0 14 EN
Page 15
ComBi-line
A
E
D
B
C
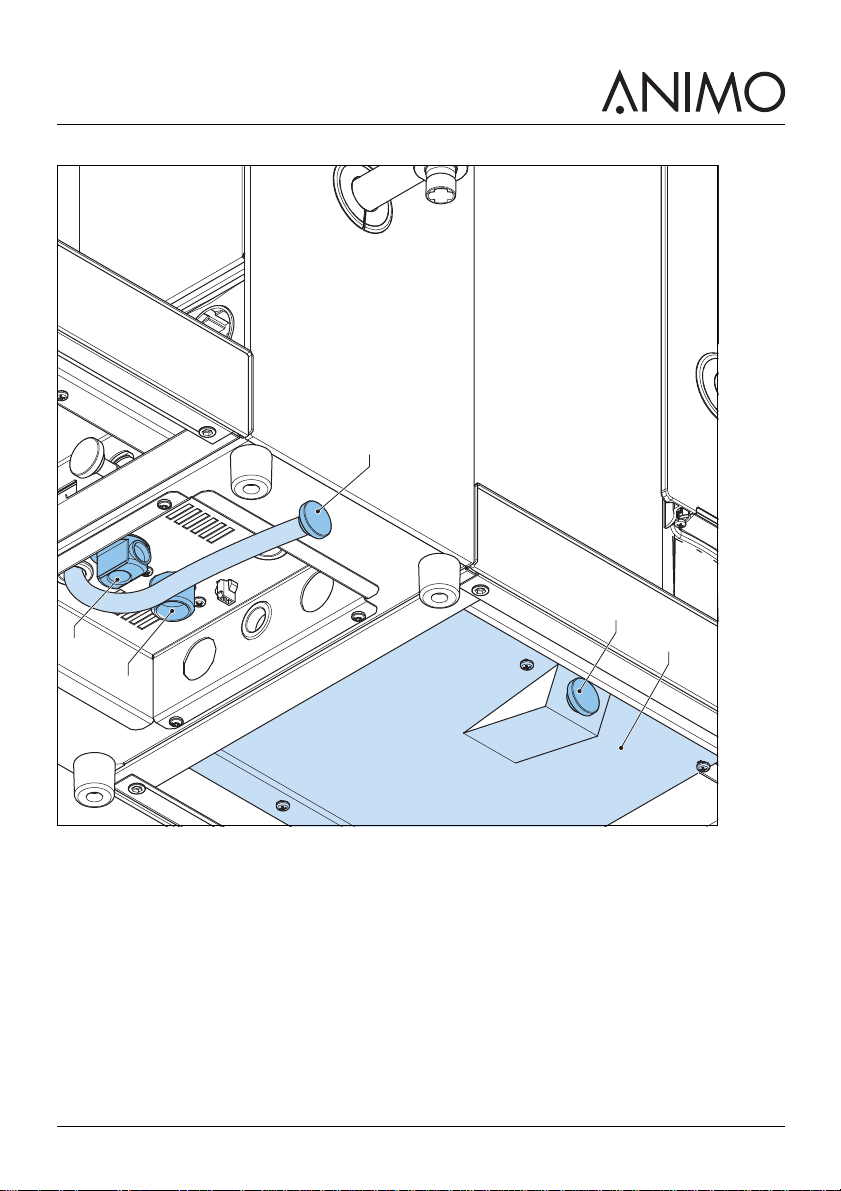
2.1.4 Underneath
A: Drain hose of the coffee brew system
B: Drain hose of the boiler system (W models only)
C: Protection plate
D: Power cable
E: Mains water supply
2018/07 Rev 3.0 15 EN
Page 16
ComBi-line
A1 A2
B
A3 A4
C F
D G
E H
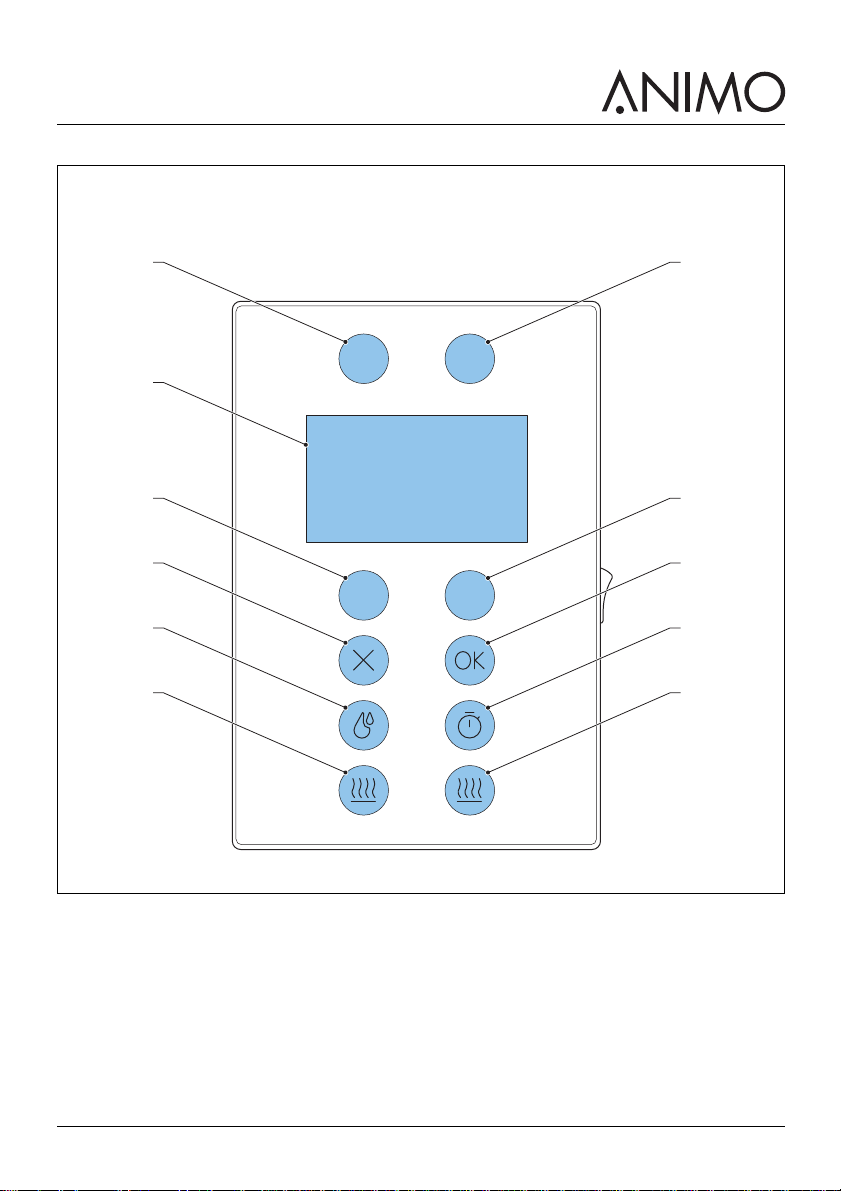
2.1.5 Control panel
A: (A1, A2, A3, A4) Selection buttons. Also use A2 to go to the operator menu. Refer to section 2.5.1
B: Display
C: Stop process or Cancel selection button
D: Switch on/off hot water boiler
E: On / Off button to switch the power socket on for the container heating LHS
F: Confirm process or Start selection button
G: Timer program button
H: On / Off button to switch the power socket on for the container heating RHS
2018/07 Rev 3.0 16 EN
Page 17

ComBi-line
A
B
C
D
E
F
G
H
I
K J
L
2.1.6 Container assembly
Note
The CN 40 model may differ from the illustrations and descriptions in this manual. In all other
respects, follow the instructions and data as applicable.
A: Water distributor lid
B: Basket filter
C: Insulated lid
D: Blender - transport disk
E: Integrated gauge glass
2018/07 Rev 3.0 17 EN
Page 18
ComBi-line
A
B
A
F: Ta p
G: LED light
H: Filling pipe (brewing tea application)
I: Tea filter with disk (brewing tea application)
J: Handle
K: Container
L: Electrical socket with splash protector (CNe)
2.2 Working principle
2.2.1 Coffee brew system
The user selects a desired quantity of beverage on the control panel (A). The coffee brew system (B)
inside the tower heats the corresponding quantity of water.
2.2.2 Swivel arm
The swivel arm (A) directs hot water from the coffee brew system into the top of a distributor lid.
2018/07 Rev 3.0 18 EN
Page 19
ComBi-line
A
B
A
2.2.3 Coffee blender and basket filter
The basket filter (A), a paper filter, and a pre-loaded coffee product receive the hot water. The filtered
coffee then flows through the coffee blender (B) into the container.
2.2.4 Tea filling pipe and filter unit
The tea filling pipe and filter unit (A) receive the hot water and combine it with a pre-loaded tea product
inside the container.
2018/07 Rev 3.0 19 EN
Page 20
ComBi-line
A
C
B
B
A
2.2.5 Container
The container (A) keeps the hot beverage ready for consumption. The container has a tap (C) to serve
the beverage. The CNe model container has an electric element (B) to keep the beverage heated.
2.2.6 Base plate and electric sockets
A container must be correctly positioned on a base plate (A) for operation. The container model CNe is
connected to the electric sockets (B) with an electric cable.
2018/07 Rev 3.0 20 EN
Page 21
ComBi-line
A
B
2.2.7 Hot water tap on tower
CB models with a ’W’ designation in the model name, have a hot water tap (A) to serve hot water from
an additional boiler (B) inside the tower.
2.3 Specifications
2.3.1 Model names and model numbers
/i
CB 5 (liter) CB 10 (liter) CB 20 (liter)
Unit
Type /
description
CB 2x
2 base plates
CB 1x L
1 base plate on
Model name /
Model number
CB 2x5
1005390
CB 1x5L
1005392
Model name /
Model number
CB 2x10
1005398
CB 1x10L
1005400
Model name /
Model number
CB 2x20
1005406
CB 1x20L
1005408
the left hand side
CB 1x R
1 base plate on
CB 1x5R
1005391
CB 1x10R
1005399
CB 1x20R
1005407
the right hand side
2018/07 Rev 3.0 21 EN
Page 22

ComBi-line
CB 5 (liter) CB 10 (liter) CB 20 (liter)
Unit
Type /
description
CB
Wall mounted CB
CB 2x W
2 base plates with
a boiler and a hot
water tap
CB 1x WL
1 base plate on
the left hand side,
with a boiler and a
hot water tap
CB 1x WR
1 base plate on
the right hand
side, with a boiler
and a hot water
tap
CB W
Wall mounted. Has
a boiler and a hot
water tap
Model name /
Model number
CB 5
1005393
CB 2x5W
1005394
CB 1x5W L
1005396
CB 1x5W R
1005395
CB 5W
1005397
Model name /
Model number
CB 10
1005401
CB 2x10W
1005402
CB 1x10W L
1005404
CB 1x10W R
1005403
CB 10W
1005405
Model name /
Model number
CB 20
1005409
CB 2x20W
1005410
CB 1x20W L
1005412
CB 1x20W R
1005411
CB 20W
1005413
2.3.2 CB 40 liter model names and model numbers
/i
40 liter container 1 base plate 1 base plate on the
left hand side
1 base plate on the
right hand side
Wall mounted
2018/07 Rev 3.0 22 EN
Page 23

ComBi-line
Model name /
Model number
CB 2x40
1007173
CB1x40L
1007175
CB 1x40R
1007174
CB 40
1007176
CB 40 liter models with the ’W’ designation are not available. CB 40 liter models do not have a hot
water tap or additional boiler inside the tower. Refer to section 2.2.7.
2.3.3 Model specifications
/i
Model (Length x Breadth x
Height)
CB 5 CB 10 CB 20
CB 2x machine dimensions 815 x 470 x 700 mm 980 x 470 x 790 mm 1095 x 500 x 895 mm
CB 1x L or R machine
505 x 470 x 700 mm 590 x 470 x 790 mm 645 x 500 x 895 mm
dimensions
CB machine dimensions 235 x 380 x 725 mm 235 x 380 x 820 mm 235 x 380 x 920 mm
CB W machine dimensions 235 x 490 x 725 mm 235 x 490 x 820 mm 235 x 490 x 920 mm
CB 2x W machine
815 x 470 x 700 mm 980 x 470 x 790 mm 1095 x 500 x 895 mm
dimensions
CB 1x W L or R machine
505 x 470 x 700 mm 590 x 470 x 790 mm 645 x 500 x 895 mm
dimensions
CB 2x weight: empty / full 45 / 56kg 59 / 80 kg 79 / 118 kg
CB 1x L or R weight: empty /
40 / 46 kg 51 / 62 kg 67 / 75 kg
full
CB weight: empty / full 12 / 12 kg 15 / 16 kg 23 / 24 kg
CB 2x W weight: empty / full
49 / 65 kg 63 / 89 kg 83 / 116 kg
(approx.)
CB W 1 x L or R weight:
44 / 54 kg 55 / 71 kg 71 / 84 kg
empty/full (approx.)
CB W weight: empty / full
16 / 21 kg 19 / 25 kg 27 / 35 kg
(approx.)
2.3.4 CB 40 Model specifications
/i
Model (Length x Breadth x
Height)
CB 40
CB 2x machine dimensions 1320 x 685 x 970 mm
CB 1x L or R machine
810 x 685 x 970 mm
dimensions
CB machine dimensions 235 x 345 x 985 mm
CB W machine dimensions Not available
CB 2x W machine
Not available
dimensions
CB 1x W L or R machine
Not avaialble
dimensions
CB 2x weight: empty / full 28 / 120
CB 1x L or R weight: empty /
24 / 73
full
2018/07 Rev 3.0 23 EN
Page 24

ComBi-line
Model (Length x Breadth x
Height)
CB 40
CB weight: empty / full 20 / 23
CB 2x W weight: empty / full
Not available
(approx.)
CB W 1 x L or R weight:
Not available
empty/full (approx.)
CB W weight: empty / full
Not available
(approx.)
2.3.5 Containers
/i
Model
CB 5 CB 10 CB 20 CB 40
Containers with an electric
CN5e CN10e CN20e CN40e
element
Containers without an electric
CN5i CN10i CN20i Not available
element
Contents 5 ltr 10 ltr 20 ltr 40 ltr
Contents Maximum 5.5 ltr 11 ltr 22 ltr 44 ltr
Electrical connection (only
1N~ 220-240 V 1N~ 220-240 V 1N~ 220-240 V 1N~ 220-240 V
CNe container models)
Frequency (only CNe
50-60 Hz 50-60 Hz 50-60 Hz 50-60 Hz
container models)
Power (only CNE container
50 W 100 W 100 W 150 W
models)
2018/07 Rev 3.0 24 EN
Page 25

ComBi-line
2.3.6 Electrical system
/i
Model CB 5 CB 10 CB 20
Electrical connection 1N~ 220-240 V 3N~ 380-415 3N~ 380-415
Frequency 50-60 Hz 50-60 Hz 50-60 Hz
Power 3075 W 6075 W 9075 W
/i
Model CB 5W CB 10W CB 20W
Electrical connection 1N~ 220-240 V 3N~ 380-415 3N~ 380-415
Frequency 50-60 Hz 50-60 Hz 50-60 Hz
Power 3375 W 6075 W 9075 W
/i
Model CB 1x5 L/R CB 1x10 L/R CB 1x20 L/R
Electrical connection 1N~ 220-240 V 3N~ 380-415 3N~ 380-415
Frequency 50-60 Hz 50-60 Hz 50-60 Hz
Power 3125 W 6175 W 9175 W
/i
Model CB 1x5 WL/R CB 1x10 WL/R CB 1x20 WL/R
Electrical connection 1N~ 220-240 V 3N~ 380-415 3N~ 380-415
Frequency 50-60 Hz 50-60 Hz 50-60 Hz
Power 3425 W 6175 W 9175 W
/i
Model CB 2x5 CB 2x10 CB 2x20
Electrical connection 1N~ 220-240 V 3N~ 380-415 3N~ 380-415
Frequency 50-60 Hz 50-60 Hz 50-60 Hz
Power 3175 W 6275 W 9275 W
/i
Model CB 2x5W CB 2x10W CB 2x20W
Electrical connection 1N~ 220-240 V 3N~ 380-415 3N~ 380-415
Frequency 50-60 Hz 50-60 Hz 50-60 Hz
Power 3475 W 6275 W 9275 W
2.3.7 CB 40 Electrical system
/i
Model CB 40 CB 1x40 L/R CB 2x40
Electrical connection 3N~ 380-415 V 3N~ 380-415 3N~ 380-415
Frequency 50-60 Hz 50-60 Hz 50-60 Hz
Power 18075 W 18225 W 18375 W
/i
2018/07 Rev 3.0 25 EN
Page 26

ComBi-line
E
D
C
B
A
D
C
B
A
C
B
A
2.3.8 Mains power cable and wire types
/i
Cable type Name Wire description
3N~ 400 V (5 core cable) (A) Green / yellow - Earth (E)
(B) Blue - Neutral (N)
(C) Brown - Phase / Live (L1)
(D) Black - Phase / Live (L2)
(E) Grey - Phase / Live (L3)
3~ 400 V (4 core cable) (A) Green / yellow - Earth (E)
(B) Brown - Phase / Live (L1)
(C) Black - Phase / Live (L2)
(D) Grey - Phase / Live (L3)
1N~ 230 V (3 core cable) (A) Green / yellow - Earth (E)
(B) Brown - Phase / Live (L)
(C) Blue - Neutral (N)
2.3.9 Capacities - coffee
/i
Item
Brew time (water dosing time) approx. 10
Hour capacity (water volume) 30 ltr 60 ltr 90 ltr 180 ltr
Buffer stock 2 x .. 10 ltr 20 ltr 40 ltr 80 ltr
Buffer stock 1 x L/R 5 ltr 10 ltr 20 ltr 40 ltr
Filter paper Ø101/317 Ø152/457 Ø203/533 Ø280/635
CB 5 CB 10 CB 20 CB 40
min./5 ltr
approx. 10
min./10 ltr
Tow er
approx. 14
min./20 ltr
approx. 14
min./40ltr
2.3.10 Capacities - hot water for all models with a ’W’ designation in the model name
/i
Item
Boiler volume (approx.) 4.2 ltr 5.6 ltr 5.6 ltr
Buffer stock water (approx.) 2.6 ltr 4.1 ltr 4.1 ltr
Boiler heating time (approx. 1596 °C)
Recovery time after maximum
drain (aaprox.)
Boiler temperature (approx.) 90 °C 90 °C 90 °C
2018/07 Rev 3.0 26 EN
CB 5W CB 10W CB 20W
9 minutes 9 minutes 9 minutes
6 minutes 6 minutes 6 minutes
Specification
Page 27

ComBi-line
............
...~.......V ..........Hz .........W
................ ............MPA
Made in The Netherlands
Dr. A.F. Philipsweg 47 • NL-9403 AD Assen • www.animo.eu
P/N
XXXXXXXX
S/N Water pressure
A D
B
C
E
F
G
2.3.11 Water system
/i
Water hardness min. 5°dH (min. 9°fH, 0,9 mmol/l)
Water conductivity greater than or equal to 15 µ Siemens/cm
Water connection 3/4" outer tread
Minimum water pressure 0.2 MPa (2 bar)
Maximum water pressure 1 MPa (10 bar)
Flow pressure 5 l. / min
Overflow connection tube Ø 25 mm
2.3.12 Ambient conditions
/i
Temperature 0 °C < T < 40 °C
Relative humidity 80%
2.3.13 Type plate
A: Model number
B: Article number
C: Supply voltage [V]
D: Machine number
E: Water pressure [MPa]
F: Power [W]
G: Frequency [Hz]
2.3.14 Consumer articles and accessories
Order these items from your dealer.
/i
Item Description Item number
Coffee fur remover per box (100) sachets of 10 gm) 49009
Scale remover per box (48 sachets of 50 gm) 49007
per can of 1 kg 00008
per can of 1 kg 00009
2018/07 Rev 3.0 27 EN
Page 28

ComBi-line
Item Description Item number
Combi filter Container CN5 1006095
Container CN10 1006096
Container CN20 1006097
Container CN40 95008
Coffee blender Container CN5 56004
Container CN10 96001
Container CN20 56010
Container CN40 96006
Basket filter paper 101/317 - container CN5 01115
152/457 - container CN10 01116
203/533 - container CN20 01117
280/635 - container CN40 01131
Tea filter with disk Container CN5 57003
Container CN10 57005
Container CN20 57011
Container CN40 57007
Filling pipe Container CN5 17018
Container CN10 17019
Container CN20 17020
Container CN40 17004
S-swivel arm With "Click" connection to use
with the drip-free ComBi-line tap
99497
Container tube 99499
Gauge glass brush 08094
Descale funnel 99740
Cable + plug 1.5 m 03072
Cable + plug 0.6 M 03071
2018/07 Rev 3.0 28 EN
Page 29

ComBi-line
A
B
2.4 Display
2.4.1 Display layout
A: An option (A) can appear in each of the corners of the display. Each option matches 1 of the 4
selection buttons on the control panel.
B: The icons and text in the main area (B) of the display provide status information and prompts to
start, confirm, or cancel a process.
2.5 Operator system configuration
2.5.1 Operator menu navigation
Note
To access the Operator menu:
1. If the machine is switched to on, then switch the machine to off. Use the on/off switch.
Refer to the section 1.5.1
2. Switch the machine to on.
3. When you see the ’opening’ screen, tap the A2 selection button on the upper right-hand
side of the control panel. Refer to the section 2.1.5
Note
When you select Descale items 1.1.2 or 1.1.4, a QR code and website reference appears on
the display. Use the instructions on these pages to do the descale procedures.
/i
Main menu Sub menu Options
1.0 Counters
1.0.1 Day counter brew system Show the brewed coffee per day
1.0.2 Reset day counter brew system No / Yes
1.0.3 Total counter brew system Show the total amount of
brewed coffee
1.0.4 Reset total coffee No / Yes
1.0.5 Day counter hot water Show the total amount of hot
water per day
2018/07 Rev 3.0 29 EN
Page 30

ComBi-line
Main menu Sub menu Options
1.0.6 Reset day counter hot water No / Yes
1.0.7 Total counter hot water Show the total amount of hot
water
1.0.8 Reset total counter hot water No / Yes
1.1 Descale
1.1.1 Counter brew system Counter brew system = 1000L [=
1.1.2 Start descaling brew system No / Yes. If Yes, use the QR
1.1.3 Counter hot water = 1000L [= default]
1.1.4 Start descaling hot water boiler No / Yes. If Yes, use the QR
1.2 System settings
1.2.1 Language Make a choice
1.2.2 Time hh:mm - use the selection
1.2.3 Date dd:mm:yyyy - use the selection
1.2.4 Sound signal No / Yes [default: Yes]
1.2.5 Tea and / or coffee Coffee
1.2.6 Tea dosage [g/L] To set the dosage in g/L: 0-100
default]
code and follow the prompts on
the display
code and follow the prompts on
the display
buttons
left selection buttons for '+' and '' the hours
right selection buttons for '+' and
'-' the minutes
buttons.
left selection buttons for '+' and '' the days
right selection buttons for '+' and
'-' the months [default]
Coffee + tea [default]
Te a
(Step 1) [default: 6]
2018/07 Rev 3.0 30 EN
Page 31

ComBi-line
Main menu Sub menu Options
1.2.7 Own image
1.2.7.1 Low level display. To set
the backlight of the display in %:
10 - 80 (step: 10) [default: 10]
1.2.7.2 Display dim time. To set
the time when the display will
dim in seconds: 10-360 [default:
120]
1.2.7.3 Remove logo No / Yes
1.2.7.4 Choose logo
1.2.8 Energy Save Mode (ESM) 1.2.8.1 Active. If Yes, ESM is
activated. [default: no]
1.2.8.2 Set time to activate the
ESM in minutes: 15 - 240 (step 5
[default:15]
1.3 Brew settings
1.3.1 Water volume [mL] Brew amount in mL (step: 50ml)
CB 5: 4800 - 5800 [default: 5300
= required amount + 6%]
CB 10: 9800 - 11800 [default:
10800 = required volume + 8%]
CB 20: 20000 - 24000 [default:
22000 = required volume + 10%]
CB 40: 40000 - 48000 [default:
44000 = required volume + 10%]
1.3.2 Unit To set the unit: (volume)
Liter (default)
Jug
Cup
Gallon
1.3.3 Cup volume [mL] - Refer to 2.5.2 Set in mL: 100 - 500 (step: 1)
[default: 125]
1.3.4 Jug volume [mL] - Refer to 2.5.3 Set in mL: 200 - 2500 (step: 1)
[default: 250]
1.3.5 Button A1 Set the brew amount in L (step
0.1)
CB 5: 1.0 - 5.0 [default: 1.0]
CB 10: 2.0 - 10.0 [default: 2.5]
CB 20: 4.0 - 20.0 [default: 5.0]
CB 40: 8.0 - 40.0 [default: 10.0]
2018/07 Rev 3.0 31 EN
Page 32

ComBi-line
Main menu Sub menu Options
1.3.6 Button A2 Set the brew amount in L (step:
0.1)
CB 5: 1.0 - 5.0 [default: 3.0]
CB 10: 2.0 - 10.0 [default: 5.0]
CB 20: 4.0 - 20.0 [default: 10.0]
CB 40: 8.0 - 40.0 [default: 20.0]
1.3.7 Button A3 Set the brew amount in L (step:
1.3.8 Button A4 Set the brew amount in L (step:
1.3.9 Auto container heating No / Yes. [default: Yes] If yes,
1.3.10 Descale brew system [L] - Refer to
2.5.4
1.3.11 Coffee dosing [g/L] Set the in g/L: 0 - 100 (step: 1)
1.3.12 Interval [%] Set the duration of interruption
1.3.13 First charge vol. [m/L] To set the first charge volume in
0.1)
CB 5: 1.0 - 5.0 [default: 4.0]
CB 10: 2.0 - 10.0 [default: 7.5]
CB 20: 4.0 - 20.0 [default: 15.0]
CB 40: 8.0 - 40.0 [default: 30]
0.1)
CB 5: 1.0 - 5.0 [default: 5.0]
CB 10: 2.0 - 10.0 [default: 10.0]
CB 20: 4.0 - 20.0 [default: 20.0]
CB 40: 8.0 - 40.0 [default: 40.0]
the correct socket for container
heating will automatically switch
to on. You must always manually
switch the socket to off.
Set the descale indicator in L: 0 10000 (step: 100) [default: 1000]
[default: 50]
of the brew process in case of
fine coarsed coffee or very weak
water in % 50 - 100 (step: 5)
[default: 100 (no interruption)]
mL (step: 100) the basket filter
overflows during the brewing
process.
Activation of the first charge
volume only if menu 1.3.12 is
set to 95% or below.
First charge volume normally is
the half of the total brewing
processRefer to the table.
2018/07 Rev 3.0 32 EN
Page 33

ComBi-line
Main menu Sub menu Options
1.3.14 Filter dripping time(s) Set the filter dripping time in
seconds (step: 10)
CB 5: 0 - 900 [default: 240]
CB 10: 0 - 900 [default: 300]
CB 20: 0 - 900 [default: 360]
CB 40: 0 - 900 [default: 360]
1.3.15 Pre-wet (The pre-wet function
provides you with the option to brew a little
amount of water to soak the coffee before
the brew process so as to improve taste and
aroma)
Activate Pre-wet. To activate the
pre-wet function - No / Yes
To set the pre-wet quantity in mL
(step: 50) 50 - 550 [default: 250]
To set the length of the soaking
time in seconds (step: 5) 5- 600
[default: 30]. This is time period
of the pause before the brewing
process continues.
1.3.16 Gallon volume To set the volume in mL (step: 1)
3600 - 3910 [default: 3785]
1.4 Hot water settings
1.4.1 Unit of temperature Fahrenheit / Celcius [=default]
1.4.3 Temperature To set the temperature in C
(step: 1) 60.0 - 97.0+ [default:
96] 97.0+ means boil through
during 50 - 80 sec (depends on
the model)
1.4.4 Descale boiler [L] - Refer to 2.5.4 To set the descale indicator in
litre (step: 100) 0 - 10000
[default: 1000]
1.5 Load defaults Load settings No / Yes
1.6 Pincode Enter pincode -
1.7 Hard and software
info
- Information about the hardware
and the software.
2.5.2 Selection buttons unit cups
/i
Model Factory settings Settings scope: cup = 125ml Step
CB 5 8 - 24 - 32 - 40 8 - 40 cups 1 cup
CB 10 20 - 40 - 60 - 80 16 - 80 cups 1 cup
CB 20 40 - 80 - 120 - 160 32 - 160 cups 5 cups
CB 40 80 - 160 - 240 - 320 64 - 320 10 cups
2.5.3 Selection buttons unit jugs
/i
Model Factory settings Settings scope: jug = 250ml Step
CB 5 4 - 12 - 16 - 20 4 - 20 jugs 1 jug
2018/07 Rev 3.0 33 EN
Page 34

ComBi-line
Model Factory settings Settings scope: jug = 250ml Step
CB 10 10 - 20 - 30 - 40 8 - 40 jugs 1 jug
CB 20 20 - 40 - 60 - 80 16 - 80 jugs 1 jug
CB 40 40 - 80 - 120 - 160 32 - 160 5 jugs
2.5.4 Descale indicator settings calculator
/i
Water quality Hardness Descale indicator: litres
°dH °F mmol/l mgCaCo3/l
Very hard 18 - 30 32 - 55 3.2 - 5.3 321 - 536 250
Hard 12 - 18 22 - 32 2.2 - 3.2 214 - 321 500
Average 8 - 12 15 - 22 1.4 - 2.2 268 - 214 1000 (Standard setting)
Soft 4 - 8 7 - 15 0.7 - 1.4 72 - 268 1500
Very soft 0 - 4 0 - 7 0 - 0.7 0 - 72 2000
2018/07 Rev 3.0 34 EN
Page 35

ComBi-line
3 Transport and Installation
3.1 Transport
3.1.1 Inspection after transport
• Check the machine for damage.
• Make sure that all the required consumer articles and accessories are present and in good order.
Refer to 3.5.1
3.2 Preparation for transport
Note
This procedure only prepares the machine for upright transportation to another local position.
Caution
• Switch the machine off.
• Disconnect the machine from the mains power outlet.
WARNING
Beware of burn injuries from hot fluids. Hot beverage(s) and water may come out from the
overflow hose, the drain hose(s), the container(s) and the tap on the machine.
1 Disconnect the container(s) from the socket(s) and remove the cords.
2 Drain the container(s) and hot water tap of all contents.
3 Close the mains water supply tap.
4 Disconnect the mains water hose from the tap.
5 Disconnect the overflow hose, if the hose is connected.
6 Drain the water from the coffee brew system. Refer to 3.3
7 Drain the water from the boiler system if you have a W model. Refer to 3.4
2018/07 Rev 3.0 35 EN
Page 36

ComBi-line
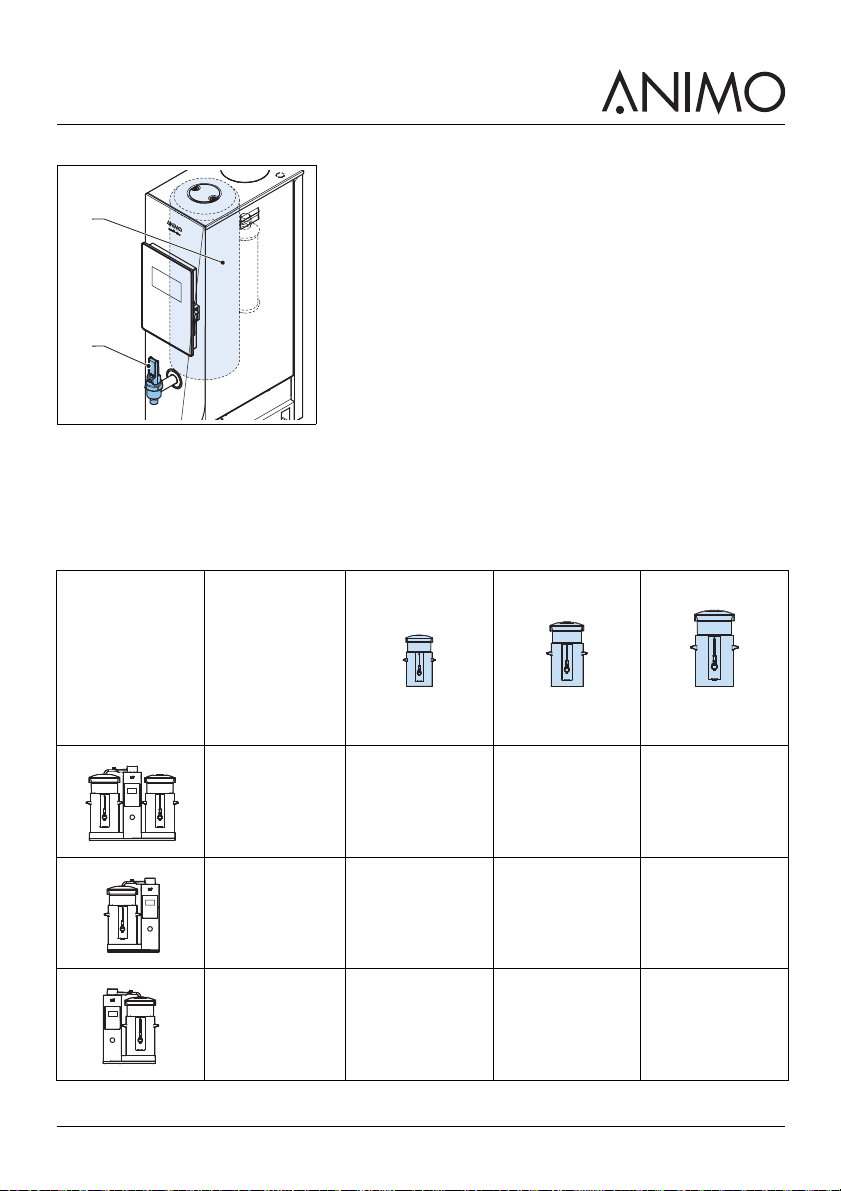
3.3 Drain the coffee brew system
WARNING
• Beware of burn injuries from hot water. Hot water may come out from the drain hose.
• Beware of crush injuries or damage to the machine. Be careful when you tilt the machine.
Note
This procedure is not applicable for CB 40 models.
1 Tilt the machine to access the drain hose. Refer to 2.1.4
2 Pull out the drain hose (1).
3 Pull the cap (A) out of the drain hose.
4 Drain the water into a receptacle. The receptacle must have
more than 5 litres of capacity.
5 Put back the cap on the drain hose.
6 Put back the drain hose.
3.4 Drain the boiler system of W models
WARNING
1
2
A
• Beware of burn injuries from hot water. Hot water may come out from the drain hose.
• Beware of crush injuries or damage to the machine. Be careful when you tilt the machine.
Note
This procedure is not applicable to CB 40 models.
1 Use the tap to drain as much water as possible.
2 Tilt the machine to access the drain hose. Refer to 2.1.4
3 Pull the drain hose out of the protection plate.
4 Pull the cap out of the drain hose.
5 Drain the water into a receptacle. The receptacle must have more than 5 litres of capacity.
6 Put back the cap on the drain hose.
7 Put back the drain hose into the protection plate.
2018/07 Rev 3.0 36 EN
Page 37

ComBi-line
3.5 Installation
Note
The machine can be used outdoors if all the relevant safety conditions set out by this manual
are met.
Caution
• Only install the machine in locations where it can be overseen by trained personnel.
• Use a filter system with a water softener if the tap water has been chlorinated or is too
hard. This increases the quality of the drink and will ensure that you do not have to
descale the machine too often.
• Do not place the machine in an area with temperatures below 0 °C.
• The tap that is used to connect the hose of the machine to the mains water supply must
be aerated.
• Only use the hose-set that was supplied with the machine.
3.5.1 Package contents
/i
Cartons and
accessories
Contents
Models
CB 1x L (or) R
CB 1x WL (or) R
Model carton 1 2 1
Machine (tower and base
plate)
Swivel arm
Drip tray
Centering pads 4 8 -
Basket filter carton 1 2
Synthetic filter
Water distributor lid
Basket filter papers
(approximately 25 pieces)
Container carton 1 2 -
Container CNe 1 2 -
Container CNi - - -
Insulated lid
Blender / transport disk
Gauge glass brush
Label sheet: coffee / tea /
hot water / blank
Mains power cable (1.5
meter)
Models
CB 2x
CB 2x W
Models
CB
CB W
-
2018/07 Rev 3.0 37 EN
Page 38

ComBi-line
Cartons and
accessories
Accessories
3.5.2 Unpacking
Caution
• Be gentle to avoid damage. Take care not to mishandle the equipment and accessories,
1 Unpack the components and accessories.
2 Make sure you have a complete set of undamaged components and accessories.
3 Make sure the tower and base plate are securely attached.
4 Contact your dealer if any items are damaged or missing.
5 Contact a qualified electrician to connect a plug to the power cable. Refer to 1.6.5.
6 Contact a service engineer to do the first-time installation and all the required connections.
Contents
Mains water connection
hose
Descaling funnel 1 1 1
Coffee fur remover sachet 1 1 1
Scale remover sachet 1 1 1
Quick guide 1 1 1
Electrical plug guide 1 1 1
Container power cables 1 2 0
Wall bracket 0 0 1
or cut through them with a sharp object.
Models
CB 1x L (or) R
CB 1x WL (or) R
111
Models
CB 2x
CB 2x W
Models
CB
CB W
2018/07 Rev 3.0 38 EN
Page 39

ComBi-line
3.5.3 Installation of wall mounted CB and CB W models
Note
The installation of the wall mounted CB and CB W models requires a wall bracket, a severy
trolley, or a product stand. Only use Animo accessories. Contact your Animo agent to order
these accessories. Refer to the back cover of this manual.
Note
The installation of the wall mounted CB or a CB W model must be performed by a service
engineer. The installation must include these items:
• the attachment of the machine onto a wall, with the Animo wall bracket.
• the attachment of a drip tray holder for a CB W model.
• the attachment of the parking rails for an Animo servery trolley onto the wall. Refer to
3.5.4
• the attachment of position studs onto the trolley for a container.
• or, the installation of a product stand.
• the connection of the electricity, the water supply, and the overflow pipe.
Caution
The electrical connection must have an RCD of 30mA with all phases, including the zero
point. The connection must have an easy disconnection (contact distance at least 3 mm ).
3.5.4 Position the servery trolley for wall mounted CB and CB W models
Caution
• The swivel arm should always be at a slight downward angle when in position over the
distributor lid on a container that is on the servery trolley.
1 Position the servery trolley so that a distributor lid on a
container is slightly below, and directly under, the outlet of the
swivel arm. Use the parking rails (A) on the wall get the correct
position.
2 Adjust the stop of the swivel arm for this position. Refer to
3.5.5
A
2018/07 Rev 3.0 39 EN
Page 40

ComBi-line
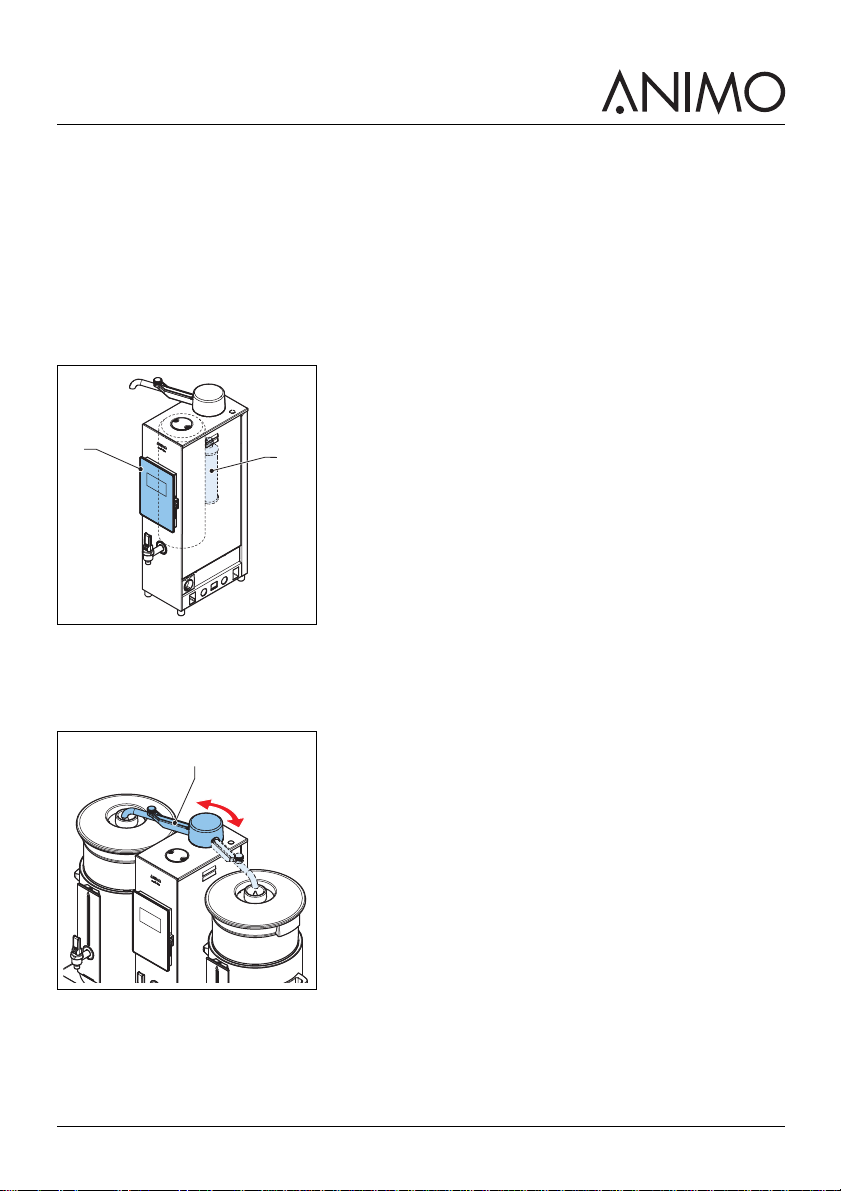
3.5.5 Adjust the stop of the swivel arm of wall mounted CB and CB W models
WARNING
Adjust the stop of the swivel arm especially if the servery trolley will only be used on 1 side of
the machine. The stop of the swivel arm prevents the possiblity of starting a brewing process
when the swivel arm is not positioned over the position for the servery trolley.
1 Position the container so that the distributor lid is directly under the swivel arm. Use the servery
trolley. Refer to 3.5.4
2 Lift the swivel arm vertically out of the tower.
3 Loosen the relevant stop from the bottom of the swivel arm. Use a 7mm wrench.
4 Adjust the position of the relevant stop to match the position of the magnet.
5 Tighten the relevant stop. Use the adjustable wrench.
6 Put back the swivel arm into the tower.
7 Do a test to make sure the brewing process can only be started when the swivel arm is directly over
the distributor lid of the container. Refer to 4.8
8 If the stop of the swivel arm is not in the correct position repeat the steps 2 to 6.
3.5.6 Position a CB model that has base plates
Note
• This procedure only relates to the temporary relocation of the machine as a portable
buffet unit. The first-time technical installation must be performed by a service engineer.
• An Animo product stand is an ideal platform for a CB model that has baseplates. Contact
your Animo agent to order this optional accessory. Refer to the back cover of this manual.
Caution
• Select a sturdy platform for the machine. Make sure the platform can support the weight
of the machine and the container(s) filled with the beverage(s). Refer to 2.3.4
• Avoid damage to other items. Make sure the machine is positioned away from anything
that might be damaged by water leakage.
• Choose a position where utilities are easily accessible. Make sure that a mains water
supply, a drain for the overflow hose, and a mains power outlet are all within 50 cm of the
position you select for the machine.
• Choose a position where the descaling functions can be easily performed. Avoid positions
where items above and in front of the machine might obstruct access to the descaler filler
openings. Refer to 5.3
1 Put the machine on a firm, level surface.
2018/07 Rev 3.0 40 EN
Page 41

ComBi-line
A
A
B
3.5.7 Attach the centering pads
1 For W models, remove the protection plate (A) from
underneath the base plate on the right-hand-side. Use a
screwdriver.
2 Attach the centering pads (A) to the base plates. Use the
fasteners (B).
3 For W models, put back the protection plate.
3.5.8 Water connection
1 Connect the mains water hose (A) to an aerated mains water
tap (B).
2 Open the tap and make sure there is no leakage.
3 If there is a leakage, contact a service engineer.
B
A
2018/07 Rev 3.0 41 EN
Page 42

ComBi-line
4 If necessary, connect the mains supply hose (A) to
a filter system (B).
5 Connect the filter system to a mains supply tap with a hose
(C).
3.5.9 Water drainage
1 Put the drainage hose into a sink or a drain.
2 Make sure that excess water will correctly drain down the hose.
3.5.10 Install the drip tray
Note
For the wall mounted CB model or the CB W model use the side strips supplied with the
model to attach the drip tray to the wall bracket.
1 Put the drip tray (A) in front of the machine (B).
C
B
A
A
3.5.11 Electrical connection
WARNING
Avoid death, or serious injury, or damage to the machine. Do not use the mains power cable if
it is damaged. If the mains power cable is damaged, refer to 1.6.5.
1 Connect the power cable to the mains power outlet.
2018/07 Rev 3.0 42 EN
Page 43

ComBi-line
B
A
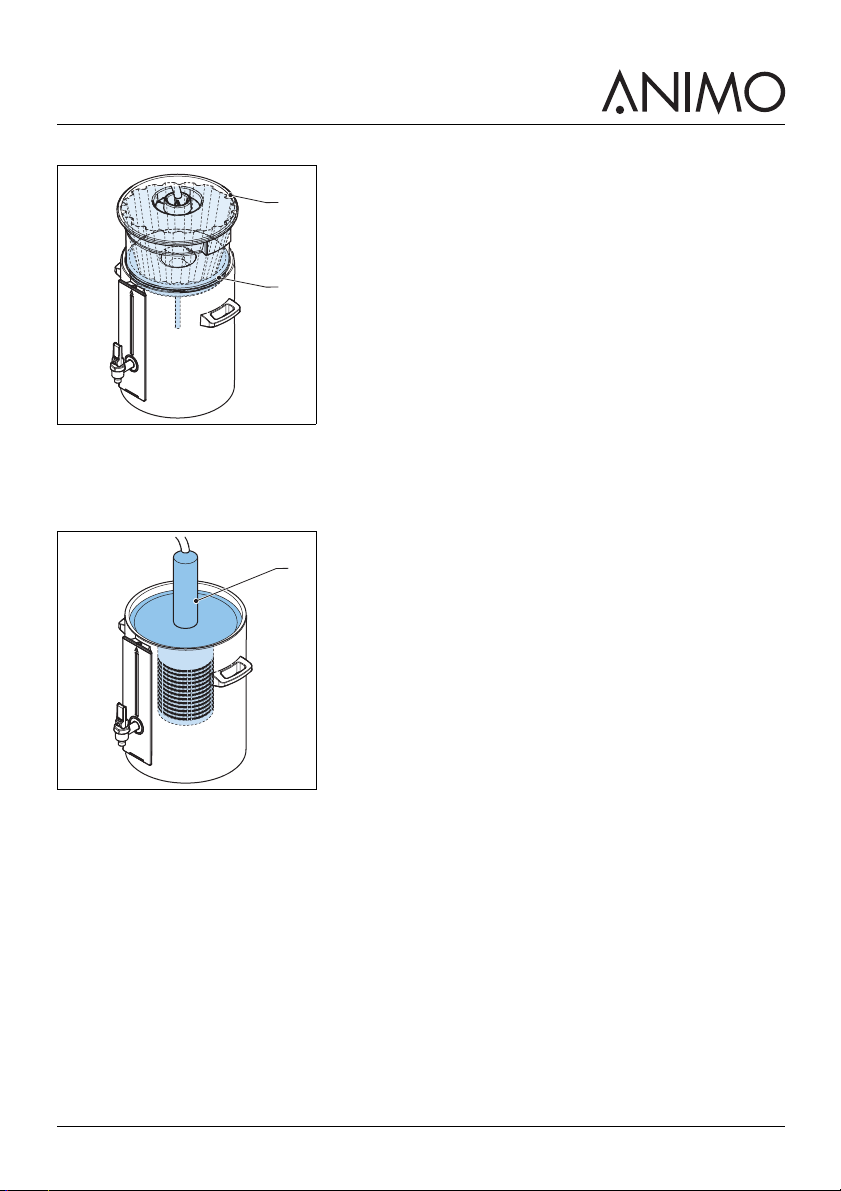
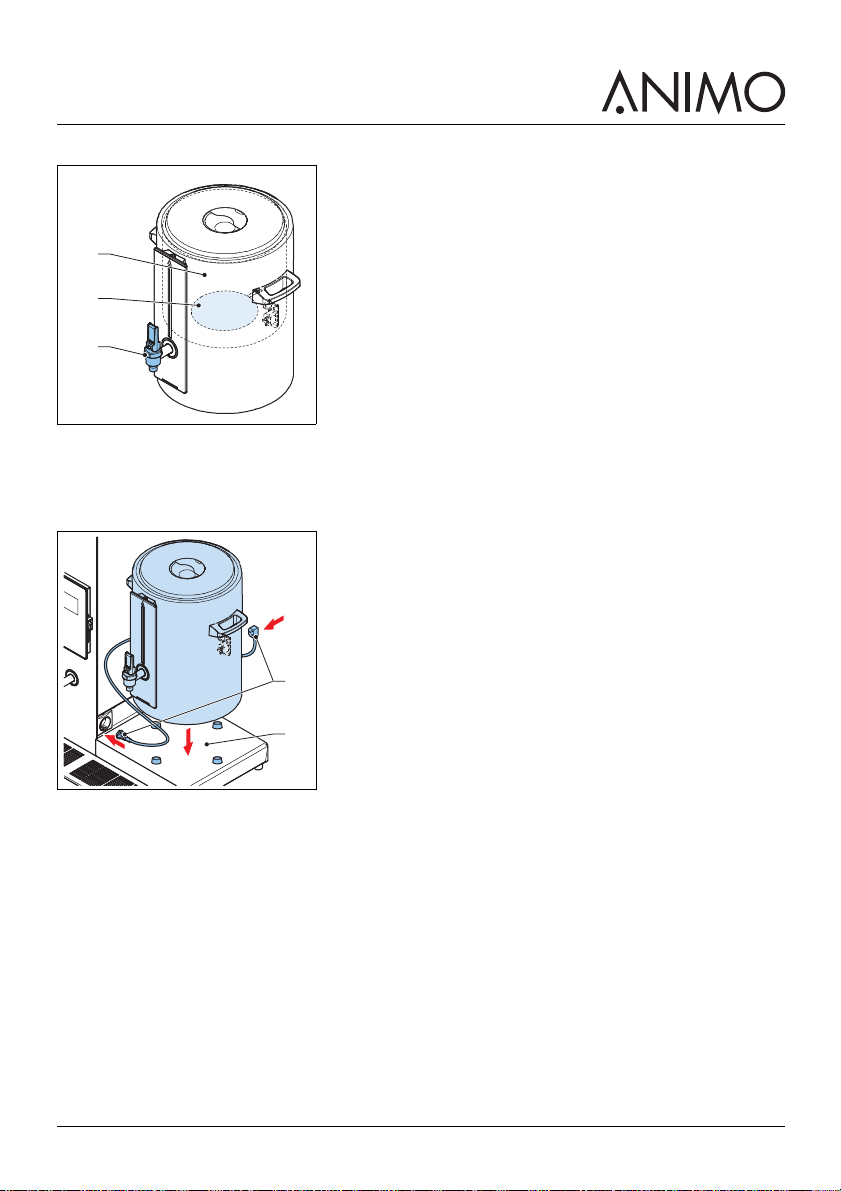
3.5.12 Install a container
Note
If you have a model with 2 base plates, do this procedure twice.
1 Check that the inside of the container is clean and dry.
2 Put the container (B) onto the centering pads on the base
plate (A).
3 Put the coffee blender (A) into the container (B).
4 Put the basket filter (C) into the container.
5 Put the put the water distributor (D) onto the basket filter.
D
C
A
B
AC B
2018/07 Rev 3.0 43 EN
Page 44

ComBi-line
6 If you have a container with an electric element, connect the power socket on the container (A) to
the power socket on the tower (C). Use the container power cable (B).
WARNING
Avoid serious injury, or damage to the machine. Do not use the container power cable if it is
damaged. If the container power cable is damaged follow the safety precautions for damaged
mains power cables. Refer to 1.6.5.
3.6 First-time use
Note
• When you start the machine for the very first time, follow the automatic prompts on the
display to insert your system preferences, then flush the container(s), the coffee brew
system, and the boiler system. After this set-up process, the machine will automatically
switch to the normal operation state.
• If the machine has not been used for a period longer than a week, do the procedure to
start the machine, then flush the coffee brew system, and flush the boiler system. Refer to
sections 3.6.1, 3.6.2, and 3.6.3.
• Do not put a beverage product in the machine for any of these procedures.
• While the swivel arm fills the container the text BREWING appears on the display. When
the process is complete the machine makes a single beep sound. The text DRIPPING
appears on the display. The text remains on the screen while the water is filtered through
the filter unit. The end of the process is signalled by 3 short beep sounds.
Caution
Stop the process if at any time a fault or error becomes evident. Use the stop button on the
control panel. Contact a service engineer before you attempt to use the machine again.
3.6.1 Start the machine for the first time
Note
The default language of the system is English.
1 Make sure that all the installation procedures have been done correctly. Refer to 3.5
2 Switch the machine ON. Refer to 4.4
3 If this is the first-time use of the machine, follow the prompts on the display for Step 1, then follow
the prompts for Step 2.
2018/07 Rev 3.0 44 EN
Page 45

ComBi-line
A
B
A
3.6.2 Flush the coffee brew system
WARNING
Beware of burn injuries. Be careful to avoid splashes. Make sure the receptacle you use to
empty the hot water into has proper handles to protect your hands from the heat of the hot
water.
1 Make sure the machine is switched on (A).
2 Make sure a filter basket and distributor lid is in the correct
position on a base plate.
3 Make sure the swivel arm is in the correct position over the
distributor lid.
4 Tap the selection button (B) for the smallest amount of
coffee.
5 Tap the OK button (C).
6 Wait for the brewing and dripping processes to finish. This
will be signalled by 3 short beep sounds. (Refer to the note.)
7 Empty the container (A). Use the tap (B).
B
A
C
8 If you have a model that has 2 containers, put the swivel arm
(A) over the distributor lid of the other container and flush the
coffee brew system again.
2018/07 Rev 3.0 45 EN
Page 46

ComBi-line
3.6.3 Flush the boiler system
Note
• Only do this procedure on W models.
• The boiler system automatically refills itself with water.
• The on/off button of the hot water system blinks until the water is ready to serve.
WARNING
Beware of burn injuries. The hot water temperature in the boiler is set at 96°C. Make sure the
receptacle you use to empty the hot water into has proper handles to protect your hands from
the heat of the hot water.
1 Turn the boiler system on. Tap the on/off button for the hot water system on the control panel. Refer
to 2.1.5
2 Wait for the on/off button to stop blinking.
3 Empty at least 2 liters of water from the boiler system into a jug. Use the tap on the front of the
tower.
Note
The tap of the tower has 2 modes of supply. The modes are short burst, and locked on. Refer
to 4.9
2018/07 Rev 3.0 46 EN
Page 47

ComBi-line
E
B
A
A
C
D
4Operation
4.1 Preparation
1 If this is the first-time use of the machine, do the procedures for first-time use. Refer to 3.6
2 If the machine has not been used for a period longer than a week, do the procedures for first-time
use. Refer to 3.6
3 Make sure the machine and the accessories are in good condition. If the machine or accessories
are in poor condition, contact a service engineer.
4 Make sure that the inner pot of the container is clean. Refer to 5.2.6
4.2 Prepare a container for coffee
1 Put the coffee blender (C) into the container (B).
2 Put the basket filter (D) into the container.
3 Put the filter paper (E) into the basket filter.
4 Put a coffee label into the label holder (A) on the tap of the
container. Snap the holder open with your fingernail.
4.3 Prepare a container for tea
1 Put the tea filter (B) into the container.
2 Put the filling pipe (C) onto the tea filter.
3 Put a tea label into the label holder (A) on the tap of the
container. Snap the holder open with your fingernail.
C
B
A
2018/07 Rev 3.0 47 EN
A
Page 48

ComBi-line
AB
4.4 Switch the machine on
1 Use the On / off switch (A) to switch the machine on.
2 Make sure the display on the control panel (B) is on.
4.5 Prepare the boiler system for use
1 Turn the boiler system on. Tap the button for the hot water
system (A) on the control panel. Refer to 2.1.5
A
Note
• If the the boiler system is idle for a specified time period, and the Energy safe mode is
activated, the boiler system switches to the Energy save mode. In the Energy save mode
the boiler system cools down and the On/off hot water button makes flashes. Tap the
On/off hot water button to re-start the boiler system. To activate, or deactivate the Energy
save mode, refer to 2.5.1
• The coffee and tea brewing processes take priority over the boiler system. The boiler
system automatically pauses if a brewing is in progress.
• For CB W models, a hot water label is supplied for the holder on the tap of the tower.
Snap the holder open with your fingernail to insert the label.
2018/07 Rev 3.0 48 EN
Page 49

ComBi-line
4.6 Select the brewing amount for coffee
Note
The display shows 4 preset brewing amounts. Each preset brewing amount shows a
recommended coffee dosage. This recommendation automatically changes if you modify the
preset brewing amount.
1 Select the coffee option on the display. Use the correct selection button on the control panel (A).
2 Select a brewing amount. Use 1 of the selection buttons on the control panel.
3 Take note of the recommended coffee dosage (A) for the
brewing amount you selected.
4 If desired, modify the brewing amount. Use the selection
buttons (B) on the control panel that correspond to the + (C)
or - (D) text on the display.
5 If you modify the brewing amount, take note of the new
coffee dosage recommendation.
6 Put the recommended coffee dosage (A) into the filter paper
inside the container. Spread the coffee evenly in the filter
paper.
7 Put the filter lid with water distributor (B) onto the basket
filter.
+
-
B
A
B
C
A
D
B
2018/07 Rev 3.0 49 EN
Page 50

ComBi-line
4.7 Select the brewing amount for tea
1 Select the tea option on the display. Use the correct selection
button on the control panel.
2 Follow the same steps as those to select a brewing amount
for coffee (refer to 4.6).
3 Take note of the recommended tea dosage.
4 Put the recommended tea dosage (A) into the tea filter in the
container.
5 Put the filling pipe (B) onto the tea filter.
4.8 Start the brewing process
Note
This procedure applies for both brewing coffee or tea.
Caution
If the swivel arm or the container is moved out of the correct position during the brewing
process, the brewing process will automatically stop. An icon and text will appear on the
display of the control panel. The machine also makes 2 short beep sounds. To restart the
brewing process, put the swivel arm and / or the container back into the correct position(s),
and tap the OK button on the control panel. You must do this within 10 minutes, or the
brewing process you selected will be cancelled.
B
A
WARNING
Beware of burn injuries. Hot water will come out of the swivel arm when the brewing process
is started.
1 If you have a model with a base plate, make sure the
container (A) is in the correct position on the base plate (B).
2 If you have a CB or CB W model, make sure the servery
trolley and the container are in the correct position. Refer to
3.5.4
3 Put the swivel arm (C) in the correct position over the
distributor lid.
4 On the control panel, tap the OK button (D).
C
D
A
B
2018/07 Rev 3.0 50 EN
Page 51

ComBi-line
5 Confirm that the container is empty. Tap the OK button.
Note
When you confirm that the container is empty the
brewing process will start.
• The power socket of the container will
automatically switch to On if the Auto Container
Heating option in the Operator menu is activated.
Refer to the section 2.5.1
• You must manually switch the power socket to On
if the option is not activated. Refer to the section
2.1.5
6 Look at the progress bar (A) on the display to see the
progress of the brew.
A
2018/07 Rev 3.0 51 EN
Page 52

ComBi-line
4.9 Complete the coffee brewing process
Note
• If you have a CB model with a second container, you can start a new brewing process
while the first container completes the brewing process. When the water supply stops
coming out of the swivel arm over the first container, put the swivel arm over the second
container and start the brewing process again.
• The container heating begins when the brewing process starts.
WARNING
• Beware of scalding injuries when you move the swivel arm.
• Beware of burn injuries from the contents of the filter basket. The contents of the filter
basket will be hot when you remove it from the container after the brewing process is
complete. Make sure you have a safe, watertight receptacle to dispose of the contents of
the filter basket.
• Beware of scalding injuries. Hot beverage is inside the container after the completion of
the brewing process. Hot beverage will come out of the tap if it is opened.
1 Wait for the machine to make 1 short beep sound.
2 Do a check that the progress bar (A) on the display shows
that the brew is Dripping.
3 After approximately 5 minutes, wait for the machine to make
3 short beep sounds.
A
4 Move the swivel arm (A) away from the container (B).
5 Take the water distributor (C) off the basket filter (D).
6 Take the basket filter off the container.
7 Put the insulated lid (E) onto the container.
8 Dispose of the filter and the contents of the filter, and clean
the filter basket. Refer to 5.2.7
A
C
E
D
B
2018/07 Rev 3.0 52 EN
Page 53

ComBi-line
4.10 Serve the beverage
Note
• In a container, the beverage is kept at an average temperature between 80 to 85°C.
• Coffee can be stored in the container for between 1 to 1.5 hours before the flavor of the
coffee deteriorates. Empty the coffee from the container after this period of time and
prepare to brew more coffee. Refer to 4.1
• The tap of the container can provide 2 modes of supply. Use the short burst supply to put
beverage into cups and mugs. Use the lock position to fill jugs and large containers.
Caution
Stop the container heater if the container is empty. To stop the heater, disconnect the power
cable from the sockets on tower, or use the control panel of the machine.
WARNING
Beware of scalding injuries. Hot beverage is inside the container after the completion of the
brewing process. Hot beverage will come out of the tap if it is opened.
1 Serve the beverage as required. Use the tap (A).
A
2 Press the tap lightly to serve the beverage in a short burst.
2018/07 Rev 3.0 53 EN
Page 54

ComBi-line
3 Press the tap fully down to lock the tap in the open position.
4 When the container becomes empty of beverage, disconnect
the power cable from the sockets on the container and the
tower.
5 Rinse the inner pot of the container before you start another
brewing process. Refer to 5.2.6
4.11 Use the timer function
Note
You can use this function to brew coffee or tea and activate the hot water system.
The timer can be programmed a maximum of 6 days in advance.
The heating element in the container switches on automatically 5 minutes before the
programmed brewing time.
You cannot start a brewing processes while the timer program is set.
If you have a model with 2 base plates, you can set a timer program on 1 container, and still
use the heating element in the other container.
The timer program is active when there is a stopwatch icon at the top of the display.
1 Prepare a container to brew either coffee or tea. Refer to 4.2
and 4.3.
2 Tap the Timer button (A) on the control panel.
3 Select Container and/or Boiler, then tap OK.
4 Select the day, then tap OK.
5 Select the time, then tap OK.
6 Select the brewing amounts for either coffee or tea. Refer to
section 4.6 or 4.7.
7 Do the preparation to start the brewing process. Refer to
section 4.8.
A
Caution
Make sure the container and swivel arm remain in the correct position while the timer program
is active. If the container or swivel arm are moved, the timer program will stop and a warning
appears on the display. Correct the position of the container and swivel arm to restart the
timer program. Refer to section 4.8
2018/07 Rev 3.0 54 EN
Page 55

ComBi-line
4.12 Complete the tea brewing process
Caution
Do not leave the tea filter in the container for longer than 15 minutes after the completion of
the brewing process. If the tea filter is left in the container for too long, the flavor of the tea
deteriorates.
1 Follow the same steps as those to complete the coffee
brewing process. Refer to 4.9.
2 Take the filling pipe (A) and tea filter (B) out of the container
(C) at least 4 minutes after the Dripping process has
stopped.
3 Serve the beverage. Refer to 4.9
A
B
C
2018/07 Rev 3.0 55 EN
Page 56

ComBi-line
5 Maintenance
5.1 Cleaning and disinfecting detergents
Caution
• Only use Animo cleaning products where specified.
• Do not immerse the container type CNe in water.
WARNING
Avoid chemical burns and eye injuries. Use safety gloves and protective glasses when using
cleaning products.
/i
Use these products where specified Remarks
Animo coffee fur remover Refer to 2.3.14
Animo scale remover Refer to 2.3.14
5.2 Cleaning
5.2.1 Daily cleaning
/i
Machine part Dishwasher proof See
Inner pot No 5.2.6
Clean the basket filter Yes 5.2.7
Clean the filter lid with water
distributor
Clean the blender No 5.2.9
Clean the drip tray No 5.2.10
Clean the exterior No 5.2.11
Yes 5.2.8
5.2.2 Weekly cleaning
/i
Machine part Dishwasher proof See
Remove coffee deposits from
No 5.2.12
the inner pot
Remove coffee deposits from
No 5.2.13
other parts
5.2.3 Descaling
Caution
Descale the machine as soon as possible after the descale indicator icon appears on the
display of the machine.
/i
Machine part Schedule See
Coffee brew system When alerted by the machine 5.3.2
Boiler system When alerted by the machine 5.3.6
2018/07 Rev 3.0 56 EN
Page 57

ComBi-line
A
5.2.4 General cleaning instructions for the machine
Caution
Never submerge or spray the machine.
1 Clean the exterior of the machine with a soft cloth or sponge that is dampened with warm water and
detergent.
2 Dry the machine with a soft dry cloth.
5.2.5 General cleaning instructions for the containers
Note
• The container type CNi can be submersed in water.
• As appropriate, increase the quantities and the sizes of the cleaning materials to clean a
CN 40 model.
Caution
Do not put the container type CNe in a dishwasher or sink.
Do not leave the lid on a container after cleaning. Position the lid ajar so that there is an air
flow into the container. The air flow avoids staleness in the container.
Leave approximately 2 cups of clean water in the container after cleaning. The water keeps
the rubber seals inside the container in good condition.
WARNING
Avoid hot water burns. Wear gloves and use a safe receptacle to clean, rinse and drain the
hot water into.
1 Disconnect the power cable from the container(s) when
cleaning the CNe container(s).
2 Close the splash protector (A).
5.2.6 Rinse the inner pot
1 Empty the contents of the container. Use the tap.
2 Remove all the accessories from the inside of the container.
3 Rinse the inner pot with hot water.
4 If required, remove beverage deposits from the inner pot. Refer to 5.2.12
2018/07 Rev 3.0 57 EN
Page 58

ComBi-line
5.2.7 Clean the basket filter
Note
You can clean the basket filter in a dishwasher.
1 Wash the basket filter in warm water with detergent.
2 Rinse the basket filter in clean water.
3 Dry the basket filter with a soft cloth.
5.2.8 Clean the filter lid with water distributor
Note
You can clean the filter lid with water distributor in a dishwasher.
1 Wash the lid in warm water with detergent.
2 Rinse the lid in clean water and dry it.
5.2.9 Clean the blender
1 Wash the blender in warm water with detergent.
2 Rinse the blender in clean water and dry it.
5.2.10 Clean the drip tray
1 Wash the drip tray in warm water with detergent.
2 Rinse the drip tray in clean water and dry it.
5.2.11 Clean the exterior
Caution
Do not use abrasive cleaning products on the exterior of the machine or the container(s).
1 Clean the exterior of the machine and the container(s) with a soft damp cloth.
2 Wipe the exterior of the machine and the container(s) dry.
5.2.12 Remove beverage deposits from the inner pot
Note
This procedure also applies to the removal of tea stains.
A sachet of coffee fur remover is required for this procedure. Refer to 2.3.14
Caution
Do not immerse the container during this procedure.
1 Empty the container. Use the tap.
2 Remove the brewing accessories from the container.
3 Fill half the container with warm water.
4 Put a sachet of coffee fur remover into the water.
5 Stir the water with a spoon to disolve the remover.
6 Wait for approxiamately 15 to 30 minutes, then empty the container. Use the tap.
2018/07 Rev 3.0 58 EN
Page 59

ComBi-line
7 Rinse the inside of the container with clean hot water several times. Use the tap to empty the
container each time you rinse the container.
8 Wipe the inside of the container dry.
5.2.13 Remove beverage deposits from other parts
Note
This procedure also applies to the removal of tea stains.
Note
This procedure requires a bucket with at least a 5 liter capacity.
A sachet of coffee fur remover is required for this procedure. Refer to 2.3.14
1 In the bucket, mix 5 liters of warm water with 1 sachet of the coffee fur remover.
2 Put the parts that need to be cleaned into the water.
3 Wait for approximately 15 to 30 minutes, then remove the parts from the receptacle.
4 Carefully discard the water.
5 Rinse the parts with clean hot water. Do this several times.
6 Repeat steps 1 to 5 if coffee deposits are still on the parts.
7 Wipe the parts dry.
5.2.14 Clean the tap on a container
1 Make sure that the container is empty and that the power
cable is disconnected.
2 Unscrew the top of the tap (A). Turn the top of the tap anti-
clockwise.
3 Take the silicon sealer (B) from the top of the tap.
4 Do the procedure to remove beverage deposits from other
parts, to clean the top of the tap and the seal. Refer to 5.2.13
5 Put back the silicon sealer and the top of the tap onto the
container. Reverse the steps 3 and 2.
B
A
2018/07 Rev 3.0 59 EN
Page 60

ComBi-line
5.2.15 Clean the gauge glass
Note
This procedure is not applicable to CB 40 models.
Note
You need these items to do this procedure.
• 1 gauge glass brush. Refer to 2.3.14
• 1 soft dry cloth.
WARNING
Handle the gauge glass carefully. The gauge glass is fragile. Use a dry cloth to hold the
gauge glass safely and avoid injury from broken glass in case the gauge glass breaks.
1 Make sure that the container is empty and that the power
cable is disconnected.
2 Remove the rubber stopper (A) from the top of the gauge
glass lid (B).
3 Remove the gauge glass lid. Pull the gauge glass lid up
vertically from the top of the protector profile (C).
4 Carefully remove the gauge glass (D) from the recess in the
protector profile. Pull the gauge glass vertically up and away
from the profile.
5 Carefully clean the gauge glass. Use the gauge glass brush.
6 Moisten both ends of the gauge glass.
7 Put back the moistened gauge glass into the protector
profile. Reverse step 4.
8 Put back the gauge glass lid and rubber. Reverse the steps 2
and 3.
A
B
C
D
5.3 Descale the machine
5.3.1 Prepare to descale the coffee brew system
Note
You need at least 2 sachets (100 grams) of scale remover to do this procedure. Refer to
2.3.14
Note
You need these items to do this procedure.
• 2 liters of water at least 60 - 70°C in temperature.
• 2 measuring jugs. Each jug must have a capacity of at least 2 liters. The measuring jugs
must also fit in the space between the swivel arm and the base plate.
• 1 funnel. Refer to 3.5.1
• 1 spoon.
2018/07 Rev 3.0 60 EN
Page 61

ComBi-line
Caution
Descale the coffee brew system promptly after the alert appears on the display. This will avoid
repair costs and the loss of the warranty.
WARNING
Avoid chemical burns and eye injuries. Use safety gloves, a plastic apron and protection
glasses when using the scale remover.
Read the warnings and directions on the sachet of the scale remover.
WARNING
Avoid scalding injuries. Hot water is used for the descaling procedure.
1 Flush the coffee brew system. Brew the smallest quantity to
heat up the system. Use only water. Refer to 3.6.2
2 Mix the water and the scale remover in a jug. Use the spoon
to stir the solution.
3 Remove the lid (A) from the descale filling opening on the
left-hand-side of the top of the tower (B). (1)
4 Put the funnel (C) into the opening. Push the funnel down
into the opening as far as possible. (2)
5 Remove the lid and basket filter from a container.
6 Position the swivel arm into the correct position over the
container.
C
2
1
A
B
2018/07 Rev 3.0 61 EN
Page 62

ComBi-line
5.3.2 Descale the coffee brew system
WARNING
Avoid chemical contamination. All the equipment used for this procedure will be contaminated
with the scale remover solution. Make sure all the equipment, including the funnel and jugs,
the spoon and any other item or protective equipment that may have come in contact with the
scale remover solution is rinsed clean after this procedure. Be careful handling these items
until they are clean.
WARNING
The descaling program cannot be stopped after the descaling solution has been poured into
the machine. In case of emergency use the Stop button on the control panel. The program will
stop. However, the descaling program, including rinsing, must be completed before the
machine can be used again.
WARNING
Avoid chemical burns. Discard the used descaling solution safely down a drain or appropriate
receptacle.
Note
The prompts on the display of the Operator menu guide you through the descale procedure.
1 Make sure you have done all the required preparations.
Refer to 5.3.1
2 Access the Operator menu, then navigate to and select the
correct descale program. Refer to 2.5.1.
3 Put an empty jug into the container.
4 Slowly pour the scale remover solution from the measuring
jug into the funnel.
5 Collect the solution in the jug as it comes out of the swivel
arm. (1)
6 Repeat steps 4 and 5 until the solution comes out of the
swivel arm without any foam. Each time, re-use the solution
you collect from the swivel arm (2).
7 Remove the funnel and put the cover back onto the descale
opening.
l
m
0
0
0
0
20
0
0
2
0
0
20
0
0
6
18
0
1
20
0
14
0
1
10
0
80
0
0
6
0
0
2
,
4
0
2
2
tr
L
2
1
2018/07 Rev 3.0 62 EN
Page 63

ComBi-line
5.3.3 Rinse the coffee brew system
Note
• Do this procedure immediately after you have descale the coffee brew system. Refer to
5.3.2
• The prompts on the display of the Operator menu guide you through the rinse procedure.
• Continue this procedure from the same descaling program you used to descale the coffee
brew system.
• At the completion of this procedure, the flow counter for the next descaling procedure
automatically resets.
WARNING
Avoid chemical contamination. Discard the flushed water used for this procedure safely down
a drain or appropriate receptacle.
1 Tap the OK button on the control panel to confirm that you are ready to rinse the coffee brew
system.
2 Put a basket filter and a distributor lid onto the container.
3 Tap the OK button again. 2 liters of hot water will move through the coffee brew system and into the
distributor lid of the container.
4 Listen for 3 beep sounds and watch the display for the signal that the rinse cycle has finished.
5 Empty the container. Use the tap.
6 Repeat steps 3, 4, and 5 twice more. The descale program will be complete after a total of 3 rinse
cycles.
7 Tap the Stop X button on the control panel twice to return to the main screen of the display. The
machine is ready for use.
5.3.4 Prepare to descale the boiler system
Note
This procedure is not applicable to CB 40 models.
Note
You need these items to do this procedure.
• At least 2 sachets of scale remover (100 grams). Refer to 2.3.14
• 1 liter of water at least 60 - 70°C in temperature.
• 1 measuring jug with a capacity of at least 2 liters.
• 1 large jug or a bucket.
• 1 funnel. Refer to 3.5.1
• 1 spoon.
Caution
Avoid repair costs and the loss of the warranty. Promptly descale the boiler system when
alerted by the display.
2018/07 Rev 3.0 63 EN
Page 64

ComBi-line
WARNING
Avoid chemical burns and eye injuries. Use safety gloves, a plastic apron and protection
glasses when using the scale remover.
Read the warnings and directions on the sachet of the scale remover.
WARNING
Avoid scalding injuries. The hot water system must be completely drained several times
during the descaling procedures. The water is hot.
1 Mix the water with the scale remover in the jug. Use the
spoon to stir the solution.
2 Access the Operator menu on the display, then navigate to
and select the correct descaling program. Refer to 2.5.1
3 Tap the OK button on the control panel to start the empty
boiler cycle of the descaling program.
4 Completely empty the boiler sytem into a large jug or a
bucket. Use the tap of the boiler, and then use the end tap of
the drainage hose.
5 Tap the OK button. If the machine makes a double beep
sound, repeat step 5.
6 Remove the cover (A) from the descale filling opening on the
right-hand side of the top of the tower (B). (1)
7 Put the funnel (C) into the opening. Push the funnel down
into the opening as far as possible.(2)
5.3.5 Rinse the boiler system
Note
• Do this procedure immediately after you descale the boiler system. Refer to 5.3.6
• The prompts on the display of the Operator menu guide you through the rinse procedure.
• Continue this procedure from the same descaling program you used to descale the boiler
system.
• At the completion of this procedure, the flow counter for the next descaling procedure
automatically resets.
WARNING
Avoid chemical contamination. All the equipment used to descale and rinse the boiler system
will be contaminated with the scale remover solution. Make sure all the equipment, including
the funnel and the jug, the spoon and any other item or protective equipment that may have
been splashed by the scale remover solution is rinsed clean after this procedure. Be careful
handling these items until they are clean.
1 Tap the OK button on the control panel to empty the boiler system.
2 Completely empty the scale remover solution from the boiler system into a large jug or a bucket.
Use the tap of the boiler, and then use the end tap of the drainage hose.
3 Tap the OK button to start the rinsing cycle. If the machine makes a double beep sound, repeat step
2.
4 Wait for the machine to make 3 beep sounds.
C
2
A
1
B
2018/07 Rev 3.0 64 EN
Page 65

ComBi-line
5 Repeat the steps 1 to 3 twice more. The descaling program will be complete after a total of 3 rinse
cycles.
6 Tap the Stop button X on the control panel twice to return to the main screen of the display. The
machine is ready for use.
7 If you want to use the boiler system, tap the hot water button on the control panel.
5.3.6 Descale the boiler system
Note
The prompts on the display of the Operator menu guide you through the descale procedure.
WARNING
The descaling program cannot be stopped after the descaling solution has been poured into
the machine. In case of emergency use the Stop button on the control panel. The program will
stop. However, the descaling program, including rinsing, must be completed before the
machine can be used again. Refer to 5.3.5
WARNING
Avoid chemical burns. Discard the used descaling solution safely down a drain or appropriate
receptacle.
1 Make sure you have done all the required preparations. Refer to 5.3.4
2 Slowly pour all of the scale remover solution from the measuring jug into the funnel.
3 Remove the funnel and put the cover back onto the descaling filling opening.
4 Tap the OK button to confirm that scale remover solution is in the machine.
5 Wait approximately 5 minutes for the machine to make 3 beep sounds.
2018/07 Rev 3.0 65 EN
Page 66

ComBi-line
6 Troubleshooting
6.1 Error codes and problems
Caution
All repairs to the electrical system must be done by a qualified service engineer.
Note
Contact your Animo representative if you cannot resolve the problem. See the back cover of
this user manual.
Problem Possible cause Correction
200, and hot water temperature
is not correct.
201, and hot water temperature
is not correct.
202, and the boiler system
does not heat.
202, and boiler system stays
on too long.
203, and the machine fills too
slowly.
204, - There is an electrical fault. Contact a service engineer.
205, and then changes to 208 The inlet valve is closed for
205, - The inlet valve is closed for
206, and machine does not
work.
207 I, and machine does not
fill.
207 II, and machine fills to
slowly.
208, and water inlet does not
close properly.
209, - There is an electrical fault. Contact a service engineer.
210, and then changes to 208. The inlet valve is closed for
There is a fault in the water temperature sensor.
There is a fault in the water temperature sensor.
Temperature protection is activated.
There is scaling in the boiler system.
The pressure of the water supply
is too low.
safety. Or, the volume sensor has
not activated.
safety.
Temperature protection is activated.
There is a problem with the
mains water supply.
There is a problem with the
mains water supply.
There is a fault with the water
inlet valve.
safety. Or, there is maximum
water in the machine.
Contact a service engineer.
Contact a service engineer.
Reset the temperature protection. Refer to 6.2. Descale the
machine Refer to 5.3
Descale the machine Refer to 5.3
Check the hose connection. Turn
the tap completely open. Turn the
machine off and then on again.
Check the hose connection. Turn
the tap completely open. Turn the
machine off and then on again.
Contact a service engineer.
Reset the temperature protection. Refer to 6.2. Descale the
machine. Refer to 5.3
Make sure the tap and the mains
water supply hose are correctly
installed. Refer to 3.5.8
Make sure the tap and the mains
water supply hose are correctly
installed. Refer to 3.5.8
Contact a service engineer.
Restore the water supply and
start the brewing process again.
Refer to 4.8
2018/07 Rev 3.0 66 EN
Page 67

ComBi-line
A B
Problem Possible cause Correction
211, and water volume is not
correct.
212, and faulty temperature
reading.
213, and faulty temperature
reading.
216, and the machine does not
heat.
There is a fault in the water level
sensor.
- Contact a service engineer.
- Contact a service engineer.
The temperature protection system is activated.
Contact a service engineer.
Reset the temperature protection. Refer to 6.2. Descale the
machine. Refer to 5.3.
6.2 Temperature protection
Note
The temperature protection automatically activates when the temperature of either the coffee
brew system, or the boiler system overheats. When activated, the temperture protection turns
the machine off. The most common cause for the activation of the temperature protection is
lime or scale.
1 Wait for the machine cool down.
2 Remove the cover of the temperature protection button for
the system that overheated (A or B).
3 Reset the temperature protection. Use a screwdriver or
similar to press the button.
4 Put back the cover of the temperature protection button.
5 Switch the machine on. Refer to 4.4
6 Descale the system that activated the temperature
protection. Refer to 5.3
7 Contact a service engineer if the temperature protection
activates again.
2018/07 Rev 3.0 67 EN
Page 68

ComBi-line
2018/07 Rev 3.0 68 EN
Page 69

Animo B.V.
Dr. A. F. Philipsweg 47
9403 AD Assen
The Netherlands
Tel: +31 (0) 592 376376
Fax: +31 (0) 592 341751
E-mail: info@animo.nl
www.animo.eu
2018/07 Rev 3.0 1006527
 Loading...