

Page 1
Quick Start Guide
Portable Mini
Bluetooth Speaker
Designed and Engineered By
TheOontZ.com
Page 2
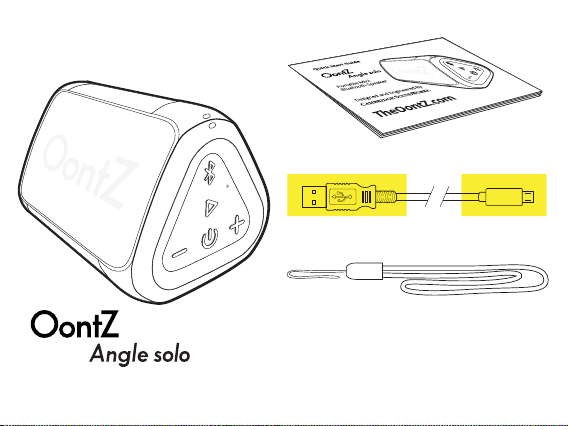
In the Package
Quick-Start Guide
Micro USB Charging Cable
Lanyard
Note: The cable and lanyard are packed below
the cardboard insert in the box. Slide out the
insert to locate them.
Page 3

Table of Contents
Pages
Buttons, Lights and Connectors
Attaching the Lanyard
Battery Features and Charging the Battery
Turning On and Off
Pair & Connect with Your Device
To Play with Non-Bluetooth Devices use a 3.5mm Audio Cable
IPX5 Water Resistance
Wireless Hands Free Personal Speakerphone
Reset Function
Contacting Customer Support
Safety and Precautions
1 - 3
4
5 - 7
8
9 - 12
13
14
15
16
17
18 - 19
Page 4

Buttons
Bluetooth
(Dual Function)
Button
(Dual Function)
Volume Down
Press to decrease volume
Track Back
Press and Hold Down to go to the
beginning of the track
Press and Hold Down twice to go to
previous track
Important - The volume control on your device and the speaker work independently of
each other. To play the speaker at the loudest volume, set the volume on your device to
maximum and raise the volume on the speaker to maximum.
Important - Some apps may not support track back, track forward, or play/pause
Power
Play/Pause
Press and Release
to Pause/Play
Button
(Dual Function)
Volume Up
Press to increase volume
Track Forward
Press and Hold Down
to go to the next track
Page 1
Page 5
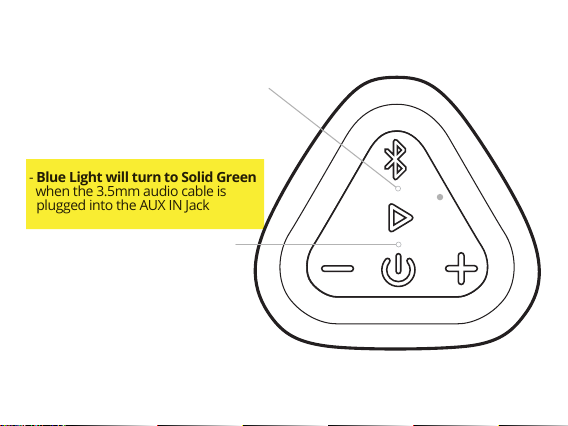
Lights
Blue Light lit when speaker is on:
- Flashing Blue
speaker is in pairing mode
- Solid Blue
speaker is connected
- Blue Light will turn to Solid Green
when the 3.5mm audio cable is
plugged into the AUX IN Jack
Red Light lit when charging:
- Slowly flashing Red
battery is charging
- Solid Red
battery is fully charged
Page 2
Page 6
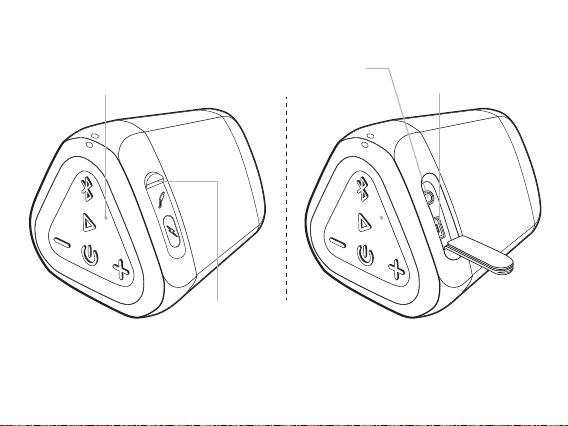
Connectors
Built-in Mic for
Speakerphone
Rubber Flap
- covers connectors
- pull gently from the top to access connectors,
it is a snug fit to provide water resistance
Note: The rubber flap needs to be closed to keep the speaker water resistant
AUX IN Jack Micro USB
Charging Connector
Page 3
Page 7
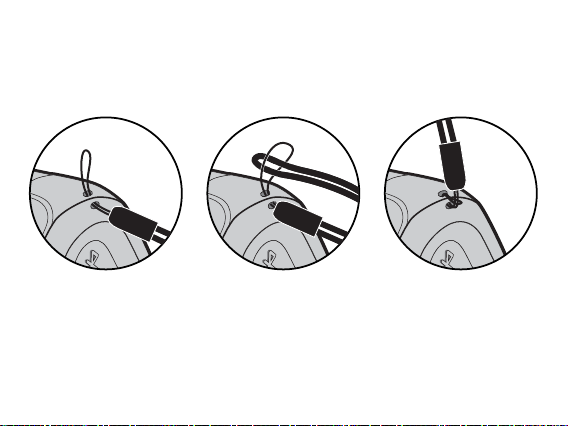
Attaching the Lanyard
Use the lanyard as a wrist strap for carrying your speaker in hand or
attaching to other objects
- Slide the smaller
lanyard loop through
one of the lanyard
attachment holes at
the top of the speaker
- Slide the larger lanyard
loop through the
smaller lanyard loop
that has passed
though the other
attachment hole
- Pull the larger lanyard
loop completely
through the smaller
lanyard loop to fasten
the lanyard to the
speaker
Page 4
Page 8
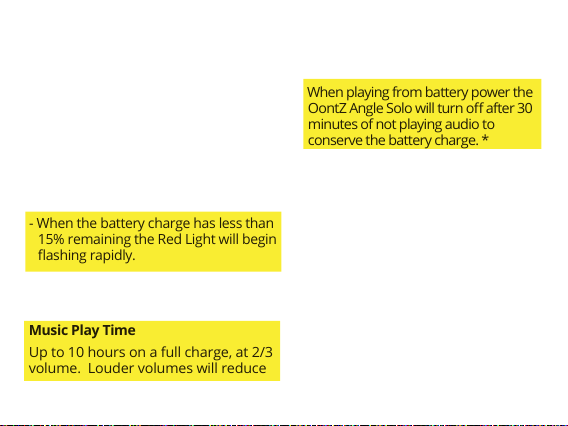
Battery Features
- The rechargeable battery comes
with a partial charge and the
speaker is ready to play.
- For maximum playtime, fully
charge the battery.
- You can play while charging.
Low Charge Remaining
- When the battery charge has less than
15% remaining the Red Light will begin
flashing rapidly.
- The volume will decrease to preserve
the remaining battery charge.
Music Play Time
Up to 10 hours on a full charge, at 2/3
volume. Louder volumes will reduce
the battery play time.
Power Saving Feature
- When playing from battery power the
OontZ Angle Solo will turn off after 30
minutes of not playing audio to
conserve the battery charge. *
- When plugged into a charging source
the OontZ Angle Solo will remain on
until you turn the power off.
- You can continue to keep the speaker
plugged into a charging source even
when it is fully charged, keeping the
speaker turned on and available
*Exception: when connected to
certain devices, including the
Amazon Echo Dot or Amazon Echo,
the Power Saving Feature is disabled
and the speaker will remain on until
you turn the power off.
Page 5
Page 9
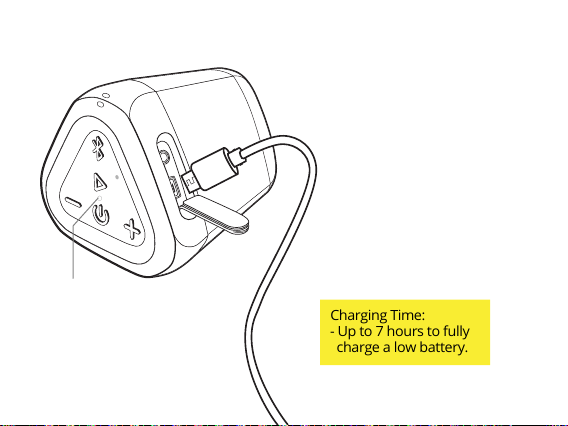
Charging the Battery
Red Light lit
when charging:
- Slowly flashing Red
battery is charging
- Solid Red
battery is fully charged
- Insert the small end of the
Micro USB Charging Cable into
the Micro USB Charging
Connector as shown.
- Insert the large end of the Micro
USB Charging cable into either a
USB wall charger for a
Smartphone or iPhone, or a USB
port on your laptop/computer
to charge the battery (see
illustrations on page 7).
Charging Time:
- Up to 7 hours to fully
charge a low battery.
Page 6
Page 10
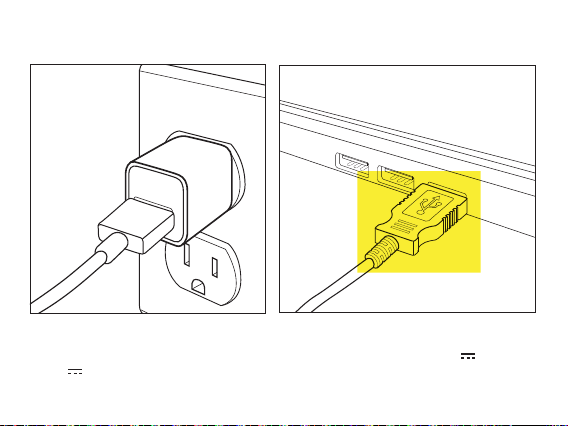
Charging the Battery (continued)
Insert the large end of the Micro USB charging cable into either a USB wall
charger for a Smartphone or iPhone (a USB wall charger that is 5V 1.0A up
to 5V 2.4A maximum) or a USB port on your laptop/computer to charge
the OontZ Angle Solo rechargeable battery.
Page 7
Page 11
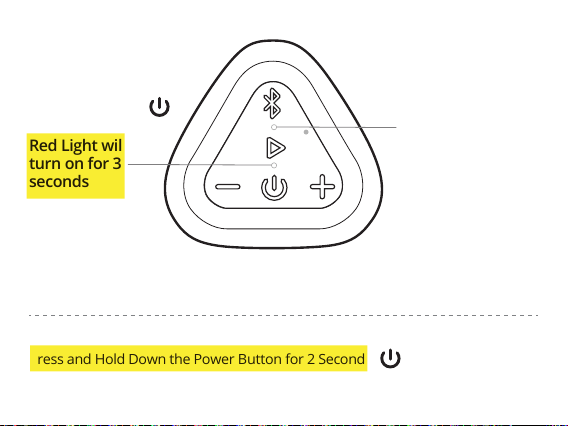
Turning On and Off
Turn ON
Press and Release
the Power Button
Red Light will
turn on for 3
seconds
Turn OFF
Press and Hold Down the Power Button for 2 Seconds
Blue Light will turn off
Blue Light will turn
on after Red Light
turns off
- Flashing Blue
The speaker is in
pairing mode
- Solid Blue
Your device has
connected with the
OontZ Angle Solo
and is ready to play
Page 8
Page 12
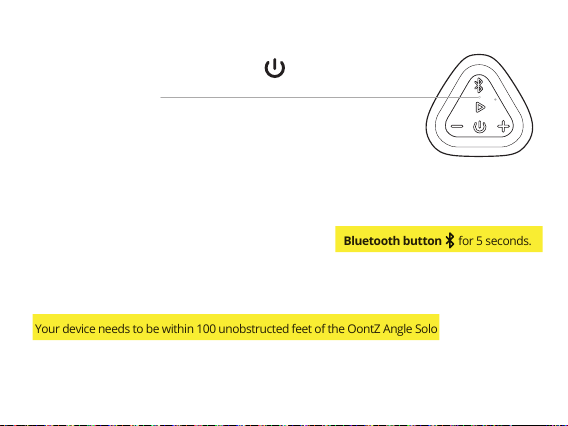
Pair & Connect with Your Device -- Step 1
Turn ON your OontZ Angle Solo
Flashing Blue Light
- The OontZ Angle Solo is ready to pair and connect.
Solid Blue Light
- Your device has connected to the OontZ Angle Solo and is ready to play.
- The OontZ Angle Solo allows the last device it was connected with to automatically reconnect with
the speaker, each time you turn the speaker on and that device is within range.*
The OontZ Angle Solo can be connected to one device at a time.
- To pair and connect to a different device, you need to first disconnect the currently paired device.
- To disconnect the current device, press and hold down the Bluetooth button for 5 seconds.
- The Blue Light will begin flashing and the OontZ Angle Solo is ready for the next device to pair
and connect.
*Exception: certain devices may not automatically reconnect. Amazon Echo devices will not
automatically reconnect. You will need to say "Alexa, connect my speaker"
- Your device needs to be within 100 unobstructed feet of the OontZ Angle Solo to pair and connect.
If there is an issue when connecting please move your device closer to the speaker, then pair and
connect.
- When the charge is too low indicated by a flashing red light on the speaker, your device will not be
able to connect with the speaker.
Page 9
Page 13
Pair & Connect with Your Device -- Step 2 --
-- With Your iPhone, iPad, or iPod
- Go to Settings > Bluetooth, check Bluetooth is on
- Select 'OontZ Angle Solo xxx' when it appears under DEVICES (xxx: 3 characters
which are unique to your speaker)
- Your device will connect in a few seconds
- The Blue Light will turn solid blue and there will bea quiet chime
- You can now play your audio wirelessly to your OontZ Angle Solo
-- With Your Smartphone, Tablet & Mobile Devices
- Go to Settings > Bluetooth, check Bluetooth is on
- Scan or Search and select 'OontZ Angle Solo xxx' when it appears under
AVAILABLE DEVICES (xxx: 3 characters which are unique to your speaker)
- Your device will connect in a few seconds
- The Blue Light will turn solid blue and there will be a quiet chime
- You can now play your audio wirelessly to your OontZ Angle Solo
Note: Your Smartphone or Tablet instructions may vary
Important - The volume control on your device and the speaker work independently
of each other. To play the speaker at the loudest volume, set the volume on your
device to maximum and raise the volume on the speaker to maximum.
Page 10
Page 14
Pair & Connect with Your Device -- Step 2 --
-- With Your Apple Mac or Windows Laptop/Computer
For the pairing and connecting guide for your Apple Mac or
Windows laptop/computer, please visit: TheOontZ.com/pairing
-- With Your Amazon Echo or Amazon Echo Dot
To pair and connect with the Amazon Echo or Amazon Echo Dot the first
time use the Alexa app. For other Amazon Alexa devices please refer to their
pairing and connecting instructions.
- Open the Alexa app
- Go to the 'Home' menu by pressing the 3 horizontal lines in the upper left
corner next to 'Home'
- Press 'Settings'
- Select your Amazon Echo device under 'Devices' by pressing it
- Press 'Bluetooth'
- Select the 'OontZ Angle Solo xxx' (xxx: 3 characters unique to your speaker)
when it appears in the list of 'Available Speakers'
- Alexa will announce: "Connected to OontZ Angle Solo"
To connect the next time, turn on the OontZ Angle 3 Solo and say
"Alexa, connect my speaker" or "Alexa, pair"
Page 11
Page 15
Pair & Connect with Your Device -- Step 2 --
-- With Your Amazon Echo or Amazon Echo Dot (continued)
Important Note: When the OontZ Angle Solo is playing from battery power and
connected to the Amazon Echo device, the speaker will remain on and it will not
automatically turn off after 30 minutes of not playing audio.
This will use up the battery charge.
We recommend to:
1) Keep the OontZ Angle Solo plugged into a USB wall charger and it will remain on
and available to play from the Amazon Echo device until you manually turn the
speaker power off.
- Or -
2) Turn off the OontZ Angle Solo when you are done listening.
- Either turn off the speaker by pressing and holding down the power button for
2 seconds,
- or say "Alexa, disconnect my speaker" and the OontZ Angle Solo will automatically
turn off after 30 minutes.
- When you want to connect and play to the speaker again turn on the OontZ Angle
Solo and say "Alexa, connect my speaker" or "Alexa, pair".
For assistance with the Alexa app, contact Amazon's Customer Service.
Open the Alexa app and select Help & Feedback > Email Customer Service
Page 12
Page 16
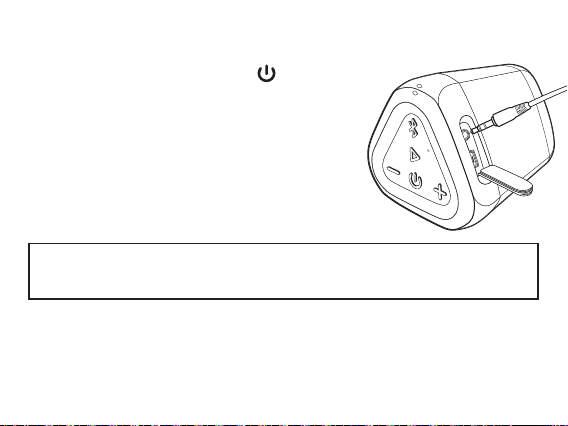
To Play with Non-Bluetooth Devices use a 3.5mm Audio Cable
Turn ON your OontZ Angle Solo
- Plug one end of a 3.5mm audio cable into the AUX
IN Jack on the speaker.
- The Blue Light will turn solid Green.
- Plug the other end of the 3.5mm audio cable into
the headphone jack on your device.
- Make sure both ends of the cable are fully inserted
- You are now ready to play.
Important: The Bluetooth on the OontZ Angle Solo is disabled when the 3.5mm audio
cable is connected to the speaker. You need to remove the 3.5mm audio cable from
the speaker in order to connect to a Bluetooth device.
- Note: When the rubber flap is open to allow the 3.5mm audio cable to be connected, the speaker
is not water resistant. The rubber flap needs to be closed to keep the speaker water resistant.
- Note: The volume control on your device and the speaker work independently of each other.
To play the speaker at the loudest volume, set the volume on your device to maximum and raise
the volume on the speaker to maximum.
Page 13
Page 17
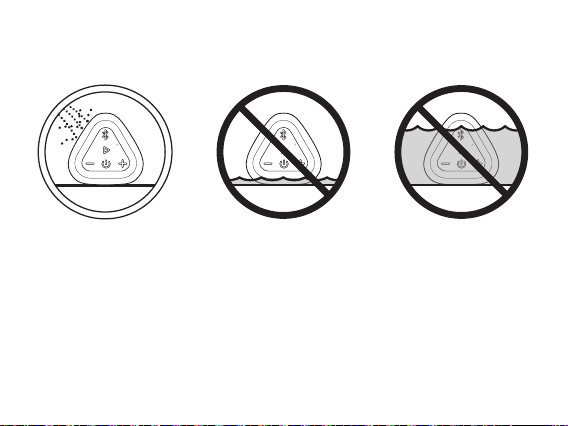
IPX5 Water Resistant
The rubber flap needs to be closed to keep the speaker water resistant and dustproof
Gentle Water Spray
or Splash is okay
Safety Precaution: When the OontZ Angle Solo speaker is plugged in to a
charging source with the Micro USB charging cable, never use the speaker
in the shower, bath, or near water, to prevent risk of electric shock.
IPX5 rating - The OontZ Angle Solo can resist water spray & splash but cannot be partially or
fully submerged or left in a wet environment for an extended period of time, any of which
could cause unrepairable damage to the speaker.
When charging or using the 3.5mm audio cable, please keep the speaker away from water as it
can be damaged by water entering the connectors.
DO NOT allow speaker
to sit in water
DO NOT allow speaker
to submerge fully or
partially in water
Page 14
Page 18
Wireless Hands Free Personal Speakerphone
The Wireless Hands Free Personal Speakerphone feature works over Bluetooth
with Smartphones and iPhones only; this feature is not supported when
connected to other types of devices.
To answer an Incoming Call / To End a Call
- Press and Release the Bluetooth Button
To Reject an Incoming Call
- Press and Hold Down the Bluetooth Button for 2 Seconds
- Please keep the speaker close in front of you so you may be heard
clearly by the listener.
- You can use your Smartphone or iPhone to switch between using
Hands Free Speakerphone and your phone.
Page 15
Page 19
Reset Function
Step 1: Remove the Micro USB charging cable
and 3.5mm Audio cable, if connected.
Step 2: Press and hold down the Power button
for approximately 15 seconds until the red and
green lights come on together and then turn off
together, then release the Power button.
Step 3: The speaker has now been reset and
you can turn it on.
Page 16
Page 20

Customer Support
If you have a question about your OontZ Angle Solo or experience an
issue with the speaker, our Customer Support Team wants to assist you.
For online troubleshooting tips please visit:
TheOontZ.com/troubleshooting
and select the OontZ Angle Solo
Contact us at:
TheOontZ.com/support
and fill in our customer support form
Page 17
Page 21

Safety and Precautions
When the OontZ Angle Solo speaker is plugged in to a charging source with the
1.
Micro USB charging cable, never use the speaker in the shower, bath, or near water,
to prevent risk of electric shock.
Read and follow all instructions – All operating and use instructions should be followed.
2.
Protect the Micro USB charging cable from being pinched, particularly at the
3.
connectors.
Unplug the Micro USB charging cable during lightning storms or when unused for long
4.
periods of time.
Do not place speaker near any heat sources such as radiators, heat registers, stoves, or
5.
other apparatus (including amplifiers) that produce heat.
Refer all servicing to qualified personnel. Servicing is required when the speaker has
6.
been damaged in any way.
Do NOT make unauthorized alterations to this speaker.
7.
Use this speaker only with an agency approved power supply which meets local
8.
regulatory requirements (e.g., UL, CSA, VDE, CCC) in accordance with the
manufacturer’s specifications.
Do NOT place naked flame sources, such as lighted candles, on or near the speaker.
9.
Do not expose products containing batteries to excessive heat (e.g. from storage in
10.
direct sunlight, fire or the like)
If the battery leaks, do not allow the liquid to come in contact with the skin or eyes.
11.
If contact is made, seek medical advice.
Apple, iPhone, iPad, iPod, Mac and Siri are registered trademarks of Apple Inc.
Amazon, Alexa, Amazon Echo and Amazon Echo Dot are registered trademarks of Amazon.com, Inc.
Windows is a registered trademark of Microsoft Corporation
Bluetooth is a registered trademark of Bluetooth SIG, Inc.
Page 18
Page 22

Safety and Precautions (continued)
This device complies with Part 15 of the FCC Rules. Operation is subject to the following
two conditions:
(1) This device may not cause harmful interference, and (2) this device must accept any
interference received, including interference that may cause undesired operation.
NOTE 1: This equipment has been tested and found to comply with the limits for a Class B
digital device, pursuant to part 15 of the FCC Rules. These limits are designed to provide
reasonable protection against harmful interference in a residential installation. This
equipment generates, uses and can radiate radio frequency energy and, if not installed
and used in accordance with the instructions, may cause harmful interference to radio
communications. However, there is no guarantee that interference will not occur in a
particular installation. If this equipment does cause harmful interference to radio or
television reception, which can be determined by turning the equipment off and on, the
user is encouraged to try to correct the interference by one or more of the following
measures:
- Reorient or relocate the receiving antenna.
- Increase the separation between the equipment and receiver.
-Connect the equipment into an outlet on a circuit different from that to which the
receiver is connected.
-Consult the dealer or an experienced radio/TV technician for help.
NOTE 2: Any changes or modifications to this unit not expressly approved by the party
responsible for compliance could void the user's authority to operate the equipment.
Page 19
 Loading...