

Page 1
ANGRY AUDIO
USER GUIDE
PHONE
+1 (615) 763-3033
WEB
[email protected]
www.angryaudio.com
ADDRESS
128 HOLIDAY CT STE 118
Franklin TN 37067 USA
Button Gizmo
P/N 991029
Revision 1.0
Page 2
1 Welcome! Safety First 2
Welcome to the world of Angry Audio,
home of the audio Gadgets and Gizmos.
The future we were all promised has, at least as of this writing, failed to manifest
itself. There are no flying cars. Jetpacks never took off (see what we did there?).
And tragically, we have no robotic housekeepers in mid-century maid outfits
picking up after us and cracking wise in a Brooklyn accent.
The audio world, on the other hand, has advanced quickly, as one look at
a modern broadcast studio will reveal. Technology has opened up creative
possibilities that would have been impossible just a few years ago. What hasn’t
changed is the importance of getting the basics right and sweating the details.
A good studio is built by including components that make it a convenient and
enjoyable place to create the content that dazzles your listeners, drives traffic to
your advertisers, and lets you hang onto your ski boat for another summer.
Accordingly, every audio Gadget and Gizmo – including this Button Gizmo
– is designed to solve common yet critical problems, and is meticulously
engineered with performance and longevity in mind to deliver pristine audio and
reliable performance for many years.
Our promise and guarantee.
In a recent survey, ten out of three people loved their Button Gizmo and we
think you will too. That’s why we give you 30 days to bond with your Gizmo. If
you find you have irreconcilable differences, we’ll buy it back.
A word or two about safety.
The Button Gizmo is a relatively low-risk product to make, install, and use in
terms of liability. There aren’t many places things can go horribly awry safetywise.
Then again, we thought the same thing when we introduced the TubToaster, an
appliance that should have saved buyers lots of time in the morning by allowing
them to simultaneously shower and make a light breakfast. Instead - how can
we put this delicately? – it quickly eroded any future customer base and denied
a lot of people the simple pleasure of perfectly toasted rye bread.
Along with a promise to mothball our gas-powered upright vacuum (it seemed
the logical progression of the cordless concept to us) we agreed to talk about
safety, so here goes.
The Button Gizmo is intended to be installed and used by qualified personnel
only. To avoid electric shock, do not open the unit or attempt to perform any
servicing unless you are qualified to do so.
Plus, every Gadget and Gizmo is warrantied to be free from defects in parts
and workmanship for two full years after you purchase it. If it fails within this
time period, Angry Audio, at its discretion, will repair or replace it so long as
you let us know of the failure within the warranty period and can provide proof
of purchase in the form of a dated sales receipt. You can call us at +1 615-7633033, or reach us online at at www.angryaudio.com/contact.
Making a good rst impression.
When you unbox your Button Gizmo, we hope it makes a good first impression
and you take a moment to appreciate the lengths we’ve gone to in order to
create a “built for broadcast” product. All of our products are over-engineered
to provide long-term reliability and guaranteed RFI immunity. Some of this is
apparent – such as the durable powder-coated steel enclosure - but much of
this goodness is invisible, like the premium components within. Even if you can’t
see it, you’ll hear it!
While the Button Gizmo does not have its own power supply, it does receive
DC voltage from the console to which it is wired, and hazardous voltages may
be present on external components.
Do not expose your Gizmo or its power supply to rain or moisture. Any
electronic device can fail without warning; do not use this product in
applications where a life threatening condition could result due to failure.
Page 3
3 Overview and Installaon Installaon Template 4
So, what exactly did I just buy?
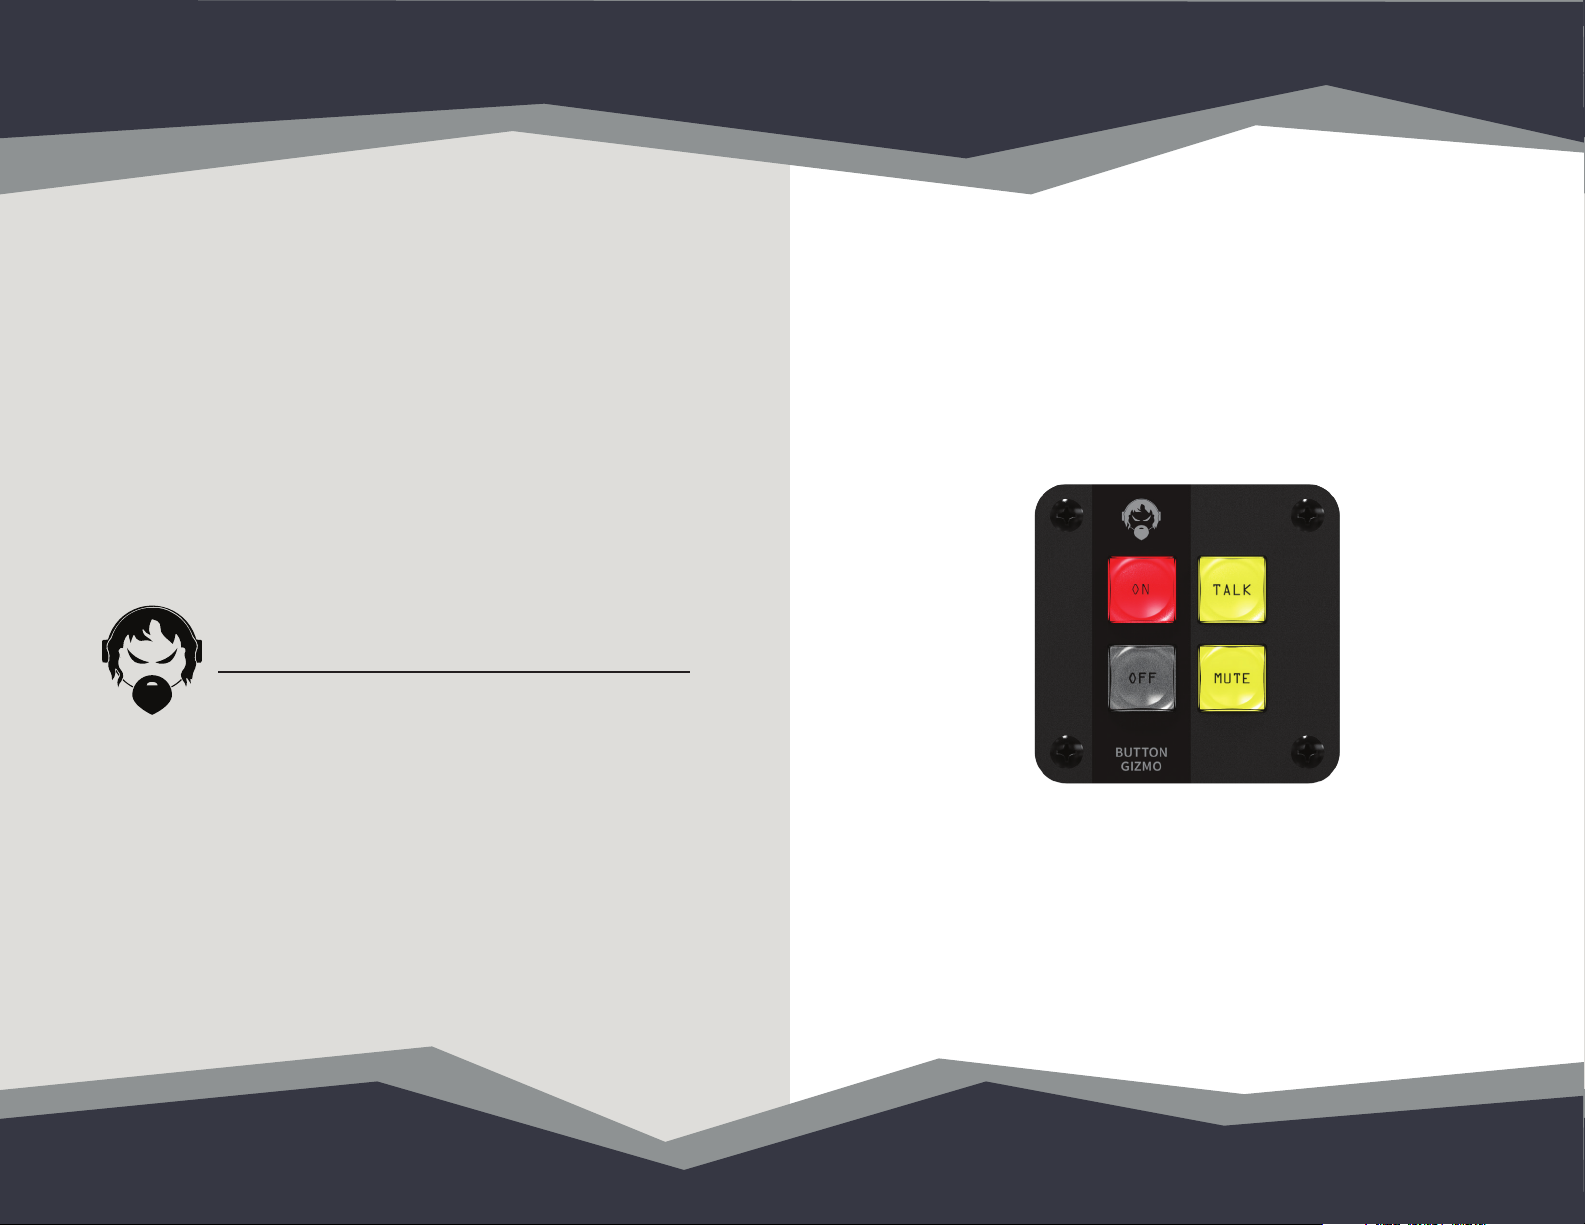
Fair question. The Button Gizmo is a guest microphone control panel with four
LED illuminated pushbuttons that elegantly mounts into your countertop. When
you push one of the buttons, something happens. Exactly what is entirely up to
you.
For example?
By default, the buttons are labeled ON, OFF, MUTE, and TALK. Thanks to
the magic of logic control, you can make them perform any task that can be
executed with GPIO. The button caps are removable so you can replace the
stock labels with your own.
Can I use it with any console?
The Button Gizmo is meant to interface with any console with GPIO logic.
Various manufacturers use different pin-outs and logic signals, so please
consult your console manual for details.
How easy is it to install?
The Button Gizmo is designed to be installed directly into your studio furniture
in a location that is practical and convenient.* The only tools required are a
power drill and a 2 1/8 inch hole saw to create the grommet hole; a router is not
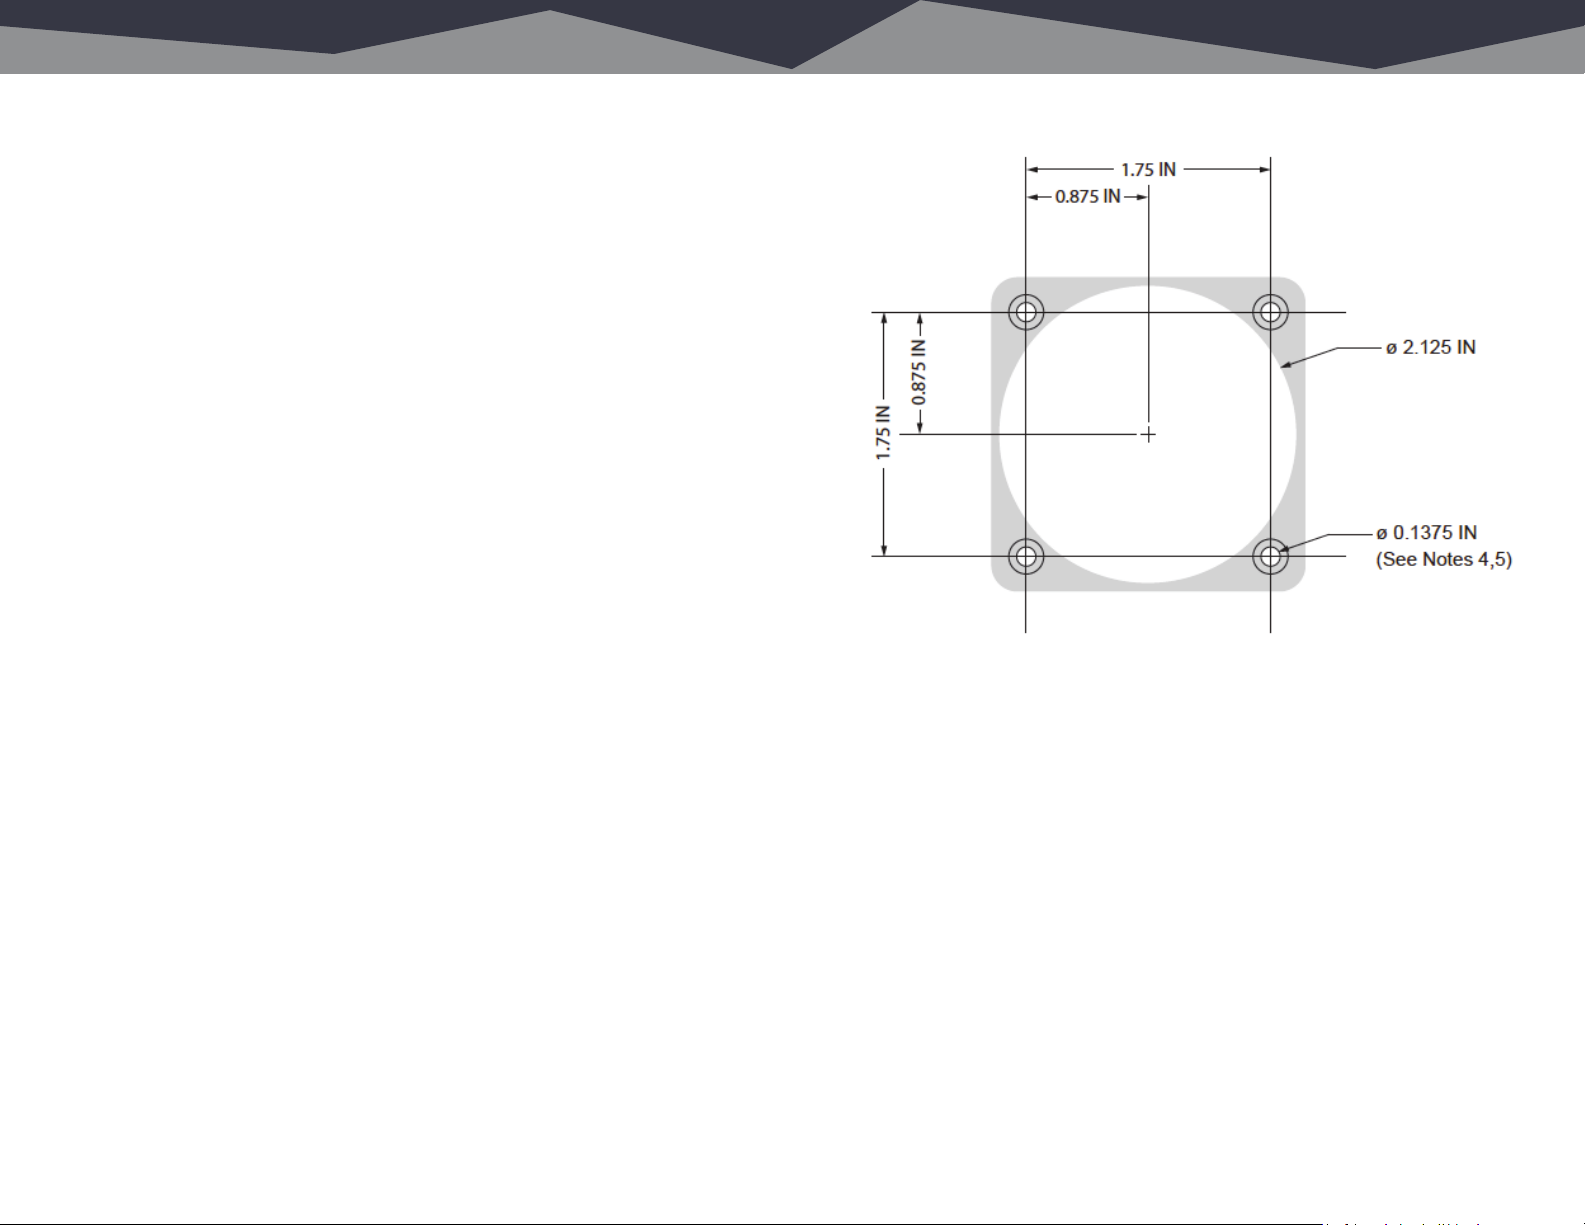
required. The Gizmo is then secured with four screws. Spacing and dimensions
are shown along with a handy to-scale template suitable for printing on Page 4.
Electrically-speaking, we include a DB15M to RJ45F adapter that is pre-wired
to work as a Guest Mic Control Panel for Axia consoles. Plug the adapter into
a GPIO port on the console or node using a standard CAT5 cable, and you’re
in business. We also throw in an RJ45F to screw terminal adapter to make
interfacing with other consoles as easy as possible.
One handy-dandy printable template.
1. This template can be used as a guide for locating holes. Your printer must
be set to print this page at 100% actual size. If your printer shrinks images
to fit the page, the dimensions will be wrong. Measure the printed page with
a ruler to make sure the printed dimensions match the actual size.
2. Once you’ve decided where you want your Button Gizmo, tape the template
to your desktop. Remember to leave at least 12 inches between the edge of
the desk facing the user and the Gizmo. Use an awl or center punch at all
five hole centers and remove the template.
* - If you want to install the Button Gizmo in a location that is impractical,
inconvenient, or both, you do you.
3. Drill the 2.125 inch diameter center hole. This hole must go completely
through the table.
4. For hardwood, plywood or MDF desktops, drill a 1/16 inch pilot hole for
each corner hole. Use the four thoughtfully included flathead wood screws
to secure the Gizmo. Do not over-tighten.
5. For desktops constructed of other materials including stone or glass or
those of a hollow (honeycomb) construction, the corner holes must be
0.1375 inch diameter through holes to allow a flathead bolt (not thoughtfully
provided) to pass through the desktop and secured with a nut (also not
provided) from beneath.
Page 4
5 Buons and Connecons RJ45 Pinout 6
5 Buttons and Connections
RJ45 Pinout 6
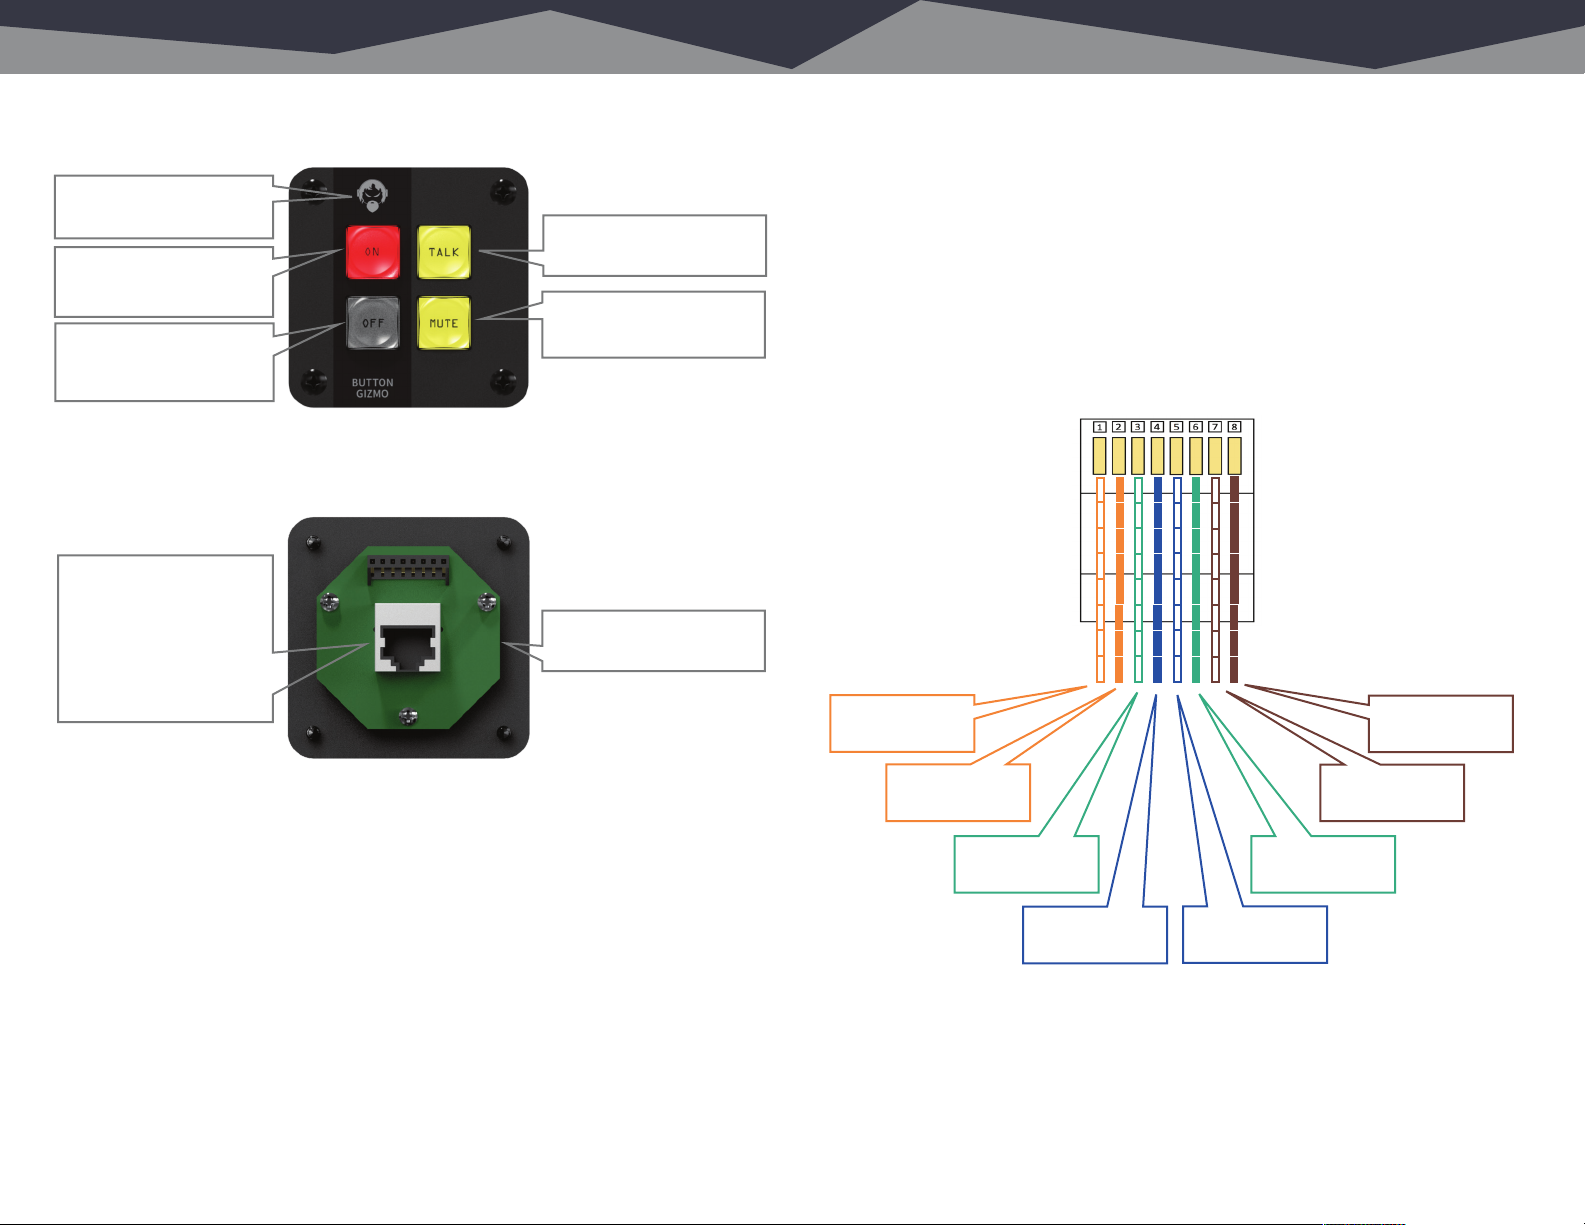
Buttons on the front.
RJ45 Pinout.
Pin 1 Button 1 Closure to common while Button 1 is pressed
Pin 2 Button 2 Closure to common while Button 2 is pressed
Pin 3 Button 3 Closure to common while Button 3 is pressed
Pin 4 Button 4 Closure to common while Button 4 is pressed
Pin 5 Lamp 1 Illuminates Button 1 LED when connected to common
Pin 6 Lamp 2 Illuminates Button 2 LED when connected to common
Pin 7 Common Connect to logic common on your GPIO port
Pin 8 V+ Connect to +5VDC or +12VDC on your GPIO port
5 Buttons and Connections
RJ45 Pinout 6
Plugs on the back.
Buttons on the front.
Button 3 – Illuminates
yellow while button is
pressed.
Button 2 – Illuminates
yellow during external
closure to common.
Button 1 – Illuminates red
during external closure to
common.
RJ45 Pinout.
Pin 1 Button 1 Closure to common while Button 1 is pressed
Pin 2 Button 2 Closure to common while Button 2 is pressed
Pin 3 Button 3 Closure to common while Button 3 is pressed
Pin 4 Button 4 Closure to common while Button 4 is pressed
Pin 5 Lamp 1 Illuminates Button 1 LED when connected to common
Pin 6 Lamp 2 Illuminates Button 2 LED when connected to common
Pin 7 Common Connect to logic common on your GPIO port
Pin 8 V+ Connect to +5VDC or +12VDC on your GPIO port
Angry Audio guy.
Everything pushes his
buttons.
Button 4 – Illuminates
yellow while button is
pressed.
1 White/Orange
Button 1
8 Brown/White
V+
RJ45 Pinout 6
RJ45 Pinout.
Pin 1 Button 1 Closure to common while Button 1 is pressed
Pin 2 Button 2 Closure to common while Button 2 is pressed
Pin 3 Button 3 Closure to common while Button 3 is pressed
Pin 4 Button 4 Closure to common while Button 4 is pressed
Pin 5 Lamp 1 Illuminates Button 1 LED when connected to common
Pin 6 Lamp 2 Illuminates Button 2 LED when connected to common
Pin 7 Common Connect to logic common on your GPIO port
Pin 8 V+ Connect to +5VDC or +12VDC on your GPIO port
Buttons on the front.
Angry Audio guy.
Everything pushes his
buttons.
Button 1 – Illuminates red
during external closure to
common.
Button 2 – Illuminates
yellow during external
closure to common.
Plugs on the back.
RJ45F connector. Use the
RJ45F to screw terminal
adapter to connect to any
console with GPIO logic,
or the RJ45F to DM15M
adapter for Axia consoles.
Both are included.
Connections.
The Button Gizmo is designed to behave as a plug-and-play Guest Mic Control
Panel for Axia consoles. You will need one available GPIO port for each Button
Gizmo. Simply plug the included RJ45F to DB15M adapter into the back of the
Button Gizmo, then connect it to the GPIO port with a standard CAT5 Ethernet
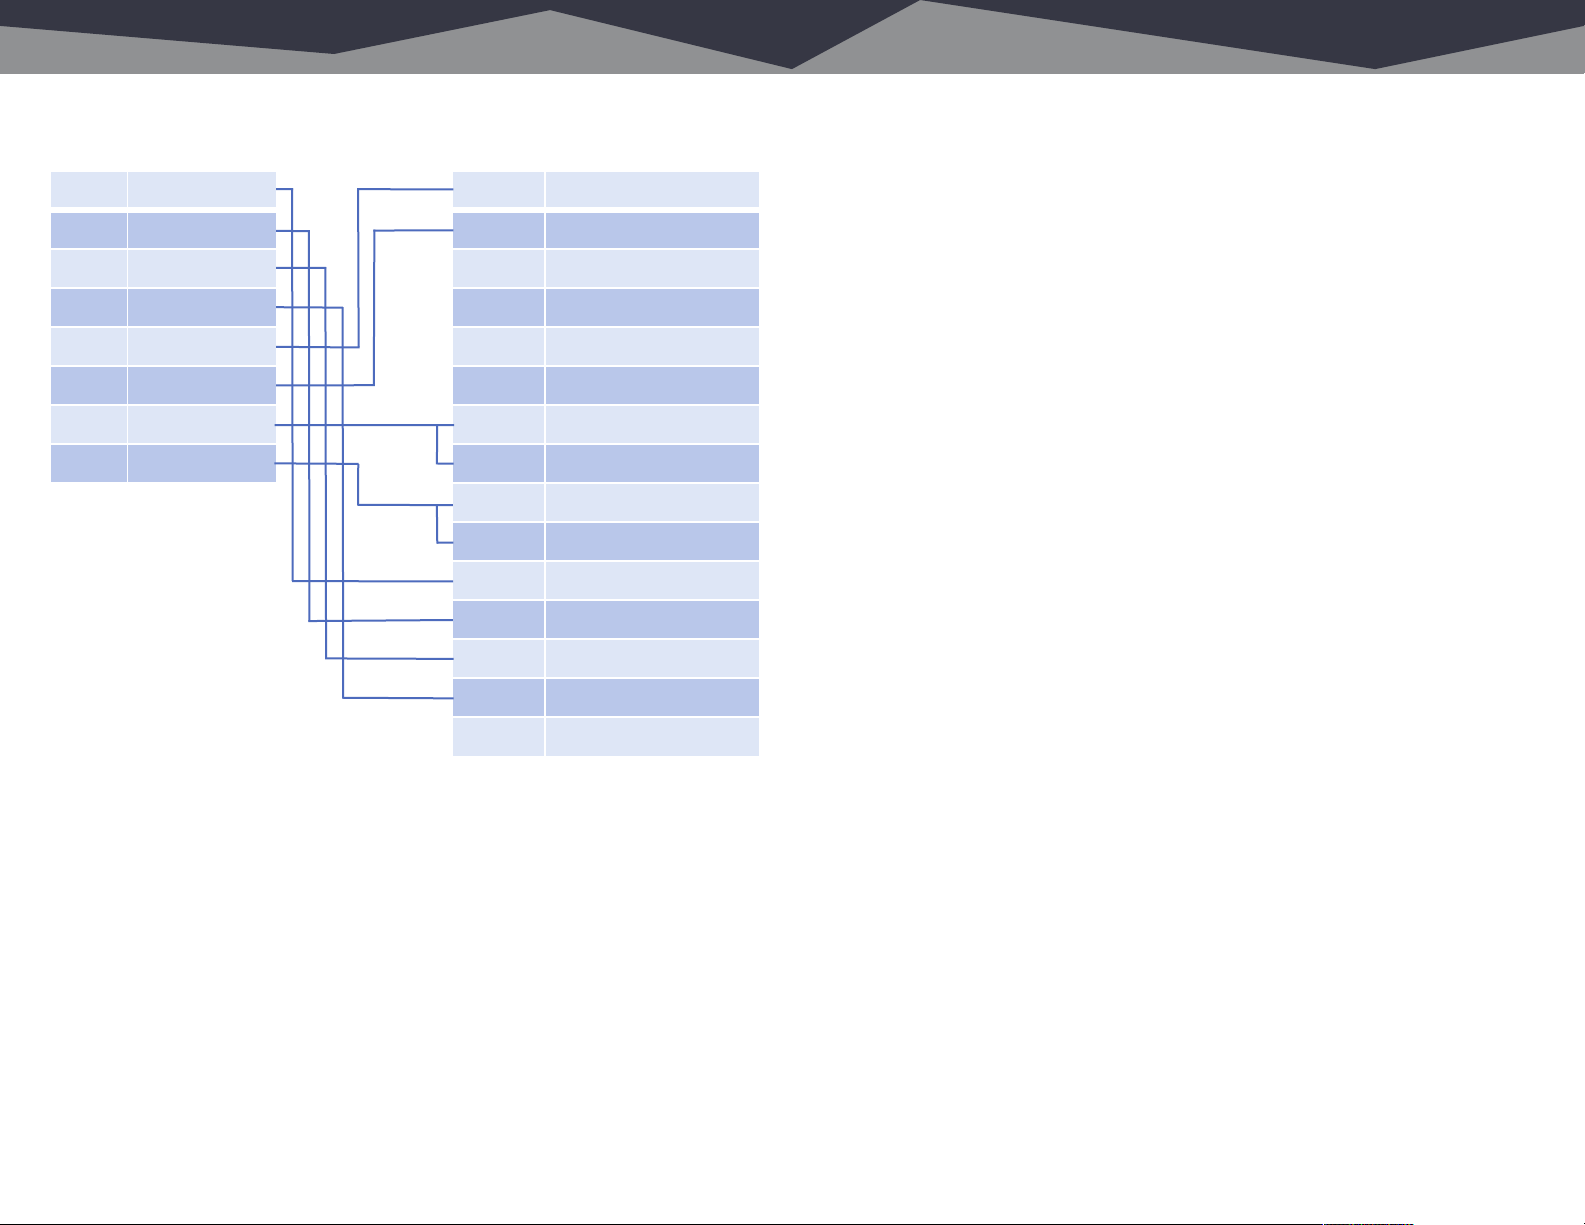
cable. For the curious, a breakout of the wiring is provided on Page 7.
Other manufacturers use different pin-outs and logic signals, so please consult
your console manual for details and refer to the RJ45 pinout on Page 6. We’ve
thoughtfully included an RJ45F to screw terminal breakout adapter to make
things easier.
Button 3 – Illuminates
yellow while button is
pressed.
Button 4 – Illuminates
yellow while button is
pressed.
Installs easily into a 2 1/8”
round hole.
RJ45 Pinout.
Pin 1 Button 1 Closure to common while Button 1 is pressed
Pin 2 Button 2 Closure to common while Button 2 is pressed
Pin 3 Button 3 Closure to common while Button 3 is pressed
Pin 4 Button 4 Closure to common while Button 4 is pressed
Pin 5 Lamp 1 Illuminates Button 1 LED when connected to common
Pin 6 Lamp 2 Illuminates Button 2 LED when connected to common
Pin 7 Common Connect to logic common on your GPIO port
Pin 8 V+ Connect to +5VDC or +12VDC on your GPIO port
1 White/Orange
Button 1
2 Orange/White
Button 2
3 White/Green
Button 3
4 Blue/White
Button 4
6 Green/White
5 White/Blue
Lamp 1
Lamp 2
8 Brown/White
V+
7 White/Brown
Common
Page 5
7 RJ45 to DB15 Wiring Specicaons and Compliance 8
7 RJ45 to DB15 Wiring
Specifications and Compliance 8
Wiring for Axia GPIO Port to Button Gizmo Logic.
Riveting data about your Gizmo.
PPaarrtt NNuummbbeerrss
Button Gizmo Part No. 991029
CCoonnnneeccttiioonnss
RJ4F
PPoowweerr aanndd EEnnvviirroonnmmeennttaall
Power Consumption at 5VDC 250mW
Power Consumption at 12VDC 500mW
Operating Temperature 0º to 40º C (32º to 104º F)
Storage Temperature -20º to 45º C (-4º to 113º F)
Relative Humidity 0% to 90% non-condensing
Mounting Hole Diameter 2 1/8”
PPrroodduucctt DDiimmeennssiioonnss
Width x depth x height 2.25 x 1.00 x 3.25 in., 5.72 x 2.54 x 8.26 cm.
SShhiippppiinngg WWeeiigghhtt && DDiimmeennssiioonnss
Width x depth x height 4.00 x 4.00 x 3.00 in., 10.16 x 10.16 x 7.62 cm.
Shipping Weight 1.0 pound, 0.46 kilograms
Compliance in the U.S.
Wiring for Axia GPIO Port to Button Gizmo Logic. Riveting data about your Gizmo.
Pin 1 On Switch
Pin 2 Off Switch
Pin 3 Talk Switch
Pin 4 Mute Switch
Pin 5 On Tally
Pin 6 Off Tally
Pin 7 Logic Common
Pin 8 +5VDC
Pin 1 On Tally Lamp
Pin 2 Off Tally Lamp
Pin 3 Talk Tally Lamp
Pin 4 Mute Tally Lamp
Pin 5 Not Connected
Pin 6 Not Connected
Pin 7 Source Common
Pin 8 Logic Common
Pin 9 Logic +5VDC Supply
Pin 10 Source Supply
Pin 11 On Command
Pin 12 Off Command
Pin 13 Talk (to CR) Command
Pin 14 Mute Command
Pin 15 Not Connected
Part Numbers
Button Gizmo Part No. 991029
Connections
RJ4F
Power and Environmental
Power Consumption at 5VDC 250mW
Power Consumption at 12VDC 500mW
Operating Temperature 0º to 40º C (32º to 104º F)
Storage Temperature -20º to 45º C (-4º to 113º F)
Relative Humidity 0% to 90% non-condensing
Mounting Hole Diameter 2 1/8”
Product Dimensions
Width x depth x height 2.25 x 1.00 x 3.25 in., 5.72 x 2.54 x 8.26 cm.
Shipping Weight & Dimensions
Width x depth x height 4.00 x 4.00 x 3.00 in., 10.16 x 10.16 x 7.62 cm.
Shipping Weight 1.0 pound, 0.46 kilograms
Compliance in the U.S.
In the U.S., this Gizmo complies with the limits for a Class A computer device
as specified by FCC Rules, Part 15, Subpart J, which are designed to provide
reasonable protection against such interference when this type of equipment is
operated in a commercial environment.
…and in Canada.
In Canada, this Gizmo does not exceed the Class A limits for radio noise
emissions set out in the Radio Interference Regulations of the Canadian
Department of Communications.
…and in Europe.
This Gizmo complies with the requirements of the EEC Council Directives
93/68/EEC (CE Marking), 73/23/EEC (safety – low voltage directive), and
89/336/EEC (electromagnetic compatibility). Conformity is declared to
standards EN50081-1 and EN50082-1
Page 6
9 Schemac Schemac 10
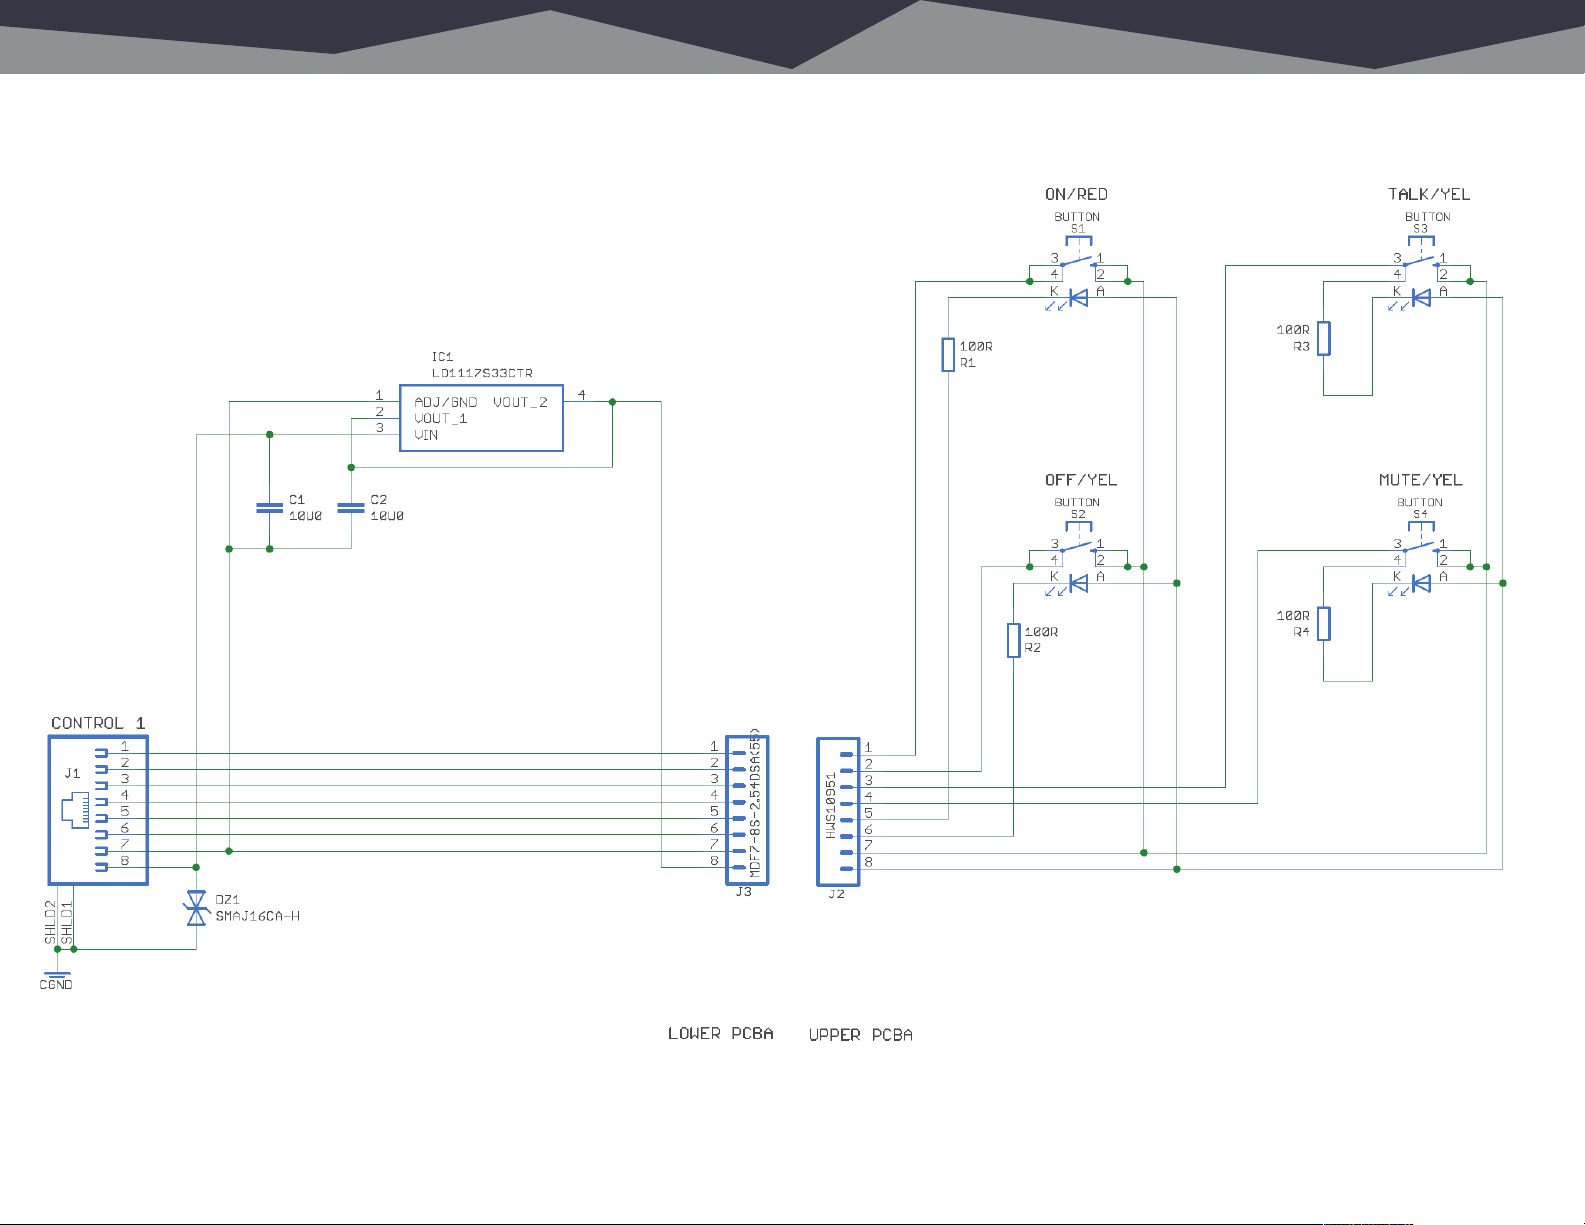
Top secret information – shhhh.
 Loading...