

Page 1
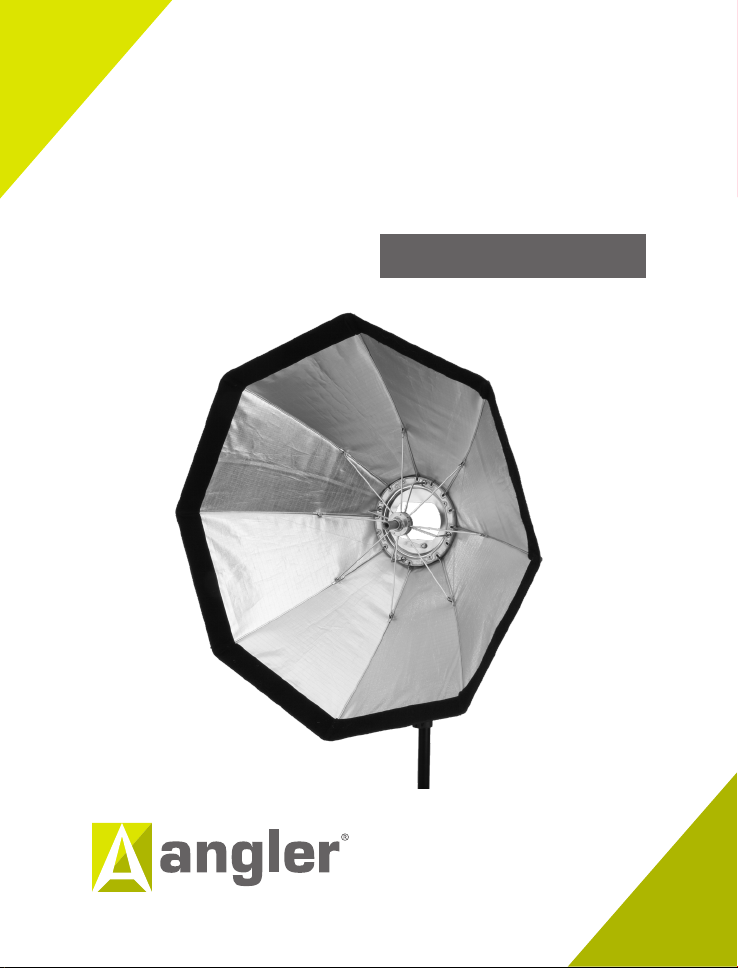
BoomBox for Bowens Mount
BB-36DB
BB-48DB
INSTRUCTIONS
Page 2
Setting Up the BoomBox
1. For Monolights and studio strobes with Bowens mounts, align the mounting
tabs with the Bowens mount and insert the BoomBox into the Bowens mount.
Turn the BoomBox clockwise until it locks.
2
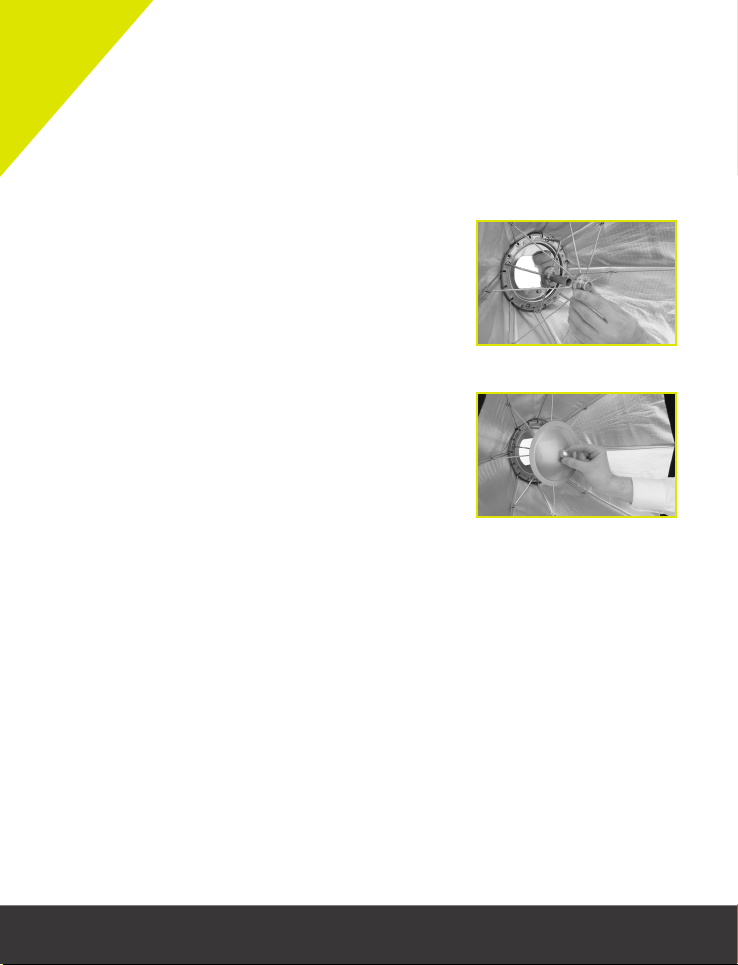
2.
Open the BoomBox, and push the center ring
over the shaft until it’s all the way in, just like
an umbrella.
Tip: You may find it easier to hold the base of the
shaft through the side opening while pushing the
center ring over it.
Optional: Attach the deflector plate to the shaft with
the thumbscrew. The deflector plate minimizes the
hot spot at the center of the box and diuses the light
for beauty dish-style wraparound light.
Try experimenting with the curved side of the deflector facing out or in, to see
which orientation gives you the lighting that’s best for your exposure.
Deflector Extension (BB-48DB Only)
The deflector extension moves the deflector further away from the BoomBox’s
interior for a wider and more even light spread. To install the deflector on the
extension, follow these steps:
1.
Open the BoomBox, and screw the threaded end of the extension into the
shaft.
2. Attach the deflector to the extender with the thumbscrew.
Page 3

Attaching the Diusers
Changing the Adapter Ring
Adapter Rings for Broncolor, Elinchrom, and Profoto are available separately.
1.
Four Philips screws and washers secure the
adapter ring to the BoomBox. Pull back the
fabric, and use a Phillips screwdriver to remove
the screws and washers.
Tip: The BoomBox fabric is stretched tightly around the ring. Don’t be afraid to use a
little force to pull the fabric back to reveal the screws.
2. Slide the adapter ring out of the BoomBox.
3.
Pull back the fabric and insert the replacement
adapter ring.
4.
Replace the washers and screws, and tighten
them to secure the ring to the BoomBox.
2
3
4
1
The inner and outer diusers add two levels of diusion that soften and spread the
light for an even and flattering eect. The diusers can be used with or without
the deflector plate.
1.
Attach the inner diuser by connecting the diuser’s clips to the elastic loops
inside the BoomBox.
2.
Attach the outer diffuser by pressing the
touch-connect strips against the inner rim of
the BoomBox.
2
Removing the BoomBox
To remove the BoomBox from a Bowens mount:
1. Press the light fixture’s Bowens release.
2. Turn the BoomBox counterclockwise and remove it from the light.
3.
If necessary, remove the diuser, deflector, and extension. Then close the
BoomBox by carefully pulling on the center ring.
Page 4

Changing the Adapter Ring
Adapter Rings for Broncolor, Elinchrom, and Profoto are available separately.
1.
Four Philips screws and washers secure the
adapter ring to the BoomBox. Pull back the
fabric, and use a Phillips screwdriver to remove
the screws and washers.
Tip: The BoomBox fabric is stretched tightly around the ring. Don’t be afraid to use a
little force to pull the fabric back to reveal the screws.
2. Slide the adapter ring out of the BoomBox.
3.
Pull back the fabric and insert the replacement
adapter ring.
4.
Replace the washers and screws, and tighten
them to secure the ring to the BoomBox.
1
2
3
4
Page 5

SPECIFICATIONS
BB-36DB BB-48DB
Size 36 in. (91.4 cm) 48 in. (121.9 cm)
Shape Octagonal Octagonal
Compatibility
Removable Front Diffuser Yes Yes
Accepts Grid Yes Yes
Requires Speed Ring No, provided No, provided
Diameter 36 in. (91.4 cm) 48 in. (121.9 cm)
Weight 2.65 lb. (1.2 kg) 3.4 lb. (1.54 kg)
Lights with Bowens
mount
Lights with Bowens
mount
Recommended Accessories
Angler Grid for the BB-36DB BoomBox
• BB-G36
Angler Grid for the BB-48DB BoomBox
• BB-G48
Adapter Ring for Broncolor
• BBAR-BRL
Adapter Ring for Elinchrom
• BBAR-EL
Adapter Ring for Profoto
• BBAR-PRO
Page 6

INSTRUCTIONS
BoomBox for Bowens Mount
BB-36DB
BB-48DB
ANGLER
A Gradus Group
Brand
One-Year Limited Warranty
This Angler product is warranted to the original purchaser to be free from defects in
materials and workmanship under normal consumer use for a period of one (1) year from
the original purchase date or thirty (30) days after replacement, whichever occurs later.
The warranty provider’s responsibility with respect to this limited warranty shall be limited
solely to repair or replacement, at the provider’s discretion, of any product that fails
during normal use of this product in its intended manner and in its intended environment.
Inoperability of the product or part(s) shall be determined by the warranty provider. If the
product has been discontinued, the warranty provider reserves the right to replace it with
a model of equivalent quality and function.
This warranty does not cover damage or defect caused by misuse, neglect, accident,
alteration, abuse, improper installation or maintenance. EXCEPT AS PROVIDED
HEREIN, THE WARRANTY PROVIDER MAKES NEITHER ANY EXPRESS
WARRANTIES NOR ANY IMPLIED WARRANTIES, INCLUDING BUT NOT
LIMITED TO ANY IMPLIED WARRANTY OF MERCHANTABILITY OR FITNESS
FOR A PARTICULAR PURPOSE. This warranty provides you with specific legal rights,
and you may also have additional rights that vary from state to state.
To obtain warranty coverage, contact the Angler Customer Service Department to obtain
a return merchandise authorization (“RMA”) number, and return the defective product
to Angler along with the RMA number and proof of purchase. Shipment of the defective
product is at the purchaser’s own risk and expense.
For more information or to arrange service, visit www.anglerlights.com or call Customer
Service at 212-594-2353.
Product warranty provided by the Gradus Group.
www.gradusgroup.com
Angler is a registered trademark of the Gradus Group.
© 2020 Gradus Group LLC. All Rights Reserved.
GG1
 Loading...