

Page 1
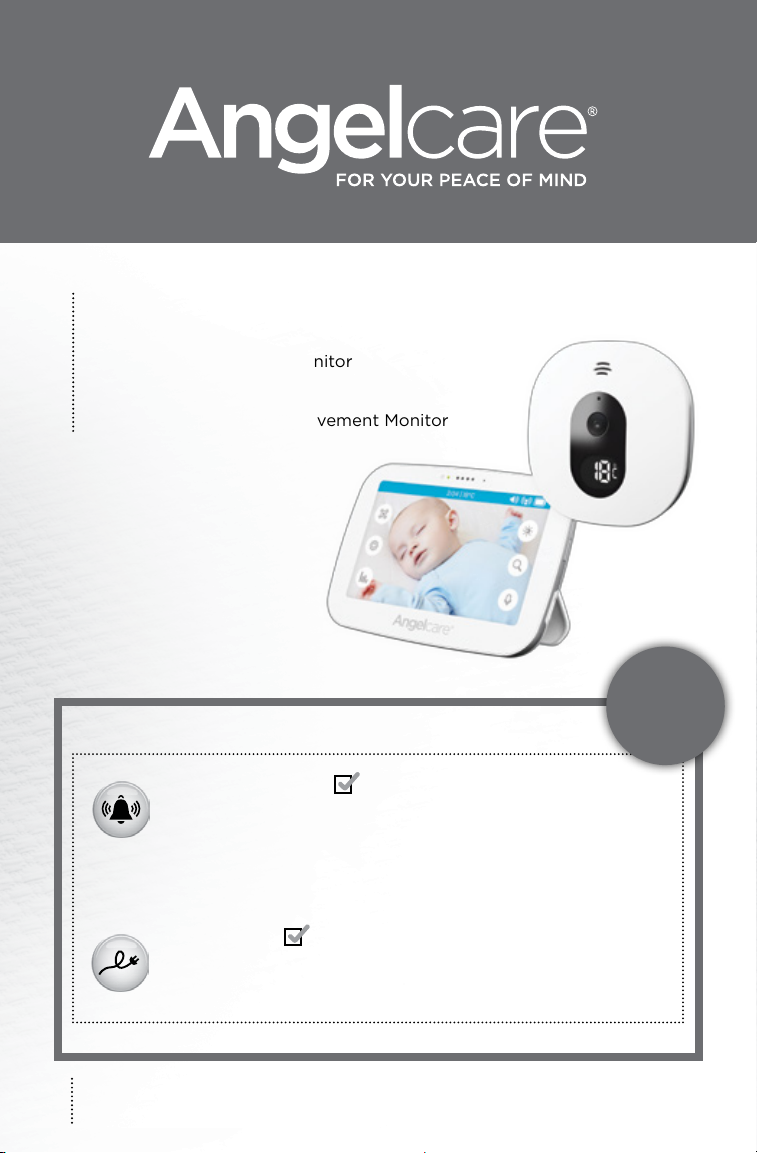
OWNER’S MANUAL
Model AC510
Baby Video and Sound Monitor
Model AC417, AC517
Baby Video, Sound and Movement Monitor
IMPORTANT ADVICE FOR INITIAL SETUP
Movement Alarm
Your monitor comes with the movement alarm activated.
When switching on your monitor it will alarm, with or without
the Sensor Pad plugged in, if no movement is detected.
Deactivate the movement function to use the monitor without
the Sensor Pad.
DON’T
FORGET
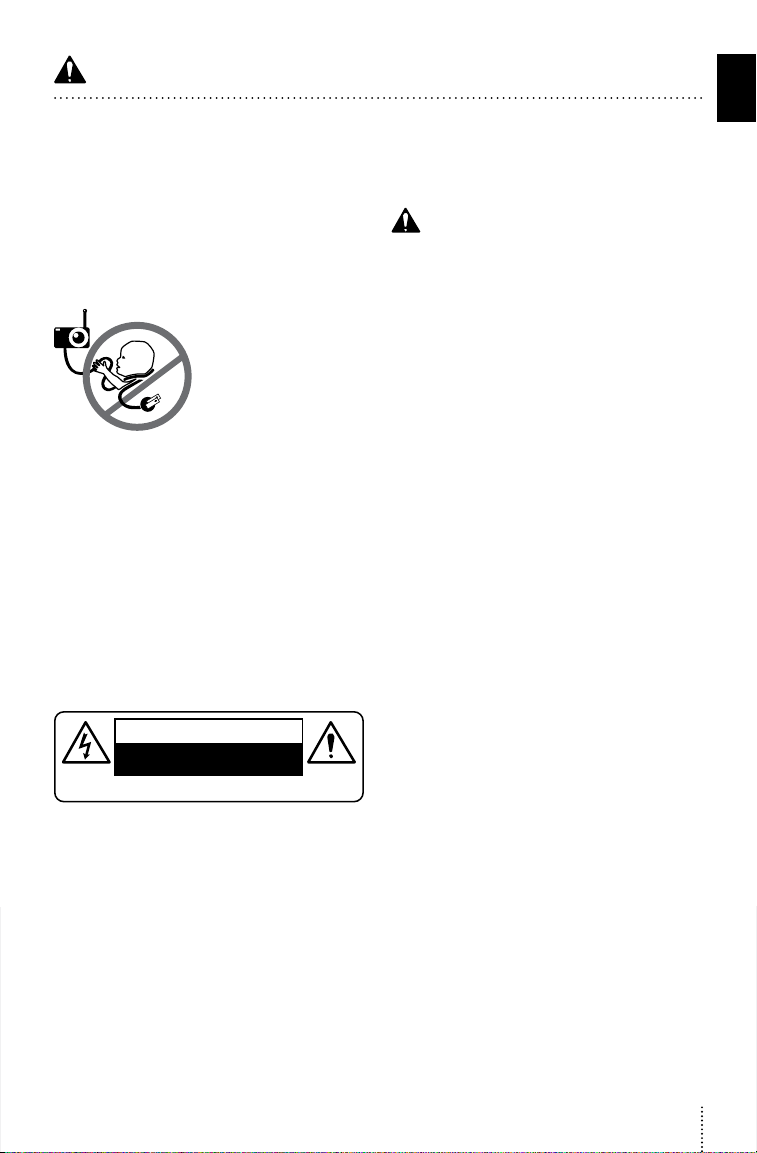
Cord Safety
Ensure the Nursery Unit is at least 1 metre away from your
baby’s cot. The Sensor Pad cord must always be kept out of
reach of baby and secured using the cord cover kit provided.
PLEASE FOLLOW THE INSTRUCTIONS CAREFULLY FOR CORRECT SETUP
Please DO NOT return this product to the store. For assistance please
contact our helpline on 0345 009 1789 or email [email protected]
Mon – Fri 10am – 4pm, excluding bank holidays.
Page 2

TABLE OF CONTENTS
WARNINGS ..................................................................................................................................................3
SETUP REQUIREMENTS ...................................................................................................................................5
STEP 1 - Charging the Parent Unit (9 hours) .............................................................................................6
STEP 2 - Positioning the Movement Sensor ..............................................................................................7
STEP 3 - Setting up the Camera ....................................................................................................................8
STEP 4 - Getting to know your monitor ................................................................................................... 12
STEP 5 - Activating and deactivating additional functions ............................................................... 16
STEP 6 - Adding accessories .......................................................................................................................26
Troubleshooting ............................................................................................................................................... 28
Limited warranty ..............................................................................................................................................29
Technical specifications ................................................................................................................................. 29
OWNER’S MANUAL
KEEP YOUR OWNER’S MANUAL FOR FUTURE REFERENCE.
PLEASE READ THE WARNINGS AND INSTRUCTIONS CAREFULLY BEFORE ASSEMBLING
& USING THE PRODUCT.
FAILURE TO FOLLOW THE WARNINGS AND THE INSTRUCTIONS COULD RESULT IN
SERIOUS INJURY OR DEATH OR DAMAGES TO THE PRODUCT.
THE SENSOR PAD FEATURE IS NOT FOR USE WITH ADULTS, CHILDREN OR INFANTS
OLDER THAN 24 MONTHS.
THE SENSOR PAD IS NOT INTENDED TO BE USED TO DETERMINE IF A CHILD IS OUT OF
THE CRIB.
WARNING
Adult assembly required.
Keep small parts away from children when assembling.
We, at Angelcare®, stand behind all of our products.
If you are not completely satisfied or have any questions,
United States and Canada: Please contact us at: [email protected]
Other countries: Please contact your local distributor.
FCC AND IC REGULATIONS
RF radiation exposure statement
The Camera complies with FCC RF radiation exposure limits set forth for an uncontrolled environment.
Caution: To maintain the compliance with the FCC’s and Industry Canada’s RF exposure guideline, install the
Camera at least 20 cm from ALL persons. The transmitter of this device must not be co-located or operating
in conjunction with any other antenna or transmitter.
Industry Canada
This product meets the applicable Industry Canada technical specifications.
CAN ICES-3 (B)/NMB-3 (B)
2
Page 3
WARNINGS
1. THIS PRO DUC T CANN OT REPLAC E
RESPONSIBLE ADULT SUPERVISION. This product
is des igne d to aid in the monitorin g of you r chil d.
Wh e n u si ng th e m o ni t or , yo u mu st st i ll pr o vi d e t he
super visi on necessa ry for the continued safety
of your ch ild. Monito ring of premature babies,
or thos e consi dere d to be at risk, should always
be carried ou t unde r the sup erv ision of a health
profes sional. Th is mo nitor S HOU LD N OT be used
as a medical devi ce, nor as a device to p revent
Sudden Infant Death Syndrome (SIDS).
WARNIN G Strangul ation Hazard — Chil dren
2.
have STRAN GLED in c ords . Keep adapter cords
damaged or broken.
3. Ne ve r use ex te n s io n co rd s wit h a da p te rs. ON LY
use the adap ters provi ded.
4. When an ada pter is plug ged into an electric al
outlet , D O N OT touch the expos ed end.
5. ALWAYS be sure that bo th the t ransmitter and
re c ei v er ar e work i ng pr o p er l y a nd ar e wit h i n ra nge
of eac h other. Test the mon itor before firs t use ,
perio dica lly and when changin g location of the
Camera.
6. ALW AYS be su re to im m edi a te l y c hec k on ba by
whenever an alarm sounds.
7. DO N OT use monitor ne ar w ater (such as b ath
tub, sink , e tc.).
out of the reach of
child ren (more than 1
me te r awa y) . N E VE R use
Senso r Pa d(s) witho ut
the protec tive cord
covering . Check
protective cord covering
before each use.
Immediately discontinue
use of Sensor Pad(s) if
protective covering is
CAUTION
RISK OF ELECTRIC SHOCK
DO NOT OPEN
DO NOT EXPOSE TO RAIN OR MOISTURE
8. Kee p monitor AWAY fro m heat sources (such
as s toves, rad iators, etc.).
9. ALWAYS pl a ce bo t h th e Cam era an d t he Pa r e nt
Unit on a flat su rfa ce in an up right position and
allow for proper ventilation. DO NOT plac e on
sofas , cushion s, b eds, etc. whic h may block
ventilation.
10. This monitor uses public air waves to transmit
signa ls. The Parent Unit may pick up sign als or
interference from other nursery monitors in your
area. Yo ur monitor may even be picked up by
other hou seho lds. To protect your pri vacy, make
sure both u nits are turned OFF when no t in u se . If
you experience interference, change the channel
on b oth units.
11. This pro duct is NOT a toy. DO NOT allow
child ren to p lay w ith it.
12. This pro duct cont ains small p arts. Ad ult
assembly required. Exercise care when unpacking
and assembling the product and keep small parts
away f rom children.
13. Wh e n usin g the mo n i to r, th e ro om te mpe r atu r e
shoul d b e betwee n 1 0°C and 40 °C.
BATTERY WARNING
14. Th e P ar en t U ni t ba t te ry is a rep lac ea bl e L i- Ion
battery. Only use the Angelcare recommended
replacement battery. Danger of explosion if the
wrong battery is used or if replace d inco rrectly.
Refer to your user manual for correct batte ry
in s t a ll a t io n. DO N OT sh o r t ci r c ui t su p pl y te rm ina l s .
Only use the Ange lcar e p rovide d p ower ada pter
to charge the battery. Remove the battery from
your Parent Un it if pro duct is to be stored f or a n
extended period of time. Dispose of batteries
ac c or d i ng to you r lo c al or d in a n ce s. ALWAY S ke ep
all batte ries away from childre n.
15. IMP ORTANT SAF ETY IN STRUCTI ONS
15.1 He ed all war nings – All warni ngs on the
produ ct a nd i n th e op erating in struction s sh ould
be a dhered to.
15. 2 Follow all ins truc tions – All ope rating and
use instr uctions shou ld be f ollowe d.
15. 3 Water and moi sture - DO NOT use t his
apparatus near water. For example, near a bath
tub , wash bowl , ki tch e n si nk , lau nd ry tub, i n a we t
environment or near a swimming pool and the
like. Car e should be take n so that object s DO NOT
fall o nto units an d that liqu ids a re not s pill ed into
either un it or S enso r Pad t hroug h its openings .
15.4 Cleaning - Disconnect all units b efore
clean ing. DO NOT imm erse in w ater any pa rt of
the monito r. Clean only with dr y cloth.
15.5 Ventilation - DO NOT bl ock any ventilation
op en in gs. All ow for pr op er ve ntil atio n wh en un it s
ar e in u se . DO NOT co ve r th e C am era or t he Pa r ent
Unit with any object su ch as a blan ket. DO NOT
pl ace it i n a d ra we r o r i n an y l oc a ti o n wh i ch wo ul d
mu f fl e the so u nd or in te r f ere with th e n or m a l flow
of ai r.
15.6 Heat sources - DO NOT install near any heat
source s such as radiators , heat regis ters , s toves,
TVs or other ap para tus (includin g ampli fiers)
that produce heat. He at c an dama ge the case or
electrical parts.
15.7 Power cord protec tion - Protec t the Sensor
Pad cord and Adapter’s power cord from be ing
wa l ke d on or p inc h e d by fu rni tu re or ot he r ite ms –
Po we r sup ply cor d s sh o ul d be r ou te d s o th a t th e y
are no t li ke ly to be walke d o n or pi nc he d by ite ms
upon o r ag ai ns t th em , p aying pa rt ic ul ar a tt entio n
to cords and plugs, conven ienc e re cepta cle, an d
the point whe re they exit from th e prod uct .
The soc ket outl et shal l be installe d near the
equipment and shall be easily accessible. Make
sure to plug the adapter to the socket outlet
neare st to the eq uipment a nd th at is easily
accessible. To disconnect from mains, unplug
the adapter.
E
N
3
Page 4

15.8 Accessories - Only use attachments/
accessorie s specified by the manufacture r. DO
NOT place this product o n an unst able c art,
stand, tripod, bracket or ta ble. Th e pr oduc t m ay
fall, causing seri ous injury to a child or a dult and
serio us da mage to th e pro duct . Use ONLY with a
cart, stand, tripod, bracket or table recommended
by the man ufac turer or sold with the product.
Any mounting of the product should follow the
manufacturer’s instructions.
15.9 Unplug this appliance during lightning storms
or w hen not use d fo r long peri ods of time.
15.10 Se rvic ing - DO NOT attemp t to service
this produ ct yourse lf as opening or removi ng
covers (except bat tery door) may expose you to
dangerous volt age or othe r hazards.
15.11 Replacement parts - When replacement
par t s are requi re d, be sure the rep la cement par ts
specified by the manufacturer have the same
chara cteristic as th e orig inal part. Unauthorized
substi tution may result in fire , el ectric shock or
other haza rds.
15.12 Usage - This baby monitor is intended as
an a id. It is NOT a su bstitu te for responsibl e and
prope r ad ult s uper vision and sh ould not be u sed
as such . Use th is app liance ONLY for its intended
use as descr ibed in this ma nual .
15.13 Powe r S ource s - Op erate thi s p roduct only
from the type of power source indicate d on th e
type plate of the adapto r.
type of powe r sup ply to your home , con sult your
deale r o r local powe r company.
15.14 Over loading - DO NOT ove rload wall
outlet s, extensio n cords or integral convenience
recept acles as this ca n res ult in a risk of fire or
electric shock.
15.15 Object an d Liqui d Entry - NE VER push
objec ts of any kind into this product through
ca s i ng sl o ts as th e y m ay to uc h da n ge rou s vol t age
po in ts or s ho r t ou t par ts th at cou ld re su lt in a r is k
of fire o r electric shock. NE VER s pill l iquid of any
kind on the product.
15.16 Antenna - The anten na used for this
transmitter must be installe d to provide a
separ ation dista nce of at leas t 20 cm from all
perso ns and must not be collocated or operati ng in
co n ju nct i on wi th an y o th e r a nte n na or tr a ns m itt e r.
15.17 Power Lines - An outside antenna system
sh ou ld NOT b e loc ated i n th e vicinit y of ove rh ea d
po wer li n es or ot h er el e c tr i c l ig ht or po we r ci rc u it ,
or wh e re it ca n f all in to su c h p ow e r li n e s o r ci r cui t s
as contac t w ith them may be fata l.
15.18 Vib ratio n Source - When the monito r is
in use, DO NOT use a crib mobile or other crib
accessories that may produce vibrations. Other
source s of vibrations may includ e fan s, washing
machi nes, loud musi c, etc . The se sources o f
vibration may interfere with the pe rfor manc e of
your Angelc are® monitor and the al arm wil l not
sound if it con tinue s to detect any movement
other th an your b aby’s . Be sure a ll vibr ation
source s a re e limin ated befo re using the mo nitor.
Yo u ma y ex pe r ie n ce fa ls e a l a rm s fo r se v e ra l re a so n s.
The most com mon reas on is t he Camera has not
been turne d OFF a f t e r yo u ha v e re m ov ed yo u r b a by
from the cri b. Another reason is the Sensor Pa d
has not be en p la ced un de r th e ma tt res s prop er ly.
Be sure the S enso r Pad is on a flat, firm s urface
If you a re uns ure of the
4
with the printed side fa cing up. The sensitivity
level may also n eed to be adjusted. Refer to Step
5.1. Alw ays be sur e to im me di at el y ch eck o n ba by
whenever an alarm sounds.
15.19 Se nsor Pa d - Your Sen sor Pad ca n b e used
in any cri b that is stati onar y. If the crib has a
sprin g or slat base, place a hard board b etwee n
the crib ba se and the Senso r Pad measurin g
at least 33 x 33 cm and 6 mm thick . Only use
you r A ng el ca re ® m on ito r i n a st at io na r y sl ee pin g
environment suc h as a cri b where the Sensor
Pad can rest on a comp letely flat, firm surface.
The Se nsor Pad is made of plas tic and does not
permi t the air to circulate . Therefo re, mild ew
build up could develop u nder neath th e mattr ess
in the Sen sor Pad ar ea. We sugg est rotating
the mattres s regular ly to prevent any mildew.
16. IMPOR TANT SAFET Y IN STRU CTIONS
REL ATED T O USE OF B ATTERIES
16.1 Use ONLY the type and size of batteri es
speci fied in the owner ’s manual. There is a r isk
of explosio n if batterie s are replace d with an
incorrect type.
16. 2 C harg e th e b attery for 9 h ours pr ior to first
use. Be sur e to have the monitor in the OFF
po s it i o n du rin g thi s pe ri o d . O N LY us e th e ada p te rs
included with your monitor.
16. 3 DO NOT use th ese adapters with any other
equipments.
16.4 When unplugging the adapter from the
Came ra, be sure it is switched to the OFF pos i ti o n .
If it isn’t, the unit will rever t to batter y mo de if
batteries are installed.
16. 5 DO NOT use rechargea ble batteri es in the
Came ra. Use alkalin e batteri es ONLY.
16.6 DO NOT disp ose bat teries i n fi re. They may
ex plo d e . C he ck wi th lo c a l reg u l at i ons fo r p oss i ble
special disposal instructions.
16.7 Exercise care i n hand ling batteries in order
not to sho rt out the bat terie s with con ducting
materi als such as rings , br acele ts a nd keys.
Overcharging, short circuiting, reverse charging,
mutila tion, or incineration of bat terie s must be
avoided to prevent on e o r m ore of the following
occ ur ren ce s: r eleas e of toxi c ma ter ia ls , re le ase of
hydroge n and/or oxygen, g as and rise in surface
temperature.
16. 8 DO NOT atte mpt to recha rge b atteries
provide d with o r iden tifie d for us e with th is
produ ct that are not intended to be charged.
The batteries may lea k corrosive electro lyte or
explode.
16.9 DO N OT atte mpt to rejuve nate the ba tteri es
provide d with o r iden tifie d for us e with th is
product by heating them. Sudden release of
battery electroly te may occur, cau sing burns or
irrita tion to eyes or s kin.
16.10 If and when necessary, the batteries must
be re pl a ce d w it h i de n ti c al ne w o ne s or e qu i va l en t
(volts and size). If a battery to be replaced is
conne cted with oth er batte ries in ser ies, re place
the othe r batteries at the s ame tim e as well. DO
NOT m ix o ld and new batteries.
16.11 Revers e pol arit y installation o f the b atteries
in the end product mus t be avoided. Revers e
Page 5
inser tion of batterie s can cause charging , and
that may resul t in le akage or exp losio n.
16.12 R em ove bat t er i e s fro m both un it s if yo u sto re
the pro duct over 30 days b ecau se the batteries
could leak and damage the product.
16.13 D isc ard ‘d ead ’ batter ies a s soo n as possi ble
since ‘dea d’ bat teries ar e more likely to lea k in a
pr o duc t. If a ba tt e r y h as le a ke d or ve nt e d , it sh o ul d
be re pl aced imme di ate ly u sing prote ct ive glov es .
16.14 DO NOT s tore thi s prod uct, or the batte ries
provide d with o r iden tifie d for us e with th is
product, in high-temperature areas.
WARNING
17.1 Warning: Changes or modifications to this
equip ment not ex press ly app roved by the party
respo nsibl e fo r compli ance could vo id the user ’s
autho rity to oper ate t he equipment .
17.2 NOTE: This equipment has been tested
and found to comply with part 15 of the FCC
Rules and the Industry Canada license-exempt
RSS stand ard(s). These limit s are designed to
provide reasonable protection against harmful
interference in a residential installation. This
equipment generates, uses and can radiate radio
frequ ency energy and, if no t ins talled and u sed
in accordanc e with the instru ctio ns, may cause
SETUP REQUIREMENTS
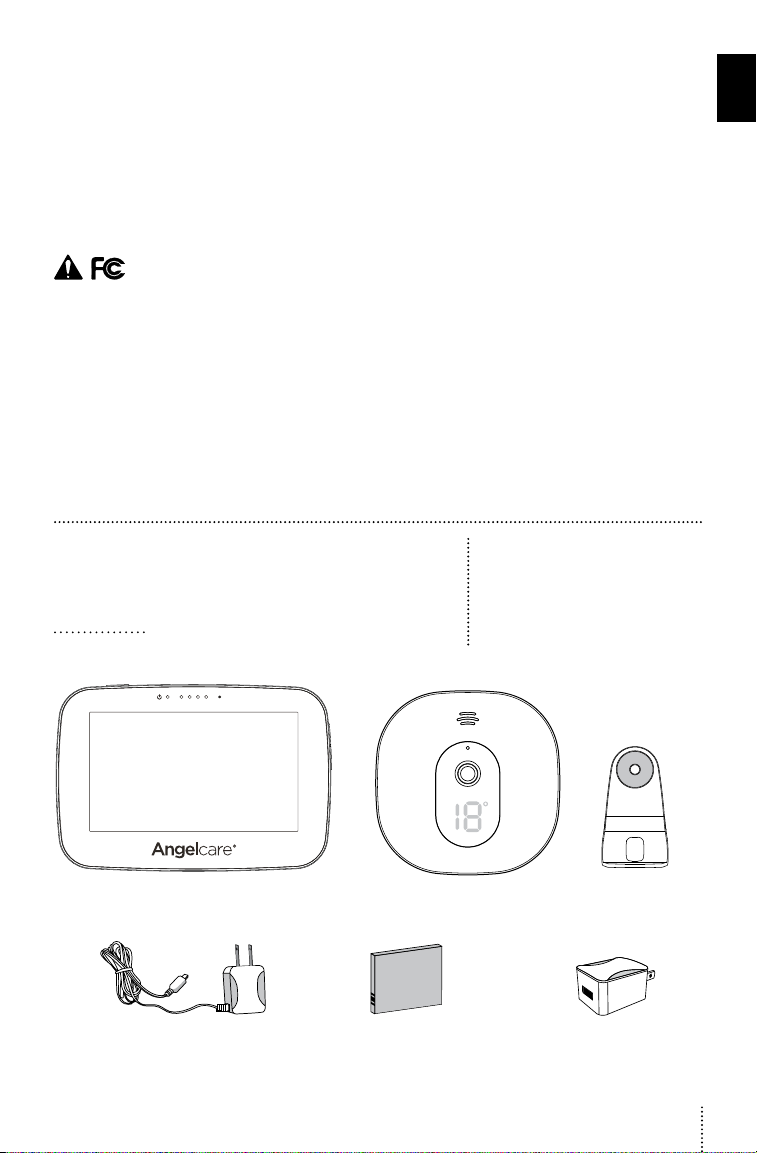
INCLUDED:
harmf ul inter ference to ra dio comm unic ation s.
17. 3 However, there is no guarantee that
interferen ce will not occur i n a par ticular
ins tal lation. I f thi s eq uipme nt d oes cause h ar mful
in ter fer enc e to ra dio or te lev is i o n re c e pt i on , whi c h
can be determ ined by turning the equipment OFF
and ON, the user is enco uraged to tr y to correct
the inter ference by one or m ore of the following
measures:
• Reorient or relocate the receiving
antenna.
• Increase the separation between
the equipment and receiver.
• Connect the equipment into an
outlet on a circuit different from that
to which the receiver is connected.
• Consult the dealer or an experienced
radio/TV technician for help.
17. 4 Th is device complies with the p art 15 of the
FCC Rules and the Industry Can ada lice nse exempt RSS standards(s). Operation is subject
to th e fo llowin g t wo conditions:
17. 5 ( 1) This d evice may n ot c ause harm ful
interference, and
17. 6 (2) This device must a ccept a ny inte rference
receive d, including interference that may cause
undesired op eration.
Model AC510
Baby Video and Sound Monitor
Model AC417, AC517
Baby Video, Sound and
Movement Monitor
E
N
Touch control Parent Unit
AC adapter
(for Parent Unit)
Camera
Lithium ion battery pack
(for Parent Unit)
Tabletop stand
(for camera)
AC adapter
(for camera)
5
Page 6
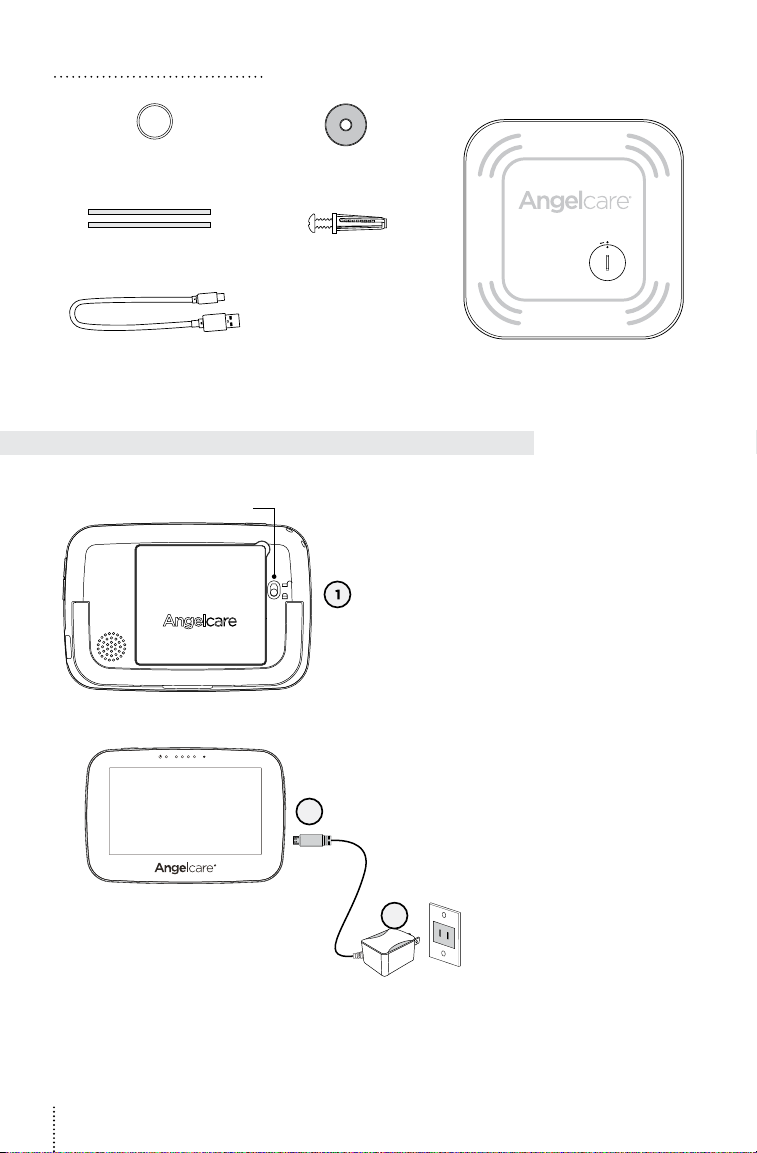
INCLUDED (CONTINUED):
* Always place printed side up *
CR3032 battery
(for Sensor Pad)
Adhesive strips
(for flat micro USB cable)
Flat micro USB cable
(for camera adapter)
STEP 1 - CHARGING THE PARENT UNIT (9 HOURS)
Battery compartment lock
Wall mount
(for camera)
with hardware
(Screwdriver required
for wall mounting)
Wireless movement Sensor Pad
(only for Model AC417, AC517)
1) Unlock the battery compartment on
the backside and remove the cover.
Insert the provided rechargeable
battery into the compartment.
Contacts of the battery and the
contacts in the compartment must be
aligned.
2) Connect the USB plug to the
Parent Unit.
2
3) Connect the power adapter
with an electrical outlet.
4) Charge the unit for 9
continuous hours prior to first
use.
3
6
Page 7
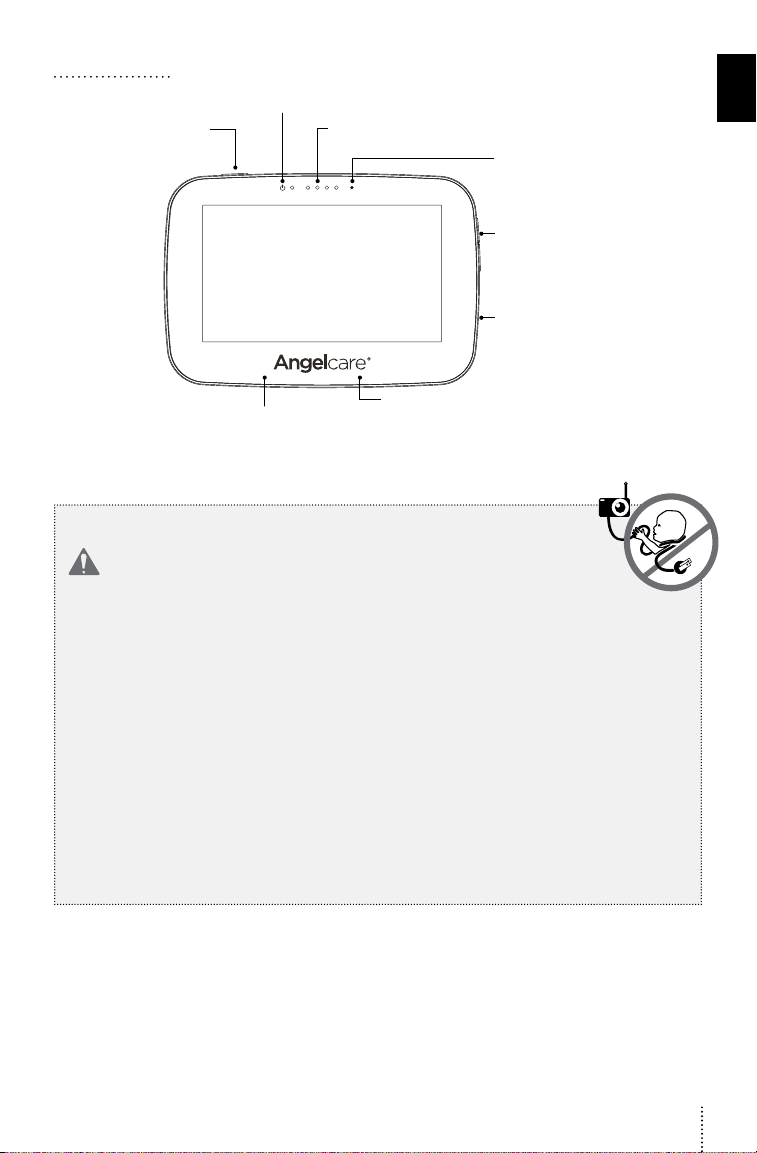
PARENT UNIT:
WARNING
Power
On/Off
Power indicator
Visual sound indicator
Folding stand (on backside)
Rechargeable battery
compartment (on reverse)
STRANGULATION HAZARD.
Children have STRANGLED in cords:
E
N
Microphone
Volume
control +/-
(on the side)
Micro USB
charging port
(on the side)
• Keep adapter cords out of the reach of children (more
than 3 feet / 1 meter away).
• Because of the serious strangulation risk to infants
and toddlers, parents and caregivers should never
place the Camera within 3 feet / 1 meter of a crib.
• NEVER use extension cords with adapters. ONLY use
the adapters provided. This product is not a toy. Never
allow children to play with it.
7
Page 8
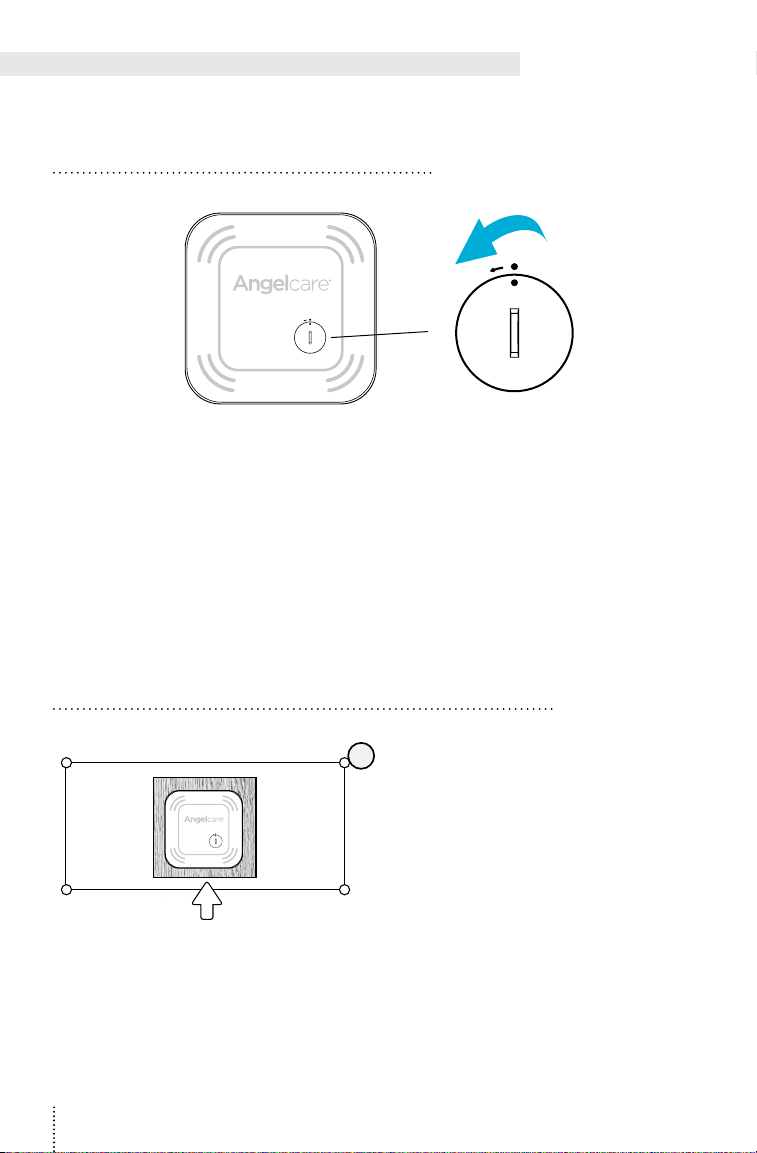
STEP 2 - POSITIONING THE MOVEMENT SENSOR
Note: If you have model AC510 (no Sensor Pad) you can skip to Page
2.1 - POWERING THE MOVEMENT SENSOR PAD
1) When using the Sensor Pad for the first time, you will need to insert the provided
CR3032 battery.
2) Remove the battery cover using a coin. Turn in the direction of the arrow.
3) Place the included battery (CR3032) in the compartment.
Note: The + symbol should be facing up.
4) Replace the battery cover (the two dots will line up). The Sensor Pad is now ON.
5) Verify the wireless Sensor Pad icon is on the status bar of your Parent Unit when
monitor is set up.
9.
2.2 - INSTALL THE SENSOR PAD ON THE MATTRESS SUPPORT
2
1) Remove the mattress from the crib.
2) Place the Sensor Pad - printed side up
- in the center of the crib. It should be
centered on the hardboard if your crib
requires a hardboard support.
3) Replace the mattress.
Sensor Pad
8
Page 9
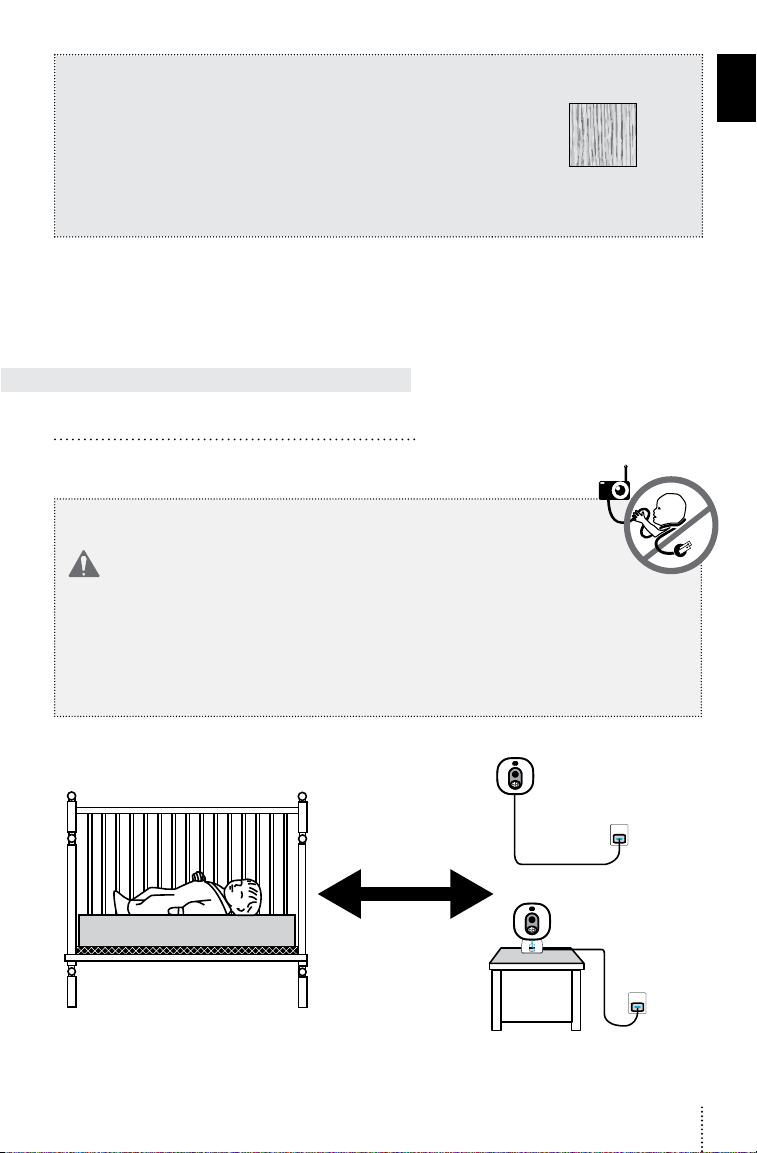
IMPORTANT
WARNING
If your crib does not have a solid, stable surface for the
Sensor Pad, you will need to place a hard support board
(not included) underneath the Sensor Pad to ensure correct
operation of the system.
This hardboard support should be at least ¼” (6 mm) thick
and should have minimum dimensions of 13” x 13” (33 cm x
33 cm). This support board must be larger than the Sensor
Pad surface area.
• Place the Sensor Pad directly underneath the mattress (and on top of support board, if
needed) in the center of the crib. Make sure there is nothing between the mattress and
Sensor Pad to interfere with operation.
• Never immerse the Sensor Pad in water or other liquids!
Hardboard
STEP 3 - POSITIONING THE CAMERA
3.1 - SELECT A LOCATION FOR THE CAMERA
IMPORTANT
Place the crib near a supporting wall and far from air currents. Install the Camera on a flat,
stable surface facing the crib at a distance of at least 1 meter / 3 feet. Make sure to plug
the adapter to the socket outlet nearest to the equipment and that is easily accessible.
E
N
Place the
camera at least
3 ft (1m) from
the crib
9
Page 10
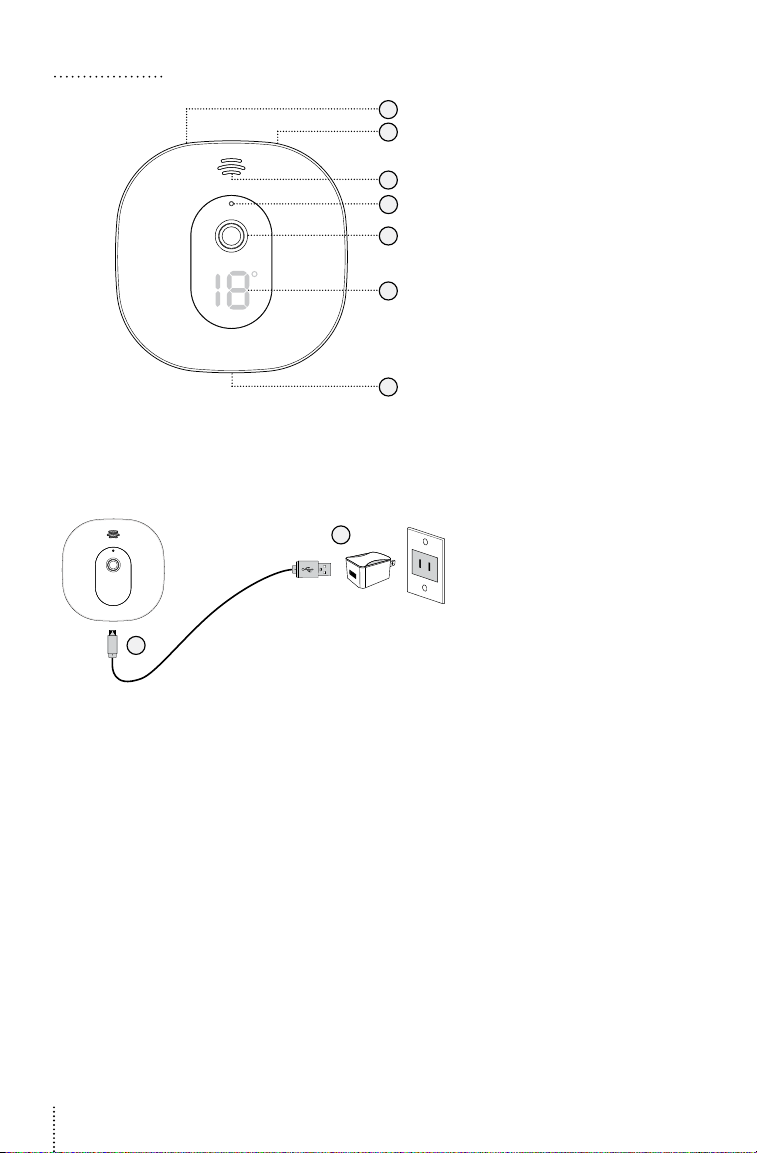
3.1 - CAMERA
A
B
C
D
E
F
A) POWER ON/OFF
B) Pause Sensor Pad
C) Speaker
D) Microphone
E) Camera
F) Room temperature display
G) Micro USB charging port
Front Side
G
1) Place the Camera at a
3
minimum of 1 meter /
3 feet away from the crib.
2) Connect the USB plug to
the Camera.
3) Connect the USB plug to
2
the power adapter and then
into an electrical outlet.
4) Adjust the camera using
the magnetic mount to get
the best view of baby in the
crib.
10
Page 11
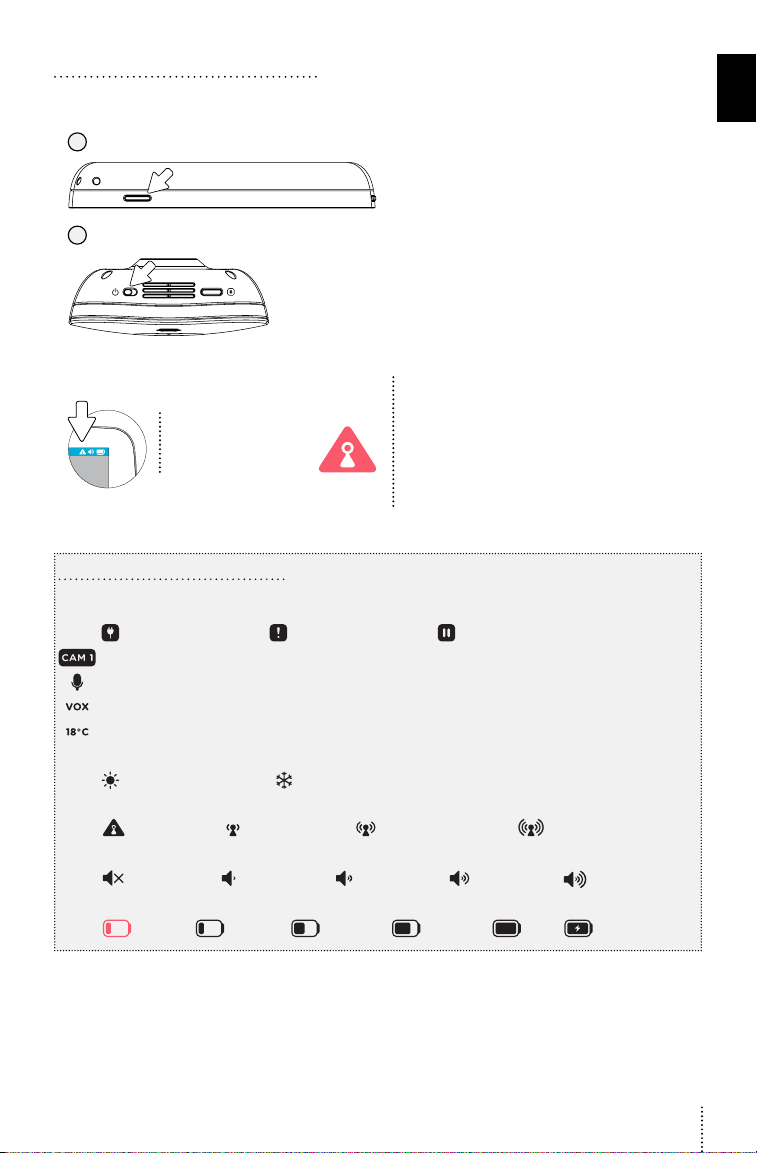
SWITCHING ON YOUR MONITOR
1
1) Press and hold the Parent Unit
ON/OFF button for 2 seconds until
LCD screen is switched ON. Angelcare’s
logo will be shown for 1 second.
2
2) Slide the Camera ON/OFF switch to
the ON position
3) The Parent Unit will now display Video
mode screen.
If there is a lost connection between the
2 units after 15 seconds, the Out-of-Range
When Parent Unit is turned
ON and Camera is OFF,
Parent Unit will display
Out-of-Range mode.
alarm will sound on the Parent Unit (refer to
troubleshooting):
• The Out-of-Range icon will appear on the
screen.
• The Out-of-Range icon will appear on the info
bar.
INFO BAR IMPORTANT ICONS
Sensor Pad Status icons: Indicates the current status of the Sensor Pad
Normal Status
Camera icons: Indicates which camera is currently viewed
Talk icon: Indicates when the Talk button is being pressed
Vox icon: Indicates when the camera is in VOX mode
Temperature icon: Indicates room temperature
Temperature Alerts Icons: Indicates Temperature Alarm is active
Too Warm Too Cold
Connection Icon: Indicates the connection quality between the Parent Unit and the Camera
Out-of-Range Poor connection Good connectionMedium connection
Sound Level Icon: Indicates sound level
Mute (0/5)
Battery Level icon: Indicates battery life
Empty
1/4 Full
Sensor Pad Alert Sensor Pad is Paused
2/5 3/5 4/5 5/5
1/2 Full 3/4 Full Full Fully charged
E
N
11
Page 12
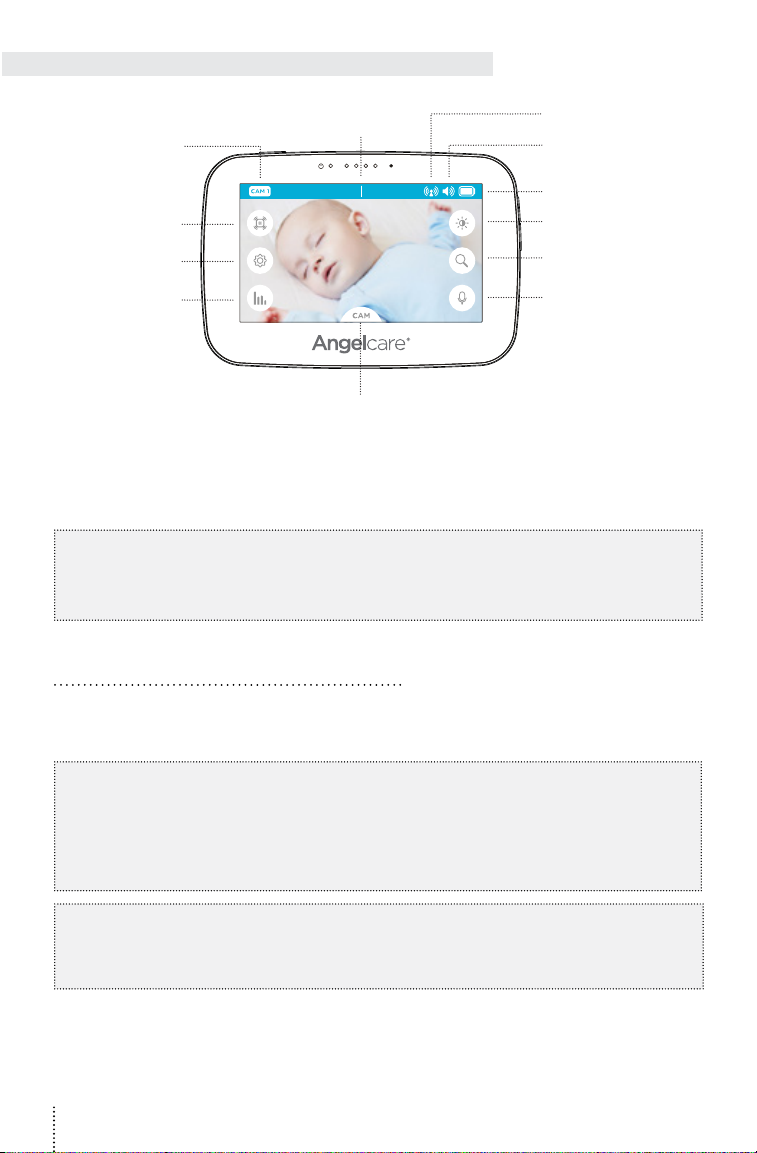
STEP 4 - GETTING TO KNOW YOUR MONITOR
Camera connection
Time/Temperature
Active Camera
18°C
2:04
Pause sensor pad
Main settings menu
Show reporting
Select Camera
Your Angelcare® monitor can be used with the preprogrammed factory settings or you
can customize the settings to your preference. Your monitor is equipped with a touch
screen. Just a tap anywhere on the screen will bring up the menu and feature selections.
IMPORTANT
When in menu or sub-menu modes, sound transmission between Parent and Cameras
will be temporarily deactivated. ONLY movement-detection alarm will remain active (if
function is activated).
signal strength
Volume level
Battery status
of parent unit
Adjust screen
brightness
Zoom
Activate talk
back feature
4.1 - SENSOR PAD (MODEL AC417 & AC517)
Note: If you have model AC510 (no Sensor Pad) you can skip to Page 15.
IMPORTANT
• To ensure adequate monitoring of your baby’s movements, you can adjust the
sensitivity of the Sensor Pad in the main settings menu.
• Set a high sensitivity for a newborn and a lower sensitivity as baby grows and gains
weight. A thicker mattress will also need a higher sensitivity.
• Alarm will sound if there is no movement after 20 seconds.
IMPORTANT
The Sensor Pad is not designed for use with adults, children or infants older than 24
months. Once you are finished using the Sensor Pad, deactivate the movement function
then remove it from the baby’s crib and store it away.
12
Page 13
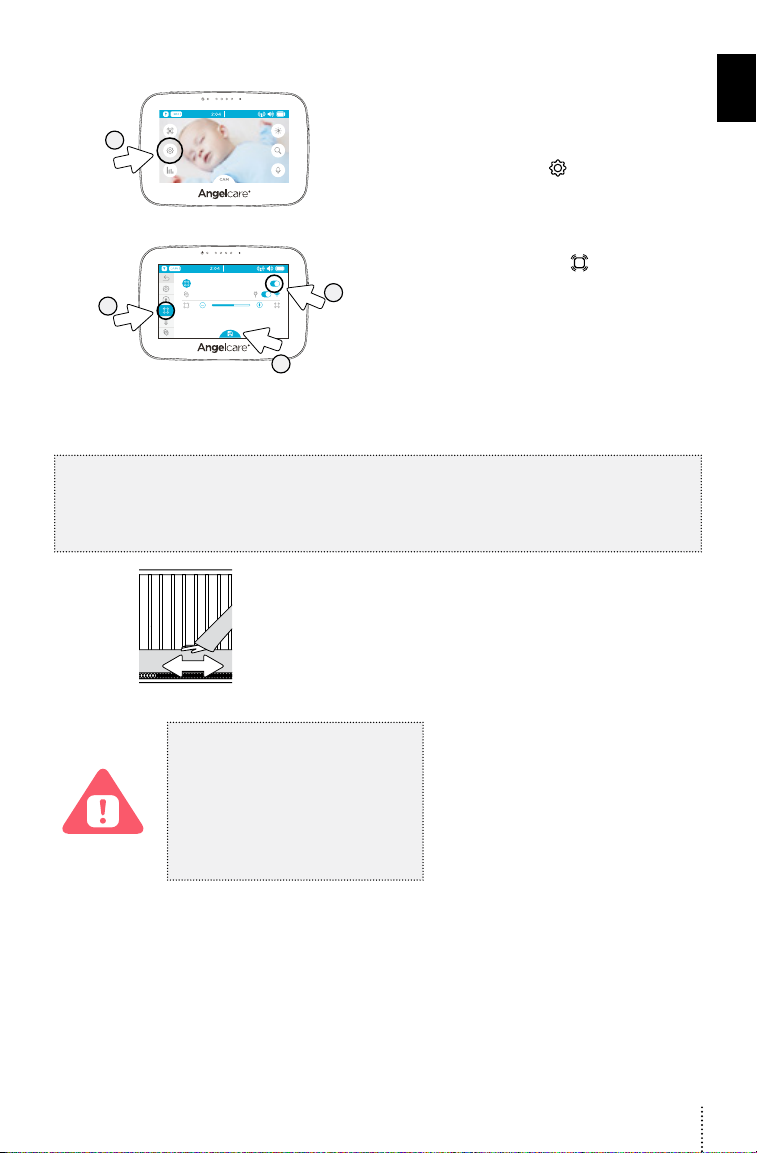
TO ACTIVATE/DEACTIVATE THE SENSOR PAD:
18°C
2
1) Tap the screen anywhere to bring up the
2) Tap the Settings Icon
E
N
menu.
.
18°C
3
3) Tap the Sensor Pad Icon .
4
4) Tap the Sensor Pad Toggle button to
activate the Sensor Pad (the toggle
button will turn blue).
5
5) Tap the Save Icon at the bottom of the
screen.
TO TEST THE SENSOR PAD:
IMPORTANT
• Test your monitor before first use.
• Test your monitor regularly to ensure it is functioning correctly.
• Test your monitor every time you move the Sensor Pad to a different place.
1) After activating the Sensor Pad, the alarm will
sound after 20 seconds.
2) Rub you hand over the mattress and confirm
the alarm stops.
MOVEMENT ALARM
• Alarm activates when no movement
is detected by the Sensor Pad for
20 seconds.
• Both the Parent Unit and the
Camera speakers will emit
continuous beeps.
• Movement Alarm icon will show on
the LCD screen.
IF THE ALARM DOES NOT SOUND
• Avoid contact with the crib while
Sensor Pad is in operation.
• Place the crib near a supporting wall to
reduce vibrations.
• Adjust the Sensor Pad sensitivity level.
• Do not use bedside crib, mobile, fans,
loud music or anything else that may
cause vibration.
13
Page 14
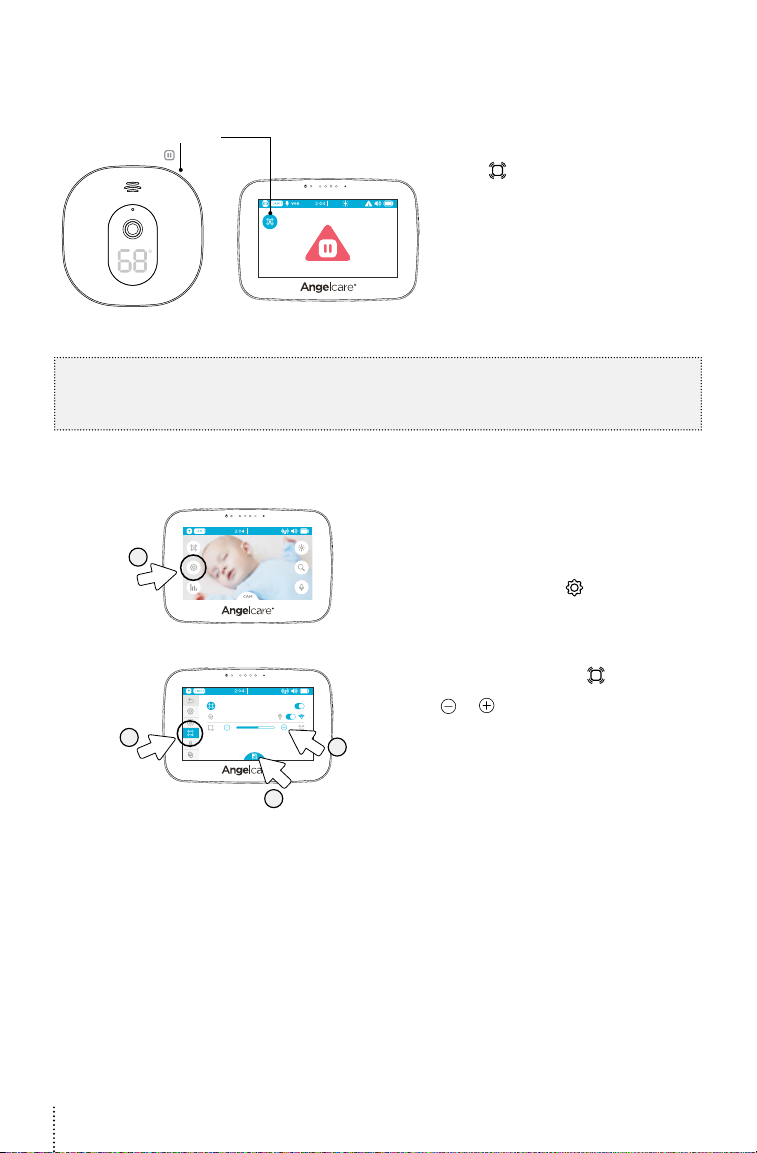
PAUSING AND RESTARTING THE SENSOR PAD:
• If you remove baby from the crib
to feed/comfort, you can pause
Pause Sensor Pad
the sensor pad:
1. Tap screen, press Sensor Pad
in top left of screen to
icon
18°C
see pause icon . To deactivate,
tap anywhere on screen
2. Press the pause button on
nursery unit to see the pause
icon. To deactivate press pause
button again or tap anywhere on
screen.
• Don’t forget to restart by utilizing
the same methods to re-engage
the Sensor Pad.
IMPORTANT
If you do not pause the Sensor Pad, the alarm will sound if there is no movement after
20 seconds
TO ADJUST THE SENSOR PAD SENSITIVITY LEVEL:
18°C
2
18°C
3
1) Tap the screen anywhere to bring up
the menu.
2) Tap the Settings Icon
3) Tap the Sensor Pad Icon .
4) Tap
or to adjust the sensitivity
level.
4
5) Tap the Save Icon at the bottom of the
.
screen to confirm your settings.
5
14
Page 15

4.2 - BATTERY
HOW TO CHECK THE BATTERY:
E
N
Unplug the adapter from the Parent
Unit and check the battery level
indicator.
HOW TO CHARGE THE BATTERY IN THE PARENT UNIT:
Leave the Parent Unit connected to power
to fully charge the unit. Although the battery
at 1/4 capacity works normally, we recommend
that you fully recharge it.
PARENT UNIT BATTERY ALERT
• Alert activates when the battery needs to be
recharged.
• Parent Unit will emit a beep sound every
30 seconds.
• Battery Alert icon will show on LCD screen.
1/4 full 1/2 full 3/4 full full
15
Page 16

YOU ARE NOW READY TO USE YOUR MONITOR
The Angelcare® monitor can be used with the pre-programmed factory settings or you can also customize
your settings to your preference.
DEFAULT SETTINGS
Parent Unit Volume: Level 3 (of 4)
NU Speaker Volume: Level 3 (of 4)
Camera Microphone Sensitivity: Level 2 (of 4)
Movement Mode: ON (AC417, AC517)
OFF (AC510)
Sensor Pad Sensitivity: Level 2 (of 4) (AC417, AC517)
Temperature Unit: Fahrenheit
Temperature Alert: OFF
Temperature Graphing: OFF (AC510)
ON (AC417, AC517)
Movement Graphing: ON (AC417, AC517)
VOX: OFF
Camera Color Changing Mode: White (No Color)
Screen Saver Timer: 30 seconds
LCD Brightness: Level 3 (of 5)
STEP 5 - ACTIVATING AND DEACTIVATING ADDITIONAL FUNCTIONS
IMPORTANT
When in the menu or sub-menu modes, sound transmission between Parent and
Cameras will be temporarily deactivated. ONLY the movement detection alarm will
remain active (if function is activated).
IMPORTANT
Movement function is pre-activated whether the battery is inserted in the Sensor Pad or
not. If there is no movement on the Sensor Pad after 20 seconds, a series of loud beeps
will emit from the Parent Unit and Nursery Unit - this is the movement alarm.
When not monitoring movement or changing/activating any settings on your monitor, to
prevent this alarm you can either:
1. Plug in/connect the Sensor Pad and gently tap the top of the Sensor Pad
2. Deactivate the movement function and refer to step 4.1
5.1 - SOUND TRANSMISSION (VOX)
VOICE ACTIVATION (VOX ON) OR CONTINUOUS SOUND (VOX OFF) MODE
16
Page 17
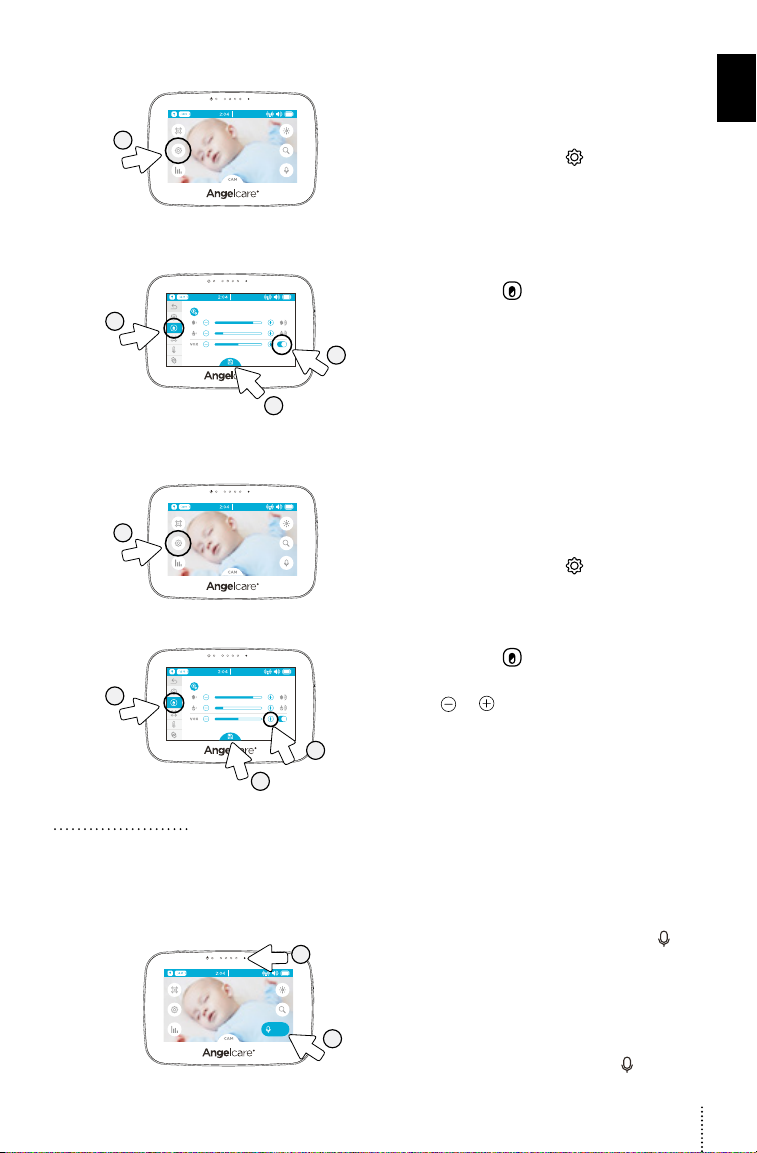
SELECT VOX ON OR VOX OFF
18°C
2
1) Tap the screen anywhere to bring up
the menu.
2) Tap the Settings Icon
.
E
N
18°C
3
3) Tap the icon to select the Camera
settings menu.
4) Tap the VOX Toggle button to activate
4
or deactivate the VOX function (toggle
will turn blue when VOX is active).
5
5) Tap the Save Icon at the bottom of the
screen to confirm your settings.
TO ADJUST THE SOUND SENSITIVITY:
18°C
2
18°C
3
1) Tap the screen anywhere to bring up
the menu.
2) Tap the Settings Icon
.
3) Tap the icon to select the Camera
settings menu.
4) Tap
or to adjust the VOX
sensitivity level.
4
5
5) Tap the Save Icon at the bottom of the
screen (Icon will turn blue) to confirm
your settings.
5.2 - TALK BACK
Your parent monitor is equipped with Two Way Talk. This feature allows you to talk to baby
without being in the nursery.
TO ACTIVATE TWO WAY TALK:
18°C
2
1) Tap and hold the microphone icon
to activate talk back (Icon will expand
and turn blue).
2) Make sure you speak into the
microphone whilst pressing the
1
microphone icon..
3) Release the microphone icon
to turn
off the two way talk function.
17
Page 18
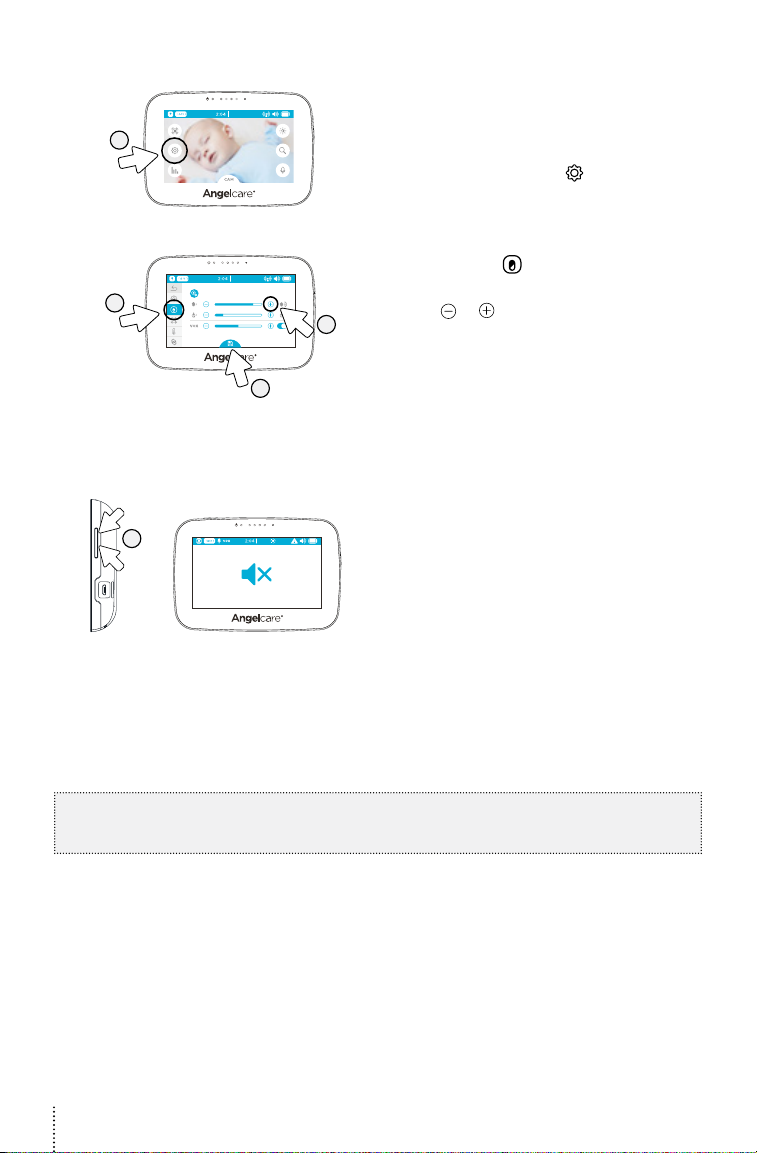
TO ADJUST THE CAMERA VOLUME:
18°C
2
1) Tap the screen anywhere to bring up
the menu.
2) Tap the Settings Icon
18°C
3
4
3) Tap the icon to select the Camera
settings menu.
4) Tap
or to adjust the two way talk
volume level.
5) Tap the Save Icon at the bottom of the
5
screen (Icon will turn blue) to confirm
your settings.
TO ADJUST & MUTE SOUND:
1) Press the Volume up / Volume down
button at the right side of the Parent
Unit to adjust the sound level.
1
18°C
2) To mute the sound press the Volume
down button until the mute symbol is
displayed.
3) To deactivate sound, press the Volume
up button until at desired level.
IF YOU HEAR NO SOUND:
• Check that both units are powered ON.
• Check that Parent Unit is not on MUTE.
• Check the battery on the Parent Unit (recharge it if necessary).
• Bring the Parent Unit closer to the Camera.
.
IMPORTANT
To avoid feedback (whistling), keep both units at least 3 meters / 10 feet apart.
18
Page 19
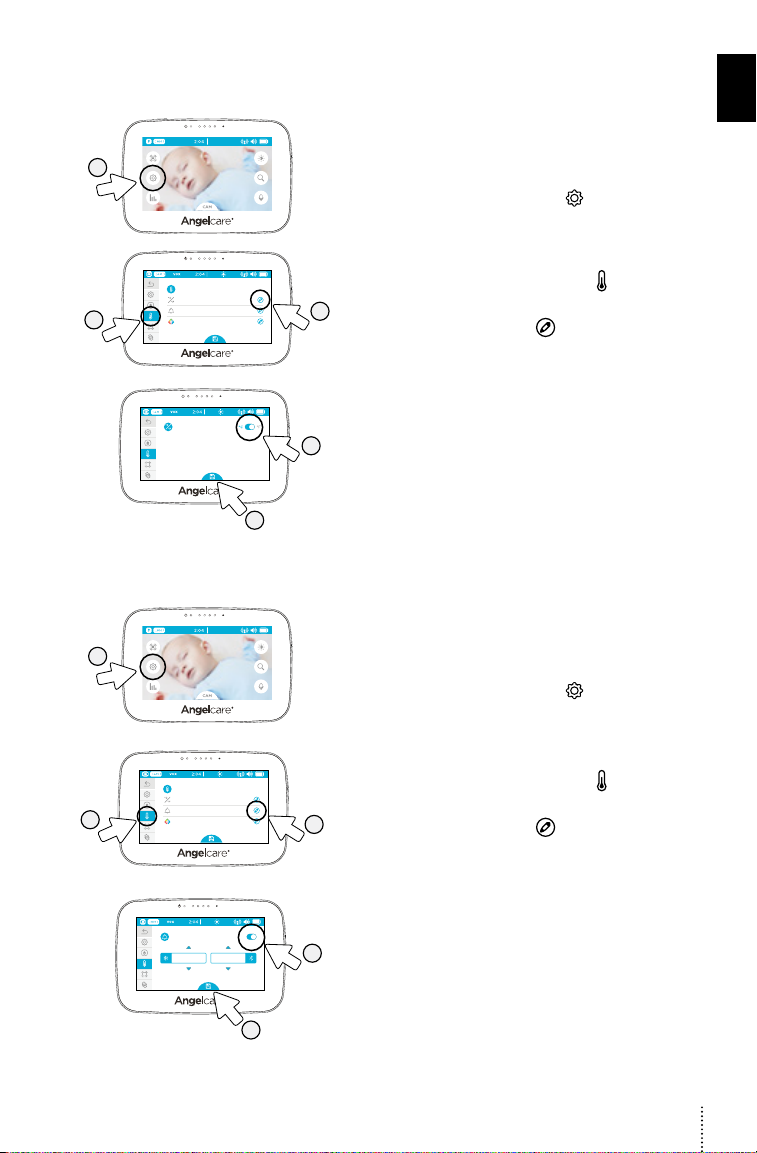
5.3 - ROOM TEMPERATURE DISPLAY
TO CHANGE FROM CELSIUS TO FAHRENHEIT:
E
N
18°C
2
1) Tap the screen anywhere to bring up
2) Tap the Settings Icon
18°C
3
18°C
4
5
3) Tap the Temperature Icon to enter
4) Tap the Edit Icon
5) Tap the Temperature Unit Toggle
6) Tap the Save Icon at the bottom of the
6
TO ACTIVATE THE ROOM TEMPERATURE ALERT:
18°C
2
1) Tap the screen anywhere to bring up
2) Tap the Settings Icon
the menu.
.
the temperature settings menu.
to enter the
temperature unit setting.
button to switch between °C and °F
(the toggle button and the chosen
setting will turn blue).
screen (Icon will turn blue) to confirm
your settings.
the menu.
.
3
18°C
18°C
66 86
3) Tap the Temperature Icon to enter
the temperature settings menu.
4
4) Tap the Edit Icon
to enter the
temperature alarm setting menu.
5) Tap the Temperature Alarm Toggle
button to activate the alarm function
(the toggle button will turn blue when
5
active).
6) Tap the Save Icon at the bottom of the
screen (Icon will turn blue) to confirm
6
your settings.
19
Page 20
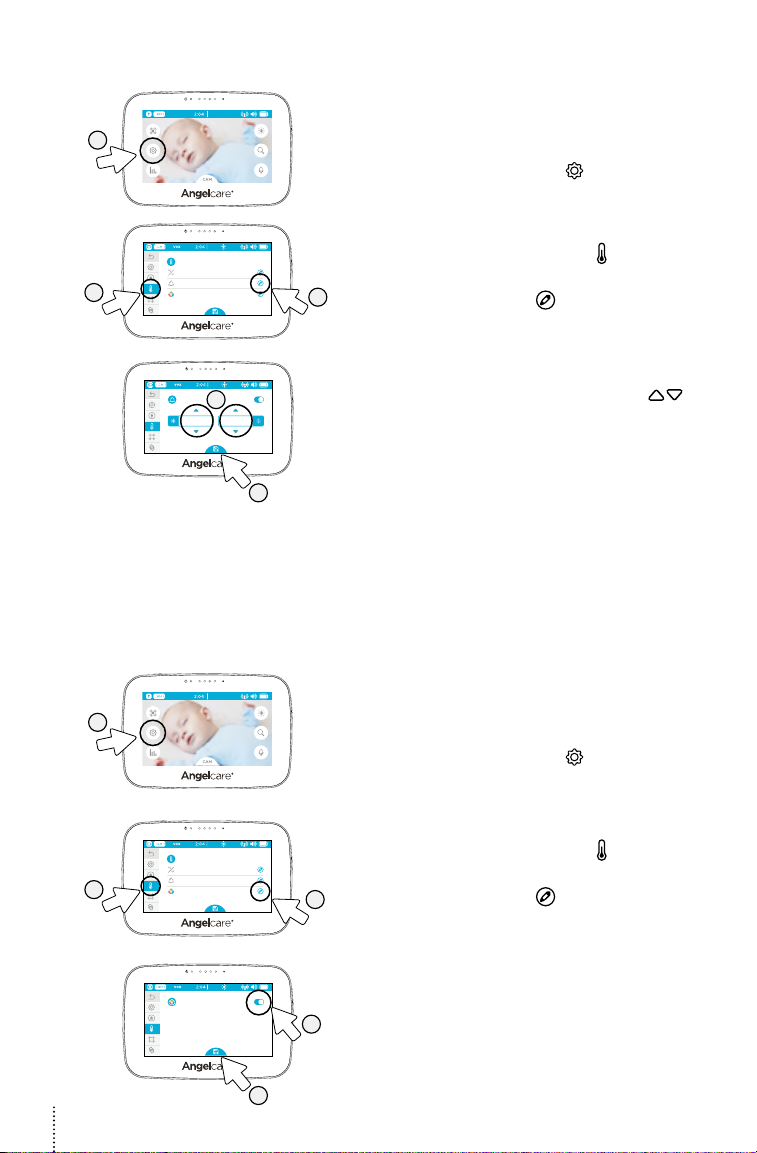
TO SET THE ROOM TEMPERATURE RANGE:
18°C
2
18°C
1) Tap the screen anywhere to bring up
the menu.
2) Tap the Settings Icon
.
3) Tap the Temperature Icon to enter
the temperature settings menu.
3
4
4) Tap the Edit Icon
to enter the
temperature alarm setting menu.
18°C
5
66 86
5) Set the lower and upper temperature
limit tapping the up/down arrows
6) Tap the Save Icon at the bottom of the
screen (Icon will turn blue) to confirm
your settings.
6
TO ACTIVATE THE CAMERA COLOR CHANGING MODE:
When activated, if the temperature goes outside of your set preferences, the temperature
digits on the Nursery Unit will either:
TOO HOT: display red
TOO COLD: display blue
Within your preferences: display white
.
20
2
3
18°C
1) Tap the screen anywhere to bring up
the menu.
2) Tap the Settings Icon
18°C
3) Tap the Temperature Icon to enter
.
the temperature settings menu.
4
4) Tap the Edit Icon
to enter the color
changing mode menu.
18°C
5) Tap the Color Changing Mode Toggle
button to activate the color changing
5
mode (the toggle button will turn blue
when active).
6) Tap the Save Icon at the bottom of the
6
screen (Icon will turn blue) to confirm.
Page 21
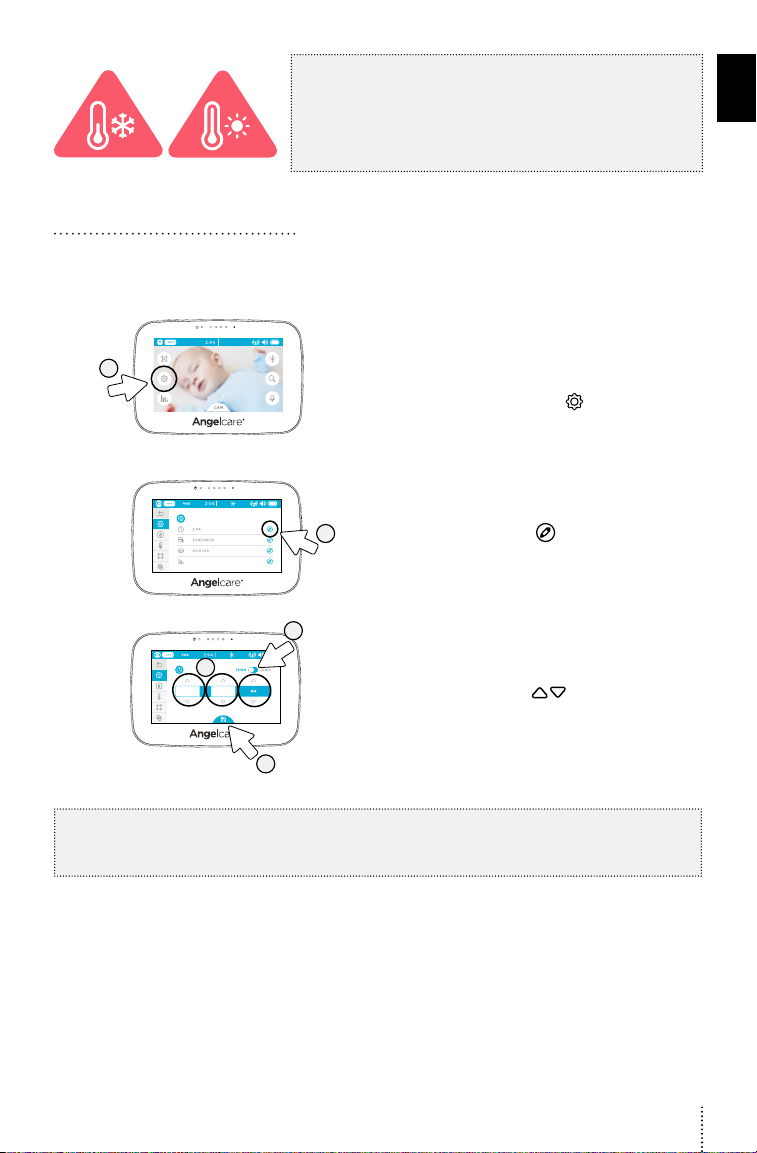
TEMPERATURE ALERT
• Alert activates when temperature reaches maximum or
• Parent Unit will emit 4 consecutive beeps, every 5 seconds.
• Temperature Alert icon will show on LCD screen.
5.4 - HOW TO ACTIVATE TIME
For model AC510, please skip to Step 1.
For model AC417, AC517:
minimum set temperature.
E
N
18°C
2
18°C
3
1) Tap the screen anywhere to bring up
the menu.
2) Tap the Settings Icon
to enter the
general settings menu.
3) Tap the Edit Icon to access the time
settings menu.
5
2 08
4
18°C
4) Tap the Time Mode Toggle button to
switch between 12 h and 24 h mode.
5) Set the hours and minutes using the
up/down arrows
.
6) Tap the Save Icon at the bottom of the
screen to confirm your settings.
6
IMPORTANT
Please remember to turn the Sensor Pad back on after setting the time / date if
deactivated.
21
Page 22
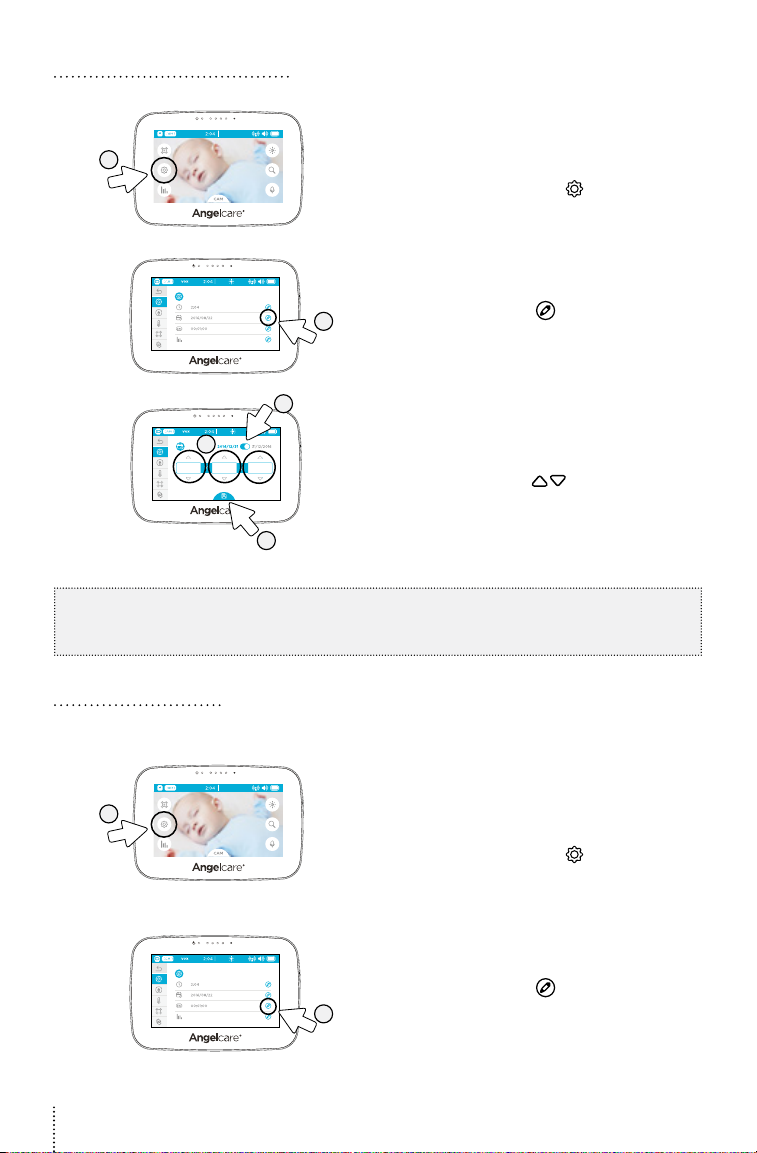
5.5 - HOW TO CHANGE DATE
2
18°C
18°C
3
4
18°C
5
08 222016
1) Tap the screen anywhere to bring up
the menu.
2) Tap the Settings Icon
to enter the
general settings menu.
3) Tap the Edit Icon to access the date
settings menu.
4) Tap the Date Mode Toggle button to
switch between Month/Day/Year and
Day/Month/Year display.
5) Set the day, month and year using the
up/down arrows
.
6) Tap the Save Icon at the bottom of the
6
screen (Icon will turn blue) to confirm
your settings.
IMPORTANT
Please remember to turn the Sensor Pad back on after setting the time / date if
deactivated..
5.6 - SCREEN SAVER
Allows you to set the screen saver.
2
22
18°C
1) Tap the screen anywhere to bring up
the menu.
2) Tap the Settings Icon
to enter the
general settings menu.
18°C
3) Tap the Edit Icon to access the
3
screen saver settings menu.
Page 23
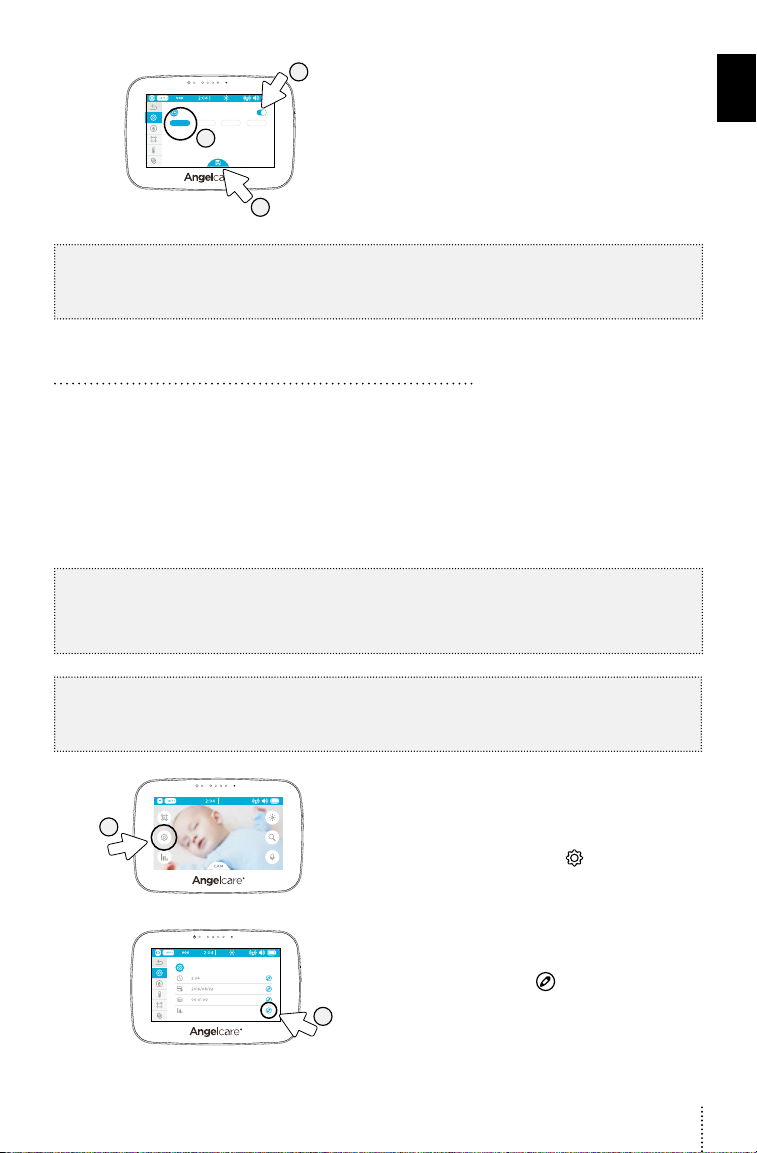
1) Tap the Screen Saver Toggle button
to switch the screen saver on or off
(the toggle button will turn blue when
active).
2) Tap to select between 30 seconds to
00:00:30
00:01:00
4
18°C
00:02:00 00:03:00
5
3 minutes.
6
NOTE:
MANUAL SETTING:
The touchscreen will turn black when video is in Screen Saver mode. Tap the screen
To manually activate the Screen Saver mode, press the Parent Unit POWER ON/OFF button.
anywhere to return to Video mode.
3) Tap the Save Icon at the bottom of the
screen to confirm your settings.
5.7 - MOVEMENT AND TEMPERATURE MONITORING
(Model AC510 has Temperature Monitoring Only)
Activity analysis and room temperature tracking give you insight into your little one’s
activity level during sleep, helping you to better adapt routines and respond to their needs.
The movement monitoring records data every ten seconds. Three times every hour the
system compiles the collected data and a “movement activity report” can be viewed on the
Parent Unit.
TO TURN ON MOVEMENT AND TEMPERATURE MONITORING:
NOTE:
Model AC417, AC517 have movement settings ON. Model AC510, you will need to activate
movement monitoring if adding a Sensor Pad. .
E
N
IMPORTANT
Before turning on the movement and temperature monitoring, ensure you have set the
date and time in sections 5.4 and 5.5.
18°C
2
18°C
1) Tap the screen anywhere to bring up
the menu.
2) Tap the Settings Icon
to enter the
general settings menu.
3) Tap the Edit Icon to access the
3
monitoring settings.
23
Page 24
4
18°C
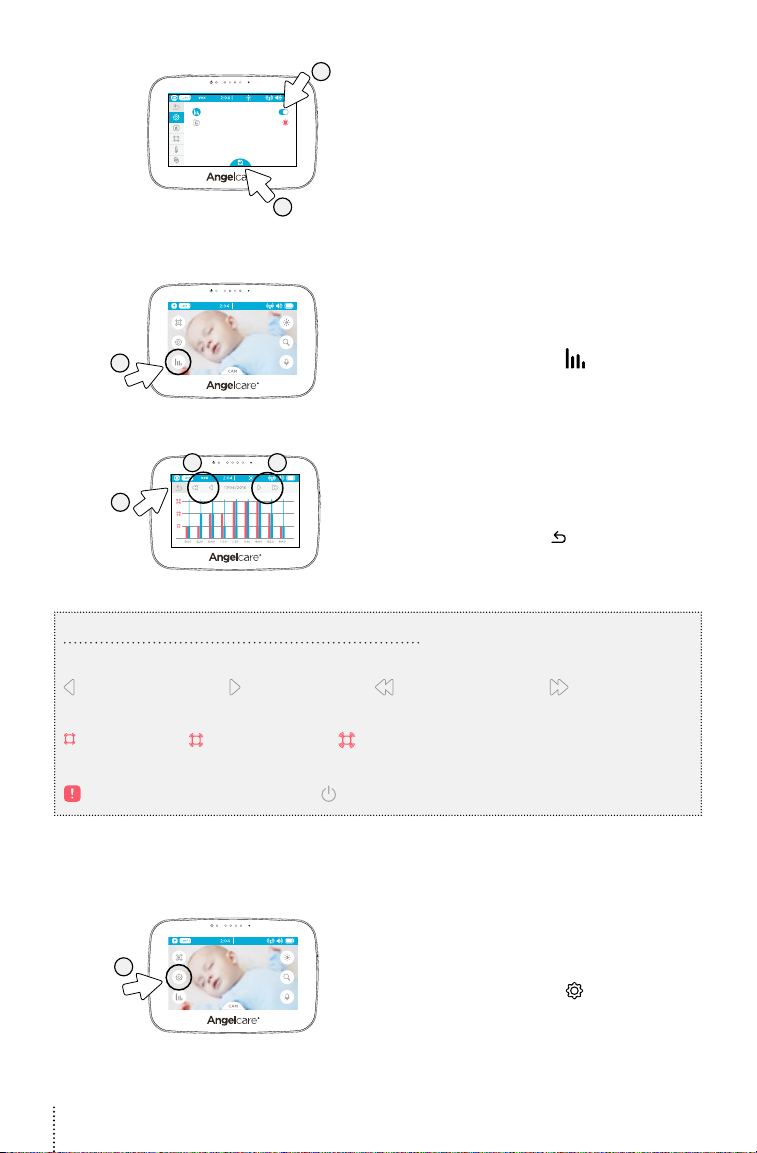
1) Tap the Monitoring Toggle button to
switch the monitoring function
ON/OFF (the toggle button will turn
blue when ON).
2) Tap the Save Icon at the bottom of the
screen to confirm.
5
NAVIGATING MOVEMENT AND TEMPERATURE REPORTS:
18°C
1) Tap the screen anywhere to bring up
the menu.
2
3
4
17 20 20 18 23 24 24 20 18
3
18°C
2) Tap the Settings Icon
3) In the movement and temperature
reports, tap the arrows to navigate
hour by hour or day by day.
4) Tap the back arrow
.
to go back to the
Main Menu.
IMPORTANT MONITORING BUTTONS AND ICONS
Navigation Icons:
Go to previous page Go to next page Go to previous day Go to next day
Sensor Pad Movement Levels: Indicates the amount of movement from your Sensor Pad
Low Movement
Medium Movement High Movement
Graphing Icons:
Indicates an alert during the period Indicates the system was turned off during the period
TO DELETE GRAPHING DATA:
Allows you to delete saved statistical graphs.
24
18°C
2
1) Tap the screen anywhere to bring up
the menu.
2) Tap the Settings Icon
to enter the
general settings menu.
Page 25
18°C
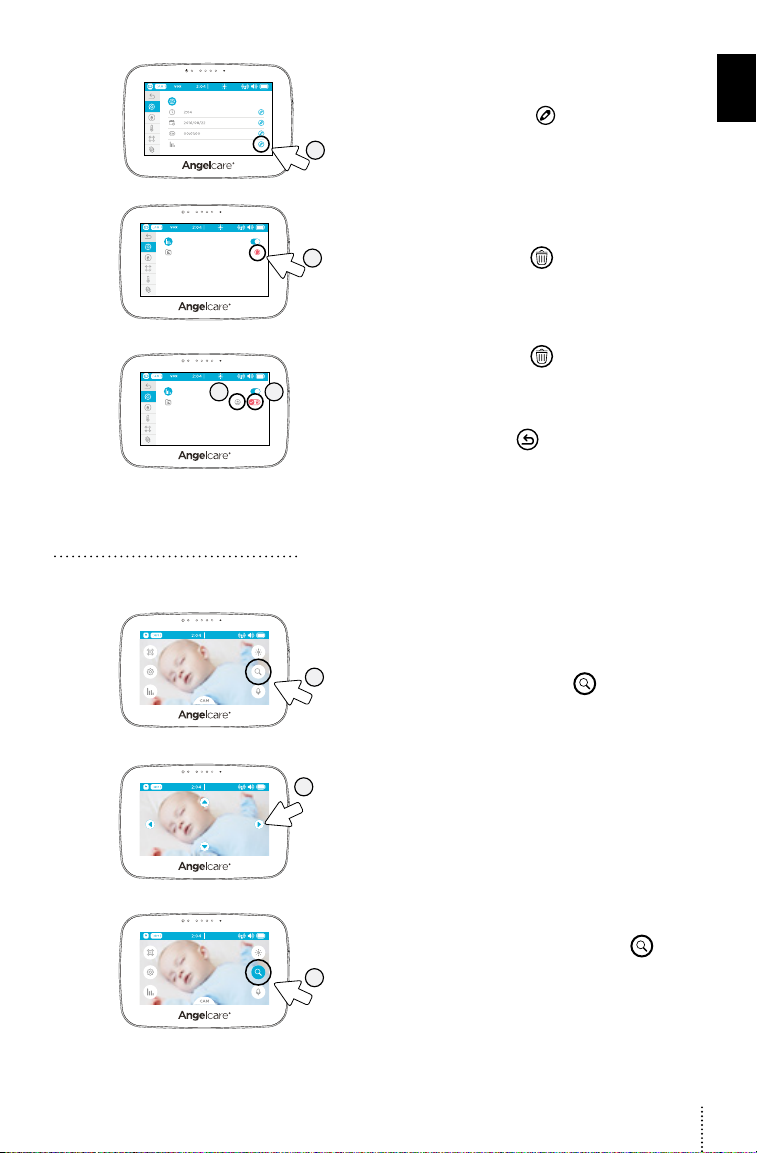
3) Tap the Edit Icon to access the
3
18°C
4
monitoring settings.
4) Tap the Bin Icon to access the
E
N
graph delete menu.
18°C
56
5.8 - DIGITAL PAN AND ZOOM
Allows you to zoom in to twice the normal view.
18°C
2
18°C
18°C
3
5
5) Tap the Bin Icon to delete previously
saved graph data. If no data has been
saved yet, this option will not be
available.
6) Tap the Arrow
to cancel deleting
of previously saved graph data. You will
return to the previous screen.
1) Tap the screen anywhere to bring up
the menu.
2) Tap the Magnifier Icon
to activate
the zoom.
3) Use the arrow keys to zoom in on what
you want to see more closely.
4) Tap anywhere on the screen, except on
the arrows, to return to the Main Menu.
The camera will stay zoomed in. When
zoomed in, the Magnifier Icon will be
blue.
5) Tap on the blue Magnifier Icon to
return to normal viewing mode. Zoom
is deactivated.
25
Page 26
5.9 - LCD SCREEN BRIGHTNESS
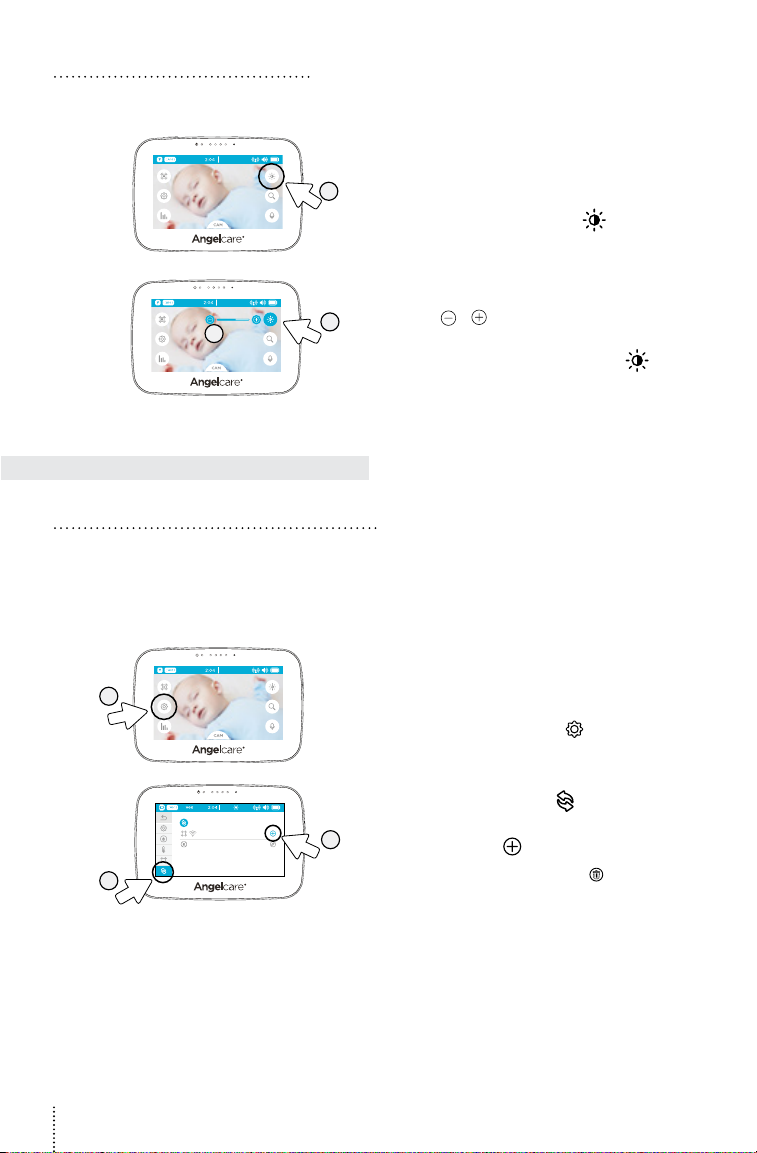
Allows you to adjust the LCD screen brightness on the Parent Unit.
18°C
2
1) Tap the screen anywhere to bring up
the menu.
2) Tap the Brightness Icon
.
18°C
3
4
3) Tap / to decrease / increase the
brightness level.
4) Tap again the Brightness Icon
to
return to the Main Menu.
STEP 6 - ADDING ACCESSORIES
6.1 - ADDING A WIRELESS SENSOR PAD
If you have purchased a wireless Sensor Pad, please refer to page 8, step 2, to add this
to your monitor.
To activate/deactivate the Sensor Pad, and adjust if required, please refer to page 13,
step 4.1.
18°C
2
18°C
3
1) Tap the screen anywhere to bring up
the menu.
2) Tap the Settings Icon
3) Tap the Pairing Icon to enter the
device pairing menu.
4
4) Tap the Icon
to add a Sensor Pad.
5) When the trash can icon
the Sensor Pad is now paired.
.
appears,
26
Page 27
6.2 - ADDING AN ADDITIONAL CAMERA
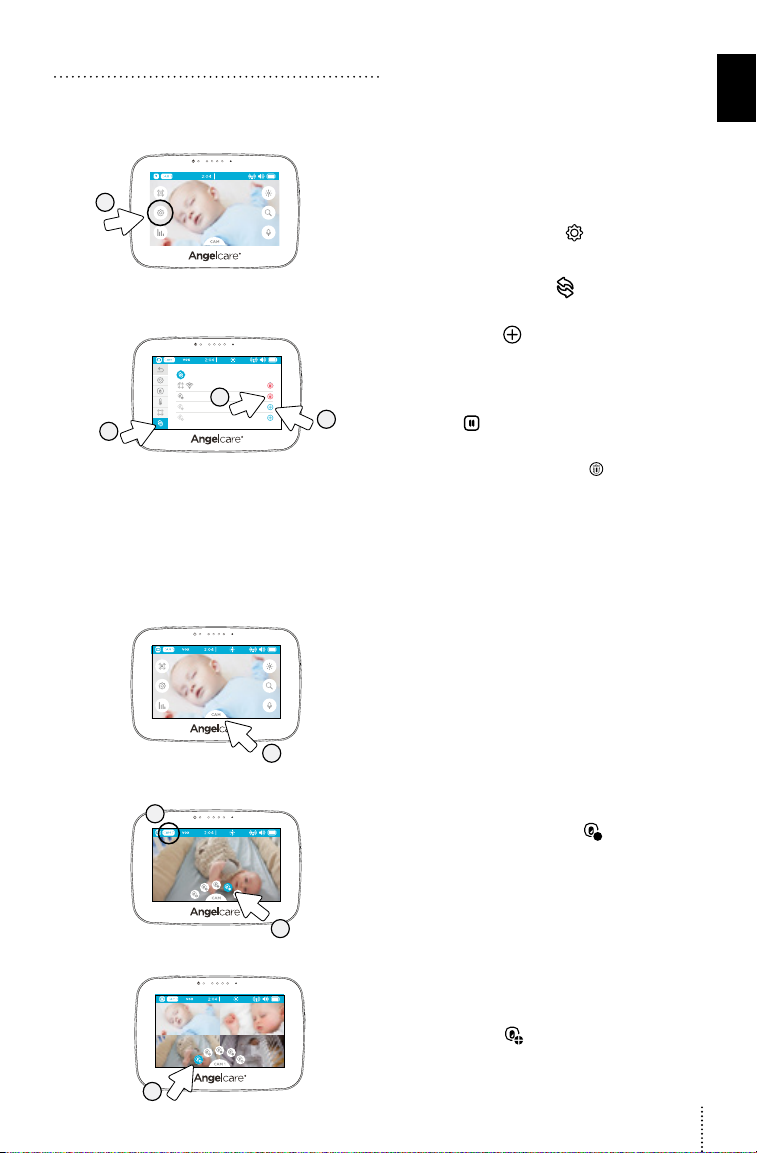
If you have purchased an Accessory Camera, please follow the steps below to add it to the
system.
E
N
18°C
2
1) Tap the screen anywhere to bring up
the menu.
2) Tap the Settings Icon
.
3) Tap the Pairing Icon to enter the
device pairing menu.
4) Tap the Icon
18°C
CAMERA 2 (icon will be grayed out).
to select/highlight
5) Plug in and turn your Camera on.
7
3
4
6) Press and hold the Pause / Pairing
button
on the top right of the
Camera.
7) When the trash can icon
appears,
the Camera is paired.
VIEWING MULTIPLE CAMERAS:
With more than one camera you can view each camera individually or use the split screen
mode to view all cameras connected simultaneously. Follow the steps below for multicamera viewing:
18°C
2:04
1) Tap the camera selection icon CAM.
The Camera Select Menu will popup and active cameras will have an
icon with a camera number (inactive
cameras will be grayed out).
1
3
18°C
18°C
2:04
2) Tap on the Camera Icon of the
camera you would like to view (the icon
turns blue).
3) The CAM # icon will appear in the left
2
18°C
2:04
18°C
hand side of the info bar.
4) To view the split screen option, tap the
Camera Icon
4
.
27
Page 28

TROUBLESHOOTING
TAKING CARE OF YOUR RECHARGEABLE BATTERY
• Ensure that you fully charge your battery for 9 hours before its first use.
• To maintain maximum battery life it is recommended that you fully discharge your battery periodically.
If your Parent Unit is not in use, please turn it OFF.
FALSE ALARMS WHEN SENSOR PAD IS IN USE
• Turn OFF the Camera.
• Make sure there is no bedding between the mattress and the Sensor Pad.
• If the crib has a spring or slat base, place a hardboard between the crib base and the Sensor Pad
measuring at least 13 in x 13 in x ¼ in thick.
• Make sure the Sensor Pad is positioned as described under the setup requirements. Sensitivity
may need to be adjusted.
ALARM WILL NOT SOUND
• Avoid contact with the crib when the monitor is ON.
• Place crib near a solid supporting wall to avoid Sensor Pad from detecting movement from outside the
crib.
• You may need to decrease the sensitivity.
NO SOUND IS BEING TRANSMITTED (REFER TO PAGE 18)
• Check monitor is not on mute, refer to step 5.1.
• Check the volume level on the Parent Unit and the Camera to ensure they are set to an appropriate level.
• Try bringing the Parent Unit closer to the Camera.
• Charge the Parent Unit.
WEAK RECEPTION
• Intermittent sound - change to vox off, refer to step 5.1.
• Bring units closer together.
• Change the position of one or both units.
• Place units on a flat surface away from baby’s reach.
• Recharge the Parent Unit.
STATIC, DISTORTION, INTERFERENCES
(FROM OTHER MONITORS, WIRELESS PHONES, WALKIE-TALKIES, ETC.)
• Rotate Parent Unit or move it away from source of interference.
FEEDBACK (LOUD NOISES EMITTED FROM THE PARENT UNIT)
• Move units farther apart (at least 3 meters).
• Decrease volume on Parent Unit.
THE PARENT UNIT SCREEN IS BLANK
• Turn the Parent Unit back ON by pushing and holding the POWER ON/OFF button for 2 seconds.
• Recharge the Parent Unit.
• Check the nursery unit is on.
• Reconnect the parent and nursery unit.
28
Page 29
LIMITED WARRANTY
Angelcare® warrants to the original owner of this
product that Angelcare® video, movement and sound
monitor is free from any material and workmanship
defects, for a period of one (1) year from the date
of the original purchase. If this monitoring system
fails to function properly when used as directed
under normal conditions within the one year period,
Angelcare® will either repair or replace the product,
at our discretion, free of charge. Please contact your
distributor.
The product must be accompanied by a proof
of purchase, either a bill of sale or other proof
that the monitoring system is within the warranty
period. Angelcare® will bear the cost of repairing or
replacing the product and shipping it back to you.
This warranty does not apply to a product which
has been damaged as a result of improper
maintenance, an accident, improper voltage
supply or any other form of misuse. The warranty
is also void if the owner repairs or modifies the
product in any way. Angelcare® is not liable for
any incidental or consequential damages with
regard to this product. The warranty also excludes
any liability other than what is stated above. No
other warranty is given.
TECHNICAL SPECIFICATIONS
Range:
Open field (Open area without obstructions):
up to 820 ft / 250 meters.
Number of Channels:
USA/Canada: 24 channels.
Europe: 24 channels.
Power Supply:
1 included Li-Ion battery (Parent Unit)
100 - 240 VAC / 5 VDC adapter for the Parent Unit
100 - 240 VAC / 5 VDC adapter for the camera
1 included CR3032 battery (wireless Sensor Pad)
(AC417, AC517)
Caution: To reduce the risk of electric shock, do
not expose this product to rain or moisture.
Danger of explosion if batteries are incorrectly
replaced. The battery included for the Parent Unit
is a user replaceable Li-ion rechargeable battery,
manufactured by Icon Energy System (Shenzhen)
Co Ltd. Only use the Angelcare recommended
replacement battery. To obtain information on
replacement batteries please contact Angelcare
customer service: www.angelcarebaby.com or
contact your local distributor. Instructions will be
included with the replacement battery. Dispose
of exhausted batteries properly according to your
local ordinances. Keep all batteries away from
children.
This warranty does not cover products and
accessories which are not Angelcare-branded, or
any problems that result from usage that is not
in accordance with product instructions, failure
to follow the product instructions, or problems
caused by using accessories, parts or components
not supplied by Angelcare.
LEGAL RIGHTS VARY FROM COUNTRY TO
COUNTRY. SOME COUNTRIES DO NOT ALLOW
THE EXCLUSION OR LIMITATION OF INCIDENTAL
OR CONSEQUENTIAL DAMAGES, SO THE ABOVE
LIMITATIONS MAY NOT APPLY TO YOU.
WE ARE NOT IN ANY WAY RESPONSIBLE FOR
ANY OUTCOME RESULTING FROM THE USE OF
THIS PRODUCT.
IMPORTANT! This Angelcare® monitor is a personal
care product. Please do not return this product
to the store. If you have questions or need help,
please call your distributor before returning this
product.
Batteries:
• DO NOT mix alkaline standard
(carbon-zinc), or rechargeable
(NI-CD, NIMH, etc.) batteries.
Transmission:
Data transmission between the Parent
Unit and the Camera is made on the 2.4 GHz
frequency.
Maximum RF Power Transmitted = 13.6dBm
(22.9mW)
Hereby, Angelcare Monitors Inc., declares that
this Baby Monitor is in compliance with Directive
2014/53/EU. Please click here to be directed
to the full text version of the EC Declaration of
Conformity
.
E
N
PROTECT THE ENVIRONMENT
This electronic equipment contains reusable material and must not be
disposed with domestic waste. Please take it to a collecting point for
electric and electronic equipment (ask your local authorities for details).
29
Page 30

This Angelcare Baby Monitor is a Personal Care Product. Please DO NOT return
this to the store, but contact us initially for advice and assistance:
NOTE: Helpline is open Monday to Friday, 10am to 4pm, excluding bank holidays.
IM510-UK-100217
 Loading...