

Page 1
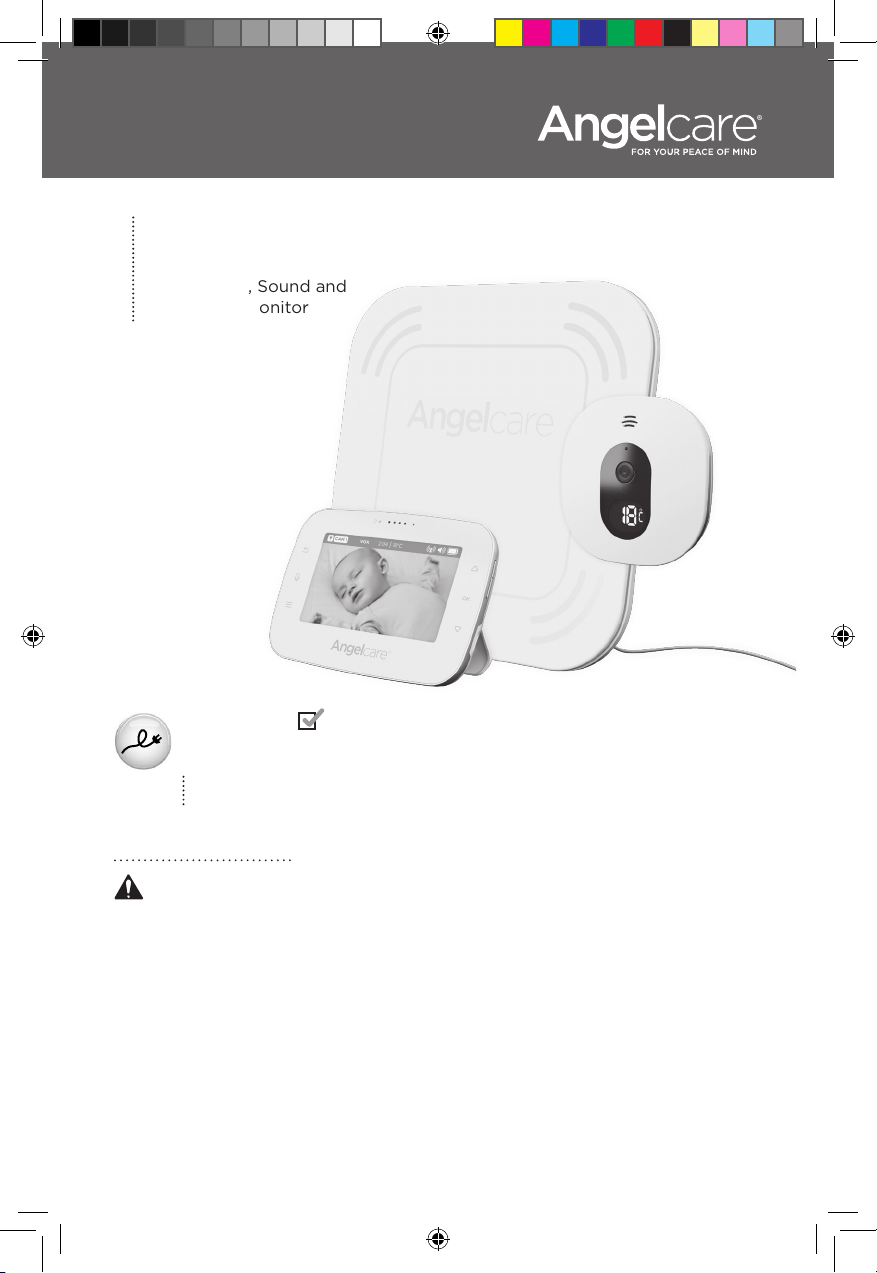
OWNER’S MANUAL
Model AC315
Baby Video, Sound and
Movement Monitor
Cord Safety
Ensure the Camera is at least 1 metre away from your baby’s cot.
For assistance, FAQs or guidance with your monitor
please visit our Customer Support page at angelcare.co.uk
TABLE OF CONTENTS
WARNINGS...............................................................................................................................................................................2
Setup requirements..........................................................................................................................................................................3
Charging the Parent Unit (9 hours) ............................................................................................................................................4
Positioning the movement Sensor Pad .....................................................................................................................................5
Setting up the Camera ....................................................................................................................................................................7
Turning on your monitor ................................................................................................................................................................7
Getting to know your monitor......................................................................................................................................................9
Activating and deactivating additional functions ................................................................................................................12
Adding accessories ........................................................................................................................................................................ 16
Troubleshooting ...............................................................................................................................................................................17
Limited warranty ............................................................................................................................................................................. 18
Technical specifications ................................................................................................................................................................ 18
01m5_Manuel_AC315_UK_12703.indd 1 2017-10-16 9:19 AM
Page 2
OWNER’S MANUAL
KEEP YOUR OWNER’S MANUAL FOR FUTURE REFERENCE.
PLEASE READ THE WARNINGS AND INSTRUCTIONS CAREFULLY BEFORE ASSEMBLING & USING THE PRODUCT.
FAILURE TO FOLLOW THE WARNINGS AND THE INSTRUCTIONS COULD RESULT IN SERIOUS INJURY OR DEATH OR
DAMAGES TO THE PRODUCT.
THE SENSOR PAD FEATURE IS NOT FOR USE WITH ADULTS, CHILDREN OR INFANTS OLDER THAN 24 MONTHS.
THE SENSOR PAD IS NOT INTENDED TO BE USED TO DETERMINE IF A CHILD IS OUT OF THE COT.
WARNING
Adult assembly required.
Keep small parts away from children when assembling.
We, at Angelcare®, stand behind all of our products.
If you are not completely satisfied or have any questions,
United States and Canada: Please contact us at: [email protected]
Other countries: Please contact your local distributor.
WARNINGS
1. THIS PRODUCT CANNOT REPLACE RESPONSIBLE ADULT SUPERVISION.
This produ ct is designed to ai d in the monitoring of y our child. When
using the m onitor, you must still pr ovide the supervi sion necessar y for the
continue d safety of your chil d. Monitoring of pr emature babies , or those
conside red to be at risk, sh ould always be car ried out under t he supervis ion
of a health pr ofessional. Th is monitor SHOU LD NOT be used as a medi cal
device, no r as a device to prevent Sudd en Infant Death Syn drome (SIDS).
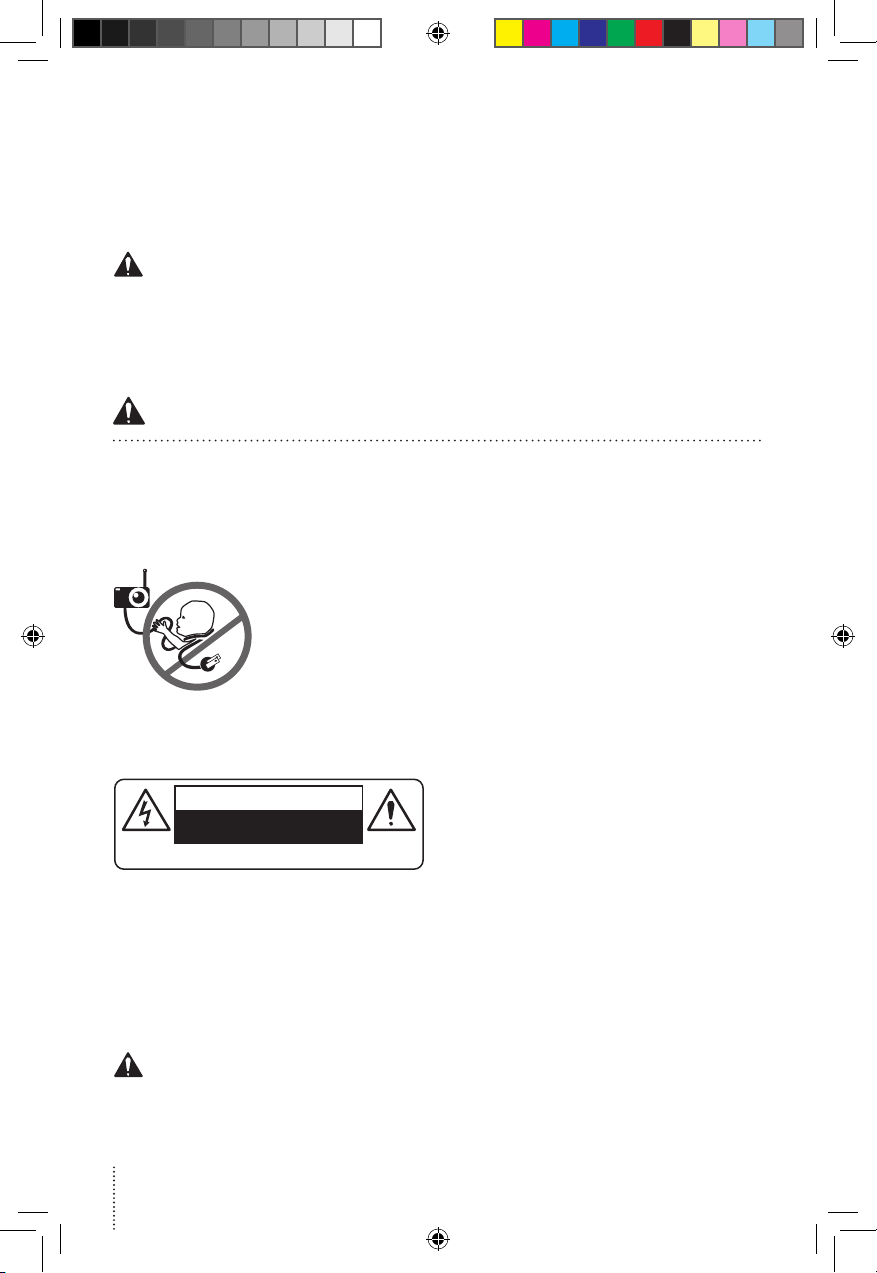
2. WAR NING Strangul ation Hazard — Chil dren have STRAN GLED in cords.
Keep adapt er cords out of the reac h of children (more than 1 m etre away).
NEVER u se Wired Sensor Pa d(s) without the protecti ve cord covering.
Check prot ective cord covering be fore each use. Imme diately discontin ue
use, peri odically and wh en changing loc ation of the Camer a.
6. ALWAYS be sure to im mediately check o n baby whenever an al arm
sounds.
7. DO N OT use monitor near w ater (such as bath tub, sin k, etc.).
use of Wired S ensor Pad(s) if
protective c overing is damage d or
broken.
3. Neve r use extension cor ds with
adapters . ONLY use the adapters
provid ed.
4. Wh en an adapter is plu gged into
an electr ical outlet, DO N OT touch
the expose d end.
5. ALWAYS be sure tha t both the
transmitter and receiver are working
properly a nd are within ran ge of each
other. Test the mon itor before first
CAUTION
RISK OF ELECTRIC SHOCK
DO NOT OPEN
DO NOT EXPOSE TO RAIN OR MOISTURE
8. Kee p monitor AWAY from heat source s (such as stoves , radiators, etc.).
9. ALWAYS place both t he Camera and th e Parent Unit on a flat s urface
in an uprig ht position and all ow for proper ventila tion. DO NOT place on
sofas, cu shions, beds , etc. which may bloc k ventilation.
10. Th is monitor uses pub lic airwaves to transmi t signals. The Par ent Unit
may pick up sig nals or inter ference from ot her nurser y monitors in you r area.
Your monitor may e ven be picked up by other h ouseholds. To prote ct your
privacy, ma ke sure both units are tu rned OFF when not in use .
11. Th is product is NOT a toy. DO N OT allow children to pl ay with it.
12. T his product cont ains small part s. Adult assemb ly required. Exe rcise
care when unpacking and assembling the product and keep small parts
away from chil dren.
13. Wh en using the moni tor, the room temperat ure should be betwe en
10°C and 4 0°C.
BATTERY WARNING
14. Th e Parent Unit bat tery is a replacea ble Li-Ion batte ry. Only use the
Angelc are recommende d replacement ba ttery. Danger of exp losion if the
wrong batt ery is used or if rep laced incorrec tly. Refer to your user m anual
for correc t battery insta llation. DO NOT sho rt circuit suppl y terminals.
Only use th e Angelcare provi ded power adapter to c harge the batter y.
Remove the ba ttery from your Pa rent Unit if produc t is to be stored for
an extende d period of time. Disp ose of batteries ac cording to your loca l
ordinan ces. ALWAYS keep all batterie s away from children .
2
15. IMPORTANT SAFETY INSTRUCTIONS
15.1 H eed all warnings – All w arnings on the pro duct and in the ope rating
instruc tions should be ad hered to.
15.2 Follow all instru ctions – All opera ting and use instru ctions should
be followed.
15.3 Water and moisture - D O NOT use this appar atus near water. For
example, n ear a bath tub, wash b owl, kitchen sink , laundry tub, in a we t
environm ent or near a swimmi ng pool and the like . Care should be ta ken
so that obje cts DO NOT fall onto u nits and that liqui ds are not spilled into
either un it or Sensor Pad thro ugh its opening s.
15.4 Cleaning - Disco nnect all units b efore cleaning . DO NOT immerse in
water any par t of the monitor. Clean o nly with dry cloth .
15.5 Ventilation - DO NOT blo ck any ventilation o penings. Al low for proper
ventilatio n when units are in use . DO NOT cover the Camer a or the Parent
Unit with any o bject such as a bla nket. DO NOT place it in a d rawer or in
any locati on which would muf fle the sound or inte rfere with the nor mal
flow of air.
15.6 Heat sources - DO NOT i nstall near any h eat sources suc h as radiators,
heat regis ters, stoves, TVs or o ther apparatus ( including ampl ifiers) that
produce h eat. Heat can dam age the case or ele ctrical part s.
15.7 Power cord protectio n - Protect the Senso r Pad cord and
Adapter’s p ower cord from being w alked on or pinche d by furniture
or other ite ms – Power supply cord s should be routed so th at they
are not likel y to be walked on or pinch ed by items upon or ag ainst
them, payi ng particular a ttention to cords an d plugs, convenie nce
receptac le, and the point wh ere they exit from the p roduct.
The socket o utlet shall be inst alled near the equ ipment and shall b e easily
accessib le. Make sure to plug th e adapter to the socke t outlet nearest
to the equip ment and that is eas ily accessible. To disc onnect from mai ns,
unplug the adapter.
15.8 Accessories - On ly use attachme nts/accessories s pecified by the
manufac turer. DO NOT place thi s product on an uns table cart, st and,
tripod, b racket or table. T he product may fal l, causing serio us injury to
a child or ad ult and serious d amage to the produc t. Use ONLY with a
cart, stand, tripod, bracket or table recommended by the manufacturer
or sold with th e product. Any mo unting of the produ ct should follow th e
manufacturer’s instructions.
15.9 Unplug this app liance during lig htning storms or wh en not used for
long peri ods of time.
15.10 Servicing - DO NOT a ttempt to service th is product yours elf as
opening o r removing covers (except b attery door) may expo se you to
dangerous voltage or other hazards.
15.11 Replacement pa rts - When repla cement parts ar e required, be sur e
the replacement parts specified by the manufacturer have the same
charac teristic as the orig inal part. Una uthorized substit ution may result
in fire, el ectric shock or oth er hazards.
15.12 Usage - This baby mo nitor is intended a s an aid. It is NOT a sub stitute
for respon sible and prop er adult supe rvision and s hould not be use d as such.
Use this ap pliance ONLY for its inte nded use as descr ibed in this manua l.
15.13 Power Sources - Ope rate this product o nly from the type of p ower
source ind icated on the type pla te of the adaptor. If you are uns ure of the
type of powe r supply to your home , consult your deal er or local power
company.
15.14 Overloading - DO NOT ove rload wall outlet s, extension cord s or
integral co nvenience recept acles as this can re sult in a risk of fire or
electric shock.
15.15 Objec t and Liquid Entr y - NEVER push obj ects of any kind into th is
product t hrough casing sl ots as they may touch dan gerous voltage po ints
or short o ut parts that co uld result in a risk of f ire or electric s hock. NEVE R
spill liqu id of any kind on the pro duct.
15.16 Antenna - The anten na used for this tra nsmitter must be i nstalled
to provide a se paration distan ce of at least 20 cm from a ll persons and
01m5_Manuel_AC315_UK_12703.indd 2 2017-10-16 9:19 AM
Page 3
must not be c ollocated or ope rating in conjun ction with any othe r antenna
E
N
or tr ansmi tter.
15.17 P ower Lines - An outsi de antenna system s hould NOT be locate d
in the vicin ity of overhead powe r lines or other ele ctric light or power
circuit, o r where it can fall int o such power lines or ci rcuits as contac t
with them may b e fatal.
15.18 Vibration Sourc e - When the monito r is in use, DO NOT use a b edside
crib, cot mo bile or other cot a ccessories th at may produce vib rations. Oth er
sources of vi brations may inc lude fans, wa shing machine s, loud music , etc.
These sou rces of vibration may i nterfere with the pe rformance of you r
Angelcare® monitor an d the alarm will not so und if it continues to d etect
any movemen t other than your baby ’s. Be sure all vibr ation sources are
elimina ted before using the m onitor.
15.19 You may experi ence false alarm s for several reason s. The
most comm on reason is the Cam era has not been tu rned OFF
after you hav e removed your baby from t he cot. Another rea son is
the Senso r Pad has not been pl aced under the ma ttress properly.
Be sure the S ensor Pad is on a flat , firm surface with th e Angelcare® logo
side faci ng up. The sensitiv ity level may also nee d to be adjusted. Ref er
to St ep 5.1. Always be sur e to immediately che ck on baby whenever a n
alarm sounds.
15.20 Sensor Pad - Your Se nsor Pad can be u sed in any cot that i s stationary.
If the cot has a s pring or slat ba se, place a hard b oard between th e cot base
and the Sen sor Pad measuri ng at least 33 x 33 cm an d 6 mm thick. Only
use your Angelcare® monitor in a s tationary sle eping environme nt such
as a cot where th e Sensor Pad can res t on a completely fla t, firm surface .
The Senso r Pad is made of plast ic and does not perm it the air to circulate .
Therefor e, milde w build up c ould deve lop und erneat h the matt ress in th e Sensor
Pad area. We su ggest rotatin g the mattress re gularly to prevent a ny mildew.
16. IM PORTANT SAFETY IN STRUCTIONS R ELATED TO USE OF BATTER IES
16.1 U se ONLY the type and s ize of battery spe cified in the own er’s manual.
There is a ris k of explosion if bat tery is replaced wi th an incorrect ty pe.
SETUP REQUIREMENTS
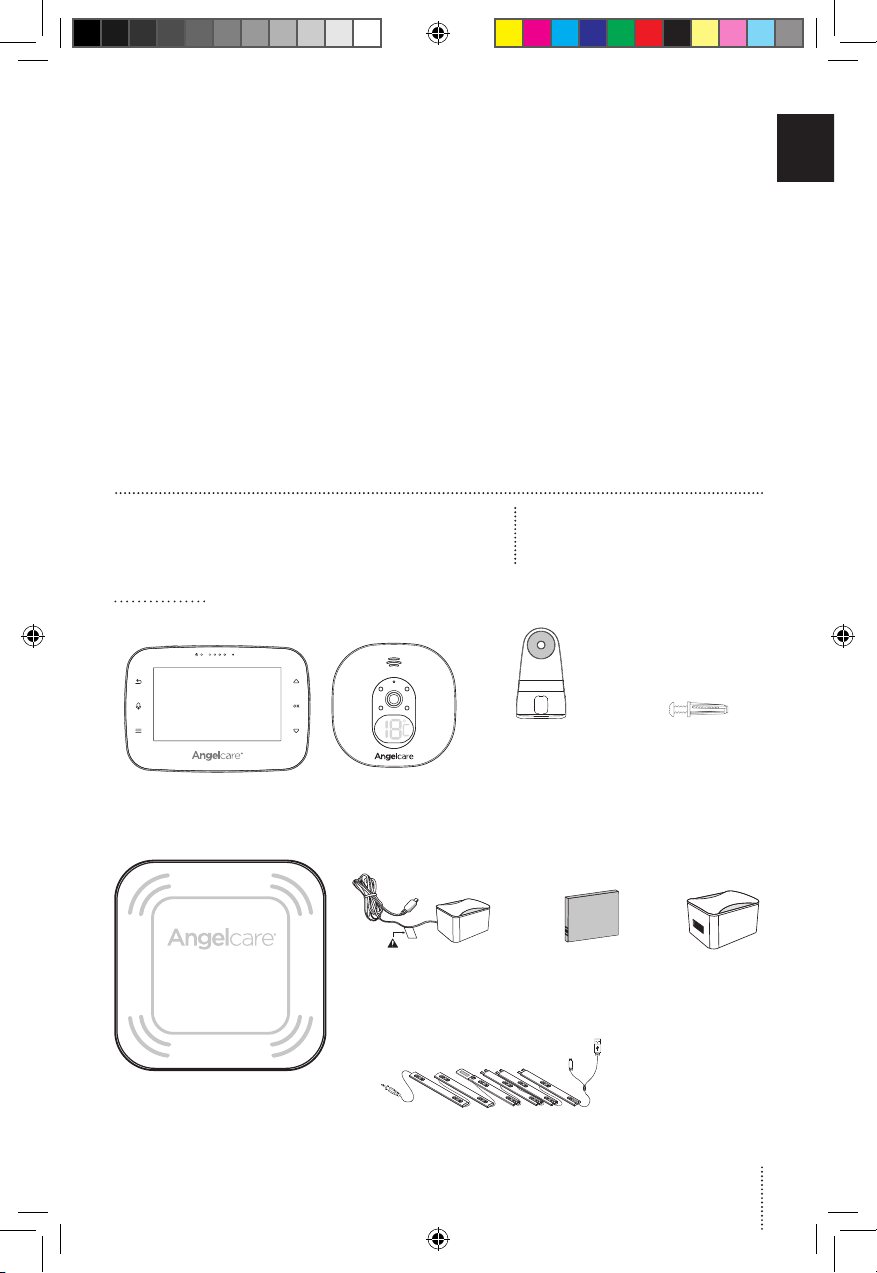
INCLUDED:
16.2 Charge the bat tery for 9 hours pri or to first use. Be su re to have the
monitor in th e OFF position during th is period. ONLY use th e adapters
included with your monitor.
16.3 DO NOT use these ada pters with any other e quipments.
16.4 When un plugging the a dapter from the C amera, be sure i t is switched
to the OFF posit ion.
16.5 DO NOT dispose of bat teries in fire. Th ey may explode. Che ck with
local reg ulations for poss ible special dis posal instruc tions.
16.6 Exercise care in ha ndling batteri es in order not to shor t out the
batterie s with conductin g materials such as r ings, bracelet s and keys.
Overcharging, short circuiting, reverse charging, mutilation, or incineration
of batteri es must be avoided to pr event one or more of the fo llowing
occurren ces: release of t oxic materials , release of hydrog en and/or oxygen ,
gas and ris e in surface tempe rature.
16.7 DO NOT attempt to rejuve nate the batter y provided with or id entified
for use with th is product by heati ng them. Sudde n release of batter y
electro lyte may occur, causin g burns or irritati on to eyes or skin.
16.8 If and when nece ssary, the batter y must be replace d with identical
new ones or e quivalent (volts an d size).
16.9 Remove the batter y from the Parent Un it if you store the produ ct
over 30 days bec ause the batter y could leak and da mage the produc t.
16.10 Discard ‘dead ’ batteries as soon a s possible since ‘d ead’ batterie s
are more like ly to leak in a produc t. If a battery has l eaked or vented, it
should be r eplaced immed iately using protec tive gloves.
16.11 DO NOT store this prod uct, or the batte ry provided with or i dentified
for use with th is product, in hig h-temperature a reas.
Model AC315
Baby Video, Sound and
Movement Monitor
Hardware
(Screwdriver
required
for wall mounting)
AC adapter
(for Camera)
Touch control Parent Unit
Camera
AC adapter
(for Parent Unit)
Tabletop stand with
removable wall
mount metal ball
(for Camera)
Lithium ion
battery pack
(for Parent Unit)
Wired movement
Sensor Pad
* Always place
Angelcare logo side up *
6 Pre-threaded cord covers with
Split USB cable
3
01m5_Manuel_AC315_UK_12703.indd 3 2017-10-16 9:19 AM
Page 4
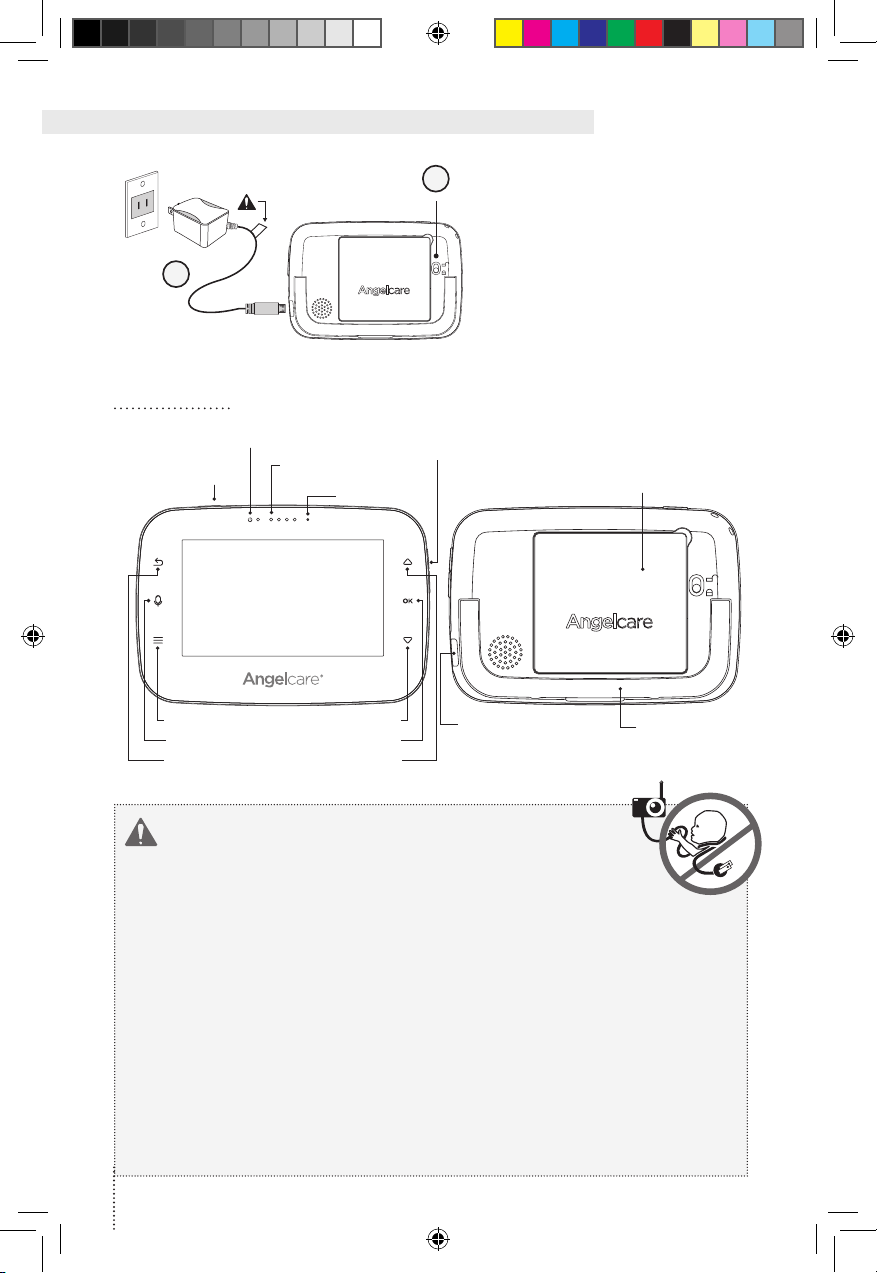
STEP 1 - CHARGING THE PARENT UNIT (9 HOURS)
WARNING
1) Unlock the battery compartment
1
Battery compartment lock
2
Rear View
PARENT UNIT:
on the rear and remove the
cover. Insert the provided
rechargeable battery into the
compartment.
battery and the contacts in the
compartment must be aligned.
2) Connect the USB plug to the
Parent Unit and connect the power
adapter with an electrical outlet.
3) Charge the unit for 9 continuous
hours prior to first use.
Contacts of the
Power indicator
Power
On/Off
Main Menu
Microphone
Navigate back
Visual sound
indicator
Navigate Down
Confirm Selection
Front Side Rear Side
Volume control +/-
(on the side)
Microphone
Navigate Up
Micro USB charging
port (on the side)
Rechargeable battery
compartment
Folding stand
(on rear)
STRANGULATION HAZARD.
Children have STRANGLED in cords:
• Keep adapter cords out of the reach of children
(more than 1 metre away).
• Because of the serious strangulation risk to infants
and toddlers, parents and caregivers should never
place the Camera within 1 metre of a cot.
• NEVER use Sensor Pad without the cord covers. Check
cord covers before each use to ensure it is securely
placed under the leg of the cot. Discontinue use of
Sensor Pad if any cord covers are damaged or broken.
• NEVER use extension cords with adapters. ONLY
use the adapters provided. This product is not a toy.
Never allow children to play with it.
4
01m5_Manuel_AC315_UK_12703.indd 4 2017-10-16 9:19 AM
Page 5
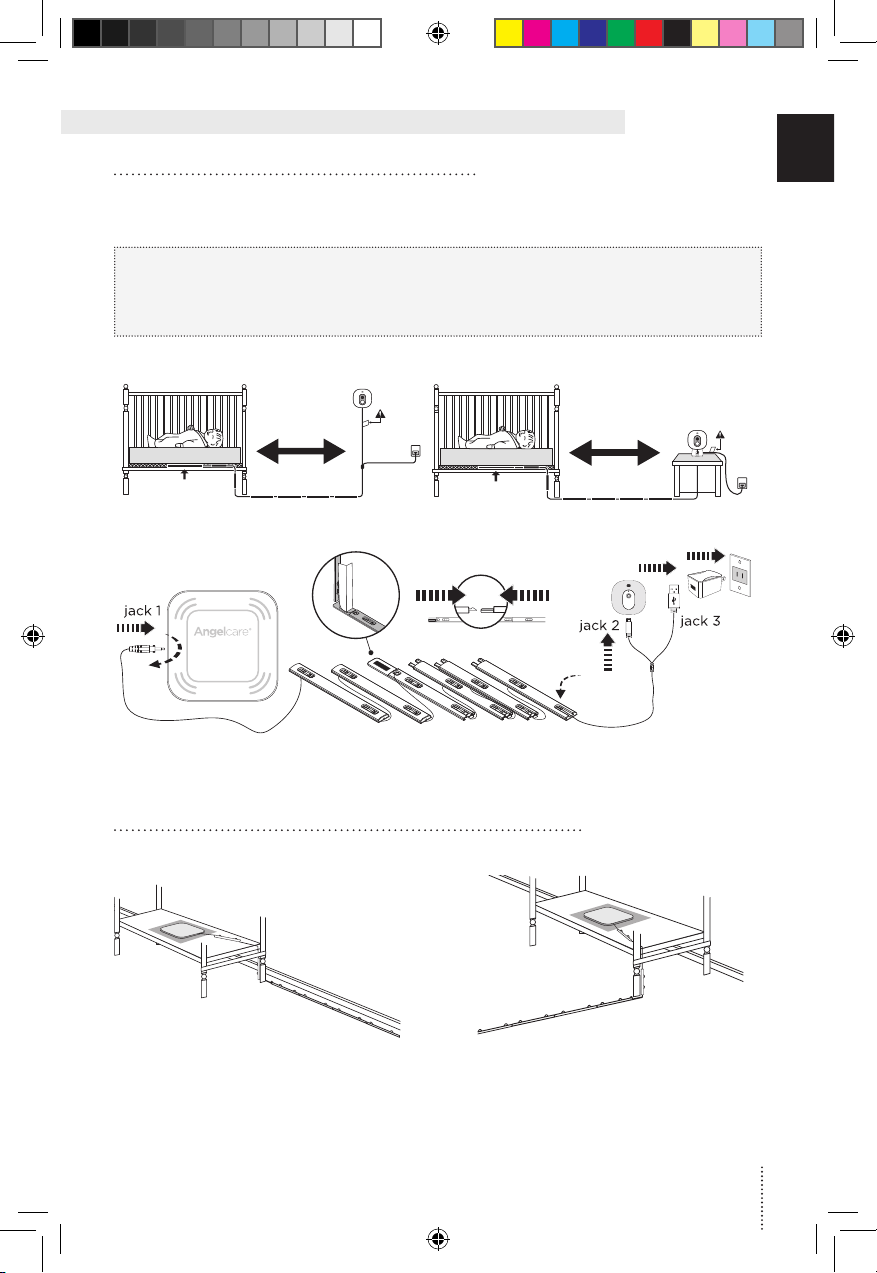
STEP 2 - POSITIONING THE MOVEMENT SENSOR PAD
E
N
2.1 - SELECT A LOCATION FOR THE CAMERA
Camera can be installed on the wall (see included parts) or using the tabletop stand.
Depending on the position you choose, you’ll need to remove the metal ball from the stand
to wall mount Camera.
IMPORTANT
Place the cot near a supporting wall and far from air currents. Install the Camera on a
flat, stable surface facing the cot at a distance of at least 1 metre. Make sure to plug the
adapter to the socket outlet nearest to the equipment and that is easily accessible.
MUST BE MORE THAN
1 METRE AWAY
MUST BE MORE THAN
1 METRE AWAY
Sensor Pad
6
5
4 3 2 1
OR
Sensor Pad
6
5
4 3 2 1
6 5 4 3 2 1
1) Insert jack 1 into the Sensor Pad and twist it clockwise to lock it.
2.2 - SELECT THE COT LEG TO SECURE THE CORD COVERS
RECOMMENDED
6
5
4
3
Figure 1 Figure 2
2
OR
3
2
1
1
6
5
4
Use the cot leg by the wall closest to the Camera (Figure 1). In cases where the Camera is
across the room, use the leg closest to the Camera to position the covered wire (Figure 2).
It is always preferable that the covered cord run along a wall.
5
01m5_Manuel_AC315_UK_12703.indd 5 2017-10-16 9:19 AM
Page 6
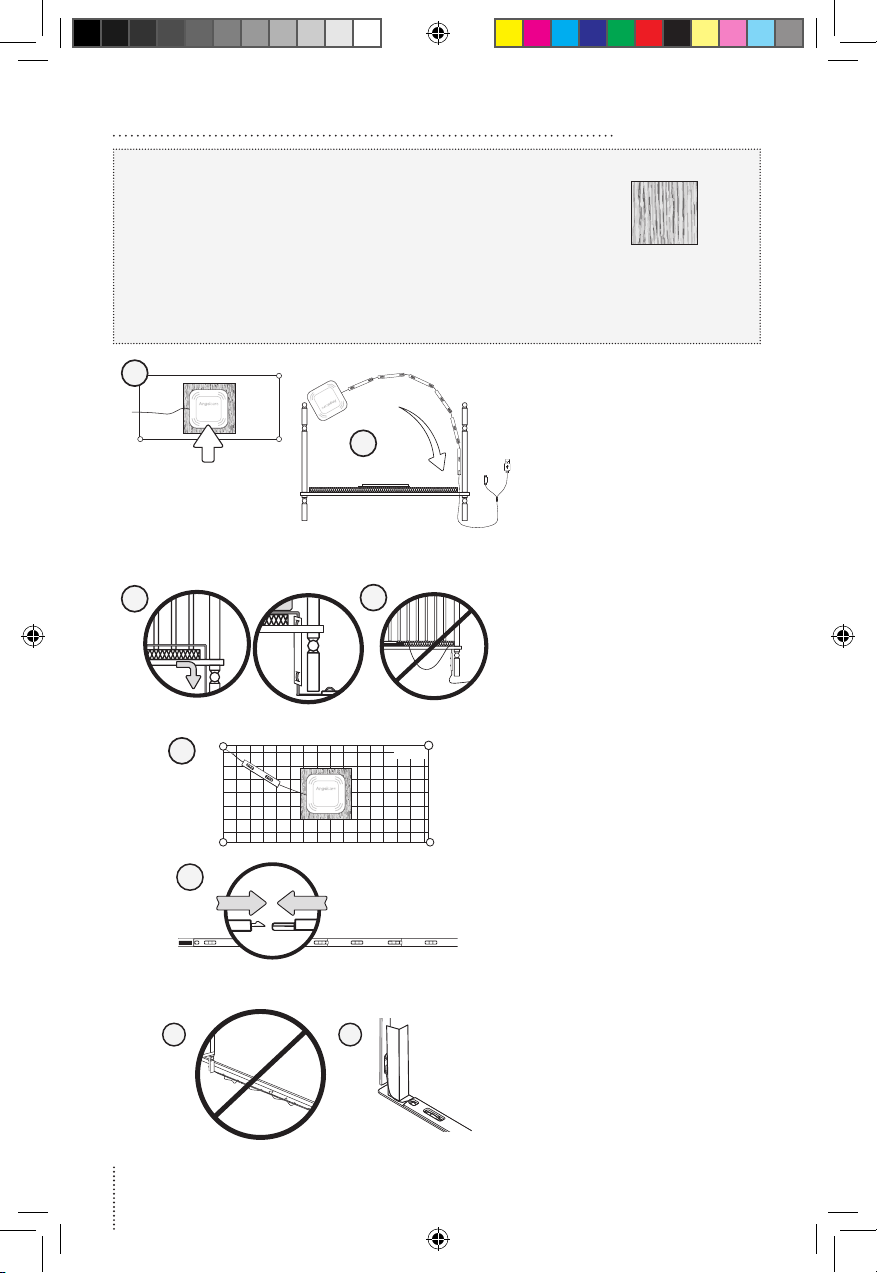
2.3 - INSTALL THE SENSOR PAD ON THE MATTRESS SUPPORT
8 cm
4132
4
3
2
1
IMPORTANT
If your cot does not have a solid, stable surface for the Sensor
Pad, you will need to place a support under it, to ensure correct
operation of the system.
This hardboard support should be at least 6 mm thick and should
have minimum dimensions of 33 cm x 33 cm. This support board
must be larger than the Sensor Pad surface area.
The Sensor Pad functions with any size and type of mattress except memory-foam
mattresses, hollow frame mattresses and water beds. The hardboard maintains a
constant pressure on the Sensor Pad, enabling it to detect the baby’s movements even
when the baby is at the edges of the cot.
2
Sensor Pad
5
4
6
3
3
2
1
1) Remove the mattress from
the cot.
2) Place the Sensor Pad –
Angelcare logo side up – on
top of the hardboard.
3) Run the connection pin,
warning label and the first
5 cord covers down along
the backside of the cot
leg, between the mattress
support and the inside edge
of the cot.
4) Bring the first 4 cord covers
4
5
down the floor, and keep
the 5th cord cover vertically,
along the backside of
the cot leg, between the
mattress and the inside
edge of the cot.
5) Remove any cord slack to
make sure no parts of the
cord are loose.
6
6) Place the 6th cord cover
approximately 8 cm from
the edge of the mattress
support.
Hardboard
7
CLICK!
7) Snap together the remaining
cord covers that will run
along the floor.
8) Remove any cord slack to
make sure no parts of the
8 9
cord are loose.
9) Peel off the double-sided
tape on the 4th cord cover
and place it securely under
the cot leg.
10) Check to make sure the
Sensor Pad has not moved
from position and place the
6
01m5_Manuel_AC315_UK_12703.indd 6 2017-10-16 9:19 AM
mattress back inside the cot.
Page 7
WARNING
STRANGULATION HAZARD
E
N
• Remove all slack from Sensor Pad Cord.
• When lowering the mattress support
as your child grows, slide the vertical
Cord Cover downward so it remains
approximately in the center between
the mattress support and the floor. Slide
the Sensor Pad Cord through the Floor
Cover to eliminate any additional slack
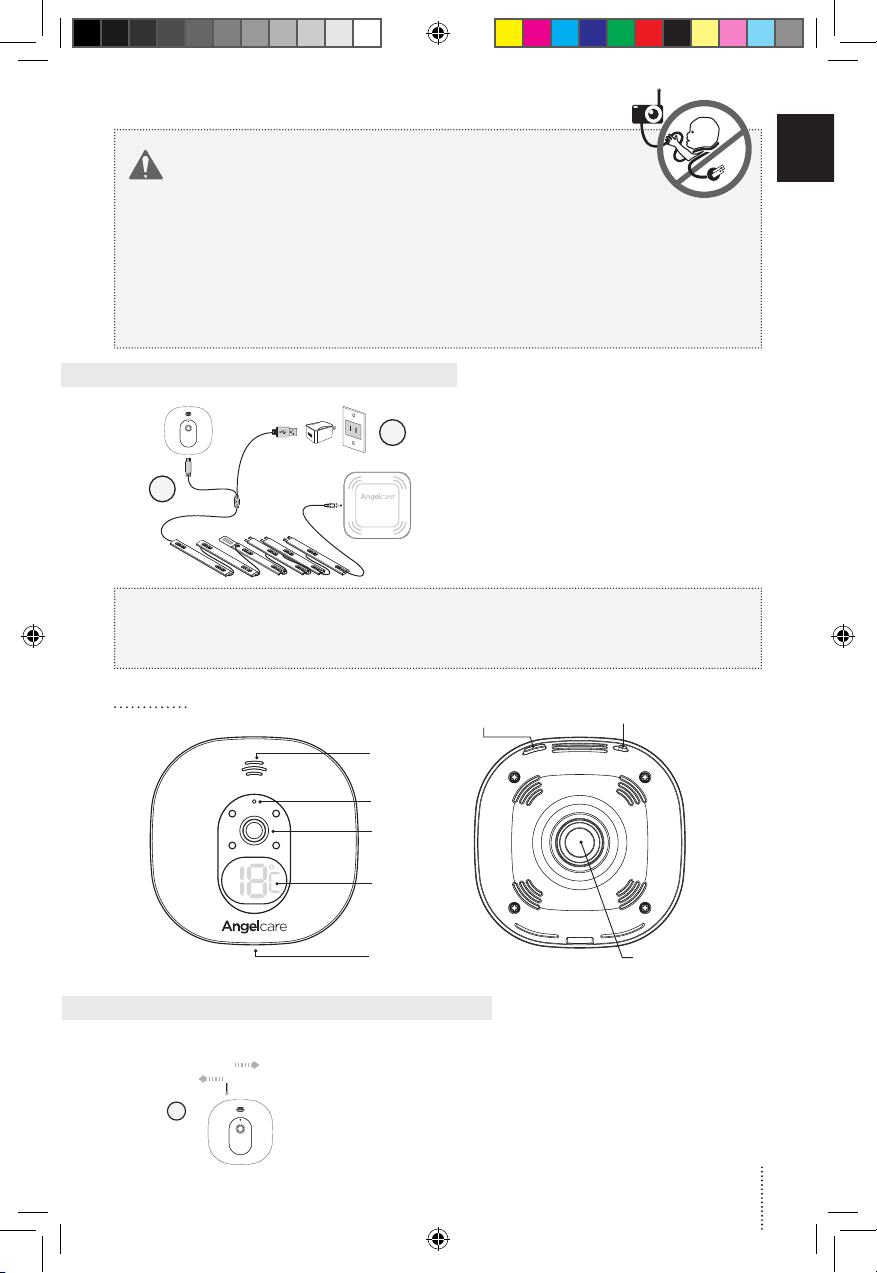
STEP 3 - SETTING UP THE CAMERA
• The Sensor Pad is not
designed for use with
adults, children or
infants older than
24 months.
• Discontinue used of the Sensor Pad
when baby is older than 24 months.
Remove Sensor Pad from cot and store
for future use.
• BEFORE FIRST TIME USE: To test
that the unit is ready for use, refer to
instruction manual on how to test that
the installation has been done correctly.
2
1) Connect the USB plug to the
Camera.
2) Connect the USB plug with the
1
power adapter and then with an
electrical outlet.
3) Adjust the Camera using the
magnetic mount to get the best
view of baby in the cot.
Note: Each time you power ON your Camera, the internal thermometer will need to
calibrate to ensure accuracy. This automatic process will take approximately 30 minutes.
The colour changing temperature display, by default, will be turned “OFF”. You may turn
this feature “ON” in the settings mode on your Parent Unit.
CAMERA
Front Side
Speaker
Microphone
Camera
Room
temperature
display
Micro USB
charging port
Pause Sensor Pad/
Pairing button
POWER ON/OFF
Rear Side
Magnet for
tabletop stand
and wall mount
STEP 4 - TURNING ON YOUR MONITOR
Your Camera and Parent Unit come pre-paired.
ON
OFF
1
1) Slide the Camera ON/OFF switch to the ON position.
01m5_Manuel_AC315_UK_12703.indd 7 2017-10-16 9:19 AM
7
Page 8
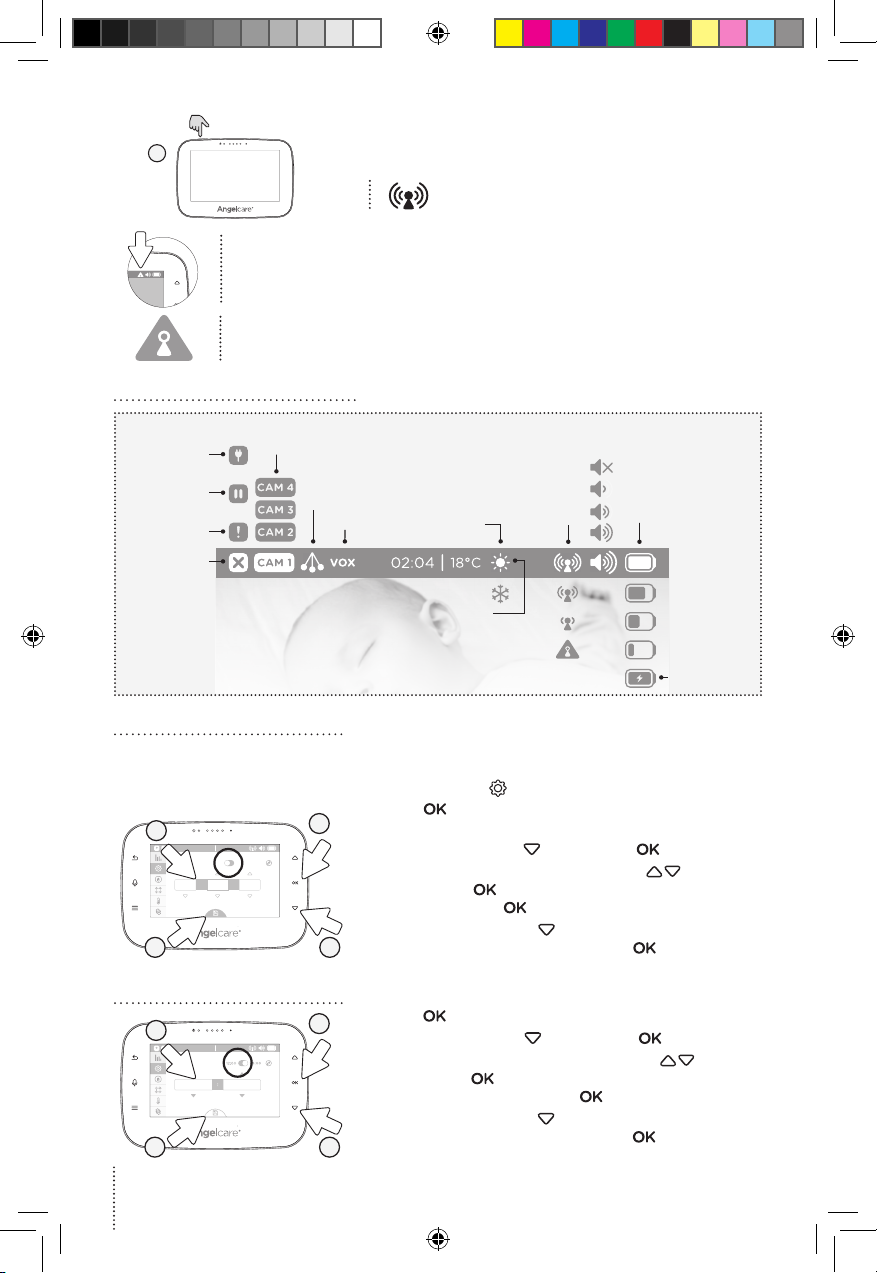
1
When Parent Unit is turned ON and Camera is OFF, Parent Unit will display
Out-of-Range icon.
If there is a lost connection between the two units after 15 seconds, the Out-of-Range
alarm will sound on the Parent Unit (refer to Troubleshooting section):
• The Out-of-Range icon will appear on the screen and on the info bar.
INFO BAR IMPORTANT ICONS
1) Press and hold the Parent Unit ON/OFF button for
2 seconds until LCD screen is turned ON. Angelcare’s
logo will be shown for 1 second.
The Camera connection signal strength
icon will appear in the status bar.
Camera
displaying image
and sound
“TIC” icon
VOX icon
Temperature
alerts icons
Too Cold
Too Warm
Reception
Quality icons
Out-of-Range
Volume Level
icons
Battery Level
indicators
Fully charged
battery (only
appears when
Parent Unit is
plugged in
Wired
Sensor Pad
Normal Status
Sensor Pad
is Paused
Sensor Pad
Alert
Sensor Pad
Lost Link
4.1 - HOW TO SET THE DATE
When activating the Parent Unit for the first time, you’ll be asked to set the date and time
in order to record movement & temperature data. If you choose to skip this step, you can
always go back later by accessing the settings menu
3
02:04 18°C
/
/
08 22 2016
1
31/12/201612/31/2016
Day/Month/Year display.
2) Press the down arrow once and then to set the date.
3) Set the day with the up/down arrows
confirm with
1) Press to switch between Month/Day/Year and
and confirm with
4) Press the down arrow
4
2
is highlighted in blue then Press the
.
and
. Do the same for the month and year
.
, the Save icon at the bottom
button to save
the settings.
4.2 - HOW TO SET THE TIME
1) Press to switch between 12 h and 24 h mode.
3
02:04 18°C
1
2) Press the down arrow
once and then to set the time.
3) Set the hours with the up/down arrows
02 04
confirm with
pm display and confirm with
4) Press the down arrow
is highlighted in blue then Press the
4
2
the settings.
. Do the same for the minutes and am/
.
, the Save icon at the bottom
button to save
8
and
01m5_Manuel_AC315_UK_12703.indd 8 2017-10-16 9:19 AM
Page 9
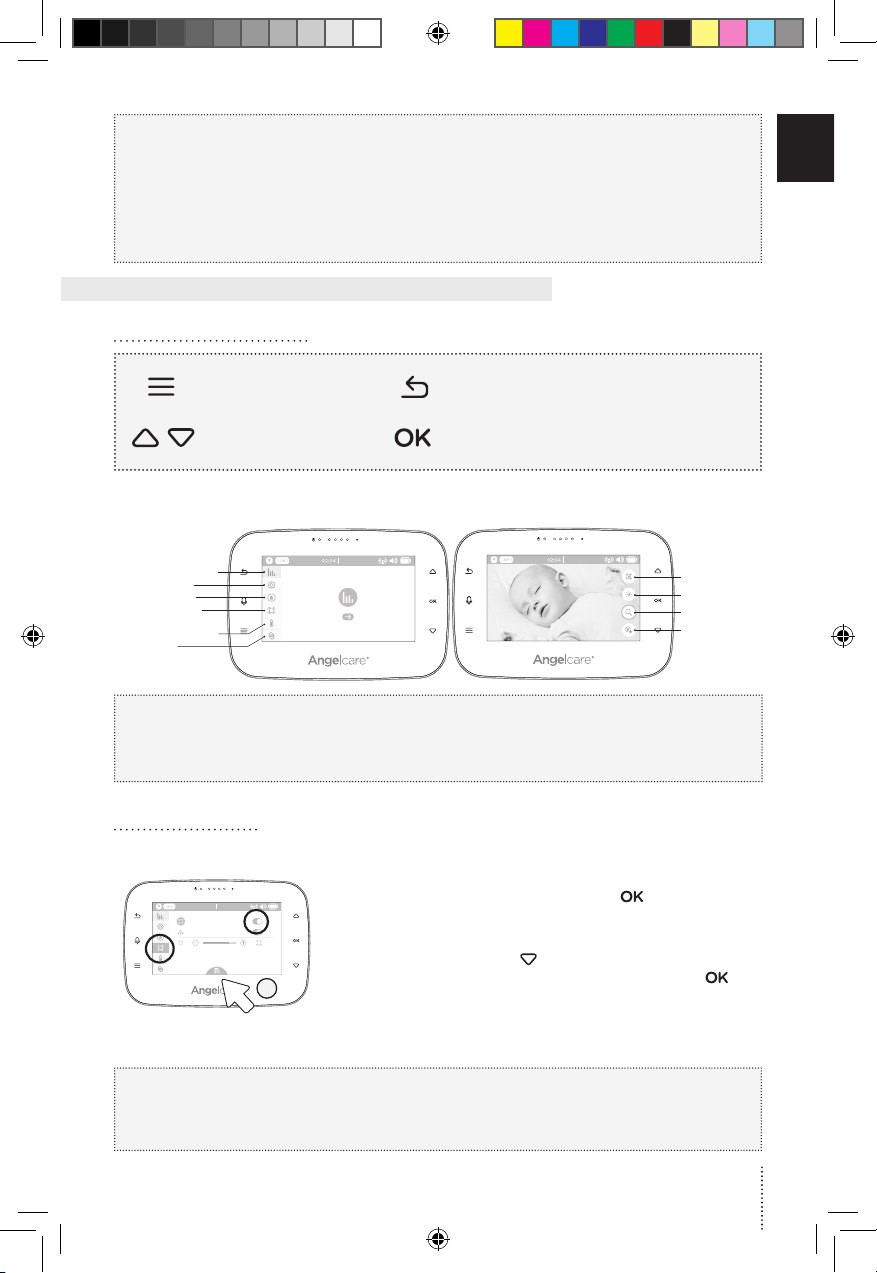
IMPORTANT
E
N
The Sensor Pad will be automatically ACTIVATED when the screen returns to video display view.
If no movement is detected on the surface of the Sensor Pad after 20 seconds, a series
of loud beeps will emit from the Parent Unit & Camera - this is the movement alarm.
When activating any functions on your monitor, to prevent this alarm either:
1) Gently tap the surface of the pad
2) De-activate the movement function, see below for information
STEP 5 - GETTING TO KNOW YOUR MONITOR
TOUCH CONTROL KEYS
The Angelcare
Access to the different
operation settings
Navigate the different
functions
®
monitor can be used with the pre-programmed factory settings or you can
Exit or to go back to main menu when
in sub-menu
Confirm a selection or setting and allows
you to access to a quick menu
also customize your settings to your preference.
Movement &
Temperature Reports
General Settings
Camera Settings
Movement Sensor
Pad Settings
Temperature Settings
Pairing Units
18°C
18°C
Pause Sensor
Pad
Adjust LCD
Brightness
Pan & Zoom
Active Camera
Indicator
IMPORTANT
When in menu or sub-menu modes, sound transmission between the Parent Unit and the
Camera will be temporarily deactivated. ONLY movement-detection alarm will remain
active (if function is activated).
5.1 - SENSOR PAD
TO ACTIVATE/DEACTIVATE THE SENSOR PAD:
18°C
02:04
2
1) In the Sensor Pad settings, press the button to
activate/deactivate the Sensor Pad (when activated the
toggle will turn blue).
2) Press the down arrow
till the Save icon at the
bottom will be highlighted in blue then Press the
button to save the settings.
TO TEST THE SENSOR PAD:
IMPORTANT
• Test your monitor before first use.
• Test your monitor regularly to ensure it is functioning correctly.
• Test your monitor every time you move the Sensor Pad to a different place.
9
01m5_Manuel_AC315_UK_12703.indd 9 2017-10-16 9:19 AM
Page 10
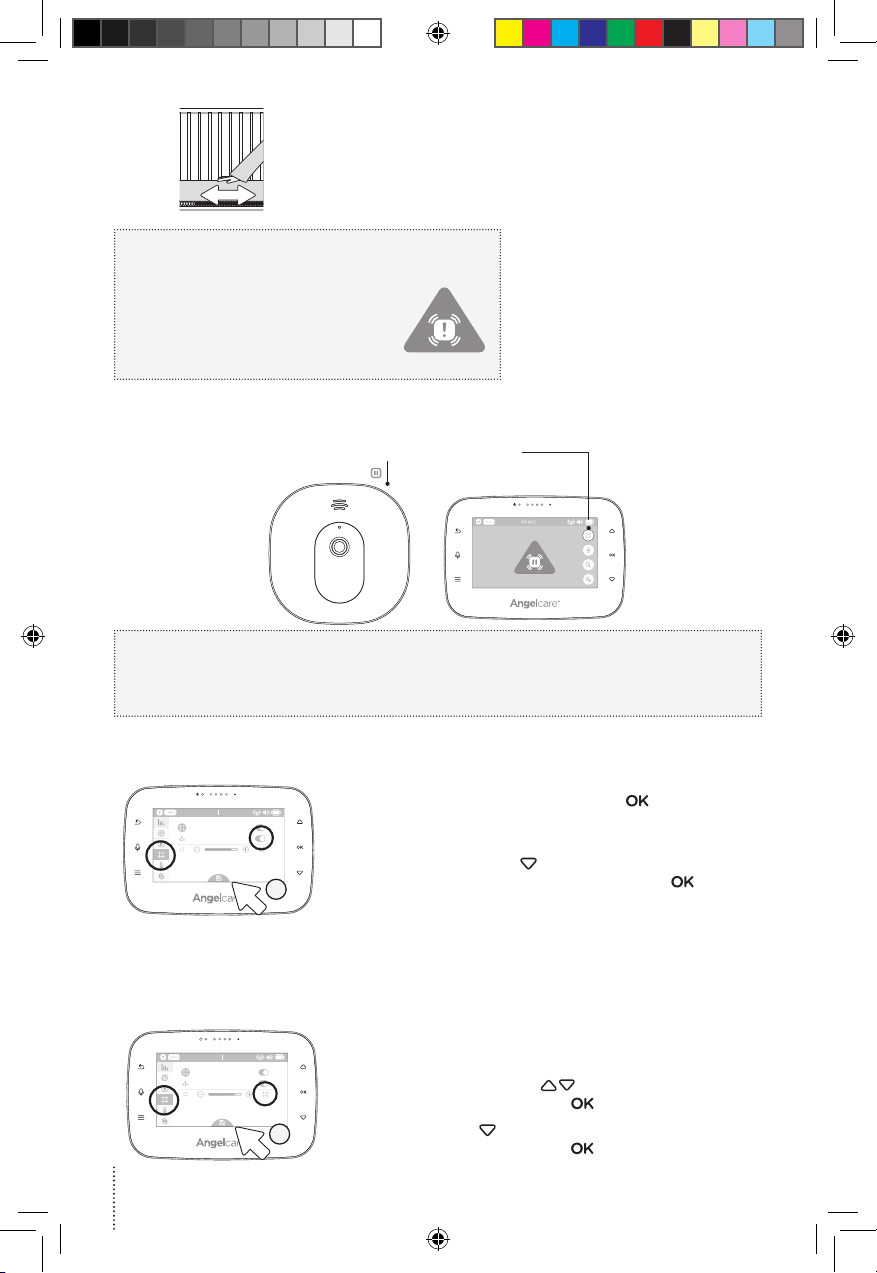
1) After activating the Sensor Pad, the alarm will sound
after 20 seconds.
2) Rub you hand over the mattress to confirm the alarm
stops.
MOVEMENT ALARM
• If NO movement is detected after 15 seconds you will hear
a single ‘TIC’ pre-alarm sound from the Camera.
• If after a further 5 seconds there is still
NO movement detected both the Parent
Unit and Camera speakers will emit loud
continous beeps. - this is the movement
alarm.
• Movement Alarm icon will show on the LCD screen.
IF THE ALARM DOES NOT SOUND
• Avoid contact with the cot while
Sensor Pad is in operation.
• Place the cot near a supporting wall
to reduce vibrations.
• Adjust the Sensor Pad sensitivity level.
• Turn OFF cot mobile, fans, loud music
or anything else that may cause
vibration.
PAUSING AND RESTARTING THE SENSOR PAD:
Allows you to pause the Sensor Pad if you remove baby from the cot, e.g. for feeding or comforting.
PAUSE/UNPAUSE Sensor Pad Buttons
18°C
IMPORTANT
• If you do not pause the Sensor Pad, the alarm will sound if there is no movement after
20 seconds/if baby is removed from the cot.
• Ensure to unpause the Sensor Pad before putting baby in the cot.
TO ACTIVATE/DEACTIVATE TIC FUNCTION:
Allows you to detect baby’s movements as well as hear a TIC sound.
18°C
02:04
1) In the Sensor Pad settings, press the button to
activate/deactivate the Tic function (when activated
the toggle will turn blue).
2) Press the down arrow
2
bottom is highlighted in blue then Press the
to save the settings.
until the Save icon at the
button
TO ADJUST THE SENSOR PAD SENSITIVITY LEVEL:
To ensure adequate monitoring of your child’s movements, you can adjust the sensitivity of the
Sensor Pad in the main settings menu. Set a high sensitivity for a newborn and a lower sensitivity
as the child grows and gains weight. A thicker mattress will also need a higher sensitivity.
18°C
02:04
3
1) In the Sensor Pad settings, select the Sensor Pad
sensitivity bar.
2) Use the up/down arrows
level and confirm by pressing
3) Press down arrow
until the Save icon at the bottom is
highlighted in blue then Press the
to adjust the sensitivity
.
button to save the settings.
10
01m5_Manuel_AC315_UK_12703.indd 10 2017-10-16 9:19 AM
Page 11
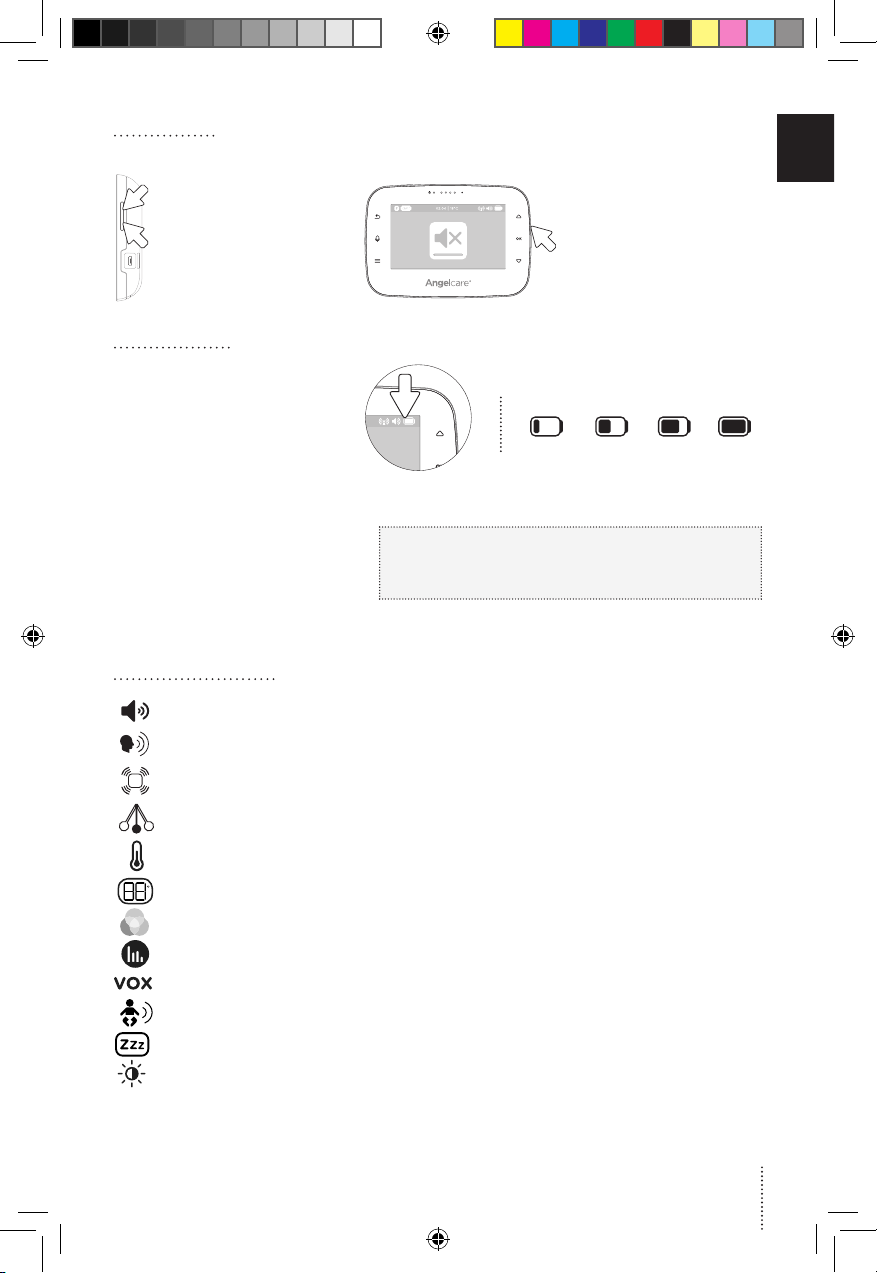
5.2 - SOUND
E
N
TO ADJUST/MUTE SOUND:
Press the Volume up /
Volume down button
to adjust the sound
level.
5.3 - BATTERY
HOW TO CHECK THE BATTERY:
Unplug the adapter from the
Parent Unit and check the
battery level indicator.
HOW TO CHARGE THE BATTERY IN THE PARENT UNIT:
To mute the sound
level press the Volume
down button until
the mute symbol is
displayed.
1/4 full 1/2 full 3/4 full full
Leave the Parent Unit plugged in to fully
charge the unit. Although the battery
at 1/4 capacity works normally,
we recommend that you fully recharge it.
PARENT UNIT BATTERY ALERT
• Alert activates when the battery needs to be recharged.
• Parent Unit will emit a beep sound every 30 seconds.
• Battery Alert icon will show on LCD screen.
YOU ARE NOW READY TO USE YOUR MONITOR
DEFAULT SETTINGS
Parent Unit Volume: Level 3 (of 4)
Camera Speaker Volume:
Movement Mode:
Sensor P
ad Sensitivity:
“TIC” Function
emperature Unit:
T
Temperature Alert:
a Temperature Indicator:
Camer
a Colour Changing Mode:
Camer
Movement and Temperature Monitoring:
oice Activation (VOX):
V
OX Sensitivity:
V
Screen Saver Timer: 30 seconds
LCD Brightness:
L
evel 3 (of 4)
ON
evel 2 (of 4)
L
OFF
elsius
C
OFF
ON
OFF (Whit
OFF
ON
evel 2 (of 4)
L
L
evel 3 (of 5)
e color)
11
01m5_Manuel_AC315_UK_12703.indd 11 2017-10-16 9:19 AM
Page 12
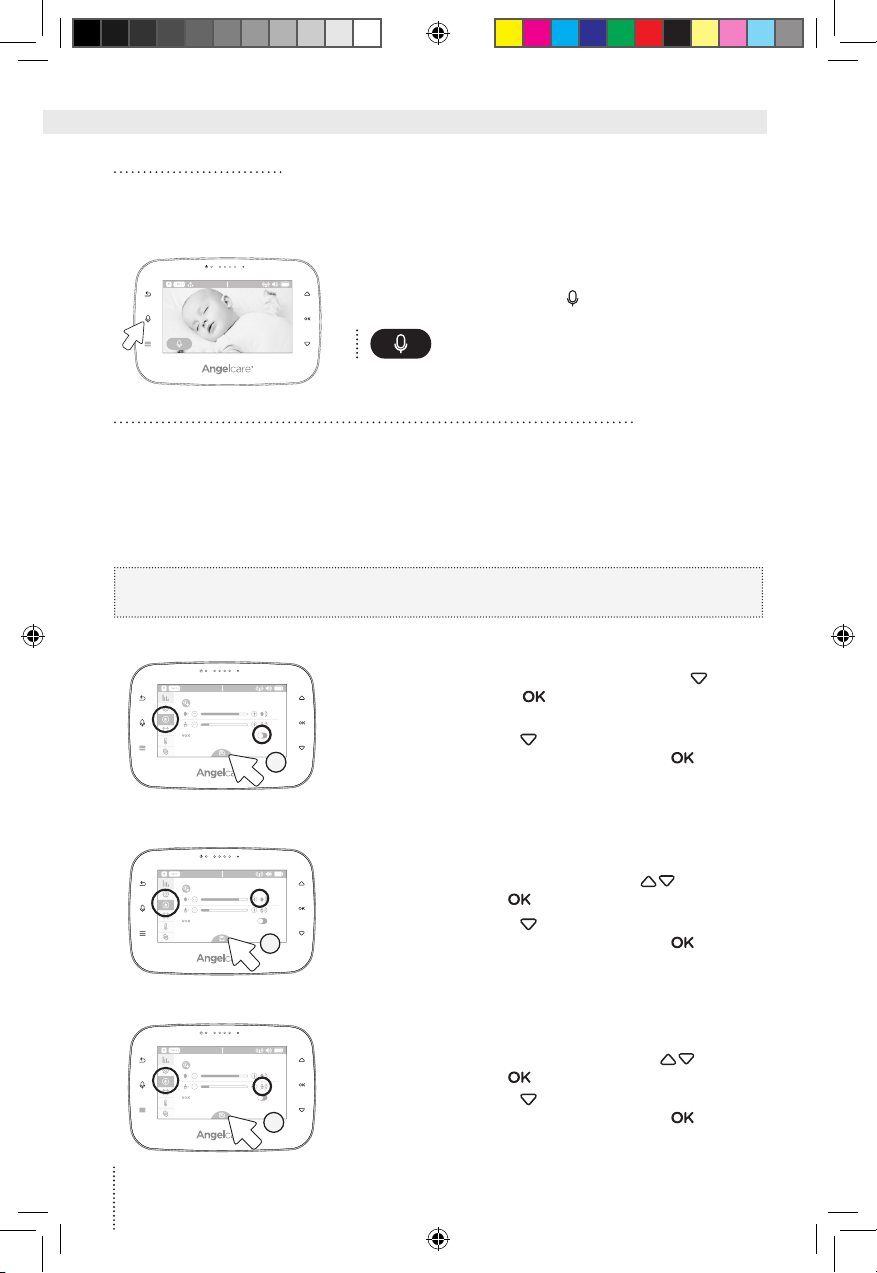
STEP 6 - ACTIVATING AND DEACTIVATING ADDITIONAL FUNCTIONS
6.1 - TWO WAY TALK
Your Parent Unit is equipped with Two Way Talk. This feature allows you to talk to baby
without being in the nursery.
TO ACTIVATE TWO WAY TALK:
02:04 18°C
Press the Microphone button to activate/deactivate
the Two Way Talk.
The Microphone icon appears in the
Screen when the microphone is active.
6.2 - VOICE ACTIVATION (VOX) OR CONTINUOUS SOUND MODE
Allows you to select your option on how your monitor sound. Your monitor is preset to
‘Sound Activated’ (VOX ON). This means that it will transmit sounds only when it detects
them, based on the setting of the sensitivity level. To save power, after 10 seconds, the
sound transmission will stop if no sound is detected. Once sound is detected transmission
will automatically activate.
Or, you can switch to ‘Continuous Sound’ (VOX OFF). The sound monitoring is
continuously ON, picking up all sounds.
NOTE:
By deactivating VOX, Continuous Sound setting will turn ON.
TO ACTIVATE/DEACTIVATE VOX:
02:04 18°C
2
TO ADJUST THE CAMERA SPEAKER VOLUME:
1) In the Camera settings, press the down arrow to the
VOX toggle and press
to activate/deactivate the
VOX function.
2) Press the down arrow
bottom is highlighted in blue then Press the
until the Save icon at the
button
to save the settings.
02:04 18°C
1) In the Camera settings, adjust the Camera speaker
volume level with the up/down arrows
confirm by pressing
.
and
2) Press the down arrow until the Save icon at the
2
bottom is highlighted in blue then Press the
button
to save the settings.
TO ADJUST THE SOUND SENSITIVITY (VOX):
02:04 18°C
2
1) In the Camera settings, adjust the microphone
sensitivity level with the up/down arrows
confirm by pressing
2) Press the down arrow
.
until the Save icon at the
bottom is highlighted in blue then Press the
to save the settings.
and
button
12
01m5_Manuel_AC315_UK_12703.indd 12 2017-10-16 9:19 AM
Page 13
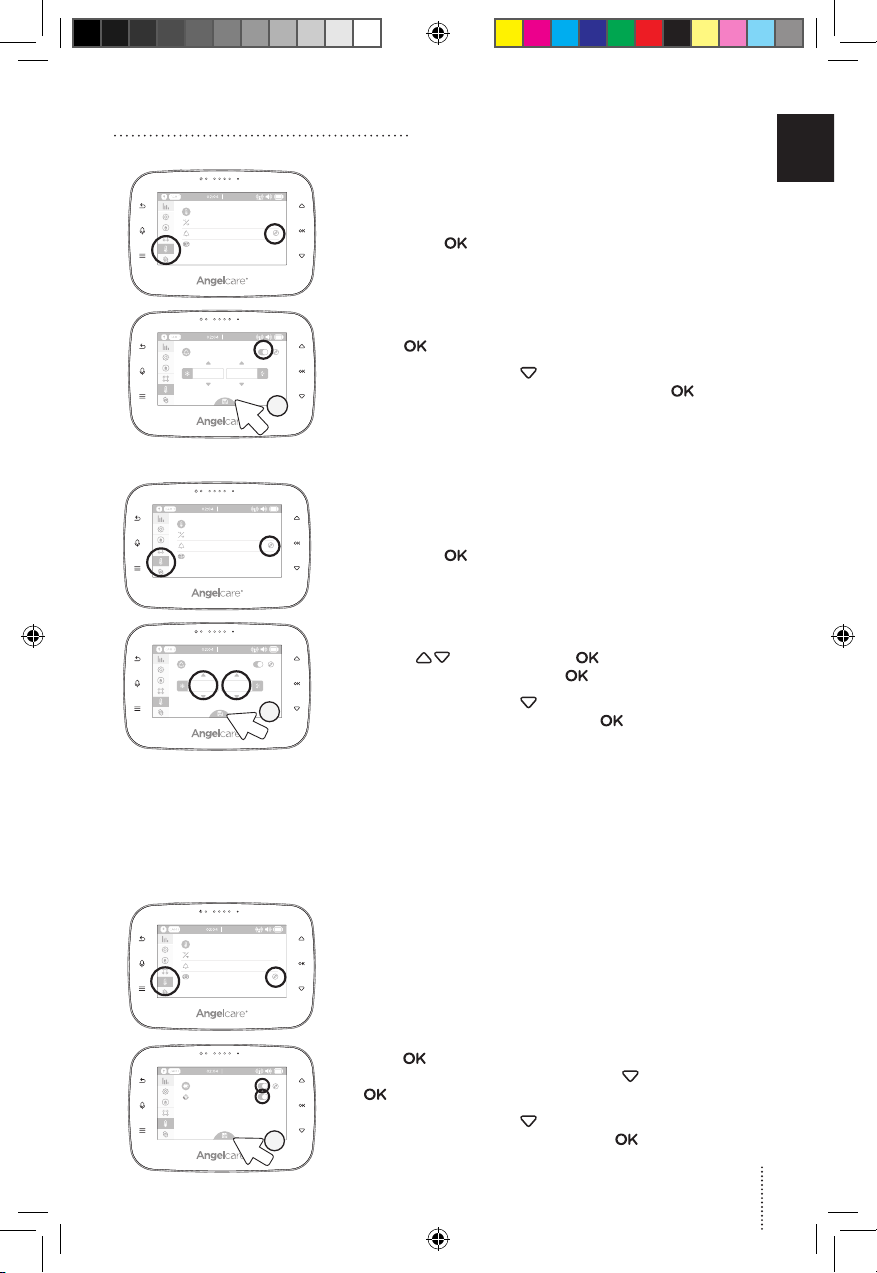
6.3 - ROOM TEMPERATURE DISPLAY
E
N
TO ACTIVATE THE ROOM TEMPERATURE ALERT:
18°C
1) In the temperature settings menu, select the alarm settings
by pressing
.
18°C
30
17
3
2) Press to switch the temperature alarm ON/OFF.
3) Press the down arrow
bottom is highlighted in blue then Press the
until the Save icon at the
button
to save the settings.
TO SET THE ROOM TEMPERATURE RANGE:
18°C
1) In the temperature settings menu, select the alarm settings
by pressing
18°C
30
17
2
1) Set the lower temperature limit with the up/down
arrows
upper limit and confirm with
2) Press the down arrow
highlighted in blue then Press the
.
and confirm with . Do the same for the
.
, the Save icon at the bottom is
button to save the
settings.
TO ACTIVATE/DEACTIVATE THE CAMERA TEMPERATURE DISPLAY AND COLOR
CHANGING MODE:
Allows you to set the LCD display on your Camera. You can completely turn OFF the
display, or set the color temperature color display on the Camera. With this option
the Camera digits light up in colour when the temperature goes above or below your
preferences. The Camera LCD will turn to red if temperature is too hot, blue if too cold and
white if correct.
18°C
1) In the temperature settings menu, select the Camera
LCD display setting menu.
18°C
2) Press to turn the LCD display mode activate/
deactivate then press the down arrow
once and then
to turn the colour changing mode activate/deactivate.
3
is highlighted in blue then Press the
3) Press the down arrow
, the Save icon at the bottom
button to save
the settings.
13
01m5_Manuel_AC315_UK_12703.indd 13 2017-10-16 9:19 AM
Page 14
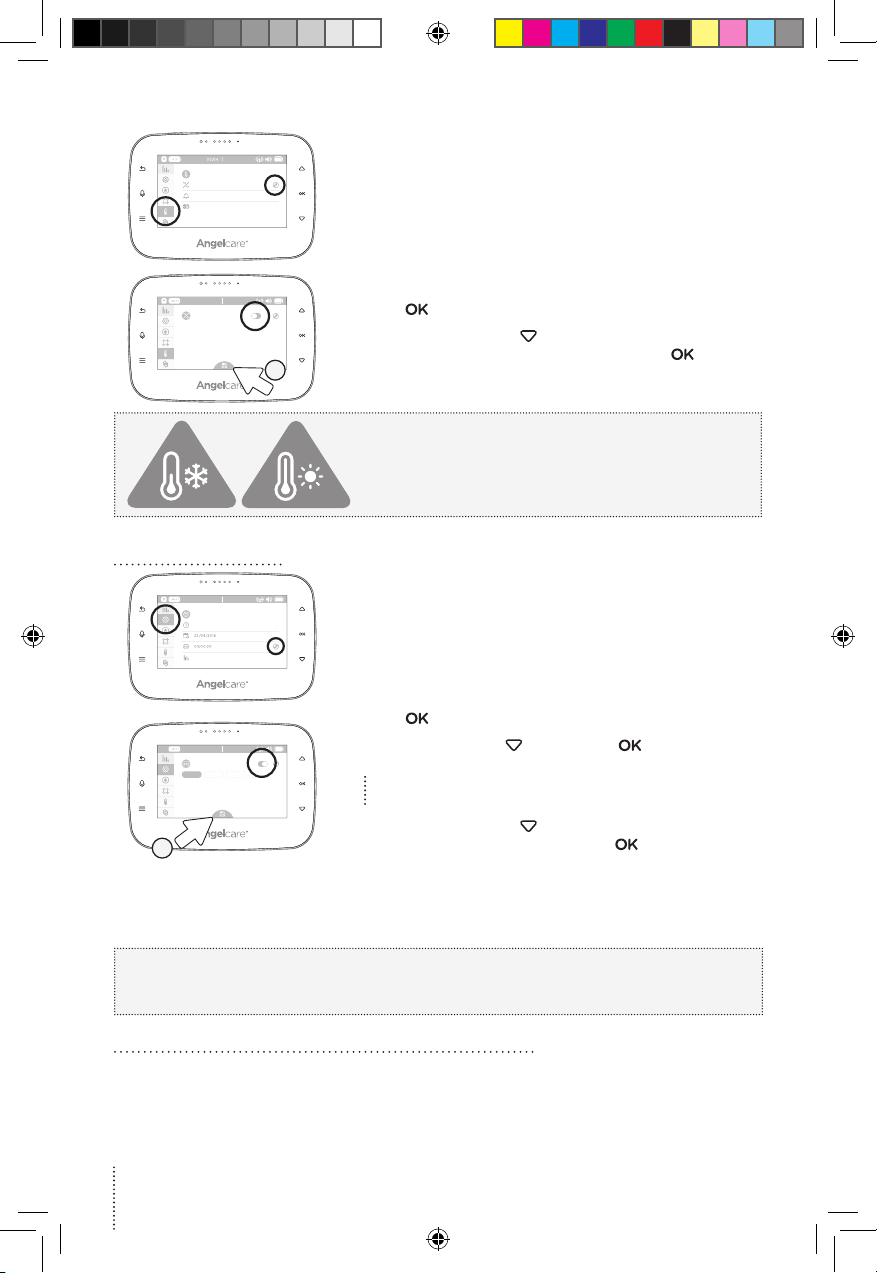
TO CHANGE BETWEEN CELSIUS AND FAHRENHEIT:
18°C
1) In the temperature settings menu, select the
temperature unit setting.
02:04 18°C
°C °F
3
2) Press to switch between °C and °F.
3) Press the down arrow
until the Save icon at the
bottom is highlighted in blue then Press the
to save the settings.
button
TEMPERATURE ALERT
• Alert activates when temperature reaches maximum or
minimum set temperature.
• Parent Unit will emit 4 consecutive beeps, every 5 seconds.
• Temperature Alert icon will show on LCD screen.
6.4 - SCREEN SAVER
02:04 18°C
02:04
02:04 18°C
00:00:30 00:01:00 00:02:00 00:03:00
4
MANUAL SETTING:
To manually activate the Screen Saver Mode, quickly press & release the Parent Unit POWER
ON/OFF button.
NOTE:
The LCD screen will turn black when video is in Screen Saver mode. Press any button to
return to Video mode.
1) In the general settings menu, select the screen saver
settings menu.
2) Press to switch the screen saver ON or OFF.
3) Press the down arrow
once and then to set the time
after the screen saver will be activated.
Select between 30 seconds
to 3 minutes.
4) Press the down arrow , the Save icon at the bottom
is highlighted in blue then Press the
button to save
the settings.
6.5 - MOVEMENT AND TEMPERATURE MONITORING
Activity analysis and room temperature tracking give you insight into your little one’s activity
level during sleep, helping you to better adapt routines and respond to their needs. The
movement monitoring records data every ten seconds. Three times every hour the system
compiles the collected data and a “movement activity report” can be viewed on the Parent Unit.
14
01m5_Manuel_AC315_UK_12703.indd 14 2017-10-16 9:19 AM
Page 15
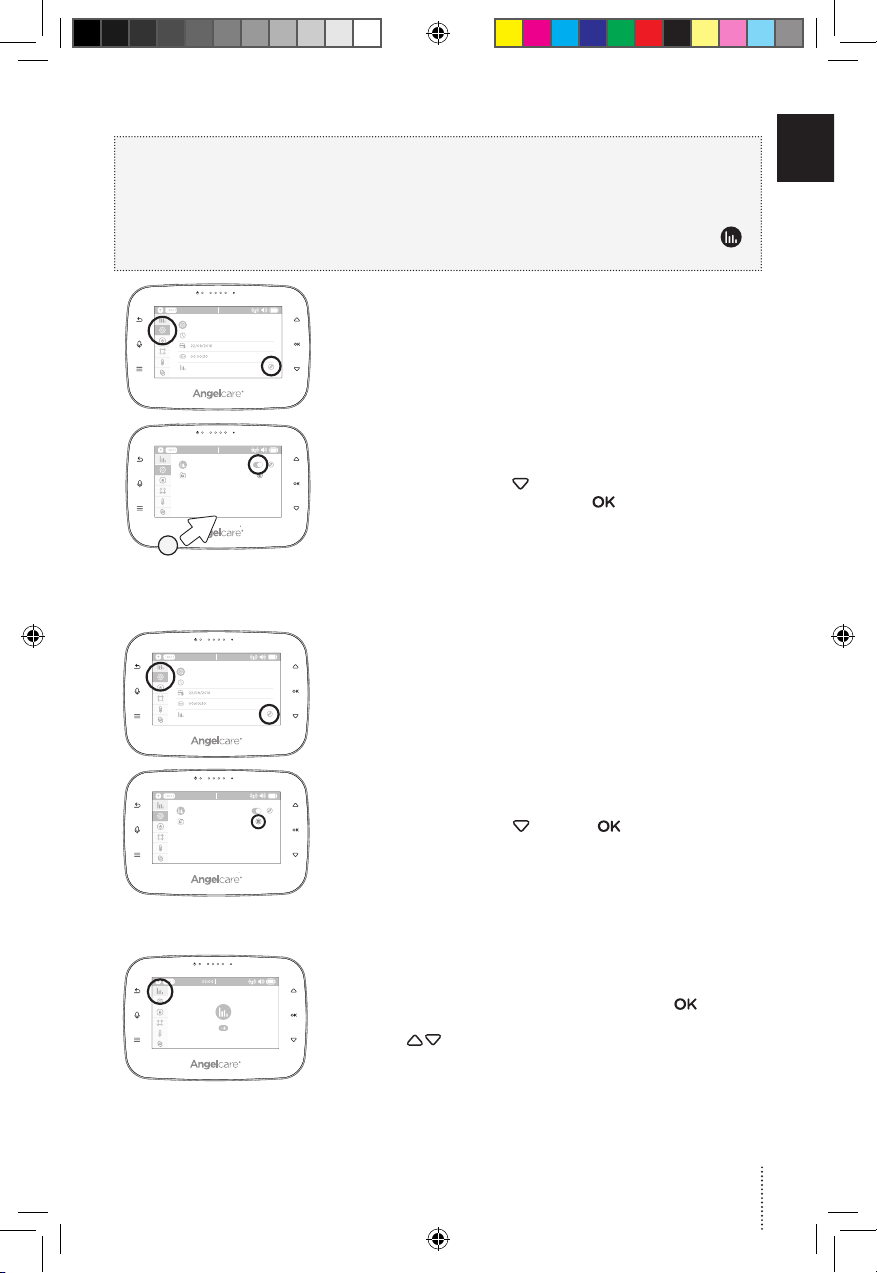
TO ACTIVATE OR DEACTIVATE MOVEMENT AND TEMPERATURE MONITORING:
E
N
IMPORTANT
In order to record the movement and temperature data, ensure you have set the date
and time in STEPS 4.1 and 4.2.
The graphing function is not available during the first 20 minutes of use as the system is
collecting the first set of data that will be displayed. During this time, the graphing icon
will not be operational.
02:04 18°C
02:04
1) In the general settings menu, select the monitoring
settings.
02:04 18°C
2) Press OK to select monitoring ON or OFF toggle.
3) Press the down arrow
highlighted in blue then Press the
, the Save icon at the bottom is
button to save the
settings.
3
DELETE GRAPHING DATA:
This option will not be available until 20 minutes from activation of this function.
02:04 18°C
02:04
1) In the general settings menu, select the graph delete
menu.
02:04 18°C
2) Press the down arrow and then to delete
previously saved graph data.
NAVIGATING MOVEMENT AND TEMPERATURE REPORTS:
18°C
1) In the movement & temperature reports, press to
highlight/select the first set of arrows. Use the up/down
arrows
to navigate page by page.
15
01m5_Manuel_AC315_UK_12703.indd 15 2017-10-16 9:19 AM
Page 16
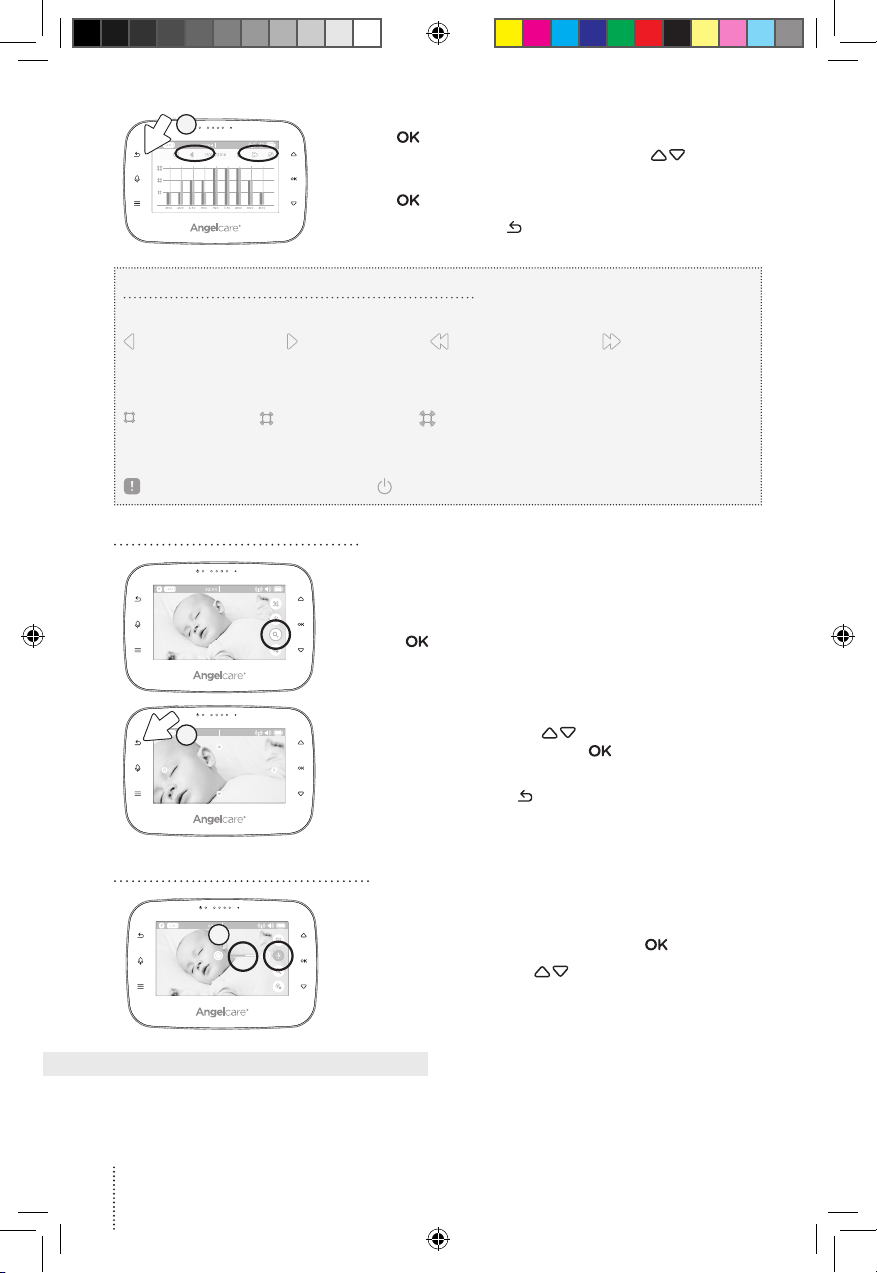
4
18°C
18 20 20 19 22 23 20 18 17
2) Press to highlight/select the second set of arrows
(double arrows). Use the up/down arrows
to
navigate day by day.
3) Press
4) Press the arrow back
to deselect the arrows.
to go back to the Menu.
MONITORING IMPORTANT BUTTONS AND ICONS
Navigation Icons:
Go to previous page Go to next page Go to previous day Go to next day
Temperature indicator: The blue bar indicates the temperature in the room.
Sensor Pad Movement Levels: The red bar indicates the amount of movement from your Sensor Pad.
Low Movement
0-20 movements
Graphing Icons:
Indicates an alert during the period Indicates the system was turned OFF during the period
Medium Movement
20-30 movements
High Movement
Over 30 movements
6.6 - DIGITAL PAN AND ZOOM
18°C
1) Select the zoom function.
2) Press
to activate the zoom.
02:04 18°C
4
3) Use the up/down arrows to zoom in on what you
want to see more closely. Press
to switch between
vertical and horizontal movement.
4) Press the arrow back
to switch back to normal
viewing mode. Zoom is deactivated.
6.7 - LCD SCREEN BRIGHTNESS
18°C
2
1) Select the brightness control and Press .
2) Use the up/down arrows
to decrease / increase the
brightness level.
STEP 7 - ADDING ACCESSORIES
Your Angelcare monitor allows you to add additional Cameras. Please contact your local
distributor to check availability in your country.
16
01m5_Manuel_AC315_UK_12703.indd 16 2017-10-16 9:19 AM
Page 17
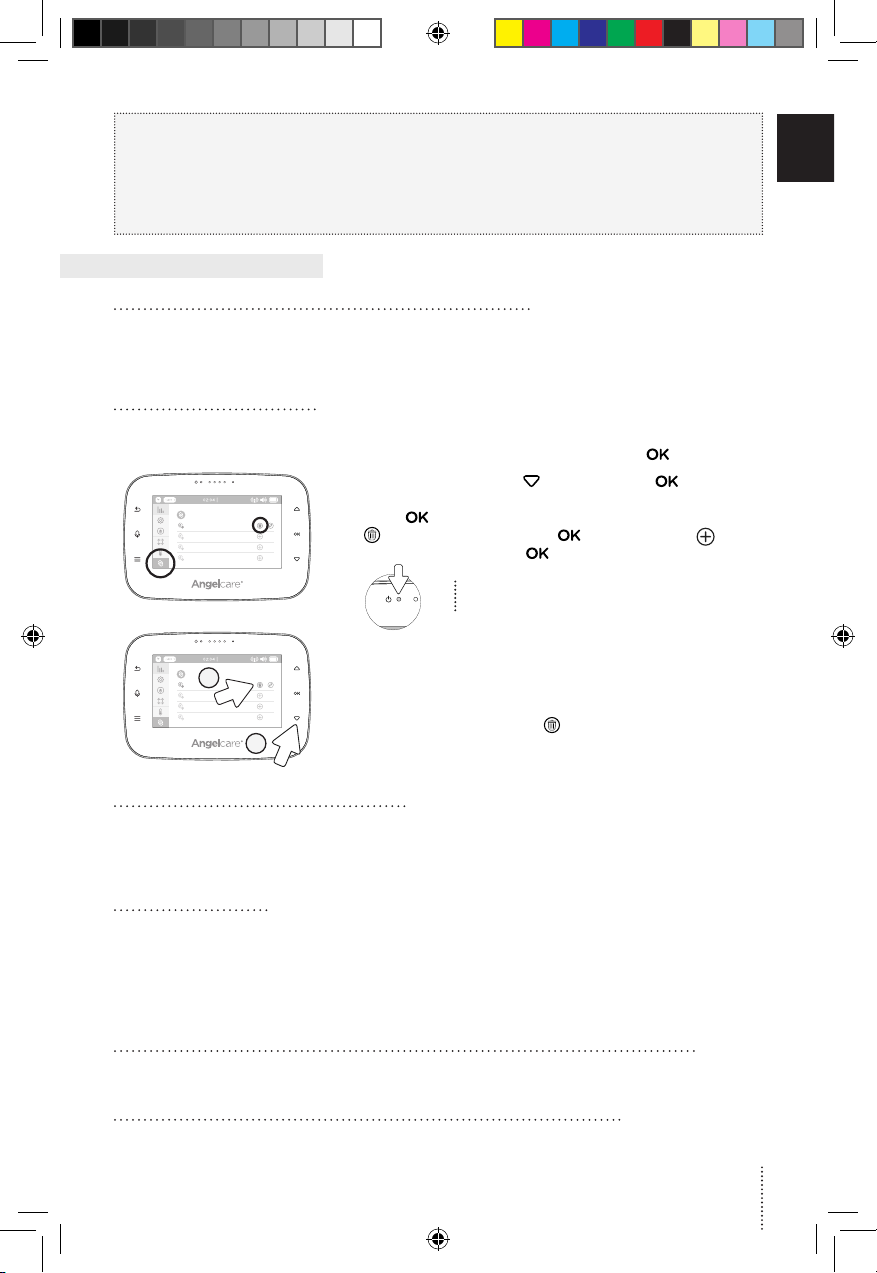
IMPORTANT
E
N
• If you have a Sensor Pad connected to your Angelcare Monitor, it can ONLY be paired
with Camera 1.
• You will only be able to hear audio from one camera at a time. When in split screen,
the sound transmitted from the Parent Unit will be from the Camera number
highlighted in the info bar.
TROUBLESHOOTING
TAKING CARE OF YOUR RECHARGEABLE BATTERY
• Ensure that you fully charge your battery for 9 hours before its first use.
• To maintain maximum battery life it is recommended that you fully discharge your battery periodically.
If your Parent Unit is not in use, please turn it OFF.
LOSS OF CONNECTIVITY
• If your Camera becomes un-paired from your Parent Unit, please follow the steps below to re-pair them.
1) Select the pairing settings menu and then to access it.
18°C
2) Press the down arrow
highlight CAMERA (the Edit icon will turn to blue).
Press
to delete the paired camera as the Trash icon
appears, and then Press to confirm. The icon
will appear, then Press
The Parent Unit Power Indicator will flash to
indicate it’s in linking mode.
once and press to select/
to re-pair the camera.
18°C
6
3) Plug in and turn your Camera ON.
4) Press and hold the Pause / Pairing button on the top
right of the Camera for 2-3 seconds.
3
now paired.
5) When the Trash can icon
shows up, the Camera is
NO SOUND IS BEING TRANSMITTED
• Check the volume level on the Parent Unit and the Camera to ensure they are set to an appropriate level.
• Try bringing the Parent Unit closer to the Camera to see if you get sound.
• Charge the Parent Unit.
WEAK RECEPTION
• Bring units closer together.
• Change the position of one or both units.
• Place units on a flat surface away from baby’s reach.
• Recharge the Parent Unit.
STATIC, DISTORTION, INTERFERENCES
(FROM OTHER MONITORS, WIRELESS PHONES, WALKIE-TALKIES, ETC.)
• Rotate Parent Unit or move it away from source of interference.
FEEDBACK (LOUD NOISES EMITTED FROM THE PARENT UNIT)
• Move units farther apart (at least 3 metres).
• Decrease volume on Parent Unit.
17
01m5_Manuel_AC315_UK_12703.indd 17 2017-10-16 9:19 AM
Page 18
THE PARENT UNIT SCREEN IS BLACK (PARENT UNIT IS OFF)
• Turn the Parent Unit back ON by pushing and holding the POWER ON/OFF button for 2 seconds.
• Recharge the Parent Unit.
FALSE ALARMS
• Turn OFF the Camera.
• Verify the connection between the Sensor Pad and the Camera. Unplug and reconnect the cord.
• Make sure there is no bedding between the mattress and the Sensor Pad.
• If the cot has a spring or slat base, place a hardboard between the cot base and the Sensor Pad
measuring at least 33 cm x 33 cm x 6 mm thick.
• Make sure the Sensor Pad is positioned as described under the setup requirements. Sensitivity
may need to be adjusted. Refer to STEP 5.1 for more information.
ALARM WILL NOT SOUND
• Avoid contact with the cot when the monitor is ON.
• Place cot near a solid supporting wall to avoid Sensor Pad from detecting movement from outside the cot.
• You may need to decrease the sensitivity. Refer to STEP 5.1 for more information.
THE PARENT UNIT DOESN’T SHOW MOVEMENT AND TEMPERATURE REPORTS
• Make sure the time and date is set up. Refers to STEP 4.1 & 4.2.
• Make sure the movement and temperature function is activated. Refers to STEP 6.5.
LIMITED WARRANTY
Angelcare® warrants to the original owner of this product that Angelcare®
monitor is free from any material and workmanship defects for the term of the
warranty period (see warranty table below to determine the warranty for your
country). If this monitoring system fails to function properly when used as
directed under normal conditions and during the warranty period, Angelcare®
will either repair or replace the product, at our discretion, free of charge. Please
contact your local distributor to validate warranty and warranty period.
The product must be accompanied by a proof of purchase, either a bill of
sale or other proof that the monitoring system is within the warranty period.
Angelcare® will bear the cost of repairing or replacing the product and
shipping it back to you.
This warranty does not apply to a product which has been damaged as a
result of improper maintenance, an accident, improper voltage supply or
any other form of misuse. The warranty is also void if the owner repairs or
modifies the product in any way. Angelcare® is not liable for any incidental
or consequential damages with regard to this product. The warranty also
excludes any liability other than what is stated above. No other warranty
is given.
TECHNICAL SPECIFICATIONS
Range:
Open field (Open area without obstructions):
up to 250 metres.
Number of Channels:
USA/Canada: 24 channels.
Europe: 24 channels.
Power Supply:
1 included rechargeable Li-Ion battery (Parent Unit)
100 - 240 VAC / 5 VDC adapter for the Parent Unit
100 - 240 VAC / 5 VDC adapter for the Camera
Caution: To reduce the risk of electric shock, do not expose this product to
rain or moisture.
Danger of explosion if batteries are incorrectly replaced. The battery
included for the Parent Unit is a user replaceable Li-ion rechargeable
battery, manufactured by manufatured by Icon Energy System (Shenzhen)
Co Ltd. Only use the Angelcare recommended replacement battery. To
obtain information on replacement batteries please contact Angelcare
customer service: www.angelcarebaby.com or contact your local distributor.
Instructions will be included with the replacement battery. Dispose of
exhausted batteries properly according to your local ordinances. Keep all
batteries away from children.
18
This warranty does not cover products and accessories which are not
Angelcare-branded, or any problems that result from usage that is not
in accordance with product instructions, failure to follow the product
instructions, or problems caused by using accessories, parts or components
not supplied by Angelcare.
LEGAL RIGHTS VARY FROM COUNTRY TO COUNTRY. SOME COUNTRIES
DO NOT ALLOW THE EXCLUSION OR LIMITATION OF INCIDENTAL OR
CONSEQUENTIAL DAMAGES, SO THE ABOVE LIMITATIONS MAY NOT
APPLY TO YOU.
WE ARE NOT IN ANY WAY RESPONSIBLE FOR ANY OUTCOME RESULTING
FROM THE USE OF THIS PRODUCT.
IMPORTANT! This Angelcare
not return this product
to the store. If you have questions or need help, please call your distributor
before returning this product.
WARRANTY TERM PER COUNTRY
North America 1 year
UK, South Africa, Russia 1 year
Other countries 2 years
Transmission:
Transmission between the Parent Unit and the
Camera is made on 2.4 GHz frequency for Europe/
Asia/Africa/Australia.
Asia/Africa/Australia
Maximum RF Power Transmitted:
• 20dBm (100mW) between Camera and Parent Unit
Hereby, Angelcare Monitors Inc., declares that this Baby Monitor is in
compliance with Directive 2014/53/EU The full text of the EU declaration of
conformity is available at the following internet address:
www.angelcarebaby.com
ErP Compliance
USE ONLY THE FOLLOWING ANGELCARE
MODEL NUMBERS:
EU (INCLUDIG GERMANY) – MODEL NUMBER: K05S050100G
UK – MODEL NUMBER: K05S050100B
PROTECT THE ENVIRONMENT
This electronic equipment contains reusable material and must not be
disposed with domestic waste. Please take it to a collecting point for
electric and electronic equipment (ask your local authorities for details).
®
monitor is a personal care product. Please do
®
BRAND POWER SUPPLY
01m5_Manuel_AC315_UK_12703.indd 18 2017-10-16 9:19 AM
Page 19
E
N
19
01m5_Manuel_AC315_UK_12703.indd 19 2017-10-16 9:19 AM
Page 20

For assistance, FAQs or guidance with your monitor please visit
our Customer Support page at Angelcare.co.uk
www.angelcarebaby.com
IM315-INT-270917
01m5_Manuel_AC315_UK_12703.indd 20 2017-10-16 9:19 AM
 Loading...