

Page 1
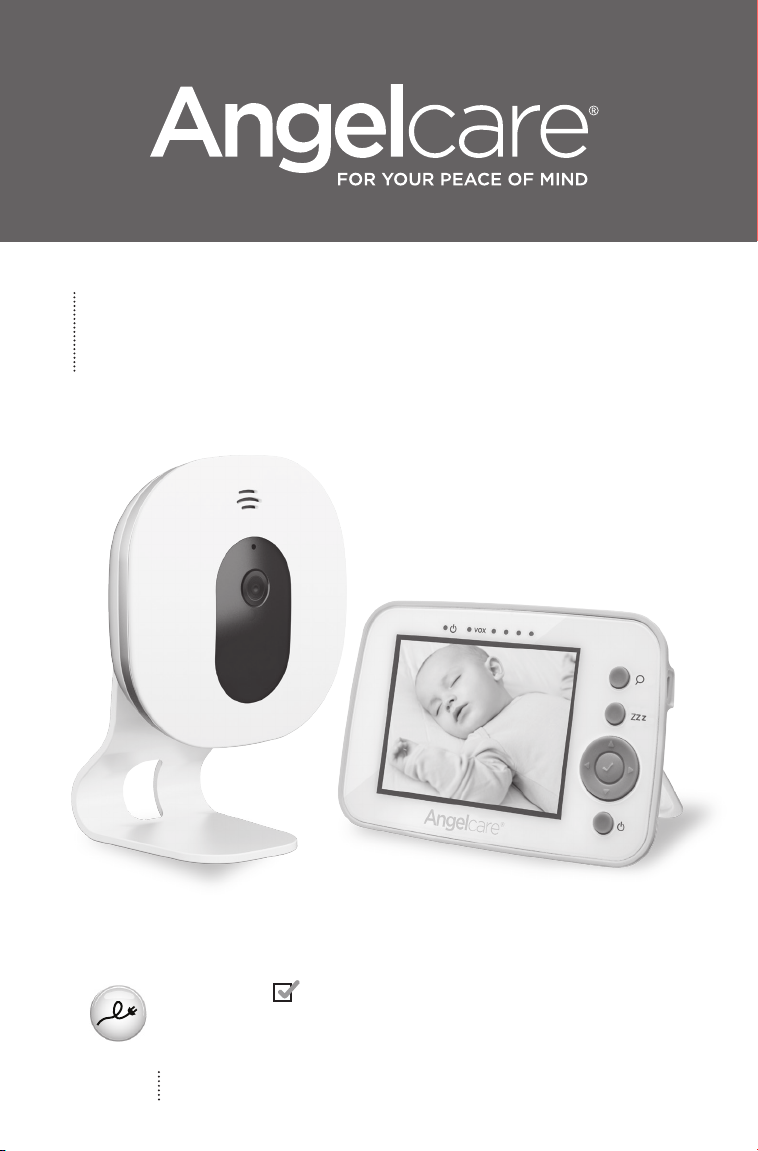
OWNER’S MANUAL
Model AC210
Baby Video and Sound Monitor
Cord Safety
Ensure the Camera is at least 1 metre away from
your baby’s cot.
For assistance, FAQs or guidance with your monitor
please visit our Customer Support page at angelcare.co.uk
Page 2
APPENDIX
Your product may include latest revision
as followed:
Latest revisions for models:
AC215, AC210, AC1300, AC1320
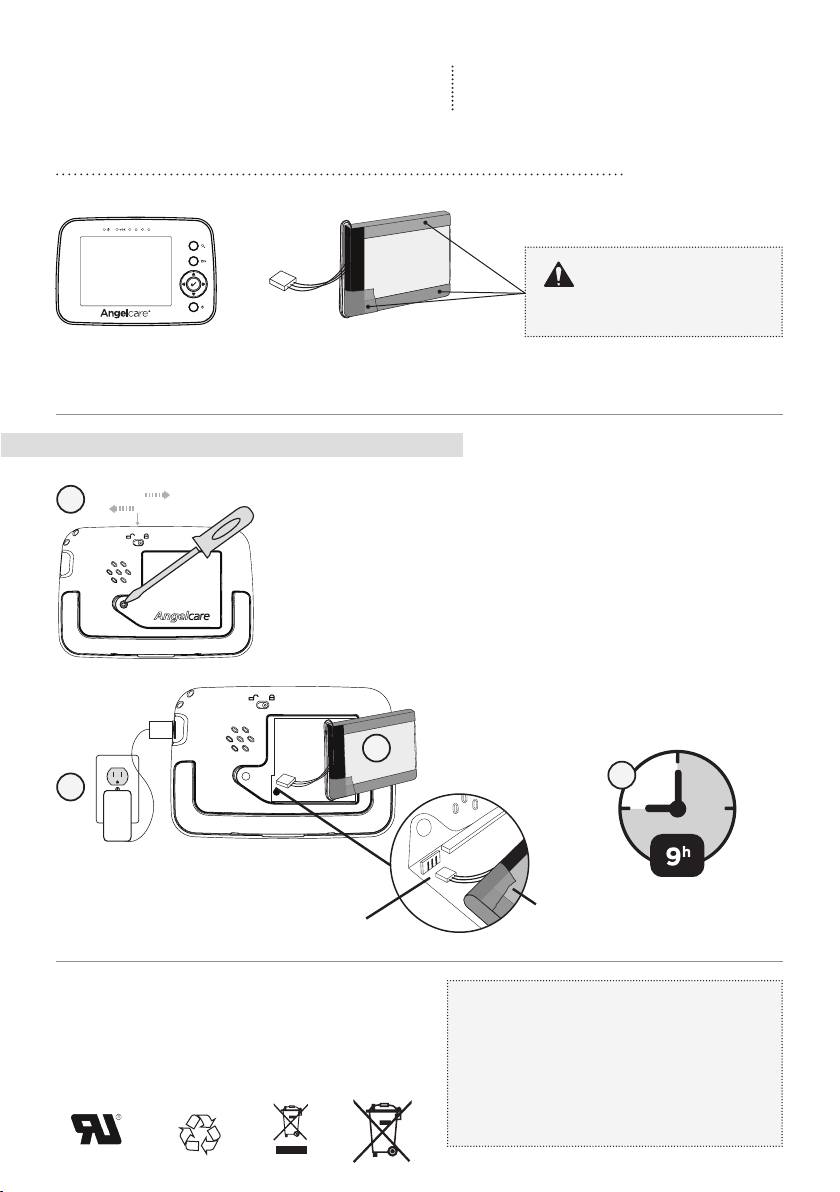
PARENT UNIT WITH LITHIUM ION BATTERY PACK (NOT INSTALLED)
CAUTION:
DO NOT REMOVE THE YELLOW
PLASTIC BATTERY COVERING
Parent Unit
Lithium ion battery pack
(for Parent Unit)
STEP 1 - HOW TO INSTALL THE BATTERY
MH46844
LOCK
UNLOCK
2
ALIGN
CONNECTOR PINS
1
3
BATTERY INFORMATION
Rechargeable Li-ion Battery 1lCP5/46/45 Made in China
Model: 454543 3.7V 1000mAh 3.7Wh YYYY/EH
Springpower Technology (Shenzhen) Co.,Ltd.
WARNING:
• Do not disassemble, crush, puncture the battery, or allow metal to touch battery
terminals (short-circuit).
• Do not dispose of in re or incinerate.
• Do not store or expose in high temperature environment (140 degree F/60 degree C).
• Do not use the battery after immersed in water.
• Refer to user’s manual before use this battery.
1) Unlock and open the battery
compartment on the rear of the
unit and remove the cover.
2) Plug in the battery connector
to the Parent Unit by aligning
the connector pins. Replace the
Parent Unit cover.
3) Connect the adaptor to the Parent
Unit and into an electrical outlet.
4) Prior to the rst use, charge the
Parent Unit for 9 continuous hour.
4
BATTERY
PROTECT THE ENVIRONMENT
The wheelie bin symbols mean that according to
local laws and regulations your product and/or
its battery shall be disposed of separately from
household waste. When the product/battery
reaches its end of life take it to a collection point
designated by local authorities. The seperate
disposal and recycling will help conserve natural
resources and protect human health and the
environment. Refer to User’s Guide for removal
of batteries.
Page 3

TABLE OF CONTENTS
WARNINGS ..................................................................................................................................................3
SETUP REQUIREMENTS ...................................................................................................................................5
STEP 1 - Charging the Parent Unit (9 hours) .............................................................................................6
STEP 2 - Setting up the Camera ....................................................................................................................7
STEP 3 - Turning on your monitor ................................................................................................................8
STEP 4 - Testing and getting to know your monitor ..............................................................................9
STEP 5 - Activating and deactivating additional functions ................................................................11
Troubleshooting ................................................................................................................................................ 16
Limited warranty ...............................................................................................................................................18
Technical specifications .................................................................................................................................. 18
OWNER’S MANUAL
KEEP YOUR OWNER’S MANUAL FOR FUTURE REFERENCE.
PLEASE READ THE WARNINGS AND INSTRUCTIONS CAREFULLY BEFORE
ASSEMBLING & USING THE PRODUCT.
FAILURE TO FOLLOW THE WARNINGS AND THE INSTRUCTIONS COULD
RESULT IN SERIOUS INJURY OR DEATH OR DAMAGES TO THE PRODUCT.
WARNING
Adult assembly required.
Keep small parts away from children when assembling.
We, at Angelcare®, stand behind all of our products.
If you are not completely satisfied or have any questions,
United States and Canada: Please contact us at: [email protected]
Other countries: Please contact your local distributor.
2
Page 4
WARNINGS
1. THIS PRODUCT CANNOT REPLACE
RESPONSIBLE ADULT SUPERVISION. This
produ ct is de signe d to aid in th e monitoring of
your chi ld. Wh en using the mo nitor, you mu st
still provide the s uper visio n necessar y for the
contin ued safety of your chil d.
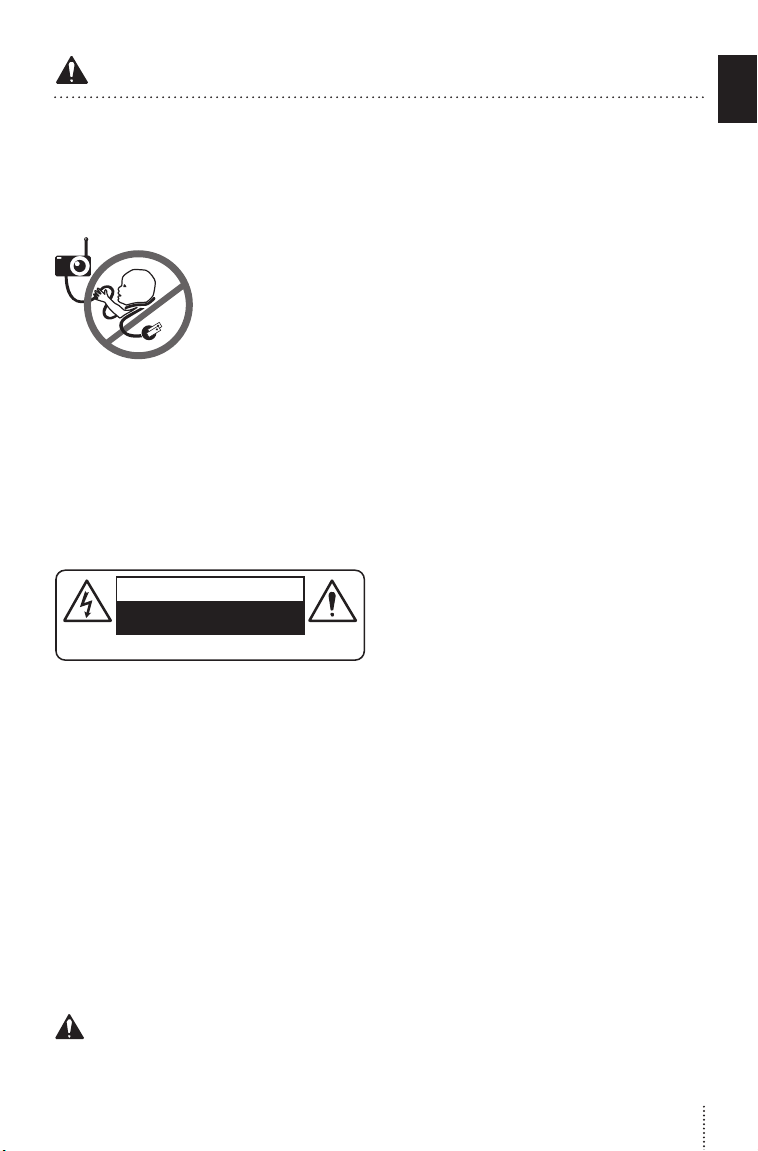
2. WARNI NG Stra ngula tion Hazard — Children
have STR ANG LED in co rds. Ke ep ada pter cor ds
exposed end.
5. ALWAYS be sure that both the tran smitter and
receiver are working properly and are within range
of each ot her. Test the mo nitor before fi rst use,
perio dica lly and when changin g location of the
Camera.
6. ALWAYS be sure to immediately check o n baby
whenever an alarm sounds.
7. DO NOT use monito r near wa ter (such as bath
tub, sin k, etc.).
out of the r each of
children (more th an
1 metre away).
3. Never use extens ion
cords with adapters.
ONLY use the a dapters
provide d.
4. When an adapte r is
plugged into an electrical
outlet , DO NOT touch the
CAUTION
RISK OF ELECTRIC SHOCK
DO NOT OPEN
DO NOT EXPOSE TO RAIN OR MOISTURE
8. Keep mo nitor AWAY from heat source s (such
as stoves , radia tors, e tc.).
9. A LWAYS place b oth the Camera a nd the Parent
Unit on a f lat sur face i n an upright pos ition and
allow for prope r ventila tion. D O NOT pla ce on
sofas , cushi ons, b eds, etc. whi ch may block
ventilation.
10. This mo nitor uses pub lic air waves to tra nsmit
signa ls. Th e Parent Unit may p ick up si gnals o r
interferen ce from other ca mera monitor s in your
area. Your monito r may even be p icked u p by
other househ olds . To protect yo ur privacy, make
sure both units a re turn ed OFF when n ot in use.
11. This p roduc t is NOT a toy. DO N OT allow
child ren to play with it.
12. This produ ct cont ains small pa rts . Adult
assem bly req uired . Exercise care when un packing
and assembling the product and keep small parts
away from childre n.
13. When u sing the monito r, the room te mper ature
shoul d be bet ween 10°C an d 40°C .
BATTERY WARNING
14. The Pa rent Un it battery is a re place able L i-Io n
battery. Only use the Angelcare recommended
repla cement batte ry. Danger of exp losio n if the
wrong batter y is used o r if repl aced incorre ctly.
Refer to yo ur user manua l for cor rect batter y
insta llation. DO N OT shor t circuit suppl y terminals .
Only us e the Ang elca re provided powe r adapter
to charg e the bat tery. Re move the batter y from
your Par ent Unit if prod uct is to b e stored for an
extend ed per iod of tim e. Dis pose of batteri es
accord ing to you r local ordinances . ALWAYS keep
all bat teries away from ch ildre n.
15. IMPORTANT SAFETY INSTRUCTIONS
15.1 Hee d all war nings – A ll warn ings on the
produ ct and i n the operatin g instr uctio ns sho uld
be adhered to.
15. 2 Fo llow all i nstru ctions – All op erating and
use ins tructions sh ould b e followe d.
15.3 Wate r and moisture - D O NOT use th is
apparatus near water. For example, near a bath
tub, was h bowl, kitchen sink, la undr y tub, in a
wet enviro nmen t or nea r a swimm ing poo l and
the like . Care should b e taken s o that ob ject s DO
NOT fal l onto uni ts and that liquids are not spil led
into eith er unit t hroug h its opening s.
15.4 Cle anin g - Disco nnec t all units before
clean ing. D O NOT immerse in water any pa rt of
the mon itor. Clea n only with dry cl oth.
15.5 Ventilation - DO NOT blo ck any ven tilation
openings. Allow for prope r ventilation wh en unit s
are in use. DO NOT cove r the Camera o r the Parent
Unit wit h any obje ct suc h as a bla nket. DO NOT
place it i n a drawer o r in any lo cation which wo uld
muff le the so und or i nterfere with th e norm al flow
of a ir.
15.6 He at sourc es - DO NOT instal l near a ny heat
source s such as radiato rs, h eat registers , stoves ,
TVs or oth er app aratus (including a mplif iers)
that pro duce heat. He at can d amag e the cas e or
electrical parts.
15.7 Power cord protectio n - Protec t the adapter ’s
power cord from being wal ked on or p inched by
furniture or other ite ms – Power supply cords
shoul d be route d so that th ey are not l ikely
to be walke d on or pinched by items up on or
against them, paying particular attention to
cords and plug s, conve nien ce receptacle, and
the poi nt where they exit f rom the produc t.
The soc ket outlet shall be inst alled n ear th e
equip ment a nd shall be eas ily acce ssibl e. Make
sure to plug the adapter to th e socket o utlet
neare st to the eq uipm ent and that is ea sily
accessible. To disconnect from mains, unplug
the adapter.
15.8 Accessories - Onl y use att achm ents/
access ories s pecif ied by th e manufactu rer. DO
NOT plac e this pro duct on an uns tabl e cart,
stand, trip od, bracket or t able . The pro duct m ay
fall, c ausi ng seri ous injury to a child or a dult an d
serio us damage to the p roduct. Use ONLY with a
cart, stand, tripod, bracket or table recommended
by the man ufac turer o r sold with the pro duct .
Any mounting of th e product should follow the
manufacturer’s instructions.
15.9 Unplug this appliance during lightning storms
or when n ot used for long perio ds of time.
15.10 Se rvicing - DO NOT attemp t to serv ice
this pro duct yourse lf as opening o r removi ng
E
N
3
Page 5

covers (except b atter y door) may expose yo u to
dangerous voltage or other hazards.
15.11 Replacement parts - When replacement
part s are req uired , be sure the replacem ent parts
speci fied by th e manu fact urer have t he sam e
chara cteri stic as th e original pa rt. U nauth orized
substi tution m ay resul t in fire , elec tric shock or
other hazards.
15.12 Usage - This baby mon itor is intende d as
an aid. It is NOT a su bstitute for responsi ble and
prope r adult s uper visio n and sh ould not be use d
as such . Use this appliance O NLY for its intende d
use as de scrib ed in thi s manu al.
15.13 Power Sources - Operate this p roduct only
from the type of p ower sou rce ind icated on the
type plate of the a daptor. If you are u nsure of the
type of p ower sup ply to you r home , consu lt your
deale r or loc al power compa ny.
15.14 Over loading - DO NOT overloa d wall
outlet s, exte nsion cords or i ntegral conven ience
recept acles as this can result in a risk of fire or
electric shock.
15.15 Object an d Liqui d Entry - N EVE R push
objec ts of any k ind into this product th rough
casin g slots a s they may tou ch dan gerou s voltag e
point s or short out p arts t hat could result in a risk
of fire or electric sho ck. N EVER s pill liquid of a ny
kind on the product.
15.16 Antenna - Th e anten na used for this
transmitter m ust be instal led to provide a
separ ation distan ce of at least 20 cm f rom all
perso ns and must not b e collocated o r operating in
conjunctio n with any oth er antenna or tr ansmi tter.
15.17 Power L ines - A n outsi de ante nna sys tem
shoul d NOT be lo cated in the vici nity of ove rhea d
power lines or oth er ele ctric l ight or p ower
circuit, or whe re it can f all into s uch powe r line s
or circu its as co ntact with them may be fat al.
16.7 DO N OT attempt to rejuve nate the batter y
provide d with or identif ied for u se with this
product by heating them. Sudden release of
battery ele ctrolyte may occur, caus ing burns or
irrita tion to eyes o r skin .
16. 8 If and when necessary, the battery must be
repla ced with identic al new ones or eq uival ent
(volts and s ize).
16.9 Reve rse polarity insta llatio n of the battery
in the en d produ ct must be avoid ed. Reverse
inser tion of b atter ies ca n caus e charg ing, a nd
that may re sult in l eakag e or expl osion .
16.10 Remove the ba tter y from th e Parent Unit
if you store the prod uct over 30 days be caus e
the battery could leak and damage the product.
16.11 Dis card ‘d ead’ b atter ies as so on as possibl e
since ‘dead’ b atter ies are m ore like ly to leak i n a
produ ct. If a b atter y has leaked or ve nted, it shoul d
be repl aced im medi ately using prote ctive gloves.
16.12 DO N OT store this product, or the bat tery
provide d with or identif ied for u se with this
product, in high-temperature areas.
16. IMPORTANT SAFETY INSTRUCTIONS
REL ATED TO US E O F BATT ERIES
16.1 Use O NLY the type a nd size of batter y
specified in the owne r’s man ual. T here is a r isk
of explos ion if battery is repla ced with an incor rect
type.
16. 2 C harge t he battery fo r 9 hours prior to f irst
use. Be sure to have th e monitor in the OFF
positi on duri ng this p eriod. ONLY use the adap ters
included with your monitor.
16. 3 DO NOT use th ese ada pters with any other
equipments.
16.4 Whe n unpl uggin g the adapter from the
Came ra, be s ure it is sw itched to the OFF posi tion .
16. 5 DO NOT disp ose bat teries in fire . They may
explod e. Che ck with lo cal regulati ons for p ossib le
special disposal instructions.
16.6 Exe rcise c are in ha ndling batte ries in order
not to sho rt out the batteries with cond ucti ng
materi als suc h as ring s, bra celet s and keys .
Overcharging, short circuiting, reverse charging,
mutila tion, o r incinerati on of bat terie s must be
avoided to p revent one or more of the following
occurrences: relea se of toxic m ateria ls, release of
hydroge n and/or ox ygen, gas and rise in su rfac e
temperature.
4
Page 6
SETUP REQUIREMENTS
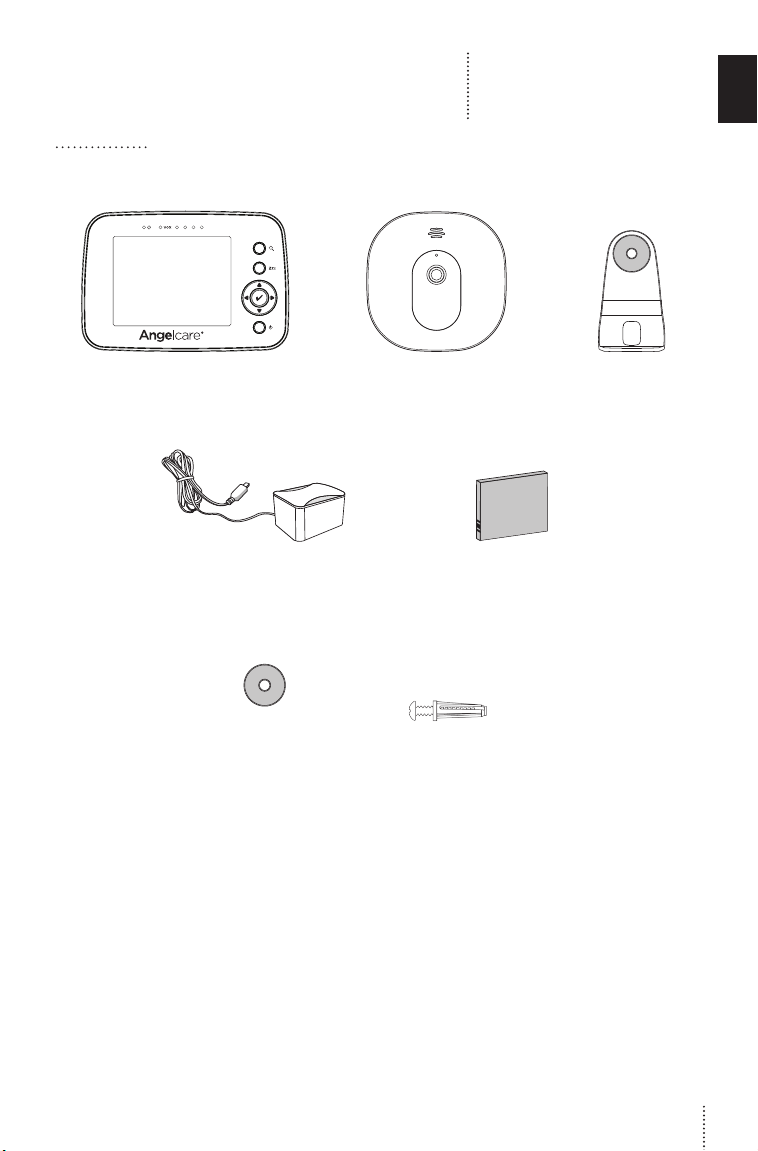
INCLUDED:
Model AC210
Baby Video and Sound Monitor
E
N
Parent Unit Camera Tabletop stand
2x AC adapter
(for Parent Unit and Camera)
Wall mount
(for Camera)
with hardware
Lithium ion battery pack
(for Parent Unit)
(Screwdriver required
for wall mounting)
(for Camera)
5
Page 7
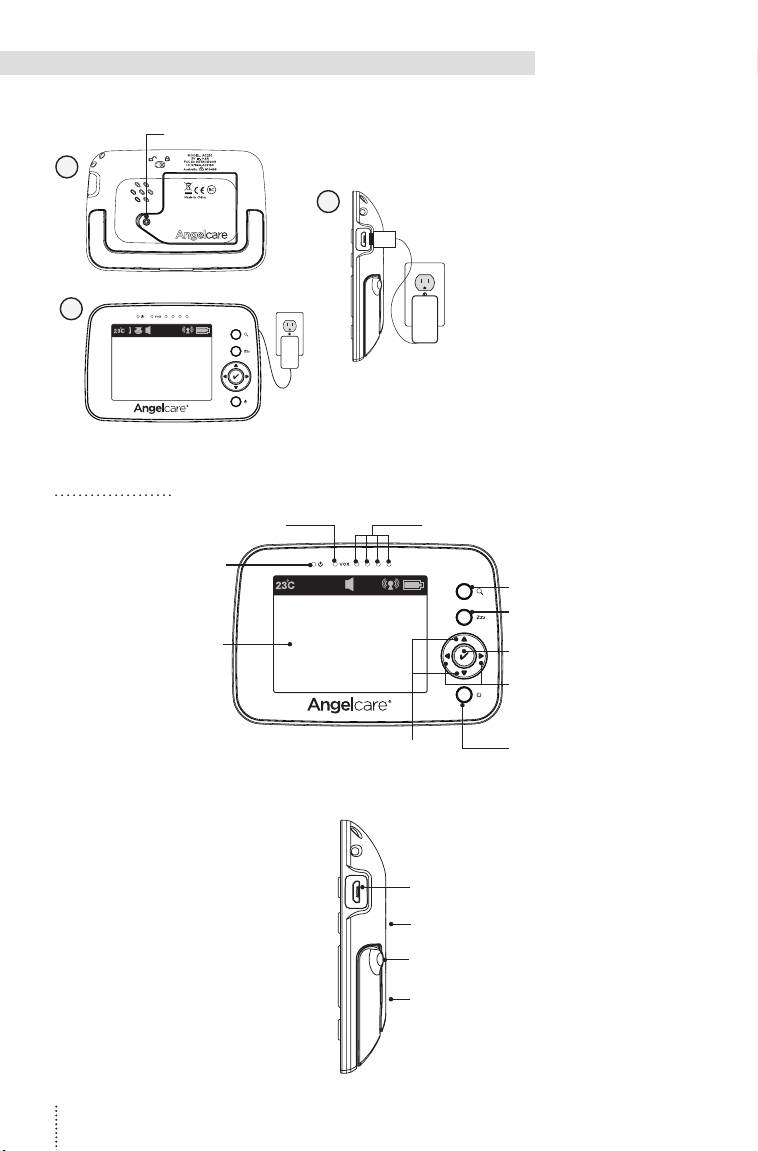
STEP 1 - CHARGING THE PARENT UNIT (9 HOURS)
1) Unlock the battery
compartment on the rear
and remove the cover. Insert
the provided rechargeable
battery into the compartment.
Contacts of the battery
and the contacts in the
compartment must be aligned.
2) Connect the adapter to the
Parent Unit and into an
electrical outlet.
3) Charge the unit for
9 continuous
hours (prior to first use).
NOTE:
To optimize your battery performance
please refer to Battery Guidelines in the
Troubleshooting section.
1
3
PARENT UNIT:
Power ON/OFF
Indicator
3.5” LCD Screen
Battery compartment lock
2
VOX Indicator Sound & TIC Light Indicator
Zoom button
Zzz button
(Video ON/OFF)
MENU/SELECT
Button
Brightness
(+ or -)
UP/DOWN Button/Volume Control
Front Side
Right Side
Adapter
Outlet
Speaker
(not shown)
Stand
Battery
door
(not shown)
Power ON/OFF
6
Page 8
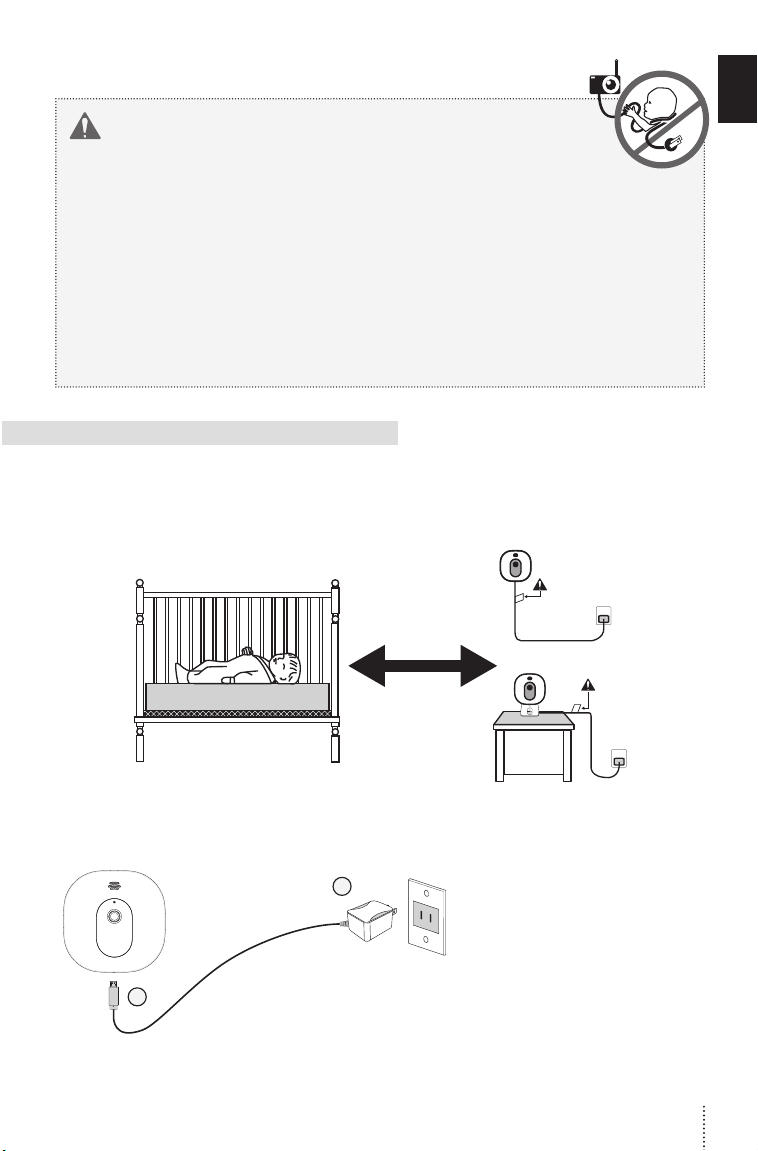
WARNING
STRANGULATION HAZARD.
Children have STRANGLED in cords:
• Keep adapter cords out of the reach of children (more
than 1 meter away).
• Because of the serious strangulation risk to infants and
toddlers, parents and caregivers should never place
the Camera within 1 meter of a cot.
• NEVER use extension cords with adapters. ONLY use
the adapters provided. This product is not a toy. Never
allow children to play with it.
STEP 2 - SETTING UP THE CAMERA
Camera can be installed on the wall (see included parts) or using the tabletop stand.
Both options include magnetic mount to get the best view of baby in cot.
Place the
Camera at least
1 metre from the
cot
E
N
2
1) Place the Camera at a
3
minimum of 1 metre away
from the cot.
2) Connect the adapter to
the Camera and into an
electrical outlet.
3) Adjust the Camera using
the magnetic mount to get
the best view of baby in
the cot.
7
Page 9
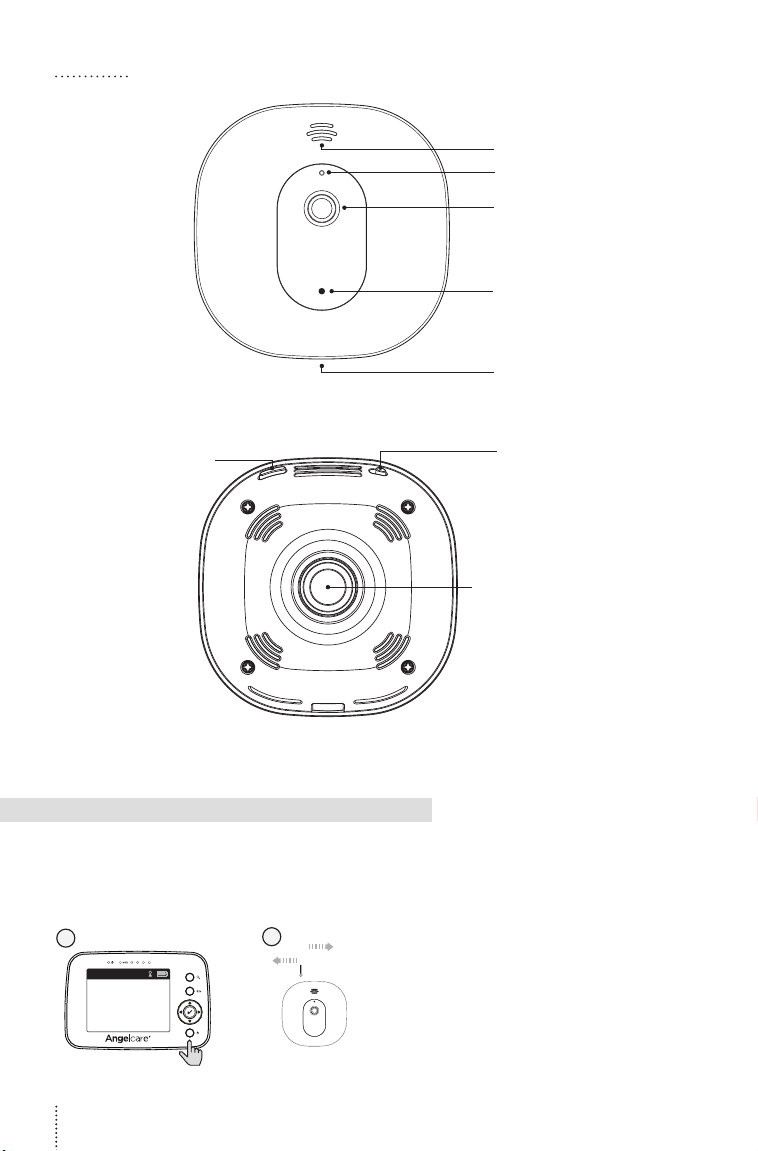
CAMERA
Speaker
Microphone
Camera
Power ON/OFF indicator
Micro USB charging port
Front Side
Pairing button
POWER ON/OFF
Magnet for tabletop stand
Rear
STEP 3 - TURNING ON YOUR MONITOR
Your Camera and Parent Unit come pre-paired, so you should see video within 3 - 4
seconds of turning ON the units. The Camera connection signal strength icon will appear in
the status bar.
1
2
ON
OFF
1) Press and hold the Parent Unit ON/
OFF button for 2 seconds until LCD
screen is turned ON. Angelcare’s
logo will be shown for 1 second.
2) Slide the Camera ON/OFF switch to
the ON position.
3) The Parent Unit will display Video
mode screen.
8
Page 10
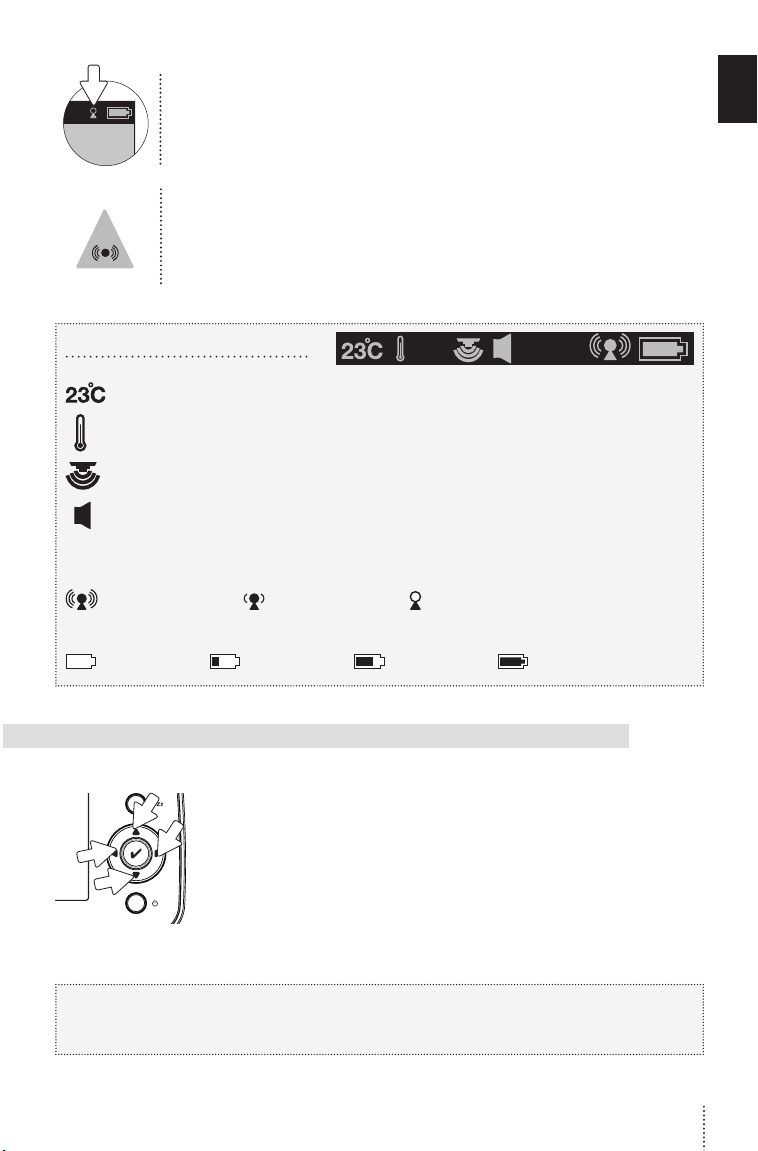
When Parent Unit is turned ON and Camera is OFF, Parent Unit will
display Out-of-Range icon.
If there is a lost connection between the 2 units after 15 seconds,
the Out-of-Range alarm will sound on the Parent Unit (refer to
Troubleshooting section):
• The Out-of-Range icon will appear on the screen. The Parent Unit will
INFO BAR IMPORTANT ICONS
Temperature icon: Indicates room temperature
Temperature Alarm icon: Indicates Temperature Alarm is active
Night View Mode icon: Indicates the Camera is in Night View Mode
Sound icon: Indicates that Sound function is active
Connection icon: Indicates the connection quality between the Parent Unit and the
Camera.
Good connection
Battery Level icon: Indicates battery level
Empty 1/3 Full 2/3 Full Full
emit 3 consecutive beeps every 3 seconds.
Poor connection
Lost connection
E
N
STEP 4 - TESTING AND GETTING TO KNOW YOUR MONITOR
The Angelcare® monitor can be used with the pre-program factory
settings or you can also customize your settings to your preference.
Main menu on the LCD display shows the different operation settings.
Use the direction keys to change or check the different functions on
the Parent Unit.
Press the Menu/Select button to highlight selected icon in blue.
Press the Menu/Select button to change from blue to green to show
preferred setting is selected. Press the Zzz button to exit or go back
to main menu when in sub-menu.
IMPORTANT
When in menu or sub-menu modes, sound transmission between the Parent Unit and the
Camera will be temporarily deactivated.
9
Page 11
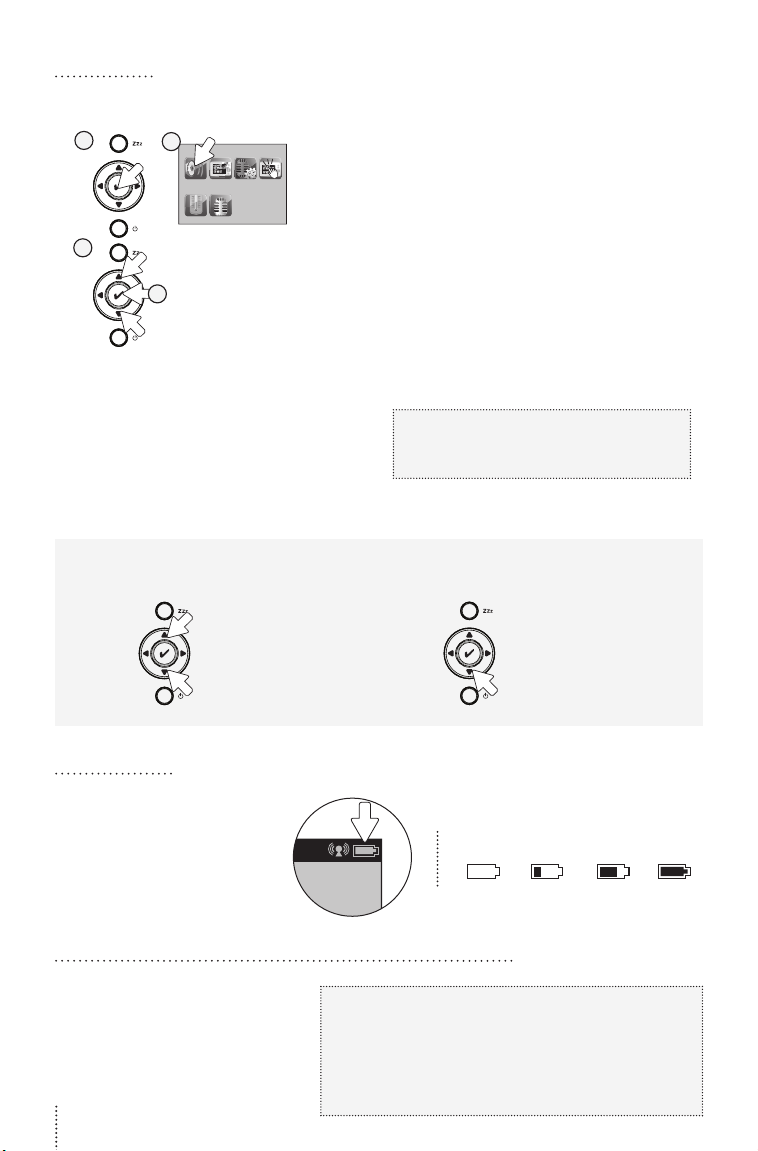
4.1 - SOUND
TO ACTIVATE/DEACTIVATE SOUND
1
3
2
TO TEST THE SOUND:
Ask someone to speak into
4
the Camera or place the unit
near a radio to ensure that
sound is being picked up.
IF YOU HEAR NO SOUND:
• Check that both units are powered ON.
• Check that both units are plugged into
functioning electrical outlets.
• Check the batteries in both units
(replace or recharge them if necessary).
• Bring the Parent Unit closer to the Camera.
Increase volume
(Up arrow)
Lower volume
(Down arrow)
1) Press Menu/Select button to access
main menu.
2) Select the Sound icon.
3) Use the up and down arrows to
activate or deactivate the sound.
4) Press Menu/Select button to confirm.
IMPORTANT
To avoid feedback (whistling), keep
both units at least 3 meters apart.
PUT IN SILENT/MUTE MODEADJUST SOUND LEVEL
Press the down arrow
for 2 seconds to mute
sound. Mute icon will
flash in Info Bar. Press
again for 2 seconds
to reactivate sound.
4.2 - BATTERY
HOW TO CHECK THE BATTERY:
Unplug the adapter from the
Parent Unit and check the
battery level indicator.
HOW TO CHARGE THE BATTERY IN THE PARENT UNIT:
Leave the Parent Unit plugged in
to fully charge the unit. Although
the battery at 1/3 capacity works
normally, we recommend that you
fully recharge it.
10
PARENT UNIT BATTERY ALERT
• Alert activates when the battery needs to be
recharged.
• Parent Unit will emit a beep sound every
15 seconds.
• Empty icon will show on LCD screen.
1/3 fullEmpty 2/3 full full
Page 12
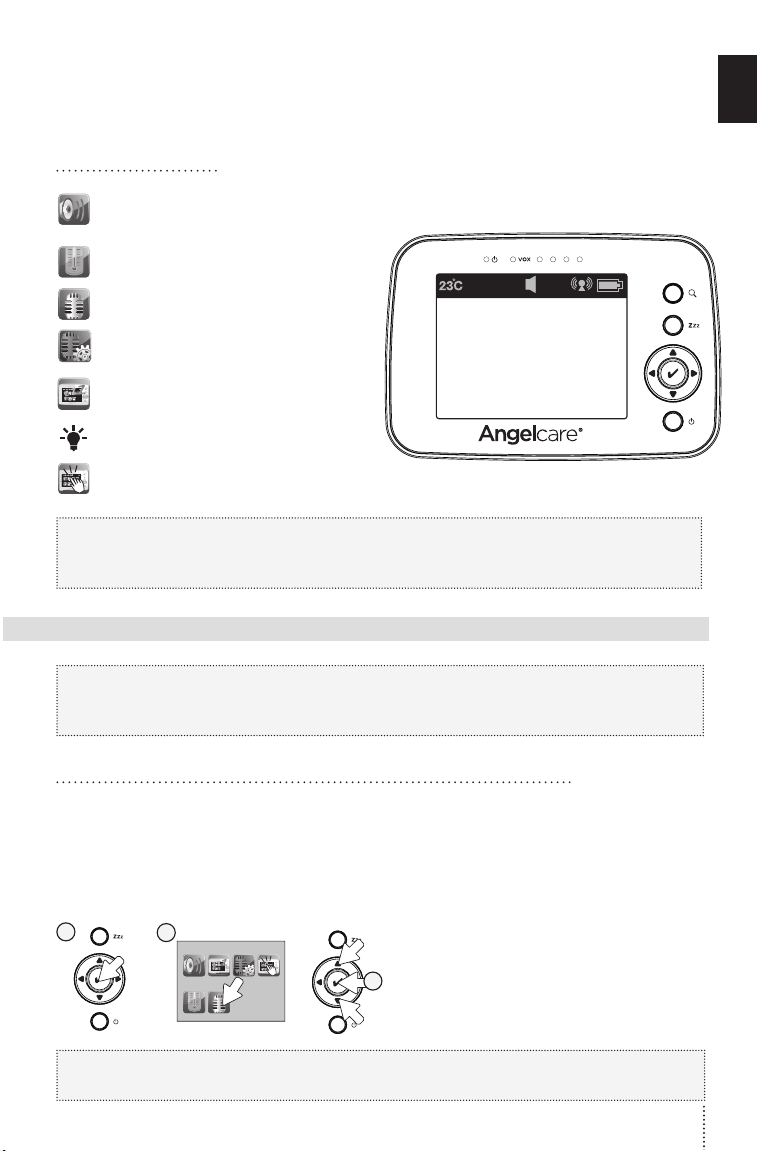
YOU ARE NOW READY TO USE YOUR MONITOR
The Angelcare® monitor can be used with the pre-program factory settings
or you can also customise your settings to your preference.
DEFAULT SETTINGS
Sound Mode: ON
Speaker Volume: Level 3 (of 6)
E
N
Temperature Unit: Celsius
Temperature Alarm: OFF
VOX: ON
VOX Level: Level 2 (of 4)
Screen Saver Timer: ON
(after 3 minutes)
LCD Brightness: Level 3 (of 5)
Key Tone: ON
IMPORTANT
• Test your monitor before first use.
• Test your monitor regularly to ensure it is functioning correctly.
STEP 5 - ACTIVATING AND DEACTIVATING ADDITIONAL FUNCTIONS
IMPORTANT
When in the menu or sub-menu modes, sound transmission between Parent Unit and
Camera will be temporarily deactivated.
5.1 - VOICE ACTIVATION (VOX) OR CONTINUOUS SOUND MODE
Allows you to select your option on how you monitor sound: VOX (voice activation picks
up sound based on the setting of the sensitivity level) or Continuous (sound monitoring is
continuously on, picking up all sounds).
TO DEACTIVATE OR ACTIVATE VOX MODE:
1
NOTE:
By deactivating VOX, Continuous Sound setting will turn ON.
2
1) Press Menu/Select button to access
the main menu.
3
2) Select the VOX icon to activate or
deactivate the VOX function.
3) Press Menu/Select button to confirm.
11
Page 13
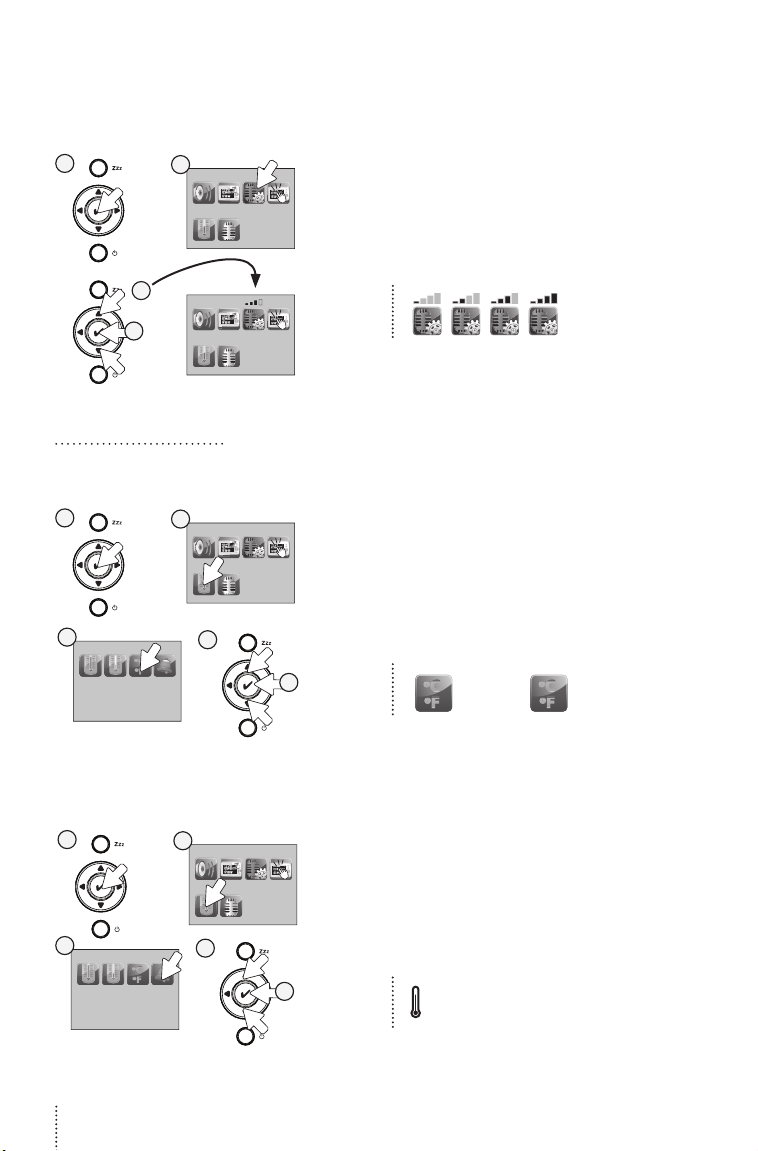
TO ADJUST THE SOUND SENSITIVITY (VOX):
ºC
ºF
o
C
ºC
ºF
o
F
ºC
ºF
ºC
ºF
Allows you to determine the sound level needed to trigger sound transmission
to the Parent Unit. This means that sound will only transmit based on the level that you set.
1
2
3
4
21
5.2 - THERMOMETER
TO CHANGE THE MEASUREMENT UNIT:
1
3
30oC 15oC
+
2
o
C
-
4
ON
5
1) Press Menu/Select button to access
the main menu.
2) Select the VOX Sensitivity icon.
3) Use the up and down arrows to choose the
desired sensitivity level (1 = LOW to 4 = High).
4) Press Menu/Select button to confirm.
1) Press Menu/Select button to access
main menu.
2) Select the Temperature icon to access
sub-menu.
3) Select the ˚C ˚F icon.
4) Use the up and down arrows to change
from Celsius to Fahrenheit.
Celsius Fahrenheit
5) Press Menu/Select button to confirm.
TO ACTIVATE THE TEMPERATURE ALARM:
1
3
30oC 15oC ON
+
-
12
2
o
C
4
1) Press Menu/Select button to access
main menu.
2) Select the Temperature icon to access
sub-menu.
3) Select the Temperature Alarm icon.
4) Use the up and down arrows to activate
or deactivate the Temperature Alarm.
5
Temperature Alarm icon:
Shows in toolbar to indicate
temperature alarm is ON.
5) Press Menu/Select button to confirm.
Page 14
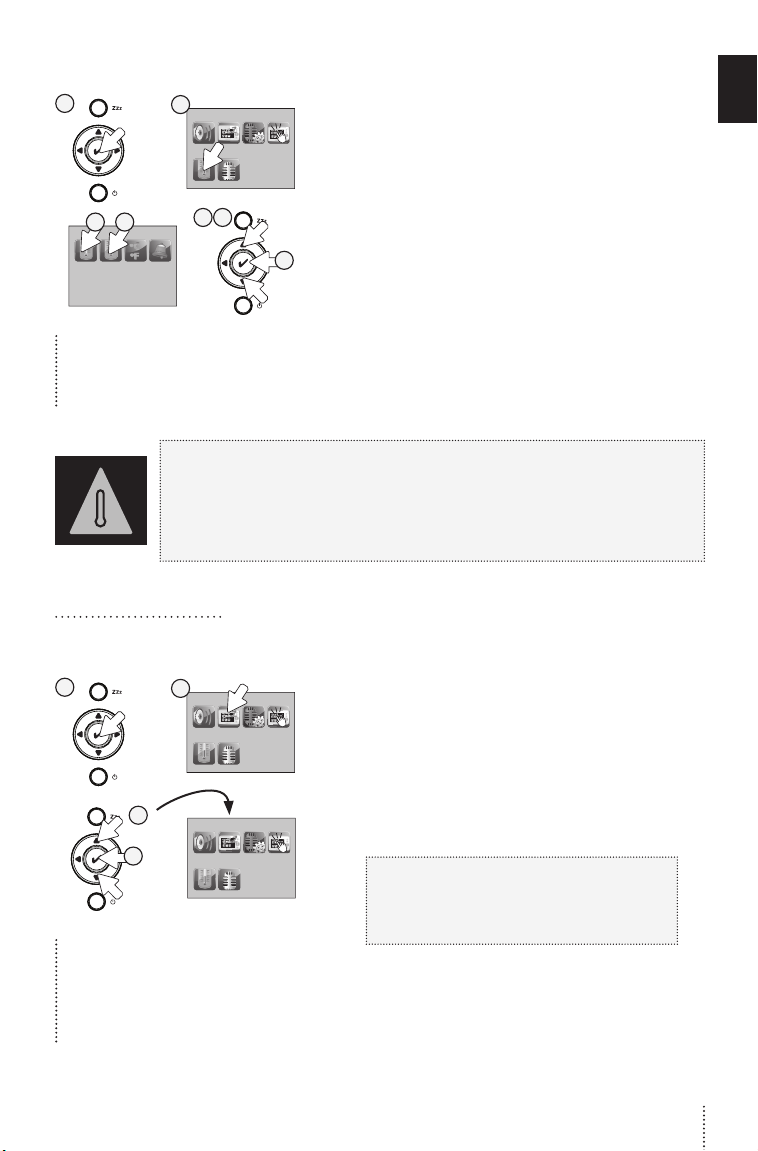
TO SET THE TEMPERATURE RANGE:
ºC
ºF
1
3 5
30oC 15oC ON
+
-
2
o
C
4 6
7
The range between the minimum and
maximum temperature must be at least
4 ˚C/7 ˚F. An error tone will be heard if you
try to set it up below this minimum level.
TEMPERATURE ALARM
• Alarm activates when temperature reaches maximum or minimum set
temperature.
• Parent Unit will emit 4 consecutive beeps, every 5 seconds.
• Temperature Alarm icon will show on LCD screen.
5.3 - SCREEN SAVER
1) Press Menu/Select button to access
main menu.
2) Select the Temperature icon to access
sub-menu.
3) Select the High Temperature icon
to set maximum temperature range
(24 to 32 ˚Celsius).
4) Use the up and down arrows to set
the highest temperature preferred.
5) Select the Low Temperature icon
to set minimum temperature range
(5 to 20 ˚Celsius).
6) Use the up and down arrows to set
the lowest temperature preferred.
7) Press Menu/Select button to confirm.
E
N
Allows you to set the screen saver starting point.
1
2
3
4
P
MANUAL SETTING:
To manually activate the Screen
Saver mode press and hold the
Parent Unit Zzz button. Press
& hold again to release.
1) Press Menu/Select button to access
main menu.
2) Select the Screen Saver icon.
3) Use the up and down arrows to select
timed delay before Video mode turns into
Screen Saver mode (Select Screensaver
OFF, 30s, 1m, 2m & 3m).
4) Press Menu/Select button to confirm.
NOTE:
The LCD screen will turn black when
video is in Screen Saver mode. Press any
button to return to Video mode.
13
Page 15
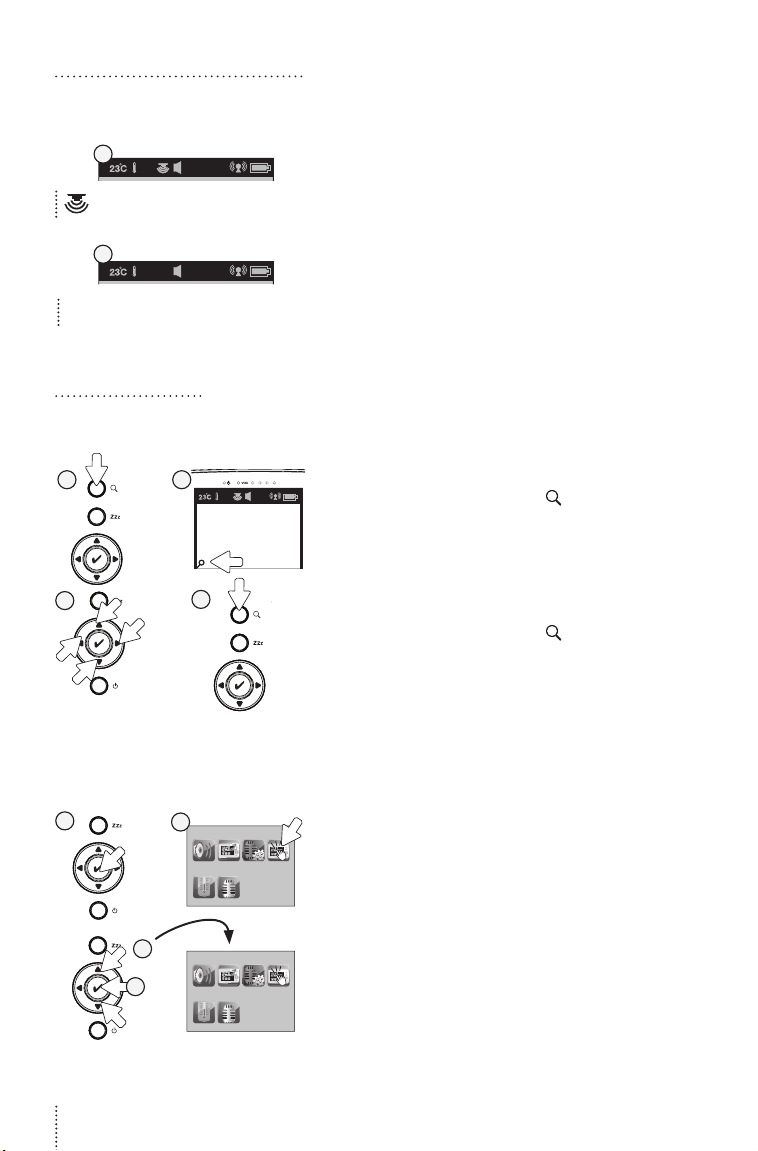
5.4 - INFRARED NIGHT VISION
Allows you to capture image when lighting is insufficient.
1
1) The infrared LEDS will turn ON
A Night View icon will appear at
the top of the Parent Unit screen.
2
The Night View icon will disappear at
2) If the light is bright enough in the room, the
the top of the Parent Unit screen.
5.5 - ZOOM MODE
Allows you to zoom in to twice the normal view.
1 2
1) Press and release the Zoom button
2) The Zoom icon will appear at the bottom
3
4
3) Use the arrow keys to zoom in
4) Press and release the Zoom button on
automatically when the lighting is not
sufficient, to give a night view on LCD
display.
Note:
When the Infrared Night Vision is ON, only
black and white image will be displayed on
the LCD screen.
infrared LED on the Camera will turn OFF
automatically.
on the Parent Unit.
left corner of the screen.
on what you want to see more closely.
the Parent Unit again to return to normal
view.
5.6 - KEY TONE
Allows you to activate or deactivate key tone sound.
1
2
3
4
21
14
1) Press Menu/Select button to access
main menu.
2) Select the Key Tone icon.
3) Use the up and down arrows to activate or
deactivate Key Tone sound.
4) Press Menu/Select button to confirm.
Page 16
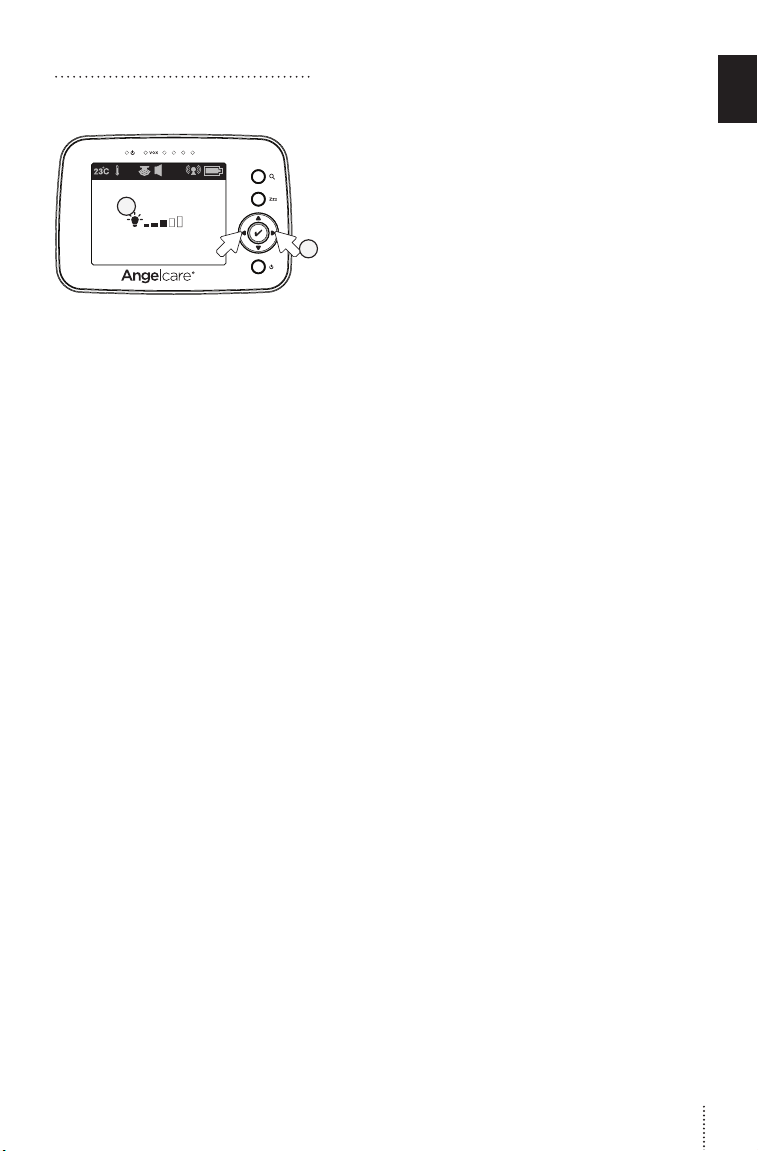
5.7 - LCD SCREEN BRIGHTNESS
Allows you to adjust the LCD screen brightness on the Parent Unit.
1) Use the left and right arrows to adjust the
2
1
screen brightness level (1 = LOW to 5 = High).
2) A light bulb will be shown on the LCD
screen.
E
N
15
Page 17
TROUBLESHOOTING
TAKING CARE OF YOUR RECHARGEABLE BATTERY
• Ensure that you fully charge your battery for 9 hours before first use.
• To maintain maximum battery life it is recommended that you fully discharge your battery
periodically. If your Parent Unit is not in use, please turn it OFF.
LOSS OF CONNECTIVITY
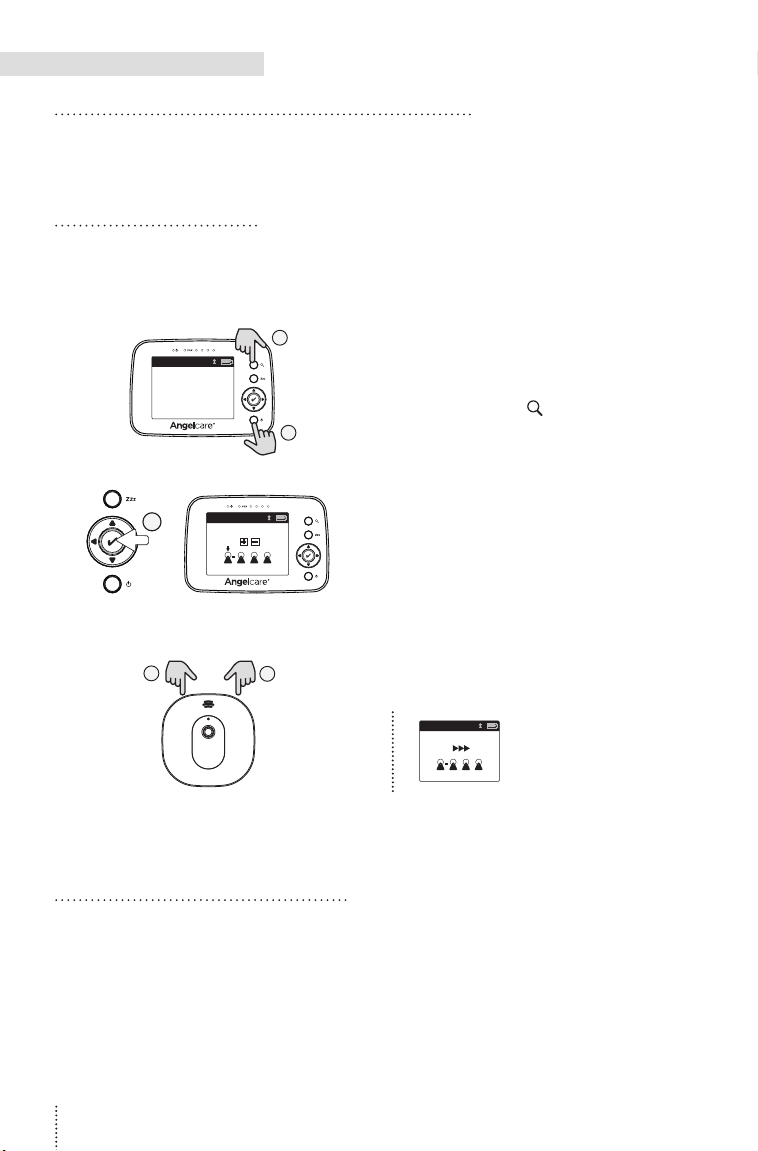
In the case of loss of connectivity, the first step is to bring the Parent Unit and Camera
closer together and make sure that both units are ON to restore the connection. If there is
still no connection and no out-of-range warning after the above has been done, then and
only then should the re-connection procedure below be done.
3
1) Turn both Units OFF
2) Turn the Parent Unit ON.
3) Press and hold the Zoom button until
2
the screen shows the Camera options.
4
5
6
4) Press the Menu/Select button to select the
Camera 1.
5) Turn the Camera ON.
6) Press the Pairing button for 3 seconds.
The Parent Unit will
display a forward icon
during the reconnection
procedure.
The reconnection is successful if Parent unit shows the camera view.
NO SOUND IS BEING TRANSMITTED
• Bring the Parent Unit closer to the Camera.
• Recharge the Parent Unit.
• Check connections or change to another electrical outlet.
• Ensure both units are ON.
• Ensure mains supply units are activated.
• Check on the top bar of the Parent Unit to see if the monitor is on MUTE instead of ON.
Refer to Step 4.1.
16
Page 18

CAMERA POWER ON INDICATOR (GREEN LIGHT) DOES NOT LIGHT UP
• Check connections or change to another electrical outlet.
• Slide the Camera ON/OFF switch to the ON position.
WEAK RECEPTION
• Bring units closer together.
• Change the position of one or both units.
• Place units on a flat surface away from baby’s reach.
• Recharge the Parent Unit.
STATIC, DISTORTION, INTERFERENCES
(FROM OTHER MONITORS, WIRELESS PHONES, WALKIE-TALKIES, ETC.)
• Rotate Parent Unit or move it away from source of interference.
FEEDBACK (LOUD NOISES EMITTED FROM THE PARENT UNIT)
• Move units farther apart (at least 3 meters).
• Decrease volume on Parent Unit.
THE PARENT UNIT SCREEN IS BLACK (PARENT UNIT IS OFF)
• Turn the Parent Unit back ON by pushing and holding the POWER ON/OFF button for
2 seconds.
• Recharge the Parent Unit.
E
N
17
Page 19
LIMITED WARRANTY
Angelcare® warrants to the original owner of this
product that Angelcare® monitor is free from any
material and workmanship defects for the term of
the warranty period (see warranty table below to
determine the warranty for your country). If this
monitoring system fails to function properly when
used as directed under normal conditions and
during the warranty period, Angelcare® will either
repair or replace the product, at our discretion, free
of charge. Please contact your local distributor to
validate warranty and warranty period.
The product must be accompanied by a proof
of purchase, either a bill of sale or other proof
that the monitoring system is within the warranty
period. Angelcare® will bear the cost of repairing or
replacing the product and shipping it back to you.
This warranty does not apply to a product which
has been damaged as a result of improper
maintenance, an accident, improper voltage
supply or any other form of misuse. The warranty
is also void if the owner repairs or modifies the
product in any way. Angelcare® is not liable for
any incidental or consequential damages with
regard to this product. The warranty also excludes
any liability other than what is stated above. No
other warranty is given.
TECHNICAL SPECIFICATIONS
Range:
Open field (Open area without obstructions):
up to 250 meters.
Number of Channels:
USA/Canada: 19 channels.
Europe: 64 channels.
Power Supply:
1 included Li-Ion battery (Parent Unit)
100 - 240 VAC / 5 VDC adapter for the Parent Unit
100 - 240 VAC / 5 VDC adapter for the Camera
Caution: To reduce the risk of electric shock, do
not expose this product to rain or moisture.
Danger of explosion if batteries are incorrectly
replaced. The battery included for the Parent Unit
is a user replaceable Li-ion rechargeable battery,
manufactured by SPRINGPOWER TECHNOLOGY
(SHENZHEN) COMPANY LIMITED. Only use the
Angelcare recommended replacement battery.
PROTECT THE ENVIRONMENT
This electronic equipment contains reusable
material and must not be disposed with
domestic waste. Please take it to a collecting
point for electric and electronic equipment
(ask your local authorities for details).
This warranty does not cover products and
accessories which are not Angelcare-branded, or
any problems that result from usage that is not
in accordance with product instructions, failure
to follow the product instructions, or problems
caused by using accessories, parts or components
not supplied by Angelcare.
LEGAL RIGHTS VARY FROM COUNTRY TO
COUNTRY. SOME COUNTRIES DO NOT ALLOW
THE EXCLUSION OR LIMITATION OF INCIDENTAL
OR CONSEQUENTIAL DAMAGES, SO THE ABOVE
LIMITATIONS MAY NOT APPLY TO YOU.
WE ARE NOT IN ANY WAY RESPONSIBLE FOR
ANY OUTCOME RESULTING FROM THE USE OF
THIS PRODUCT.
IMPORTANT! This Angelcare® monitor monitor is
a personal care product. Please do not return this
product to the store. If you have questions or need
help, please call your distributor before returning
this product.
Please contact your local distributor for warranty
information. Find your local distributor by visiting
our website: www.angelcarebaby.com
WARRANTY TERM PER COUNTRY
UK, South Africa, Russia 1 year
Other countries 2 years
To obtain information on replacement batteries
please contact Angelcare customer service:
www.angelcarebaby.com or contact your local
distributor. Instructions will be included with
the replacement battery. Dispose of exhausted
batteries properly according to your local
ordinances. Keep all batteries away from children.
Transmission:
Data transmission between the Parent
Unit and the Camera is made on the 2.4 GHz
frequency.
Maximum RF Power Transmitted = 20dBm (100mW)
Hereby, Angelcare Monitors Inc., declares that
this Baby Monitor is in compliance with Directive
2014/53/EU The full text of the EU declaration of
conformity is available at the following internet
address: www.angelcarebaby.com.
ErP COMPLIANCE
USE ONLY THE FOLLOWING ANGELCARE® BRAND
POWER SUPPLY MODEL NUMBERS:
EUROPEAN UNION (INCLUDING GERMANY) –
K05S050060G
UK - K05S050060B
See product for compliance marks specific to
this device.
18
Page 20

E
N
19
Page 21

For assistance, FAQs or guidance with your monitor please visit
our Customer Support page at Angelcare.co.uk
www.angelcarebaby.com
IM1210-INT-10817
 Loading...