

Page 1
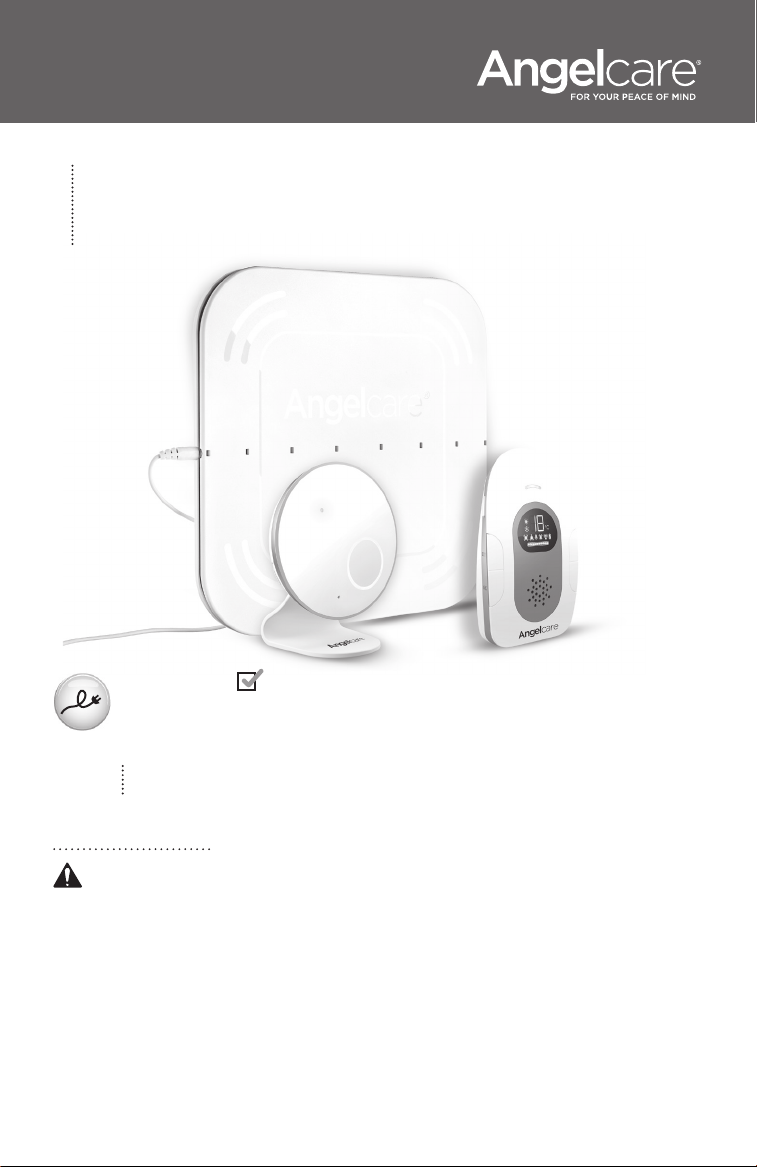
OWNER’S MANUAL
Model AC115
Baby Sound and Movement Monitor
Cord Safety
Ensure the Nursery Unit is at least 1 metre away from your baby’s cot.
The Sensor Pad cord must always be kept out of reach of baby and
secured using the cord cover kit provided.
For assistance, FAQs or guidance with your monitor
please visit our Customer Support page at angelcare.co.uk
TABLE OF CONTENTS
WARNINGS...............................................................................................................................................................................2
SETUP REQUIREMENTS .................................................................................................................................................................3
Charging the Parent Unit (10 hours) ..........................................................................................................................................4
Positioning the movement Sensor Pad .....................................................................................................................................5
Setting up the Nursery Unit ..........................................................................................................................................................8
Turning on your monitor ................................................................................................................................................................9
Testing and getting to know your monitor ............................................................................................................................. 11
Activating and deactivating additional functions ................................................................................................................17
Troubleshooting ..............................................................................................................................................................................18
Limited warranty ..............................................................................................................................................................................21
Technical specifications .................................................................................................................................................................21
Page 2
OWNER’S MANUAL
KEEP YOUR OWNER’S MANUAL FOR FUTURE REFERENCE.
PLEASE READ THE WARNINGS AND INSTRUCTIONS CAREFULLY BEFORE ASSEMBLING & USING THE PRODUCT.
FAILURE TO FOLLOW THE WARNINGS AND THE INSTRUCTIONS COULD RESULT IN SERIOUS INJURY OR DEATH OR DAMAGES
TO THE PRODUCT.
THE SENSOR PAD FEATURE IS NOT FOR USE WITH ADULTS, CHILDREN OR INFANTS OLDER THAN 24 MONTHS.
THE SENSOR PAD IS NOT INTENDED TO BE USED TO DETERMINE IF A CHILD IS OUT OF THE COT.
WARNING
Adult assembly required.
Keep small parts away from children when assembling.
We, at Angelcare®, stand behind all of our products.
If you are not completely satisfied or have any questions,
United States and Canada: Please contact us at: [email protected]
Other countries: Please contact your local distributor.
WARNINGS
1. THIS PRODUCT CANNOT REPLACE RESPONSIBLE ADULT SUPERVISION.
This prod uct is desi gned to aid i n the monito ring of your b aby. When
using the m onitor, you must still prov ide the supervisi on necessary for t he
continue d safety of yo ur baby. Mon itoring of pr emature b abies, o r those
conside red to be at risk, sho uld always be car ried out under t he supervisi on
of a health pr ofession al. This m onitor SH OULD NOT b e used as a me dical
device, no r as a device to pr event Sudd en Infant D eath Syndr ome (SIDS ).
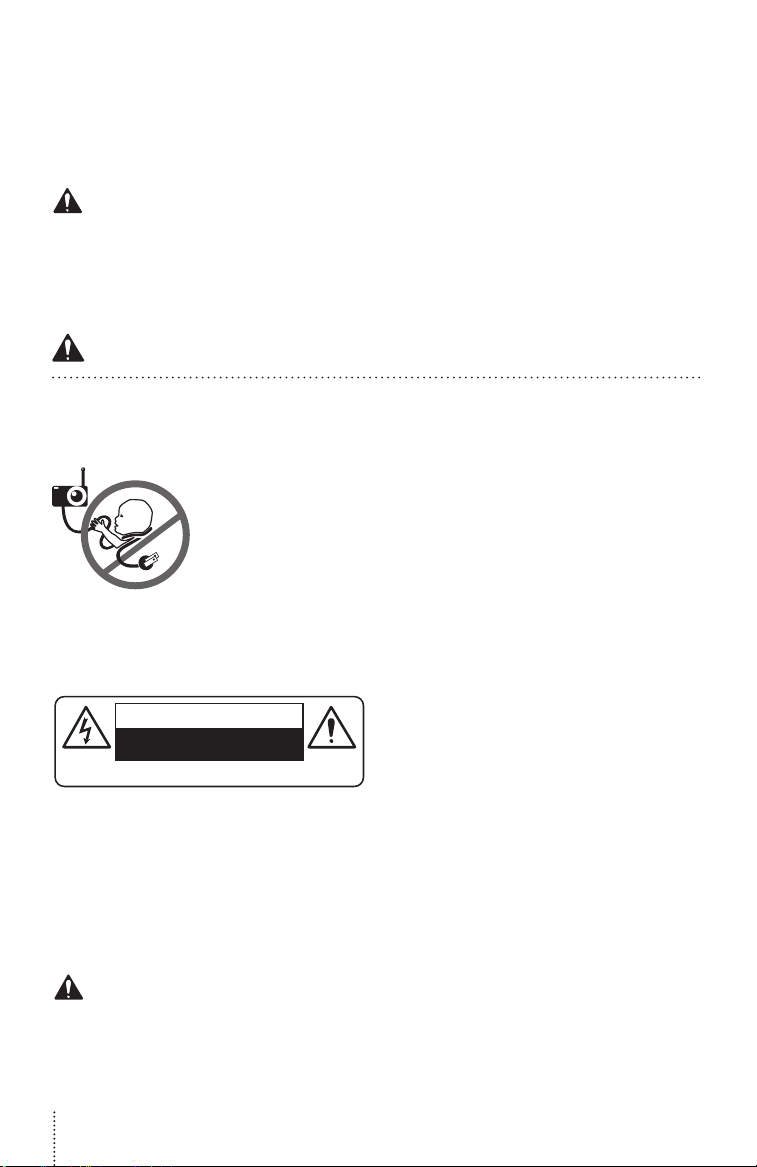
2. WAR NING Strangula tion Hazard — Childr en have STRANGL ED in cords.
an electr ical outl et, DO NOT tou ch the expos ed end.
5. ALWAYS be sure tha t both the tra nsmitter a nd receive r are worki ng
properly a nd are within range of ea ch other. Test monitor before f irst use,
periodi cally an d when chan ging loc ation of the N urser y Unit.
6. ALWAYS be sure to im mediatel y check on b aby wheneve r an alarm
sounds.
7. DO N OT use monit or near wate r (such as bath tu b, sink, e tc.).
Keep adapt er cords out o f the reach
of childre n (more than 1 me ter away).
NEVER u se Wired Se nsor Pad (s)
without th e protective c ord covering .
Check prot ective cord coverin g before
each use. I mmediately d iscontinue us e
of Wired Se nsor Pad (s) if protective
covering is d amaged o r broken.
3. Neve r use exten sion cords w ith AC
adapters . ONLY use the AC ad apters
provid ed.
4. Wh en an AC Adapter is plu gged into
CAUTION
RISK OF ELECTRIC SHOCK
DO NOT OPEN
DO NOT EXPOSE TO RAIN OR MOISTURE
8. Kee p monitor AWAY from heat sources (suc h as stoves, radiators , etc.).
9. ALWAYS place both t he Nurse ry Unit an d Parent U nit on a flat s urface
in an uprig ht positio n and allow fo r proper ve ntilation . DO NOT pla ce on
sofas, cu shions , beds, etc . which may b lock venti lation.
10. Th is monitor u ses publi c airwaves to t ransmit si gnals. T he Parent U nit
may pick up sig nals or in terfere nce from oth er nurse ry monito rs in your
area. Your mo nitor may even be picked u p by other househo lds. To protect
your priva cy, make sure bo th units are t urned OF F when not in u se. If you
experien ce interf erence, c hange th e channe l on both unit s.
11. Th is produ ct is NOT a toy. DO NOT al low childr en to play with it .
12. T his produ ct conta ins small p arts. Ad ult asse mbly requ ired. Exe rcise
care when unpacking and assembling the product and keep small parts
away from chil dren.
13. Us e and store th e monitor a t a tempera ture betwe en 10 °C an d 40 °C.
BATTERY WARNING
14. U se ONLY AAA RECHA RGEABLE ba tteries for the Pa rent Unit. DO NOT
mix old and n ew batteries. DO N OT mix alkaline, stan dard or recharge able
batterie s. Inser t batter ies with corr ect pola rity. DO NOT sh ort-circu it
supply ter minals . ONLY use the rec ommend ed batter ies or equ ivalent
(volts and size) and the correct adapter. Remove batteries when product
is stored fo r long periods of tim e or when batteri es are exhausted. D ispose
exhauste d batteries pro perly. DO NOT rech arge non-re chargeabl e batteries.
Recharg eable bat teries ar e ONLY to be charg ed under a dult supe rvisio n.
Keep all bat teries away f rom child ren.
2
15. IMPORTANT SAFETY INSTRUCTIONS
15.1 R ead these i nstruct ions - All th e safety in structi ons shou ld be read
before the p roduct i s operated .
15.2 Keep these instr uctions. The sa fety and operatin g instructions s hould
be retaine d for futu re referen ce.
15.3 Heed all warnin gs – All warnings on the p roduct a nd in the ope rating
instruc tions sho uld be adh ered to.
15.4 Follow all instruc tions – Al l operatin g and use in structi ons shou ld
be followed.
15.5 Water and moisture - D O NOT use this a pparatu s near water. Fo r
example, n ear a bath tu b, wash bowl , kitchen si nk, lau ndry tub , in a wet
environm ent or nea r a swimming p ool and th e like. Ca re should b e taken
so that obje cts DO NOT fall onto u nits and th at liquids are not spil led into
either un it or Senso r Pad throu gh its ope nings.
15.6 Cleaning - Disco nnect al l units bef ore clean ing. DO NOT i mmerse i n
water any par t of the Nursery Uni t, Parent U nit. Clea n only with dry cloth.
15.7 Ventilation - DO NOT bloc k any ventilation op enings. Allow fo r proper
ventilatio n when units are in us e. DO NOT cover the Nurs ery Unit or Paren t
Unit with any o bject such as a bl anket. DO NOT pla ce it in a drawer or in any
location w hich would muf fle the sound o r interfere wi th the normal fl ow of air.
15.8 Heat sources - DO N OT install near any h eat sources such a s radiators,
heat regis ters, stove s, TVs or oth er appar atus (incl uding am plifier s) that
produce h eat. Heat c an dama ge the case o r electr ical par ts.
15.9 Power cord protectio n - Protect th e Sensor P ad cord and Ad apter’s
power cord fr om being wa lked on or pi nched by fu rniture or o ther items
– Power supp ly cords sho uld be route d so that they a re not likely t o be
walked on or p inched by it ems upon o r against t hem, payi ng partic ular
attentio n to cords and plugs, c onvenience recept acle, and the poi nt where
they exit from t he produc t.
15.10 Accessories - Only use attachments/accessories specified by the
manufa cturer. DO NOT p lace this p roduct on a n unstab le cart , stand,
tripod, b racket or ta ble. The p roduct m ay fall, ca using se rious inj ury to
a child or ad ult and ser ious dam age to the pro duct. Us e ONLY with a
cart, stand, tripod, bracket or table recommended by the manufacturer
or sold with th e produc t. Any moun ting of the pr oduct sh ould foll ow the
manufacturer’s instructions.
15.11 Unplug this appl iance dur ing lightn ing storm s or when not u sed for
long peri ods of time .
15.12 Servicing - DO NOT a ttempt to serv ice this produc t yourself as o pening
or removin g covers (except bat tery doo rs) may expose you to d angero us
voltage or o ther haza rds.
15.13 Replacement pa rts - Whe n replace ment par ts are req uired, be s ure
the replacement parts specified by the manufacturer have the same
charact eristic as t he origin al part. U nautho rized subst itution may re sult
in fire, el ectric sh ock or othe r hazards .
15.14 Usage - This baby mon itor is intended as a n aid. It is NOT a subst itute
for respon sible and prop er adult supe rvision and s hould not be use d as such.
Use this ap pliance O NLY for its inten ded use as d escribe d in this man ual.
15.15 Power Sou rces - Ope rate this pro duct onl y from the ty pe of power
source ind icated on the ty pe plate of the ada ptor.
of power sup ply to your home, co nsult your deal er or local powe r company.
15.16 Overloading - DO N OT overload wa ll outlet s, extens ion cords o r
integral co nvenienc e recepta cles as this c an result i n a risk of fire o r
electric shock.
15.17 O bject a nd Liquid E ntry - NE VER push ob jects of a ny kind into th is
product t hrough casing slot s as they may touch dange rous voltage point s
or short o ut parts that cou ld result in a risk of fi re or electric sho ck. NEVER
spill liqu id of any kind o n the produ ct.
15.18 Antenna - The anten na used fo r this trans mitter mu st be inst alled
to provide a se paration d istance o f at least 20 c m from all pe rsons an d
must not be c ollocated or ope rating in conjunc tion with any other ante nna
or tr ans mit ter.
If you are uns ure of the type
Page 3
15.19 Power Lines - An outs ide anten na system sh ould NOT be l ocated
in the vicin ity of overhe ad power lin es or other e lectri c light or powe r
circuit, o r where it ca n fall into su ch power lin es or circu its as cont act
with them may b e fatal.
15.20 WARNING Stran gulatio n Hazard — Ch ildren have S TRANG LED in
cords. Kee p adapter cords out of th e reach of children (mo re than 1 meter
away). NEVER u se Senso r Pad(s) without th e protecti ve cord coveri ng.
Check prot ective cord covering be fore each use. Imme diately discontinu e
use of Sens or Pad(s) if protec tive coverin g is damage d or broken .
15.21 Interferen ce - This mon itor uses pu blic air waves to transm it signals.
The Paren t Unit may pic k up signal s or interf erence fro m other nu rsery
monitors i n your area . Your monitor m ay even be picke d up by other
househo lds. To protec t your priva cy, make sure bot h units are tu rned
OFF when n ot in use. If yo u experie nce interf erence, c hange th e channe l
on both unit s.
15.22 Vibration So urce - When t he monitor i s in use, DO N OT use
a bedside c rib, cot mob ile or othe r cot accesso ries that m ay produce
vibratio ns. Othe r sources of v ibration s may inclu de fans, w ashing
machine s, loud mu sic, etc . These sou rces of vibra tion may inte rfere
with the per forman ce of your Ang elcare® monitor an d the alarm w ill not
sound if it co ntinues to d etect any m ovement oth er than you r baby’s.
Be sure all vi bration so urces are e liminate d before usi ng the moni tor.
15.23 You may experience f alse ala rms for sever al reason s. The
most comm on reason i s the Nurse ry Unit h as not bee n turned O FF
after you ha ve removed you r baby from th e cot. Anoth er reason i s
the Senso r Pad has not b een plac ed under th e mattres s properl y.
Be sure the S ensor Pad is on a fla t, firm surfac e with the printed sid e facing
up. The sen sitivity l evel may also n eed to be adj usted. Re fer to Step 5 .4.
Always be sure to i mmediately check o n baby whenever an ala rm sounds .
15.24 Sensor Pad - If th e cot has a spring or slat ba se, place a hard board
between th e cot base an d the Sens or Pad mea suring at le ast 33 x 33 c m
and 6 mm thic k. Only use your An gelcare® monitor in a s tationary sle eping
environm ent such as a cot where the S ensor Pad can rest o n a completely
flat, fir m surfac e. The Sen sor Pad is ma de of plas tic and doe s not permi t
the air to circ ulate. The refore, mi ldew buil d up could deve lop unde rneath
the mattre ss in the Se nsor Pad ar ea. We sugge st rotatin g the mattre ss
regular ly to prevent any m ildew.
16. IMPORTANT SAFETY INSTRUCTIONS RELATED TO USE OF BATTERIES
16.1 U se ONLY the type and s ize of batteries s pecified in th e owner’s manu al.
There is a ris k of explosion if batte ries are replace d with an incorrect t ype.
16.2 Use ONLY AAA rech argeabl e batteri es and/or the AC Ad apters
provided fo r the Paren t Unit. You mus t use only re chargea ble batte ries
in the Paren t Unit. DO N OT use alkal ine batte ries or you wi ll severely
damage th e unit.
16.3 Charge the batte ries for 10 hour s prior to first use . Be sure to have the
monitor in th e OFF position dur ing this period. O NLY use the AC Adapters
included with your monitor.
16.4 DO NOT use t hese adap ters with any ot her equi pment.
16.5 When unplugg ing the AC Adap ter from the N urser y Unit, be su re it
is switched to t he OFF pos ition. If it i sn’t, th e unit will reve rt to batte ry
mode if bat teries are i nstall ed.
16.6 DO NOT use recharge able bat teries in th e Nurser y Unit. Use alkalin e
ba tt er ies O NLY.
16.7 DO NOT dispose batte ries in fire. They m ay explode. Check wi th local
regulati ons for pos sible spe cial disp osal ins tructio ns.
16.8 Exercise care in h andling batt eries in order n ot to short out th e batteries
with condu cting material s such as rings, b racelets and keys . Overchargin g,
short ci rcuiting , reverse cha rging, m utilation , or incin eration of b atterie s
must be avoid ed to prevent o ne or more of t he followi ng occurre nces:
release of tox ic materia ls, relea se of hydroge n and/or oxyge n gas and
rise in sur face temp erature.
16.9 DO NOT attempt to rech arge batteries p rovided with or ident ified for
use with this p roduct th at are not in tended to be c harged . The batte ries
may leak cor rosive elec trolyte o r explode .
16.10 DO NOT attempt to reju venate the batte ries provided w ith or identif ied
for use with th is produc t by heating t hem. Sud den rele ase of batte ry
electro lyte may occu r, causing b urns or irr itation to eye s or skin.
16.11 If and when necessary, the batteries must be replaced with identical new
ones or equivalent (volts and size). If a battery to be replaced is connected
with other batteries in series, replace the other batteries at the same time
as well. DO NOT mix old and new batteries.
16.12 Reverse polarit y installation of th e batteries in the e nd product must
be avoided . Reverse ins ertion o f batterie s can cau se chargi ng, and tha t
may result in l eakage o r explosio n.
16.13 Remove batteries f rom this product if yo u store the product ove r 30
days because the batteries could leak and damage the product.
16.14 Discard ‘dead’ b atterie s as soon as po ssible si nce ‘dead ’ batteri es
are more like ly to leak in a p roduct . If a batter y has leake d or vented , it
should be r eplaced i mmedia tely using p rotective gl oves.
16.15 DO NOT store this prod uct, or the bat teries provide d with or identifi ed
for use with th is produc t, in high -temper ature area s.
E
N
SETUP REQUIREMENTS
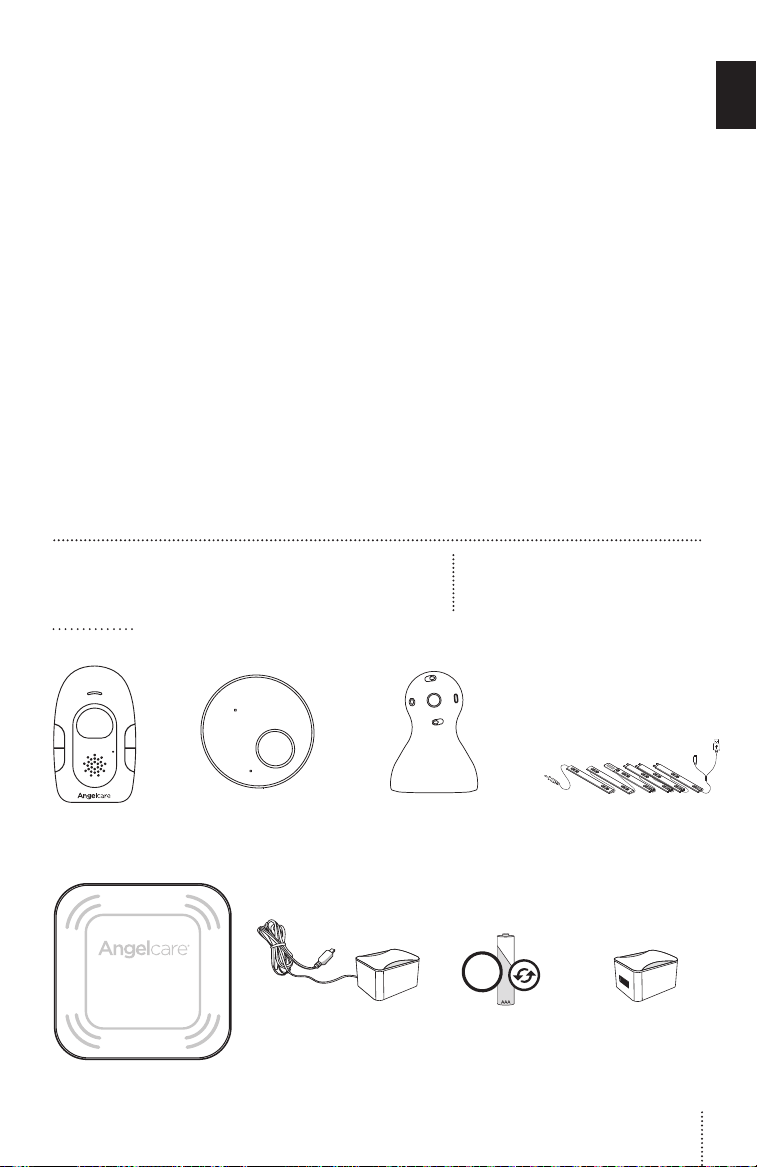
INCLUDED:
Parent Unit Nursery Unit Tabletop stand
AC adapter
(for Parent Unit)
Wired Movement Sensor Pad
* Always place Angelcare® logo
side up *
(for Nursery Unit)
2 Rechargeable AAA Batteries
Model AC115
Sound and Movement Monitor
6 Pre-threaded cord
covers with Split USB
cable
2X
AC adapter
(for Parent Unit)
(for Nursery Unit)
3
Page 4
YOU MUST PREPARE:
WHAT YOU WILL NEED (NOT INCLUDED):
One hardboard (not included)
Thickness: 6 mm
Minimum dimensions:
33 x 33 cm
Maximum dimensions:
equal to the mattress size
IMPORTANT
The hardboard must be larger than
Hardboard
2X
2 AAA Alkaline
Batteries
(for Nursery Unit)
the Sensor Pad surface.
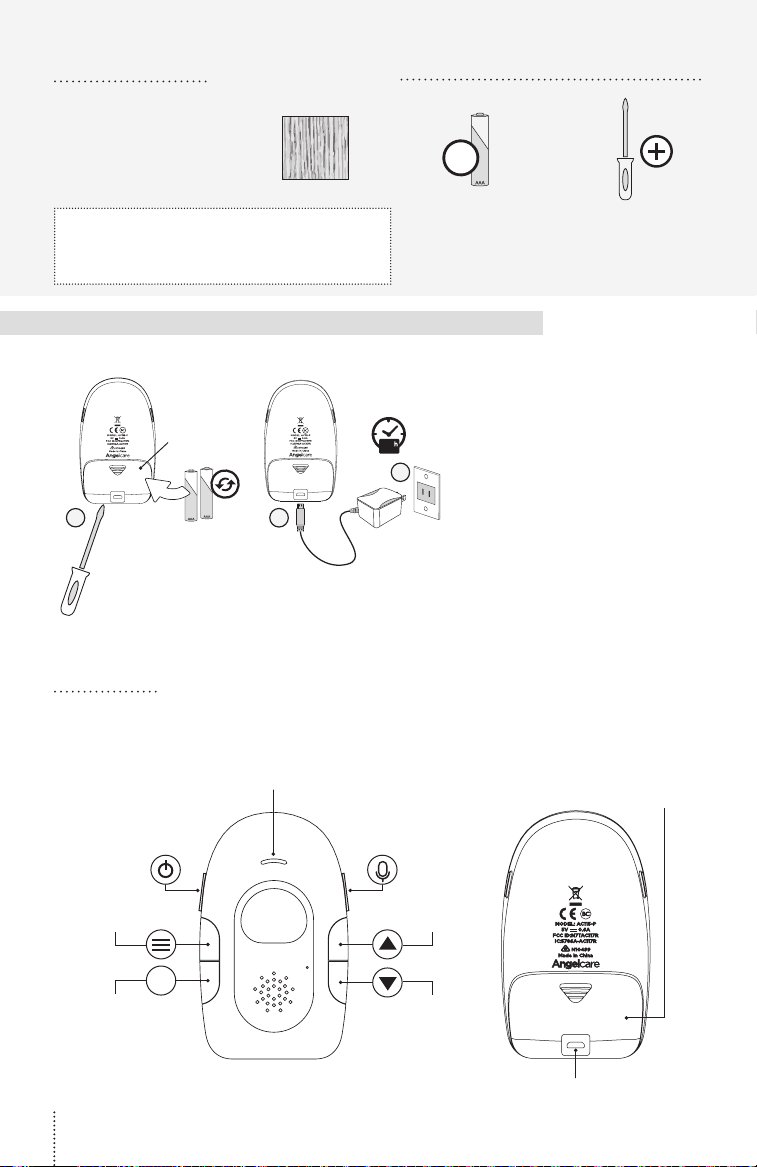
STEP 1 - CHARGING THE PARENT UNIT (10 HOURS)
1) Remove the battery
compartment on the
rear. Insert the provided
Battery
compartment
1
2
10
3
rechargeable batteries into
the compartment.
2) Connect the USB plug to
the Parent Unit.
3) Connect the power
adapter to an electrical
outlet.
4) Charge the unit for
10 continuous hours prior
to first use.
Miniature Philips
Screwdriver
PARENT UNIT:
Menu/
Exit Menu
Confirm Selection/
Pause Sensor Pad
4
Power
On/Off
OK
TIC Indicator
Talk Back
Button
UP/
Volume +
Down/
Volume -
Rechargeable
battery
compartment
Micro USB
charging port
Page 5
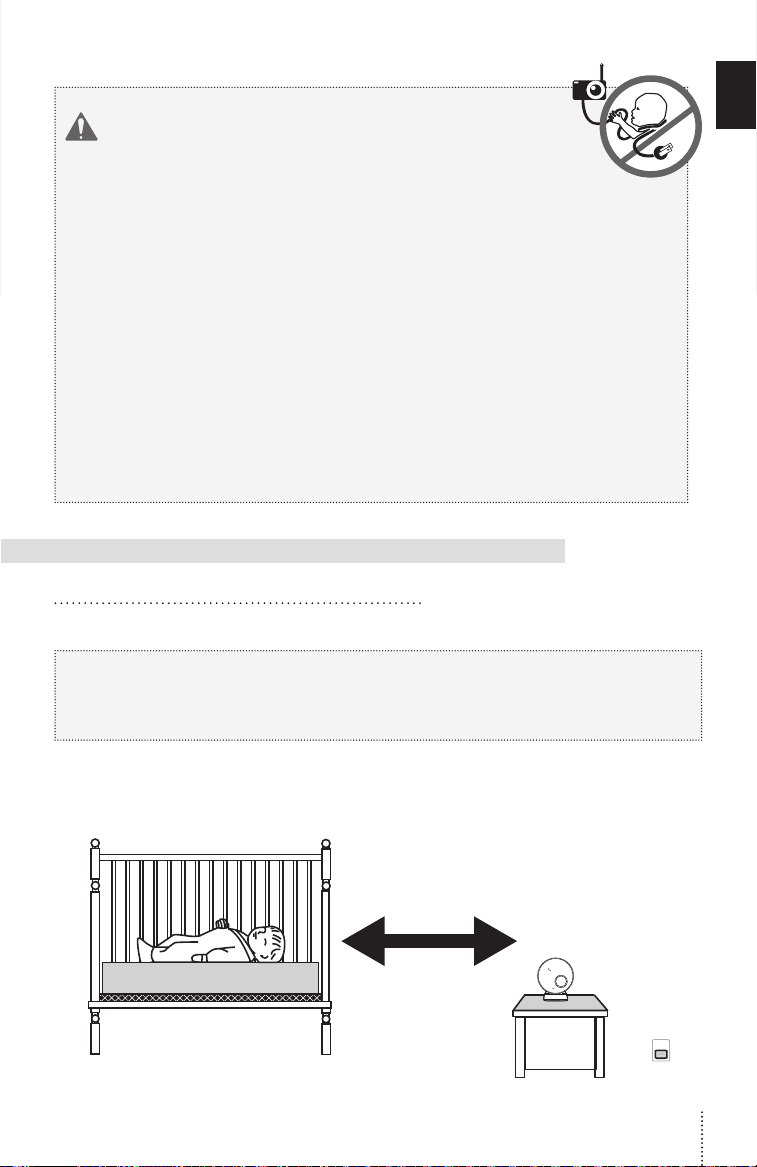
WARNING
STRANGULATION HAZARD.
Children have STRANGLED in cords:
• Keep adapter cords out of the reach of children
(more than 1 meter away).
• Because of the serious strangulation risk to infants
and toddlers, parents and caregivers should never
place the Nursery Unit within 1 meter of a cot.
• NEVER use Sensor Pad without the cord covers.
Check cord covers before each use to ensure it is
securely placed under the leg of the cot. Discontinue
use of Sensor Pad if any cord covers are damaged or
broken.
• NEVER use extension cords with adapters. ONLY
use the adapters provided. This product is not a toy.
Never allow children to play with it.
STEP 2 - POSITIONING THE MOVEMENT SENSOR PAD
2.1 - SELECT A LOCATION FOR THE NURSERY UNIT
E
N
IMPORTANT
Place the cot near a supporting wall and far from air currents. Install the Nursery Unit on
a flat, stable surface facing the cot at a distance of at least 1 meter. Make sure to plug
the adapter to the socket outlet nearest to the equipment and that is easily accessible.
Place the Nursery
Unit at least
1 meter
from the cot
5
Page 6
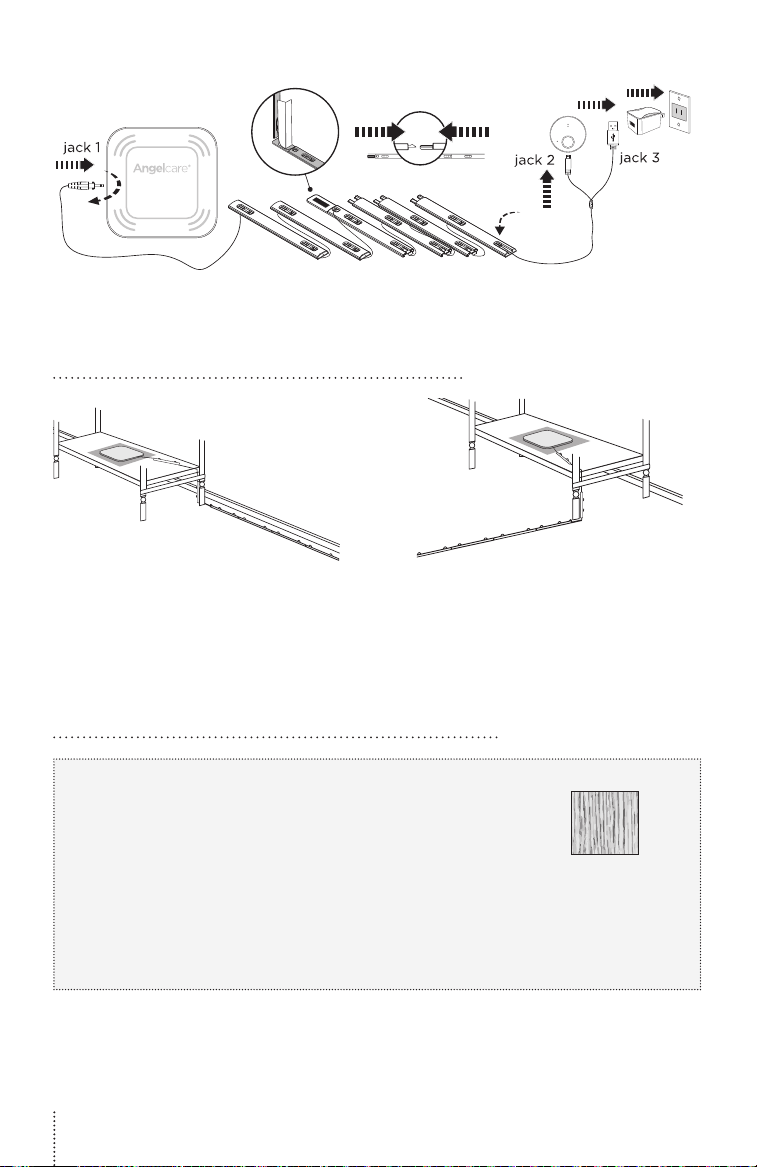
1) Insert jack 1 into the Sensor Pad and twist it clockwise to lock it.
6 5 4 3 2 1
2.2 - SELECT THE COT LEG TO SECURE THE CORD COVERS
RECOMMENDED
6
5
4
3
Figure 1 Figure 2
2
OR
2
1
1
6
5
4
3
Use the cot leg by the wall closest to the Nursery Unit (Figure 1). In cases where the
Nursery Unit is across the room, use the leg closest to the Nursery Unit to position the
covered wire (Figure 2). It is always preferable that the covered cord run along a wall.
2.3 - INSTALL THE SENSOR PAD ON THE MATTRESS SUPPORT
IMPORTANT
If your cot does not have a solid, stable surface for the Sensor
Pad, you will need to place a support under it, to ensure correct
operation of the system.
This hardboard support should be at least 6 mm thick and should
have minimum dimensions of 33 x 33 cm. This support board must
Hardboard
be larger than the Sensor Pad surface area.
The Sensor Pad functions with any size and type of mattress except memory-foam
mattresses, hollow frame mattresses and water beds. The hardboard maintains a
constant pressure on the Sensor Pad, enabling it to detect baby’s movements even
when baby is at the edge of the cot.
6
Page 7
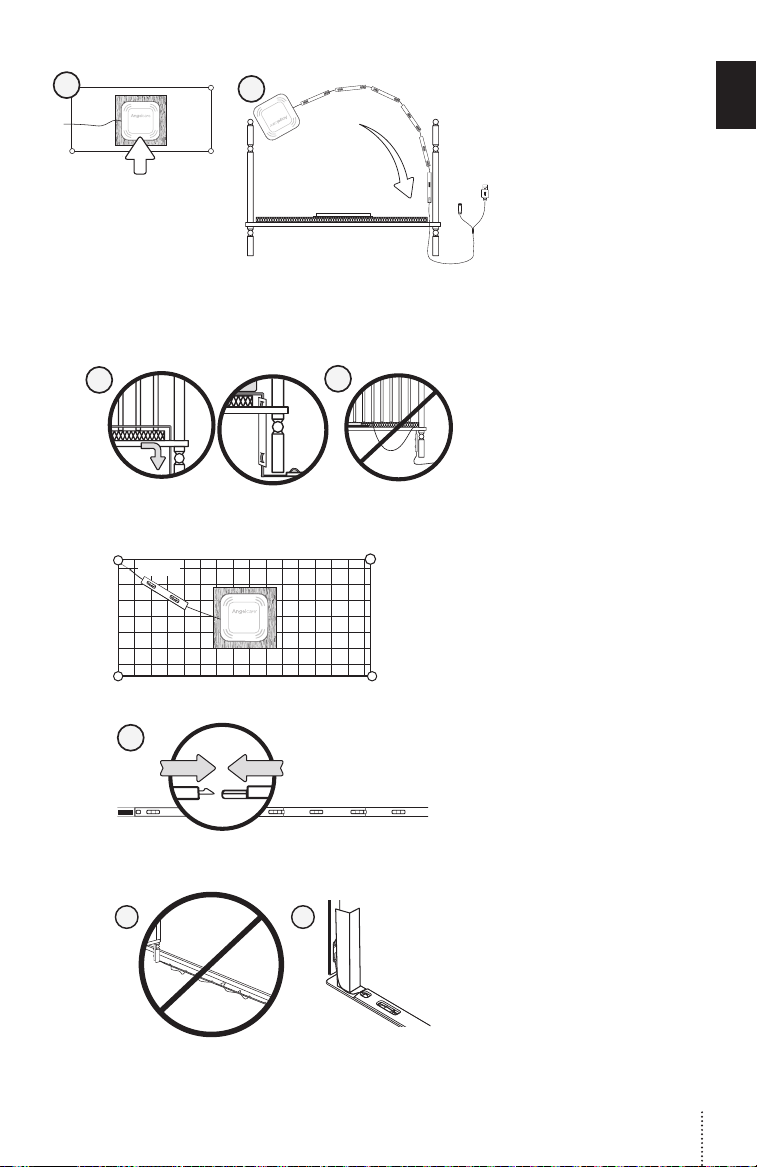
2
4132
4
3
2
1
Sensor Pad
4
8 cm
3
5
6
4
3
2
1
1) Remove the mattress
from the cot.
2) Place the Sensor Pad –
Angelcare
– on top of the
®
logo side up
hardboard.
3) Run the connection pin,
E
N
warning label and the first
5 cord covers down along
the rear of the cot leg,
between the mattress
support and the inside
edge of the cot.
4) Bring the first 4 cord
5
covers down the floor,
and keep the 5th cord
cover vertically, along
the rear of the cot leg,
between the mattress
and the inside edge of
the cot.
5) Remove any cord slack
to make sure no parts
of the cord are loose.
6) Place the 6th cord
cover approximately
8 cm from the edge of
the mattress support.
7
8 9
CLICK!
7) Snap together the
remaining cord covers
that will run along the
floor.
8) Remove any cord slack
to make sure no parts
of the cord are loose.
9) Peel off the doublesided tape on the 4
cord cover and place
th
it securely under the
cot leg.
7
Page 8
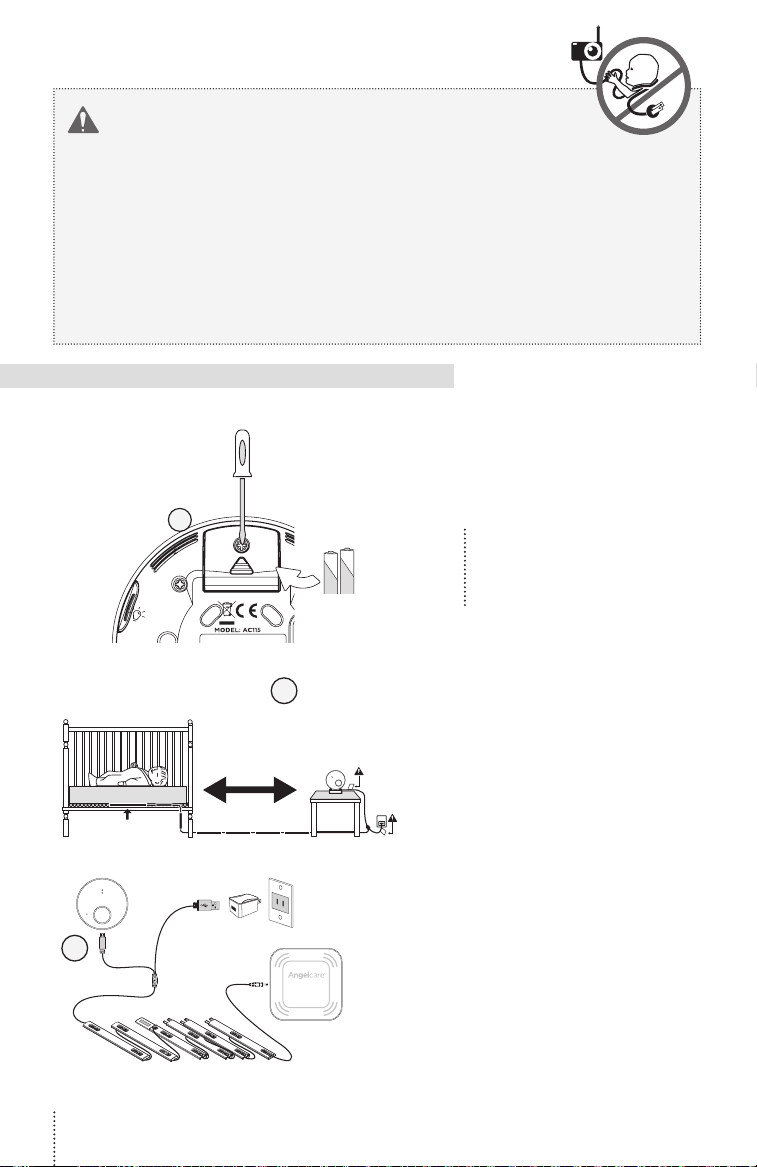
WARNING
STRANGULATION HAZARD
• Remove all slack from Sensor Pad Cord.
• When lowering the mattress support
as your baby grows, slide the vertical
Cord Cover downward so it remains
approximately in the center between
the mattress support and the floor. Slide
the Sensor Pad Cord through the Floor
Cover to eliminate any additional slack.
• The Sensor Pad is not designed
for use with adults, children or infants
older than 24 months.
• Discontinue use of the Sensor Pad
when baby is older than 24 months.
Deactivate the Movement Function and
remove the Sensor Pad from cot and
store for future use.
• BEFORE FIRST TIME USE: To test
that the unit is ready for use, refer to
instruction manual on how to test that
the installation has been done correctly.
STEP 3 - SETTING UP THE NURSERY UNIT
Select a location for the Nursery Unit that is at least 1 meter away from the cot.
1) Remove the batteries cover and
insert 2 AAA Alkaline Batteries
1
(not included)
Note:
The batteries are a back up
power supply in case of power
outage.
Sensor Pad
5
8
6
5
2
MUST BE AT LEAST
1 METER DISTANCE
4 3 2 1
2) Install the Nursery Unit on a flat,
stable surface facing the cot at
a distance of at least 1 meter
and plug the Sensor Pad cord
into the Nursery Unit.
3) Check to make sure the Sensor
Pad has not moved from its
position.
4) Place the mattress back inside
the cot.
5) Connect the USB plug to the
Nursery Unit and the USB plug
with the power adapter and
then to an electrical outlet.
Page 9
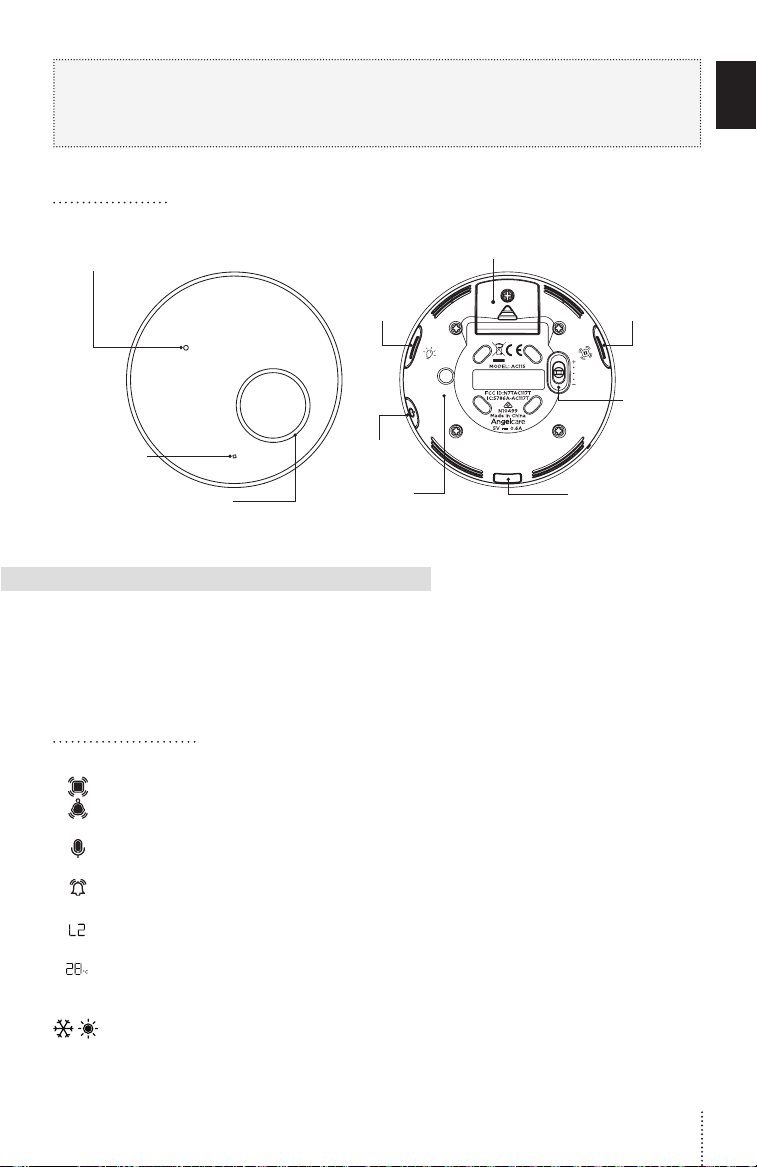
Note: Each time you power ON your Nursery Unit, the internal thermometer will need to
calibrate to ensure accuracy. This automatic process will take approximately 30 minutes.
The colour changing temperature display, by default, will be turned “OFF”. You may turn
this feature “ON” in the settings mode on your Parent Unit.
NURSERY UNIT:
Power ON/OFF Light Indicator
Low Batteries Light Indicator
Microphone
Sensor Pad Indicator/
Temperature Indicator
Temperature
Indicator
ON/OFF /
Pager
Power
ON/OFF
Speaker
Battery
Compartment
Pause Movement
Sensor Pad
Movement
Sensor Pad
sensitivity
switch
Micro USB
Port
STEP 4 - TURNING ON YOUR MONITOR
YOU ARE NOW READY TO USE YOUR MONITOR
E
N
The Angelcare® monitor can be used with the pre-program factory settings or you can also
customize your settings to your preference.
DEFAULT SETTINGS
Detection Mode:
Movement: ON
Sound: ON
Sound transmission (VOX): OFF
TIC Function: OFF
VOX Sensitivity: Level 2 (of 4)
Temperature Unit: Celsius
Temperature Alarm: OFF
Temperature Alarm Setting: High: 30˚C
Low: 19˚C
9
Page 10
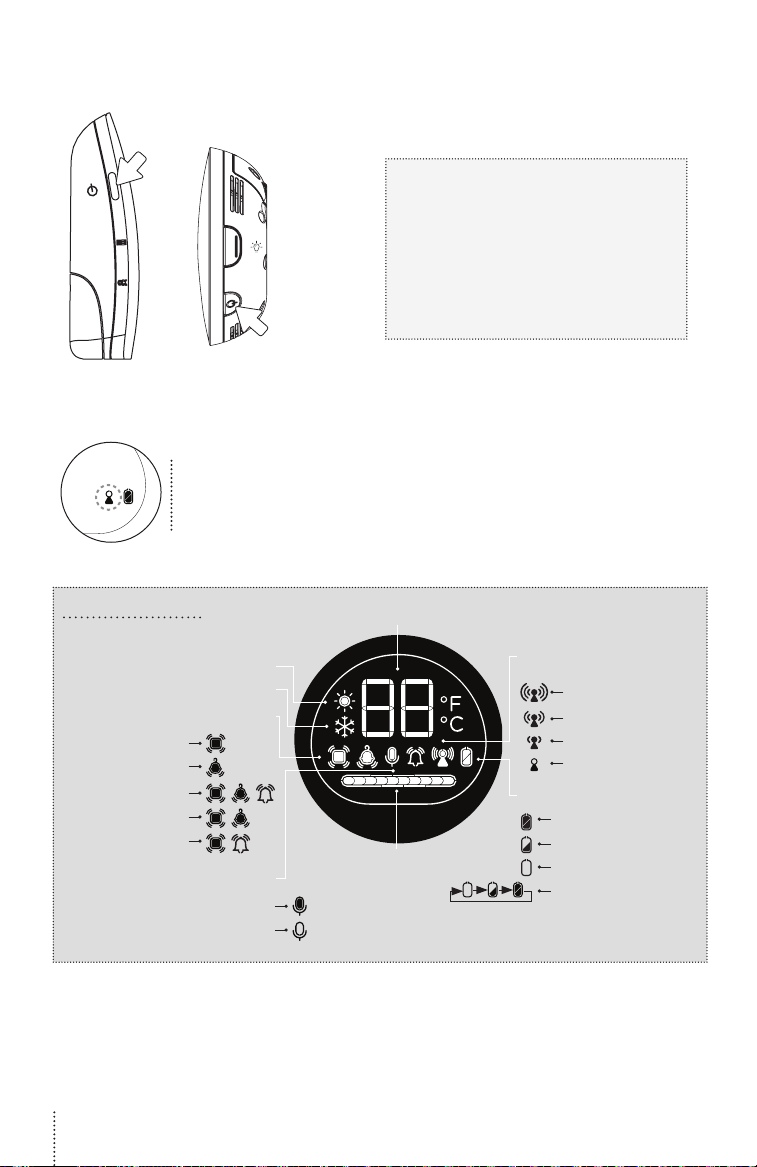
TURN ON YOUR MONITOR
Press ON/OFF on
the Parent Unit
for 2 seconds.
When the Parent Unit is ON and Nursery Unit is OFF or, if there is a
lost connection between the 2 units;
-The Out-of-Range icon on the Parent Unit will blink
-The Parent Unit will beep 3 times every 15 seconds
Press ON/OFF on
the Nursery Unit
for 2 seconds.
NOTE:
The screen of the Parent Unit flashes
the out-of-range icon until it displays
the room temperature and function
icons. The connection process should
be complete within 30 seconds. If this
sequence is not completed within 30
seconds you will need to switch the
units off and repeat.
IMPORTANT ICONS
Temperature alerts icons:
Indicates which functions are activated
Detection mode icons:
Movement only
Sound only
Movement, Sound
Movement & Sound
Movement & “TIC”
VOX icon: Indicates when the
Nursery Unit is in VOX mode
10
Too Warm
Too Cold
& “TIC”
Sound activated
transmission (VOX ON)
Continuous sound
transmission (VOX OFF)
Temperature display
Sound Sensitivity Indicator
Connection icon: Indicates the
connection quality between the
Parent Unit and the Nursery Unit
Good connection
Medium connection
Poor connection
Out-of-range
Battery level icon: Indicates
Parent Unit battery life
Full
1/2
Empty
Charging
Page 11
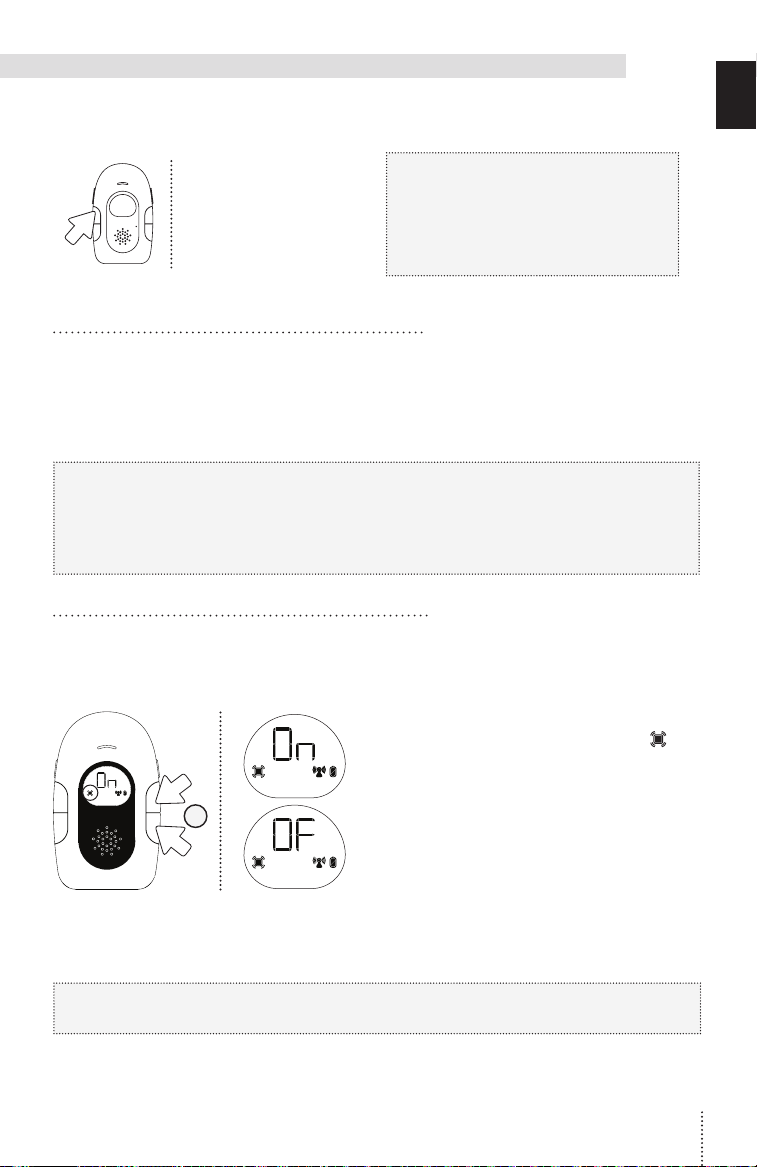
STEP 5 - TESTING AND GETTING TO KNOW YOUR MONITOR
The Angelcare® monitor can be used with the pre-programmed factory settings or you can
customize your settings to your preference.
E
N
All changes and
adjustments made in the
main menu will not be
saved unless you confirm
them by pressing the
EXIT button.
5.1 - MENU ACCESS AND CHANGING THE SETTINGS
The MENU settings are accessed by pressing and HOLDING the MENU button on the Parent
Unit. The MENU functions are in a loop. Each time you press the OK button briefly you
move on to the next setting. Once you have selected your preferred settings you must
press EXIT MENU or your changes will not be saved. The MENU functions are in the
following order:
PRESS AND HOLD: Movement & ‘’TIC” .….….….….….….….….….….….….….….….….….….….…. STEP 5.2
PRESS 1 TIME: Sound ….….….….….….….….….….….….….….….….….….….….….….….….….….….….…. STEP 5.5
PRESS 2 TIMES: Sound Transmission (VOX) .….….….….….….….….….….….….….….….….…. STEP 5.6
PRESS 4 TIMES: Temperature .….….….….….….….….….….….….….….….….….….….….….….….…. STEP 5.7
5.2 - ACTIVATING/DEACTIVATING THE SENSOR PAD
SET THE MOVEMENT DETECTION
Allows you to detect baby’s movements.
2
IMPORTANT
When in MENU mode, sound
transmission between the Parent and
Nursery Units will be temporarily
deactivated. The TIC indicator will flash
rapidly if no movement is detected.
1) Press and HOLD the MENU button
until the Movement monitoring
icon blinks.
2) Use the UP and DOWN arrows to
activate or deactivate movement
detection.
3) Press the OK button to go to the next
setting or press the EXIT button to
confirm your choice.
SET THE TIC FUNCTION
Allows you to detect baby’s movements as well as hear a TIC sound.
IMPORTANT
To activate the ‘’TIC’’ Function, the movement detection activated.
11
Page 12
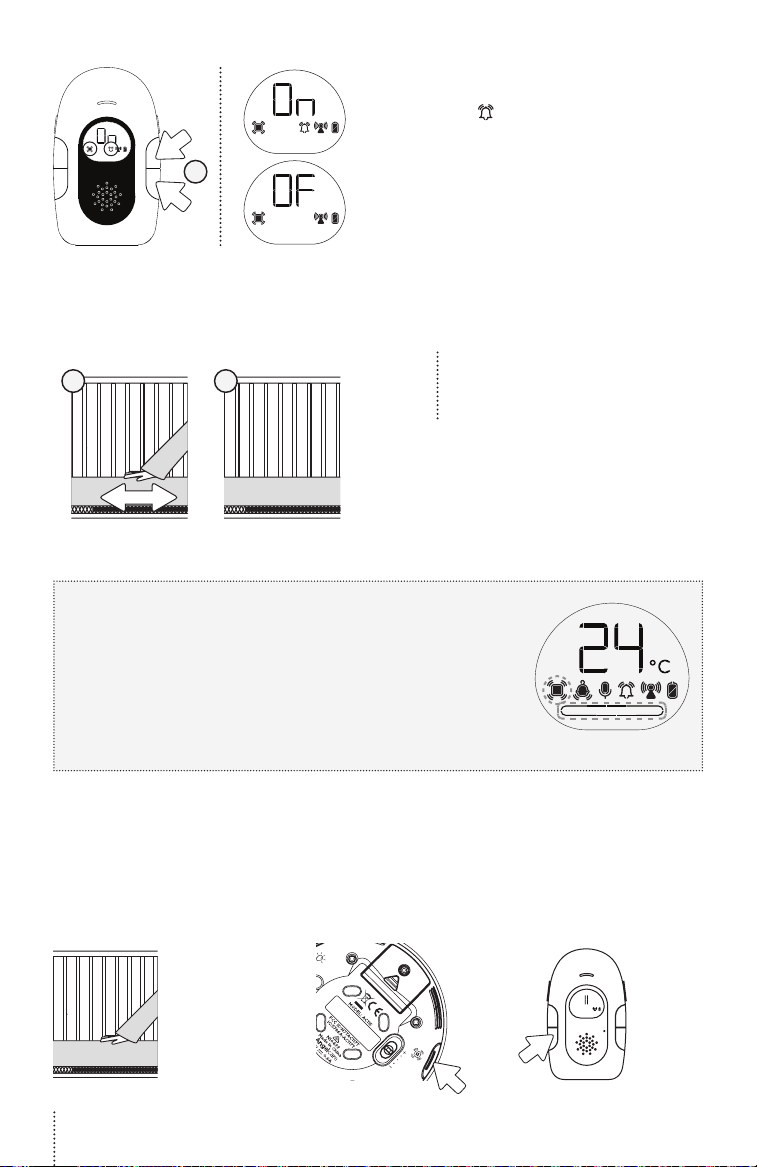
1) Press and HOLD the MENU Button
then press the OK button until the
“TIC”
2) Use the UP and DOWN arrows to
2
activate or deactivate the TIC function.
3) Press the OK button to go to the
next setting or press the EXIT
button to confirm your choice.
TO TEST THE SENSOR PAD
MOVEMENT FUNCTION NEEDS TO BE ACTIVATED:
1) Move your hand lightly on the mattress.
NOTE:
1 2
The Parent Unit will emit a
“TIC” sound (when activated) and
will flash every 5 seconds.
2) Remove your hand from the mattress.
After 15 seconds you will hear a
“TIC” pre-alarm sound, and 5 seconds
later the Movement Alarm will trigger.
3) Repeat by moving your hand lightly
in all four corners of the mattress.
MOVEMENT ALARM
• If NO movement is detected after 15 seconds you will hear
a single “TIC” pre-alarm sound from the Nursery Unit.
• If after a further 5 seconds there is still NO movement
detected on the surface of the mattress, the Parent Unit
and Nursery Unit will emit loud continuous beeps
- this is the Movement Alarm.
• Nursery Unit light will flash red.
• Sensor Pad Icon and sound level bar on Parent Unit will flash.
icon blinks.
IF THE ALARM DOES NOT SOUND
• Avoid contact with cot while Sensor Pad is in operation.
• Place cot near a supporting wall.
• Adjust Sensor Pad sensitivity level.
• Turn OFF cot mobile, fans, loud music or anything else that may cause vibration.
TO STOP THE ALARM
OR OR
Place your hand
back on the
mattress.
Press PAUSE button
12
on the Nursery Unit
Press any
button on the
Parent Unit.
Page 13
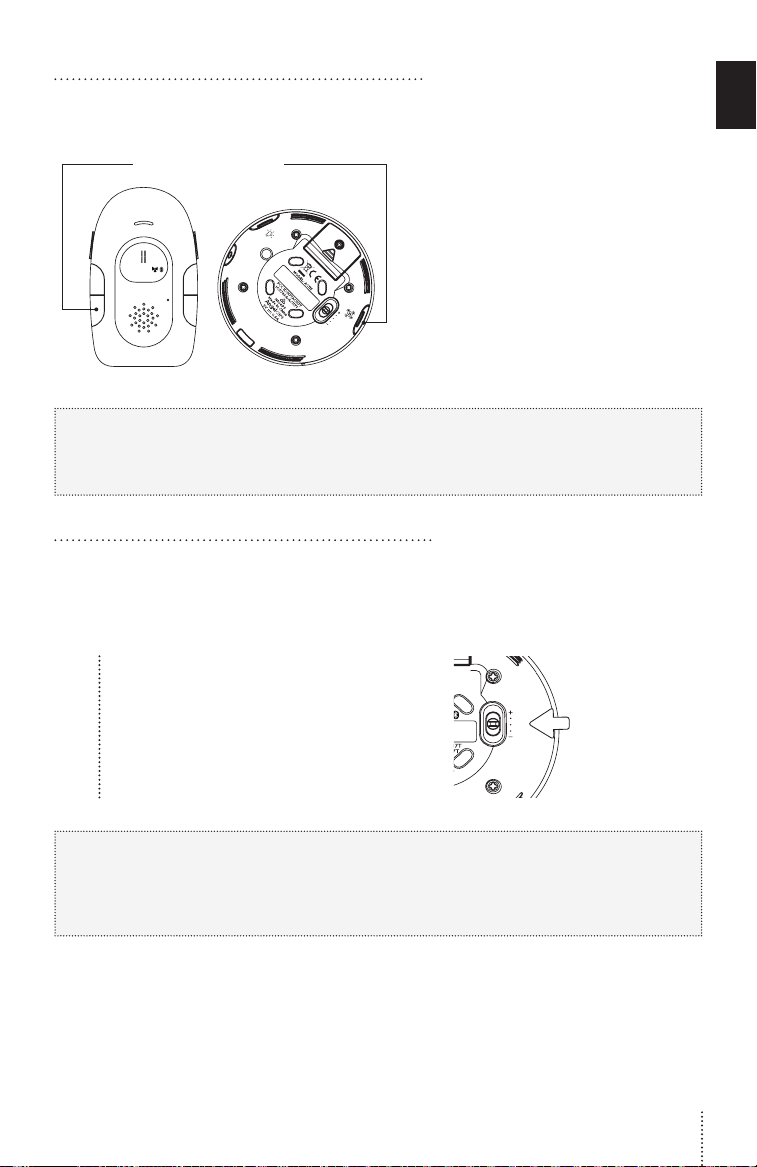
5.3 - PAUSING AND RESTARTING THE SENSOR PAD
Allows you to pause the Sensor Pad if you remove baby from the cot, e.g. for feeding or comforting.
E
N
Pause/Unpause Sensor Pad
IMPORTANT
• If you do not pause the Sensor Pad, the alarm will sound if there is no movement
detected on the surface of the mattress after 20 seconds.
• Ensure to unpause the Sensor Pad before putting back in the cot.
5.4 - ADJUST THE SENSOR PAD SENSITIVITY LEVEL:
To ensure adequate monitoring of your baby’s movements, you can adjust the sensitivity of the
Sensor Pad. Set a high sensitivity for a newborn and a lower sensitivity as baby grows and gains
weight. A thicker mattress will also need a higher sensitivity. Slide the Nursery Unit sensitivity
level button to select between low, medium or high level.
For optimal results begin with medium
sensitivity level, adjusting the sensitivity
by increasing or decreasing if required.
NOTE:
If you are experiencing false alarms,
adjust the sensitivity level.
1) From the Parent Unit, press and
hold Pause Sensor Pad button
for at least 2 seconds.
OR
From the Nursery Unit, press
the Pause button.
2) To unpause the Sensor Pad,
from the Parent Unit, press the
Pause Sensor Pad button (OK
button)
OR
From the Nursery Unit, press
the Pause button.
IMPORTANT
• The Sensor Pad is not designed for use with adults, children or infants older than
24 months.
• Once you are finished using the Sensor Pad, please deactivate the movement
function, remove it from the baby’s cot and store it away.
13
Page 14
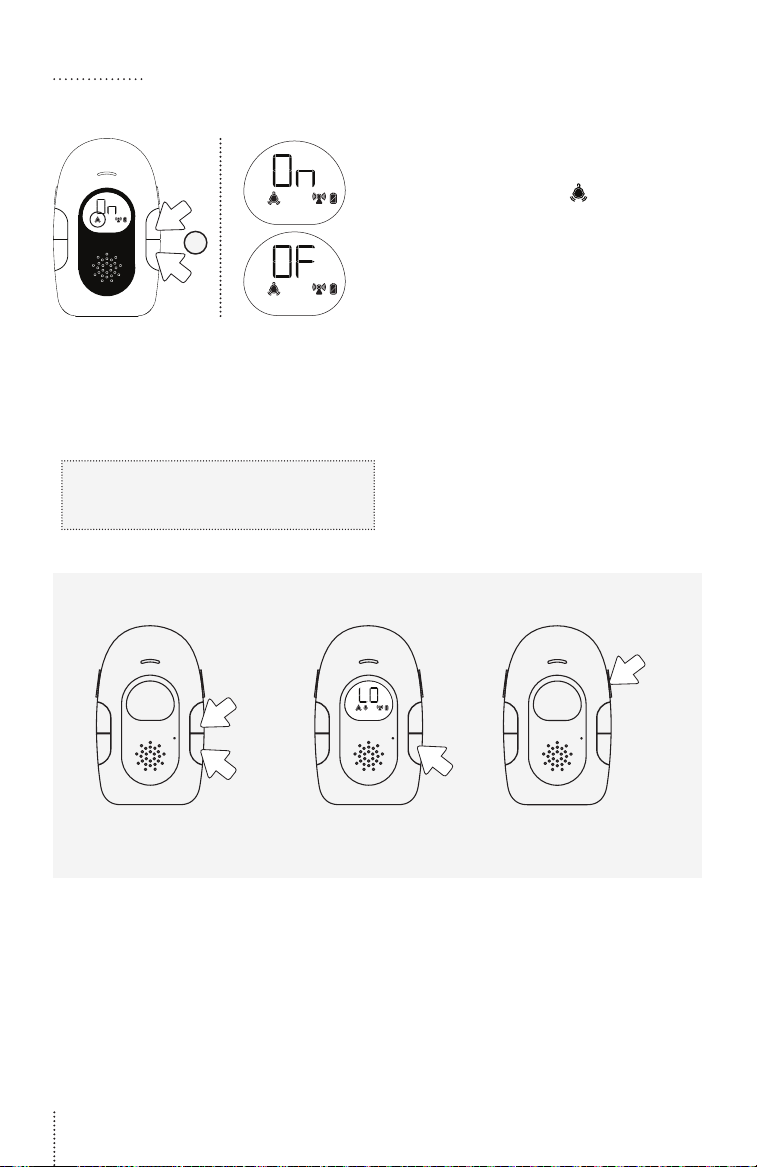
5.5 - SOUND
TO ACTIVATE SOUND:
2
1) Press and hold the MENU Button
then press the OK button until the
Sound Monitoring
icon blinks.
2) Using the UP and DOWN arrows to
turn the function ON or OFF.
3) Press the OK button to go to the
next setting or press the EXIT
button to confirm your choice.
TO TEST SOUND:
Ask someone to speak into the Nursery
Unit or place the unit near a radio to ensure
that sound is being picked up.
IMPORTANT
To avoid feedback (whistling), keep both
units at least 3 meters apart.
ADJUST THE
SOUND LEVEL
Raise
volume
Lower
volume
PUT IN
MUTE MODE
Press the VOLUME - until L0
is being displayed. When in
MUTE the sound icon will
flash to indicate this.
IF YOU HEAR NO SOUND:
• Check that both units are powered ON.
• Check that both units are plugged into
functioning electrical outlets.
• Check the batteries in both units
(replace or recharge them if necessary).
• Bring the Parent Unit closer to the
Nursery Unit.
PUT IN DIALOGUE
MODE
Press and
hold talk
button to
speak to
baby
14
Page 15
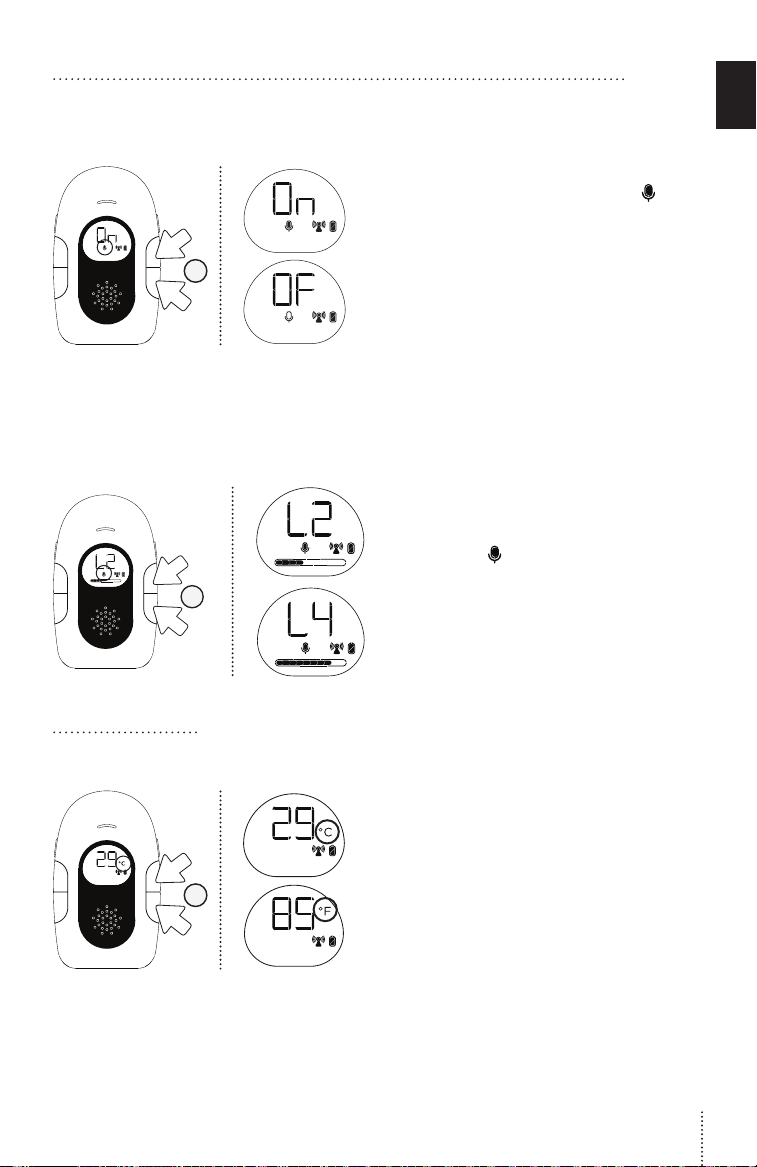
5.6 - VOICE ACTIVATION (VOX ON) OR CONTINUOUS SOUND (VOX OFF) MODE
Allows you to select your option on how you monitor sound: VOX (voice activation picks
up sound based on the setting of the sensitivity level) or Continuous (sound monitoring is
continuously on, picking up all sounds).
1) Press and hold the MENU button then
press the OK button until the VOX
blinks.
2) Use the UP and DOWN arrows to
2
TO ADJUST SOUND SENSITIVITY (VOX)
The sensitivity of the microphone is adjustable and has 4 levels (the most sensitive is
level 4). This means that sound will only transmit based on the level that you set.
2
TO
activate or deactivate the VOX
function.
3) Press the OK button to go to the next
setting or press the EXIT button to
confirm your choice.
1) When the Sound Transmission is ON
(VOX ON) press and hold the MENU
button then press OK button until
VOX ON
2) Use the UP and DOWN arrows to select
desired microphone sensitivity level.
3) Press the OK button to go to the next
setting or press the EXIT button to
confirm your choice.
icon blinks.
icon
E
N
5.7 - TEMPERATURE
TO SELECT TEMPERATURE IN CELSIUS OR FAHRENHEIT
1) Press and hold the MENU button then
press OK button until the
˚C / ˚F icon blinks.
2) Use the UP and DOWN arrows to
2
select temperature in Celsius or
Fahrenheit.
3) Press the OK button to go to the next
setting or press the EXIT button to
confirm your choice.
15
Page 16
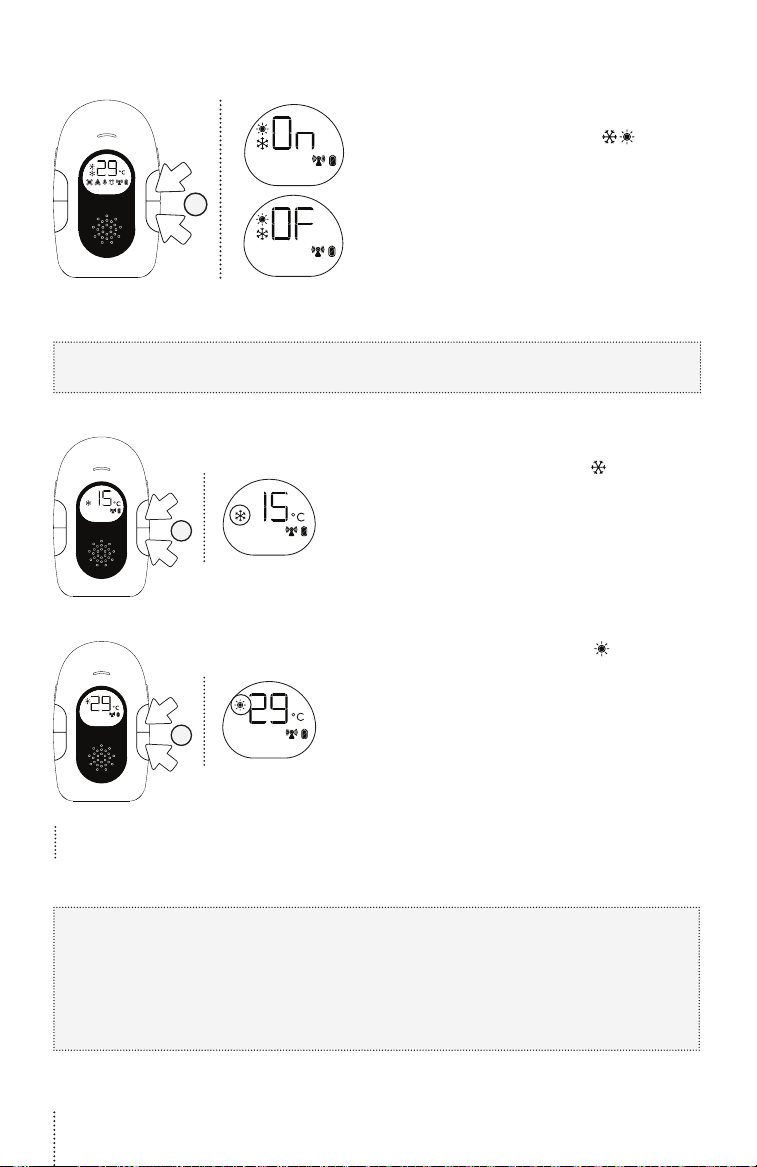
TO ACTIVATE THE TEMPERATURE ALARM
1) Press and hold the MENU button
then press OK button until the
Temperature Indicator
blinks.
2) Use the UP and DOWN arrows
2
to activate or deactivate the
temperature alarm.
3) Press OK button to confirm your
choice and set the Temperature
range as below.
TO SET TEMPERATURE RANGE
NOTE:
Make sure to turn ON Temperature alarm to be able to set Temperature range.
4) The Low Temperature icon will
blink. Use the UP and DOWN arrows
to set the LOW temperature alarm
4
(5 to 19° Celsius).
5) Press the OK button to confirm your
choice.
icon
6) The High Temperature icon will
blink. Use the UP and DOWN arrows
to set the HIGH temperature alarm
(22 to 37° Celsius).
6
7) Press the OK button to go to the next
setting or press the EXIT button to
confirm your choice.
The low temperature range is 5 to 19°C and
high temperature range is 22 to 37°C.
TEMPERATURE ALARM
• Alarm activates when the temperature reaches the maximum or minimum set
temperature.
• Parent Unit will emit 3 consecutive beeps, every 5 seconds if the temperature reaches
levels out of your chosen range. The relevant icon will flash on the Parent Unit screen
to alert you.
16
Page 17
STEP 6 - ACTIVATING AND DEACTIVATING ADDITIONAL FUNCTIONS
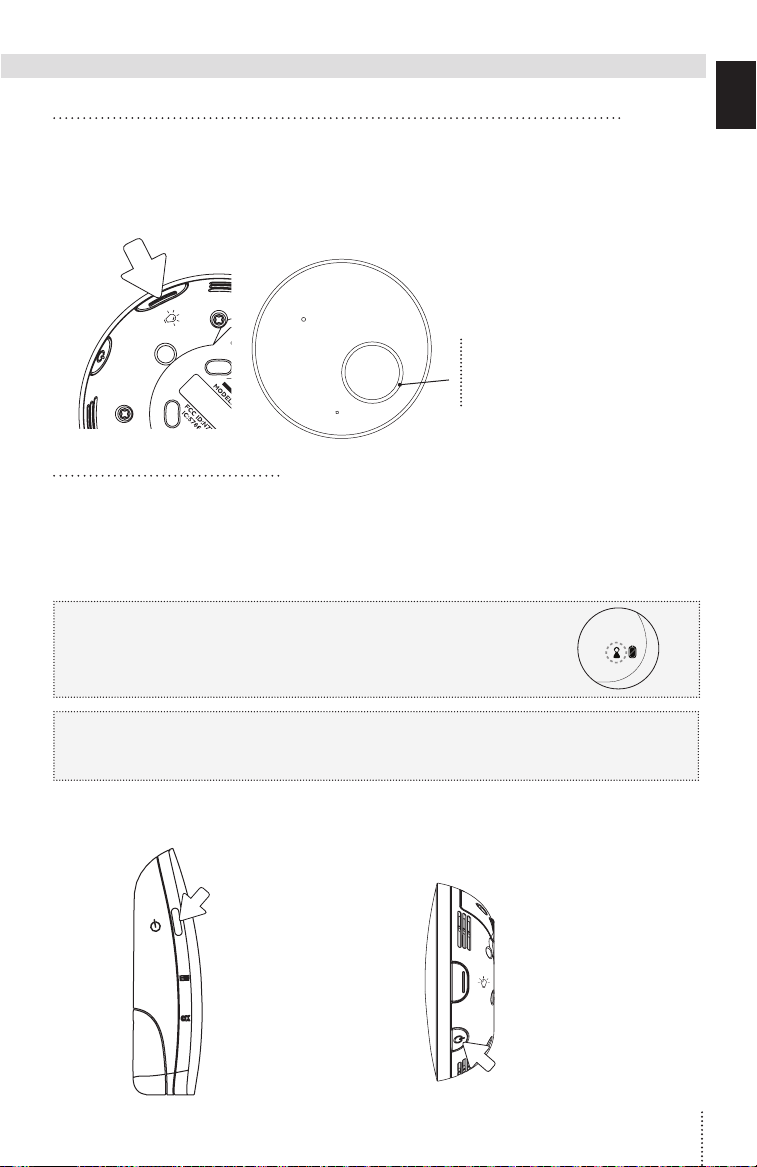
6.1 - ACTIVATE OR DEACTIVATE TEMPERATURE INDICATOR ON NURSERY UNIT
With this option the Nursery Unit Temperature Indicator will light up in colour when the
temperature goes above or below your preferences. If the temperature goes above your
set preferences and this option is turned ON, the light on the Nursery Unit will turn to red
instead of the default white. If the temperature goes below the set preferences, then the
light will turn blue.
ON/OFF
Temperature
light
Red - Room temperature is too hot
Blue - Room temperature is too cold
White - Room temperature is good
6.2 - OUT OF RANGE SETTINGS
Your monitor has an Out-of-Range alarm that advises you when your two units are not
communicating. Out-of-Range situations can be caused by distance or by physical interferences.
RANGE:
Open field (Open area without obstructions): up to 230 meters.
OUT-OF-RANGE ALARM
• Alarm activates when your two units are not communicating.
• The Parent Unit will emit a triple beep every 16 seconds.
• Out-of-Range Icon will flash on the screen.
E
N
IMPORTANT
If you turn the Nursery Unit OFF the Out-of-Range Alarm will sound. Turn the Nursery
Unit ON again to reactivate the link.
TO STOP THE OUT-OF-RANGE ALARM:
Press 2 seconds
to turn the Parent
Unit OFF
OR
Turn the Nursery
Unit ON
17
Page 18
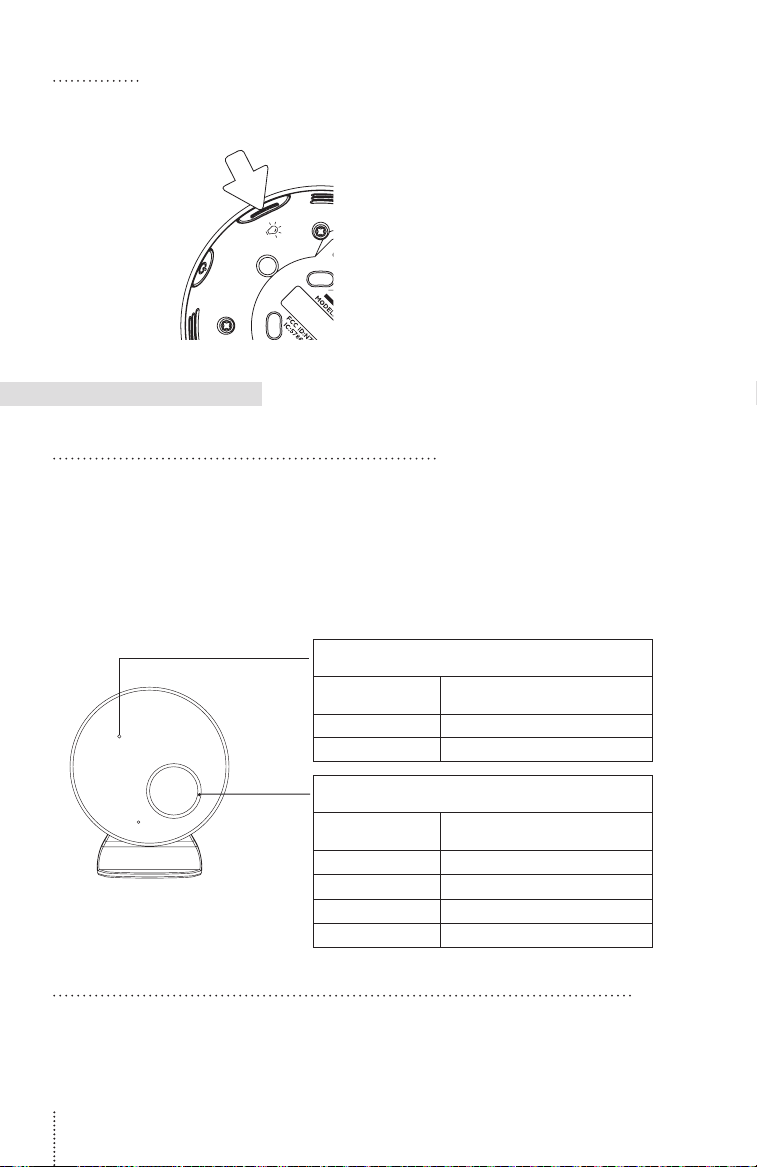
6.3 - PAGER
Allows you to locate the Parent Unit.
Press and hold
the Temperature
Light button
TO LOCATE THE PARENT UNIT
Press and hold the Temperature Light
button on the side of the Nursery Unit.
The Parent Unit will emit a paging
sound.
TO STOP THE PAGING SOUND
Press any button on the Parent Unit or
the Pager button on the Nursery Unit.
TROUBLESHOOTING
TAKING CARE OF YOUR RECHARGEABLE BATTERIES
• Ensure that you fully charge your batteries for 10 hours before their first use.
• To maintain maximum battery life it is recommended that you fully discharge your
batteries periodically. Battery performance can be diminished by leaving the batteries
constantly charging. If your Parent Unit is not in use, please turn it off.
• Inadequate battery power can impair the performance of your monitor. If you are
not happy with the performance of your Parent Unit please replace the rechargeable
batteries (2 x NiMH Rechargeable Batteries).
• It is advisable to change the batteries every 6 months.
Power On/Off Light Indicator
Low Battery Light Indicator
Flashing green
Flashing yellow Nursery Unit batteries are low
Steady green Monitor is activated
Sensor Pad Light Indicator
Temperature Indicator
Flashing red
Flashing white Monitor is paused
Steady Red Room temperature is too hot
Steady Blue Room temperature is too cold
Steady White Room temperature is good
Nursery unit is using the
back-up batteries
No movement is detected or
Sensor Pad is disconnected
LOSS OF CONNECTIVITY BETWEEN THE PARENT UNIT AND THE NURSERY UNIT
• In the case of loss of connectivity, the first step is to bring the Parent Unit and Nursery
Unit closer together and make sure that both units are ON to restore the connection. If
there is still no connection and no out-of-range warning after the above has been done,
then and only then should the re-connection procedure below be done.
18
Page 19
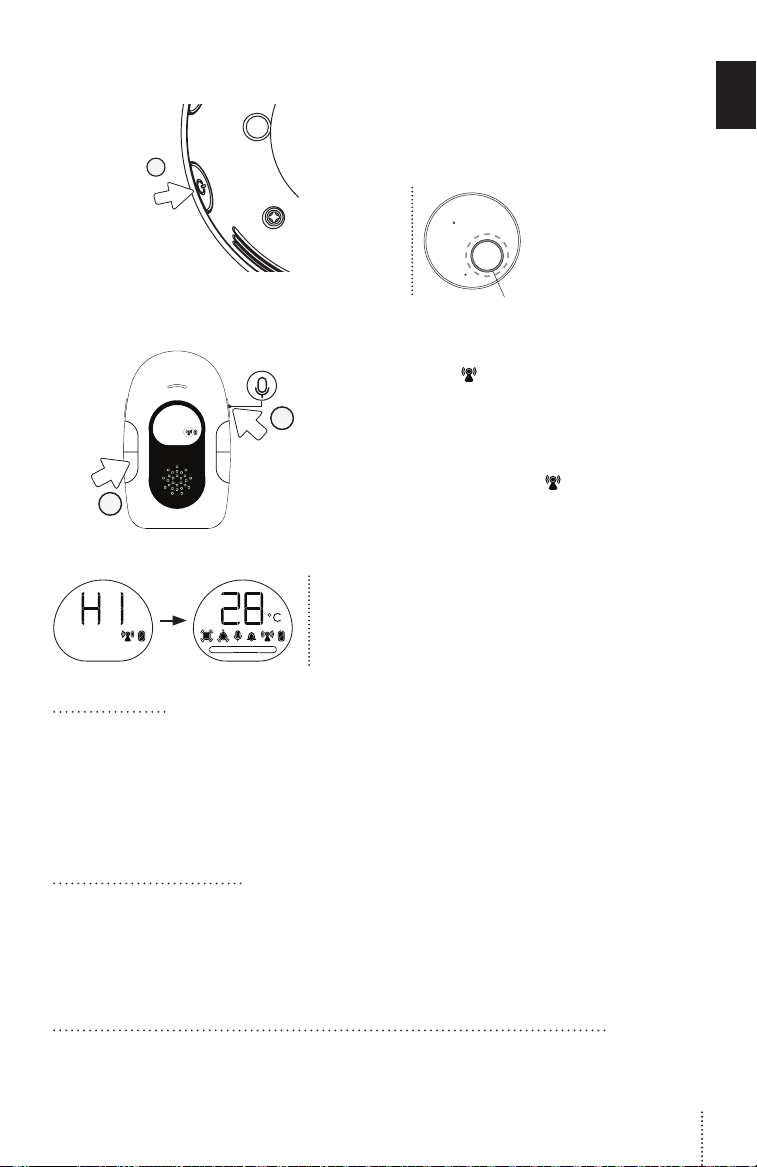
1) Turn Parent Unit OFF.
2) Turn Nursery Unit OFF and then turn
it ON.
3) Press the Power ON/OFF button on the
3
Nursery Unit 4 consecutive times.
The Sensor Pad
Indicator Light on
the Nursery Unit will
flash quickly in green
(indicates Nursery Unit
is in linking mode).
GREEN
E
N
4) Turn the Parent Unit ON. The Out-of-
Range
5
6
FALSE ALARMS
• Turn OFF the Nursery Unit.
• Make sure there is no bedding between the mattress and the Sensor Pad.
• If the cot has a spring or slat base, place a hardboard between the cot base and the
Sensor Pad measuring 6 mm thick and should have minimum dimensions of 33 x 33 cm.
• Make sure the Sensor Pad is positioned as described under the setup requirements.
• You may need to increase the sensitivity, refer to Step 5.4.
ALARM WILL NOT SOUND
• Avoid contact with the cot when the monitor is ON.
• Place cot near a solid supporting wall to avoid Sensor Pad from detecting movement
from outside the cot.
• Turn OFF cot mobile, fans, loud music or anything else that may cause vibration.
• You may need to decrease the sensitivity, refer to Step 5.4.
5) Press and hold the Talk Back button
on the Parent Unit until a beep tone is
heard.
6) Press OK button on the Parent Unit.
The Out-of-Range
faster to indicate that the Parent Unit is
in linking mode.
The Parent Unit will display H1-H2 icon during
the reconnection procedure. The reconnection
is successful if the Parent unit shows the regular
screen view.
icon should blink.
icon should blink
NURSERY UNIT POWER ON INDICATOR (GREEN LIGHT) DOES NOT LIGHT UP
• Check connections or change to another electrical outlet.
• Press the Nursery Unit ON/OFF button for 2 seconds to turn the Nursery Unit ON.
19
Page 20

WEAK RECEPTION
• Bring units closer together.
• Change the position of one or both units.
• Place units on a flat surface out of baby’s reach.
• Replace the batteries or recharge the Parent Unit.
STATIC, DISTORTION, INTERFERENCES (FROM OTHER
MONITORS, WIRELESS PHONES, WALKIE-TALKIES, ETC...)
• Rotate the Parent Unit or move it away from source of interference.
FEEDBACK (LOUD NOISES EMITTED FROM THE PARENT UNIT)
• Move units further apart (at least 3 meters apart).
• Decrease volume on the Parent Unit.
THE PARENT UNIT SCREEN IS BLACK (PARENT UNIT IS OFF)
• Turn the Parent Unit back ON by pushing and holding the power button.
• Replace the batteries or recharge the Parent Unit.
SENSOR PAD LIGHT INDICATOR FLASHING RED
(MONITOR IS BARELY DETECTING MOVEMENT)
• Make sure there is no bedding between the mattress and the Sensor Pad.
• The Sensor Pad must rest on a completely flat and firm surface. If the cot has a spring
or slat base, place a hard board between the cot base and the Sensor Pad measuring
6 mm thick and should have minimum dimensions of 33 x 33 cm.
• Make sure Sensor Pad is positioned as described under the setup requirements.
• You may need to increase the sensitivity, refer to Step 5.4.
NO POWER
• Check or replace batteries.
• Make sure Monitor is ON.
NURSERY UNIT POWER ON INDICATOR (GREEN LIGHT) DOES NOT LIGHT UP
• Check connections or change to another electrical outlet.
• Press the Nursery Unit ON/OFF button for 2 seconds to turn the Nursery Unit ON.
20
Page 21
LIMITED WARRANTY
Angelcare® warrants to the original owner of this product that Angelcare®
monitor is free from any material and workmanship defects for the term of
the warranty period (see warranty table below to determine the warranty for
your country). If this monitoring system fails to function properly when used as
directed under normal conditions and during the warranty period, Angelcare®
will either repair or replace the product, at our discretion, free of charge. Please
contact your local distributor to validate warranty and warranty period.
The product must be accompanied by a proof of purchase, either a bill of
sale or other proof that the monitoring system is within the warranty period.
Angelcare® will bear the cost of repairing or replacing the product and
shipping it back to you.
This warranty does not apply to a product which has been damaged as a
result of improper maintenance, an accident, improper voltage supply or
any other form of misuse. The warranty is also void if the owner repairs or
modifies the product in any way. Angelcare® is not liable for any incidental
or consequential damages with regard to this product. The warranty also
excludes any liability other than what is stated above. No other warranty
is given.
This warranty does not cover products and accessories which are not
®
-branded, or any problems that result from usage that is not
Angelcare
in accordance with product instructions, failure to follow the product
instructions, or problems caused by using accessories, parts or components
not supplied by Angelcare.
LEGAL RIGHTS VARY FROM COUNTRY TO COUNTRY. SOME COUNTRIES
DO NOT ALLOW THE EXCLUSION OR LIMITATION OF INCIDENTAL OR
CONSEQUENTIAL DAMAGES, SO THE ABOVE LIMITATIONS MAY NOT
APPLY TO YOU.
WE ARE NOT IN ANY WAY RESPONSIBLE FOR ANY OUTCOME RESULTING
FROM THE USE OF THIS PRODUCT.
IMPORTANT! This Angelcare® monitor is a personal care product. Please
do not return this product to the store. If you have questions or need help,
please call your distributor before returning this product.
Please contact your local distributor for warranty information. Find your local
distributor by visiting our website: www.angelcarebaby.com
E
N
TECHNICAL SPECIFICATIONS
Range:
Open field (Open area without obstructions):
up to 755 feet (230 meters).
Power Supply:
2 AAA alkaline batteries (not included) or
100/240V AC/5V DC adapter for Nursery Unit.
2 AAA rechargeable batteries and 100/240V AC/5V DC adapter for the
Parent Unit.
Caution: To reduce the risk of electric shock, do not expose this product to
rain or moisture.
Danger of explosion if batteries are incorrectly replaced. The battery
included for the Parent Unit is 2 AAA NIMH rechargeable batteries,
manufactured by GPI INTERNATIONAL LIMITED (GN60AAAHC, 1.2V
600mAh). Only use the Angelcare® recommended replacement battery.
To obtain information on replacement batteries please contact Angelcare®
customer service: www.angelcarebaby.com or contact your local distributor.
Instructions will be included with the replacement battery. Dispose of
exhausted batteries properly according to your local ordinances. Keep all
batteries away from children.
See product for compliance marks specific to this device.
Batteries:
• DO NOT mix old and new batteries.
• DO NOT mix alkaline standard (carbon-zinc), or rechargeable (NI-CD,
NIMH, etc.) batteries.
CAUTION: RISK OF EXPLOSION IF BATTERY IS REPLACED BY AN
INCORRECT TYPE.
Transmission:
Transmission between the Parent Unit and the Nursery Unit is made on
1.88 - 1.9 GHz frequency for Europe/Asia/Africa/Australia.
Maximum RF Power Transmitted = 24dBm (250mW)
RF channel no.: 10
Hereby, Angelcare® Monitors Inc., declares that this Baby Monitor is in
compliance with Directive 2014/53/EU The full text of the EU declaration
of conformity is available at the following internet address:
https://international.angelcarebaby.com/declaration-of-conformity
PROTECT THE ENVIRONMENT
The wheelie bin symbols mean that according to local laws and
regulations your product and/or its battery shall be disposed
of separately from household waste. When the product/battery
reaches its end of life take it to a collection point designated by
local authorities. The seperate disposal and recycling will help
conserve natural resources and protect human health and the
environment. Refer to User’s Guide for removal of batteries..
ErP COMPLIANCE
USE ONLY THE FOLLOWING ANGELCARE® BRAND
POWER SUPPLY MODEL NUMBERS:
EUROPEAN UNION (INCLUDING GERMANY) –
K05S050060G
UK - K05S050060B
APPENDIX: INFORMATION ON EXPOSURE TO RADIO WAVES AND SAR (SPECIFIC ABSORPTION RATE)
The design of Parent Unit complies with the current regulations governing exposure to radio waves. These regulations are based on
scientific guidelines that indicates safety margins designed to ensure the safety of everyone, regardless of age or state of health. The
guidelines on exposure to radio waves use a unit of measurement known as the SAR (Specific Absorption Rate). SAR tests are carried
out using standardized method, with the Parent Unit transmitting at the highest certified level of power on all the frequency bands it
uses. The maximum SAR level recommended by ICNIRP (International Commission on Non Ionizing Radiation Protection) is
2 W/kg, measured on 10 g of tissue. The highest SAR levels recorded for the Parent Unit are as follows: When used in direct contact
with the body 1.8GHz DECT is 0.042W/Kg(10g). When used in front of the face 1.8GHz DECT is 0.021W/Kg(10g). This device complies
with th e guidelines on exposure to radio frequency both when it is positioned at 0mm from the body or in front of the face.
21
Page 22

22
Page 23

E
N
23
Page 24

For assistance, FAQs or guidance with your monitor please visit
our Customer Support page at Angelcare.co.uk
www.angelcarebaby.com
IM115-UK-01082018
 Loading...