

Page 1
Anets Inc.
E
R
Mailing Address: P.O. Box 501, Concord,NH 03302-0501 USA Telephone: 603-225-6684
Shipping Address: 10 Ferry Street, Concord, NH 03301 USA
www.anets.com
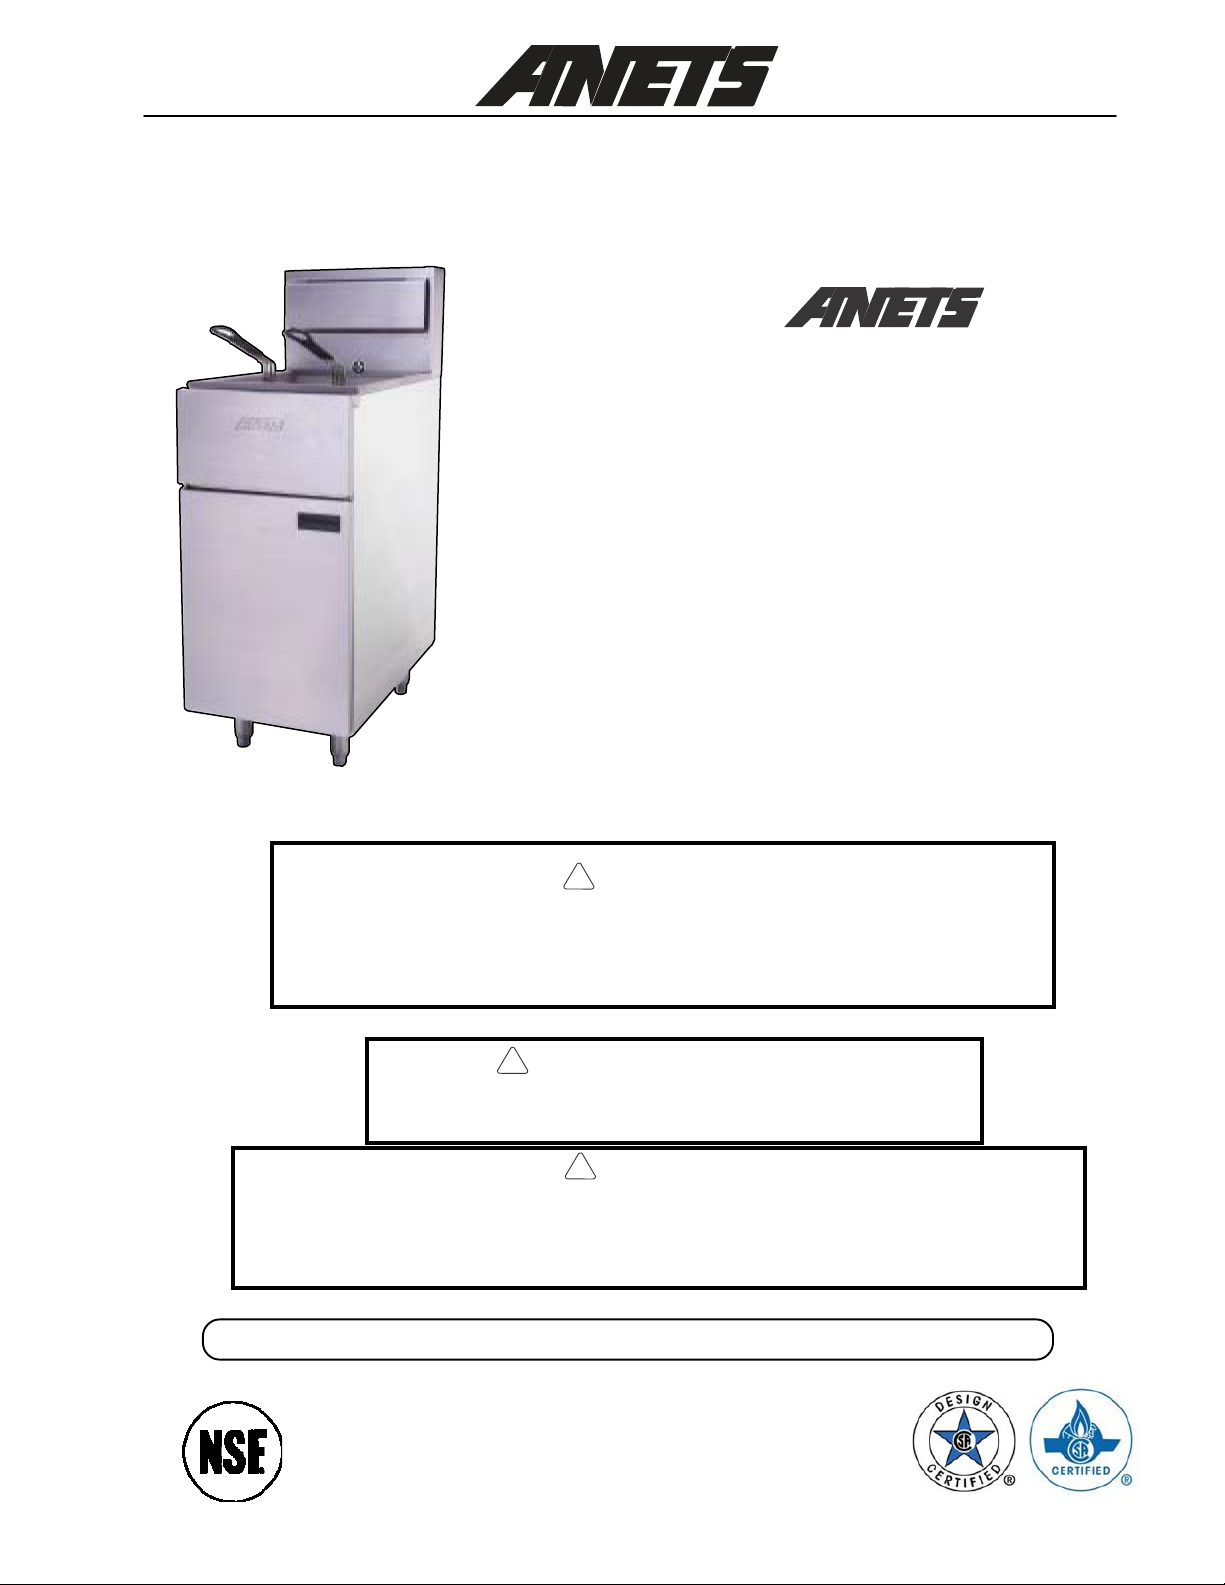
FRYER
Model
SLG40
Installation,
User Operation,
&
Maintenance
SLG40 shown on standard 6” legs
Improper installation, adjustment, alteration, service, or maintenance can
cause property damage, injury or death. Read the installation, operating
and maintenance instructions thoroughly before installing or servicing this
equipment.
After installation of this equipment, immediately contact your local gas
supplier to obtain information about what action to take whenever any
person smells gas. Post this information in a prominent location.
DO NOT store or use gasoline or other flammable vapors
or liquids in the vicinity of this or any other appliance.
Keep this Manual in a Convenient Location for Reference
DANG
!
!
FOR YOUR SAFETY
!
WARNING
Manual
The Anets SilverLine
Quality Equipment For The Restaurant, Supermarket, and Bakery Industries
1 L20-349 R3
Page 2
!
Read these specifications, Code Requirements, Installation Requirements, Installation
Instructions, and Operating Instructions very carefully. Failure to follow the
could cause the fryer to malfunction. A fryer malfunction can result in
serious bodily injury, or death.
DANGER
Instructions
property damage,
CONTENTS
Sh ippi ng Co ntai ner I nspe cti on .......................................................
Fry er Gas Supp ly Sp ecif icat ions ....................................................
Fry er E lect ric al Sp ecif ica tion s .......................................................
Figure 1 - F ryer W ir ing Di agram ............................................
Cod e Req uire ment s ......................................................................
Figure 2 - Fr yer Si te Inst allat ion Req uirem ents .......................
Installation Requirements
Fryer Restraining Device Installation Instructions
Le g Ins tal lat ion I nst ruc tio ns .....................................................
Figure 3 - Leg Installation .....................................................
Le g Le vel ing Ins tr uct ion s .........................................................
Cas ter I nst alla tion Inst ruc tion s .................................................
Figure 4 - Caster Install ation .................................................
Cas ter Leve lin g In stru ctio ns ....................................................
Gas Connection Instructions
Fry er Op erat ion R ecom mend ation s ...............................................
Fry er Op erati ng In stru ctio ns ..........................................................
...............................................................
....................... 5
..........................................................
3
3
3
3
4
4
5
6
6
6
6
6
6
7
7
8
Fryer Pr eparatio n For Use ......................................................
Figure 5 - Draining The Kettle ...............................................
Lighting Procedure
Figure 6 - Gas Saf ety Valve & Con trol Knob Po sitions ..........
Shut down P roced ure ..............................................................
Dai ly Cle anin g Pr oce dure ....................................................... 10
Monthly Maintenance Instructions
Fryer Troubleshooting Guide ................................................... 11-14
Fryer W arranty
............................................................................ 15
..................................................................
.............................. ............ 10
2 L20-349 R3
8
8
9
9
9
Page 3
SHIPPING CONTAINER INSPECTION
1.Carefully examine the shipping carton for external
damage
carrier immediately . Save all packing materials for
damage claim exami nation.
2
carton from the fryer and examine the f ryer carefully for
damage
noted, so that the freight damage claims adjuster can
examine the fryer .
3
installation. Refer to the Installation Instructions for that
procedure.
. When damage is noted, notify the delivery
. If no external damage is noted, rem ove the shipping
. Place the fryer in a safe location, if damage is
. Save the shipping container for use during leg/ caster
Standard Accessories furnished in the shipping carton
for this fryer include:
2 Fryer Baskets 1 Screen
4 Adjustable Legs
1 Drain V alve Ext ension
1 Basket Hanger 1 Flue Deflector
Optional Accessories available for this fryer include:
Single or Triple Fryer Baskets
1 Set (4) of Casters
FRYER GAS SUPPLY SPECIFICATIONS
Please make sure that your desired fryer location has gas supply factors that are suitable for this product:
* - Rating is based on sea level operation. Reduce rating 4% for each 1000 feet above sea level.
** *** - Measure Supply Pressure when all other gas-powered equipment is operating.
INPUT REQUIRED:
90,000 BTU/Hr *
MANIFOLD PRESSURE
SUPPL Y PRESSURE
“
W.C. = Inches, Water Column.
***
Natural Gas Propane
3½
“
W.C. **
6“ W.C., minimum 11“ W.C., minimum
10“ W.C.
Gas Supply Inlet Pipe must be ½“ standard gas line.
gas supply inlet line should be as straight as possible
(fewest bends or elbows) to obtain the highest available
gas pressure at the fryer. Locate this inlet line horizontally at the center of the desired fryer location, approximately 8¼“ above the floor.
NOTE:
gas supply line location, both horizontally and vertically.
Using a flexible inlet line permits variation in the
The
Anets fryers are only for use with the type of gas
specified on the spec plate. If a fryer requires m odification to use a gas other than that which is identified on the
fryer spec plate, contact your Anets representative or call
1-603-225-6684.
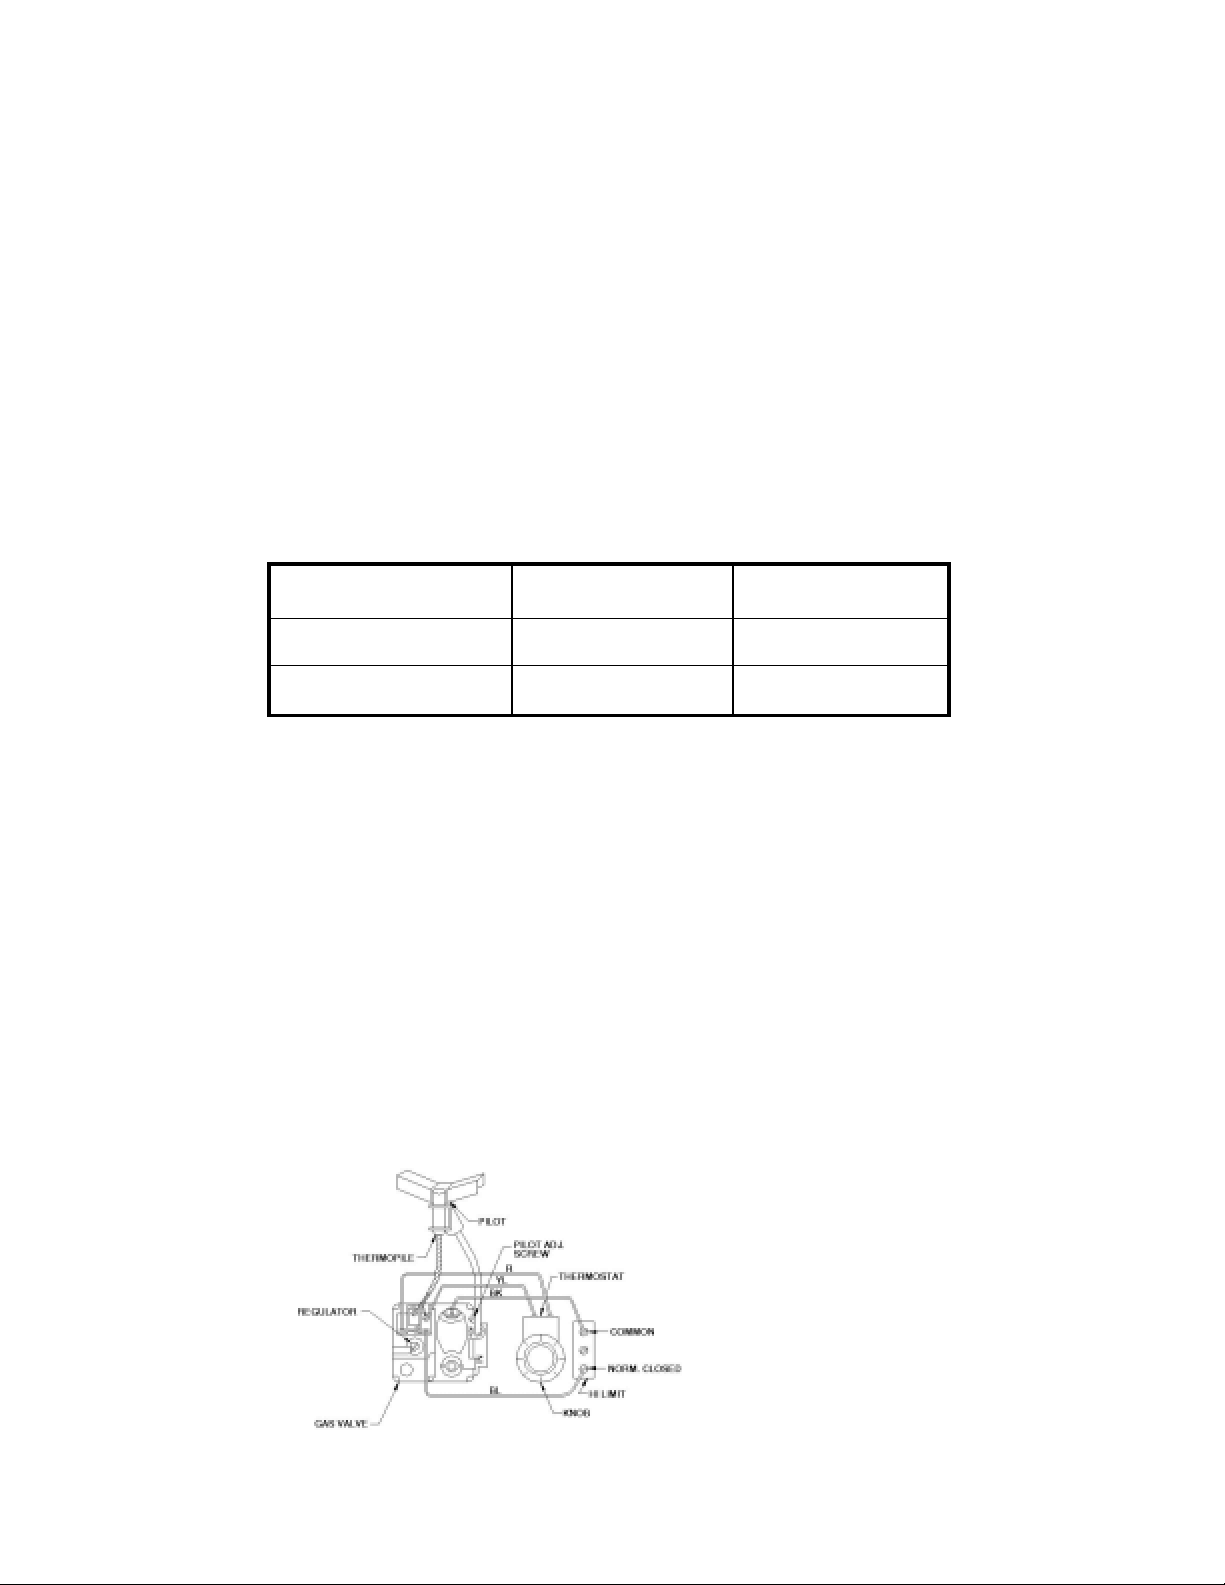
FRYER ELECTRICAL SPECIFICATIONS
The ANETS Fryer Model SLG40 requires no external electric power source.
Figure 1 is the wiring diagram of an ANETS SLG40 Fryer.
Figure 1. Fryer Model SLG40 Wiring Diagram
3
3 L20-349 R3
Page 4
CODE REQUIREMENTS
N
IMPOR T ANT : Read the Code Requirements and ALL
installation instructions carefully, before starting the
installation
problems or questions arise.
The fryer installation must conform with local codes, or
in the absence of local codes, with the National Fuel Gas
Code, ANSI Z223.1 (latest edition); the Natural Gas
Installation Code, CAN/CGA-B149.1 (latest edition); or
the Propane Gas Installation Code, CAN/CGA-B149.2
(latest edition), as applicable, including:
a
. Disconnect the fryer and its i ndividual shutoff
valve from the gas supply piping system during
any pressure testing of the gas supply system at
test pressures in excess of ½ psig (3.45 kPa).
b
. Isolate the fryer from the gas supply pi pin g
system during any pressure testing of the gas
supply system at test pressures equal to or less
than ½ psig (3.45 kPa).
c
. For fryers utilizing floor casters, the fryer instal
lation shall be made with a connector that
complies with the Standard for Connectors for
Movable Gas Appliances, AN SI Z21.69
(latest edition) or CAN/CGA 6.16 (latest
edition), and a quick-disconnect device that
complies with the Standard for Quick-Disconnect Devices for Use with Gas Fuel, ANSI
Z21.41 or CAN/CGA 1-6.9 (l atest edition).
. Contact the fac- tory (1-603-225-6684) if any
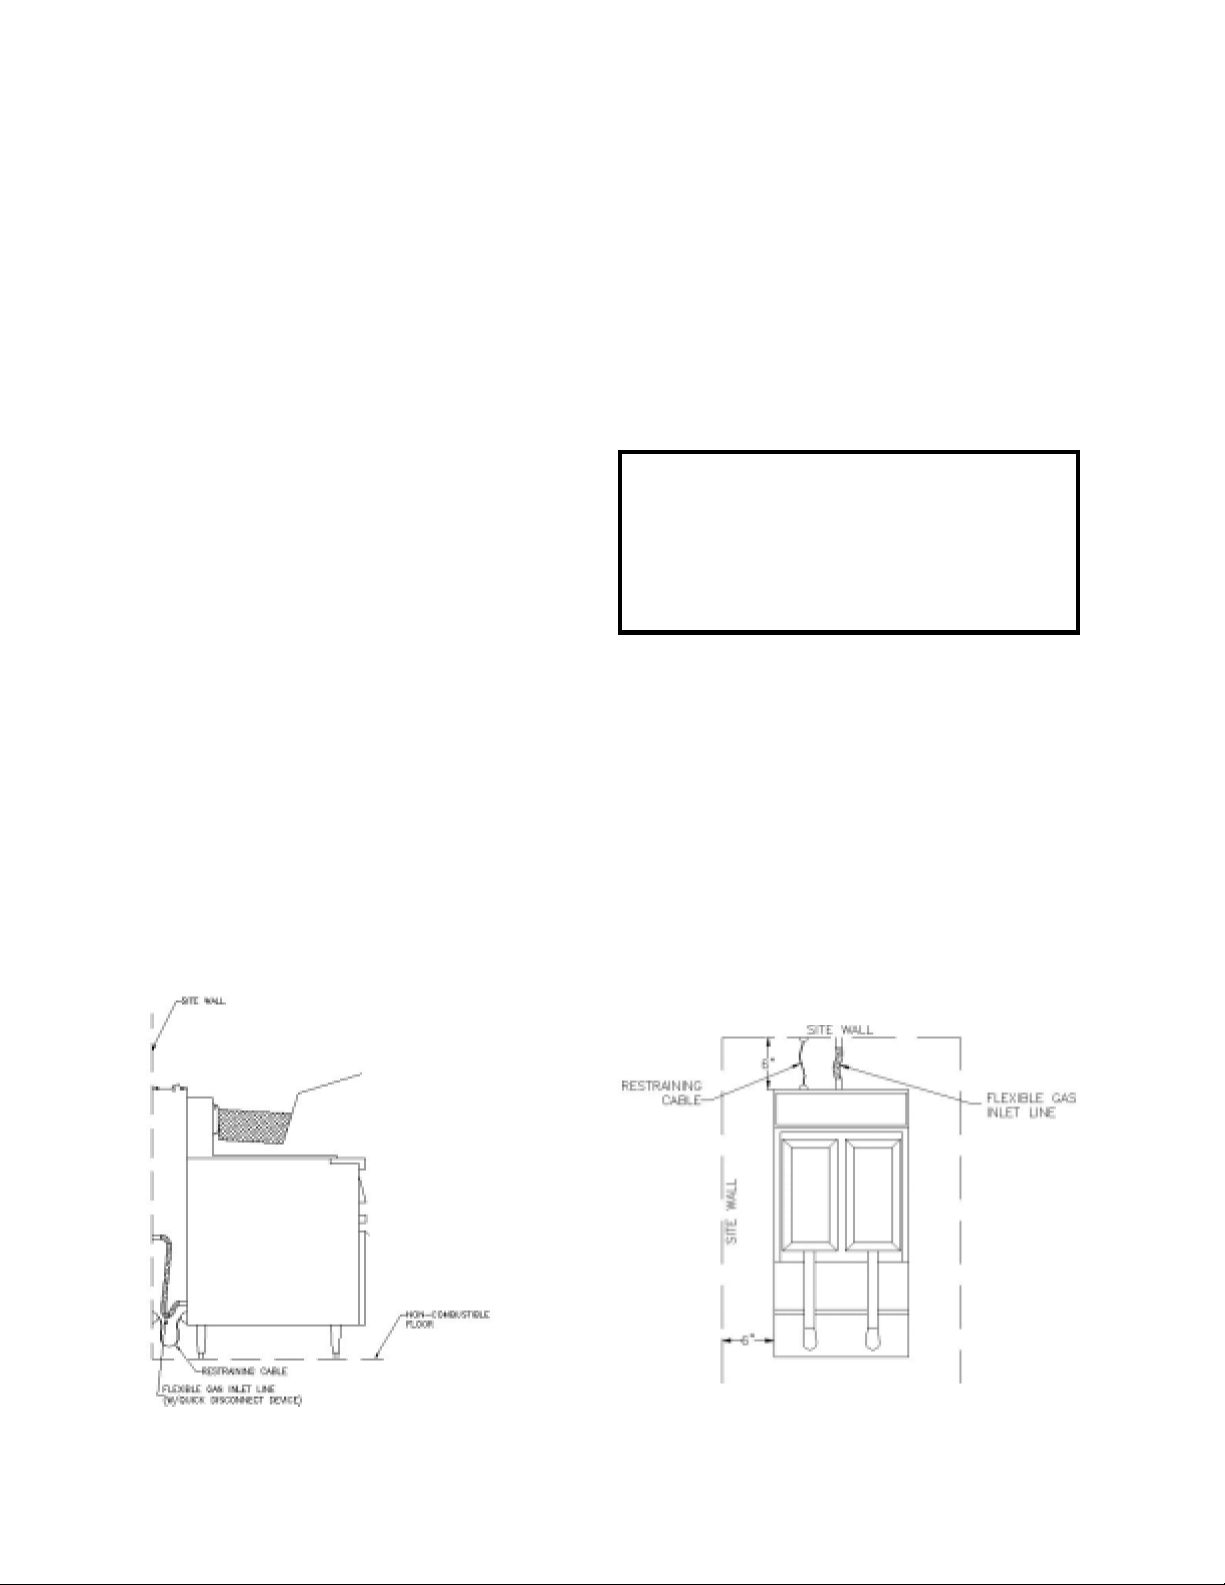
From the top of the flue on
the fryer, allow a minimum
of at least 10 inches vertical clearance beneath a
ventilating hood.
Figure 2. Fryer Model SLG40 Site Installation Requirements
d
. Restrict the movement of a caster-equipped
fryer by using a lim iting device (for example, a
cable attached both to the fryer and to a fixture attached to the site structure) to avoid
depending on the connector and the quickdisconnect device or its associated piping to
limit fryer movement.
e
. Install this fryer on a non-combustible floor
with its back and sides at least 6” away from
any combustible wall, as shown in Figure 2.
Install this fryer under a ventilation
hood that conducts combustion pro-
ducts outside the building. Venting
must comply with ANSI/NFP A 96
(latest edition).
WARNING
f
. Install this fryer in a location where adequate
combustion and ventilation air is available.
Keep the area directly in front of the fryer open
for adequate air flow to the bu rners.
OT
obstruct the flow of combustion and
DO
ventilation air.
g
. Keep the fryer area free and clear from
combustibles and debris.
h
. Attach a restraining device to each fryer, to
prevent the unit from tipping, whi ch coul d
cause splashing of hot liquid .
4 L20-349 R3
Page 5
INSTALLATI ON
r
!
1
WAR
F
p
REQUIREMENTS
Install the fryer in accordance with the preceding Code
Requirements, as well as the following Installation
Requirements.
1
. DO NOT install this fryer in a mobile home,
trailer, or recreational vehicle.
2
. Install this fryer in a location that allows it to be
moved away from other adjacent appliances
for cleaning and maintenance.
NOTE: If the fryer is installed among
a row of appliances (“banked”), with
its only convenient movem ent forward,
sufficient room must be available in
front of the fryer to permit its separation from adjacent appliances for
cleaning and maintenance.
3
. Tightly fasten the legs (or casters) to the bot-tom of the
fryer using the supplied hardware, to prevent the fryer
from tipping, wobbling or rocking when it is in its
desired location. Refer to the following Leg Installation
Instructions or Caster Installation Instructions for leg
or caster attachment and leveling inform ation.
4
. Confirm that the air from the ventilation hood
flowing near the fryer after installation is
blowing on the rear of the unit, to prevent
affecting the burner flames and possibly causing
control damage.
CAUTION:
MUST NOT flow in a manner that
restricts or impedes the natural flow
of combustion or ventilation ai
Hood make-up air
NOT
.
FRYER RESTRAINING DEVICE INSTALLATION INSTRUCTIONS
.
!
ryers
MUST
(restraining cable) device installed to
revent tipping that causes splashing or
spilling its HOT contents.
NOTE:
is to be furnished and installed by the
fryer’s installing contractor before the
fryer is connected to the gas line at its
desired location.
This movement-limiting de vice
NING
have a movement-limiting
Install one restraining device connector
securely into the structure wall directly behind
the fryer’s desired location (Figure 2).
2. Install one restraining device connector on the
rear panel of the fryer very close to the quick-
disconnect device on the end of the fryer’s gas
line.
3. Attach one end of the restraining cable to the
wall connector. Attach the other end to the
fryer connector .
4 . Confirm that the fryer cannot m ove far e nough
away from the wall to cause excessive movement of the flexible gas line or its associated
connectors.
5
5 L20-349 R3
Page 6

LEG INSTALLATION INSTRUCTIONS
W
A
G
1
. Position the fryer on its side on a clean surface.
2. Attach each leg with four bolts, washers and nuts
(provided).
3. Tighten securely
LEG LEVELING
INSTRUCTIONS
1. Move the fryer to its desired location.
2. Turn the screw-type leg adjustment ends as
necessary to level the fryer, until NO tipping,
rocking, or wobbling is evident.
3. Perform the “Fryer Restraining Device
Installation Instructions.”
The fryer MUST NOT tip, rock or wobble, to avoid splashing or spilling its HOT
shortening contents during operation.
CASTER INSTALLATION
INSTRUCTIONS
!
RNIN
Figure 3. Typical Leg Installation
CASTER LEVELING INSTRUCTIONS
1. Postion the fryer on its side on a clean surface.
2. Attach each caster with four bolts, washers, and nuts
(provided).
3. Mount locking casters on the front of the fryer
and fixed casters on the rear.
4
. Tighten securely.
Figure 4. Typical Caster Installation
Move the fryer to its desired location.
1.
2.
Determine whether the fryer tends to wobble
or rock when in its desired location. If it
does
3.
4.
5.
6.
7.
8.
9.
10.
, perform steps 3 through 9. If it does
not, skip to step 10, then proceed to the
Installation Instr uctions.
Determine which caster requires adjustment
and the approximate amount of change
required to level the fryer.
Position the fryer on its side, exposing the bottom
of the fryer (Figure 5).
Completely remove the bolts. Retain the bolts for
later reassembly .
Reinsert each mounting bolt through the
caster mounting plate; next, place a spacer of
the required size on the bolt before inserting
the bolt into the bottom of the fryer.
Repeat step 6 for all remaining bolts.
Tighten all four bolts with locking nuts evenly
and securely against the bottom of the fryer.
Return the fryer to its desired location.
the front casters to prevent fryer movement
and check again for wobbling or rocking.
Repeat steps 4 through 8 until no wobbling or rocking occurs. When the fryer no
longer wobbles or rocks, perform step 10.
Next, perform the “Fryer Restraining
Device Installation Instructions.”
Lock
6 L20-349 R3
Page 7

GAS CONNECTION INSTRUCTIONS
S
!
WAR
G
r
m
D
ANGER
!
t
b
S
Installing your
procedure, after its legs or casters are properly attached and it is in its desired location.
1. Ensure that the gas safety valve control knob
in the fryer has its OFF position next to the
valvemark.
2. Ensure that the gas supply inlet line valve is
closed (crosswise to the line direction).
3. Ensure that the fryer’s thermostat is set to
OFF .
4. Connect the ½” gas supply line to the gas line
adapter on the lower rear of the fryer .
ANETS
Fryer requires the fol- lowing
FRYER OPERATION RECOMMENDATIONS
DO NOT attempt to operate this fryer during an interruption of gas service. Turn all
fryer controls to OFF, including the gas control valve knob, then close the gas
supply line valve. When notified that the interruption of gas service has ended,
perform the Lighting Procedure (later in this manual).
!
CAUTION
5. Turn the gas supply line valve ON; then, check
all gas supply line joints and couplings for
leaks using soap sud s or a le ak - che ck so lution, after the fryer is in its desired location.
6. Refer to Fryer Operation Recommenda-
tions
and
Fryer Operating Instructions
begin using your
ANET
Fryer.
to
NIN
DONOTuse a flame to check for leaks.
NEVER operate this fryer when its flue is blocked because the combus-
tion products can cause injury to personnel.
Please observe the following recommendations to obt ain
the optimum results from your
ANETS
!
Avoid moving the fryer while it contains HOT
shortening. Drain the shortening from the frye
before moving it for service, clean- ing or maintenance to avoid spilling or splashing. Burns fro
hot shortening can cause serious injury or death.
A
. An
ANETS
designed for operation with a kettle
filled with approximately 35 to 40 pounds of
liquid shortening. (This is approximately
3½ to 5 gallons.)
CAUTION: DO NOT melt solid shorten-
ing in this fryer because the melting can
damage the kettle, which will void the
fryer warranty.
Model SLG40 Fryer is
Fryer.
DANGER
Shortening mus
before it can be used in an
B . Schedule regular cleaning of the fryer to
ensure long-term satisfactory operation.
Refer to the Daily Cleaning Procedure
later in this manual.
C. Before servicing and maintenance, allow the
fryer to cool. ALWAYS shut off gas to the
fryer while working on it, to prevent burns.
D. Contact the factory (1-603-225-6684) for war-
ranty service authorization. [Always notify
the factory the next business day about
‘after-hours’ warranty service.] Contact
your local restaurant equipment service
agency for other service, repairs, or m ainte-
nance activities, as necessary.
e melted into the liquidstate
ANET
Fryer.
,
7
7 L20-349 R3
Page 8

FRYER OPERATING INSTRUCTIONS
Normal operation of an
level marked on the rear of the kettle, before lighting the fryer’s m ain burners.
CAUTION:
!
Damage caused by melting solid shortening will
Shortening MUST be in liquid form to avoid scorching or discoloration and possible damage to the kettle.
ANETS
Fryer requires that the kettle is filled with liquid shortening to above the lower indent
NOT
be covered by the warranty.
FRYER PREP ARA TION FOR USE
“BOIL OUT” INSTRUCTIONS
8
Before using the newly installed fryer for food preparation, clean the rust preventive material from the kettle:
1 . Thoroughly wipe the interior of the kettle with clean
cloths
. Open the front door on the lower portion of the
fryer to access the drain ball valve. Open the drain ball
valve (by aligning the valve handle with t he drain
ball valve) and wipe the entire drain line clean of rust
preventive material.
2 . Close the drain ball valve (tur n the valve handl e
cross-wise to the drain ball valve). Fill the kettle with
water to about 3“ from the top. Add 1 to 2 cups of low
sudsing soap powder, washing soda (trisodium phosphate), or deep fat fryer kettle cleaner.
3. Perform the
to the Lighting Procedure later in this manual.)
4 . Set the thermostat to 190
the water. Stir the water to dissolve the cleaning material.
5 . Clean the fryer kettle for at least 20 minutes. Use a
small hand mop (an optional brush can be ordere d for t his
purpose) to clean the upper portion of the kettle (above
the 3
“
waterline) and the top rim of the kettle.
Lighting Procedure
°
F . Heat, but DO NOT boil
for the fryer . (Refer
. Open the drain ball valve SLOWL Y, to avoid
splashes while draining the cleaning solution from the
kettle.
9 . Close the drain ball valve (valve handle cross-wise
and remove the drain extensi on. Close the front door.
10. Safely dispose of the cleaning solution.
11. Fill the kettle with water to about 3
Add 2 cups of vinegar to neutralize the cleaning solution.
12. Repeat steps 3 through 10 of this procedure.
13. Thoroughly wipe the interior of the kettle and the
drain ball valve with clean, dry , wipin g cloths to remove
ALL water.
14. Dry the kettle thoroughly because any remaining
water can cause spattering of hot shortening when the
kettle is later filled and heated.
)
“
from the top.
6 . Shut down the fryer using the Shutdown Procedure
for the fryer. Refer to the Shutdown Procedure later in
this manual. Allow the water to cool slightly.
7. Open the front door and mount the drain extension
to the drain ball valve. Position a container (bucket)
capable of holding VERY HOT cleaning solution beneath
the end of the drain extension to hold the cleaning
solution being drained, as shown in Fi g u re 5.
Figure 5. Draining The Kettle
8
8 L20-349 R3
Page 9

FRYER OPERATING
p
T
INSTRUCTIONS
(Continued)
LIGHTING PROCEDURE
NOTE: The gas line of a new fryer installation may
contain a considerable amount of air which will hinder
immediate lighting. Y ou may have to press in the control
knob as long as several minutes before the pil ot flam e
burns steadily.
30
1. Open the front door and en s ur e that the fr yer’s
thermostat knob is set to OFF.
2. Open the gas supply line inlet valve to the fryer by
aligning the gas valve handle with the gas line piping.
3 . Turn the gas control valve knob to align the PILOT
setting with the valve mark. Figure 6 shows the possible
control knob positions.
4. Press, and hold down, the valve control knob to
allow pilot gas to flow. Apply a lighted match to the end
of the pilot burner, until the pilot flame lights.
NOTE: A butane lighter may also be used to light the
pilot flame.
Continue holding down the control knob for at least
seconds until the pilot flame burns steadily, without
going out.
5.Release the control knob and observe that the pilot
flame remains lighted.
6. Turn the gas control valve knob to align the ON
setting with the valve mark.
7. Turn the thermostat knob to the desired temperature
. Observe that the fryer’s main burners light to heat
the kettle.
Valve
Mark
OFF
ON
Valve
Mark
PILO
Valve
Mark
ON
OFF
Figure 6. Gas Control Valv e & Knob Positions
SHUTDOWN PROCEDURE
NOTE:
workday or whenever no frying is scheduled for a
of several hours. To prevent damage, the f ryer
also be shutdown whenever there is no shortening in the
kettle.
setting with the valve mark. Observe that the main
burners’ flames go out.
align the OFF setting with the valve mark. Observe that
the pilot flame goes out.
servicing the fryer, close the gas supply line inlet valve to
the fryer by turning the gas valve handle cross-wise with
the gas line piping.
Shutdown is
recommended
at the end of a
eriod
MUST
1 . Turn the thermostat knob to OFF.
2 . Turn the gas control valve knob to align the PILOT
3. Press down and turn the gas control valve knob to
or
NOTE: For extended periods of non-use
when
9 L20-349 R3
Page 10

FRYER OPERATING INSTRUCTIONS
W
A
G
(Continued)
DAIL Y CLEANING PROCEDURE
NOTE:
workday to prepare the fryer for p roper ope ration t he next
time it is to be used.
extension to the drain ball valve.
gas supply line inlet valve is closed (handle cross-wise to
pipe line) and the pilot flame is extinguished.
filter cone directly beneath the drain extension end.
shortening.
kettle
and rinse, these items in the sink. MAKE SURE that
these items are completely dry before their next use.
out all sediment in the bottom of the kettle by pouring
filtered liquid shortening into the kettle until the shortening being drained runs clear .
completely empty of sh orteni ng a nd sedim ent. Detach
the drain extension. Clean,rinse, and dry it before storing.
Cleaning is recommended at the end of a
DANGER
Avoid moving the fryer while it contains HOT
shortening. Drain the shortening from the fryer
before moving it for service, clean- ing or m aintenance to avoid spilling or splashing. [Refer to
steps 1 through 7.] Burns from HOT shortening
can cause serious injury or death.
1. Open the front door of the fryer. Attach the drain
2. Perform the Shutdown Procedure. Ensure that the
3 . Position a steel drum [NEVER use plastic!] with a
4 . Slowly open the drain ball valve to drain the HOT
5 . Remove the fryer baskets and screen fro m the
. Remove the basket hanger from the flue.
6 . Clear any sediment blocking the kettle drain.
7 . Close the drain ball valve, after the kettle is
!
Wait until the kettle has
cooled before performing step
8, to avoid injury from burns.
RNIN
Clean,
Flush
equipped fryers, lock the locking casters to prevent
movement.)
11 . Refill the kettle with filtered (or fresh) liquid
shortening to the desired indent mark on the rear wall of
the kettle, only if fryer operation is to continue during a
subsequent shift. Otherwise, melt shortening into its
liquid state and refill the kettle before fryer operation is
scheduled during the next no rmal working sh ift.
12. Attach the basket hanger to the top of the
backsplash panel. Return the screen and fryer baskets to
their proper positions on the basket hanger.
13. Perform the Lighting Procedure to return the fryer
to operation, when desired.
MONTHL Y MAINTENANCE
INSTRUCTIONS
NOTE:
the fryer operating properly.
Once each month, before beginning fry er operation,
check the flue (behind the backsplash panel) to ensure
that it is clear and free of obstructions, enabling exhaust
combustion gases to flow freely toward the ventilation
hood area. DO NOT allow the flue to become excessively
dirty.
Monthly, observe the condition of the ventilation hood.
If it shows evidence of a great deal of greasy residue,
remove (clean) the residue to allow free flow of ventilation
air.
Regular maintenance is recommended to keep
8.Thoroughly wipe the kettle interior using clean cloths.
9. Periodically perform the “BOIL OUT”Instructions
to ensure thorough cleaning of the kettle. ( Refer to the
earlier FRYER PREP ARA TION FOR USE section.)
10. Return the fryer to its normal operating location, if
it was moved for cleaning, and reconnect both the gas
supply line and the movement-limiting cable. (For caster-
10 L20-349 R3
Page 11

FRYER TROUBLESHOOTING GUIDE
f
t
!
All service (repairs or part replacement) must be performed by a qualified Service Agency.
PROBLEM
Pilot flame does no
stay lighted.
CAUS E
1
. Dirty/sooty pilot burner .
”
2. Low gas supply pressure [less than 6
”
W.C. for natural gas (11
pane) when all other gas-powered equipment is operating.].
3. Pilot flame too small to heat thermo pile.
4
. Pilot flame ‘wavering’ (being blown about
by a draft).
5
. Improper thermopile output voltage (must
be at least 180 millivolts, measured at the
thermocouple junction block).
6
. High-limit thermostat problem has shut of
the gas.
7. Gas control valve has failed.
W.C. for pro-
REMEDY
1
. Clean the pilot burner .
the Lighting Procedure.
2
. Measure t he gas supply pres-
sure.
Contact your local gas supplier
to obtain adequate gas supply
volume and pressure.
3
. Adjust the pilot valve (part of
the gas safety valve) to increase the flame size: Unscrew and retain the large
threaded cover; turn the pilot
valve adjustment screw
turns counterclockwise;
reinstall the threaded cover.
4
. Block or redirect the draft, to
keep the flame burning steadily .
5
. Replace the thermopile.
6
. Check for, and repair, any dam-
aged high-limit thermostat wiring
. Otherwise, test the highlimit thermostat by bypassing
the high-limit thermostat (black
and blue wires) at the gas control valve with a jumper wire.
Next, perform the Lighting Procedure, to check whether the
pilot flame lights. If the pilot
flame lights and stays lit, the
high-limit thermostat has failed
and must be replaced.
CAUTION: DO NOT return
the fryer to normal operation
with its high-limit thermostat
bypassed.
7
. Replace the gas control valve.
Perform
two
11 L20-349 R3
Page 12

FRYER TROUBLESHOOTING GUIDE
t
(Continued)
PROBLEM
Pilot flame goes out
repeatedly.
Main burners do no
ignite.
CAUS E
1. Low gas supply pressure [less than 6”
”
W.C. for natural gas (11
pane) when all other gas-powered equipment is operating.].
2. Loose thermocouple or high-limit thermostat connection(s) on gas control valve.
3
. Pilot flame does not continuously touch
the thermocouple because of excessive
air flow around the pilot burner assembly.
4
. High-limit thermostat problem has shut off
the gas.
CAUTION: DO NOT return
!
the fryer to normal operation
with its high-limit thermostat
bypassed.
1
. Gas control valve knob set to OFF or
PILOT.
2
. Low gas supply pressure [less than 6”W.C.
for natural gas (11” W.C. for propane)
when all other gas-powered equipment is
operating.].
3
. Pilot burner problem.
4
. Thermostat control set below the tempera-
ture of the liquid shortening in the kettle.
W.C. for pro-
REMEDY
1
. Measure the gas supply pres-
sure.
Contact your local gas supplier
to obtain adequate gas supply
volume and pressure.
2
. Check and tighten the connec-
tions.
3.
Block the excessive air flow to
make the pilot flame contact
the thermocouple.
4
. Check for, and repair, any dam -
aged high-limit thermostat wiring
. Otherwise, test the highlimit thermostat by bypassing
the high-limit thermostat (black
and blue wires) at the gas control valve with a jumper wire.
Next, perform the Lighting Procedure, to check whether the
pilot flame lights. If the pilot
flame lights and stays lit, the
high-limit thermostat has failed
and must be replaced.
1
. Perform the normal
Procedure. Turn the gas
control valve knob to ON to
light the main burners.
If the burners do not light, the
gas safety valve has failed and
must be replaced.
2
. Measure the gas supply pres-
sure.
Contact your local gas supplier
to obtain adequate gas supply
volume and pressure.
3
. Refer to the preceding Pilot
Burner problems and use the
correct remedy.
4
. Increase the thermostat setting
the burners light. If this setting is
greater than the desired temperature,
reset the thermostat.
Lighting
until
12 L20-349 R3
Page 13

FRYER TROUBLESHOOTING GUIDE
peat
(Continued)
PROBLEM CAUSE REMEDY
5
Main burners do not
(Continued)
ignite.
Main burners do not
stop burning.
Liquid shortening does
not reach the desired
temperature for frying.
. Gas control valve has failed.
1
. Thermostat has failed.
2
. Gas control valve has failed.
1
. Low gas supply pressure [less than 6”
”
W.C.for natural gas (11
when all other gas-powered equipment is
operating], causing reduced heat from main
burners.
2
. Low gas manifold pressure [less than 3½”
W.C.for natural gas (10
pane).
3
. Loose knob on thermostat; or thermostat
requires calibration (temperature setting
differs by about 10°F from the measured
shortening temperature).
W.C.
”
W.C. for pro-
propane)
for
5
. Replace the gas control valve.
1
. Turn the thermostat control
knob to OFF. If the burners
do not quit burning, the thermostat has failed and must
be replaced.
2
. Turn the gas control valve knob
to OFF. If the burners do not
quit burning, the gas control
valve has failed and must be
replaced.
1. Measure the gas supply pressure.
Contact your local gas supplier
to obtain adequate gas supply
volume and pressure.
2. Measure the gas pressure at
the fryer’s manifold pressure
tap
. Adjust the manifold pressure (see Figure 6), as necessary: [a] Unscrew (and retain) the threaded Main Burner
Regulator Adjustment Cover.
[b] Use a flat-blade screwdriver to turn the regulator
adjustment screw (clockwise to
increase; counterclockwise to
decrease) to reset the pressure
adjustment
tighten the Regulator Adjustment Cover, when finished.
3. Stir the shortening to mix the
hot shortening with some from
the lower ‘cool zone’ and allow
it to sit for 5 minutes. T urn the
thermostat knob until it ‘clicks’
on (causing the main burners to
flame); note the setting where
this occurs
stat knob until it ‘clicks’ off
(causing the main burners to go
out); note the setting where this
occurs. Re
. [c] Reinstall, and
. Turn the thermo-
this tempera-
13 L20-349 R3
Page 14

FRYER TROUBLESHOOTING GUIDE
PROBLEM CAUSE REMEDY
Liquid shortening does 3.
(Continued)
(Continued)
not reach the desired 3. Loose knob on thermostat; or thermostat ture ‘click points’ step at least
temperature for frying
(Continued)
differs by about 10°F from the measured shortening temperature has
. requires calibration (temperature setting three times to ensure that the
shortening temperature).
(Continued)
stabilized.
Measure the temperature of
the shortening by inserting an
accurate thermometer about
4 inches into the shortening to
measure its temperature. If the
NOTE: A Parts List for each
ANETS
Fryer is among the items shipped with each fryer. If an
temperature difference between the measured temperature and the thermostat setting
is more than 15°F the thermostat is failing and must be
replaced.
additional copy of this list is needed, please contact the factory as directed on the back cover.
14 L20-349 R3
Page 15

ORIGINAL EQUIPMENT LIMITED WARRANTY
Anets, Inc. warrants to the original user of its commercial cooking appliances and related equipment that said appliances and related equipment will be free from defects
in material and workmanship under norm al use for a period of one (1) year from the date of installation, with approp riate docume ntation, to a maximum of
months
from the date of manufacture, subject to the following additions, exceptions, exclusions and limitations.
This warranty is limited to the repair or replacement at the Company’s option, without charge, of any part found to be defective within the warranty period and reasonable
expenses incurred for freight and material for the installation of such part; in addition, the Company’s obligation shall be limited to reimbursement for normal labor on such
parts.
Anets, Inc. agrees to pay the Authorized Service and Parts Distributor, for any labor and material required to repair or replace, at the Company’s option, any part which
may fail due to defects in material or workmanship during the above general warranty period.
In addition to the above general warranty, for its economy fryers and cookers, the Company warrants to the original user any mild.
vessel to be free from defects for a period of one (1) year,
In addition to the above general warranty, for its standard fryers and cookers, the Company warrants to the original user any stainless steel fry tank or cooking vessel
to be free from defects for a period of (1) year parts and labor and 10 year Frypot or cooking vessel Part only from the date of manufacture
be the responsibility of the end user.
from the date of manufacture
In addition to the above general warranty, for its standard fryers and cookers, the Company warrants to the original user any stainless steel fry tank or cooking vessel
to be free from defects for a period of one (1) year parts and labor and 5 years Frypot or cooking vessel part only after year one from the date of manufacture
Labor and freight shall be the responsibility of the end user.
After the expiration of the general warrant y period, any addi tional warrant y on fry tanks or cooking v essels shall onl y obligate the Comp any to repa ir or replace, at its
option, any fry tank or cooking vessel which it determines to be defective. Claims under this item shall be supported b y a statement detailing the defect, and the
Company
may require the return of the fry tank or cooking vessel claimed to be defective
• Make sure any shipping damages are reported immediately. Damages of this nature are the responsibility of the carrier and must be reported by the receiver.
.
• Install the unit properly
•
part. This repair or replacement will be at the expense of Anets, Inc. except as limited by this warranty statement. Any repair or replacement under this warranty does not
constitute an extension in time to the original warranty. Parts covered under this warranty will be repaired or replaced, at the Company’s option, with new or functionally operative
parts. The liability of Anets, Inc. on any claim of any kind, including claims based on warranty, express or implied contract, negligence, strict liability or any other legal theories
will be exclusively the repair or replacement of the appliance
consequential or other damages of any kind, including, but not limited to, injuries to persons, damage to property, loss of pro
Do not install it in a home or residence.
• Maintain it properly.
• Adjustments, such as calibration, leveling, tightening of fasteners or plumbing or electrical connections normally associated with initial installation.
procedures are outlined in the manual and are NOT covered by warranty.
If it is damaged due to flood, fi
•
Use it for what it is intended.
•
warranty.
• Make sure that it has the corr ect voltage, gas suppl y and/or g ood qualit y water
or gas supplies, these damages are not covered under the warranty.
• Do not materially alter or modify from the condition in which it left the factory.
Do not obliterate, remove or alter the serial number rating plate.
•
• Use only Genuine OEM parts from Anets, Inc. or its Authorized Parts and Service Distributors. Repairs are not covered by the warranty.
•
If any other failure occurs which is not attributable to a defect in materials or workmanship, it is not covered.
This warranty specifically excludes parts which wear or would b e replac ed under normal usage, inclu ding, but not limited to, elect ric lamps, fus es, i nterior or exterior
finishes, o-rings and gaskets.
Outside the United States of America and Canada, this warran ty is limited to the replacement of parts and Anets, Inc. will not bear any ot her expense be i t labor,
mileage, fr ei ght or tr av el.
If any oral statements have been made regarding the appliance, these statements do not constitute warranties and are not part of the contract of sale. This limited
warranty constitutes the c omplet e, final and exclu sive stat ement wit h regard to warra nties.
THIS LIMITED WARR ANTY IS EXCLU SIVE AND IS IN LIEU OF ALL OTHER W ARRANTIES W HETHER W RITTEN, ORAL OR IMPLIED, INCLUDING, BUT NOT
LIMITED TO ANY WARRANTY OF MERCHANTABILITY OR FITNESS FOR A PARTICULAR PURPOSE OR WARRANTY AGAINST LATENT DEFECTS.
In the event of a warranty or other claim, the sole obligation of Anets, Inc. will be the repair or replacement, at the Company’s option, of the appliance or the component
If any provision of this warranty is unenforceable under the law of any jurisdiction, th at provis ion only will be inapplicable there, and the remainder of the warranty will
.
remain unaffected
The maximum exclusion or limitation allowed by law will be substituted for the unenforceable provision.
This is the responsibility of the installer and the procedures are outlined in the manual.
This is the responsibility of t he user of the appli ance and the proce dures are outlined in the manual.
Limitations to Fry Tank and Cooking Vessel Warranty
How to Keep Your Warranty in Force
re or other acts of God, this is not covered under this warranty.
If it is used for a purpose other than for which it was intended or designed, resulting damages are not covered under the
.
This liability will not include, and the purchaser specifically renounces an y right to recov er special , incidental ,
First direct your claim to the Anets, Inc. Authorized Service and Parts Distri butor closest to you giving com plete model, serial and code numb ers, voltage, gas type,
and descri ption of th e problem. Pro of of the date of inst allation an d/or the sal es slip may also be required.
Service Manager, Anets, Inc., P
This warranty gives you certain speci
Anets,Inc.,
. O. Box 501, Concord, NH. 03302-0501.
fic legal rights; you may have other rights which vary from state to state.
P.O.Box501,Jct.I‐89&I‐93Concord,NH03302‐0501
509Route3A,Bow,NH03304USA
Tel:(603)225‐6684Fax:(603)228‐5231www.ANETS.com
General Warranty
What is covered
Silver Line Fryers
. Labor and freight shall be the responsibility of the end user.
Gold Line Fryers
Pasta Cooker
. Labor and freight shall be the responsibility of the end user.
.
If a failure is due to poor water quality, harsh chemical action, erratic voltage
Limits to the Warranty
Limitations of Liability
How to Obtain Warranty Service
USA
L14‐022R1PrintedinU.S.A.
15 L20-349 R3
Stainless steel fry tank or cooking
Labor and freight shall
These
fi
ts or anticipated loss of the use of this appliance.
If this procedure fails to be satisfactory, write the National
fi
fteen (15)
.
Page 16

In the event of problems with or questions
about your order, please contact the Anets
factory at:
(603)-225-6684 World Wide
Website Address: www.anets.com
MAILING ADDRESS – P.O. BOX 501, CONCORD, NH 03302-0501
SHIPPING ADDRESS – 10 FERRY STREET, CONCORD, NH 03301
In the event of problems with or questions about
your equipment, please contact the Anets
Authorized Service and Parts representative
(ASAP) covering your area, or contact Anets
at the number
listed to the left.
16 L20-349 R3
 Loading...