

Page 1
0
Page 2

1
Contents
INTRODUCTION ............................................................................................................................. 2
A. Security Considerations ............................................................................................................... 3
B. Product Details ............................................................................................................................ 4
1.Specifications .......................................................................................................................... 4
2.Machine parts ......................................................................................................................... 4
3.Extruder drawing ..................................................................................................................... 5
4.Tool List .................................................................................................................................. 6
C. Cura Software ............................................................................................................................. 9
1.Installation of Cura14.07 ......................................................................................................... 9
1.1 File location in the TF card ............................................................................................ 9
2. Cura Setting ................................................................................................ ......................... 18
2.1 Clear platform .............................................................................................................. 18
2.3 Layer height settings ................................................................................................... 23
D. Printing Operation ..................................................................................................................... 46
1. Introduction of Display ......................................................................................................... 46
2. Install Filament ..................................................................................................................... 56
2.1 Set Preheat Mode .................................................................................................... 56
2.2 Filament Installation ..................................................................................................... 57
2.3 Pull out filament ........................................................................................................... 59
3. Platform Adjustment .......................................................................................................... 60
4. Printing ................................................................................................................................ 62
E. FAQ and Solution ...................................................................................................................... 65
1. Z Axis Ajustment .............................................................................................................. 655
2. Nozzle blocking .................................................................................................................... 67
3. FAQ ..................................................................................................................................... 69
F. Maintenance ............................................................................................................................... 70
G. Maintenance policy ................................................................................................................... 71
Page 3

2
INTRODUCTION
A8 FDM 3D printer can print CAD 3D printer model to real . A8 uses Acrylic to build
its frame while it uses linear bearings , belts and threaded rods to build X , Y , Z axis .
It enables A8 to print steadily with no vibration .
Note:
1. All statement included in this Instructions have been checked carefully , if any
typographical errors or misunderstanding , we have the final interpretation .
2. No noification if any update .
Page 4

3
A. Security Considerations
To avoid danger when using 3D printer , please pay attention to precautions below .
Danger
During Operation , the maximum temeprature of nozzle can be 260 ℃ while hotbed
can be 100 ℃ . For your safety , during printing or cooling down , do not touch the
nozzle , hotbed and models under printing . Power works at 110V/220V 50HZ AC and
supply ground needed . Do not use other power supply , or it may cause components
damage , fire or electric shock . And we take no responsibility for this .
Warning
We suggest wering protective goggles when removing auxiliary support materials .
Some filaments will emit slight irritant gases , so we suggest to use 3D printer in a
ventilated environment .
Note: ABS filament will emit a bit toxic gases when it melts .
Page 5
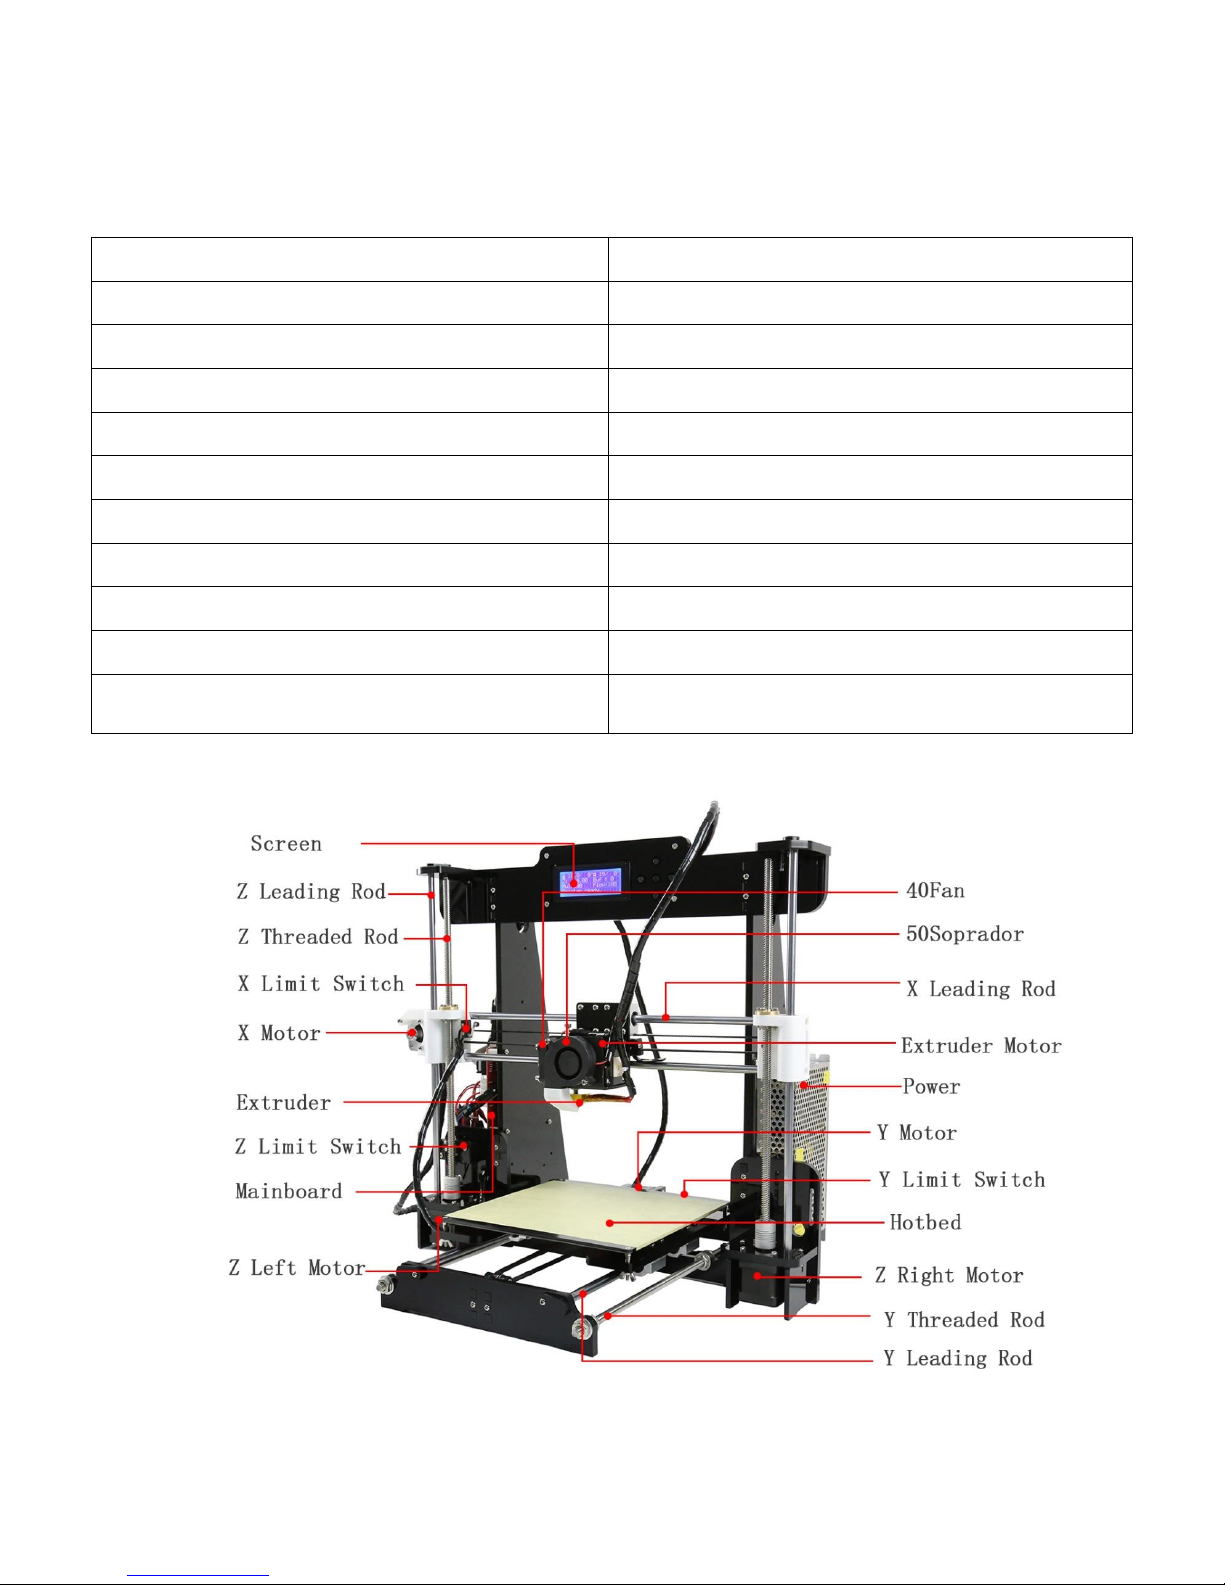
4
B. Product Details
1.Specifications
2.Machine parts
Model:A8
Nozzle diameter: 0.4mm
Layer thickness:0.1-0.3mm
Machine size: 500*400*450mm
Printing speed:10-120mm/s
Machine weight:7.5KG
X Y axis position accuracy:0.05mm
Packing size:510*345*215mm
Z axis position accuracy:0.015m
Gross weight:9.2KG
Printing material:ABS,PLA
Build size:220*220*240mm
Material tendency:PLA
LCD screen:Yes
Filament diameter :1.75mm
Offline printing:SD CARD
Software language:Multi-Language
File format:STL、G-Code、OBJ
Function of support:automatically
OS:windows(linux、mac)
Software: Cura
Working condition: 10-30℃,Humidity 20-50%
Page 6
5
3.Extruder drawing
No.
Part Name
Quantity
1
Extruder Motor
1 2 Blower
1 3 Wind Mouth
1
4
Nozzle(0.4mm)
1 5 Heating Block
1 6 Throat
1 7 Fan Cover
1 8 Fan 1 9
Heat Sink
1
10
Extruder Seat
1
11
Bend Parts
1
12
Brass Wheel
1
13
U-Bearing
1
14
Briquetting
1
15
Spring
1
16
Heating Pipe
1
Page 7
6
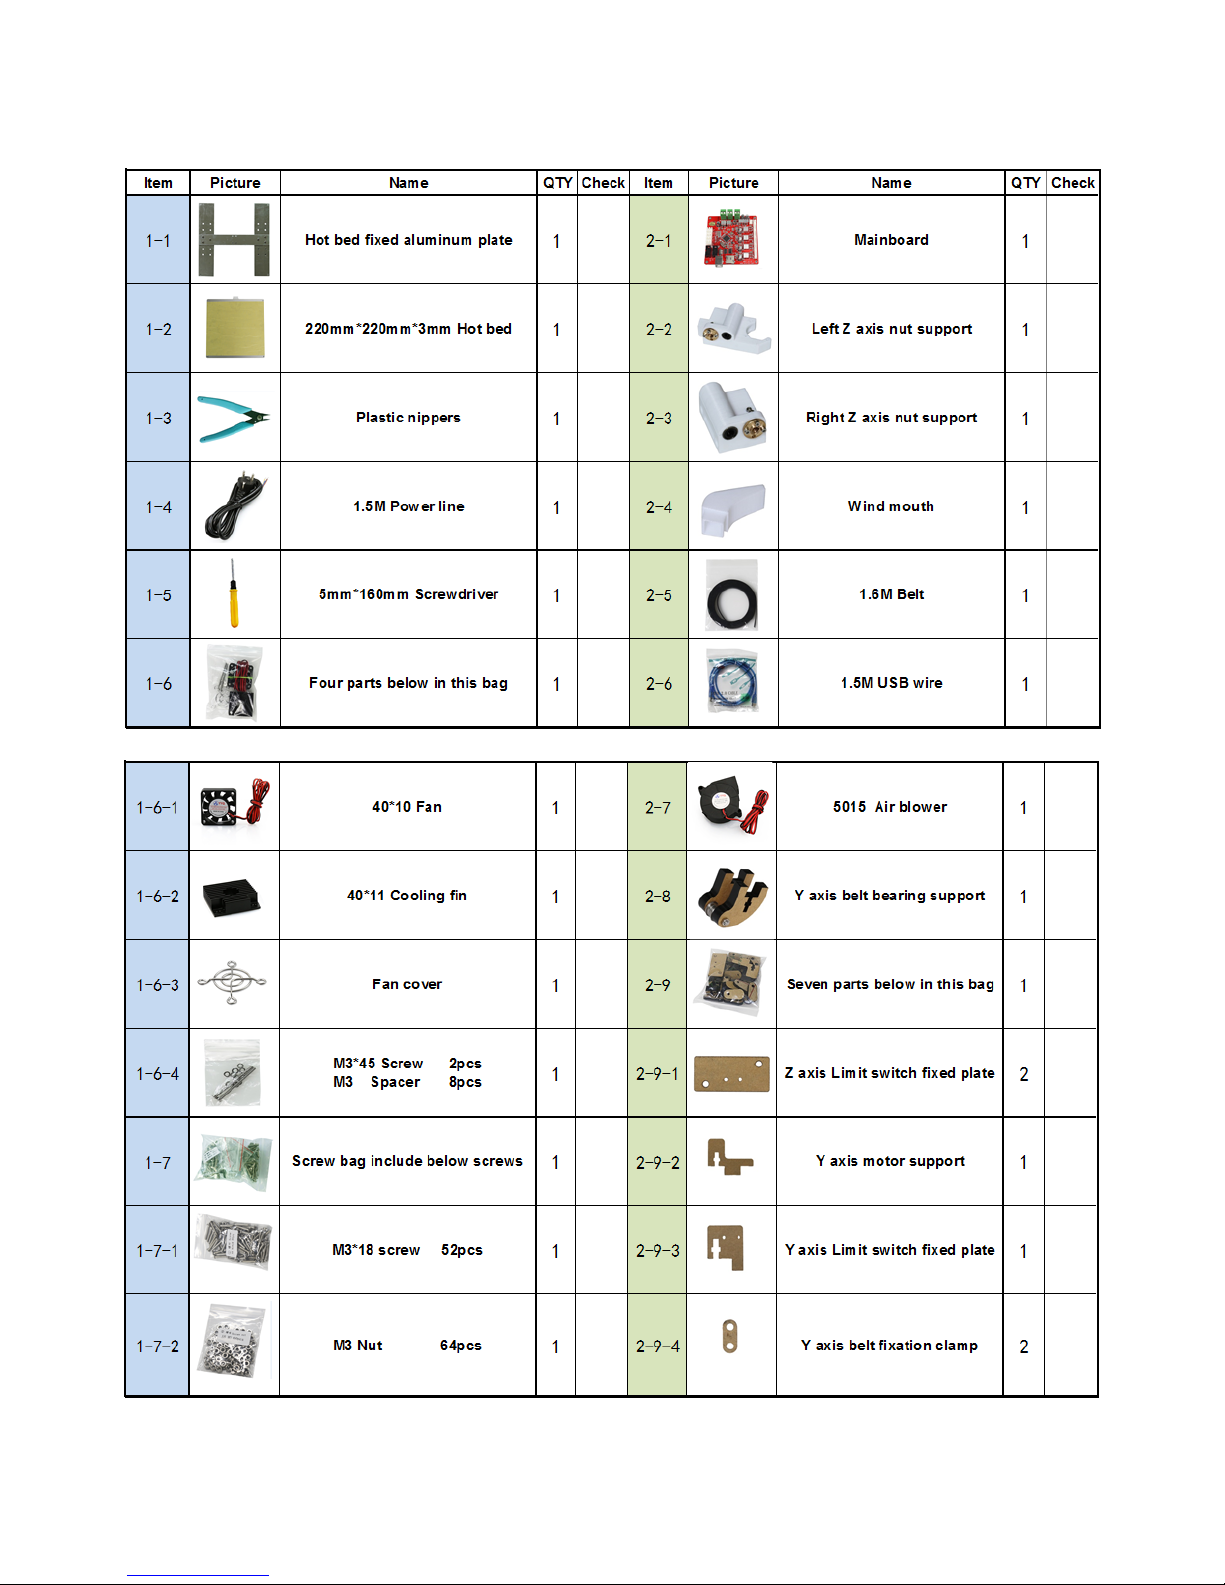
4.Tool List
Page 8
7
Page 9
8
Page 10
9
C. Cura Software
1.Installation of Cura14.07
a: Where can I find the software?
1) SD card with shipment; 2) download from Internet;
b: Installation process
1) From SD card with shipment
Insert SD card and open the file
1.1 File location in the TF card
1)Insert SD card , open the file
Page 11
10
2) Download from Internet
Official Website:https://ultimaker.com/en/cura-software/list
Choose corresponding software to download
Page 12
11
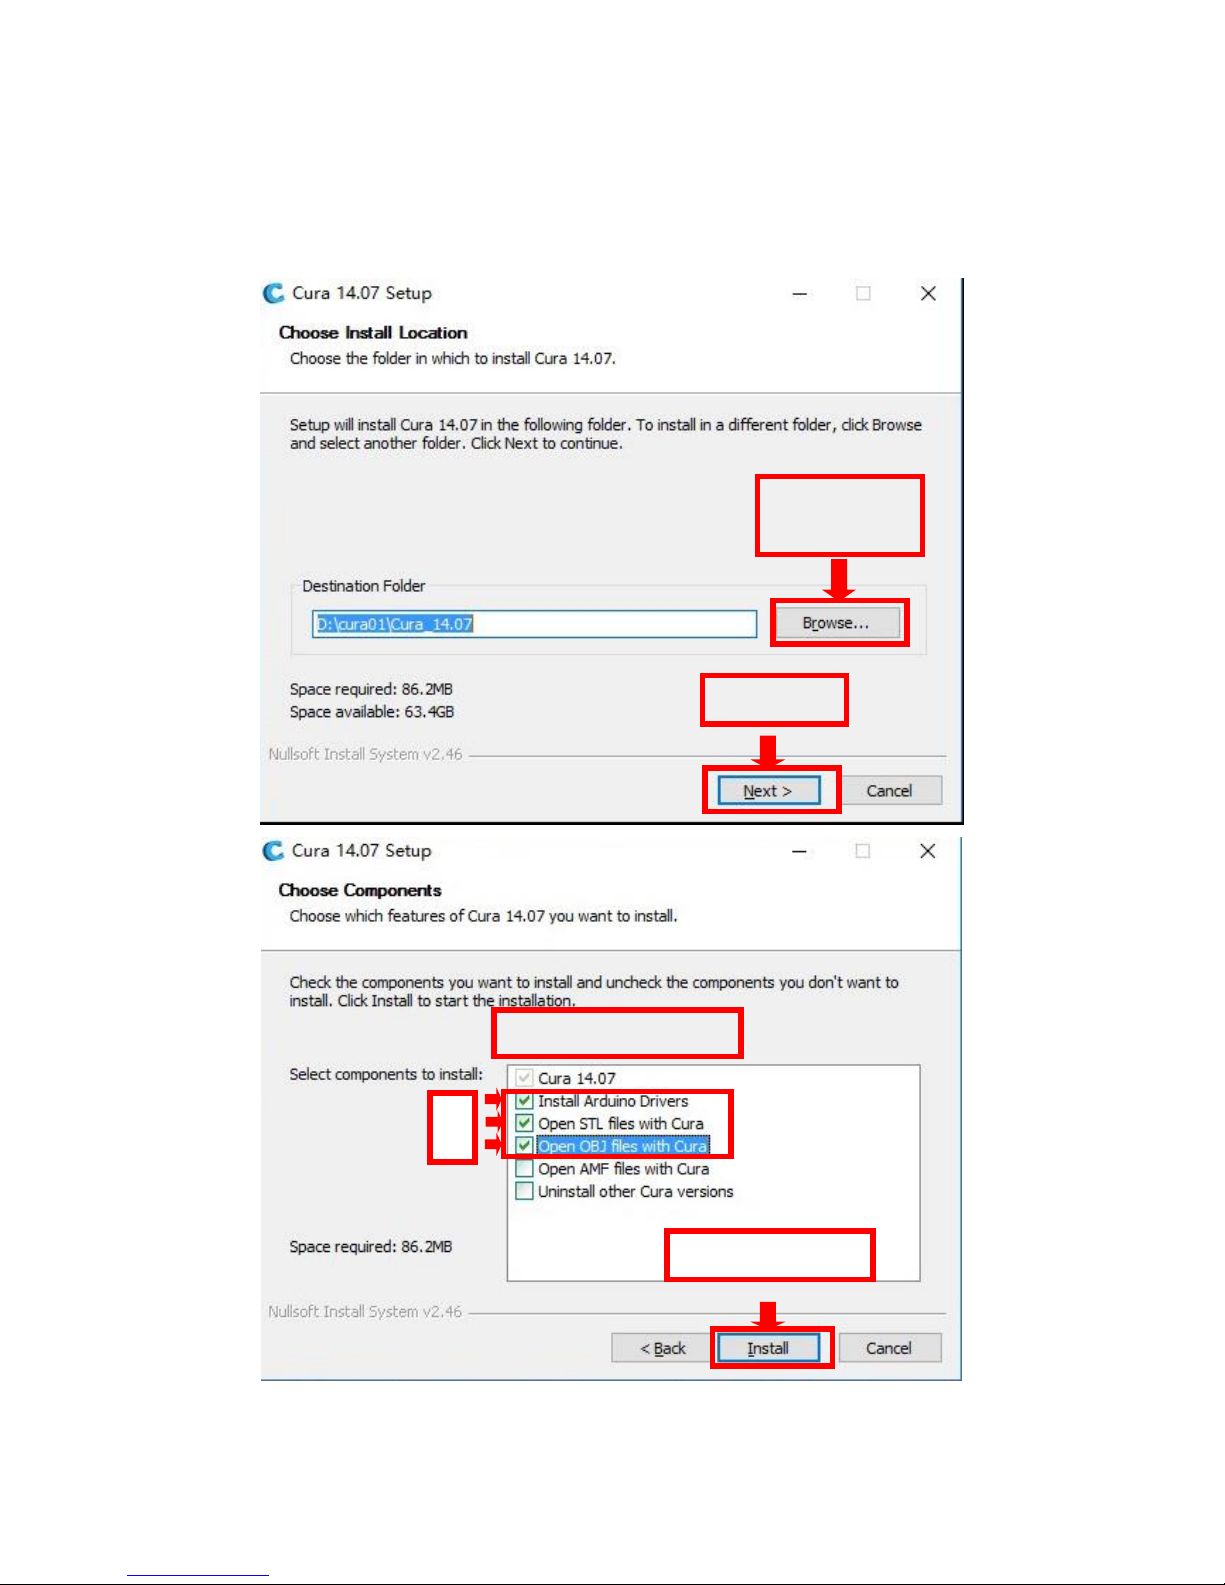
b.Software Installation Process
1. Installation
Positioning
2. Click Next
1
2
3
Choose 3 options below
4. Click Install
Page 13
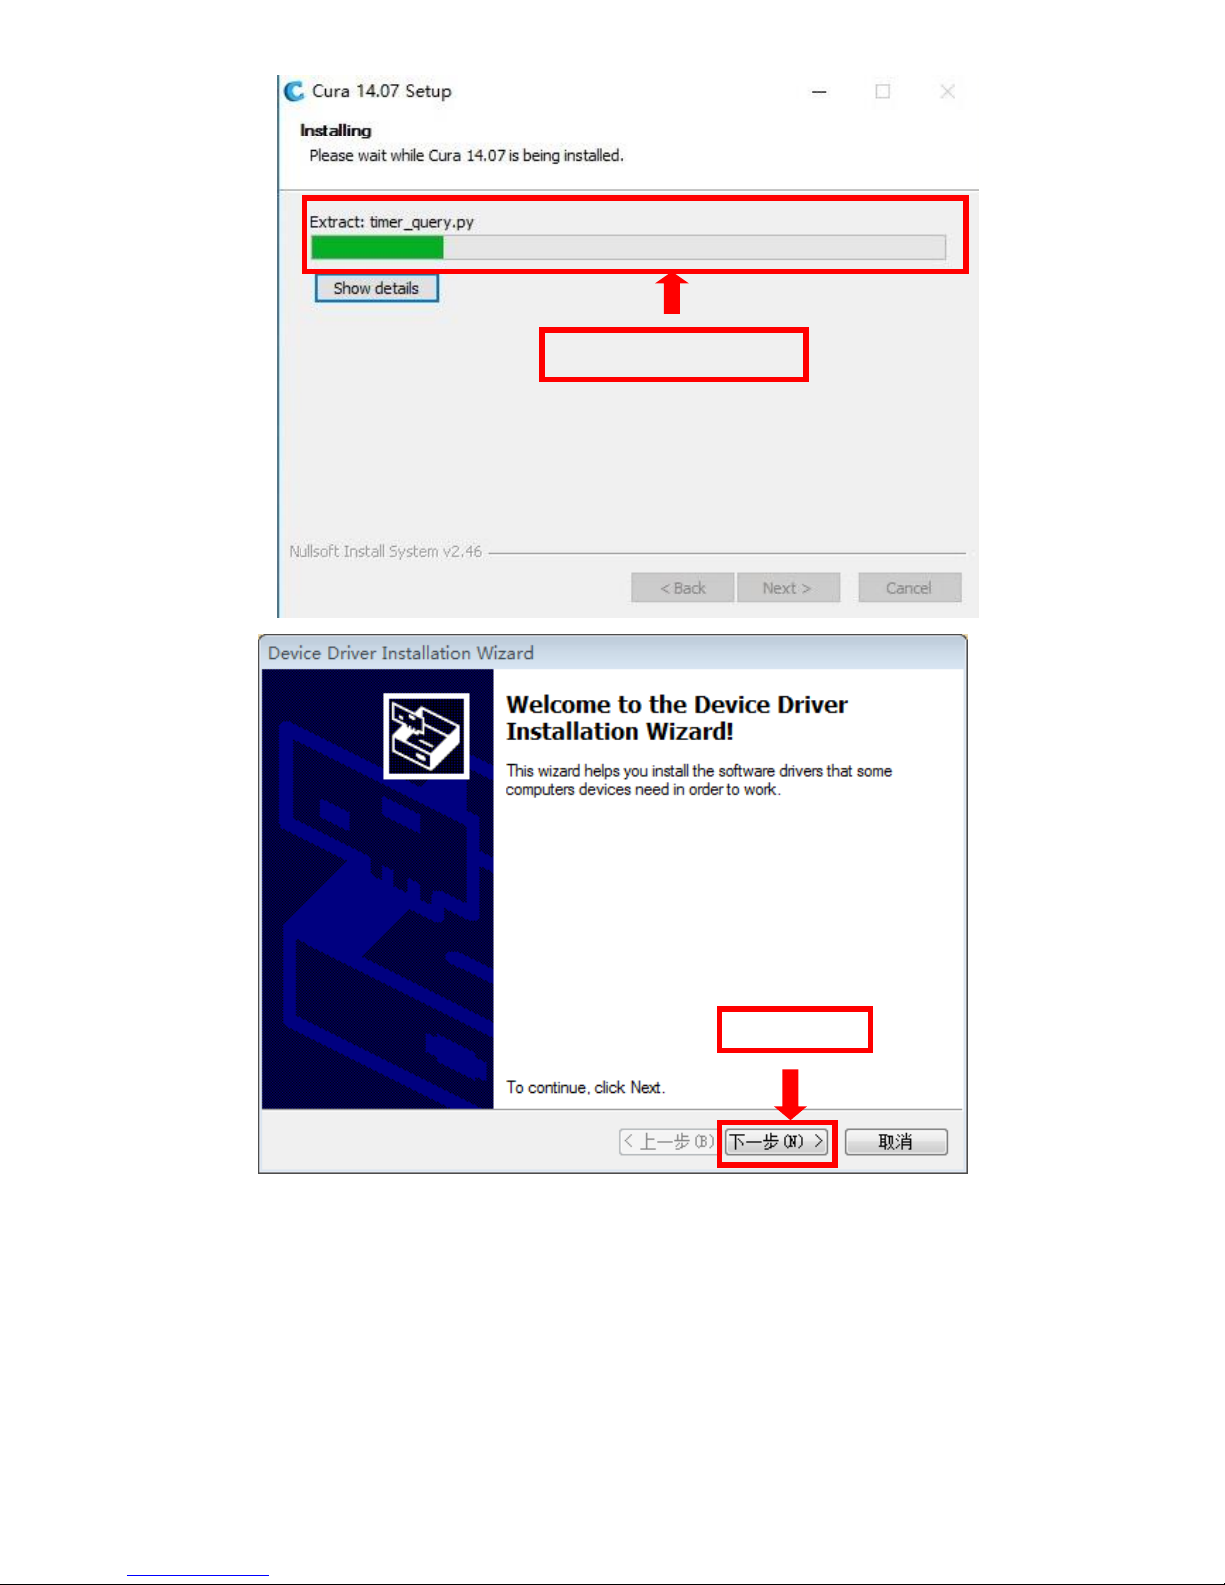
12
Please wait for installation
1.Click Next
Page 14
13
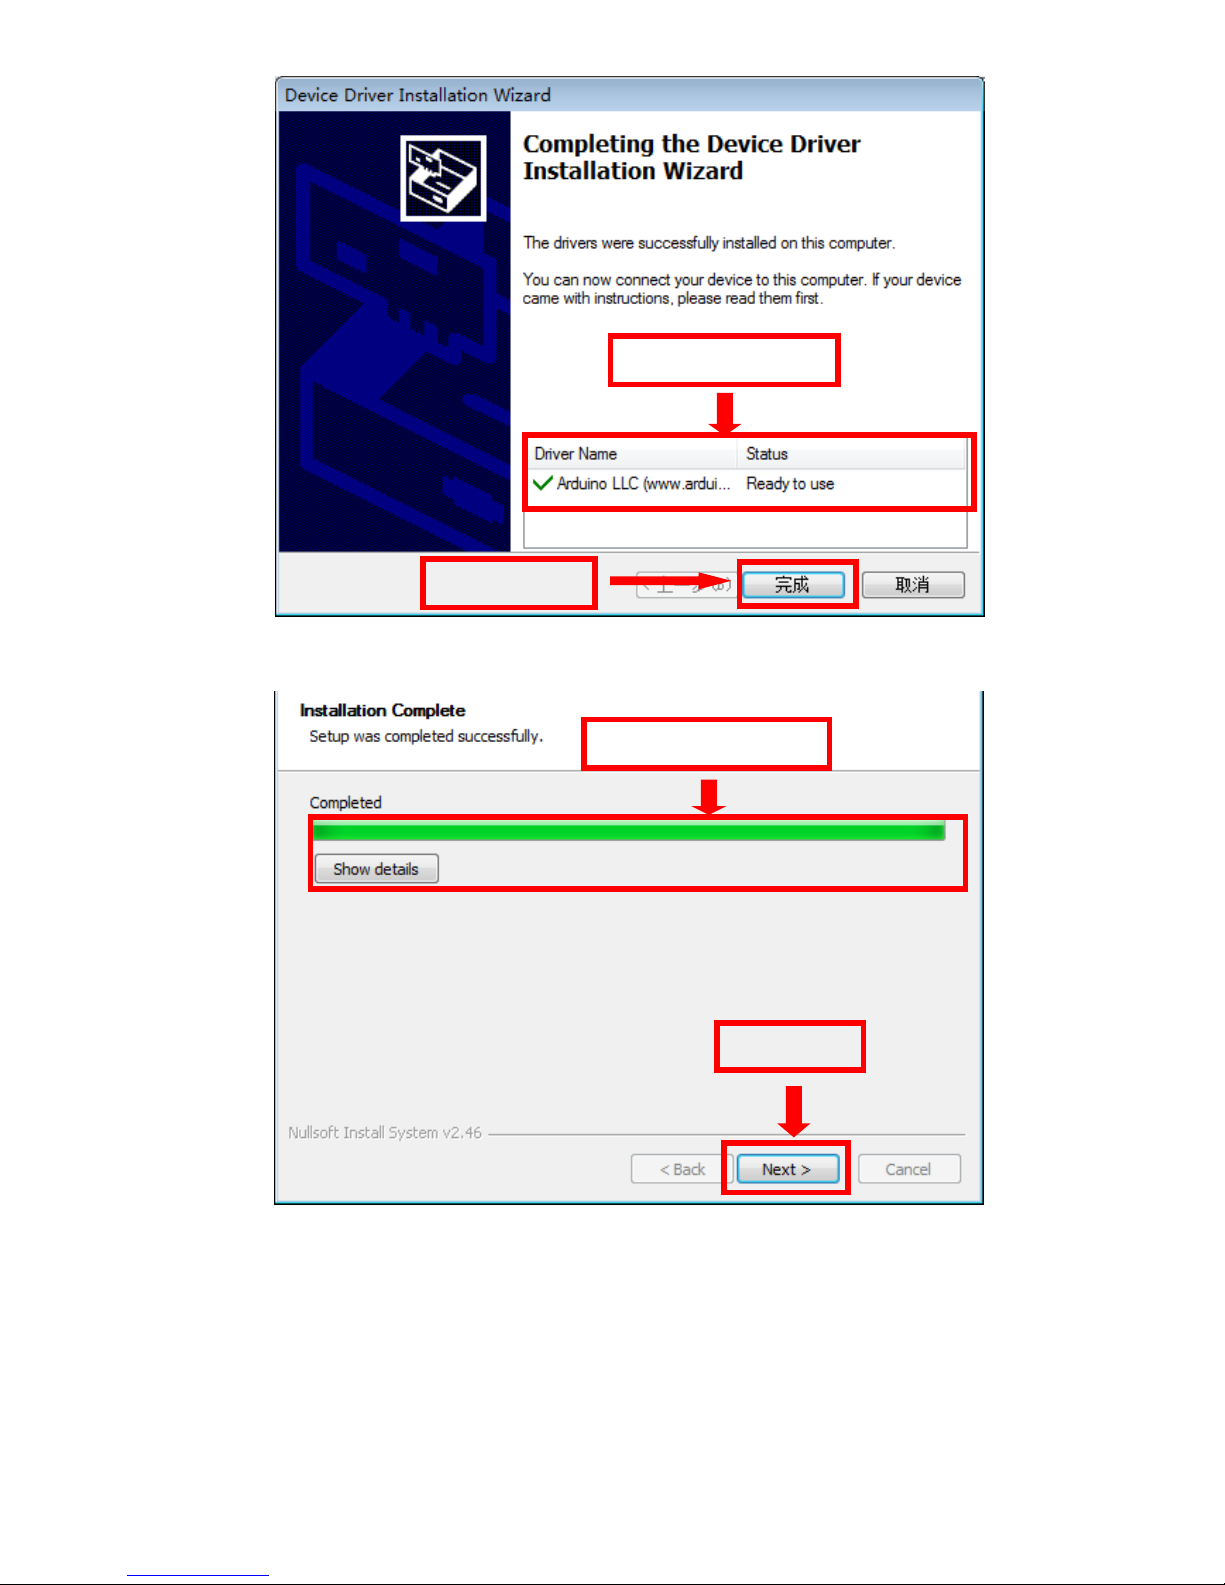
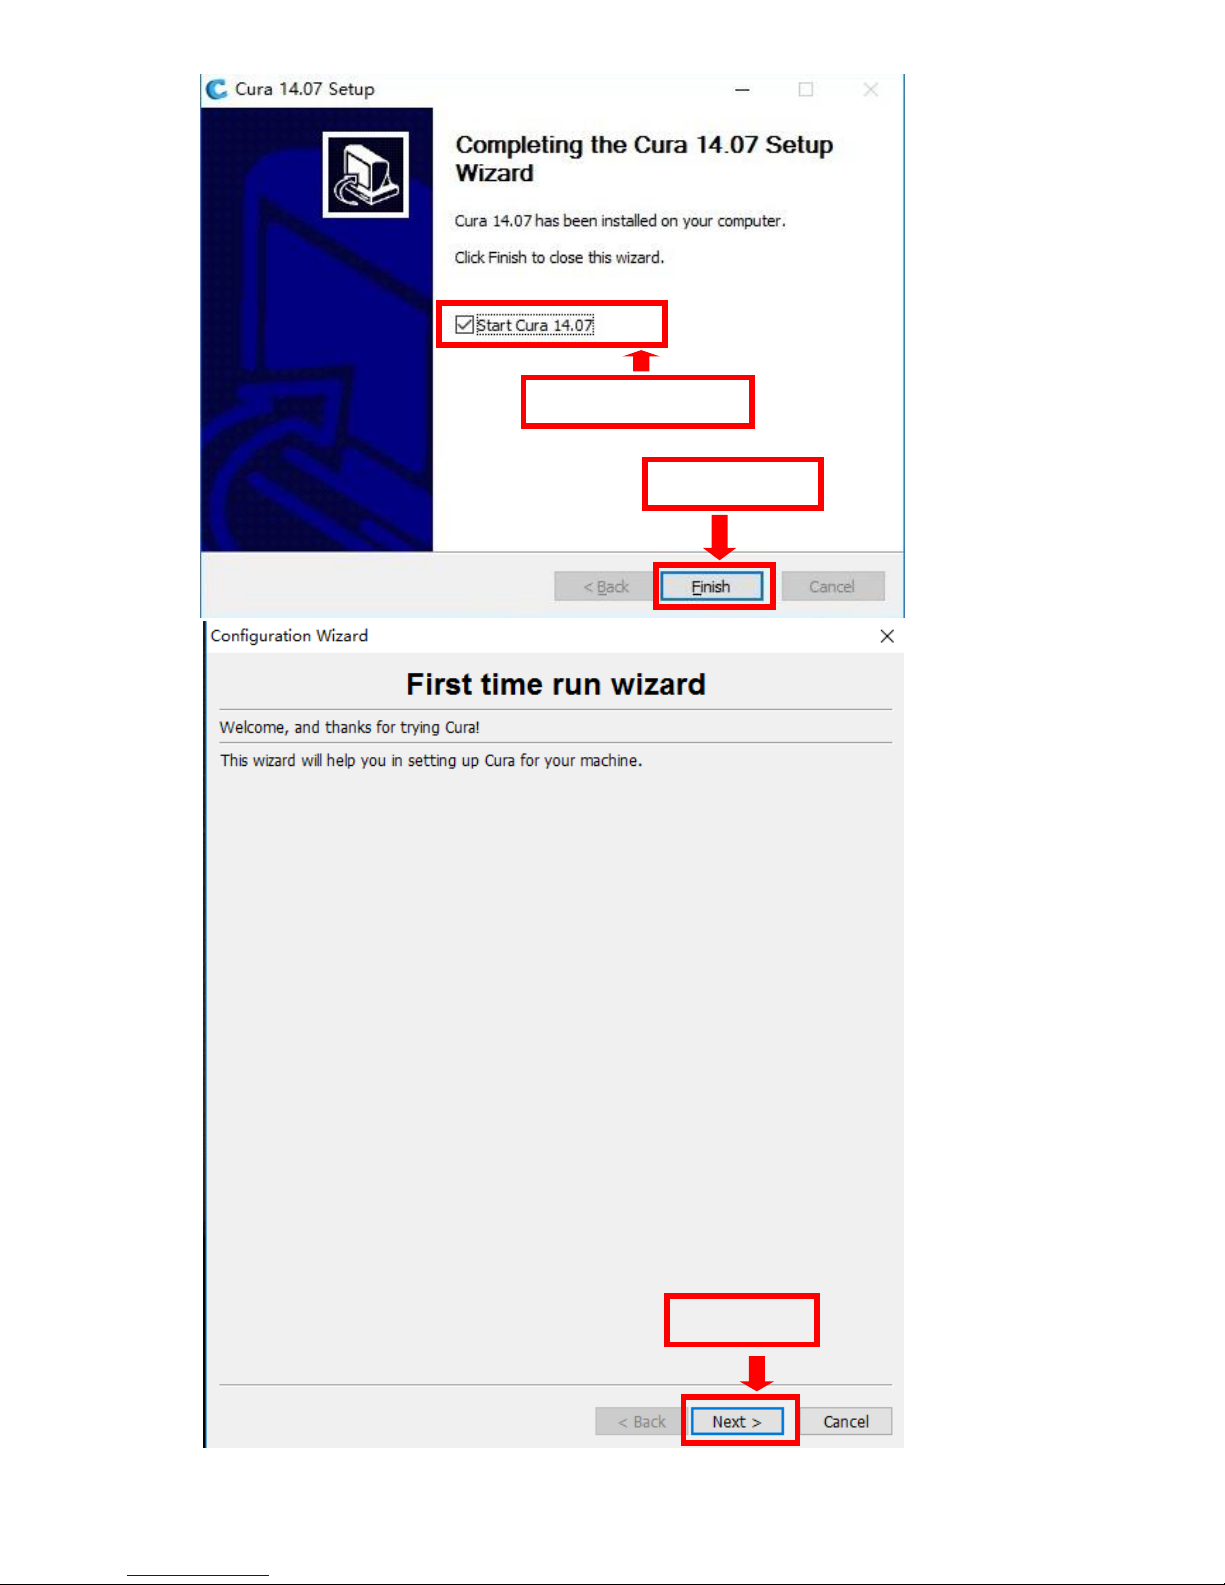
1.Installation Success
2.Click to finish
Installation complete
Click Next
Page 15
14
2. Click to finish
1.Choose to run Cura
Click Next
Page 16
15
3.Click Next
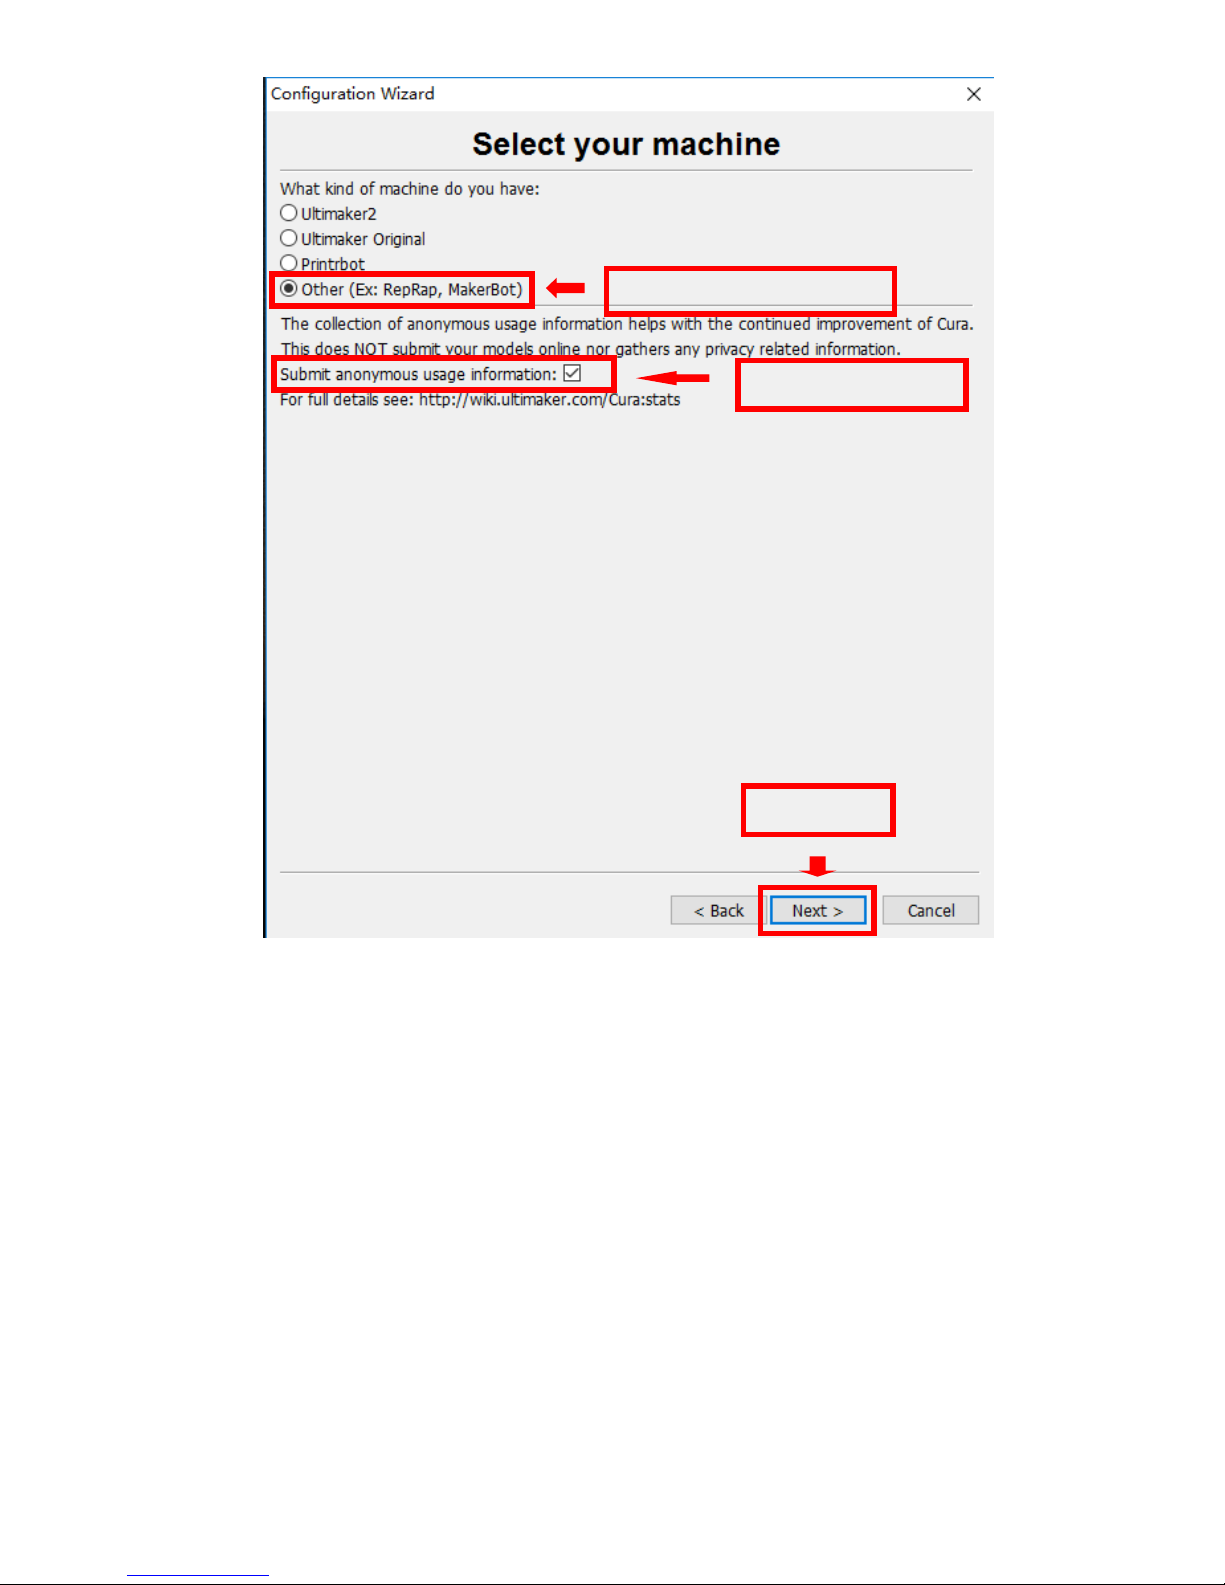
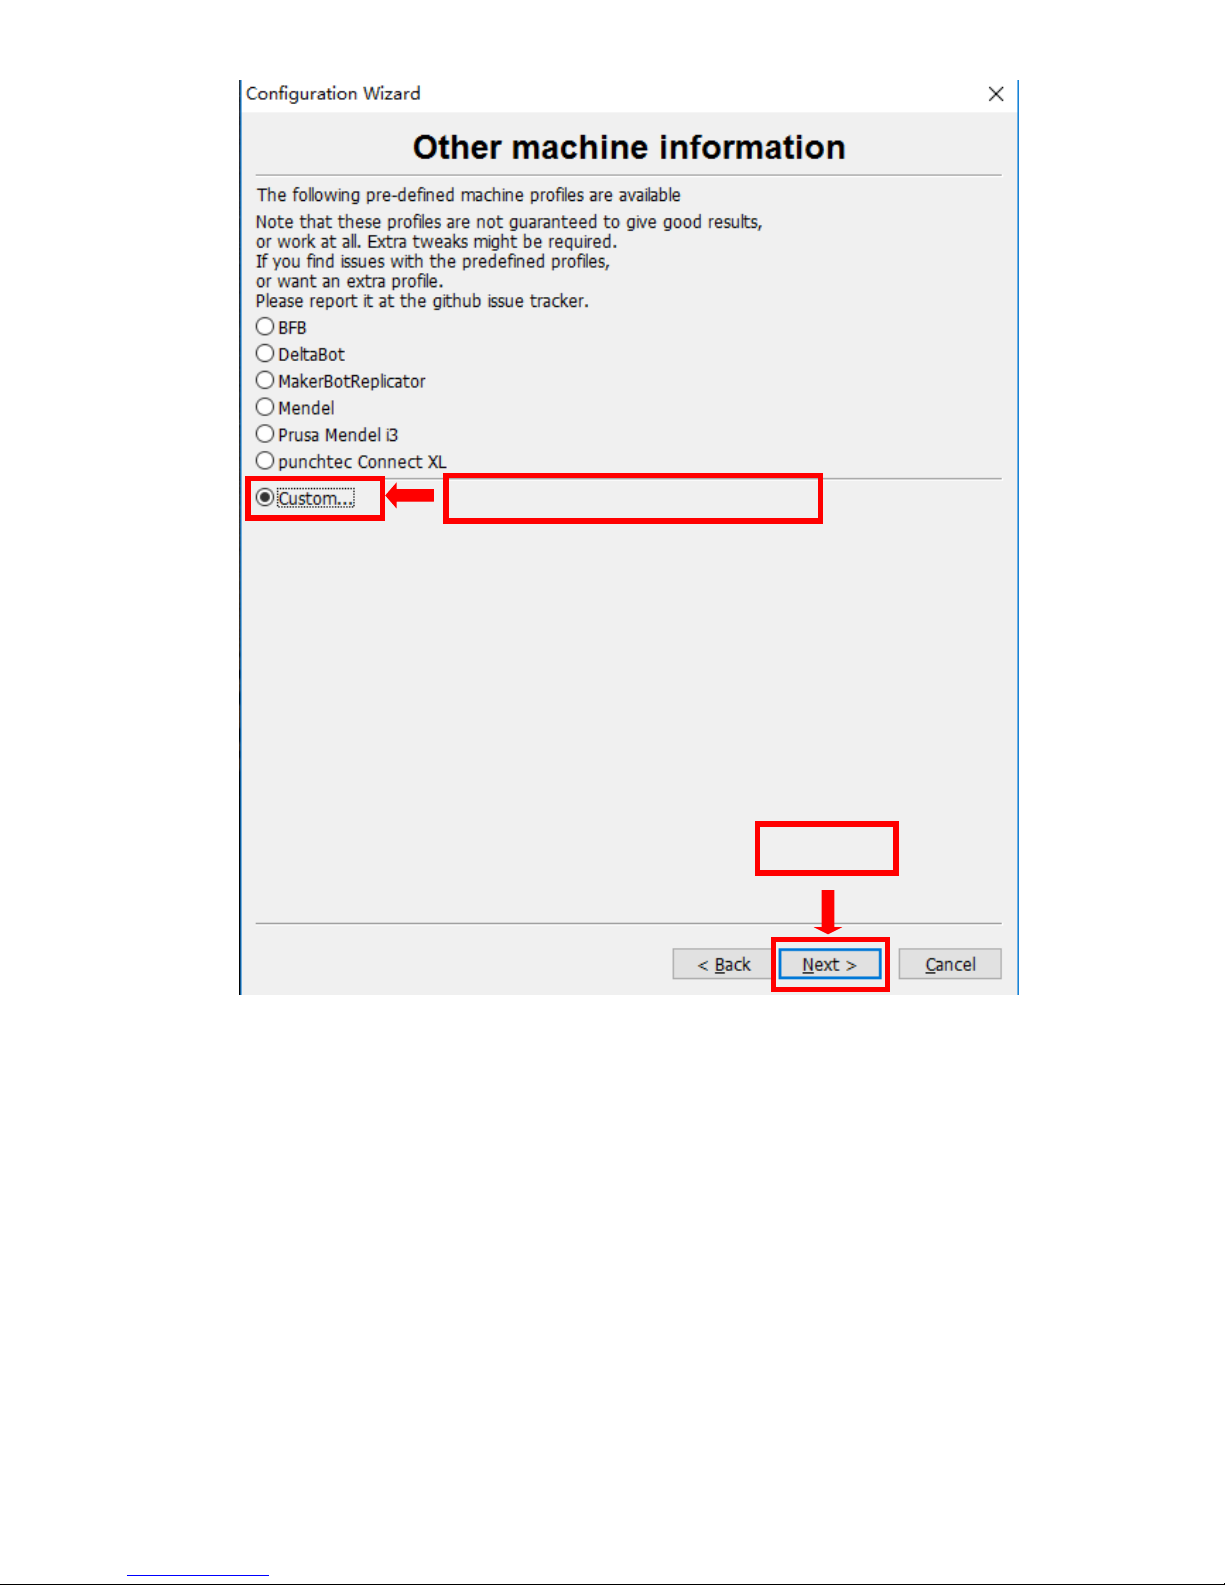
1.Choose other to customize
2.Choose this option
Page 17
16
1.Choose to customize
2.Click Next
Page 18
17
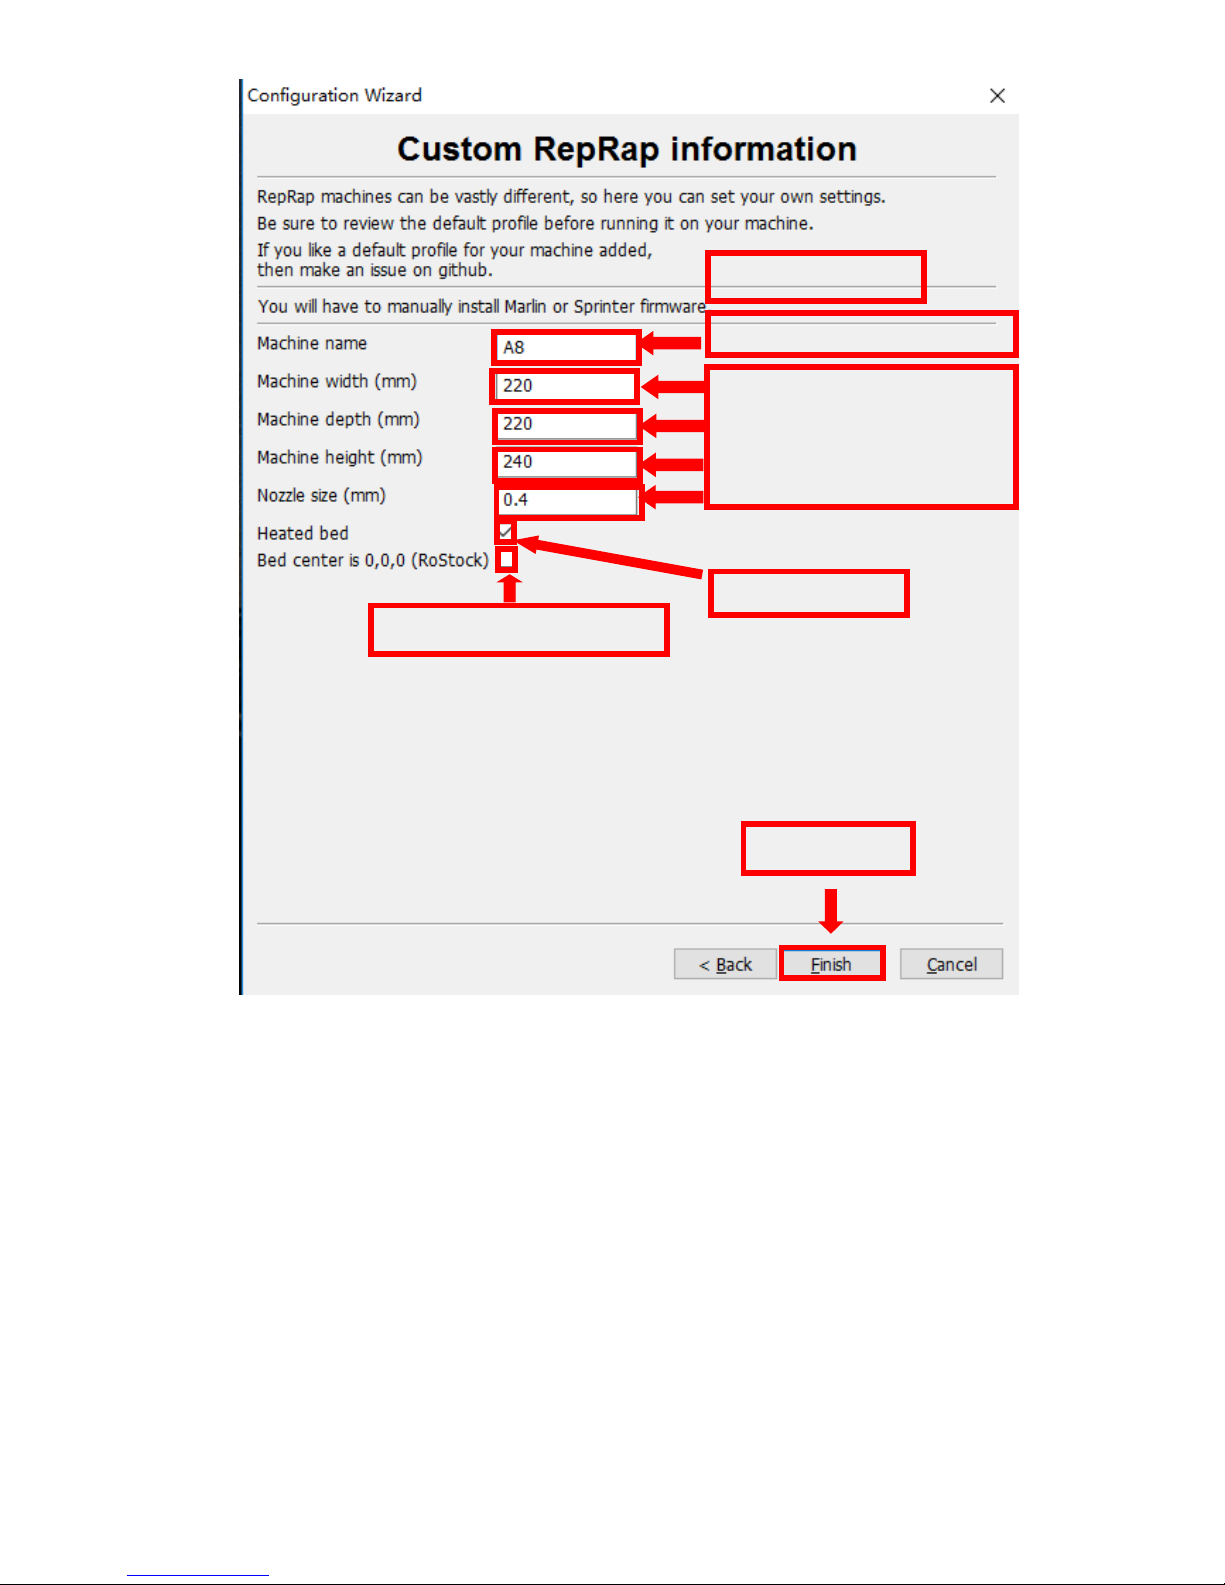
You can customize name here.
This is A8 parameter
We default these data .
You can fill in according to
actual condition
Choose this option
DO NOT choose this option !!!
1.Click to finish
Page 19
18
Now you have finished the installation. Next , enter Cura .
2. Cura Setting
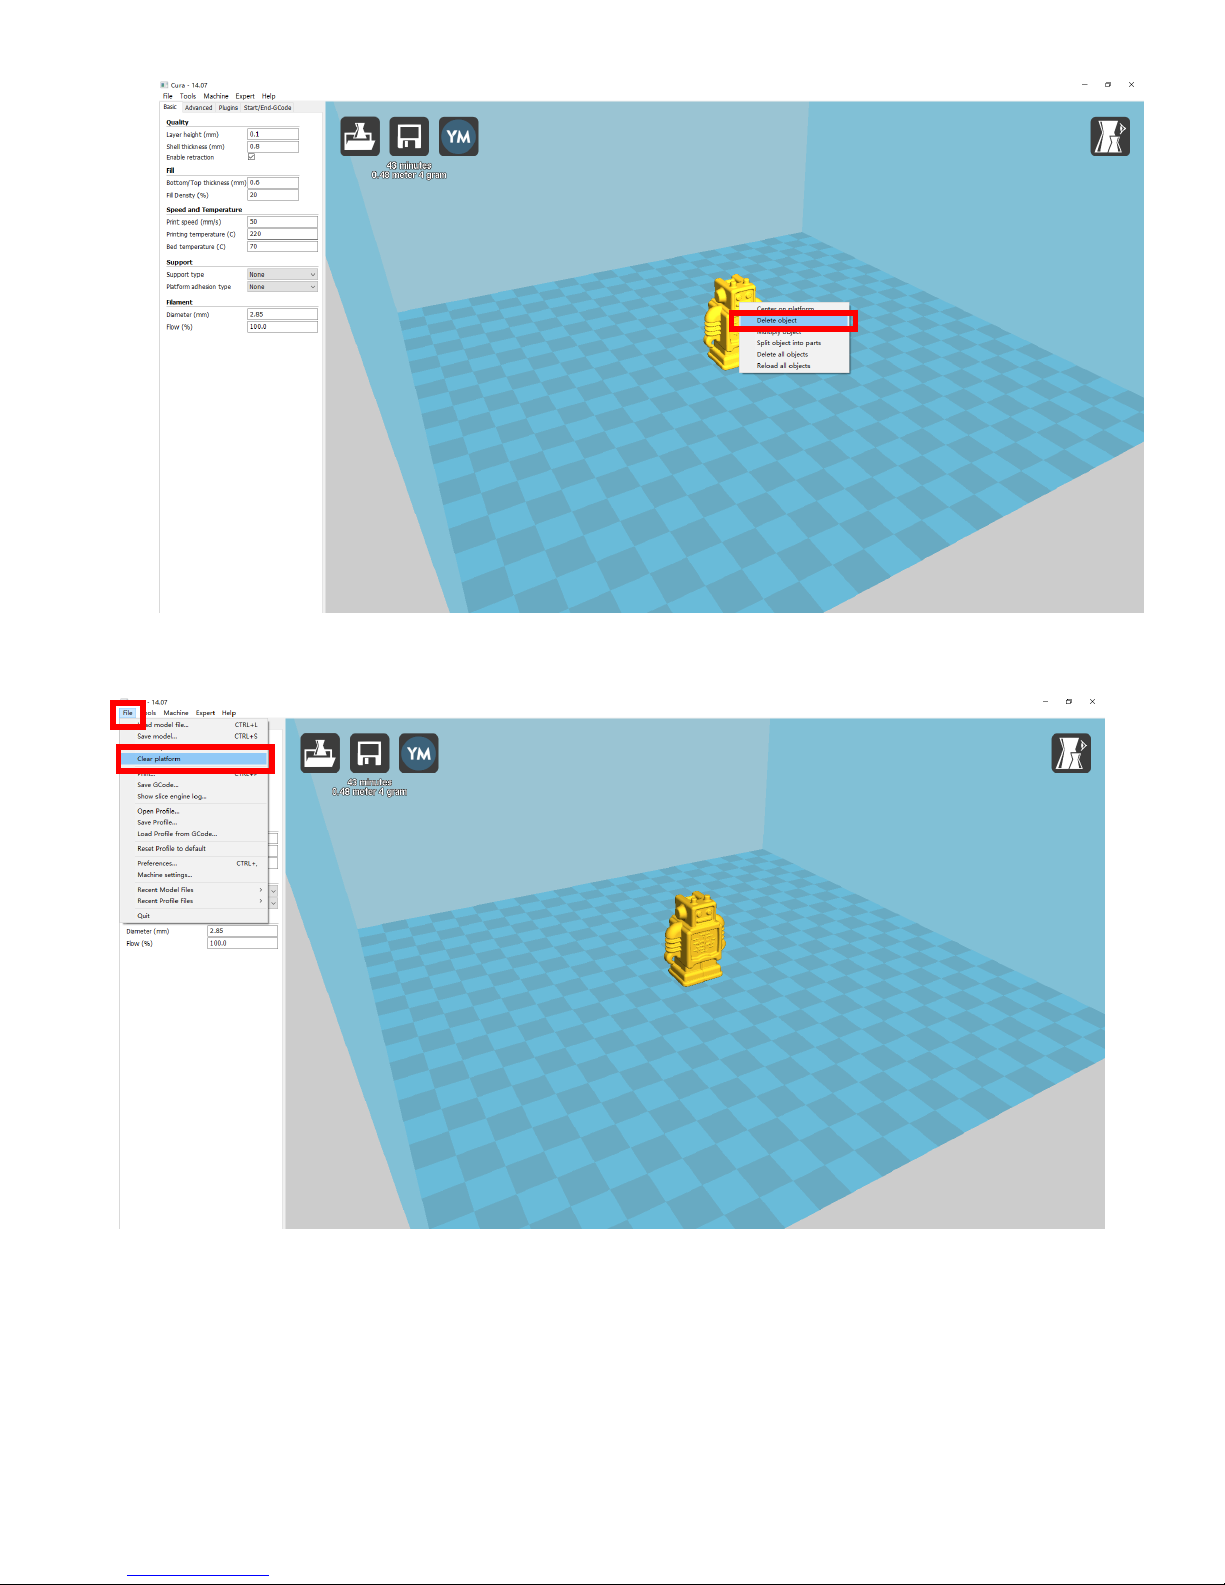
2.1 Clear platform
Delete the dog. Two ways for you :
1.Move mouse to dog ,right click, click “delete object”.
Page 20
19
2.Left click “File” , choose ”Clear platform”.
Page 21
20
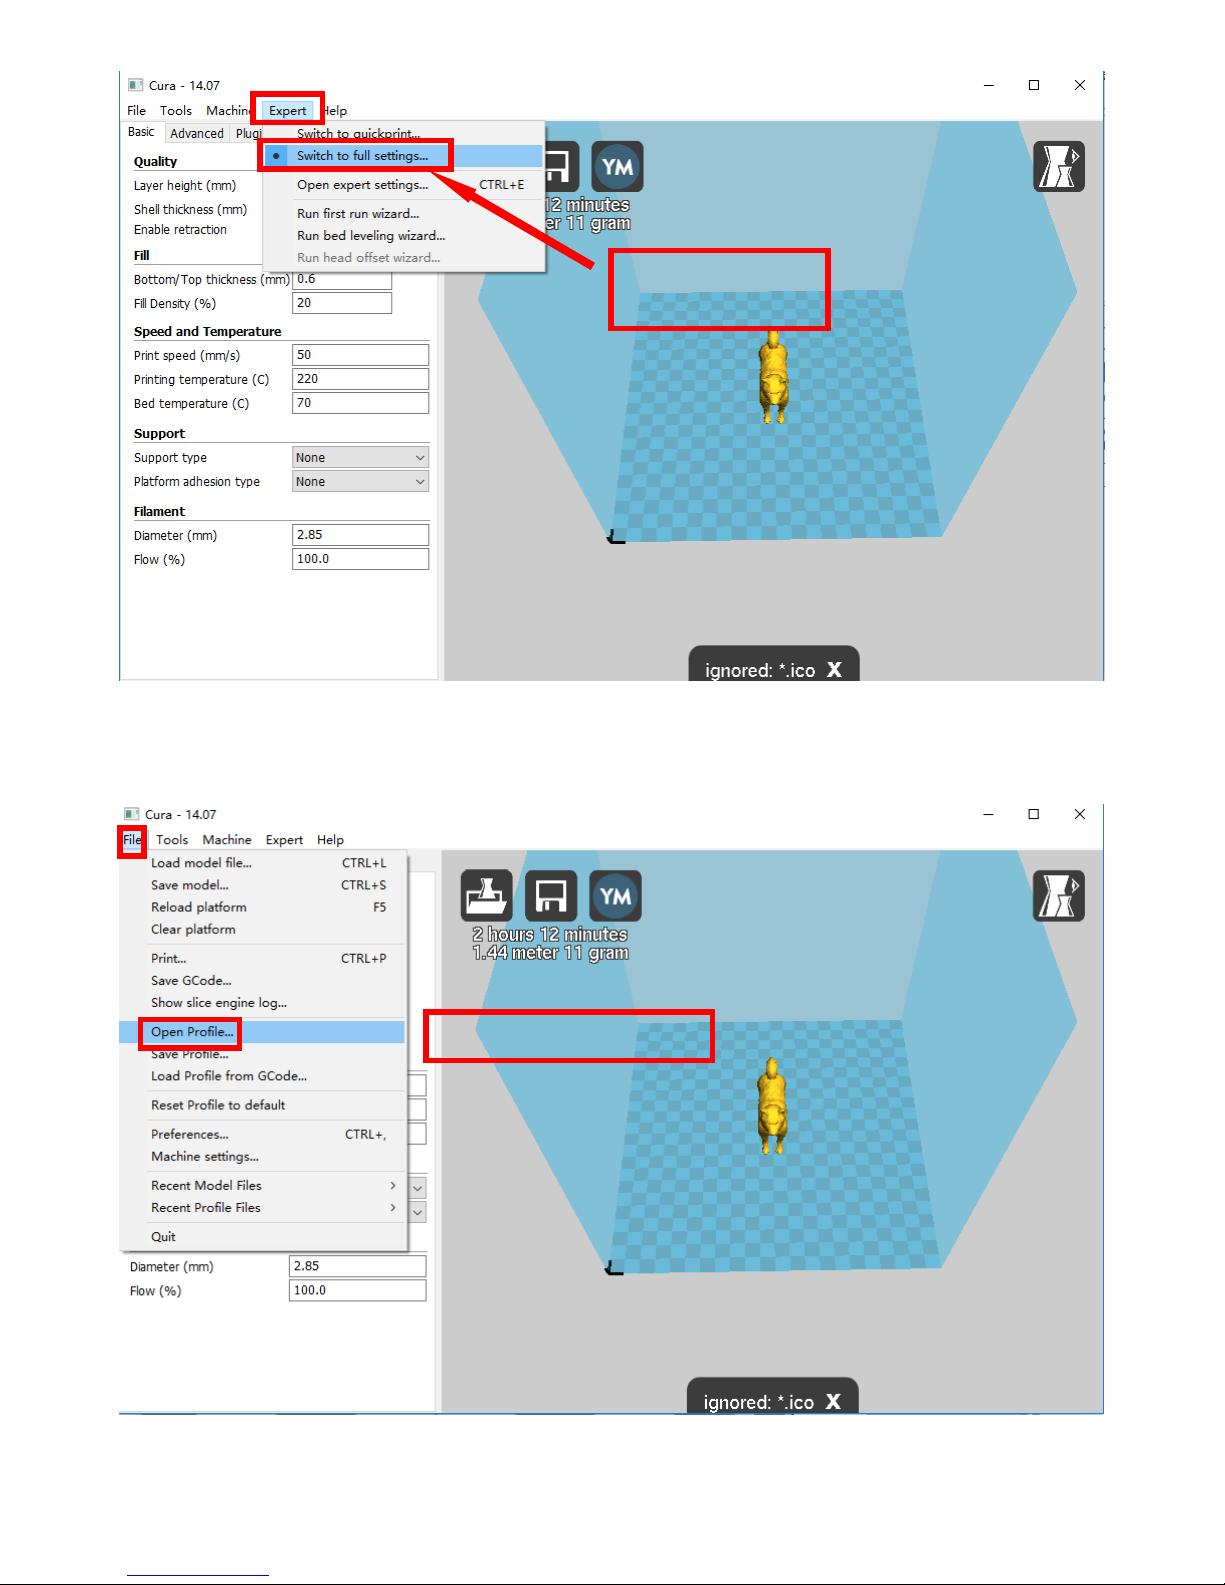
Switch to full settings
for parameter setting
Open file:A8 Cura 14.07.ini
Page 22
21
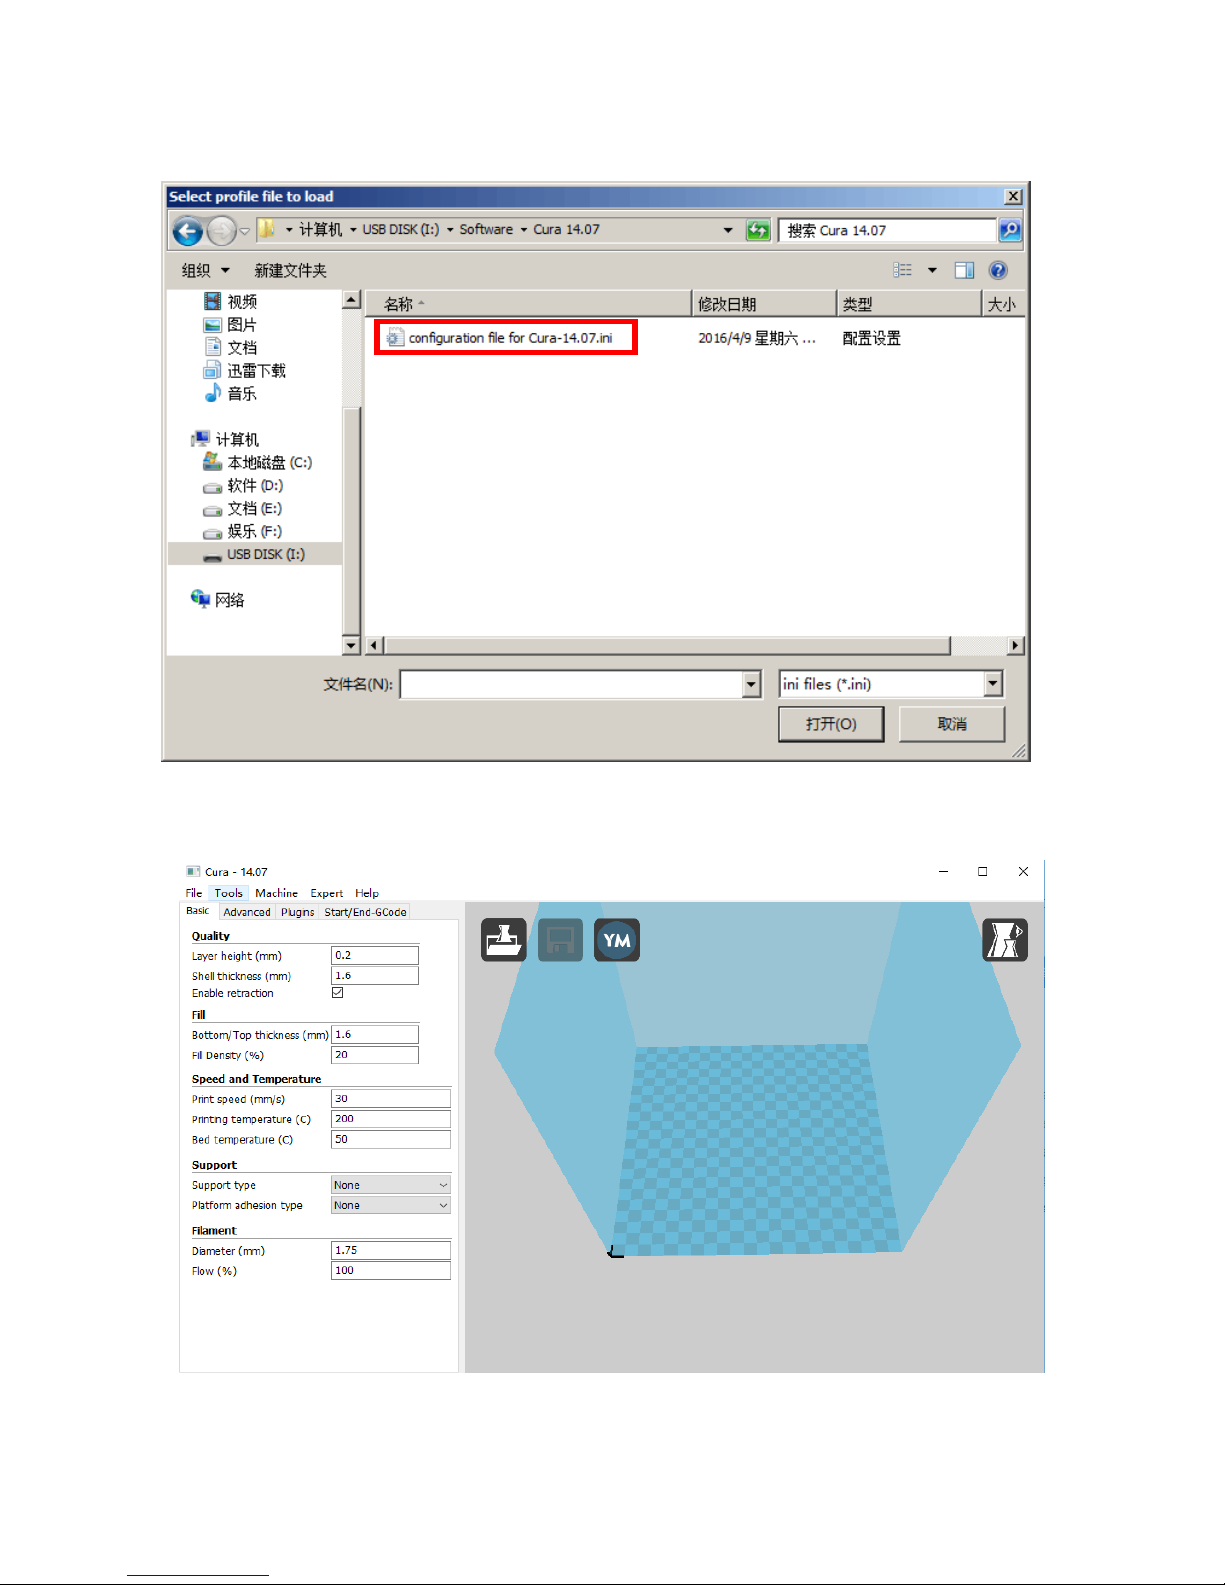
Position of configuration file: Computer/SD card)/ configuration file for cura-14.07
(suggestion :keep this file copy to your computer)
After Loading,the basic and advanced
configuration will be changed to the A8
regular printing configuration.
Page 23

22
If print once at a time , it will influence the printing
quality, even cause damage to priner. So please
choose “Printer at once”.
Page 24

23
2.3 Layer height settings
Layer height:0.1mm cost long time but have the best
printing precision. 0.2mm cost half time compared to
0.1mm , but have general printing precision. 0.3 cost less
time with not good precision. It defaults 0.2mm.
Left:0.1mm
Layer height
Right:0.2mm
Layer height
Layer height setting
0.8mm is too thin for shell, 2mm shell
costs more time, 1.2mm is relatively
better. Please use the integer mutiple
of nozzle diameter.
Shell thickness setting
0.8mm
1.2mm
2mm
Page 25

24
The Blue line is
the leak filament
Enable retraction to avoid filaments
leakage when nozzles move in
empty area
Enable retraction
Bottom/Top thickness: 1.2mm
Under the same
fill density
When fill density is less than 20%,
it’s easy for 0.6mm thickness to
cause hollow on the top. 1.2mm
normally won’t have this issue.
Bottom/Top thickness: 0.6mm
Page 26

25
Bottom/Top thickness setting
20%
50%
90%
Fill Density: If strength requirement
is not so high , set 10% is ok.
Please improve fill density when
strength requirement gets higher.
Printing time will go up as well.
Fill Density
Setting
Pringting Temperature
This is default speed. If other settings aren’t changed,
it prints more accurately while the printing process
takes more time.
High printing speed takes less time while it cannot
print accurately , making the model have bad quality.
Normally 40-60 print speed is suitable for printing.
Printing Speed setting
PLA filament temperature setting: nozzle: 190-210 ℃ hotbed: 40-60℃
ABS filament temperature setting: nozzle: 230-250℃ hotbed: 60-90℃
Page 27

26
Support type: Touching
Original Model
Support type: None
Support type: Everywhere
Support type setting
Attention: Normally we add support to complex model or model with vacant parts. It
may have influence on the surface if you choose everywhere. You’d better circle
around the model and try to avoid unnecessary support.
Page 28

27
Brim:Touch with the adge
None: no support
Raft: Totally touch with the bottom
Support setting
Attention: please choose None if the printing platform is ready and the high temperature
adhesive tape is good. Please choose Brim when the model is small . Choosing Raft makes it
difficult to seperate model from the platform
Page 29

28
Attention:
Flow is proportion of filament , we suggest to use 100
Increasing flow & decrease diameter has the similar
effect.
Model surface gets many bumps when flow is too
big;model frame gets flimsy if flow is too small.
Attention: A8 use 1.75mm filament
We suggest not to change
it , A8 default 0.4mm
We suggest not to change it ,
or use the date in the picture
We suggest 0.2mm to avoid initial layer tilt,0.3mm
is more easy to seperate from the platform.
Initial layer line proportion
“0” means using default speed
Min printing time for each layer. When the time is
less than 10 , it prints slower. It’s better to
decrease time when printing thin and long models.
We suggest not choose this when printing ABS.
Page 30

29
Attention:Normally this option cannot be
changed , if changed ,it’s at your peril.
Attention:Normally this option cannot be
changed , if changed , it’s at your peril.
Ending
Starting
Page 31

30
3.Expert Setting
Page 32

31
1. The minimum length before retraction . Used to avoid frequent retraction. No need to
change.
2. Enable Combing: Digital for surface quality , the nozzle will try not to go through surface ,
that’s why Cura is better than Slic3r.
3. Minimum extrusion length , to avoid frequent extrusion.
1
2
3
4
Printing route
with Combing
Go aside of the
surface
Printing route
without Combing
Go through the
surface
Page 33

32
Skirt is to avoid extruder unfilled before printing , and it appears only when platform
attachment type is None. Normally “1” is ok . Change it to “0” when your model reaches the
maximum size , or the printing size will be too big.
Peripheral line quantity: 1
Start distance: 3
Peripheral line quantity: 1
Start distance: 3
Page 34

33
1. To ensure the attachment of model to platform , fan won’t start at the beginning.
2-4. Fan speed min & max : If they are not equal , the soft ware will choose a suitable speed
during them.
5. Condition to choose cool head lift : When it’s printing with the minimum speed but still cannot
reach the minimum time , you need to choose cool head lift . But it may cause filament leak.
Page 35

34
If no solid infill top , the only qualification is the surface thickness .
Please check the detail below.
No solid infill top
With solid infill top
Page 36

35
No solid infill bottom
With solid infill bottom
Infill coverlap: 20
Infill coverlap: 40
Page 37

36
Structure types:lines
Infill covertap: 15
Distance X/Y: 0.7
Structure types:lines
Infill covertap: 30
Distance X/Y: 0.7
Structure types:grids
Infill covertap: 15
Distance X/Y: 0.7
These above are examples , you can set these options according to actual
requirements. The biggest progress Cura has made is the kinds of support
structure types , making it easier to seperate from the model.
Page 38

37
60°
45°
30°
It’s difficult to seperate if the distance between support and the supported place is too
close; The surface will be influenced if the distance is too far.
Different angle will generate different support , you can try the examples we provide
above which will have different effect.
Page 39

38
When choosing “Spiralize
the outer contour” : Z axis
rises while X,Y axis moves ,
and only a hollow bottom
and a single layer of surface.
Attention: The software defaults not open the option above , you’d better not turn it on .
When choosing “Only follow
mesh surface” : The nozzle
prints along the surface.
Page 40

39
Guidance to use Brim if needed: Expert → Expert Settings → Support → Support
Types → Birm.
The images above are only for reference , please set the parameter according to
actual requirement.
Brim line amount: 10
Brim line amount: 20
Page 41

40
Guidance to use Raft if needed: Expert → Expert Settings → Support → Support Types →
Raft.
The images above are only for reference , please set the parameter according to actual
requirement.
Page 42

41
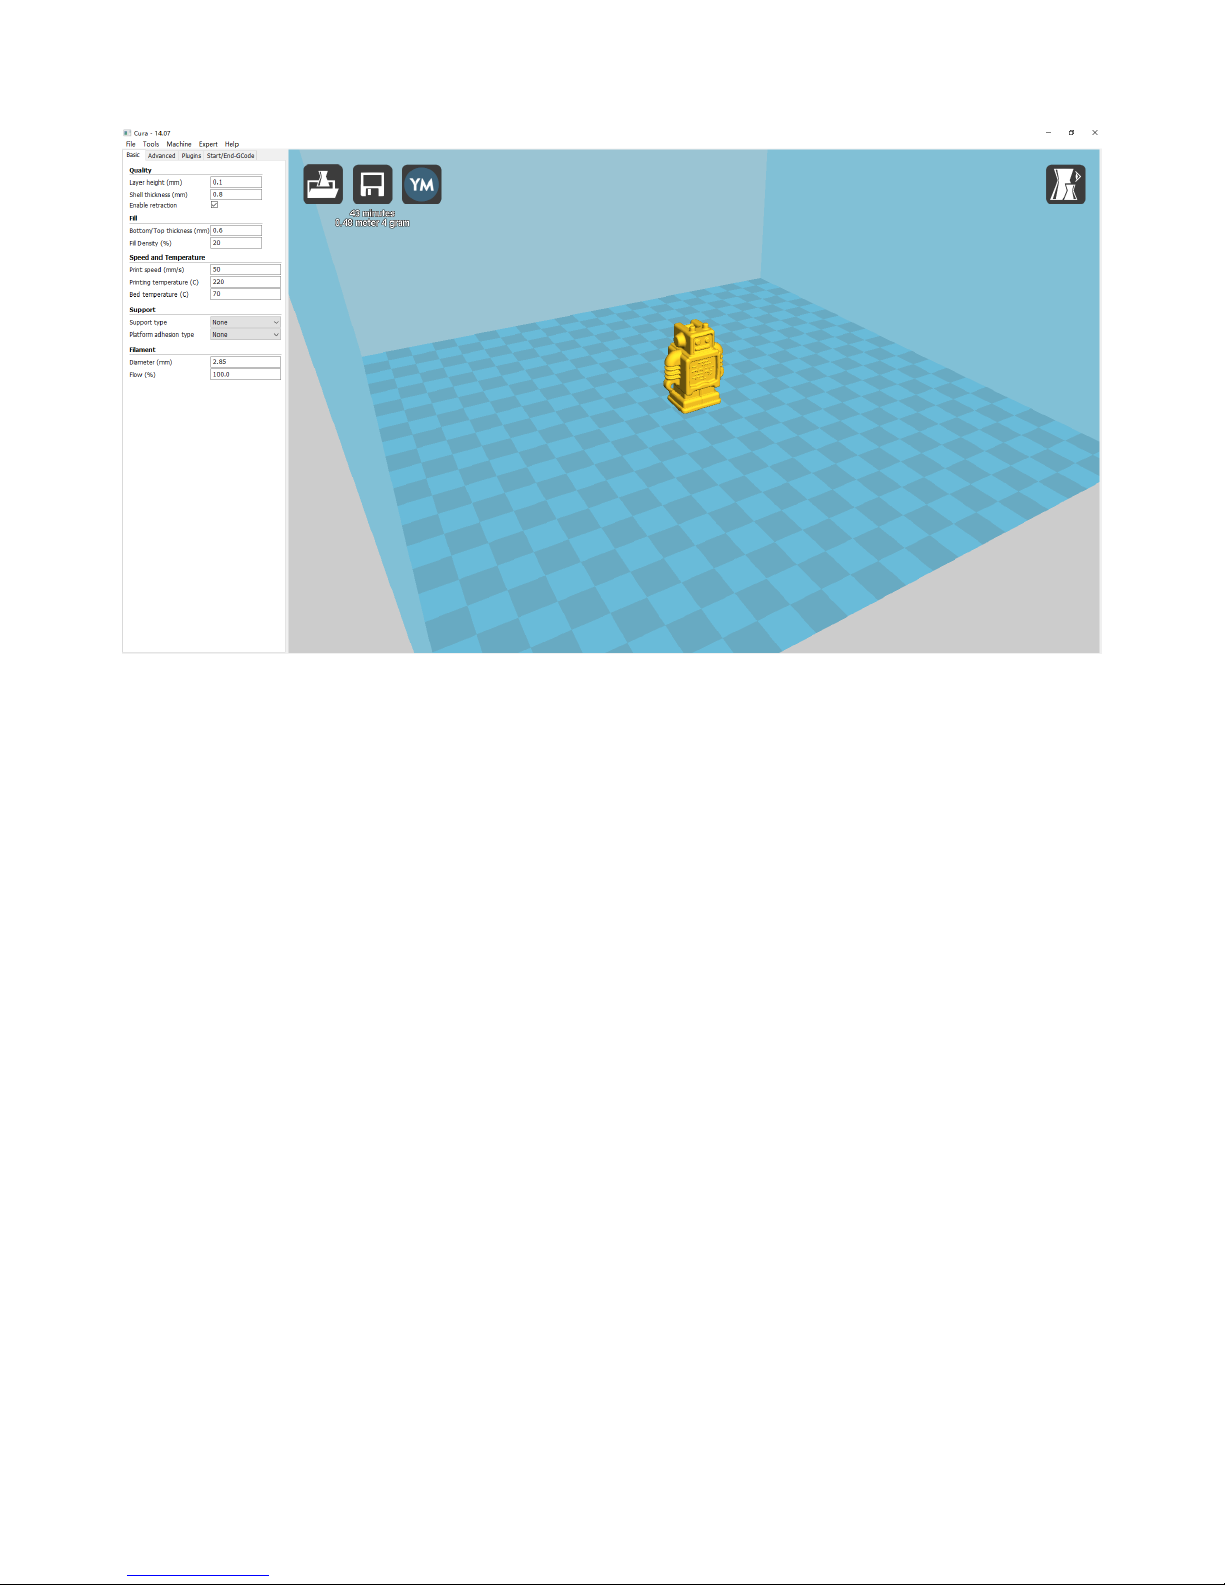
Load model
Save the Gcode file
Link to Youmagine
Model Display
Estimated Length of Filament
Estimated Print Time
Whirling
Scaling
Mirroring
Left click to select model and move → move model.
Slide mouse wheel → scaling.
Right click to select model and move → whirling.
Shift + right click platform and move → move platform
Left click the model and you will see the icon of “whirling, scaling, mirroring.
Page 43

42
Place platform
Reset
Green: X axis
Yellow: Y axis
Red: Z axis
Scaling ratio
Modification ratio
Zoom to max size
Reset
Page 44

43
Z axis mirroring
Attention: The model will be converse after mirroring.
Z axis mirroring
Z axis mirroring
Page 45

44
Normal: Most used.
Transparent
X-Ray
Layers:Used to simulate the effect of
each layer and the path.
Overhang: Used to see the vacant part.
Page 46

45
Right click model → Left click “Multiply
object” → Example: copy 4 model
5 models in total
Attention: You can try other
functions by yourself.
Page 47

46
D. Printing Operation
1. Introduction of Display
Current extrusion rate
Page 48

47
Page 49

48
Page 50

49
Page 51

50
Page 52

51
Page 53

52
Page 54

53
Page 55

54
Page 56

55
Page 57

56
2.Install Filament
2.1 Set Preheat Mode
Page 58

57
2.2 Filament Installation
Page 59

58
Page 60

59
2.3 Pull out filament
Page 61

60
3. Platform Adjustment
Page 62

61
Page 63

62
4.Printing
1) SD Card Offline Printing
a. Loading mode
Cura supports STL file & G-code file.
b. Code Saving
Copy file to SD card . Then connect SD card to printer, click reset. Picture below
shows the location of print file , there are 2 methods to find print file.
c. Introduction of Stop print , Pause print , Continue Print:
Only when the printer is printing can we use Stop print, Pause print, Continue
Print.
Page 64

63
d. Print model
e. Judgment of the gap between nozzle and platform.
1. Too big gap: The printed model is uneven, curled with gap. It means the gap is too big for
filament to reach the platform, making the printing effect so bad.
2. Too close gap: The printed model edge has irregular projections. It means the gap is too
close to print normally. Sometimes it even cannot output filament
3. Appropriate distance: Printed model flat with no gap, no glitches. It means the distance is
appropriate to print.
Wait to print complete after gap adjustment.
The printer will start printing
automatically when the extruder &
hotbed reaches estimated temp after you
choose print model .
Attention: If the print bottom fails to stick
to platform tight , you can adjust the
platform to make it tight during printing.
Page 65

64
2) USB Online Printing
a.Machine settings ( Use USB to connect to PC )
b. Online Pringting
Page 66

65
E. FAQ and Solution
1. Z Axis Ajustment
During installation, we need to test moving parts:
1. Preparation: Before Z axis moving adjustment, please confirm the height of
both Z aixs screw support is the same. ( Keep the same height of two white
parts )
Page 67

66
2.Ajust concentricity
Z axis left screw support Z axis right screw support
Z motor & Flexible bearing Z motor screw locking sequence
1. Click to adjust Z axis to move ( Position → Z pos.Fast → +/- ) . If it cannot move
smoothly, you need to adjust the unsmooth side’s screw support. Try to keep them at
the same height.
2. We can also tight/loose the Z motor screw according to requirments. This is to correct
the deviation in the first time installation. Please take steps as follows to lock screws,
Page 68

67
2. Nozzle blocking
A. Only a little filament left in the nozzle and difficult to take out:
Tips: We have removed fan to show obviously. Please cosider movement according
to actual requirment.
Page 69

68
B. Filament full filled in spout
Page 70

69
3. FAQ
No.
Symptom
Reason
Method
1
Print model
dislocation
Synchronous
wheel/belt loose.
Tighten set screws
or fasten belt
2
Glitch with the
print model
Too high temp or
slicing problem.
Extruder temp is too
high and retracting
speed & distanse is
too small
3
Foamy print model
Low temp or not
smooth filament
entering.
Rise extruder temp
or check if brass nut
and bearing is good.
Replace a nozzle if
methods above can’t
solve the problem.
4
Printer model is
warped
Hotbed level isn’t
well adjusted.
Adjust hotbed
5
Unavaliable Gcode
tramsformation
Wrong
setting/wrong save
path
Choose right
machine type and
change the right
path
6
Software
installation failed
Different OS
Reset OS
7
Unusual temp
Broken temp sensor
Change a new one
Page 71

70
F. Maintenance
Important maintenance tips:
1. maintenance of X,Y,Z axis: Add some lubricants on the rods to reduce
friction when the machine works noisy and a little bit shake.
2. Please refer to the USER MANUAL before printing, do preparation of
hot bed adjustment first.
3. When finished printing, the filament should keep sealing, avoid
moisture.
4. Preheat the extruder at the beginning of 2 nd time printing, let extruder
auto-push filament for a while.
5. Machine should do some regular maintenance, drop some lubricating oil
on thread rod, polished rod and bearings to avoid fatigue wear.
6. Do not let the fan and air-condition blow to the hot bed when printing.
7. Keep the working condition at “Temp:10-30℃,Humidity:20-70%”.
Page 72

71
G. Maintenance policy
1. This product executes regulations of “Product Warranty Card”.
2. Please contact supplier or customer service if the product have any
problems . Do not repair it by yourself, otherwise you need to bear all the
consequences.
 Loading...