

Page 1
Page 2

Contents
Welcome
Security Considerations
Product Details
1
2
3
Open the Package
4
Open the package
Tool List
Machine Parts
5
6
7
Menu Commands
Menu
Main Interface
8
9
10
Slice Software
Installation and Usage
11
12
Print
14
Stick the Masking Tape
Hotbed Levelling
15
16
Filament Installation
Print File
Pull Out Filament
17
18
19
Machine Maintenance
Maintenance
Lubrication
FAQ and Solution
Settings and Calibration Problems
Extruder Problems
Hardware Problems
Printing Problems
20
21
22
23
24
24
25
25
Page 3

Welcome Use
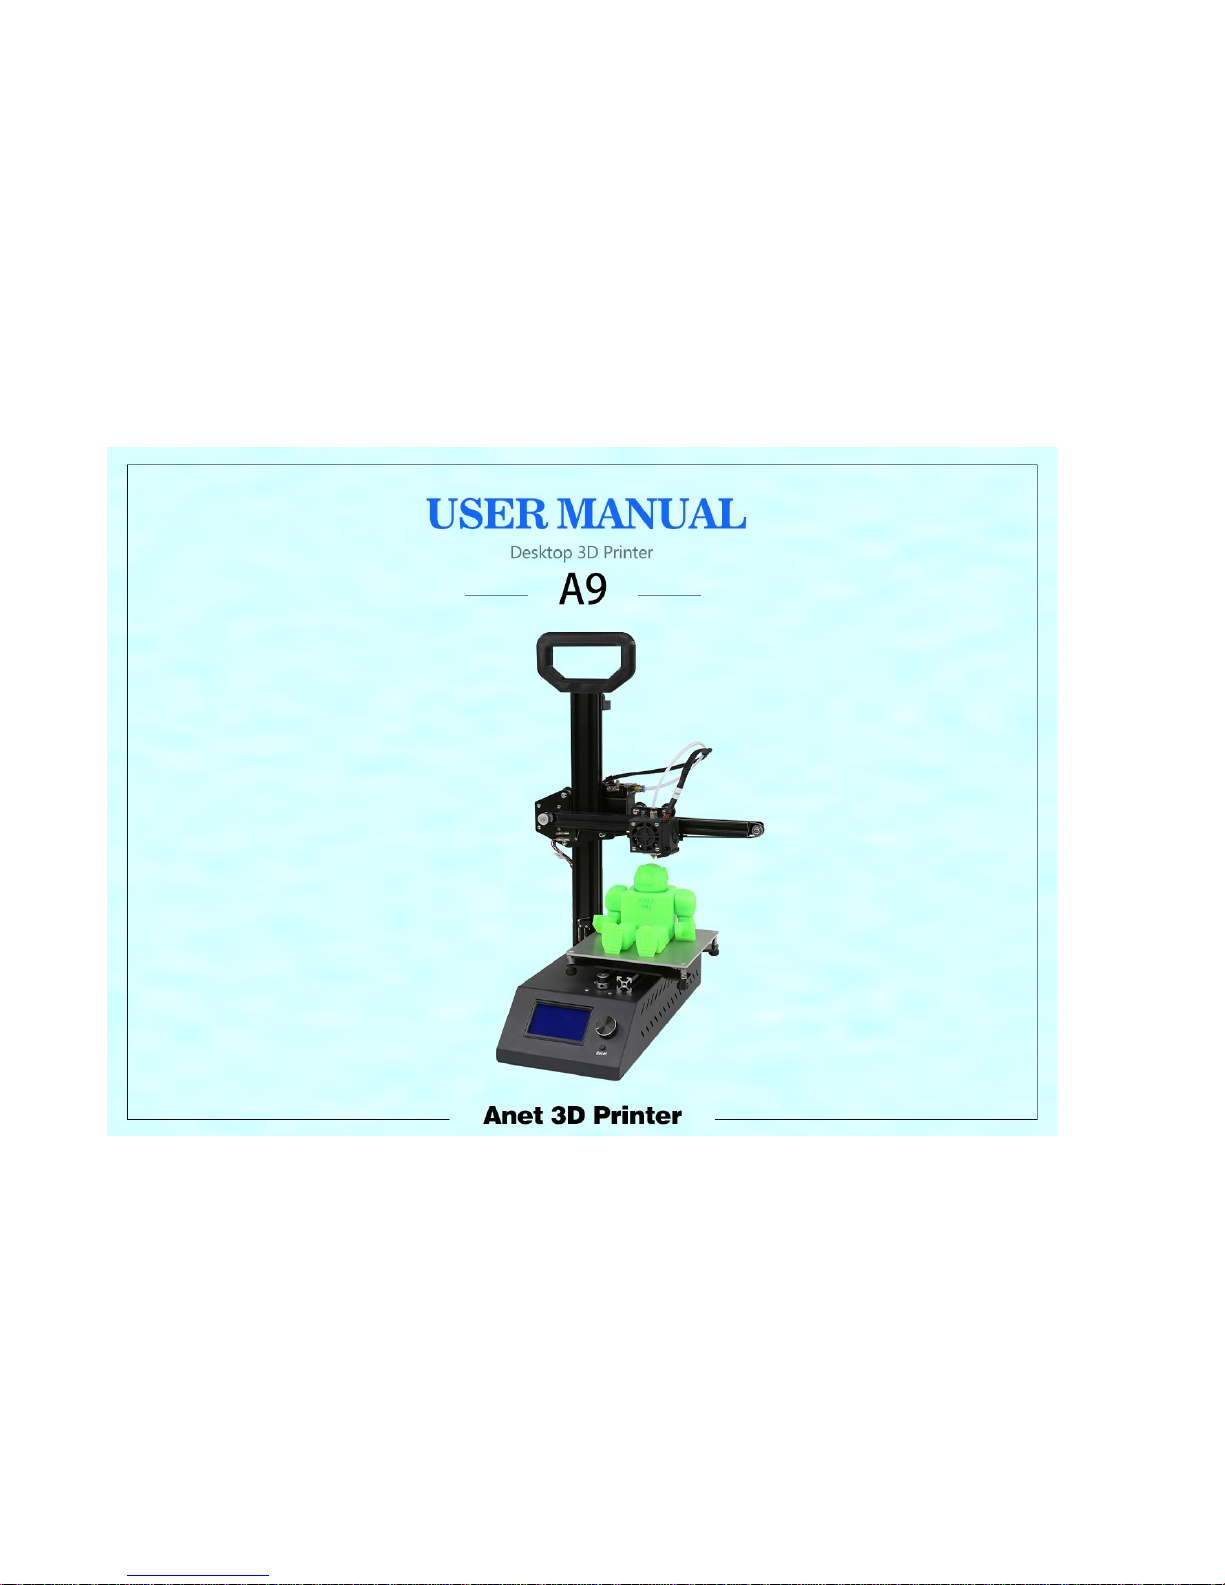
Anet
A9
This user manual will quikly guide you to use Anet A9
As a huge improvement, A9 will provide you with a more high precision print effect
and more print ways
Now, start to print your idea!
Page 4
Case Ground
Warning: Make sure the power supply is grounded, otherwise it may cause the fire
capacitor line to melt.
Hotbed and Extruder head
Warning: A9 will produce high temperatures during printing or heating, including moving parts that could
cause personal injury. To avoid burns, do not touch the extruder or the heatingaluminum block.
Warning: Don't leave the machine too long during the printing process.If you have to do so, please follow
these instructions:
• Make sure the first print layer on the hotbed correctly;
• Make sure the filament into E axis normally, no knotting or winding, in order to successfully feed.
• Regularly monitor the printer
Warning: During the printing process, some filaments produce a slight odor but make people
feel uncomfortable. Please keep your ventilation in the workplace.
Warning: Unplug if there is an emergency.
Warning: Self-disassembly or modification may result in damage or performance abnormality. Any self-
disassembly or modification that is not approved by will make your machine no longer subject to warranty or
after-sales service.
All contents of this manual are carefully checked, if there is any printing errors or misunderstandings,
the company reserves the right to explain.
产品信息
Security Considerations
Page 5
Product Details
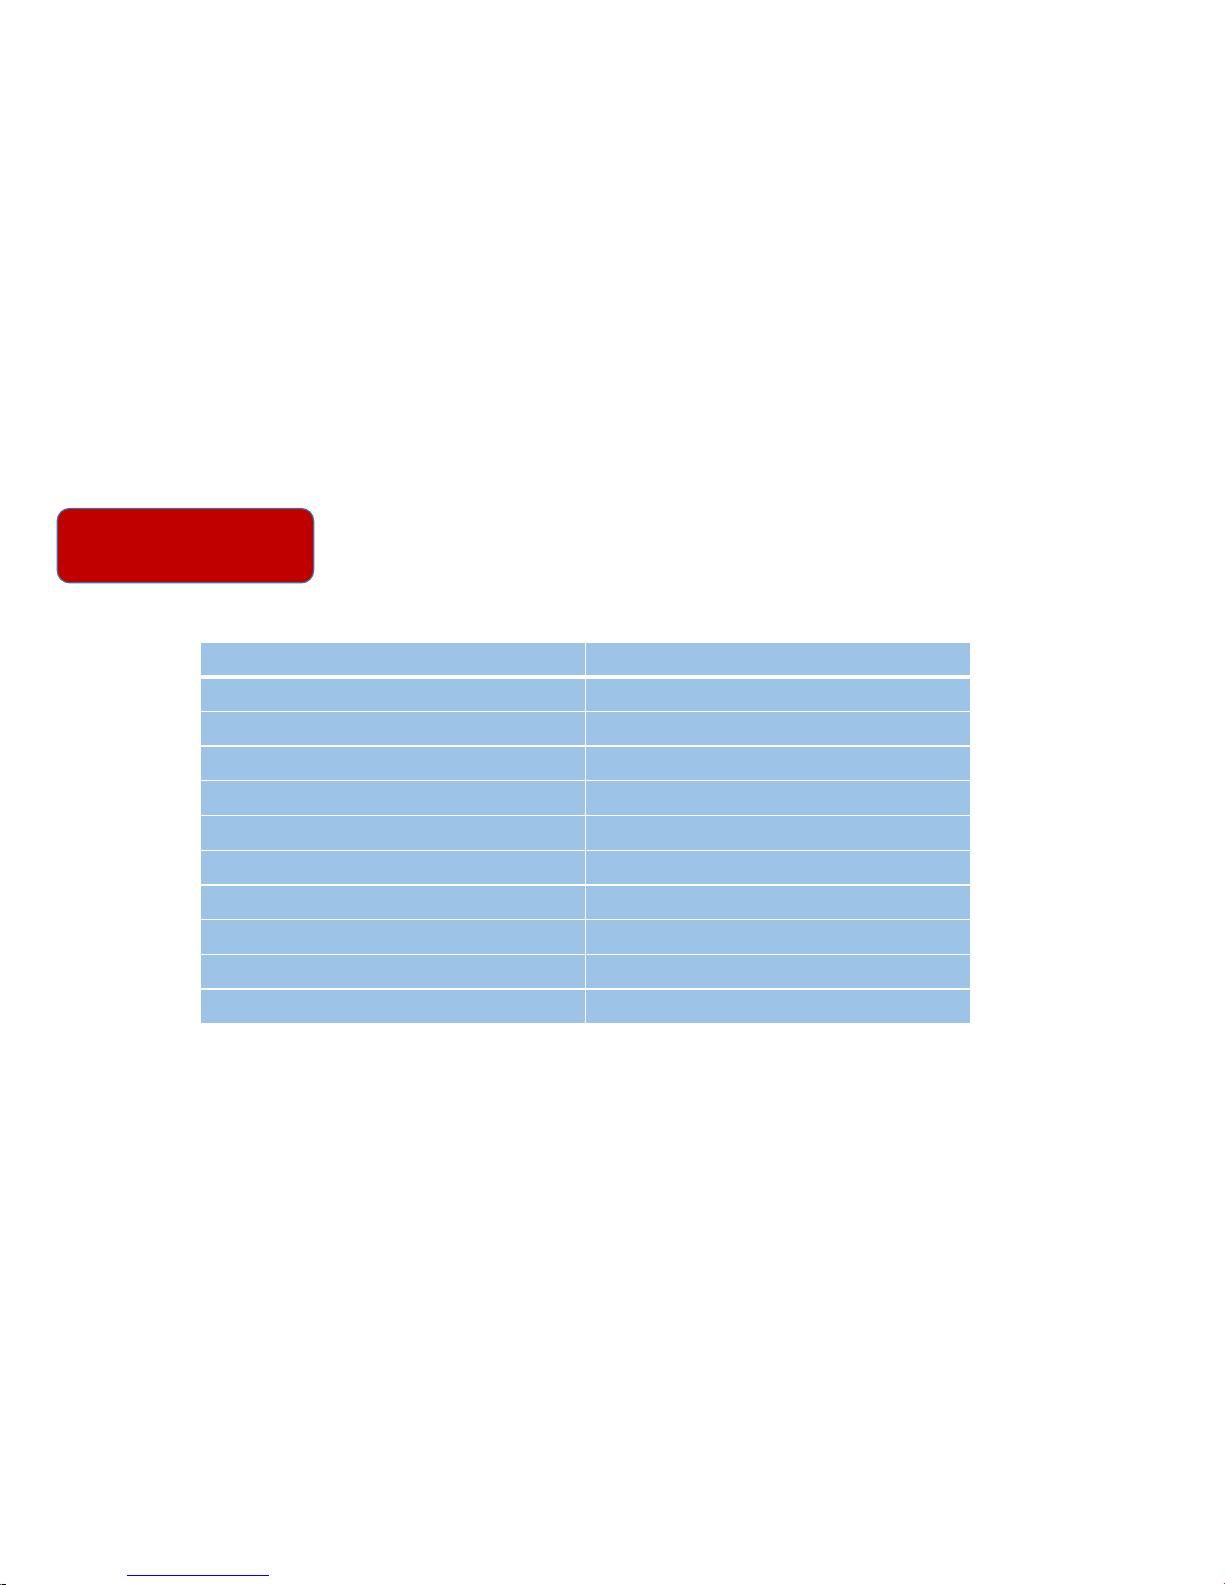
Model#
:A9
Extruder
Dia.:Normally 0.4mm
Print
Precision:0.1-0.4mm
Machine
Dimensions:375mm*335mm*525mm
Printing
Speed:10-120mm/s
Machine
Weight:5.7kg
XY
Axis Positioning Accuracy:0.012mm
Package
Dimensions:440mm*385mm*200mm
Z
Axis Positioning Accuracy:0.004mm
Package
Weight: 7.5kg
Filament
Materials: PLA,ABS
Build
Size:160mm*160mm*200mm
Filament
Tendency:PLA
LCD
Monitor Screen:LCD12864
Filament
Dia.:1.75mm
Offline
Printing:Support
Software
Language:Chinese, English
Data
Format:STL、G-Code、OBJ
Model
Support:Generate, do not generate optional
Compatible
Computer OS:windows(Linux、MAC)
3
D Printing Software:Repetier-Host
Ambient
Temp and Humidity:10-40℃, 20-50%
Page 6

Open the Package
Each A9 has been rigorously tested,
and it was carefully packed, then send it away from factory,
Hope you can read this section and assemble your A9 successfully.
Page 7
开箱
Open the Package
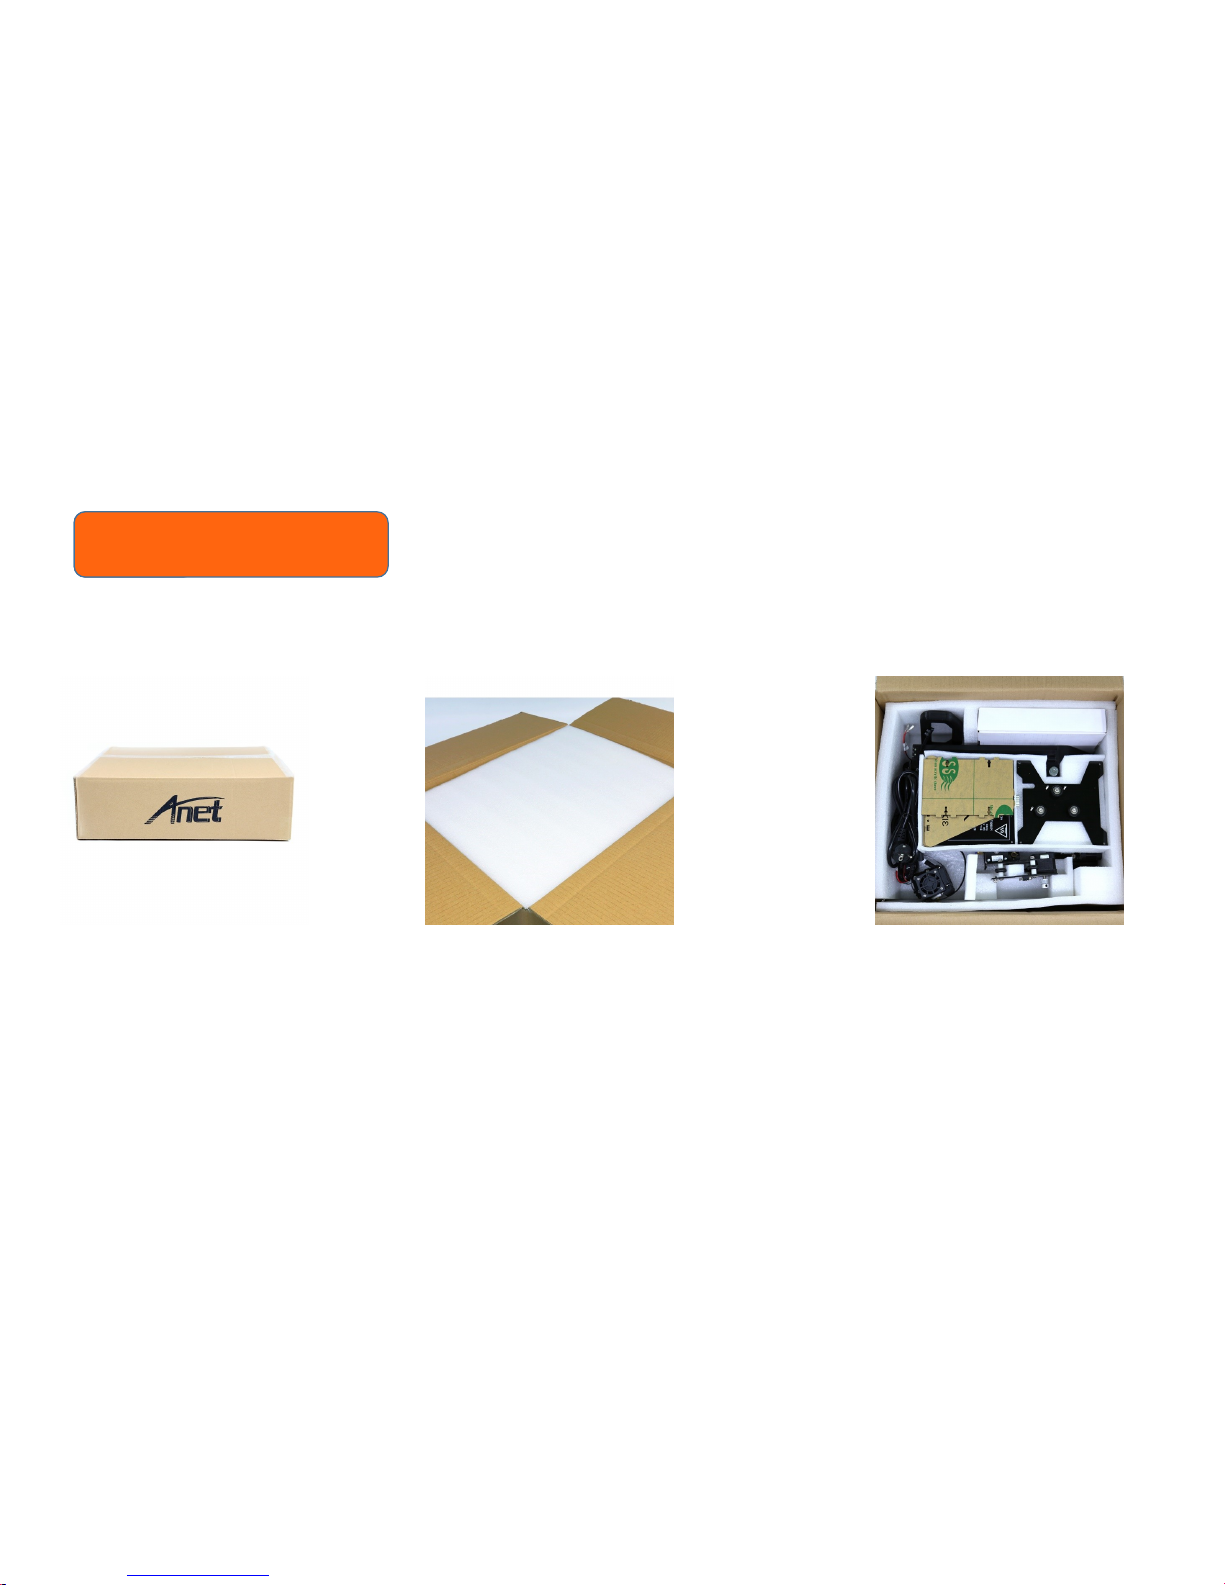
2.Please open the box, and make sure
foam, carton and paperboard are not
damaged
1.Please put the box on the enough
place to assemble.
3.Please check goods and tools
quantity.
Page 8
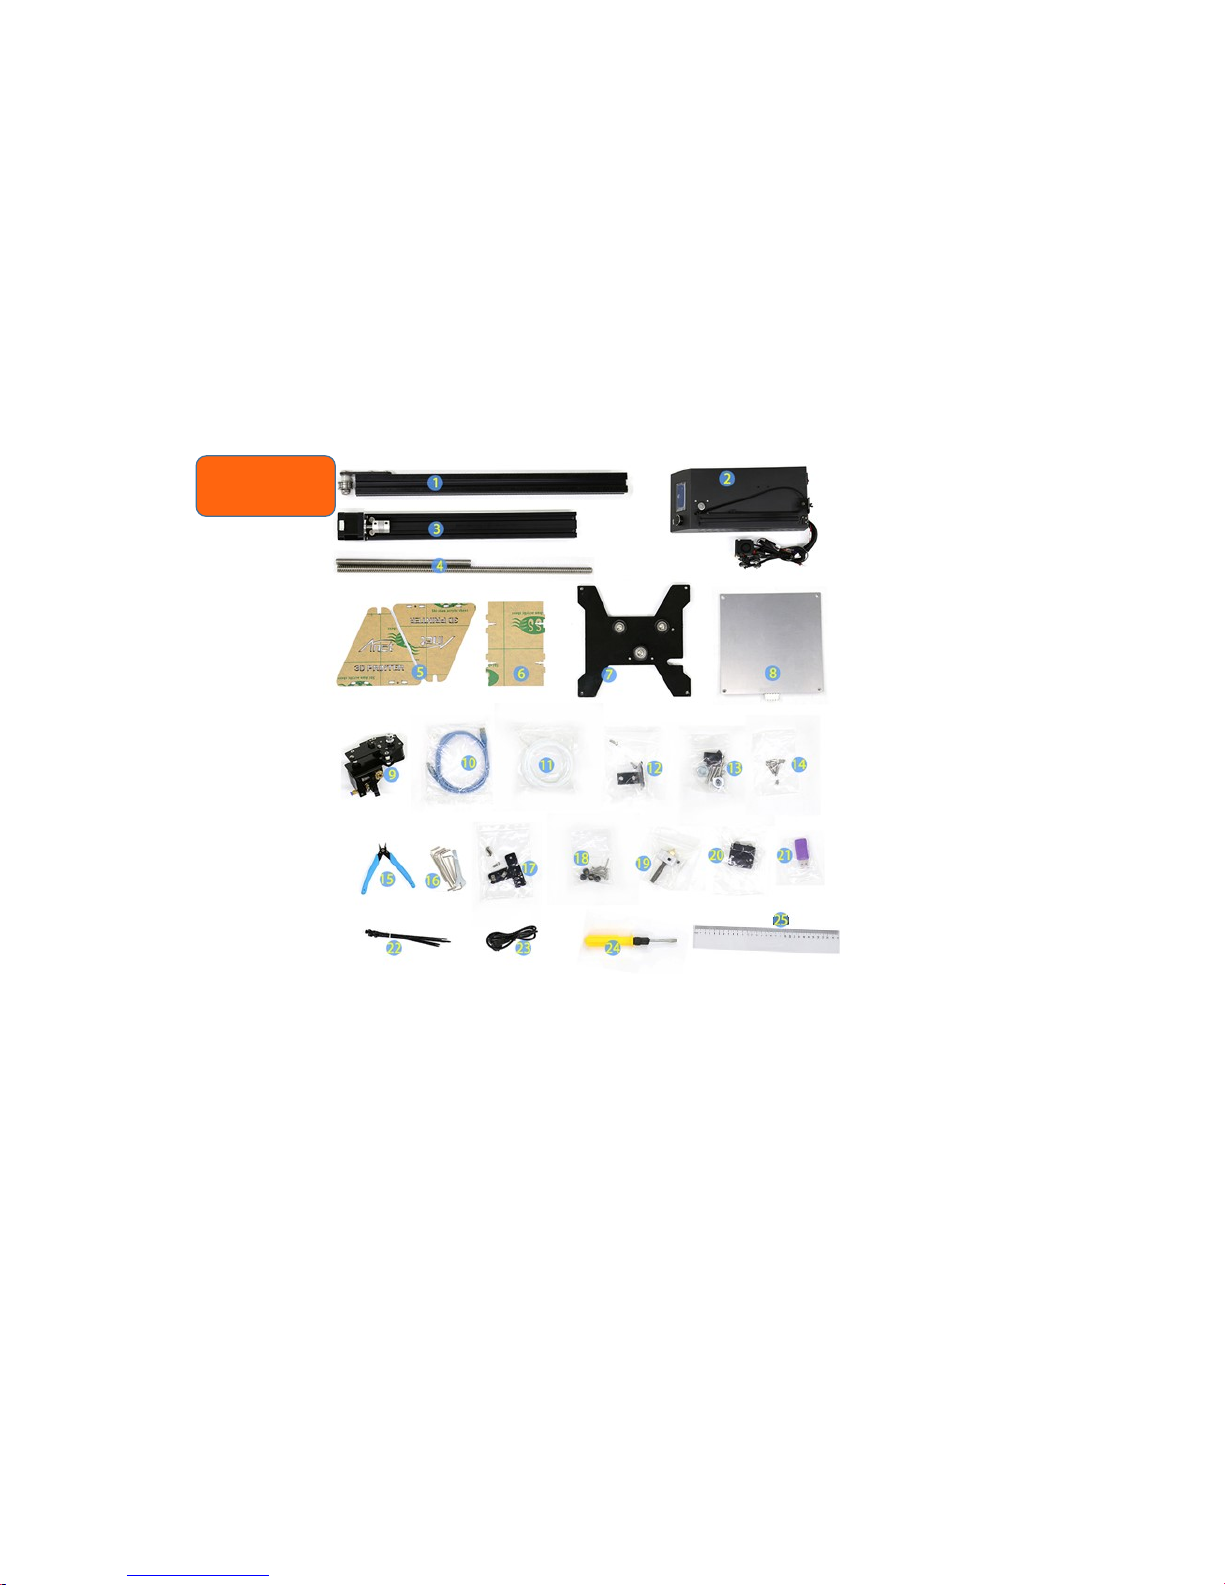
1.X轴型材组合件 *1
6. Rack connector*1
3. Z-axis profile assembly *1
4. Z axis rod *1
5. Material racks*1
2. Chassis *1
7. Hot bed mounting plate assembly *1
8. Hot bed *1
9. Extruder assembly *1
10. 1.5M wire *1
11. 10M Filament *1
12. Installation package of
Z-axis right fixing plate *1
13.Screw set 3 *1
M3*18 6pcs
M8 Screw nut 2pcs
M3 Screw nut 6pcs
R-type clip 1pcs
14.Screw set 1 *1
M6*20 2pcs
M4*6 2pcs
M4 nut 5pcs
物品清单
15. Nippers*1
16.Tool beg *1
Hex Wrench M1.5
Hex Wrench M2
Hex Wrench M2.5
Hex Wrench M3
Hex Wrench M4
Hex Wrench M5
Open-end wrench
17. Installation package of left and
right fixing plate holder *1
18.Screw set 2 *1
M3 Hand screw nut *4pcs
Spring *4pcs
M3*30 *4pcs
19. Nozzle kit *1
20. Linear bearing holder *1
21. 8GTF Card and Reader *1
22. Black Ribbon *1
23. 1.5M Power line*1
24. 5mm*160mm screwdriver*1
25. Transparent ruler *1
Page 9
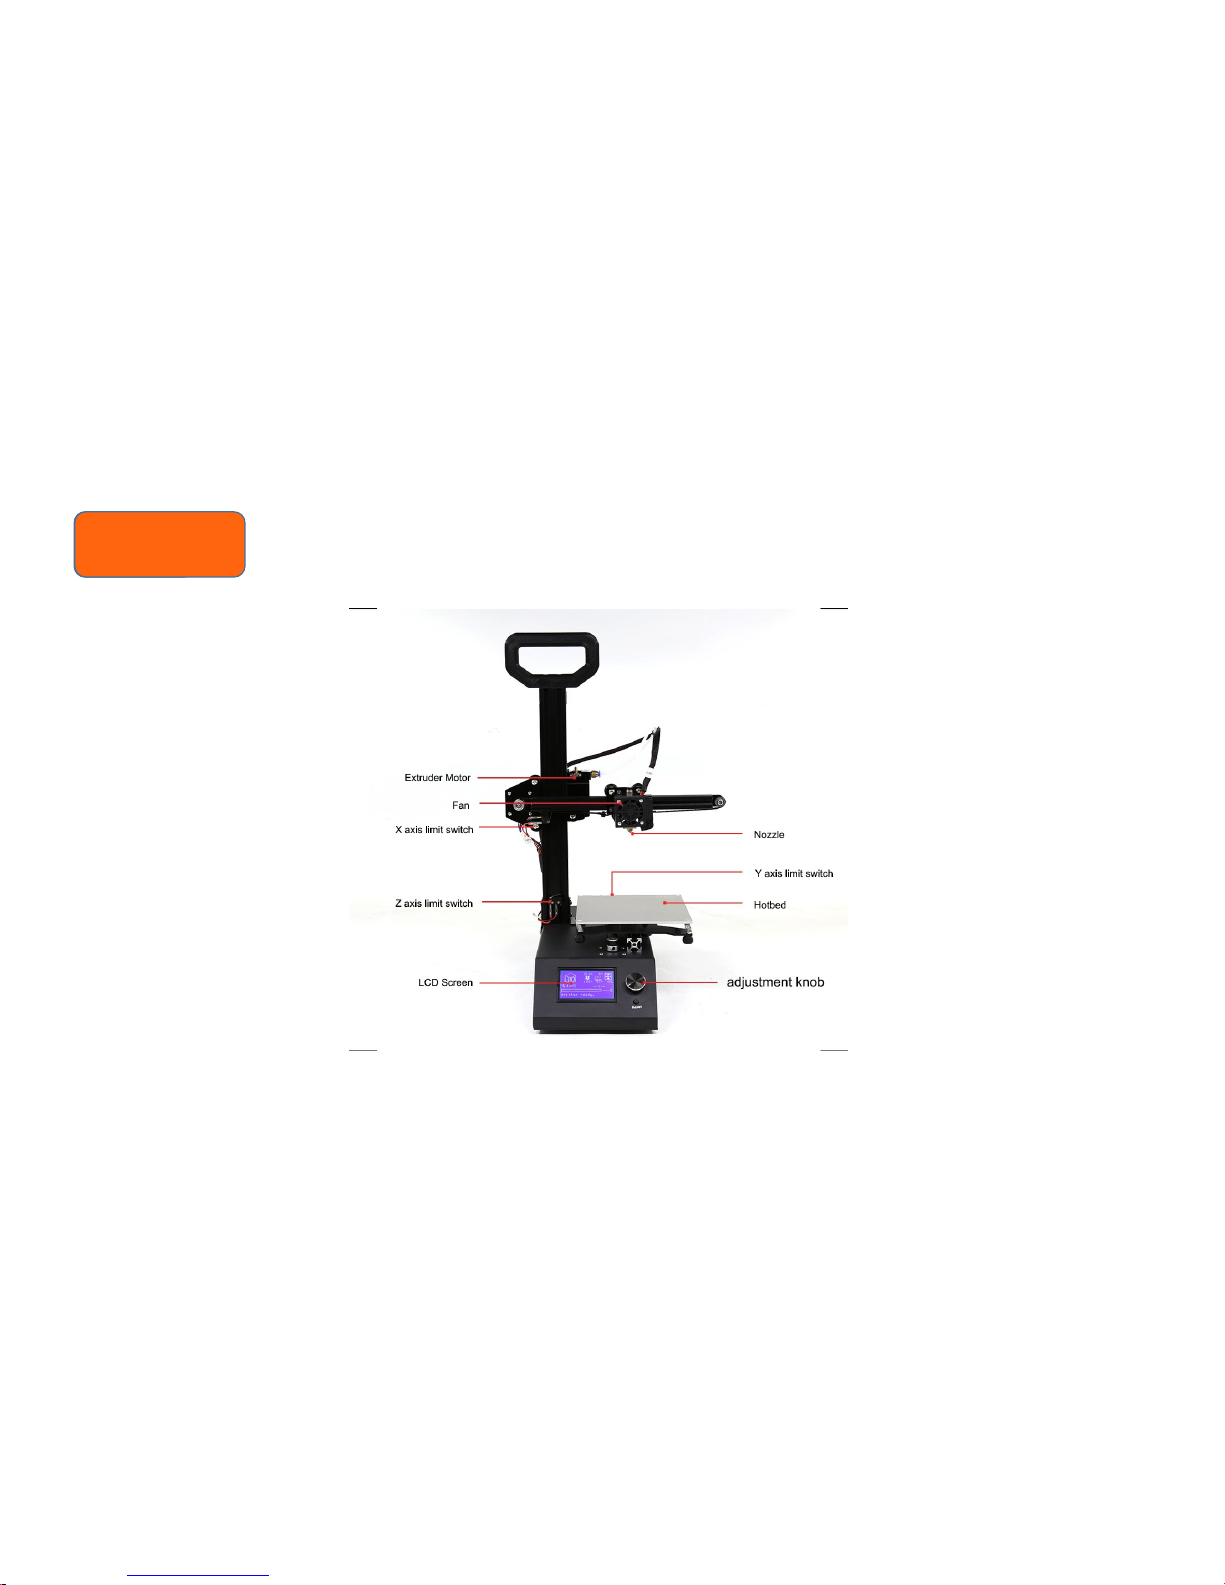
外型介绍
Machine Parts
Install the video in the "Video" folder on the TF card
Handle need to print,print the file in the “Test file GCODE”>“Handle”.
Page 10

Menu Commands
In this chapter, you can learn more menu interface in detail.
Page 11
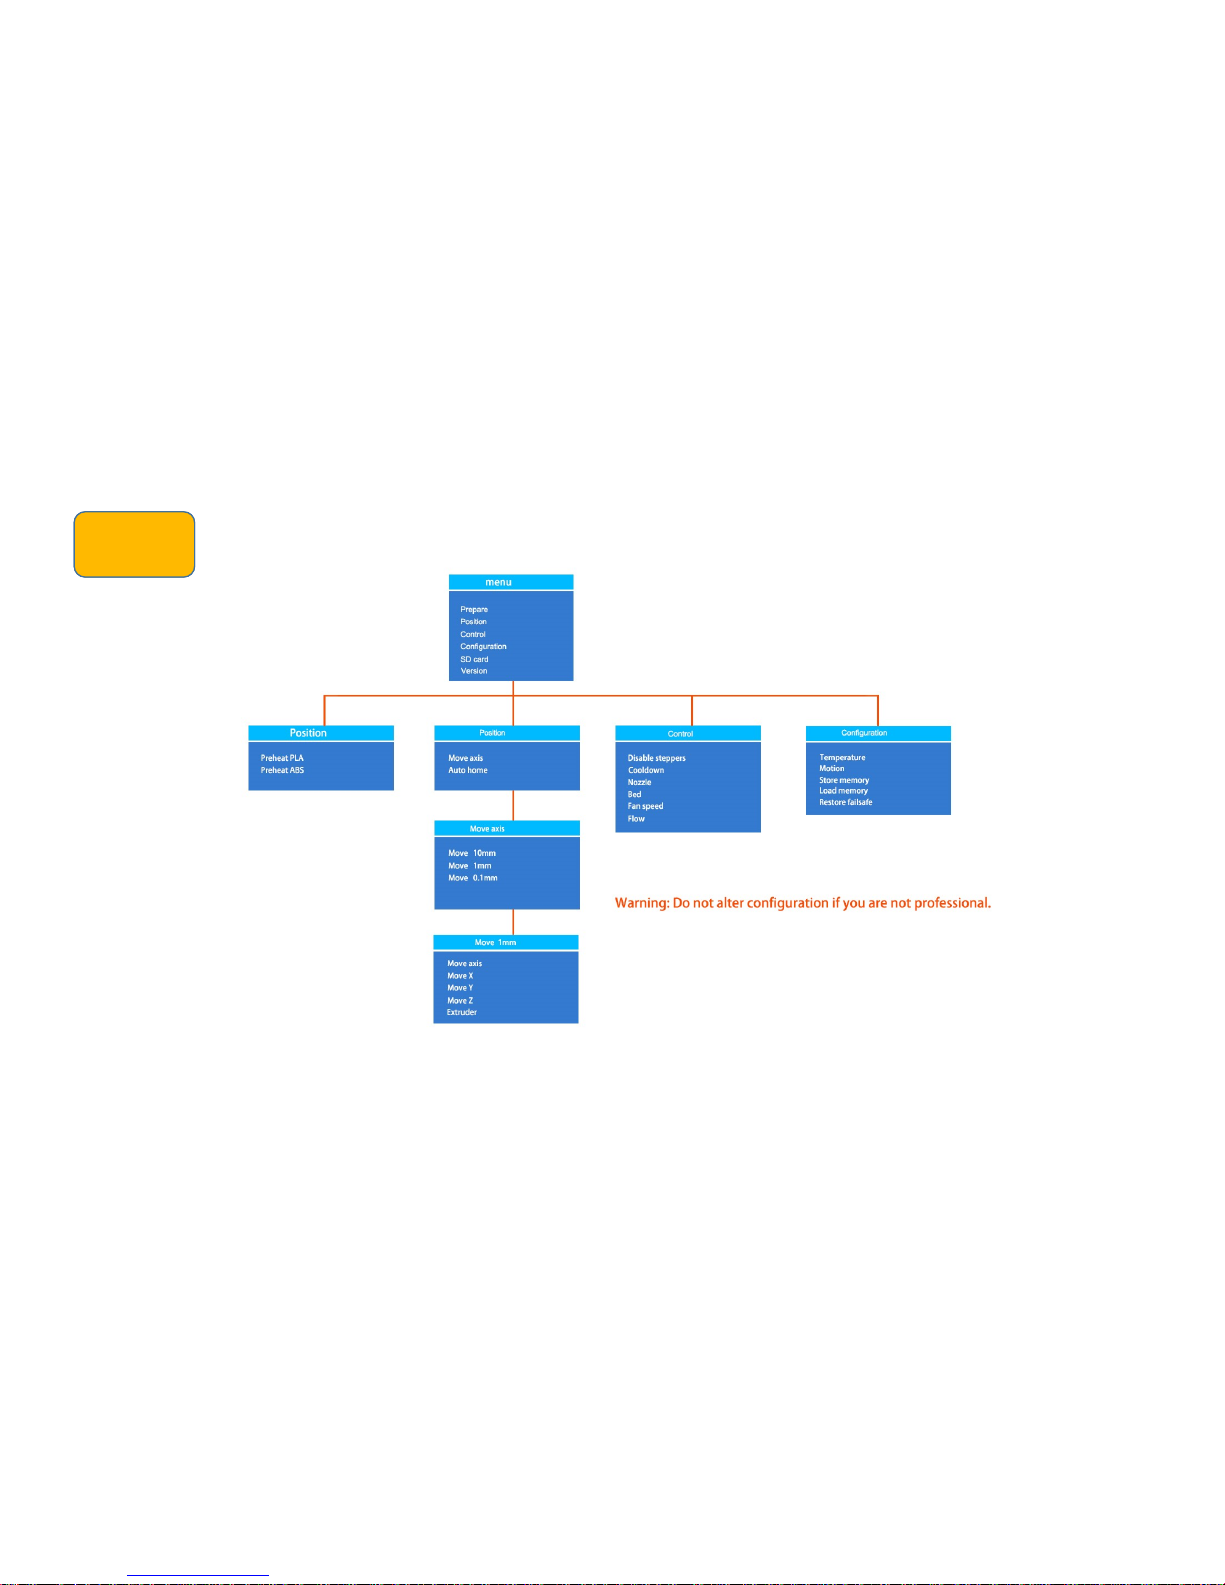
菜单
Menu
Page 12
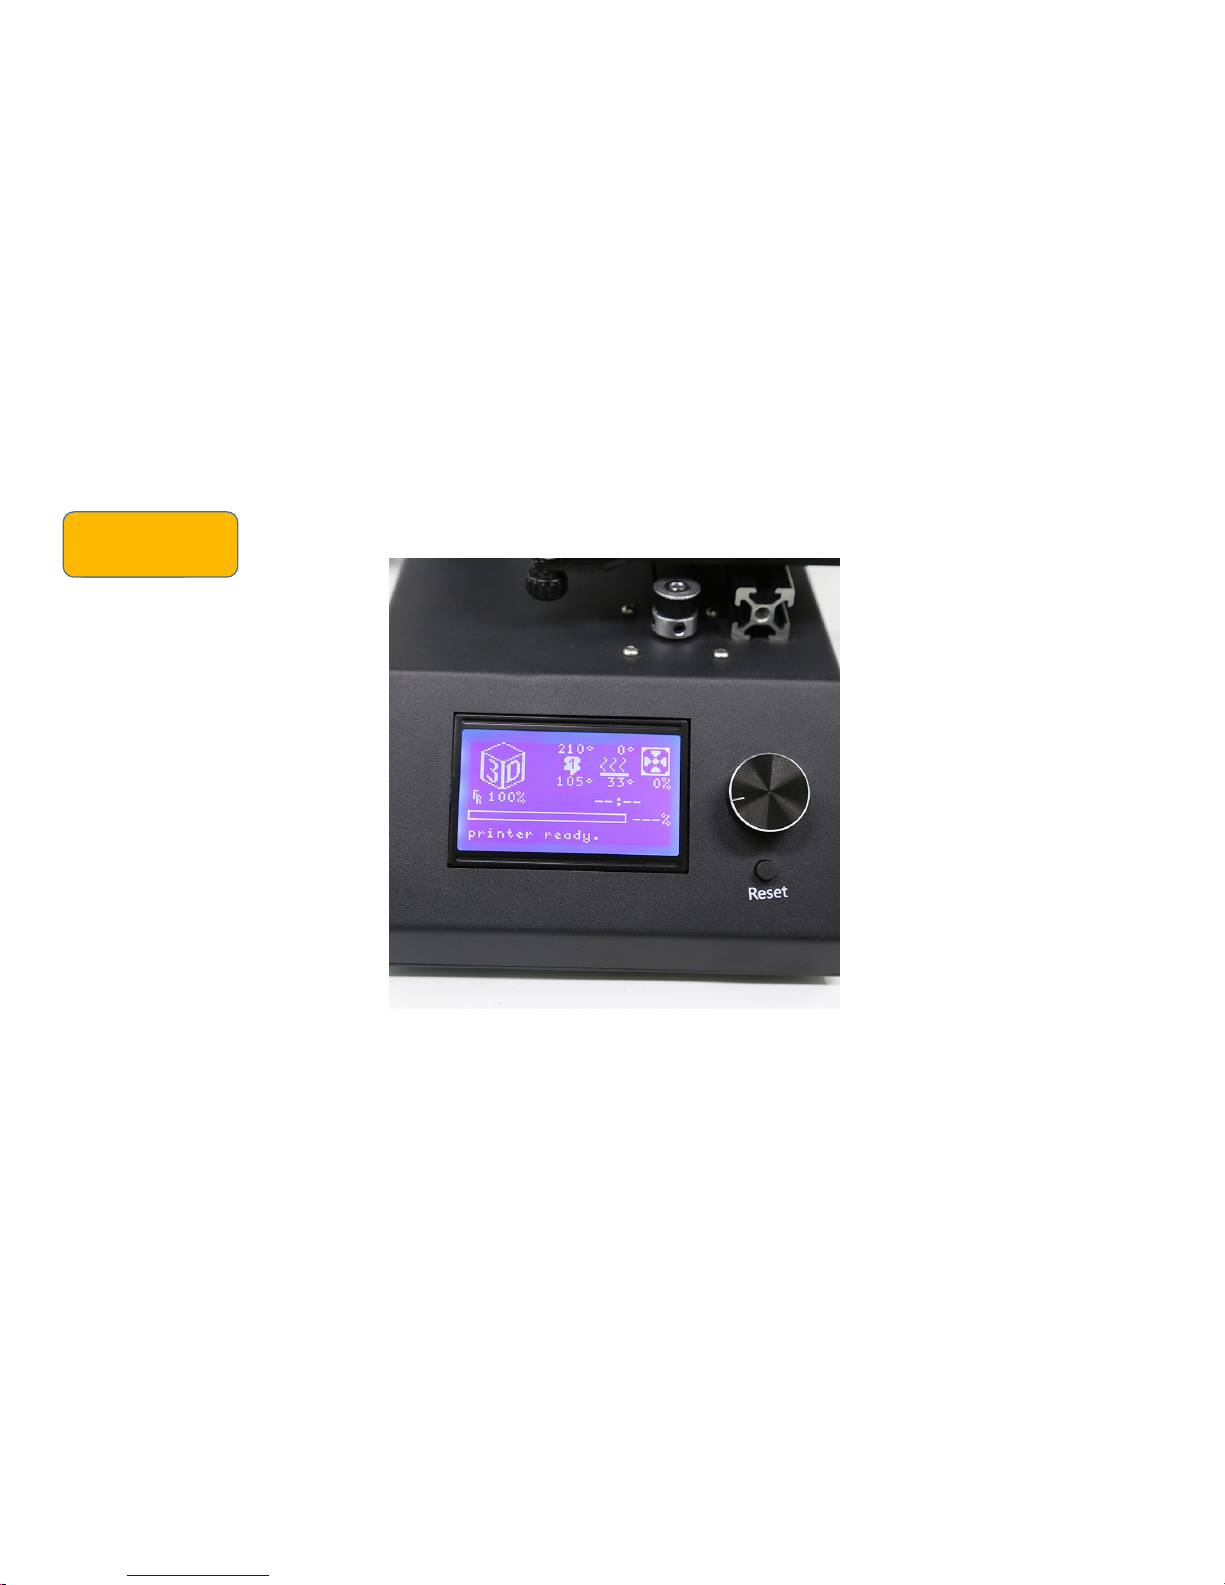
主界面
Main Interface
Page 13

This chapter will guide you how to install and use the slice software
Slice Sofeware
Page 14
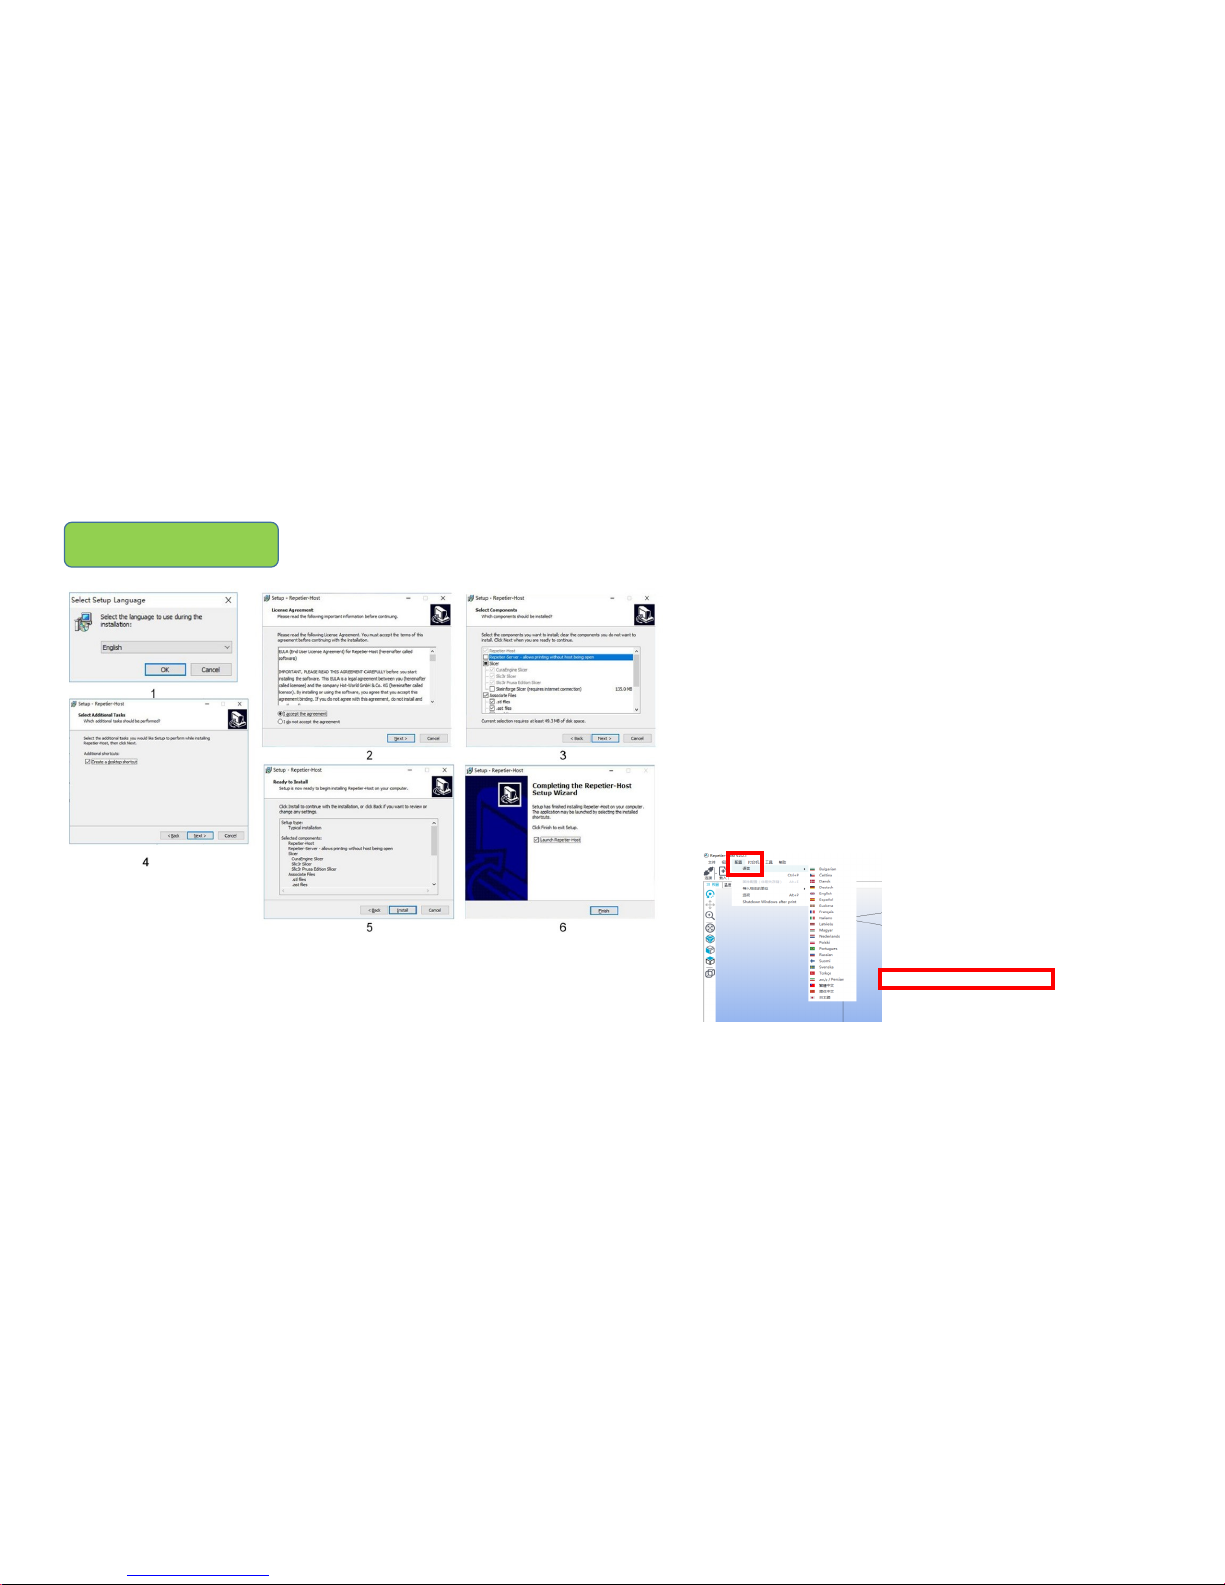
Assembly and Usage
Please select your language shown
Open TF data first, then click “software” file to find
“setupRepetierHost_2_0_1”file to finish your
installation.
Please install referring to the pictures.
Page 15
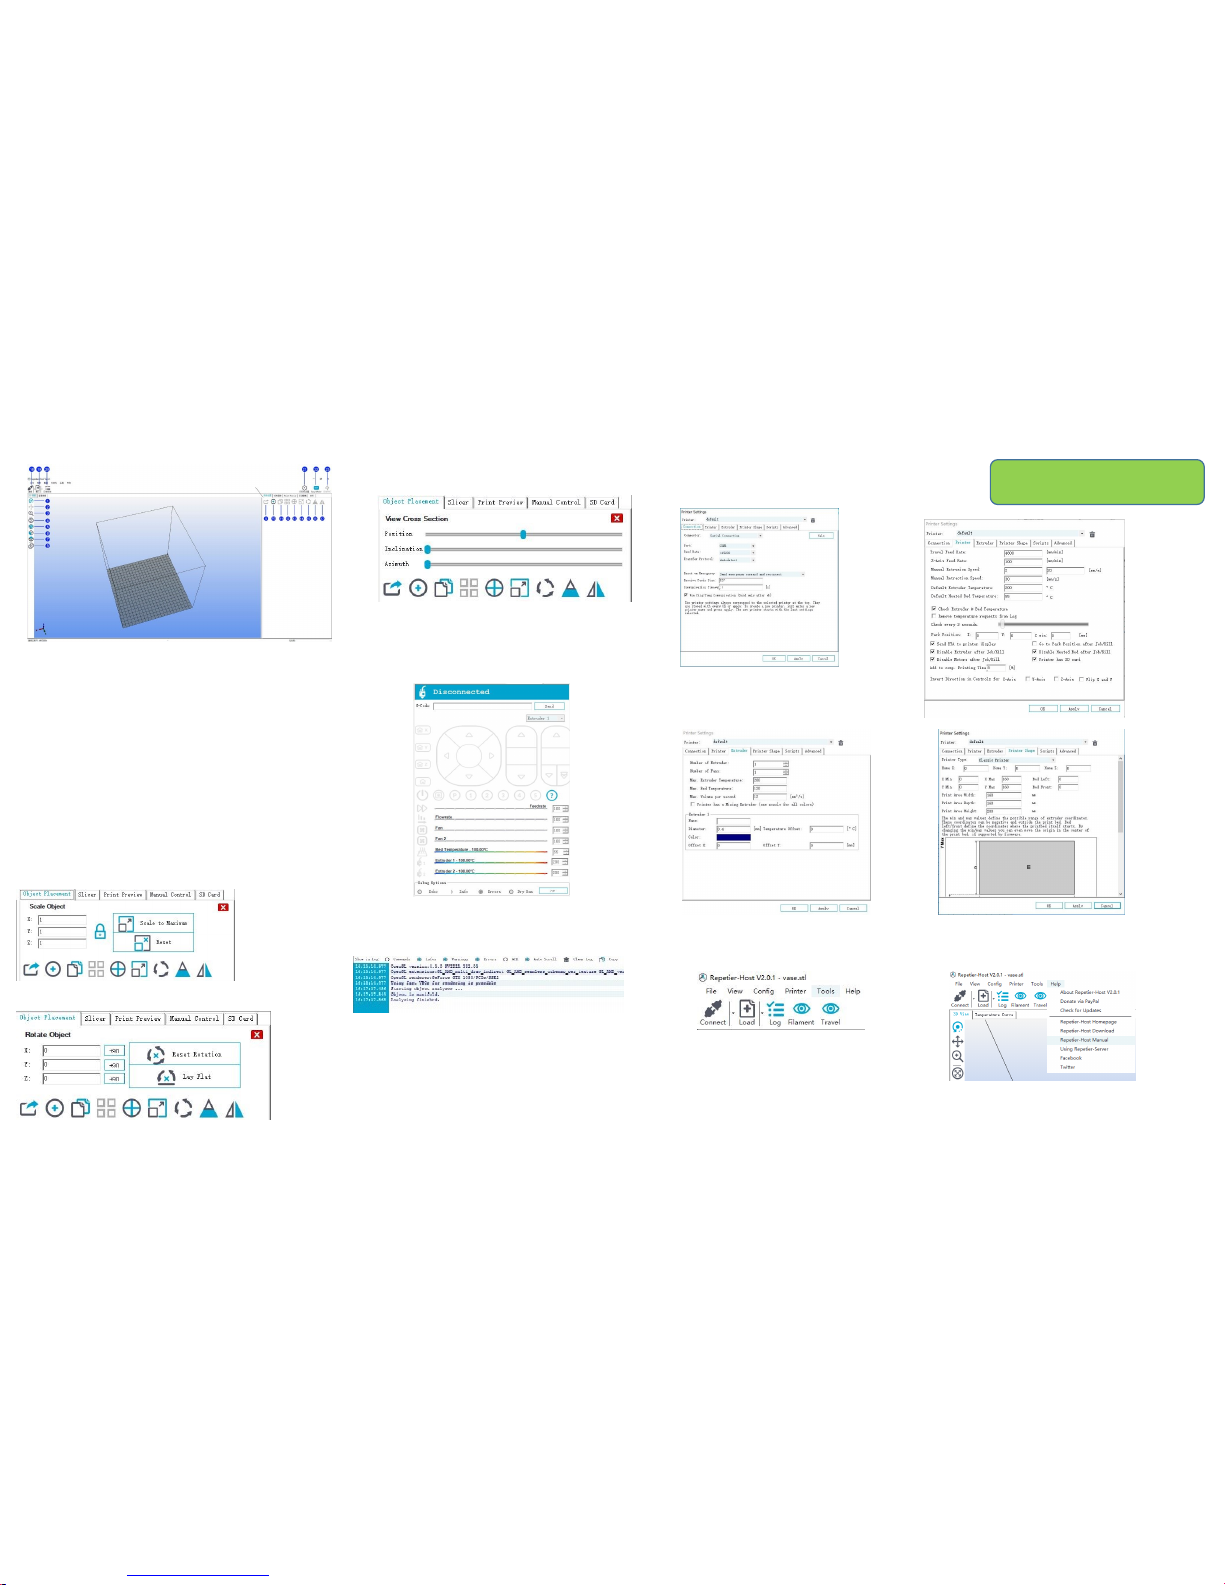
1. “Rotation”means active status, you can use your mouse to rotate the
model and view the object from different angels
2. Move the object: after selected, the object can be parallelly moved all around
3. Zoom the object: Can zoom the image, wheel also can make it
4 .Zoom: Zoom and go back to object location
5. Proportional view: back to the proportional perspective of virtual platform
6.Front view:back to the face of the virtual platform
7.Overlook: look at Hotbed from the virtual platform above.
8. Parallel projection: view is always aroud the virtual platform
9.Save as STL file:save file as STL format format.
10. Add an object: add another print object.
11. Copy object: once you click,it will remind you of the copy number.
12.Auto Layout: it will sort automatically when the number gets to 2 or more
13. Object centring:get the object back to the center point of the platform.
14. Zoom the object: zoom in or out the object, after click to unlock, can
control it unilaterally
15. Rotate the object: control object rotation in XYZ axis.
16.”C”: Slice the object by its position,obliquity and azimuth.
17.“M” can make the object flip oppositely
18. Connect the mahcine:after connectting the USB cable
and the 3D printer,it can be operated in solfware.
19. Loading: load the GCOOD STL format file.
20. Log file: show all the records of the machine.
21.Printer setup: set printing properties and other configures
Please keep the printing properties same as the picture shows.
Any problem, please contact with customer service .
Communication port: there will be a surplus port.
when connect the printer, please connect to the surplus one
communication port:There will be an extra
port when connecting the printer,
please choose the extra one
22.Easy Mode: Click to control the extrusion rate, material and
trajectory 。
.23. Emergency stop: it can be used to control sudden halt
machine when it is online printing
More use details, please click the instructions
Assembly and Usage
Page 16

Print
This chapter will guide you how to use A9 step by step
More use details, please click the instructions
Page 17
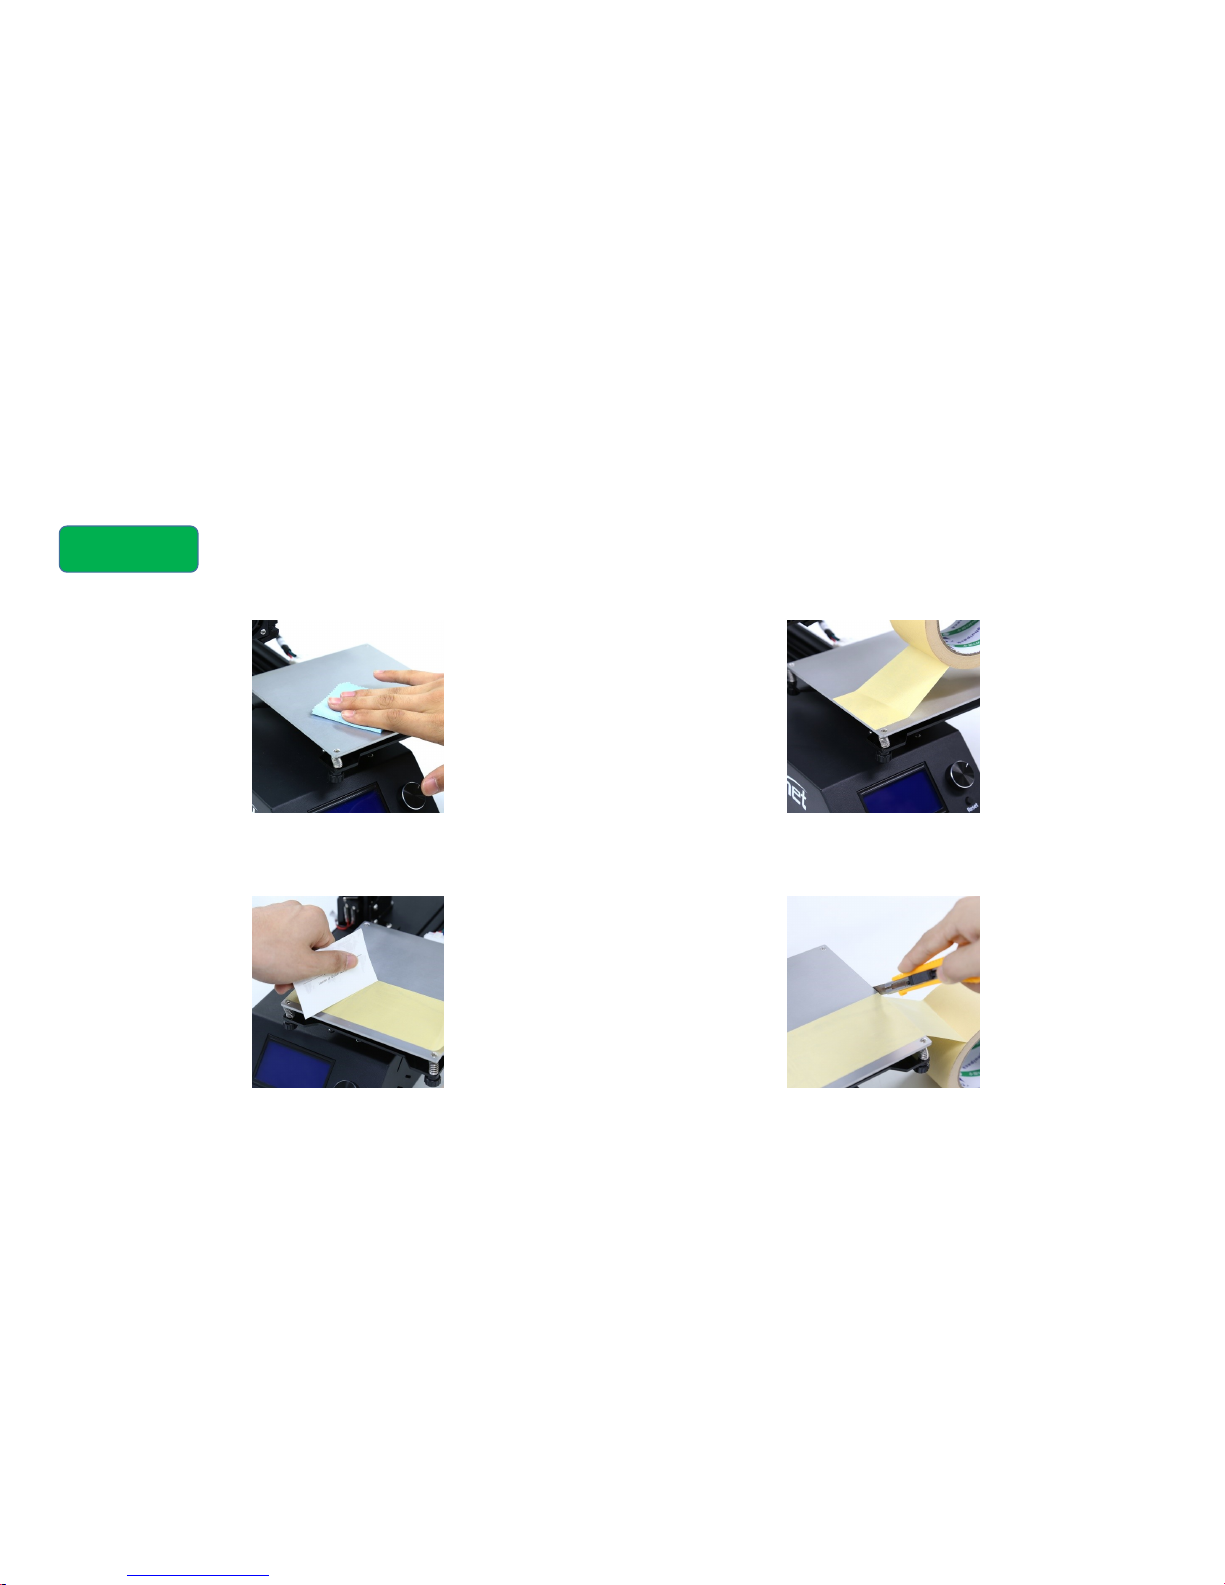
贴胶纸
1.将热床表面清理干净
2.请勿将胶纸覆盖在螺丝上
3.您可以使用小卡片
来辅助刮平.
4.去掉边缘的胶带
Page 18
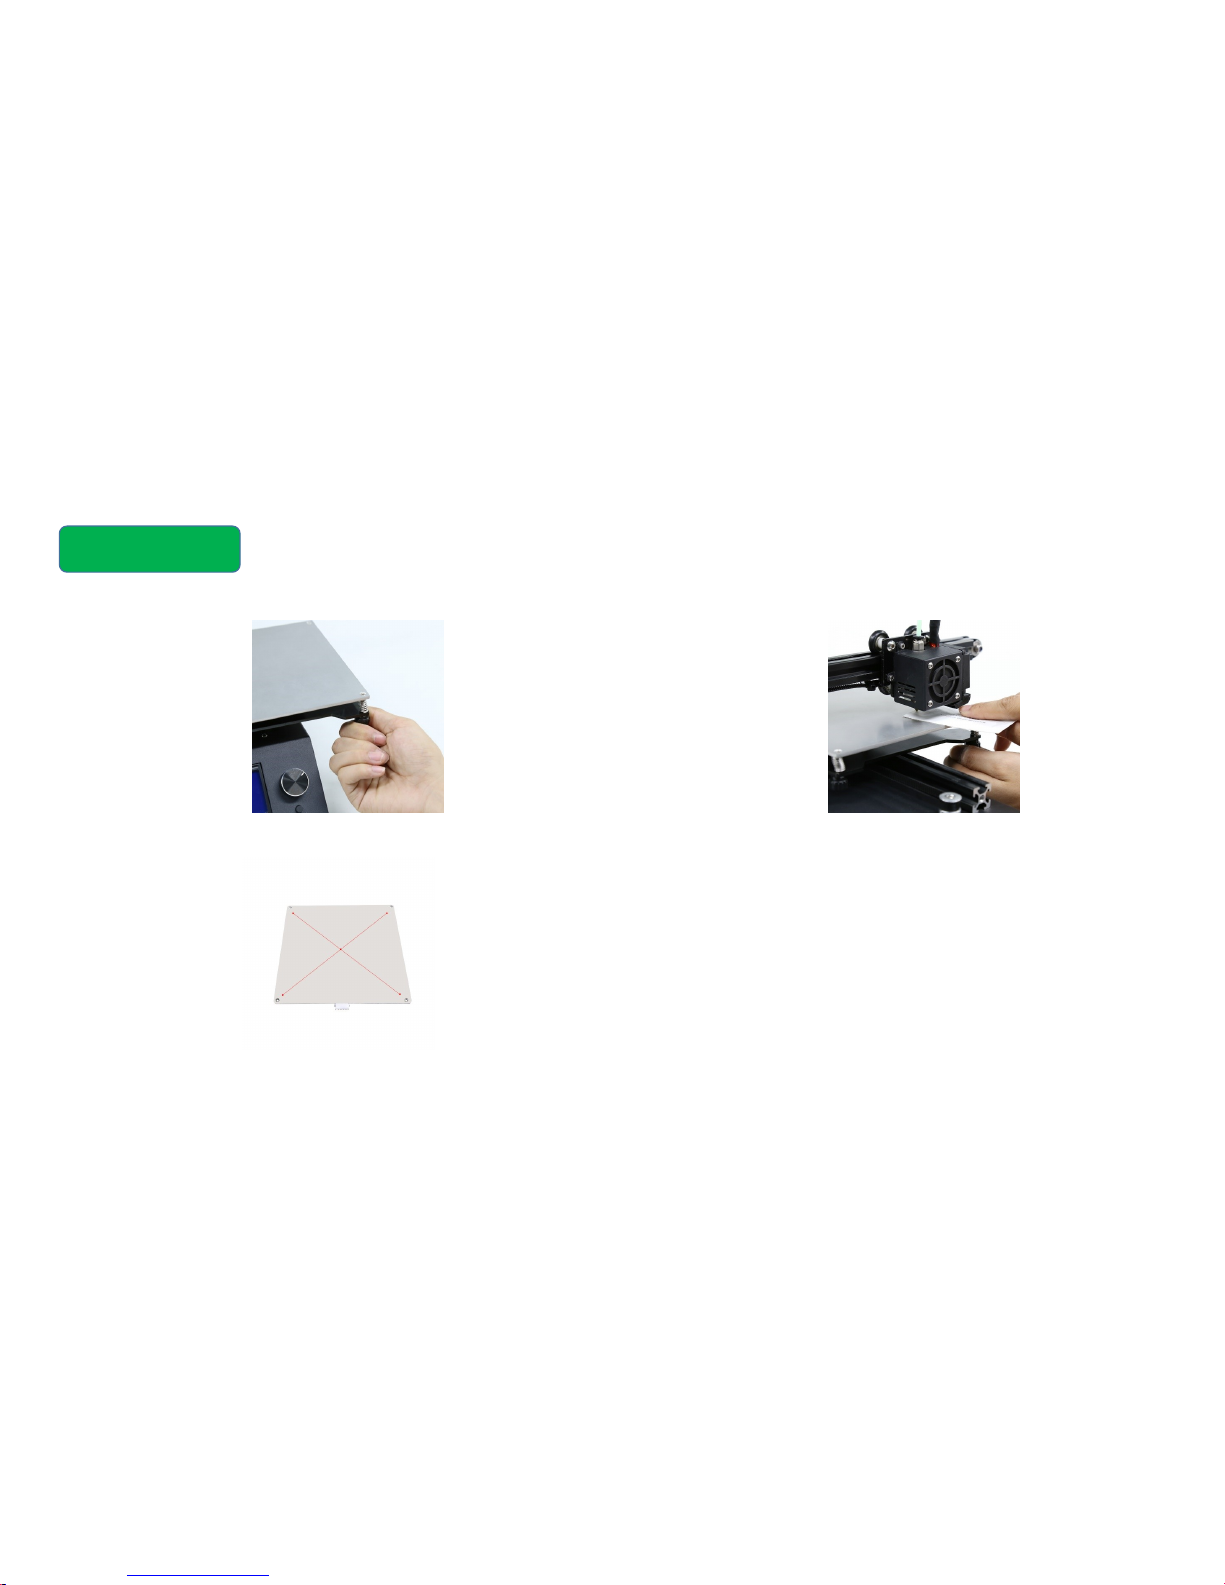
Hotbed Leveling
1. Please tie the four screws to the
bottom tightly in order to avoid the
nozzle knocking the Hotbed.
Enter the Menu from “position” to
“home all” . Back to the beginning ,
unlock the motor from “quick
settings” to “ Disable stepper”
2. Move X axis to the first
position of the Hotbed .
Put the card between the
nozzle and the hotbed gap.
Tight the screws.
3. Clamp the card and
move to the next point.( 4
points as the picture
showed)
Page 19
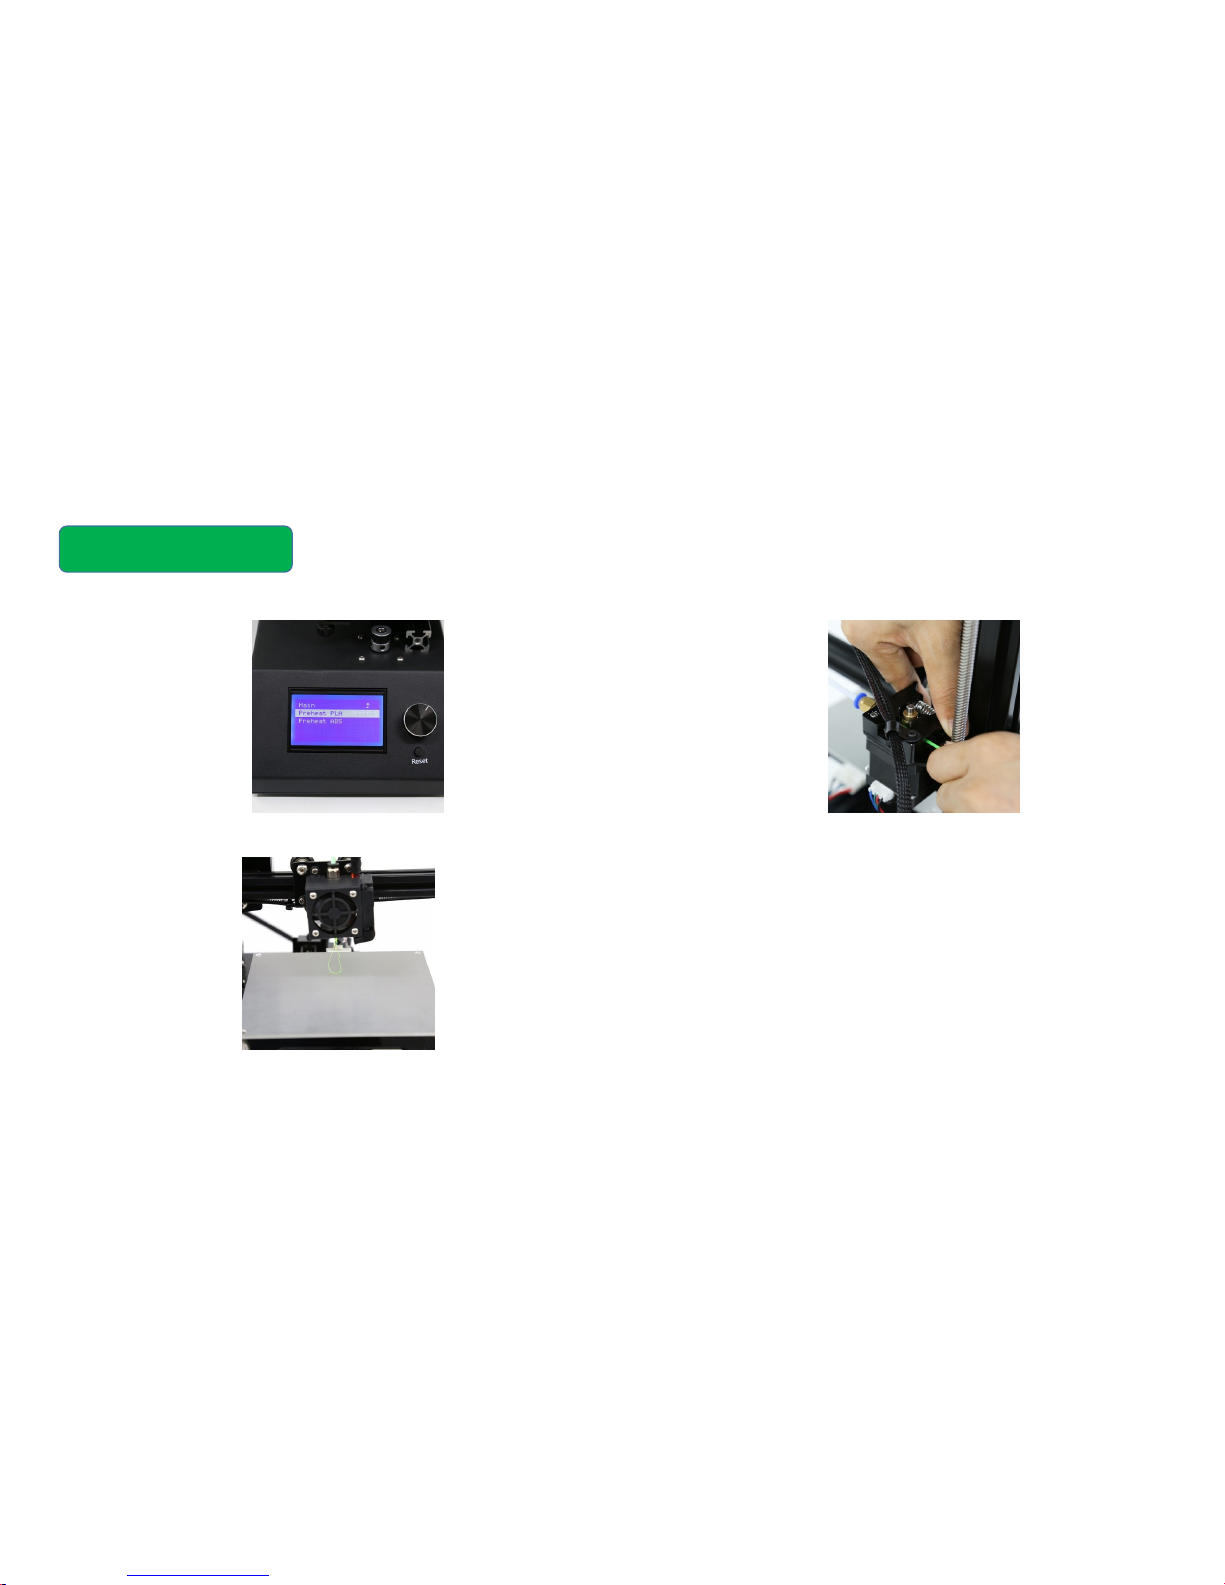
Installation of filament
1. First preheat the nozzle:
Enter the menu from Quick settings”
to “Preheat PLA(ABS)
2. Insert the filament to
the extruder( or push the
filament into it by hand)
and control the rotation
of the extruder. Make the
filament get to the nozzle.
3. Keep feeding the
filament till the nozzle
spin.
Warning:
1.Make sure the clipper is not too loose or tight, otherwise the
filament feeding will cause printing trouble.
2. Check if the filament twists or knots after the filament is
installed. Make sure the filament feeding smoothly.
3.Lubricate X,Y axis and sliding block to avoid being stuck.
Page 20
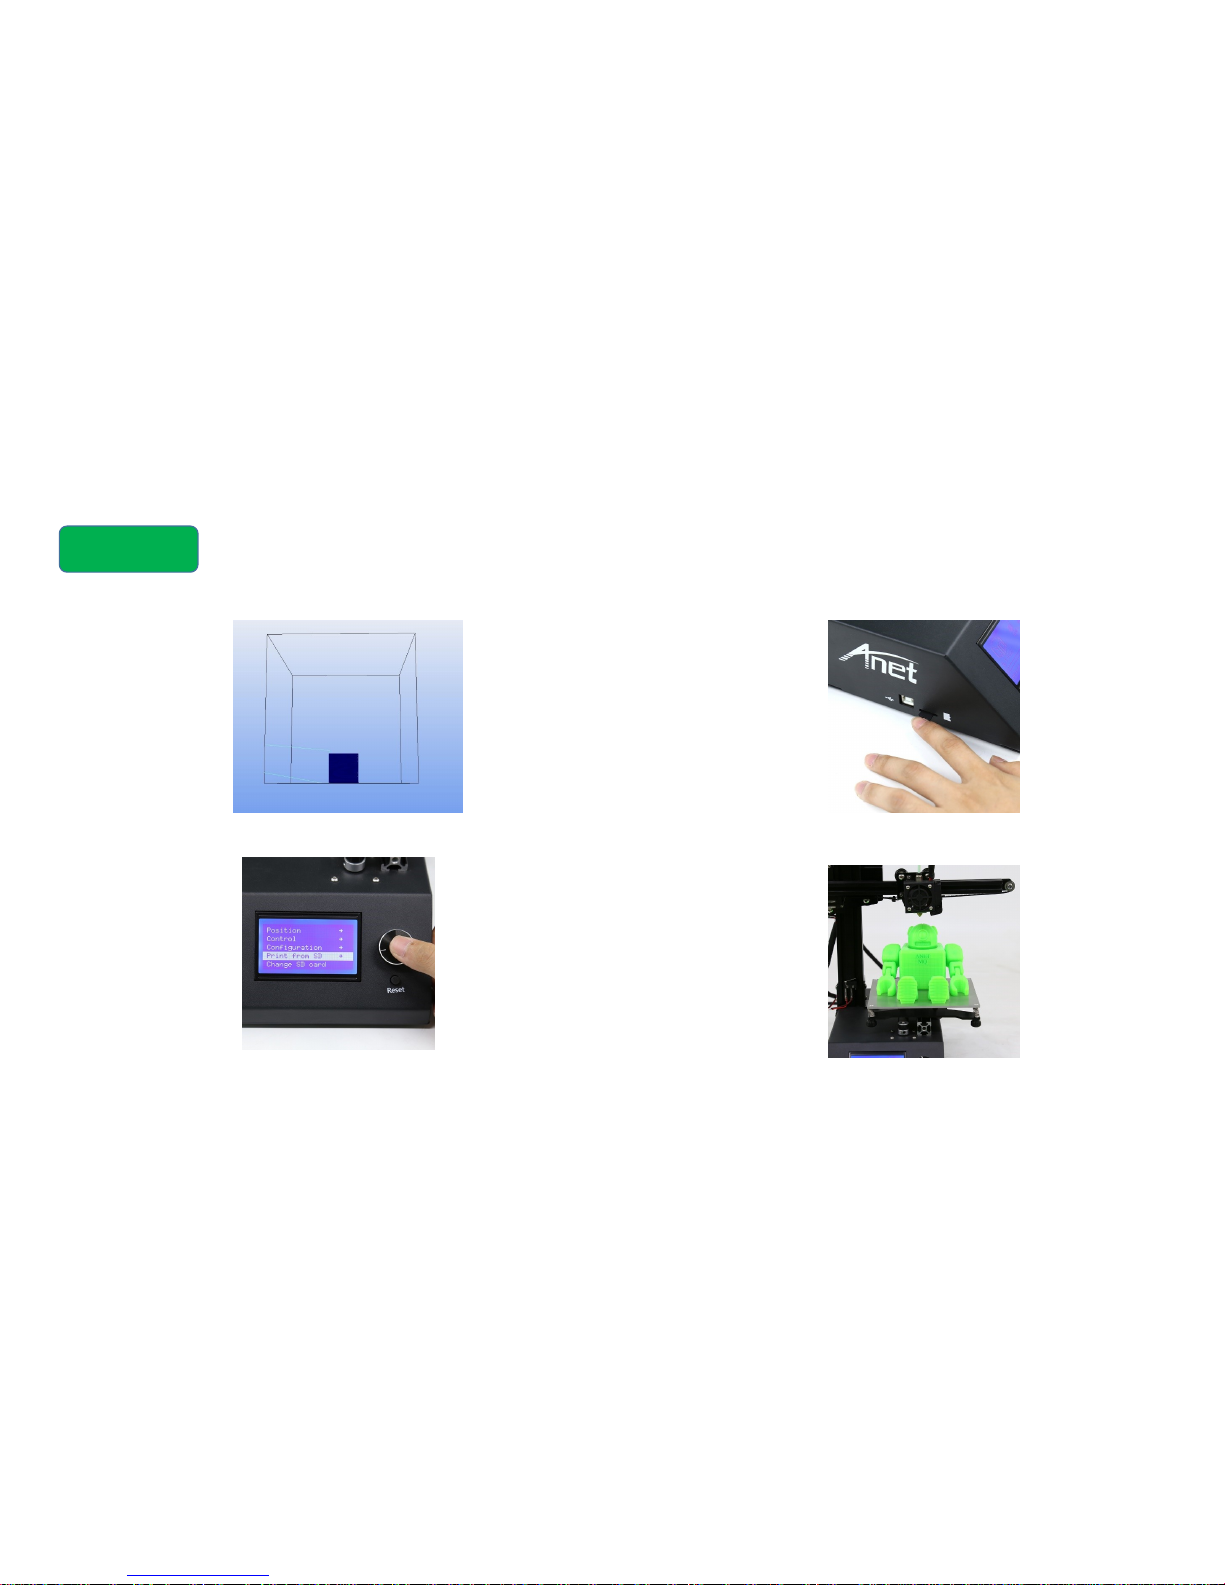
File printing
1. Open slice software, choose STl
file to slice. Put the sliced file into TF
card
2. Insert TF into the
machine.
3. Enter the menu and
choose “SD card” or “print
file”, choose your print file.
4. Z axis will move up when
print completed. Heating the
Hotbed to 50℃ will make the
model be took out easily.
Page 21
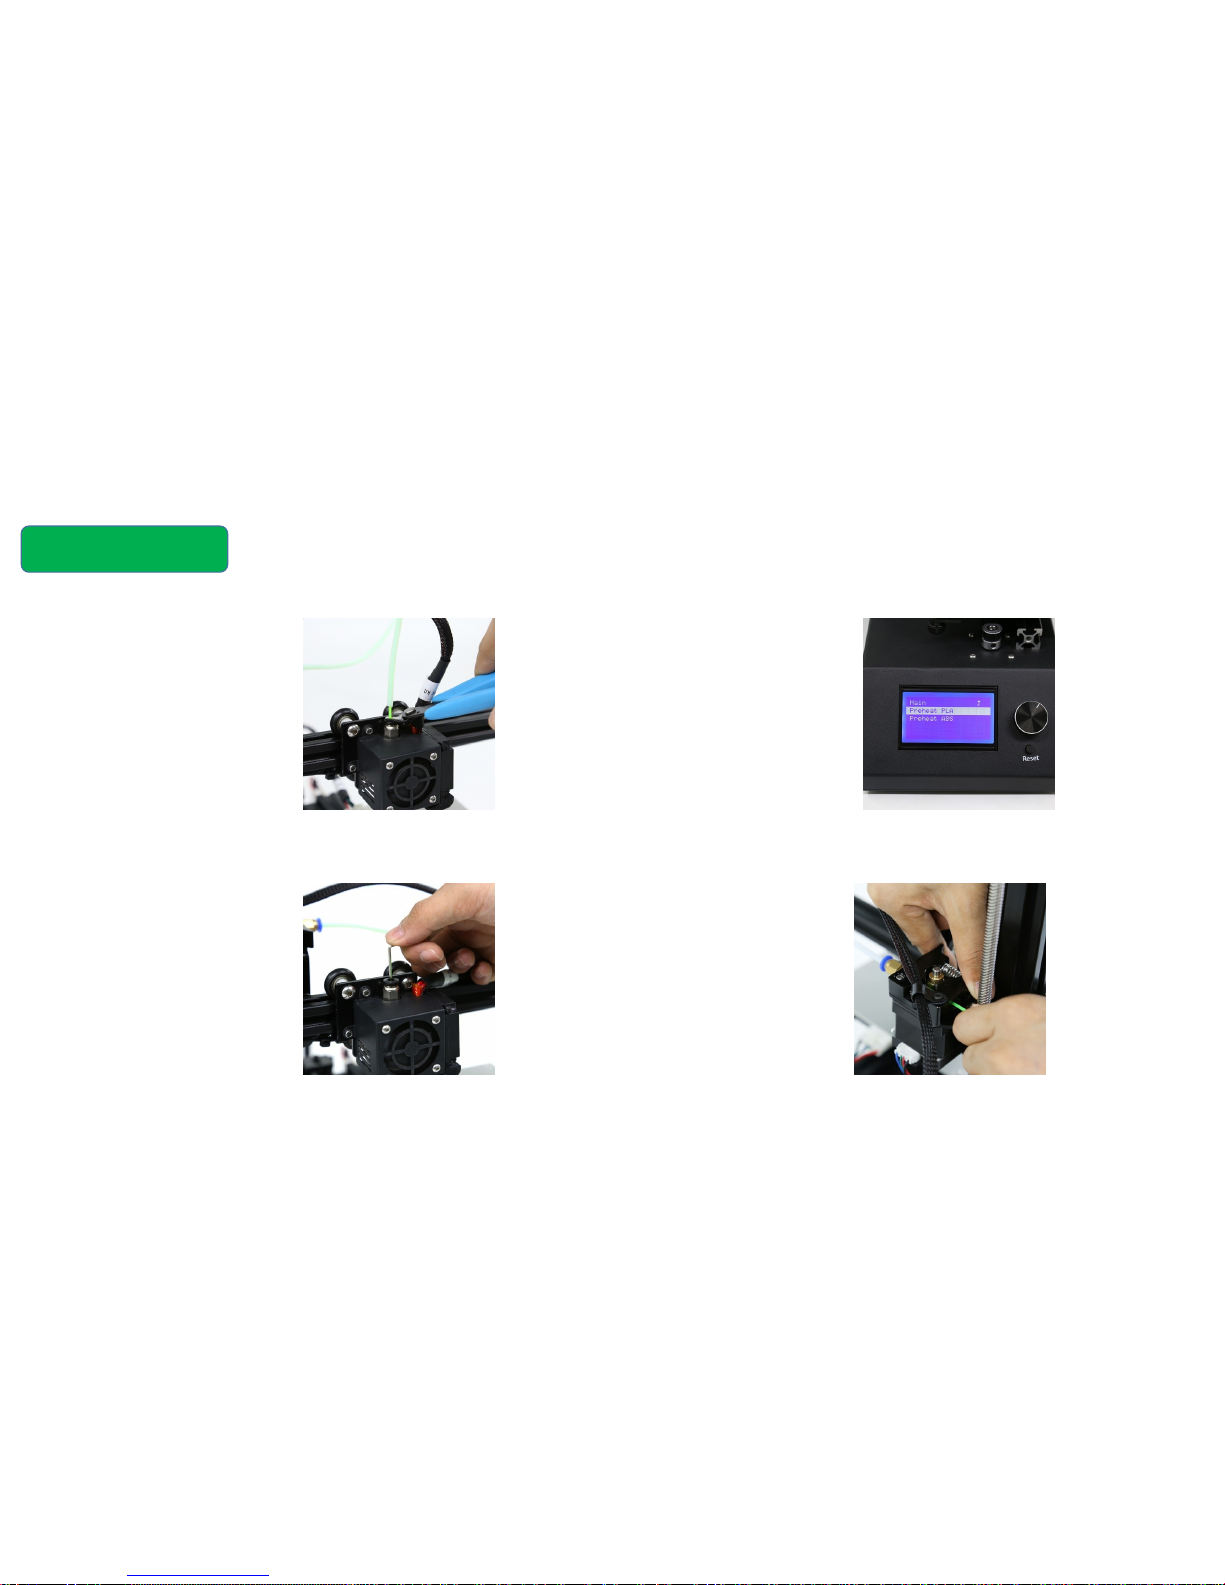
Remove the Filament
1. Remove the guide tube and
cut off the consumable closest
to the extrusion head
2. preheat the nozzle to enter
the menu”Quincksettings”
>“Preheat PLA( ABS)” Waiting for
preheating
3. Use a tool to push the
consumables out of the nozzle
and make the filament flow out
4. pull the consumables cut
off out of the extruder
Page 22

Machine Maintenance
The routine maintenance is very necessary to keep the type
of A9 in the good status.
This chapter will introduce some basic skills to maintain the
3D printer
Page 23
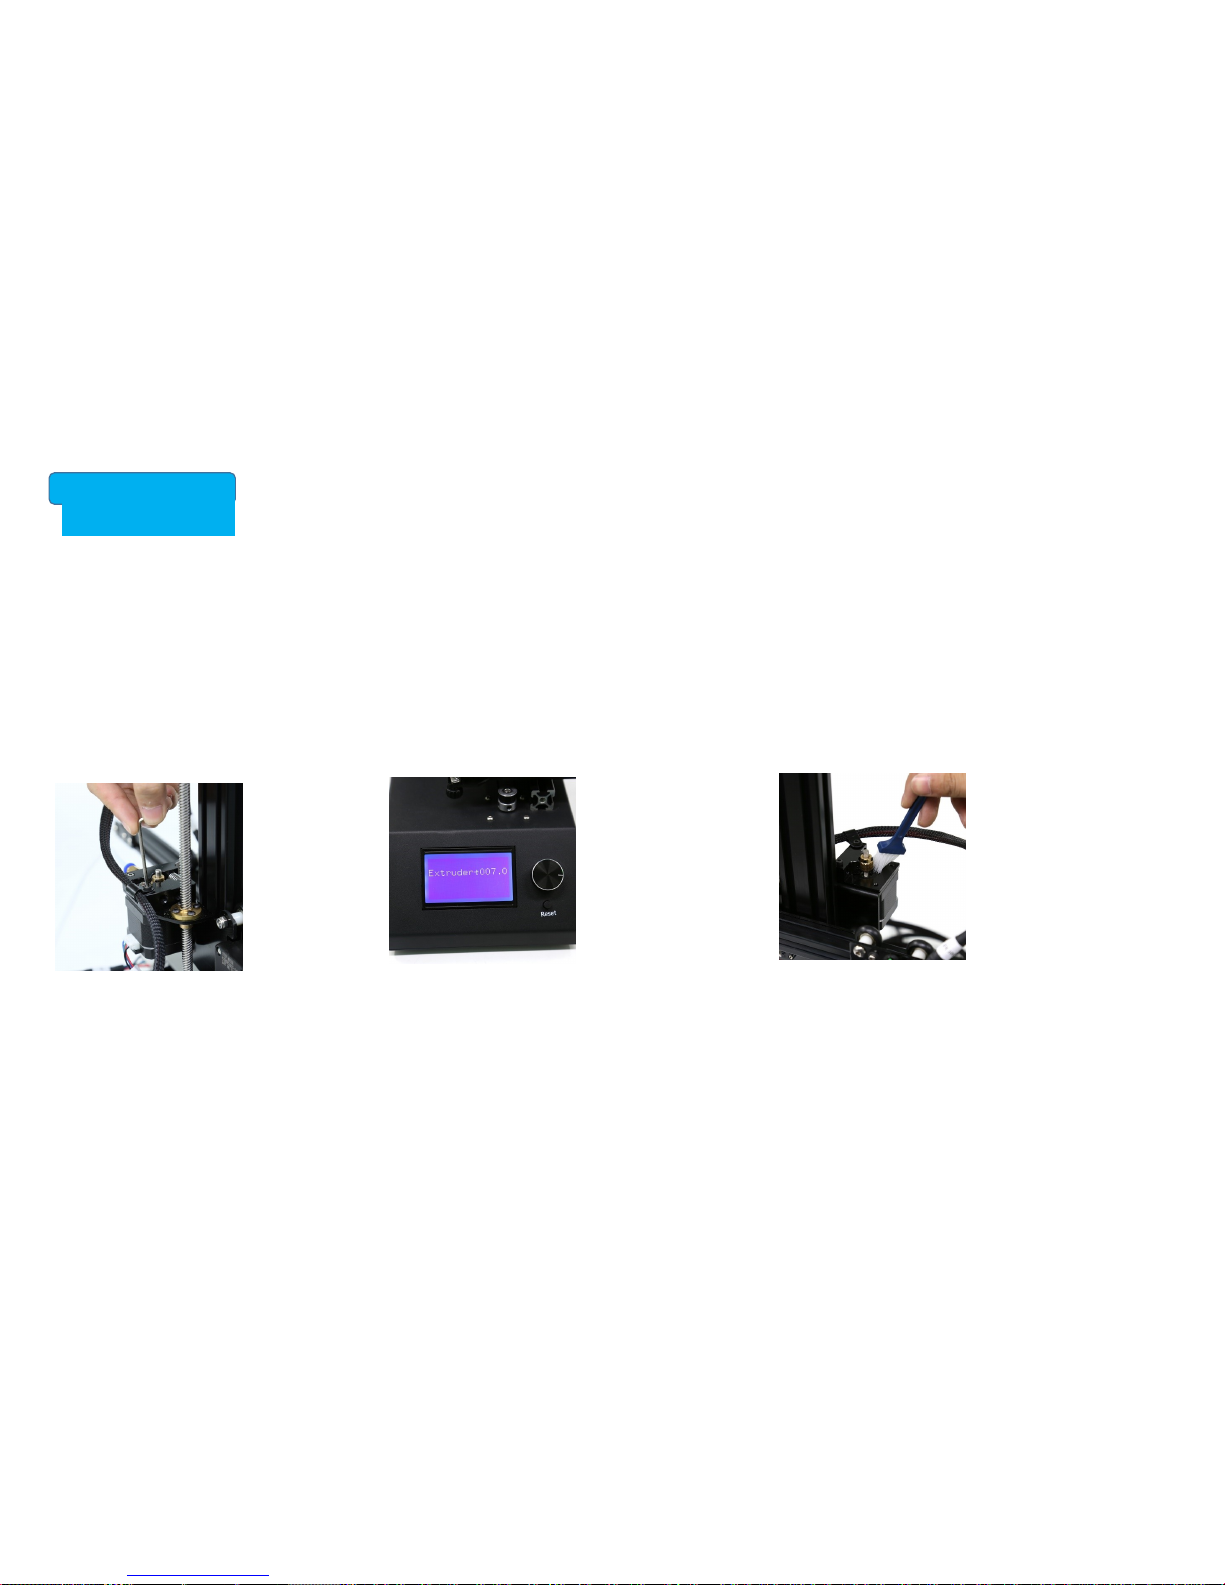
Hot bed
Make sure the hot bed is free of dust, grease and scratches
1. Use tweezers to remove filament residue.
2. Do not touch the hotbed with sharp objects.
3If the printer is left unused for a long period of time, clean the surface of the machine, clean the
hot bed, and completely loosen the 4 screws on the hot bed.
Clean the extrusion shaft
After a long period of printing, consumables entering the extrusion axis (E-axis)
may slowly build up small consumables particles on the extruder and you can clean it
with a brush.
Maintenance
1. Remove the extruder
2. Select menu“Position”> “Extr.position” . Turn the
button extrusion wheel to start turning
3. Use a brush to clean the extrusion wheel
Page 24
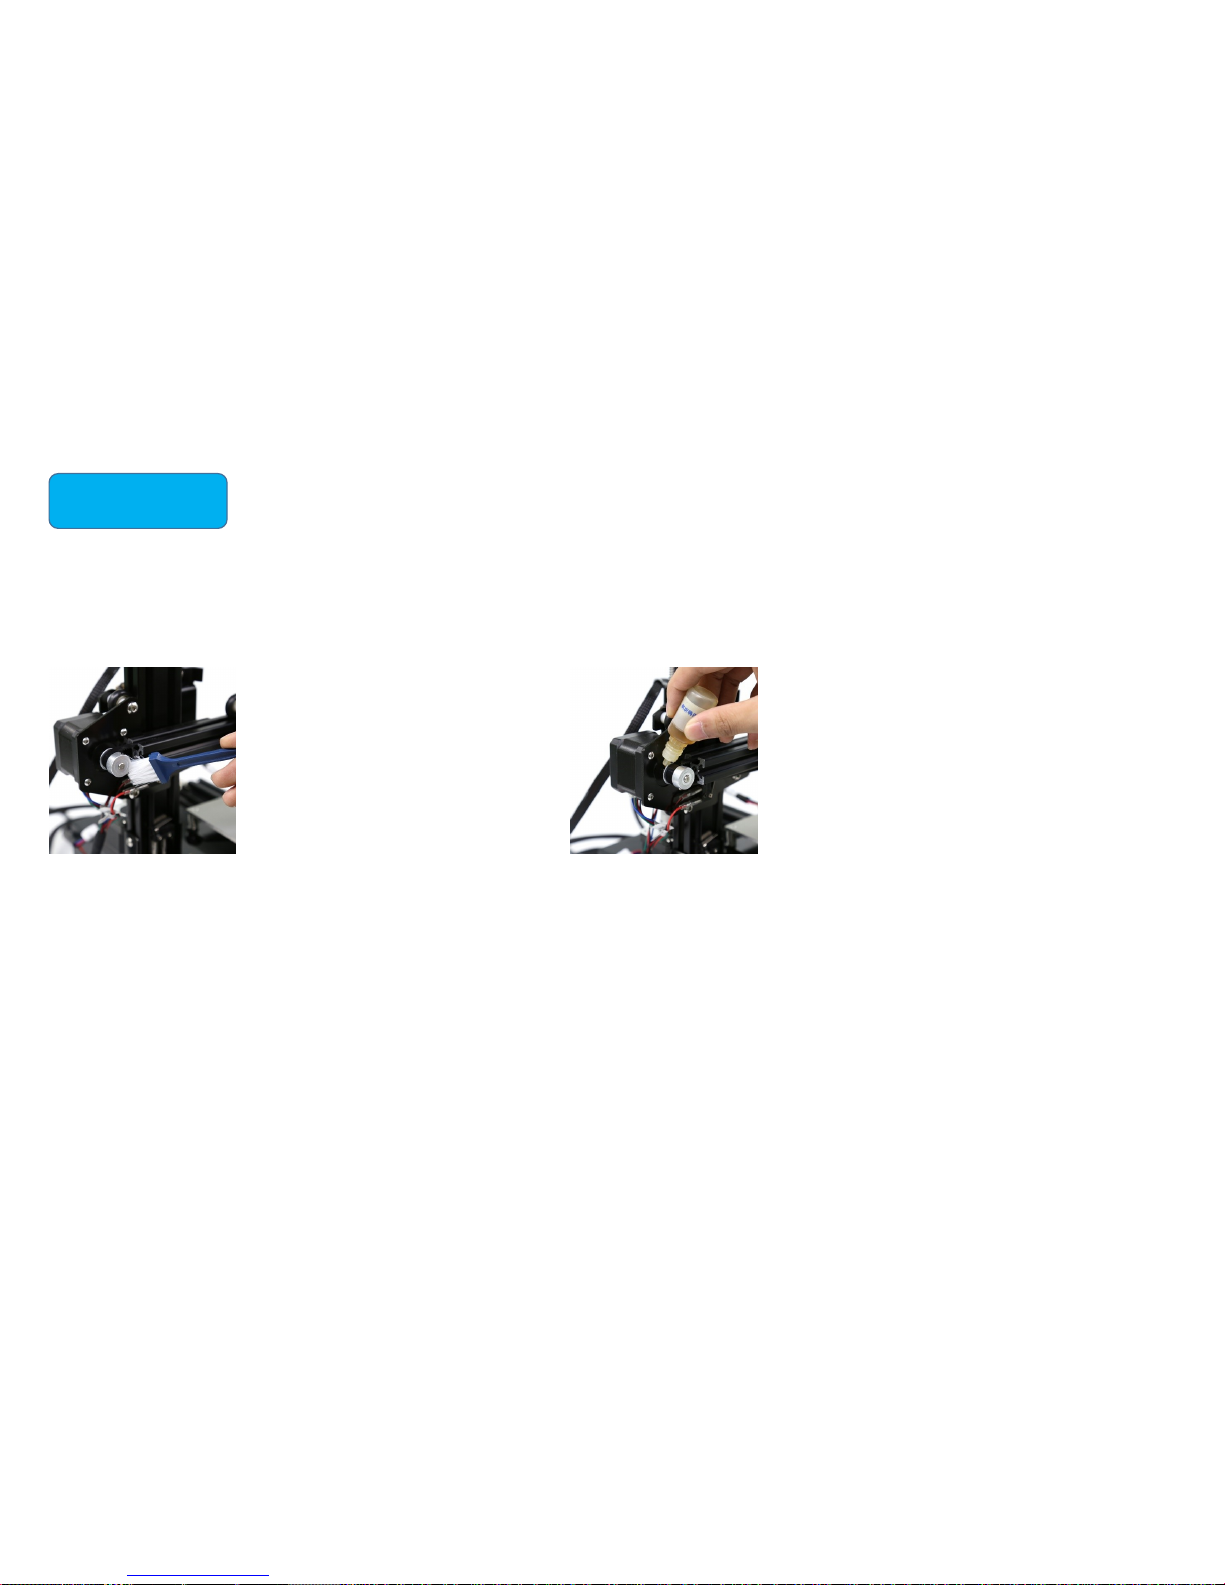
lubricating
1. Clean X, Y, Z axis polished rod and screw rod 2. Regular lubrication of X, Y, Z axis rod and screw can keep it lubricated.
Page 25

This chapter will help to diagnose and solve the common problem
when it appears.
Please look up the instruction in electronic document or contact
service support center when you meet the problem unable to solve.
FAQ and Solution
Page 26

Setup and calibration problems
Q: Temperature settings for several common filaments.
A: PLA: nozzle temperature: 200-220 ° C hot bed temperature: 50 ° C
ABS:Nozzle temperature: 230-235 ℃ hot bed temperature: 80-95 ℃
Q: What is the relationship between layer thickness, print speed and nozzle temperature?
A: The purpose of the interaction is to spare enough time to heat and cool of the filaments. Generally, if the layer
thickness increases, please lower the printing speed, the normal printing temperature (if the printing speed exceeds 60
° C, the temperature rises 5 ° C, exceeds 9 °C, increases 10 ° C ); If the layer thickness the contrary layer is reduced,
please increase the printing speed and reduce the printing temperature.
Q: How to set the best parameters when printing a model with sealed top and bottom?
A: Increase the printing thickness of the top or bottom in the basic parameters.
Q: How to set the parameters when printing a model with a single layer thickness?
A:Usually keep the layer thickness of the model more than 1mm
Note:
1. The layer thickness in the software can not be set more than 0.8 times the diameter of the nozzle (for example ,the
layer thickness should not exceed 0.32mm when the nozzle is directly 0.4mm).
Q: Is the warped edge on the model related to the joint problem?
A: : 1 hot bed leveling is not correct; please readjust the hot bed level.
2.If the filament is not attached the hot bed, please use 3M adhesive tape or high-
temperature adhesive tape to make it attach to the hot bed.
Q: Nozzle heating failed
A: 1.The heating tube is loosely connected, please check the black top wire and the heating tube under the heating block, insert the
heating tube and tighten the black top wire.
2 . Heating:
1) Open the case, find the connector of the heating tube, replace the connector, and then heat the nozzle again. If the heating failed
nozzle can work normally, which means that the heating tube is broken and needs to be changed;
2) With the replacement of heating pipe, the faulty nozzle still can not run, please replace the heating pipe, and try to change the
connection with the temperature controller, and reheat the hot nozzle. If the fault nozzle turns to be normal which shows that the
temperature controller is broken and need to be replaced.
3)If the solutions above is useless, it should be the problem of the power tube on the mainboard, please replace it.
Q: Maximum temperature / minimum temperature
A: 1. Nozzle temperature is too high.
Please reduce the nozzle preset temperature
2. The temperature controller is damaged..
Please replace the thermostat.
3. LCD line is loose / LCD line is damaged.
Q: The print head is stuck / can not move
A: 1 . Bearing is lack of lubricating oil.
Please clean the bearings and lubricate oil evenly.
2. Rack deformation caused by external forces during transportation.
3. The Y axis motor line is loose.
Please check the motor cable, reconnect.
4. Please check the fixed belt and screw in X axis and Y axis.
If you find the belt loose, tighten the belt, tighten the screws.
Q: Limit switch is inactive when zeroing or moving
A: Limit switch, the cable is loose or the switch is disconnected.
If the cable connecting the limit switch and the main board is loose, Please check whether the main board's terminal cable is correct. If
so, you need to pull out the terminal cable and reinsert it, if not, it means the limit switch is broken and needs to be replaced.
Q:Filament generate intermittent noise on the E-axis motor
A:1 . Feeding device is too tight, Please loosen the clamp screws
2. When the nozzle is clogged, the filament can not be fed smoothly. Use a drill or a needle to clean the nozzle
Extruder problem
Q:Blocking of the nozzel
A:A: 1. If there are impurities in the filaments, they will be melted in the nozzle, please use a needle to clean the nozzle; Or take down the
nozzle and use needle and drill to clean the inside of the nozzle.
2. If the nozzle is overheated, it will make the filament carbonized , please Use a needle to clean the nozzle; Or take down the nozzle and
use needle and drill to clean the inside of the nozzle
3. If the shape of nozzle hole is generated by external forces which resulting in deformation. Please change the nozzle.
Page 27
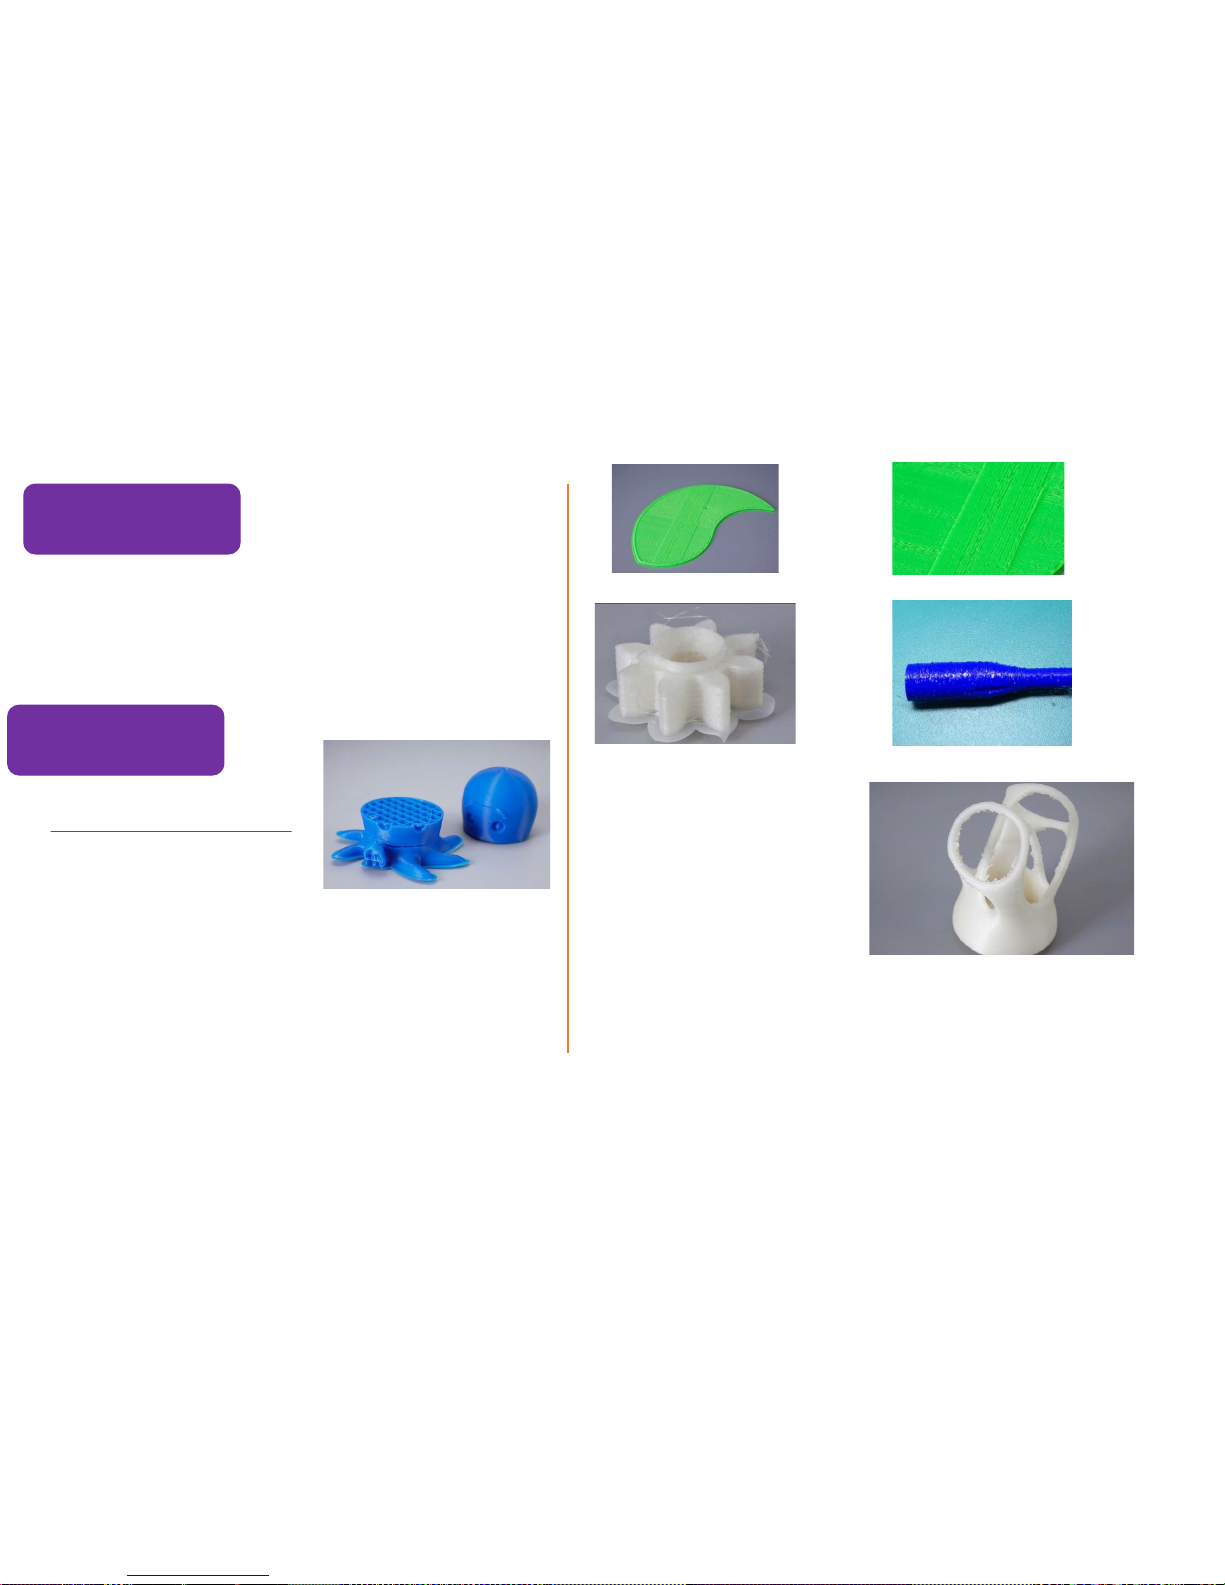
Hardware problem
Q: Even if the screws on the hot bed have been screwed up to the top, the hot bed sheet is still too far away from the nozzle (the distance
between the hot bed and the nozzle is too far to adjust).
A: Adjust the printer's Z-axis limit switch, move the limit switch up a little.
Q:Z axis motion abnormalities.
A: 1 . The top of the Z-axis screw is loose, please check the Z-axis connection shaft and tighten the screw.
2. The connection of the z-axis motor is loose, Please check whether the main board is loose and plug the motor line again.
3. . The Z-axis screw needs lubricating oil, please use the lubricating oil to make the motor slide smoothly.
Printing problems
Q:The first layer has a printing problem.
Q: The directly heated cathode does not stick in the hot bed
- A1:The distance between the nozzle and the hot bed is too far.
- A2:The hot bed has not been leveled.
.-A3:The height of the first layer is too small, reommendation≥0.2
Q:Spin too less from the nozzel (only traces on the hot bed).
A: The distance between the nozzle and the hot bed is too close, which may result in the nozzle not spinning out.
Q: The nozzle does not print when printing.
A: The filament dose not enter the end of the nozzle, please wait for the filament input.
Q:Edge warped, use ABS material to print the material damage
A:Please keep hot bed heating and leveling hot bed, reduce the printing speed of the first layer, and avoid direct air blowing.
Q:The surface of the model is loose and with flaw
A: Layer thickness is too thick,print speed is too fast,
temperature of the hotbed is too low, wrongly choosing of the nozzel, stuck of the the filament, all of the problems
talked above will cause the situation.
Q:There is a leak on the side of the model
A: The temperature is too high or the material is carbonized or liquefied (if the temperature is too high, the PLA will is liquefy and the ABS will be carbonized.)
If the problem still could not be solved, please turn to after sales service.
Q: The surface of the model is not smooth
A: Turn off and pumpback .
Q:The model is easy to fall off
A: no adhesive tape or the tape loses stickiness; or the bottom of the model is too small;
It can be used to stick a hot bed with a heat gun; add support
Q:It is difficult to remove the support structure
A:In the slice software, rotate model direction correctly; do not set the support density too much
Q:Failed to print the mini-model.
A: Please do not set the model too small and the nozzle diameter is 0.4mm.
In the slice software, adjust the object vertically to the hotbed or add support structure
Q:The printed object can not be modled for being slant
More solutions, please check the the quality solution
guidance of Chinese version in TF card.
Page 28
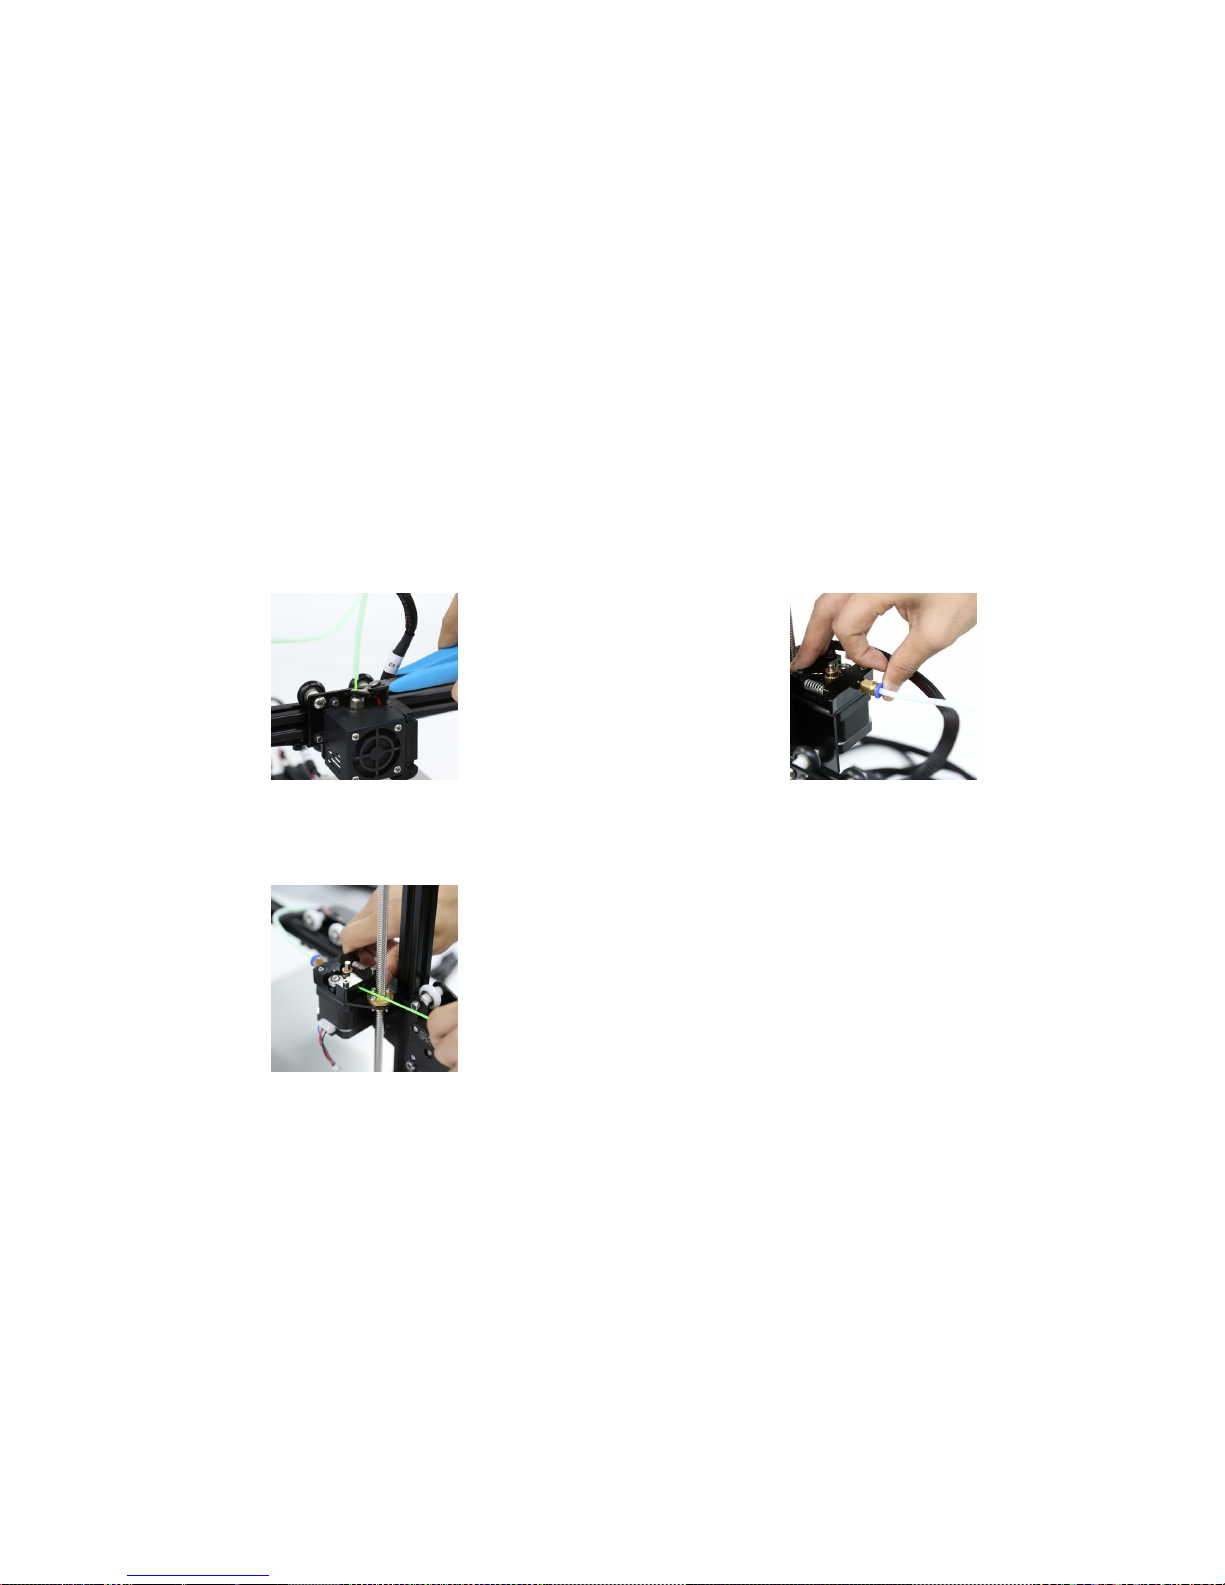
How to deal with filament stuck in the extruder?
1. Remove the card out of filament
2. Take out the filament
Page 29
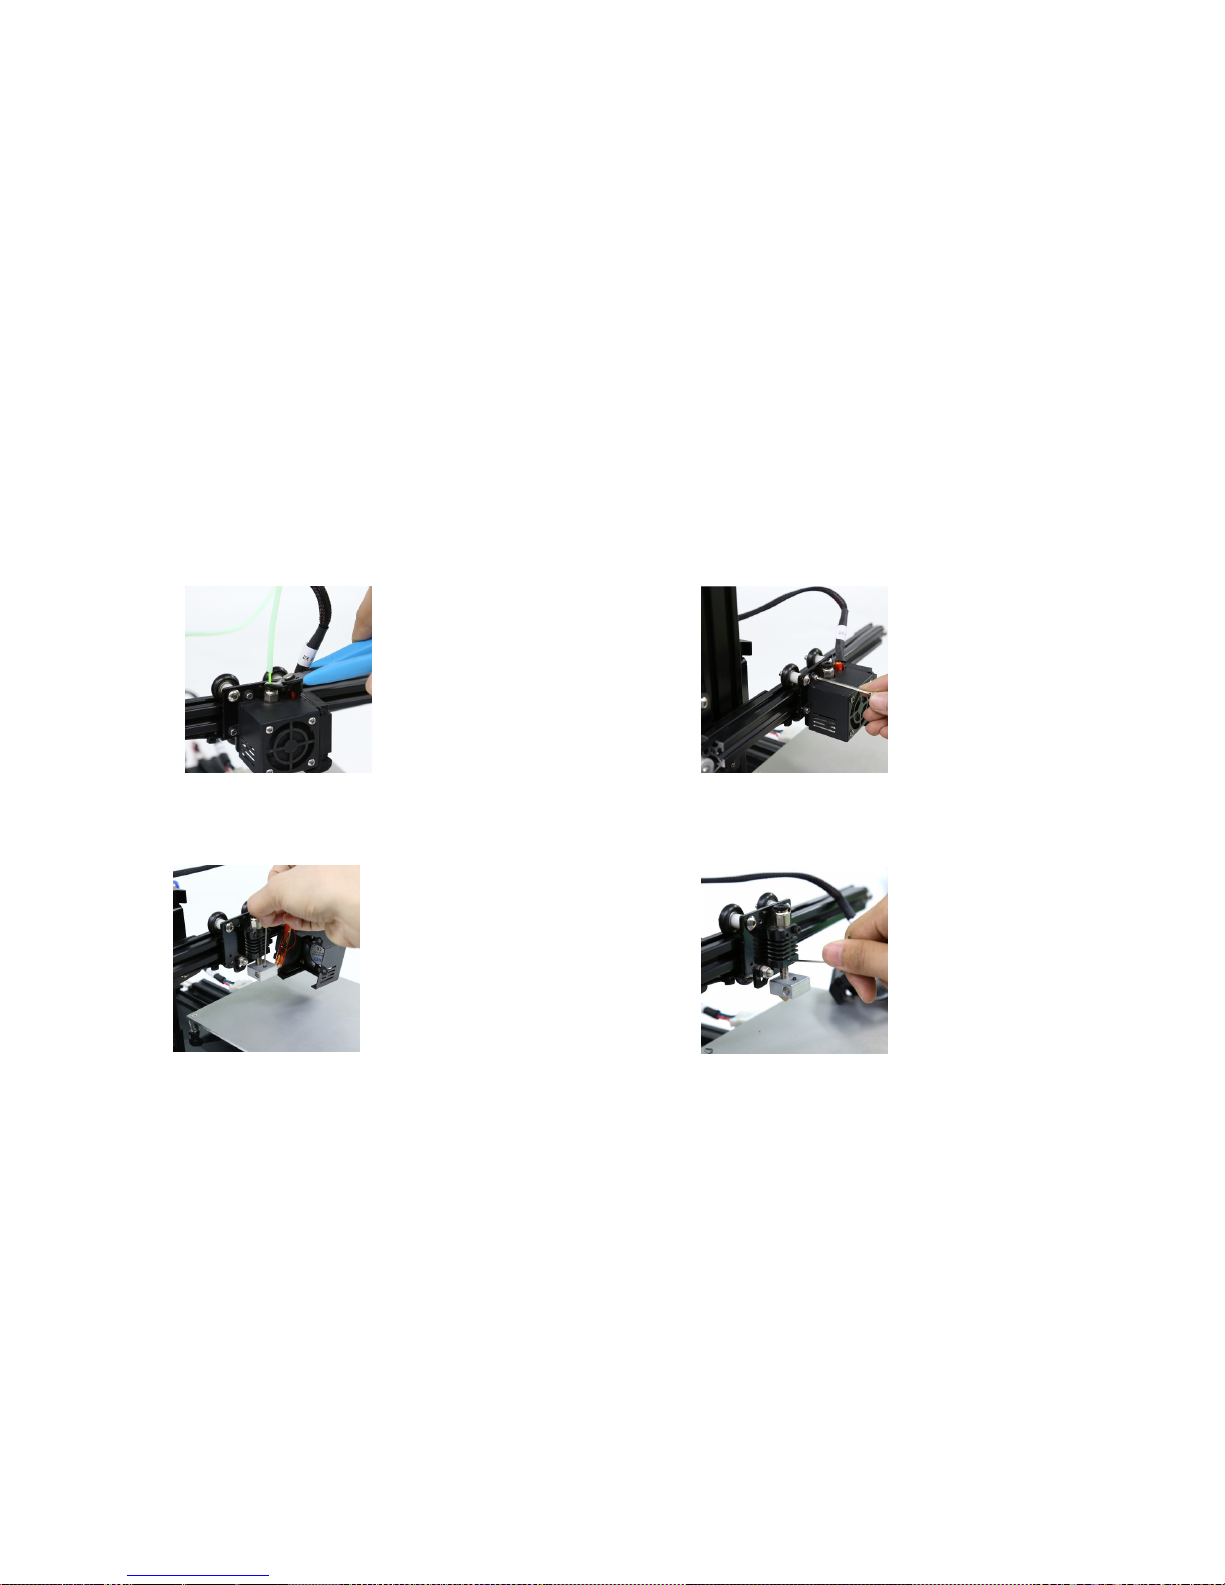
How to Disassemble and Install the Extruder
1.Remove filament
and the feeding
pipe out
3. screw out the jack
screw and remove
the heat block out
2.Increase the nozzle
temperature to 210℃ to let
the remain filament flow
out automatically and then
drop the temperature down
to 30 ℃
4. Loosen the set screw in the
extruder and remove the heat
pipe out.
Install the extruder based on the
opposite steps above.
Page 30
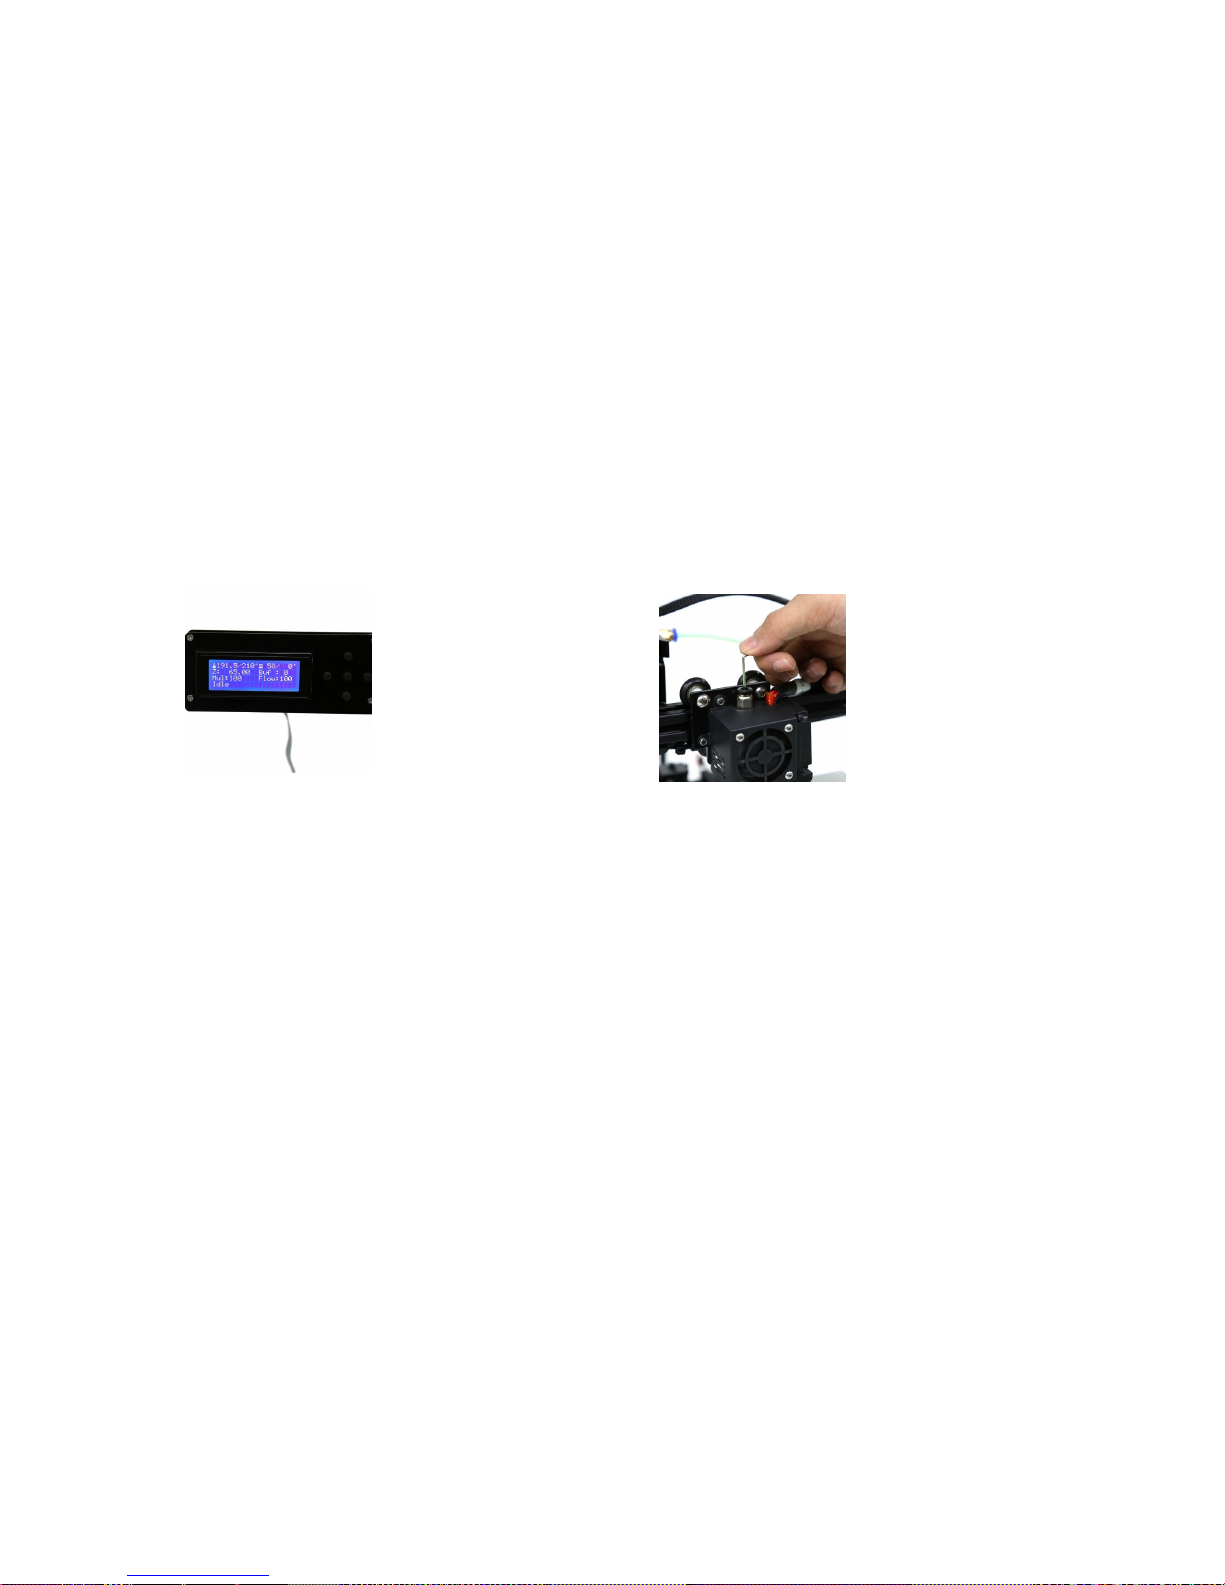
How to Clean the Nozzle?
1. Increase the nozzle
temperature to 210℃
to let the remain
filament flow down
automatically
2. When liquid filament is ran
out , clean the nozzle and drill
with tool squeezing in the hole
Page 31
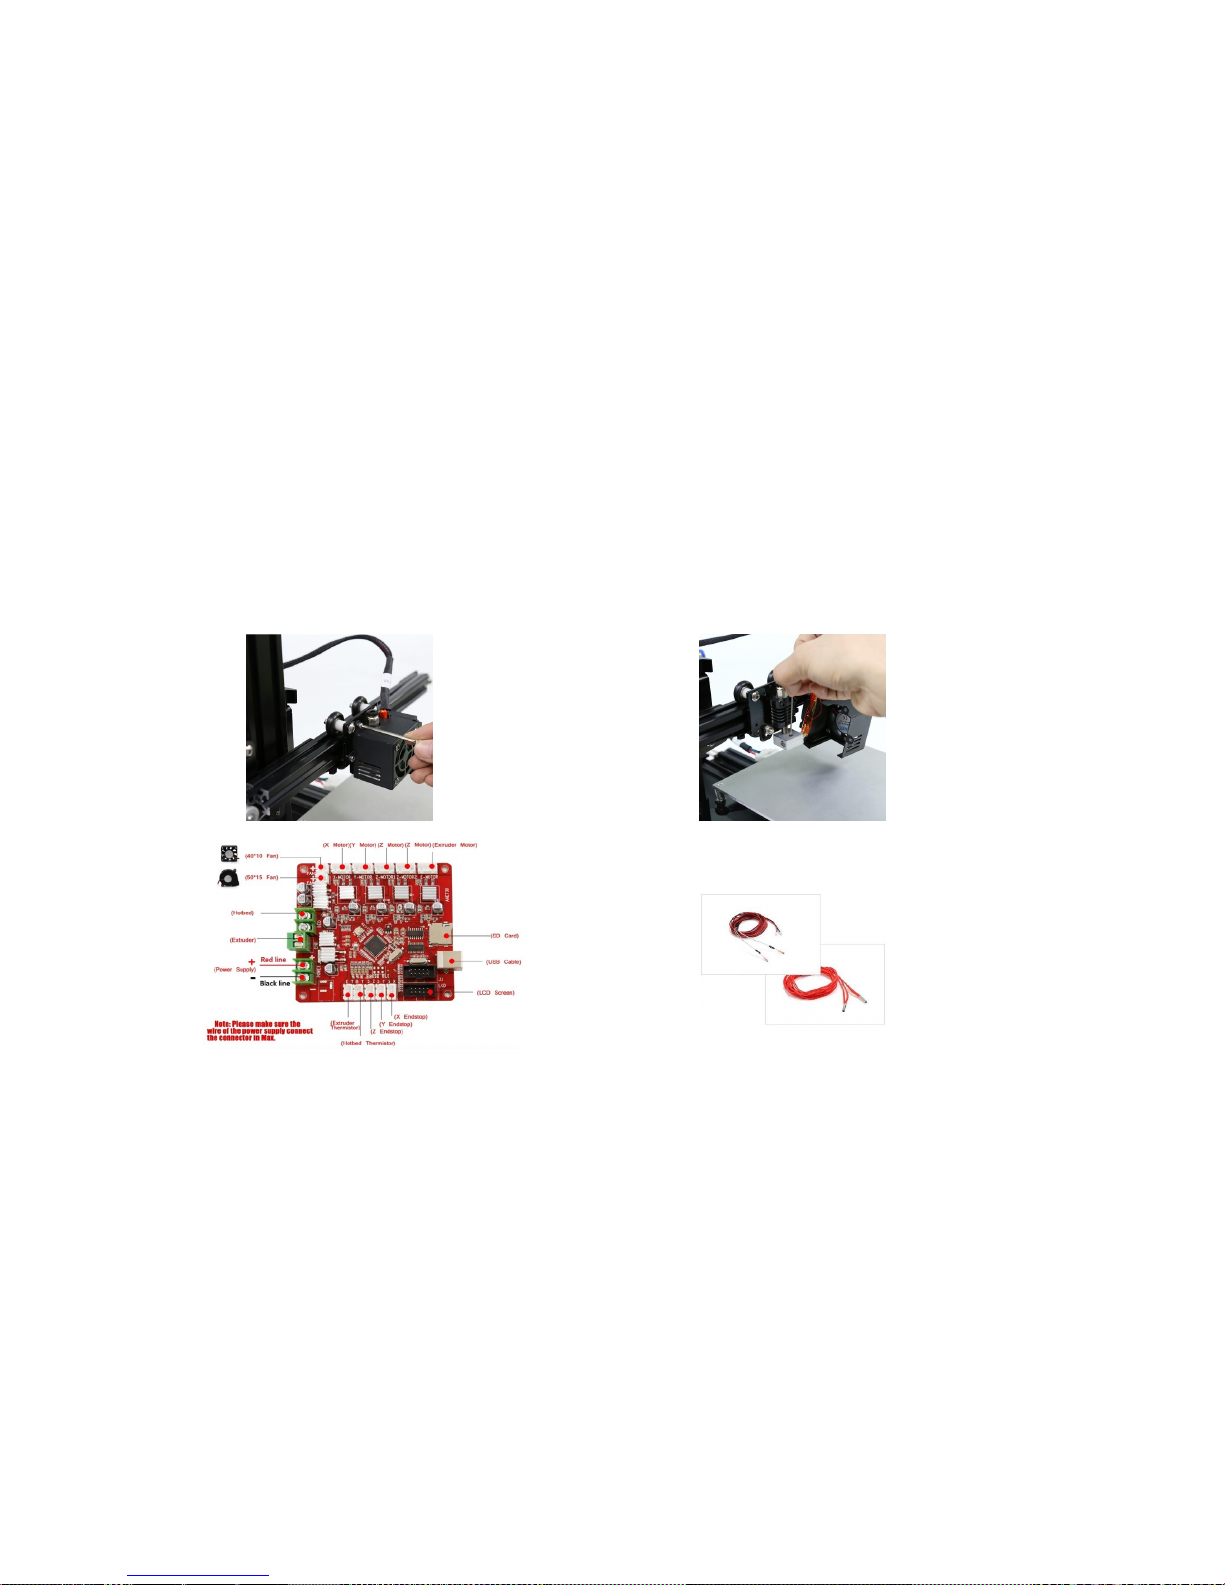
How to Replace Heat Pipe and Thermistor?
1. Disassemble
extruder and
screw out the
screw on the heat
block
2. 2.Remove heat
pipe and thermistor
out
3. Connect to the right
interrupts referring to the
mainboard
4. Replace the heat
pipe and thermistor
with new ones. Reinsert
the heat block
accordingly
Page 32
 Loading...