

Page 1
User's
User's
User's
User's Guide
Guide
Guide
Guide
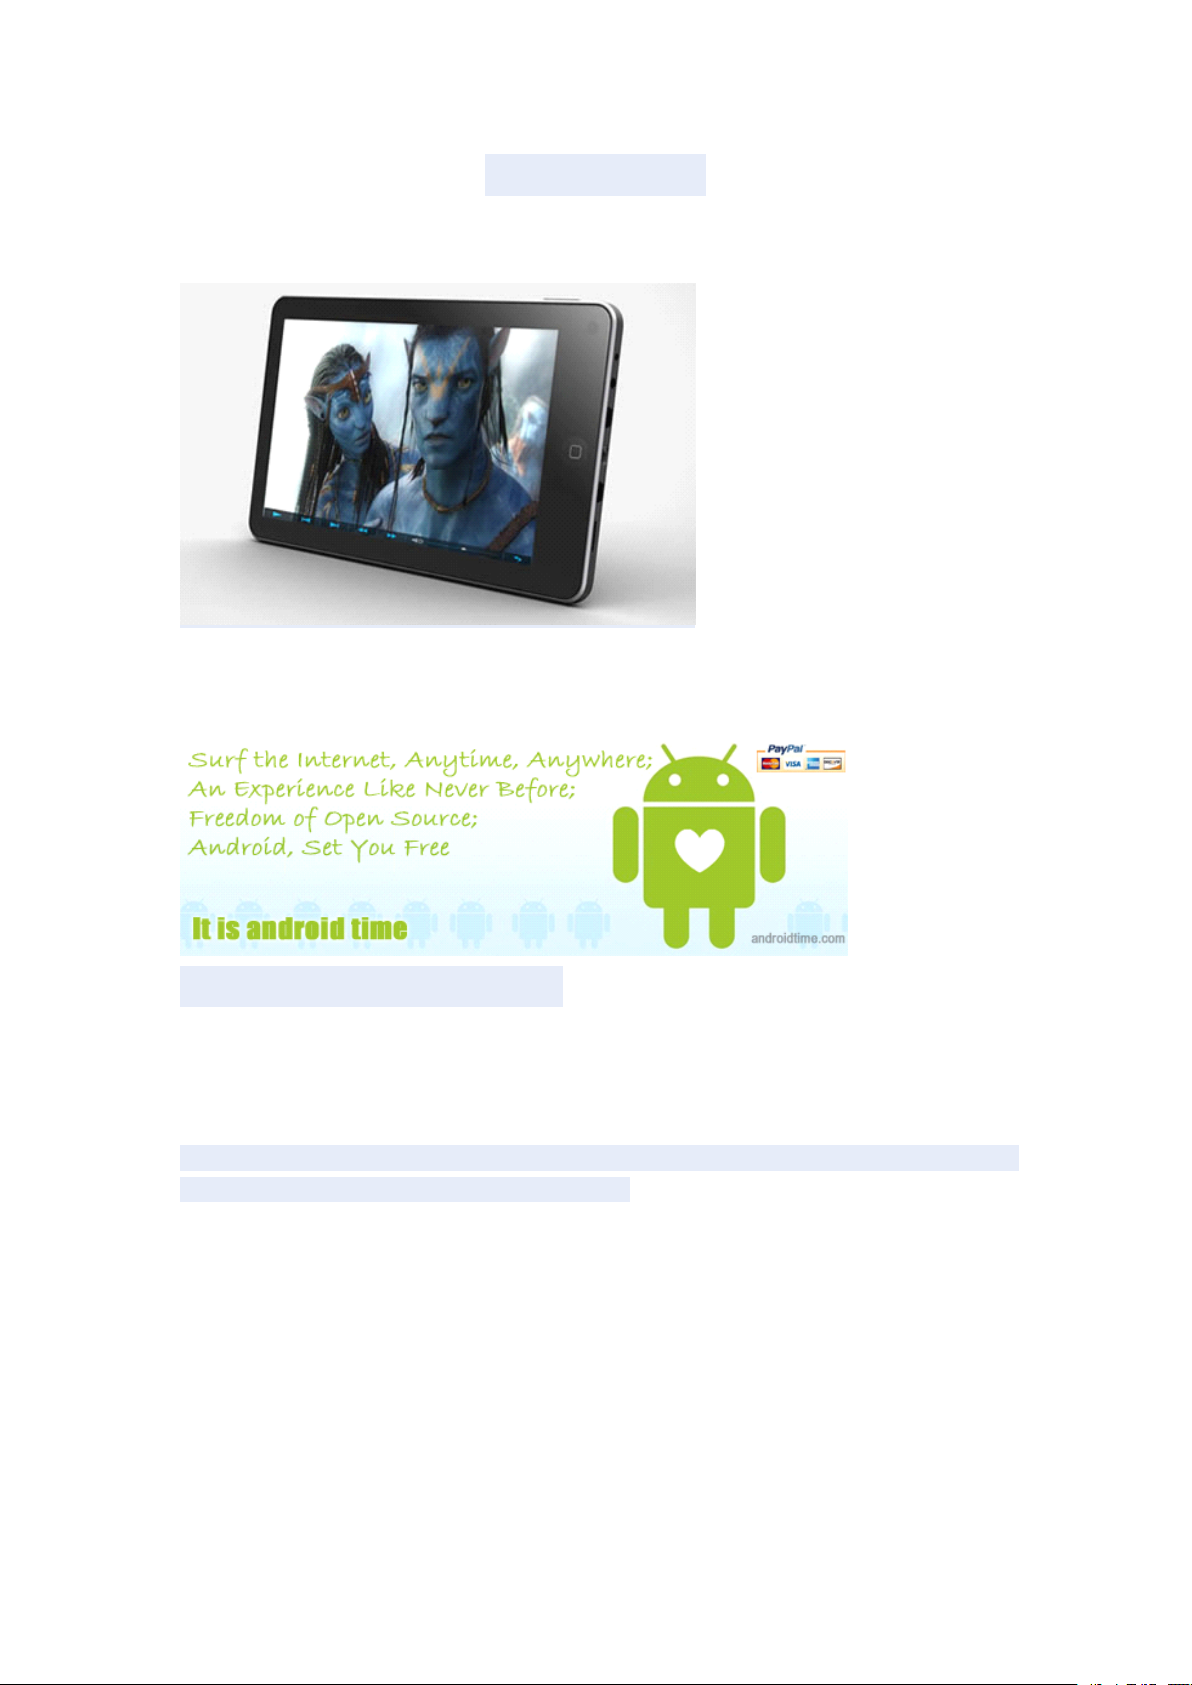
HaiPad
HaiPad
HaiPad
HaiPad MID
It is android time,It is our time ;
Hot android device,Factory price,Fast delivery,online store,blog and forum
www.androidtime.com
www.androidtime.com
www.androidtime.com
www.androidtime.com
Thanks:
Dear User
Thank you for purchasing our product.
These operational guidelines for the user, to ensure you
use, read the instructions carefully before use.
a
MID
M701
MID
M701
MID M701
M701
quick and convenient to
Contents:
1. Notes
2. Random Accessories
3. Hardware Specifications
4. Knowledge products
5. Startup and shutdown
6. Desktop
7. Button
8. System Settings
Page 2

* Time and date settings
* Screen brightness
* Standby screen
* WIFI Wireless Connection
9. Install, remove and run the application
10. Touch calibration
11. Music
12. Video
13. Picture
14. Network
15. Recording
16. Mail Client
17. Wallpaper
18. External equipment
* USB connection
* OTG use
* Keyboard and mouse
19. Firmware upgrade
23. Frequently Asked Questions Treatment
Note:
* This product is
a
high precision electronic products, do not disassemble.
* Avoid strong beat, the collision of the product.
* Avoid using this product the following conditions: high and low temperature, moisture,
dust, magnetic fields strong and long-term exposure to sunlight.
* Please use
chemical cleaning solution. This product should not be dripping
should not be placed near the product category, such as glass filled with
*
Too
long, use the headphone volume is too large may cause permanent hearing
a
wet cotton cloth wrung gently wipe the product shell, do not use other
or
splashing water, so
a
liquid items.
damage.
* Do not cross the road, driving motor vehicle
or
bicycle use headphones to avoid
traffic accidents.
* Please only use permitted batteries, chargers and accessories, use any other type
of products would violate the warranty regulations and may be dangerous.
* Please follow the relevant local environmental regulations to deal with obsolete
machines and accessories.
Page 3
* This product is in the course of any questions, please contact your local dealer
directly with the company's customer service center.
* For those because the product is damaged, repair or other causes of memory loss
wipe coating, the Company assumes no responsibility, please follow the user manual
for standard operation, and timely backups.
Random accessories:
(Related diagram)
MID701 host
9V 1.5A DC charger
Quick Start Guide
Warranty Card
HDMI cable
USB cable
or
Hardware
Hardware
Hardware
Hardware rules:
Processor
Memory
Storage
Wireless
rules:
rules:
rules:
USB
MID701 硬件参数
Telechip Tcc8902 High-performance ARM
Frequency 720MHz Support for hardware 2D/3D graphics acceleration
11
processors
DDR2 256MB
Built-in flash memory 2GB/4GB/8GB/16GB/32GB Support external TF
card, maximum capacity of 32GB
IEEE802.11b / g wireless network
USB1.1 high speed interface and USB2.0 OTG
Video
Output
Audio
HDMI1.3 Full HD Video Output Interface
Analog
3.5mm headphone jack
High-quality stereo loud speaker
Built-in microphone
Headset maximum output power of 40mW
Frequency response: 20Hz-20KHz
AV
composite video output interface
Page 4
SNR: greater than 90db
7 inch
Size
Screen
Other
Annex
Resolution
WVGA 800*480
Color
Operating
Size
Color Black / White / Silver
Weight
Battery
Power adapter (DC V / A)
HDMI cable (optional)
16 million colors
Resistive Touch Screen Single
193*115*14.3mm
350mg
Built-in lithium polymer battery 3000AH
USB Cable
Certificate, quick guide and warranty card
Startup and shutdown
* Boot: Press and hold the power button, the green LED indicator light, the system will
enter the startup process, as follows:
Boot Logo startup ...
Page 5
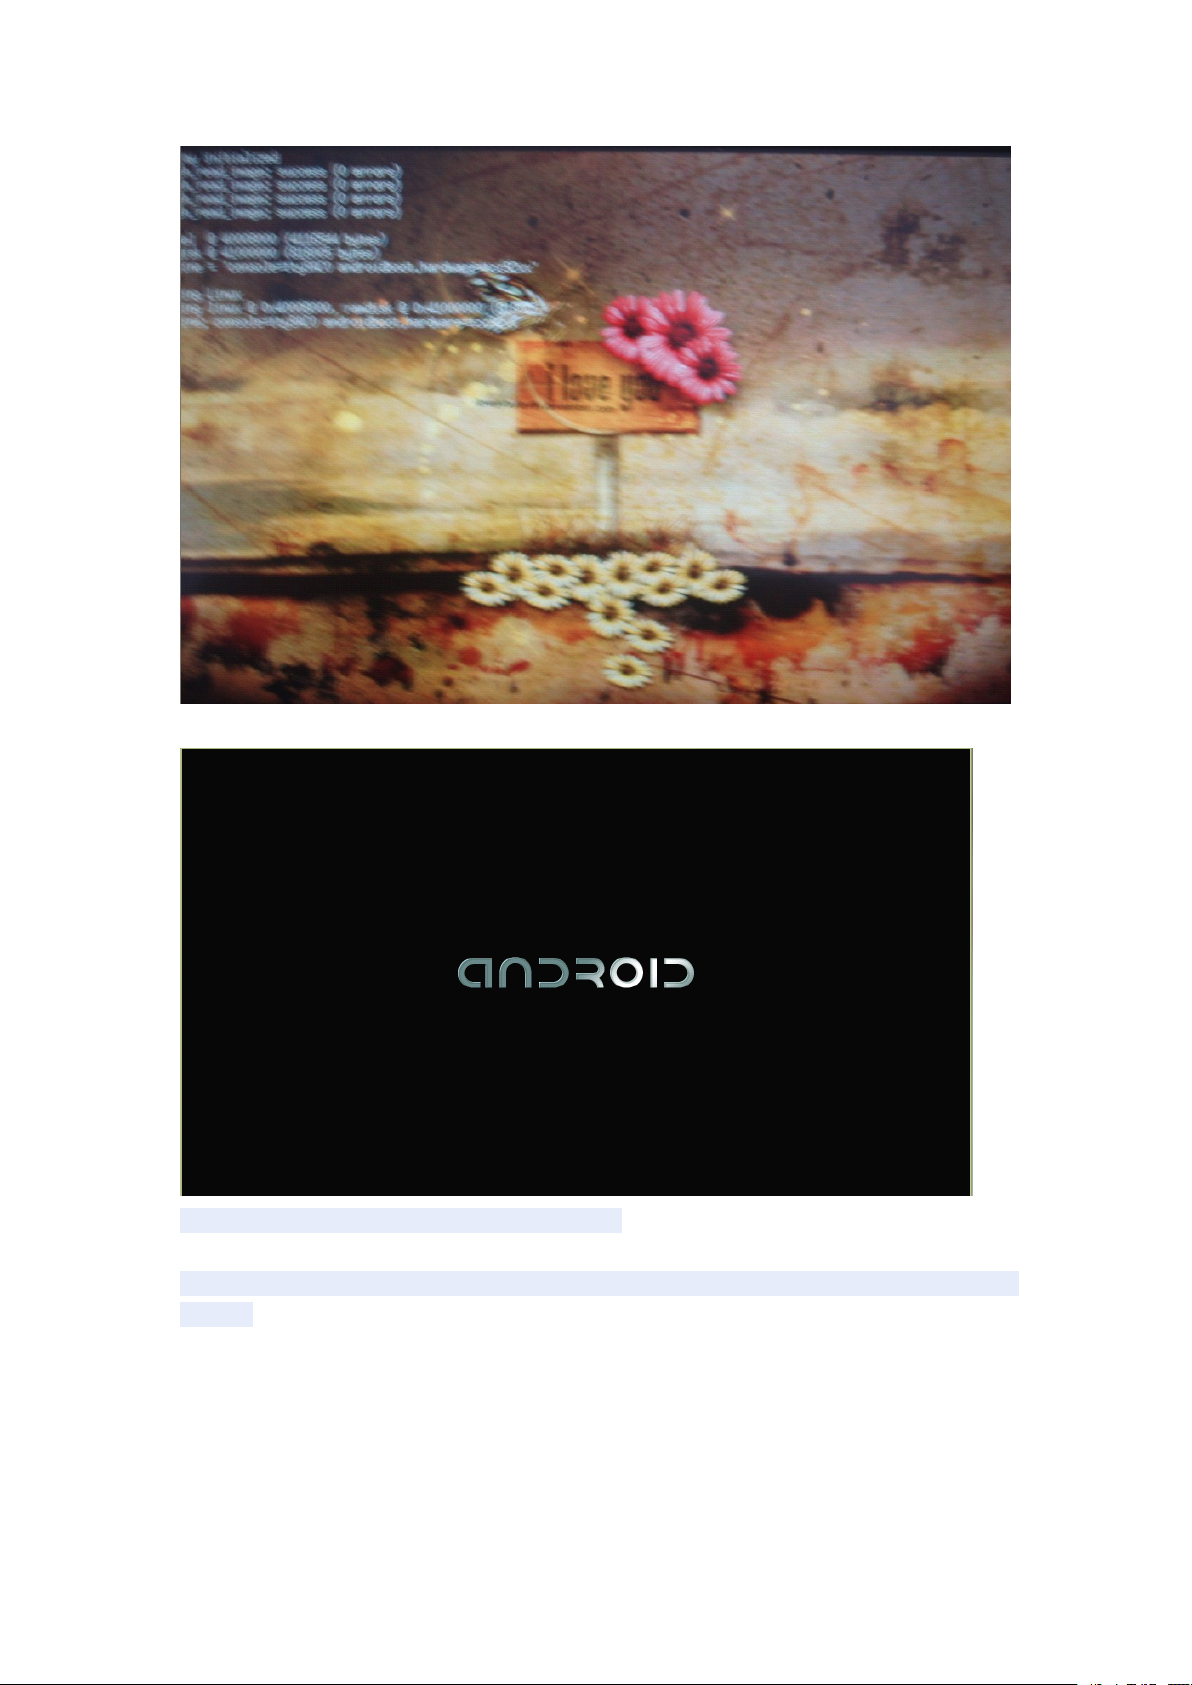
System has been started, are entering the Android system:
The system enters the default home interface
* Shutdown: Press the power button, pop-up device options, select Shut Down,
follows:
as
Page 6
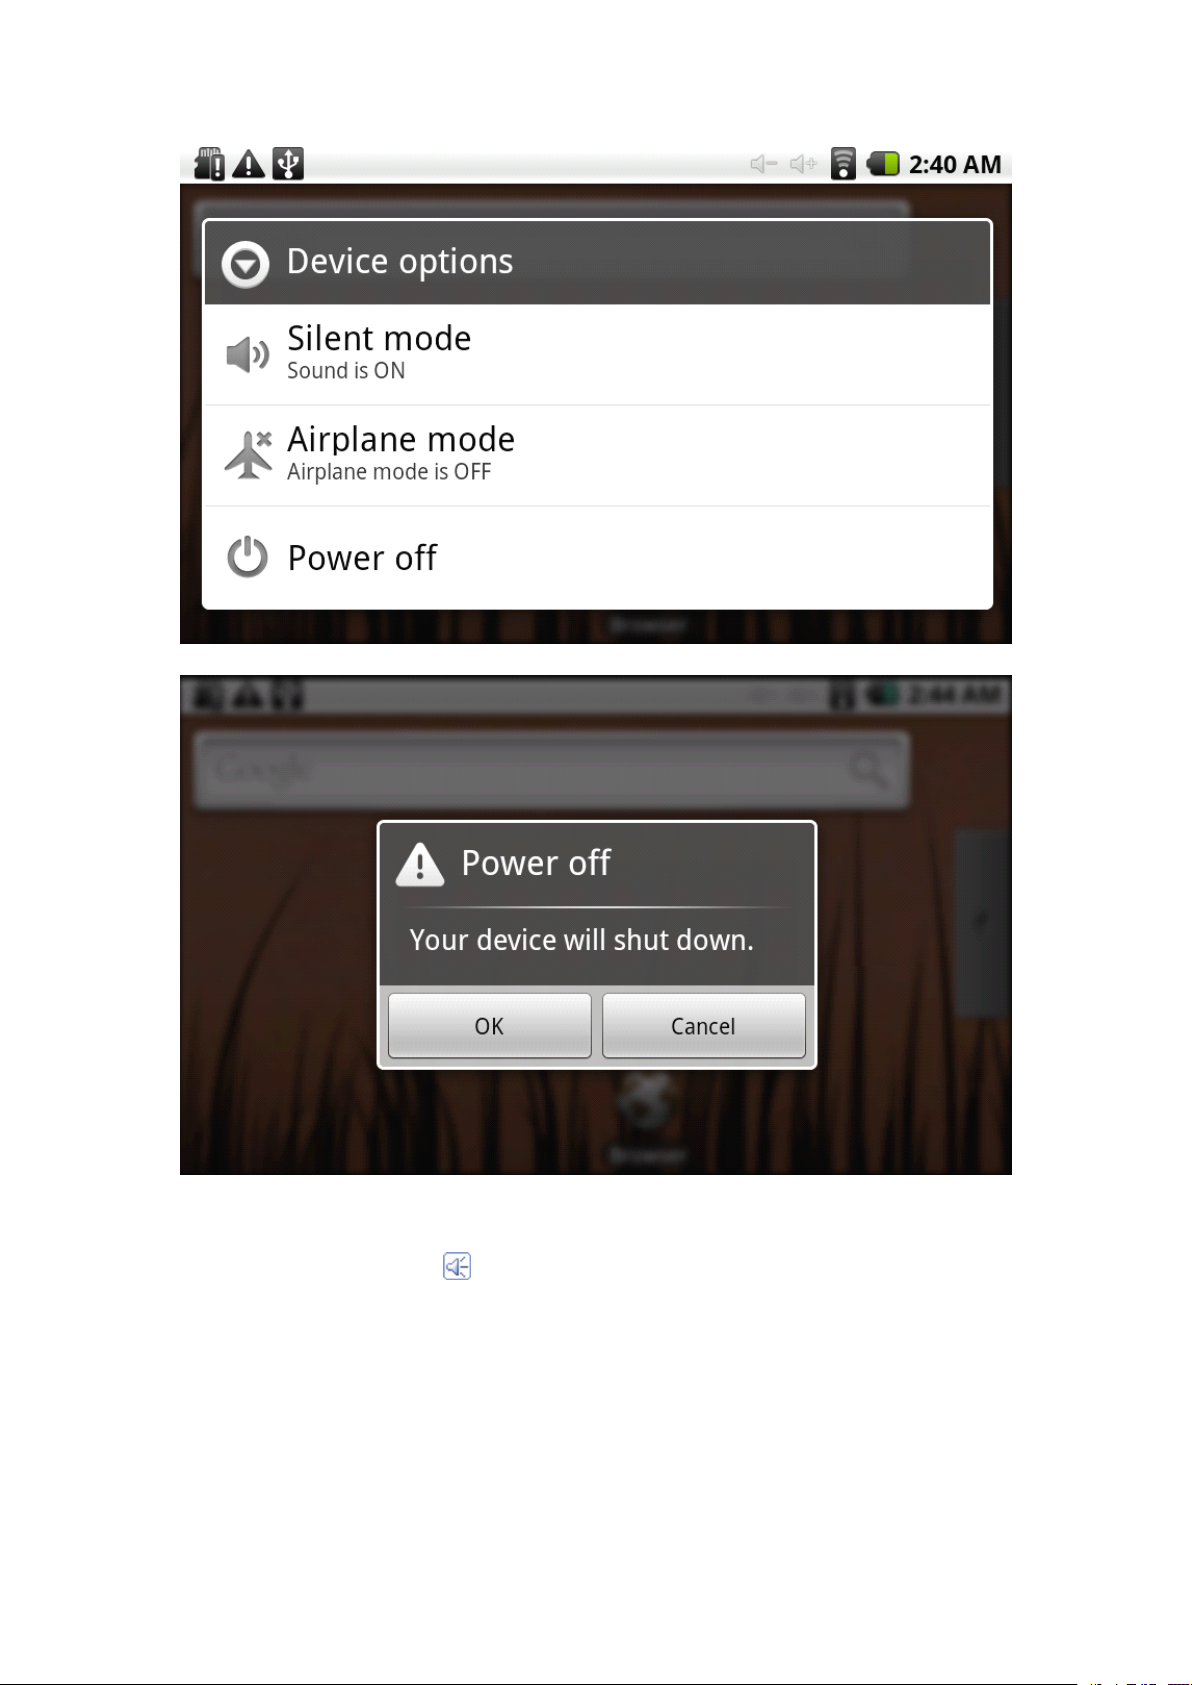
Click OK, you can safely shut down.
* Sleep: the machine under normal operating conditions , Short press the power button ,
Into hibernation , Now , Screen will close . Short press the power button again , Be able
to resume normal mode . When the time being use this MID can enable this
feature when ,
Desktop
Desktop
Desktop
Desktop :
System after the completion of normal start , Desktop can see Android2.1 ( The figure )
The default desktop by the : Status Bar 、 Quick Search Bar 、 Main menu labels and
number of shortcut icons form .
To
reduce power consumption .
:
:
:
a
Page 7
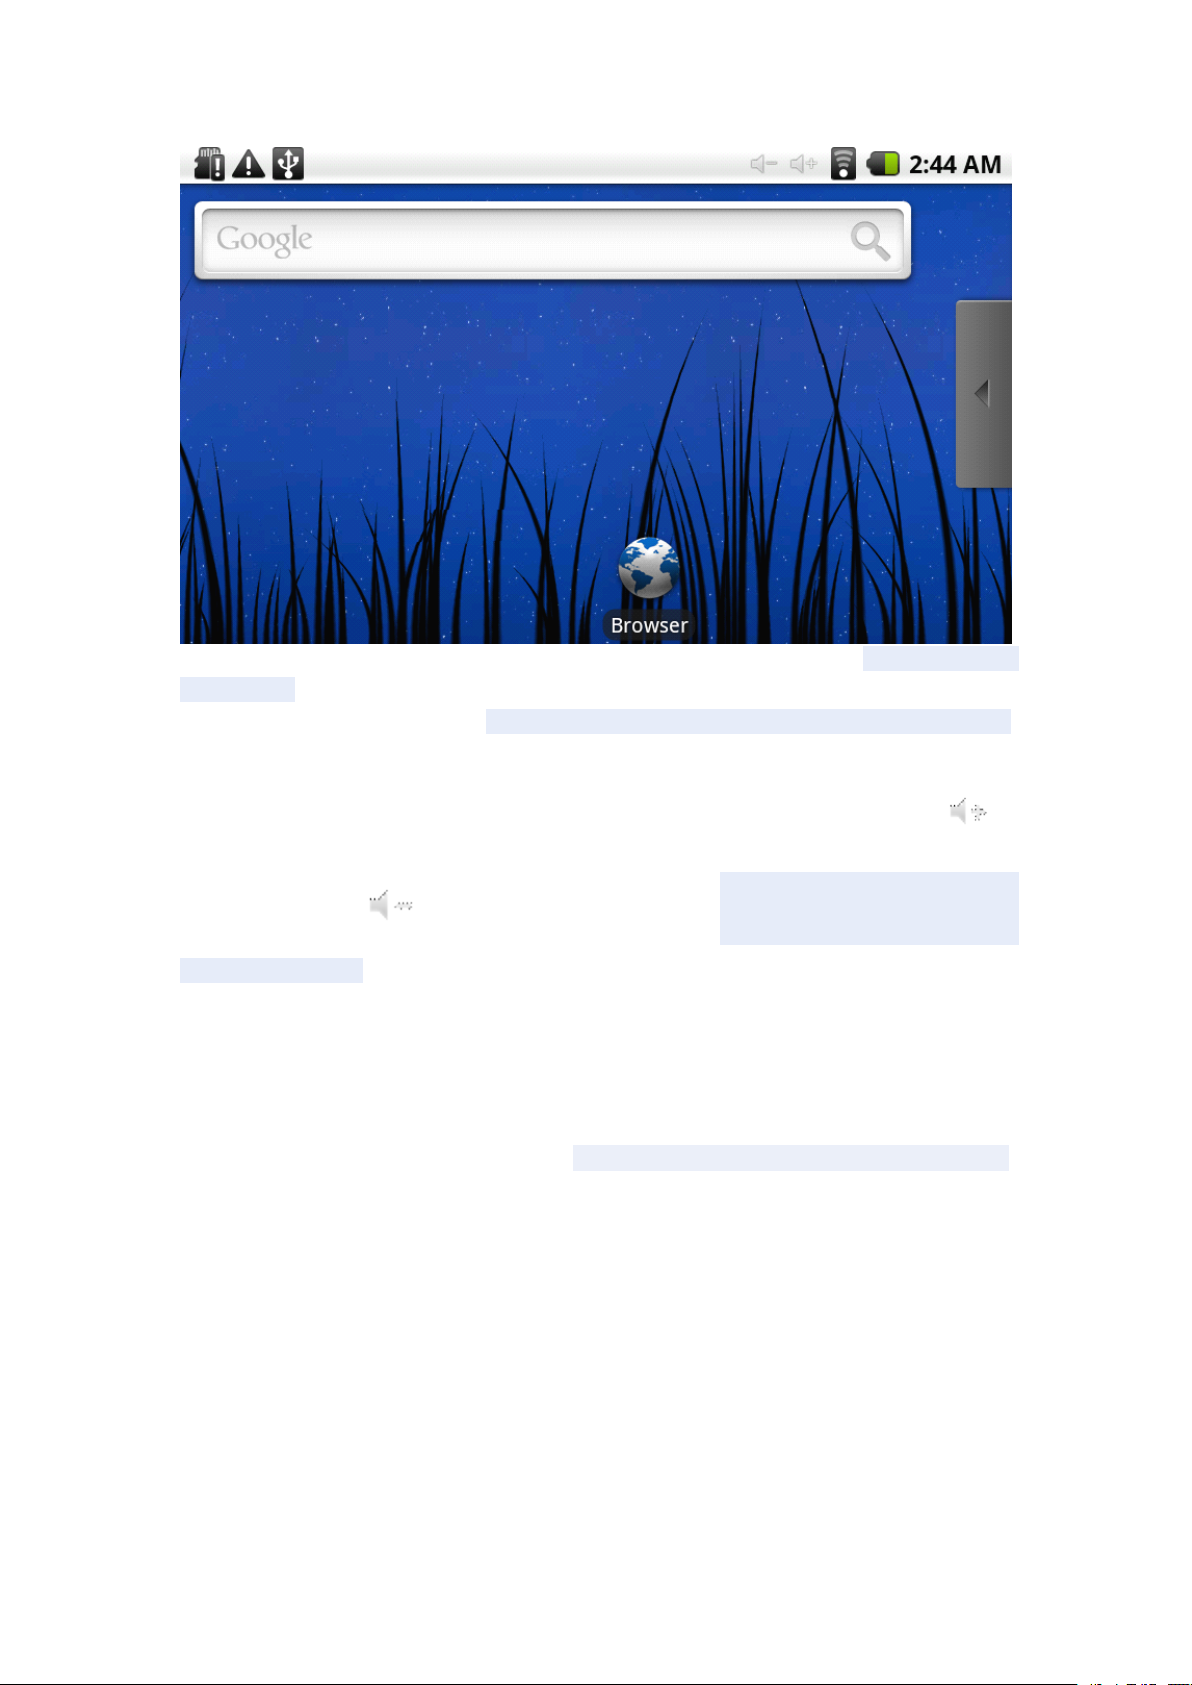
The status bar to display the current system of network status , Battery , Time
information . Quick search box for Web search by typing key words . Middle right of the
screen the main menu tab stop , Click
Bottom of the screen displaying the browser shortcut icon .
Optimization of the status bar results , Increase the volume of two icons ,
Volume reduction . Click to adjust the volume . Equivalent to Volume + and
Volume – features .
or
drag to the main menu bar to start the default .
Button
Button
Button
Button :
Volume keys: the task bar Volume +, Volume-achieve changes in the volume .
Power key: Press and switch machines. Short press to enter
Menu button: Displays the current form of the menu items (if any) .
Home button: Back to the main interface
Return: Return on an interface .
Main
Main
Main
Main Menu
Click or drag the main interface of the main menu tab, the main menu will be from
right to left (or bottom-first, last), and is as follows :
:
:
:
Android system uses in the course of the keys :
or
choose .
Menu
Menu
Menu Operation
Operation
Operation
Operation :
:
:
:
or
leave the hibernation .
Page 8
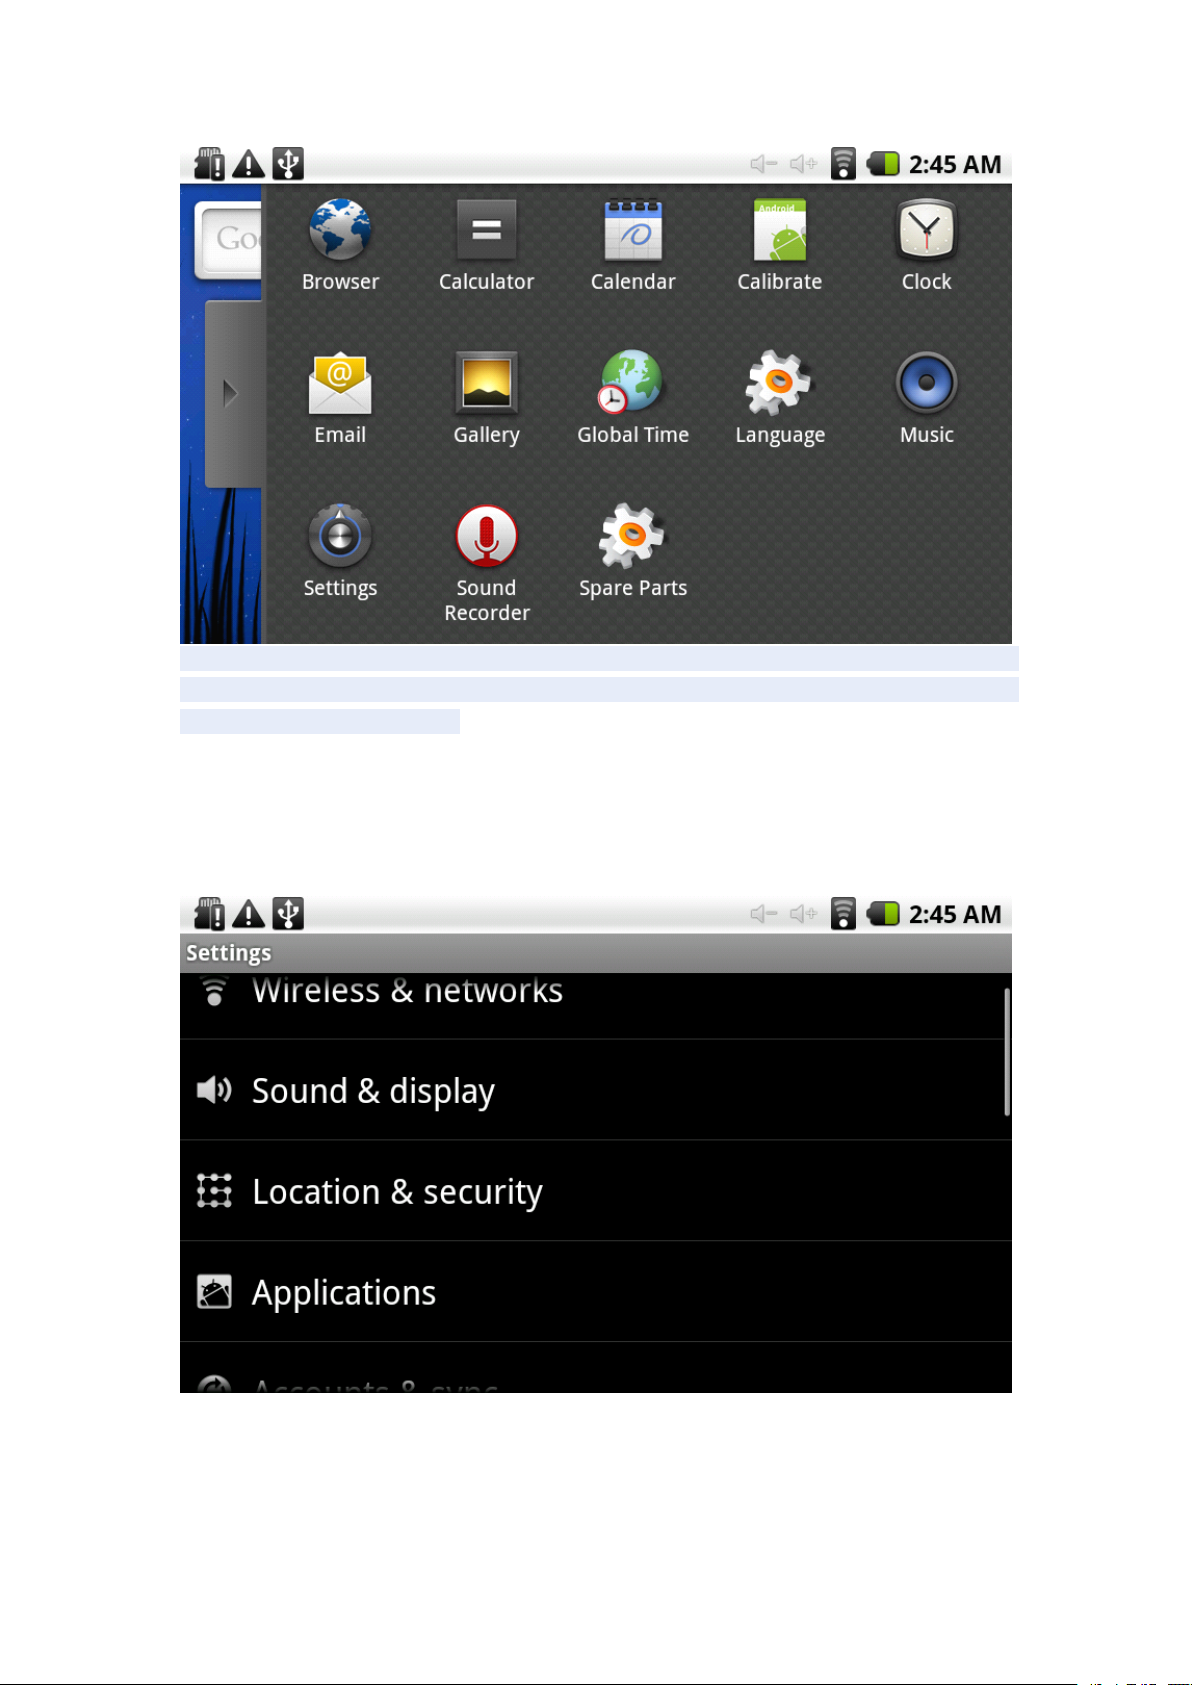
In the main menu, the system can be set to run existing applications, installanew
application, start the touch calibration, music player, video player, web browsing,
games and other operations .
System
System
System
System Settings
Click the main menu interface in the "Settings" icon, you can open the system
settings interface, as shown below :
Settings
Settings
Settings :
:
:
:
Select the appropriate operation of the relevant items, such as :
* Wireless and network
*
*
*
* Sound and display
* Date and time settings
Page 9
* About Equipment
Etc.
* Date and time settings :
Set interface options "time and date settings options"
settings interface :
Can choose to automatically: use the Network Time .
Can also select to set the date, select the time zone, set the time, time format, date
format and other information .
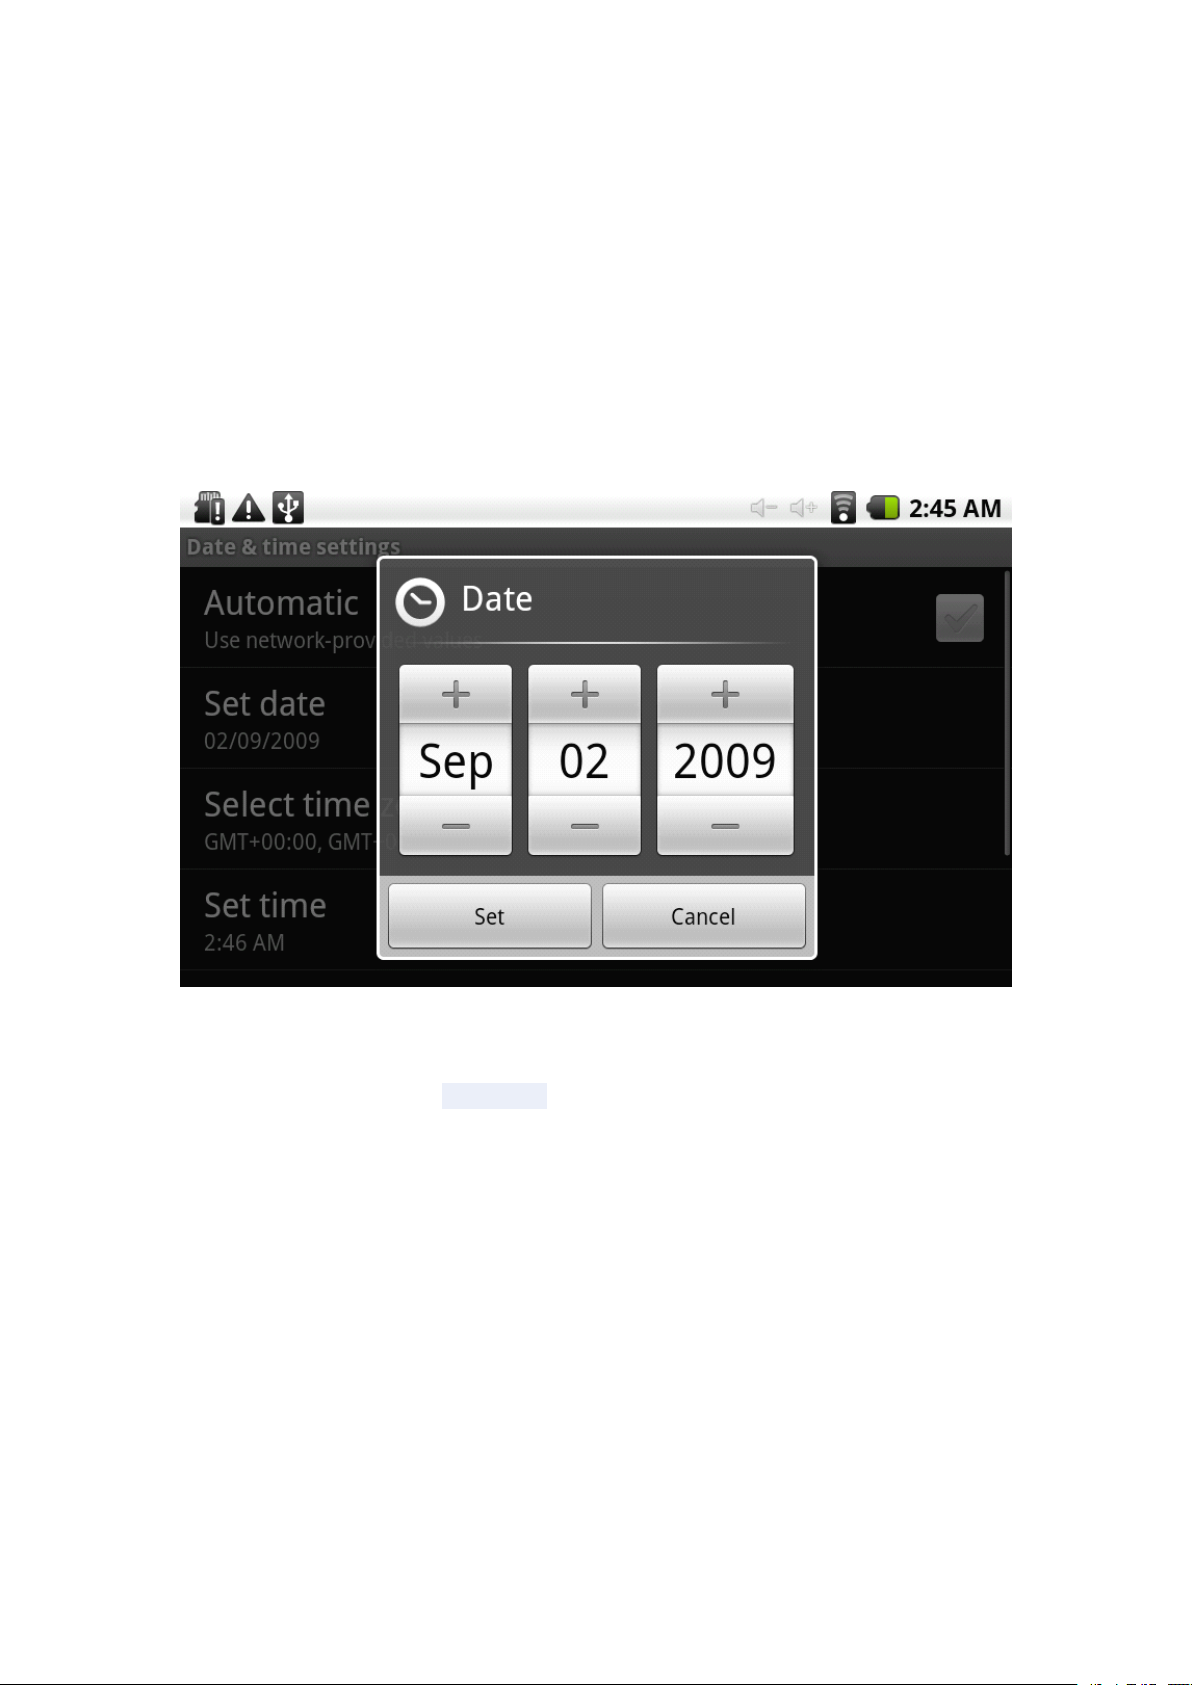
For example, choose to set the date, as follows :
to
enter the date and time
Select +: that the increase
Select -: that the reduction of 1 unit .
Also can choose the number, enter the input mode. Directly entering the desired
number, then select Done. As follows :
of
1 unit ,
Page 10
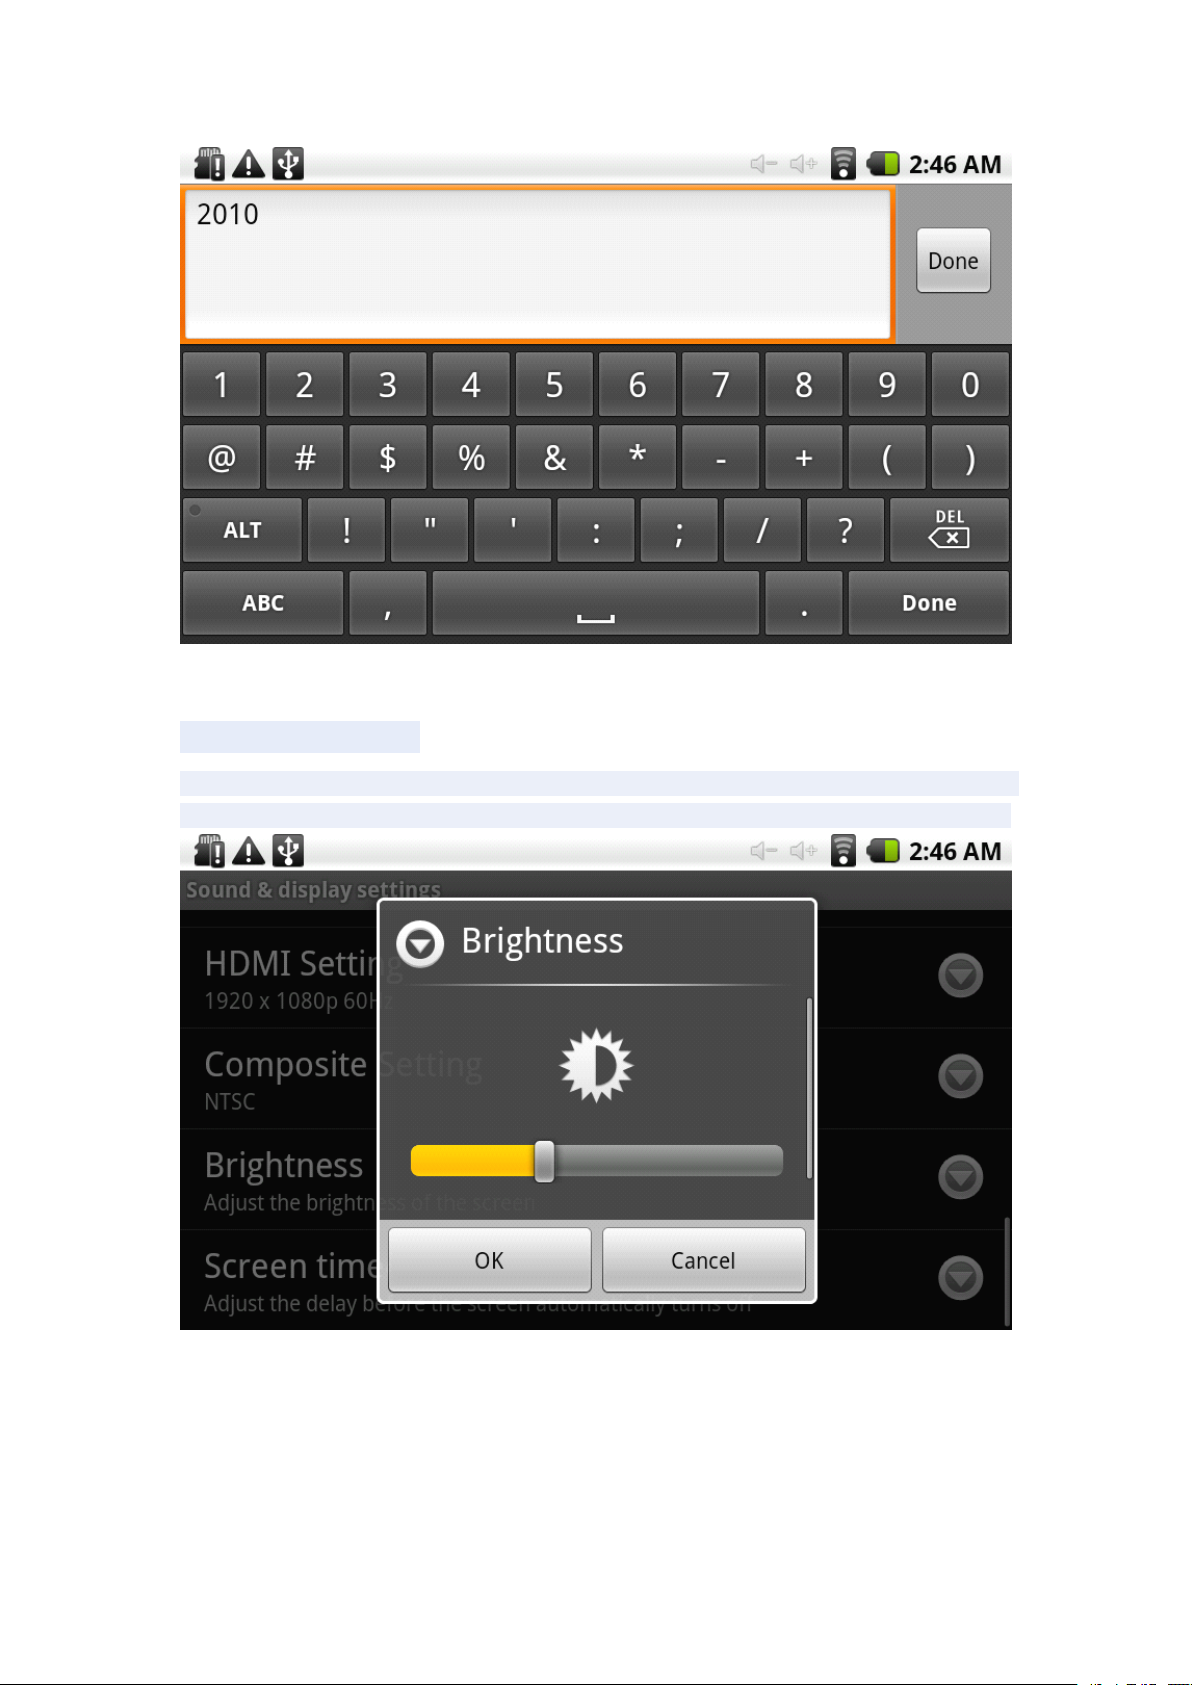
Select "Settings." If you enter the number of legitimate, then the operation is
successful, the system will set the option to use the new .
* Screen brightness :
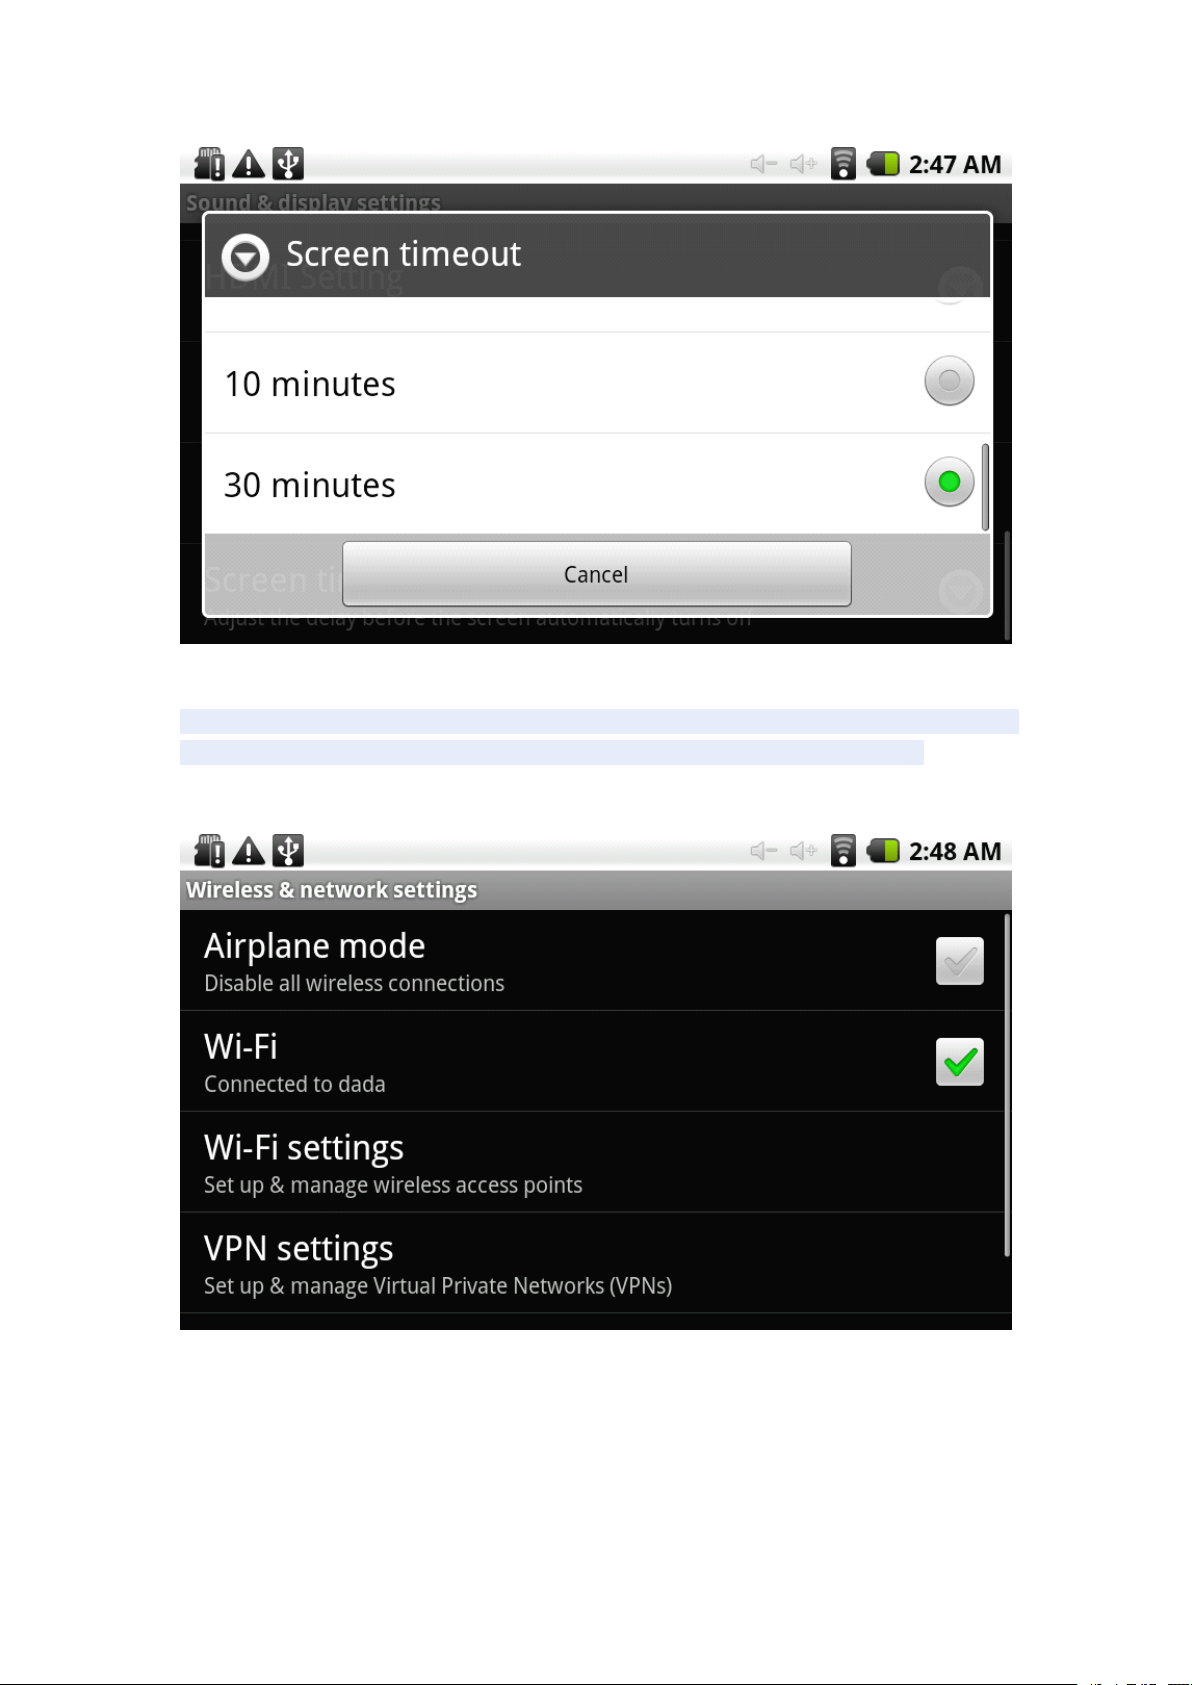
In the setup interface choose "sound and display settings" to enter the sound and
display settings interface, scroll down section, select "Brightness", there are interface :
* Standby screen :
Standby screen: the screen automatically locks the delay before .
In the setup interface choose "sound and display settings" to enter the sound and display settings
interface, scroll down section, select the "standby screen" interface appears , as follows :
Note: In the video, the screen auto-standby function does not work
Page 11
* WIFI Wireless Connection :
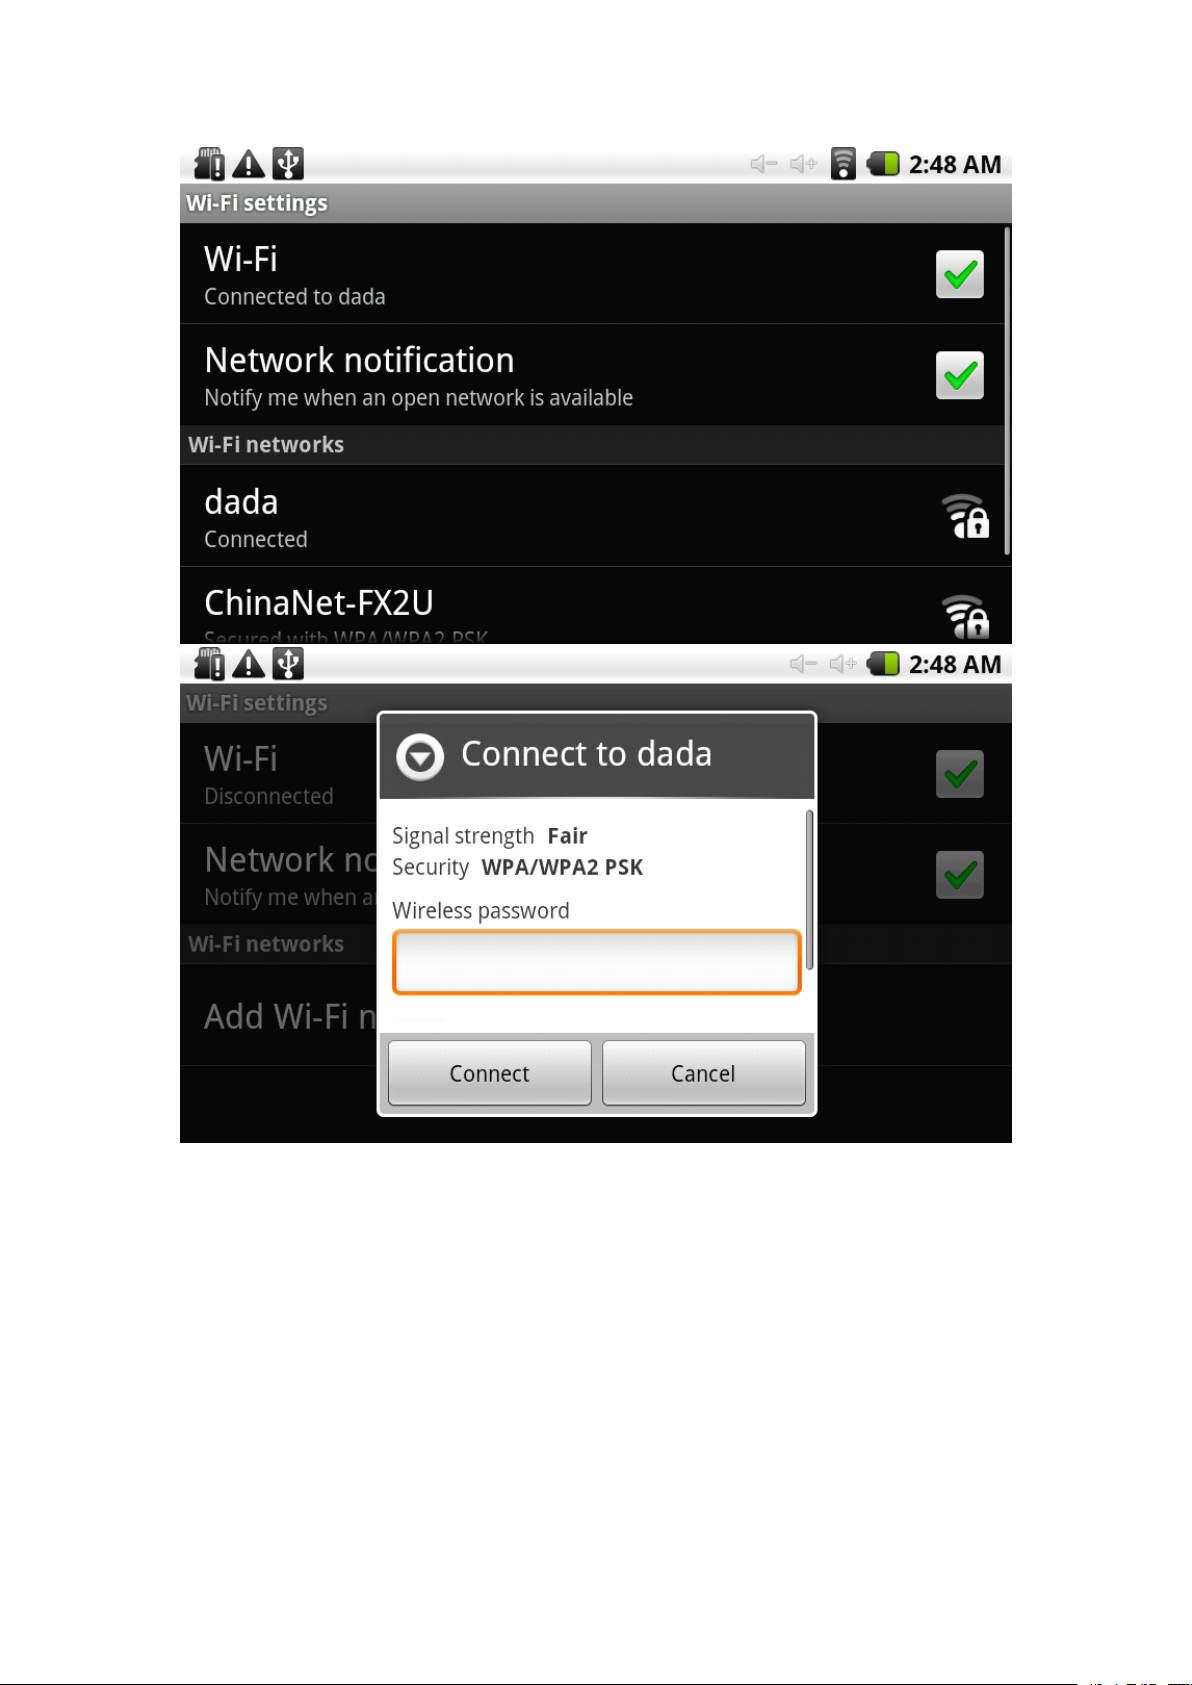
Click the main menu "Settings" icon, go to "System Settings" screen, click on
"Wireless and network" into the "Wireless and network" setup interface. Click the
"WIFI" section to quickly open the WIFI feature, click on "WIFI settings" column enter
"WIFI set interface"
as
shown below :
In the "WIFI settings" interface (above), click on the WIFI column also can open and
close the WIFI feature, click on the "Network Notice" lists MID701 search to the
wireless router, wireless router, click the search name will pop up settings window ,
please follow the prompts to complete the WIFI network links. Some encrypted
network, need to enteravalid
key.
Link diagram below :
Page 12
*HDMI 和 TVOUT:
This product supports HDMI output and TVOUT .
Page 13
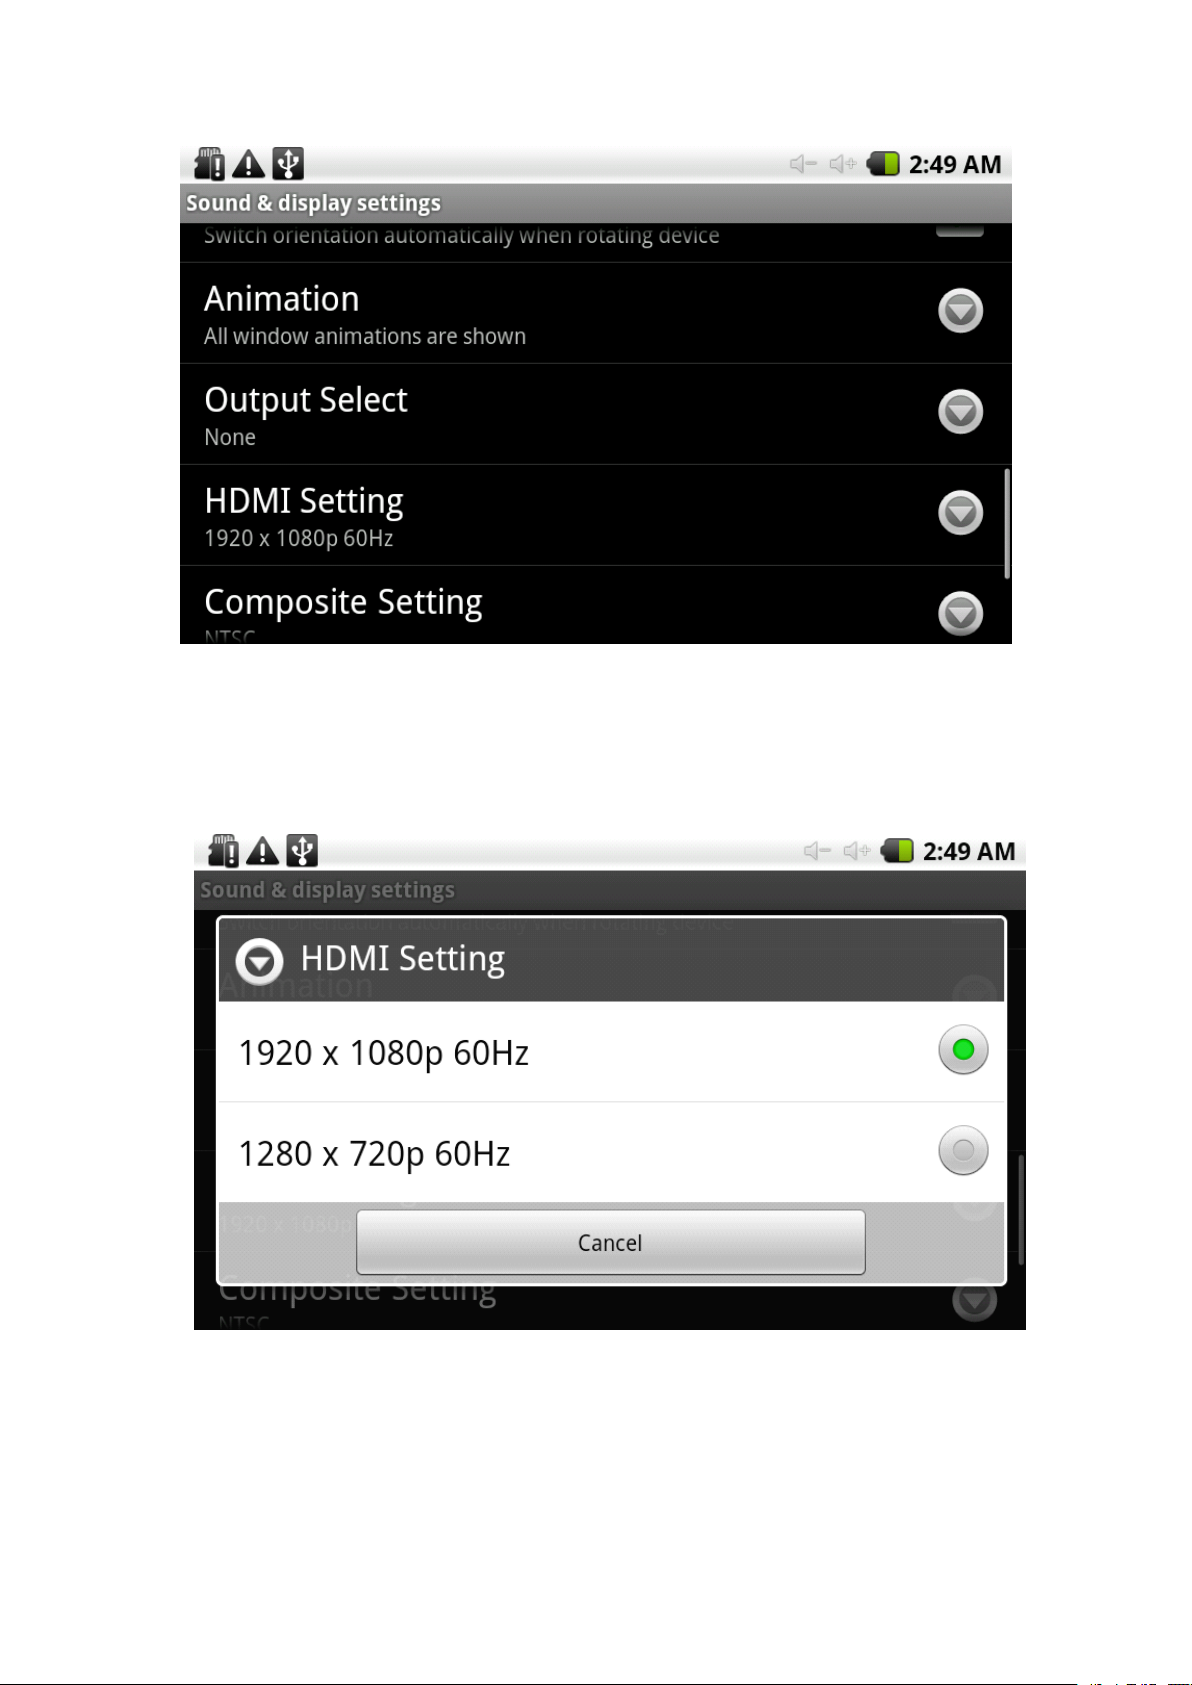
* Using the HDMI cable to connect
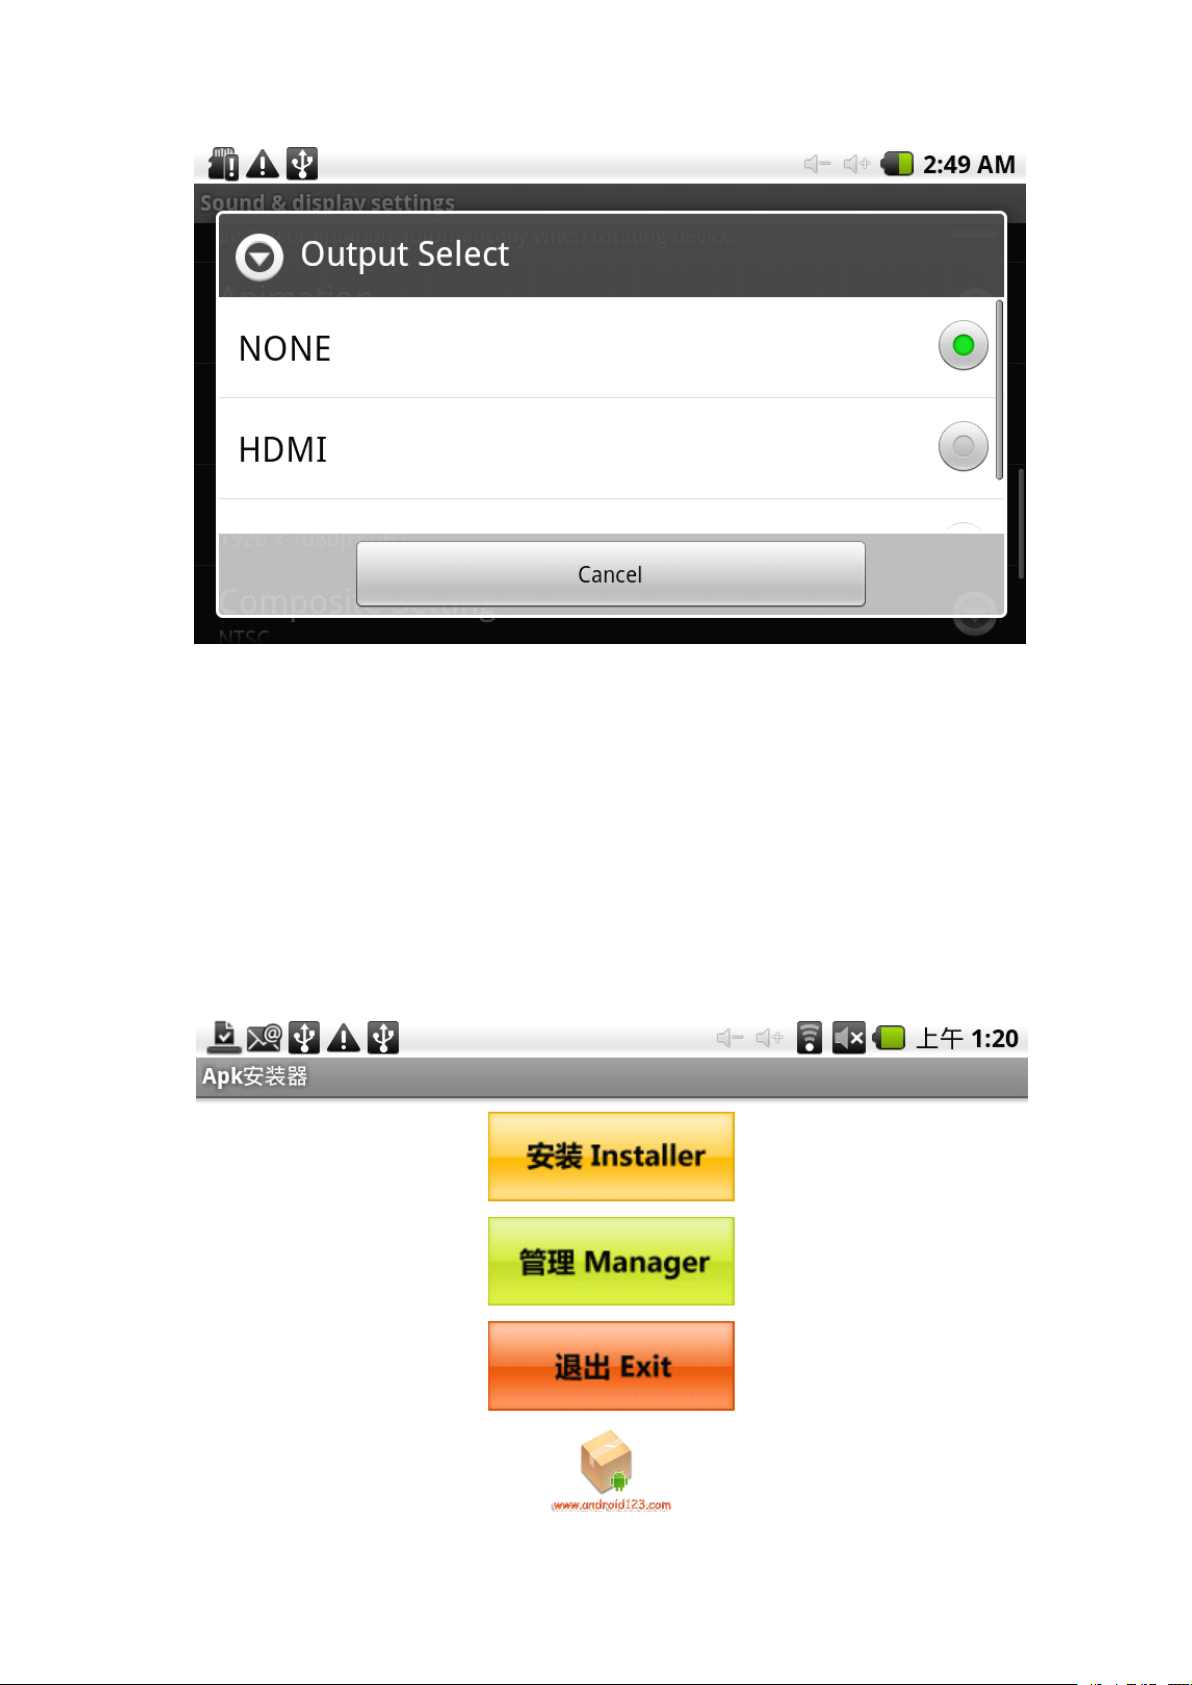
"Settings" / "sound and display" / "OutPut Select" to select HDMI output mode, the
system output to HDMI .
If you choose HDMI output, you can "HDMI Setting" which choose to change the
output format. System 1920X1080P 60Hz and 1280X720P 60Hz choice of two
formats .
a
HDMI input MID701 and equipment. In the
* Through the
In the "Settings" / "sound and display" / "OutPutSelect" select Composite output
mode, the system output to
If you choose to
output format. System "NTSC", "PAL" choice of two formats .
AV
cable to connect MID701 and digital input devices with complex .
AV
.
AV
output, you can "Composite Setting" which choose
to
change the
Page 14
When using the HDMI
scaled output to external devices at the same time .
or
Composite output on, LCD will display the contents of the
Install, uninstall, run the application
* Installation: Android install the application there are
through USB install, install third-party program aid. Here we introduce assisted by
APK installer to instal l .
Click the main menu interface "APK installer" can enter the "application installation
and management" interface. As shown below :
a
variety of ways, such as
Page 15
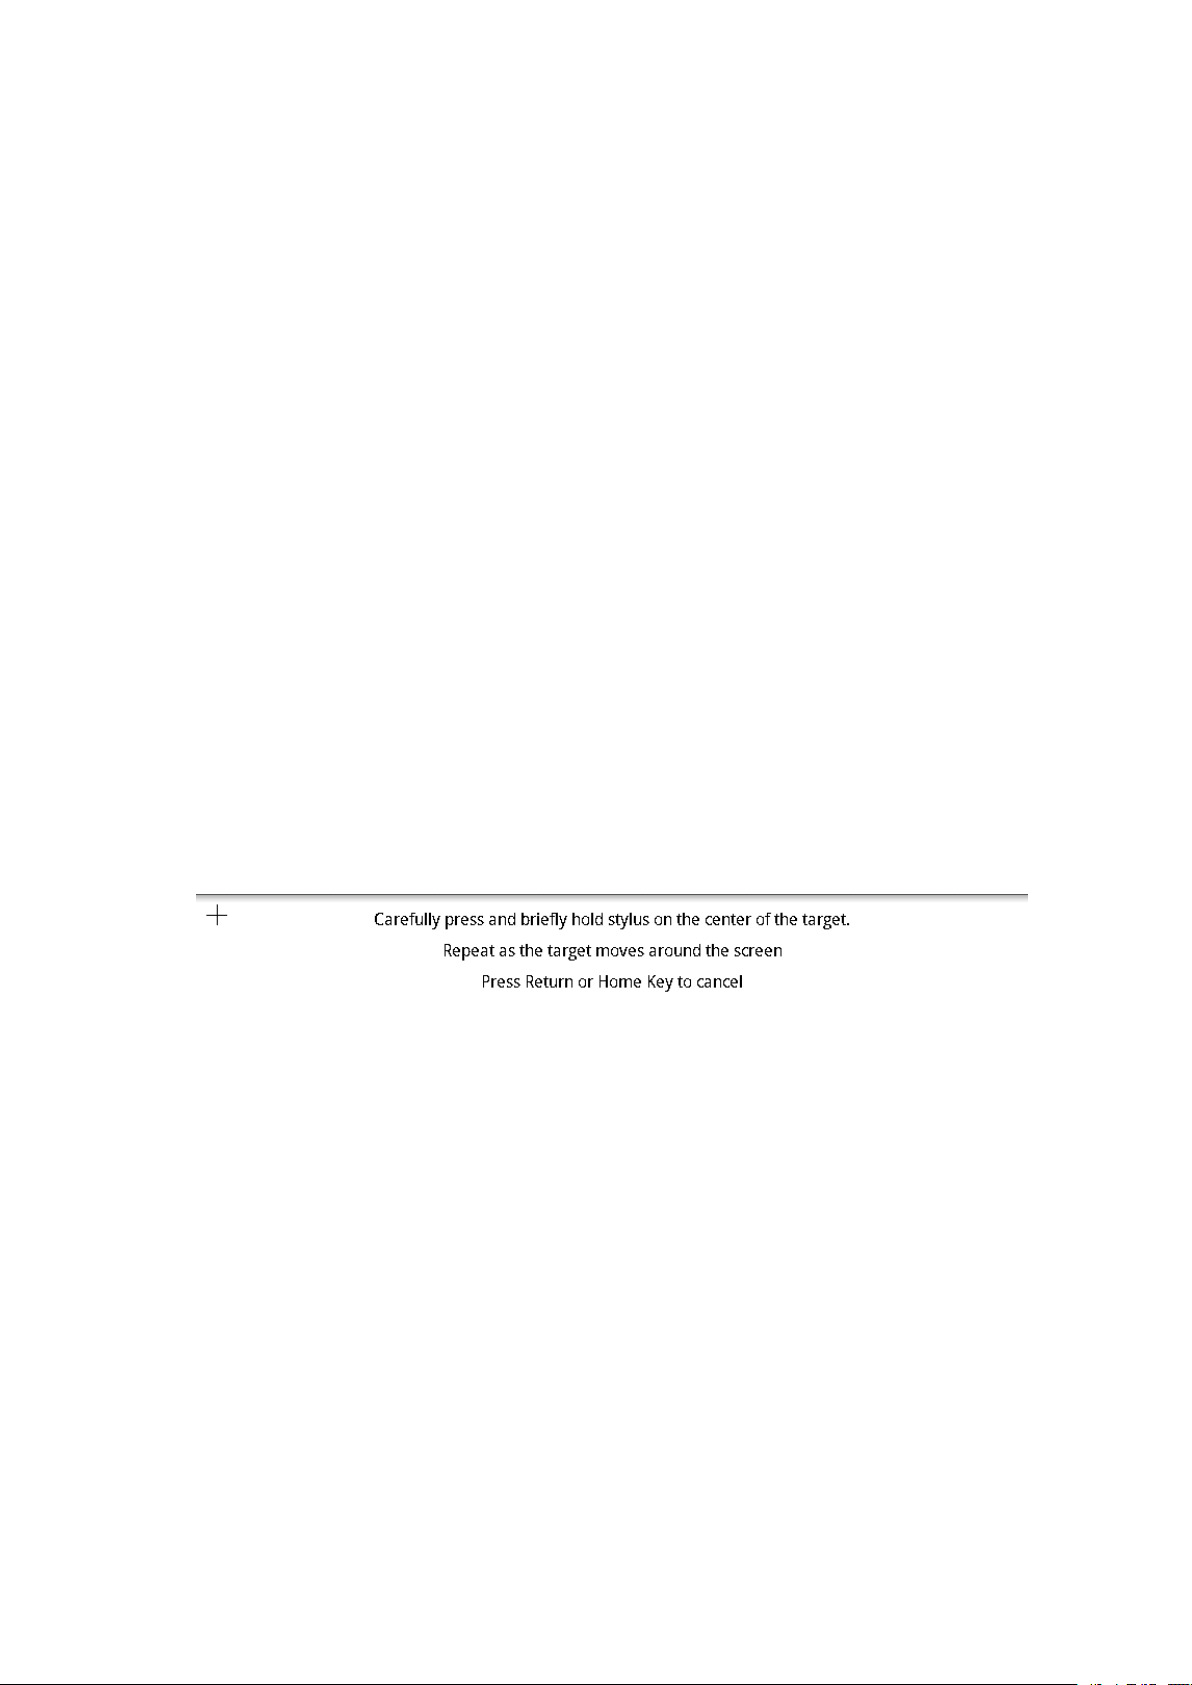
Click "Install Installer" install options into the APK interface. In the choice of interface
and file browse the directory, find your path to the file storage APK, what you want to
APK file into the application installation interface, click on Install to automatically
install the application .
After installation is complete, there will be "open" or "complete" message. Click "Open"
to open to install the program directly. Click "Finish" then exit the installation interface.
Generally installed in the main menu program to create the corresponding icon. Directly
in the main menu you can click on the icon to open the appropriate application .
Users can "Andrews market" online installation, or download via the computer, or online
through the machine built-in browser to download and install .
*
Uninstall
*
Uninstall
*
* Uninstall
Uninstall applications
management tools or applications that use the Android comes with management
software
Select "Settings" / "Application" / "Management Applications", select the appropriate
application has been installed, to view program information, the uninstall program
and other operations
applications
applications
applications :
.
You
can use the appropriate third-party software
Touch
Touch
Touch
Touch Calibration
When you first start the system by default called touch calibration procedures. Users
can also in the main menu, select "touch calibration", enter the touch calibration
procedures .
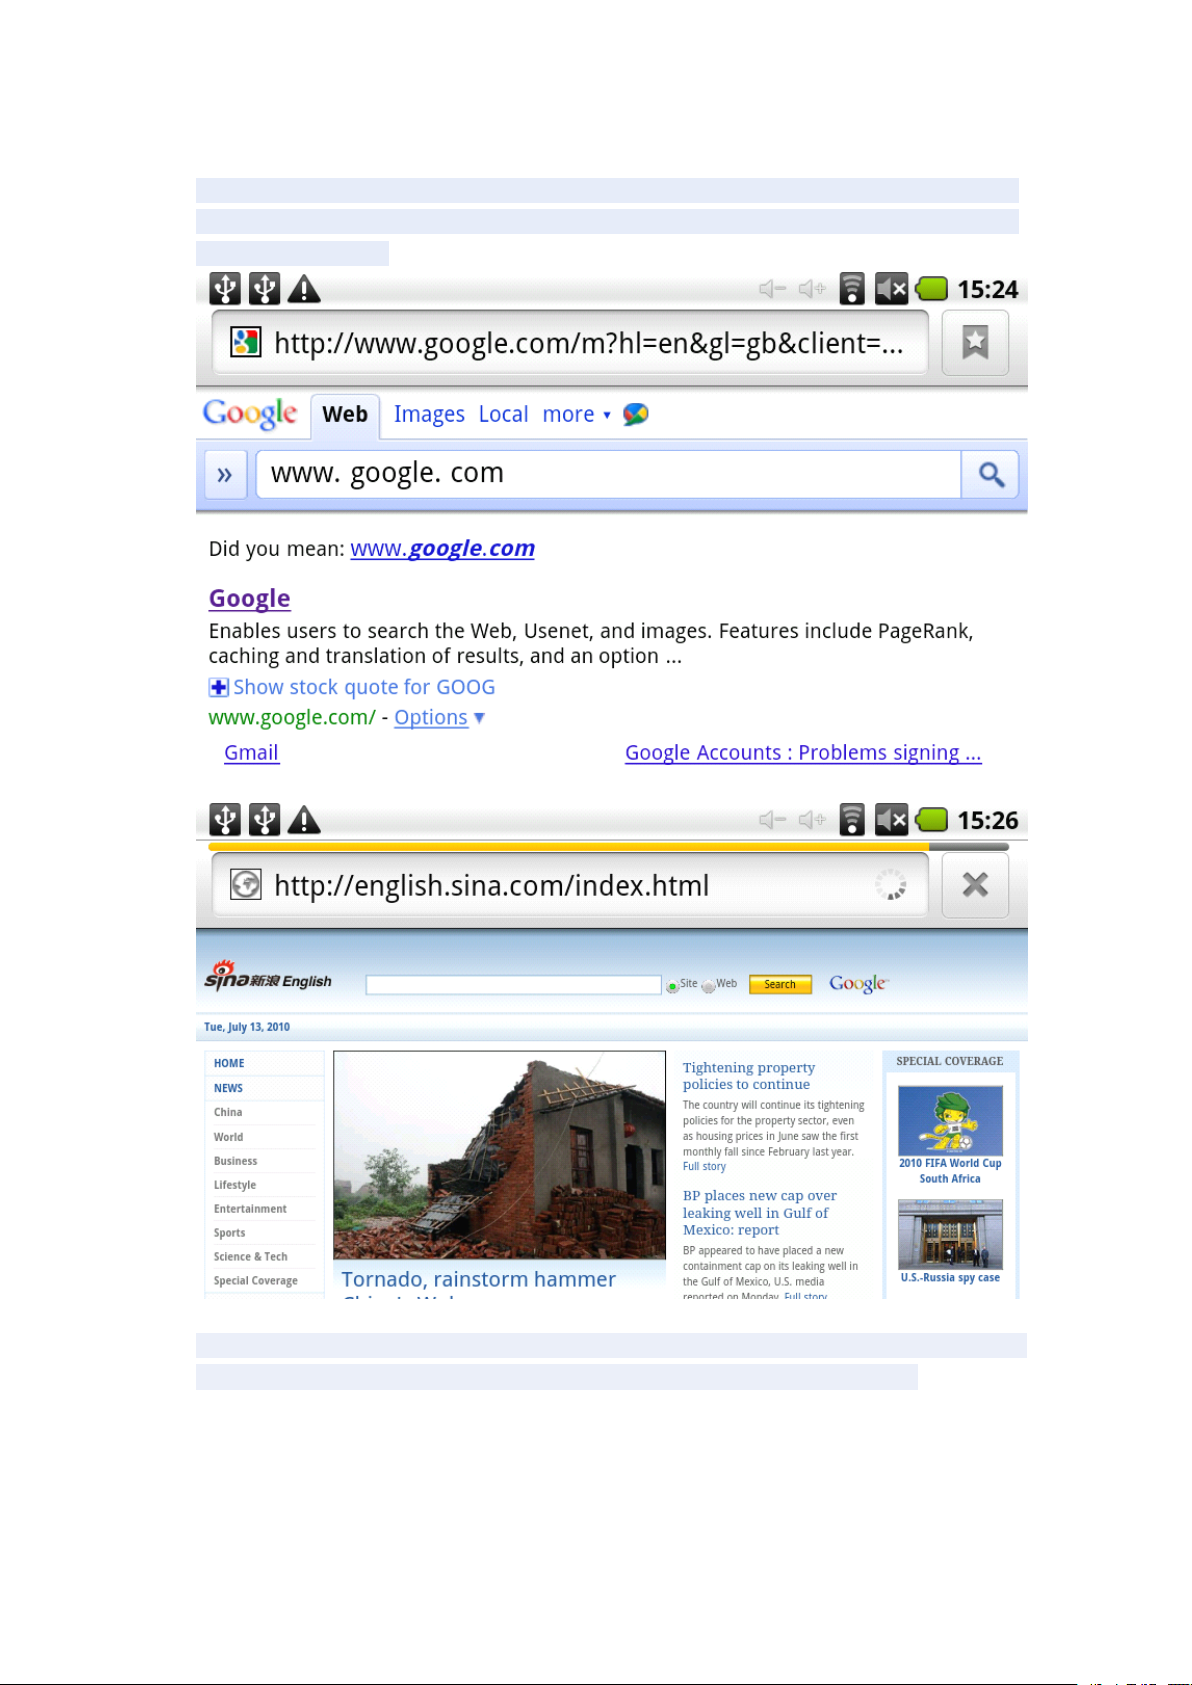
Follow the prompts to complete the calibration operation, if successful touch
calibration, the system prompts and automatically exit the touch calibration interface.
As follows :
Calibration
Calibration
Calibration
Network :
Page 16
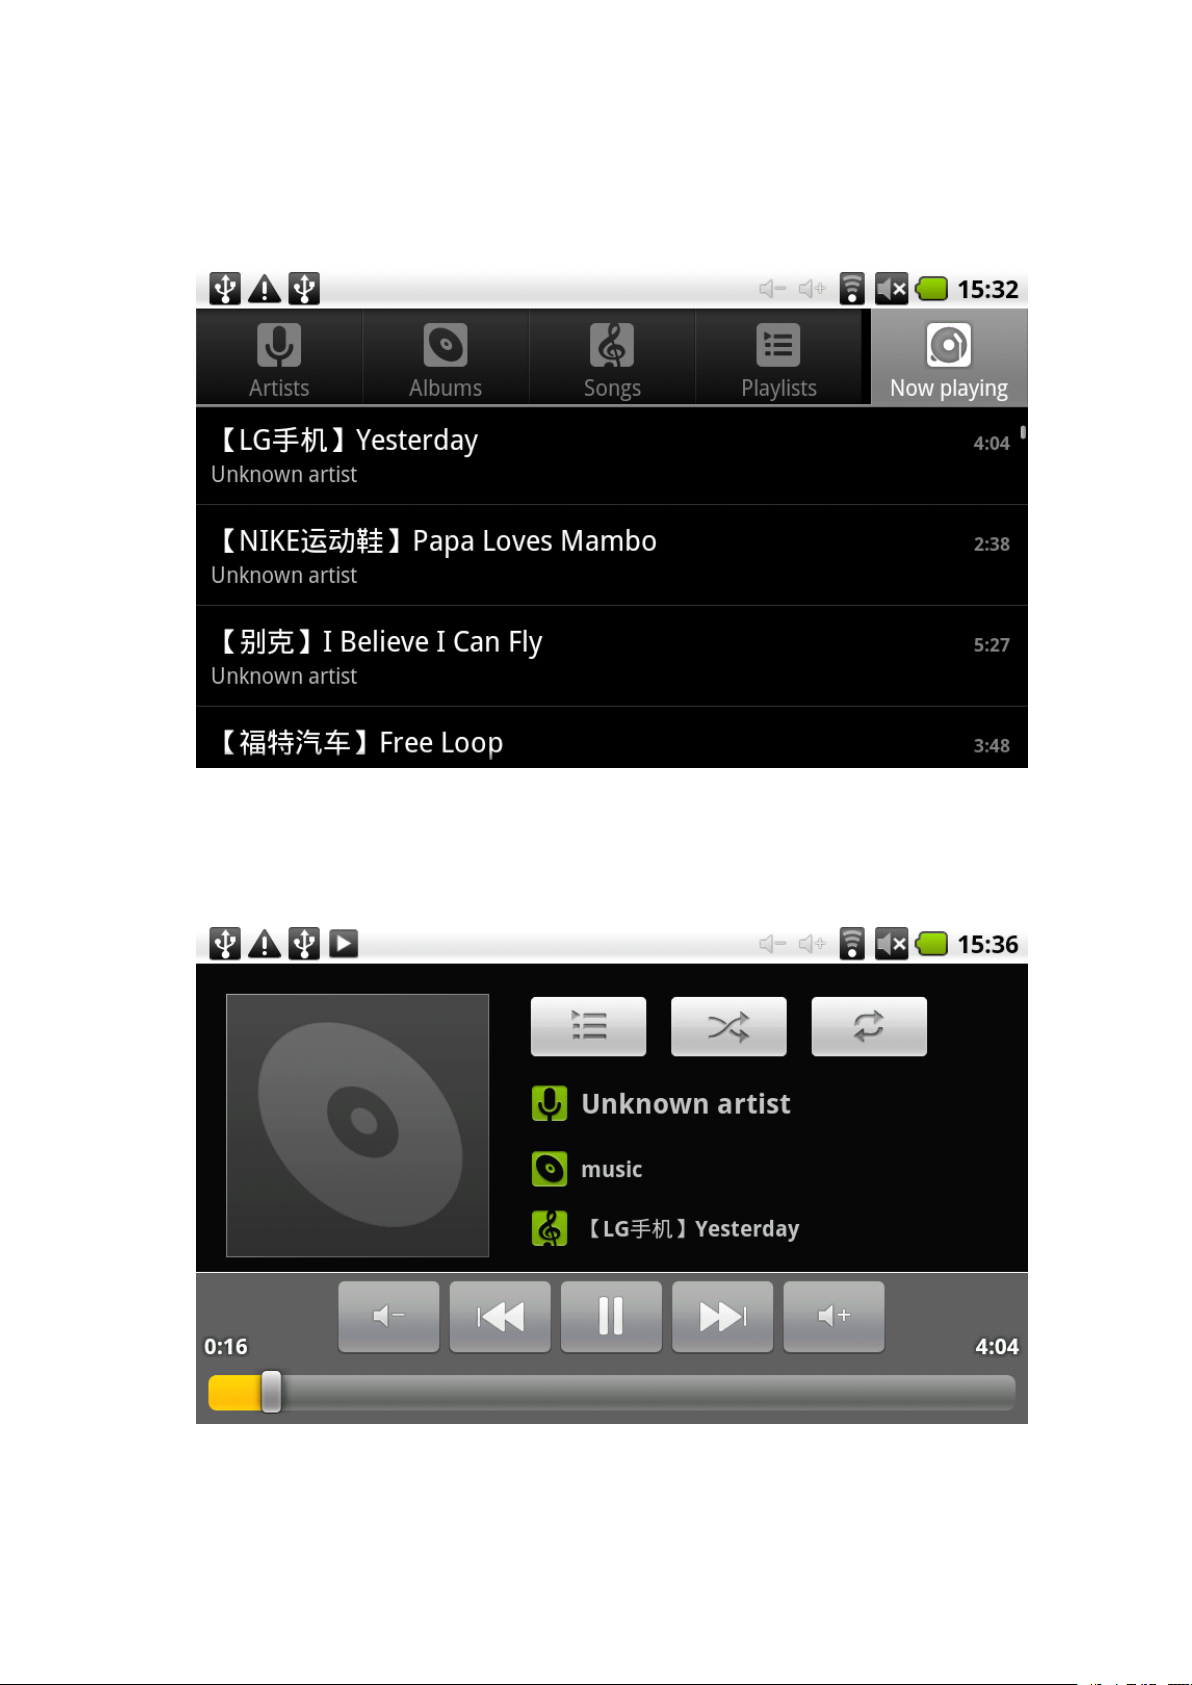
Web browsing :
When the connected network, open the Web browser enter the URL, you can
quickly browse the Web; or through the main desktop search bar enter the URL,
open the web page .
Free page can use the zoom controls zoom, as shown :
Online video :
Through "Andrews market" or other means to download online video player software,
online TV player, online music software, then install to this machine. Open the
software installed, you can watch online video or online TV, listening to online radio
stations
Users can also download other third-party Web applications, including web browsing,
video playback, Web client, instant messaging software, etc .
.
Page 17
Music
Music
Music
Music :
Click the main menu in the "music" icon, you can enter the music player interface.
Here lists the system default user data area of all audio files. As shown below :
We can spread through the USB audio files synchronized manner, or by inserting
the SD card with audio files were audio files, you can also download the audio files
via the network .
Select the appropriate tab
and other interfaces. Select song to play .
key,
you can see for example "Artist", "album", "songs"
Video
Video
Video
Video :
Page 18
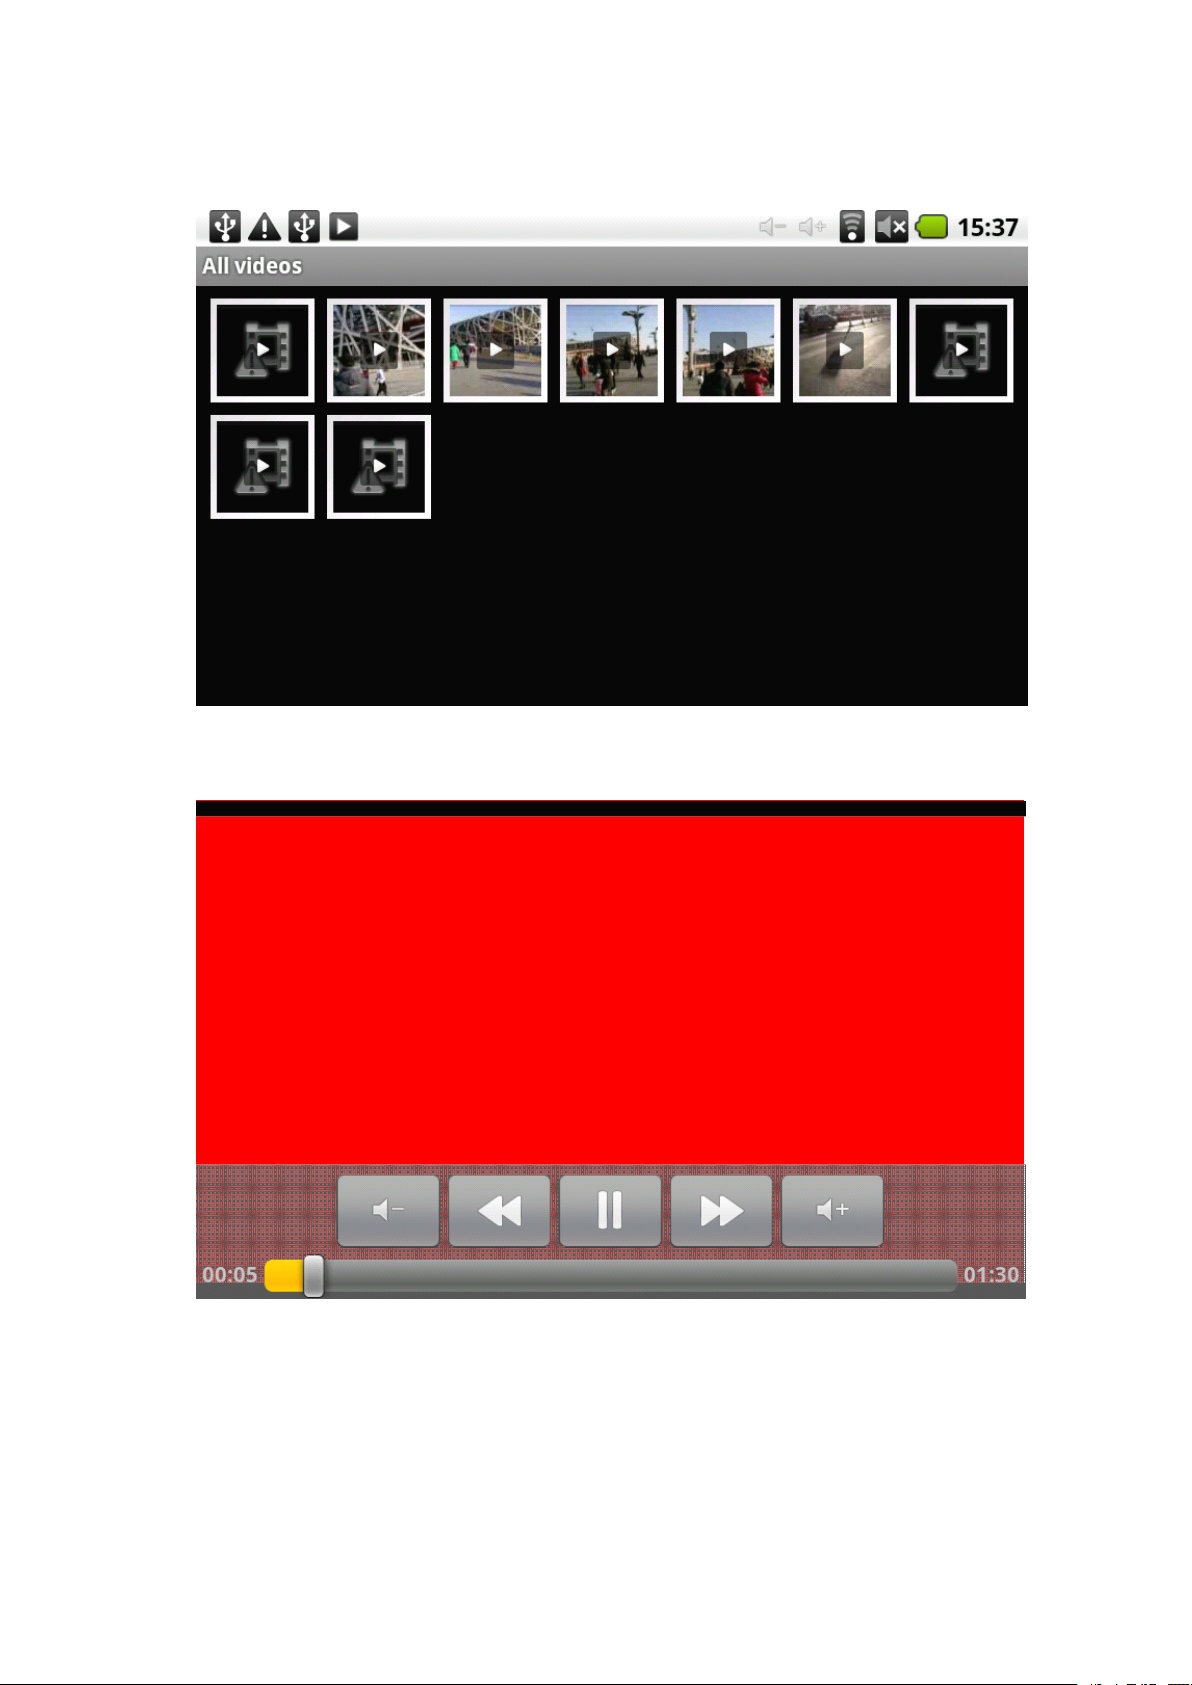
Click the main menu in the "gallery" into the "gallery" the main interface, there will list
all the video files and picture files. As shown below :
Select video file into the video player interface, as shown below. Can select "Play",
"stop", "Volume +", "Volume -", "fast forward", "rewind", "progress bar" and control
keys to control playback of the progress .
Photo Browse :
Click the main menu in the "gallery" into the "gallery" the main interface, there will list
all the picture files and video files. As shown below :
Page 19
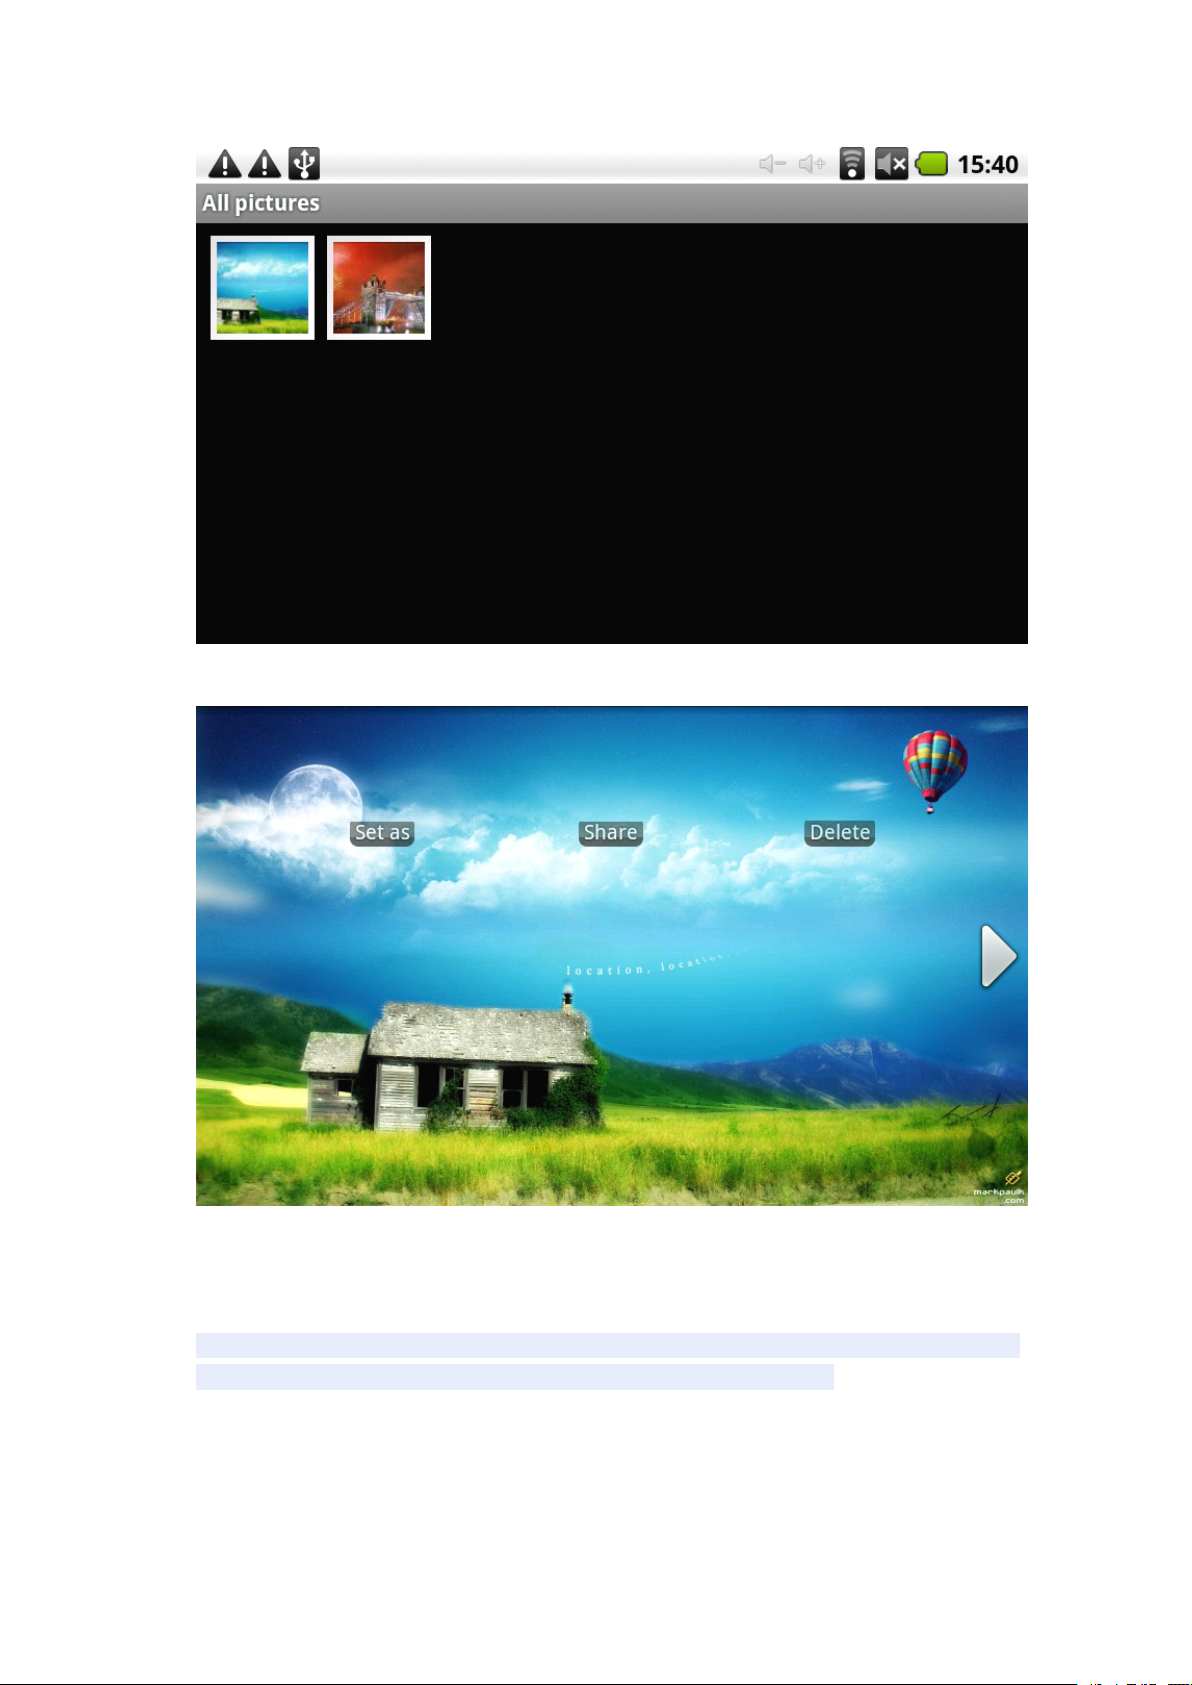
Select
select "Zoom", "narrow" "sharing", "Previous" "Next," "set" and "delete" operation .
a
picture file, enter the picture playback interface, as shown below. Can
Wallpaper
Wallpaper
Wallpaper
Wallpaper :
System supports static image wallpaper, as well
In the desktop interface, hold down the Menu button, pop-up menu option, select the
"wallpaper", the pop-up "Choose wallpaper source" selection box :
as
3D wallpaper .
Page 20
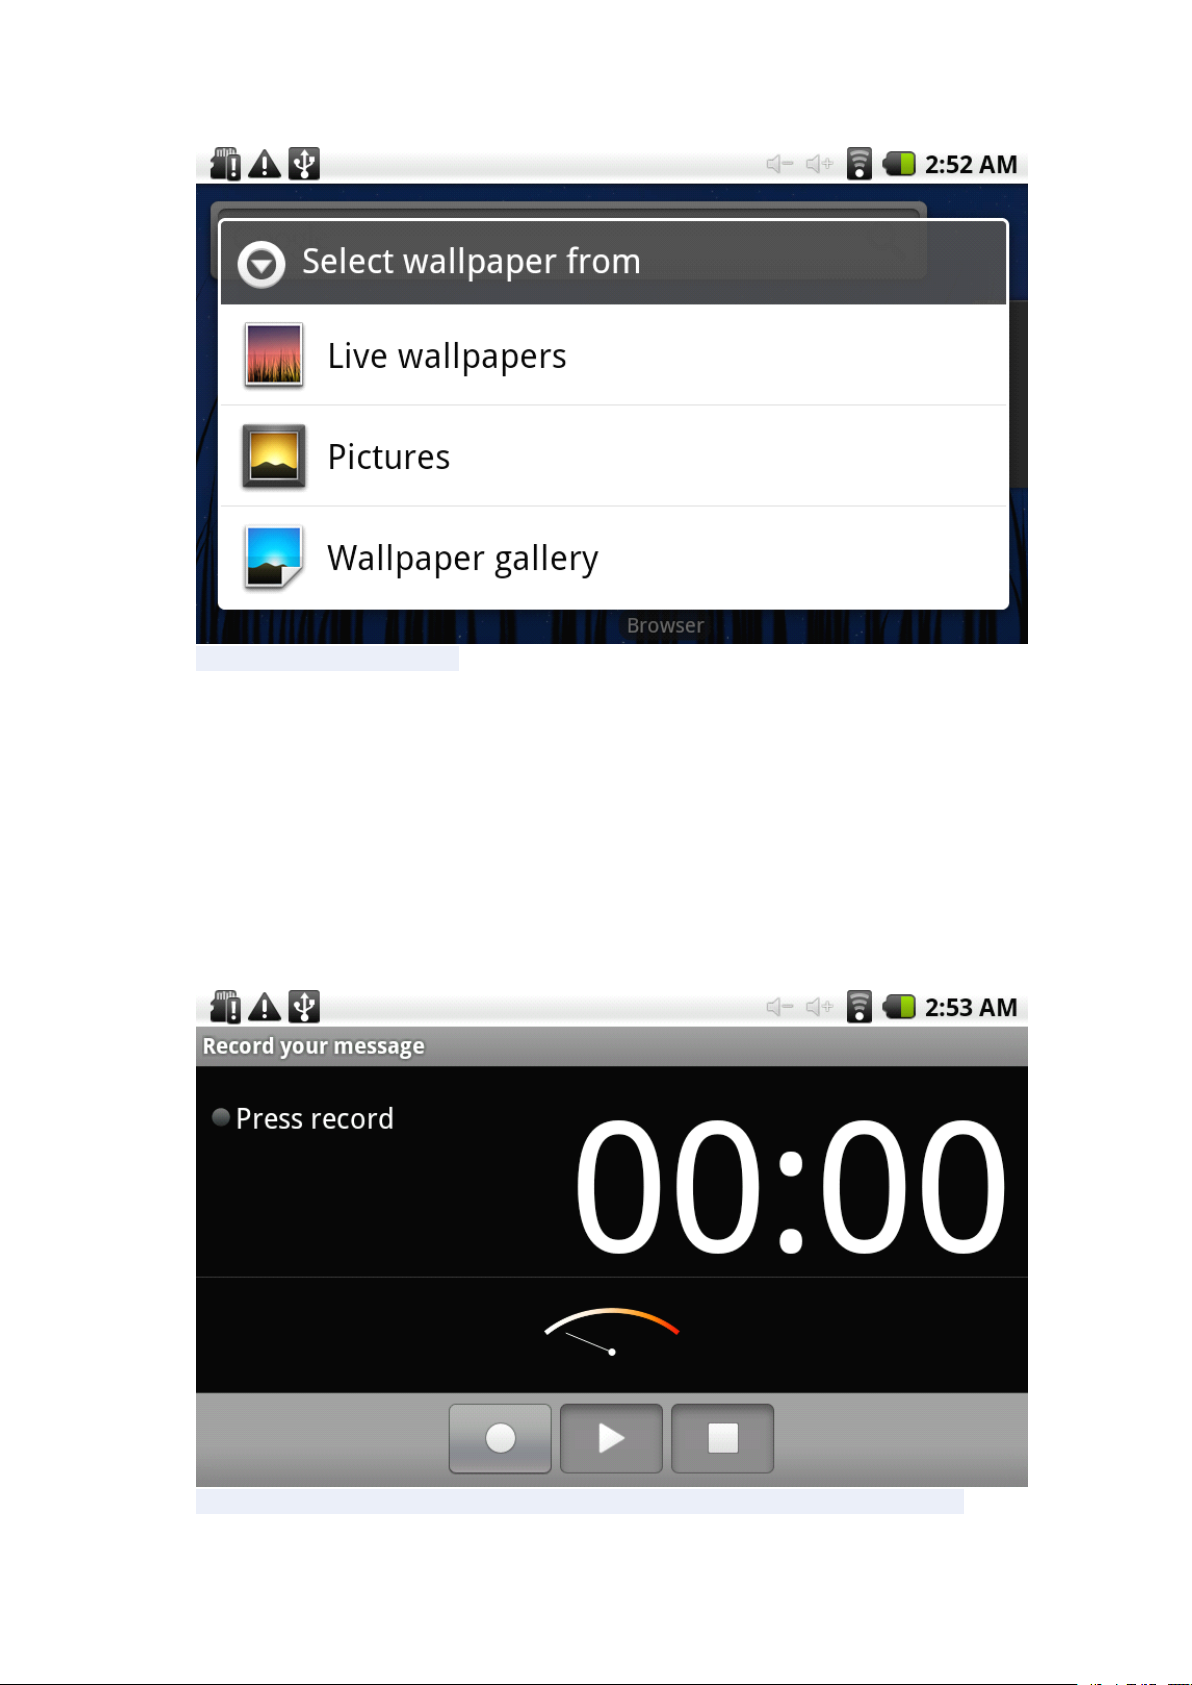
Have the following options :
Select "Wallpaper Gallery":
wallpaper .
Select "Current Wallpaper":
Select "Photo":
You
can use the picture as wallpaper Customize .
You
can select the system provides
You
can select the system provides 3D wallpaper .
a
static picture
Recording :
Click the main menu in the "recorder" icon into the "tape" the main interface. As
shown below :
as
Note: when inserting SD card recording, audio file will be saved in the SD card .
Page 21
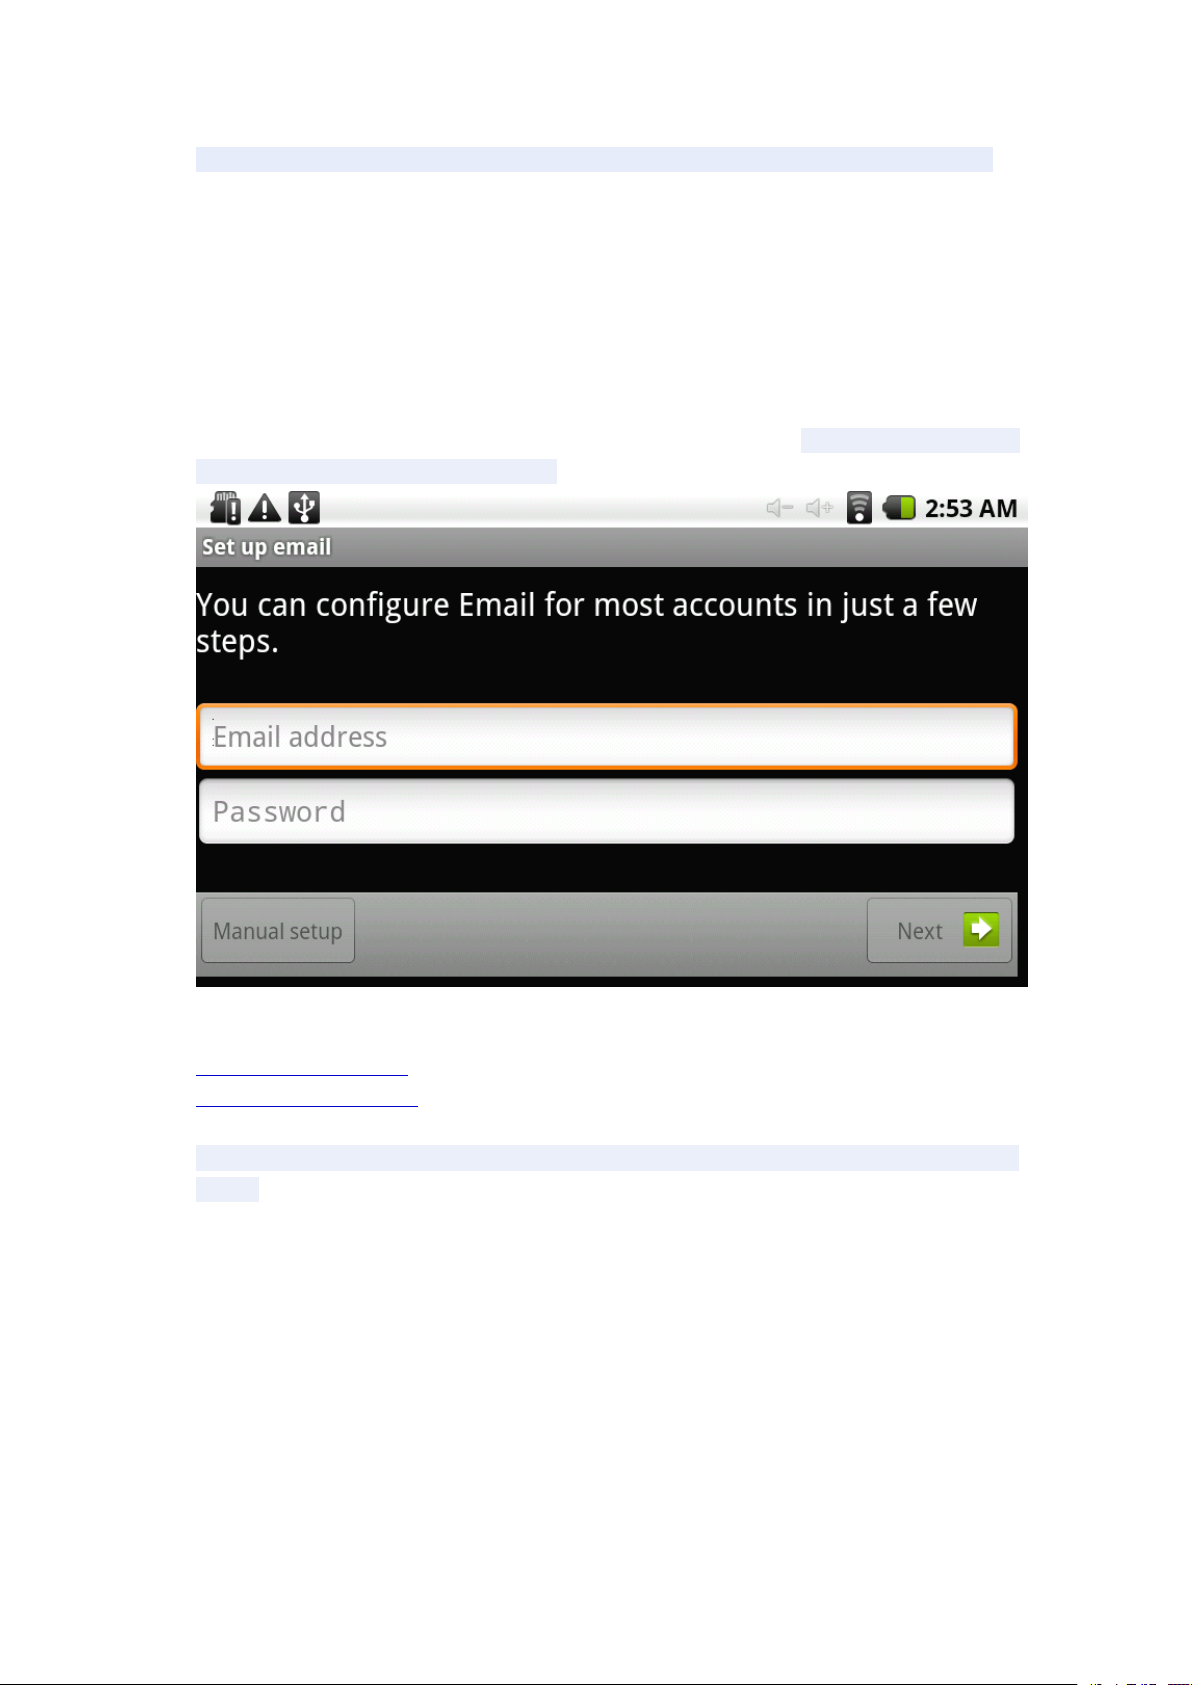
Select "Record" button recording, recording is completed, select "Stop" button. At
this point you can select the "Play" button plays the sound just recorded. Select
"Use this record" button, save the recording, this can be found in the SD card in the
appropriate recording documentation; If you do not save, you can select the
"Discard" button .
E-mail
E-mail
E-mail
E-mail client
In the main menu, click "Email" icon to enter the e-mail client. The first entry will ask
to configure the account information. As shown below :
client
client
client :
E-mail require network support, please email links to ensure normal .
Here we [email protected] Case :
In the Password field enter your valid password: 123456789 .
You
can then select the "Next", select the account type interface appears as shown
below :
Page 22
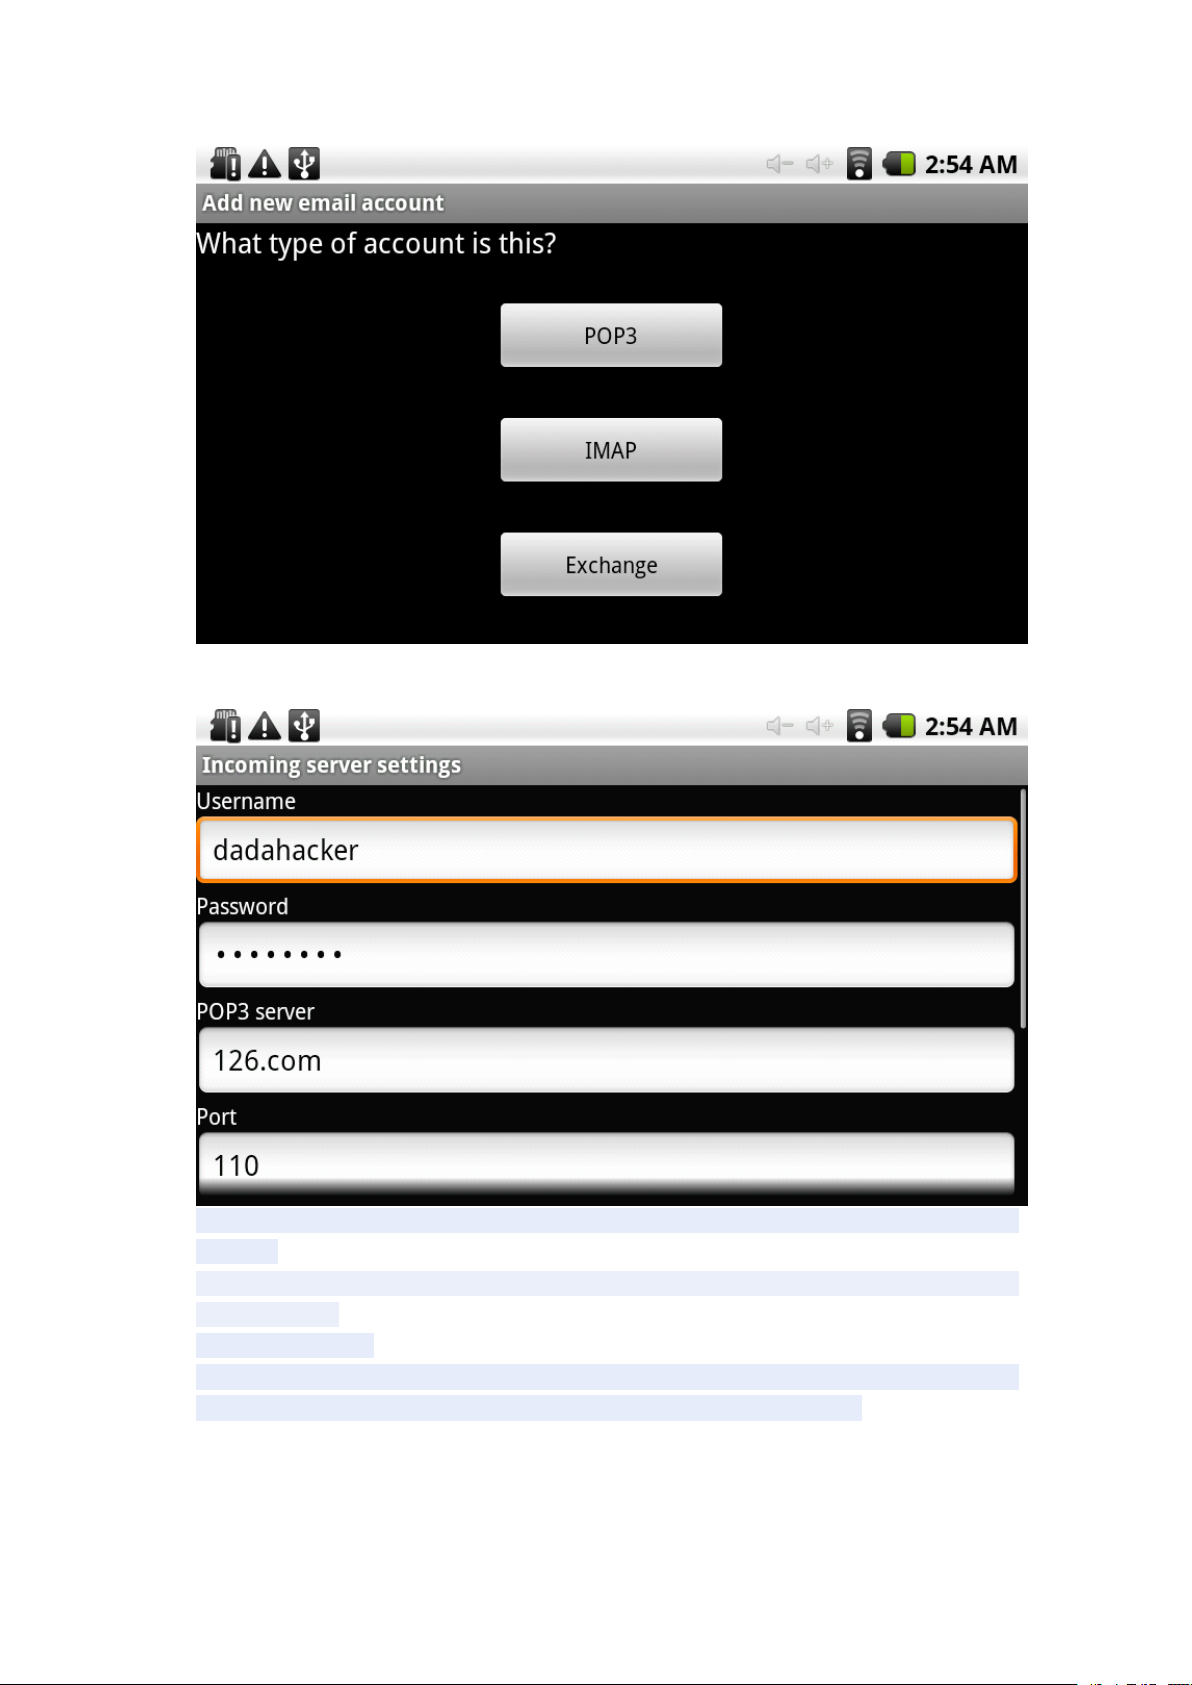
Here we are using
the interface as follows :
Please e-mail providers, each based on the information, set different parameters,
such as
POP3 server: The system default is "126.com", should be amended to
"pop.126.com"
Port number "110"
Then select "Next", will enter the "Check to accept the server settings", if set
correctly, there will be "outgoing server settings" interface as follows :
:
a
POP3 account type. Appears to accept the server after setting
Page 23
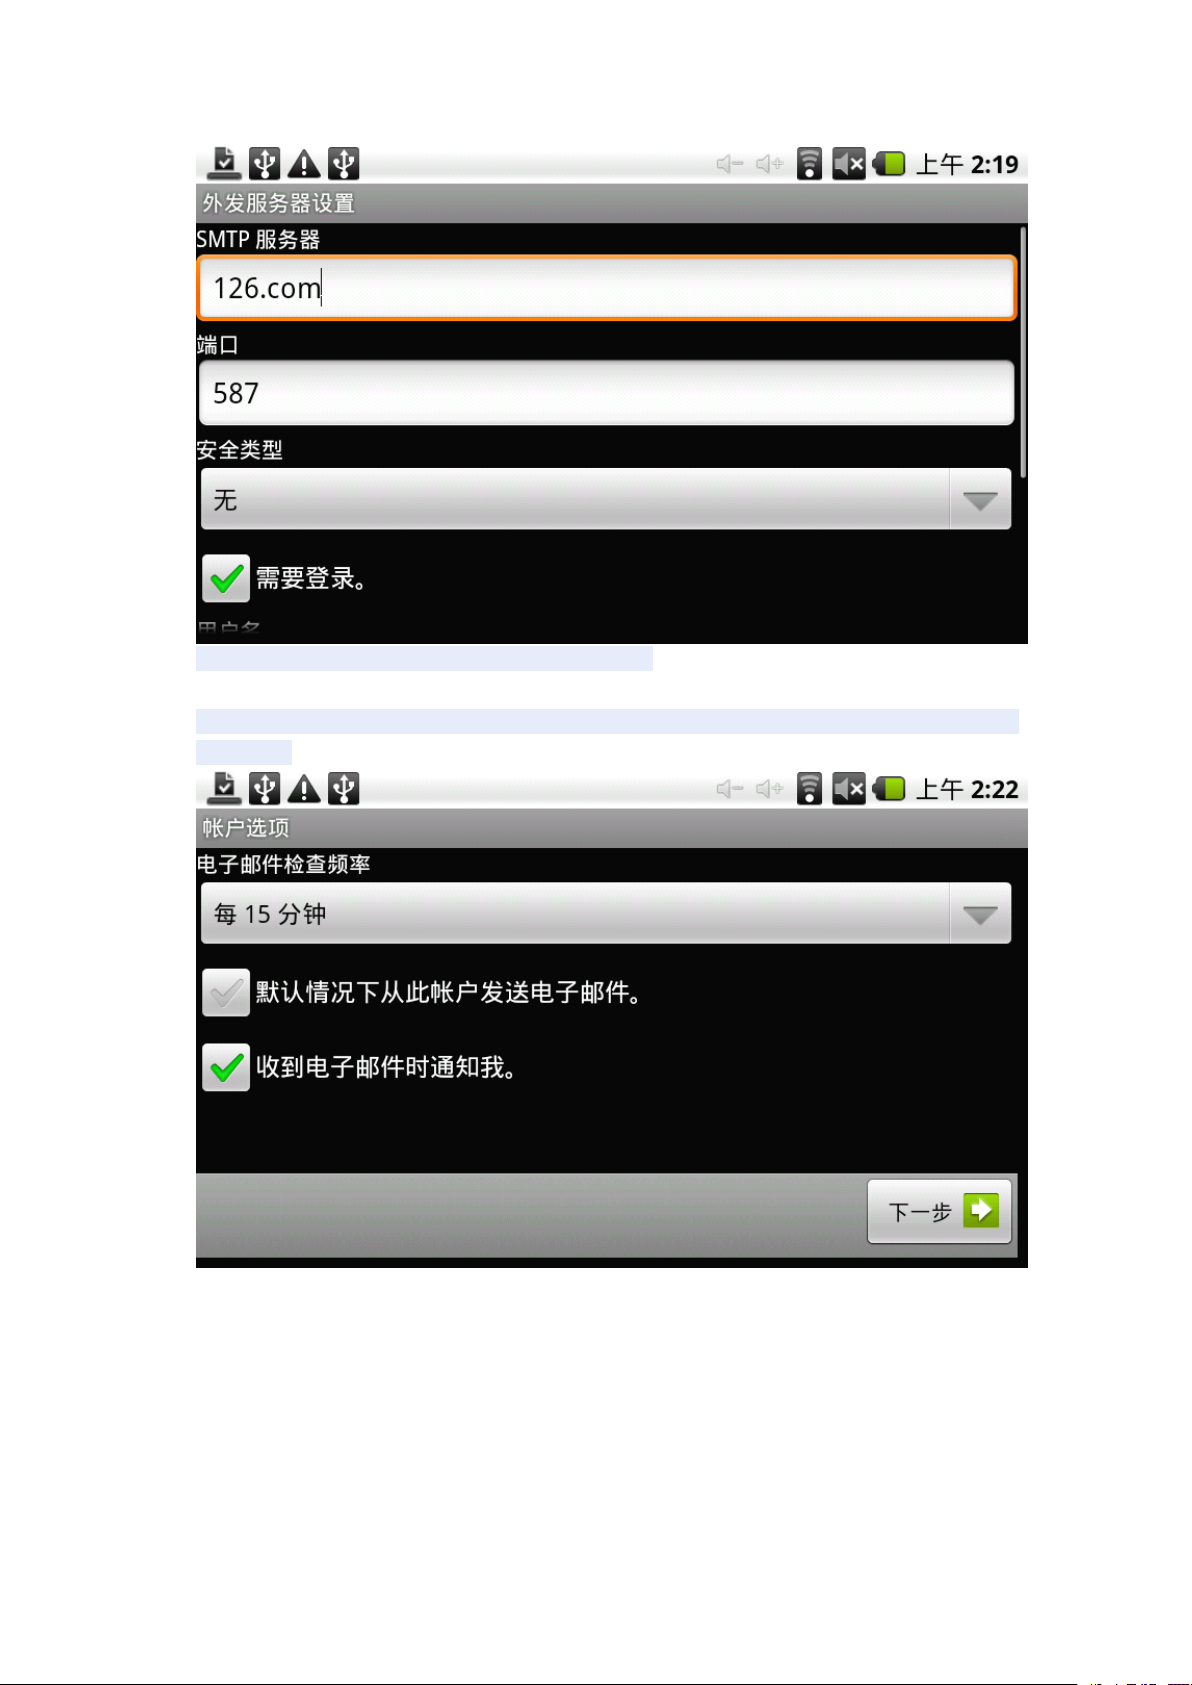
sed SMIP server "126.com" as "smtp.126.com"
Modify the port number "587" to "25"
Drag the scroll bar, select "Next" and enter "Check outgoing server settings"
interface. If the settings are correct, will enter the following interface :
Select "Next", you can enter the account information to customize the interface :
Page 24
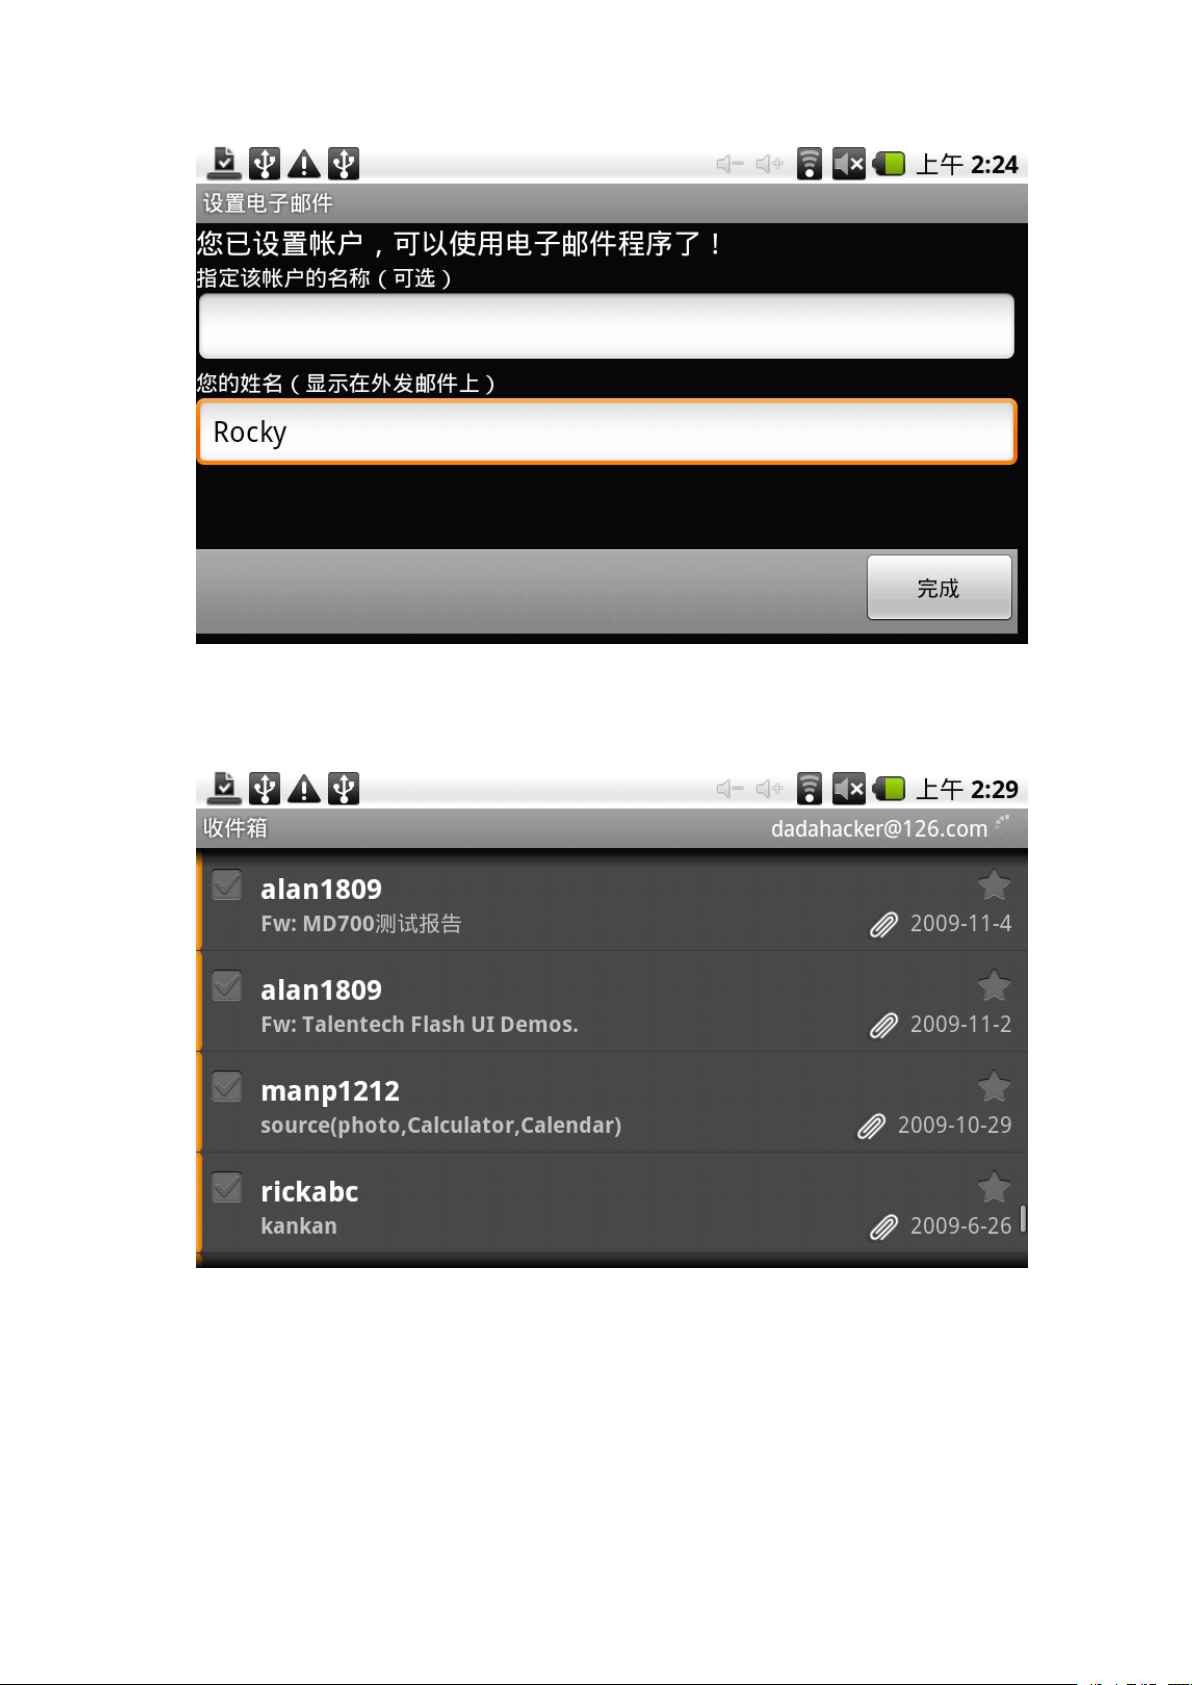
In the
here: Rocky
Then click "Finish" button to enter the mail interface. It will automatically load the
e-mail, mailing list below shows :
"Your
Name" enter the bar you want to show the name of outgoing mail, enter
Selectacolumn can view the messages, you can view the column inside
"delete", "Open attachment" and other operations .
a
"reply",
Page 25
External
External
External
External devices
* USB connection :
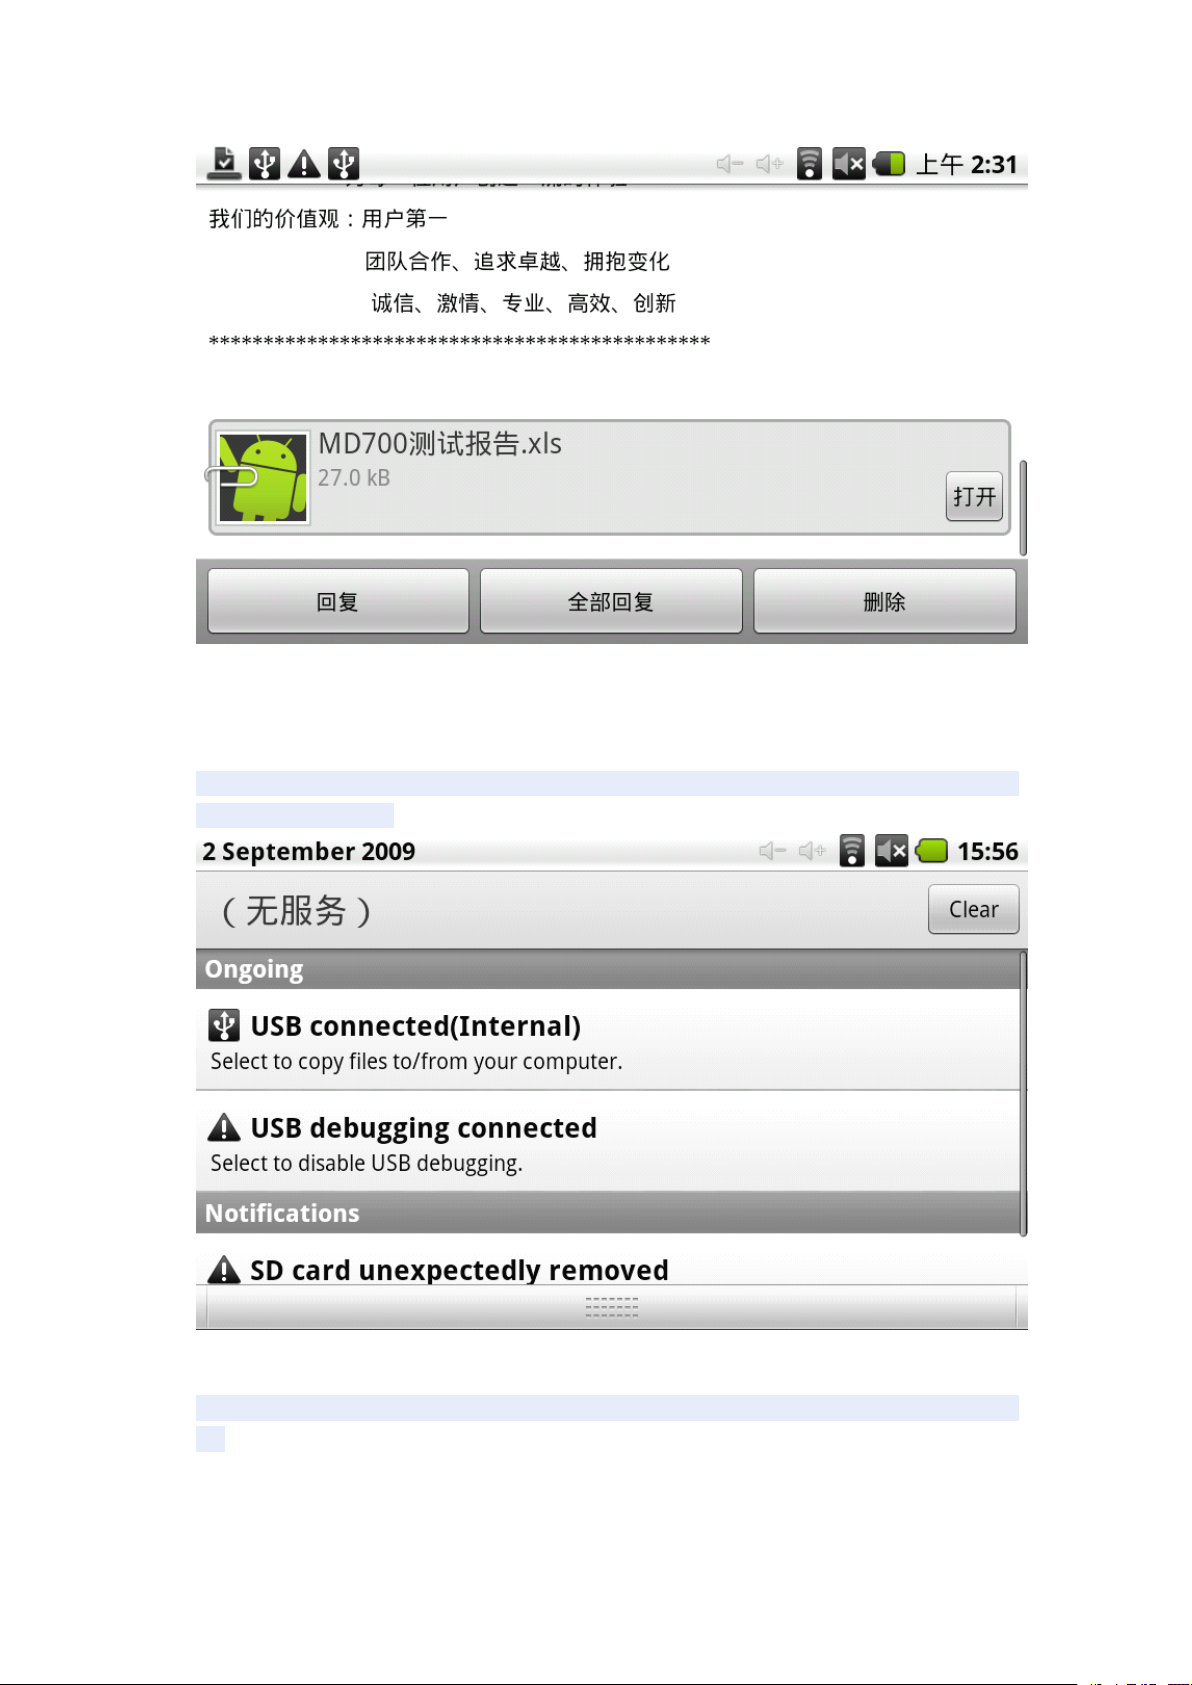
MID using the USB connection and PC, the default connection method is the
synchronous mode. Can drag the status bar pulled down, there are interface :
devices
devices
devices :
"USB Connected (Internal)": that built-in memory .
"USB is connected": said external memory (SD card) .
If you need to copy data using USB, you can select the load you need the memory,
as :
Page 26
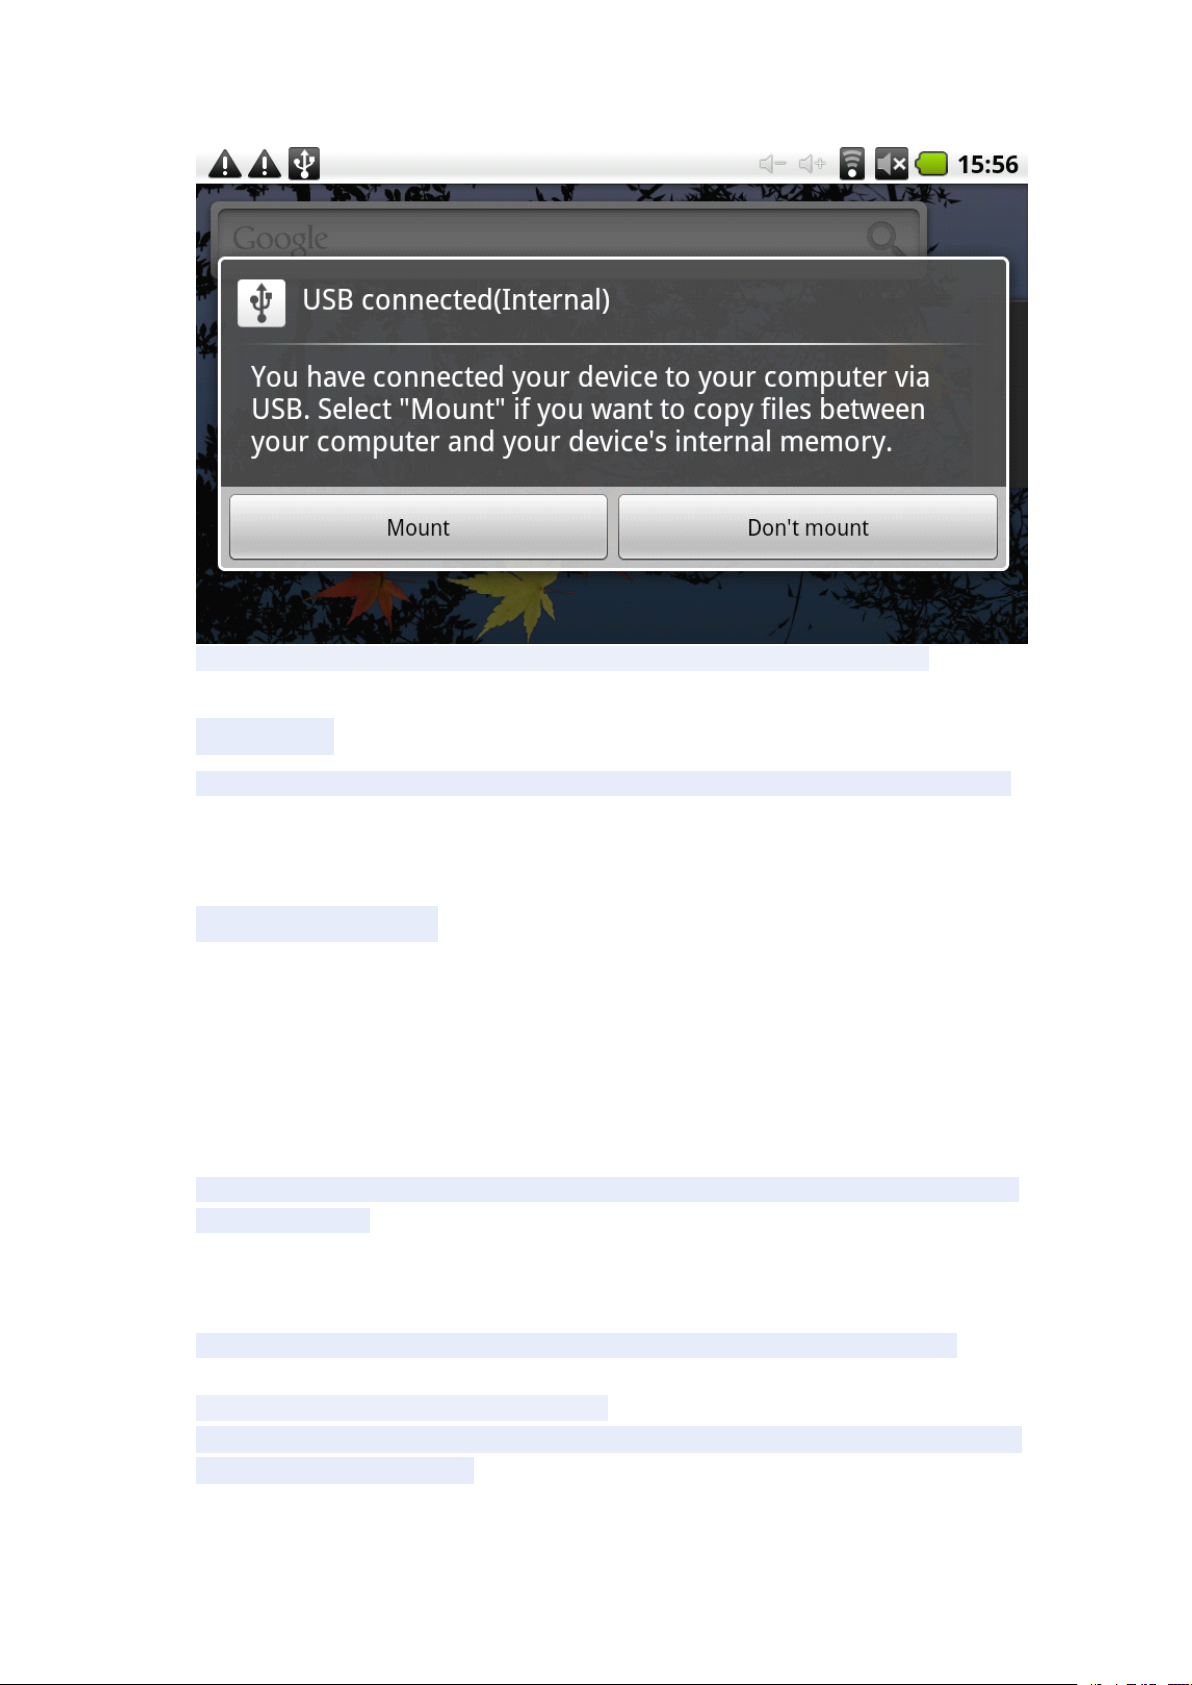
Loading is complete, you can see in the PC end of the corresponding letter .
* OTG use
Support the
Plug and Play connection method .
Use OTG cable MID701 USB OTG port and external device .
FAT32
format for mobile devices: for example, U disk, mobile hard drive .
Keyboard Mouse
Support plug and play USB mouse, keyboard equipment .
Firmware
Firmware
Firmware
Firmware Upgrade
Android upgrade process will format the internal flash memory and, if necessary,
back up your data in advance .
Android PC upgrade client upgrades the use of specialized tools, the latest upgrade
tool for download :
Upgrade file include: lk.rom and tcc8900_mtd.img. Can be downloaded through the
following website package :
Upgrade process is as follows: (in order to upgrade the Windows XP example)
1: Download and unzip upgrade tool .
2: Download and extract the upgrade files .
3: In the PC side running the upgrade tool FWDN 【 If prompted to install drivers, install
the driver FWDN directory 】 . The upgrade files will be added to the FilePath lk.rom and
tcc8900_mtd.img list, as shown below .
Upgrade
Upgrade
Upgrade
Page 27
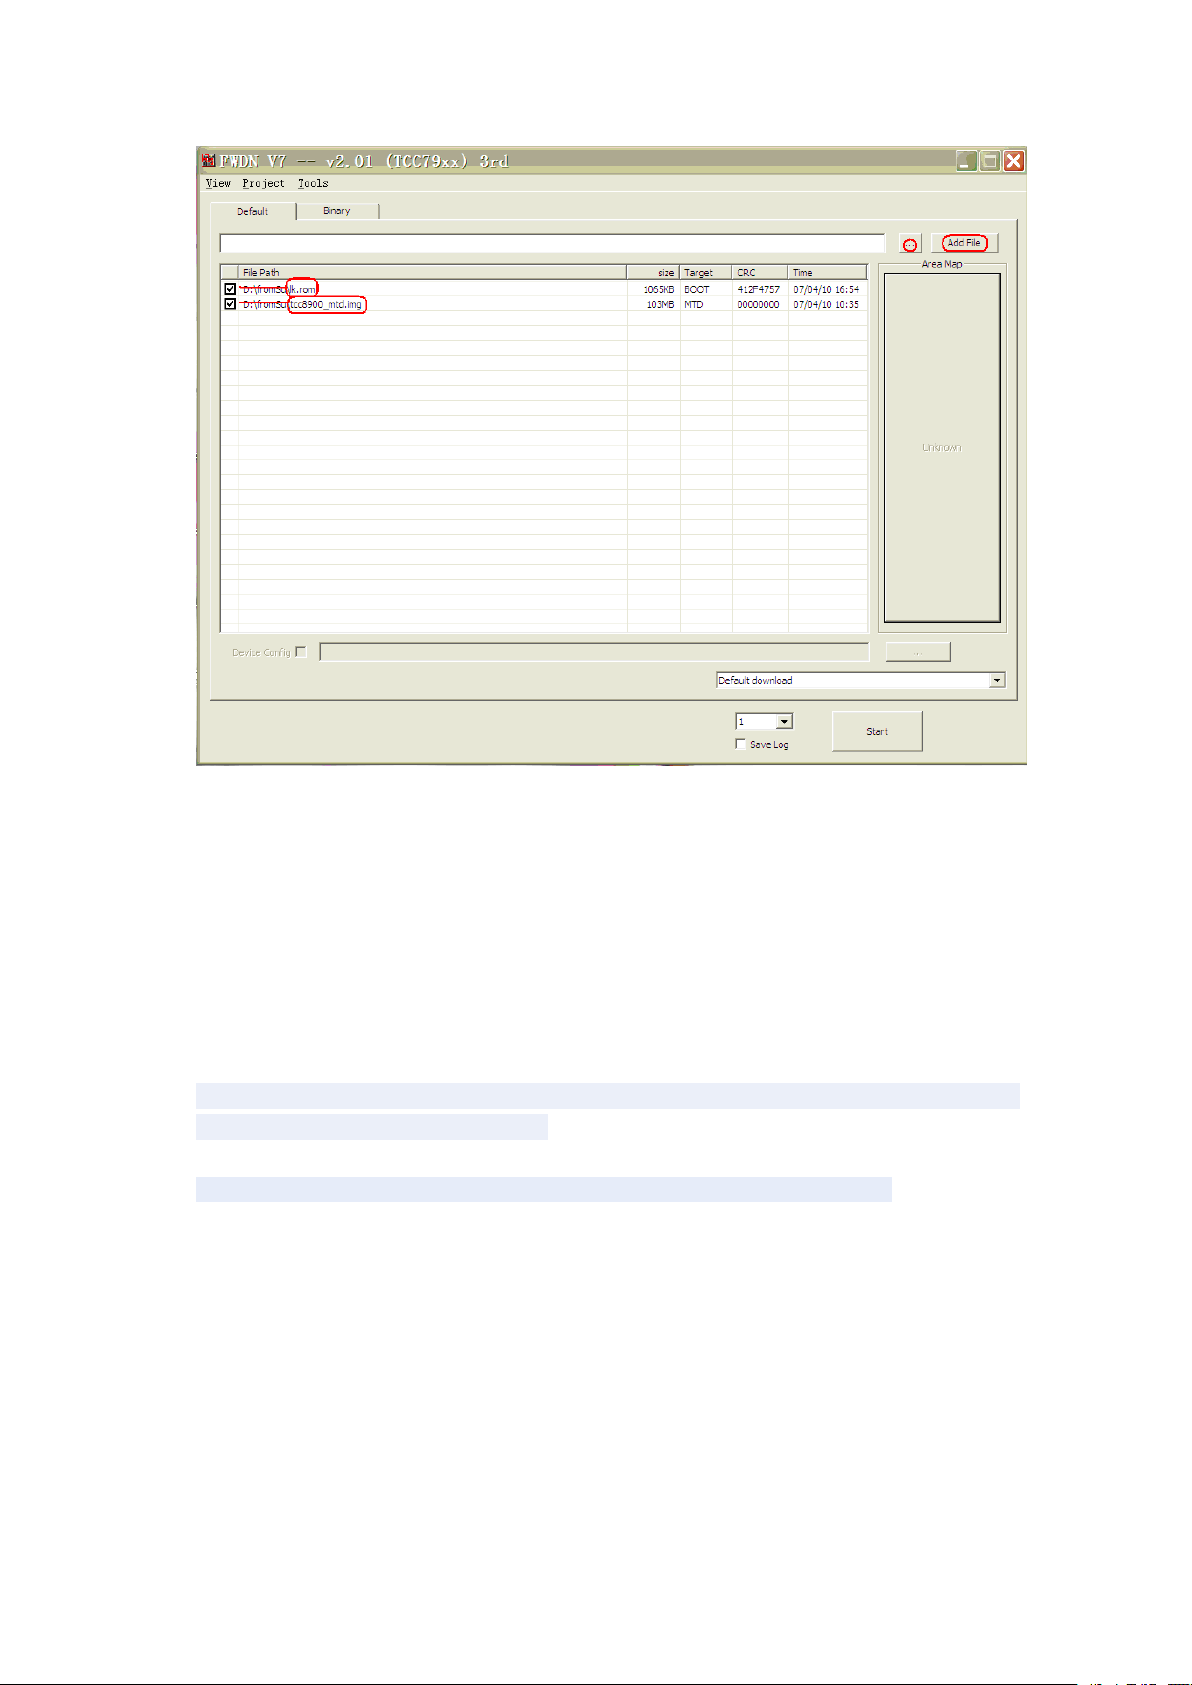
4: Please add to the need to upgrade the MID701 DC adapter. 【 Upgrade process
needs to ensure that external power supply 】 .
5: presses MID701 the touch screen, and pressing the power
starts, the following prompt appears the word :
key.
The machine
“ if you want to update ,please release power button . ”
Follow the prompts Language: Release the power button and the screen. At this
point the following prompt screen will appear :
“ I f you want to update ,please touch powerbutton. ”
Follow the prompts Words: hand-hold the power button and hold forawhile, until the
screen the following word prompted :
"FWDN Start", before we can release the power button
Finally, please use the USB cable to connect PC terminal and MID701. At this point,
PC-side FWDN program interface appears as follows :
Page 28
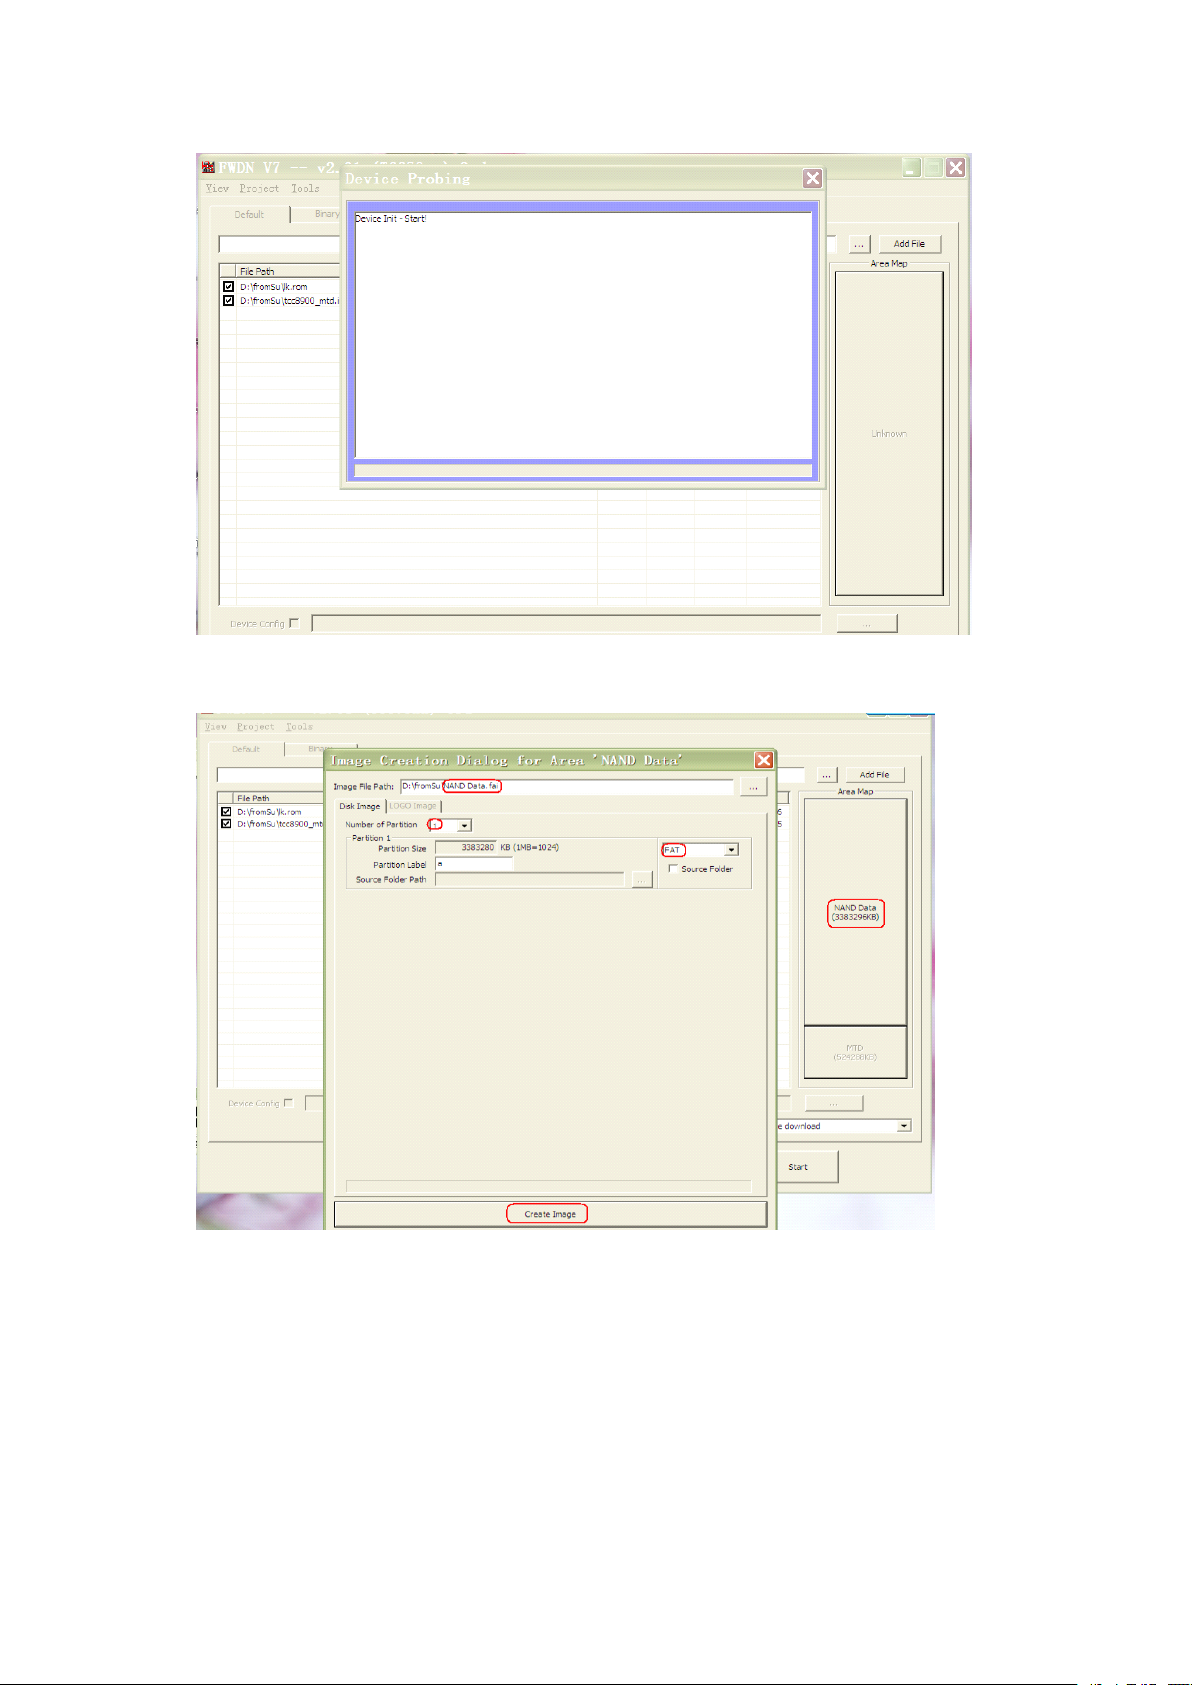
6: Initialization complete, click FWDN interface to the right of "Nand Data" area,
there are interface :
Please fill out the correct option according to the diagram of each :
ImageFilePath: Nand Data files store the resulting path can be chosen at random .
Number Of Partion : 1
Partion 1: Select
FAT
format
Partion Lable:a
Filling is complete, click CreateImage button below :
Page 29
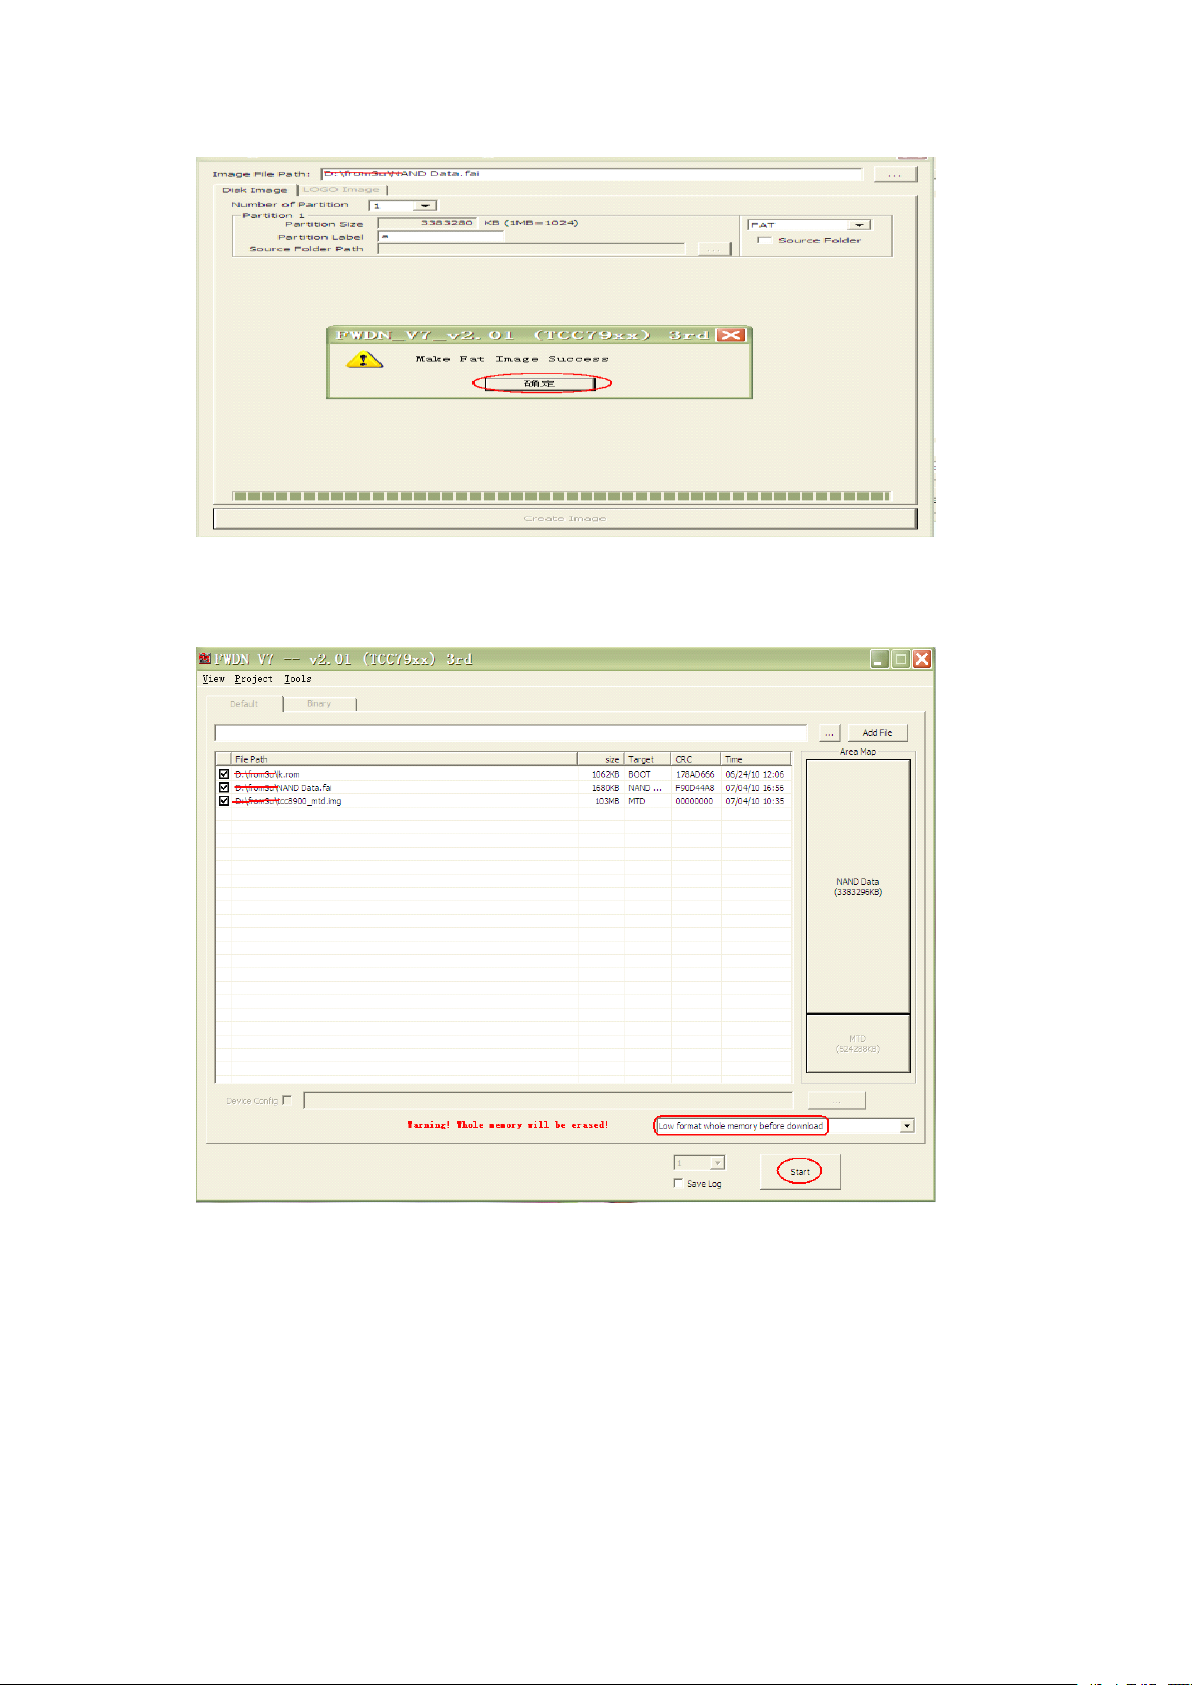
8: Select "OK", the following interface :
Please select Low format whole memeory before download. Then click on Start button.
System begins to upgrade .
The upgrade process similar to the following interface will appear :
Page 30
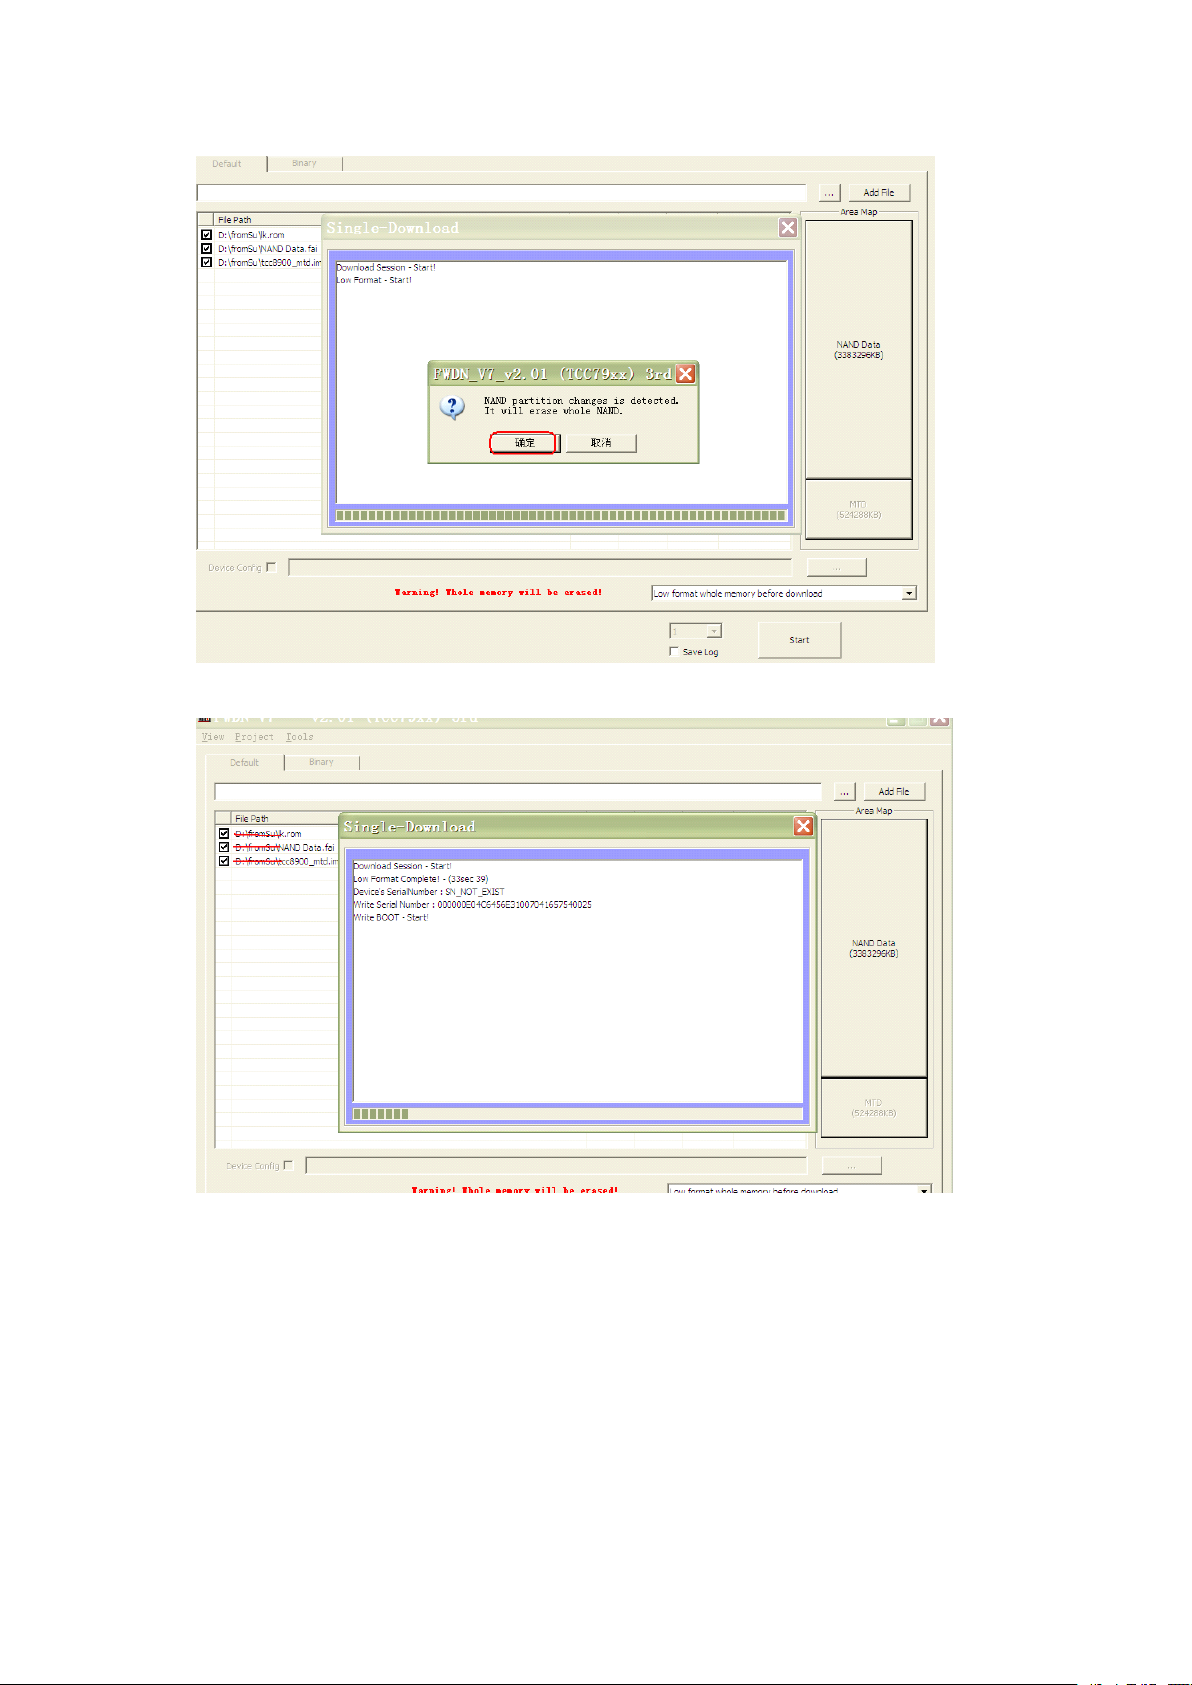
Confirmed, continue to escalate :
After the upgrade is complete, the interface prompts the following :
Page 31
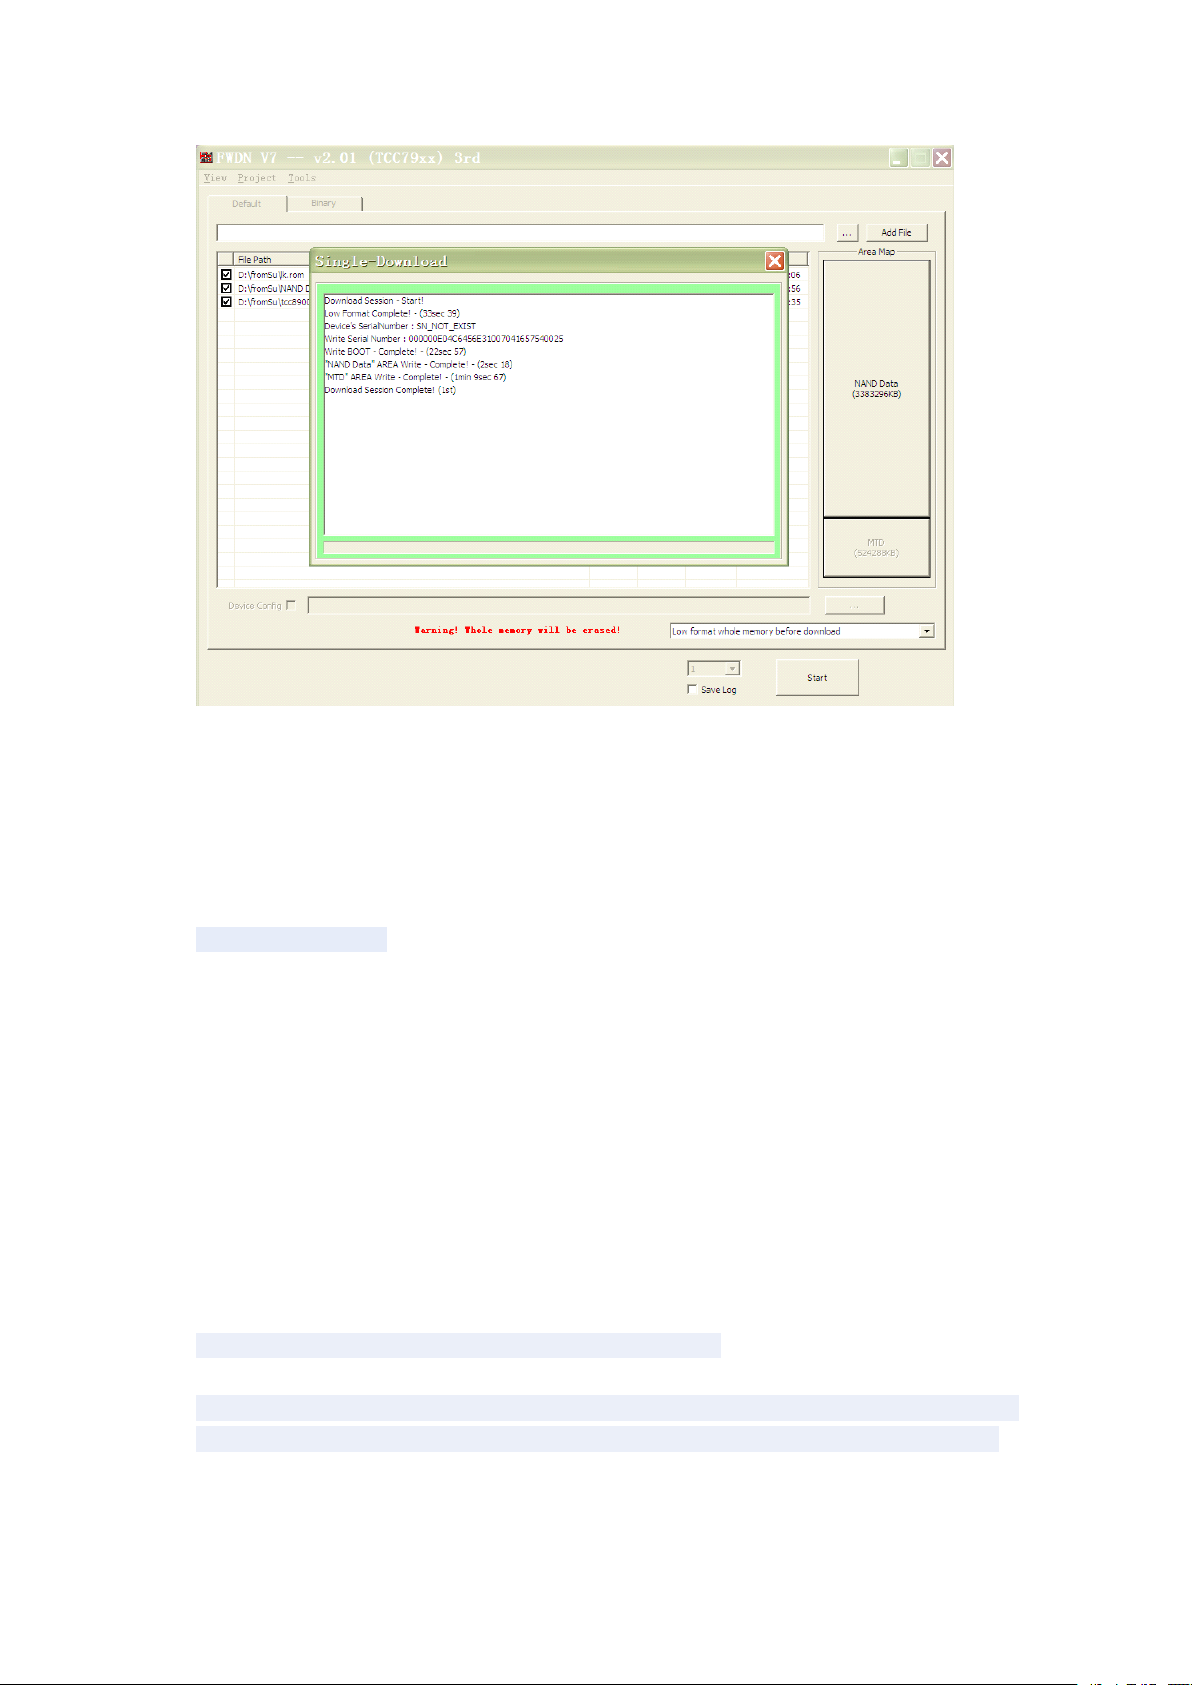
Reset reset button, complete the upgrade operation .
Note: the first boot after the upgrade process is relatively slow, this is normal. The
second boot much faster .
Frequently Asked Questions Treatment :
1: What is Android?
A: Android is Google on November 5, 2007 announced the open source
Linux-based operating system name .
2: What is APK?
A: APK is Android Package acronym that Android installation package .
3: How to obtain the APK?
A:
You
can download via PC-side installation, you can also "Andrews market" online
to download and install .
4: The machine operating system version?
A: This machine adopts Android2.1, built-in hardware 3D acceleration, can run Android
applications market most .
5: The machine can charge through USB?
Answer: no. But the results can be powered through the USB implementation.
Recommend the use of Annex DC 9V adapter to charge .
Pictures
Pictures
Pictures
Pictures for
kind,
the
kind,
the
kind,
kind, the
the product
for
reference
for
reference
for reference
reference only,
product
product
product rules
rules
rules
rules and
only,
product
only,
product
only, product
product appearance,
and
design
and
design
and design
design are
are
are
are subject
appearance,
appearance,
appearance, functionality
subject
subject
subject to
functionality
functionality
functionality please
to
change
to
change
to change
change without
without
without
without prior
please
please
please prevail
prevail
prevail
prevail in
prior
notice
prior
notice
prior notice
notice
in
in
in
Page 32

 Loading...