


Mod. 0988
Andreja Profili
ISTRUZIONI D’USO
OPERATING INSTRUCTIONS
GEBRAUCHSANLEITUNG

1
Mod. 0988 Rev. 00
2
2
QUICK MILL vi ringrazia per aver scelto un nostro prodotto. Prima di mettere in funzione la macchina, vi consigliamo di leggere
attentamente questo manuale per avere le necessarie informazioni per un corretto utilizzo ed una adeguata manutenzione del
prodotto. Per eventuali altre domande, rivolgetevi al vostro rivenditore di fiducia o alla nostra sede.
QUICK MILL thanks you for having purchased one of our products. Before using the machine we suggest you carefully read this
manual to obtain the necessary information for correctly using and servicing the product. If you have any questions please contact
your retailer or our offices.
QUICK MILL dankt für die Wahl eines unserer Produkte. Vor Inbetriebnahme der Maschine, empfehlen wir dieses Handbuch
aufmerksam zu lesen um alle nötigen Informationen zur korrekten Anwendung und der entsprechenden Wartung des Produktes zu
erhalten. Für eventuelle weitern Fragen, wenden Sie sich an Ihren Fachhändler oder an unsere Büros.
FOTO 1
FIGURA 2
FIGURA 3
FIGURA 4
DOTAZIONE
Mod. 0988 Rev. 00
3
3
2
PREMESSA
Conservare il libretto istruzioni in un luogo
sicuro, per eventuali informazioni o
problematiche trattate in modo non esaustivo
rivolgersi al personale competente.
1. SIMBOLI
Il triangolo d’avvertimento
identifica tutte le spiegazioni
di natura importante per la
sicurezza della persona.
Attenersi a tali indicazioni per evitare incidenti!
Il simbolo numerico numeri o lettere
indica riferimenti ad illustrazioni e
parti della macchina come tasti, spie
luminose ecc.
L’azienda costruttrice non si assume
nessuna responsabilità per eventuali
danni in caso di:
Impieghi non conformi agli scopi previsti;
Alterazione del cavo di alimentazione;
Alterazione di qualsiasi parte componente
la macchina;
Utilizzo di componenti o accessori non
originali;
Riparazioni non effettuate presso centri
assistenza convenzionati;
Questo prodotto risponde ai requisiti
sull’etichettatura stabiliti nella
Direttiva RAEE (2002/96/CE). Il
simbolo apposto indica che non si
deve gettare questo prodotto elettrico o
elettronico in un contenitore per rifiuti
domestici. CATEGORIA DEL PRODOTTO con
riferimenti ai tipi di apparecchiature elencate
nell’Allegato 1 della Direttiva RAEE, questo
prodotto rientra nella categoria 2 “Piccoli
elettrodomestici”.
NON GETTARE IN UN CONTENITORE PER RIFIUTI
DOMESTICI.
La mancata osservazione dei punti sopra citati
rendono la garanzia decaduta.
2. AVVERTENZE
Gli elementi d’imballaggio (sacchetti di plastica,
polistirolo espanso, chiodi, cartoni, ecc...) non
devono essere lasciati alla portata di bambini in
quanto potenziali fonti di pericolo.
Prima di collegare la macchina accertarsi che i dati
di targa siano rispondenti a quelli della rete di
distribuzione elettrica.
Il cavo di alimentazione deve essere ben steso
(evitare arrotolamenti o sovrapposizioni) in posizione non esposta ad eventuali urti o manomissioni
di minori, non deve essere in prossimità di liquidi o
acqua e a fonti di calore, non deve essere danneggiato (eventualmente farlo sostituire da personale
qualificato)
É sconsigliato l’uso di adattatori, prese multiple e
prolunghe. Qualora il loro uso si rendesse
indispensabile è necessario utilizzare prodotti con
marchio di certificazioni qualità (tipo IMQ, VDE, +s,
ecc....) e controllare che il valore di potenza
stampigliato sia comunque superiore all’assorbimento (A = ampére) degli apparecchi allacciati.
In caso di dubbio o di incertezza far controllare da
personale qualificato l’impianto di alimentazione
elettrica che deve rispondere ai requisiti disposti
dalle normative di sicurezza vigenti, fra i quali:
o efficace messa a terra;
o sezione dei conduttori sufficiente alla potenza
di assorbimento;
o dispositivo salvavita efficiente.
Posizionare la macchina su un piano idrorepellente
(laminato, acciaio, ceramica, ecc...) lontano da
sorgenti di calore (forni, fornelli, camini, ecc...) e in
ambienti dove la temperatura non scenda sotto i
5°C.
Non esporre la macchina ad intemperie o installarla
in ambienti ad elevata umidità come locali da
bagno.
In caso di sostituzione di pezzi, rivolgersi ad un
concessionario o ad un Rivenditore Autorizzato ed
utilizzare solo ricambi originali.
La macchina imballata va immagazzinata in luogo
riparato dalle intemperie, asciutto e privo di umidità. La temperatura deve essere non inferiore a
+5°C.
I colli si possono impilare per un massimo di
quattro pezzi dello stesso tipo. Evitare di
sovrapporre all’imballo colli pesanti di altro
genere.
In caso di danni a cose o persone causati da un errata
installazione o utilizzo il costruttore non può
considerarsi responsabile.
3. DESCRIZIONE
3.1. Caratteristiche
La macchina è costituita da una caldaia dedicata
all’erogazione di caffè e da una caldaia dedicata alla
produzione di acqua calda e vapore. La scocca della
macchina è composta da una struttura portante in
acciaio INOX. Tramite il display touch screen si possono
regolare le funzioni della macchina.
Mod. 0988 Rev. 00
4
4
3.2. Sicurezza La caldaia caffè è dotata di una valvola
meccanica a molla per le sovrapressioni tarata a 14
bar, e di un protettore termico che interrompe il
riscaldamento in caso di guasto. La caldaia vapore
è dotata di una valvola di sicurezza tarata a 2,3 Bar
ed un protettore termico che interrompe il
riscaldamento in caso di guasto. La pompa è
dotata di protettore termico a riarmo automatico
che la protegge in caso di surriscaldamento. Tutti
gli organi di riscaldamento e sottoposti a tensione
elettrica sono interni alla pannellatura della
macchina.
3.3. Vibrazioni La macchina è equipaggiata di piedini in
gomma antivibranti. In normali condizioni di lavoro
la macchina non genera vibrazioni dannose a
persone e/o cose.
4. CARATTERISTICHE TECNICHE
Dimensioni
mm L 345 x H 435 x P 470
Peso
Kg 26
Dati elettrici
Tensione alimentazione
Potenza
220/230 V - 50-60 Hz
2070 W
115V – 60 Hz
2070 W
Capacità serbatoio acqua 3 Lt.
Temperatura ambiente di lavoro +5° +45° C
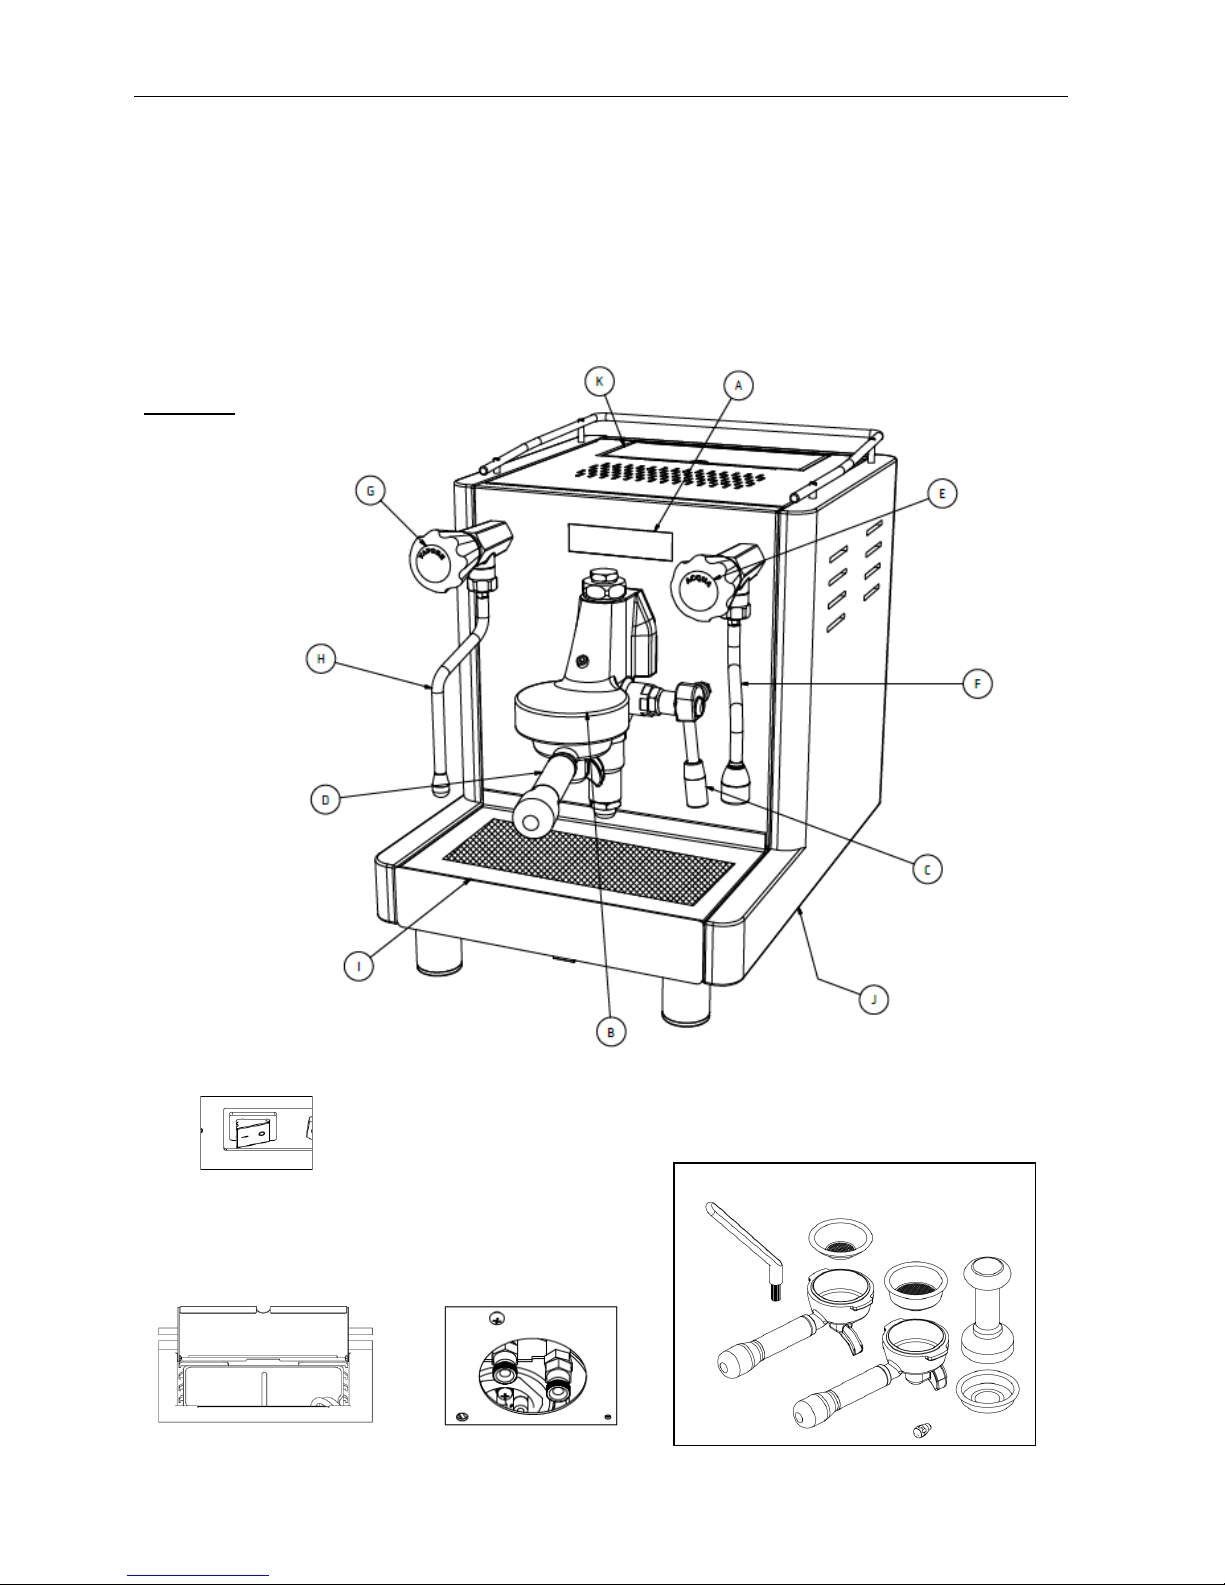
5. LEGENDA (foto 1)
a) Display touch screen
b) Gruppo erogazione caffè
c) Leva erogazione caffè
d) Portafiltro
e) Rubinetto acqua calda
f) Lancia acqua
g) Rubinetto vapore
h) Lancia vapore
i) Bacinella scarico
j) Interruttore generale (FIg.)
k) Serbatoio acqua (Fig. )
l) Rubinetti di scarico (Fig. )
6. DESTINAZIONE D’USO
La macchina è stata progettata, e costruita per
l’erogazione della bevanda caffè e la preparazione di
bevande calde (the, cappuccino, ecc....).
Ogni altro uso é da considerarsi improprio e quindi
pericoloso.
L’operatore deve sempre attenersi alle indicazioni di
uso e manutenzione contenute nel presente libretto.
In caso di dubbio e/o anomalia di funzionamento,
fermare la macchina, astenersi da effettuare riparazioni
e/o interventi diretti rivolgersi al servizio di assistenza
autorizzato.
L’operatore non deve:
toccare con le mani le superfici calde , ma utilizzare
solo i comandi previsti;
intervenire in opere di manutenzione e/o di
trasporto macchina con la spina inserita e la
macchina calda;
staccare la spina tirando il cavo di alimentazione;
utilizzare la macchina se il cavo di alimentazione
risulta danneggiato;
toccare la macchina con mani e piedi bagnati o
umidi;
capovolgere o coricare su un fianco l’imballo e la
macchina.
lavare la macchina con getti d’acqua diretti in
pressione o con vapore;
immergere la macchina in acqua o in altro tipo di
liquido;
La macchina non è destinata a persone (inclusi
bambini) con capacità mentali fisiche o sensoriali
ridotte, fatti salvi i casi in cui tali persone abbiano
ricevuto assistenza o formazione per l’uso
dell’apparecchio da una persona responsabile della
loro incolumità. Adottare le dovute precauzioni per
evitare che i bambini giochino con l’apparecchio.
appoggiare contenitori di liquidi sulla macchina.
Qualora la macchina risultasse bagnata o
fortemente umida, bisogna astenersi da
procedere all’installazione e uso fino a quando
non si abbia la certezza della sua asciugatura.
E’ comunque necessario fare un controllo preventivo da
parte del servizio di assistenza per accertare eventuali
danni subiti dai componenti elettrici.
Controindicazioni d’uso
La macchina va utilizzata solo per l’uso
previsto e non per altri scopi come erogare
prodotti diversi da caffè o prodotti non
alimentari.
7. TRASPORTO
7.1. Imballo
Durante il trasporto tenere sempre il collo in posizione
corretta facendo riferimento all’indicazione stampata
all’esterno del cartone.
Non capovolgere o coricare su un fianco l’imballo.
Nell’imballo sono contenute le parti staccate e la
documentazione a corredo che va conservata per
ulteriori consultazioni.
Aprire la parte superiore della confezione, togliere
gli accessori e quindi sfilare la macchina dall’involucro.
Controllare l’integrità della macchina, degli ac-
cessori, del cavo di alimentazione e della spina ed
in caso di danni, avvertire con tempestività il
rivenditore.
Mod. 0988 Rev. 00
5
5
Gli elementi d’imballaggio (sacchetti di plastica, polistirolo espanso, chiodi, cartoni, ecc..)
non devono essere lasciati alla portata di
bambini in quanto potenziali fonti di pericolo.
Non disperdere nell’ambiente gli elementi
d’imballaggio, ma smaltirli affidandoli agli organi
preposti a tali attività.
8. INSTALLAZIONE
La macchina viene consegnata pronta per l’installazione
secondo i dati di targa.
Accertarsi che la linea elettrica abbia le stesse
caratteristiche della macchina.
La macchina può essere alimentata a rete idrica o con la
tanica.
L’impianto di alimentazione elettrica deve essere dotato
di salvavita o di interruttore generale automatico con
una efficiente presa a terra. Qualora non vi fosse alcuna
sicurezza elettrica, fare installare da personale
qualificato un interruttore bipolare magnetotermico
differenziale come previsto dalle norme di sicurezza
vigenti.
E’ obbligatorio il collegamento a terra
dell’apparecchio. Il costruttore declina ogni
responsabilità qualora questa norma
antinfortunistica non venga rispettata.
Fare attenzione a non danneggiare il cavo di
alimentazione con piegature, schiacciamenti o
sollecitazioni. Per evitare eventuali danni, scollegare
l’apparecchio tirando la spina e non il cavo, non toccare
mai la spina con le mani bagnate.
Si consiglia di evitare il collocamento della macchina in
nicchie o similari onde evitare disagi operativi, di
rifornimento e manutenzione.
Il piano sul quale va installata la macchina deve
essere ben livellato, asciutto, robusto stabile ed
essere ad una altezza dal pavimento di 80 cm.;
Posizionare la macchina e inserire la spina nella
presa di corrente.
8.1. Allacciamento alla rete idrica
L’acqua della fonte di alimentazione della rete deve
essere addolcita e deve avere una temperatura
compresa tra i +5°C e +25°C. La linea di alimentazione
idrica deve avere un rubinetto di intercettazione che
consenta di chiudere la fonte di alimentazione. In
dotazione con la macchina viene fornito un kit per
l’allacciamento alla rete, composto da un tubo ed un
riduttore di pressione. La macchina viene fornita con le
impostazioni per essere alimentata a serbatoio.
Collegare alla rete idrica il riduttore di pressione in
dotazione.
Collegare alla macchina il tubo di allacciamento
rete idrica collegato al riduttore di pressione.
Aprire il rubinetto di intercettazione acqua
8.2. Descrizione comandi
Interruttore generale (Fig ): Azionandolo si
accende il display (Fig ).
Leva erogazione caffè (Fig ): Azionando la leva
verso l’alto si attiva l’erogazione dal gruppo caffè.
Abbassando la leva l’erogazione si arresta.
Rubinetto acqua calda (Fig ): azionando la leva si
attiva l’erogazione di acqua calda dalla lancia acqua
(Fig ).
Rubinetto vapore (Fig ): azionando la leva si attiva
l’erogazione di vapore dalla lancia vapore (Fig ).
9. FUNZIONAMENTO
Si raccomanda di fare attenzione alle parti calde della
macchina, in special modo al gruppo erogazione e al
tubo vapore.
Durante l’uso della lancia vapore prestare molta
attenzione a non mettere le mani sotto e non
toccarla subito dopo l’uso.
9.1. Riempimento serbatoio
Riempire il serbatoio di acqua potabile addolcita.
In caso di allacciamento diretto alla rete idrica vedi
paragrafo 8.1.
Accendere l’interruttore generale (Fig 2) ed
attendere che la macchina ricarichi la caldaia quindi
azionare la leva del gruppo caffè per attivare
l’erogazione e lasciare scorrere 500ml di acqua.
Attendere che la macchina raggiunga la
temperatura di esercizio.
Al primo utilizzo lasciare scorrere a macchina
calda circa 0,5 litri di acqua per effettuare il
risciacquo del gruppo attivando l’erogazione
caffè.
9.2. Erogazione del caffè
Sganciare il portafiltro dalla propria sede
ruotandolo in senso orario.
Riempire il filtro con una o due dosi di caffè (a
seconda del filtro inserito) usando l'apposito
dosatore.
Premere il caffè con il pressino.
Riagganciare e serrare il portafiltro nella propria
sede ruotandolo in senso antiorario.
Posizionare le tazze in corrispondenza dei fori di
uscita posti sotto il portafiltro.
Selezionare il profilo di erogazione (vedi paragrafo
10.3).
Alzare la leva di erogazione caffè dopo alcuni
secondi inizia l’erogazione. Raggiunta la dose
desiderata abbassare la leva.
Mod. 0988 Rev. 00
6
6
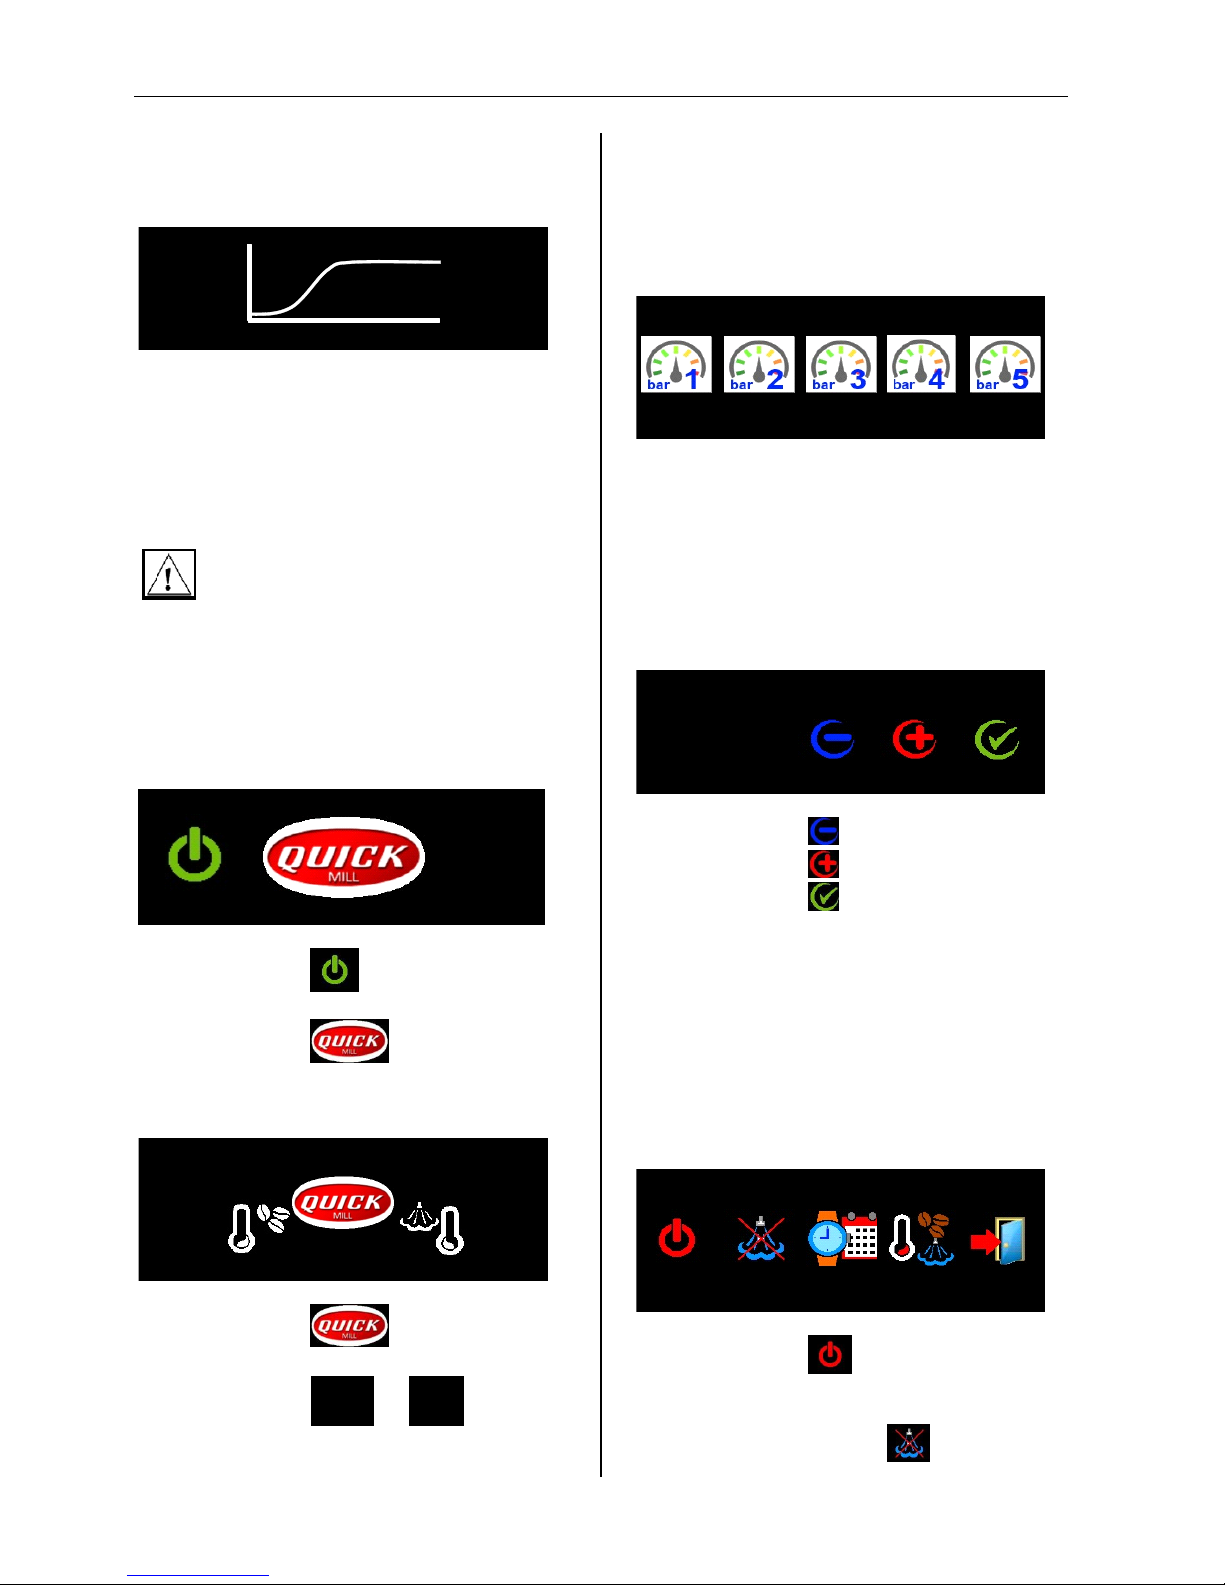
Durante l’erogazione del caffè sul display appare una
schermata dove vengono indicati: il profilo selezionato,
la temperature, il tempo e la pressione. In oltre appare
un grafico che delinea la curva di pressione.
Profilo
sec.
2.
15,7
°C Bar
94
9.1
9.3. Erogazione vapore
Aprire il rubinetto e scaricare un po’ di vapore nella
bacinella di scarico, quindi immergere la lancia vapore
nel liquido da scaldare ed aprire il rubinetto fino al
raggiungimento della temperatura desiderata quindi
chiudere il rubinetto.
Terminato di riscaldare la bevanda, scaricare
del vapore dal tubo per pulire i fori dello
spruzzatore
9.4. Erogazione acqua calda
Porre il recipiente atto a raccogliere l’acqua sotto
al diffusore acqua calda, quindi aprire il rubinetto.
10. PROGRAMMAZIONE E FUNZIONAMENTO
10.1. Stato macchina OFF
10/11/2015
16:25
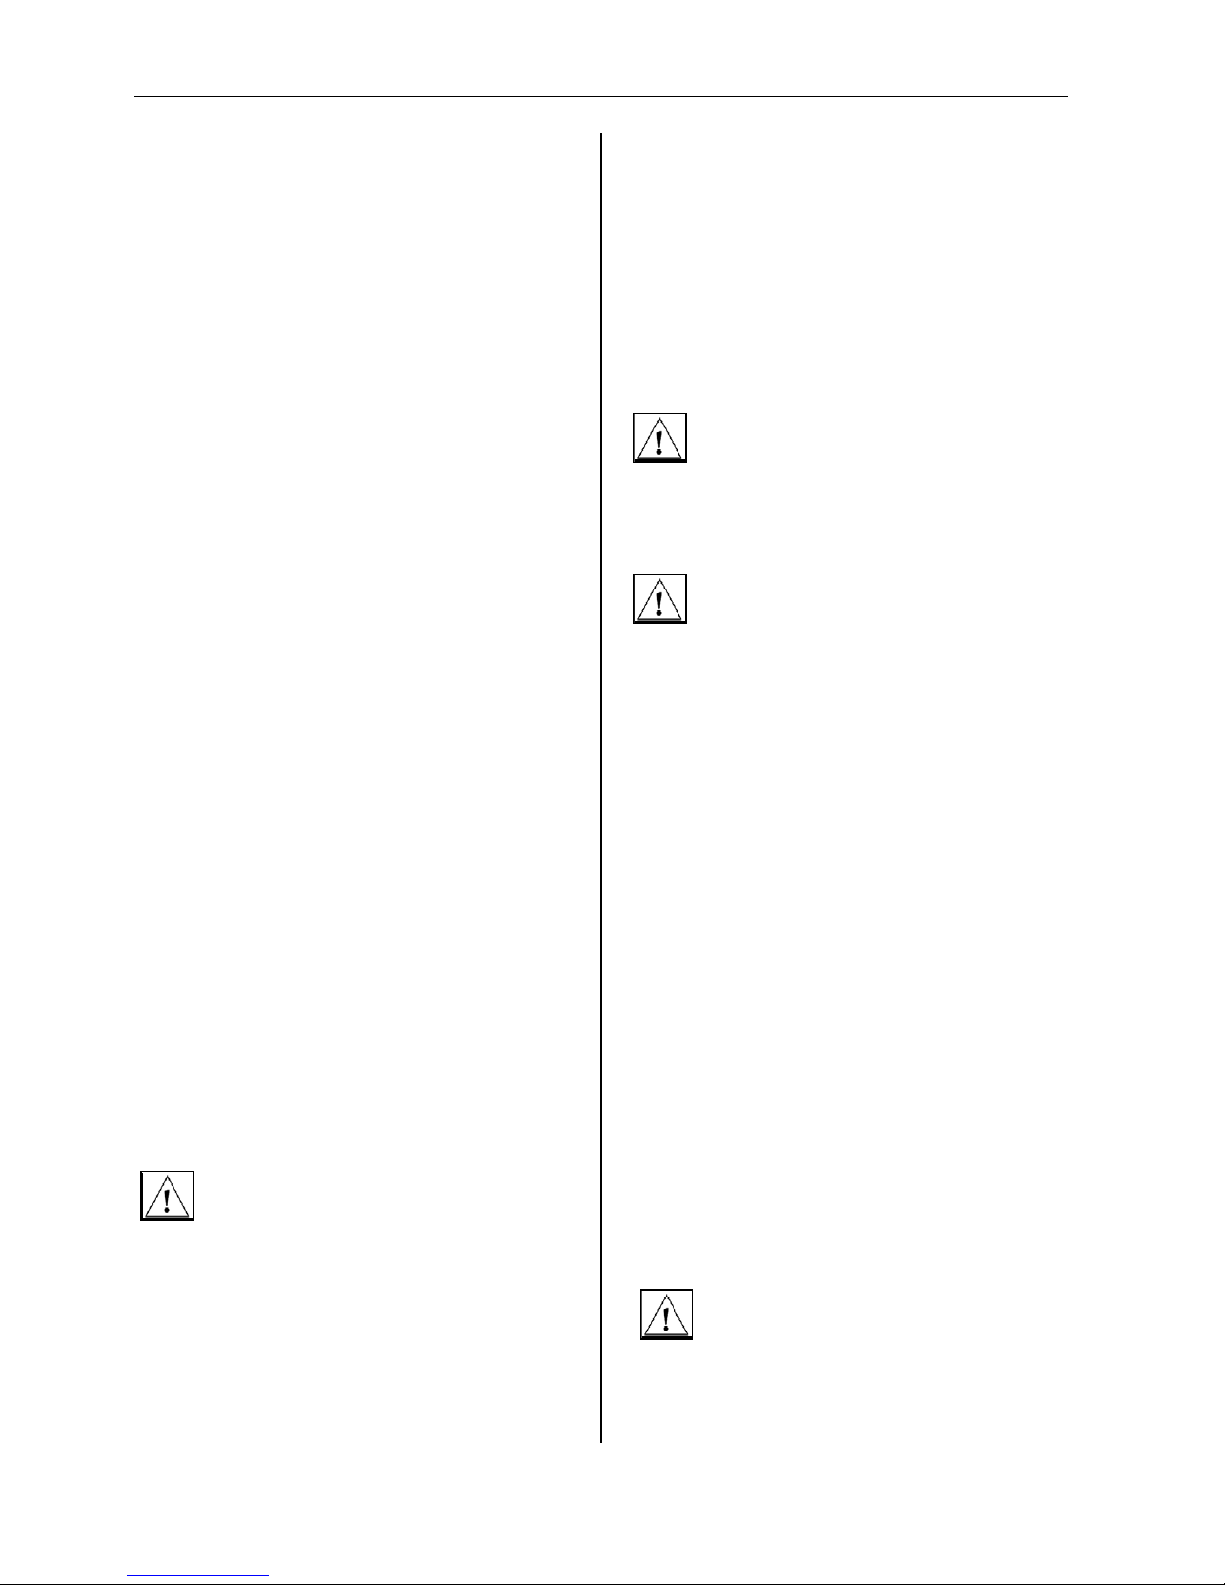
Premere il tasto 1 per accendere la
macchina, sul display appare2.
Premere il tasto 3 per accedere al
menù tecnico.
10.2. Stato macchina ON
Profilo n° 2
95°C 120°C
10/11/2015
16:25
Premere il tasto 3 per selezionare il
profilo di erogazione caffè.
Premere il tasto 1 o 5
(temperatura caffè o temperatura vapore) per
accedere al menù programmazione.
10.3. Menù selezione profilo erogazione
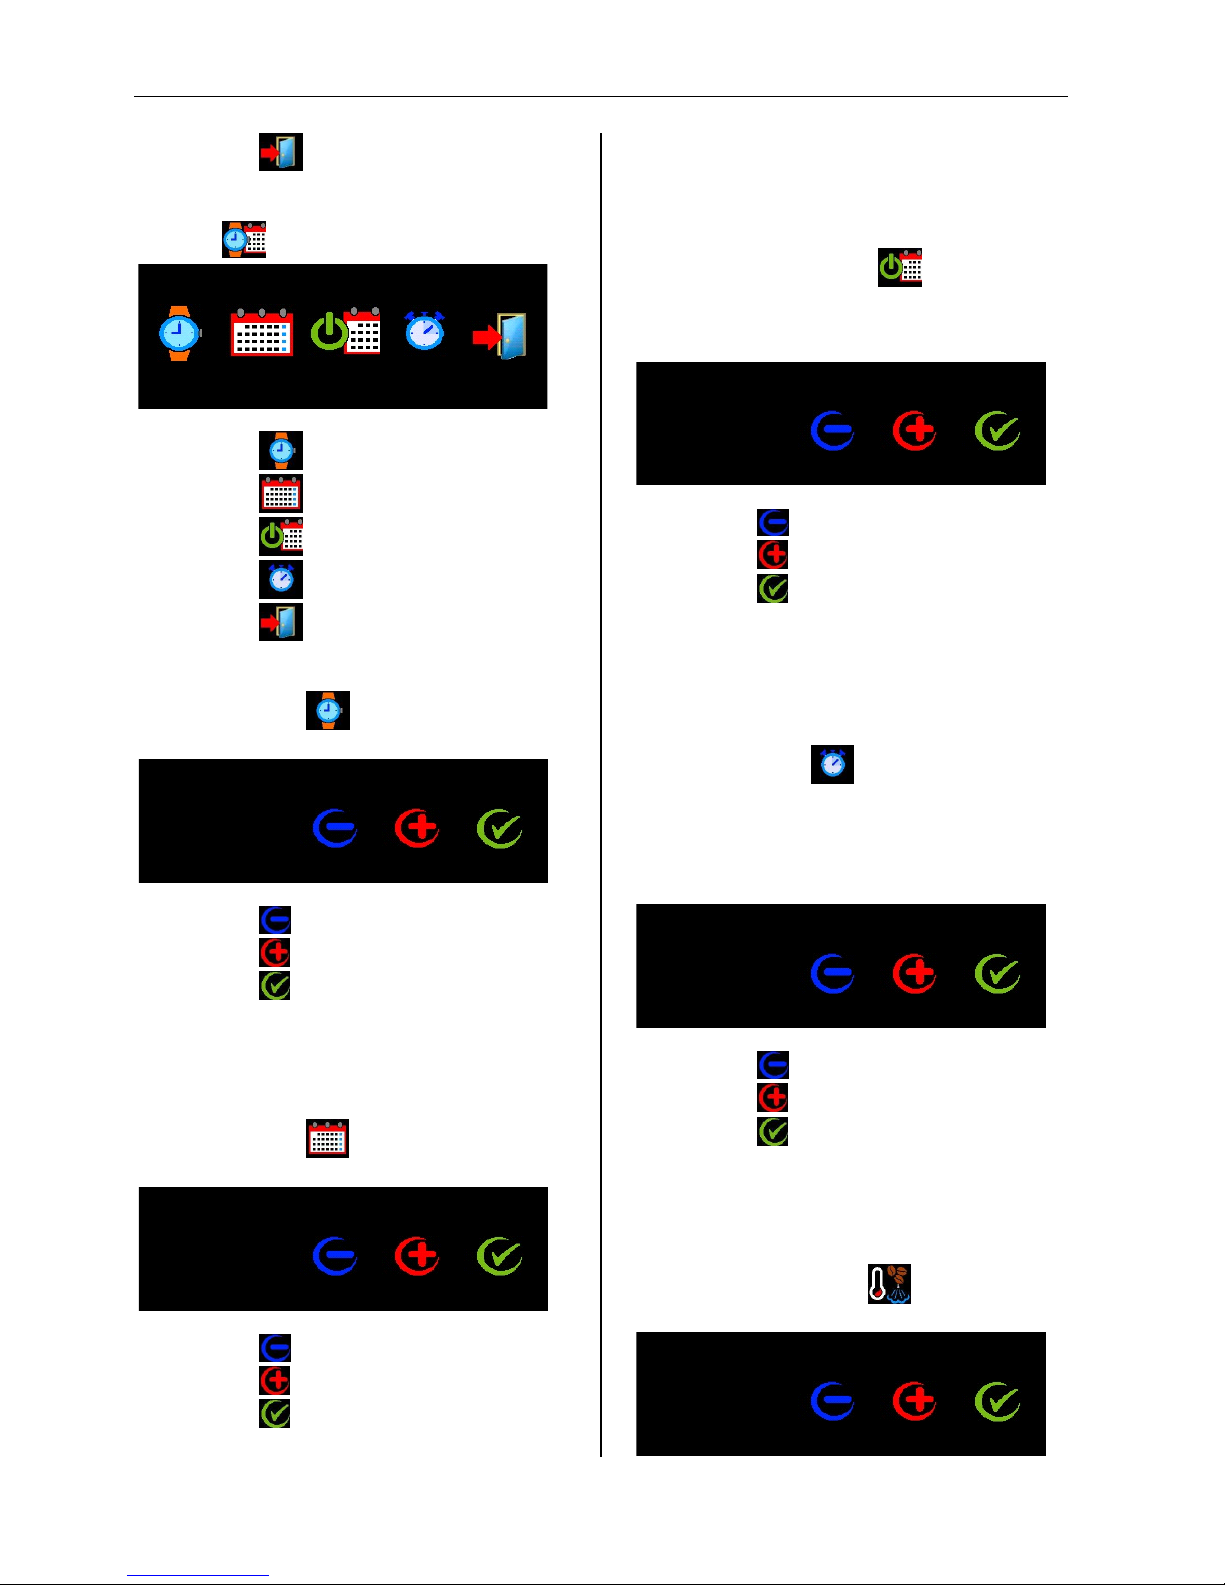
La selezione del profilo permette di impostare i
parametri di pressione e tempo in tutte le fasi di
estrazione del caffè dalla pre-infusione alla fusione. I 5
profili sono inizialmente impostati dalla fabbrica ma
possono essere programmati a piacere dall’utente.
Premere un tasto da 1 a 5 per selezionare il
profilo di erogazione caffè. Appare nuovamente la
schermata principale selezionando il profilo
desiderato oppure dopo 10 secondi senza
selezionare.
Premere per 5 secondi un tasto da 1 a 5 per
accedere alla regolazione dei parametri del
profilo relativo al tasto premuto.
impostazione profilo n° 1
Fase 1:
Pressione: 0,1
Tempo: 0,1
Premere il tasto 3 per diminuire il valore.
Premere il tasto 4 per aumentare il valore.
Premere il tasto 5 per confermare il
parametro e passare alla regolazione successiva.
Premendo il tasto 5 si conferma la modifica del
valore impostato e si passa alla regolazione del
parametro successivo con questa sequenza:
fase1: tempo/pressione; fase2: tempo/pressione;
fase3: tempo/pressione; ecc. Premere 3 secondi il
tasto 5 per uscire. Sulla riga in alto del display
appare il testo con il n° del profilo che si sta
impostando.
10.4. Menù programmazione
Premere il tasto 1 per spegnere la
macchina.
Premere il tasto 2 per spegnere il circuito vapore,
sul display appare il simbolo (se il circuito
16:25
120°C
10/11/15
96°C

Mod. 0988 Rev. 00
7
7
vapore viene disattivato sulla schermata
principale non appare la temperatura vapore).
Premere il tasto 3 per accedere alla
regolazione di: data, ora, stand-by, accensione e
spegnimento.
Premere il tasto 4 per accedere alle
impostazioni del set point temperature.
Premere il tasto 5 per uscire dal menù e
tornare alla schermata principale.
10.5. Orologio
Premere il tasto 1 per impostare l’ora.
Premere il tasto 2 per impostare la data.
Premere il tasto 3 per impostare
accensione e spegnimento.
Premere il tasto 4 per impostare il timer
dello stand-by .
Premere il tasto 5 per uscire dal menù e
tornare alla schermata principale.
10.6. Regolazione ora
Permette di impostare l’ora visualizzata sul display.
Regolazione ora
Minuti: 00
Ora: 00
Premere il tasto 3 per diminuire il valore.
Premere il tasto 4 per aumentare il valore.
Premere il tasto 5 per confermare il
parametro e passare alla regolazione successiva.
Premendo il tasto 5 si conferma la modifica del
valore impostato e si passa alla regolazione del
parametro successivo con questa sequenza:
ora/minuti. Premere di nuovo il tasto 5 per uscire.
10.7. Regolazione data
Permette di impostare la data ed il formato.
Giorno: 01
Regolazione data
Formato: GG/MM/AA
Mese: 01
GG Week: LUN
Anno: 15
Premere il tasto 3 per diminuire il valore.
Premere il tasto 4 per aumentare il valore.
Premere il tasto 5 per confermare il
parametro e passare alla regolazione successiva.
Premendo il tasto 5 si conferma la modifica del
valore impostato e si passa alla regolazione del
parametro successivo con questa sequenza:
giorno/mese/anno/giorno della
settimana/formato. Premere di nuovo il tasto 5
per uscire.
10.8. Regolazione accensione e spegnimento
Permette di impostare l’orario di accensione e
spegnimento settimanale. Con i valori ON e OFF a zero
(00) non viene effettuato nessuna accensione e
spegnimento automatico della macchina.
Giorno: LUN
ON/OFF
Minuti OFF: 00
Ora ON: 00
Ora OFF: 00
Minuti ON: 00
Premere il tasto 3 per diminuire il valore.
Premere il tasto 4 per aumentare il valore.
Premere il tasto 5 per confermare il
parametro e passare alla regolazione successiva.
Premendo il tasto 5 si conferma la modifica del
valore impostato e si passa alla regolazione del
parametro successivo con questa sequenza:
giorno/ora ON/minuti ON/ora OFF/minuti OFF.
Premere di nuovo il tasto 5 per uscire.
10.9. Regolazione timer
Permette di impostare il tempo di spegnimento
automatico per il risparmio energetico. Impostando i
valori a zero (00) non viene effettuato nessuno
spegnimento. I timer inizia il conteggio dall’ultima
erogazione effettuata.
Timer ECO
Minuti: 00
Ora: 00
Premere il tasto 3 per diminuire il valore.
Premere il tasto 4 per aumentare il valore.

Mod. 0988 Rev. 00
8
8
Premere il tasto 5 per confermare il
parametro e passare alla regolazione successiva.
Premendo il tasto 5 si conferma la modifica del
valore impostato e si passa alla regolazione del
parametro successivo con questa sequenza:
ora/minuti. Premere di nuovo il tasto 5 per uscire.
10.10. Regolazione temperatura
Permette di impostare il set point della temperatura
caffè.
Temperatura caffè
94°C
Premere il tasto 3 per diminuire il valore.
Premere il tasto 4 per aumentare il valore.
Premere il tasto 5 per confermare il
parametro e passare alla regolazione successiva.
Premendo il tasto 5 si conferma la modifica del
valore impostato e si passa alla regolazione della
temperatura vapore.
Permette di impostare il set point della temperatura
vapore.
Temperatura vapore
120°C
Premere il tasto 3 per diminuire il valore.
Premere il tasto 4 per aumentare il valore.
Premere il tasto 5 per confermare il
parametro tornare alla schermata precedente.
10.11. Programmazione menù tecnico
Premere il tasto 1 per impostare
l’alimentazione idrica RETE/SERBATOIO. Ogni
pressione del tasto cambia il valore da
“serbatoio” a “rete” . Ad ogni
pressione del tasto cambia l’’icona che indica il
parametro impostato (serbatoio).
Premere il tasto 2 per impostare i parametri
di funzionamento della pompa
kp/ki/kd/accelerazione.
Premere il tasto 3 per impostare la gestione
delle temperature: priorità riscaldamenti, unità di
misura °C/°F, parametri pid caffè, parametri pid
vapore.
Premere il tasto 4 per impostare la lingua.
Ad ogni pressione del tasto cambia l’icona che
indica la lingua impostata.
Premere il tasto 5 per tornare alla
schermata precedente.
10.12. Set PWM pompa
Modificando questi parametri si potrebbe
compromettere il corretto funzionamento del controllo
della pompa.
Set PWM pompa
Acc.: 1225
Kp: 7,00
Kd: 99,9
Ki: 4,00
Premere il tasto 3 per diminuire il valore.
Premere il tasto 4 per aumentare il valore.
Premere il tasto 5 per confermare il
parametro e passare alla regolazione successiva.
Premendo il tasto 5 si conferma la modifica del
valore impostato e si passa alla regolazione del
parametro successivo con questa sequenza:
Kp/Ki/Kd/Acc. Premere di nuovo il tasto 5 per
uscire.
10.13. Set riscaldamento
Permette di impostare tutti i parametri relativi alla
gestione del riscaldamento delle caldaie.
Premere il tasto 1 per impostare la priorità
di riscaldamento. Ogni pressione del tasto cambia
il valore: “priorità caffè” attiva il
riscaldamento caldaia vapore solo dopo aver
raggiunto la temperatura caffè; “priorità vapore”

Mod. 0988 Rev. 00
9
9
attiva il riscaldamento caldaia caffè solo
dopo aver raggiunto la temperatura vapore;
“nessuna priorità” attiva entrambi i riscaldamenti
contemporaneamente senza dare priorità. L’icona
del tasto indica il parametro impostato.
Premere il tasto 2 per impostare l’unità di
misura della temperatura °C/°F. Ogni pressione
del tasto cambia il valore da °C a °F . L’icona
del tasto indica il parametro impostato.
Premere il tasto 3 per impostare i parametri
PID caffè. La pressione del tasto apre la pagina dei
parametri.
Premere il tasto 4 per impostare i parametri
PID vapore. La pressione del tasto apre la pagina
dei parametri.
Premere il tasto 5 per tornare alla
schermata precedente.
10.14. Set PID caffè
Modificando questi parametri si potrebbe
compromettere il corretto funzionamento del controllo
della temperatura caffè.
Kp: 1,5
Set PID caffè
Ki: 00
Banda: 5
Offset: 15
Kd: 1,5
Premere il tasto 3 per diminuire il valore.
Premere il tasto 4 per aumentare il valore.
Premere il tasto 5 per confermare il
parametro e passare alla regolazione successiva.
Premendo il tasto 5 si conferma la modifica del
valore impostato e si passa alla regolazione del
parametro successivo con questa sequenza:
Kp/Ki/Kd/Banda/Offset. Premere di nuovo il tasto
5 per uscire.
10.15. Set PID vapore
Modificando questi parametri si potrebbe
compromettere il corretto funzionamento del controllo
della temperatura vapore.
Kp: 1,5
Set PID vapore
Ki: 00
Banda: 5
Offset: 00
Kd: 1,5
Premere il tasto 3 per diminuire il valore.
Premere il tasto 4 per aumentare il valore.
Premere il tasto 5 per confermare il
parametro e passare alla regolazione successiva.
Premendo il tasto 5 si conferma la modifica del
valore impostato e si passa alla regolazione del
parametro successivo con questa sequenza:
Kp/Ki/Kd/Banda/Offset. Premere di nuovo il tasto
5 per uscire.
11. ALLARMI
11.1. Mancanza acqua
Viene visualizzato quando manca acqua nel serbatoio.
Profilo n° 2
95°C 120°C
10/11/2015
16:25
11.2. Allarme temperature
Viene visualizzato quando in caso di guasto la
temperatura supera quella impostata oppure nel caso in
cui una sonda di temperatura sia interrotta o guasta.
Profilo n° 2
95°C 120°C
10/11/2015
16:25
11.3. Allarme pressione
Viene visualizzato quando non viene rilevata pressione
nel circuito durante l’erogazione oppure in caso di
guasto del sensore di pressione.
Profilo n° 2
95°C 120°C
10/11/2015
16:25
12. MANUTENZIONE
Le operazioni di manutenzione vanno effettuate a macchina spenta, fredda e con la spina
di alimentazione elettrica disinserita. Per la
pulizia non utilizzare strumenti metallici o abrasivi tipo
pagliette, spazzole metalliche, aghi, e detergenti a usare
un panno o una spugna umidi.
12.1. Giornaliera
Pulire la carrozzeria, lancia vapore, doccetta e
guarnizione sottocoppa del gruppo.
Controllare ed eventualmente pulire il cassetto di
scarico.
Mod. 0988 Rev. 00
10
10
Sciacquare i filtri e il portafiltro con acqua calda e
un panno o spugna.
12.2. Periodica o dopo l’uso intenso della macchina
Oltre alle operazioni giornaliere, effettuare le seguenti
operazioni:
Immergere i filtri e il porta filtro in acqua bollente
per qualche minuto per favorire lo scioglimento dei
grassi del caffé, quindi utilizzare un panno e/o una
spugna per rimuoverlo.
Pulire il serbatoio dell’acqua.
12.3. Pulizia gruppo caffè
In dotazione con la macchina viene fornito un filtro
cieco per poter effettuare la pulizia del gruppo. Questa
operazione deve essere eseguita almeno una volta a
settimana in modo da rimuovere le incrostazioni di caffè
dal circuito.
Sganciare il porta filtro dal gruppo.
Rimuovere il filtro dal porta filtro ed inserire il
filtro cieco.
Agganciare il porta filtro al gruppo.
Selezionare un profilo di erogazione a salita rapida
(in modo da raggiungere una pressione di almeno
9 Bar in 5 secondi).
Avviare l’erogazione di caffè per 15 secondi circa
quindi arrestare l’erogazione. Ripetere
l’operazione per 10-15 volte.
12.4. Decalcificazione
Inserire nella tanica dell’acqua il prodotto
decalcificante.
Attivare l’erogazione dal gruppo caffè e dal
rubinetto acqua. Lasciare la macchina accesa per
circa 1 ora per fare agire il decalcificante quindi
spegnere la macchina e introdurre acqua pulita
nella tanica.
Attivare l’erogazione dal gruppo e dal rubinetto
acqua quindi spegnere la macchina e scaricare la
pressione nelle due caldaie.
Quando la macchina si sarà raffreddata aprire i
rubinetti e scaricare l’acqua dalle caldaie (Fig ).
Chiudere i rubinetti di scarico e rimettere in
funzione la macchina seguendo le operazioni di
messa in servizio.
Leggere attentamente ed attenersi alle
istruzioni d’uso del prodotto decalcificante.
13. MESSA FUORI SERVIZIO
13.1. Temporanea
Svuotare il serbatoio dell’acqua e la bacinella di
scarico.
Spegnere l’interruttore generale e staccare la spina
di alimentazione elettrica.
Effettuare le operazioni di manutenzione.
Riporre la macchina in un ambiente asciutto, al
riparo da intemperie e di esclusivo accesso (evitare
di lasciarla alla portata di minori).
13.2. Definitiva
Oltre alle operazioni della messa fuori servizio temporanea, provvedere a :
Tagliare il cavo di alimentazione.
Imballare la macchina con cartone o altro e con-
segnarla al personale preposto (smaltimento rifiuti
autorizzato o ritiro usato).
I materiali di scarto usati per la lavorazione o
manutenzione, se non biodegradabili o inquinanti, vanno riposti in separati contenitori e
consegnati negli appositi centri di raccolta.
14. INCONVENIENTI POSSIBILI
In caso di danneggiamento del cavo di alimentazione, fare riferimento ad un centro di
assistenza autorizzato per la sostituzione in
quanto è necessario l’uso di un utensile speciale.
Operazioni di controllo eseguibili dall’utilizzatore.
14.1. Non si accende la macchina:
a) Controllare se è inserita la spina;
b) Controllare che ci sia corrente in rete e il salvavita o
l’interruttore generale sia inserito;
c) Controllare le condizioni della spina e del cavo di
alimentazione, se sono danneggiati farli sostituire
da personale qualificato.
14.2. Non eroga caffè
a) Mancanza acqua nel serbatoio, ripristinare il livello.
b) Verificare la presenza di acqua nella rete idrica (se
allacciata a rete).
14.3. Erogazione irregolare del caffè
a) Pulire il filtro contenuto nel portafiltro.
b) Macinatura del caffè, troppo fine o troppo grossa.
14.4. Non eroga acqua calda o vapore
a) Mancanza di acqua nel serbatoio; ripristinare il
livello.
b) Diffusore acqua calda intasato, smontare e pulire.
c) Ugelli intasati; pulire gli ugelli della lancia vapore
con uno spillo.
Per ogni altro tipo di anomalia o
inconveniente non specificato, staccare la
spina di alimentazione elettrica, astenersi da
interventi diretti di riparazione o verifica e rivolgersi al
servizio tecnico di assistenza qualificato.

Mod. 0988 Rev. 00
11
11
2
INTRODUCTION
Keep this instruction manual in a safe place. For
any information or difficulties not fully
explained, please contact the service personnel.
15. SYMBOLS
The warning triangle
identifies all the explanations
of an important nature for
the safety of persons.
Follow these instructions to avoid accidents!
The numerical symbol, numbers or
letters refer to illustrations and parts
of the machine such as buttons, lights,
etc.
The manufacturer assumes no
responsibility for any damages in the
event of:
Uses not in accordance with the intended
purposes;
Alterations made to the power cable;
Alterations made to any component part of
the machine;
Use of non-original components or
accessories;
Repairs not carried out by an authorised
service centre;
This product meets the labeling
requirements set out in RAEE
Directive (2002/96/CE). The symbol
indicates that this electrical or
electronic product must not be discarded with
normal household waste. PRODUCT CATEGORY
with references to the type of equipment listed
in Annex 1 of the RAEE Directive. This product is
in category 2, “Small domestic appliances”.
DO NOT DISCARD WITH NORMAL HOUSEHOLD
WASTE
The failure to observe the above mentioned
points voids the guarantee.
16. WARNING
The packaging material (plastic bags, polystyrene,
nails, cardboard, etc.) must not be left within the
reach of children as they are a potential sources of
danger.
Before connecting the machine to power supply,
make certain that the rating plate corresponds to
the requirements of the electrical grid.
The power cable must lie flat (avoid curling or
overlapping) in a position which is not exposed to
any impacts or handling by minors. It must not be
placed near liquids, water or heat sources, and
must not be damaged (if necessary have qualified
personnel replace it).
The use of adapters, multiple sockets and/or
extensions is not advised. Whenever their use is
absolutely necessary, only use products with
quality certification markings (IMQ, VDE, +S, etc.),
and ensure that the power rating stamp is higher
than the absorption (A = amps) of the equipment to
be attached.
In the event of doubt or uncertainty, have qualified
personnel check the electrical power supply which
must correspond to the provisions required by the
current safety regulations, including:
o proper earthing;
o conductor section is suitable for the absorption
capacity;
o efficient residual current device.
Position the machine on a hydro-repellent surface
(laminated, stainless steel, ceramic, etc.) away from
heat sources (ovens, stove tops, fireplaces, etc.)
and in an environment where temperature does
not drop below 5 °C.
Do not expose the machine to the elements, or
install it in an environment with high humidity,
such as a bathroom area.
If the need for a replacement part arises, contact a
distributor or Authorised Retailer and only used
original spare parts.
The machine in its packaging is to be stored in a dry
location, free from humidity and protected from
the elements. The temperature must not be lower
than +5 °C.
A maximum of four packages containing pieces
of the same type may be stacked, one on top
of the other. Do not stack heavy packages on
boxes of a different type.
In the event of damage to objects or persons caused by
the improper installation or use, the manufacturer can
not be considered responsible.
17. DESCRIPTION
17.1. Features
The machine consists of two boilers: the first is strictly
for the delivery of coffee and the second produces hot
water and steam. The outer shell of the machine is
composed of a stainless steel structural frame. Use the
touch screen display to select and set the functions of
the machine
17.2. Safety The boiler is equipped with a mechanical
spring control valve to regulate overpressure up to
a maximum 14 Bar and a thermal protector which
interrupts the heating in the case of failure. The
boiler is equipped with a safety valve set to 2.3 Bar
and a thermal protector which interrupts the

Mod. 0988 Rev. 00
12
12
heating in the case of failure. The pump is
equipped with a thermal protector with an
automatic reset which protects against
overheating. All of the heating elements and parts
under electric tension are within the paneling of
the machine.
17.3. Vibrations The machine is supplied with rubber
vibration damping feet. In normal working
conditions the machine does not generate
vibrations which could damage objects or cause
injury to persons.
18. TECHNICAL CHARACTERISTICS
Dimensions
mm L 345 x H 435 x D 28.5
Weight
Kg 26
Electrical data
Power supply
Rating
220/230 V - 50-60 Hz
2070 W
115 V – 60 Hz
2070 W
Water tank capacity 3 Lt.
Ambient working temperature +5 ° +45 ° C
19. KEY (photo 1 and 2)
a) Touch screen display
b) Coffee delivery group
c) Coffee delivery lever
d) Filter holder
e) Hot water tap
f) Water spout
g) Steam tap
h) Steam spout
i) Discharge basin
j) Main switch (Fig.)
k) Water tank (Fig.)
l) Drain tap (Fig.)
20. INTENDED USE
The machine was designed and manufactured for the
delivery of coffee drinks and the preparation of hot
drinks (tea, cappuccino, etc.).
Any other use is to be considered improper and
therefore dangerous.
The operator must always comply with the instructions
for use and maintenance in this manual.
In the event of doubt or irregularities during operation,
stop the machine, refrain from performing direct
repairs or interventions and contact the authorised
service centre.
The operator must not:
touch hot surface areas, only use the controls
provided;
perform maintenance operations or transport the
machine with the plug inserted or when the
machine is hot;
remove the plug by pulling on the power cable;
use the machine if the power cable shows damage;
touch the machine with wet or damp hands or feet;
turn over or lay the machine and packaging on its
side.
clean the machine using a direct spray or water
under pressure, or with steam;
immerse the machine in water or any other type of
liquid;
The machine is not intended for use by persons
(including children) with reduced physical sensory
or mental abilities, except in the case where they
have received training in the use of the equipment
by a person who is responsible for their safety.
Adopt the precautions necessary so that children
cannot touch the equipment.
lean liquid containers against the machine.
Whenever the machine appears to wet or
overly damp, do not proceed with installation
and use until it can be determined that the
machine has completely dried.
In any event, it is necessary to have the service centre
perform an inspection to ascertain if any damage has
occurred to the electrical components.
Precautions for use
The machine is to be operated only for its
intended use and not for any other purpose,
such as the delivery of products which are not
coffee or non-food products.
21. TRANSPORTATION AND HANDLING
21.1. Packaging
During transport, always keep the package in the
correct position referring to the indications printed on
the outside of the box.
Do not turn over or lay the machine and packaging on
its side.
The packaging contains loose parts and accompanying
documentation which is to be kept for further
consultation.
Open the upper part of the package, remove the
accessories and then slip the machine from the
wrapper.
Check the integrity of the machine, the accessories,
the power supply cable and plug, and in the event
of damage contact the retailer immediately.
The packaging material (plastic bags,
polystyrene, nails, cardboard, etc.) must not be
left within the reach of children as they are a
potential sources of danger.

Mod. 0988 Rev. 00
13
13
Avoid release to the environment. Dispose of them at a
local waste disposal company.
1. INSTALLATION
The machine is shipped ready for installation in
accordance with the data found rating plate.
Ensure that the machine specifications comply with
those of the local electrical power supply.
The machine can be connected directly to the water
supply system or supplied with water from the tank.
The electrical system must be equipped with an
efficient residual current device or an automatic circuit
breaker with an efficient earthing system. In the event
no electrical safety device is present, have a qualified
technician install a two pole rocker switch/thermalmagnetic circuit breaker as required by current safety
regulations.
Proper earthing of the device is mandatory.
The manufacturer declines all responsibility
in the event this health and safety regulation
is not respected.
Be careful not to damage the power supply cable by
bending, crushing or stresses. To avoid possible
damage, disconnect the machine from the mains by
pulling the plug and not the cable; never touch the plug
with wet hands.
It is advised to avoid positioning the machine in tight
spaces or avoid disruption to its operation, supply or
maintenance.
The surface where the machine is to be installed
must be level, dry, durable and stable, and at a
height of 80 cm from ground.
Position the machine and connect the power
supply cable to the electrical socket.
1.1. Connection to the local water supply network
The water supplied directly from the local water
network must be softened and at a temperature
between +5°C e +25°C. The water supply line must have
an intercept tap which allows the water supply to be
closed. The machine is supplied with a kit for connecting
directly to the water supply, consisting of a tube and a
pressure reducer. The machine is supplied with the
settings for a reservoir water supply.
Connect the supplied pressure reducer to the water
supply network.
Connect machine to the tube which was previously
connected to the pressure reducer attached to the
water supply network.
Open the water intercept tap.
1.2. Control descriptions
Main switch (Fig. ): Pressing the switch activates
the display (Fig. ).
Coffee delivery lever (Fig. ): Turn the lever upwards
to activate the coffee delivery group. Lower the
lever to stop delivery.
Hot water tap (Fig. ): Turning the lever starts the
delivery of hot water from the water spout (Fig. ).
Steam tap (Fig. ): Turning the lever starts the
delivery of steam from the steam spout (Fig. ).
2. OPERATION
It is recommended to pay attention to the hot parts of
the machine, especially the delivery group and the
steam tap.
Pay careful attention when using the steam
spout. Do not place hands beneath the spout or
touch it immediately after use.
2.1. Filling the water reservoir
Fill the water reservoir with drinking water only,
softened if possible. If connected directly to the
water supply system, see paragraph 8.1.
Turn the main switch to the ON position (Fig. 2)
and wait for the machine to recharge the boiler,
then use the lever to activate the coffee delivery
group and let 500ml of water to flow.
Wait until the machine reaches operating
temperature.
When the machine is used for the first time,
let approximately .5L of water flow through
the machine at operating temperature by
activating coffee delivery to flush the group.
2.2. Coffee delivery
Remove the filter holder from its seat, turning it in
the clockwise direction.
Fill the filter with one or two doses of coffee
(according to the filter inserted), using the
appropriate doser.
Compact the coffee with the presser.
Replace and tighten the filter holder in its seat,
turning it in the anti-clockwise direction.
Position the cups under the corresponding outlets
beneath the filter holder.
Select the delivery profile (see section 10.3).
Lift the coffee delivery lever, and after a few
seconds coffee delivery begins. When the desired
amount of coffee has been delivered, lower the
lever.
During coffee delivery, a screen will appear on the
display to indicate: the selected profile, temperature,
time and pressure. In addition, a graph displaying the
pressure curve will appear.
Mod. 0988 Rev. 00
14
14
Profile
sec.
2.
15,7
°C Bar
94
9.1
2.3. Steam delivery
Open the tap and release a small amount of steam into
the discharge basin, then lower the steam spout into
the liquid to be heated and open the tap until the
desired temperature is reached and close the tap.
Once the drink is heated, release some steam
to clean the sprayer outlet holes
2.4. Hot water delivery
Place the container to be used to collect water
below the hot water nozzle.
3. PROGRAMMING AND OPERATION
3.1. Machine OFF
10/11/2015
16:25
Press key 1 to switch machine ON. The
number 2 will appear on the display.
Press key 3 to access the technical
menu.
3.2. Machine ON
Profile n° 2
95°C 120°C
10/11/2015
16:25
Press key 3 to select the coffee delivery
profile.
Press key 1 or 5 (coffee
temperature or steam temperature) to access the
programming menu.
3.3. Delivery profile selection menu
Profile selection permits the setting of the pressure
and time parameters for all the stages of coffee
extraction, from pre-infusion to fusion. The 5 profiles
are pre-set at the factory but can be reprogrammed
by the user to suit their preferences.
Press a key numbered 1 to 5 to select the coffee
delivery profile. The main display will show again
upon selection of the desired profile or after 10
seconds, if no selection is made.
Pressing one of the keys numbered 1 to 5, for five
seconds, allows adjustment of the delivery
parameters for the profile (key) selected.
6
Setting profile n° 1
Phase 1:
Pressure: 0,1
Time: 0,1
Press key 3 to decrease the value.
Press key 4 to increase the value.
Press key 5 to confirm the parameter setting
and move to the next adjustment. Pressing key 5
confirms the new setting and moves to the next
parameter for adjustment in this sequence: step
1: time/pressure; step 2: time/pressure; step 3:
time/pressure; etc. Press key 5 for three seconds
to exit. The top line of the display shows the text
of the profile no. currently being set.
3.4. Programming menu
Press key 1 to switch machine OFF.
Press key 2 to close the steam circuit. This symbol
will appear on the display (if the steam
circuit is deactivated on the main display the
steam temperature will not appear).
Press key 3 to adjust the date, time, stand-
by, switch ON and switch OFF settings.
Press key 4 to access the set point
temperature setting.
16:25
120°C
10/11/15
96°C
Mod. 0988 Rev. 00
15
15
Press key 5 to exit the menu and return to
the main display.
3.5. Clock
Press key 1 to set the time.
Press key 2 to set the date.
Press key 3 to set the ON/OFF timer.
Press key 4 to set the stand-by timer.
Press key 5 to exit the menu and return to
the main display.
3.6. Setting the time
Allows the time shown on the display to be set.
Setting the time
Minutes: 00
Hour: 00
Press key 3 to decrease the value.
Press key 4 to increase the value.
Press key 5 to confirm the parameter setting
and move to the next adjustment. Pressing key 5
confirms the new setting and moves to the next
parameter for adjustment in this sequence:
hour/minutes. Press key 5 once more to exit.
3.7. Setting the date
Permits the date and format to be set.
Day: 01
Setting the date
Format: DD/MM/YY
Month: 01
Day of Week: MON
Year: 15
Press key 3 to decrease the value.
Press key 4 to increase the value.
Press key 5 to confirm the parameter setting
and move to the next adjustment. Pressing key 5
confirms the new setting and moves to the next
parameter for adjustment in this sequence:
day/month/year/day of the week/format. Press
key 5 once more to exit.
3.8. Setting the ON/OFF timer
Permits the weekly ON/OFF timer to be set. With the
ON and OFF values set to zero (00), the machine will not
switch ON or OFF automatically.
Day: MON
ON/OFF
Minutes OFF: 00
Hour ON: 00
Hour OFF: 00
Minutes ON: 00
Press key 3 to decrease the value.
Press key 4 to increase the value.
Press key 5 to confirm the parameter setting
and move to the next adjustment. Pressing key 5
confirms the new setting and moves to the next
parameter for adjustment in this sequence:
day/hour ON/ minutes ON/hour OFF/minutes
OFF. Press key 5 once more to exit.
3.9. Setting the timer
This allows the time for the automatic switch OFF
function to be set, saving energy usage. With the values
set to zero (00), the machine will not switch OFF
automatically. The timer begins its countdown from the
time of the last performed delivery.
Timer ECO
Minutes: 00
Hour: 00
Press key 3 to decrease the value.
Press key 4 to increase the value.
Press key 5 to confirm the parameter setting
and move to the next adjustment. Pressing key 5
confirms the new setting and moves to the next
parameter for adjustment in this sequence:
hour/minutes. Press key 5 once more to exit.
3.10. Setting the temperature
Allows the coffee temperature set-point to be inserted.
Temperature of the coffee
94°C

Mod. 0988 Rev. 00
16
16
Press key 3 to decrease the value.
Press key 4 to increase the value.
Press key 5 to confirm the parameter setting
and move to the next adjustment. Pressing key 5
confirms the new setting and moves to the
adjustment of the steam temperature.
Allows the steam temperature set-point to be inserted.
Temperature of the steam
120°C
Press key 3 to decrease the value.
Press key 4 to increase the value.
Press key 5 to confirm the parameter setting
and move to the next adjustment.
3.11. Technical menu programming
Press key 1 to set the water supply:
NETWORK/RESERVOIR. Each time the key is
pressed, the value changes from “reservoir”
to “network” . Each time the key is pressed,
the icon which indicates the set parameter
(reservoir) changes.
Press key 2 to set the operating parameters
of the pump kp/ki/kd acceleration.
Press key 3 to set the temperature
management: heating priority, unit of measure
°C/°F, coffee pid parameters, steam pid
parameters.
Press key 4 to set the language. Each time
the key is pressed, the icon which indicates the
language changes.
Press key 5 to return to the previous
screen.
3.12. PWM pump settings
Changing these parameters could compromise the
correct operation of the pump control.
PWM pump settings
Acc.: 1225
Kp: 7,00
Kd: 99,9
Ki: 4,00
Press key 3 to decrease the value.
Press key 4 to increase the value.
Press key 5 to confirm the parameter setting
and move to the next adjustment. Pressing key 5
confirms the new setting and moves to the next
parameter for adjustment in this sequence:
Kp/Ki/Kd/Acc. Press key 5 once more to exit.
3.13. Heat settings
Allows all the parameters related to management of
heating the boiler to be set.
Press key 1 to set the heating priority. Each
time the key is pressed the value changes:
“priority coffee” activates the steam boiler
heater only after reaching coffee temperature;
“priority steam” activates the coffee boiler
heater only after reaching the steam
temperature; “no priority” activates both heaters
at the same time without giving priority. The icon
of the key which indicates the parameter setting.
Press key 2 to set the unit of measure for
the temperature °C/°F. Each time the key is
pressed, the value changes from °C to °F. .
The icon of the key which indicates the parameter
setting.
Press key 3 to set the coffee PID
parameters. Pressing the key opens the
parameters page.
Press key 4 to set the steam PID
parameters. Pressing the key opens the
parameters page.
Press key 5 to return to the previous
screen.
Mod. 0988 Rev. 00
17
17
3.14. PID coffee settings
Changing these parameters could compromise the
correct operation of the coffee temperature control.
Kp: 1,5
PID coffee settings
Ki: 00
Banda: 5
Offset: 15
Kd: 1,5
Press key 3 to decrease the value.
Press key 4 to increase the value.
Press key 5 to confirm the parameter setting
and move to the next adjustment. Pressing key 5
confirms the new setting and moves to the next
parameter for adjustment in this sequence:
Kp/Ki/Kd/Band/Offset. Press key 5 once more to
exit.
3.15. PID steam settings
Changing these parameters could compromise the
correct operation of the steam temperature control.
Kp: 1,5
PID Steam setting
Ki: 00
Band: 5
Offset: 00
Kd: 1,5
Press key 3 to decrease the value.
Press key 4 to increase the value.
Press key 5 to confirm the parameter setting
and move to the next adjustment. Pressing key 5
confirms the new setting and moves to the next
parameter for adjustment in this sequence:
Kp/Ki/Kd/Band/Offset. Press key 5 once more to
exit.
4. ALARMS
4.1. No water
This will be displayed when there is no water in the
reservoir.
Profile n° 2
95°C 120°C
10/11/2015
16:25
4.2. Temperature alarm
This will be displayed in the event the temperature
exceeds the set value or in the event a temperature
probe fails or is interrupted.
Profile n° 2
95°C 120°C
10/11/2015
16:25
4.3. Pressure alarm
This will be displayed when no pressure is detected in
the circuit during delivery or in the event of a pressure
sensor failure.
Profile n° 2
95°C 120°C
10/11/2015
16:25
5. MAINTENANCE
Maintenance operations are to be performed
with the machine turned OFF and when cold,
with the power supply disconnected from the
mains. For cleaning do not use any metals or abrasives
such as steel wool, wire brushes, needles, or. Always
use a damp cloth or sponge.
5.1. Daily
Clean the casing, steam spout, nozzle and the sump
gasket of the delivery group.
Check and, if necessary, clean the drain pan.
Rinse the filters and the filter holder with hot water
and a cloth or sponge.
5.2. Periodic cleaning of the machine or after a period
of intense use.
In addition to daily cleaning, perform the following
operations:
Immerse the filters and the filter holder in boiling
water for a few minutes to dissolve coffee greases
and oils, then use a cloth or a sponge to remove
them completely.
Clean the water reservoir.
5.3. Cleaning the coffee group
The machine is supplied with a blind filter used to clean
the group. This operation must be performed at least
once a week to remove coffee deposits in the circuit.
Remove the filter holder from the group.
Remove the filter from the filter holder and insert
the blind filter.
Reattach the filter holder to the group.
Select a fast delivery profile (to reach a pressure of
at least 9 Bar in 5 seconds).
Start coffee delivery for approximately 15 seconds,
then stop delivery. Repeat this operation at least
10-15 times.
Mod. 0988 Rev. 00
18
18
5.4. Decalcification
Place a decalcifying product in the water tank.
Turn on the coffee delivery group and open the
water delivery tap. Leave the machine switched ON
for about 1 hour giving the decalcifier time to act,
then switch the machine OFF and refill the tank
with clean water.
Turn on the coffee delivery group and open the
water delivery tap then switch the machine OFF
and discharge the pressure in the two boilers.
When the machine has cooled down, open the taps
and discharge the water from the boilers (Fig ).
Close the discharge tap and switch the machine ON
following the steps performed in the
commissioning process.
Read and follow the instructions for use of
the decalcifying product carefully.
6. DECOMMISSIONING
6.1. Temporary
Empty the water reservoir and the spill basin.
Close the main switch and remove the power plug
from the mains.
Perform the maintenance operations.
Store the machine in a dry environment, protected
from the elements and with limited access (avoid
leaving it in the reach of minors or unfit persons).
6.2. Definitive
Besides carrying out the operations necessary for a
temporary stop, do the following:
Cut the power cable.
Pack the machine in cardboard or other packing
material and send it to authorised personnel for its
disposal or second-hand sale).
The disposable materials used for processing
or maintenance, if non-biodegradable or are
pollutants, should be placed in separate containers and
sent to special waste disposal centres.
7. PROBLEMS AND REMEDIES
In the event the power cable is damaged, contact an
authorised service centre to have it replaced as it
requires the use of a dedicated tool.
Inspections which can be performed by the user.
7.1. The machine does not start:
a) Ensure the plug is inserted correctly;
b) Ensure there is mains power and the residual
current device or circuit breaker is inserted;
c) Check the condition of the plug and the power
supply cable; if damaged have them
replaced by qualified personnel.
7.2. No coffee is delivered
a) No water in the reservoir, refill with water.
b) Check that there is water in the water supply
network (if attached to the network).
7.3. Irregular coffee delivery
a) Clean the filter in the filter holder.
b) The coffee grounds are too fine or too coarse.
7.4. No hot water or steam delivery
a) No water in the reservoir; refill with water.
b) Hot water diffuser is clogged, remove and clean.
c) Nozzles clogged; clean the nozzles of the steam
spout with a pin.
For any other type of irregularity or problem which has
not been specified, unplug the power supply cable,
avoid performing any direct repairs or inspections and
contact a qualified technical service centre.
Mod. 0988 Rev. 00
19
19
2
VORWORT
Bitte bewahren Sie die Anleitungen an einem
sicheren Ort auf, eventuelle Hinweise oder
Einzelheiten zu bestimmten Problemfällen
erhalten Sie beim Fachpersonal.
1. SYMBOLE
Das Warndreieck
kennzeichnet alle wichtigen
Erklärungen zur Sicherheit
der Person.
Bitte halten Sie sich an diese Anweisungen, um
Unfälle zu vermeiden!
Nummern oder Buchstaben sind
Hinweise auf Abbildungen und
Geräteteile wie Tasten,
Leuchtanzeigen usw.
Die Herstellerfirma haftet nicht für
eventuelle Schäden in folgenden
Fällen:
Unsachgemäßer Gebrauch;
Abwandlung des Stromkabels;
Abwandlung beliebiger
Gerätekomponenten;
Verwendung von nicht originalen
Komponenten oder Zubehör;
Reparaturen, die nicht bei unseren
vertraglich gebundenen
Reparaturdienststellen erfolgt sind.
Dieses Produkt entspricht den
Anforderungen zur Kennzeichnung
gemäß WEEE-Richtlinie (2002/96/EG).
Das angebrachte Symbol bedeutet,
dass dieses Elektro- oder Elektronikgerät nicht
mit dem normalen Abfall entsorgt werden darf.
GERÄTEKATEGORIE, in Bezug auf die in Anhang
1 der WEEE-Richtlinie aufgeführten Geräte
gehört dieses Produkt zur Kategorie 2
"Haushaltskleingeräte".
NICHT IN BEHÄLTER FÜR UNSORTIERTEN
SIEDLUNGSABFALL WERFEN
Die mangelnde Beachtung der oben genannten
Punkte führt zum Verfall der Garantie.
2. WARNHINWEISE
Verpackungsmaterialien (Plastikhüllen, Styropor,
Nägel, Pappe usw.) dürfen nicht in die Hände von
Kindern gelangen, da sie eine Gefährdung
darstellen können.
Vor dem Anschluss der Maschine an den Strom
sicherstellen, dass die Daten des Typenschilds mit
denen des Stromnetzes übereinstimmen.
Das Stromkabel muss glatt liegen (Kabel sollte nicht
aufgerollt oder aufeinander verlaufen), so dass
Kinder es nicht erreichen bzw. mitreißen können;
es darf nicht in der Nähe von Flüssigkeiten, Wasser
und Wärmequellen verlaufen und muss unversehrt
sein (beschädigte Kabel sind von Fachpersonal zu
ersetzen).
Es sollten keine Adapter, Mehrfachsteckdosen und
Verlängerungskabel verwendet werden. Sollte die
Verwendung solcher Einrichtungen notwendig sein,
verwenden Sie nur zertifizierte Produkte mit den
entsprechenden Qualitätskennzeichen (z.B. IMQ,
VDE, +s usw.) und überprüfen Sie, dass der
eingeprägte Leistungswerte über der Aufnahme (A
= Ampere) der angeschlossenen Geräte liegt.
Wenn Sie Zweifel haben oder sich nicht sicher sind,
lassen Sie von Fachpersonal prüfen, dass die
Stromversorgungsanlage den Anforderungen der
einschlägigen Sicherheitsbestimmungen entspricht,
darunter:
o leistungsfähige Erdung;
o für die Stromaufnahme ausreichende
Leiterquerschnitte;
o leistungsfähiger Fehlerstromschutzschalter.
Stellen Sie das Gerät auf eine wasserabstoßende
Unterlage (Platte mit Beschichtung, aus Stahl,
Keramik usw.), fern von Wärmequellen (Öfen,
Herdplatten, Kaminen usw.) und in Räumen, in
denen die Temperatur nicht unter 5°C sinkt.
Das Gerät darf nicht der Witterung ausgesetzt oder
in Räumen mit hoher Luftfeuchte, wie
Badezimmern aufgestellt werden.
Zum Ersatz von Teilen wenden Sie sich bitte an
einen Vertrags- oder zugelassenen Einzelhändler
und verwenden Sie nur Originalersatzteile.
Das verpackte Gerät muss vor der Witterung
geschützt, trocken und ohne Feuchtigkeit gelagert
werden. Die Raumtemperatur darf nicht unter +5°C
betragen.
Es dürfen höchsten vier gleiche Packungen
übereinander gestapelt werden. Bitte stellen
Sie keine anderen schweren Packstücke darauf.
Der Hersteller haftete nicht bei Personen- und
Sachschäden, die durch falsche Installation oder
Verwendung verursacht werden.
3. BESCHREIBUNG
3.1. Eigenschaften
Die Maschine besteht aus einem Kessel zur Abgabe von
Kaffee und einem Kessel zur Erzeugung von heißem
Wasser und Dampf Das Gehäuse des Geräts besteht aus
einem tragenden Rahmen aus Edelstahl. Über ein
Touchscreen kann man die Funktionen der Maschine
regulieren.
Mod. 0988 Rev. 00
20
20
3.2. Sicherheit Der Kaffeekessel verfügt über ein auf
14 Bar eingestelltes Federventil für Überdruck und
einen Schutzschalter, der den Heizvorgang bei
einer Panne unterbricht. Der Dampfkessel verfügt
über ein auf 2,3 Bar eingestelltes Sicherheitsventil
und einen Schutzschalter, der den Heizvorgang bei
einer Panne unterbricht. Die Pumpe ist mit einem
Schutzschalter mit automatischer Rücksetzung, der
sie vor Überhitzung schützt, ausgestattet. Alle
Heizkomponenten und spannungsführenden Teile
befinden sich innerhalb des Gehäuses der
Maschine.
3.3. Schwingungen Die Maschine ist mit
vibrationshemmenden Gummifüßen ausgestattet.
Unter normalen Betriebsbedingungen erzeugt die
Maschine keine für Personen und/oder Sachen
schädlichen Schwingungen.
4. TECHNISCHE EIGENSCHAFTEN
Abmessungen
L 345 x H 435 x T 470 mm
Gewicht
26 kg
Elektrische Kenndaten
Versorgungsspannung
Leistung
220/230 V - 50-60 Hz
2070 W
115V - 60 Hz
2070 W
Fassungsvermögen Wassertank 3 l
Temperatur Verwendungsraum +5° +45°C
5. LEGENDE (Foto 1)
a) Touchscreen
b) Kaffeeabgabegruppe
c) Kaffeeabgabehebel
d) Siebträger
e) Heißwasserhahn
f) Wasserdüse
g) Dampfhahn
h) Dampfdüse
i) Ablassschale
j) Hauptschalter (Abb.)
k) Wassertank (Abb.)
l) Ablasshähne (Abb.)
6. VERWENDUNGSZWECK
Die Maschine wurde zur Abgabe von Espresso und zur
Zubereitung von heißen Getränken (Tee, Cappuccino
usw.) projektiert und gebaut.
Andere Anwendungen gelten als unsachgemäß und sind
daher gefährlich.
Verwender müssen sich immer an die in diesem Heft
enthaltenen Gebrauchs- und Wartungsanweisungen
halten.
Bei Zweifeln oder Funktionsstörungen Maschine
stoppen, keine Reparaturen oder Arbeiten am Gerät
selbst vornehmen, wenden Sie sich bitte an den
zugelassenen Reparaturdienst.
Verwender müssen vermeiden,
heiße Flächen anzufassen, es dürfen nur die
vorgesehenen Schalter verwendet werden;
die Maschine bei angeschlossenen Stromkabel bzw.
wenn sie noch heiß ist, zu warten oder zu
befördern;
den Stecker am Kabel aus der Steckdose zu ziehen;
die Maschine mit beschädigtem Stromkabel zu
verwenden;
die Maschine mit nassen oder feuchten Händen
und Füßen zu berühren;
die Maschine oder die Packung mit der Maschine
umzukehren oder auf die Seite zu legen;
die Maschine mit direktem Wasserstrahl,
Hochdruckwasser bzw. Dampf zu reinigen;
die Maschine ins Wasser oder in andere
Flüssigkeiten zu tauchen;
Die Maschine darf nicht von Personen
(einschließlich Kindern) mit verminderten
körperlichen Fähigkeiten verwendet werden, außer
wenn diese von einer für ihre Unversehrtheit
verantwortliche Person zum Gebrauch angeleitet
oder dabei unterstützt werden. Es sind
angemessene Vorsichtsmaßnahmen zu treffen, um
zu verhindern, dass Kinder mit dem Gerät spielen.
Behälter mit Flüssigkeiten auf der Maschine
abzustellen.
Sollte die Maschine nass oder sehr feucht sein,
darf sie nicht installiert und verwendet werden,
bis man sichergestellt hat, dass sie getrocknet
ist.
In jedem Fall ist zuvor eine Kontrolle durch den
Reparaturdienst auszuführen, um sicherzustellen, dass
die Elektrokomponenten nicht beschädigt wurden.
Gegenanzeigen zum Gebrauch
Die Maschine ist nur zur vorgesehenen
Anwendung zu gebrauchen und nicht für
Anderes, wie zur Abgabe von anderen
Flüssigkeiten außer Kaffee oder von Produkten, die
nicht zum Verzehr bestimmt sind.
7. BEFÖRDERUNG
7.1. Verpackung
Beim Transport Packung immer in aufrechter Position
halten, siehe dazu die außen auf den Karton gedruckten
Hinweise.
Packung nicht umkehren oder auf die Seite legen.
In der Packung befinden sich lose Teile und die zum
Lieferumfang gehörenden Unterlagen, die zum späteren
Nachlesen aufzubewahren sind.

Mod. 0988 Rev. 00
21
21
Packung oben öffnen, Zubehörteile herausnehmen
und anschließend Maschine aus der Packung
ziehen.
Kontrollieren, dass Maschine, Zubehör, Stromkabel
und Stecker unversehrt sind, bei Schäden ist der
Einzelhändler umgehend zu benachrichtigen.
Verpackungsmaterialien (Plastikhüllen,
Styropor, Nägel, Pappe usw.) dürfen nicht in
die Hände von Kindern gelangen, da sie eine
Gefährdung darstellen können.
Verpackungsmaterialien umweltgerecht entsorgen und
zu diesem Zweck den zuständigen Stellen zur
Entsorgung überführen.
8. INSTALLATION
Die Maschine wird fertig zur Installation nach den
Angaben auf dem Typenschild geliefert:
Sicherstellen, dass die Eigenschaften des Stromnetzes
mit denen der Maschine übereinstimmen.
Die Maschine kann aus dem Wassernetz oder aus einem
Tank versorgt werden.
Die elektrische Anlage muss mit einem
Fehlerstromschutzschalter oder einem
Sicherungsautomaten mit leistungsfähiger Erdung
ausgestattet sein. Besteht keine elektrische Sicherung,
ist ein den geltenden Sicherheitsvorschriften
entsprechender 2-poliger Fehlerstromschutzschalter
von Fachpersonal zu installieren.
Das Gerät muss an eine Erdleitung
angeschlossen sein. Der Hersteller haftet
nicht, wenn diese Vorschrift zur
Unfallverhütung nicht eingehalten wird.
Darauf achten, dass das Stromkabel nicht geknickt oder
gequetscht wird bzw. Zugspannung ausgesetzt ist. Um
Schäden zu vermeiden, muss das Kabel immer am
Stecker aus der Steckdose gezogen werden, Stecker nie
mit feuchten Händen berühren.
Von der Aufstellung der Maschine in Nischen oder an
ähnlichen Orten ist abzuraten, damit Bedienung,
Befüllung und Wartung bequem ausgeführt werden
können.
Der Untergrund, auf der die Maschine aufgestellt
wird, muss eben, trocken, robust und stabil sein,
die Höhe über dem Fußboden sollte 80 cm
betragen.
Maschine aufstellen und Stecker an die Steckdose
anschließen.
8.1. Anschluss an das Wassernetz
Das Wasser aus dem Versorgungsnetz muss enthärtet
sein und eine Temperatur zwischen +5°C und +25°C
aufweisen. Die Wasserversorgungsleitung muss über
einen Sperrhahn verfügen, der es ermöglicht, die
Versorgungsleitung zu schließen. Zusammen mit der
Maschine wird ein Montagesatz für den Netzanschluss
geliefert, der aus einem Schlauch und einem
Druckminderer besteht. Die Maschine wird mit den
Einstellungen zur Versorgung aus einem Tank geliefert.
Druckminderer im Lieferumfang an das Wassernetz
anschließen.
Den an den Druckminderer angeschlossenen
Anschlussschlauch für das Wassernetz mit der
Maschine verbinden.
Wasserhahn öffnen.
8.2. Beschreibung der Bedienungselemente
Hauptschalter (Abb. ): Bei Betätigung dieses
Schalters geht das Display an (Abb. ).
Kaffeeabgabehebel (Abb. ): Stellt man den Hebel
nach oben, wird die Abgabe aus der Brühgruppe
eingeschaltet. Stellt man den Hebel nach unten,
stoppt die Abgabe.
Heißwasserhahn (Abb. ): durch Betätigen des
Hebels wird heißes Wasser aus der Wasserdüse
abgegeben (Abb. ).
Dampfhahn (Abb. ): Bei Betätigung des Hebels
erfolgt die Abgabe von Dampf aus der Dampfdüse
(Abb. ).
9. BETRIEB
Die heißen Teile der Maschine sind unbedingt mit
Vorsicht zu handhaben, insbesondere Brühgruppe und
Dampfdüse.
Bei der Verwendung der Dampfdüse sehr
vorsichtig vorgehen, Hände nicht darunter
halten und Düse sofort nach der Verwendung
nicht anfassen.
9.1. Tankfüllung
Tank mit enthärtetem Trinkwasser füllen. Bei
direktem Anschluss an das Wassernetz, siehe
Abschnitt 8.1.
Hauptschalter (Abb. 2) einschalten und abwarten,
dass die Maschine den Kessel befüllt, dann Hebel
der Brühgruppe betätigen, um die Abgabe
auszulösen und 500 ml Wasser ablaufen lassen.
Abwarten, bis die Maschine die Betriebstemperatur
erreicht hat.
Bei der ersten Verwendung bei heißer
Maschine durch Einschalten der Kaffeeabgabe
etwa 0,5 Liter Wasser ablaufen lassen, um die
Brühgruppe zu spülen.
9.2. Kaffeeabgabe
Siebträger durch Drehen im Uhrzeigersinn aus
seinem Sitz ausspannen.
Sieb mit Kaffeepulver für ein oder zwei Tassen (je
nach eingesetztem Sieb) unter Verwendung der
Dosiervorrichtung füllen.
Mod. 0988 Rev. 00
22
22
Kaffeepulver mit dem Espressostampfer pressen.
Siebträger durch Drehen im Gegenuhrzeigersinn in
seinen Sitz einspannen.
Tassen unter die Ablauföffnungen unter dem
Siebträger stellen.
Abgabeprofil wählen (siehe Abschnitt 10.3)
Kaffeeabgabehebel nach oben stellen, nach einigen
Sekunden beginnt die Abgabe. Ist die gewünschte
Menge erreicht, Hebel senken.
Während der Kaffeeabgabe erscheint auf dem Display
eine Bildschirmseite mit folgenden Angaben: gewähltes
Profil, Temperatur, Zeit und Druck. Außerdem erscheint
eine Grafik mit der Druckkurve.
Profil Sek.
2. 15,7
°C Bar
94
9.1
9.3. Dampfabgabe
Hahn öffnen, etwas Dampf in die Ablassschale ablassen,
dann Dampfdüse in die zu erwärmende Flüssigkeit
stecken, Hahn öffnen, bis die gewünschte Temperatur
erreicht ist, dann Hahn schließen.
Nach dem Erhitzen des Getränks ein wenig
Dampf aus dem Rohr ablassen, um die
Düsenöffnungen zu reinigen.
9.4. Heißwasserabgabe
Ein zum Auffangen des Wasser geeignetes Gefäß
unter die Heißwasserdüse stellen, dann den Hahn
öffnen.
10. PROGRAMMIERUNG UND BETRIEB DER MASCHINE
10.1. Maschinenzustand OFF
10.11.2015
16:25
Taste 1 drücken, um die Maschine
einzuschalten, auf dem Display erscheint 2.
Taste 3 drücken, um das technische
Menü abzurufen.
10.2. Maschinenzustand ON
Profil Nr. 2
95°C 120°C
10.11.2015
16:25
Taste 3 drücken, um das Profil der
Kaffeeabgabe zu wählen.
Taste 1 oder 5
(Kaffeetemperatur oder Dampftemperatur)
drücken, um das Menü zur Programmierung
abzurufen.
10.3. Menü zur Wahl des Abgabeprofils
Die Wahl des Profils ermöglicht die Einstellung der
Druck- und Zeitparameter für alle Phasen des
Kaffeeauszugs, vom Voraufguss zum Brühen. Anfangs
sind werkseitig 5 Profile eingestellt, diese können
jedoch vom Verwender beliebig programmiert
werden.
Eine Taste von 1 bis 5 drücken, um das Profil der
Kaffeeabgabe zu wählen. Nach der Wahl des
gewünschten Profils bzw. wenn 10 Sekunden
ohne Wahl abgelaufen sind, erscheint erneut die
Hauptseite.
Eine Taste von 1 bis 5 drücken, um die Parameter
des der gedrückten Taste entsprechenden Profils
zu regulieren.
Einstellung Profil Nr. 1
Phase 1:
Druck: 0,1
Zeit: 0,1
Taste 3 drücken, um den Wert zu
vermindern.
Taste 4 drücken, um den Wert zu erhöhen.
Taste 5 drücken, um den Wert zu bestätigen
und mit der Regulierung des nächsten Parameters
fortzufahren. Durch Druck auf Taste 5 wird der
eingestellte Wert bestätigt und man geht zur
Regulierung des nächsten Parameters über und
zwar in folgender Reihenfolge: Phase1:
16:25
120°C
10.11.15
96°C
Mod. 0988 Rev. 00
23
23
Zeit/Druck; Phase2: Zeit/Druck; Phase3:
Zeit/Druck; usw. Zum Verlassen 3 Sekunden lang
Taste 5 drücken. Auf der Zeile oben auf dem
Display erscheint der Text mit der Nr. des Profils,
das man gerade einstellt.
10.4. Menü zur Programmierung
Taste 1 drücken, um die Maschine
auszuschalten.
Taste 2 drücken, um den Dampfkreis
auszuschalten, auf dem Display erscheint das
Symbol (wird der Dampfkreis ausgeschaltet,
erscheint die Dampftemperatur auf der
Hauptseite nicht).
Taste 3 drücken, um die Regulierung von
Datum, Uhrzeit, Standby, Ein- und Ausschaltung
zu regulieren.
Taste 4 drücken, um die Einstellung des
Temperatursollwerts abzurufen.
Taste 5 drücken, um das Menü zu verlassen
und zur Hauptbildschirmseite zurückzukehren.
10.5. Uhr
Taste 1 drücken, um die Uhrzeit
einzustellen.
Taste 2 drücken, um das Datum
einzustellen.
Taste 3 drücken, um Ein- und Ausschaltung
einzustellen.
Taste 4 drücken, um die Standby-Zeituhr
einzustellen.
Taste 5 drücken, um das Menü zu verlassen
und zur Hauptbildschirmseite zurückzukehren.
10.6. Einstellung der Uhrzeit
Zur Einstellung der auf dem Display angezeigten
Uhrzeit.
Einstellung Uhrzeit
Minuten: 00
Stunde: 00
Taste 3 drücken, um den Wert zu
vermindern.
Taste 4 drücken, um den Wert zu erhöhen.
Taste 5 drücken, um den Wert zu bestätigen
und zur Regulierung des nächsten Parameters
überzugehen. Durch Druck auf Taste 5 wird der
eingestellte Wert bestätigt und man geht zur
Regulierung des nächsten Parameters über und
zwar in folgender Reihenfolge: Stunde/Minuten.
Zum Verlassen erneut Taste 5 drücken.
10.7. Einstellung des Datums
Ermöglicht die Einstellung des Datums und des
Anzeigeformats.
Tag: 01 Einstellung Datum
Monat: 01
Wochentag: MON
Jahr: 15
Format: TT/MM/JJ
Taste 3 drücken, um den Wert zu
vermindern.
Taste 4 drücken, um den Wert zu erhöhen.
Taste 5 drücken, um den Wert zu bestätigen
und zur Regulierung des nächsten Parameters
überzugehen. Durch Druck auf Taste 5 wird der
eingestellte Wert bestätigt und man geht zur
Regulierung des nächsten Parameters über und
zwar in folgender Reihenfolge:
Tag/Monat/Jahr/Wochentag/Format. Zum
Verlassen erneut Taste 5 drücken.
10.8. Regulierung der Ein- und Ausschaltzeiten
Ermöglicht die Einstellung der wöchentlichen Ein- und
Ausschaltzeiten. Mit den Werten ON und OFF auf Null
(00) erfolgt kein automatisches Ein- und Ausschalten
der Maschine.
Tag: MON ON/OFF
Minuten OFF: 00
Stunde ON: 00
Stunde OFF: 00
Minuten ON: 00
Mod. 0988 Rev. 00
24
24
Taste 3 drücken, um den Wert zu
vermindern.
Taste 4 drücken, um den Wert zu erhöhen.
Taste 5 drücken, um den Wert zu bestätigen
und zur Regulierung des nächsten Parameters
überzugehen. Durch Druck auf Taste 5 wird der
eingestellte Wert bestätigt und man geht zur
Regulierung des nächsten Parameters über und
zwar in folgender Reihenfolge: Tag/Stunde
ON/Minuten ON/Stunde OFF/Minuten OFF. Zum
Verlassen erneut Taste 5 drücken.
10.9. Regulierung der Zeituhr
Ermöglicht die Einstellung der automatischen
Ausschaltzeit zur Energieeinsparung. Stellt man die
Werte auf Null (00) wird die Maschine nicht
ausgeschaltet. Der Timer läuft ab der letzten erfolgten
Abgabe.
Timer ECO
Minuten: 00
Stunde: 00
Taste 3 drücken, um den Wert zu
vermindern.
Taste 4 drücken, um den Wert zu erhöhen.
Taste 5 drücken, um den Wert zu bestätigen
und zur Regulierung des nächsten Parameters
überzugehen. Durch Druck auf Taste 5 wird der
eingestellte Wert bestätigt und man geht zur
Regulierung des nächsten Parameters über und
zwar in folgender Reihenfolge: Stunde/Minuten.
Zum Verlassen erneut Taste 5 drücken.
10.10. Temperaturregulierung
Ermöglicht die Einstellung des Sollwerts der
Kaffeetemperatur.
Kaffeetemperatur
94°C
Taste 3 drücken, um den Wert zu
vermindern.
Taste 4 drücken, um den Wert zu erhöhen.
Taste 5 drücken, um den Wert zu bestätigen
und zur Regulierung des nächsten Parameters
überzugehen. Durch Druck auf Taste 5 wird der
eingestellte Wert bestätigt und man geht zur
Regulierung der Dampftemperatur über.
Ermöglicht die Einstellung des Sollwerts der
Dampftemperatur.
Dampftemperatur
120°C
Taste 3 drücken, um den Wert zu
vermindern.
Taste 4 drücken, um den Wert zu erhöhen.
Taste 5 drücken, um den Wert zu bestätigen
und zur vorherigen Seite zurückzukehren.
10.11. Programmierung technisches Menü
Taste 1 drücken, um die Wasserversorgung
NETZ/TANK einzustellen. Bei jedem Tastendruck
springt der Wert von “Tank” zwischen
“Netz” um. Bei jedem Tastendruck wechselt
das Symbol zur Anzeige des Parameters (Tank).
Taste 2 drücken, um die
Funktionsparameter der Pumpe
kp/ki/kd/Beschleunigung einzustellen.
Taste 3 drücken, um die
Temperaturverwaltung einzustellen:
Erhitzungspriorität, Maßeinheit °C/°F, PidParameter Kaffee, Pid-Parameter Dampf.
Taste 4 drücken, um die Sprache
einzustellen. Bei jedem Tastendruck wechselt das
Symbol der eingestellten Sprachanzeige.
Taste 5 drücken, um zur vorherigen
Bildschirmseite zurückzukehren.
10.12. Einstellung PWM Pumpe
Durch Änderung dieser Parameter kann die korrekte
Funktionsweise der Pumpensteuerung beeinträchtigt
werden.

Mod. 0988 Rev. 00
25
25
Einstellung PWM Pumpe
Beschl.: 1225
Kp: 7,00
Kd: 99,9
Ki: 4,00
Taste 3 drücken, um den Wert zu
vermindern.
Taste 4 drücken, um den Wert zu erhöhen.
Taste 5 drücken, um den Wert zu bestätigen
und zur Regulierung des nächsten Parameters
überzugehen. Durch Druck auf Taste 5 wird der
eingestellte Wert bestätigt und man geht zur
Regulierung des nächsten Parameters über und
zwar in folgender Reihenfolge: Kp/Ki/Kd/Beschl.
Zum Verlassen erneut Taste 5 drücken.
10.13. Einstellung der Erhitzung
Hiermit können alle Parameter zur Verwaltung der
Kesselerhitzung eingestellt werden.
Taste 1 drücken, um die Erhitzungspriorität
einzustellen. Bei jedem Tastendruck springt der
Wert um. Bei “Priorität Kaffee” wird der
Dampfkessel erst erhitzt, wenn die
Kaffeetemperatur erreicht ist; bei “Priorität
Dampf” wird der Kaffeekessel erst erhitzt,
wenn die Dampftemperatur erreicht ist; bei
“keine Priorität” werden beide Kessel ohne
Priorität gleichzeitig erhitzt. Das Tastensymbol
zeigt den eingestellten Parameter an,
Taste 2 drücken, um die Maßeinheit für die
Temperatur °C/°F einzustellen. Bei jedem
Tastendruck springt der Wert zwischen °C und °F
um. Das Tastensymbol zeigt den
eingestellten Parameter an.
Taste 3 drücken, um die PID-Parameter für
Kaffee einzustellen. Durch Druck auf die Taste
wird die Parameterseite abgerufen.
Taste 4 drücken, um die PID-Parameter für
Dampf einzustellen. Durch Druck auf die Taste
wird die Parameterseite abgerufen.
Taste 5 drücken, um zur vorherigen
Bildschirmseite zurückzukehren.
10.14. PID-Einstellung Kaffee
Durch Änderung dieser Parameter kann die korrekte
Funktionsweise der Kaffeetemperatursteuerung
beeinträchtigt werden.
Kp: 1,5
Einstellung PID Kaffee
Ki: 00
Bandbreite: 5
Offset: 15
Kd: 1,5
Taste 3 drücken, um den Wert zu
vermindern.
Taste 4 drücken, um den Wert zu erhöhen.
Taste 5 drücken, um den Wert zu bestätigen
und zur Regulierung des nächsten Parameters
überzugehen. Durch Druck auf Taste 5 wird der
eingestellte Wert bestätigt und man geht zur
Regulierung des nächsten Parameters über und
zwar in folgender Reihenfolge:
Kp/Ki/Kd/Bandbreite/Offset. Zum Verlassen
erneut Taste 5 drücken.
10.15. PID-Einstellung Dampf
Durch Änderung dieser Parameter kann die korrekte
Funktionsweise der Dampftemperatursteuerung
beeinträchtigt werden.
Kp: 1,5
Einstellung PID Dampf
Ki: 00
Bandbreite: 5
Offset: 00
Kd: 1,5
Taste 3 drücken, um den Wert zu
vermindern.
Taste 4 drücken, um den Wert zu erhöhen.
Taste 5 drücken, um den Wert zu bestätigen
und zur Regulierung des nächsten Parameters
überzugehen. Durch Druck auf Taste 5 wird der
eingestellte Wert bestätigt und man geht zur
Regulierung des nächsten Parameters über und
zwar in folgender Reihenfolge:
Kp/Ki/Kd/Bandbreite/Offset. Zum Verlassen
erneut Taste 5 drücken.
11. FEHLERMELDUNGEN
11.1. Wassermangel
Wird angezeigt, wenn Wasser im Tank fehlt.
Mod. 0988 Rev. 00
26
26
Profil Nr. 2
95°C 120°C
10.11.2015
16:25
11.2. Temperaturwarnung
Wird angezeigt, wenn die Temperatur durch eine
Störung den eingestellten Wert überschreitet oder
wenn der Temperaturfühler unterbrochen oder defekt
ist.
Profil Nr. 2
95°C 120°C
10.11.2015
16:25
11.3. Druckwarnung
Wird angezeigt, wenn bei der Abgabe kein Druck im
Kreislauf erfasst wird oder wenn der Druckfühler defekt
ist.
Profil Nr. 2
95°C 120°C
10.11.2015
16:25
12. WARTUNG
Die Tätigkeiten zur Instandhaltung sind bei
ausgeschalteter und kalter Maschine
durchzuführen, der Stecker muss vom
Stromnetz getrennt werden. Zur Reinigung weder
metallene noch scheuernde Geräte wie Topfreiniger,
Metallbürsten, Nadeln und Reinigungsmittel
verwenden; feuchtes Tuch oder Schwamm benutzen.
12.1. Tägliche Reinigung
Gehäuse, Dampfdüse, Sprühkopf und Dichtung
unter der Brühgruppe reinigen.
Ablasskasten prüfen und eventuell reinigen.
Siebe und Siebträger mit warmem Wasser
ausspülen und mit einem Tuch oder Schwamm
reinigen.
12.2. Regelmäßige Reinigung nach intensivem
Gebrauch der Maschine
Außer der täglichen Reinigung ist Folgendes
auszuführen:
Siebe und Siebträger einige Minuten lang in
kochendes Wasser legen, damit die Kaffeefette sich
auflösen können, dann mit einem Tuch oder
Schwamm reinigen.
Wassertank reinigen.
12.3. Reinigung Brühgruppe
Im Lieferumfang der Maschine befindet sich auch ein
Blindsieb, das zur Reinigung der Brühgruppe dient.
Diese Tätigkeit ist mindestens einmal wöchentlich
auszuführen, um Kaffeeverkrustungen aus dem
Kreislauf zu entfernen.
Siebträger aus der Brühgruppe ausspannen.
Sieb aus dem Siebträger nehmen und Blindsieb
einsetzen.
Siebträger in die Brühgruppe einspannen.
Ein Abgabeprofil mit schnellem Anstieg wählen
(um einen Druck von mindestens 9 bar in 5
Sekunden zu erreichen).
Kaffeeabgabe 15 Sekunden einschalten, dann
Abgabe stoppen. Diesen Vorgang 10-15 Mal
wiederholen.
12.4. Entkalkung
Entkalkungsmittel in den Wassertank füllen.
Abgabe aus der Brühgruppe und aus dem
Wasserhahn einschalten. Maschine etwa 1 Stunde
eingeschaltet lassen, um das Entkalkungsmittel
einwirken zu lassen, dann Maschine ausschalten
und sauberes Wasser in den Tank füllen.
Abgabe aus Brühgruppe und Wasserhahn
einschalten, dann Maschine ausschalten und Druck
aus beiden Kesseln ablassen.
Sobald die Maschine sich abgekühlt hat, Hähne
öffnen und das Wasser aus beiden Kesseln ablassen
(Abb. ).
Ablasshähne schließen und Maschine unter
Beachtung der Schritte zur Inbetriebnahme wieder
in Betrieb setzen.
Gebrauchsanleitung des Entkalkungsmittels
sorgfältig lesen und beachten.
13. AUSSERBETRIEBNAHME
13.1. Vorübergehende Außerbetriebnahme
Wassertank und Ablassschale entleeren.
Hauptschalter ausschalten und Stecker aus der
Steckdose ziehen.
Reinigung durchführen.
Maschine in trockener Umgebung geschützt vor
Witterung und geschlossen (nicht zugänglich für
Minderjährige) aufbewahren.
13.2. Endgültige Außerbetriebnahme
Außer den Tätigkeiten zur vorübergehenden
Außerbetriebnahme Folgendes ausführen:
Stromkabel abschneiden.
Maschine in einen Karton oder anderes Material
einpacken und beim zuständigen Personal
abgegeben (zugelassene Entsorgungs- oder
Abholstelle für Altgeräte).

Mod. 0988 Rev. 00
27
27
Die zu Betrieb oder Reinigung verwendeten
Restmaterialien sind, falls nicht kompostierbar
oder umweltschädlich, in getrennten Behältern
zu sammeln und den entsprechenden Sammelstellen zu
übergeben.
14. MÖGLICHE PROBLEME
Im Fall der Beschädigung des Stromkabels
wenden Sie sich bitte an den zugelassenen
Reparaturdienst, da zum Ersatz ein
Spezialwerkzeug erforderlich ist.
Vom Verwender ausführbare Prüfungen.
14.1. Die Maschine geht nicht an:
a) Prüfen, dass der Stecker angeschlossen ist.
b) Prüfen, dass das Netz Spannung führt und dass
Sicherung und Hauptschalter eingeschaltet sind.
c) Zustand von Stecker und Stromkabel prüfen, sollten
diese beschädigt sein, sind sie von Fachpersonal zu
ersetzen.
14.2. Die Maschine gibt keinen Kaffee ab
a) Wassermangel im Tank, Füllstand wieder
herstellen.

28

29I
I
COD. IMIS0988
 Loading...