

Page 1
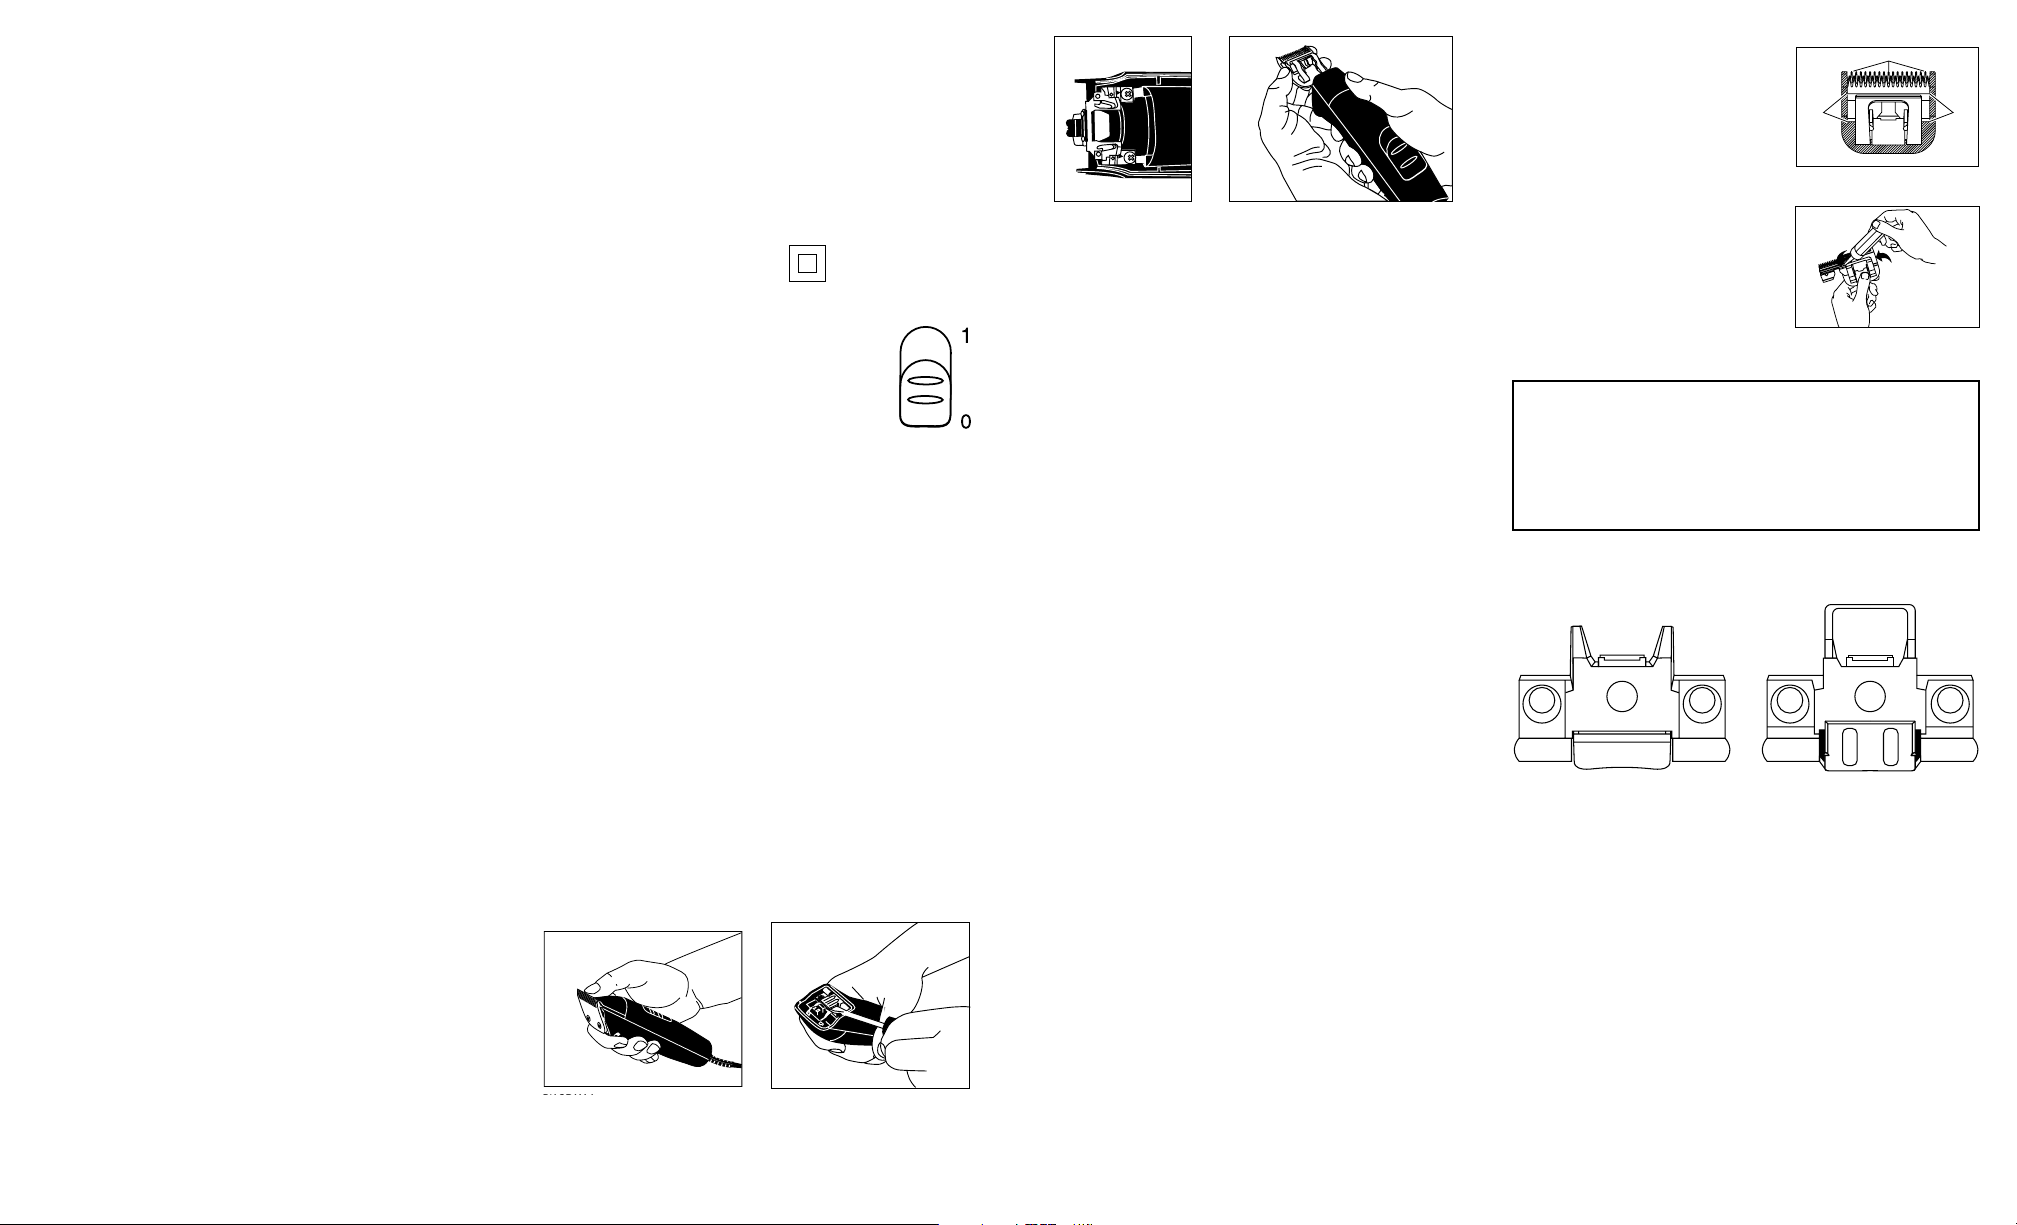
CHANGING THE BLADE DRIVE ASSEMBLY
If your clipper blades no longer cut properly (be
sure to try more than one blade, since the blade
currently being used may be dull), it could be that
your blade drive assembly needs replacement.
To change the blade drive assembly:
1. Remove blade set (Diagram G).
2. Remove drive cap (Diagram H).
3. Remove blade drive mounting screws
(Diagram I).
4. NOTE: Before removing blade drive assembly,
note the way it is positioned (this will help you in
reassembly). Remove blade drive assembly
(Diagram J).
5. Drive bearing should be at its lowest position, if
not, move it with your finger to lowest position
(Diagrams K & L).
6. Put on new drive assembly, align screw holes
and press down (Diagram J).
7. Reassemble blade drive by mounting screws
(Diagram I).
8. Replace drive cap (Diagram H).
9. Replace blade (Diagram M).
Andis®Model BG
Detachable Blades
are compatible with Oster
®
Models 76, 10 & 111
Congratulations –
You just went First Class
when you bought this Andis Clipper.
Careful workmanship and quality design
have been the hallmarks of Andis products
since 1922.
FACTORY REPAIR SERVICE
When the blades of your Andis Clipper become dull
after repeated use, it is advised to send your blades
to an Andis Authorized Service Station mentioned
above for resharpening. If you wish your clipper to be
serviced as well, they should be carefully packed
and mailed either Parcel Post Insured, or U.P.S.
LIMITED WARRANTY
This Andis product is warranted against defective material or workmanship for one year from the
date of purchase. All implied warranties arising and by virtue of State law shall also be limited to
one year. Any Andis product determined to be defective in material or workmanship during the
warranty period will be repaired or replaced without cost to consumer for parts and labor. The
defective product must be returned with proof of purchase and $6.50 to cover cost of handling,
to any Authorized Andis Repair Station or to: Andis,
1800 Renaissance Blvd., Sturtevant, WI 53177
U.S.A. or IN CANADA to: A & AG AGENCIES (CANADA), INC. 10050 Côte de Liesse, Lachine,
Québec, H8T 1A3 CANADA. Enclose or attach a letter describing the nature of the problem. Due
to foreign matter sometimes found in hair, clipper blades or resharpening of blades are not subject to the one year warranty. The blade set has a 10 Day Limited Warranty. If the blade set fails
to cut, it will be resharpened free of charge if returned within 10 days of purchase. Send your
blade set postage prepaid with the original purchase receipt to: ANDIS COMPANY, ATTENTION:
Service Department,
1800 Renaissance Blvd., Sturtevant, WI 53177
U.S.A. (U.S. & Canada only).
Andis will not be liable under this warranty for any defect, failure or malfunction of any of its
products cause by normal wear, abuse, misuse, unauthorized adjustments or disassembling.
Andis will not be liable for any consequential damages resulting from any defect in material or
workmanship of any of its products. Some States do not allow limitations on how long an
implied warranty lasts or exclusion or limitation of incidental or consequential damages, so the
above limitations or exclusions may not apply to you. The Warranty gives you specific legal
rights, and you may also have other rights which may vary from State to State.
Date
Purchased______________________________________
Model____________________________
ANDIS AUTHORIZED
REPAIR
SERVICE STATIONS
Please refer to the service stations listing
on web site for most up-to-date
Listings !
Thanks
KEEP THIS FOR YOUR RECORDS
Form # 22311 Rev. A ©2001 Andis Company, USA Printed in U.S.A.
MODEL BGC
Clipper
DIAGRAM G
DIAGRAM H
DIAGRAM H
DIAGRAM M
DIAGRAM I
DIAGRAM K
DIAGRAM L
DIAGRAM J
BLADE
DRIVE
MOUNTING
SCREWS
CORRECT
POSITION
OF
DRIVE
BEARING
INCORRECT
POSITION
OF DRIVE
BEARING
DIAGRAM H
Page 2
IMPORTANT SAFEGUARDS
When using an electrical appliance, basic precautions
should always be followed, including the following:
Read all instructions before using the Andis Clipper.
DANGER: To reduce the risk of electric shock:
1. Do not reach for an appliance that has fallen
into water. Unplug immediately.
2. Do not use while bathing or in a shower.
3. Do not place or store appliance where it can
fall or be pulled into a tub or sink. Do not place
in or drop into water or other liquid.
4. Always unplug this appliance from the electrical
outlet immediately after using.
5. Unplug this appliance before cleaning, removing, or assembling parts.
WARNING:
To reduce the risk of burns,
fire, electric shock, or injury to persons:
1. An appliance should never be left unattended
when plugged in.
2. Close supervision is necessary when this appliance is used by, on, or near children or invalids.
3. Use this appliance only for its intended use as
described in this manual. Do not use attachments not recommended by Andis.
4. Never operate this appliance if it has a damaged cord or plug, if it is not working properly, if
it has been dropped or damaged, or dropped
into water. Return the appliance to an Andis
Service Center for examination and repair.
5. Keep the cord away from heated surfaces.
6. Never drop or insert any object into any opening.
7. Do not use outdoors or operate where aerosol
(spray) products are being used or where oxygen is being administered.
8. Do not use this appliance with a damaged
comb or broken blade, as injury to the skin may
occur.
9. To disconnect turn control to “off” then remove
plug from outlet.
SAVE THESE INSTRUCTIONS
SERVICING OF A DOUBLE-INSULATED CLIPPER
In a double-insulated clipper, two systems of insulation
are provided instead of grounding. No grounding means
is provided on a double-insulated clipper, nor should a
means for grounding be added. Servicing a double-insulated clipper requires extreme care and knowledge of the
system, and should be done only by an Andis Authorized
Service Station. Replacement parts must be identical to
those parts being replaced. A double-insulated clipper is
marked by the words “DOUBLE INSULATION” or “DOU-
BLE INSULATED”. The symbol may also be
marked on the appliance.
OPERATING INSTRUCTIONS
Please read the following instructions
before using your new Andis Clipper.
Give it the care that a fine precision built
instrument deserves and it will give you
years of service. Plug cord into electrical outlet, operate
120 volt, 60 cycle AC electrical current or as noted on
unit. To start clipper move switch button to the # 1
position. To stop, move switch button back to original
position.
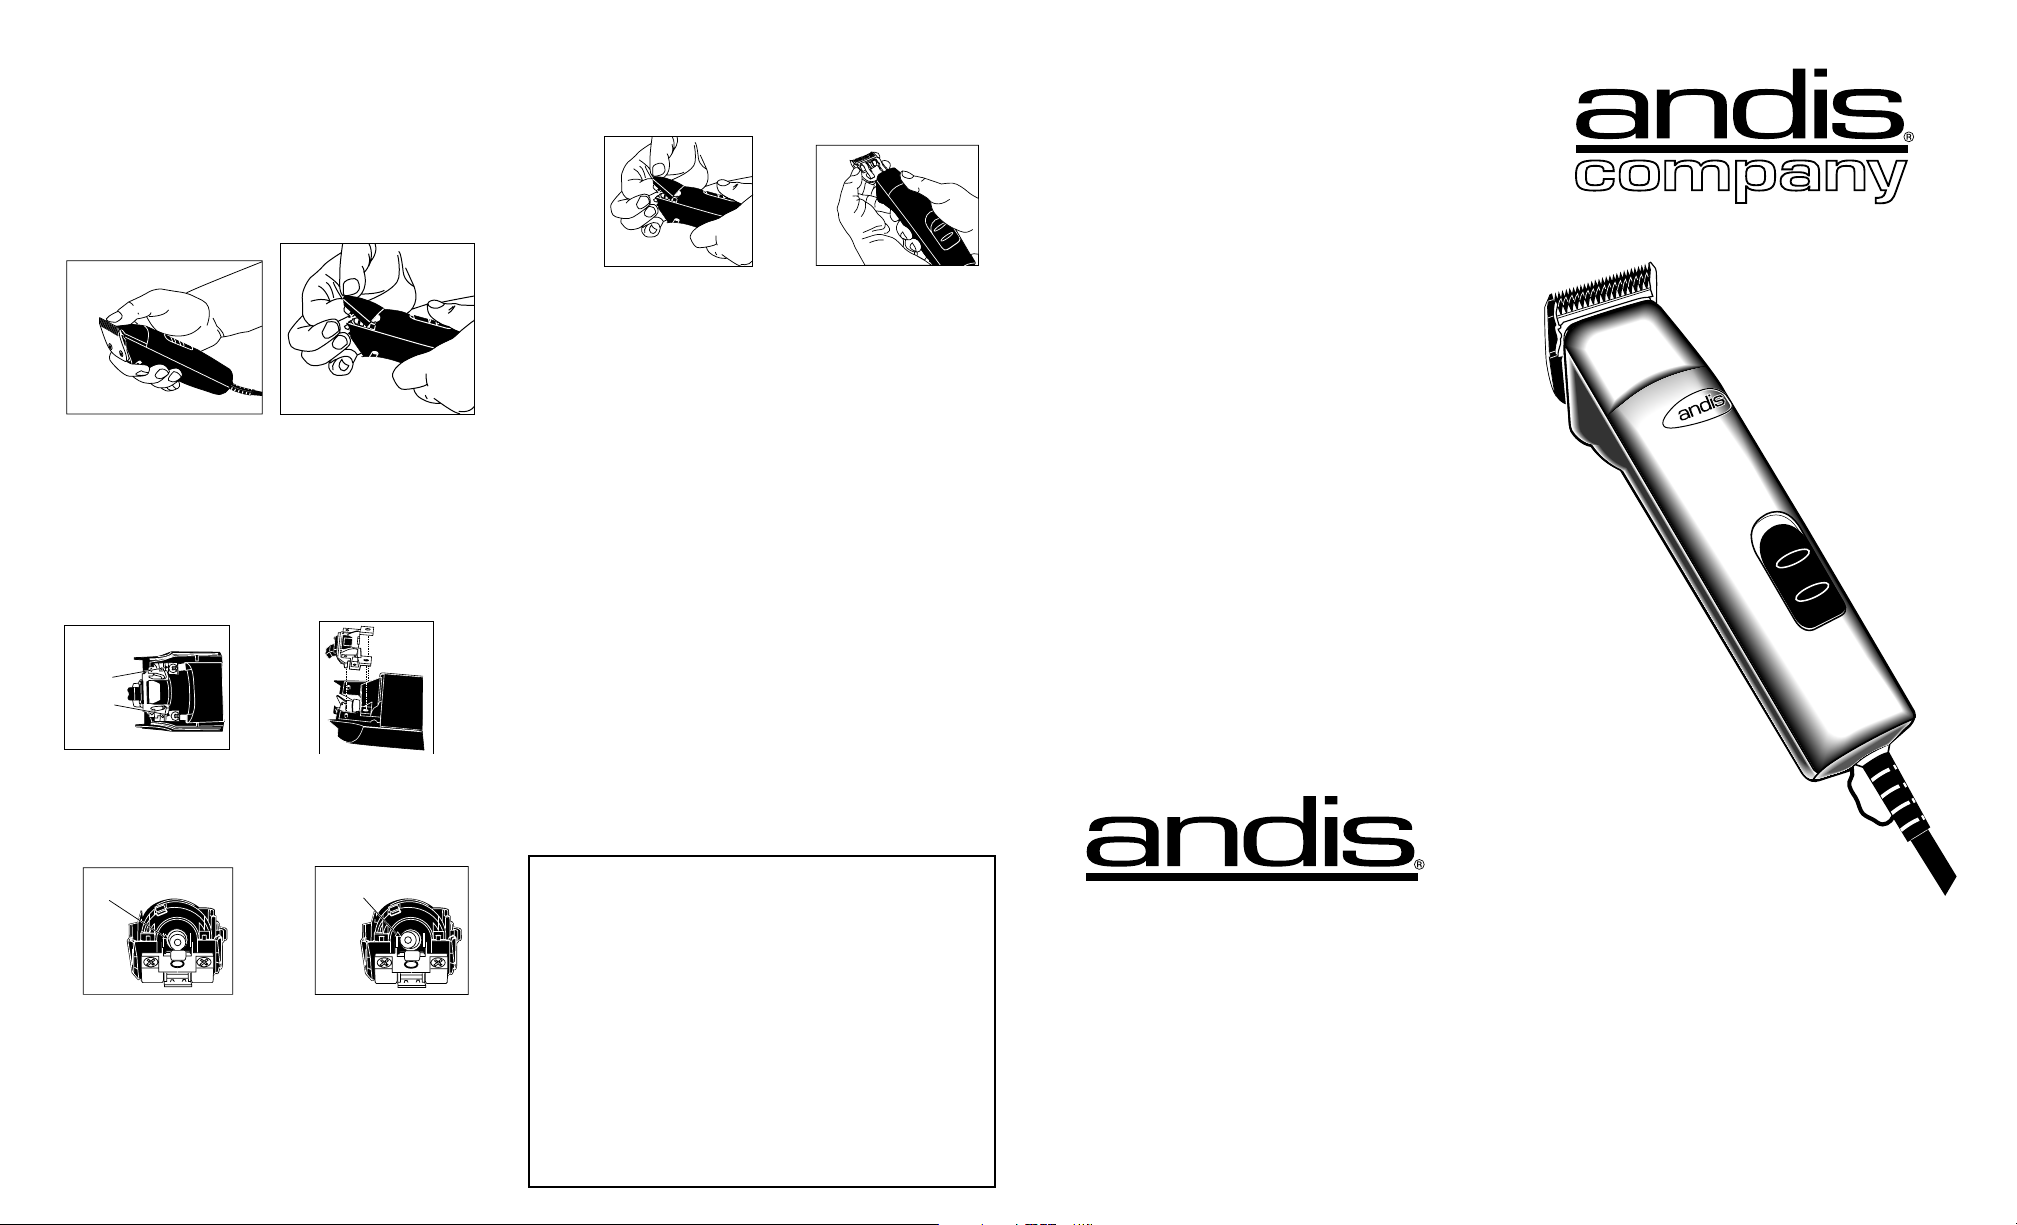
REMOVING BLADE SET
To remove blade set, first make sure your clipper
motor is switched “OFF”, then push down on blade
with one or both thumbs (Diagram A) and slide
blade off blade hinge. If your blade hinge should
snap closed and is flush with the clipper, use a
small standard screwdriver to pry the tongue of the
hinge out (Diagram B).
NOTE: Hair may accumulate in the front cavity of
the housing under the blade. If this happens, you
can clean out the hair by brushing out the cavity
with a small brush or an old toothbrush while the
blade is off the clipper (See Diagram C for location
of cavity being referenced).
REPLACING OR CHANGING BLADE SET
To replace or change your blade set, slide the blade
bracket onto the hinge of the clipper (Diagram D)
and with the clipper turned “ON”, push the blade
towards the clipper to lock into position.
USER MAINTENANCE
The internal mechanism of your motor clipper has
been permanently lubricated by the factory. Other
than the recommended maintenance described in
this manual, no other maintenance should be performed, except by Andis Company, or an Andis
Authorized Repair Service Station.
This Product intended for Professional Use
CARE AND SERVICING OF YOUR ANDIS
CLIPPER BLADES
Blades should be oiled before, during, and after
each use. If your clipper blades leave streaks or
slow down, it’s a sure sign blades need oil. Place a
few drops of oil on the front and side of the cutter
blades (Diagram E). Wipe excess oil off blades with
a soft, dry cloth. Spray lubricants contain insufficient
oil for good lubrication, but are an excellent clipper
blade coolant. Always replace broken or nicked
blades to prevent injury. You can clean the excess
hair from your blades by using a small brush or
worn out toothbrush. To clean the blades, we suggest to immerse the blades only into a shallow pan
of Andis Clipper Oil, while the clipper is running. Any
excess hair and dirt that has accumulated between
the blades should come out. After cleaning, turn
your clipper off and dry blades with a clean dry cloth
and start clipping again. If upon cleaning your
blades you find that the blades will still not cut, there
may be a few fine pieces of hair trapped between
the upper and lower blade. If this happens, you will
need to snap the blade off the clipper. Proceed to
slide the upper blade to one side, without loosening
the tension spring or moving the upper blade completely out from under the tension spring (See
Diagram F for position of blade). Wipe the surface
between the blades clean with a dry cloth, then
place a drop of clipper oil
where the upper and lower
blades meet and also in the
guide slot of the tension spring
(Diagram F). Now slide the
upper blade to the opposite
side of the lower blade and
repeat this process. After completing this procedure, slide the
upper blade, centering it over
the lower blade. Handle or
store your Andis Clipper with
the blades down so excess oil
will not run into the clipper
case.
HINGE KITS
CAUTION: Never handle your Andis Clipper while you
are operating a water faucet and never hold your clipper under a water faucet or in water. There is danger
of electrical shock and damage to your clipper.
ANDIS COMPANY will not be responsible in case
of injury due to this carelessness.
Hinge packed with clipper for
use with Andis Model BG
Blades and Oster Models 10,
22, & 111 Blades
Hinge assembled on clipper for
use with Andis Model BG
Blades and Oster Model 76
Blades
DIAGRAM A
DIAGRAM B
DIAGRAM C
DIAGRAM D
DIAGRAM E
DIAGRAM F
DIAGRAM A
DIAGRAM B
DIAGRAM C DIAGRAM D
OIL
OIL OIL
DIAGRAM E
DIAGRAM F
 Loading...