

Page 1

VeriLock® Security Sensor Application
VeriLock® Security Sensor Application
for Andersen® A-Series Double-Hung Windows
for Andersen® A-Series Double-Hung Windows
Thank you for choosing Andersen. / Gracias por elegir Andersen.
For questions call 1-888-888-7020. For more information and/or guides visit andersenwindows.com.
Please leave this guide with building owner.
Si tiene alguna pregunta llame al 1-888-888-7020. Para obtener más información y/o guías, visite andersenwindows.com.
Deje esta guía con el dueño de la construcción.
▶ Read guide from beginning to end before starting installation. Read all warnings and cautions during unit installation.
Lea completamente la guía antes de comenzar la instalación. Lea y respete todas las advertencias y precauciones durante la instalación de la unidad.
▶ Check with your local building code ofcial to identify and conrm compliance with local building code requirements.
Consulte los códigos locales de construcción para identicar y conrmar que se cumplan los requisitos del código de construcción.
Tools Needed / Herramientas Necesarias
∙ Safety Glasses / Lentes de seguridad
∙ Phillips Screwdriver /Destornillador Phillips
Parts Included / Partes Incluidas
(1) VeriLock Sensor / VeriLock Sensor
(4) VeriLock Active Cover / VeriLock Active Cover
(4) Lock Magnet / Lock Magnet
(1) Keeper Magnet / Keeper Magnet
(1) CR-2025 Battery / CR-2025 Battery
(1) Battery Cap / Battery Cap
(8) #8 x 1" Screw (color matched) /
#8 x 1" Screw (color matched)
(1) Cleaning Wipe / Cleaning Wipe
#8 x 1" Screw
Tornillo No. 8 x 1"
Keeper Magnet
Keeper Magnet
Additional Parts Required for Units with Two Locks
Additional Parts Required for Units with Two Locks
(4) VeriLock Dummy Cover /
VeriLock Dummy Cover
(8) #8 x 1" Screw (color matched) /
#8 x 1" Screw
Tornillo No. 8 x 1"
#8 x 1" Screw (color matched)
VeriLock® Dummy Cover
VeriLock® Dummy Cover
Lock Magnet
Lock Magnet
VeriLock® Active Cover
VeriLock® Active Cover
Battery Cap
Battery Cap
CR-2025
Battery
VeriLock Sensor
VeriLock Sensor
CR-2025
Battery
Use caution when working at elevated heights and around unit openings.
Follow manufacturers’ instructions for ladders and/or scaffolding. Failure
to do so may result in injury or death.
Sea cauteloso al trabajar en lugares elevados y cerca de las aberturas de
la unidad. Siga las instrucciones del fabricante para el uso de escaleras
y/o andamios. Si no lo hiciera, podrían producirse lesiones o la muerte.
“Andersen” and all other marks where denoted are trademarks of Andersen Corporation and its subsidiary. © 2016 Andersen Corporation. All rights reserved.
“Andersen” y todas las demás marcas que aparezcan son marcas registradas de Andersen Corporation y su subsidiaria © 2016 Andersen Corporation. Todos los derechos reservados.
NOTE: VeriLock dummy
cover is installed on the
left lock of units with two
locks, as viewed from the
interior.
NOTE: VeriLock dummy
cover is installed on the
left lock of units with two
locks, as viewed from the
interior.
Follow manufacturers’ instructions for hand or power tools. Always
wear safety glasses. Failure to do so may result in injury and/or
product damage.
Siga las instrucciones del fabricante para el uso de herramientas
eléctricas o manuales. Utilice siempre gafas de seguridad. Si no lo
hiciera, podrían producirse lesiones y/o daños al producto.
9142195 BA -0 1 Revised 03/09/16
Page 2

Batteries carry the risk of re, explosion and burns. Do not recharge,
disassemble, heat above 212 degrees F (100 degrees C) or
incinerate. Dispose of used batteries promptly and properly. Keep
away from children.
Les piles représentent un risque d’incendie, d’explosion et de
brûlures. Ne pas recharger, démonter, chauffer à une température
excédant 100degrés C (212degrésF) ou incinérer. Éliminer les piles
rapidement et de manière appropriée. Garder à l’écart des enfants.
Magnetic eld can be harmful to implanted medical device wearers.
Keep magnets away from devices.
Magnetic eld can be harmful to implanted medical device wearers.
Keep magnets away from devices.
Batteries are small parts and, if swallowed, could pose a choking
hazard to young children.
Las baterías son partes pequeñas que, en caso de ingesta, pueden
representar un riesgo de asxia para niños pequeños.
Magnets are small parts and, if swallowed, could pose a choking
hazard to young children.
Los imanes son partes pequeñas que, en caso de ingesta, pueden
representar un riesgo de asxia para niños pequeños.
1
Interior
(bottom view)
(bottom view)
VeriLock Sensor
VeriLock Sensor
CR-2025 Battery
CR-2025 Battery
Insert battery into VeriLock sensor (+) facing out. Indicator light will illuminate for one
(1) second when battery is installed correctly.
Insert battery into VeriLock sensor (+) facing out. Indicator light will illuminate for one
(1) second when battery is installed correctly.
(top view)
(top view)
Indicator Light
Indicator Light
2
Interior
Battery Cap
Battery Cap
Position battery cap over battery with edges tightly
sealed. Make sure all cap edges are sealed around
the battery ring.
Position battery cap over battery with edges tightly
sealed. Make sure all cap edges are sealed around
the battery ring.
3
Interior
VeriLock®
Active Cover
VeriLock®
Active Cover
Adhesive Liner
Adhesive Liner
VeriLock Assembly
VeriLock Assembly
VeriLock Sensor
VeriLock Sensor
Select preferred color VeriLock active cover. Remove adhesive liner from sensor and press sensor firmly into backside of VeriLock active cover
as shown.
Select preferred color VeriLock active cover. Remove adhesive liner from sensor and press sensor firmly into backside of VeriLock active cover
as shown.
9142195
2
Page 3
4
Interior
5
Interior
Phillips Screwdriver
Destornillador
Phillips
Lock
Cerrojo
NOTE: VeriLock
sensor is installed
on the right lock
of units with two
locks, as viewed
from the interior.
NOTE: VeriLock
sensor is installed
on the right lock
of units with two
locks, as viewed
from the interior.
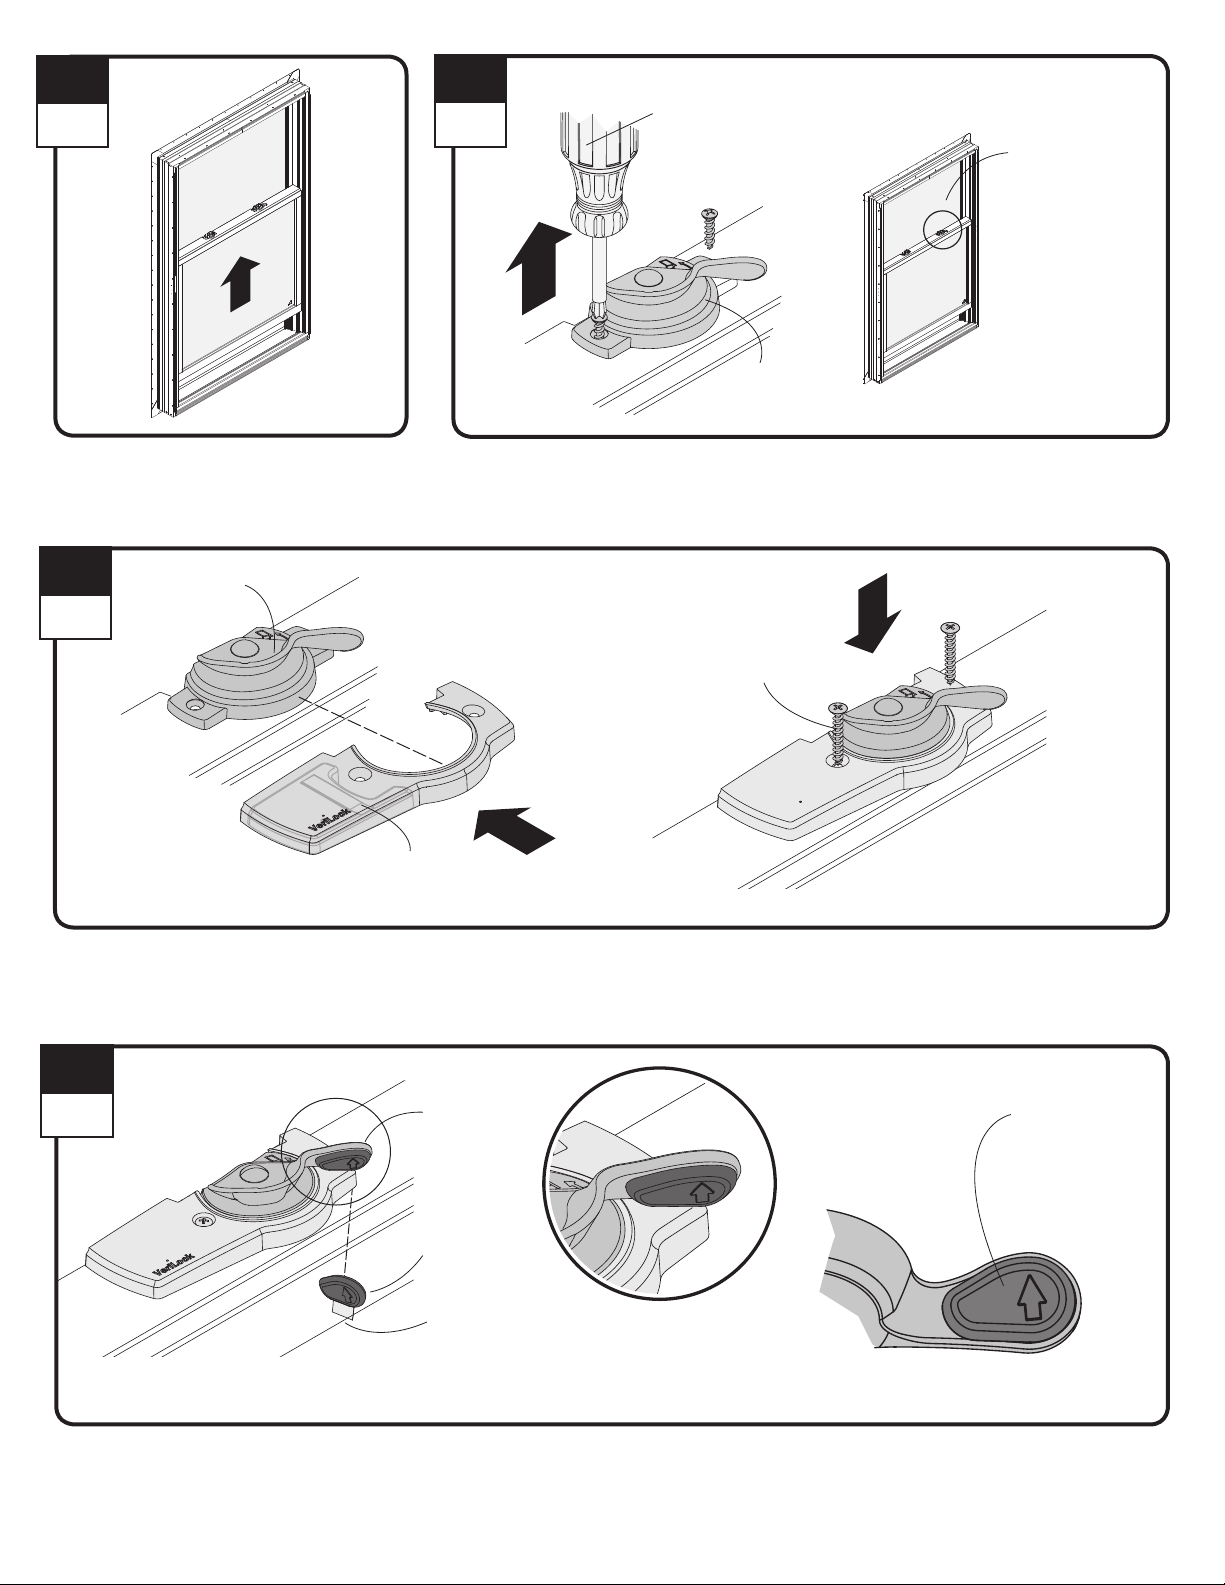
Unlock and open bottom sash.
Desbloquee y abra la hoja inferior.
6
Interior
Lock
Cerrojo
VeriLock Assembly
VeriLock Assembly
Remove screws from lock and dispose of properly. Do not remove or lift lock after unscrewing.
Retire los tornillos del cerrojo y deséchelos adecuadamente. Do not remove lock after
unscrewing.
#8 x 1" Screw
#8 x 1" Screw
Position VeriLock assembly around lock as shown. Fasten using #8 x 1" color matched screws provided. Do not over tighten screws.
Position VeriLock assembly around lock as shown. Fasten using #8 x 1" color matched screws provided. Do not over tighten screws.
7
Interior
Lock Handle
Lock Handle
Lock Magnet
Lock Magnet
Adhesive Liner
Adhesive Liner
Clean area on lock handle to receive lock magnet with cleaning wipe provided. Remove adhesive liner press magnet firmly on lock handle with
arrow pointing up as shown.
Clean area on lock handle to receive lock magnet with cleaning wipe provided. Remove adhesive liner press magnet firmly on lock handle with
arrow pointing up as shown.
9142195
3
Position magnet as
shown with arrow
pointing up.
Position magnet as
shown with arrow
pointing up.
Page 4
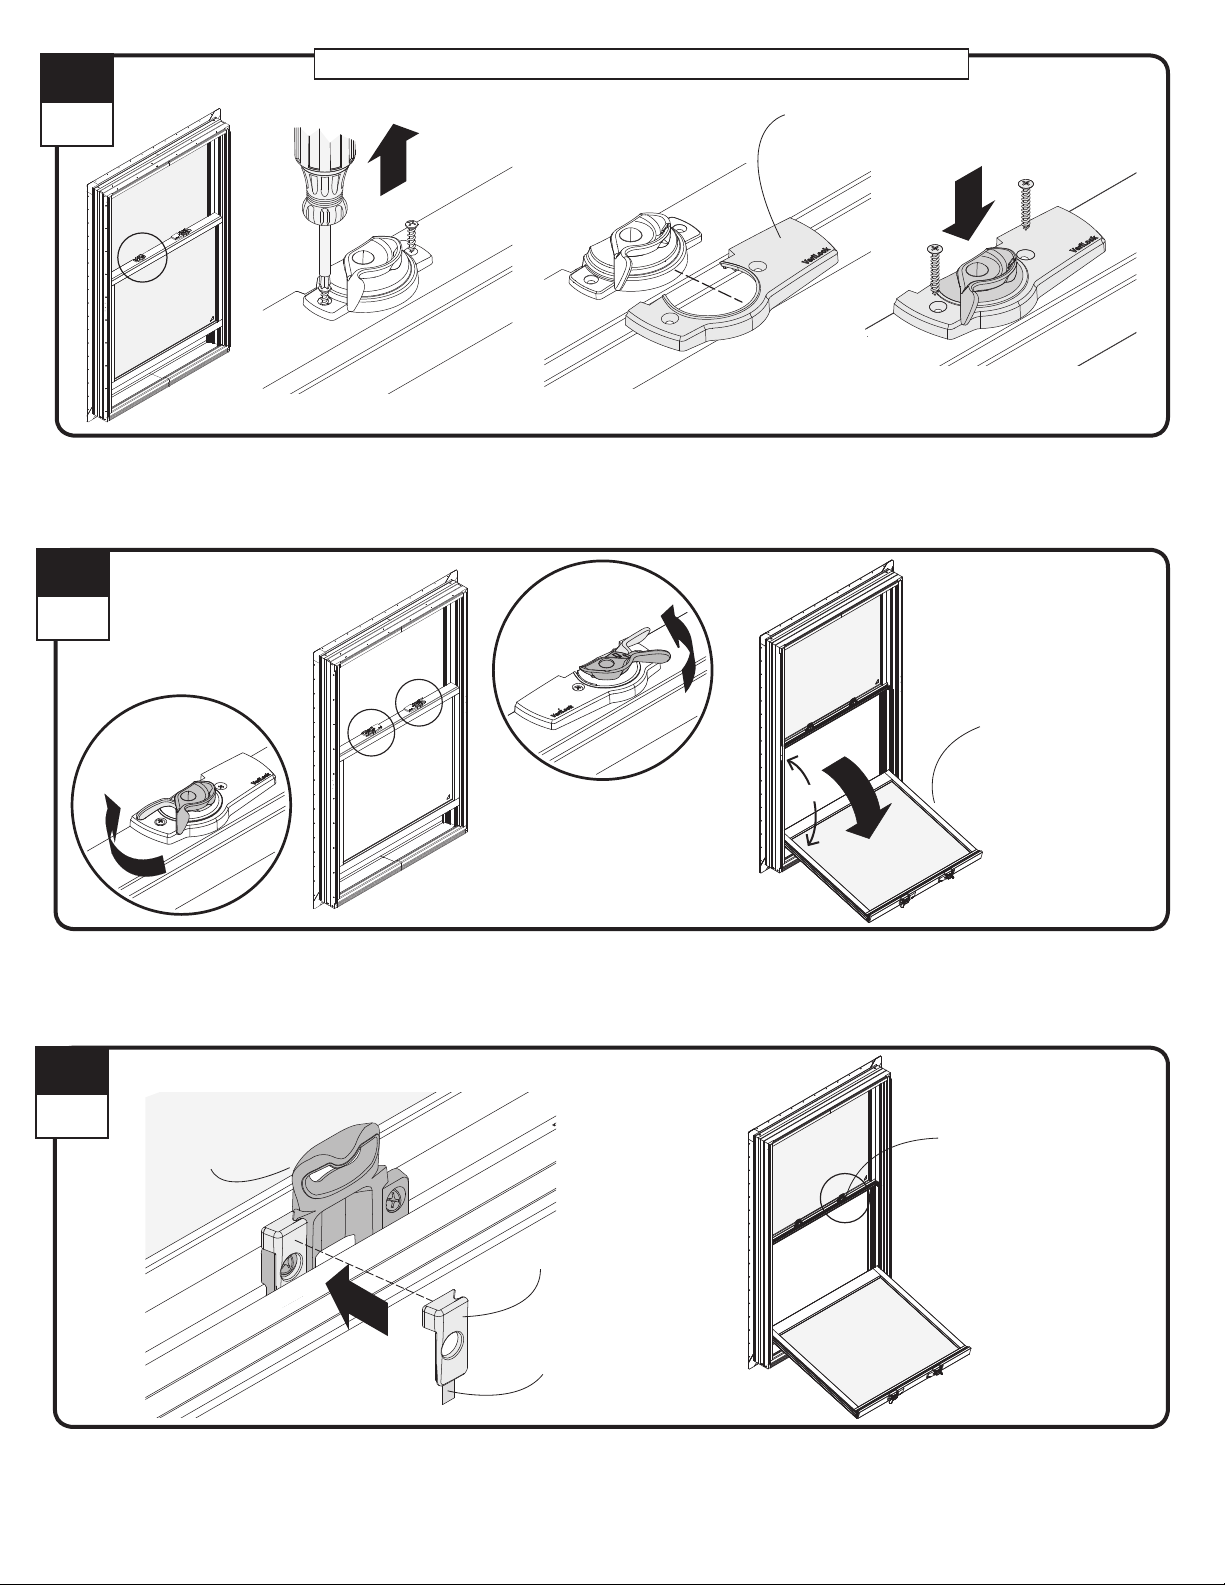
For Units with Two Locks Only / For Units with Two Locks Only
8
Interior
Remove screws from left lock and dispose of properly. Do not remove lock. Position VeriLock dummy cover around left lock and fasten using #8 x 1"
color matched screws provided. Do not over tighten screws.
Remove screws from left lock and dispose of properly. Do not remove lock. Position VeriLock dummy cover around left lock and fasten using #8 x 1"
color matched screws provided. Do not over tighten screws.
VeriLock Dummy Cover
VeriLock Dummy Cover
9
Interior
Retract tilt latches by pushing lock handle(s) outward. Tilt bottom sash in and support.
Retract tilt latches by pushing lock handle(s) outward. Tilt bottom sash in and support.
10
Interior
Keeper
Keeper
Keeper Magnet
Keeper Magnet
>100º
NOTE: Set window on
a support object at
an angle greater than
100 degrees.
NOTE: Set window on
a support object at
an angle greater than
100 degrees.
NOTE: Magnet is
installed on the right
keeper of units with
two locks, as viewed
from the interior.
NOTE: Magnet is
installed on the right
keeper of units with
two locks, as viewed
from the interior.
Adhesive Liner
Adhesive Liner
Clean area on keeper to receive magnet with cleaning wipe provided. Remove adhesive liner and position keeper magnet as shown. Press firmly in place.
Clean area on keeper to receive magnet with cleaning wipe provided. Remove adhesive liner and position keeper magnet as shown. Press firmly in place.
9142195
4
Page 5
11
Interior
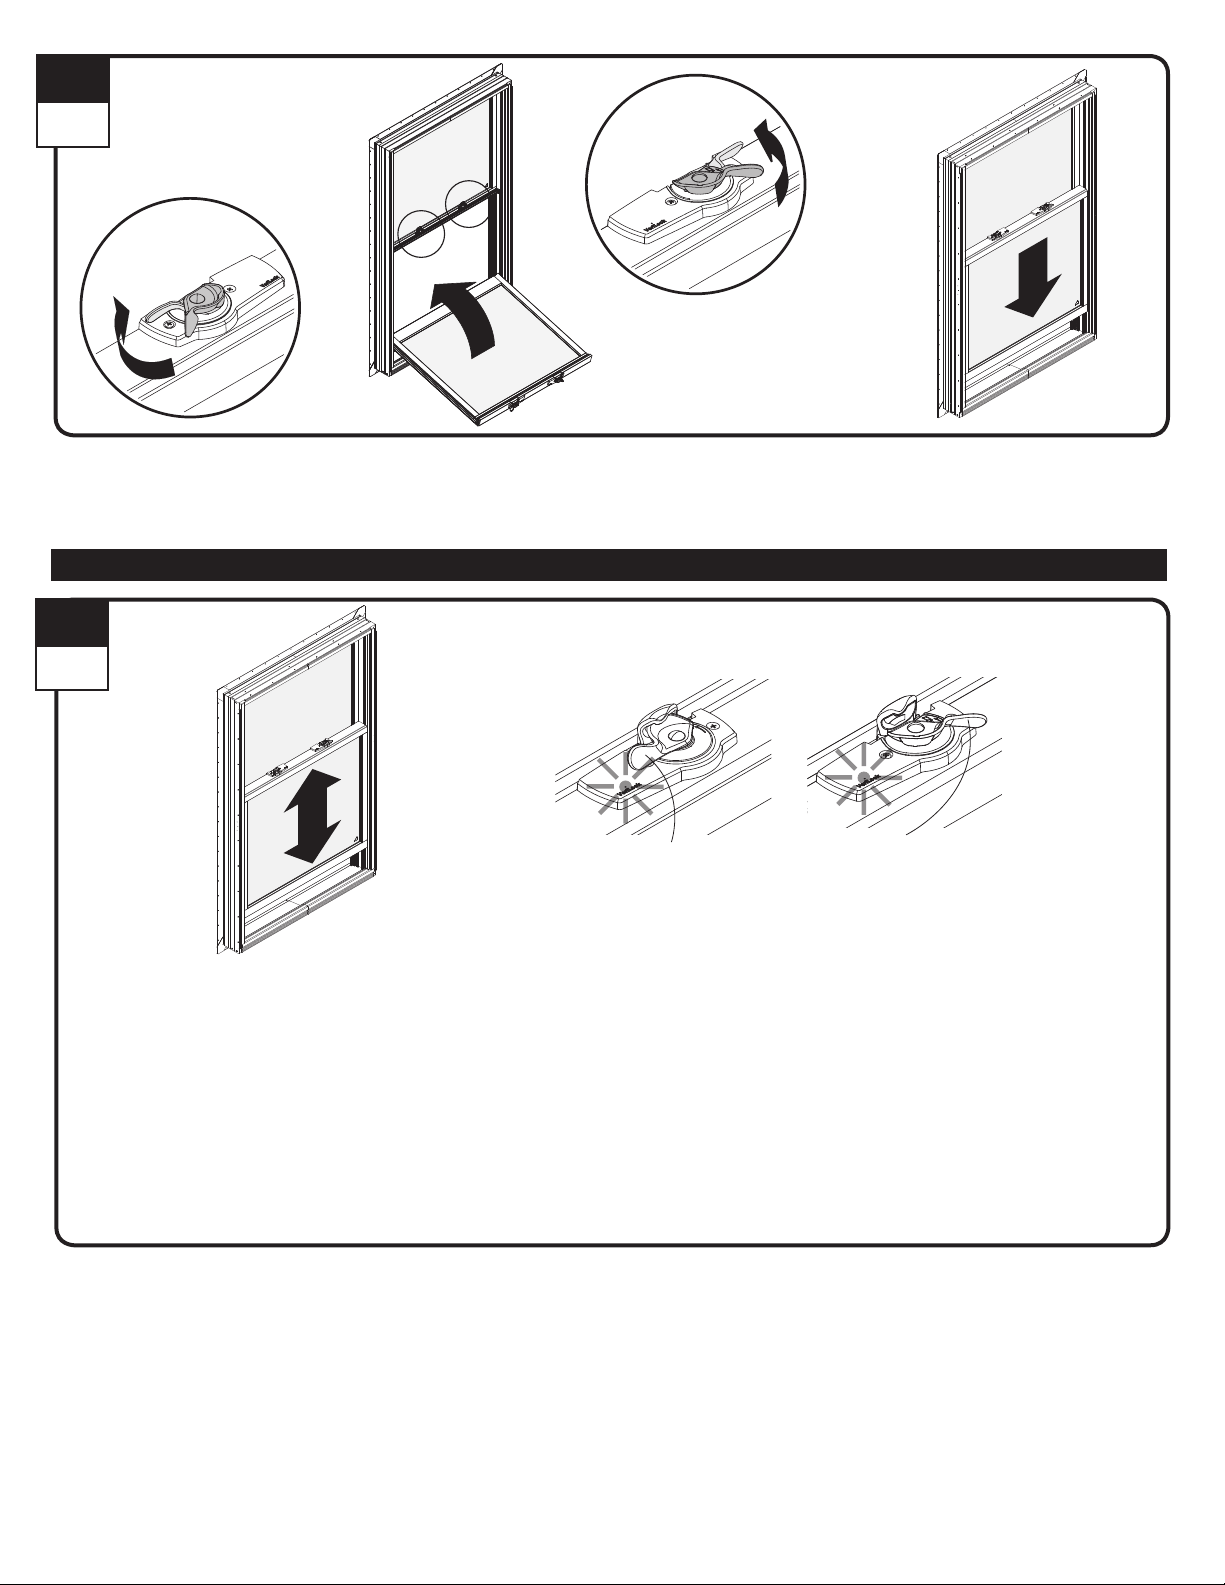
Retract tilt latches by pushing lock handle(s) outward and tilt sash up. Close and lock sash.
Retract tilt latches by pushing lock handle(s) outward and tilt sash up. Close and lock sash.
Verify VeriLock Sensor Function / Verify VeriLock Sensor Function
12
Interior
Locked
Locked
1. Raise lower sash from closed position. Indicator light will illuminate for one (1) second.
2. Close lower sash so the lock aligns with the keeper. Indicator light will illuminate for one (1) second.
3. Lock window. Indicator light will illuminate for one (1) second.
4. Unlock window. Indicator light will illuminate for one (1) second.
1. Raise lower sash from closed position. Indicator light will illuminate for one (1) second.
2. Close lower sash so the lock aligns with the keeper. Indicator light will illuminate for one (1) second.
3. Lock window. Indicator light will illuminate for one (1) second.
4. Unlock window. Indicator light will illuminate for one (1) second.
Unlocked
Unlocked
Verify VeriLock sensor function. If indicator light does not respond as described, verify sensor application and magnet placement.
Verify VeriLock sensor function. If indicator light does not respond as described, verify sensor application and magnet placement.
▶ Procedure is complete.
Procedure is complete.
Refer to monitoring system of your choice for sensor enrollment.
Refer to monitoring system of your choice for sensor enrollment.
For maintenance information, please visit http://www.andersenwindows.com/verilock and consult with the VeriLock user guide.
For maintenance information, please visit http://www.andersenwindows.com/verilock and consult with the VeriLock user guide.
9142195
5
Page 6

Regulatory Statements / Regulatory Statements
Federal Communications Commission (FCC)
Part 15 Statement
This device complies with FCC Rules Part 15. Operation is
subject to the following two conditions: (1) This device may not
cause harmful interference. (2) This device must accept any
interference that may be received, including interference that
may cause undesired operation.
Industry Canada (IC) RSS Statement
This device complies with Industry Canada license-exempt RSS
standard(s). Operation is subject to the following two conditions:
(1) This device may not cause interference, and (2) This device
must accept any interference, including interference that may
cause undesired operation of the device.
Le présent appareil est conforme aux CNR d'Industrie Canada
applicables aux appareils radio exempts de licence.
L'exploitation est autorisée aux deux conditions suivantes: (1)
I'appareil ne doit pas produire de brouillage; (2) I'utilisateur de
I'appareil doit accepter tout brouillage radioélectrique subi,
méme si le brouillage est susceptible d'en compromettre le
fonctionnement.
Changes or modifications not expressly approved by Andersen
may void the user's authority to operate the equipment.
9142195
6
 Loading...