

Page 1
Quick Start Guide
Precision Balances
Guide de démarrage rapide
Balances de précision
Schnellstartanleitung
Präzisionswaagen
Guía de inicio rápido
Balanzas de precisión
Guida introduttiva
Bilance di precisione
快速入門指南
中文
FZ
-
i
/ FX
-
i
/ FZ
-
i
WP / FX
-
i
WP / FZ-GD / FX-GD Series
English (EN)
Séries FZ
Serie FZ
Series FZ
Serie FZ
-
-
i
/ FX
-
-
i
/ FX
i
/ FX
i
/ FX
-
-
i
/ FZ
-
-
i
/ FZ
i
/ FZ
i
/ FZ
-
i
WP / FX
-
i
WP / FX
-
i
WP / FX
-
i
WP / FX
-
i
WP / FZ-GD / FX-GD
-
i
WP / FZ-GD / FX-GD
-
i
WP / FZ-GD / FX-GD
-
i
WP / FZ-GD / FX-GD
Français (FR)
Deutsch (DE)
Español (ES)
Italiano (IT)
FZ
-
i
/ FX
-
i
/ FZ
-
i
WP / FX
精密天平
1WMPD4004336
-
i
WP / FZ-GD / FX-GD 系列
(CT)
Page 2

EN
FR
DE
ES
IT
CT
Quick Start Guide – FZ
Precision Balances
-
i
/ FX
-
i
/ FZ
-
i
WP / FX
-
i
WP / FZ-GD / FX-GD Series
............................................................................. 3
Guide de démarrage rapide – Séries FZ
-
i
/ FX
-
i
/ FZ
-
i
WP / FX
-
i
WP / FZ-GD / FX-GD
Balances de précision ................................................................... 12
Schnellstartanleitung – Serie FZ
Präzisionswaagen
............................................................................ 22
-
i
/ FX
-
i
/ FZ
-
i
WP / FX
-
i
WP / FZ-GD / FX-GD
Guía de inicio rápido – Series FZ
Balanzas de precisión
....................................................................... 32
-
i
/ FX
-
i
/ FZ
-
i
WP / FX
-
i
WP / FZ-GD / FX-GD
Guida introduttiva – Serie FZ
Bilance di precisione
-
i
/ FX
-
i
/ FZ
-
i
WP / FX
-
i
WP / FZ-GD / FX-GD
......................................................................... 42
快速入門指南–
FZ
-
i
/ FX
-
i
/ FZ
-
i
WP / FX
-
i
WP / FZ-GD / FX-GD
系列
精密天平 ........................................................................................ 52
2
Page 3
EN
①
②
③
④
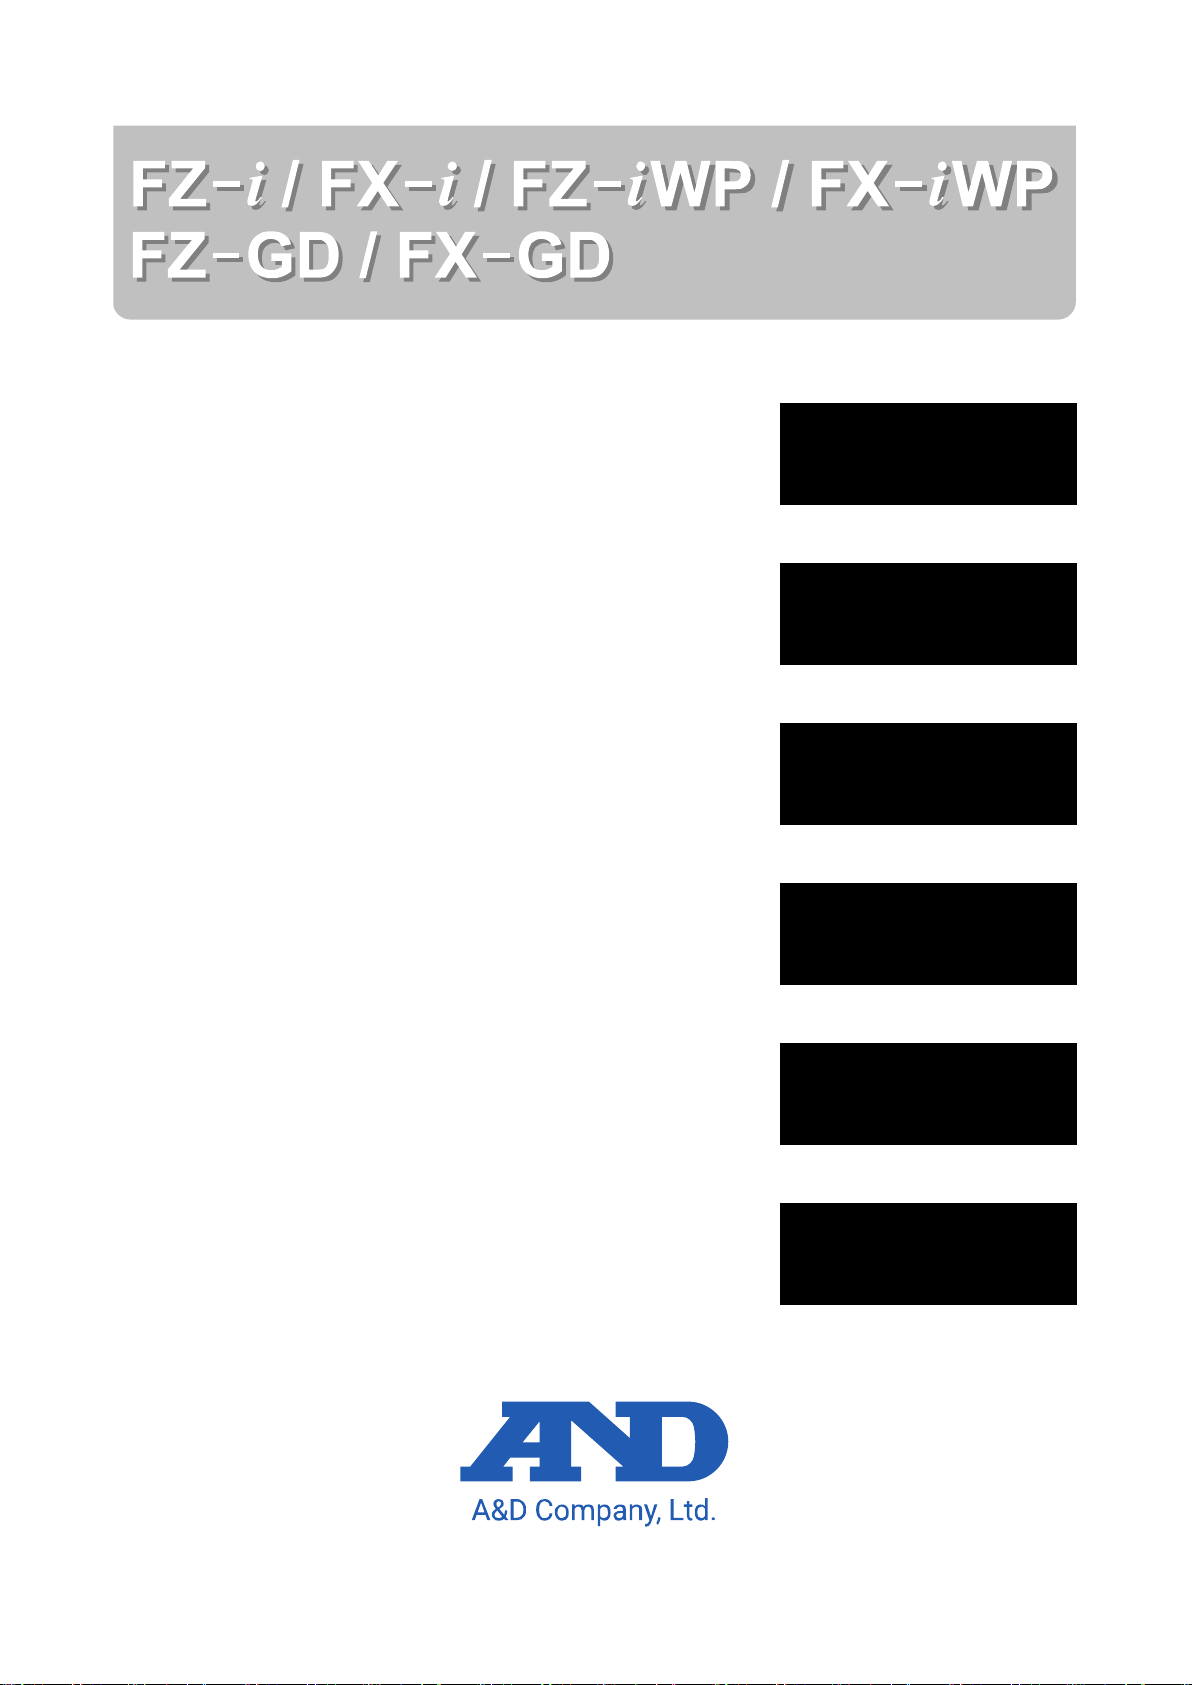
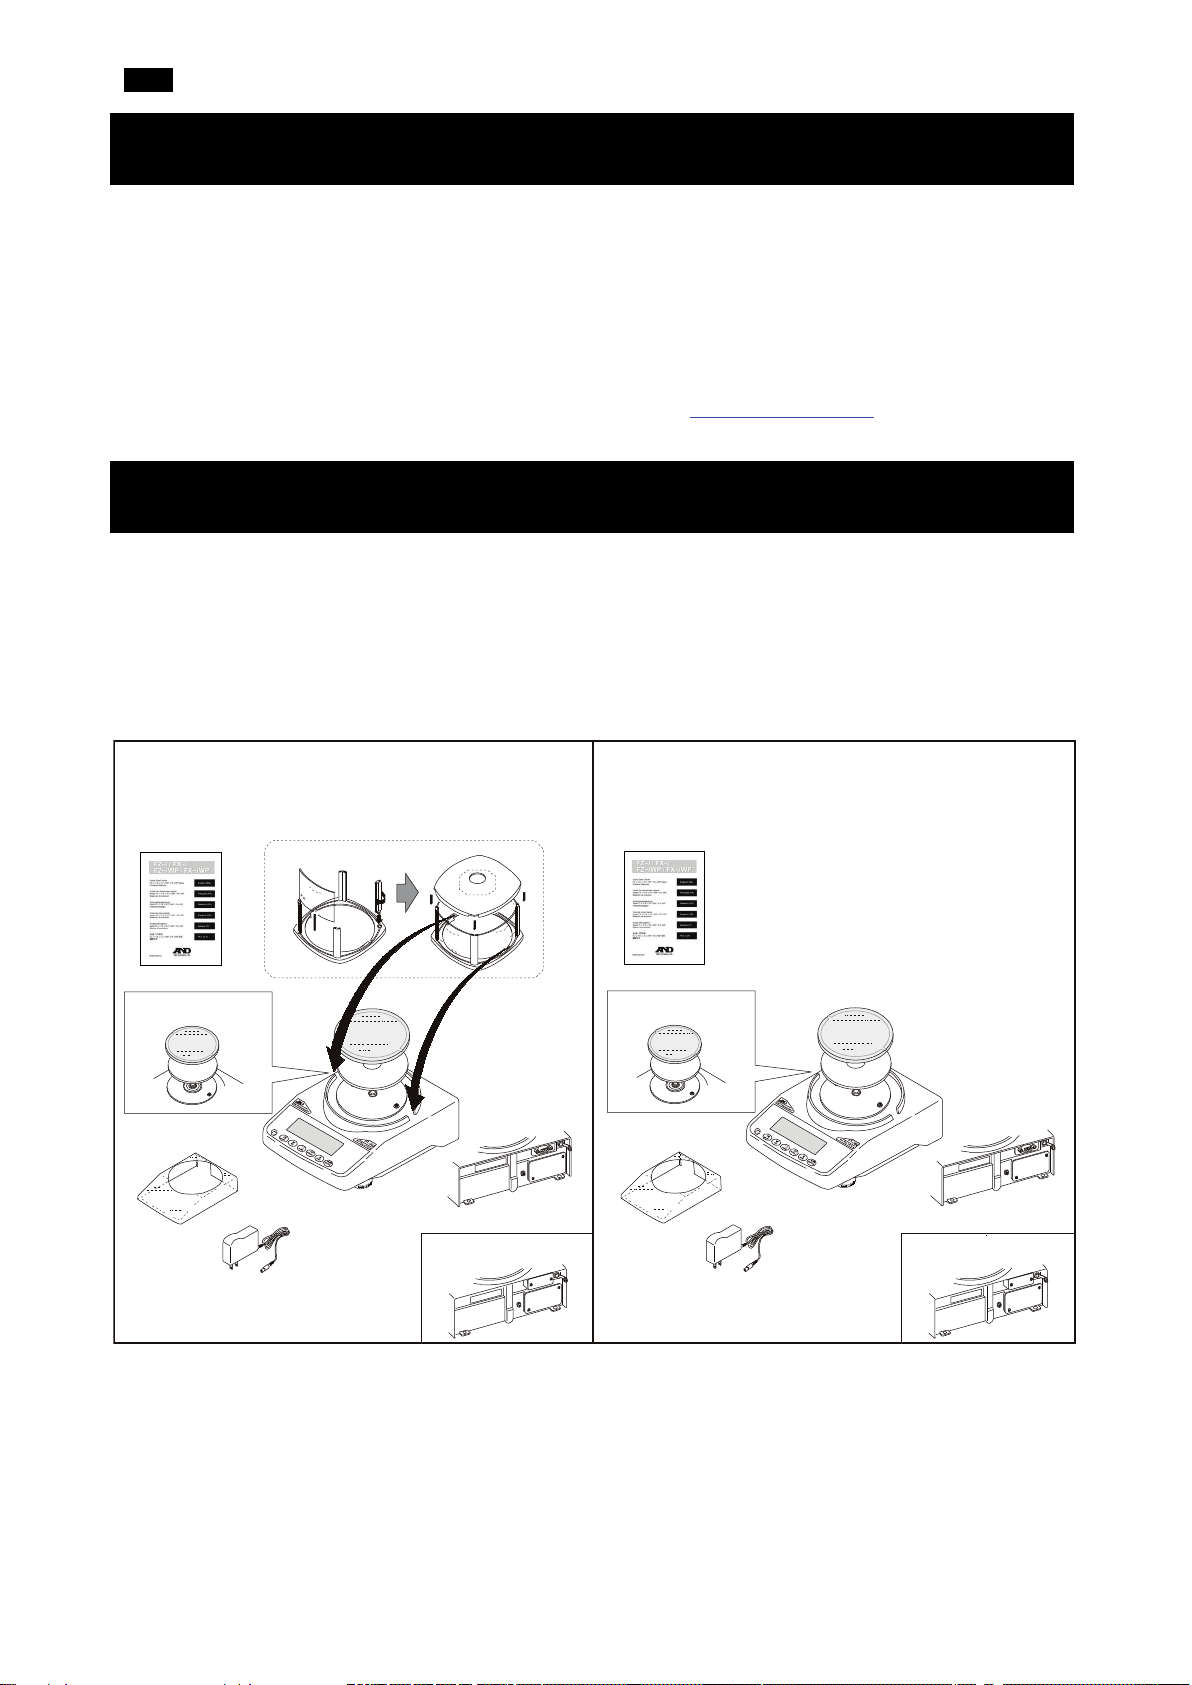
FX-i / FX-i WP / FX-GD (0.01g models)
FZ-i / FZ-i WP / FZ-GD (0.001g / 0.01g models)
FX-i / FX-i WP / FX-GD (0.001g models)
FZ-i WP / FX-i WP
FZ-i WP / FX-i WP
FX-i WP
FX-i WP
1. Introduction
This quick start guide describes the basic functions and operations of the balance (FZ-i / FX-i / FZ-i WP /
FX-i WP / FZ-GD / FX-GD series).
The functions and operating procedures of the balance are explained in details in the “FZ-i / FX-i / FZ-i WP
/ FX-i WP / FZ-GD / FX-GD SERIES Precision Balance INSTRUCTION MANUAL”. This manual can be
downloaded from our website https://www.aandd.jp
.
2. Installation and Precautions
The balance is a precision instrument. Unpack it carefully. It is recommended to keep the packing materials
to be used for transporting the balance in the future.
The packing contents depend on the balance model. See the following illustrations to confirm that everything
is included.
Cautions:
▢ Verify that the AC adapter type is correct for your local voltage and receptacle type.
▢ Use the dedicated AC adapter specified for the balance.
▢ Do not use the AC adapter provided with the balance for models that are not considered compatible with
the AC adapters.
▢ If you use a wrong AC adapter, the balance and other equipment may not operate properly.
3
Page 4
EN
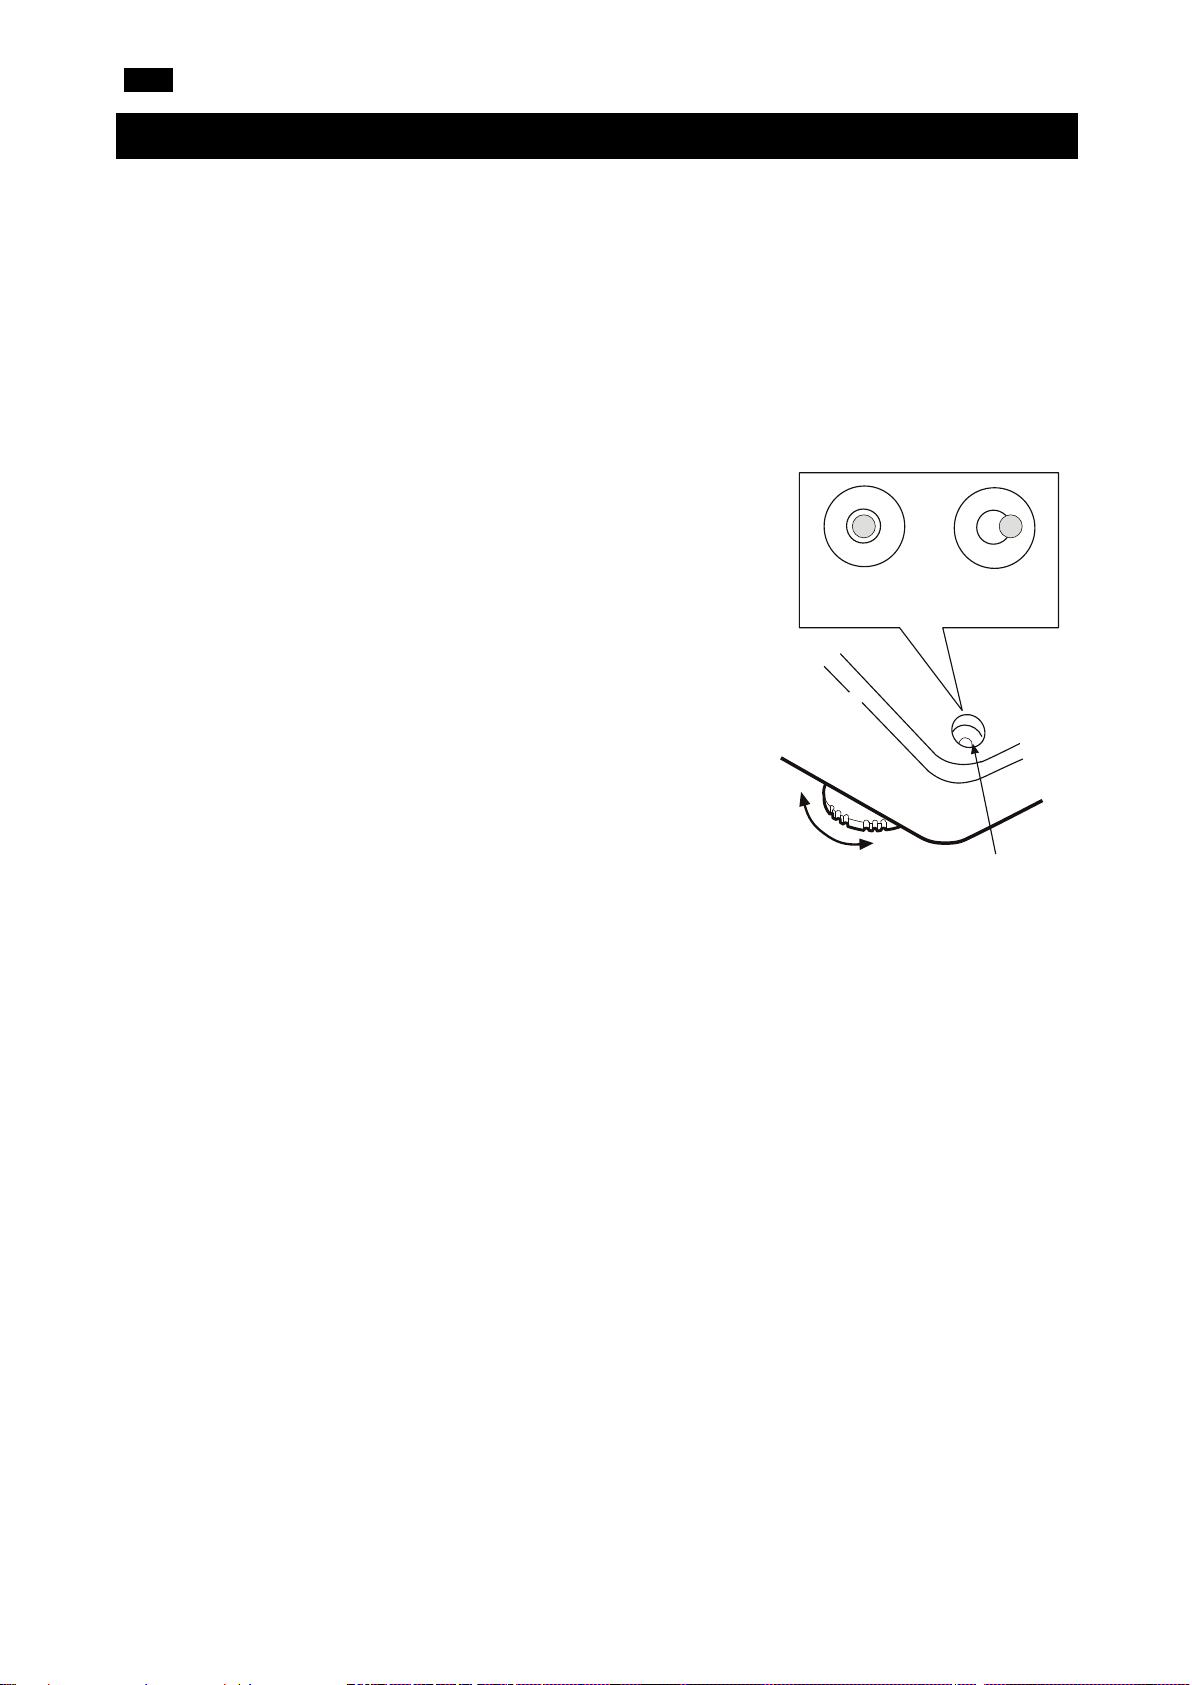
The weighing table should be solid (An anti-vibration table or stone table is ideal).
location. Refer to "8. CALIBRATION" in the instruction manual.
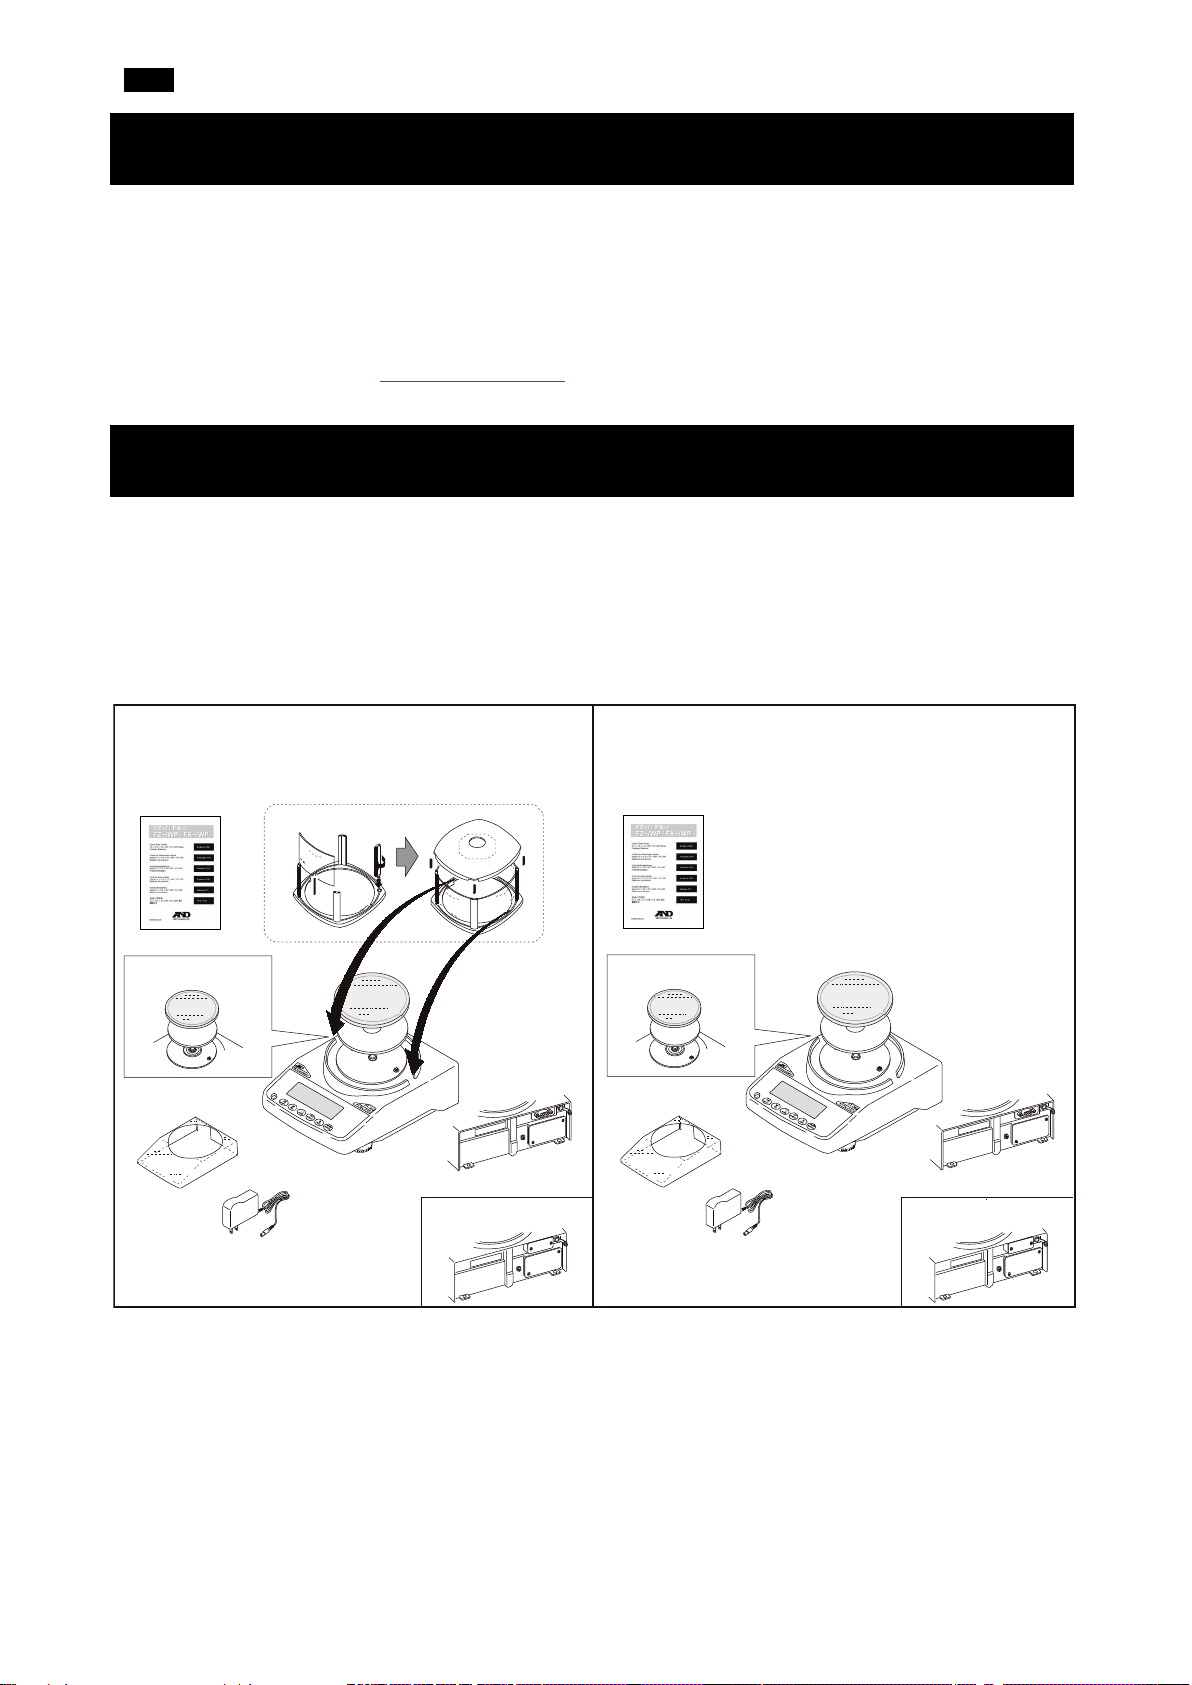
OK
Not OK
Bubble spirit level
Leveling
foot
2-1. Precautions
To get the optimum performance from the balance and acquire accurate weighing data, note the following:
▢ Install the balance in an environment where the temperature and humidity are not excessive. The
best operating temperature is about 20°C±2°C at about 45 ~ 60%RH relative humidity.
▢ Install the balance where it is free of dust.
▢
▢ Install the balance on a horizontal table and check that it is not
tilted.
▢ Install the balance in a stable place avoiding vibration and shock.
Corners of rooms on the first floor are best, as they are less prone
to vibration.
▢ Install the balance where it is not affected by heaters or air
conditioners.
▢ Install the balance where it is not exposed to direct sunlight.
▢ Install the balance away from equipment which produces
magnetic fields.
▢ Level the balance by adjusting the leveling feet and confirm it
using the bubble spirit level. Refer to the next page "How to adjust
the bubble spirit level".
▢ Warm up the balance for at least 30 minutes. Plug in the AC
adapter as usual.
Calibrate the balance before use or after moving it to another
▢
With the FZ-i WP / FX-i WP series
▢ The dustproof and waterproof level of the balance is equivalent to IP65, and its second digit, “5”,
corresponds to "having no harmful influence by receiving direct jet of water". Washing the balance with
strong water pressure or submerging it in water, may cause water to seep inside the balance and
cause a malfunction.
▢ When installing and using the balance under conditions requiring dustproof and waterproof
performances, make sure that the AC adapter plug is fully inserted into the AC adapter jack and that the
terminal cover is attached to the RS-232C interface or the waterproof RS-232C cable
(AX-KO2737-500) is used.
▢ If the RS-232C terminal cover is removed or the waterproof RS-232C cable (AX-KO2737-500) is not
used, protection against dust and water is not provided.
Caution: Do not install the balance where flammable or corrosive gas is present.
4
Page 5
EN
Leveling
foot
OK
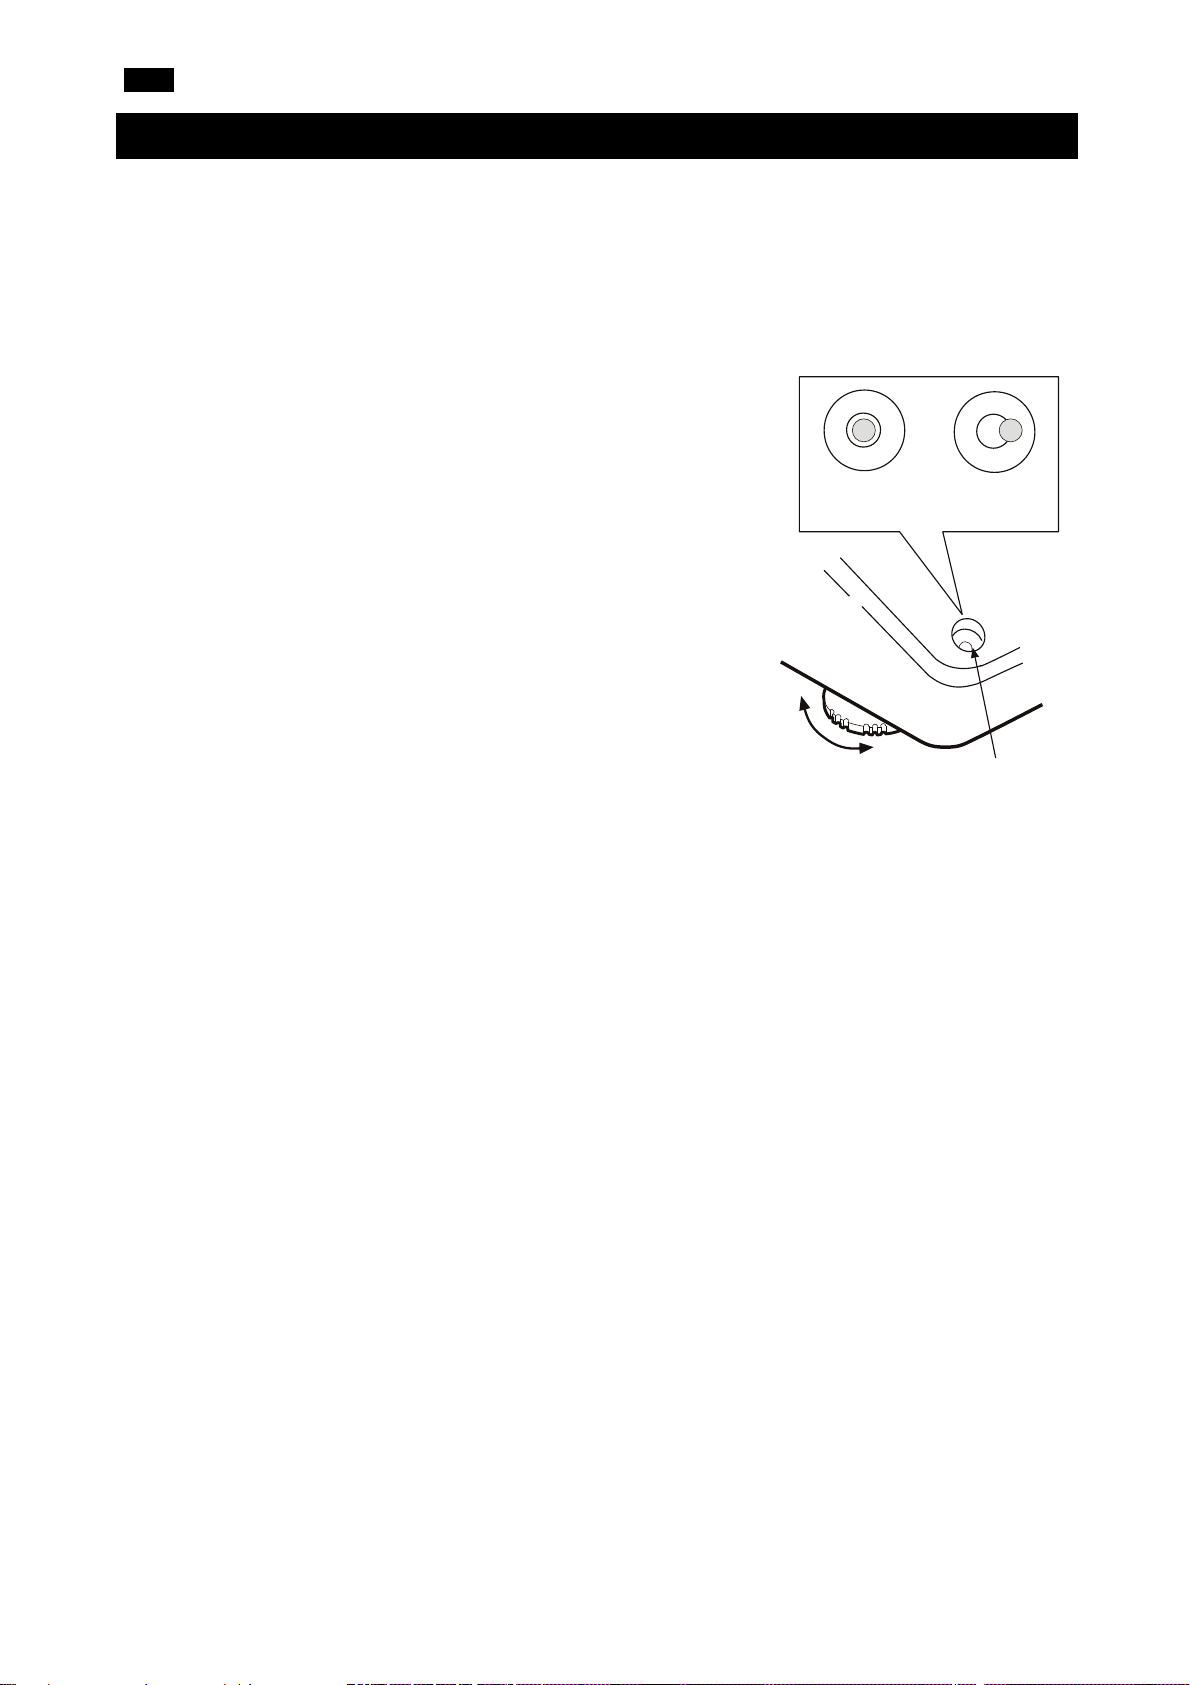
When the bubble is off to the left:
Turn the leveling foot on the front right in the clockwise
direction.
When the bubble is off to the right:
Turn the leveling foot on the front left in the clockwise
direction.
When the bubble is off to the backward position:
Turn both leveling feet on the front in the clockwise
direction
When the bubble is off to the forward position:
Turn both leveling feet on the front in the counter
clockwise direction at the same time.
Bubble spirit level
Not OK
Down
Down
Red circle
Bubble
How to adjust the bubble spirit level
at the same time.
Up
Leveling
foot
Up
5
Page 6
EN
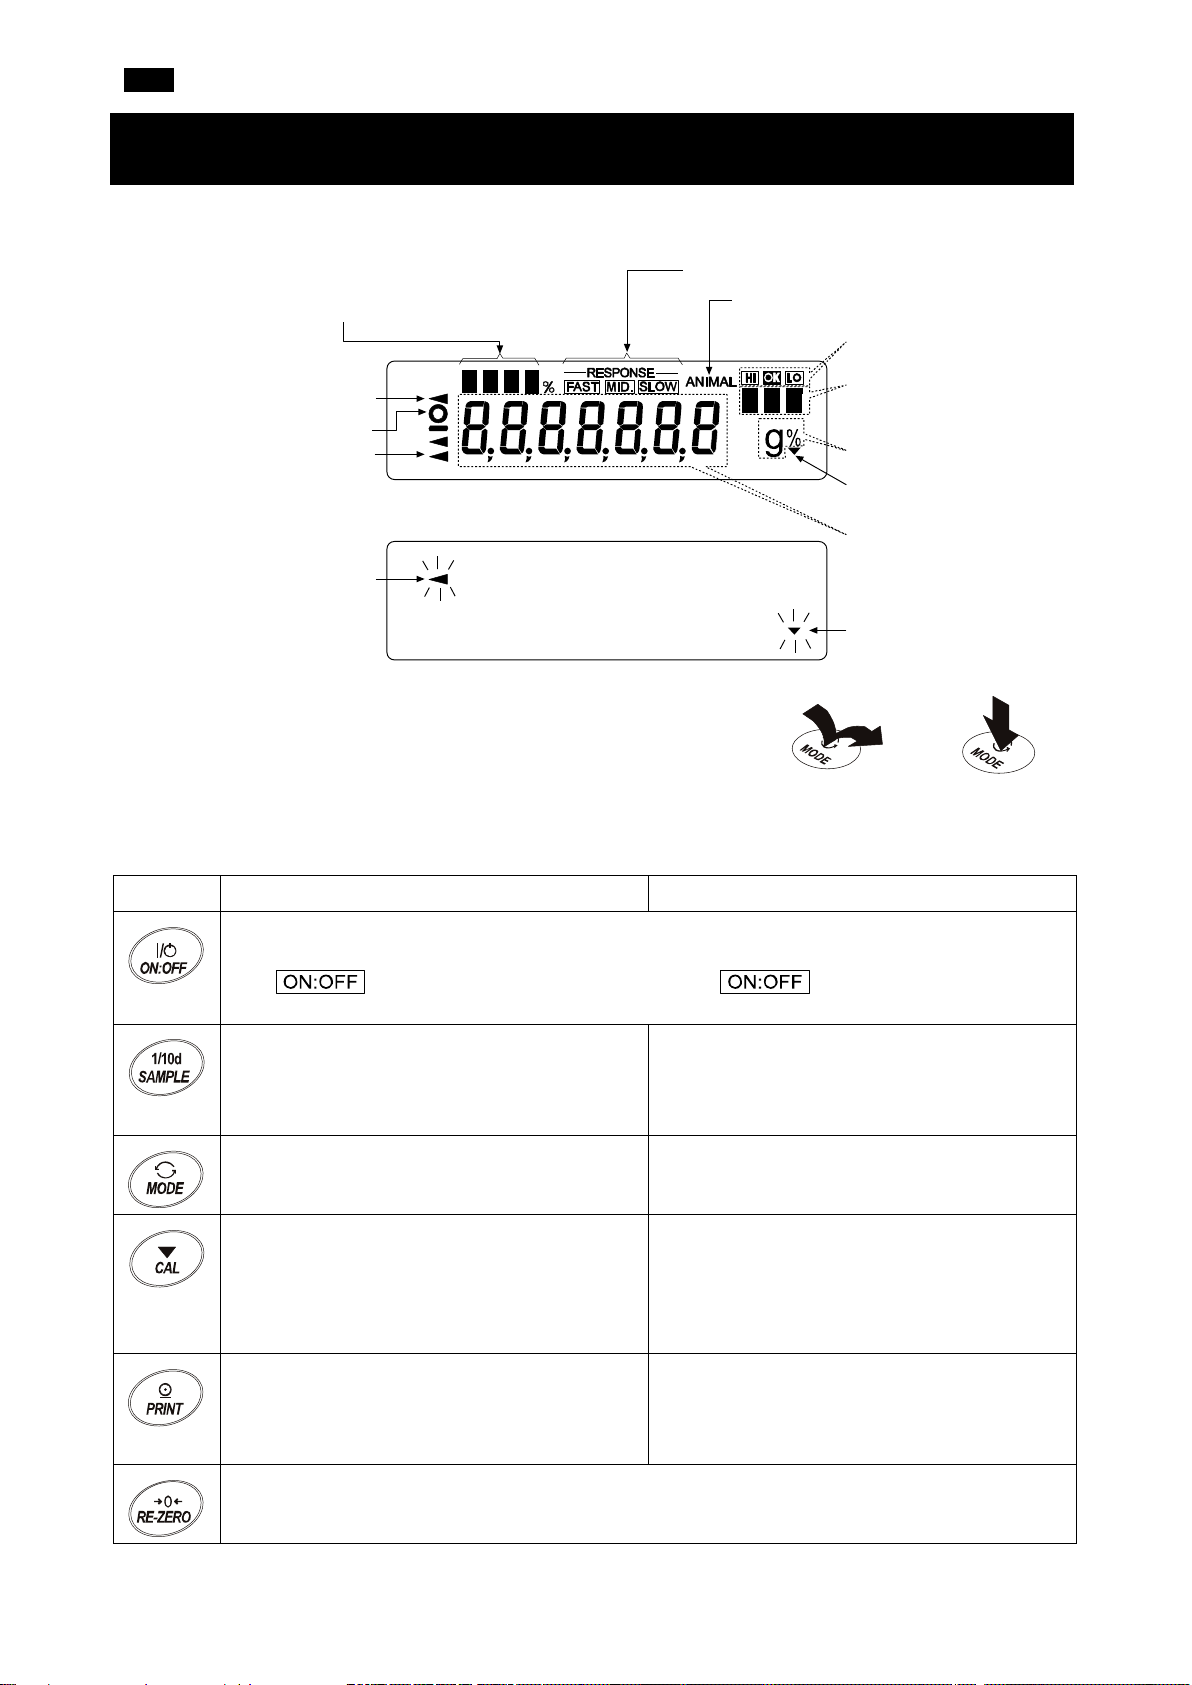
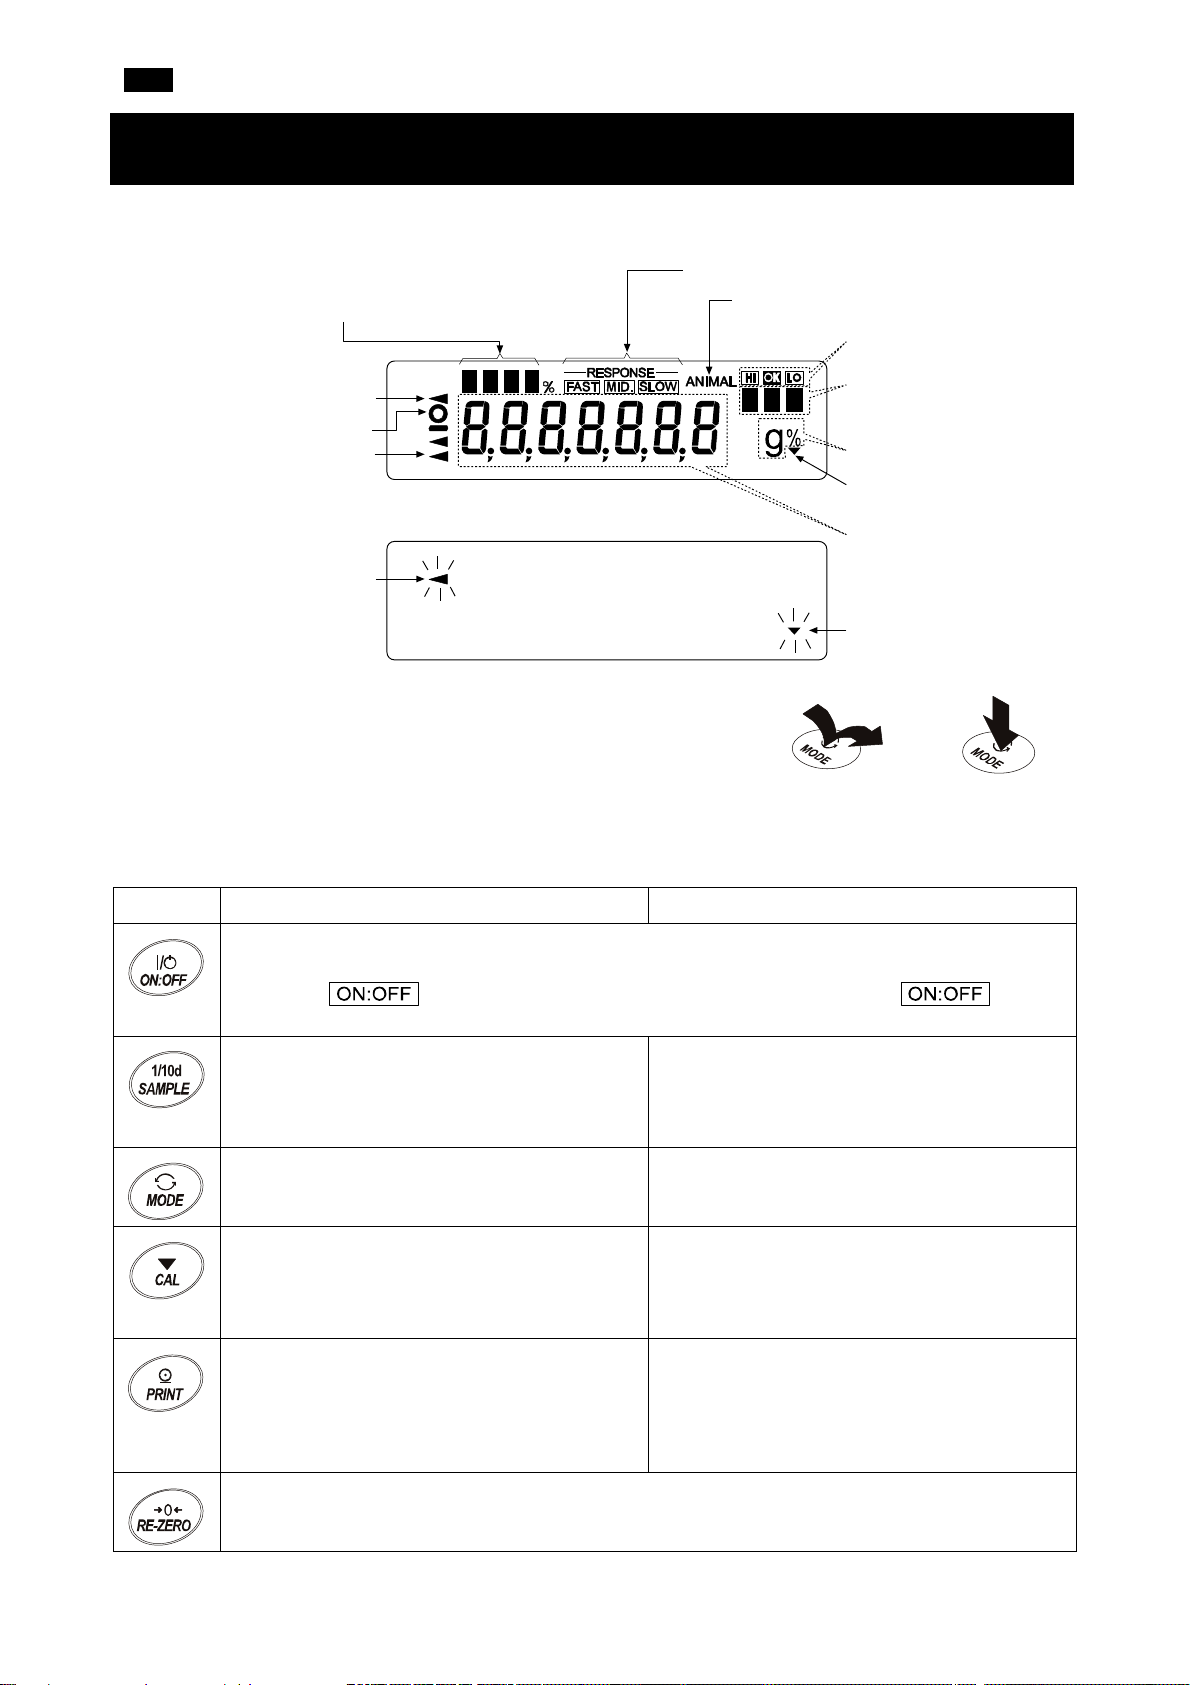
Key Operations
・Number of statistical data (Statistical calculation mode)
・
in percentage, in the weighing mode (Capacity indicator)
Response indicators
Animal mode indicator
Comparator indicators
Units (pcs, ct, mom)
Units (g, %)
Interval output mode
standby indicator
Weight data
Interval output mode
active indicator
Blinking
Processing indicator
Processing indicator
Stabilization indicator
Standby indicator
Press and hold the
Press the key
the key immediately)
3. Display Symbols and Key Operations
Display symbols
Displays the weight data relative to the weighing capacity,
The behavior of the balance differs depending on whether ”Press and
release the key immediately” or ”Press and hold the key (for 2
seconds)”. The normal weighing operation is to ”Press and release the
key immediately”. Do not hold down the key unless you need to.
(Press and release
key for 2 seconds
Key When pressed and released When pressed and held (for 2 seconds)
Turns the display ON / OFF. The standby indicator is displayed when the display is turned off.
The weighing mode is enabled when the display is turned on.
The key is available anytime. Pressing the key during operation will
always turn the display OFF.
In the weighing mode, turns the digit for
Displays the menu of function table.
readability ON / OFF.
In the counting or percent mode, enters the
sample storing mode.
Switches the weighing units stored in the
function table.
Enters the calibration mode (One-Touch
Calibration) using the internal mass (FZ-i /
FZ-i WP / FZ-GD series only).
Enters the mode for changing the weighing
speed.
Enters the calibration mode using an external
weight (with your weight).
In the internal setting mode, the operation is
canceled.
When stable, outputs the weighing data
according to the function table.
In the function table, confirms the operation.
Sets the display to zero.
No function at the time of shipment.
Outputs "Title block" and "End block" for GLP,
GMP, etc. report by changing the function
table.
6
Page 7
EN
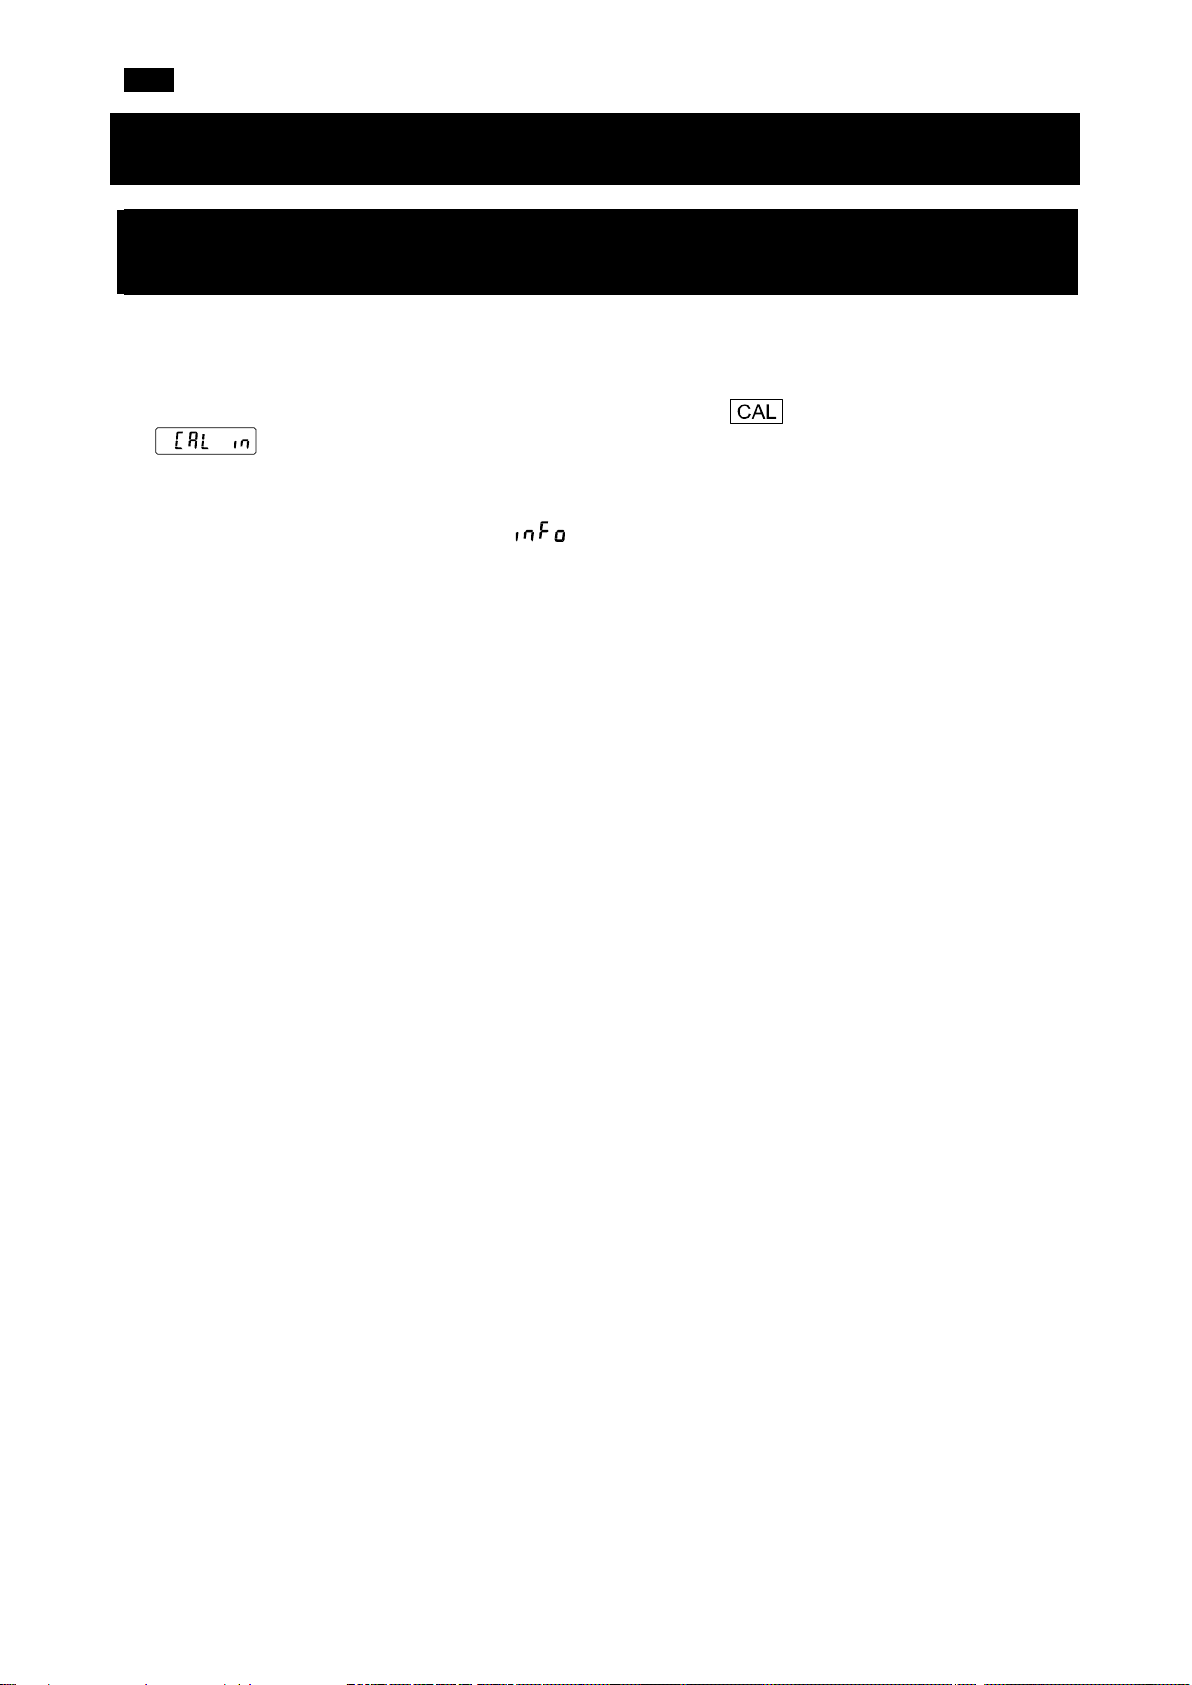
4. Calibration
4-1. Calibration Using the Internal Mass
(One-Touch Calibration, FZ-i / FZ-i WP / FZ-GD Series Only)
This function calibrates the balance using the internal mass.
1. Connect the AC adapter and warm up the balance for at least 30 minutes with nothing on the weighing
pan.
2. Place the accessory breeze break on the balance and press the key. The balance displays
.
3. The balance performs calibration using the internal mass. Do not allow vibration or drafts to affect the
balance.
4. After the calibration, if the "GLP output ( )" parameter of the function table is set, the balance
outputs a sensitivity adjustment report.
5. The balance will automatically return to weighing mode after calibration.
7
Page 8

EN
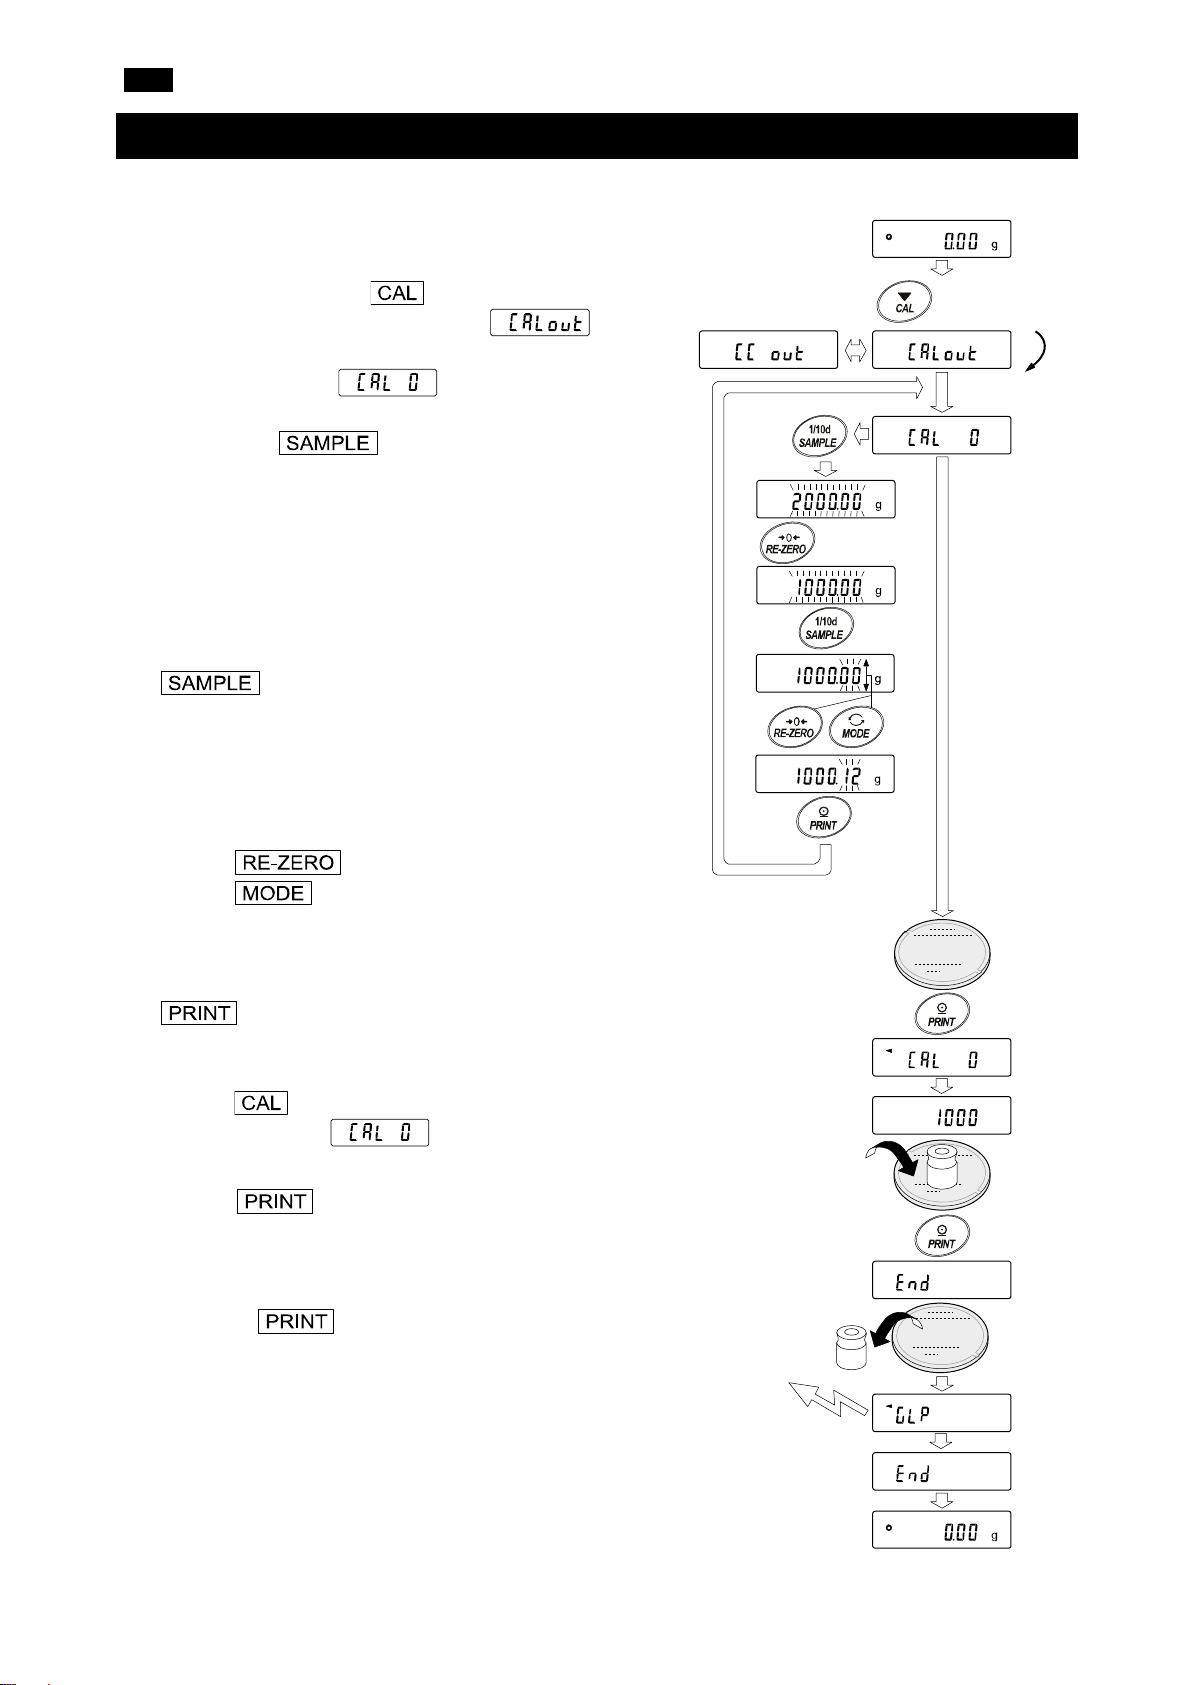
2. Press and hold the key for 2 seconds until
3. The balance displays .
4. Specify the calibration weight value as follows:
key
To switch the display condition to "All
key (To increase the value)
To select the calibration weight or
key
To store a new weight value. Even if the
key
To cancel the operation (return to
7. Remove the weight from the pan.
Press and hold the
key for 2 seconds
Release the key
Press the
key
Select a
weight
e.g. Calibration weight
value: 1000.12g
Calibration weight
GLP output
4-2. Calibration Using an External Weight
This function calibrates the balance using an external weight.
1. Connect the AC adapter and warm up the balance for at
least 30 minutes with nothing on the weighing pan.
is displayed, and then release the key.
If you want to change the calibration weight, press
the key and go to step 4.
Refer to "8. CALIBRATION" in the instruction manual
for selectable calibration weights.
If you use the calibration weight value stored in the
balance, go to step 5.
of the segments blinking" (target
weight selection mode) or "The last
two digits blinking" (value adjustment
mode).
key (To decrease the value)
adjust the value.
AC adapter is removed, the data is
maintained in non-volatile memory.
).
5. Confirm that there is nothing on the pan and press the
key. The balance measures the zero point and
displays the measured value. Do not allow vibration or
drafts to affect the balance.
6. Place the calibration weight on the pan and press the
key. The balance measures the calibration
weight and displays the measured value. Do not allow
vibration or drafts to affect the balance.
8. After the calibration, if the “GLP output” is set, the
balance outputs a “sensivity adjustment report”.
9. The balance will automatically return to the weighing
mode.
10. Place the calibration weight on the pan again and check if
the value is within the range (set value ± 2 digits). If it is
out of the range, pay attention to the surrounding
environment and start again from step 1.
8
Page 9
EN
Enter a correct value.
Perform the weighing operation from the beginning again.
on the pan. Remove the sample from the pan.
properly installed and calibrate the balance.
the percent mode because it is too light. Use a larger sample.
appears frequently, contact the local A&D dealer.
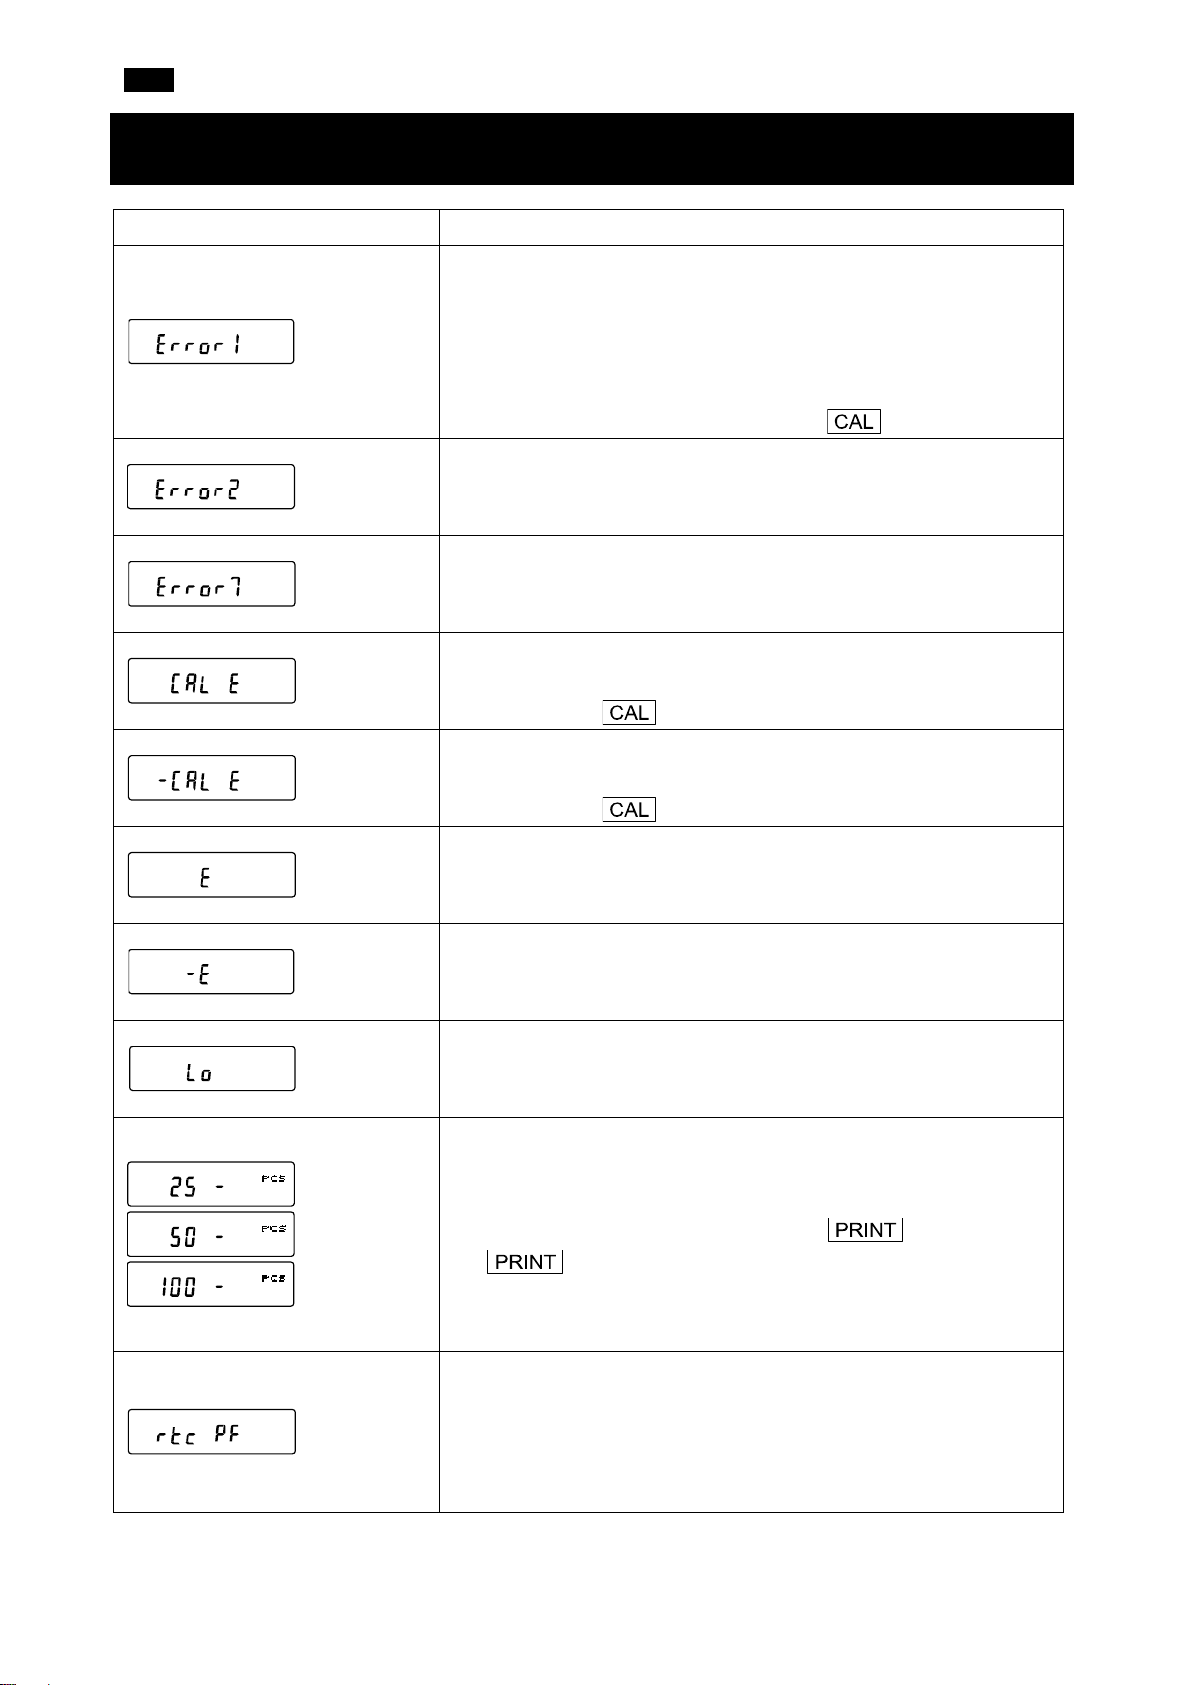
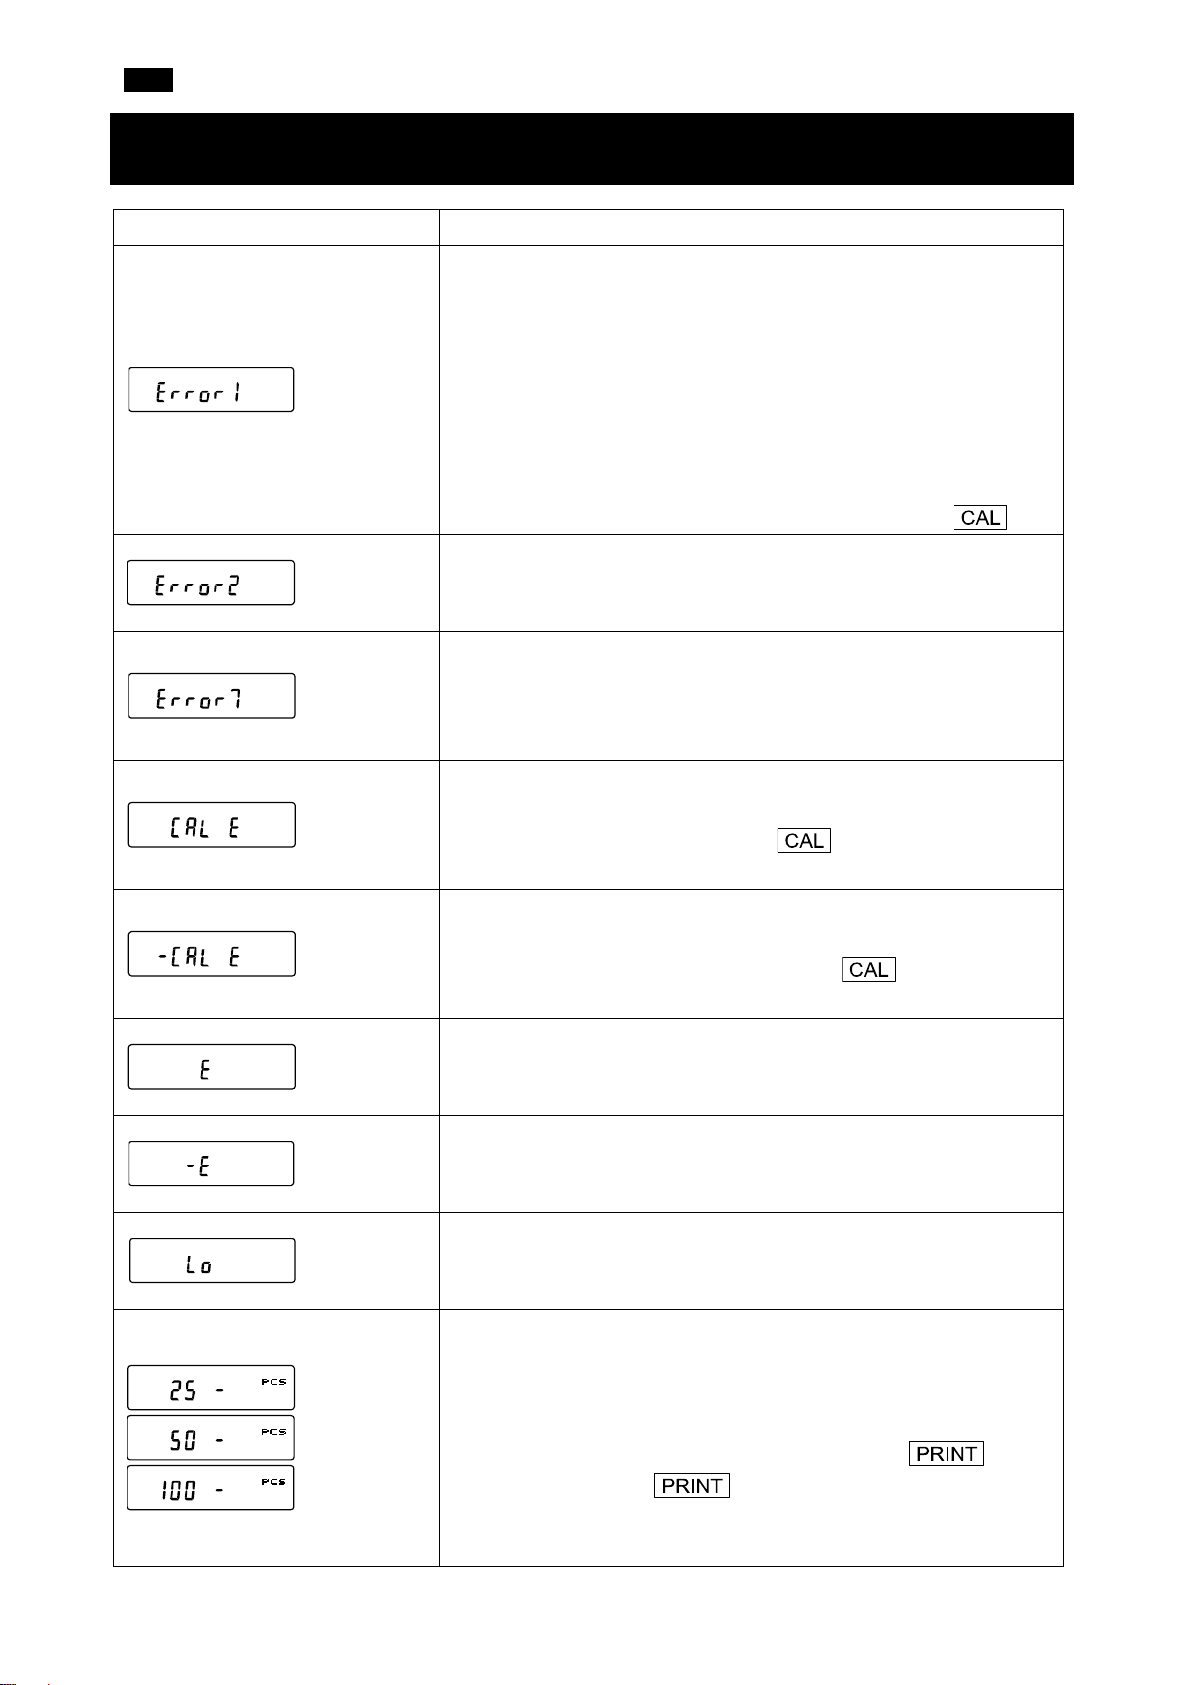
5. Error Codes
Display Error code Description
EC, E11
EC, E17
EC, E20
EC, E21
Stability error
The balance cannot stabilize due to an environmental problem.
Check around the pan. Prevent vibration, drafts, temperature
changes, static electricity and magnetic fields, from influencing the
balance. Refer to "3-2 During Use" in the instruction manual.
To return to the weighing mode, press the key.
Out of range error
The entered value exceeds the setting range.
Internal mass error (FZ-i / FZ-i WP / FZ-GD series only)
The internal mass application mechanism does not work properly.
Calibration weight error (Positive value)
The calibration weight is too heavy. Verify the calibration mass
value. Press the key to return to the weighing mode.
Calibration weight error (Negative value)
The calibration weight is too light. Confirm the calibration mass
value. Press the key to return to the weighing mode.
Overload error
A sample beyond the balance weighing capacity has been placed
Weighing pan error
The mass value is too light. Confirm that the weighing pan is
Sample mass error
The balance cannot store the sample for the counting mode or for
Unit mass error
The sample unit mass for the counting mode is too light. Storing and
using it for counting will cause a counting error. Add samples to
reach the specified number and press the key. Pressing
the key without adding samples will shift the balance to
the counting mode. But, for accurate counting, be sure to add
samples.
Clock battery error
The clock backup battery has been depleted. Press any key and set
the time and date. The clock and calendar function work normally as
long as the AC adapter is connected to the balance. If this error
9
Page 10
EN
Confirm the format, baud rate and parity.
Confirm the command.
Adjust the delay time to transmit a command.
Confirm the command.
Confirm the command.
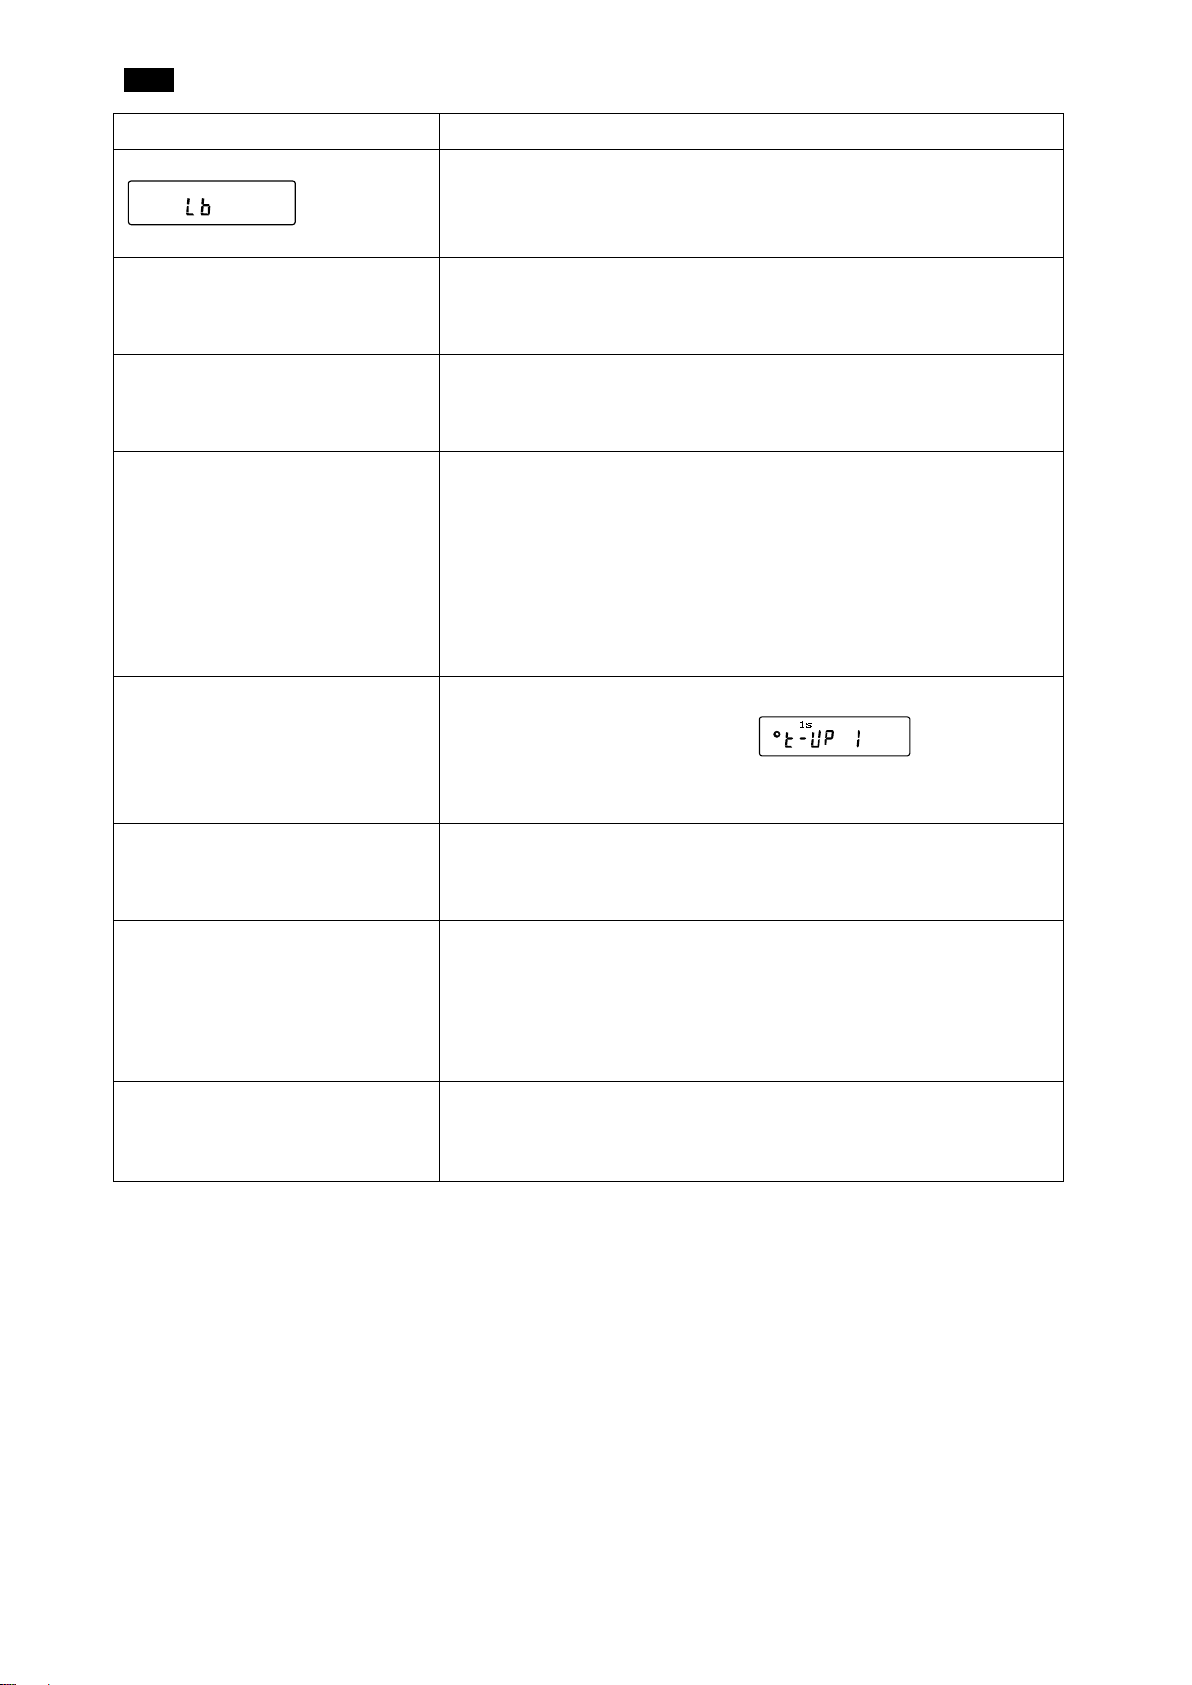
Display Error code Description
Power supply voltage fault
The voltage supplied from the AC adapter is abnormal. Check if the
AC adapter is one provided with the balance.
EC, E00
EC, E01
EC, E02
EC, E03
EC, E04
Communications error
A protocol error occurred in communications.
Undefined command error
An undefined command was received.
Not ready
A received command cannot be processed.
e.g. The balance received a Q command, but not in the weighing
mode.
e.g. The balance received a Q command while processing a
RE-ZERO command.
Timeout error
If the timeout parameter is set to “ ”, the balance
did not receive the next character of a command within the time limit
of one second. Confirm the communication.
Excess characters error
The balance received excessive characters in a command.
EC, E06
EC, E07
Format error
A command includes incorrect data.
e.g. The number of digits is incorrect.
e.g. The alphabet was included in the numerical value.
Parameter setting error
The received data exceeds the range that the balance can accept.
Confirm the parameter range of the command.
10
Page 11
EN
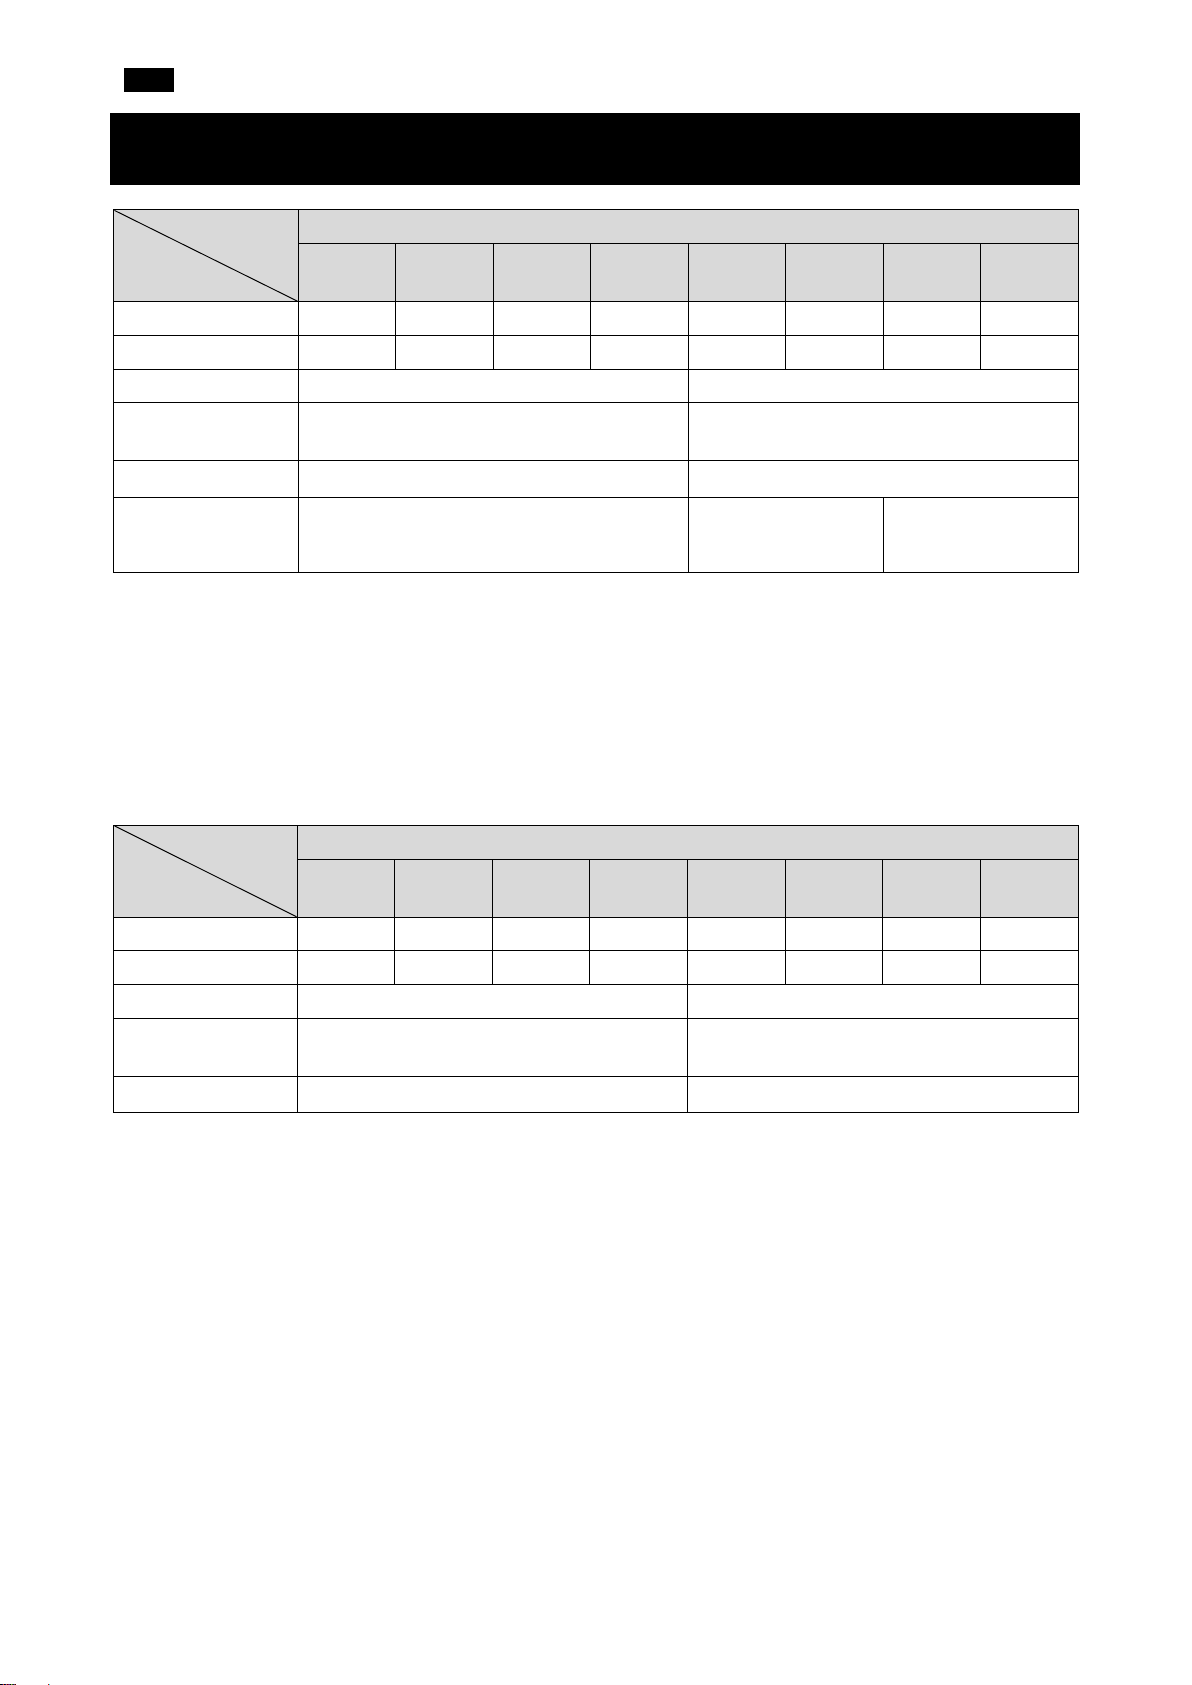
6. Specifications
FZ series
Weighing capacity 122g 220g 320g 520g 1220g 2200g 3200g 5200g
Maximum display 122.084g 220.084g 320.084g 520.084g 1220.84g 2200.84g 3200.84g 5200.84g
Minimum display 0.001g 0.01g
Repeatability
(Standard deviation)
Linearity ±0.002g ±0.02g
Accuracy after
calibration with
internal mass*
* ● Accuracy after calibration using the internal mass, with the accessory breeze break installed and in
good ambient conditions (within the temperature range of 10°C to 30°C (50°F to 86°F) with no abrupt
120
i
/ iWP / GD
200
i
/ iWP / GD
i
300
/ iWP / GD
500i
1200
i
/ iWP / GD
2000
i
/ iWP / GD
i
/ iWP / GD
0.001g 0.01g
±0.010g ±0.10g ±0.15g
3000
5000i
changes in temperature or humidity, no drafts, no vibration and no effect by magnetic fields or static
electricity).
● With the FZ-i / FZ-i WP / FZ-GD series balance, the environment and aging may cause internal mass
value error. Calibrate the balance using an external mass and perform maintenance regularly.
FX series
120
i
/ iWP / GD
200
i
/ iWP / GD
300
i
/ iWP / GD
500i
1200
i
/ iWP / GD
2000
i
/ iWP / GD
3000
i
/ iWP / GD
5000i
Weighing capacity 122g 220g 320g 520g 1220g 2200g 3200g 5200g
Maximum display 122.084g 220.084g 320.084g 520.084g 1220.84g 2200.84g 3200.84g 5200.84g
Minimum display 0.001g 0.01g
Repeatability
(Standard deviation)
0.001g 0.01g
Linearity ±0.002g ±0.02g
● The FZ-i WP / FX-i WP series balances have dustproof and waterproof performances (IP65 compliant).
11
Page 12
FR
①
②
③
④
FX-i / FX-i WP / FX-GD (modèles 0,01 g)
FZ-i / FZ-i WP / FZ-GD (modèles 0,001 g / 0,01 g)
FX-i / FX-i WP / FX-GD (modèles 0,001 g)
FZ-i WP / FX-i WP
FZ-i WP / FX-i WP
FX-i WP
FX-i WP
1. Introduction
Ce guide de démarrage rapide décrit les fonctions et les opérations de base de la balance (séries FZ-i / FX-
i / FZ-i WP / FX-i WP / FZ-GD / FX-GD).
Les fonctions et les procédures de fonctionnement de la balance sont expliquées en détail dans le « FZ-i /
FX-i / FZ-i WP / FX-i WP / FZ-GD / FX-GD SERIES Precision Balance INSTRUCTION MANUAL »
(MANUEL D'INSTRUCTIONS de la balance de précision SÉRIES FZ-i / FX-i / FZ-i WP / FX-i WP / FZ-GD
/ FX-GD). Ce manuel peut être téléchargé depuis notre site web https://www.aandd.jp
.
2. Installation et précautions
La balance est un instrument de précision. La déballer avec soin. Il est recommandé de conserver les
matériaux d'emballage en cas de transport ultérieur de la balance.
Le contenu de l'emballage dépend du modèle de la balance. Se référer aux illustrations suivantes pour
confirmer que tous les éléments sont inclus.
Attention :
▢ S'assurer que le type d'adaptateur CA convient à la tension locale et au type de prise.
▢ Utiliser l'adaptateur CA dédié spécifié pour la balance.
▢ Ne pas utiliser l'adaptateur CA fourni avec la balance pour les modèles qui ne sont pas considérés
compatibles avec les adaptateurs CA.
▢ Si un adaptateur CA incorrect est utilisé, la balance et les autres équipements peuvent ne pas
fonctionner correctement.
12
Page 13
FR
ption idéale).
manuel d'instructions.
OK
Pas OK
Niveau à bulle
Pied
réglable
2-1. Précautions
Pour obtenir des performances optimales de la balance et des données de pesage précises, noter ce qui
suit :
▢ Installer la balance dans un environnement où la température et l'humidité ne sont pas excessives.
La meilleure température de fonctionnement est d'environ 20 °C±2 °C à environ 45~60 % d'humidité
relative.
▢ Installer la balance dans un endroit exempt de poussière.
▢
La table de pesage doit être robuste (une table antivibration ou une table en pierre est une o
▢ Installer la balance sur une table horizontale et vérifier qu'elle
n'est pas inclinée.
▢ Installer la balance dans un endroit stable, exempt de vibrations et
de chocs. Les coins des pièces au rez-de-chaussée sont idéaux
car ils sont moins exposés aux vibrations.
▢ Installer la balance dans un endroit non affecté par des systèmes
de chauffage ou de climatisation.
▢ Installer la balance dans un endroit non exposé à la lumière
directe du soleil.
▢ Installer la balance à l'écart d'équipements produisant des
champs magnétiques.
▢ Mettre la balance de niveau à l'aide des pieds réglables et vérifier
avec le niveau à bulle. Se référer à la page suivante « Comment
régler le niveau à bulle ».
▢ Attendre au moins 30 minutes que la balance préchauffe.
Raccorder l'adaptateur CA comme d'habitude.
▢
Étalonner la balance avant utilisation ou après l'avoir déplacée.
Se référer à « 8. CALIBRATION » (8. ÉTALONNAGE) dans le
Avec les séries FZ-i WP / FX-i WP
▢ Le niveau d'étanchéité à la poussière et à l'eau de la balance est équivalent à l'indice IP65, dont le
▢ Lors de l'installation et l'utilisation de la balance dans des conditions nécessitant une étanchéité à la
▢ Si le couvercle de la borne RS-232C est retiré ou le câble RS-232C étanche à l'eau (AX-KO2737-500)
Attention : Ne pas installer la balance dans un environnement où des gaz inflammables ou corrosifs sont
présents.
deuxième chiffre, « 5 », signifie que la balance peut « recevoir des projections directes d'eau sans que
cela ait d'effet nocif ». Le lavage de la balance avec une forte pression d'eau ou en l'immergeant dans
l'eau peut entraîner une infiltration d'eau dans la balance et entraîner un dysfonctionnement.
poussière et à l'eau, s'assurer que la fiche de l'adaptateur CA est complètement insérée dans le
connecteur de l'adaptateur CA et que le couvercle de la borne est fixé à l'interface RS-232C ou que le
câble RS-232C étanche à l'eau (AX-KO2737-500) est utilisé.
n'est pas utilisé, la protection contre la poussière et l'eau n'est pas effective.
13
Page 14

FR
Pied
réglable
OK
Quand la bulle dévie vers la gauche
Tourner le pied réglable avant droit dans le sens des
aiguilles d'une montre.
Quand la bulle dévie vers la droite
Tourner le pied réglable avant gauche dans le sens
des aiguilles d'une montre.
Quand la bulle dévie vers l'arrière
Tourner simultanément les deux pieds réglables
avant dans le
Quand la bulle dévie vers l'avant
Tourner simultanément les deux pieds réglables avant
dans le sens contraire des aiguilles d'une montre.
Niveau à bulle
Pas OK
Bas
Bas
Cercle rouge
Bulle
Comment régler le niveau à bulle
sens des aiguilles d'une montre.
:
Haut
Pied
réglable
Haut
:
:
:
14
Page 15
FR
Opérations de base
・Nombre de données statistiques (Mode de calcul statistique)
・
de capacité)
Indicateurs de réponse
Indicateur du mode animal
Indicateurs de comparateur
Unités (pcs, ct, mom)
Unités (g, %)
Indicateur de veille du mode
d'exportation de l'intervalle
Données de poids
Indicateur de veille
d'activité du mode
d'exportation de l'intervalle
Clignotant
Indicateur de traitement
Indicateur de traitement
Indicateur de stabilisation
Indicateur de veille
Appuyer sur la
Appuyer sur la touche
(Appuyer et relâcher la
immédiatement)
3. Symboles affichés et opérations de base
Affichage des symboles
Affiche les données de poids relatives à la capacité de
pesage, en pourcentage, en mode de pesage (Indicateur
Le comportement de la balance diffère selon s'il faut « Appuyer et
relâcher la touche immédiatement » ou « Appuyer sur la touche et la
maintenir enfoncée (pendant 2 secondes) ». L'opération de pesage
normale consiste à « Appuyer et relâcher la touche immédiatement ».
Ne pas maintenir enfoncée la touche sauf si cela est nécessaire.
Touche Enfoncée puis relâchée
Enfoncée et maintenue enfoncée (pendant 2 secondes)
Met l'écran sous ou hors tension (ON/OFF). L'indicateur de veille s'affiche lorsque l'écran est
mis hors tension. Le mode de pesage est activé lorsque l'écran est mis sous tension.
La touche est disponible à tout moment. Appuyer sur la touche
pendant l'opération mettra toujours l'écran hors tension (OFF).
En mode de pesage, active (ON) et désactive
Affiche le menu de la table de fonctions.
(OFF) le chiffre pour la lisibilité.
En mode de comptage ou de pourcentage, passe
en mode d'enregistrement de l'échantillon.
Permute entre les unités de pesage
enregistrées dans la table de fonctions.
Entre en mode d'étalonnage (Étalonnage à une
touche) à l'aide de la masse interne (uniquement
séries FZ-i / FZ-i WP / FZ-GD).
Entre en mode de changement de la vitesse
de pesage.
Entre en mode d'étalonnage à l'aide d'un
poids externe (avec votre poids).
En mode de réglage interne, l'opération est annulée.
touche
touche et la
maintenir enfoncée
pendant 2 secondes
Dans un endroit stable, fournit les données
de pesage selon le tableau de fonctions.
Dans le tableau de fonctions, confirme
l'opération.
Règle l'affichage sur zéro.
Aucune fonction définie au moment de l'expédition.
Exporte le « Title block » (Bloc de titre) et le
« End block » (Bloc de fin) pour établir un
rapport GLP, GMP, etc. en changeant la table
de fonctions.
15
Page 16
FR
4. Étalonnage
4-1. Étalonnage à l'aide de la masse interne
(Étalonnage à une touche, uniquement séries FZ-i / FZ-i WP /
FZ-GD)
Cette fonction étalonne la balance à l'aide de la masse interne.
1. Raccorder l'adaptateur CA et laisser la balance chauffer pendant au moins 30 minutes, plateau de
pesage vide.
2. Placer l'accessoire coupe-brise sur la balance et appuyer sur la touche . La balance affiche
.
3. La balance procède à un étalonnage à l'aide de la masse interne. Éviter d'exposer la balance à des
vibrations ou des courants d'air.
4. Après l'étalonnage, si le paramètre « GLP output ( ) » (exportation GLP) de la table de fonctions
est réglé, la balance exporte un rapport du réglage de la sensibilité.
5. La balance retourne automatiquement en mode de pesage après l'étalonnage.
16
Page 17
FR
2. Appuyer sur la touche et la maintenir enfoncée
3. La balance affiche .
4. Spécifier la valeur du poids d'étalonnage comme suit :
Touche
Pour basculer l'état d'affichage sur
Touche (Pour augmenter la valeur)
Pour sélectionner le poids
Touche
Pour enregistrer une nouvelle valeur de
Touche
Pour annuler l'opération (revenir à
Appuyer sur la touche et
la maintenir enfoncée
pendant 2 secondes
Relâcher la
touche
Appuyer
sur la
touche
Sélectionner
un poids
Par ex. Valeur du poids
Poids d'étalonnage
Exportation GLP
4-2. Étalonnage à l'aide d'un poids externe
Cette fonction étalonne la balance à l'aide d'un poids externe.
1. Raccorder l'adaptateur CA et laisser la balance chauffer
pendant au moins 30 minutes, plateau de pesage vide.
pendant 2 secondes jusqu'à ce que
s'affiche, puis relâcher la touche.
Si le poids d'étalonnage est changé, appuyer sur la
touche et passer à l'étape 4.
Se référer à « 8. CALIBRATION » (8.
ÉTALONNAGE) dans le manuel d'instructions pour
les poids d'étalonnage pouvant être sélectionnés.
Si la valeur du poids d'étalonnage enregistré dans la
balance est utilisé, passer à l'étape 5.
Touche (Pour diminuer la valeur)
5. Confirmer qu'il n'y a rien sur le plateau et appuyer sur la
touche . La balance mesure le point zéro et
affiche la valeur mesurée. Éviter d'exposer la balance à
des vibrations ou des courants d'air.
6. Placer le poids d'étalonnage sur le plateau et appuyer sur
la touche . La balance mesure le poids
d'étalonnage et affiche la valeur mesurée. Éviter
d'exposer la balance à des vibrations ou des courants d'air.
7. Retirer le poids du plateau.
8. Après l'étalonnage, si le paramètre « GLP output »
(exportation GLP) est défini, la balance exporte un
« sensivity adjustment report » (rapport du réglage de la
sensibilité).
« All of the segments blinking » (Tous
les segments clignotent) (mode de
sélection du poids cible) ou « The last
two digits blinking » (Les deux derniers
chiffres clignotent) (mode d'ajustement
de la valeur).
d'étalonnage :
1000,12g
d'étalonnage ou ajuster la valeur.
poids. Même si l'adaptateur CA est
retiré, les données sont conservées
dans la mémoire non volatile.
).
17
Page 18

FR
9. La balance retourne automatiquement en mode de
pesage.
10. Placer à nouveau le poids d'étalonnage sur le plateau et
vérifier si la valeur se trouve dans la plage (valeur définie
± 2 chiffres). Si elle se trouve en dehors de la plage, tenir
compte de l'environnement ambiant et recommencer
depuis l'étape 1.
18
Page 19
FR
Saisir une valeur correcte.
correctement. Recommencer l’opération de pesage depuis le début.
placé sur le plateau. Retirer l'échantillon du plateau.
pesage est correctement installé et étalonner la balance.
ou de pourcentage car il est trop léger. Utiliser un échantillon plus gros.
5. Codes d’erreur
Affichage
Code d'erreur
EC, E11
EC, E17
EC, E20
Description
Erreur de stabilité
La balance ne peut pas se stabiliser en raison d'un problème
environnemental.
Vérifier les abords du plateau. Éviter les vibrations, les courants
d'air, les changements de température, l'électricité statique et les
champs magnétiques qui peuvent nuire au fonctionnement de la
balance. Se référer à « 3-2 During Use » (3-2 Pendant l'utilisation)
dans le manuel d'instructions.
Pour revenir en mode de pesage, appuyer sur la touche .
Erreur de dépassement de plage
La valeur saisie dépasse la plage de réglage.
Erreur de masse interne (Uniquement séries FZ-i / FZ-i WP /
FZ-GD)
Le mécanisme d'application de la masse interne ne fonctionne pas
Erreur de poids d'étalonnage (valeur positive)
Le poids d'étalonnage est trop lourd. Vérifier la valeur de la masse
d'étalonnage. Appuyer sur la touche pour revenir en mode
de pesage.
EC, E21
Erreur de poids d'étalonnage (valeur négative)
Le poids d'étalonnage est trop léger. Confirmer la valeur de la
masse d'étalonnage. Appuyer sur la touche pour revenir en
mode de pesage.
Erreur de surcharge
Un échantillon dépassant la capacité de pesage de la balance a été
Erreur du plateau de pesage
La valeur de la masse est trop légère. Confirmer que le plateau de
Erreur de masse de l'échantillon
La balance ne peut pas enregistrer l'échantillon en mode de comptage
Erreur de la masse unitaire
La masse de l'unité d'échantillonnage en mode de comptage est
trop légère. L'enregistrement et l'utilisation de l'échantillon
entraîneront une erreur de comptage. Ajouter des échantillons pour
obtenir le nombre spécifié et appuyer sur la touche .
Appuyer sur la touche sans ajouter d'échantillon fera
passer la balance en mode de comptage. Toutefois, il convient
d'ajouter des échantillons pour obtenir un comptage précis.
19
Page 20

FR
de manière récurrente, contacter le distributeur A&D local.
Confirmer le format, la vitesse de transmission et la parité.
Confirmer la commande.
Ajuster le temps de retard pour transmettre une commande.
Confirmer la commande.
Confirmer la commande.
Affichage
Code d'erreur
EC, E00
EC, E01
EC, E02
Description
Erreur de batterie de l'horloge
La batterie de secours de l'horloge est déchargée. Appuyer sur
n'importe quelle touche pour régler l'heure et la date. La fonction
horloge et calendrier fonctionnent normalement tant que
l'adaptateur CA est raccordé à la balance. Si cette erreur s'affiche
Erreur de tension d'alimentation
L'alimentation fournie par l'adaptateur CA est anormale. Vérifier que
l'adaptateur CA est bien celui qui a été fourni avec la balance.
Erreur de communications
Une erreur de protocole est survenue dans les communications.
Erreur de commande non définie
Une commande indéfinie a été reçue.
Non prête
Une commande reçue ne peut pas être traitée.
Par ex. La balance a reçu une commande Q mais n'est pas en
mode de pesage.
Par ex. La balance a reçu une commande Q pendant le traitement
d'une commande RE-ZERO.
EC, E03
EC, E04
EC, E06
EC, E07
Erreur de délai d'expiration
Si le paramètre du délai d'expiration est défini sur
« », la balance n'a pas reçu le caractère suivant
d'une commande dans la limite d'une seconde. Confirmer la
communication.
Erreur de caractères excessifs
La balance a reçu des caractères excessifs dans une commande.
Erreur de format
Une commande inclut des données incorrectes.
Par ex. Le nombre de chiffres est incorrect.
Par ex. Une lettre de l'alphabet a été incluse dans la valeur
numérique.
Erreur de réglage des paramètres
Les données reçues dépassent la plage que la balance peut
accepter. Confirmer la plage des paramètres de la commande.
20
Page 21

FR
6. Spécificités
Série FZ
Capacité de pesage 122g 220g 320g 520g 1220g 2200g 3200g 5200g
Affichage maximum 122,084g 220,084g 320,084g 520,084g 1220,84g 2200,84g 3200,84g 5200,84g
Affichage minimum 0,001g 0,01g
Répétabilité
(Écart type)
120
i / i WP /
GD
200
i / i WP /
GD
0,001g 0,01g
300
i / i WP /
GD
500i 1200
i / i WP /
GD
2000
i / i WP /
GD
3000
i / i WP /
GD
5000i
Linéarité
Précision après
étalonnage à l'aide
de la masse
interne*
±0,002g ±0,02g
±0,010g ±0,10g ±0,15g
* ● Précision après étalonnage à l'aide de la masse interne, avec l'accessoire coupe-brise installé et dans
de bonnes conditions ambiantes (avec une plage de température de 10 °C à 30 °C (de 50 °F à 86 °F)
sans changements brusques de température ou humidité, sans courants d'air, sans vibration et sans
effets dus à des champs magnétiques ou de l'électricité statique).
● Avec la balance séries FZ-i / FZ-i WP / FZ-GD, l'environnement et le vieillissement peuvent provoquer
une erreur de valeur de la masse interne. Étalonner la balance à l'aide d'une masse externe et
effectuer régulièrement la maintenance.
Série FX
Capacité de pesage 122g 220g 320g 520g 1220g 2200g 3200g 5200g
Affichage maximum 122,084g 220,084g 320,084g 520,084g 1220,84g 2200,84g 3200,84g 5200,84g
Affichage minimum 0,001g 0,01g
Répétabilité
(Écart type)
120
i / i WP /
GD
200
i / i WP /
GD
0,001g 0,01g
300
i / i WP /
GD
500i 1200
i / i WP /
GD
2000
i / i WP /
GD
3000
i / i WP /
GD
5000i
Linéarité ±0,002g ±0,02g
● Les balances séries FZ-i WP / FX-i WP sont étanches à la poussière et à l'eau (Conformes à IP65).
21
Page 22

DE
①
②
③
④
FX-i / FX-i WP / FX-GD (0,01g-Modelle)
FZ-i / FZ-i WP / FZ-GD (0,001g / 0,01g-Modelle)
FX-i / FX-i WP / FX-GD (0,001g-Modelle)
FZ-i WP / FX-i WP
FZ-i WP / FX-i WP
FX-i WP
FX-i WP
1. Einführung
In dieser Schnellstartanleitung werden die Grundfunktionen und die Bedienung der Waage beschrieben
(FZ-i / FX-i / FZ-i WP / FX-i WP / FZ-GD / FX-GD-Serie).
Die Funktionen und die Bedienungsverfahren der Waage werden im „FZ-i / FX-i / FZ-i WP / FX-i WP /
FZ-GD / FX-GD SERIES Precision Balance INSTRUCTION MANUAL (Präzisionswaagen-
BEDIENUNGSHANDBUCH der FZ-i / FX-i / FZ-i WP / FX-i WP / FZ-GD / FX-GD-SERIE)“ näher erklärt.
Dieses Handbuch kann von unserer Webseite https://www.aandd.jp
heruntergeladen werden.
2. Installation und Vorsichtsmaßnahmen
Diese Waage ist ein Präzisionsinstrument. Gehen Sie beim Auspacken vorsichtig vor. Es wird empfohlen, die
Verpackungsmaterialien für eventuelle zukünftige Transporte aufzubewahren.
Der Inhalt der Verpackung hängt vom Modell der Waage ab. Überprüfen Sie anhand der folgenden
Abbildungen, ob alle Teile enthalten sind.
Vorsichtshinweise:
▢ Überprüfen Sie, dass der Wechselstromadapter der Spannung und dem Steckdosentyp vor Ort
entspricht.
▢ Verwenden Sie den für die Waage angegebenen Wechselstromadapter.
▢ Verwenden Sie den mit der Waage mitgelieferten Wechselstromadapter nicht für Modelle, die nicht als
mit Wechselstromadaptern kompatibel erachtet werden.
▢ Wenn Sie einen falschen Wechselstromadapter verwenden, funktionieren die Waage und andere
Geräte eventuell nicht richtig.
22
Page 23

DE
Der Wägetisch sollte stabil sein (ideal ist ein Anti-Vibrationstisch oder ein Steintisch).
(8. KALIBRIERUNG)“ im Bedienungshandbuch.
OK
Nicht OK
Wasserwaage
Nivellierungsfuß
2-1. Sicherheitsvorkehrungen
Um die Leistungsfähigkeit der Waage zu optimieren und exakte Wägedaten zu erhalten, beachten Sie bitte
folgende Hinweise:
▢ Stellen Sie die Waage in einer Umgebung ohne extreme Temperaturen und Feuchtigkeit auf. Die
optimale Betriebstemperatur beträgt etwa 20°C ± 2°C bei einer relativen Luftfeuchtigkeit von etwa 45
~ 60%.
▢ Stellen Sie die Waage in einer staubfreien Umgebung auf.
▢
▢ Installieren Sie die Waage auf einem horizontalen Tisch und
stellen Sie sicher, dass er nicht geneigt ist.
▢ Stellen Sie die Waage auf eine stabile Fläche, die weder
Vibrationen noch Stößen ausgesetzt ist. Am besten geeignet sind
die Eckräume im Erdgeschoss, weil sie weniger Vibrationen
ausgesetzt sind.
▢ Installieren Sie die Waage an einem Ort, wo sie nicht durch
Heizkörper oder Klimaanlagen beeinträchtigt wird.
▢ Installieren Sie die Waage an einem Ort, wo sie keiner direkten
Sonneneinstrahlung ausgesetzt ist.
▢ Stellen Sie die Waage nicht in der Nähe von Geräten auf, die
magnetische Felder erzeugen.
▢ Stellen Sie die Nivellierungsfüße ein und vergewissern Sie sich
mithilfe der Libelle in der Wasserwaage, dass die Waage
waagerecht steht. Siehe „Einstellung der Wasserwaage“ auf der
nächsten Seite.
▢ Lassen Sie die Waage mindestens 30 Minuten aufwärmen.
Schließen Sie den Wechselstromadapter wie üblich an.
▢
Kalibrieren Sie die Waage vor dem Gebrauch oder nach dem
Aufstellen an einem anderen Standort. Siehe „8. CALIBRATION
Bei der FZ-i WP / FX-i WP-Serie
▢ Die Staub- und Wasserdichtigkeit der Waage entspricht IP65, deren zweite Ziffer „5“ bedeutet, dass die
Waage „durch Exposition gegenüber einem direkten Wasserstrahl keiner schädlichen Einwirkung
ausgesetzt ist“. Das Waschen der Waage mit starkem Wasserdruck oder das Eintauchen in Wasser
kann dazu führen, dass Wasser in die Waage eindringt und eine Fehlfunktion verursacht.
▢ Wenn die Waage unter Bedingungen installiert und verwendet wird, die eine staub- und wasserdichte
Funktionsweise erfordern, stellen Sie sicher, dass der Wechselstromadapterstecker vollständig in die
Wechselstromadapterbuchse eingesteckt ist und dass die Anschlussabdeckung mit der RS-232CSchnittstelle verbunden ist oder das wasserdichte RS-232C-Kabel (AX-KO2737-500) verwendet wird.
▢ Wenn die RS-232C-Anschlussabdeckung entfernt oder das wasserdichte RS-232C-Kabel (AX-
KO2737-500) nicht verwendet wird, ist kein Schutz gegen Staub und Wasser gegeben.
Vorsicht: Stellen Sie die Waage nicht in einer Umgebung auf, in der entzündliche oder ätzende Gase
auftreten.
23
Page 24

DE
-
fuß
OK
Wenn sich die Libelle links befindet:
Drehen Sie den Nivellierungsfuß vorn rechts im
Uhrzeigersinn.
Wenn sich die Libelle rechts befindet:
Drehen Sie den Nivellierungsfuß vorn links im
Uhrzeigersinn.
Wenn sich die Libelle hinten befindet:
Drehen Sie beide Nivellierungsfüße an der
Vorderseite gleichzeitig im Uhrzeigersinn.
Wenn sich die Libelle vorn befindet:
Drehen Sie beide Nivellierungsfüße an der
Vorderseite
Wasserwaage
Nicht OK
Nach oben
Nach unten
Nach unten
Nivellierungs
fuß
Roter Kreis
Libelle
Einstellung der Wasserwaage
Nach oben
Nivellierungs
-
gleichzeitig gegen den Uhrzeigersinn.
24
Page 25

DE
Tastenbetrieb
・Anzahl der statistischen Daten (Statistik-Berechnungsmodus)
・
Verhältnis zur Wägekapazität angezeigt (Kapazitätsanzeige)
Reaktionsanzeigen
Tiermodus-Anzeige
Vergleichsanzeigen
Einheiten (pcs, ct, mom)
Einheiten (g, %)
Intervall-AusgabemodusBereitschaftsanzeige
Wägedaten
Intervall-AusgabemodusAktiv
Blinkt
Verarbeitungsanzeige
Verarbeitungsanzeige
Stabilisierungsanzeige
Bereitschaftsanzeige
Taste drücken und 2
Taste drücken
loslassen)
3. Anzeigensymbole und Tastenbetrieb
Anzeigensymbole
Im Wägemodus werden die Wägedaten in Prozent im
-Anzeige
Das Verhalten der Waage unterscheidet sich je nachdem, ob „Taste
drücken und sofort wieder loslassen“ oder „Taste drücken und 2
Sekunden lang gedrückt halten“ ausgeführt wird. Der normale
Wägevorgang ist „Taste drücken und sofort wieder loslassen“. Halten
Sie die Taste nur gedrückt, wenn es notwendig ist.
(Taste drücken und
sofort wieder
Sekunden lang
gedrückt halten
Tast e Gedrückt und losgelassen Gedrückt und gedrückt gehalten (für 2 Sekunden)
Schaltet die Anzeige ON/OFF (ein/aus). Wenn die Anzeige ausgeschaltet ist, erscheint die
Bereitschaftsanzeige. Der Wägemodus wird mit dem Einschalten der Anzeige aktiviert.
Die -Taste ist jederzeit verfügbar. Wird die -Taste während des Betriebs
gedrückt, wird die Anzeige stets ausgeschaltet.
Schaltet im Wägemodus die Ziffer für die
Zeigt das Menü der Funktionstabelle an.
Lesbarkeit ON / OFF (ein / aus).
Schaltet im Zähl- und Prozentmodus den
Probenspeichermodus ein.
Wechselt zwischen den in der
Funktionstabelle gespeicherten
Öffnet den Modus zum Ändern der
Wägegeschwindigkeit.
Gewichtseinheiten.
Gibt den Kalibrierungsmodus (Kalibrierung per
Tastendruck) unter Verwendung der internen
Masse ein (nur FZ-i / FZ-i WP / FZ-GD-Serie).
Gibt den Kalibrierungsmodus unter
Verwendung eines externen Gewichts (mit
Ihrem Gewicht) ein.
Im internen Einstellungsmodus wird der
Betrieb abgebrochen.
Gibt bei Stabilität die Wägedaten
entsprechend der Funktionstabelle aus.
Bestätigt den Betrieb in der Funktionstabelle.
Stellt die Anzeige auf Null.
Keine Funktion zum Zeitpunkt der Auslieferung.
Gibt den „Title block (Titelblock)“ und den „End
block (Endblock)“ für GLP, GMP etc.-Bericht durch
Änderung der Funktionstabelle aus.
25
Page 26

DE
4. Kalibrierung
4-1. Kalibrierung unter Verwendung der internen Masse
(Kalibrierung per Tastendruck, nur FZ-i / FZ-i WP / FZ-GDSeries)
Mit dieser Funktion wird die Waage mithilfe der internen Masse kalibriert.
1. Schließen Sie den Wechselstromadapter an und lassen Sie die Waage mindestens 30 Minuten lang
aufwärmen, ohne etwas in die Waagschale zu legen.
2. Stellen Sie den Windschutz (Zubehör) auf die Waage und drücken Sie die -Taste. Die Waage
zeigt an.
3. Die Waage führt eine Kalibrierung mit der internen Masse durch. Sorgen Sie dafür, dass die Waage
weder Vibrationen noch Zugluft ausgesetzt ist.
4. Wenn nach der Kalibrierung der Parameter „GLP output (GLP-Ausgabe) ( )“ der Funktionstabelle
aktiviert ist, gibt die Waage einen Bericht über die Empfindlichkeitseinstellung aus.
5. Die Waage kehrt nach der Kalibrierung automatisch wieder in den Wägemodus zurück.
26
Page 27

DE
ohne etwas in die Waagschale zu legen.
2. Drücken Sie die -Taste und halten Sie sie 2
3. Die Waage zeigt an.
ist, fahren Sie mit Schritt 5 fort.
4. Legen Sie den Wert des Kalibrierungsgewichts wie folgt fest:
Zum Umschalten des Anzeigemodus auf
blinken)“ (Werteinstellungsmodus).
-Taste (Zum Erhöhen des Werts)
-Taste (Zum Verringern des Werts)
Zum Auswählen des
Anpassen des Werts.
Zum Speichern eines neuen
Speicher erhalten.
Zum Abbrechen des Betriebs (zurück
5. Vergewissern Sie sich, dass sich nichts auf der
6. Legen Sie das Kalibrierungsgewichts in die Waagschale
7. Nehmen Sie das Gewicht von der Waagschale.
Taste drücken und
2 Sekunden lang
gedrückt halten
Taste loslassen
Taste
drücken
Ein Gewicht
auswählen
Z. B.: Kalibrierungsgewicht
Kalibrierungsgewicht
GLP-Ausgabe
4-2. Kalibrierung mithilfe eines externen Gewichts
Mit dieser Funktion wird die Waage mithilfe eines externen Gewichts kalibriert.
1. Schließen Sie den Wechselstromadapter an und lassen
Sie die Waage mindestens 30 Minuten lang aufwärmen,
Sekunden lang gedrückt, bis angezeigt wird,
und lassen Sie dann die Taste wieder los.
Wenn Sie das Kalibrierungsgewicht ändern
möchten, drücken Sie die -Taste und
gehen Sie zu Schritt 4.
Für Details zu auswählbaren Kalibriergewichten
siehe „8. CALIBRATION (8. KALIBRIERUNG)“ im
Bedienungshandbuch.
Falls Sie den Wert des Kalibrierungsgewichts
verwenden möchten, der in der Waage gespeichert
-
Tast e
„All of the segments blinking (Alle
Segmente blinken)“ (ZielgewichtAuswahlmodus) oder „The last two digits
blinking (Die letzten beiden Ziffern
Kalibrierungsgewichts oder zum
-Taste
Gewichtswerts. Auch wenn der
Wechselstromadapter entfernt wird,
bleiben die Daten im nichtflüchtigen
-Taste
zu ).
Waagschale befindet und drücken Sie die Taste. Die Waage misst den Nullpunkt und zeigt den
Messwert an. Sorgen Sie dafür, dass die Waage weder
Vibrationen noch Zugluft ausgesetzt ist.
Wert: 1000,12g
und drücken Sie die -Taste. Die Waage misst
das Kalibrierungsgewicht und zeigt den Messwert an.
Sorgen Sie dafür, dass die Waage weder Vibrationen
noch Zugluft ausgesetzt ist.
27
Page 28

DE
8. Wenn nach der Kalibrierung „GLP output (GLPAusgabe)“ aktiviert ist, gibt die Waage einen „sensitivity
adjustment report (Bericht über die
Empfindlichkeitseinstellung)“ aus.
9. Die Waage kehrt automatisch wieder in den Wägemodus
zurück.
10. Legen Sie das Kalibrierungsgewicht erneut auf die
Waagschale und prüfen Sie, ob der Wert innerhalb des
Bereichs liegt (eingestellter Wert ± 2 Ziffern). Wenn das
Gewicht außerhalb des zulässigen Bereichs liegt, achten
Sie auf die Umgebung und beginnen Sie erneut mit
Schritt „1“.
28
Page 29

DE
Geben Sie einen korrekten Wert ein.
Führen Sie den Wägevorgang von Anfang an erneut durch.
Waagschale.
Waagschale korrekt installiert wurde, und kalibrieren Sie die Waage.
Sie eine größere Probe.
5. Fehlercodes
Anzeige Fehlercode Beschreibung
EC, E11
EC, E17
EC, E20
EC, E21
Stabilitätsfehler
Die Waage kann sich aufgrund der Betriebsumgebung nicht stabilisieren.
Prüfen Sie die Umgebung der Waagschale. Vermeiden Sie die
Beeinflussung der Waage durch Vibration, Zugluft,
Temperaturschwankungen, statische Elektrizität und Magnetfelder. Siehe
„3-2 During Use (3-2 Während des Gebrauchs)“ im
Bedienungshandbuch.
Drücken Sie die Taste , um in den Wägemodus zurückzukehren.
Fehler „Außerhalb des Bereichs“
Der eingegebene Wert überschreitet den Einstellbereich.
Fehler mit der internen Masse (Nur FZ-i / FZ-i WP / FZ-GD-Serie)
Der Mechanismus für die interne Masse funktioniert nicht richtig.
Wert des Kalibrierungsgewichts (Positiver Wert)
Das Kalibriergewicht ist zu schwer. Überprüfen Sie den Wert der
Masse. Drücken Sie die Taste , um in den Wägemodus
zurückzukehren.
Wert des Kalibrierungsgewichts (Negativer Wert)
Das Kalibriergewicht ist zu leicht. Überprüfen Sie den Wert der
Masse. Drücken Sie die Taste , um in den Wägemodus
zurückzukehren.
Überlastfehler
Eine Probe, die schwerer ist als die zulässige Kapazität der Waage,
wurde auf die Waagschale gelegt. Nehmen Sie die Probe von der
Waagschalen-Fehler
Die Masse ist zu leicht. Vergewissern Sie sich, dass die
Probenmassen-Fehler
Die Waage kann den Wert der Probe weder im Zählmodus noch im
Prozentmodus speichern, weil die Probe zu leicht ist. Verwenden
Einheitsmasse-Fehler
Die Probeneinheitsmasse ist für den Zählmodus zu leicht. Diese zu
speichern und im Zählmodus zu benutzen, würde zu einem
Zählfehler führen. Fügen Sie weitere Proben hinzu, um die
angegebene Zahl zu erreichen, und drücken Sie die Taste. Wenn Sie die -Ta ste drücken, ohne weitere Proben
hinzuzufügen, springt die Waage wieder in den Zählmodus zurück.
29
Page 30

DE
Händler.
Waage mitgeliefert wurde.
Überprüfen Sie Format, Baudrate und Parität.
Überprüfen Sie den Befehl.
Passen Sie die Verzögerungszeit für die Befehlsübertragung an.
Überprüfen Sie den Befehl.
Überprüfen Sie den Befehl.
Anzeige Fehlercode Beschreibung
Uhr-Batteriefehler
Die Backup-Batterie der Uhr ist leer. Drücken Sie eine beliebige
Taste und stellen Sie die Uhrzeit und das Datum ein. Die Uhr- und
die Kalenderfunktion funktionieren normal, solange der
Wechselstromadapter an die Waage angeschlossen ist. Wenn
dieser Fehler häufig auftritt, wenden Sie sich an den lokalen A&D-
Spannungsfehler in der Stromversorgung
Die vom Wechselstromadapter gelieferte Spannung ist nicht normal.
Prüfen Sie, ob der Wechselstromadapter derjenige ist, der mit der
EC, E00
EC, E01
EC, E02
EC, E03
EC, E04
Kommunikationsfehler
Bei der Übertragung trat ein Protokollfehler auf.
Fehler Undefinierter Befehl
Ein nicht definierter Befehl wurde empfangen.
Nicht bereit
Ein empfangener Befehl kann nicht verarbeitet werden.
Z. B.: Die Waage erhielt einen Q-Befehl, aber nicht im Wägemodus.
Z. B.: Die Waage erhielt einen Q-Befehl während der Verarbeitung
eines RE-ZERO-Befehls.
Timeout-Fehler
Ist der Timeout-Parameter auf „ “ eingestellt, hat
die Waage das nächste Zeichen eines Befehls in der vorgegebenen
Frist von einer Sekunde nicht erhalten. Überprüfen Sie die
Kommunikation.
Fehler „Überschüssige Zeichen“
Die Waage erhielt überschüssige Zeichen in einem Befehl.
EC, E06
EC, E07
Formatfehler
Ein Befehl enthält falsche Daten.
Z. B.: Die Anzahl der Ziffern ist inkorrekt.
Z. B.: Das Alphabet war in dem numerischen Wert enthalten.
Parameter-Einstellungsfehler
Die empfangenen Daten übersteigen den für die Waage zulässigen
Bereich. Überprüfen Sie den Parameterbereich des Befehls.
30
Page 31

DE
6. Spezifikationen
FZ-Serie
Wägekapazität 122g 220g 320g 520g 1220g 2200g 3200g 5200g
Maximale Anzeige 122,084g 220,084g 320,084g 520,084g 1220,84g 2200,84g 3200,84g 5200,84g
Minimale Anzeige 0,001g 0,01g
Wiederholbarkeit
(Standardabweichung)
120
i / i WP /
GD
200
i / i WP /
GD
0,001g 0,01g
300
i / i WP /
GD
500i 1200
i / i WP /
GD
2000
i / i WP /
GD
3000
i / i WP /
GD
5000i
Linearität
Genauigkeit nach
Kalibrierung mit
interner Masse*
±0,002g ±0,02g
±0,010g ±0,10g ±0,15g
* ● Genauigkeit nach Kalibrierung mit interner Masse, mit installiertem Windschutz (Zubehör) und unter
guten Umgebungsbedingungen (innerhalb des Temperaturbereichs von 10°C bis 30°C ohne abrupte
Temperatur- oder Feuchtigkeitsschwankungen, ohne Zugluft, ohne Vibration und ohne Einwirkung von
Magnetfeldern oder statischer Elektrizität).
● Bei der Waage der FZ-i / FZ-i WP / FZ-GD-Serie können die Umgebung und die Alterung zu internen
Massewertfehlern führen. Kalibrieren Sie die Waage mit einer externen Masse und führen Sie die
Wartung regelmäßig durch.
FX-Serie
Wägekapazität 122g 220g 320g 520g 1220g 2200g 3200g 5200g
Maximale Anzeige 122,084g 220,084g 320,084g 520,084g 1220,84g 2200,84g 3200,84g 5200,84g
Minimale Anzeige 0,001g 0,01g
Wiederholbarkeit
(Standardabweichung)
120
i / i WP /
GD
200
i / i WP /
GD
0,001g 0,01g
300
i / i WP /
GD
500i 1200
i / i WP /
GD
2000
i / i WP /
GD
3000
i / i WP /
GD
5000i
Linearität ±0,002g ±0,02g
● Die Waagen der FZ-i WP / FX-i WP-Serie haben eine staub- und wasserdichte Funktionsweise (IP65-
konform).
31
Page 32

ES
①
②
③
④
FX-i / FX-i WP / FX-GD (modelos de 0,01 g)
FZ-i / FZ-i WP / FZ-GD (modelos de 0,001 g / 0,01 g)
FX-i / FX-i WP / FX-GD (modelos de 0,001 g)
FZ-i WP / FX-i WP
FZ-i WP / FX-i WP
FX-i WP
FX-i WP
1. Introducción
En esta guía de inicio rápido se describen las funciones y operaciones básicas de la báscula (series FZ-i /
FX-i / FZ-i WP / FX-i WP / FZ-GD / FX-GD).
Las funciones y los procedimientos de uso de la báscula se explican detalladamente en “FZ-i / FX-i / FZ-
i WP / FX-i WP / FZ-GD / FX-GD SERIES Precision Balance INSTRUCTION MANUAL” (MANUAL DE
INSTRUCCIONES de las básculas de precisión de las SERIES FZ-i / FX-i / FZ-i WP / FX-i WP / FZ-GD /
FX-GD). Este manual se puede descargar de nuestro sitio web https://www.aandd.jp
.
2. Instalación y medidas de precaución
La báscula es un instrumento de precisión. Desembálelo con cuidado. Se recomienda conservar los
materiales de embalaje con el fin de utilizarlos para transportar la báscula en el futuro.
El contenido del paquete depende del modelo de la báscula. Consulte las siguientes ilustraciones para
comprobar que incluye todos los componentes.
Medidas de precaución:
▢ Verifique que el tipo de adaptador de CA sea el correcto para la tensión que se utiliza en su zona y para
el tipo de enchufe.
▢ Utilice el adaptador de CA específico indicado para la báscula.
▢ No utilice el adaptador de CA suministrado con la báscula con modelos que no se consideren
compatibles con los adaptadores de CA.
▢ Si utiliza un adaptador de CA incorrecto, la báscula y el resto del equipo podrían no funcionar bien.
32
Page 33

ES
ntivibraciones).
manual de instrucciones.
Bien
Mal
Nivel de burbuja
Rueda
niveladora
2-1. Medidas de precaución
Para obtener un rendimiento óptimo de la báscula y adquirir datos de pesaje precisos, tenga en cuenta lo
siguiente:
▢ Coloque la báscula en un entorno cuya temperatura y humedad no sean excesivos. La temperatura
de funcionamiento óptima es de aproximadamente 20 °C ± 2 °C con una humedad relativa de
alrededor del 45-60 %.
▢ Coloque la báscula en un lugar sin polvo.
▢
La mesa donde se realice el pesaje debe ser firme (lo ideal es usar una mesa de piedra o a
▢ Coloque la báscula sobre una mesa horizontal y compruebe que
no esté inclinada.
▢ Coloque la báscula en un lugar estable; evite las vibraciones y los
golpes. El lugar idóneo son las esquinas de las salas situadas en
la primera planta, ya que son zonas menos propensas a las
vibraciones.
▢ Coloque la báscula en un lugar en el que no se vea afectada por
calefactores ni aires acondicionados.
▢ Coloque la báscula en un lugar en el que no esté expuesta a la
luz solar directa.
▢ Coloque la báscula alejada de equipos que produzcan campos
magnéticos.
▢ Nivele la báscula ajustando las ruedas niveladoras y confirme que
lo está con el nivel de burbuja. Consulte la siguiente pagina,
“Cómo ajustar el nivel de burbuja”.
▢ Deje que la báscula se caliente durante un mínimo de 30 minutos.
Enchufe el adaptador de CA como de costumbre.
▢
Calibre la báscula antes de su uso o después de moverla a otra
ubicación. Consulte “8. CALIBRATION” (8. CALIBRACIÓN) en el
Con las series FZ-i WP / FX-i WP
▢ El nivel de resistencia al polvo y al agua de la báscula equivale a IP65, y su segunda cifra, el “5”,
▢ Cuando la báscula se vaya a colocar y usar en condiciones que requieran resistencia al polvo y al
▢ Si se retira la tapa del terminal RS-232C o no se usa el cable RS-232C resistente al agua (AX-
Precaución: No coloque la báscula en lugares donde haya gases inflamables o corrosivos.
significa “sin efectos perjudiciales al recibir un chorro de agua directo”. Si se lava la báscula con una
presión de agua elevada o se sumerge en agua, puede entrar agua en su interior, lo que puede
provocar una avería.
agua, asegúrese de que el conector del adaptador de CA esté totalmente introducido en la toma del
adaptador de CA y la tapa del terminal esté fijada en la interfaz RS-232C o se use el cable RS-232C
resistente al agua (AX-KO2737-500).
KO2737-500), el aparato no estará protegido contra el polvo y el agua.
33
Page 34

ES
Bien
Si la burbuja está a la izquierda:
Gire la rueda niveladora delantera derecha en el
sentido de las
Si la burbuja está a la derecha:
Gire la rueda niveladora delantera izquierda en el
sentido de las agujas del reloj.
Si la burbuja está detrás:
Gire las dos ruedas niveladoras delanteras a la vez
en el sentido de las agujas del reloj.
Si la burbuja está delante:
Gire las dos ruedas niveladoras delanteras a la vez
en el sentido contrario a las agujas del reloj.
Nivel de burbuja
Mal
Bajar
Bajar
Círculo rojo
Burbuja
Cómo ajustar el nivel de burbuja
agujas del reloj.
Subir
Rueda
niveladora
Rueda
niveladora
Subir
34
Page 35

ES
Operaciones de las teclas
・Número de datos estadísticos (modo de cálculo estadístico)
・Muestra los datos de peso en relación con la capacidad de
capacidad)
Indicadores de respuesta
Indicador del modo de animal
Indicadores del comparador
Unidades (pcs, ct, mom)
Unidades (g, %)
Indicador de espera del
modo de salida de intervalos
Datos de peso
Indicador de activación del
modo de salida de
intervalos
Parpadeando
Indicador de procesamiento
Indicador de procesamiento
Indicador de estabilización
Indicador de espera
Mantener pulsada la
Pulsar la tecla
inmediatamente)
3. Símbolos de la pantalla y operaciones de las teclas
Símbolos de la pantalla
pesaje, en porcentaje, en el modo de pesaje (indicador de
El funcionamiento de la báscula varía según si se realizan “Pulsar la
tecla y soltarla inmediatamente”, o bien “Mantener pulsada la tecla
(durante 2 segundos)”. La operación de pesaje estándar se realiza al
“Pulsar la tecla y soltarla inmediatamente”. No mantenga pulsada la
tecla a menos que sea necesario.
Tecla Cuando se pulsa y se suelta
Cuando se mantiene pulsada (durante 2 segundos)
Enciende/apaga la pantalla. El indicador de espera aparece cuando se apaga la pantalla. El
modo de pesaje se activa cuando se enciende la pantalla.
La tecla está disponible en todo momento. Si pulsa la tecla mientras
está en funcionamiento, la pantalla se apagará.
En el modo de pesaje, enciende/apaga la
Muestra el menú de la tabla de funciones.
legibilidad de los dígitos.
En el modo de recuento o de porcentaje, entra
en el modo de almacenamiento de muestras.
Cambia las unidades de pesaje almacenadas
en la tabla de funciones.
Entra en el modo de calibración (calibración
con un solo toque) utilizando la masa interna
(solo series FZ-i / FZ-i W P / FZ-GD).
Entra en el modo para cambiar la velocidad
de pesaje.
Entra en el modo de calibración utilizando
una pesa externa (con su peso).
En el modo de ajustes internos, se cancela la
operación.
(pulsarla y soltarla
tecla 2 segundos
Cuando está estable, indica los datos de pesaje
de acuerdo con la tabla de funciones.
En la tabla de funciones, confirma la operación.
Restablece la pantalla a cero.
No tiene ninguna función ajustada en el
momento del envío.
Envía el “Title block” (Bloque de título) y el “End
block” (Bloque final) para los informes de GLP,
GMP, etc., cambiando la tabla de funciones.
35
Page 36

ES
4. Calibración
4-1. Calibración con la masa interna
(calibración con un solo toque, solo series FZ
Esta función calibra la báscula con el peso interno.
1. Conecte el adaptador de CA y deje que la báscula se caliente durante un mínimo de 30 minutos sin
colocar nada en el plato de pesaje.
2. Coloque el accesorio de protección contra corrientes de aire sobre la báscula y pulse la tecla . La
báscula indica .
3. La báscula lleva a cabo la calibración con la masa interna. No permita que la báscula se vea afectada
por vibraciones o corrientes de aire.
4. Tras la calibración, si se ha configurado el parámetro “GLP output (salida GLP) ( )” de la tabla de
funciones, la báscula envía un informe de ajuste de la sensibilidad.
5. La báscula volverá automáticamente al modo de pesaje tras la calibración.
-
i
/ FZ
-
i
WP / FZ-GD)
36
Page 37

ES
nada en el plato de pesaje.
vea afectada por vibraciones o corrientes de aire.
7. Retire la pesa del plato.
Mantener pulsada
la tecla 2
segundos
Soltar la tecla
Pulsar la
tecla
Seleccion
ar un peso
P. ej., valor de peso
1000,12g
Pesa de calibración
Salida GLP
4-2. Calibración con una pesa externa
Esta función calibra la báscula con una pesa externa.
1. Conecte el adaptador de CA y deje que la báscula se
caliente durante un mínimo de 30 minutos sin colocar
2. Mantenga pulsada la tecla durante 2 segundos
hasta que aparezca y, a continuación, suelte
la tecla.
3. La báscula indica .
Si desea cambiar el peso de calibración, pulse la
tecla y vaya al paso 4.
Consulte “8. CALIBRATION” (8. CALIBRACIÓN) en
el manual de instrucciones para ver los pesos de
calibración que se pueden seleccionar.
Si desea usar el valor del peso de calibración
almacenado en la báscula, vaya al paso 5.
4. Especifique el valor del peso de calibración de la siguiente manera:
Tecla
Tecla (para aumentar el valor)
Tecla (para disminuir el valor)
Para seleccionar el peso de
Tecla Para almacenar un nuevo valor de
Tecla Para cancelar la operación (volver a
Para cambiar al estado de la pantalla
“All of the segments blinking”
(Parpadean todos los segmentos)
(modo de selección de peso deseado)
o “The last two digits blinking”
(Parpadean los dos últimos dígitos)
(modo de ajuste del valor).
calibración o ajustar el valor.
peso. Aunque se extraiga el adaptador
de CA, los datos se mantienen en la
memoria no volátil.
).
de calibración:
5. Compruebe que no haya nada sobre el plato y pulse la
tecla . La báscula mide el punto del cero y
muestra el valor medido. No permita que la báscula se
6. Coloque la pesa de calibración en el plato y pulse la tecla
. La báscula mide la pesa de calibración y
muestra el valor medido. No permita que la báscula se
vea afectada por vibraciones o corrientes de aire.
8. Tras la calibración, si se ha configurado “GLP output”
(salida GLP), la báscula envía un “sensivity adjustment
report” (informe de ajuste de la sensibilidad).
37
Page 38

ES
9. La báscula volverá automáticamente al modo de pesaje.
10. Vuelva a colocar la pesa de calibración en el plato y
compruebe si el valor está dentro del intervalo correcto
(valor configurado ± 2 dígitos). Si está fuera de ese
intervalo, preste atención a las condiciones del entorno y
vuelva a empezar desde el paso 1.
38
Page 39

ES
Introduzca un valor correcto.
principio.
pesaje de la báscula. Retire la muestra del plato.
pesaje está bien colocado y calibre la báscula.
muestra más grande.
5. Códigos de error
Pantalla
Código de error
EC, E11
EC, E17
EC, E20
Descripción
Error de estabilidad
La báscula no se estabiliza debido a un problema del entorno.
Compruebe el entorno del plato. No permita que la báscula se vea
afectada por vibraciones, corrientes de aire, electricidad estática ni
campos magnéticos. Consulte “3-2 During Use” (3-2 Durante el
uso) en el manual de instrucciones.
Para volver al modo de pesaje, pulse la tecla .
Error de fuera del intervalo
El valor introducido está fuera del intervalo de ajustes.
Error de masa interna (solo series FZ-i / FZ-i WP / FZ-GD)
El mecanismo de aplicación de la masa interna no funciona
correctamente. Vuelva a realizar la operación de pesaje desde el
Error del peso de calibración (excesivo)
El peso de calibración es demasiado alto. Verifique el valor de la
masa de calibración. Pulse la tecla para volver al modo de
pesaje.
EC, E21
Error del peso de calibración (insuficiente)
El peso de calibración es demasiado bajo. Confirme el valor del
peso de calibración. Pulse la tecla para volver al modo de
pesaje.
Error de sobrecarga
Se ha colocado en el plato una muestra que supera la capacidad de
Error del plato de pesaje
El valor de la masa es demasiado bajo. Compruebe que el plato de
Error de masa de la muestra
La báscula no puede guardar la muestra en el modo de recuento o
en el modo de porcentaje porque es demasiado ligera. Utilice una
Error de masa de la unidad
La masa de la unidad de muestra para el modo de recuento es
demasiado ligera. Si se almacena y se usa para realizar recuentos
provocará un error de recuento. Añada muestras para alcanzar el
número especificado y pulse la tecla . Si pulsa la tecla
sin añadir ninguna muestra, la báscula pasará al modo de
recuento. No obstante, asegúrese de añadir muestras para obtener
un recuento preciso.
39
Page 40

ES
póngase en contacto con su proveedor local de A&D.
báscula.
Compruebe el formato, la velocidad en baudios y la paridad.
Compruebe el comando.
Ajuste la sincronización de la transmisión del comando.
Compruebe el comando.
Compruebe el comando.
parámetro del comando.
Pantalla
Código de error
EC, E00
EC, E01
EC, E02
Descripción
Error de la batería del reloj
La batería de reserva del reloj se ha agotado. Pulse cualquier tecla
y ajuste la fecha y la hora. Las funciones del reloj y del calendario
funcionan con normalidad siempre que el adaptador de CA esté
conectado a la báscula. Si este error aparece con frecuencia,
Fallo de tensión de alimentación
La tensión suministrada por el adaptador de CA es anómala.
Compruebe si el adaptador de CA es el suministrado con la
Error de comunicación
Ha habido un error del protocolo de comunicaciones.
Error de comando no definido
Se ha recibido un comando no definido.
La báscula no está lista
No se puede procesar el comando recibido.
P. ej., la báscula ha recibido un comando Q, pero no se encontraba
en el modo de pesaje.
P. ej., la báscula ha recibido un comando Q mientras estaba
procesando el comando RE-ZERO.
EC, E03
EC, E04
EC, E06
EC, E07
Error de tiempo límite
Si el parámetro del tiempo límite está configurado como
“ ”, la báscula no recibió el siguiente carácter de
un comando dentro del tiempo límite de un segundo. Compruebe la
comunicación.
Error de exceso de caracteres
La báscula ha recibido demasiados caracteres en un comando.
Error de formato
Un comando incluye datos incorrectos.
P. ej., el número de dígitos es incorrecto.
P. ej., se ha incluido una letra en un valor numérico.
Error del valor de ajuste
Los datos recibidos superan el intervalo de valores que puede
aceptar la báscula. Compruebe el intervalo de valores del
40
Page 41

ES
6. Especificaciones
Serie FZ
Capacidad de
pesaje
Valor de
visualización
máximo
Valor de
visualización
mínimo
Repetibilidad
(desviación estándar)
Linealidad ±0,002g ±0,02g
Precisión tras la
calibración con la
masa interna*
120
i / i WP /
GD
122g 220g 320g 520g 1220g 2200g 3200g 5200g
122,084g 220,084g 320,084g 520,084g 1220,84g 2200,84g 3200,84g 5200,84g
200
i / i WP /
GD
0,001g 0,01g
0,001g 0,01g
±0,010g ±0,10g ±0,15g
300
i / i WP /
GD
500i 1200
i / i WP /
GD
2000
i / i WP /
GD
i / i WP /
3000
GD
5000i
* ● Precisión tras la calibración con la masa interna, con el accesorio de protección contra corrientes de
aire colocado y en condiciones ambientales adecuadas (dentro del intervalo de temperaturas de 10 °C
a 30 °C [de 50 °F a 86 °F] y sin cambios drásticos de temperatura o humedad, sin corrientes de aire,
sin vibraciones y sin efectos de campos magnéticos o electricidad estática).
● Con las básculas de las series FZ- i / FZ-i WP / FZ-GD, el entorno y el paso del tiempo pueden
provocar errores en el valor de la masa interna. Calibre la báscula utilizando una masa externa y
realice periódicamente las tareas de mantenimiento.
Serie FX
Capacidad de
pesaje
Valor de
visualización
máximo
Valor de
visualización
mínimo
Repetibilidad
(desviación estándar)
120
i / i WP /
GD
122g 220g 320g 520g 1220g 2200g 3200g 5200g
122,084g 220,084g 320,084g 520,084g 1220,84g 2200,84g 3200,84g 5200,84g
200
i / i WP /
GD
0,001g 0,01g
0,001g 0,01g
300
i / i WP /
GD
500i 1200
i / i WP /
GD
2000
i / i WP /
GD
3000
i / i WP /
GD
5000i
Linealidad
±0,002g ±0,02g
● Las básculas de las series FZ-i W P / FX-i WP son resistentes al polvo y al agua (conformes con IP65).
41
Page 42

IT
①
②
③
④
FX-i / FX-i WP / FX-GD (modelli 0,01g)
FZ-i / FZ-i WP / FZ-GD (modelli 0,001g / 0,01g)
FX-i / FX-i WP / FX-GD (modelli 0,001g)
FZ-i WP / FX-i WP
FZ-i WP / FX-i WP
FX-i WP
FX-i WP
1. Introduzione
Questa guida introduttiva descrive le funzioni di base e le operazioni della bilancia (serie FZ-i / FX-i / FZ-
i WP / FX-i WP / FZ-GD / FX-GD).
Le funzioni e le procedure operative della bilancia sono illustrate nel dettaglio nel “FZ-i / FX-i / FZ-i W P /
FX-i WP / FZ-GD / FX-GD SERIES Precision Balance INSTRUCTION MANUAL (MANUALE DI
ISTRUZIONI della Bilancia di precisione delle SERIE FZ-i / FX-i / FZ-i WP / FX-i WP / FZ-GD / FX-GD)”.
Questo manuale può essere scaricato dal nostro sito web https://www.aandd.jp
.
2. Installazione e precauzioni
La bilancia è uno strumento di precisione. Disimballare con cura. Si raccomanda di conservare i materiali di
imballaggio, che andranno utilizzati per trasportare la bilancia in futuro.
Il contenuto dell’imballaggio cambia a seconda del modello della bilancia. Vedere le illustrazioni seguenti per
verificare che sia incluso tutto.
Attenzione:
▢ Verificare che il tipo di adattatore CA sia adatto al voltaggio locale e al tipo di presa.
▢ Utilizzare l’apposito adattatore CA specificato per la bilancia.
▢ Non utilizzare l’adattatore CA in dotazione con la bilancia per modelli che non sono considerati
compatibili con gli adattatori CA.
▢ Se si utilizza un adattatore CA sbagliato, la bilancia e altri apparecchi potrebbero non funzionare
correttamente.
42
Page 43

IT
o un tavolo di pietra).
CALIBRAZIONE)” nel manuale di istruzioni.
OK
Non OK
Livella a bolla d'aria
Piedino di
livellamento
2-1. Precauzioni
Per ottenere prestazioni ottimali dalla bilancia e acquisire dati di pesatura precisi, considerare quanto segue:
▢ Installare la bilancia in un ambiente in cui la temperatura e l’umidità non siano eccessive. La
temperatura migliore per il funzionamento è di circa 20°C±2°C al 45 ~ 60% di umidità relativa (UR).
▢ Installare la bilancia in un luogo privo di polvere.
▢
Il tavolo di pesatura deve essere solido (sono particolarmente indicati un tavolo antivibrazione
▢ Installare la bilancia su un tavolo orizzontale e controllare che non
sia inclinata.
▢ Installare la bilancia in un luogo stabile ed evitare vibrazioni e
scosse. I luoghi migliori sono gli angoli delle stanze al primo
piano, poiché sono meno soggetti a vibrazioni.
▢ Installare la bilancia in un luogo che non sia in prossimità di
termosifoni o impianti di aria condizionata.
▢ Installare la bilancia in un luogo che non sia direttamente esposto
alla luce solare.
▢ Installare la bilancia lontano da apparecchi che producono campi
magnetici.
▢ Livellare la bilancia regolando i piedini di livellamento e verificare
che sia piana utilizzando la livella a bolla d’aria. Consultare “Come
regolare la livella a bolla d’aria” alla pagina seguente.
▢ Far riscaldare la bilancia per almeno 30 minuti. Inserire
l’adattatore CA come di consueto.
▢
Calibrare la bilancia prima dell’uso o dopo averla spostata in
un’altra posizione. Consultare “8. CALIBRATION (8.
Con le serie FZ-i WP / FX-i WP
▢ Il livello di resistenza alla polvere e di impermeabilità della bilancia è equivalente a IP65, la cui
seconda cifra, “5”, corrisponde a “non subire danni in caso di getti d’acqua diretti”. Se la bilancia viene
lavata con una forte pressione dell’acqua oppure immersa in acqua, l’acqua potrebbe penetrare
all’interno della bilancia e causare un malfunzionamento.
▢ Quando si installa e si utilizza la bilancia in condizioni che richiedono prestazioni di impermeabilità e
resistenza alla polvere, assicurarsi che la spina dell’adattatore CA sia completamente inserita nella
presa dell’adattatore CA e che il copriterminale sia fissato all’interfaccia RS-232C o che venga utilizzato
il cavo RS-232C impermeabile (AX-KO2737-500).
▢ Se il copriterminale RS-232C viene rimosso o se non viene utilizzato il cavo RS-232C impermeabile
(AX-KO2737-500), non viene fornita protezione contro polvere e acqua.
Attenzione: Non installare la bilancia in presenza di gas infiammabili o corrosivi.
43
Page 44

IT
Piedino di
livellamento
OK
Quando la bolla è decentrata verso sinistra:
Ruotare il piedino di livellamento anteriore destro in
senso orario.
Quando la bolla è decentrata verso destra:
Ruotare il piedino di livellamento anteriore sinistro in
senso orario.
Quando la bolla è decentrata verso la parte posteriore:
Ruotare contemporaneamente entrambi i piedini di
livellamento anteriori in senso orario.
Quando la bolla è decentrata verso la parte anteriore:
Ruotare contemporaneamente entrambi i piedini di
livellamento anteriori in senso antiorario.
Livella a bolla d'aria
Non OK
Giù
Giù
Cerchio rosso
Bolla
Come regolare la livella a bolla d’aria
Su
Piedino di
livellamento
Su
44
Page 45

IT
Operazioni dei tasti
seconda di quale delle due azioni viene eseguita. Per la normale operazione
・Numero di dati statistici (Modalità di calcolo statistico)
・
capacità)
Indicatori di risposta
Indicatore della modalità animale
Indicatori del comparatore
Unità (pcs, ct, mom)
Unità (g, %)
Indicatore della modalità
intervallo di output in standby
Dati di pesatura
Indicatore della modalità
intervallo di output attivo
Lampeggiante
Indicatore di processo
Indicatore di processo
Indicatore di stabilizzazione
Indicatore di standby
Tenere premuto il
Premere il tasto
(Premere e rilasciare
tasto)
3. Simboli del display e operazioni dei tasti
Simboli del display
Mostra i dati di pesatura relativi alla capacità di pesatura,
in percentuale e in modalità di pesatura (Indicatore di
È possibile “Premere e rilasciare immediatamente il tasto” o “Tenere
premuto il tasto (per 2 secondi)”, il comportamento della bilancia varia a
di pesatura è necessario “Premere e rilasciare immediatamente il tasto”.
Non mantenere premuto il tasto a meno che non sia necessario.
immediatamente il
tasto per 2 secondi
Tast o Se premuto e rilasciato Se mantenuto premuto (per 2 secondi)
Accende e spegne il display. L’indicatore di Standby viene visualizzato quando il display è
spento. La modalità di pesatura è abilitata quando il display è acceso.
Il tasto è disponibile in qualsiasi momento. Premendo il tasto durante
l’operazione, il display verrà sempre spento.
In modalità di pesatura, accende e spegne le
Mostra il menu della tabella delle funzioni.
cifre per la leggibilità.
In modalità di conteggio o percentuale, entra
in modalità di memorizzazione del campione.
Commuta le unità di pesatura memorizzate
nella tabella delle funzioni.
Entra in modalità di calibrazione (Calibrazione
One-Touch) utilizzando la massa interna (solo per
le serie FZ-i / FZ-i WP / FZ-GD).
Entra in modalità di modifica della velocità di
pesatura.
Entra in modalità di calibrazione utilizzando
un peso esterno (con il proprio peso).
In modalità di impostazione interna,
l’operazione viene annullata.
Se stabile, invia i dati di pesatura secondo la
tabella delle funzioni.
Nella tabella delle funzioni, conferma
l’operazione.
Azzera il display.
45
Nessuna funzione al momento della spedizione.
Cambiando la tabella delle funzioni, invia il “Title
block (Blocco del titolo)” e l’“End block (Blocco
finale)” per il rapporto GLP, GMP, ecc.
Page 46

IT
4. Calibrazione
4-1. Calibrazione mediante massa interna
(Calibrazione One-Touch, solo per le serie FZ-i / FZ-i WP / FZ-GD)
Questa funzione calibra la bilancia utilizzando la massa interna.
1. Collegare l’adattatore CA e far riscaldare la bilancia per almeno 30 minuti senza posizionare niente sul
piatto per la pesatura.
2. Posizionare il frangivento accessorio sulla bilancia e premere il tasto . La bilancia visualizza
.
3. La bilancia esegue la calibrazione utilizzando la massa interna. Non esporre a vibrazioni o correnti
d’aria che influirebbero sulla bilancia.
4. Dopo la calibrazione, se è impostato il parametro “GLP output (Output GLP) ( )” della tabella
delle funzioni, la bilancia invia un rapporto di regolazione della sensibilità.
5. Dopo la calibrazione, la bilancia ritornerà automaticamente alla modalità di pesatura.
46
Page 47

IT
la pesatura.
correnti d’aria che influirebbero sulla bilancia.
7. Rimuovere il peso dal piatto.
Tenere premuto il
tasto per 2
secondi
Rilasciare il tasto
Premere il
tasto
Selezionar
e un peso
Es. Valore del peso di
1000,12g
Peso di calibrazione
Output GLP
4-2. Calibrazione mediante un peso esterno
Questa funzione calibra la bilancia utilizzando un peso esterno.
1. Collegare l’adattatore CA e far riscaldare la bilancia per
almeno 30 minuti senza posizionare niente sul piatto per
2. Tenere premuto il tasto per 2 secondi finché non
viene visualizzato , quindi rilasciare il tasto.
3. La bilancia visualizza .
Se si desidera cambiare il peso di calibrazione,
premere il tasto e andare al passaggio 4.
Consultare “8. CALIBRATION (8. CALIBRAZIONE)”
nel manuale di istruzioni per i pesi di calibrazione
selezionabili.
Se si utilizza il valore del peso di calibrazione
memorizzato nella bilancia, andare al passaggio 5.
4. Specificare il valore del peso di calibrazione come segue:
Tasto
Tasto (per aumentare il valore)
Tasto (per diminuire il valore)
Per selezionare il peso di calibrazione
Tasto Per memorizzare un nuovo valore di
Tasto Per annullare l’operazione (ritornare a
Per commutare la condizione di
visualizzazione su “All of the segments
blinking (Tutti i segmenti
lampeggianti)” (modalità di selezione
del peso di riferimento) o “The last two
digits blinking (Le ultime due cifre
lampeggianti)” (modalità di regolazione
del valore).
o regolare il valore.
peso. Anche se l’adattatore CA viene
rimosso, i dati vengono conservati nella
memoria non volatile.
).
calibrazione:
5. Verificare che non ci sia niente sul piatto e premere il
tasto . La bilancia misura il punto zero e
visualizza il valore misurato. Non esporre a vibrazioni o
6. Posizionare il peso di calibrazione sul piatto e premere il
tasto . La bilancia misura il peso di calibrazione
e visualizza il valore misurato. Non esporre a vibrazioni o
correnti d’aria che influirebbero sulla bilancia.
8. Dopo la calibrazione, se è impostato “GLP output (Output
GLP)”, la bilancia invia un “sensitivity adjustment report
(rapporto di regolazione della sensibilità)”.
47
Page 48

IT
9. La bilancia ritornerà automaticamente alla modalità di
pesatura.
10. Posizionare nuovamente il peso di calibrazione sul piatto
e controllare che il valore rientri nell’intervallo (valore
impostato ± 2 cifre). Se non rientra nell’intervallo,
prestare attenzione all’ambiente circostante e iniziare di
nuovo dal passaggio 1.
48
Page 49

IT
Inserire un valore corretto.
correttamente. Eseguire di nuovo l’operazione di pesatura dall’inizio.
pesatura della bilancia. Rimuovere il campione dal piatto.
pesatura sia installato correttamente e calibrare la bilancia.
Usare un campione più grande.
5. Codici di errore
Display
Codice di errore
EC, E11
EC, E17
EC, E20
Descrizione
Errore di stabilità
La bilancia non può stabilizzarsi a causa di un problema ambientale.
Controllare intorno al piatto. Evitare che vibrazioni, correnti d’aria,
cambi di temperatura, elettricità statica e campi magnetici
influiscano sulla bilancia. Consultare “3-2 During Use (3-2 Durante
l’uso)” nel manuale di istruzioni.
Per ritornare alla modalità di pesatura, premere il tasto .
Errore fuori intervallo
Il valore inserito non rientra nell’intervallo di impostazione.
Errore della massa interna (solo per le serie FZ-i / FZ-i WP /
FZ-GD)
Il meccanismo di applicazione della massa interna non funziona
Errore nel peso di calibrazione (valore positivo)
Il peso di calibrazione è troppo elevato. Verificare il valore della
massa di calibrazione. Premere il tasto per ritornare alla
modalità di pesatura.
EC, E21
Errore nel peso di calibrazione (valore negativo)
Il peso di calibrazione è troppo basso. Verificare il valore della
massa di calibrazione. Premere il tasto per ritornare alla
modalità di pesatura.
Errore di sovraccarico
È stato posizionato sul piatto un campione che supera la capacità di
Errore nel piatto per la pesatura
Il valore della massa è troppo basso. Verificare che il piatto per la
Errore della massa del campione
La bilancia non può memorizzare il campione per la modalità di
conteggio o per la modalità percentuale perché è troppo leggero.
Errore della massa dell’unità
La massa dell’unità di campionamento per la modalità di conteggio
è troppo bassa. La sua memorizzazione e il suo utilizzo per il
conteggio causerà un errore di conteggio. Aggiungere campioni per
raggiungere il numero specificato e premere il tasto . Se si
preme il tasto senza aver aggiunto i campioni, la bilancia
passerà alla modalità di conteggio. Tuttavia, per un conteggio
accurato, accertarsi di aggiungere dei campioni.
49
Page 50

IT
di A&D.
Controllare il formato, la velocità in baud e la parità.
Controllare il comando.
Regolare il tempo di ritardo per trasmettere un comando.
Controllare il comando.
Controllare il comando.
Display
Codice di errore
EC, E00
EC, E01
EC, E02
Descrizione
Errore nella batteria dell’orologio
La batteria di backup dell’orologio si è scaricata. Premere qualsiasi
tasto e impostare l’ora e la data. La funzione orologio e calendario
funziona normalmente se l’adattatore CA è collegato alla bilancia.
Se questo errore appare di frequente, contattare il rivenditore locale
Guasto di tensione dell’alimentazione
Il voltaggio fornito dall’adattatore CA è anomalo. Controllare che
l’adattatore CA sia quello fornito con la bilancia.
Errore nelle comunicazioni
Si è verificato un errore di protocollo nelle comunicazioni.
Errore di comando non definito
È stato ricevuto un comando non definito.
Non pronto
Un comando ricevuto non può essere elaborato.
Es. La bilancia ha ricevuto un comando Q, ma non in modalità di
pesatura.
Es. La bilancia ha ricevuto un comando Q mentre stava elaborando
un comando RE-ZERO.
EC, E03
EC, E04
EC, E06
EC, E07
Errore di timeout
Se il parametro di timeout è impostato su “ ”, la
bilancia non ha ricevuto il carattere successivo di un comando entro
il tempo limite di un secondo. Verificare la comunicazione.
Errore di eccesso di caratteri
La bilancia ha ricevuto un numero eccessivo di caratteri in un
comando.
Errore di formato
Un comando include dati non corretti.
Es. Il numero di cifre non è corretto.
Es. L’alfabeto è stato incluso nel valore numerico.
Errore nell’impostazione del parametro
Il dato ricevuto non rientra nell’intervallo accettato dalla bilancia.
Verificare l’intervallo del parametro del comando.
50
Page 51

IT
6. Specifiche tecniche
Serie FZ
Capacità di
pesatura
Display massimo 122,084g 220,084g 320,084g 520,084g 1220,84g 2200,84g 3200,84g 5200,84g
Display minimo 0,001g 0,01g
Ripetibilità
(Deviazione standard)
Linearità ±0,002g ±0,02g
Precisione dopo la
calibrazione con la
massa interna*
120
i / i WP /
GD
122g 220g 320g 520g 1220g 2200g 3200g 5200g
* ● Precisione dopo la calibrazione utilizzando la massa interna, con il frangivento accessorio installato e in
200
i / i WP /
GD
0,001g 0,01g
±0,010g ±0,10g ±0,15g
300
i / i WP /
GD
500i 1200
i / i WP /
GD
2000
i / i WP /
GD
3000
i / i WP /
5000i
GD
buone condizioni ambientali (a una temperatura compresa tra 10°C e 30°C (da 50°F a 86°F), senza
bruschi cambiamenti di temperatura o umidità, senza correnti d’aria, senza vibrazioni e senza effetti
dovuti a campi magnetici o a elettricità statica).
● Con le bilance delle serie FZ-i / FZ-i W P / FZ-GD, l’ambiente e l’usura possono causare errori del
valore della massa interna. Calibrare la bilancia utilizzando una massa esterna ed eseguire
regolarmente la manutenzione.
Serie FX
Capacità di
pesatura
Display massimo 122,084g 220,084g 320,084g 520,084g 1220,84g 2200,84g 3200,84g 5200,84g
Display minimo 0,001g 0,01g
Ripetibilità
(Deviazione standard)
Linearità
120
i / i WP /
GD
122g 220g 320g 520g 1220g 2200g 3200g 5200g
200
i / i WP /
GD
0,001g 0,01g
±0,002g ±0,02g
300
i / i WP /
GD
500i 1200
i / i WP /
GD
2000
i / i WP /
GD
3000
i / i WP /
GD
5000i
● Le bilance delle serie FZ-i WP / FX-i WP hanno prestazioni di resistenza all’acqua e alla polvere
(conformi IP65).
51
Page 52

CT
簡介
安裝和預防措施
警告:
①
②
③
④
FX-i / FX-i WP / FX-GD(0.01g 型號)
FZ-i / FZ-i WP / FZ-GD(0.001g / 0.01g 型號)
FX-i / FX-i WP / FX-GD(0.001g 型號)
FZ-i WP / FX-i WP
FZ-i WP / FX-i WP
FX-i WP
FX-i WP
1.
此快速入門指南描述天平的基本功能和操作(FZ-i / FX-i / FZ-i WP / FX-i WP / FZ-GD / FX-GD 系列)。
天平的功能和操作程序會在「FZ-i / FX-i / FZ-i WP / FX-i WP / FZ-GD / FX-GD SERIES Precision
Balance INSTRUCTION MANUAL(FZ-i / FX-i / FZ-i WP / FX-i WP / FZ-GD / FX-GD 系列精準天平說明
手冊)」中詳細說明。本手冊可從我們的網站下載
2.
天平是精密儀器。拆開包裝時請小心,建議保留包裝材料,以便將來搬運天平時使用。
包裝內容物視天平型號而定。請參閱以下插圖,確認沒有任何遺漏。
:https://www.aandd.jp。
▢ 請確認變壓器類型適用您當地的電壓和插座類型。
▢ 使用指定變壓器作為天平專屬的變壓器。
▢ 請勿將天平隨附的變壓器與不相容的型號搭配使用。
▢ 如果使用的變壓器有誤,天平和其他設備可能無法正常運作。
52
Page 53

CT
使用
系列
警告:
正確
不理想
水平調整
腳座
2-1.預防措施
為了讓天平充分發揮效能並產生準確的稱重資料,請注意以下事項:
▢ 將天平放置在溫度和濕度適中的環境。最佳運作溫度約為 20°C±2°C,相對濕度約為 45~60%RH。
▢ 將天平放置在沒有灰塵的地方。
▢ 稱量台應為堅固的固體(最理想的是抗震的桌子或石桌)。
▢ 將天平放置在水平桌上並確認沒有傾斜情況。
▢ 將天平放置在平穩的地方,避免震動和撞擊。最好放在一樓房間的
角落,比較不會受到震動。
▢ 將天平放置在不受暖爐或冷氣空調影響的地方。
▢ 將天平放置在不受陽光直射的地方。
▢ 切勿將天平放置在會產生磁場的設備附近。
▢ 調整水平調整腳座,讓天平處於水平狀態,並使用氣泡式水平儀確
認。請參閱下一頁的「如何調整氣泡式水平儀」。
▢ 讓天平熱機至少 30 分鐘。如常插入變壓器。
▢ 使用天平前或將天平移動位置後,請校正天平。請參閱說明手冊的
「8.CALIBRATION(8. 校 正 )」。
氣泡式水平儀
FZ-i WP / FX-i WP
▢ 天平的防塵和防水等同於 IP65,而其第二個數字「5」表示「受到噴射水柱沖擊時無有害影響」。使用
強力水壓或放入水中清洗天平可能導致水進入天平內部並造成故障。
▢ 在需要防塵和防水性能的條件下放置和使用天平時,請確保將變壓器插頭完全插入變壓器插孔中且端子
蓋連接到 RS-232C 介面或使用防水的 RS-232C 纜線 (AX-KO2737-500)。
▢ 如果卸下 RS-232C 端子蓋或未使用防水的 RS-232C 纜線 (AX-KO2737-500),則無法提供防塵和防
水保護。
請勿在有易燃氣體或腐蝕性氣體的地方放置天平。
53
Page 54

CT
如何調整氣泡式水平儀
水平調整
腳座
氣泡向左偏移時:
將右前方的水平調整腳座依順時針方向旋轉。
氣泡向右偏移時:
將左前方的水平調整腳座依順時針方向旋轉。
氣泡向後偏移時:
同時將前方的兩個水平調整腳座依順時針方向旋轉。
氣泡向前偏移時:
同時將前方的兩個水平調整腳座依逆時針方向旋轉。
氣泡式水平儀
不理想
下
下
紅色圓圈
氣泡
正確
上
水平調整
腳座
上
54
Page 55

CT
顯示符號和按鍵操作
顯示符號
按鍵操作
的行為而不同。一般稱重操作是「按下並立即放開按鍵」。除非需要時才
・統計資料數量(統計計算模式)
・在稱重模式(上限指示燈)以百分比顯示與稱重
反應指示燈
動物模式指示燈
比較器指示燈
單位 (pcs、ct、mom)
單位 (g、%)
間隔輸出模式待機指
示燈
重量資料
間隔輸出模式使用中
指示燈
處理指示燈
處理指示燈
待機指示燈
2 秒
3.
天平的操作模式依據「按下並立即放開按鍵」或「長按按鍵(2 秒 鐘 )」
按住按鍵。
上限相關的重量資料
穩定性指示燈
閃爍
按下按鍵
(按下並立即放開按鍵)
長按按鍵
按鍵 按下並放開時 長按(2 秒)
顯示螢幕切換 ON/OFF(開啟/關閉)。關閉顯示幕時會顯示待機指示燈。開啟顯示幕時會啟用
稱重模式。
在稱重模式下,可 ON/OFF(開啟/關閉)可
讀數的數字。
在計數或百分比模式下,進入樣品儲存模式。
切換功能表中儲存的稱重單位。
使用內部質量進入校正模式(一觸校正)(僅
適用 FZ-i / FZ-i WP / FZ-GD 系列)。
在內部設定模式中,將取消操作。
穩定時,依據功能表輸出稱重資料。
在功能表中,確認操作。
將顯示螢幕設為零。
按鍵隨時可用。在操作過程中按下
顯示功能表中的選單。
進入變更稱重速度的模式。
使用外部砝碼進入校正模式(使用您的重
量 )。
出廠時無功能。
變更功能表,輸出 GLP、GMP 報告的「Title
block(標題區塊)」和「End block(結束區
塊 )」。
按鍵將始終關閉顯示螢幕。
55
Page 56

CT
校正
4.
4-1.使用內部質量校正
(一觸校正,僅適用 FZ-i / FZ-i WP / FZ-GD 系列)
此功能使用內部質量校正天平。
1. 連接變壓器,並讓天平熱機至少 30 分鐘,此時不要在秤盤上放置任何物件。
將配件風防放在天秤上並按下
2.
天平使用內部質量進行校正。請勿讓震動或氣流影響天平。
3.
校正後,如果已設定功能表的「
4.
告。
校正後,天平將自動返回稱重模式。
5.
按鍵。天平顯示
GLP output(GLP
輸出)
( )
。
」參數,天平將輸出靈敏度調整報
56
Page 57

CT
2.
2
4.
5.
7.
長按按鍵 2
放開按鍵
按下按鍵
選取重量
例如:校正重量值:
1000.12g
校正砝碼
GLP 輸出
4-2.使用外部砝碼校正
此功能使用外部砝碼校正天平。
1. 連接變壓器,並讓天平熱機至少 30 分鐘,此時不要在秤
盤上放置任何物件。
長按
開按鍵。
按鍵
秒,直到顯示
,然後放
秒
天平顯示
3.
如果您想要變更校正砝碼,按下
前往步驟
請參閱說明手冊的「
瞭解可選的校正砝碼。
如果您使用儲存在天平的校正砝碼,前往步驟
如下指定校正砝碼值:
按鍵(要減少值)
按鍵
按鍵
。
4。
8.CALIBRATION(8.
按鍵 要切換顯示狀態為「
segments blinking
(目標重量選取模式)或「
two digits blinking
爍)」(值調整模式)。
按鍵(要增加值)
要選取校正砝碼或調整值。
要儲存新的重量值。即使取下變壓器,
資料仍會保留在非揮發性記憶體中。
要取消操作(返回
按鍵並
校 正 )」,
5。
All of the
(所有部份閃爍)」
The last
(最後兩個數字閃
)。
確認稱盤上無任何物件並按下
按鍵。天平測量
為零點並顯示測量值。請勿讓震動或氣流影響天平。
將校正砝碼放在秤盤上,然後按下
6.
按鍵。天平
測量為校正砝碼並顯示測量值。請勿讓震動或氣流影響天
平。
從秤盤取下砝碼。
校正後,如果已設定功能表的「
8.
出)」參數,天平將輸出「
敏度調整報告)」。
天平將自動返回稱重模式。
9.
10.
將校正砝碼再次放在稱盤上並確認值是否在範圍內(設定
值 ±
驟
個數字)。如果超出範圍,請注意周圍環境並從步
2
開始。
1
GLP output(GLP
sensivity adjustment report
輸
(靈
57
Page 58

CT
錯誤代碼
穩定性錯誤
超出範圍錯誤
內部質量錯誤(僅適用
系列)
校正砝碼錯誤
正值
校正砝碼錯誤
負值
超載錯誤
秤盤錯誤
樣品質量錯誤
單位質量錯誤
時鐘電池錯誤
A&D
電源電壓故障
通訊錯誤
未定義的命令錯誤
5.
顯示 錯誤代碼 描述
EC, E11
EC, E17
EC, E20
EC, E21
由於環境問題,天平無法穩定。
請檢查秤盤。避免震動、氣流、溫度變化、靜電和磁場影響天平。請
參閱說明手冊的「
要返回稱重模式,按下
輸入的值超過設定範圍。
輸入正確的值。
內部質量應用機制無法適當運作。請從頭開始執行稱重操作。
校正砝碼太重。確認校正砝碼值。按下
校正砝碼太輕。請確認校正質量值。按下
式。
在秤盤上放置了超出天平稱重上限的樣品。從秤盤取下樣品。
質量值太輕。確認已正確安裝秤盤並校正天平。
天平不能儲存計數模式或百分比模式的樣品,因為樣品太輕。請使用
較重的樣品。
計數模式的樣品單位質量太輕。儲存並用於計數將導致計數錯誤。將
樣品增加到指定數量,然後按下
加樣品。
按鍵將使天平轉換為計數模式。為了正確計數,請務必增
3-2 During Use(3-2
FZ-i / FZ-i WP / FZ-GD
(
)
(
)
按鍵。
使用中)」。
按鍵。未增加樣品即按下
按鍵返回稱重模式。
按鍵返回稱重模
時鐘備用電池已耗盡。按下任意按鍵設定時間和日期。只要將變壓器
EC, E00
EC, E01
連接到天平,時鐘和日曆功能就可以正常運作。如果此錯誤經常出
現,請聯絡當地
變壓器電壓異常。檢查變壓器是否為天平隨附的配件。
通訊時發生通訊協定錯誤。
請確認格式、鮑率和奇偶。
收到未定義的命令。
請確認命令。
經銷商。
58
Page 59

CT
尚未準備就緒
逾時錯誤
超出字元錯誤
格式錯誤
參數設定錯誤
顯示 錯誤代碼 描述
EC, E02
無法處理收到的命令。
EC, E03
EC, E04
EC, E06
EC, E07
例如:天平收到「Q」命令,但未處於稱重模式下。
例如:天平在處理 RE-ZERO 命令時收到「Q」命令。
調整傳輸命令的延遲時間。
如果逾時參數設為「
內收到命令的下一個字元。請確認通訊情況。
天平收到的命令中含有過多字元。
請確認命令。
命令包含不正確的資料。
例如數字的數量不正確。
例如數字值中包含字母。
請確認命令。
收到的資料超出天平可以接受的範圍。請確認命令的參數範圍。
」,而天平沒有在
1
秒時限
59
Page 60

CT
規格
6.
FZ 系列
稱重上限
最大顯示數值
最小顯示數值
可重複性
(標準偏差)
線性 ±0.002g ±0.02g
使用內部質量校正後
的準確性*
120
i / i WP /
GD
122g 220g 320g 520g 1220g 2200g 3200g 5200g
122.084g 220.084g 320.084g 520.084g 1220.84g 2200.84g 3200.84g 5200.84g
200
i / i WP /
GD
0.001g 0.01g
0.001g 0.01g
±0.010g ±0.10g ±0.15g
300
i / i WP /
GD
500i 1200
i / i WP /
GD
2000
i / i WP /
GD
i / i WP /
3000
GD
5000i
* ● 使用內部質量校正後,安裝配件風防且處於良好環境(溫度介於 10°C 至 30°C(50°F 至 86°F), 溫 度
或濕度未突然改變,無氣流、無震動且未被磁場或靜電影響)。
● 使用 FZ-i / FZ-i WP / FZ-GD 系列天平時,環境和老化可能導致內部質量值錯誤。使用外部質量校正
天平並定期執行維護工作。
FX 系列
稱重上限
120
i / i WP /
GD
122g 220g 320g 520g 1220g 2200g 3200g 5200g
200
i / i WP /
GD
300
i / i WP /
GD
500i 1200
i / i WP /
GD
2000
i / i WP /
GD
3000
i / i WP /
GD
5000i
最大顯示數值
最小顯示數值
可重複性
(標準偏差)
線性 ±0.002g ±0.02g
122.084g 220.084g 320.084g 520.084g 1220.84g 2200.84g 3200.84g 5200.84g
0.001g 0.01g
0.001g 0.01g
● FZ-i WP / FX-i WP 系列天平具防塵且防水功用(IP65 相 容 )。
60
Page 61

Page 62

3-23-14 Higashi-Ikebukuro, Toshima-ku, Tokyo 170-0013, JAPAN
Telephone: [81] (3) 5391-6132 Fax: [81] (3) 5391-1566
A&D ENGINEERING, INC.
1756 Automation Parkway, San Jose, California 95131, U.S.A.
Telephone: [1] (408) 263-5333 Fax: [1] (408)263-0119
A&D INSTRUMENTS LIMITED
Unit 24/26 Blacklands Way, Abingdon Business Park, Abingdon, Oxfordshire OX14 1DY United Kingdom
Telephone: [44] (1235) 550420 Fax: [44] (1235) 550485
A&D AUSTRALASIA PTY LTD
32 Dew Street, Thebarton, South Australia 5031, AUSTRALIA
Telephone: [61] (8) 8301-8100 Fax: [61] (8) 8352-7409
A&D KOREA Limited 한국에이.엔.디(주)
서울특별시 영등포구 국제금융로6길33 (여의도동) 맨하탄빌딩 817 우편 번호 07331
( 817, Manhattan Bldg., 33. Gukjegeumyung-ro 6-gil, Yeongdeungpo-gu, Seoul, 07331 Korea )
전화: [82] (2) 780-4101 팩스: [82] (2) 782-4264
OOO A&D RUS OOO "ЭЙ энд ДИ РУС"
121357, Российская Федерация, г.Москва, ул. Верейская, дом 17
( Business-Center "Vereyskaya Plaza-2" 121357, Russian Federation, Moscow, Vereyskaya Street 17 )
тел.: [7] (495) 937-33-44 факс: [7] (495) 937-55-66
A&D INSTRUMENTS INDIA PRIVATE LIMITED
( 509, Udyog Vihar, Phase-
: 91-124-4715555
, Gurgaon - 122 016, Haryana, India )
: 91-124-4715599
BackCover 1WMPD4000058N .
 Loading...