

Page 1
Quick Start Guide
Compact Balances
Guide de démarrage rapide
Balances compactes
Schnellstartanleitung
Kompakte-Waage
Guía de inicio rápido
Básculas compactas
Guida introduttiva
Bilancia compatte
紧
中文
EK-i / EW-i Series
Séries EK-i / EW-i
Serie EK-i / EW-i
Series EK-i / EW-i
English (EN)
Français (FR)
Deutsch (DE)
Español (ES)
Serie EK-i / EW-i
快速入門指南
EK-i / EW-i
凑型天平
1WMPD4004399
系列
Italiano (IT)
(CT)
Page 2

EN
FR
DE
ES
IT
CT
Quick Start Guide –
Compact
Balance .............................................................................. 3
EK-i / EW-i
Guide de démarrage rapide – Séries
Balance
compactes
Schnellstartanleitung – Serie
Kompakte-Waage
......................................................................... 12
EK-i / EW-
............................................................................. 21
Series
EK-i / EW-
i
i
Guía de inicio rápido – Series
Básculas compactas
......................................................................... 30
EK-i / EW-
i
Guida introduttiva – Serie EK-i / EW-
Bilancia compatte
............................................................................. 39
i
快速入門指南– EK-i / EW-i系列
紧凑型天平 ..................................................................................... 48
2
Page 3
EN る
1. Introduction
This quick start guide describes the basic functions and operations of the balance.
The functions and operating procedures of the balance (EK-i / EW-i series) are explained in details in
the following instruction manual.
[EK-i / EW-i Series Instruction Manual]
This is an instruction manual for understanding and fully utilizing the precision electronic balance
EK-i / EW-i series. This manual can be downloaded from our website https://www.aandd.jp
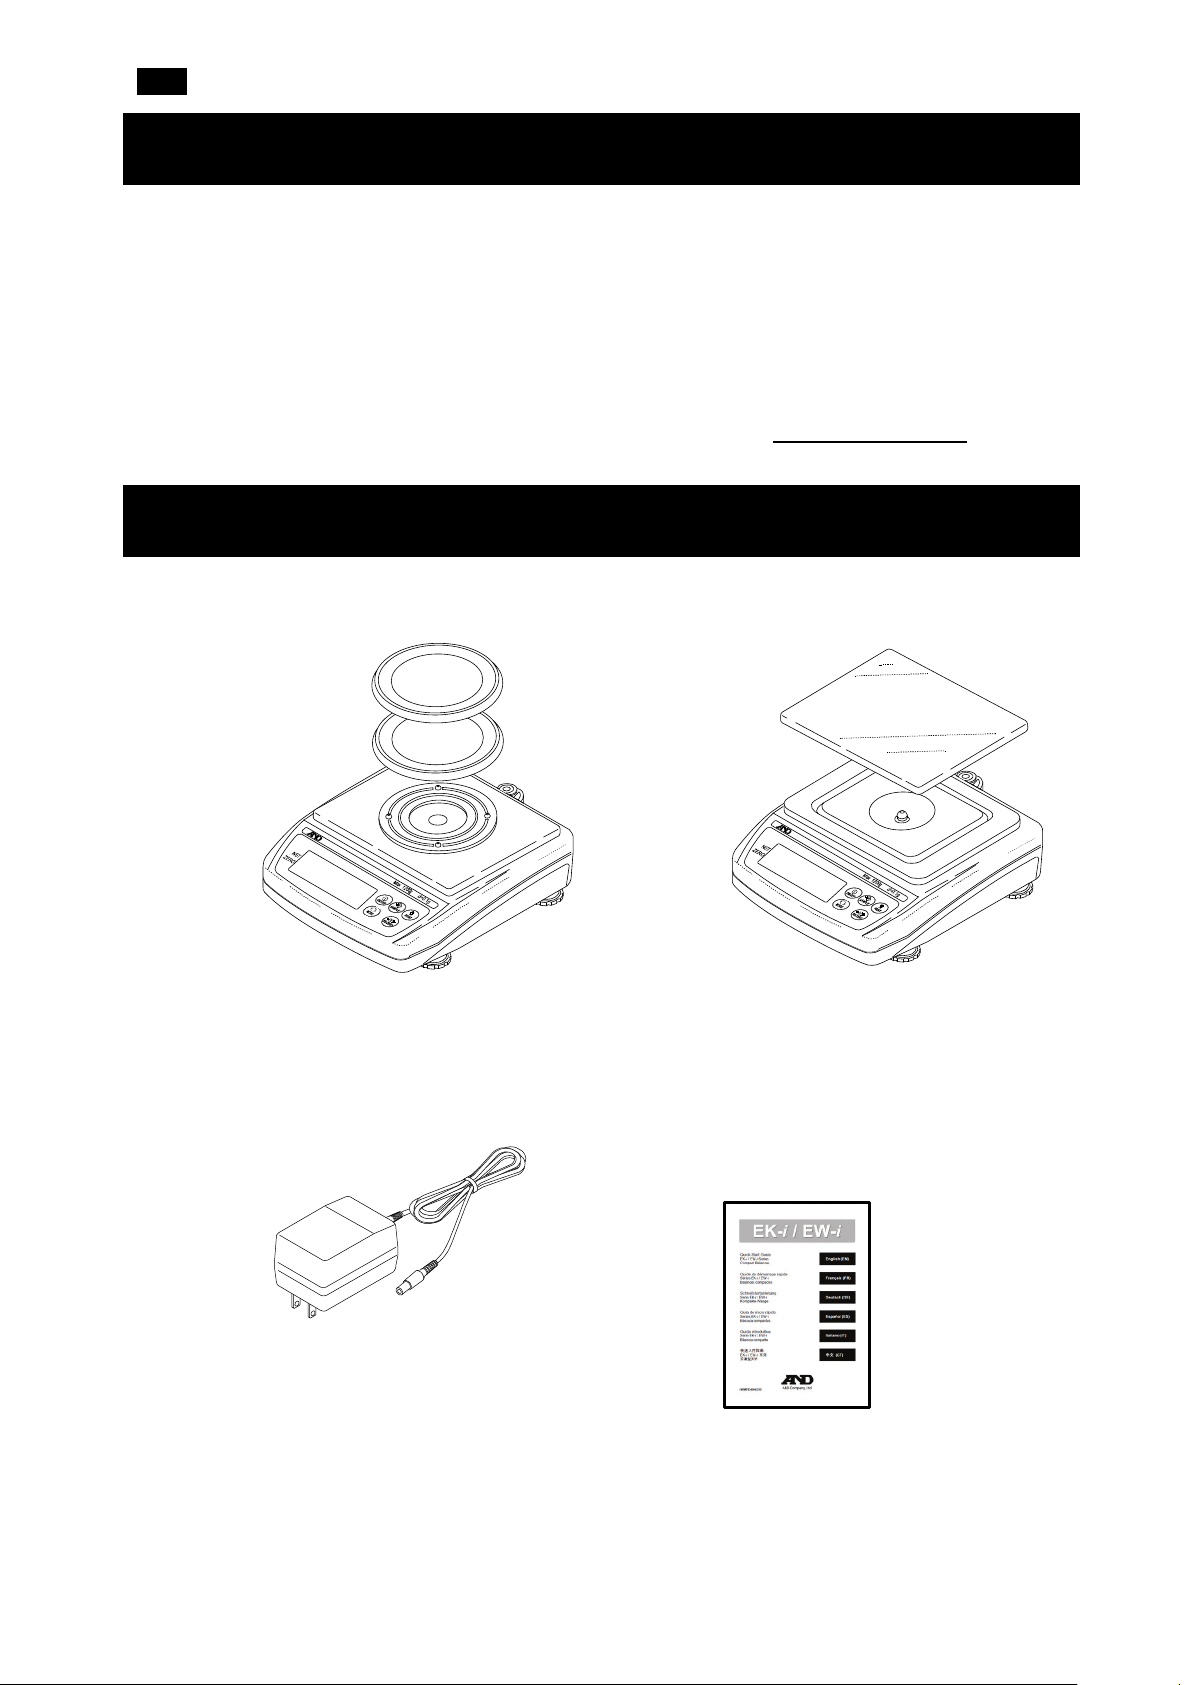
2. Unpacking
When unpacking, check whether all of the following items are included:
Weighing pan
Pan support
Main unit
EK-120i / EK-200i / EK-300i
EK-410i / EK-610i
EW-150i
Weighing pan
Main unit
EK-600i / EK-1200i / EK-2000i
EK-3000i / EK-6000i / EK-12Ki
EK-4100i / EK-6100i
EW-1500i / EW-12Ki
.
AC adapter Quick Start Guide
Note:
Verify that the AC adapter type is correct for
your local voltage and receptacle type.
3
Page 4
EN る
down to enter the function
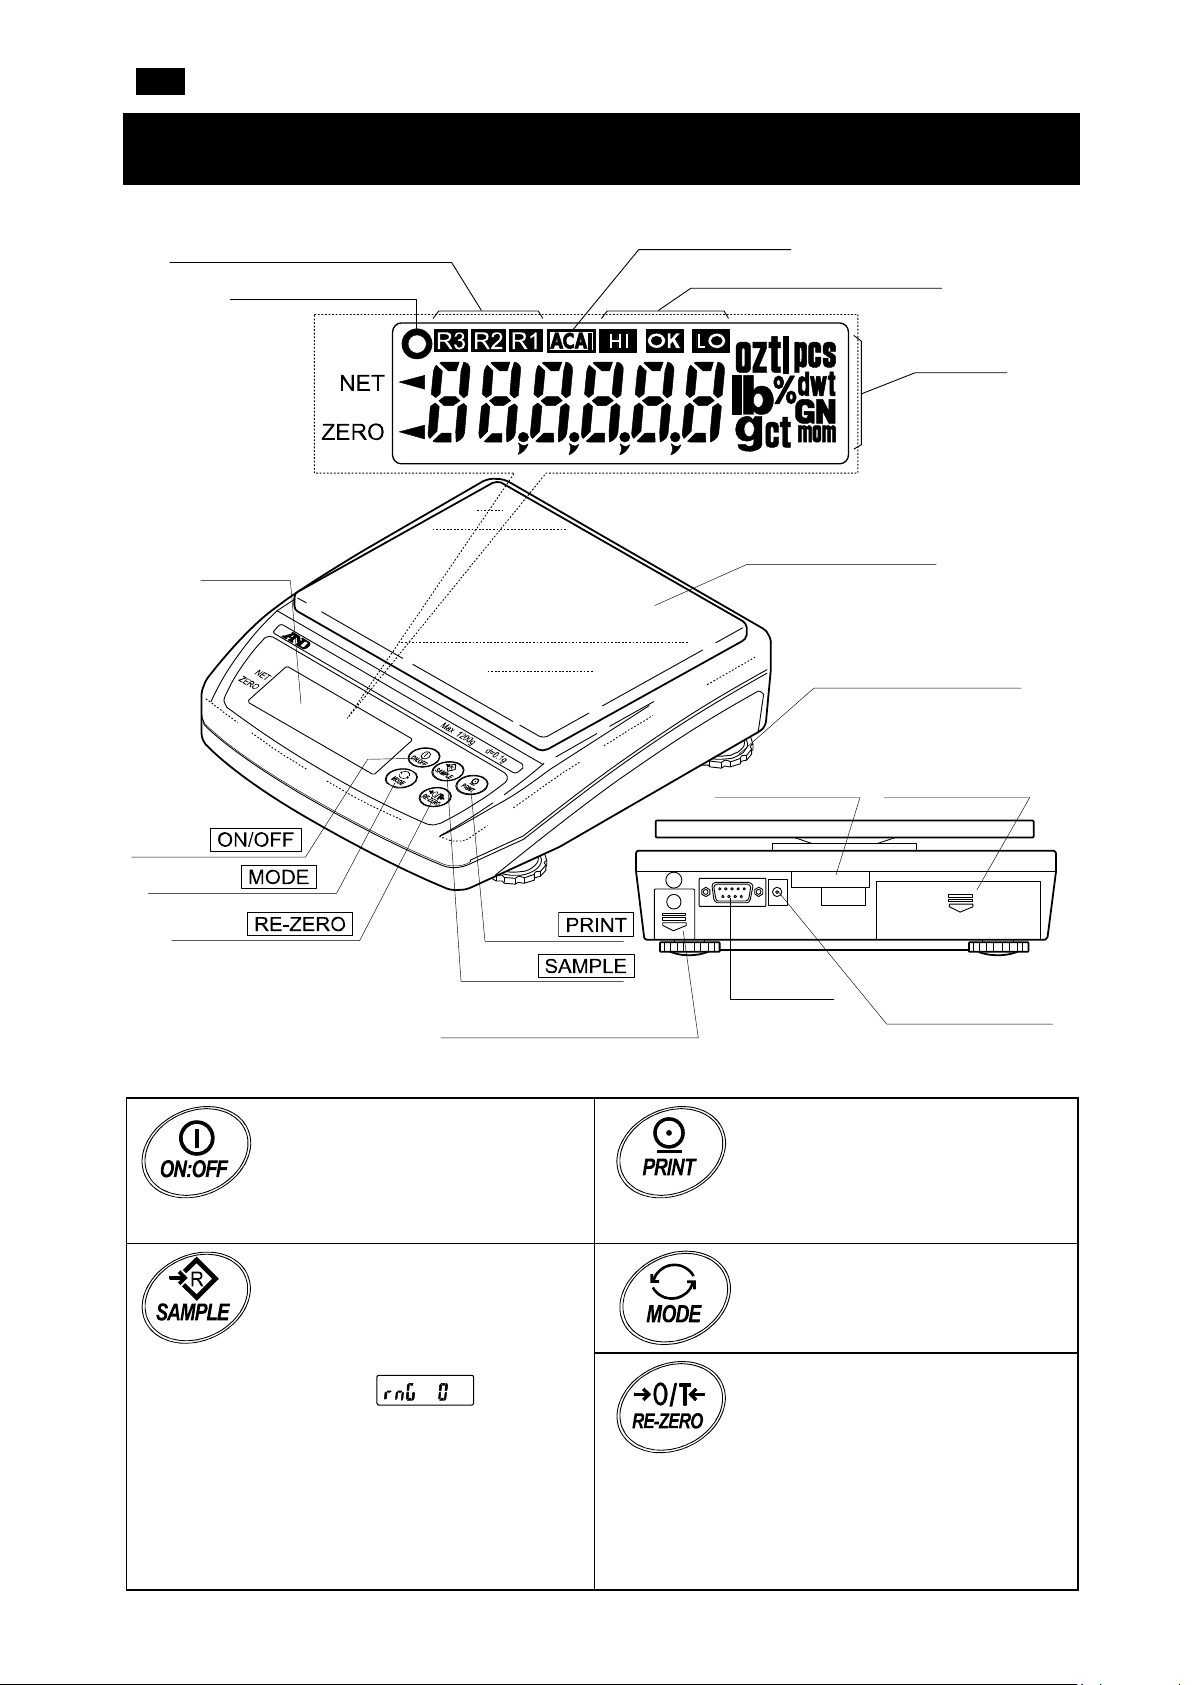
witches the weighing unit (the
Weighing range indicator
Stability mark
3. Part names and functions
ACAI mark
Comparator results
LCD
key
key
key
key
key
Calibration switch cover
Weighing pan
Leveling foot
Spirit level
RS-232C
Units
OP-04/09 slot
AC adapter jack
Turns the power ON or OFF.
Hold
setting mode.
Weighing mode (EW-i only):
Changes the weighing range
(when is selected).
pcs mode:
Enters the sample unit weight
storing mode.
% mode:
Enters the 100% weight storing
mode.
Outputs the weight data to a
printer or computer, or enters a
unit weight, 100% weight or other
setting values to the balance.
S
weighing mode).
Clears the display to zero.
4
Page 5

EN る
4. Setting up
4-1 Setting up your balance
1. Place the weighing pan on the main unit as shown on the previous page.
2. Adjust the level of the balance using the leveling feet.
Use the spirit level to confirm. The bubble should be in the center of the circle.
3. Calibrate your balance before use. (See “6. Calibration”)
Balance installation
To measure correctly, to keep the balance in good condition, and to prevent hazards, observe the
following:
□ Do not install the balance in locations that are subject to excessive dust, breezes, vibration, large
temperature fluctuations, condensation, or that may have magnetic fields.
□ Do not install the balance on a surface that is soft or that may cause the balance level to shift.
□ Do not install the balance in direct sunshine.
□ Do not install the balance near heaters or air conditioners.
□ Do not use an unstable AC power source.
□ Do not install the balance in a place where combustible or corrosive gases may exist.
□ Allow the balance to reach equilibrium with the ambient temperature before use.
□ Switch the power ON at least half an hour before use so that the balance can warm up.
□ When the balance is installed for the first time, or the balance has been moved, carry out calibration
as described in “6. Calibration”.
4-2 Power source
For the power source, the AC adapter or the rechargeable battery pack (EKW-09i: Optional item) is
available.
When using the AC adapter
Use a stable power source. To use the AC adapter, insert the AC adapter plug into the AC adapter jack
on the EK-i / EW-i.
When using the rechargeable battery pack (EKW-09i)
Refer to the [EK-i / EW-i Series Instruction Manual] for more information.
5
Page 6
EN る
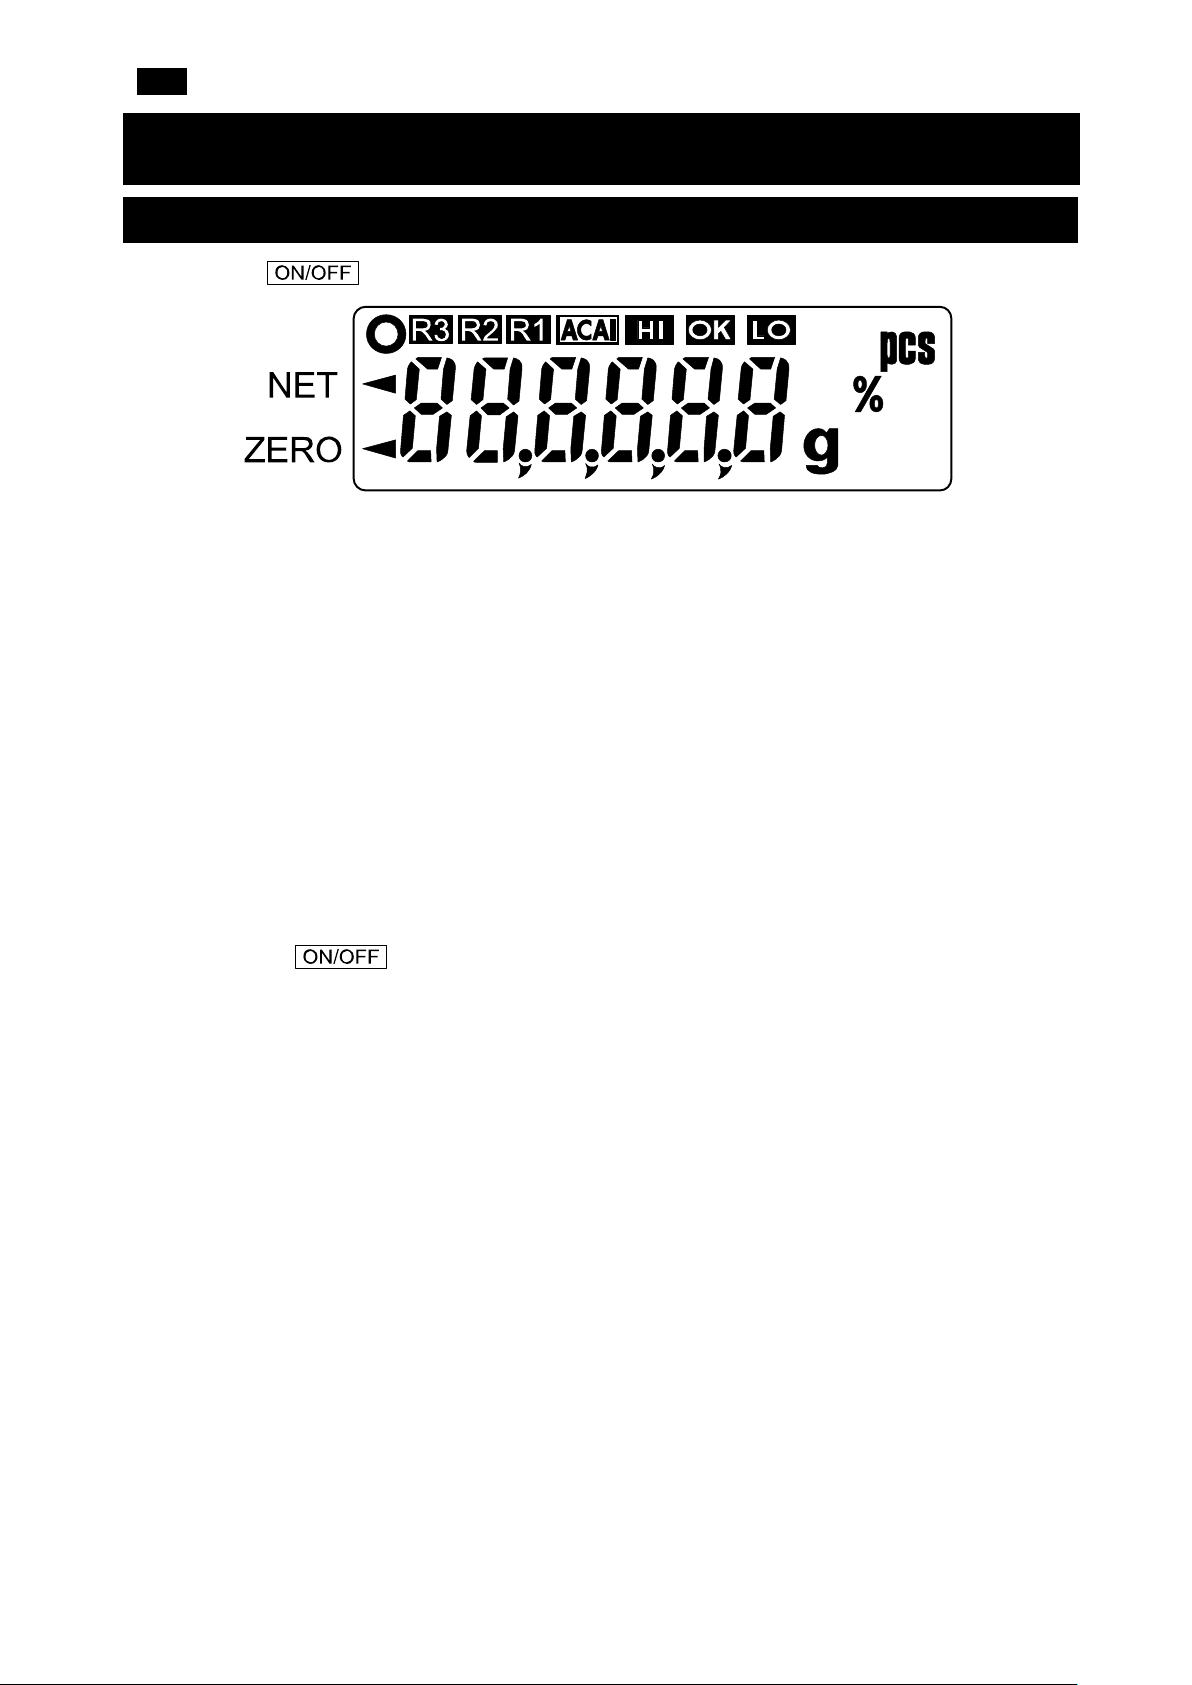
5. Operation
5-1 Turning the power ON and OFF
1. Press the key to turn the power ON.
All of the indicators are displayed as shown above.
(About units: Only the units available will be displayed.)
The display turns off except for a weighing unit and the decimal point.
The balance waits for the weight data to become stable, and zero will be displayed with the ZERO
mark (power-on zero).
The range for power-on zero is within ±10% of the weighing capacity around the calibrated zero
point.
If the power is switched ON while there is a load beyond this range, the balance will be tared to
zero and the NET mark and the ZERO mark turn on.
2. Pressing the key again, and the power will be switched OFF.
6
Page 7
EN る
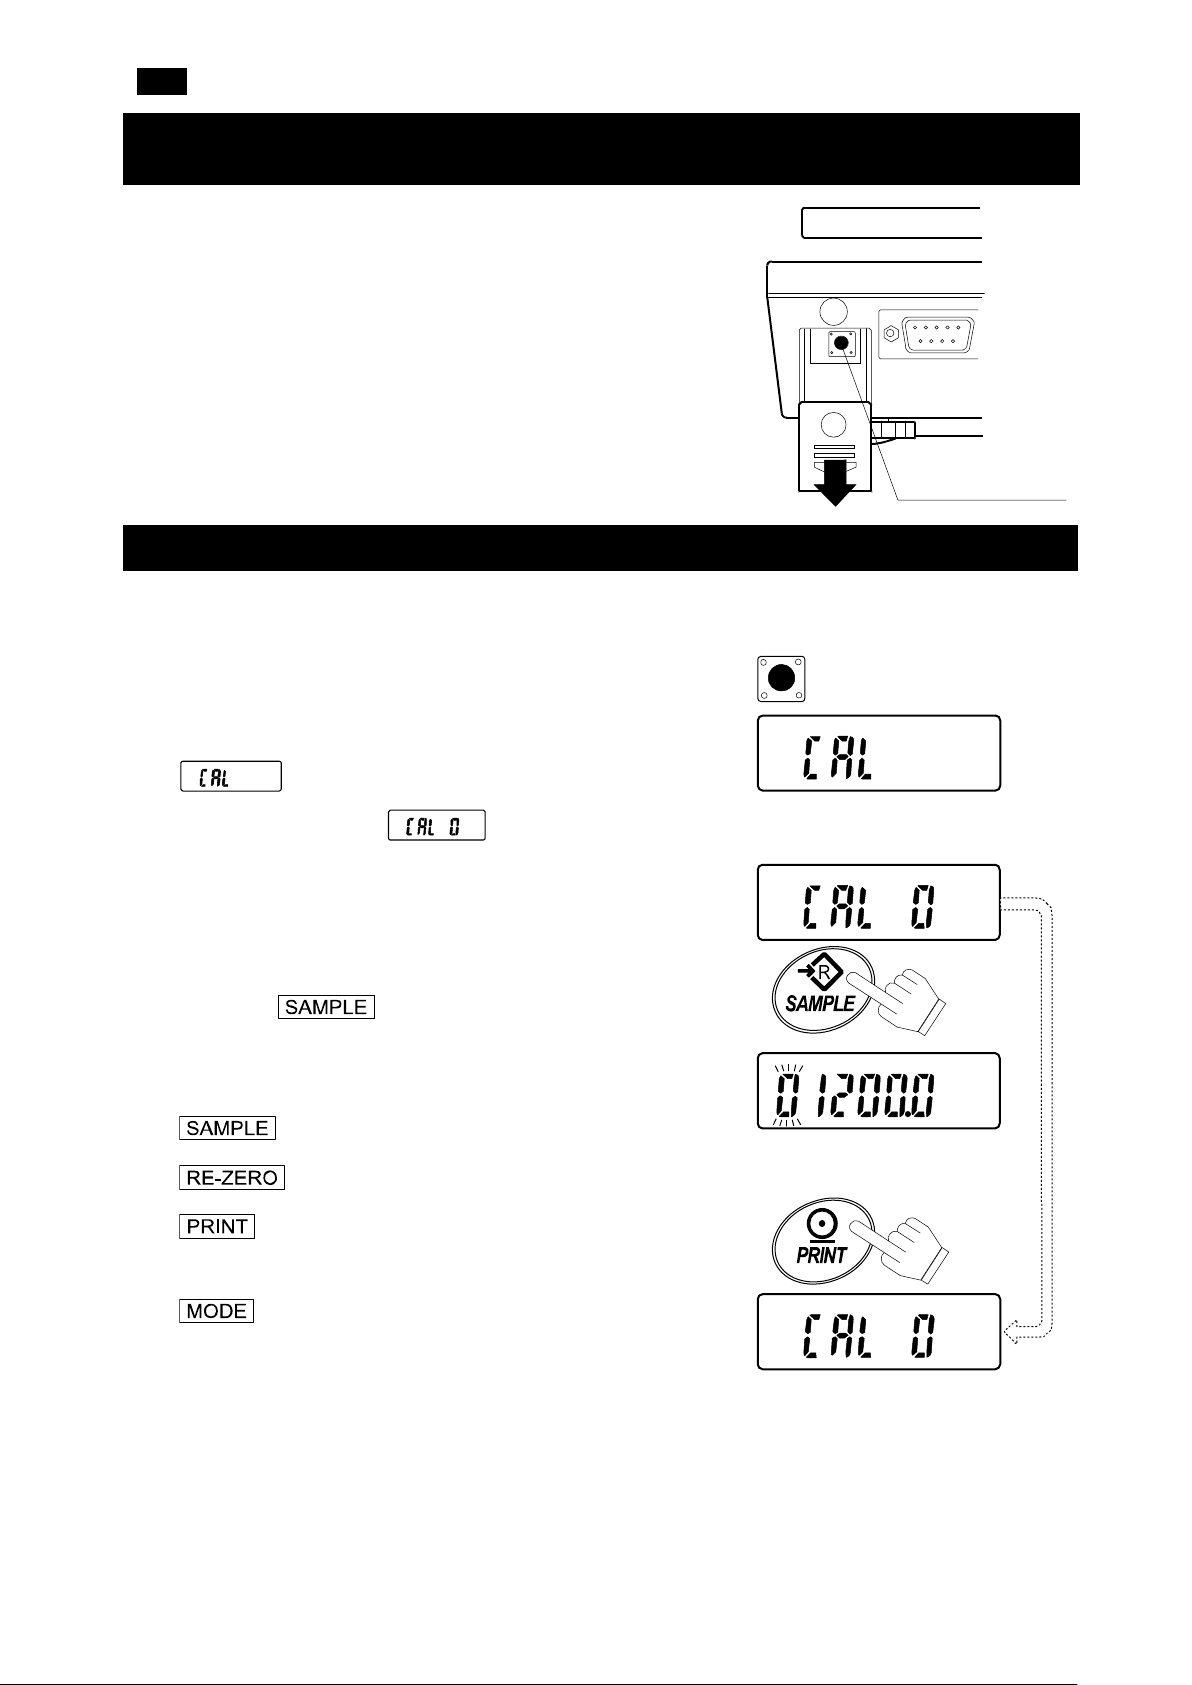
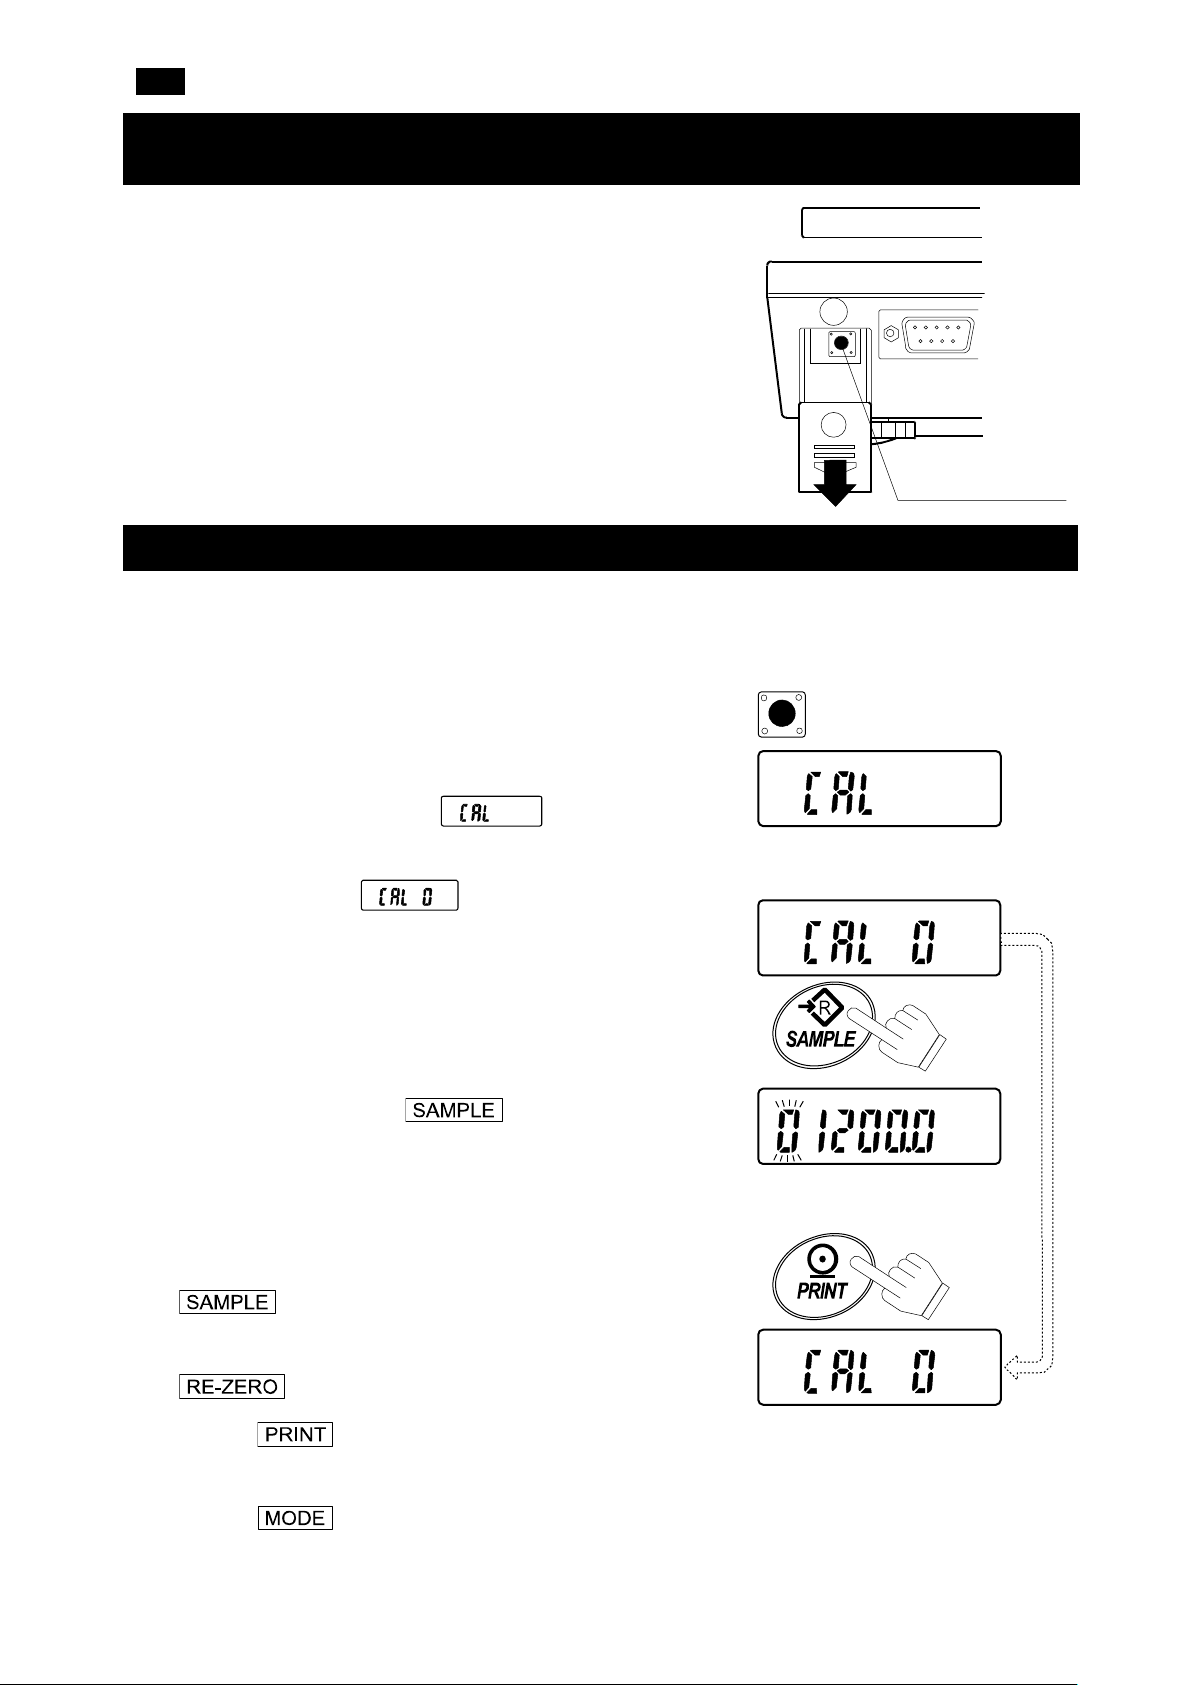
Calibration
(CAL) switch
Press and lower the
calibration switch cover.
Press and hold
the CAL switch.
Release
the CAL switch.
Set the weight using
the relevant keys.
6. Calibration
This function adjusts the balance for accurate weighing.
Perform calibration in the following cases.
□ When the balance is first used.
□ When the balance has been moved.
□ When the ambient environment has changed.
□ For regular calibration.
6-1 Calibration using a weight
□ Prepare a calibration weight (optional) before start.
1. Warm up the balance for at least half an hour with nothing
on the pan.
2. Press and hold the calibration (CAL) switch until
appears, and release the switch.
3. The balance displays .
To change the calibration weight value, proceed to step 4.
To use the calibration weight value in the balance memory,
proceed to step 5.
4. Press the key. The display shows the
calibration weight value in “gram” that is stored in the
balance. Use the following keys to change the value.
key
key
key
To select the digit blinking to change.
To set the value of the digit selected.
To store the value and return to
□ Use a calibration weight of more than 2/3 of the
capacity (of the highest range for EW- i series).
key
step 3.
To cancel the value and return to
step 3.
7
Page 8
EN る
Weighing pan
With nothing
on the pan
To store
To store
Calibration
weight
5. At step 3, pressing the key weighs the zero-point
value. Do not touch the pan during weighing.
When the zero calibration is completed, the display shows
the calibration weight value.
□ To perform the zero calibration only and finish the
procedure, press the key.
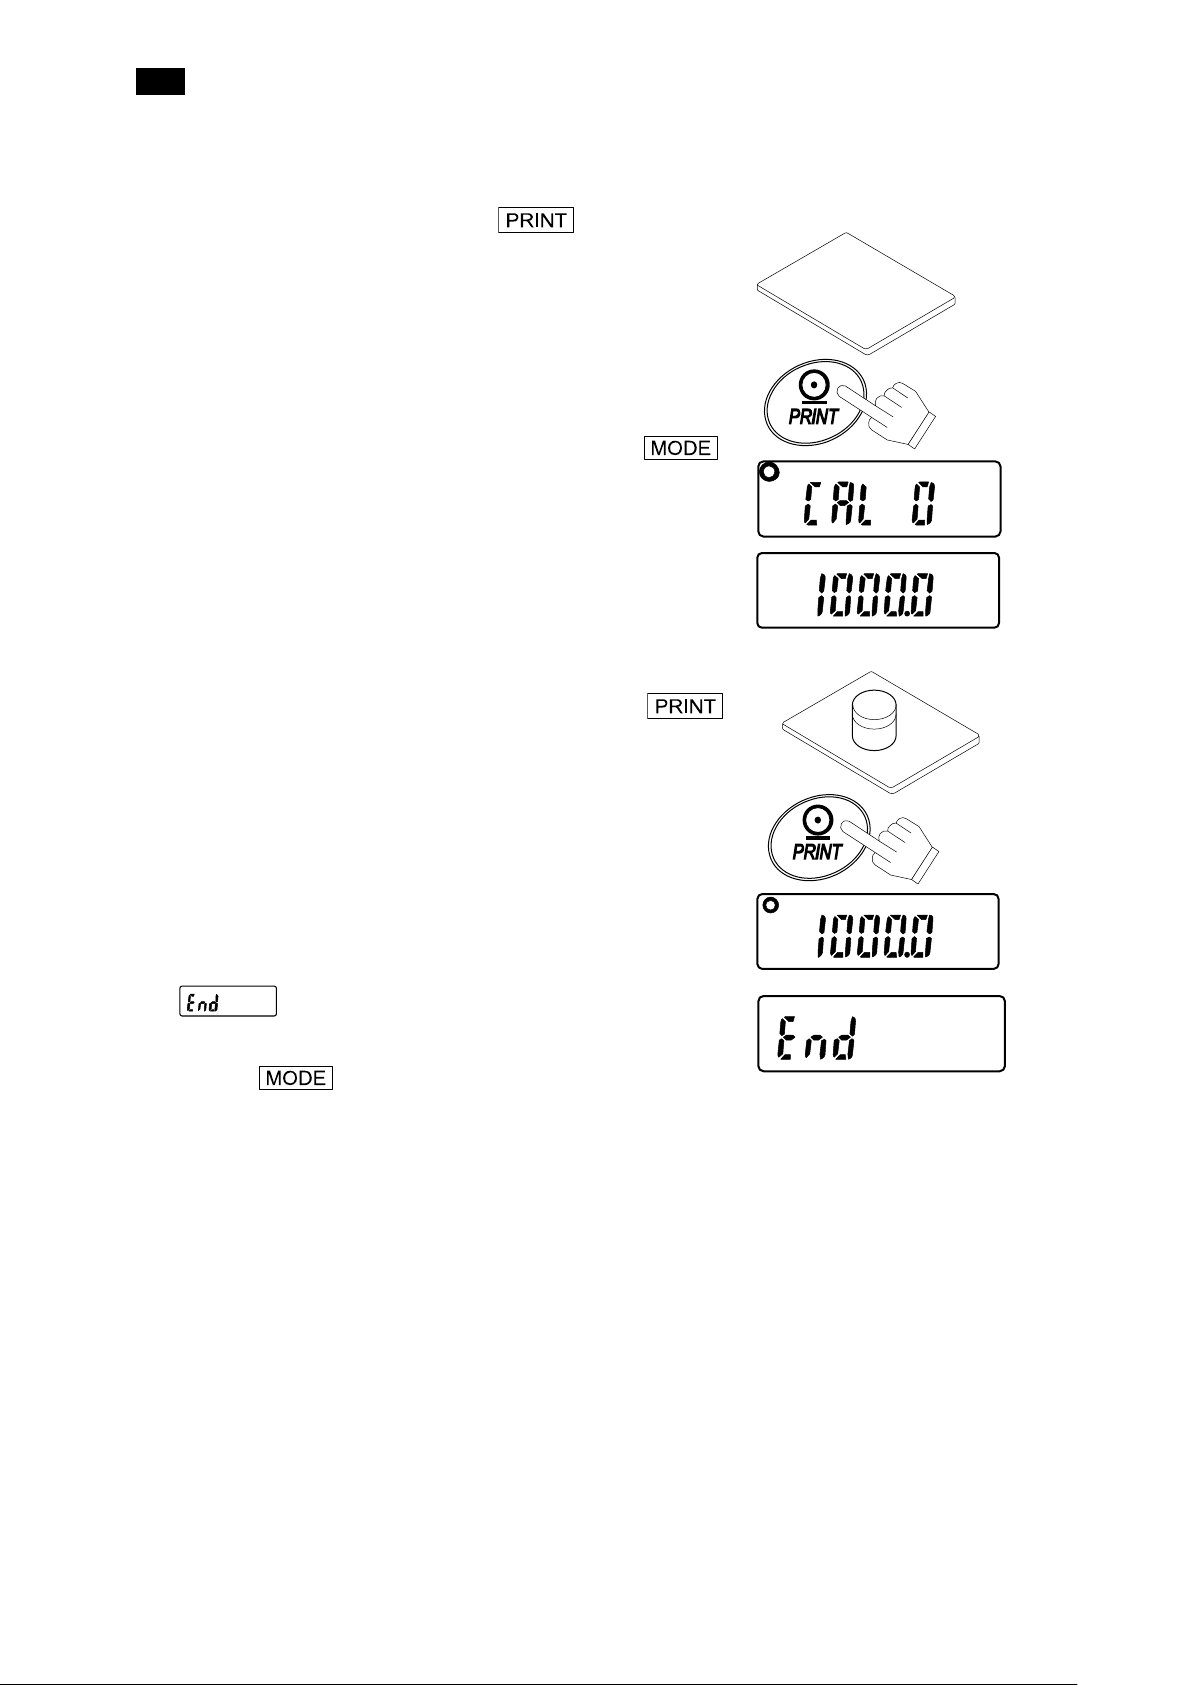
6. Place the calibration weight with the same value as
displayed on the pan. Press the key to weigh it.
Do not touch the pan during weighing.
7. appears.
Remove the weight from the pan, and press the CAL switch
or key to return to the weighing mode.
8
Page 9
EN る
7. Maintenance
7-1 Notes on maintenance
□ Do not disassemble the balance. Contact your local A&D dealer if your balance needs service or
repair.
□ Use the original package for transportation.
□ Do not use organic solvents to clean the balance. Use a lint free cloth dampened with a mild
detergent.
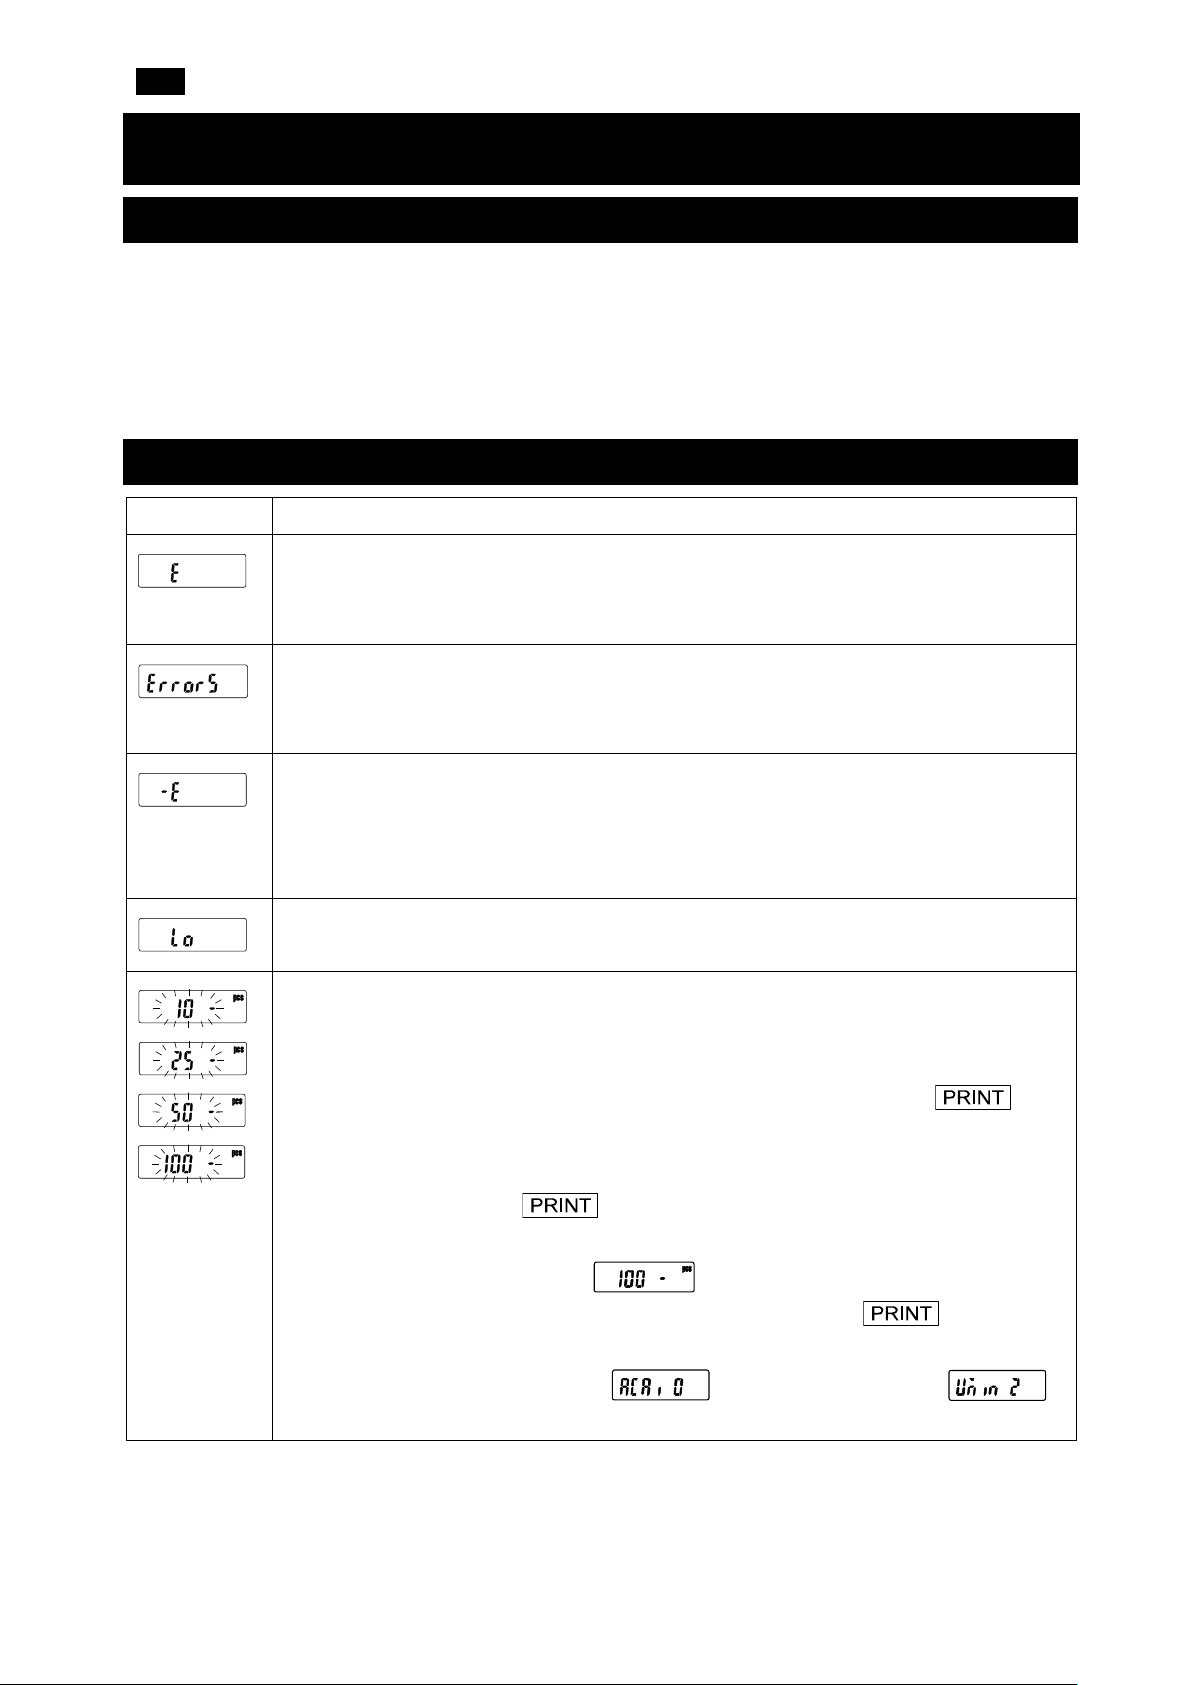
7-2 Error codes
Display Description
Overload error
Warning to indicate that an object beyond the balance capacity has been placed on
the pan. Remove the object from the pan.
Overload error
Warning to indicate that the balance detects an unexpected load. Remove all objects
from the pan or check that the weighing pan is correctly installed.
Range over notice
This will be shown if the weight sensor receives strong force upward. Check if there
is anything sandwiched around the weighing pan. There is a possibility that the weight
sensor itself may have a failure.
Unit / 100% weight error
The unit / 100% weight is too light in the counting / % mode.
Sample quantity notice
When sample weight is light and the counting error could become large, the balance
will prompt you to use a larger number of samples. Place the displayed number of
samples on the pan and press the key to store the unit weight.
Note:
Pressing the key without adding samples may reduce counting accuracy.
Starting from the 100 samples, may be displayed when the sample
weight is light. This is for your notice and press the key without adding any
samples.
This notice is not shown when “ ” (ACAI disabled) or “ ” is set.
CAL errors
Warning to indicate that calibration has been canceled because the calibration weight
is too light.
Check the weighing pan and the calibration weight.
To return to the weighing mode, press the key.
9
Page 10
EN る
Low battery
Warning to indicate that the battery pack (OP-09) is discharged. Immediately stop
using it, and recharge or use the AC adapter.
AC adapter error
Warning to indicate that the output voltage of the AC adapter is too high. Check if
the AC adapter is correct.
AC adapter error
Warning to indicate that the output voltage of the AC adapter is too low. Check if
the AC adapter is correct.
Stability error
Warning to indicate that the weight value is not stable and the balance cannot display
it. Prevent vibration and drafts. Press the key to return to the weighing
mode.
Internal errors (# = , , or )
The balance detects error state in the internal processing. With nothing on the
weighing pan, turn the power OFF and ON again. If the error persists, request service.
If you cannot cancel an error or other errors have occurred, request service from the store where
you purchased the balance or from your local A&D dealer.
10
Page 11
EN る
8-1 EK-i series
8. Specifications
Model
Weight capacity 120g 200g 300g 600g
Readability 0.01g 0.01g 0.01g 0.1g
Repeatability
(Standard deviation)
Linearity ±0.01g ±0.01g ±0.02g ±0.1g
Model
Weight capacity 1200g 2000g 3000g 6000g 12kg
Readability 0.1g 0.1g 0.1g 1g 1g
Repeatability
(Standard deviation)
Linearity ±0.1g ±0.1g ±0.2g ±1g ±1g
Model
Weight capacity 400g 600g 4000g 6000g
EK-120i EK-200i EK-300i EK-600i
0.01g 0.01g 0.01g 0.1g
EK-1200i EK-2000i EK-3000i EK-6000i EK-12Ki
0.1g 0.1g 0.1g 1g 1g
EK-410i EK-610i EK-4100i EK-6100i
Readability 0.01g 0.01g 0.1g 0.1g
Repeatability
(Standard deviation)
Linearity ±0.02g ±0.02g ±0.2g ±0.2g
0.01g 0.01g 0.1g 0.1g
8-2 EW-i series
Model
Weight capacity 30g 60g 150g 300g 600g 1500g 3kg 6kg 12kg
Readability 0.01g 0.02g 0.05g 0.1g 0.2g 0.5g 1g 2g 5g
Repeatability
0.01g 0.02g 0.05g 0.1g 0.2g 0.5g 1g 2g 5g
(Standard deviation)
Linearity ±0.01g ±0.02g ±0.05g ±0.1g ±0.2g ±0.5g ±1g ±2g ±5g
EW-150i EW-1500i EW-12Ki
11
Page 12
FR る
1. Introduction
Ce guide de démarrage rapide décrit les fonctions basiques et le fonctionnement de la balance.
Les fonctions et procédures de fonctionnement de la balance (séries EK-i/EW-i) sont expliquées en
détail dans le manuel d'instructions suivant.
[Manuel d'instructions des séries EK-i/EW-i]
Ceci est un manuel d'instructions pour comprendre et utiliser correctement la précision électronique
de la balance des séries EK-i/EW-i. Ce manuel peut être téléchargé depuis notre site web
https://www.aandd.jp
.
2. Déballage
Lors du déballage, vérifier si tous les éléments suivants sont inclus :
Plateau de pesage
Support de plateau
Unité principale
EK-120i / EK-200i / EK-300i
EK-410i / EK-610i
EW-150i
Plateau de pesage
Unité principale
EK-600i / EK-1200i / EK-2000i
EK-3000i / EK-6000i / EK-12Ki
EK-4100i / EK-6100i
EW-1500i / EW-12Ki
Adaptateur CA
Remarque :
Vérifier que le type d'adaptateur CA convient à la
tension locale et au type de prise.
Guide de démarrage rapide
12
Page 13
FR る
Maintenir la touche enfoncée
Remet l'affichage sur zéro.
Prise jack de
l'adaptateur CA
Cache du commutateur
d'étalonnage
3. Nomenclature et fonctions
Indicateur de plage de pesage
Marque de stabilité
LCD
Marque ACAI
Résultats du comparateur
Plateau de pesage
Pied réglable
Niveau à bulle
Unités
Fente OP-04/09
Touche
Touche
Touche
Touche
Touche
Met sous ou hors tension.
pour entrer en mode de réglage
des fonctions.
Mode de pesage (EW-i uniquement) :
Modifie la plage de pesage
(lorsque est
sélectionné).
Mode pcs :
Saisit le mode d'enregistrement du
poids spécifique de l'échantillon.
Mode % :
Saisit le mode d'enregistrement
du poids à 100 %.
13
RS-232C
Émet les données de poids vers
une imprimante ou un
ordinateur, ou saisit un poids
spécifique, un poids à 100 % ou
d'autres valeurs de réglage sur
la balance.
Commute l'unité de pesage
(mode de pesage).
Page 14

FR る
4.Mise en place
4-1 Mise en place de votre balance
1. Placer le plateau de pesage sur l'unité principale comme indiqué à la page précédente.
2. Ajuster le niveau de la balance à l'aide des pieds réglables.
Utiliser le niveau à bulle pour confirmer. La bulle doit se trouver au centre du cercle.
3. Étalonner votre balance avant de l'utiliser. (Voir « 6. Étalonnage »)
Installation de la balance
Pour mesurer correctement, pour maintenir la balance en bon état et pour prévenir les risques, il faut
respecter les instructions suivantes :
□ Ne pas installer la balance dans des endroits soumis à une poussière excessive, à des brises, à
des vibrations, à de grandes fluctuations de température, à de la condensation, ou à des endroits
qui peuvent présenter des champs magnétiques.
□ Ne pas installer la balance sur une surface souple ou qui pourrait faire bouger le niveau de la
balance.
□ Ne pas installer la balance en plein soleil.
□ Ne pas installer la balance à proximité d'appareils de chauffage ou de climatisation.
□ Ne pas utiliser de source d'alimentation CA instable.
□ Ne pas installer la balance dans un endroit où il pourrait y avoir des gaz combustibles ou corrosifs.
□ Laisser la balance atteindre un équilibre avec la température ambiante avant de l'utiliser.
□ Mettre sous tension au moins une demi-heure avant l'utilisation afin que la balance puisse se
réchauffer.
□ Lorsque la balance est installée pour la première fois, ou que la balance a été déplacée, effectuer
l'étalonnage comme décrit dans « 6. Étalonnage ».
4-2 Source d'alimentation
Pour la source d'alimentation, l'adaptateur CA ou le bloc-batterie rechargeable (EKW-09i : élément en
option) est disponible.
Lors de l'utilisation de l'adaptateur CA
Utiliser une source d'alimentation stable. Pour utiliser l'adaptateur CA, insérer la fiche de l'adaptateur
CA dans la prise jack de l'adaptateur CA de la balance EK-i/EW-i.
Lors de l'utilisation du bloc-batterie rechargeable (EKW-09i)
Se reporter au [Manuel d'instructions des séries EK-i /EW-i] plus d'informations.
14
Page 15
FR る
5. Fonctionnement
5-1 Mise sous et hors tension
1. Appuyer sur la touche pour mettre sous tension.
Tous les indicateurs sont affichés comme indiqué ci-dessus.
(À propos des unités : Seules les unités disponibles seront affichées.)
L'affichage s'éteint sauf pour une unité de pesage et le point décimal.
La balance attend que les données de poids soient stables, et le zéro sera affiché avec la marque
ZERO (zéro à la mise sous tension).
La plage de zéro à la mise sous tension est de ±10 % de la capacité de pesage autour du point
zéro étalonné.
Si l'appareil est mis sous tension alors qu'il y a une charge en dehors de cette plage, la balance
sera remise à charge vide, et la marque NET et la marque ZERO s'allumeront.
2. Appuyer à nouveau sur la touche pour mettre hors tension.
15
Page 16
FR る
apparaisse, puis
Pour modifier la valeur du poids d'étalonnage, passer à
Pour utiliser la valeur du poids d'étalonnage dans la
. L'affichage indique la
dans la balance. Utiliser les touches suivantes pour
Pour définir la valeur du chiffre
Pour annuler la valeur et revenir à
Commutateur
d'étalonnage (CAL)
Appuyer et baisser le
cache du commutateur d'étalonnage.
Appuyer et
enfoncé.
Relâcher le
commutateur CAL.
Définir le poids en utilisant
les touches pertinentes.
6. Étalonnage
Cette fonction permet d'ajuster la balance pour un pesage précis.
Effectuer un étalonnage dans les cas suivants.
□ Lorsque la balance est utilisée pour la première fois.
□ Lorsque la balance a été déplacée.
□ Lorsque l'environnement ambiant a changé.
□ Pour un étalonnage régulier.
6-1 Étalonnage à l'aide d'un poids
□ Préparer un poids d'étalonnage (en option) avant de
commencer.
1. Réchauffer la balance pendant au moins une demi-heure
sans rien laisser sur le plateau.
2. Appuyer et maintenir le commutateur d'étalonnage (CAL)
enfoncé jusqu'à ce que
relâcher le commutateur.
3. La balance affiche .
l'étape 4.
mémoire de la balance, passer à l'étape 5.
4. Appuyer sur la touche
valeur du poids d'étalonnage en « gramme » enregistrée
maintenir le
commutateur CAL
modifier la valeur.
Touche
Touche
Touche
Touche
Pour sélectionner le chiffre qui clignote
et le modifier.
sélectionné.
Pour enregistrer la valeur et revenir à
l'étape 3.
l'étape 3.
16
Page 17
FR る
Utiliser un poids d'étalonnage supérieur à 2/3 de la
zéro est terminé, l'affichage
Pour effectuer l'étalonnage du zéro uniquement et
Plateau de pesage
Sans rien sur
le plateau
Pour
enregistrer
Pour
enregistrer
Poids
d'étalonnage
□
capacité (de la plage la plus haute pour la série EW- i).
5. À l'étape 3, appuyer sur la touche pour peser à la
valeur du point zéro. Ne pas toucher le plateau pendant le
pesage.
Lorsque l'étalonnage du
indique la valeur du poids d'étalonnage.
□
terminer la procédure, appuyer sur la touche .
6. Placer le poids d'étalonnage avec la même valeur que celle
affichée sur le plateau. Appuyer sur la touche
pour peser.
Ne pas toucher le plateau pendant le pesage.
7. apparaît.
Retirer le poids du plateau et appuyer sur le commutateur
CAL ou pour revenir au mode de pesage.
17
Page 18
FR る
sans ajouter d'échantillons pourrait réduire la
peut s'afficher lorsque le poids de
7. Entretien
7-1 Remarques sur l'entretien
□ Ne pas démonter la balance. Contacter le revendeur A&D local si votre balance a besoin d'être
révisée ou réparée.
□ Utiliser l'emballage d'origine pour le transport.
□ Ne pas utiliser de solvants organiques pour nettoyer la balance. Utiliser un chiffon non pelucheux
humidifié avec un détergent doux.
7-2 Codes d'erreur
Affichage Description
Erreur de surcharge
Avertissement indiquant qu'un objet dépassant la capacité de la balance a été placé
sur le plateau. Retirer l'objet du plateau.
Erreur de surcharge
Avertissement indiquant que la balance détecte une charge inattendue. Retirer tous
les objets du plateau ou vérifier que le plateau de pesage est correctement installé.
Avis de plage dépassée
Ceci s'affichera si le capteur de poids reçoit une forte force vers le haut. Vérifier si
quelque chose est pris en sandwich autour du plateau de pesage. Il est possible que
le capteur de poids lui-même soit défaillant.
Erreur de poids spécifique/à 100 %
Le poids spécifique/à 100 % est trop léger en mode de comptage/%.
Avis de quantité d'échantillon
Lorsque le poids de l'échantillon est léger et que l'erreur de comptage peut devenir
importante, la balance invitera à utiliser un plus grand nombre d'échantillons. Placer
le nombre d'échantillons affiché sur le plateau et appuyer sur la touche pour
enregistrer le poids spécifique.
Remarque :
Appuyer sur la touche
précision du comptage.
À partir de 100 échantillons,
l'échantillon est léger. Il s'agit d'un avis, appuyer sur la touche sans ajouter
d'échantillons.
Cet avis ne s'affiche pas lorsque « » (ACAI désactivé) ou « »
est défini.
18
Page 19

FR る
Avertissement indiquant que l'étalonnage a été annulé parce que le poids
09) est déchargé. Cesser
peut pas l'afficher. Éviter les vibrations et les courants d'air. Appuyer sur la touche
plateau de pesage, mettre à nouveau sous tension et hors tension. Si l'erreur
Erreurs CAL
d'étalonnage est trop léger.
Vérifier le plateau de pesage et le poids d'étalonnage.
Pour revenir en mode de pesage, appuyer sur la touche .
Batterie faible
Avertissement indiquant que le bloc-batterie (OPimmédiatement l'utilisation, et recharger ou utiliser l'adaptateur CA.
Erreur de l'adaptateur CA
Avertissement indiquant que la tension de sortie de l'adaptateur CA est trop élevée.
Vérifier si l'adaptateur CA est correct.
Erreur de l'adaptateur CA
Avertissement indiquant que la tension de sortie de l'adaptateur CA est trop faible.
Vérifier si l'adaptateur CA est correct.
Erreur de stabilité
Avertissement indiquant que la valeur du poids n'est pas stable et que la balance ne
pour revenir au mode de pesage.
Erreurs internes (# = , , ou )
La balance détecte l'état d'erreur dans le traitement interne. Sans rien sur le
persiste, demander une révision.
Si l'erreur ou d'autres erreurs ne peuvent pas être annulées, demander une révision auprès du
magasin où la balance a été achetée ou auprès de votre revendeur A&D local.
19
Page 20

FR る
8. Spécificités
8-1 Série EK-i
Modèle EK-120i EK-200i EK-300i EK-600i
Capacité de
pesage
Lisibilité 0,01 g 0,01 g 0,01 g 0,1 g
Répétabilité
(Écart type)
Linéarité ±0,01 g ±0,01 g ±0,02 g ±0,1 g
Modèle EK-1200i EK-2000i EK-3000i EK-6000i EK-12Ki
Capacité de
pesage
Lisibilité 0,1 g 0,1 g 0,1 g 1 g 1 g
Répétabilité
(Écart type)
Linéarité ±0,1 g ±0,1 g ±0,2 g ±1 g ±1 g
Modèle EK-410i EK-610i EK-4100i EK-6100i
120 g 200 g 300 g 600 g
0,01 g 0,01 g 0,01 g 0,1 g
1200 g 2000 g 3000 g 6000 g 12 kg
0,1 g 0,1 g 0,1 g 1 g 1 g
Capacité de
pesage
Lisibilité 0,01 g 0,01 g 0,1 g 0,1 g
Répétabilité
(Écart type)
Linéarité ±0,02 g ±0,02 g ±0,2 g ±0,2 g
400 g 600 g 4000 g 6000 g
0,01 g 0,01 g 0,1 g 0,1 g
8-2 Série EW-i
Modèle EW-150i EW-1500i EW-12Ki
Capacité de pesage
30 g 60 g 150 g 300 g 600 g
Lisibilité 0,01 g 0,02 g 0,05 g 0,1 g 0,2 g 0,5 g 1 g 2 g 5 g
Répétabilité
0,01 g 0,02 g 0,05 g 0,1 g 0,2 g 0,5 g 1 g 2 g 5 g
(Écart type)
Linéarité ±0,01 g ±0,02 g ±0,05 g ±0,1 g ±0,2 g ±0,5 g ±1 g ±2 g ±5 g
1500
3 kg 6 kg 12 kg
g
20
Page 21

DE る
1. Einführung
In dieser Schnellstartanleitung werden die Grundfunktionen und die Bedienung der Waage beschrieben.
Die Funktionen und die Bedienungsverfahren der Waage (Serien EK-i / EW-i) werden in diesem
Bedienungshandbuch näher erklärt.
[Bedienungshandbuch der EK-i-Serie / EW-i-Serie]
Dies ist ein Bedienungshandbuch zum Verständnis und der vollständigen Nutzung der elektronischen
Präzisionswaage der Serie EK-i / EW-i. Dieses Handbuch kann von unserer Webseite
https://www.aandd.jp
heruntergeladen werden.
2. Auspacken
Prüfen Sie während des Auspackens, ob die folgenden Elemente enthalten sind:
Waagschale
Unterschale
Hauptgerät
EK-120i / EK-200i / EK-300i
EK-410i / EK-610i
EW-150i
Waagschale
Hauptgerät
EK-600i / EK-1200i / EK-2000i
EK-3000i / EK-6000i / EK-12Ki
EK-4100i / EK-6100i
EW-1500i / EW-12Ki
Wechselstromadapter Schnellstartanleitung
Hinweis:
Vergewissern Sie sich, dass der Wechselstromadapter
der Spannung und dem Steckdosentyp vor Ort
entspricht.
21
Page 22

DE る
Wägebereichsanzeige
Stabilitätszeichen
3. Bezeichnungen und Funktionen
ACAI-Zeichen
Vergleichsergebnisse
LCD-Display
-Tas te
-Tas te
-Tas te
Wasserwaage
-Tas te
-Tas te
Kalibrierungsschalterabdeckung
Waagschale
RS-232C
Einheiten
Nivellierungsfuß
OP-04/09-Steckplatz
Wechselstromadapterbuchse
Schaltet das Gerät ein oder aus.
Gedrückt halten, um den
Funktionseinstellmodus zu
öffnen.
Wägemodus (nur EW-i):
Ändert den Wägebereich
(wenn ausgewählt
ist).
pcs-Modus:
Öffnet den Speichermodus
des Probeeinheitsgewichts.
%-Modus:
Öffnet den Speichermodus
des 100%-Gewichts.
22
Gibt die Wägedaten an einen
Drucker oder Computer aus
oder gibt ein Stückgewicht,
100% Masse oder andere
Einstellwerte für die Waage ein.
Wechselt die Gewichtseinheit
(den Wägemodus).
Stellt die Anzeige auf Null.
Page 23

DE る
4. Einstellung
4-1 Einstellung Ihrer Waage
1. Stellen Sie die Waagschale wie auf der letzten Seite dargestellt auf das Hauptgerät.
2. Stellen Sie die Waage mit den Nivellierungsfüßen ein.
Vergewissern Sie sich mithilfe der Wasserwaage, dass sie waagerecht steht. Die Libelle sollte in
der Mitte des Kreises sein.
3. Kalibrieren Sie Ihre Waage vor der Verwendung. (Siehe „6. Kalibrierung“)
Installation der Waage
Beachten Sie die folgenden Hinweise, um korrekt zu messen, die Waage in einem guten Zustand zu
bewahren und Gefahren zu vermeiden:
□ Stellen Sie die Waage nicht an einem Ort auf, an dem übermäßiger Staub, Zugluft, Vibrationen,
große Temperaturschwankungen, Kondensation oder Magnetfelder auftreten.
□ Stellen Sie die Waage nicht auf einer Oberfläche auf, die weich ist oder auf der die Waage
verrutschen kann.
□ Stellen Sie die Waage nicht in direktem Sonnenlicht auf.
□ Stellen Sie die Waage nicht in der Nähe von Heizungen oder Klimaanlagen auf.
□ Verwenden Sie keine instabile Stromquelle.
□ Stellen Sie die Waage nicht an einem Ort auf, an dem brennbare oder ätzende Gase auftreten
können.
□ Lassen Sie die Waage vor der Verwendung ein Gleichgewicht in der Umgebungstemperatur
erreichen.
□ Schalten Sie das Gerät mindestens eine halbe Stunde vor der Verwendung ein, damit sich die
Waage aufwärmen kann.
□ Wenn die Waage zum ersten Mal aufgestellt wird oder bewegt wurde, führen Sie die Kalibrierung
wie unter „6. Kalibrierung“ beschrieben aus.
4-2 Stromquelle
Als Stromquelle sind der Wechselstromadapter und der Akku (EKW-09i: Optionales Zubehör) erhältlich.
Verwendung des Wechselstromadapters
Verwenden Sie eine stabile Stromquelle. Um den Wechselstromadapter zu verwenden, stecken Sie den
Stecker des Wechselstromadapters in die Buchse am EK-i / EW-i.
Verwendung des Akkus (EKW-09i)
Für weitere Informationen siehe das [Bedienungshandbuch der EK-i-Serie / EW-i-Serie].
23
Page 24

DE る
5. Bedienung
5-1 Ein- und Ausschalten
1. Drücken Sie die Taste , um das Gerät einzuschalten.
Alle Anzeigen werden wie in der Darstellung angezeigt.
(Zu den Einheiten: Nur die verfügbaren Einheiten werden angezeigt.)
Die Anzeige wird außer einer Gewichtseinheit und dem Dezimalpunkt ausgeschaltet.
Die Waage wartet, bis die Wägedaten stabil werden, und Null wird mit dem ZERO-Zeichen
(Zurückstellen beim Einschalten) angezeigt.
Der Bereich für das Zurückstellen beim Einschalten liegt innerhalb von ±10% der Wägekapazität
um den kalibrierten Nullpunkt.
Wenn das Gerät eingeschaltet wird, während eine Ladung außerhalb dieses Bereichs aufliegt, wird
die Waage auf Null tariert und das NET-Zeichen und das ZERO-Zeichen werden eingeschaltet.
2. Durch erneutes Drücken der Taste wird das Gerät ausgeschaltet.
24
Page 25

DE る
Bereiten Sie vor dem Start ein Kalibrierungsgewicht
Drücken Sie den Kalibrierungsschalter (CAL) und halten
erscheint. Lösen Sie
Kalibrierungsgewichts aus dem
Waage gespeichert ist. Verwenden Sie die folgenden
Kalibrierungsschalter
(CAL)
Drücken und senken Sie die
Abdeckung des Kalibrierungsschalters.
Drücken Sie den
halten Sie ihn gedrückt.
Lösen Sie den
Kalibrierungsschalter.
Stellen Sie das Gewicht mit
Tasten ein.
6. Kalibrierung
Diese Funktion stellt die Waage für genaues Wägen ein.
Führen Sie in den folgenden Fällen eine Kalibrierung durch.
□ Wenn die Waage zum ersten Mal verwendet wird.
□ Wenn die Waage bewegt wurde.
□ Wenn sich die Umgebung verändert hat.
□ Zur regelmäßigen Kalibrierung.
6-1 Kalibrierung mit einem Gewicht
□
(optional) vor.
1. Wärmen Sie die Waage mindestens eine halbe Stunde lang
auf, ohne etwas in die Schale zu legen.
2.
Sie ihn gedrückt, bis
dann den Schalter.
3. Die Waage zeigt an.
Um den Wert des Kalibrierungsgewichts zu ändern, fahren
Sie mit Schritt 4 fort.
Um einen Wert des
Speicher der Waage zu verwenden, fahren Sie mit Schritt 5
fort.
4. Drücken Sie die Taste . Die Anzeige zeigt den
Wert des Kalibrierungsgewichts in „Gramm“ an, der in der
Kalibrierungsschalter und
den entsprechenden
Tas te n, um den Wert zu ändern.
-Tas te
-Tas te
-Tas te
-Tas te
Zur Änderung der blinkenden Ziffer.
Zur Einstellung der gewählten Ziffer.
Zur Speicherung des Werts und
Rückkehr zu Schritt 3.
Zum Abbrechen des Werts und
Rückkehr zu Schritt 3.
25
Page 26

DE る
alibrierung abgeschlossen ist, zeigt die
Waagschale
Ohne etwas
in der Schale
Zum
Speichern
Zum
Speichern
Kalibrierungsgewicht
□ Verwenden Sie ein Kalibrierungsgewicht von mehr
als 2/3 der Kapazität (des höchsten Bereichs für die
Serie EW- i).
5. Durch Drücken der Taste in Schritt 3 wird der
Nullpunktwert gewogen. Berühren Sie die Schale während
des Wägens nicht.
Wenn die Nullk
Anzeige den Wert des Kalibrierungsgewichts an.
□ Um nur die Nullkalibrierung auszuführen und den
Vorgang abzuschließen, drücken Sie die Taste
.
6. Legen Sie das Kalibrierungsgewicht mit demselben Wert,
der auf der Schale angezeigt wird, in die Schale. Drücken
Sie die Taste , um es zu wägen.
Berühren Sie die Schale während des Wägens nicht.
7. wird angezeigt.
Nehmen Sie das Gewicht aus der Schale und drücken Sie
den Kalibrierungsschalter oder die Taste , um
zum Wägemodus zurückzukehren.
26
Page 27

DE る
Kapazität der Waage überschreitet. Nehmen Sie den Gegenstand von der
drücken, ohne Proben hinzuzufügen, kann die
angezeigt werden, wenn das
7. Wartung
7-1 Hinweise zur Wartung
□ Zerlegen Sie die Waage nicht. Wenden Sie sich an Ihren lokalen A&D-Händler, wenn Ihre Waage
gewartet oder repariert werden muss.
□ Verwenden Sie zum Transport die Originalverpackung.
□ Verwenden Sie keine organischen Lösemittel, um die Waage zu reinigen. Verwenden Sie ein
flusenfreies Tuch, das mit einem milden Reinigungsmittel befeuchtet wurde.
7-2 Fehlercodes
Anzeige Beschreibung
Überlastfehler
Warnung, um anzuzeigen, dass ein Gegenstand in die Schale gelegt wurde, der die
Waagschale.
Überlastfehler
Warnung, um anzuzeigen, dass die Waage eine unerwartete Last entdeckt. Entfernen
Sie alle Gegenstände von der Schale oder prüfen Sie, ob die Waagschale korrekt
aufgestellt wurde.
Bereichsübertritthinweis
Dies wird angezeigt, wenn der Wägesensor eine stark wachsende Kraft empfängt.
Prüfen Sie, ob etwas um die Waagschale liegt. Es ist möglich, dass der Wägesensor
selbst fehlschlägt.
Einheits- / 100%-Gewicht-Fehler
Die Einheit / Das 100%-Gewicht ist zu leicht im Zähl- / %-Modus.
Probemengenhinweis
Wenn das Probegewicht leicht ist und der Zählfehler groß werden könnte, werden Sie
von der Waage aufgefordert, eine große Anzahl an Proben zu verwenden. Legen Sie
die angezeigte Anzahl an Proben in die Schale und drücken Sie die Taste ,
um das Einheitsgewicht zu speichern.
Hinweis:
Wenn Sie die Taste
Zählgenauigkeit verringert werden.
Beim Start mit 100 Proben kann
Probegewicht zu leicht ist. Dies dient als Hinweis für Sie. Drücken Sie die Taste
, ohne Proben hinzuzufügen.
Dieser Hinweis wird nicht angezeigt, wenn „ “ (ACAI deaktiviert) oder
„ “ eingestellt ist.
27
Page 28

DE る
anzuzeigen, dass die Kalibrierung abgebrochen wurde, weil das
die Verwendung und laden Sie den Akku wieder auf oder verwenden Sie den
anzeigen kann. Vermeiden Sie Vibrationen und Zugluft. Drücken Sie die Taste
CAL-Fehler
Warnung, um
Kalibrierungsgewicht zu leicht ist.
Prüfen Sie die Waagschale und das Kalibrierungsgewicht.
Drücken Sie die Taste , um in den Wägemodus zurückzukehren.
Niedriger Akkustand
Warnung, um anzuzeigen, dass der Akku (OP-09) entladen ist. Stoppen Sie sofort
Wechselstromadapter.
Wechselstromadapterfehler
Warnung, um anzuzeigen, dass die Ausgangsspannung des Wechselstromadapters
zu hoch ist. Prüfen Sie, ob der Wechselstromadapter korrekt ist.
Wechselstromadapterfehler
Warnung, um anzuzeigen, dass die Ausgangsspannung des Wechselstromadapters
zu niedrig ist. Prüfen Sie, ob der Wechselstromadapter korrekt ist.
Stabilitätsfehler
Warnung, um anzuzeigen, dass der Wägewert nicht stabil ist und die Waage ihn nicht
, um in den Wägemodus zurückzukehren.
Interne Fehler (# = , , oder )
Die Waage entdeckt einen Fehlerstatus in der internen Verarbeitung. Schalten Sie
das Gerät ohne etwas in der Schale aus und wieder ein. Wenn dieser Fehler weiterhin
besteht, fordern Sie eine Wartung an.
Wenn Sie einen Fehler nicht abbrechen können oder weitere Fehler aufgetreten sind, fordern Sie
eine Wartung von dem Geschäft an, in dem Sie die Waage erworben haben, oder wenden Sie
sich an Ihren lokalen A&D-Händler.
28
Page 29

DE る
8-1 EK-i-Serie
8. Spezifikationen
Modell
Gewichtskapazität 120 g 200 g 300 g 600 g
Lesbarkeit 0,01 g 0,01 g 0,01 g 0,1 g
Wiederholbarkeit
(Standardabweichung)
Linearität ±0,01 g ±0,01 g ±0,02 g ±0,1 g
Modell
Gewichtskapazität 1200 g 2000 g 3000 g 6000 g 12 kg
Lesbarkeit 0,1 g 0,1 g 0,1 g 1 g 1 g
Wiederholbarkeit
(Standardabweichung)
Linearität ±0,1 g ±0,1 g ±0,2 g ±1 g ±1 g
Modell
Gewichtskapazität 400 g 600 g 4000 g 6000 g
EK-120i EK-200i EK-300i EK-600i
0,01 g 0,01 g 0,01 g 0,1 g
EK-1200i EK-2000i EK-3000i EK-6000i EK-12Ki
0,1 g 0,1 g 0,1 g 1 g 1 g
EK-410i EK-610i EK-4100i EK-6100i
Lesbarkeit 0,01 g 0,01 g 0,1 g 0,1 g
Wiederholbarkeit
(Standardabweichung)
Linearität ±0,02 g ±0,02 g ±0,2 g ±0,2 g
0,01 g 0,01 g 0,1 g 0,1 g
8-2 EW-i-Serie
Modell
Gewichtskapazität 30 g 60 g 150 g 300 g 600 g 1500 g 3 kg 6 kg 12 kg
Lesbarkeit 0,01 g 0,02 g 0,05 g 0,1 g 0,2 g 0,5 g 1 g 2 g 5 g
Wiederholbarkeit
0,01 g 0,02 g 0,05 g 0,1 g 0,2 g 0,5 g 1 g 2 g 5 g
(Standardabweichung)
Linearität ±0,01 g ±0,02 g ±0,05 g ±0,1 g ±0,2 g ±0,5 g ±1 g ±2 g ±5 g
EW-150i EW-1500i EW-12Ki
29
Page 30

ES る
1. Introducción
La presente guía de inicio rápido describe las funciones y el funcionamiento básicos de la báscula.
Las funciones y procedimientos operativos de la báscula (series EK-i / EW-i) se explican en detalle en
el siguiente manual de instrucciones.
[Manual de instrucciones de las series EK-i / EW-i]
Este es un manual de instrucciones para comprender y aprovechar al máximo las básculas
electrónicas de precisión de las series EK-i / EW-i. El manual se puede descargar desde nuestro sitio
web https://www.aandd.jp
.
2. Desembalaje
Al desembalar, compruebe que están incluidos todos los elementos siguientes:
Plato de pesaje
Soporte del plato
Unidad principal
EK-120i / EK-200i / EK-300i
EK-410i / EK-610i
EW-150i
Plato de pesaje
Unidad principal
EK-600i / EK-1200i / EK-2000i
EK-3000i / EK-6000i / EK-12Ki
EK-4100i / EK-6100i
EW-1500i / EW-12Ki
Adaptador de CA Guía de inicio rápido
Nota:
Compruebe que el tipo de adaptador de CA es
correcto para la tensión y el tipo de enchufe de su
zona.
30
Page 31

ES る
introduce un peso unitario, un
% u otros valores
Cambia la unidad de pesaje (el
Toma del
adaptador de CA
3. Nombres y funciones de los componentes
Indicador del intervalo de pesaje
Marca de estabilidad
Marca ACAI
Resultados del comparador
Pantalla LCD
Tecla
Tec la
Tec la
Tec la
Tec la
Tapa del botón de calibración
Enciende o apaga el aparato.
Unidades
Plato de pesaje
Rueda niveladora
Nivel de burbuja
RS-232C
Transmite los datos de pesaje a
una impresora o un ordenador, o
Ranura OP-04/09
Manténgala pulsada para entrar en
el modo de ajuste de funciones.
Modo de pesaje (solo EW-i):
Cambia el intervalo de pesaje
(cuando está seleccionado
Modo pcs:
Abre el modo de
almacenamiento de pesaje
unitario de muestras.
Modo %:
Abre el modo de
almacenamiento de pesaje del
100 %.
).
31
peso del 100
de ajuste en la báscula.
modo de pesaje).
Vuelve a poner la pantalla a cero.
Page 32

ES る
4. Preparación
4-1 Preparación de la báscula
1. Coloque el plato de pesaje sobre la unidad principal como se muestra en la página anterior.
2. Ajuste la nivelación de la báscula utilizando las ruedas niveladoras.
Use el nivel de burbuja para comprobar la nivelación. La burbuja debe estar en el centro del círculo.
3. Calibre la báscula antes de usarla. (Consulte “6. Calibración”).
Instalación de la báscula
Para que las mediciones sean correctas, mantener la báscula en buen estado y evitar riesgos, siga
estas instrucciones:
□ No instale la báscula en lugares sujetos a un nivel excesivo de polvo, viento, vibración, grandes
fluctuaciones de temperatura o condensación, o donde pueda haber campos magnéticos.
□ No instale la báscula sobre superficies blandas o que puedan hacer que cambie la nivelación de
la báscula.
□ No instale la báscula en un lugar expuesto a la luz solar directa.
□ No instale la báscula cerca de sistemas de calefacción o aire acondicionado.
□ No utilice una fuente de alimentación de CA inestable.
□ No instale la báscula en ningún lugar donde pueda haber gases corrosivos o combustibles.
□ Antes de usar la báscula, deje que alcance el equilibrio respecto de la temperatura ambiente.
□ Encienda la báscula al menos media hora antes de usarla para que pueda calentarse.
□ Después de instalar la báscula por primera vez, o si esta se ha movido, calíbrela como se explica
en “6. Calibración”.
4-2 Fuente de alimentación
Como fuente de alimentación, están disponibles el adaptador de CA y el conjunto de batería recargable
(EKW-09i: artículo opcional).
Si se usa el adaptador de CA
Utilice una fuente de alimentación estable. Para usar el adaptador de CA, introduzca el conector del
adaptador de CA en la toma del adaptador de CA de EK-i / EW-i.
Si se usa el conjunto de batería recargable (EKW-09i)
Consulte el [manual de instrucciones de las series EK-i / EW-i] para obtener más información.
32
Page 33

ES る
5. Funcionamiento
5-1 Encender y apagar la báscula
1. Pulse la tecla para encender la báscula.
Aparecerán todos los indicadores que se muestran más arriba.
(Acerca de las unidades: solo se mostrarán las unidades disponibles).
Después, se apagarán todos los elementos de la pantalla excepto la unidad de pesaje y el punto
decimal.
La báscula esperará a que los datos de pesaje se estabilicen y aparecerá un cero con la marca
ZERO (cero de encendido).
El intervalo del cero de encendido se encuentra dentro del ±10 % de la capacidad de pesaje
alrededor del punto cero calibrado.
Si la báscula se enciende mientras hay una carga que supere ese intervalo, la tara se pondrá a
cero y se encenderán las marcas NET y ZERO.
2. Si se vuelve a pulsar la tecla , la báscula se apagará.
33
Page 34

ES る
. En la pantalla aparecerá
indicado en “gramos” el valor de la pesa de calibración
Botón de
calibración (CAL)
Presione y baje la tapa
del botón de calibración.
Mantenga pulsado
el botón CAL.
Suelte el botón
CAL.
Defina el peso con las
teclas correspondientes.
6. Calibración
Esta función ajusta la báscula para realizar un pesaje preciso.
Calíbrela en los siguientes casos:
□ Al usar la báscula por primera vez.
□ Después de mover la báscula.
□ Cuando la temperatura ambiente haya cambiado.
□ Para calibrarla de manera periódica.
6-1 Calibración con una pesa
□ Prepare una pesa de calibración (opcional) antes de
empezar.
1. Deje que la báscula se caliente durante media hora como
mínimo sin colocar nada sobre el plato de pesaje.
2. Mantenga pulsado el botón de calibración (CAL) hasta que
aparezca y, entonces, suelte el botón.
3. La báscula mostrará .
Para cambiar el valor de la pesa de calibración, vaya al
paso 4.
Para usar el valor de la pesa de calibración guardado en la
memoria de la báscula, vaya al paso 5.
4. Pulse la tecla
guardado en la báscula. Utilice las siguientes teclas para
cambiar el valor.
Tecla
Para seleccionar el dígito parpadeante
que se desea cambiar.
Tecla
Tecla
Tecla
Para definir el valor del dígito
seleccionado.
Para guardar el valor y volver al
paso 3.
Para cancelar el valor y volver al
paso 3.
34
Page 35

ES る
Plato de pesaje
Sin nada
en el plato
Para
guardarlo
Para
guardarlo
Pesa de
calibración
□ Utilice una pesa de calibración de más de 2/3 de la
capacidad (del intervalo máximo en la serie EW- i).
5. En el paso 3, al pulsar la tecla , se pesa el valor
del punto cero. No toque el plato durante el pesaje.
Cuando finalice la calibración del punto cero, en la pantalla
aparecerá el valor de la pesa de calibración.
□ Para realizar solamente la calibración a cero y terminar
el procedimiento, pulse la tecla .
6. Coloque en el plato la pesa de calibración con el mismo
valor que aparece. Pulse la tecla para pesarla.
No toque el plato durante el pesaje.
7. Aparecerá .
Retire la pesa del plato y pulse el botón CAL o la tecla
para volver al modo de pesaje.
35
Page 36

ES る
los objetos del plato o compruebe que el plato de pesaje está instalado
Advertencia que indica que la calibración se ha cancelado porque la pesa de
7. Mantenimiento
7-1 Notas sobre el mantenimiento
□ No desmonte la báscula. Si necesita reparar la báscula o someterla a mantenimiento, póngase en
contacto con el distribuidor de A&D de su zona.
□ Utilice el embalaje original para transportarla.
□ No use disolventes orgánicos para limpiar la báscula. Utilice un paño que no suelte pelusa
humedecido con un detergente suave.
7-2 Códigos de error
Pantalla Descripción
Error de sobrecarga
Advertencia que indica que se ha colocado sobre el plato un objeto que supera la
capacidad de la báscula. Retire el objeto del plato.
Error de sobrecarga
Advertencia que indica que la báscula ha detectado una carga inesperada. Retire
todos
correctamente.
Aviso de salida de intervalo
Este mensaje aparece si el sensor de pesaje recibe una gran fuerza en dirección
ascendente. Compruebe si hay algo atrapado alrededor del plato de pesaje. Es
posible que haya algún fallo en el sensor de pesaje.
Error de peso unitario / 100 %
El peso unitario/100 % es demasiado ligero en el modo de recuento / %.
Aviso de cantidad de muestras
Si la muestra es ligera y el error de recuento puede llegar a ser grande, la báscula le
pide que utilice un número mayor de muestras. Coloque en el plato el número de
muestras que se indica en la pantalla y pulse la tecla para guardar el peso
unitario.
Nota:
Si pulsa la tecla sin añadir muestras, el recuento puede ser menos preciso.
A partir de 100 muestras, puede aparecer si la muestra es ligera. Es un
aviso y puede pulsar la tecla sin añadir ninguna muestra.
Este aviso no aparece cuando se ha definido “ ” (ACAI inhabilitado) o
“ ”.
Errores de CAL
calibración es demasiado ligera.
Revise el plato de pesaje y la pesa de calibración.
Para volver al modo de pesaje, pulse la tecla .
36
Page 37

ES る
Batería baja
Advertencia que indica que el conjunto de batería (OP-09) está descargado. Deje de
usarlo inmediatamente y recárguelo o utilice el adaptador de CA.
Error del adaptador de CA
Advertencia que indica que la tensión de salida del adaptador de CA es demasiado
alta. Compruebe si el adaptador de CA es correcto.
Error del adaptador de CA
Advertencia que indica que la tensión de salida del adaptador de CA es demasiado
baja. Compruebe si el adaptador de CA es correcto.
Error de estabilidad
Advertencia que indica que el valor del peso no es estable y la báscula no puede
mostrarlo. Evite las vibraciones y el movimiento. Pulse la tecla para volver
al modo de pesaje.
Errores internos (# = , , o )
La báscula ha detectado un error en el procesamiento interno. Despeje el plato de
pesaje, apague la báscula y vuelva a encenderla. Si el error persiste, solicite una
reparación.
Si no puede cancelar un error o si se producen otros errores, solicite una reparación al comercio
donde adquirió la báscula o al distribuidor de A&D de su zona.
37
Page 38

ES る
8. Especificaciones
8-1 Serie EK-i
Modelo EK-120i EK-200i EK-300i EK-600i
Capacidad de
pesaje
Legibilidad 0,01 g 0,01 g 0,01 g 0,1 g
Repetibilidad
(desviación estándar)
Linealidad ±0,01 g ±0,01 g ±0,02 g ±0,1 g
Modelo EK-1200i EK-2000i EK-3000i EK-6000i EK-12Ki
Capacidad de
pesaje
Legibilidad 0,1 g 0,1 g 0,1 g 1 g 1 g
Repetibilidad
(desviación estándar)
Linealidad ±0,1 g ±0,1 g ±0,2 g ±1 g ±1 g
Modelo EK-410i EK-610i EK-4100i EK-6100i
120 g 200 g 300 g 600 g
0,01 g 0,01 g 0,01 g 0,1 g
1200 g 2000 g 3000 g 6000 g 12 kg
0,1 g 0,1 g 0,1 g 1 g 1 g
Capacidad de
pesaje
Legibilidad 0,01 g 0,01 g 0,1 g 0,1 g
Repetibilidad
(desviación estándar)
Linealidad ±0,02 g ±0,02 g ±0,2 g ±0,2 g
400 g 600 g 4000 g 6000 g
0,01 g 0,01 g 0,1 g 0,1 g
8-2 Serie EW-i
Modelo EW-150i EW-1500i EW-12Ki
Capacidad de
pesaje
Legibilidad 0,01 g 0,02 g 0,05 g 0,1 g 0,2 g 0,5 g 1 g 2 g 5 g
Repetibilidad
(desviación estándar)
Linealidad ±0,01 g ±0,02 g ±0,05 g ±0,1 g ±0,2 g ±0,5 g ±1 g ±2 g ±5 g
30 g 60 g 150 g 300 g 600 g 1500 g 3 kg 6 kg 12 kg
0,01 g 0,02 g 0,05 g 0,1 g 0,2 g 0,5 g 1 g 2 g 5 g
38
Page 39

IT る
1. Introduzione
Questa guida introduttiva descrive le funzioni di base e le operazioni della bilancia.
Le funzioni e le procedure operative della bilancia (serie EK-i / EW-i) sono illustrate nel dettaglio nel
seguente manuale di istruzioni.
[Manuale di istruzioni della serie EK-i / EW-i]
Questo è un manuale di istruzioni per comprendere e utilizzare appieno la bilancia elettronica
di precisione della serie EK-i / EW-i. Questo manuale può essere scaricato dal nostro sito web
https://www.aandd.jp
.
2. Disimballaggio
Durante il disimballaggio, controllare che tutti gli elementi seguenti siano inclusi:
Piatto per la pesatura
Supporto del piatto
Unità principale
EK-120i / EK-200i / EK-300i
EK-410i / EK-610i
EW-150i
Piatto per la pesatura
Unità principale
EK-600i / EK-1200i / EK-2000i
EK-3000i / EK-6000i / EK-12Ki
EK-4100i / EK-6100i
EW-1500i / EW-12Ki
Adattatore CA Guida introduttiva
Nota:
Verificare che il tipo di adattatore CA sia adatto al
voltaggio locale e al tipo di presa.
39
Page 40

IT る
Cambia l’unità di pesatura (la
Presa jack per
adattatore CA
Copertura del pulsante
di calibrazione
3. Nomi e funzioni dei componenti
Indicatore del campo di pesatura
Segnale di stabilità
LCD
Segnale ACAI
Risultati del comparatore
Piatto per la pesatura
Piedino di livellamento
Livella
Unità
Alloggiamento
OP-04/09
Tas to
Tas to
Tas to
Accende o spegne l’unità.
Tenere premuto per entrare in
modalità di impostazione delle
funzioni.
Modalità di pesatura (solo EW-i):
Modifica il campo di pesatura
(quando viene selezionato
Modalità pcs:
Entra in modalità di
memorizzazione del peso
specifico del campione.
Modalità %:
Entra in modalità di
memorizzazione del peso 100%.
).
Tas to
Tas to
40
RS-232C
Invia i dati di pesatura ad una
stampante o un computer, oppure
inserisce un peso specifico, un
peso 100% o altri valori di
impostazione nella bilancia.
modalità di pesatura).
Azzera il display.
Page 41

IT る
4. Assemblaggio
4-1 Assemblaggio della bilancia
1. Posizionare il piatto per la pesatura sull’unità principale come mostrato nella pagina precedente.
2. Regolare il livello della bilancia utilizzando i piedini di livellamento.
Utilizzare la livella per verificare che sia piana. La bolla d’aria deve trovarsi al centro del cerchio.
3. Calibrare la bilancia prima dell’uso. (Consultare “6. Calibrazione”)
Installazione della bilancia
Al fine di ottenere una corretta misurazione, di mantenere la bilancia in buone condizioni e di prevenire
rischi, osservare quanto segue:
□ Non installare la bilancia in luoghi esposti a polvere, vento, vibrazioni, forti sbalzi di temperatura o
formazioni di condensa eccessivi o in luoghi che possano essere esposti a campi magnetici.
□ Non installare la bilancia su una superficie morbida o che possa causare uno spostamento del
livello della bilancia.
□ Non installare la bilancia in luoghi esposti alla luce solare diretta.
□ Non installare la bilancia in prossimità di termosifoni o impianti di aria condizionata.
□ Non utilizzare una fonte di alimentazione CA instabile.
□ Non installare la bilancia in luoghi dove possano trovarsi gas combustibili o corrosivi.
□ Prima dell’uso, attendere che la bilancia si stabilizzi a temperatura ambiente.
□ Accendere la bilancia almeno mezz’ora prima dell’uso affinché questa possa riscaldarsi.
□ Se la bilancia viene installata per la prima volta, o se la bilancia è stata spostata, eseguire la
calibrazione come descritto in “6. Calibrazione”.
4-2 Fonte di alimentazione
Per l’alimentazione, sono disponibili l’adattatore CA o il pacco batteria ricaricabile (EKW-09i: elemento
opzionale).
Per l’utilizzo dell’adattatore CA
Utilizzare una fonte di alimentazione stabile. Per usare l’adattatore CA, inserire lo spinotto
dell’adattatore CA nella presa jack per adattatore CA di EK-i / EW-i.
Per l’utilizzo del pacco batteria ricaricabile (EKW-09i)
Fare riferimento al [Manuale di istruzioni della serie EK-i / EW-i] per maggiori informazioni.
41
Page 42

IT る
5. Funzionamento
5-1 Accensione e spegnimento
1. Premere il tasto per accendere la bilancia.
Tutti gli indicatori vengono visualizzati come mostrato sopra.
(Circa le unità di peso: vengono visualizzate solo quelle disponibili).
Il display si spegne, ad eccezione dell’unità di pesatura e del punto decimale.
La bilancia attende che i dati di pesatura diventino stabili, quindi viene visualizzato zero con il
segnale ZERO (zero di accensione).
L’intervallo zero di accensione è compreso tra ±10% della capacità di pesatura rispetto al punto
zero calibrato.
Se si accende la bilancia mentre è presente un carico che supera tale intervallo, la bilancia viene
tarata a zero e si accendono i segnali NET e ZERO.
2. Premendo nuovamente il tasto , la bilancia si spegne.
42
Page 43

IT る
Prima di iniziare, preparare un peso di calibrazione
Far riscaldare la bilancia per almeno mezz’ora senza
peso di calibrazione in “grammi” che è memorizzato nella
Per selezionare la cifra lampeggiante
della cifra
Pulsante di
calibrazione (CAL)
Premere e abbassare la
calibrazione.
Tenere premuto il
pulsante CAL.
Rilasciare il
pulsante CAL.
Impostare il peso
usando i tasti pertinenti.
6. Calibrazione
Questa funzione regola la bilancia per una pesatura precisa.
Eseguire la calibrazione nei casi seguenti.
□ Quando si utilizza la bilancia per la prima volta.
□ Quando la bilancia è stata spostata.
□ Quando le condizioni ambientali sono cambiate.
□ Per la calibrazione periodica.
copertura del pulsante di
6-1 Calibrazione mediante un peso
□
(opzionale).
1.
posizionare niente sul piatto.
2. Tenere premuto il pulsante di calibrazione (CAL) finché non
compare , quindi rilasciare il pulsante.
3. La bilancia visualizza .
Per modificare il valore del peso di calibrazione, andare al
passaggio 4.
Per utilizzare il valore del peso di calibrazione nella memoria
della bilancia, andare al passaggio 5.
4. Premere il tasto . Il display mostra il valore del
bilancia. Utilizzare i tasti seguenti per modificare il valore.
Tasto
da modificare.
Tasto
Tasto
Tasto
Per impostare il valore
selezionata.
Per memorizzare il valore e ritornare
al passaggio 3.
Per cancellare il valore e ritornare
al passaggio 3.
43
Page 44

IT る
Utilizzare un peso di calibrazione di oltre i 2/3 della
valore del punto zero. Non toccare il piatto durante la
Piatto per la pesatura
Con il piatto
vuoto
Per memorizzare
Per
memorizzare
Peso di
calibrazione
□
capacità (dell’intervallo più alto per la serie EW- i).
5. Al passaggio 3, premendo il tasto viene pesato il
pesatura.
Quando la calibrazione dello zero è completata, il display
mostra il valore del peso di calibrazione.
□ Per eseguire solamente la calibrazione dello zero e
terminare la procedura, premere il tasto .
6. Posizionare sul piatto il peso di calibrazione con lo stesso
valore di quello visualizzato. Premere il tasto per
pesarlo.
Non toccare il piatto durante la pesatura.
7. Compare .
Rimuovere il peso dal piatto e premere il pulsante CAL o il
tasto per ritornare alla modalità di pesatura.
44
Page 45

IT る
gli oggetti dal piatto o verificare che il piatto per la pesatura sia installato
premere il tasto
” (ACAI disabilitato) o
7. Manutenzione
7-1 Indicazioni relative alla manutenzione
□ Non smontare la bilancia. Contattare il rivenditore A&D locale qualora fossero necessari lavori di
manutenzione o riparazione della bilancia.
□ Utilizzare l’imballaggio originale per il trasporto.
□ Non utilizzare solventi organici per pulire la bilancia. Utilizzare un panno privo di lanugine inumidito
con un detergente delicato.
7-2 Codici di errore
Display Descrizione
Errore di sovraccarico
Avvertenza per segnalare che è stato posizionato sul piatto un oggetto che
supera la capacità della bilancia. Rimuovere l’oggetto dal piatto.
Errore di sovraccarico
Avvertenza per segnalare che la bilancia rileva un carico imprevisto. Rimuovere tutti
correttamente.
Avviso fuori intervallo
Viene mostrato quando il sensore di pesatura riceve una potente forza verso l’alto.
Controllare che non vi sia niente schiacciato attorno al piatto per la pesatura. È
possibile che il sensore di pesatura stesso sia guasto.
Errore peso specifico / 100%
Il peso specifico / 100% è troppo leggero nella modalità di conteggio / %.
Avviso quantità campione
Quando il peso del campione è leggero e l’errore di conteggio potrebbe diventare
significativo, la bilancia richiederà un maggior numero di campioni. Posizionare sul
piatto il numero di campioni visualizzato e premere il tasto per memorizzare
il peso specifico.
Nota:
Se si preme il tasto senza aver aggiunto dei campioni, la precisione del
conteggio può essere ridotta.
A partire dai 100 campioni, può essere visualizzato quando il peso del
campione è leggero. Si tratta di un avviso per l’utente, quindi
senza aggiungere alcun campione.
Questo avviso non viene mostrato quando “
“ ” sono impostati.
45
Page 46

IT る
09) è scarico. Interrompere
Avvertenza per segnalare che la tensione di uscita dell’adattatore CA è troppo
Errori CAL
Avvertenza per segnalare che la calibrazione è stata annullata perché il peso di
calibrazione è troppo leggero.
Controllare il piatto per la pesatura e il peso di calibrazione.
Per ritornare alla modalità di pesatura, premere il tasto .
Batteria scarica
Avvertenza per segnalare che il pacco batteria (OPimmediatamente l’utilizzo e ricaricarla oppure usare l’adattatore CA.
Errore adattatore CA
elevata. Verificare che l’adattatore CA sia corretto.
Errore adattatore CA
Avvertenza per segnalare che la tensione di uscita dell’adattatore CA è troppo bassa.
Verificare che l’adattatore CA sia corretto.
Errore di stabilità
Avvertenza per segnalare che il valore del peso non è stabile e la bilancia non può
visualizzarlo. Evitare vibrazioni e correnti d’aria. Premere il tasto per
ritornare alla modalità di pesatura.
Errori interni (# = , , o )
La bilancia rileva uno stato di errore nell’elaborazione interna. Con il piatto per la
pesatura vuoto, spegnere e riaccendere la bilancia. Se l’errore persiste, richiedere
assistenza.
Se non è possibile annullare un errore o se si sono verificati altri errori, richiedere assistenza al
negozio presso cui è stata acquistata la bilancia o al rivenditore A&D locale.
46
Page 47

IT る
8-1 Serie EK-i
8. Specifiche tecniche
Modello
Capacità di
pesatura
Leggibilità 0,01g 0,01g 0,01g 0,1g
Ripetibilità
(deviazione standard)
Linearità ±0,01g ±0,01g ±0,02g ±0,1g
Modello
Capacità di
pesatura
Leggibilità 0,1g 0,1g 0,1g 1g 1g
Ripetibilità
(deviazione standard)
Linearità ±0,1g ±0,1g ±0,2g ±1g ±1g
EK-120i EK-200i EK-300i EK-600i
120g 200g 300g 600g
0,01g 0,01g 0,01g 0,1g
EK-1200i EK-2000i EK-3000i EK-6000i EK-12Ki
1200g 2000g 3000g 6000g 12kg
0,1g 0,1g 0,1g 1g 1g
Modello
Capacità di
pesatura
Leggibilità 0,01g 0,01g 0,1g 0,1g
Ripetibilità
(deviazione standard)
Linearità ±0,02g ±0,02g ±0,2g ±0,2g
EK-410i EK-610i EK-4100i EK-6100i
400g 600g 4000g 6000g
0,01g 0,01g 0,1g 0,1g
8-2 Serie EW-i
Modello
Capacità di
pesatura
Leggibilità 0,01g 0,02g 0,05g 0,1g 0,2g 0,5g 1g 2g 5g
Ripetibilità
(deviazione standard)
Linearità ±0,01g ±0,02g ±0,05g ±0,1g ±0,2g ±0,5g ±1g ±2g ±5g
30g 60g 150g 300g 600g 1500g 3kg 6kg 12kg
0,01g 0,02g 0,05g 0,1g 0,2g 0,5g 1g 2g 5g
EW-150i EW-1500i EW-12Ki
47
Page 48

CT る
簡介
內容物
注意:
1.
本快速入門指南說明天平的基本功能和操作。
天平 (EK-i / EW-i 系列) 的功能和操作步驟在以下說明手冊中均有詳細說明。
[EK-i / EW-i 系列說明手冊]
這本使用說明書協助使用者瞭解並充分利用精密電子天平 EK-i / EW-i 系列。您可以從我們的網站下載
本手冊:https://www.aandd.jp。
2.
打開包裝時,請檢查是否包含以下所有物品:
秤盤
秤盤支承
主機
EK-120i / EK-200i / EK-300i
EK-410i / EK-610i
EW-150i
秤盤
主機
EK-600i / EK-1200i / EK-2000i
EK-3000i / EK-6000i / EK-12Ki
EK-4100i / EK-6100i
EW-1500i / EW-12Ki
變壓器 快速入門指南
確認變壓器類型適用您當地的電壓和插座類型。
48
Page 49

CT る
將稱量資料輸出到印表機或電腦,
3. 零件名稱和功能
稱量範圍指示燈
液晶顯示器
穩定性標記
ACAI 標記
比較器結果
水平儀
單位
秤盤
水平調整腳座
OP-04/09 插槽
按鍵
按鍵
按鍵
校正開關蓋
將電源切換至 ON 或 OFF。
按住即可進入功能設定模式。
稱量模式 (僅適用於 EW-i):
改變稱量範圍
選取
(
時)。
pcs 模式:
進入樣品單位重量儲存模式。
% 模式:
進入 100% 重量儲存模式。
按鍵
按鍵
RS-232C
變壓器插孔
或在天平輸入單位重量、100% 重
量或其他設定值。
切換稱量單位 (稱量模式)。
清除結果,將顯示幕設為零。
49
Page 50

CT る
設定
安裝天平
使用變壓器時
使用可充電電池組
4.
4-1 設定天平
1. 如前頁所示,將秤盤置於主機上。
2. 使用水平調整腳座,讓天平處於水平狀態。
使用氣泡式水平儀確認。氣泡應位於圓圈中心。
3. 使用前請校正天平。(請參閱「6. 校正」)
為了獲得正確測量結果,並讓天平維持良好狀態、避免危險,請遵守以下事項:
□ 請勿將天平安裝在灰塵過多、有風、會震動、溫差大、會結露或有磁場的地方。
□ 請勿將天平安裝在柔軟或可能導致天平移動的表面上。
□ 請勿將天平安裝在直射陽光下。
□ 請勿將天平安裝在暖爐或冷氣空調附近。
□ 請勿使用不穩定的 AC 電源。
□ 請勿將天平安裝在可能有可燃氣體或腐蝕性氣體的地方。
□ 使用天平之前,請先讓天平與環境溫度達到平衡。
□ 使用天平之前,請先將電源切換到 ON,讓天平熱機至少 30 分鐘。
□ 第一次安裝天平或移動天平後,請依「6. 校正」中的說明執行校正。
4-2 電源
變壓器或可充電電池組 (EKW-09i:選購項目) 可當作電源。
請使用穩定的電源。若要使用變壓器,請將變壓器插頭插入 EK-i / EW-i 上的變壓器插孔。
如需詳細資訊,請參閱 [EK-i / EW-i 系列說明手冊]。
( EKW-09i ) 時
50
Page 51

CT る
操作
5.
5-1 將電源切換至 ON 或 OFF
按下
1.
2.
此時會顯示所有指示燈,如上圖所示。
(關於單位:只會顯示可用的單位。)
接著顯示幕會熄滅,只看得到稱量單位和小數點。
天平等待稱量資料趨於穩定,穩定後會顯示零,此時會看到 ZERO 標記 (開機歸零)。
開機歸零的範圍在校正零點左右稱量上限 ±10% 以內。
如果電源在負載超過此範圍時處於 ON 狀態,天平將歸零,並亮起 NET 標記和 ZERO 標記。
再按一次
按鍵將電源切換至
按鍵,可將電源切換為
ON。
OFF。
51
Page 52

CT る
校正
(CAL)
開關
按住 CAL 開關。
放開 CAL 開關。
量。
此功能可調整天平以產生準確的稱量結果。
請在以下情況執行校正。
□ 第一次使用天平時。
□ 移動天平後。
□ 周圍環境發生變化時。
□ 例行校正時。
6-1 使用砝碼校正
□ 開始使用之前,請準備好校正砝碼 (選購)。
6.
按壓並拉下
校正開關蓋。
校正
1. 請讓天平熱機至少 30 分鐘,此時不要在秤盤上放置任何物
件。
按住校正
2.
天平顯示
3.
若要變更校正稱量值,請繼續執行步驟 4。
若要使用天平記憶體的校正稱量值,請繼續執行步驟 5。
按下
4.
以克為單位)。使用以下按鍵變更值。
(
□ 使用的校正砝碼應大於稱量上限的 2/3 (EW- i 系列的
(CAL)
按鍵
按鍵
開關,出現
。
按鍵。顯示幕顯示天平儲存的校正稱量值
按鍵 若要選擇閃爍的數字進行變更。
按鍵 若要設定所選數字的值。
若要儲存值並返回步驟 3。
若要取消值並返回步驟 3。
後放開。
使用相關按鍵設定重
最大範圍)。
52
Page 53

CT る
秤盤
秤盤淨空
若要儲存
若要儲存
校正砝碼
在步驟
5.
摸秤盤。
歸零校正完成後,顯示幕會顯示校正稱量值。
□
在秤盤上放置校正砝碼,值須與顯示的相同。按下
6.
按鍵稱量。
稱量期間請勿觸摸秤盤。
按下
3
若只要執行歸零校正並完成步驟,請按下
按鍵。
按鍵稱量零點值。稱量期間請勿觸
出現
7.
。
從秤盤取下砝碼,然後按
量模式。
CAL
開關或
按鍵返回稱
53
Page 54

CT る
維護
超載錯誤
超載錯誤
警告使用者天平偵測到意外負載。請從秤盤取下所有物件,或檢查是否正確安裝秤盤。
超過範圍通知
單位
重量錯誤
樣品數量通知
注意:
錯誤
低電量
變壓器錯誤
變壓器錯誤
7.
7-1 維護注意事項
□ 請勿拆解天平。如果您的天平需要維護或維修,請連絡當地的 A&D 經銷商。
□ 請使用原始包裝運送。
□ 請勿使用有機溶劑清潔天平。請使用無絨布蘸中性清潔劑來清潔。
7-2 錯誤代碼
顯示幕 描述
警告使用者在秤盤上放置的物件已超出天平稱量上限。請從秤盤取下物件。
如果重量感應器接收到強大的向上作用力,將會顯示此通知。檢查是否有任何物件夾
在秤盤周圍。重量感應器本身可能故障。
/ 100%
在計數 / % 模式下,單位 / 100% 重量太輕。
樣品重量較輕且計數誤差可能變大時,天平將提示您增加樣本數量。將樣品按照顯示
的數量放在秤盤上,然後按下
不增加樣品數量即按下
從
已,請按下
若設定「 」
CAL
警告使用者已因校正砝碼太輕而取消校正。
請檢查秤盤和校正砝碼。
若要返回稱量模式,請按下
警告使用者電池組 (OP-09) 已放電。立即停止使用,並再充電或使用變壓器。
個樣品開始,樣品重量較輕時,可能會顯示
100
按鍵,不需增加任何樣品。
停用
(
按鍵可能會降低計數準確度。
ACAI)
按鍵儲存單位重量。
或「 」,不會顯示此通知。
按鍵。
。這只是一個通知而
警告使用者變壓器輸出電壓過高。請檢查變壓器是否正確。
警告使用者變壓器輸出電壓過低。請檢查變壓器是否正確。
54
Page 55

CT る
穩定性錯誤
內部錯誤
、 、 或
如果您無法取消錯誤,或有其他錯誤發生,請將天平送至原購買商店或當地的
經銷商修理。
警告使用者稱量值不穩定且天平無法顯示稱量值。請避免震動和氣流。按下
按鍵返回稱量模式。
(# =
天平偵測到內部處理發生錯誤。將秤盤淨空,然後將電源切換至 OFF,再切換至 ON。
)
如果此錯誤持續出現,請將天平送修。
A&D
55
Page 56

CT る
規格
8-1 Ek-i 系列
8.
型號
稱量上限
可讀數
重複性 (標準偏差)
線性
型號
稱量上限
可讀數
重複性 (標準偏差)
線性
型號
稱量上限
可讀數
重複性 (標準偏差)
EK-120i EK-200i EK-300i EK-600i
120g 200g 300g 600g
0.01g 0.01g 0.01g 0.1g
0.01g 0.01g 0.01g 0.1g
±0.01g ±0.01g ±0.02g ±0.1g
EK-1200i EK-2000i EK-3000i EK-6000i EK-12Ki
1200g 2000g 3000g 6000g 12kg
0.1g 0.1g 0.1g 1g 1g
0.1g 0.1g 0.1g 1g 1g
±0.1g ±0.1g ±0.2g ±1g ±1g
EK-410i EK-610i EK-4100i EK-6100i
400g 600g 4000g 6000g
0.01g 0.01g 0.1g 0.1g
0.01g 0.01g 0.1g 0.1g
線性
8-2 EW-i 系列
型號
稱量上限
可讀數
重複性 (標準偏差)
線性
±0.02g ±0.02g ±0.2g ±0.2g
EW-150i EW-1500i EW-12Ki
30g 60g 150g 300g 600g 1500g 3kg 6kg 12kg
0.01g 0.02g 0.05g 0.1g 0.2g 0.5g 1g 2g 5g
0.01g 0.02g 0.05g 0.1g 0.2g 0.5g 1g 2g 5g
±0.01g ±0.02g ±0.05g ±0.1g ±0.2g ±0.5g ±1g ±2g ±5g
56
Page 57

Page 58

3-23-14 Higashi-Ikebukuro, Toshima-ku, Tokyo 170-0013, JAPAN
Telephone: [81] (3) 5391-6132 Fax: [81] (3) 5391-1566
A&D ENGINEERING, INC.
1756 Automation Parkway, San Jose, California 95131, U.S.A.
Telephone: [1] (408) 263-5333 Fax: [1] (408)263-0119
A&D INSTRUMENTS LIMITED
Unit 24/26 Blacklands Way, Abingdon Business Park, Abingdon, Oxfordshire OX14 1DY United Kingdom
Telephone: [44] (1235) 550420 Fax: [44] (1235) 550485
A&D AUSTRALASIA PTY LTD
32 Dew Street, Thebarton, South Australia 5031, AUSTRALIA
Telephone: [61] (8) 8301-8100 Fax: [61] (8) 8352-7409
A&D KOREA Limited 한국에이.엔.디(주)
서울특별시 영등포구 국제금융로6길33 (여의도동) 맨하탄빌딩 817 우편 번호 07331
( 817, Manhattan Bldg., 33. Gukjegeumyung-ro 6-gil, Yeongdeungpo-gu, Seoul, 07331 Korea )
전화: [82] (2) 780-4101 팩스: [82] (2) 782-4264
OOO A&D RUS OOO "ЭЙ энд ДИ РУС"
121357, Российская Федерация, г.Москва, ул. Верейская, дом 17
( Business-Center "Vereyskaya Plaza-2" 121357, Russian Federation, Moscow, Vereyskaya Street 17 )
тел.: [7] (495) 937-33-44 факс: [7] (495) 937-55-66
A&D INSTRUMENTS INDIA PRIVATE LIMITED
( 509, Udyog Vihar, Phase-
: 91-124-4715555
, Gurgaon - 122 016, Haryana, India )
: 91-124-4715599
BackCover 1WMPD4000058N .
 Loading...