

Page 1
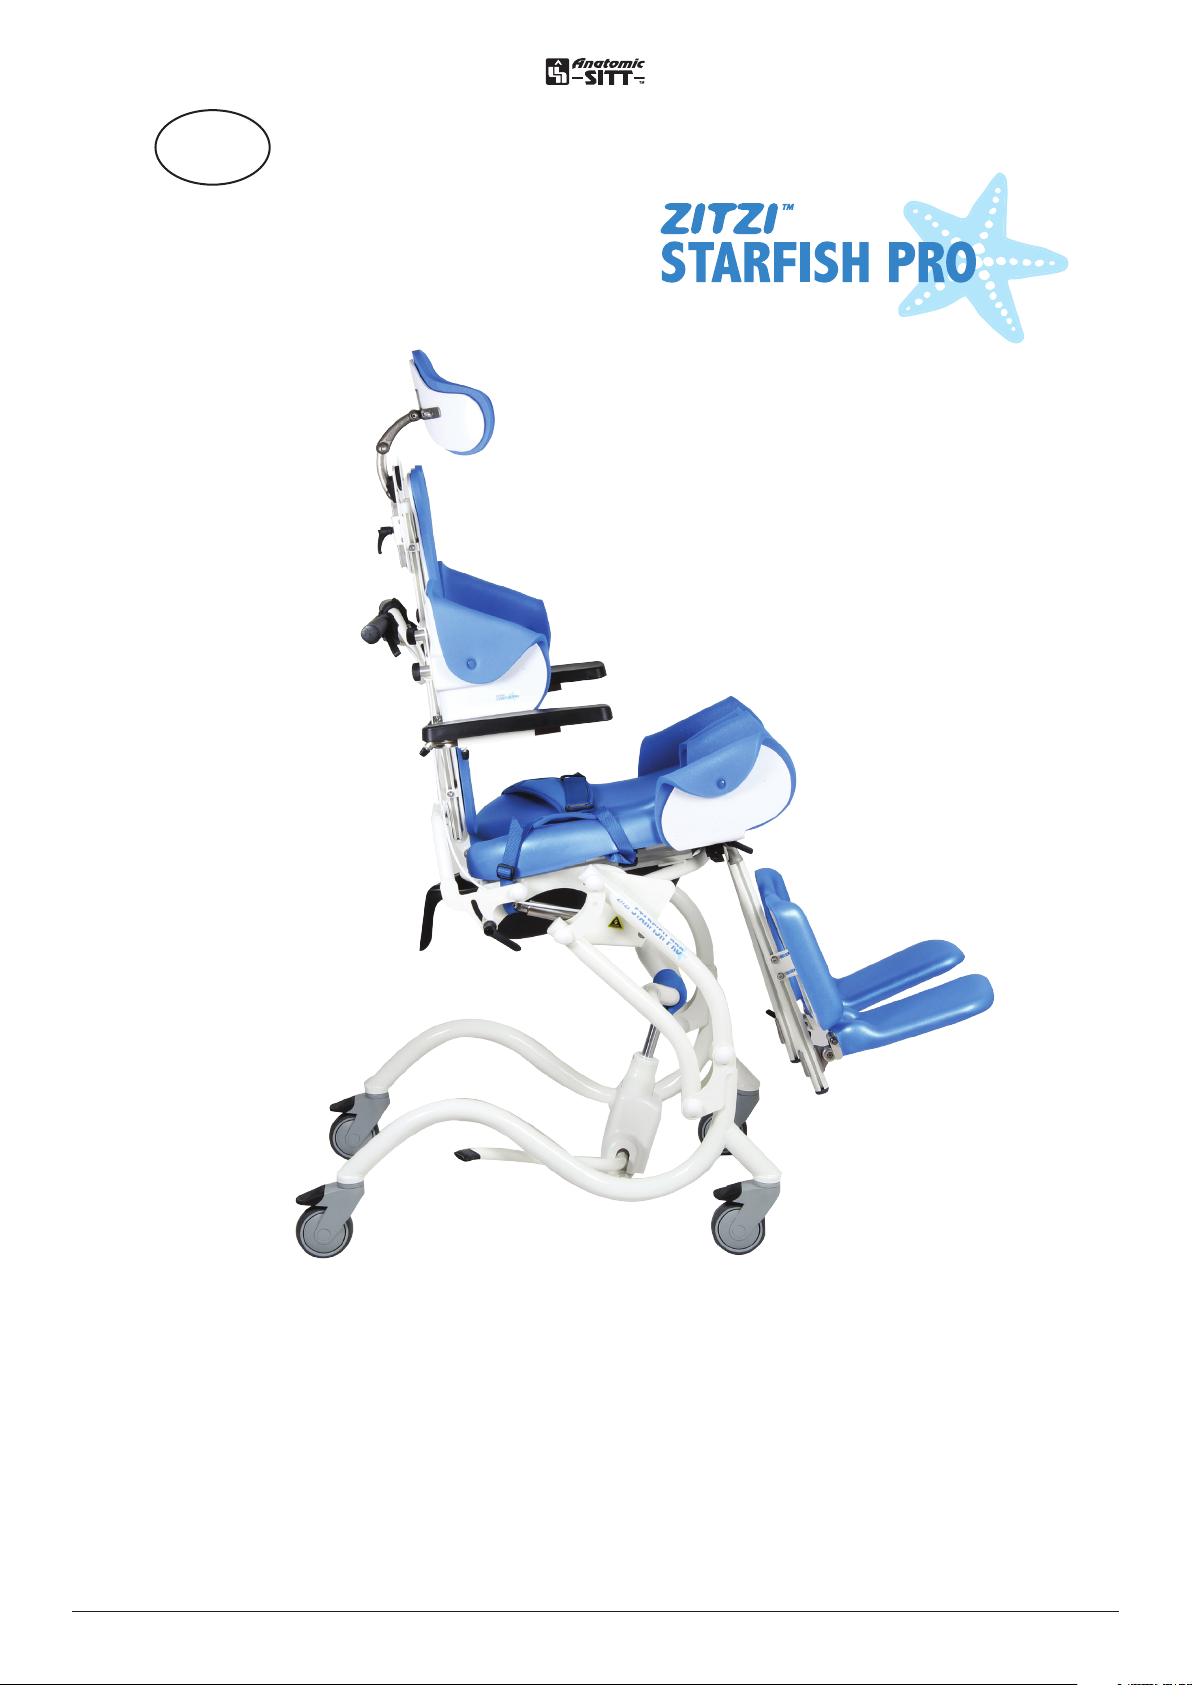
2017.07.14EDITION 1
EN
User manual
Zitzi Starfish Pro
Page 2

Table of content
Safety precautions 3
Chassi 4
Manual chassi 4
Height adjustable chassi 4
Fixed footrest mounting 18
Flexible footrest adapter 19
Turn up footrest mounting 19
Swivel adapter 19
Calf support 20
Wheels 5
Seat part 6
Adjustment of the seat part 6
Adjustment of the seat depth/abduction 6
Abduction/adduction support 7
Assembly 7
Adjustment 7
Hipbelt 8
Assembly 8
Adjustment 8
Back 9
Hip angle 10
Mounting of calf support 20
Height adjustment of the calf support 20
Width adjustment of the calf support 20
Pot 21
Urine protection 22
Service and maintenance 23
Service 23
Cleaning 23
Warranty 23
Combinations 23
Spare parts 23
Reconditioning 23
Marking 23
Recycling 23
Tilt of the seat unit 11
Summary and follow-ups 24
Hip support 12
Follow-up inspections 24
Armrest 13
Armrest, chassi 14
Driving handle 15
Headrest 16
Mounting/Adjustment of the headrest 16
Support mounting 17
Mounting/Adjustment of the harnesses 17
Footrest 18
Mounting of the footrest 18
Angle adjustment of the knee 18
Adaptation and customization 25
Guidelines and recommendations 25
Terms of sale 26
Warranty 26
Warranty claims 26
Returning products 26
Technical data 27
Check the box if the
Check
box!
product has been
customized. The CEmarking is no longer valid.
2User manual Zitzi Starfish Pro www.anatomicsitt.com | +46 11 16 18 00
Page 3

Safety precautions
Introduction
To be able to use all advandtages of the Zitzi Starfish Pro, it is important that you
read through this manual thoroughly. This applies to all persons who are in the
vicinity of the user. The product is designed for users with seating problems and
fits many dierent types of diagnoses. Adjustment of the Zitzi Starfish Pro should
always be performed by medically qualified person.
If you need additional information, please contact Anatomic SITT AB.
Field of application
The product is intended to use as a seating system together with the chassis
produced by Anatomic SITT AB. If the desire for another use exists,
please contact Anatomic SITT AB.
Correspondence
Zitzi Starfish Pro and its accessories are a CE marked product. A unique serial
number is located on a label placed on the frame. This serial number should be
quoted in any correspondence regarding the product.
This product is manufactured by Anatomic SITT AB
Postal address Anatomic SITT AB, Box 6137, SE-600 06 Norrköping
Street address Anatomic SITT AB, Terminalgatan 1, SE-603 61 Norrköping
Telephone +4611-161800
Fax +4611-162005
Email [email protected]
Web anatomicsitt.com, youtube.com/anatomicsitt
3User manual Zitzi Starfish Pro www.anatomicsitt.com | +46 11 16 18 00
Page 4
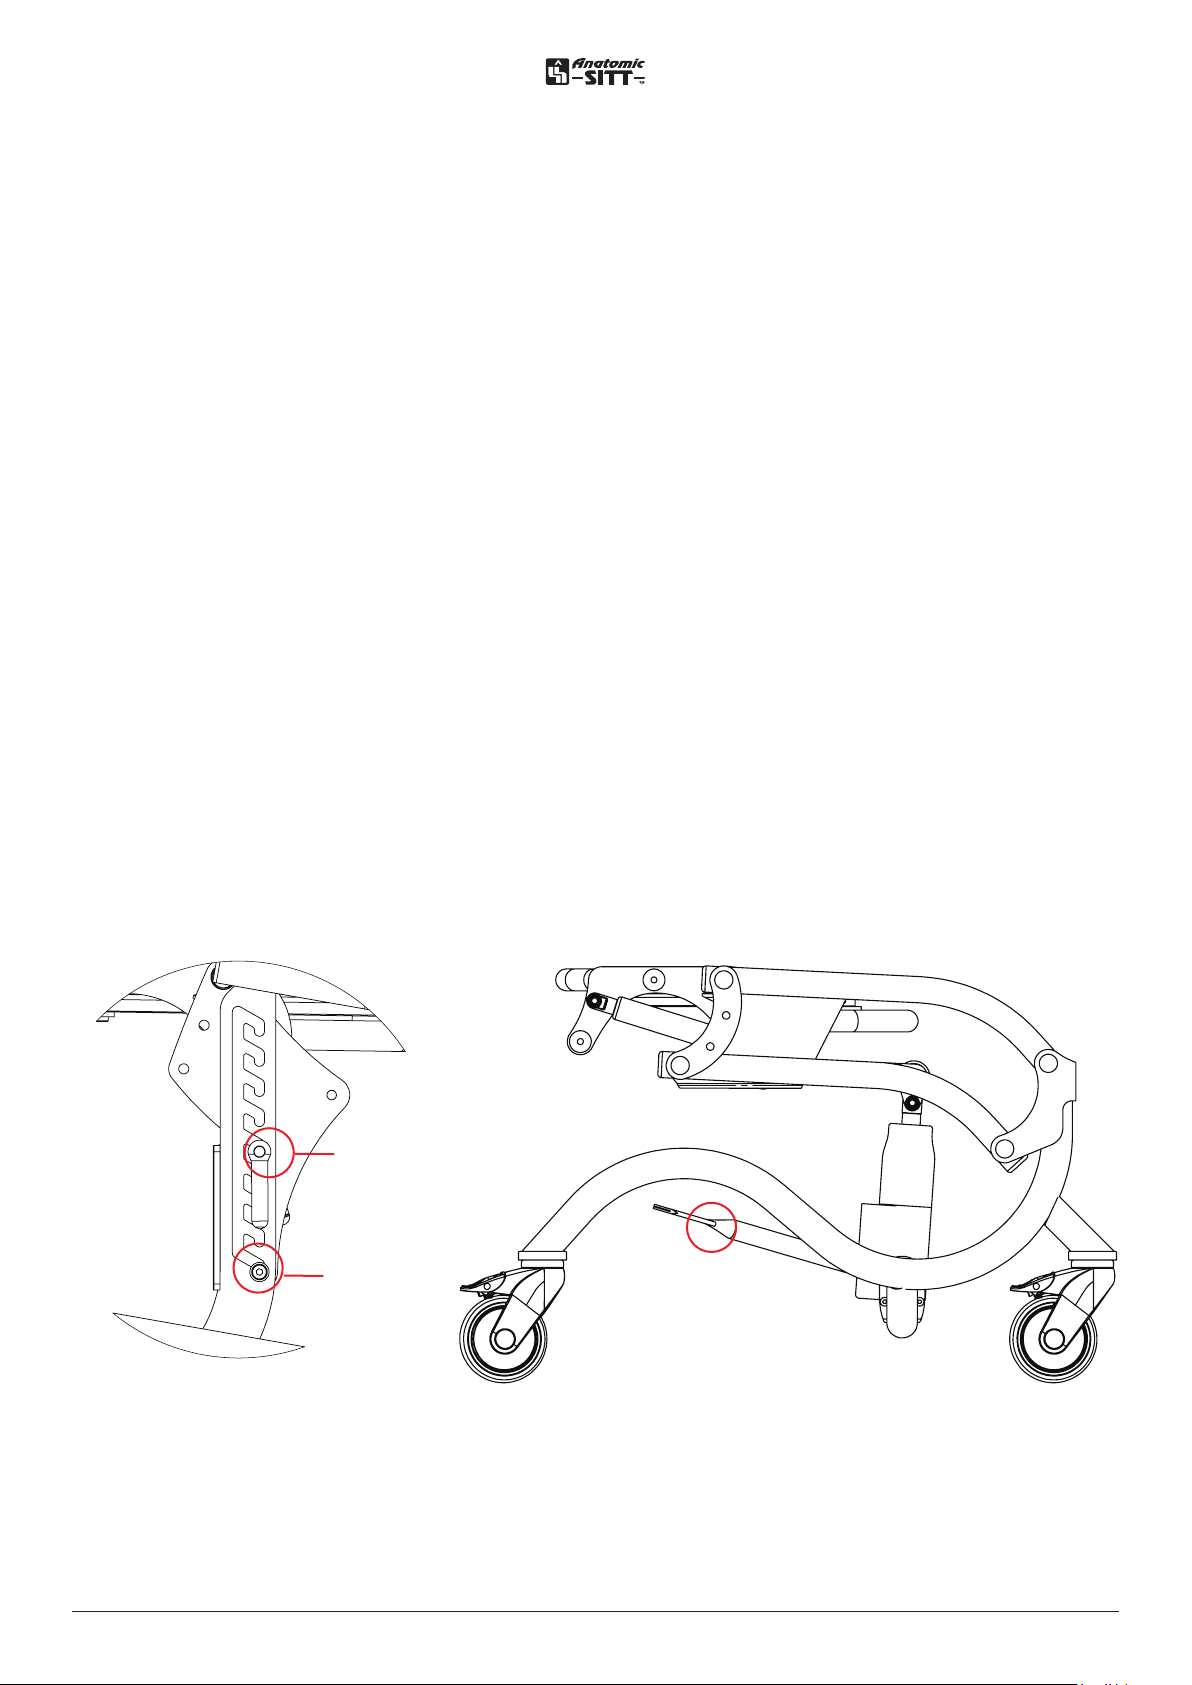
Chassi
Manual chassi
The seat unit can be adjusted to the desired height before the patient is in the
seat. Release the lever (A) on both sides (position (B) is not fully tightened,
but helps to control the cradle in the tracks). Lift the seat out of the tracks and
slide the seat to the desired height. Be sure to push down the seat firmly in the
slots. Finish by tightening the lever (A) firmly.
Height adjustable chassi
The seatpart is height adjustable to reach any desired height. You adjust the
height by stepping on the pump handle. Make shore that you step on the
pump handle with smooth movements so that the adjustment is comfortable
for the user. To lower the chassi place the foot underneath the pump handle
and push it up.
A
A
B
Manual chassi Height adjustable chassi
4User manual Zitzi Starfish Pro www.anatomicsitt.com | +46 11 16 18 00
Page 5
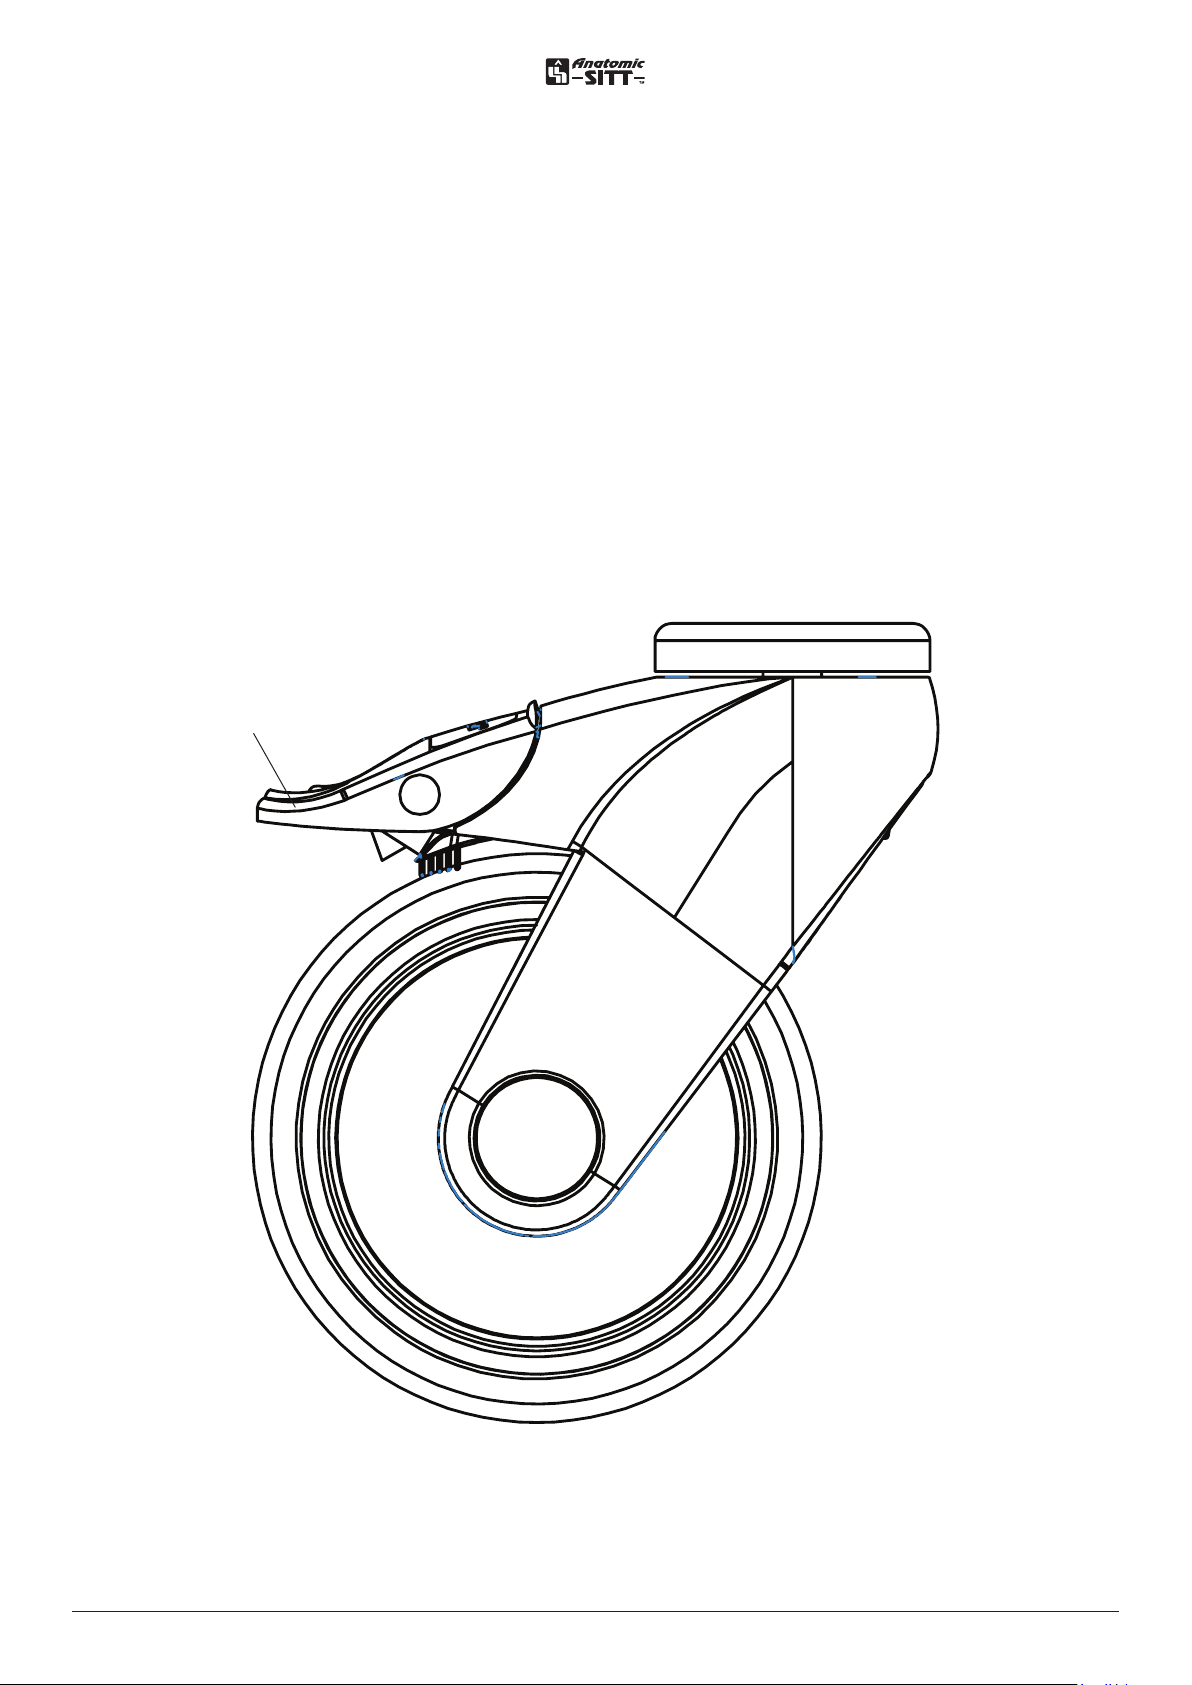
Wheels
To lock the wheels
Push down the brake handle (A) with Your foot to lock the wheel.
(See picture.) Pull up the brake handle to release the brake.
A
5User manual Zitzi Starfish Pro www.anatomicsitt.com | +46 11 16 18 00
Page 6
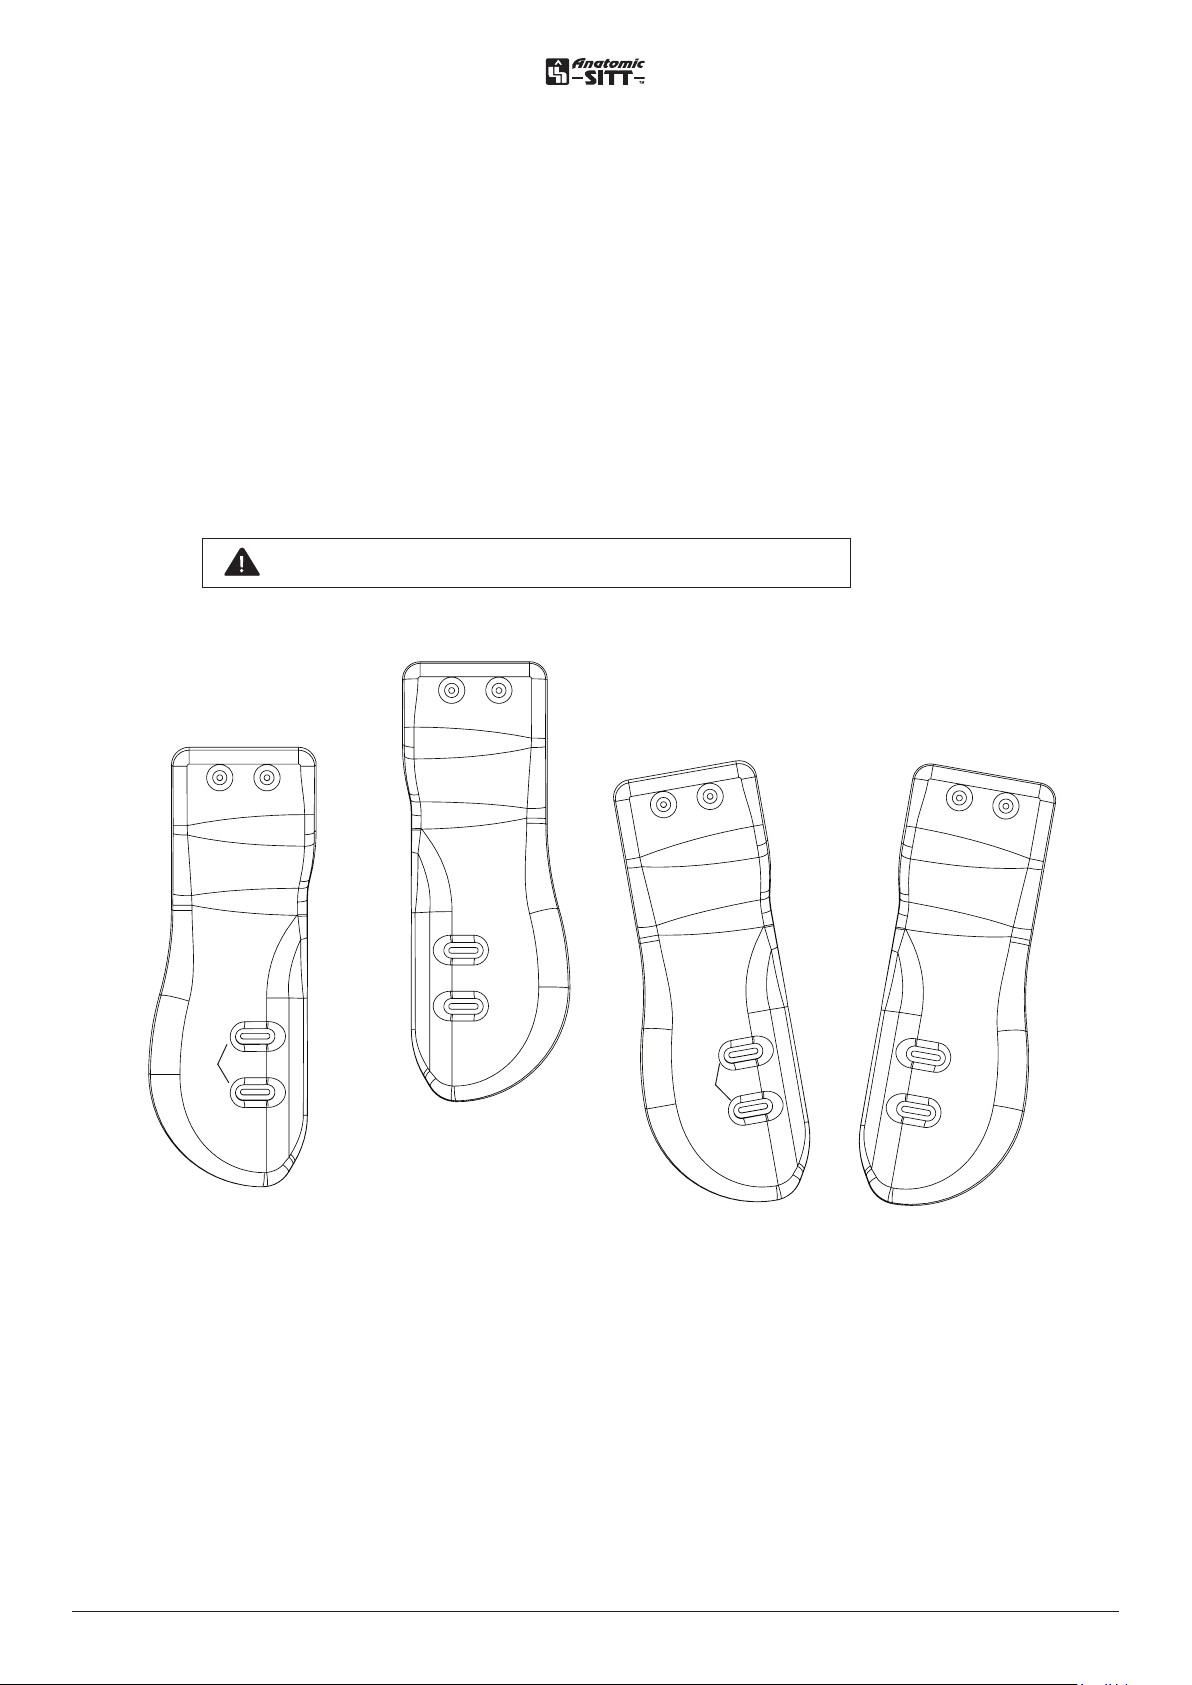
Seat part
Adjustment of the seatpart
Seat depth, leg length dierent and abduction/adduction of the legs is easy to adjust.
Take away the cover to access the screws.
Adjustment of the seat depth/ abduction
Release the screws (A) then the seat parts can be adjusted by hand.
Adjust the seat part. Lock the screws firmly when you are done with the adjustment.
Attention! Be careful not to adjust the screws all the way out!
A
A
6User manual Zitzi Starfish Pro www.anatomicsitt.com | +46 11 16 18 00
Page 7
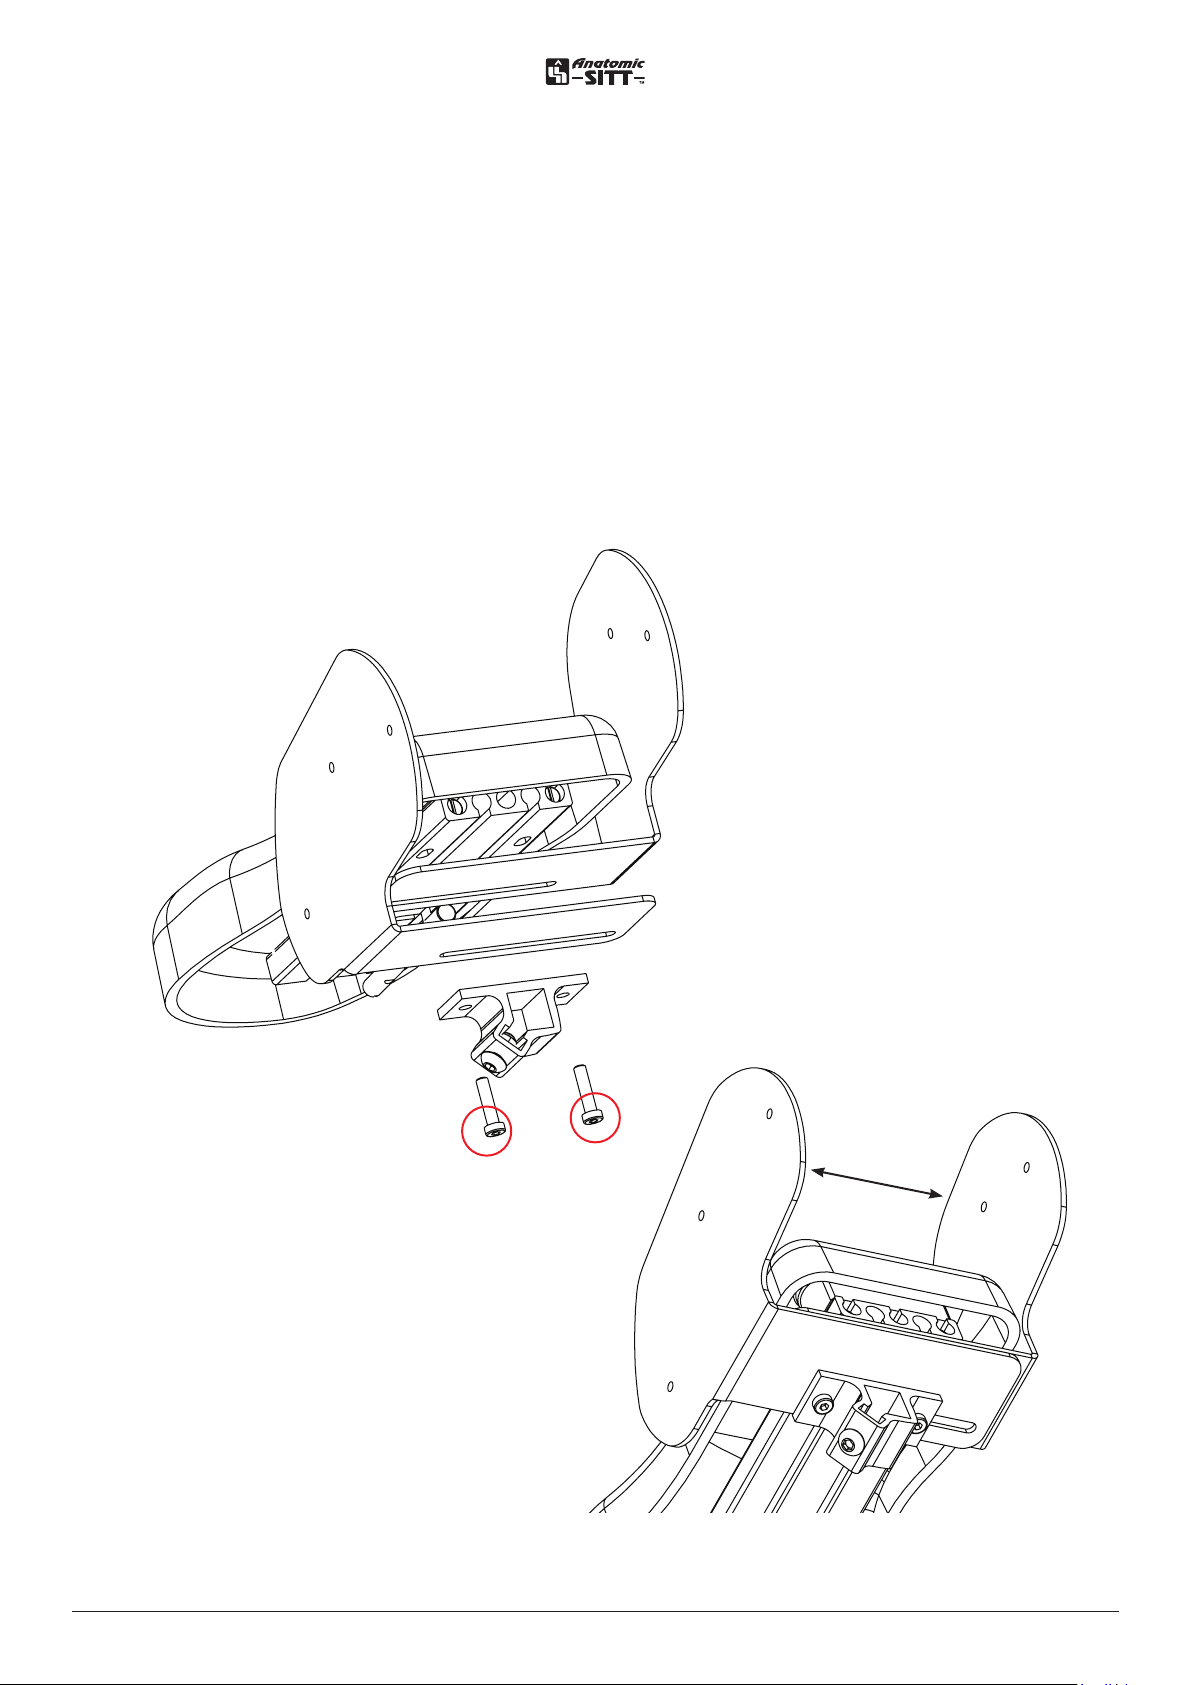
Abduction/Adduction support
Assembly
Release the screws (A) and mount the supports so that You see the holes through the
lines on the support. Mount the screws through the lines in to the holes.
Adjustment
Release a little bit on the screws (A) so that You are able to slide the support sideways.
Adjust the support to desired location and then fix the screws firmly.
A
7User manual Zitzi Starfish Pro www.anatomicsitt.com | +46 11 16 18 00
Page 8
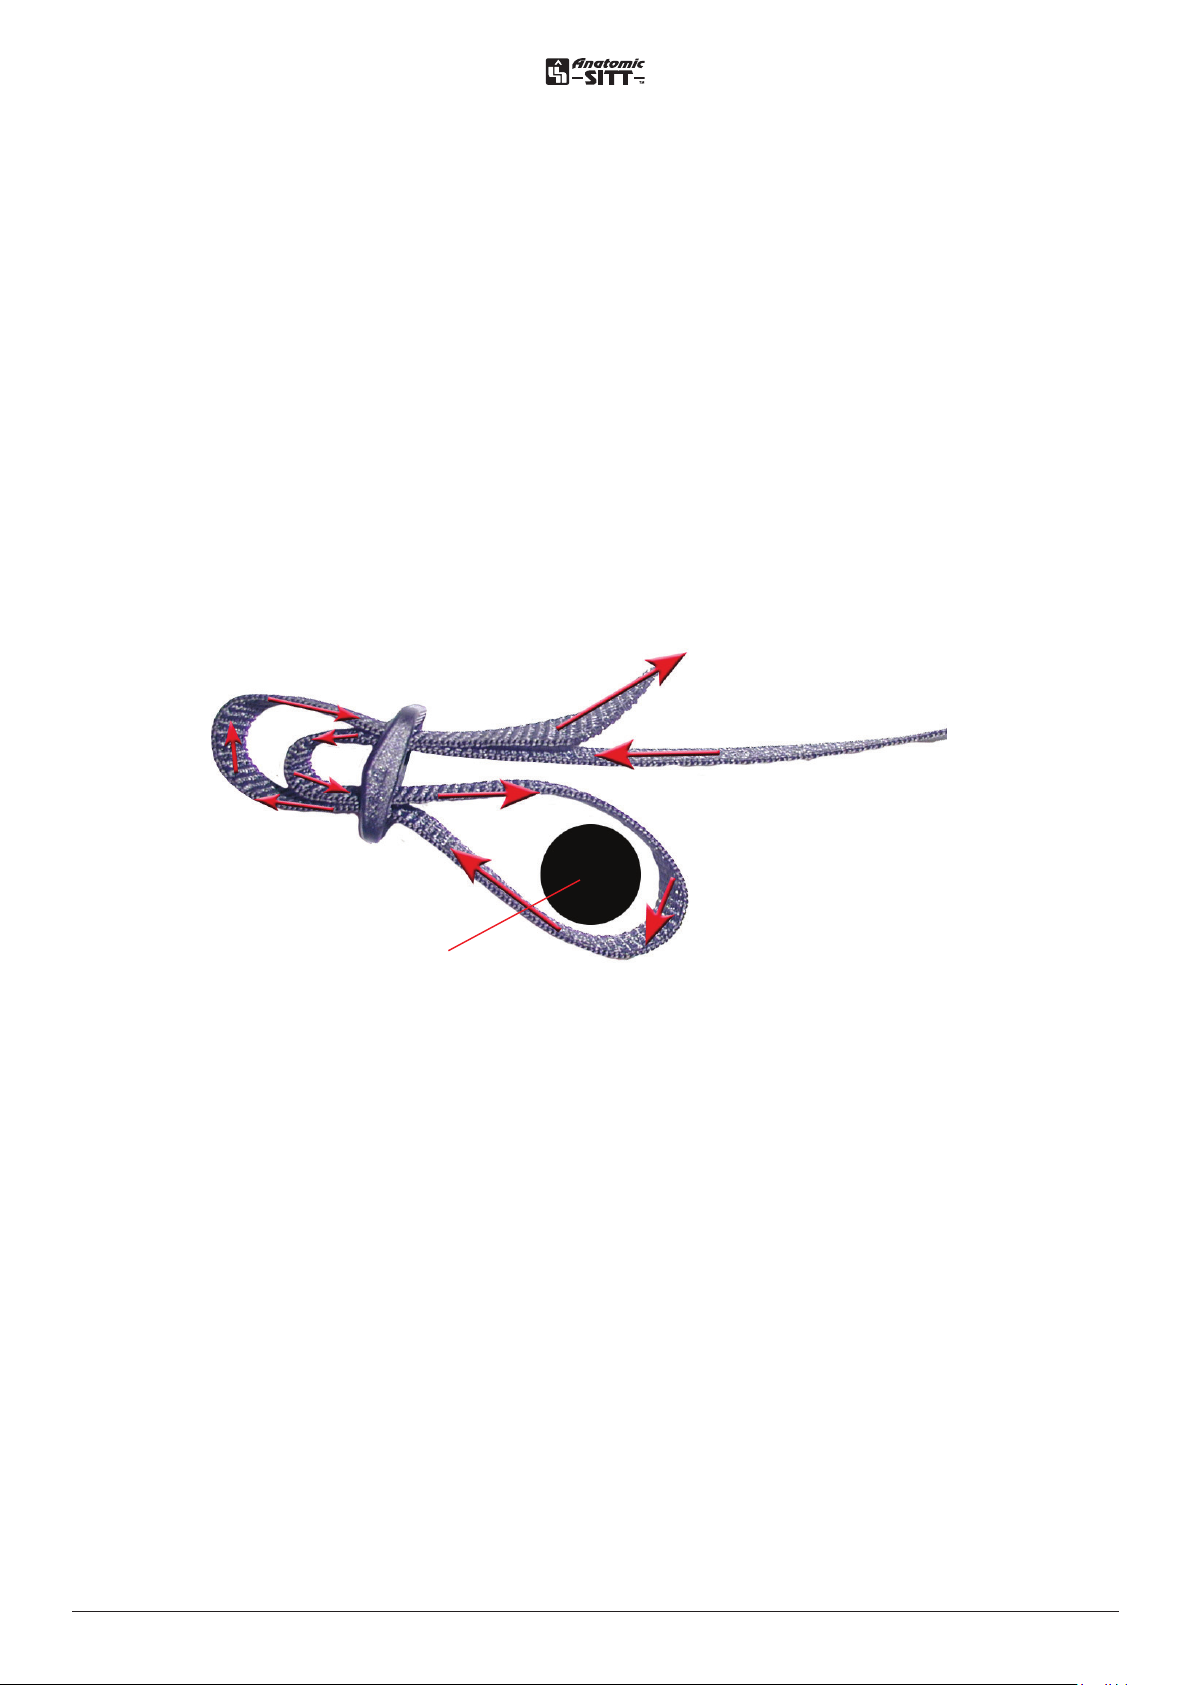
Hipbelt
Assembly
Mount the straps in each loop.
Adjustment
Pull the belt on both sides of the buckle to get the buckle centered.
Adjust the pads to give the best pressure release.
If the straps is too long, cut the straps you don’t need and burn the end.
Mounting pipe
8User manual Zitzi Starfish Pro www.anatomicsitt.com | +46 11 16 18 00
Page 9
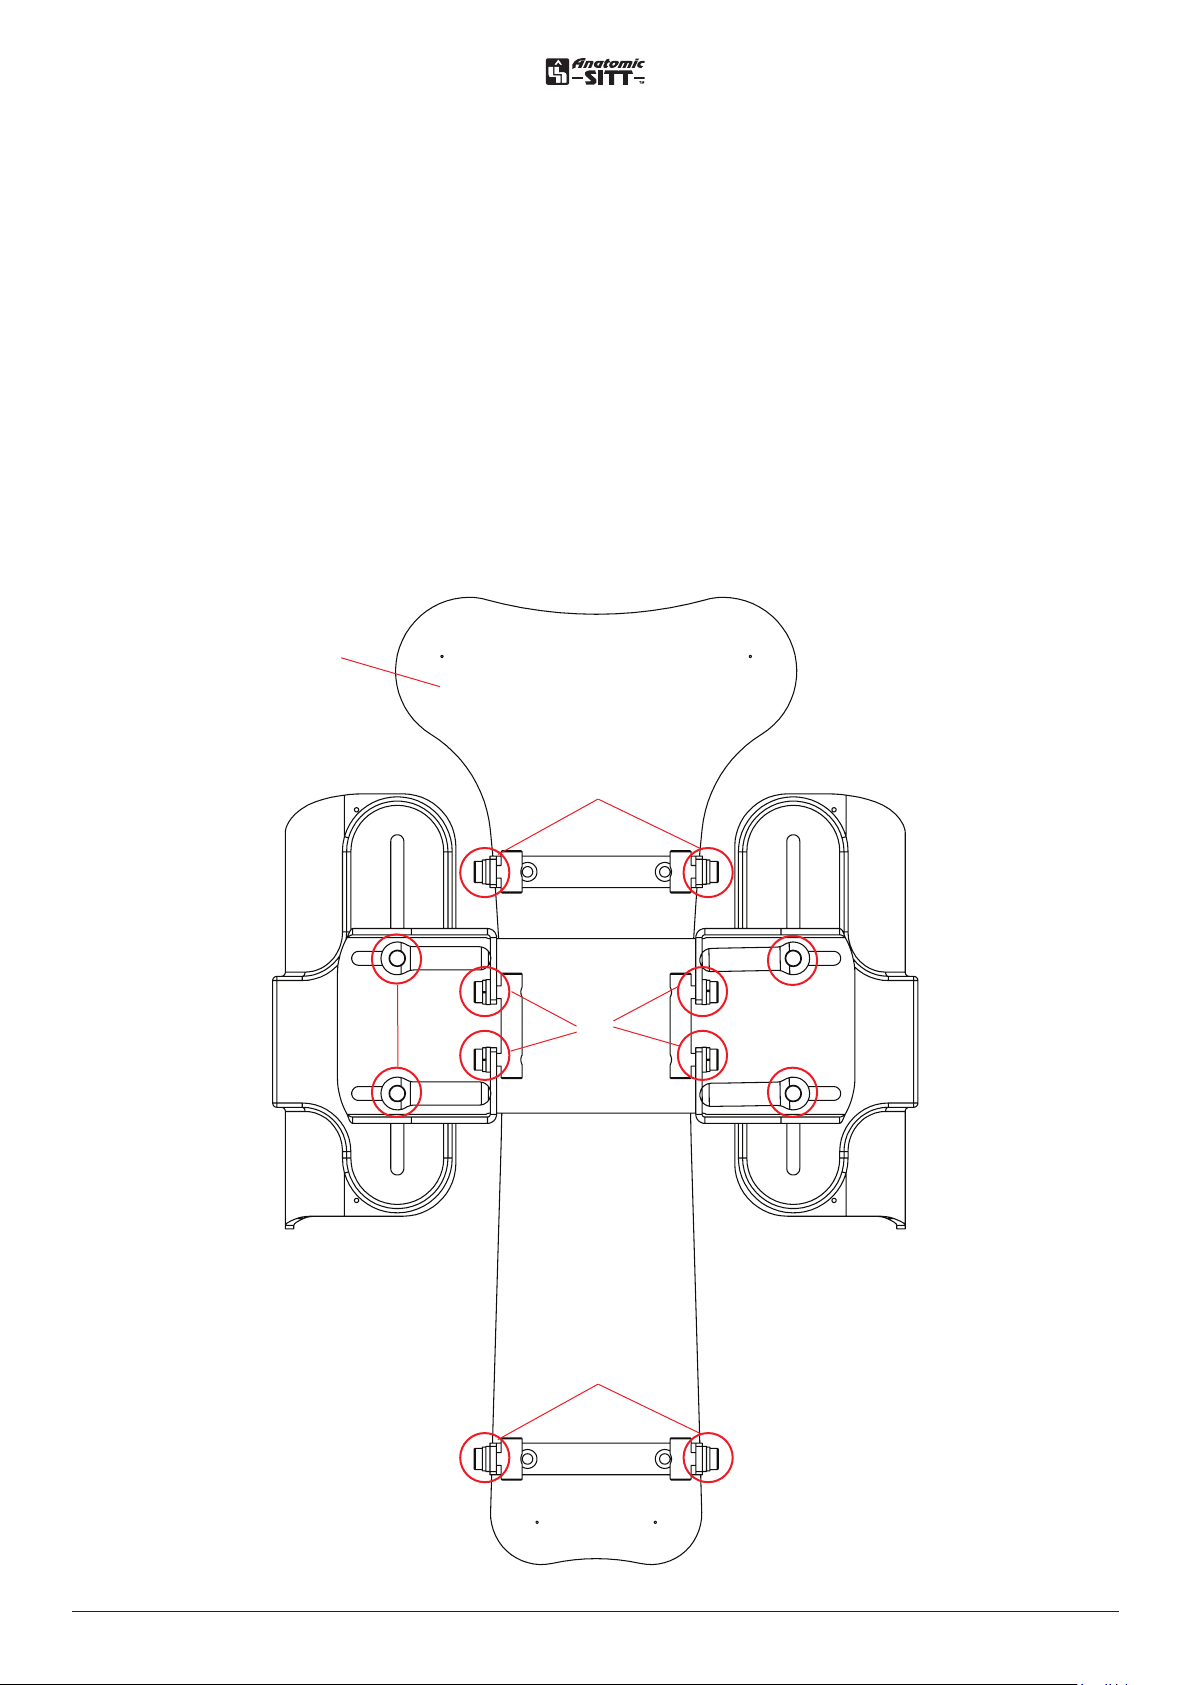
Back
To adjust the back part (A), release the four screws (B) that attach the back part to the
profile. Adjust the back part to desired height and fix the screws (B) firmly.
Roughly adjust the height of the trunk support by releasing the four screws (C) that
attach into the profile. Attach to desired height and fix the screws firmly (C).
The trunk support can now be tweaked through releasing the lever knobs (D).
Adjust the trunk supports to your desired position and then fix the lever knobs
firmly (D).
A
B
D
C
B
D
9User manual Zitzi Starfish Pro www.anatomicsitt.com | +46 11 16 18 00
Page 10
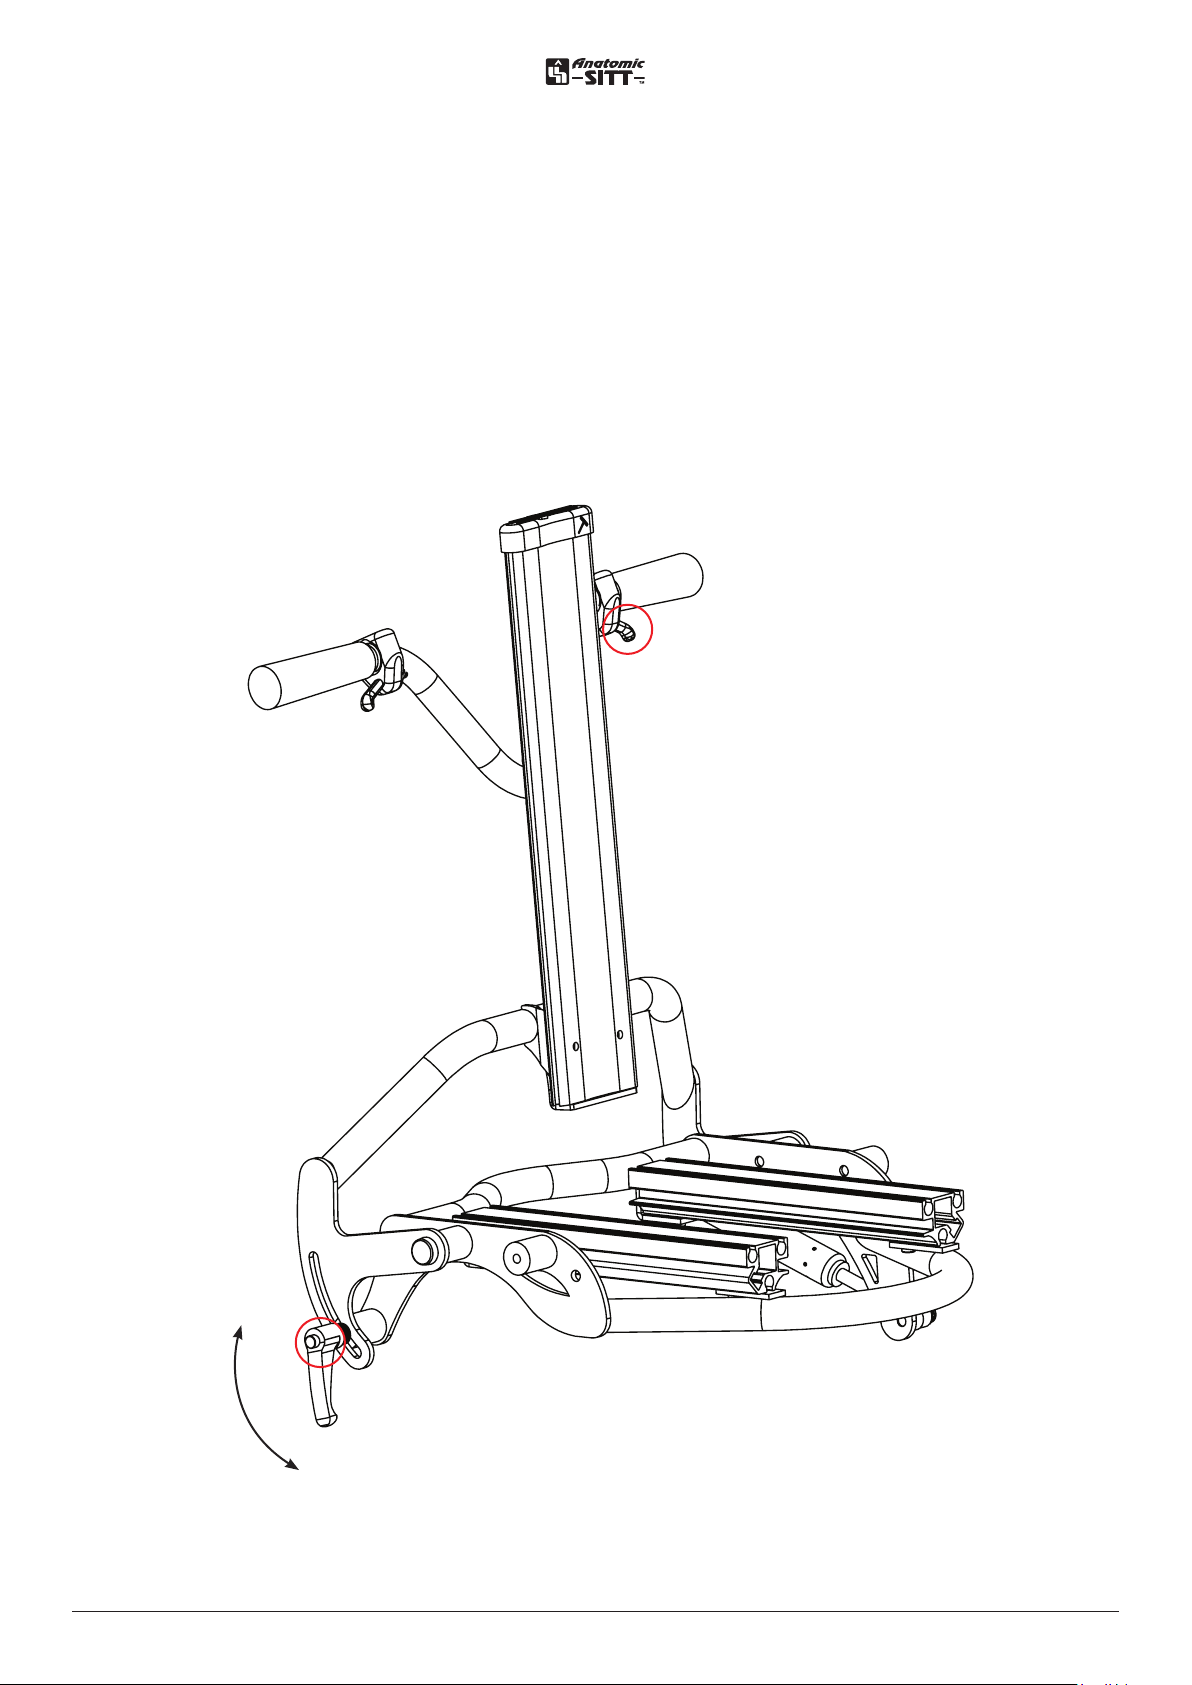
Hip angle
When the hip angle shall be adjusted: Start with releasing the security knob
(A). Make shore to have a secure grip of the driving handle at the same time
push the trigger to the gas spring (B).
Adjust the back to the desired angle and release the trigger (B). Fix the
security knob firmly when you are finish (A).
B
A
10User manual Zitzi Starfish Pro www.anatomicsitt.com | +46 11 16 18 00
Page 11
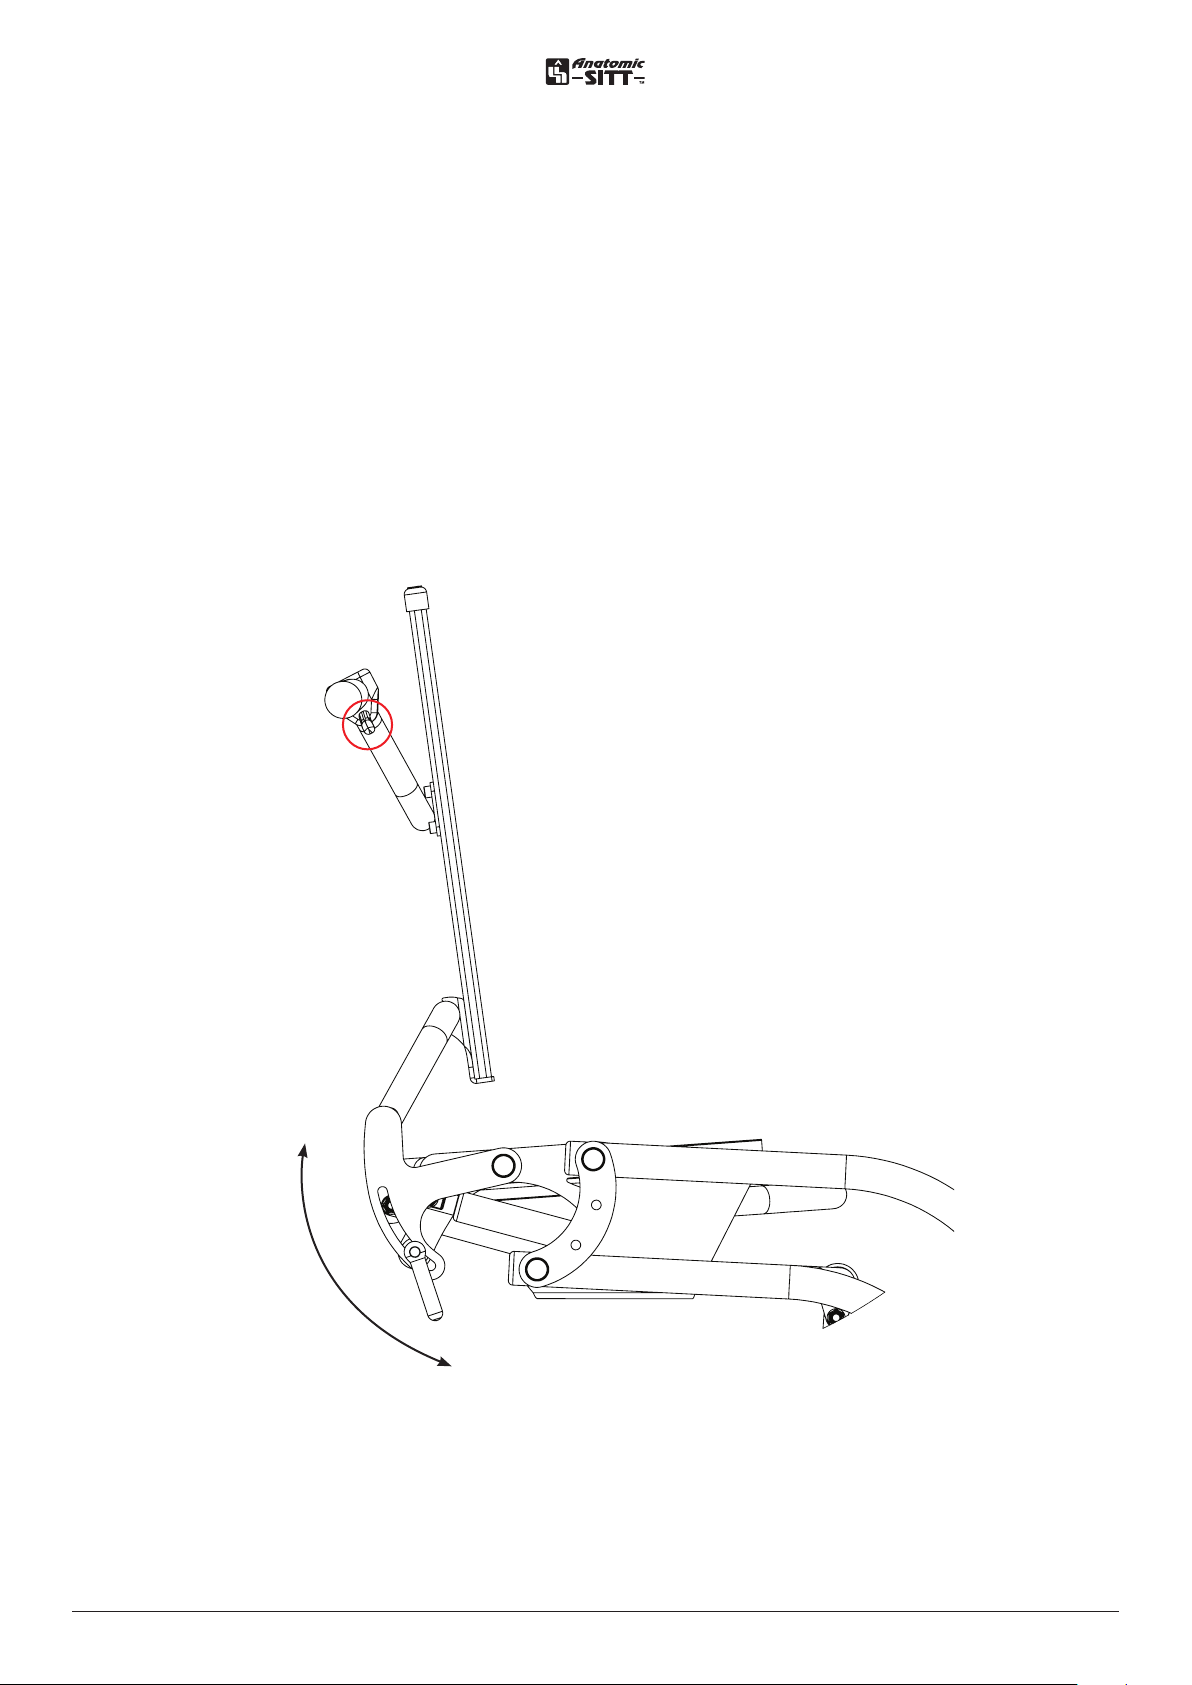
Tilt of the seat unit
When the angle of the seat shall be adjusted, make shore to have a secure grip
of the driving handle at the same time push the trigger for the gas spring (A).
Adjust the seat to desired angle and release the trigger (A). Make sure to have
the patient under supervision at all time when doing the adjustment so that
the patient does not squeeze or get hurt.
A
11User manual Zitzi Starfish Pro www.anatomicsitt.com | +46 11 16 18 00
Page 12
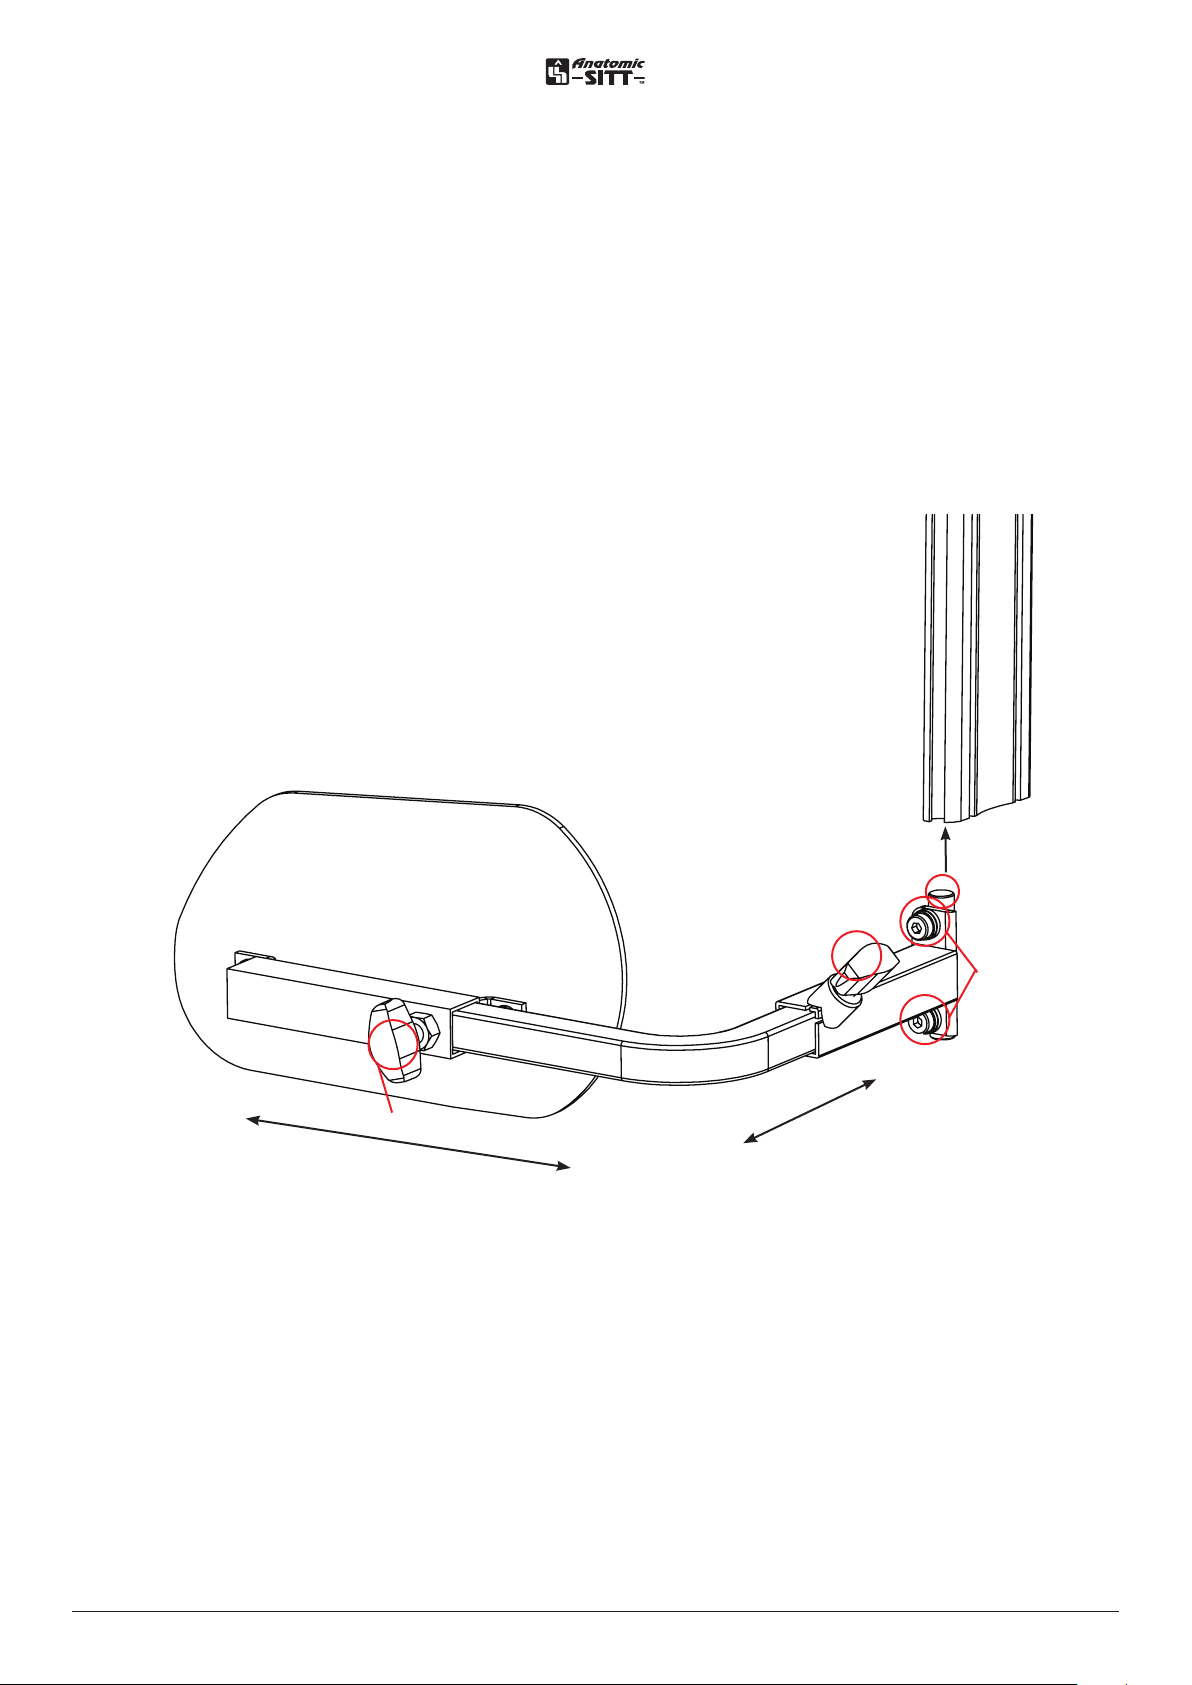
Hip support
The hip support is mounted in the bottom of the back profile. Insert rim pins
(A) and slide the hip support to the desired height. Tighten the screws (B).
Adjust the angle bracket to the desired position laterally. Tighten the knob (C).
Adjust the hip brackets to the desired depth, tighten the knob (D).
A
C
B
D
12User manual Zitzi Starfish Pro www.anatomicsitt.com | +46 11 16 18 00
Page 13
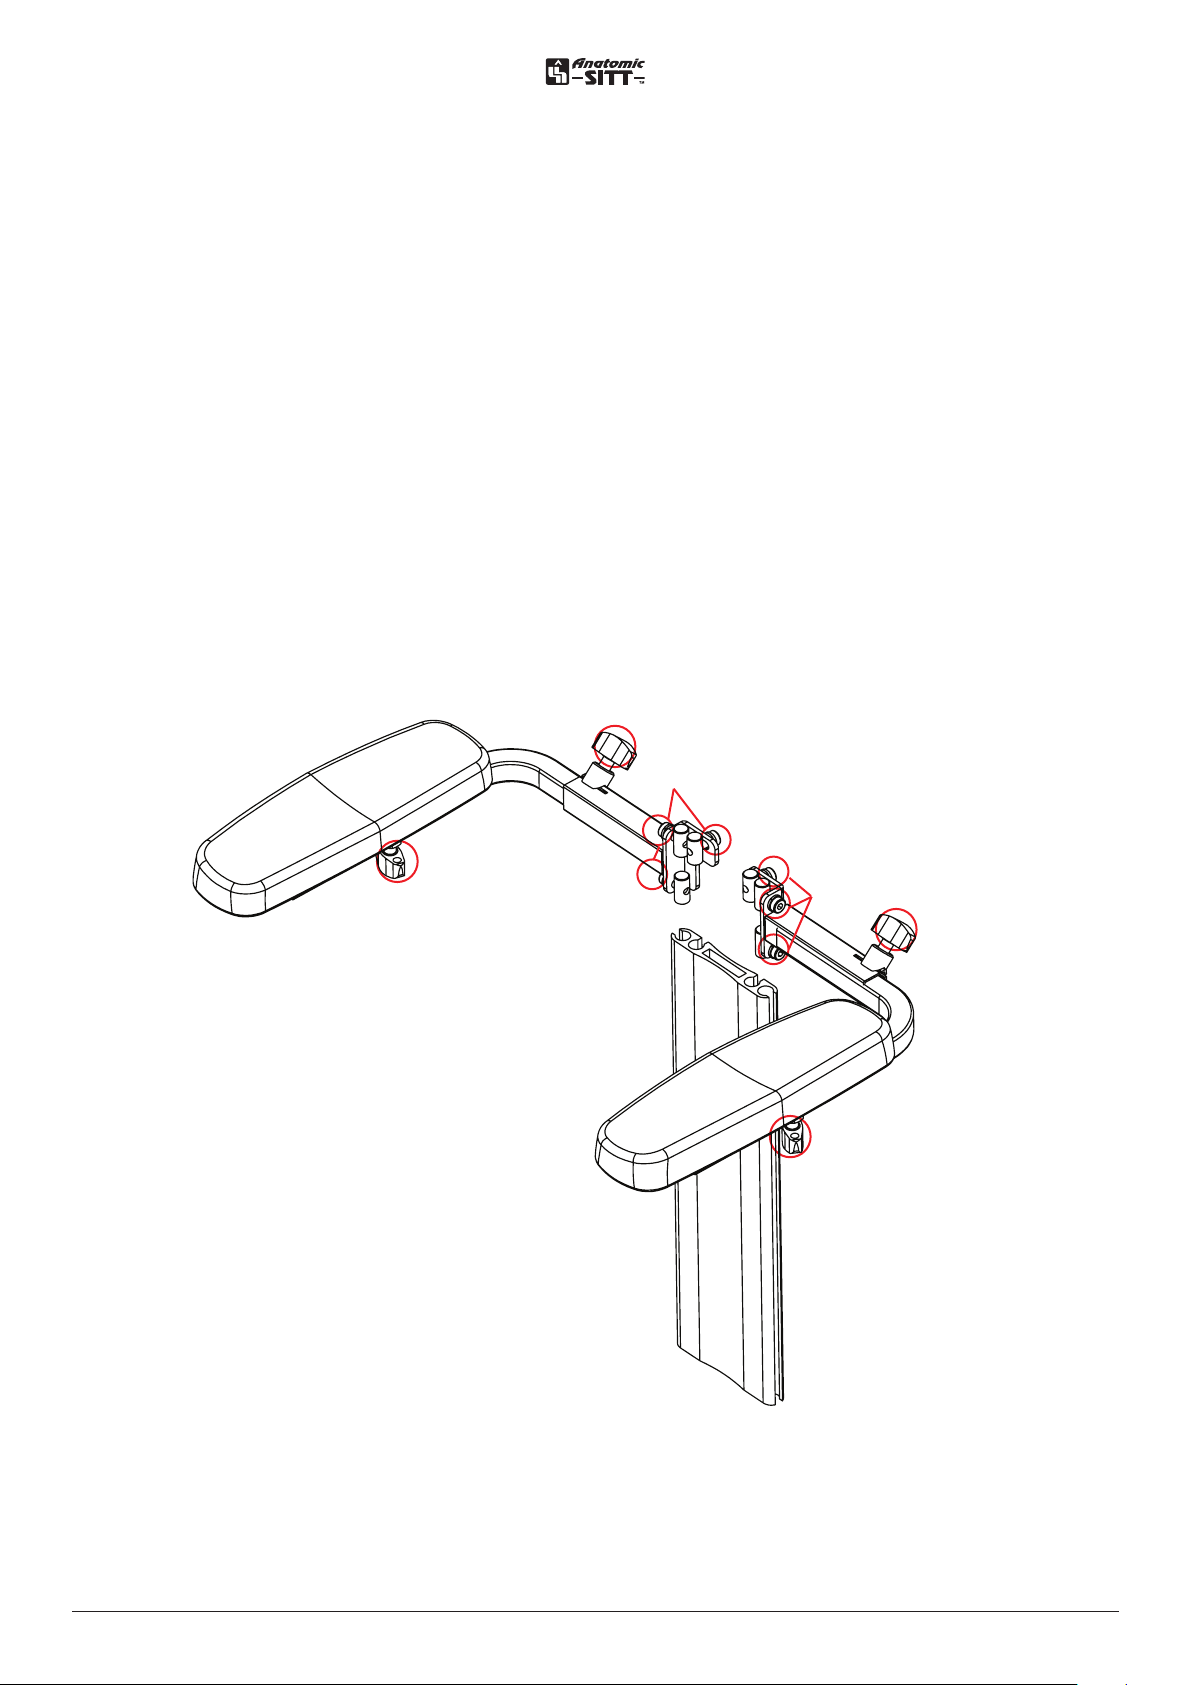
Armrest
Mounting the armrest
The armrest shall be mounted on the back in the profile. Mount the armrest
according to the picture. Adjust to desired height. Fix the screws firmly (A).
Adjustment of the width
Release the lever knob (B). adjust to desired width. Then fix the lever knob
firmly.
Depth adjustment
Release the lever knob (C). Adjust to desired position, then fix the lever knob
firmly.
B
A
C
A
C
B
13User manual Zitzi Starfish Pro www.anatomicsitt.com | +46 11 16 18 00
Page 14
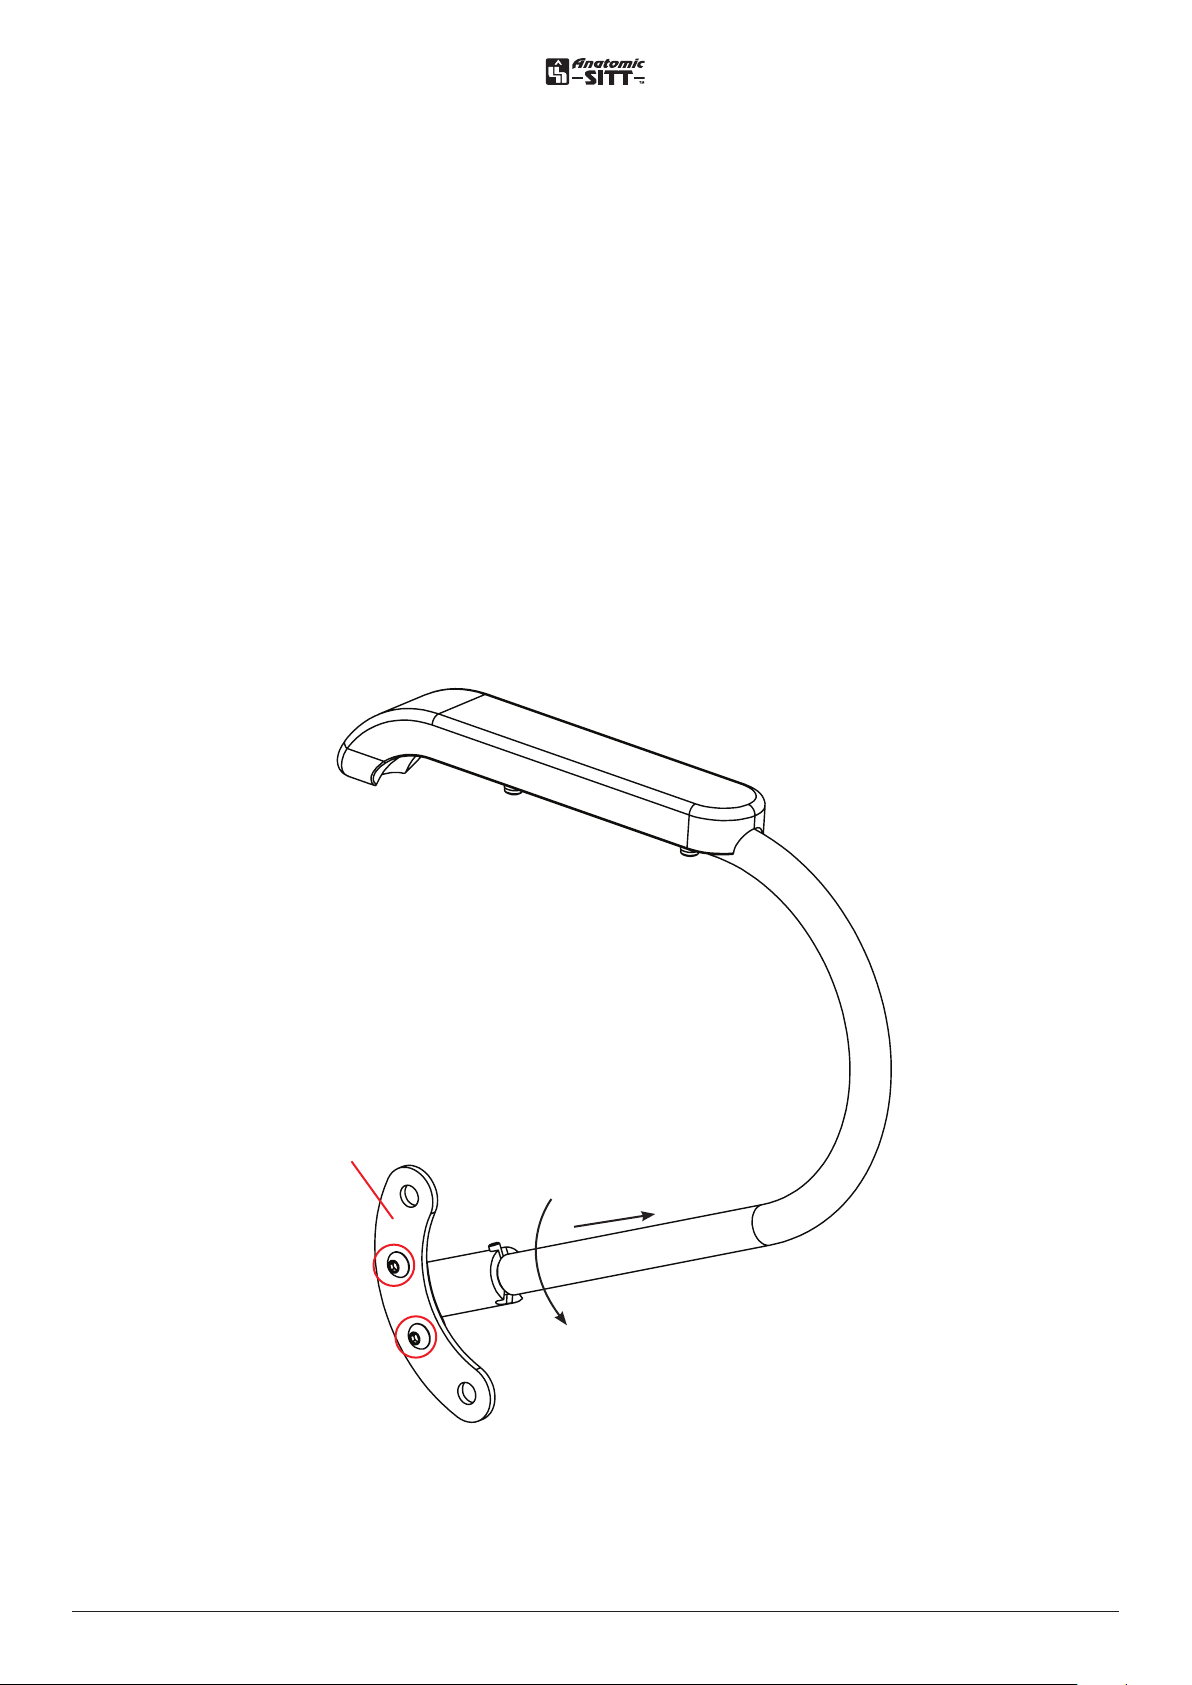
Armrest, chassi
Mounting, armrest on the chassi
The armrest shall be mounted on the side plate (A). Mount the screws (B)
through the centered holes on the plate and in to the threaded holes on the
armrest.
Folding of the armrest
Pull the armrest to the side and up. Then twist the support away from the
chassi until the support attach into the next hem.
A
B
14User manual Zitzi Starfish Pro www.anatomicsitt.com | +46 11 16 18 00
Page 15
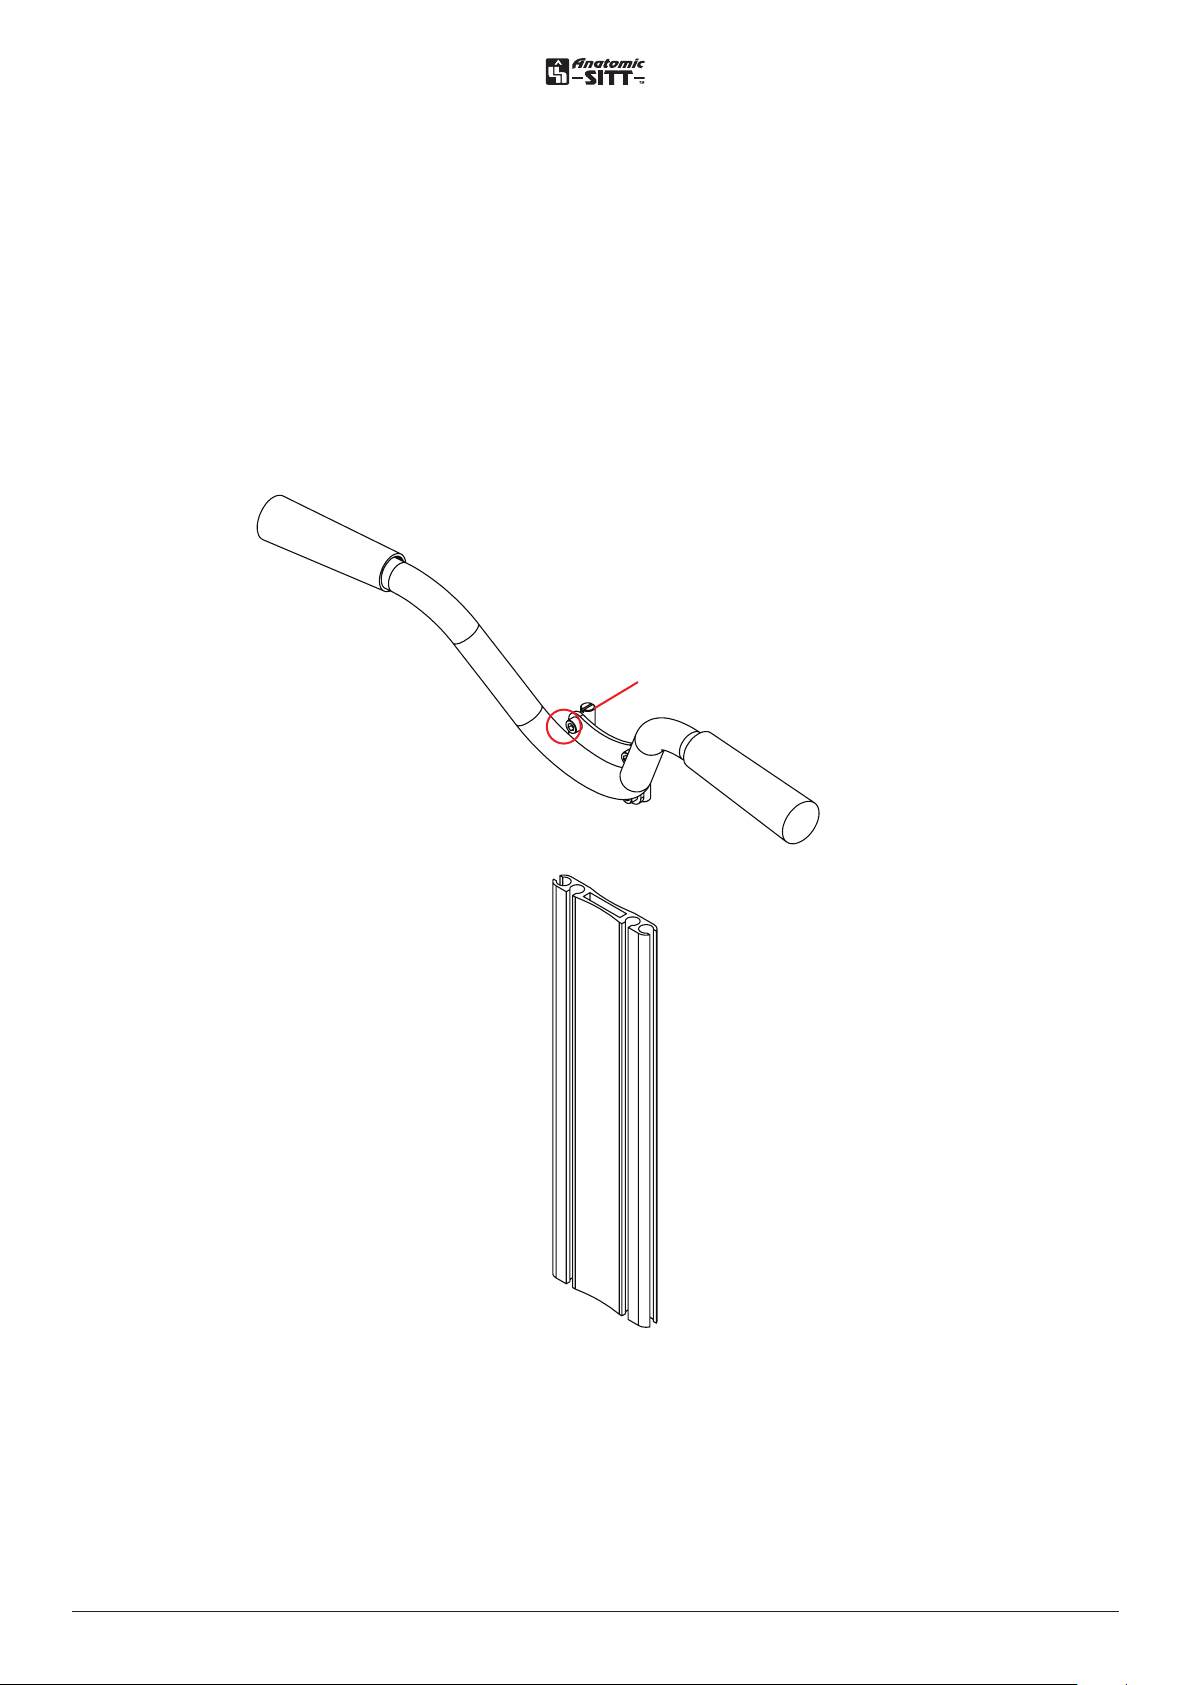
Driving handle
Release the screws (A) enough to be able to slide in the rim sprints (B) into
the profile (C). Adjust to desired height and fix the screws firmly (A).
A
B
C
15User manual Zitzi Starfish Pro www.anatomicsitt.com | +46 11 16 18 00
Page 16
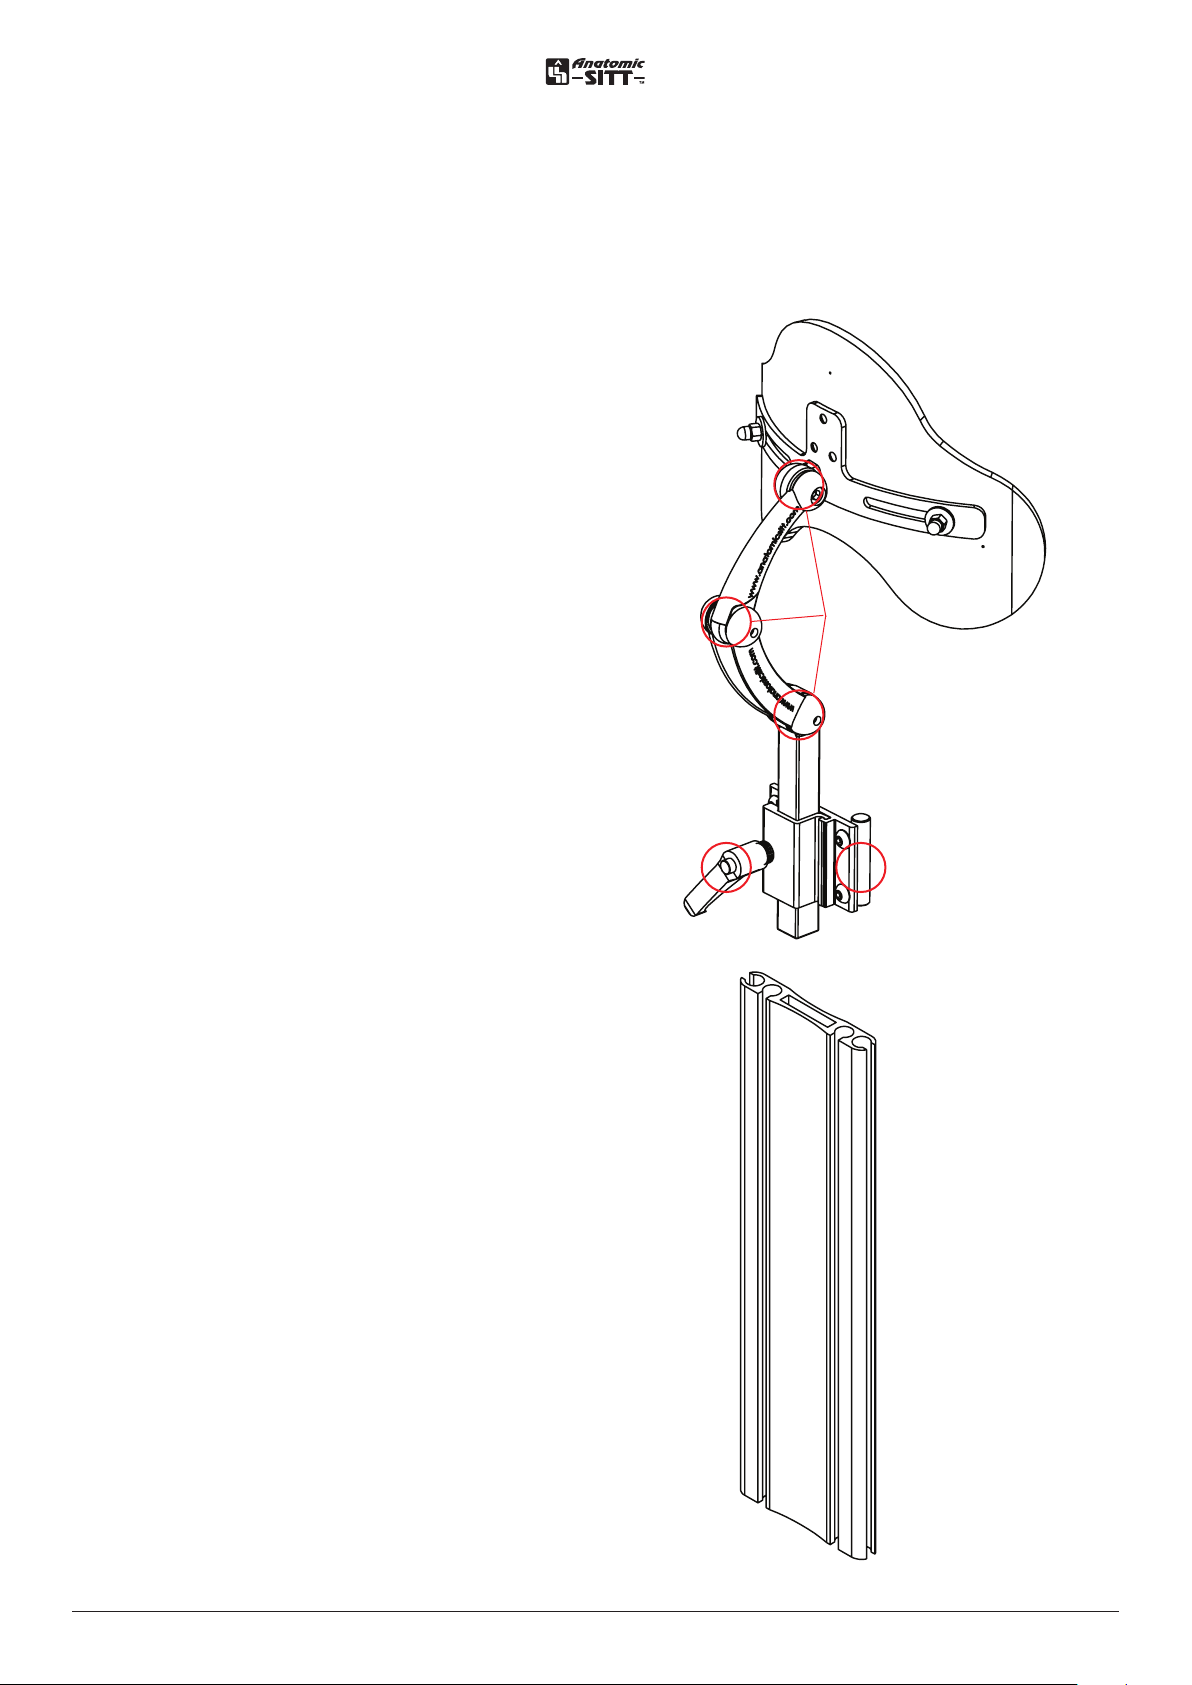
Headrest
Mounting / Adjustment of the headrest
* Take away the protection cap on the profile.
* Mount the headrest mounting on the profile.
* Release the screws (B) enough to be able to slide the
mounting by hand.
* Put in the Patient adjust to desired position (A).
* Fix all of the screws and the lever knob firmly and mount
the protection cap back on the profile.
The headrest is easy to release:
* Loosen the lever knob (C) to be able to take away
the headrest.
A
B
C
16User manual Zitzi Starfish Pro www.anatomicsitt.com | +46 11 16 18 00
Page 17
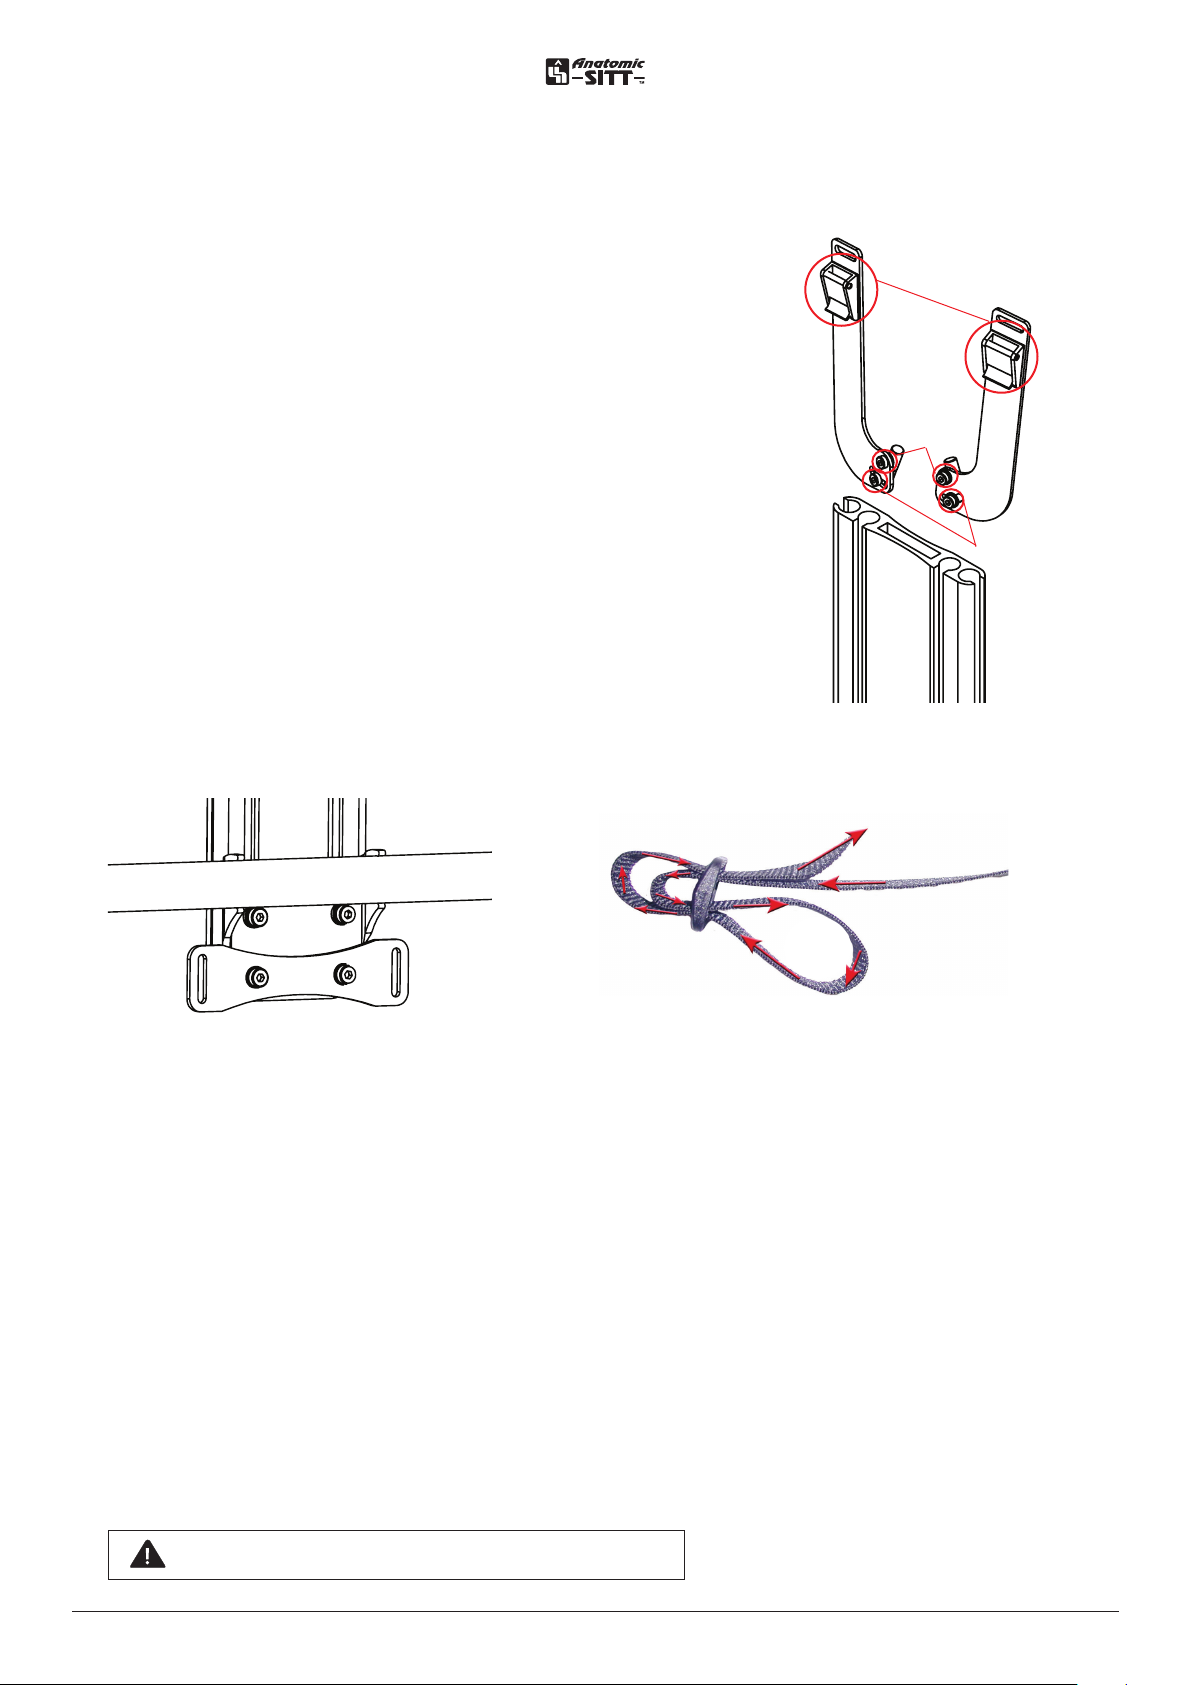
Support mounting
Mounting / Adjustment of the harnesses (Sternum support, H-strap)
Mounting:
Upper mounting: (Picture 1)
* Release the protection cap on the profile.
* Mount the upper mounting as described in the picture 1.
* Open the buckle (A), slide the straps through the hole in the
mounting and through the buckle and lock the buckle.
Lower mounting to H-strap, Sternum support: (picture 2)
The lower mounting is included in the chair always. Lock the strap with the
help of the triglide buckle as the picture 3 shows.
Pic 1
A
B
C
Pic 2
Adjustment:
Seat the patient in the seat and release the socket head screw according to position B & C in picture 1.
Adjust the arms so that the angle of force on the upper mounting points ends up in the same height as the
shoulders.
Attach the screw according to position B on picture 1.
Adjust to desired width by angling the hardware to the right or left. (make shore that it is enough space for
the neck)
Lock the screws according to position C, picture 1.
Adjust the pads in height to give the best pressure relief,
Subsequent verification
• Make sure that there is enough space by the neck.
• Pressure on the strap
• Placement of the pads.
Pic 3
Make sure that there is enough space for the neck.
17User manual Zitzi Starfish Pro www.anatomicsitt.com | +46 11 16 18 00
Page 18
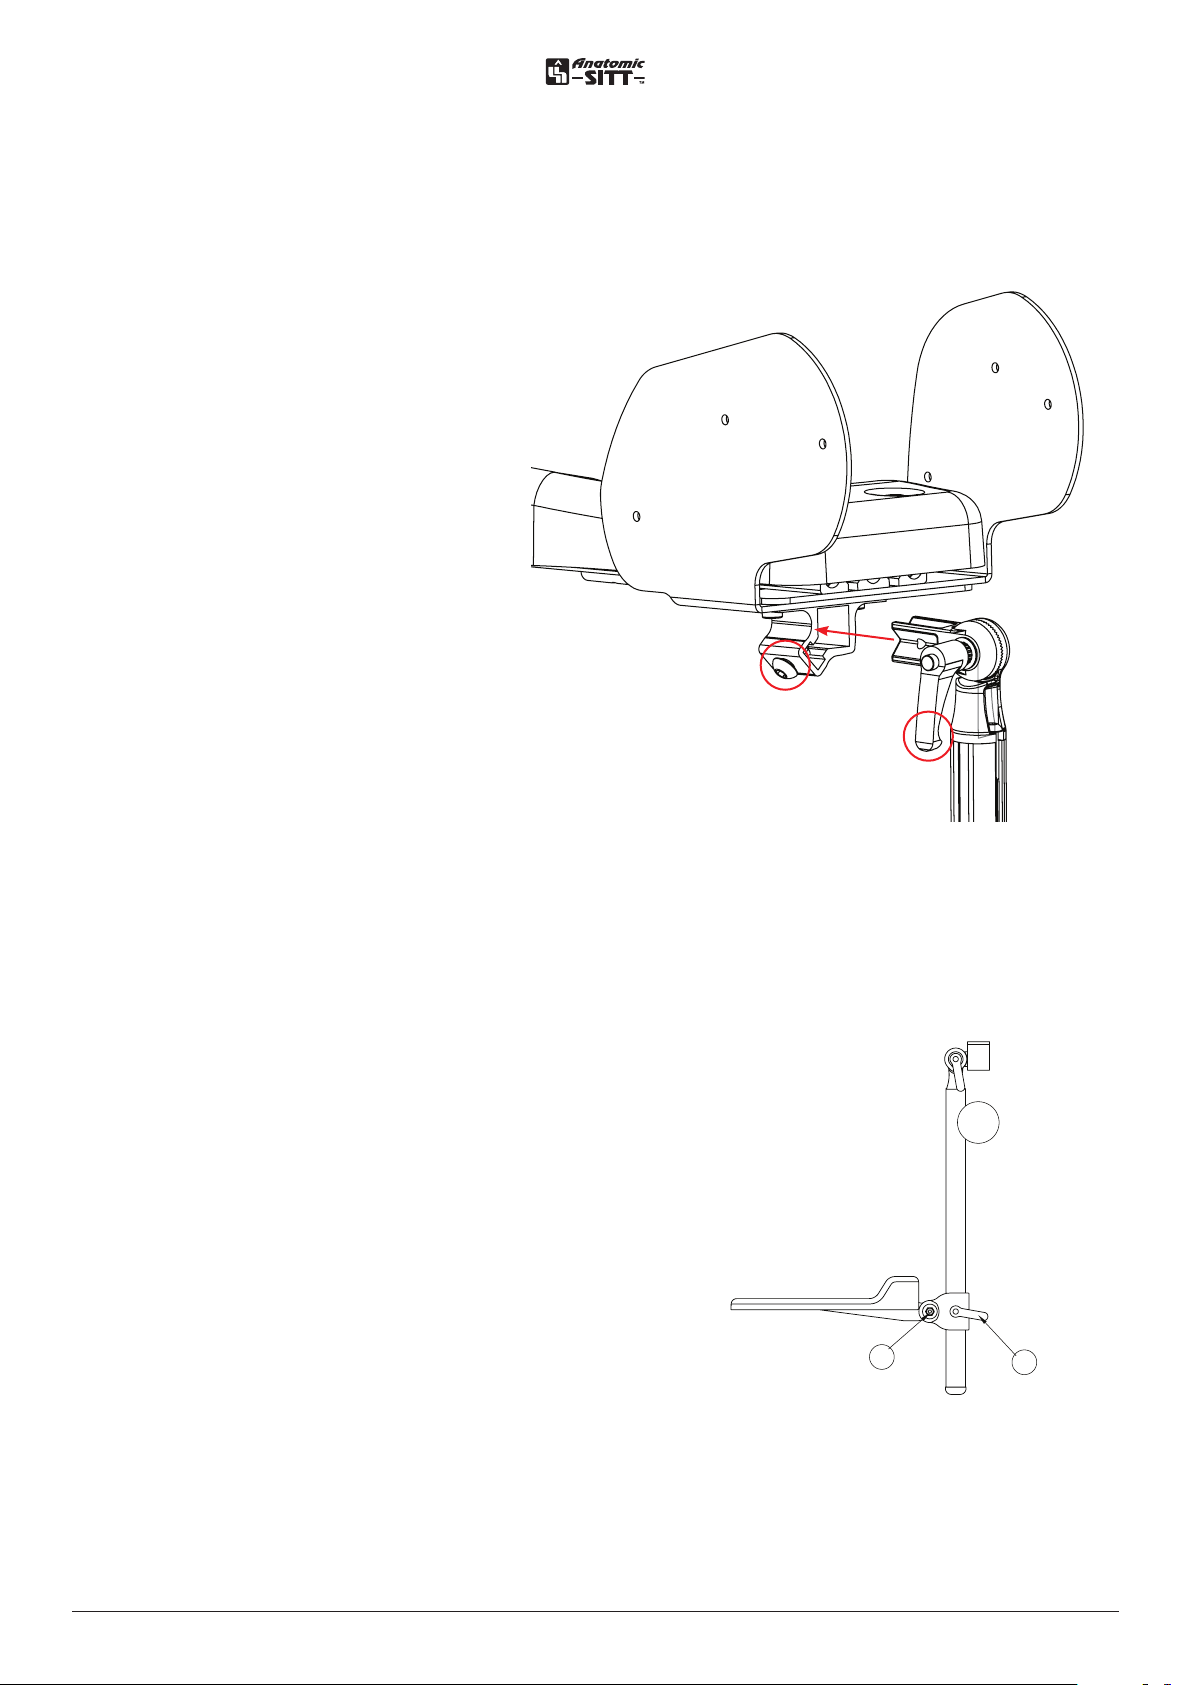
Footrest
D
2
C
E
Mounting of the footrest
• Mount the footrest as the picture.
• Fix the screw firmly (A)
Angle adjustment of the knee
• Loosen the lever knob (B).
djust to desired angle.
• A
• Fix the lever knob firmly.
A
B
Fixed footrest mounting
To be able to height adjust the footrest loosen the lever
knob (A) enough to be able to slide on the profile. Then
adjust to desired height. Fix the lever knob firmly
To be able to adjust the angle by the foot loosen the
screw (B). Adjust to desired angle and fix the screw (B)
firmly.
18User manual Zitzi Starfish Pro www.anatomicsitt.com | +46 11 16 18 00
1
B
A
Page 19
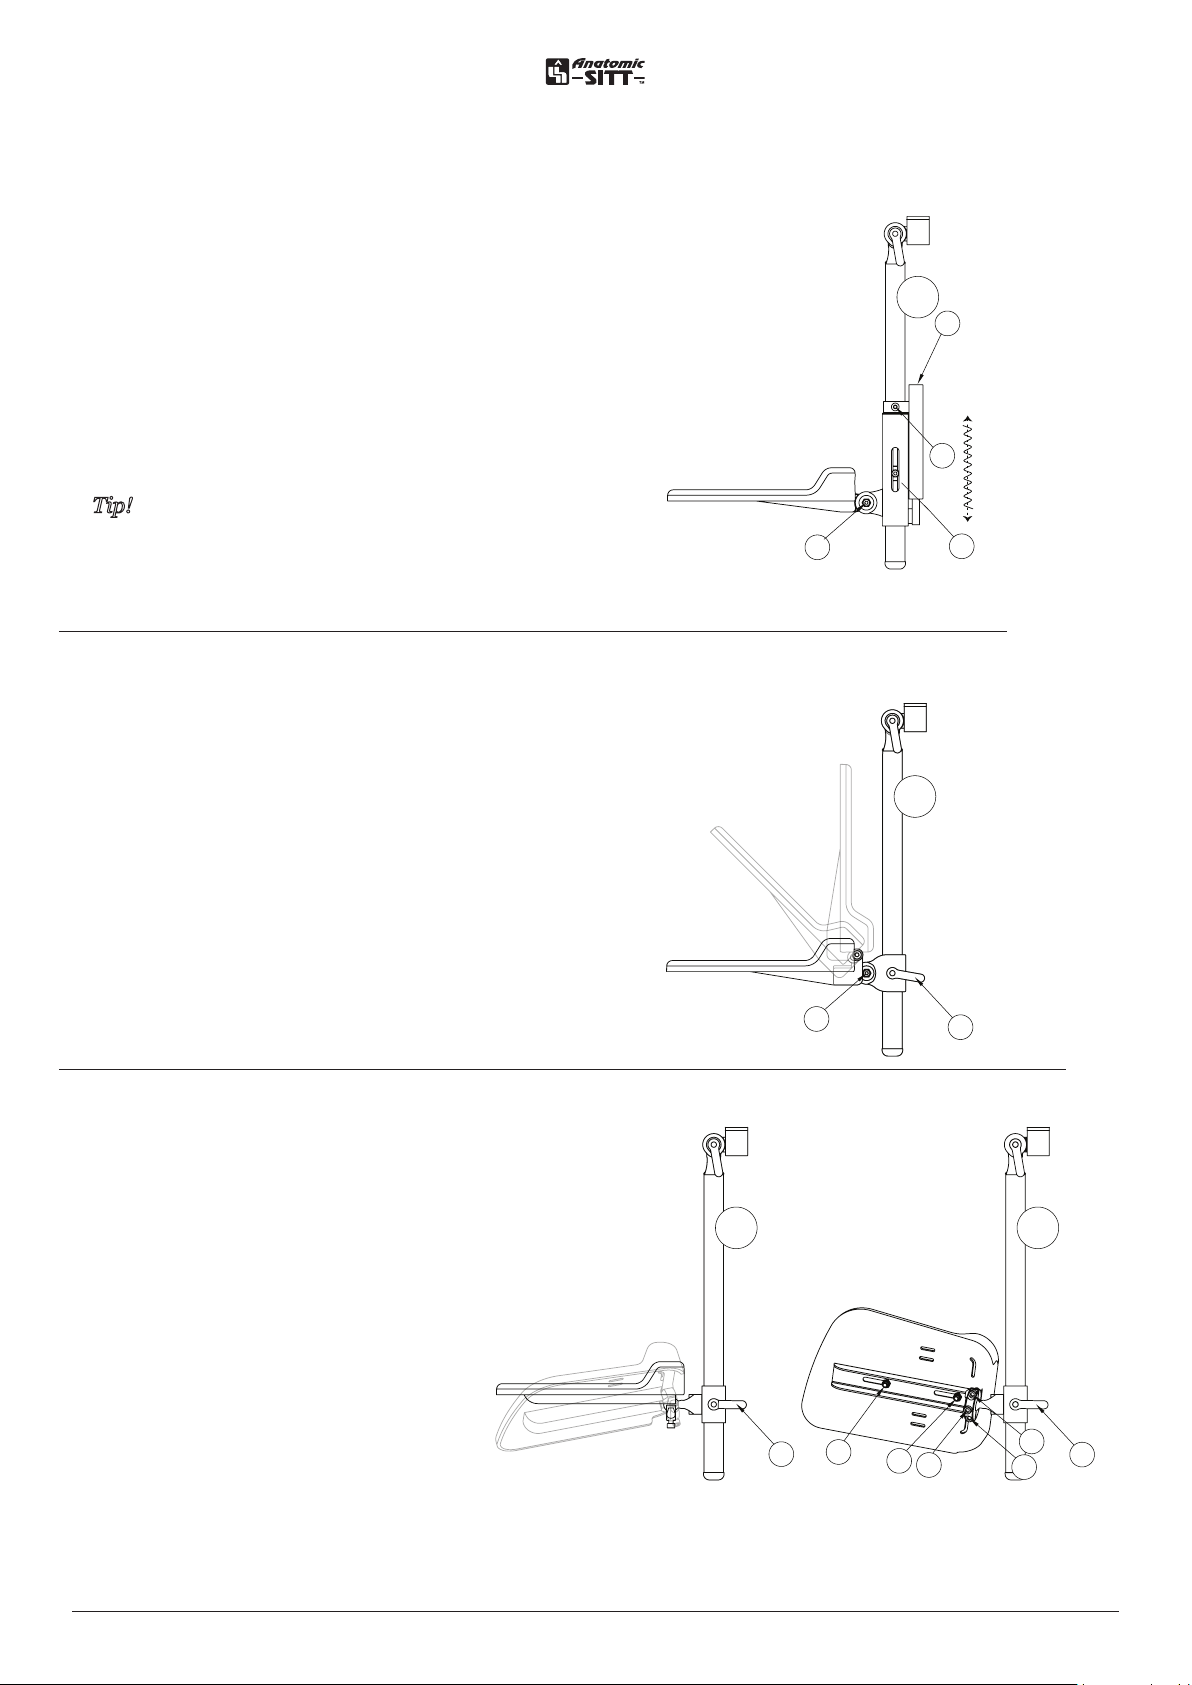
Flexible footrest adapter
A
D
1 2
B
C
E
A
D
C
E
A
A
D
1 2
B
C
E
B
3
To adjust the height of the footrest loosen the screw
(D) and then adjust to desired height.
Fix the screw firmly (D).
To Adjust the angle by the foot loosen the screw (C).
Adjust to desired angle and then fix the screw firmly.
2
E
D
Tip!
The resistance of the spring can be adjusted by using
the screw (A). To get the flexible adapter to work best, the
profile shall be in a straight line down.
Turn up footrest mounting
To adjust the footrest in height loosen the lever knob
(A) and then adjust to desired height. Fix the lever knob
firmly.
To use the turn up function lift the footrest plate in the
front.
To adjust the angle by the foot loosen the screw (B).
Adjust to desired angle and then fix the screw firmly.
C
A
3
B
A
Swivel adapter
To adjust the footrest in height loosen the
lever knob (A) and then adjust to desired
height. Fix the lever knob firmly.
To use the swivel function loosen the
screws (B) and (C) and adjust to desired
position. Fix the screws (B) firmly and the
security screw firmly (C).
To adjust the foot plate in depth loosen the
screws (D) the adjust to desired position,
then fix the screws firmly.
4 4
A
D
A
A
D
C
19User manual Zitzi Starfish Pro www.anatomicsitt.com | +46 11 16 18 00
B
A
B
A
Page 20
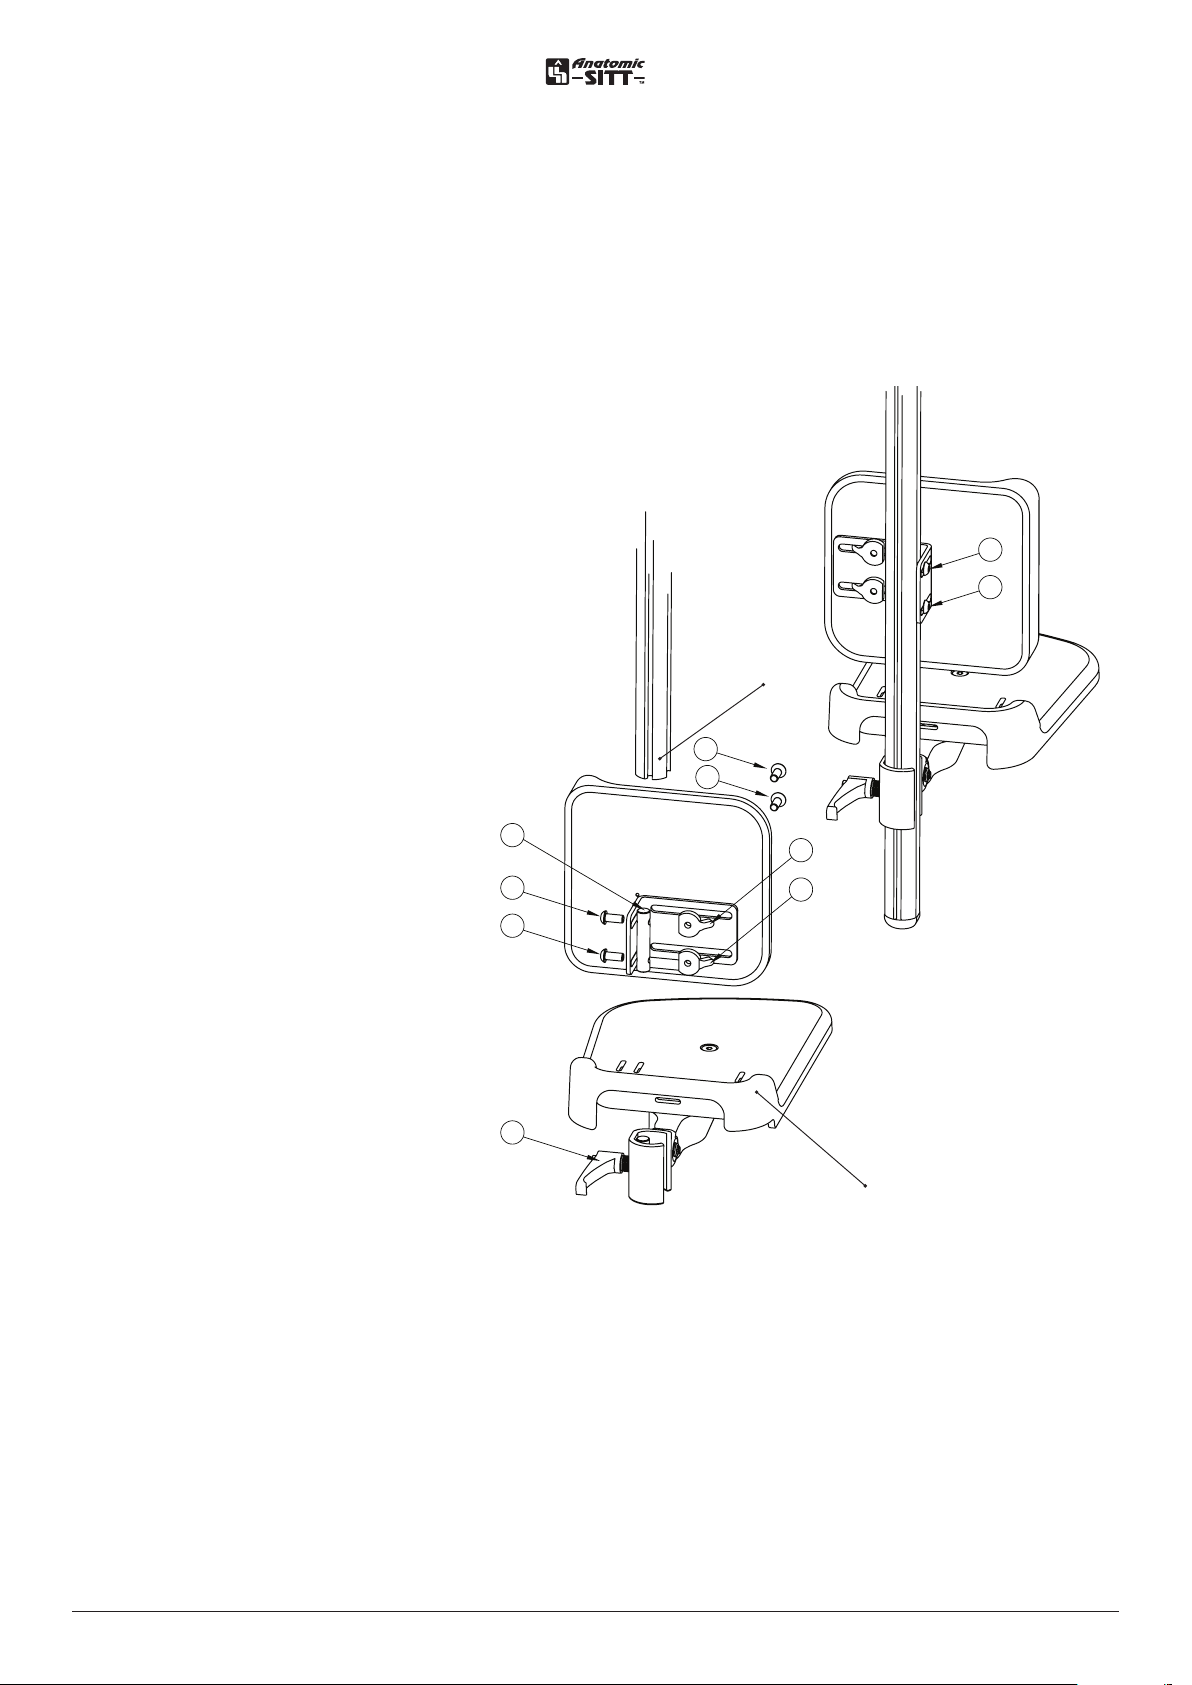
Calf support
Mounting of calf support
Before mounting the calf support take away the
footrest if this is mounted. Loosen the screw (F)
that holds the footrest on the profile then pull the
footrest down and o.
E
Mount the calf support through sliding the rim
sprint (C) in the profile, adjust to desired height
and fix the screws firmly (E). Then mount the
footrest back.
Height adjustment of the calf support
To adjust the height of the calf support
C
loosen the screws (E) then adjust to
desired height. Fix the screws firmly (E).
E
E
Width adjustment of the calf support
To adjust the width of the calf support
loosen the screws (A) and then adjust to
desired width. Fix the screws firmly (A).
F
E
Footrest stay
A
A
D
D
Foot plate
20User manual Zitzi Starfish Pro www.anatomicsitt.com | +46 11 16 18 00
Page 21
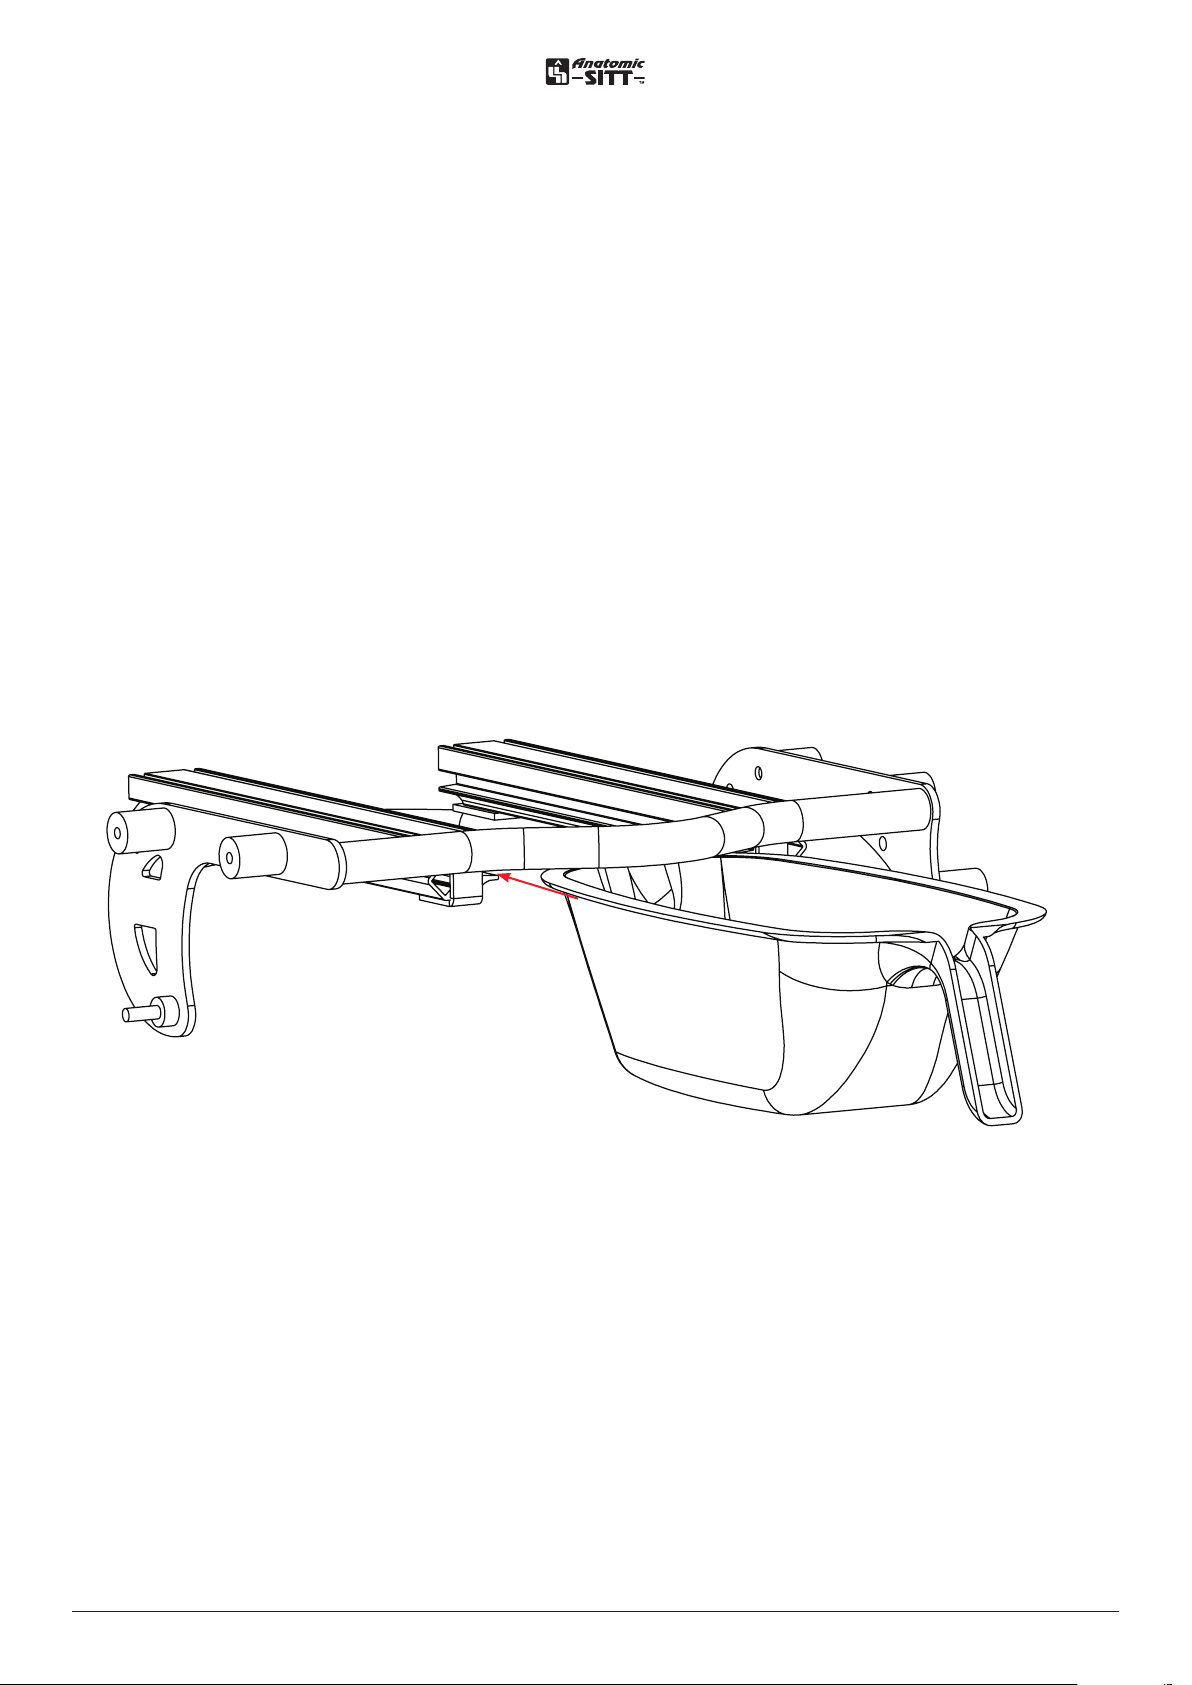
Pot
Mounting of the pot
Mount the pot by sliding it in the lines (A) under the seatpart from the rear.
Slide the pot all the way in until it stops against the front pipe.
A
21User manual Zitzi Starfish Pro www.anatomicsitt.com | +46 11 16 18 00
Page 22
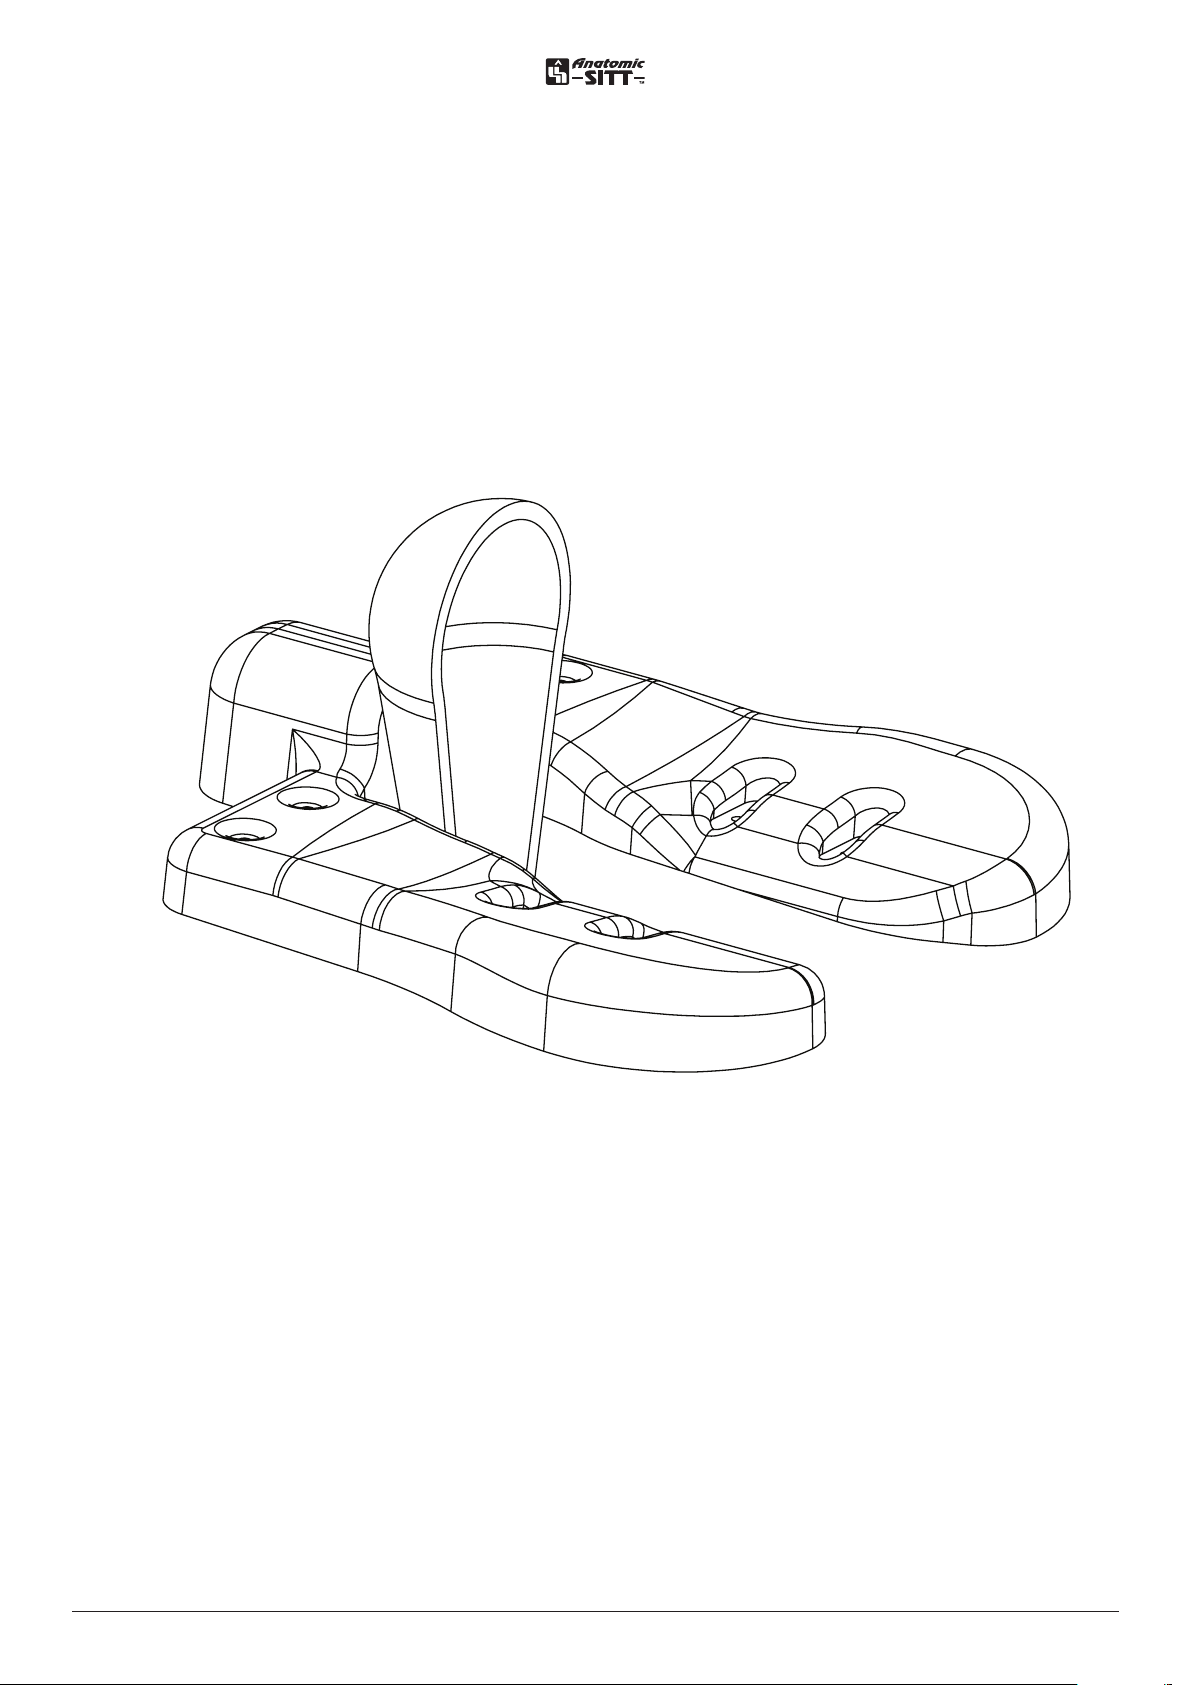
Urine protection
Mount the urine protection by wedging it down between the leg parts.
Measure the correct height of the urine protection so it fits the patient. If the
pot is being used; cut o the material in the bottom of the urine protection so
that the bottom rests on the bottom of the pot.
22User manual Zitzi Starfish Pro www.anatomicsitt.com | +46 11 16 18 00
Page 23

Service and maintenance
Service
Regular maintenance is important for the Zitzi Starfish Pro to function safe and
properly. The need for service changes depends on use and wear. Check
all moving parts and fasteners regularly. Use original parts from Anatomic SITT
AB when reconditioning the Zitzi Starfish Pro. Work should always be done by
professional and qualified sta. If you need support, you are always welcome to
contact Anatomic SITT AB.
Cleaning
Painted surfaces, wheels, front castors and handles are cleaned with cleaning
solvent. Never use paint thinner, gasoline or other solvent.
Warranty
1 year against manufacturing defects.
Combinations
Zitzi Starfish Pro and its accessories are CE marked products that can be combined
with all the accessories described in this manual. For other combinations
please contact Anatomic SITT AB.
Spare parts
For the CE marking of the Zitzi Starfish Pro to be valid, the Starfish Pro may only be
fitted with spare parts delivered by Anatomic SITT AB.
Reconditioning
Reconditioning only allowed with original parts from Anatomic SITT AB.
Attn.
Always check that the device is not customized when reconditioning,
before it is sent to new users.
Marking
Zitzi Starfish Pro and its accessories are CE marked products. A unique serial number
is located on a label placed on the frame. This serial number should be quoted
in any correspondence regarding the product.
Recycling
A used part or product should be dismantled and discarded. The parts should
be separated by material type, metal, plastic and combustibles (textiles).
Gas piston is sorted as hazardous material.
23User manual Zitzi Starfish Pro www.anatomicsitt.com | +46 11 16 18 00
Page 24

Summary and follow-ups
Follow-up inspections
Continuously perform the follow-ups specified in each point. You should check the
following points every time the patient uses the seating product.
• Continue to regularly perform the follow-ups.
• Regularly examine that all the screws are securely locked.
• Regularly examine the wear of straps and cushions.
• Do not tilt the seat too much forward when the patient is placed in the seat.
24User manual Zitzi Starfish Pro www.anatomicsitt.com | +46 11 16 18 00
Page 25

Adaptation and customization
Guidelines and recommendations
Every time the Zitzi Starfish Pro is altered in some way, an assessment has to be
made to determine if it is an adaptation or a customization.
An adaptation is any change made in comprehension of the CE mark. All other
changes are customizations. Adaptations must only be made by a person
deemed to be qualified for the task and should always be made in a professional
manner. The CE mark means that the product fulfils all of the essential European
safety requirements.
Note that a risk assessment always should be done for an adaptation as well as
for a customization of a medical aid. The product must never become dangerous
to use after adaptation.
The product should be fitted with a note that it is adapted to a specific user,
so that it cannot be mistaken for a standard model product.
Cut the profile of the footrest
The length of the profile is allowed to be cut to fit the patient better.
Cut the profile of the armrest
The length of the metal bar is allowed to be cut to fit the patient better.
Cut the back profile
The length of the profile holding the back can be cut to fit the patient better. The profile
can never be shorten more than the mounting on the back part fits on the profile.
25User manual Zitzi Starfish Pro www.anatomicsitt.com | +46 11 16 18 00
Page 26

Terms of sale
Warranty
Warranty against manufacturing errors is valid for one (1) year from delivery date. Warranty is
void if the product has been subjected to external factors or rough handling. It’s required that the
faulty product is returned for us to process a warranty claim. Always attach the packing slip of the
original delivery. Wearables such as cushions and splash guard are excluded.
Warranty claims
Describe the error and the possible cause for this as thoroughly as possible. Always attach a copy
of the invoice and state that the product should be returned to you after repairs. Provide a
shipping address, a contact person and a phone number.
Make sure that you pack the product well to protect it from damages during the transportion.
Note the shipping number in your documentation. This is so that you can track the shipment if
anything should occur during transport.
Returning products
Hygiene items are not returnable. Please check with ordering facility if their policy deviates from
Clarke's. In the event of damage at delivery, immediately report damage with the shipping, freight
company. For freight shipments any damage must be noted on the bill of lading, provided by the
driver, at time of delivery. Retain any packing and packaging. Notify the company where you
purchased the product. A claim will be started and appropriate action taken. In cases of shortages
or faulty orders, notify your ordering company within 10 days. Provide your reason for returning
the products. Shortage or damage claims cannot be accepted after 10 days.
If asked to return, always attach a copy of both the packing slip and the invoice. Make sure that
you pack the product well to protect it from damages during the transportation. Note the shipping
number in your documentation. This is so that you can track the shipment if anything should occur
during transport.
Customized products cannot be returned
26User manual Zitzi Starfish Pro www.anatomicsitt.com | +46 11 16 18 00
Page 27

USER INFO
User length
Technical data
46.8-56.5” 54.6-68.2” 66.3-78”
Chassis with seat part
Seat depth
Seat width
Bredd bendel m foder
Seat depth
Seat width
Width leg art incl cushion
Size hygiene outlet
Clearance toilet, Man. Chassis
Clearance toilet, Hydraulic/Pwr
Seat height, Man. Chassis
Seat height, Hydraulic/Pwr
Tilt
Hip-/Back angle
Chassis, width
Chassis, length
Wheels
Floor clearance
Ca. weight incl. headrest,
footrest, armrest
Seat part size 1 Seat part size 2 Seat part size 3
11.7-14.8” 14-18.3” 17.5-21.4”
14.8” 17.5” 19.9”
14.8” 17.5” 19.9”
Seat part divided size 1 Seat part divided size 2 Seat part divided size 3
11.7-14.8” 14-18.3” 17.5-21.4”
13.6-16(18.7*)” 14.8-17.1(19.9*)” 15.2-17.5(20.2*)”
6.4” 7.2” 7.8”
1.9-4.2(7*)” 1.5-8.9(6.6*)” 1.1-3.5(6.6*)”
1.6-2” 1.6-2” 1.6-2”
1.6-2.5” 1.6-2.5” 1.6-2.5”
20.6-24.5” 20.6-24.5” 20.6-24.5”
20.6-30.4” 20.6-30.4” 20.6-30.4”
-5-30° -5-30° -5-30°
-10-35° -10-35° -10-30°
21” 21” 23”
26.9” 26.9” 30.8”
4” 4” 4”
2.5” 2.5” 2.5”
68.3 lb. 72.7 lb. 77.1 lb.
Max user weight Man. Chassis
Max user weight Hydraulic/Pwr
* Seat parts mounted in the outer tracks
BACK
Size 1: Back Height 17.9”
Size 2:
Size 3:
FOOTREST
Foot plate (W x D)
Foot plate (W x D)
Profile Length
Back Profile 19.5”
Back Height 21.8”
Back Profile 23.4”
Back Height 25.7”
Back Profile 27.3”
265 lb. 265 lb. 330 lb.
220 lb. 220 lb. 265 lb.
Footrest size 1 Footrest size 2 Footrest size 3
13.4 x 8.7” 14.8 x 9.9” 14.8 x 12”
Footrest divided size 1 Footrest divided size 2 Footrest divided size 3
6.2 x 8.5” 7 x 9.9” 7 x 11.9”
11.7” 15.6” 19.5”
LATERAL SUPPORT
Size 1: Trunk Width 8.2-11.7”
Size 2:
Size 3:
Lateral adjustment +/- 3.3”
Trunk Depth 5.4”
Trunk Width 9.3-13.2”
Trunk Depth 6.6”
Trunk Width 11.7-15.6”
Trunk Depth 7.8”
27User manual Zitzi Starfish Pro www.anatomicsitt.com | +46 11 16 18 00
Page 28
SE
DK
FI
Anatomic SITT AB (manufacturer)
Box 6137, SE-600 06 Norrköping, Sweden
Tel +46 11 16 18 00
Fax +46 11 16 20 05
Support +46 11 16 18 05
Visiting address
Terminalgatan 1, SE-602 29 Norrköping, Sweden
Anatomic SITT A/S
Viengevej 4, 8240 Risskov, Denmark
Tel +45 86 17 01 74
Fax +45 86 17 01 75
Rehaco OY
Haaransuontie 6 A7, 90240 Oulu, Finland
Tel: +35 840 775 22 88
NL
US
Anatomic SITT Nederland BV
Postbus 6027 / 4000 HA Tiel, Netherlands
Tel +31 344 63 45 40
Fax +31 344 62 33 61
Clarke Health Care
7830 Steubenville Pike, Oakdale, PA 15071
Tel 888 347 4537
Fax 724 695 2922
anatomicsitt.com
[email protected]
facebook.com/anatomicsitt
28User manual Zitzi Starfish Pro www.anatomicsitt.com | +46 11 16 18 00
 Loading...